1
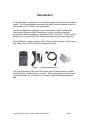
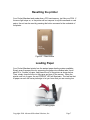
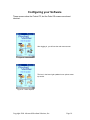
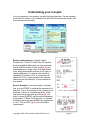
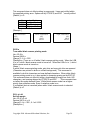
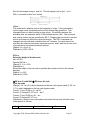
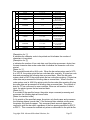
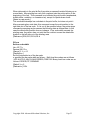
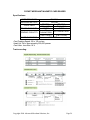
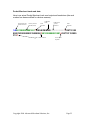
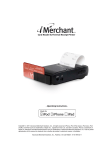
CARD READER AND THERMAL PRINTER
User Guide
Copyright 2004, AMSI
FCC COMPLIANCE STATEMENT:
Note: This equipment has been tested and found to comply with the limits for a Class A digital
device, pursuant to part 15 of the FCC Rules. These limits are designed to provide reasonable
protection against harmful interference when the equipment is operated in a commercial
environment. This equipment generates, uses, and can radiate radio frequency energy and, if not
installed and used in accordance with the instruction manual, may cause harmful interference to
radio communications. Operation of this equipment in a residential area is likely to cause harmful
interference in which case the user will be required to correct the interference at his own
expense.
Modifications not expressly approved by the manufacturer could void the user's authority to
operated the equipment under FCC rules.
TABLE OF CONTENTS
Introduction......................................................................................................................... 4
Connectors and Controls..................................................................................................... 5
Turning the unit On and Off ............................................................................................... 5
Data Connector ................................................................................................................... 6
Battery Considerations........................................................................................................ 6
Resetting the printer............................................................................................................ 7
Loading Paper ..................................................................................................................... 7
Charging Pocket Merchant ................................................................................................. 8
Swiping a magnetic card..................................................................................................... 9
Configuring your Software ............................................................................................... 10
Customizing your receipts ................................................................................................ 12
Pocket Merchant Communications ................................................................................... 14
Pocket Merchant Printer Escape Codes ............................................................................ 14
Horizontal tab................................................................................................................ 14
Print and line feed ......................................................................................................... 14
Print and carriage return................................................................................................ 15
Turn underline mode on /off ......................................................................................... 16
Select 1 /6-inch line spacing ......................................................................................... 16
Select line spacing......................................................................................................... 17
Initialize printer............................................................................................................. 17
Set horizontal tab positions ........................................................................................... 17
Turn emphasized mode on /off ..................................................................................... 18
Turn on /off double-strike mode ................................................................................... 18
Print and feed paper ...................................................................................................... 19
Select justification......................................................................................................... 19
Turn white /black reverse printing mode ...................................................................... 20
Set left margin............................................................................................................... 20
Select the height of the bar code................................................................................... 21
Print bar code................................................................................................................ 21
Set bar code width......................................................................................................... 23
POCKET MERCHANT MAGNETIC CARD READER ................................................ 24
Specifications:............................................................................................................... 24
Track encoding: ............................................................................................................ 24
Pocket Merchant track read data:.................................................................................. 25
Pocket Merchant Warranty ............................................................................................... 26
Introduction
Pocket Merchant is a complete, self contained magnetic card reader and thermal
printer. The Pocket Merchant can read credit cards, driver’s licenses, as well as
print receipts in 42, 32 and 16 column formats.
The Pocket Merchant is designed to work with Pocket Verifier Professional,
WebConnect, Merchant Mover, iMerchant, AirVerify, and other merchant
processing software packages for either Palm OS or Pocket PC. Pocket Verifier
will allow you to read credit cards, and issue receipts anytime, and anywhere!
Pocket Merchant comes complete, with a 70-minute fast charger, 3 rolls of paper,
data cable for your PDA, and leather case with belt clip.
Figure 1 – Included accessories
The Pocket Merchant uses your PDA’s serial port for communications at 9600
baud, No parity, 8 data bits, and 1 stop bit. These parameters are not required
for most software, but will allow you to configure other software packages for
use.
Copyright 2004 Advanced Merchant Solutions, Inc.
Page 4
Connectors and Controls
On the right hand side of the unit, you will find the pushbutton power switch, and
the connector for the charger. On the top of the unit, you will find the tabs that
open the paper door, and below that, the indicator LED’s.
The slot for the magnetic card reader is located at the front of the unit.
Figure 2 – Location of connectors and controls
Turning the unit On and Off
The Pocket Merchant is turned on by pressing the power button once. The unit
will give 5 rising tones, and the green “ON LINE” LED will illuminate. After about
two seconds, when the internal self test is complete, the printer will beep once
more, the red LED will flash, and the printer will advance the paper about 1 mm.
This indicates that the printer is ready for use.
If the printer remains unused for five minutes, it will turn itself off in order to
conserve battery power. This way, you can “use and forget” it, and never come
back to a dead printer.
To turn the printer off manually, depress and hold the button until the printer
makes 5 falling beep tones, and all LED’s extinguish.
Copyright 2004 Advanced Merchant Solutions, Inc.
Page 5
For any reason, if the printer fails to respond to the power button, or fails to print
or read properly, there is a reset button on the back of the printer. See Resetting
the printer.
Data Connector
On the left side of the printer, there is a connector for the data cable. The
connector can only be properly inserted on way, as shown in the picture below.
Some cables have a sticker marked “TOP” in order to prevent incorrect insertion.
Figure 3 – Data connector orientation.
Battery Considerations
Your new Pocket Merchant reader / printer is equipped with built-in, high capacity
Ni-MH (Nickel – Metal Hydride) batteries. Please note that the new Ni-MH
battery reaches maximum performance levels only after having been discharged
and recharges at least two or three times.
Never use battery chargers that are damaged or worn. Battery life varies
depending, for example on print density and the text to be printed. Batteries may
be recharged and discharged hundreds of times, but they will wear out over time.
If not used, even a completely charged battery will discharge over time. Your
battery pack will come to a full charge in 70 to 90 minutes.
Copyright 2004 Advanced Merchant Solutions, Inc.
Page 6
Resetting the printer
Your Pocket Merchant and reader has a CPU and memory, just like your PDA. If
the error light stays on, or the printer will not respond to a print command or card
swipe, the unit can be reset by pressing the button recessed in the underside of
the printer.
Figure 4 – Reset button
Loading Paper
Your Pocket Merchant printer has the easiest paper loading system available.
Simply open the paper door by squeezing the paper door release tabs. Unroll
about 2 or 3 inches of paper, and place the roll in the printer as shown below.
Then, simply close the door on the paper and tear off the excess. When the
printer runs out of paper, the red “ERROR” LED will illuminate. The last few feet
of paper on each roll has a pink edge to let you know that you are running low.
Figure 5 – Loading paper
Copyright 2004 Advanced Merchant Solutions, Inc.
Page 7
Charging Pocket Merchant
Your Pocket Merchant needs to be charged periodically. Included with the
Pocket Merchant is a Universal Charger, and 110V power cord. The Universal
Charger can operate on any voltage from 110VAC to 220VAC at 50 or 60 Hz
(cycles).
Your charger comes with a 110V power cord, but you can use an inexpensive
adaptor if you travel overseas.
When the adaptor is plugged into the wall outlet and the Pocket Merchant, both
the charge indicators on the charger and the printer will illuminate.
When the batteries have reached a full charge, the LED on the charger will flash.
The LED on the printer will not flash.
Figure 6 – Pocket Merchant Charger
Copyright 2004 Advanced Merchant Solutions, Inc.
Page 8
Swiping a magnetic card
Your Pocket Merchant has a 2-track magnetic card reader. This reader can
accommodate all types of credit cards, as well as driver’s licenses that have a
magnetic stripe.
With the magnetic stripe down, and facing into the printer, slide the card through
the slot in the direction shown. You will see that the card slot is a little wider on
the left side, making it easier to get the card started in the slot.
Wipe the card with a smooth, even motion. Do not “Jerk” the card, or stop during
the swipe. The most common mistake new merchants make is swiping too fast.
Make sure that the card slides firmly against the bottom of the slot.
The unit will beep once, and the red LED will flash ONCE to indicate a good
read. On Pocket Verifier, Web Connect, iMerchant, AirVerify, and many other
software packages, the PDA screen will change to a calculator keypad to indicate
a good read.
If the unit was UNABLE to read the card, the unit will beep THREE times, and the
LED will flash three times as well. Attempt to re-read the card if this happens.
Figure 7 – Swiping a card.
Copyright 2004 Advanced Merchant Solutions, Inc.
Page 9
Configuring your Software
These screens show the Pocket PC, but the Palm OS screens are almost
identical:
After logging in, you will see the main menu screen.
Figure 8 – Main Menu
The icon in the lower right quadrant is our options menu.
tap on this.
Figure 9 – Select Options
Copyright 2004 Advanced Merchant Solutions, Inc.
Page 10
Figure 10 - Options
You can now see the options available. If you have
multiple PDA's on a single account, entering a unique
number in the REP ID field will identify them in
Transaction Central. You can also select which card
reader you will be using. We will be using the Pocket
Merchant. The Condense Receipts option will print 42
columns, and produce a 3 inch receipt. This gives you 64
receipts per roll of Pocket merchant paper. The next
checkbox determines if you will be sending signatures
to the server. If you do, receipts with signatures on them
will be visible and printable from Transaction Central! You
can also automatically Prompt for Tips, and use text
popups for data entry (recommended)
The power button is on the RIGHT hand side of the
printer. Pressing it will turn the printer on, with a series of
rising tones. Pressing it again will turn the printer off,
accompanied by a series of descending tones.
The Pocket Merchant comes with an leather case with an
integral belt/pocket clip. This makes it easy to keep with
you. In addition, if you drop your handheld, the cable will
usually prevent the handheld from striking the ground!
Figure 11 – Belt clip
Copyright 2004 Advanced Merchant Solutions, Inc.
Page 11
Customizing your receipts
You can customize your receipts, using the following interface. We are showing
the Pocket PC version of the software, but the Palm OS screens are similar, and
have the same functionality.
Figure 12 – Receipt customization
Receipt customization for Pocket Verifier
Professional - Pocket PC AND Palm OS versions
are now available! Merchants can now customize
the top AND the bottom of their receipts [1] with
customized text, in large, small, bold and normal
fonts, along with individual choice of left, right, or
center justification! You still have the choice of
standard (32 char/line 6 LPI) or condensed (42
char/line 8 LPI) for optimum paper use, and the
titles can track this selection, or auto-override at
your option!
Service Receipts! A service receipt is a receipt
that you print PRIOR to sending the transaction for
approval. Like in a restaurant, it has a place for the
customer to enter tip, total and signature. When
they return the receipt with tip and total [2], just
enter it, press CHARGE, and the entire transaction
is approved! If "Show Tip Suggestion" is checked,
the receipt will show pre-calculated tip suggestions
of 15%, 18% and 20% [3] for your customer's
convenience!
Copyright 2004 Advanced Merchant Solutions, Inc.
Page 12
Print Samples make customizing your receipts easy. Right on the configuration
page is a button that will print a sample receipt with your selected options! This
lets you see your changes and new receipt formats instantly!
You can mix Plain / Bold / Left / Right / Center, etc….You can also override the
character size (i.e., select "BCN" for header 1 and the company name will
always be Bold, Centered, and Normal font – even when small fonts is checked
in Options. Now you can generate custom receipts with marketing slogans,
holiday greetings, and more.
Auto TAX calculations! We now have an option to automatically calculate and
add tax to your transactions! Changing the Tip Percent in options will have not an
effect on existing saved transactions (approved or not). Basically, Tax Amount is
calculated at time of entering Ticket Item (Amount). If you save the transaction
(or send it), then the tip % and amount is fixed. If you save an unapproved
transaction, then change the Tip % in the Options screen, the transaction will
NOT reflect the new change (Tip % sets the tip amount at the time of entry, then
it is fixed for that transaction). Thus, you can have a variety of transactions with
different Tax % (the drop down list in the Transaction Manager can show you the
tax amount and the % used for the sale). If a tax is charged (i.e., an amount
greater than 0.00, then receipts will show a Tax (with %) and a subtotal.
Copyright 2004 Advanced Merchant Solutions, Inc.
Page 13
Pocket Merchant Communications
All communications between the Pocket Merchant and the PC / PDA are
performed at: 9600 baud, No Parity, 1 Stop Bit, 8 Data Bits. (9600,8,N,1).
The Pocket Merchant is capable of accepting RS-232 signals at either the
standard RS-232 levels, or at TTL levels. This allows the device use a straight
through data cable on PDA’s that have a level converter module on their own
RS-232 Data cable. If you are attempting to interface the Pocket Merchant to a
custom device, contact Advanced Merchant Solutions, Inc.
[email protected] for the pinout.
Pocket Merchant Printer Escape Codes
HT
Horizontal tab
Hex 09
Decimal 9
[Description ] Moves the print position to the next horizontal tab position..
[Notes ]
This command is ignored unless the next horizontal tab position has been set. If
the next horizontal tab position exceeds the printing area, the printer sets the
printing position to [Printing area width +1 ]. Horizontal tab positions are set with
ESC D. If this command is received when the printing position is at [Printing area
width +1 ],the printer executes print buffer-full printing of the current line and
horizontal tab processing from the beginning of the next line.
LF
Print and line feed
Hex 0A
Decimal 10
[Description ] Prints the data in the print buffer and feed one line based on the
current line spacing..
[Notes ]
This command sets the print position to the beginning of the line.
[Reference ] ESC 2,ESC 3
FF
Print and return to standard mode (in page mode)
Hex 0C
Decimal 12
[Description ] Prints the data in the print buffer collectively and returns to
standard mode..
[Notes ]
Copyright 2004 Advanced Merchant Solutions, Inc.
Page 14
The buffer data is deleted after being printed. . The printing area set by ESC W is
reset to the default setting. The printer does not execute paper cutting. This
command sets the print position to the beginning of the line. This command is
enabled only in page mode.
[Reference ] ESC FF,ESC L,ESC S
CR
Print and carriage return
Hex 0D
Decimal 13
[Description ] When auto-line feed is enabled, this command functions in the
same way as LF. When auto-line feed is disabled, this command is ignored.
[Notes ]
This command sets the print position to the beginning of the line.
ESC!n
Select print mode(s)
Hex 1B 21 n
Decimal 27 33 n
[Range ] 0 ≤n ≤255
[Description ] Selects print mode((s)using n as follows :
BIT Off/On Hex Decimal Function
Off
00
0
Character font A(12x24)selected.
0
On
01
1
Character font B(9x17)selected.
1
Undefined
2
Undefined
Off
00
0
Emphasized mode not selected
3
On
08
8
Emphasized mode selected
Off
00
0
Double-height mode not selected
4
On
10
16
Double-height mode selected
Off
00
0
Double-width mode not selected
5
On
20
32
Double-width mode selected
6
Undefined
Off
00
0
Underline mode not selected
7
On
80
128
Underline mode selected
Determine the values of n by adding the values of all the characteristics you want
to select.
[Notes ]
When both double-height and double-width modes are selected, quadruple size
characters are printed. The printer can underline all characters, but can not
underline the space set by HT,ESC $,or ESC\or 90 degree clockwise rotated
characters. The thickness of the underline is that selected by ESC -,regardless
of the character size. When some characters in a line are double or more height,
Copyright 2004 Advanced Merchant Solutions, Inc.
Page 15
all the characters on the line are aligned at the baseline. ESC E can also turn on
or off emphasized mode. However,the setting of the last received command is
effective. ESC -can also turn on or off underline mode. However, the setting of
the last received command is effective. GS !Can also select character size.
However, the setting of the last received command is effective.
[Default ] n=0
[Reference ]ESC -,ESC E,GS !
ESC-n
Turn underline mode on /off
Hex 1B 2D n
Decimal 27 45 n
[Range ] 0 ≤≤n ≤2,48 ≤n ≤50
[Description ] Turns underline mode on or off, based on the following value of n.
N
0.48
1.49
2.50
Function
Turns off underline mode
Turns on underline mode(1-dots thick)
Turns on underline mode (2-dots thick)
[Notes ]
The printer can underline all characters (including right-side character
spacing),but cannot underline the space set by HT. The printer cannot underline
90 .clockwise rotated characters and white /black inverted characters. When
underline mode id turned off by setting the value of n to 0 or 48,the following data
is not underlined, and the underline thickness set before the mode is turned off
does not change. The default underline thickness is 1 dot. Changing the
character size does not affect the current underline thickness. Underline mode
can also be turned on or off by using ESC !. Note, however, that the last
received command is effective.
[Default ] n =0
[Reference ] ESC !
ESC 2
Select 1 /6-inch line spacing
Hex 1B 32
Decimal 27 50
[Notes ]
The line spacing can be set independently in standard mode and in page mode.
[Reference ]ESC 3
Copyright 2004 Advanced Merchant Solutions, Inc.
Page 16
ESC 3 n
Select line spacing
Hex 1B 33 n
Decimal 27 51 n
[Range ] 0 ≤≤n ≤255
[Description ] Sets the line spacing to [n × vertical or horizontal motion unit ]
inches.
[Notes ]
The line spacing can be set independently in standard mode and in page mode.
The horizontal and vertical motion unit are specified by GS P. Changing the
horizontal or vertical
motion unit does not affect the current line spacing. The GS P command can
change the horizontal (and vertical)motion unit. However, the value cannot be
less than the minimum vertical movement amount, and it must be in even units of
the minimum vertical movement amount. In standard mode, the vertical motion
unit (y) is used. In page mode, this command functions as follows, depending on
the starting position of the printable area: ① When the starting position is set to
the upper left or lower right of the printable area using ESC T, the vertical motion
unit (y)is used. ② When the starting position is set to the upper right or lower left
of the printable area using ESC T, the horizontal motion unit (x) is used. . The
maximum line spacing is 40 inches. When the setting value exceeds the
maximum, it is converted to the maximum automatically.
[Default ] n =60 (1 /6 inch)
[Reference ] ESC 2,,GS P
ESC @
Initialize printer
Hex 1B 40
Decimal 27 64
[Description ]
Clears the data in the print buffer and resets the printer mode to the mode that
was in effect when the power was turned on.
[Notes ]
The data in the receive buffer is not cleared.
ESC D [n ] k NUL
Set horizontal tab positions
Hex 1B 44 [n ]k 00
Decimal 27 68 [n ]k 0
[Range ] 1 ≤≤n ≤0 ≤k ≤32
[Description ] Set horizontal tab positions..
n specifies the column number for setting a horizontal tab position from the
beginning of the line. k indicates the total number of horizontal tab positions to
be set.
Copyright 2004 Advanced Merchant Solutions, Inc.
Page 17
[Notes ]
The horizontal tab position is stored as a value of [character width × beginning of
the line. The character width includes the right-side character spacing, and
double-width characters are set with twice the width of normal characters. This
command cancels the previous horizontal tab settings. When setting n =8,the
print position is moved to column 9 by sending HT. Up to 32 tab positions (k =
32) can be set. Data exceeding 32 tab positions is processed as normal data.
Transmit [n ]k in ascending order and place a NUL code 0 at the end. When [n ]k
is less than or equal to the preceding value [n ]k -1,tab setting is finished and the
following data is processed as normal data. ESC D NUL cancels all horizontal
tab positions. When [n ]k exceeds the number of characters printable on one
line, the tab position set is equal to the maximum printable column plus 1. The
previously specified horizontal tab positions do not change, even if the character
width
changes.
[Default ]
The default tab positions are at intervals of 8 characters (columns 9,17,25,…)for
the font A (12 ×24)
[Reference ]HT
ESC E n
Turn emphasized mode on /off
Hex 1B 45 n
Decimal 27 69 n
[Range ] 0 ≤≤n ≤255
[Description ]
Turns emphasized mode on or off. When the LSB of n is 0,emphasized mode is
turned off. When the LSB of n is 1,emphasized mode is turned on.
[Notes ]
Bit image and downloaded bit image, and bar code cannot be emphasized. ESC
!also turns on and off emphasized mode. However, the last received command is
effective.
[Default ] n =0
[Reference ]ESC !
ESC G n
Turn on /off double-strike mode
Hex 1B 47 n
Decimal 27 71 n
[Range ] 0 ≤≤n ≤255
[Description ] Turns double--strike mode on or off.
When the LSB of n is 0,double-strike mode is turned off. When the LSB of n is
1,double-strike mode is turned on.
[Notes ]
Copyright 2004 Advanced Merchant Solutions, Inc.
Page 18
Printer output is the same in double-strike mode and in emphasized mode.
Double-strike mode can not be used for the bit image.downloaded bit image, and
bar code.
[Default ] n =0
[Reference ]ESC E
ESC J n
Print and feed paper
Hex 1B 4A n
Decimal 27 74 n
[Range ] 0 ≤≤n ≤255
[Description ]
Prints the data in the print buffer and feed the paper [n × vertical or horizontal
motion unit ] inches.
[Notes ]
After printing is completed, this command sets the print starting position to the
beginning of the line. The paper feed amount set by this command does not
affect the values set by ESC 2 or ESC 3. The horizontal and vertical motion unit
are specified by GS P. The GS P command can change the vertical (and
horizontal)motion unit. However, the value cannot be less than the minimum
vertical movement amount, and it must be in even units of the
minimum vertical movement amount. In standard mode, the printer uses the
vertical motion unit (y). When this command is used in page mode, the
command functions as follows, depending on the starting position of the printable
area. ① When the starting position is set to the upper left or lower right of the
printable area using ESC T, the vertical motion unit (y)is used.② When the
starting position is set to the upper right or lower left of the printable area using
ESC T, the horizontal motion unit (x)is used. The maximum paper feed amount
is 40 inches. Even if a paper feed amount of more than 40 inches is set, the
printer feeds the paper only 40 inches.
[Reference ] GS P
ESC a n
Select justification
Hex 1B 61 n
Decimal 27 97 n
[Range ] 0 ≤≤n ≤2,48 ≤n ≤50
[Description ]
Aligns all the data in one line to the specified position.n selects the type of
justification as follows :
[Notes ]
The command is enabled only when input at the beginning of the line. If this
command is input in page mode, the printer performs only internal flag operation.
Copyright 2004 Advanced Merchant Solutions, Inc.
Page 19
This command does not affect printing in page mode. Lines are justified within
the specified printing area. Spaces set by HT,ESC $,and ESC \are all justified.
[Default ] n =0
N
Justification
1.49,31H Left justification
0.48,30H
Centering
2.50,32H Right justification
[Example ]
Left Justification
ABC
ABCD
ABCDE
Center Justification
ABC
ABCD
ABCDE
Right Justification
ABC
ABCD
ABCDE
GS B n
Turn white /black reverse printing mode
Hex 1D 42 n
Decimal 29 66 n
[Range ] 0 ≤≤n ≤255
[Description ] Turns on or off white / black reverse printing mode. When the LSB
of n is 0, white / black reverse mode is turned off. When the LSB of n is 1, white /
black reverse mode is turned on.
[Notes ]
In white /black reverse printing mode, print dots and non-print dots are reversed.
(Characters are printed in white on a black background.) This command is
available for built-in characters and user-defined characters. When white /black
reverse printing mode is on, it also applied to character spacing set by ESC SP.
This command does not affect bit image, downloaded bit image, bar code, HRI
characters, and spacing skipped by HT,ESC $,and ESC \. This command does
not affect the space between lines. White /black reverse mode has a higher
priority than underline mode. Even if underline mode is on,
it is disabled (but not canceled) when white / black reverse mode is selected.
[Default ]n =0
GS L nL nH
Set left margin
Hex 1D 4C nL nH
Decimal 29 76 nL n H
[Range ]0 ≤nL ≤255 ; 0 ≤nH ≤255
[Description ]
Copyright 2004 Advanced Merchant Solutions, Inc.
Page 20
Sets the left margin using nL and nH. The left margin is set to [(nL +nH ×
256)× horizontal motion unit ] inches.
[Notes ]
This command is effective only at the beginning of a line. If this command is
input in page mode, the printer performs only internal flag operations. This
command does not affect printing in page mode. If the setting exceeds the
printable area, the maximum value of the printable area is used. The horizontal
and vertical motion unit are specified by GS P. Changing the horizontal or vertical
motion unit does not affect the current left margin. The GS P command can
change the horizontal (and vertical)motion unit. However, the value cannot be
less than the minimum horizontal movement amount, and it must be in even units
of the minimum horizontal movement amount.
[Default ] nL =0,nH =0
[Reference ] GS P,,GS W
GS h n
Select the height of the bar code
Hex 1D 68 n
Decimal 29 104 n
[Range ] 0 ≤≤n ≤255
[Description ]
Select the height of the bar code n specifies the number of dots in the vertical
direction.
[Default ] n =162
[Reference ] GS K
①GS k m d1 … dk NUL ② GS k m n d1 … dn
Print bar code
[Range ] ①0 ≤m ≤6 (k and d depends on the bar code system used) ② 65 ≤m
≤73 (n and d depends on the bar code system used)
Format ① Hex 1D 6B m d1 …dk 00
Format ① Decimal 29 107 m d1 …dk 0
Format ② Hex 1D 6B m n d1 … dn
Format ② Decimal 29 107 m n
[Description ] Select a bar code system and prints the bar code; M select a bar
code system as follows;
M
Bar Code System Number of Characters
Copyright 2004 Advanced Merchant Solutions, Inc.
Remark
Page 21
1
0
1
2
3
UPC-A
UPC-E
JAN13 (EAN)
JAN8 (EAN)
11≤k ≤12
11≤k ≤12
12≤k ≤12
7≤k ≤8
4
CODE39
1≤k
5
ITF
1≤k (even number)
6
CODABAR
1≤k
65
66
67
68
UPC-A
UPC-E
JAN13(EAN)
JAN8(EAN)
11≤n ≤12
11≤n ≤12
12≤n ≤13
7≤n ≤8
69
CODE39
1≤n ≤255
70
ITF
1≤n ≤255 (even number)
71
CODABAR
1≤n ≤255
72
73
CODE93
CODE128
1≤n ≤255
2≤n ≤255
2
48 ≤d ≤57
48 ≤d ≤57
48 ≤d ≤57
48 ≤d ≤57
48 ≤d ≤57
65 ≤d ≤90,
32,36,37,43,45,46,47
48 ≤d ≤57
48 ≤d ≤57
65 ≤d ≤ 68,36,43
45,46,47,48
48 ≤d ≤57
48 ≤d ≤57
48 ≤d ≤57
48 ≤d ≤57
48 ≤d ≤57
65 ≤d ≤ 90,32,36,
37,43,45,46,47
48 ≤d ≤57
48 ≤d ≤57
65 ≤d ≤ 68,36,43
45,46,47,58
0≤d ≤127
0≤d ≤127
[Description for ①]
d indicates the character code to be printed and k indicates the number of
characters to be printed.
[Description for ②]
n indicates the number of bar code data, and the printer processes n bytes from
the next character data as bar code data. d indicates the character code to be
printed.
[Notes for ①]
This command ends with a NUL code. When the bar code system used is UPCA or UPC-E, the printer prints the bar code data after receiving 12 bytes bar code
data and processing the following data as normal data. When the bar code
system used is JAN 13,the printer prints the bar code after receiving 13 bytes bar
code data and processes the following data as normal data. When n the bar
code system used is JAN 8,the printer prints the bar code after receiving 8 bytes
bar code data and processes the following data as normal data. The number of
data for ITF bar code must be even numbers. When an odd number of data is
input, the printer ignores the last received data.
[Notes for ②]
If is outside of the specified range, the printer stops command processing and
processes the following data as normal data.
[Notes for standard mode ]
If d is outside of the specified range, the printer only feeds paper and processes
the following data as normal data. If the horizontal size exceeds printing area,
the printer only feeds the paper. This command feeds as much paper as is
required to print the bar code, regardless of the line spacing specified by ESC 2
or ESC 3. This command is enabled only when no data exists in the print buffer.
Copyright 2004 Advanced Merchant Solutions, Inc.
Page 22
When data exists in the print buffer, the printer processes the data following m as
normal data. After printing bar code, this command sets the print position to the
beginning of the line. This command is not affected by print modes (emphasized,
double-strike, underline, or character size), except for upside-down mode.
[Notes in page mode ]
This command develops bar code data in the print buffer, but does not print it.
After processing bar code data, this command moves the print position to the
right side dot of the bar code. If d is out of the specified range, the printer stops
command processing and processes the following data as normal data. In this
case the data buffer position does not change. If bar code width exceeds the
printing area, the printer does not print the bar code but moves the data buffer
position to the left side out of the printing area.
[Reference ]GSH,GS f,GS h,GS w
GS w n
Set bar code width
Hex 1D 77 n
Decimal 29 119 n
[Range ] 2 ≤ n ≤6
[Description ]
Set the horizontal size of the bar code.
n specified the bar code width as follows : Multi-level bar codes are as follows
:UPC-A,UPC-E,JAN13,JAN8,CODE93,CODE128 Binary-level bar codes are as
follows :CODE39,ITF,CODABAR
[Default ] n =3
[Reference ] GS k
Copyright 2004 Advanced Merchant Solutions, Inc.
Page 23
POCKET MERCHANT MAGNETIC CARD READER
Specifications:
CARD STANDARD
READING METHOD
TRACK USED
READING DENSITY
READING CAPACITY
CARD THICKNESS
ISO-7811
F2F(FM)
TRACK1
TRACK2
ISO I (IATA)
ISO II (ABA)
210 BPI
75 BPI
79
40 CHARACTERS
CHARACTERS
(7-BIT CODE)
(5-BIT CODE)
0.76 +0.08mm
-Card Feeding Speed :20 to 120 cm/sec
-Head Life Time :Approximately 500,000 passes
-Card Jitter: Less than 18 %
Track encoding:
Copyright 2004 Advanced Merchant Solutions, Inc.
Page 24
Pocket Merchant track read data:
Here is an actual Pocket Merchant track read output and breakdown (the card
number has been modified for obvious reasons):
Start Sentinel and
Format Character
Primary Account
Number (PAN)
Cardholder
Name
Field
Separator
Padded with
space(s)
ASCII 32
Field
Separator
%B4012888888881881^IDEUE/DENNIS¤¤¤¤¤¤¤¤¤¤¤¤^030710100
000019302000000315000000?4012888888881881=0307101193020
315?
End of Track indicator
Copyright 2004 Advanced Merchant Solutions, Inc.
Track 2 Field
Separator
Page 25
Pocket Merchant Warranty
This limited warranty is provided to the original consumer and covers Pocket Merchant printers sold by or
through Advanced Merchant Solutions, Inc.. The telephone number for warranty information is 1-714-4490211.
The warranty period for the Pocket Merchant is 12 months from the date of purchase. The warranty period
for any Options or accessories is ninety (90) days from the date of purchase. During these periods, if the
Pocket Merchant or accessories are found to be defective in materials or workmanship during normal use,
Advanced Merchant Solutions, Inc. or an Advanced Merchant Solutions, Inc. Authorized Service Agent will
repair or replace the equipment, at the sole option of Advanced Merchant Solutions, Inc., at no charge to the
purchaser. Warranty repair may use new or equal replacement parts. The purchaser will be required to show
date and proof of purchase by presenting the bill of sale.
This limited warranty does not cover and Advanced Merchant Solutions, Inc. will not be responsible for the
following:
•
Consumables, which includes the paper.
•
Products or options not sold by Advanced Merchant Solutions, Inc.
•
Failures or defects due to misuse, neglect, abuse, accidents, alterations, improper or unauthorized
installation, unauthorized removal or repairs, failure to follow instructions, fire, floods, acts of God,
or spills of food or liquids.
•
Payments for labor or service by someone other than an Advanced Merchant Solutions, Inc.
Authorized Service Agent.
•
Transportation costs to/from the Authorized Service locations.
In addition, Advanced Merchant Solutions, Inc. will not be responsible for loss of time, mileage,
inconvenience, loss of use of the Pocket Merchant, its consumables or options, damage to purchaser or
other persons or property caused by the Pocket Merchant, its consumables or options or by their failure to
work or for any other incidental, punitive or consequential damages.
Advanced Merchant Solutions, Inc. reserves the right to make the final decision on any warranty claim that
may be questionable. This warranty is valid only when the Pocket Merchant, Options and Consumables are
purchased in The United States from Advanced Merchant Solutions, Inc. or an Advanced Merchant
Solutions, Inc. Authorized Dealer. This warranty applies only to the original purchaser and is not
transferable. Pocket Merchant Printers with the serial number plate or model designation plate removed,
altered, replaced or defaced are not covered by this warranty.
EXCEPT AS PROVIDED HEREIN, AMSI EXPRESSLY EXCLUDES:
•
All warranties and conditions, whether express, implied or statutory, including but not limited to
warranties and conditions of merchantability and fitness for a particular purpose;
•
and any agreements, representations, affirmations, warranties or conditions, whether oral or
written, made by any agent, employee or representative of seller.
This warranty sets forth the entire responsibility of Advanced Merchant Solutions, Inc.. with respect to the
Pocket Merchant, Options and Consumables. The purchaser's exclusive remedy is repair or replacement as
stated herein. In no event shall Advanced Merchant Solutions, Inc. liabilities exceed the cost of correcting
defects as provided herein and any such liabilities will terminate upon expiration of the Pocket Merchant 12
month warranty period or the Options ninety (90) day warranty period
Copyright 2004 Advanced Merchant Solutions, Inc.
Page 26
Copyright 2004 Advanced Merchant Solutions, Inc.
Page 27