1
the possibilities
Thank you for purclaaslngthis Samsulqg product.
To receive more complete service,
please register your product at
www.samsung.com/register
100%
RecycledPaperj'
I
1. Extra Large Capacity
Ultra drying capabilities are at your fingertips! Now you can dry extra-large loads. Our ultra
large 7.3 cu.ft, capacity dryer circulates more air through your clothes, drying them faster for
a wrinkle-free result.
2. Various
Drying
Cycles
& Fuzzy Logic Algorithm
Simply turn the Jog Dial to select one of the 7 automatic drying cycles, including normal
and heavy duty, or let the Fuzzy Logic Control measure the degree of dampness and
automatically set the drying time. Precision drying has never been easier than with Samsung.
3. Time Saving
Our cycles are designed with you in mind. All our dryers are designed to dry your clothes in
less time.., just 42 minutes! Giving you time for more important things in life.
4. Energy Saving
Samsung dryers are super energy efficient. You can dry up to 3.06 pounds of laundry with
1kWh. Also, both the large capacity and Fuzzy Logic Control save energy by automatically
drying your clothes the most efficient way.
5. Easy Reversible
Door
Our dryers will fit just about anywhere. The direction of our easy reversible door can be
changed with just four screws.
6. Pedestal
with Storage
Drawers
An optional 15" pedestal is available to raise the dryer for easier loading and unloading.
It also offers a built-in storage drawer that can hold a 100 oz. bottle of detergent
7. Stacking
(MODEL
NO: SK-3A1/XAA,
SK-4A/XAA,
SK-5A/XAA)
Samsung's Washers and Dryers can be stacked to maximize usable space.
The Dryer legs need to be removed to stack the Washer and Dryer. An optional stacking kit
is available for purchase from your Samsung retailer.
2 features
C
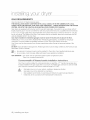
Congratulations on your new Samsung Dryer. This manual contains valuable
information on the installation, use, and care of your appliance. Please take the
time to read this manual to take full advantage of your dryer's many benefits and
features.
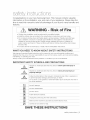
WARNING
- R k of Fire
• Clothes dryer installation must be performed by a qualified installer.
Install the clothes dryer according to the manufacturer's instructions and local codes.
Do not install a clothes dryer with flexible plastic venting materials. If flexible metal (foil type)
duct is installed, it must be of a specific type identified by the appliance manufacturer as
suitable for use with clothes dryers. Flexible venting materials are known to collapse, be
easily crushed, and trap lint. These conditions will obstruct clothes dryer airflow and increase
the risk of fire.
To reduce the risk of severe injury or death, follow all installation instructions.
WHAT YOU NEED TO KNOW ABOUT SAFETY
INSTRUCTIONS
Warnings and Important Safety Instructions in this manual do not cover all possible conditions and
situations that may occur. It is your responsibility to use common sense, caution, and care when installing,
maintaining, or operating your dryer.
Always contact your manufacturer about problems or conditions you do not understand.
IMPORTANT
SAFETY SYMBOLS
i/_k
WARNING
CAUTION
Z_
CAUTION
AND PRECAUTIONS
Hazards or unsafe practices that may result in severe personal
death.
injury or
Hazards or unsafe practices that may result in minor personal injury or
property damage.
Follow the information in this manual to minimize the risk of fire or explosion or
to prevent property damage, personal injury, or death.
Do not store or use gasoline or other flammable vapors and liquids near this or
any other appliance.
Do NOT attempt.
Do NOT disassemble.
®
Do NOT touch.
Follow directions explicity.
@
@
Unplug the power plug from the wall socket.
Make sure the machine is grounded to prevent electric shock.
Call the service center for help.
SAVE THESE INSTRUCTIONS
safety instructions 3
WARNING: To reduce the risk of fire, electric shock, or injury to persons when using your
....... appliance, follow basic precautions, including the following:
1. Read all instructions before using this appliance.
2. Do not dry articles that have been previously cleaned in, washed in, soaked in,
or spotted with gasoline, dry-cleaning solvents, or other flammable or explosive
substances, as they give off vapors that could ignite or explode.
3. Do not allow children to play on or in the appliance. Close supervision of children is
necessary when the appliance is used near children.
4. Before the appliance is removed from service or discarded, remove the door to the
drying compartment.
5. Do not reach into the appliance if the drum is moving.
6. Do not install or store this appliance where it will be exposed to the weather.
7. Do not tamper with controls.
8. Do not repair or replace any part of the appliance or attempt any servicing unless
specifically recommended in the user-maintenance instructions or in published userrepair instructions that you understand and have the skills to carry out.
9. Do not use fabric softeners or products to eliminate static unless recommended by the
manufacturer of the fabric softener or product.
10.Clean lint screen before or after each load.
11.Do not use heat to dry articles containing foam rubber or similarly textured rubber-like
materials.
12.Keep area around the exhaust opening and adjacent surrounding areas free from the
accumulation of lint, dust, and dirt.
13.The interior of the appliance and exhaust duct should be cleaned periodically by
qualified service personnel.
14.Do not place items exposed to cooking oils in your dryer. Items contaminated with
cooking oils may contribute to a chemical reaction that could cause a load to catch fire.
SAVE THESE INSTRUCTIONS
4 safety instructons
WHAT TO DO iF YOU SMELL GAS:
•
Do not try to light any appliance.
Do not turn on the appliance.
Do not touch any electrical switch.
Do not use any phone in your building.
Clear the room, building or area of all occupants.
Immediately call your gas supplier from a neighbor's phone. Follow the gas supplier's
instructions.
If you cannot reach your gas supplier, call the fire department.
Installation and service must be performed by a qualified installer, service agency, or the gas
supplier.
_Read
Z_To
all instructions before using the appliance.
reduce the risk of fire or explosion:
WARNING
•
Do not dry items that have been previously cleaned, washed, soaked, or spotted with
gasoline, dry cleaning solvents, or other flammable or explosive substances. They
emit vapors that could ignite or explode. Any material that has been in contact with a
cleaning solvent or flammable liquids or solids should not be placed in the dryer until all
traces of these flammable liquids or solids and their fumes have been removed.
There are many highly flammable items used in homes, such as acetone, denatured
alcohol, gasoline, kerosene, some liquid household cleaners, some spot removers,
turpentine, waxes, and wax removers
Items containing foam rubber (may be labeled latex foam) or similarly textured rubberlike materials must not be dried on a heat setting. Heated foam rubber materials can,
under certain circumstances, produce fire by spontaneous combustion.
Do not allow children or pets to play on, in, or in front of the appliance. Close supervision is
necessary when the appliance is used near children and pets.
Before discarding or removing your dryer from service, remove the door to the drying
compartment to prevent children or animals from becoming trapped inside.
@ Do not reach into the appliance
when the drum is moving.
Do not install or store this appliance where it will be exposed to the weather.
Do not tamper with controls.
Do not repair, replace, or attempt to service any part of the appliance unless specifically
recommended in the user-repair instructions and you understand and have the skills to
carry those out.
Do not use fabric softeners or products to eliminate static unless recommended for dryer
use by the manufacturer of the fabric softener or product.
Clean the lint screen before or after each load.
Keep the area around the exhaust opening and surrounding areas free from lint, dust, and
dirt.
The interior of the dryer and exhaust duct should be cleaned periodically by qualified service
personnel.
SAVE THESE INSTRUCTIONS
safety instructions 5
This appliance must be properly grounded. Never plug the power cord into a receptacle
that is not grounded adequately and in accordance with local and national codes. See
installation instructions for grounding this appliance.
Do not sit on top of the dryer.
_
A
.......
ecause of continuing product improvements, Samsung reserves the right to change
specifications without notice. For complete details, see the Installation Instructions
packed with your product before selecting cabinetry, making cutouts, or beginning
installation.
Ensure pockets are free from small irregularly shaped hard objects, foreign material, etc. ie.
coins, knives, pins, etc. These objects could damage your dryer.
Do not wash clothing with large buckles, buttons, or other heavy metal or solid things.
A
Gas leaks may occur in your system, resulting in a dangerous situation.
WARNING
Gas leaks may not be detected by smell alone.
Gas suppliers recommend you purchase and install a UL-approved gas detector.
Install and use in accordance with the manufacturer's instructions.
Do not place items in your dryer that have been spotted or soaked with vegetable oil or
cooking oil. Even after being washed, these items may contain significant amounts of these
oils.
Residual oil on clothing can ignite spontaneously. The potential for spontaneous
combustion increases when items containing vegetable oil or cooking oil are exposed to
heat. Heat sources such as your dryer can warm these items, allowing an oxidation reaction
in the oil to occur. Oxidation creates heat. If this heat cannot escape, the items can become
hot enough to catch fire. Piling, stacking, or storing these kinds of items may prevent heat
from escaping and can create a fire hazard.
All washed and unwashed fabrics that contain vegetable oil or cooking oil can be
dangerous. Washing these items in hot water with extra detergent will reduce, but not
eliminate, the hazard. Always use the Cool Down cycle for these items to reduce their
temperature. Never remove these items from the dryer hot or interrupt the drying cycle until
the items have run through the Cool Down cycle. Never pile or stack these items when they
are hot.
SAVE THESE iNSTRUCTiONS
6 safety instructons
content
INSTALLING
OPERATING
YOUR
DRYER
INSTRUCTIONS,
TIPS
CARE AND CLEANING
SPECIAL
LAUNDRY
TiPS
TROUBLESHOOTING
APPENDIX
8
Tools needed for installation
8
9
See Dryer Exterior
Ducting requirements
10
10
10
11
Important to installer
Location considerations
Alcove or closet installation
Mobile home installation
11
Exhausting
12
13
13
14
Gas requirements
Electrical requirements
Grounding
Electrical connections
15
15
17
Replacement parts and accessories
Installation
Final installation checklist
18
19
Dryer Exhaust Tips
Door Reversal
20
22
Overview of the control panel
Child lock
23
24
Rack Dry (Optional Part)
Clean the lint filter
24
24
Load the dryer properly
Getting started
25
25
25
Control Panel
Tumbler
Powder coated tumbler
25
Dryer Exterior
25
Dryer Exhaust System
26
Special laundry tips
27
28
Check these points if your dryer.,.
Information codes
29
Fabric care chart
30
30
Protecting the environment
Declaration of conformity
30
31
Specifications
Cycle chart
contents 7
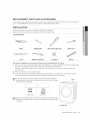
TOOLS NEEDED FOR INSTALLATION
Hire a professional to install this dryer properly. If there is a service call performed as a result of poor setup,
adjustment, and connection, it is considered the responsibility of the installer. If you install the dryer, you are
responsible.
Make sure you have everything necessary for proper installation.
1o A GROUNDED ELECTRICAL OUTLET is required. See Electrical Requirements. See page 12.
2. A POWER CORD for electric dryers (except Canada). See page 13.
3. GAS LINES (if a gas dryer) must meet national and local codes.
4. EXHAUST SYSTEM - must be rigid metal or flexible stiff-walled metal exhaust ducting.
See the exhaust requirements on pages 8-10.
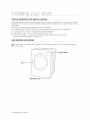
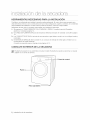
SEE DRYER EXTERIOR
Drying
is not supplied in this model. The Drying Rack is optional. You can purchase it through a
service Rack
center.
Control panel
Door
Adjustable
8 instaling your dryer
legs
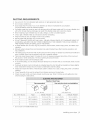
DUCTING
•
REQUIREMENTS
Use a 4-inch (10.2 cm) diameter rigid aluminum or rigid galvanized steel duct.
Do not use a smaller duct.
Ducts larger than 4 inches (10.2 cm) in diameter can result in increased lint accumulation.
Lint accumulation should be cleaned regularly.
If a flexible metal duct must be used, use the type with a stiff sheet metal wall. Do not use a flexible duct
with a thin foil wall. Serious blockage can result if the flexible metal duct is bent too sharply.
Never install any type of flexible duct in walls, ceilings, or other concealed spaces.
Only a rigid or flexible metal duct should be used for exhausting.
Keep the exhaust duct as straight and short as possible.
•
Secure joints with duct tape. Do not use screws.
DO NOT EXHAUST DRYER INTO ANY WALL, CEILING, CRAWL SPACE, OR CONCEALED SPACE OF
A BUILDING, GAS VENT, OR ANY OTHER COMMON DUCT OR CHIMNEY. THIS COULD CREATE A
FIRE HAZARD FROM LINT EXPELLED BY THE DRYER.
A plastic flexible duct can kink, sag, be punctured, reduce airflow, extend drying times, and affect dryer
operation.
Exhaust systems longer than recommended can extend drying times, affect machine operation, and
may collect lint.
The exhaust duct should end with an exhaust hood with a swing-out damper to prevent back drafts and
entry of wildlife. Never use an exhaust hood with a magnetic damper.
•
The hood should have at least 12 inches (30.5 cm) of clearance between the bottom of the hood and
the ground or other obstruction. The hood opening should point down.
Never install a screen over the exhaust outlet.
To avoid lint buildup, do not exhaust the dryer directly into a window well. Do not exhaust under a house
or porch.
If exhaust ductwork must run through an unheated area, the duct should be insulated and slope slightly
down towards the exhaust hood to reduce condensation and lint buildup.
Inspect and clean the interior of the exhaust system at least once a year. Unplug the power cord before
cleaning.
Check frequently to be sure the exhaust hood damper opens and closes freely.
Check once per month, and clean at least one time per year. Note: If clothes are not getting dry, then
check ducting for obstructions.
Weather
Hood Type
I
Recommended
Use
only for short=run installation
4" (10.16 cm)
o
*
2.5" (6.35 cm)
No. of 90 elbows
Rigid
Metallic Flexible*
I
Rigid
'
Metallic Flexible*
0
24.4 m (80 ft.)
12.4 m (41 ft.)
22.6 m (74 ft.)
10.1 m (33 ft.)
20.7 m (68 ft.)
11.2 m (37 ft.)
18.9 m (62 ft.)
8.8 m (29 ft.)
17.4 m (57 ft.)
10.1 m (33 ft.)
15.5 m (51 ft.)
7.6 m (25 ft.)
14.3m (47 ft.)
9.0 m (29 ft.)
12.5 m (41 ft.)
6.5 m (21 ft.)
Do not use non-metallic flexible duct.
instaling your dryer 9
If the new Dryer is installed
sure:
,,
•
into an existing
exhaust
system
you must make
The exhaust system meets all local, state, and national codes.
That a flexible plastic duct is not used.
To Inspect and clean all lint buildup from inside the existing duct.
The duct is not kinked or crushed.
The exhaust hood damper opens and closes freely.
The static pressure in any exhaust system must not exceed 0.83 inches of water column, or be
less than 0.
This can be measured while the Dryer is running with a manometer at the point where the
exhaust duct connects to the Dryer. A no-heat setting should be used. The Dryer tumbler should
be empty and the lint filter clean.
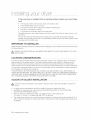
IMPORTANT
TO INSTALLER
Please read the following instructions carefully before installing the dryer. These instructions should be kept
for future reference.
,/_
REMOVE THE DOOR FROM ALL DISCARDED APPLIANCES TO AVOID THE DANGER OF A CHILD
....... SUFFOCATING.
LOCATION
CONSIDERATIONS
The dryer should be located where there is enough space at the front for loading the Dryer, and enough
space behind for the exhaust system. This Dryer is factory-ready for rear exhaust. To exhaust out the
bottom or the left, use the accessory exhaust kit. Instructions are included with the kit. It's important to
make sure the room has enough fresh air. The Dryer must be located where there is no air-flow obstruction.
On gas Dryers, adequate clearance as noted on the data plate must be maintained to ensure adequate air
for combustion and proper Dryer operation.
THE DRYER MUST NOT BE INSTALLED OR STORED IN AN AREA WHERE IT WILL BE EXPOSED TO
WATER AND/OR WEATHER. THE DRYER AREA IS TO BE KEPT CLEAR OF COMBUSTIBLE MATERIALS,
GASOLINE, AND OTHER FLAMMABLE VAPORS AND LIQUIDS. A DRYER PRODUCES COMBUSTIBLE
LINT. THE AREA AROUND THE DRYER SHOULD BE KEPT LINT-FREE.
ALCOVE
OR CLOSET INSTALLATION
z_The
Dryer must be exhausted to the outside to reduce the risk of fire when installed in an alcove or
wAR.,NG
closet.
No other fuel-burning appliance should be installed in the same closet as the Dryer.
WARNING: To reduce the risk of fire, this dryer MUST BE EXHAUSTED TO THE OUTDOORS.
See EXHAUST INFORMATION section.
Minimum clearances between the Dryer and adjacent walls or other surfaces are:
2" in front, 17" on top, 1" on either side, and 2.375" in the back.
The closet front must have two unobstructed air openings for a combined minimum total area of 72 in2
with 3" minimum clearance on the top and bottom. A Iouvered door with equivalent space clearance is
acceptable.
10 instaling your dryer
MOBILE
HOME INSTALLATION
The installation of the Dryer in mobile homes must conform to the Manufactured Home Construction and
Safety Standard Title 24 CFR, Part 32-80 {formerly the Federal Standard for Mobile Home Construction and
Safety, Title 24, HUD (Part 280), 1975} for the United States) or CSA Standards Z240 (for Canada).
When installing a Dryer in a mobile home, provisions for anchoring the Dryer to the floor must be made.
Locate an area that has adequate fresh air.
A minimum of 72 in2 (465 cm 2) of unobstructed space is required.
Call 1-800-SAMSUNG(726-7864)
for information on purchasing the Floor Anchoring Kit as an accessory.
All mobile home installations must be exhausted to the outside with the exhaust duct termination securely
fastened to the mobile home structure, using materials that will not support combustion.
The exhaust duct may not terminate underneath the mobile home.
See Exhausting section for more information.
EXHAUSTING
Exhausting the Dryer to the outside will prevent large amounts of lint and moisture from being blown into the
room.
In the United
o
o
o
States:
All dryers must be exhausted to the outside.
The required exhaust duct is 4inch(102mm) in diameter.
Only those foil-type flexible ducts, if any, specifically identified for use with the appliance by
the manufacturer and that comply with the Outline for Clothes Dryer Transition Duct, Subject
2158A, shall be used.
The duct shall not be assembled with screws or other fastening means that extend into the
duct and catch lint.
In Canada:
•
Only those foil-type flexible ducts, if any, specifically identified for use with the appliance by
the manufacturer shall be used.
All dryers must be exhausted to the outside.
The exhaust duct should be 4inch (102mm) in diameter.
Outside
the U.S. and Canada:
Refer to the local codes.
z_The
dryer must be exhausted to the outside to reduce the risk of fire when installed in an
wAR,,,G
alcove or closet.
NEVER USE A PLASTIC OR NON-METAL FLEXIBLE DUCT.
If your existing ductwork is plastic, non-metal, or combustible, replace it with metal.
Use only a metal exhaust duct that is non-flammable to ensure containment of exhaust air,
heat, and lint.
instaling your dryer 11
GAS REQUIREMENTS
Use only natural or LP (liquid propane) gases.
THE INSTALLATION MUST CONFORM WITH LOCAL CODES, OR IN THE ABSENCE OF LOCAL
CODES, WITH THE NATIONAL FUEL GAS CODE ANSVZ223.1, LATEST REVISION (FOR THE UNITED
STATES), OR WITH THE CAN/CGA-B149
INSTALLATION CODES (FOR CANADA).
Gas dryers are equipped with a burner vent for use with natural gas. If you plan to use your dryer with LP
(liquid propane) gas, it must be converted for safe and proper performance by a qualified service technician.
A 1/2" (1.27 cm) gas supply line is recommended and must be reduced to connect to the 3/8" (1 cm) gas
line on your dryer. The National Fuel Gas Code requires that an accessible, approved manual gas shut-off
valve be installed within 6' of your dryer.
Gas dryers installed in residential garages must be raised 18 inches (46 cm) above the floor.
Additionally, a 1/8" (0.3 era) N.P.T. (National Pipe Thread) plugged tapping, accessible for test gauge
connection, must be installed immediately upstream of your dryer's gas supply connection.
Your Dryer must be disconnected from the gas supply pipe system during any pressure testing of the
system.
DO NOT reuse old flexible metal gas lines. Flexible gas lines must be design certified by the American Gas
Association (CGA in Canada).
o
•
Any pipe joint compound used must be resistant to the action of any liquefied petroleum gas.
As a courtesy, most local gas utilities will inspect a gas appliance installation.
GAS IGNITION - Your Dryer uses an automatic ignition system to ignite the burner.
There is no constant burning pilot.
Commonwealth
of Massachusetts
installation
instructions
Your Dryer must be installed by a licensed plumber or gas fitter. A "T" handle manual gas valve
must be installed in the gas supply line to your dryer. If a flexible gas connector is used to install
your Dryer, the connector must have a maximum length of 3' (36").
=
WARNING =
Gas leaks may occur in your system, creating a dangerous situation.
Gas leaks may not be detected by smell alone.
Gas suppliers recommend you purchase and install a UL-approved gas detector.
Install and use in accordance with manufacturer's instructions.
12 instaling your dryer
ELECTRICAL
_A
WARNING
REQUIREMENTS
Wiring diagram is located on the back of the dryer.
Improper connection of the equipment grounding conductor can result in a risk of electric shock.
Check with a qualified electrician or serviceman if you are in doubt as to whether your Dryer is
properly grounded. Do not modify the plug provided with your Dryer - if it doesn't fit the outlet,
have a proper outlet installed by a qualified electrician.
To prevent unnecessary risk of fire, electrical shock, or personal injury, all wiring and grounding
must be done in accordance with local codes, or in the absence of local codes, with the National
Electrical Code, ANSI/NFPA No. 70-Latest Revision (for the U.S.) or the Canadian Electrical Code
CSA C22.1 - Latest Revisions and local codes and ordinances. It is your responsibility to provide
adequate electrical services for your Dryer.
All gas installations must be done in accordance with the national Fuel Code ANSI/Z2231 - Latest
Revision (for the U.S.) or CAN/CGA- B149 Installation Codes - Latest Revision (for Canada) and
local codes and ordinances.
GROUNDING
This Dryer must be grounded. In the event of a malfunction or breakdown, the ground will reduce the risk of
electrical shock by providing a path of least resistance for the electrical current.
Gas models
Your Dryer has a cord with an equipment-grounding conductor and a grounding plug.
The plug must be plugged into an appropriate outlet that is properly installed and grounded in
accordance with all local codes and ordinances.
Do not modify the plug provided with your Dryer - if it doesn't fit the outlet, have a proper outlet
installed by a qualified electrician.
NEVER CONNECT GROUND WIRE TO PLASTIC PLUMBING LINES, GAS LINES, OR HOT
WATER PIPES.
Electric
models
Your Dryer has a cord with an equipment-grounding conductor and a grounding plug, sold
separately.
The plug must be plugged into an appropriate outlet that is properly installed and grounded in
accordance with all local codes and ordinances.
If a power cord is not used and the Electric Dryer is to be permanently wired, the Dryer must
be connected to a permanently grounded metal wiring system, or an equipment grounding
conductor must be run with the circuit conductors and connected to the equipment grounding
terminal.
instaling your dryer 13
ELECTRICAL
CONNECTIONS
Before operating or testing, follow all grounding instructions in the Grounding section.
An individual branch (or separate) circuit serving only your Dryer is recommended. DO NOT USE AN
EXTENSION CORD.
Gas models-
U.S. and Canada
A 120 volt, 60 Hz AC approved electrical service, with a 15-amp fuse or circuit breaker is
required.
Electric models - U.S. only
Most U.S. dryers require a 120/240 volt, 60 Hz AC approved electrical service. Some require
120/208 volt, 60 Hz approved electrical service. The electric service requirements can be found
on the data label located behind the door. A 30-amp fuse or circuit breaker on both sides of the
line is required.
•
If a power cord is used, the cord should be plugged into a 30-amp receptacle.
The power cord is NOT provided with U.S. electric model dryers.
IM PO RTANT:
When local codes allow, the dryer electrical supply may be connected by means of a new
power supply cord kit, marked for use with a dryer, that is U.L. listed and rated at a minimum of
120/240 volts, 30-amp with three No. 10 copper wire conductors terminated with closed loop
terminals, open-end spade lugs with turned up ends, or with tinned leads.
1. size of the conductors and the type of cord.
2. 3/4" (1.9 cm) UL-listed strain relief
Do not reuse a power supply cord from an old Dryer. The power cord electric supply wiring
must be retained at the dryer cabinet with a suitable UL-listed strain relief.
Grounding through the neutral conductor is prohibited for (1) new branch-circuit installations,
(2) mobile homes, (3) recreational vehicles, and (4) areas where local codes prohibit
grounding through the neutral conductor. (Use 4-prong plug for 4 wire receptacle, NEMA
type 14-30R.)
Electric models - Canada Only
A 120/240 volt, 60 Hz AC approved electrical service fused through a 30-amp fuse or circuit
breaker on both sides of the line is required.
All Canadian models are shipped with the power cord attached. The power cord should be
plugged into a 30-amp receptacle.
lt is not permissible to convert a dryer in Canada to 208 volts.
14 instaling your dryer
REPLACEMENT
PARTS AND ACCESSORIES
If your dryer requires replacement parts or accessories, contact the dealer from whom you purchased your
dryer or the SAMSUNG customer care center at 1-800-SAMSUNG(726-7864).
iNSTALLATION
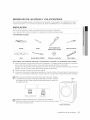
Gather the required tools and parts before starting the installation.
Read and follow the instructions provided with any tools listed here.
Tools and Parts
Pliers
Cutting
knife
Pipe wrench
(gas only)
Nut drivers
j
Level
Phillips Screwdriver
Duct tape
Wrench
For proper installation, we recommend that you hire a professional. To install:
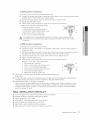
1. Move your dryer to an appropriate location for installation. Consider installing the dryer and washer side
by-side. This will allow access to gas, electrical, and exhaust connections.
Lay two of the carton cushion-tops on the floor. Tip your dryer on its side so it will lay across both
cushion-tops.
2. Set your dryer back in an upright position.
3. To ensure that the dryer provides optimal drying performance, it must be level. To minimize vibration,
noise, and unwanted movement,the floor must be a perfectly level, solid surface.
Level
To set the dryer to the same height as the washer, fully retract the
leveling feet by turning them counterclockwise, then loosen the legs
by turning them clockwise
Retract fully
Then loosen
................................................................J....................................................................J
_
Adjust the leveling feet only as much as necessary to level the dryer.
Extending the leveling feet more than necessary can cause the dryer
to vibrate.
Leveling feet
instaling your dryer 15
4, Review the Exhausting section before installing the exhaust system. Install the ductwork from your dryer
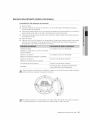
to the exhaust hood. The crimped end of the duct sections must point away from your dryer.
DO NOT use sheet metal screws when assembling ducting. These joints should be taped.
Never use plastic flexible exhaust material.
Tip for tight installations: install a section of exhaust system to your dryer before putting it in place.
Use duct tape to secure this section to your dryer, but do not cover ventilation slots at the back of the
unit in the dryer cabinet.
5, Review Electrical Requirements section.
BEFORE OPERATING OR TESTING, follow the grounding instructions in the Grounding section.
U,S, MODELS:
IMPORTANT - All U.S. models are produced for a 3-WIRE SYSTEM CONNECTION.
The Dryer frame is grounded to the neutral conductor at the terminal block.
A 4-WIRE SYSTEM CONNECTION is required for new or remodeled construction, mobile
homes, or if local codes do not permit grounding through neutral conductor. If the 4-wire system
is used, the Dryer frame cannot be grounded to the neutral conductor at the terminal block.
Refer to the following instructions for 3- and 4-WIRE SYSTEM CONNECTIONS.
Remove the terminal block cover plate.
Insert the power cord with a UL-listed strain relief through the hole provided in the cabinet near the
terminal block.
A strain relief must be used.
6_
Do not loosen the nuts already installed on the terminal block. Be sure they are tight.
Use a 3/8' (lcm) deep well socket.
Review Gas Requirements section.
Remove the pipe thread protective cap.
Apply pipe joint compound or about 1 1/2 wraps of Teflon tape over all threaded connections.
_Pipe
joint compound must be resistant to the action of any liquefied petroleum gas.
Connect the gas supply to your Dryer.
An additional fitting is required to connect the 3/4" (1.9 cm) female thread end of a flexible connector to
the 3/8" (1 cm) male threaded end on the dryer.
Securely tighten the gas line fitting over threads.
Turn on the gas supply. Check all gas connections for leaks using a soap solution.
If bubbles appear, tighten the connections and recheck.
DO NOT use an open flame to check for gas leaks.
16 instaling your dryer
3-WIRE
system
connections
1. Loosen or remove the center terminal block screw.
2.
Connect the neutral wire (white or center wire) of the power cord to the center, silver-colored
terminal screw of the terminal block. Tighten screw.
3. Connect the other wires to outer terminal block screws. Tighten screws.
4. Tighten the strain relief screws.
5.
Insert the tab of the terminal block cover into your Dryer's rear panel slot.
Secure the cover with a hold-down screw.
1. External ground connector
2. Neutral grounding wire (green/yellow)
3. Center silver-colored terminal block screw
4. Neutral wire (white or center wire)
5.3/4" (1.9 cm) UL-listed strain relief
_lf
converting from a 4-wire electrical system to a 3-wire, the ground strap must be
....... reconnected to the terminal block support to ground the Dryer frame to the neutral
conductor.
4-WIRE
system
connections
1. Remove the center terminal block screw.
2.
Connect the ground wire (green or unwrapped) of the power cord to the external ground
conductor screw.
3.
Connect the neutral wire (white or center wire) of the power cord and the appliance ground
wire (green with yellow stripes) under the central screw of the terminal block.
4. Connect the other wires to the outer terminal block screws. Tighten screws.
5. Tighten the strain relief screws.
6. Insert the tab of the terminal block cover into your Dryer's rear panel slot.
Secure the cover with a hold-down screw.
1. External ground connector
2. Green or bare copper wire of power cord
3. 3/4 in. (1.9 cm) UL-listed strain relief
4. Center silver-colored terminal block screw
2
5. Grounding wire (green/yellow)
3
6
6. Neutral wire (white or center wire)
With a level, check your Dryer and make necessary adjustments to the
leveling legs.
8. At this time, make sure all gas connections (on gas models), exhaust and electrical connections are
complete. Plug in your Dryer, and check operation by using the checklist below.
9. (GAS MODELS ONLY: DV210AG*, DV220AG*)
The burner may not ignite initially due to air in the gas line. Allowing your Dryer to operate on a heat
setting will purge the line. If the gas does not ignite within 5 minutes, turn your Dryer off and wait 5
minutes. Be sure the gas supply to your Dryer has been turned on. In order to confirm gas ignition,
check the exhaust for heat.
7.
FINAL INSTALLATION
CHECKLIST
[]
[]
[]
Dryer is plugged into an electrical outlet and is properly grounded.
Exhaust ductwork is hooked up and joints are taped.
Plastic flexible duct is NOT used.
[]
[]
[]
Used rigid or stiff-walled flexible metal vent material.
Dryer is leveled and is sitting firmly on the floor.
Gas models - gas is turned on with no gas leaks.
[]
Start your dryer to confirm that it runs, heats, and shuts off.
instaling your dryer 17
DRYER EXHAUST
Z_
TIPS
Plastic or non-metal flexible duct presents a potential fire hazard.
WARNING
1.
Make sure your dryer is installed properly so it exhausts air
easily.
2.
Use a 4" diameter rigid metal duct. Tape all joints, including
at the dryer.
Never use lint-trapping screws.
3.
Keep ducts as straight as possible.
4.
Clean all old ducts before installing your new dryer.
Be sure the vent flap opens and closes freely.
Inspect and clean the exhaust system annually.
Don't let a poor exhaust
system
slow drying
1.
2.
Restricting your dryer with a poor exhaust system.
Using a plastic, thin foil, or non-metal flexible duct.
3.
Unnecessarily using long ducts that have many
elbows.
4.
Having crushed or clogged ducts and vent.
18 instaling your dryer
[
by:
1
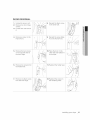
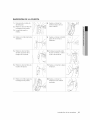
DOOR REVERSAL
1,
2.
Unplug the power cord.
Remove two door hinge
screws.
3. Lift the door and remove
it.
8.
Reinsert the black screw
in the other hole.
9.
Reinsert the screw (Step
4) on the Frame Front.
,Ji;::Y
_" ,,,I
4.
5,
6.
7,
Remove a screw on the
Frame Front.
o
Remove the two screws
on the opposite side of
the door hinge.
10. Place the door on the
other side and reattach it
to the dryer.
Remove two screws from
the holder lever.
11. Reattach the holder lever.
Remove one black screw
from the door hinge.
12. Reattach the screws in
the remaining holes.
instaling your dryer 19
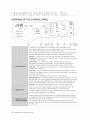
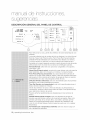
OVERVIEW OF THE CONTROL
PANEL
.......
Sensor
4 Dry
Manual
Dry
Normal
Heavy Duty
I LoadBell/ ......
L
More Dry
O High
Normal Dry
_ Medium
0 40 min.
30 min,
Time Dry
•
Perm Press •
Delicates
-_
•
o
Wrinkle
Release
•
Air Fluff
0 Less Dry
@ Damp DP/
Low
O 20 rain,
I
_=_
@ Extra Low
\_.
©
®
®
®
® ®®®
_______________________________________________________________________________________________________________________________________________
_______________________________________________________________________________________________________________________________________________
_______________________________________________________________________________________________________________________________________________
_______________________________________________________________________________________________________________________________________________
_______________________________________________________________________________________________________________________________________________
_______________________________________________________________________________________________________________________________________________
_______________________________________________________________________________________________________________________________________________
To select a cycle, rotate the Cycle Selector dial to the desired cycle.
The indicator light by the cycle name will illuminate. The Normal, Heavy Duty,
Perm Press and Delicates cycles are Sensor Dry cycles.
Sensor Dry automatically senses the moisture in the load and shuts the dryer
off when the selected dryness level (more dry to damp dry) is reached.
_______________________________________________________________________________________________________________________________________________
_______________________________________________________________________________________________________________________________________________
_______________________________________________________________________________________________________________________________________________
_______________________________________________________________________________________________________________________________________________
_______________________________________________________________________________________________________________________________________________
_______________________________________________________________________________________________________________________________________________
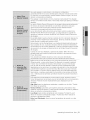
Normal - Use this cycle to dry loads such as cotton, underwear, and linen.
Heavy Duty - Use this cycle to get high heat for heavy fabrics such as jeans,
corduroys, or work clothes.
Perm Press - Dry wrinkle-free cottons, synthetic fabrics, knits, and
permanent press fabrics automatically. The cycle minimizes wrinkling by
providing a longer unheated cool-down period at the end of the cycle.
Delicates - The Delicates cycle is designed to dry heat-sensitive items at a
low drying temperature.
Time Dry - Time Dry allows you to select the desired cycle time in minutes.
Turn the Cycle Selector dial to Time Dry, then press the Adjust Time up arrow
to set the drying time.
Press the arrow repeatedly to scroll through the time settings.
Wrinkle Release - The Wrinkle Release cycle will release wrinkles from items
that are clean, dry, and only slightly wrinkled, such as clothes from a crowded
closet, suitcase or items that have been in the dryer too long after the cycle
has ended. Wrinkle Release can be used with any temperature selection.
Air Fluff - The Air Fluff cycle tumbles the load in room temperature air.
_______________________________________________________________________________________________________________________________________________
_______________________________________________________________________________________________________________________________________________
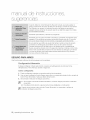
Time can be added or subtracted from the automatically set times in the
iiiiiiiii!iiiiiiiiiiiiiiiiiiiiiiiiiiiiiii!i!
i!iiiiiiiiiiiii
iiiiiiiiiiiii!i!i!iii!i!i!iii
i!!!!!!!i!iiiii!ii!ili
iiiiiiiiiiiiiiiiiiiiiiiiiiiiiiiiiiiiiiiiiiiiii
Manual Dry cycles (Time Dry, Wrinkle Release, or Air Fluff cycles).
iiiiiiiiiiiiiiiiiii:i'Qi! i!i!i!i!i!
To add
or subtract time from the cycle, press the Adjust Time arrow pad up
or down until the desired time is displayed.
Wrinkle Prevent provides approximately 90 minutes of intermittent tumbling
in unheated air at the end of the cycle to reduce wrinkling. Press the Wrinkle
Prevent button to activate this feature.
The indicator light above the pad will illuminate when Wrinkle Prevent is
selected. The load is dry, and can be removed at any time during the Wrinkle
Prevent cycle.
20 operatng
Instructions, tps
The display window shows the estimated time remaining in the cycle after the
Start/Pause button is pressed. The estimated time remaining may fluctuate as
the cycle progresses.
The Drying light will illuminate and remain lit until the cycle is complete.
When your dryer is in the cool-down phase, the Cooling light will illuminate.
When your dryer is in the wrinkle prevent phase, the Wrinkle Prevent light will
illuminate.
When the cycle is complete, "END" will appear in the display panel until the
dryer door is opened or the Power button is pushed.
If your dryer is paused during a cycle, the indicator lights will blink until the
Start/Pause button is pressed.
To select the dry level in the Normal, Heavy Duty, or other Sensor Dry cycles,
press the Dry Level button. An indicator light will illuminate next to the desired
dryness level. Press the button repeatedly to scroll through the settings.
Larger or bulkier loads may require the More Dry setting for complete
dryness. The Less Dry setting is best suited for lightweight fabrics or for
leaving some moisture in the clothing at the end of the cycle. Use for items
that lay flat or hang to dry.
To select the correct temperature for the load, press the Temp button. An
indicator light will illuminate next to the desired temperature. Press the button
repeatedly to scroll through the settings.
High - For sturdy cottons or those labeled Tumble Dry.
Medium - For permanent press, synthetics, lightweight cottons, or items
labeled Tumble Dry Medium.
Low - For heat sensitive items labeled Tumble Dry Low or Tumble Dry Warm.
Extra Low - Provides the lowest heated dry temperature possible.
When using Manual Dry cycles, time can be adjusted by pressing the Time
Selection button.
During the Sensory Dry cycle, the time light indicator is off because exact
drying times are determined by fluctuating humidity levels.
Press to pause and restart programs.
Press once to turn your dryer on, press again to turn it off. If your dryer is left
on for more than 10 minutes without any buttons being touched, the power
automatically turns off.
This is an alarm that notifies the user when the average dry level is damp dry
(80% dried). This is useful when the laundry contains various types of clothing
you do not want to dry completely. An alarm sounds for five (5) seconds while
continuing to perform the cycle.
This function can only be selected in the Sensor Dry course, and the dry level can
only be selected from among Normal Dry, More Dry.
operatng
hstructons,
tips 21
CHILD LOCK
A function to prevent children from playing with your dryer.
Setting/Releasing
If you want to set or release the Child Lock, press both the Temp. and Time buttons
simultaneously for 3 seconds.
How to Set:
1, It can be set while your dryer is running.
2, Once you set the Child Lock function, no button, except for the Power button, will respond
until you release the Child Lock function.
3, The Child Lock indicator will be lit.
1, If the dryer is powered on again, the Child Lock function stays on.
2, To release that function, follow the instructions above.
When other buttons, except for the Power button, do not respond, check the Child Lock
indicator.
22 operatng
hstmctions,
tps
RACK DRY (OPTIONAL
Installing
PART)
the drying rack
1. Open the Dryer door.
2. Position the drying rack in the tumbler, placing the front lip of the drying rack on the top of
the lint filter.
3.
4.
5.
6.
Place the rear legs in the two recessed areas of the dryer's back wall, then push down the
middle of the drying rack to fix.
Place the items to be dried on the rack, leaving space between them so air can circulate.
Close the Dryer door.
Use the Time Dry cycle. Select the time according to the moisture and weight of the items.
Start the Dryer. It may be necessary to reset the timer if a longer drying time is needed.
Washable sweaters
Low or Extra Low
(block to shape and lay flat on rack)
Stuffed toys
(cotton or polyester fiberfilled)
Low or Extra Low
Stuffed toys
(foam or rubber-filled)
Air Fluff
Foam rubber pillows
Air Fluff
Sneakers
Air Fluff or Heat (Extra Low)
Z/_ Drying foam rubber, plastic, or rubber on a heat setting may cause damage to the item and
....... lead to a fire hazard.
_
rying Rack is not supplied in this model. The Drying Rack is optional. You can purchase it
through a service center. (Part code : DC61-02773A)
operatng
hstructons,
t+ps23
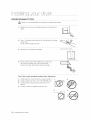
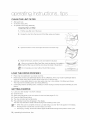
CLEAN THE LINT FILTER
,,
•
•
After each load.
To shorten drying time.
To operate more energy efficiently.
Cleaning
the Lint filter
1+ Pull the case-filter out of the dryer.
2+ Scrape the dust from the top part of the filter using your fingers.
3+ Open the bottom cover and scrape the dust in the same way.
4+ Shake off the dust, close the cover and install it in its place.
When you re-insert the Filter-Case Filter,check the direction it is installed in.
....... (Insert the Filter-Case so that the arrow faces the inside of the product.)
_Do
not operate your dryer without the lint filter in place.
LOAD THE DRYER PROPERLY
•
•
•
,,
Place only one washload in your dryer at a time.
Mixed loads of heavy and lightweight fabrics will dry differently, which may result in lightweight fabrics
being dry while heavy fabrics remain damp at the end of a drying cycle.
Add one or more similar items to your dryer when only one or two articles of clothing need drying.
This improves the tumbling action and drying efficiency.
Overloading restricts tumbling action, resulting in uneven drying as well as excessive wrinkling of some
fabrics.
G ETTi NG STARTE D
1. Load your dryer loosely2. Close the door.
DO NOT overload.
3+ Select the appropriate cycle and options for the load (see pages 20, 21).
4+ Press the Start/Pause button.
5, The dryer indicator light will illuminate.
6+ The estimated cycle time will appear in the display.
The time may fluctuate to better indicate drying time remaining in the cycle.
o
o
o
When the cycle is complete, the Door Lock light will go out and "End" will appear in the display.
Pressing Power cancels the cycle and stops your dryer.
The Drying, Cooling, and Done indicator lights will illuminate during those portions of the cycle.
24 operatng
hstructions,
tps
CONTROL
PANEL
Clean with a soft, damp cloth. Do not use abrasive substances.
Do not spray cleaners directly on the panel.
The control panel finish may be damaged by some laundry pre-treatment soil and stain remover products.
Apply such products away from your Dryer and wipe up any spills or overspray immediately.
TUMBLER
Remove any stains such as crayon, ink, or fabric dye (from new items such as towels or jeans) with an allpurpose cleaner.
Tumble old towels or rags to remove any excess stain or cleaning substance.
Once these steps are followed, stains may still be visible, but should not transfer to subsequent loads.
POWDER COATED TUMBLER
To clean the powder coated tumbler, use a damp cloth with a mild, non-abrasive cleaner suitable for
powder coated surfaces.
Remove the cleaner residue and dry with a clean cloth.
DRYER EXTERIOR
The entire dryer has a high-gloss finish. Clean with a soft, damp cloth. Do not use abrasive substances.
Protect the surface from sharp objects as they may scratch or damage the finish. Do not place any heavy
or sharp objects or a detergent box on the dryer. Keep them on the purchased pedestal or in a separate
storage box.
DRYER EXHAUST
SYSTEM
Should be inspected and cleaned yearly to maintain optimum performance.
The outside exhaust hood should be cleaned more frequently to ensure proper operation.
care and ceaning 25
SPECIAL
LAUNDRY
TIPS
Please follow the care label or manufacturer's instructions for drying special
items. If care label instructions are not available, use the following information
a guide,
Bedspreads
& Comforters
•
as
Follow the care label instructions or dry on the Normal cycle and
High temperature.
Make sure the item is thoroughly dry before using or storing.
May require repositioning to ensure even drying.
Blankets
Use Normal cycle and dry only one blanket at a time for best
tumbling action.
Make sure the item is thoroughly dry before using or storing.
Curtains
& Draperies
Use the Perm Press cycle and Low or Extra Low temperature to help
minimize wrinkling.
Dry in small loads for best results and remove as soon as possible.
Cloth Diapers
Use the Normal cycle and the High temperature settings for soft,
fluffy diapers.
Down-filled items (jackets,
sleeping bags, comforters,
etc.)
Use the Normal cycle and the Low or Extra Low temperature setting.
Adding a couple of dry towels shortens drying time and absorbs
moisture.
Foam Rubber (rug backs,
stuffed toys, shoulder pads,
etc.)
DO NOT dry on a heat setting. Use the Air Fluff cycle (no heat).
WARNING - Drying a rubber item with heat may damage it or be a
fire hazard.
Pillows
Use the Normal cycle.
Add a couple of dry towels to help the tumbling action and to fluff the
item.
DO NOT dry kapok or foam pillows in the Dryer.
Use the Air Fluff cycle.
Plastics (shower curtains,
outdoor furniture covers,
etc.)
Use the Air Fluff cycle or the Time Dry cycle and the Low or Extra
Low temperature settings depending on the care label instructions.
THINGS TO AVOID :
Fiberglass items (curtains, draperies, etc.).
Woolens, unless recommended on the label.
Vegetable or cooking oil-soaked items.
26 special aundrytips
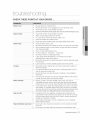
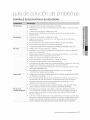
CHECK THESE POINTS iF YOUR DRYER...
Doesn't
run.
o
Be sure the door is latched shut.
o
Be sure the power cord is plugged into a live electrical outlet.
Check the home's circuit breaker and fuses.
o
Doesn't
heat,
o
Press the Start/Pause button again if the door is opened during the cycle.
o
Check the home's circuit breaker and fuses.
o
Select a heat setting other than Air Fluff.
On a gas dryer, check that the gas supply is on.
Clean the lint filter and exhaust duct.
o
o
Doesn't
dry.
o
Dryer may have moved into the cool-down phase of the cycle.
o
Check all of the above, plus...
Be sure the exhaust hood outside the home can open and close freely.
Check exhaust system for lint buildup. Ducting should be inspected
and cleaned annually.
Use a 4" rigid metal exhaust duct.
Do not overload. 1 wash load = 1 dryer load.
Sort heavy items from lightweight items.
o
o
•
Large, bulky items like blankets or comforters may require
repositioning to ensure even drying.
Check that the washer is draining properly to extract adequate water
from the load.
Load may be too small to tumble properly. Add a few towels.
Is noisy.
Check the load for objects such as coins, loose buttons, nails, etc.
Remove promptly.
It is normal to hear the dryer gas valve or heating element cycle on
and off during the drying cycle.
Be sure the Dryer is leveled properly as outlined in the installation
instruction.
It is normal for the Dryer to hum from the high velocity of air moving
through the dryer drum and exhaust system.
Dries unevenly,
Seams, pockets, and other similarly heavy areas may not be
completely dry when the rest of the load has reached the selected
dryness level. This is normal. Select the More Dry setting if desired.
If one heavy item is dried with a lightweight load, such as one towel
with sheets, it is possible that the heavy item will not be completely
dry when the rest of the load has reached the selected dryness level.
Sort heavy items from lightweight items for best drying results.
Has an odor.
Household odors from painting, varnishing, strong cleaners, etc.
may enter the dryer with the surrounding room air. This is normal as
the Dryer draws the air from the room, heats it, pulls it through the
tumbler, and exhausts it outside.
When these odors linger in the air, ventilate the room completely
before using the Dryer.
Shuts off before load is dry
Dryer load is too small. Add more items or a few towels and restart
the cycle.
Dryer load is too large. Remove some items and restart the dryer.
troub eshooting 27
troLAbe hootncj
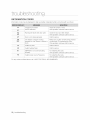
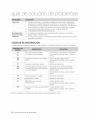
INFORMATION
CODES
Information codes may be displayed to help you better understand what is occurring with your Dryer.
tS
Clogged Lint Screen
Clean the screen or vent.
to
Vent is restricted
If the problem continues call for service.
dO
dE
Running the dryer with door open
Close the door and then restart.
dF
Door is not closing properly
Call for service.
bE2
Unit detects a button is being
oressed for over 30secs or button is
stuck
Make sure a button is NOT being pressed
continuously. Try restarting the cycle.
If the problem continues call for service.
Invalid Dry time
Call for service.
Invalid heating Temp
Call for service.
EEPROM is not communicating
properly
Try restarting the cycle.
Invalid power source Frequency
Try restarting the cycle.
If the problem continues call for service.
hE
If the problem continues call for service.
For any codes not listed above, call 1-800-726-7864
28 troubleshooting
If the problem continues call for service.
(1-800-SAMSUNG)
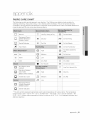
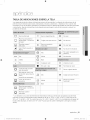
FABRIC CARE CHART
The following symbols provide garment care direction. The Clothing care labels include symbols for
washing, bleaching, drying and ironing, or dry cleaning when necessary. The use of symbols ensures
consistency among garment manufacturers of domestic and imported items. Follow care label directions to
maximize garment life and reduce laundering problems.
Normal
m
Line Dry/Hang to Dry
Permanent Press/
Wrinkle Resistant/
Wrinkle Control
[]
Gentle/Delicates
Drip Dry
Do Not Wash
_
Do Not Wring
Dry Flat
Do Not Bleach
Hand Wash
Do Not Tumble Dry
i@ High
eeo
Hot
Medium
••
Warm
Low
®
Cold
0
Any Heat
®
iron)No
Steam (added to
Do Not Iron
0
Do Not Dry Clean
No Heat/Air
Any Bleach (when
needed)
Only Non-Chlorine
/ocher-safe)
m
Dry Clean
Line Dry/Hang to Dry
High
[]
Drip Dry
Bleach (when needed)
Tumble Dry Cycle
Medium
Dry Flat
Low
Permanent Press/
Wrinkle Resistant/
Wrinkle Control
Gentle/Delicates
** The dot symbols represent appropriate wash water temperatures for various items. The temperature
range for Hot is 105° -125 ° F/41 o_ 52 ° C, for Warm 85 ° - 105° F/29 ° - 41 o C and for Cold 60 ° - 85 °
F/16 ° - 29 ° C. (Wash water temperature must be a minimum of 60 ° F/16 ° C for detergent activation and
effective cleaning.)
append x 29
a,,ppondx
PROTECTING
THE ENVIRONMENT
This appliance is manufactured from recyclable materials. If you decide to dispose of this appliance,
please observe local waste disposal regulations. Cut off the power cord so that the appliance cannot be
connected to a power source. Remove the door so that animals and small children cannot get trapped
inside the appliance.
DECLARATION
OF CONFORMITY
This appliance complies with UL2158.
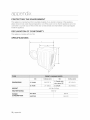
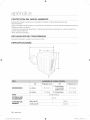
SPECIFICATIONS
A
B
Div
inches (cm)
Div
inches (cm)
C. Depth with
DIMENSIONS
A. Height
B. Width
WEIGHT
38.3"(97.1)
door open 90 °
49" (124.5)
27" (68.6)
D. Depth
30.3"(76.8)
119.01b (54.0kg)
HEATER RATING
5300 W
POWER
NO HEAT
268 W
CONSUMPTION
HEATING
5445 W
30 append x
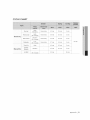
CYCLE CHART
High
(Medium)
Heavy Duty
Sensor Dry
Manual Dry
High
(No change)
Normal dry
42 min
39 min
3 min
Normal dry
58 min
55 min
3 min
Perm Press
Medium
(No change)
Normal dry
32 min
29 min
3 min
Delicates
Low
(No change)
Normal dry
27 min
24 min
3 min
Time Dry
High
40 min
35 min
5 min
Wrinkle
Release
Medium
25 min
20 min
5 min
Air Fluff
(No change)
90 min
20 min
20 min
append x 31
SAMSUNG
DRYER
LiMiTED WARRANTY TO ORiGiNAL PURCHASER
This SAMSUNG brand product, as supplied and distributed by SAMSUNG ELECTRONICS AMERICA, INC.
(SAMSUNG) and delivered new, in the original carton to the original consumer purchaser, is warranted by
SAMSUNG against manufacturing defects in materials and workmanship for a limited warranty period of:
One (1) Year parts & Labor
Two (2) years control board (part)
This limited warranty begins on the original date of purchase, and is valid only on products purchased and
used in the United States.
To receive warranty service, the purchaser must contact SAMSUNG for problem determination and service
procedures.
Warranty service can only be performed by a SAMSUNG authorized service center.
The original dated bill of sale must be presented upon request as proof of purchase to SAMSUNG or
SAMSUNG's authorized service center.
SAMSUNG will provide in-home service during the warranty period at no charge, subject to availability
within the contiguous United States.
In-home service is not available in all areas.
To receive in-home service, product must be unobstructed and accessible to the service agent.
If service is not available, SAMSUNG may elect to provide transportation of the product to and from an
authorized service center.
SAMSUNG will repair, replace, or refund this product at our option and at no charge as stipulated herein,
with new or reconditioned parts or products if found to be defective during the limited warranty period
specified above.
All replaced parts and products become the property of SAMSUNG and must be returned to SAMSUNG.
Replacement parts and products assume the remaining original warranty, or ninety (90) days, whichever is
longer.
This limited warranty covers manufacturing defects in materials and workmanship encountered in normal,
noncommercial use of this product and shall not apply to the following: damage that occurs in shipment;
delivery and installation; applications and uses for which this product was not intended; altered product or
serial numbers; cosmetic damage or exterior finish; accidents, abuse, neglect, fire, water, lightning, or other
acts of nature or God; use of products, equipment, systems, utilities, services, parts, supplies, accessories,
applications, installations, repairs, external wiring or connectors not supplied or authorized by SAMSUNG
that damage this product or result in service problems; incorrect electrical line voltage, fluctuations and
surges; customer adjustments and failure to follow operating instructions, maintenance and environmental
instructions that are covered and prescribed in the instruction book; product removal and reinstallation;
problems caused by pest infestations.
This limited warranty does not cover problems resulting from incorrect electric current, voltage or supply,
light bulbs, house fuses, house wiring, cost of a service call for instructions, or fixing installation errors.
SAMSUNG does not warrant uninterrupted or error-free operation of the product.
32 warranty
EXCEPT AS SET FORTH HEREIN, THERE ARE NO WARRANTIES ON THIS PRODUCT EITHER EXPRESS
OR IMPLIED, AND SAMSUNG DISCLAIMS ALL WARRANTIES INCLUDING, BUT NOT LIMITED TO, ANY
IMPLIED WARRANTIES OF MERCHANTABILITY, INFRINGEMENT OR FITNESS FOR A PARTICULAR
PURPOSE.
NO WARRANTY OR GUARANTEE GIVEN BY ANY PERSON, FIRM, OR CORPORATION WITH RESPECT
TO THIS PRODUCT SHALL BE BINDING ON SAMSUNG.
SAMSUNG SHALL NOT BE LIABLE FOR LOSS OF REVENUE OR PROFITS, FAILURE TO REALIZE
SAVINGS OR OTHER BENEFITS, OR ANY OTHER SPECIAL, INCIDENTAL OR CONSEQUENTIAL
DAMAGES CAUSED BY THE USE, MISUSE, OR INABILITY TO USE THIS PRODUCT, REGARDLESS OF
THE LEGAL THEORY ON WHICH THE CLAIM IS BASED, AND EVEN IF SAMSUNG HAS BEEN ADVISED
OF THE POSSIBILITY OF SUCH DAMAGES.
NOR SHALL RECOVERY OF ANY KIND AGAINST SAMSUNG BE GREATER IN AMOUNT THAN THE
PURCHASE PRICE OF THE PRODUCT SOLD BY SAMSUNG AND CAUSING THE ALLEGED DAMAGE.
WITHOUT LIMITING THE FOREGOING, PURCHASER ASSUMES ALL RISK AND LIABILITY FOR LOSS,
DAMAGE, OR INJURY TO PURCHASER AND PURCHASER'S PROPERTY AND TO OTHERS AND THEIR
PROPERTY ARISING OUT OF THE USE, MISUSE, OR INABILITY TO USE THIS PRODUCT.
THIS LIMITED WARRANTY SHALL NOT EXTEND TO ANYONE OTHER THAN THE ORIGINAL
PURCHASER OF THIS PRODUCT, IS NONTRANSFERABLE AND STATES YOUR EXCLUSIVE REMEDY.
Some states do not allow limitations on how long an implied warranty lasts, or the exclusion or limitation
of incidental or consequential damages, so the above limitations or exclusions may not apply to you. This
warranty gives you specific rights, and you may also have other rights, which vary from state to state.
To obtain warranty service, please contact SAMSUNG at:
SAMSUNG ELECTRONICS AMERICA, INC. - CONSUMER ELECTRONICS
105 Challenger Road Ridgefield Park, NJ 07660=0511
1=800=SAMSU NG(726=7864}
www,sa
CUSTOMER
SERVICE
rGsung,con3
warranty 33
QUESTIONS
OR COMMENTS?
U.S.A
1-800-SAMSUNG(726-7864)
www.samsung.com
MEXICO
01-800-SAMSUNG(726-7864)
www.samsung.com
Code No. DC68-02810A-03_EN
cj s
e eot ca
del usuario
las posibilidades
Gracias
pot adqutnr
este producto
Samsung.
Para recibir un servJcJomas completo,
registre su producto en
www, samsung,com/register
100%
,,
I
Recycled Paper ji
ca ctor t
1. Capacidad
cas
extra grande
iLas capacidades de secado ultra al alcance de la mano! Ahora puede secar cargas extra
grandes. Nuestra secadora ultra grande de 7,3 cu.ft. (13 kg) de capacidad hace circular ma,s
aire entre su ropa, seca,ndola ma,s ra,pido, para obtener un resultado sin arrugas.
2. Diversos
ciclos
de secado
y programa
Fuzzy Logic
Simplemente gire el Jog Dial para seleccionar uno de los 7 ciclos de secado automa,tico,
incluyendo normal y potencia extra, o deje que el Control Fuzzy Logic mida el grado de
humedad y determine automa, ticamente el tiempo de secado. La precision en el secado
nunca fue m_ts sencilla que con Samsung.
3. Ahorro
de tiempo
Los ciclos esta,n disenados pensando en usted. Todas nuestras secadoras esta,n disenadas
para secar su ropa en menos tiempo.., isolo en 42 minutos! Asi le queda tiempo para las
cosas ma,s importantes de la vida.
4. Ahorro
de energia
Las secadoras Samsung son super eficientes en el consumo de energia. Puede secar hasta
3,06 Ib (1,38 kg) de ropa con 1 kWh. Adema,s, tanto la gran capacidad como el control
Fuzzy Logic ahorran energia secando automa, ticamente sus prendas de la manera ma,s
eficiente.
5. Puerta f&cilmente
reversible
Nuestras secadoras se adecuan a casi cualquier lugar. La direccion de la puerta fa,cilmente
reversible puede modificarse con sOlo cuatro tornillos.
6. Base con cajones
de almacenamiento
Hay disponible un pedestal de 15" opcional para elevar la secadora y Iograr asi una carga y
descarga ma,s sencilla.
Tambien ofrece un cajon de almacenamiento incorporado que puede sostener una botella de
detergente de 100 oz.
7. Apilamiento
(MODELO N.°: SK-3A1/XAA,
SK-4A/XAA,
SK-5A/XAA)
Las lavadoras y la secadoras de Samsung pueden apilarse para maximizar el espacio
aprovechable.
Deben retirarse las patas de la secadora para apilar la lavadora y la secadora. Puede
adquirir un kit de apilamiento opcional en su comercio minorista de productos Samsung.
2 caracter sticas
Felicitaciones por la compra de la nueva secadora Samsung. Este manual
contiene informaciOn importante acerca de ia instaiaciOn, ei uso y ei cuidado dei
eiectrodomestico.
Lea detenidamente estas instrucciones a fin de aprovechar al
maximo los mOitipies beneficios y funciones de ia secadora.
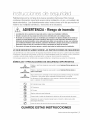
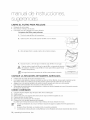
ADVERTENCIA-Riesgode incendio
= La instalacibn de la secadora de ropa debe estar a cargo de un instalador calificado.
= Instale la secadora de ropa seg_n las instrucciones del fabricante y los cbdigos locales.
= No instale una secadora de ropa con materiales para ventilaciOn de pl_stico fle×ible. Si se instala un
conducto de metal fle×ible (tipo I_mina met_lica), debe set de un tipo especlfico identificado por el
fabricante del electrodom_stico como adecuado para utilizar con secadoras de ropa. Los materiales
para ventilaciOn fle×ibles suelen hundirse, aplastarse f_cilmente y atrapar pelusa. Estas condiciones
obstruir_n el flujo de aire de la secadora de ropa y aumentar_n el riesgo de incendio.
= Para reducir el riesgo de lesiones graves o muerte, siga todas las instrucciones de instalaciOn.
LO QUE NECESITA SABER SOBRE LAS INSTRUCCIONES DE SEGURIDAD
Las advertencias y las instrucciones de seguridad importantes de este manual no cubren todas las posibles
condiciones y situaciones que pueden ocurrir. Es su responsabilidad actuar con sentido comun, precaucion
y cuidado cuando instale, realice el mantenimiento o ponga en funcionamiento la secadora.
Comunfquese siempre con el fabricante si surgen problemas o situaciones que usted no comprende.
SiMBOLOS
Y PRECAUCIONES
ADVERTENClA
//_
PRECAUCION
PRECAUCION
DE SEGURIDAD
IMPORTANTES
Peligros o pra.cticas inseguras que pueden causar lesiones fisicas graves o la
muerte.
Peligros o pra.cticas inseguras que pueden causar lesiones fisicas leves o
dafios materiales.
Siga la informacion contenida en este manual para minimizar el riesgo de incendio
o explosion o para evitar da_os materiales, lesiones fisieas o la muerte.
No almacene ni utilice gasolina u otros vapores o Ifquidos inflamables cerca de
este o cualquier otro eleetrodomestieo.
NO intente hacer nada.
NO desarme.
NO toque.
Siga las instrucciones fielmente.
Desenchufe el cable de alimentaci6n electrica del tomacorriente
de pared.
Asegurese de que la ma.quina tenga buena conexion a tierra para evitar
descargas electricas.
Llame al centro de servicio tecnico para obtener asistencia.
GUARDE ESTAS INSTRUCCIONES
instrucciones
de segurdad
3
/_k ADVERTENCIA: Para reducir el riesgo de incendio, descargas electricas o lesiones fisicas
...........cuando use este electrodomestico, siga las instrucciones de seguridad ba,sicas que figuran
a continuacion:
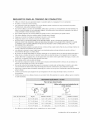
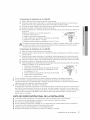
1. Lea todas las instrucciones antes de usar este electrodomestico.
2. No seque prendas que han sido previamente limpiadas, lavadas, remojadas o
salpicadas con gasolina, solventes de limpieza en seco u otras sustancias inflamables o
explosivas, ya que emiten vapores que pueden prenderse fuego o explotar.
3. No permita que los ninos jueguen sobre la lavadora o dentro de ella. Se requiere de
supervision cuando el electrodomestico es utilizado cerca de los ninos.
4. Antes de descartar el electrodomestico
compartimiento de secado.
o de retirarlo de servicio, extraiga la puerta del
5. No introduzca la mano en el electrodomestico
6. No instale o guarde este electrodomestico
si el tambor esta, en movimiento
donde quede expuesto a factores clima,ticos.
7. No modifique los controles.
8. No repare, reemplace ni intente realizar el mantenimiento de cualquier pieza del
electrodomestico salvo que este recomendado especificamente en las instrucciones
de mantenimiento del usuario o en las instrucciones de reparacion para el usuario
publicadas y que, a su juicio, usted tenga la habilidad para Ilevarlas a cabo.
9. No use suavizante para ropa o productos para evitar la esta,tica salvo que el fabricante
del suavizante para ropa o del producto Io recomiende.
10.No aplique calor para secar prendas que contengan goma espuma o materiales
semejantes a la goma con textura similar.
11.Limpie el filtro atrapapelusa antes o despues de cada carga.
12.EI personal tecnico calificado debe efectuar una limpieza periodica del interior del
electrodomestico y del conducto de drenaje.
13.EI personal tecnico calificado debe efectuar una limpieza periodica del interior del
electrodomestico y del conducto de drenaje.
14.No coloque elementos expuestos a aceites de cocina en la secadora. Los elementos
contaminados con aceites de cocina pueden contribuir a que se produzca una reaccion
quimica que ocasione queen la carga de ropa se prenda fuego.
GUARDE ESTAS INSTRUCCIONES
4 instrucciones
de segurdad
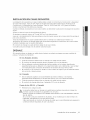
QUI
HACER Sl PERCIBE OLOR A GAS:
•
No intente encender ningun electrodomestico.
No encienda este electrodomestico.
No toque ningun interruptor electrico.
No utilice ningun telefono de su edificio.
Haga que todos los ocupantes se retiren de la habitacion, edificio o a,rea.
,,
Comuniquese inmediatamente con el proveedor de gas desde el telefono de un vecino. Siga
las instrucciones del proveedor de gas.
Si no puede comunicarse con el proveedor de gas, Ilame al departamento de bomberos.
La instalacion y el servicio tecnico debera,n estar a cargo de un instalador calificado, una agencia
de reparaciones o el proveedor de gas.
Lea todas las instrucciones antes de usar el electrodomestico.
Z_
Para reducir el riesgo de incendio o explosion:
ADVERTENClA
•
,,
No seque prendas que hayan sido previamente limpiadas, lavadas, remojadas o
salpicadas con gasolina, solventes de limpieza en seco u otras sustancias inflamables
o explosivas. Emiten vapores que se pueden prender fuego o explotar. No debe
colocarse en la secadora ningun material que haya estado en contacto con un solvente
de limpieza o liquidos o solidos inflamables hasta que se haya eliminado todo vestigio
de tales liquidos o solidos inflamables y sus vapores.
Existen muchos articulos altamente inflamables en los hogares, tales como acetona,
alcohol desnaturalizado, gasolina, kerosene, algunos limpiadores liquidos de uso
domestico, algunos quitamanchas, aguarrs,s, ceras y removedores de cera.
No se deben secar articulos que contengan goma espuma (puede estar catalogada
como espuma de I_ttex)o materiales semejantes a la goma y con textura similar en
la opcion de secado con calor. Los materiales de goma espuma que reciben calor
pueden, en ciertas circunstancias, provocar incendios pot combustion esponta,nea.
No permita que los nihos o las mascotas jueguen sobre el electrodomestico, dentro de el
o frente a el. Se requiere de supervision cuando el electrodomestico es utilizado cerca de
nihos y mascotas.
Antes de desechar la secadora o de retirarla de servicio, quite la puerta del compartimiento
de secado para evitar que los nihos y las mascotas queden atrapados dentro de la
secadora.
Q
No introduzca la mano en el electrodomestico
No instale o guarde este electrodomestico
cuando el tambor este en movimiento.
donde quede expuesto a factores clima,ticos.
No modifique los controles.
No repare, reemplace ni intente realizar el mantenimiento de ninguna pieza del
electrodomestico a menos que se recomiende especificamente en las instrucciones de
reparacion para el usuario y que, a su juicio, usted tenga la habilidad para Ilevarlas a cabo.
No utilice suavizante de ropa o productos para eliminar la esta,tica salvo que el fabricante
del suavizante de ropa o del producto recomiende su uso con la secadora.
Limpie el filtro para pelusas antes o despues de cada carga.
Mantenga el a,rea alrededor de la salida del drenaje y las a,reas circundantes libres de
pelusa, polvo y suciedad.
El personal tecnico calificado debe efectuar una limpieza periodica del interior de la
secadora y del conducto de drenaje.
GUARDE ESTAS INSTRUCCIONES
instrucciones
de segurdad
5
Este electrodomestico debe conectarse a tierra correctamente. Nunca enchufe el cable
de alimentacion a un recepta,culo que no este conectado a tierra correctamente ni guarde
conformidad con los codigos locales y nacionales. Consulte las instrucciones de instalacion
para conectar este electrodomestico a tierra.
No se siente encima de la secadora.
_
ebido alas constantes mejoras a los productos, Samsung se reserva el derecho
de modificar las especificaciones sin previo aviso. Para conocer detalles completos,
consulte las instrucciones de instalacion incluidas con su producto antes de
seleccionar los gabinetes, hacer aberturas o comenzar la instalacion.
/_
Asegurese de que los bolsillos no contengan objetos pequenos, solidos y de forma
...........
_
irregular, material extrano, etc., pot ejemplo: monedas, cuchillos, alfileres, etc. Tales objetos
podrian danar la secadora.
No lave ropa que contenga hebillas grandes, botones u otros objetos de metal pesado o
solido.
Se pueden producir perdidas de gas en su sistema que generen una situacion peligrosa.
Las perdidas de gas pueden no set detectadas unicamente pot el olor.
Los proveedores de gas recomiendan que compre e instale un detector de gas aprobado
pot UL.
Instale y utilice de acuerdo con las instrucciones del fabricante.
No coloque prendas en la secadora que hayan sido salpicadas o remojadas con aceite
vegetal o aceite de cocina. Incluso despues del lavado, estas prendas pueden contener
una cantidad importante de dichos aceites.
El aceite residual en las prendas puede prenderse fuego en forma esponta,nea. La
posibilidad de combustion esponta, nea aumenta cuando las prendas que contienen aceite
vegetal o aceite de cocina son expuestas al calor. Las fuentes de calor, tales como la
secadora, pueden calentar estas prendas y permitir que se produzca la oxidacion del aceite
a modo de reaccion. La oxidacion genera calor. Si dicho calor no tiene forma salir, las
prendas pueden calentarse Io suficiente como para prenderse fuego. Amontonar, apilar o
guardar este tipo de prendas puede impedir que el calor salga y puede generar un peligro
de incendio.
Todas las prendas limpias y sucias que contengan aceite vegetal o aceite de cocina
pueden resultar peligrosas. Lavar dichas prendas en agua caliente con una dosis adicional
de detergente reducira, el peligro, aunque no Io eliminara,. Siempre use el ciclo Cool Down
(Enfriamiento) para estas prendas con el fin de reducir la temperatura. Nunca retire estas
prendas cuando la secadora se encuentre caliente ni interrumpa el ciclo de secado hasta
que las prendas hayan pasado pot el ciclo Cool Down (Enfriamiento). Nunca amontone o
apile estas prendas cuando esten calientes.
GUARDE ESTAS INSTRUCCIONES
6 instrucciones
de segurdad
INSTALACION
MANUAL
DE LA SECADORA
8
8
Herramientas necesarias para la instalaci6n
Consulte Exterior de la secadora
9
10
10
10
11
Requisitos para el tendido de conductos
Importante para el instalador
Consideraciones acerca de la ubicaci6n
Instalaci6n del electrodom6stico en un
gabinete o en un hueco
Instalaci6n en casas rodantes
11
12
13
13
Drenaje
Requisitos en cuanto al gas
Requisitos el6ctricos
Conexi6n a tierra
14
Conexiones el6ctricas
15
15
17
Reemplazo de las piezas y los accesorios
Instalaci6n
Lista de verificaci6n final de la instalaci6n
18
Sugerencias
secadora
19
Inversi6n de la puerta
20
22
23
Descripci6n general del panel de control
Seguro paraniNos
Secado en estante (pieza opcional)
24
24
24
Limpie el filtro para pelusas
Cargue la secadora de manera adecuada
C6mo comenzar
25
25
Panel de control
Tambor
25
25
Tambor acabado con pintura en polvo
Exterior de la secadora
25
Sistema de drenaje de la secadora
PARA PRENDAS
ESPECIALES
26
Sugerencias
DE PROBLEMAS
27
28
Controle estos puntos si su secadora...
C6digos de informaci6n
APENDICE
29
30
30
Tabla de indicaciones sobre la tela
Protecci6n del medio ambiente
Declaraci6n de conformidad
30
31
Especificaciones
Tabla de ciclos
DE INSTRUCCIONES,
SUGERENCIAS
CUIDADO
SUGERENCIAS
GUIA DE SOLUCION
Y LIMPIEZA
acerca del drenaje de la
para prendas especiales
conten do 7
HERRAMIENTAS
NECESARIAS
PARA LA INSTALACION
Contrate a un profesional para instalar la secadora adecuadamente. En caso de que sea necesaria una
visita del servicio tecnico como consecuencia de una mala configuraci0n, ajuste y conexi0n, se considerara,
responsabilidad del instalador. Si usted mismo instala la secadora, usted es el responsable.
Asegurese de tenet todo Io necesario para realizar una instalaci0n adecuada.
1, Se requiere un TOMACORRIENTE CON CONEXION A TIERRA. Consulte la secci0n Requisitos
electricos. Consulte la pa,gina 12.
2, UN CABLE DE ALIMENTACION para las secadoras electricas (excepto en Canada,). Consulte la pa,gina
13.
3, Los CONDUCTOS DE GAS (si se trata de una secadora a gas) deben cumplir con los c0digos locales y
nacionales.
4, El SISTEMA DE DRENAJE debe consistir en un conducto de drenaje de metal rigido o flexible con un
recubrimiento de metal resistente.
Consulte los requisitos para el drenaje en las pa,ginas 8-10.
CONSULTE
EXTERIOR
DE LA SECADORA
EI estante de secado no se suministra con este modelo. El estante de secado es opcional. Lo puede
adquirir en un centro de servicio.
Panel de control
Puerta
Patas ajustables
8 instalacon
de a secadora
REQUISITOS
•
•
PARA EL TENDIDO
DE CONDUCTOS
Utiliceun conducto de acero galvanizadorigidoo de aluminiorigido,de 4 pulgadas(10,2cm)de dia.metro.
No utiliceun conductode menortama_o.
Los conductosde ma.sde 4 pulgadas(10,2cm)de dia.metropuedenocasionaruna mayoracumulaciOnde pelusa.
PeriOdicamente,debe retirarlapelusaacumulada.
Si es preciseutilizarun conducto de metalflexible,utiliceeltipo quevienecon un recubrimientode metalresistente.No
utiliceun conductoflexiblecon un recubrimientodelgado.Se puedeproducirunaobstrucciOnimportantesi se doblael
conductoflexibleen formademasiadomarcada.
Nunca instaleninguntipo de conductoflexibleen paredes,techosu otros espaciosquequedenocultos.
SOlodebenutilizarseconductos metalicosrigidoso flexiblespara el drenaje.
Haga queel conductode drenajese mantengaIo ma.srecto y corto posible.
Asegurelasunionescon cinta paraconductos. No utilicetornillos.
NO HAGAQUELA SEOADORADRENEHAOIANINGUNAPARED,TEOHO,SOTANODE PEQUENAALTURA0
ESPAOIOOOULTODEUN EDIFIOIO,LiNEADE DESOARGADE GASES0 CUALQUIEROTROOONDUOTOOOMUN
00HIMENEA. ESTOPODRiAGENERARUN PELIGRODE INOENDIOOOMOOONSEOUENOIA
DE LA PELUSA
EXPULSADAPORLA SEOADORA.
Un conductoflexiblede pla.sticose puedeenroscar,combar,pinchar,puedereducirelflujo de aire,prolongarel tiempo de
secadoy afectarelfuncionamientode lasecadora.
Los sistemasde drenajede mayorIongitudquela recomendadapuedenprolongareltiempo de secado,afectarel
funcionamientodelequipo y acumularpelusa.
El conducto de drenajedebe finalizaren unatapa de drenajecon un reguladorde tiro que girehacia afuerapara evitarel
reflujode airey elingresode insectoso plantas.Nuncautiliceunatapa de drenajecon un reguladorde tiro magnetico.
La tapa debe tener12 pulgadas(30,5cm)de espaciolibre come minimoentrelaparteinferiorde latapa y elsuelo u otra
obstrucciOn.Laaberturade latapa debe apuntarhacia abajo.
Nunca instaleun filtro sobre lasalidadel drenaje.
Para evitarla acumulaciOnde pelusa,no permitaque lasecadoradrenedirectamenteen el huecode unaventana.No
permitaque drenedebajo de lacasa o de unagaleria.
Si lared de conductosdel drenajedebe pasarper un a.reaqueno recibecalor,se debe aislarel conductoy se Iodebe
colocar levementeen declivehacia latapa de drenajepara reducirla condensaciOny laacumulaciOnde pelusa.
Inspeccioney limpieelinteriordel sistemade drenajepor Io menosunavez por ano. Desenchufeel cable de alimentaciOn
antesde limpiar.
Oontrolecon frecuenciapara asegurarsede que el reguladorde tiro de latapa de drenajese abray se cierresin
inconvenientes.
Oontroleunavez por ruesy limpieal menosunavezal a_o. Nota: Si lasprendasno se secan,verifiquequelos conductos
no estenobstruidos.
iiiiiiiiiiiiiiiiiiiiiiiiiiiiiiiiiiiiiiiiiiiiiiiiiiiiiiiiiiiiiiiiiiiiiiiiiiiiiiiiiiiiiiiiiiiiiiiiiiiiiiiiiiiiiiiiiiiiiiiiiiiii_!!_
Tipo
de tapa impermeable
S61o para una instalaci6n de
coPto
4" (10,16 cm)
cant. de Codosde 90°
i
*
a_cance
2,5" (6,35 cm)
Rigido
Met_liOo fiexible*,
Rigido
Metalioo flexible*
24,4 m (80 pies)
12,4 m (41 pies)
22,6 m (74 pies)
10,1 m (33 pies)
20,7 m (68 pies)
11,2 m (37 pies)
18,9 m (62 pies)
8,8 m (29 pies)
17,4 m (57 pies)
10,1 m (33 pies)
15,5 m (51 pies)
7,6 m (25 pies)
14,3 m (47 pies)
9 m (29 pies)
12,5 m (41 pies)
6,5 m (21 pies)
No utilice un conducto flexible de un material que no sea el metal.
instaaciOn de la secadora 9
Si la nueva secadora se instala dentro
debe asegurarse de que:
•
de un sistema
de drenaje
existente,
el sistema de drenaje cumpla con todos los c0digos locales, estaduales y nacionales;
no se utilice un conducto flexible de pB,stico;
se controle y limpie toda la pelusa acumulada del interior del conducto existente;
el conducto no este enroscado o aplastado;
el regulador de tiro de la tapa de drenaje se abra y se cierre sin inconvenientes.
La presi0n esta,tica de cualquier sistema de drenaje no debe superar las 0,83 pulgadas de la
columna de agua ni set inferior a 0.
Esto se puede medir cuando la secadora esta,en funcionamiento con un man0metro en el punto
donde el conducto de drenaje se conecta a la secadora. Se debe utilizar la opci0n sin calor. Se
debe vaciar el tambor de la secadora y se debe limpiar el filtro para pelusas.
IMPORTANTE
PARA EL INSTALADOR
Lea las siguientes instrucciones con detenimiento antes de instalar la secadora. Estas instrucciones se
deben conservar para consultas futuras.
/_
RETIRE LA PUERTA DE TODOS LOS ELECTRODOMESTICOS DESECHADOS PARA EVlTAR EL
.....
"_'_,EN
,APELIGRO DE QUE UN NINO SE ASFIXIE.
CONSIDERACIONES
ACERCA
DE LA UBICACi0N
La secadora debe estar ubicada donde haya suficiente espacio adelante para cargarla y suficiente espacio
atra,s para el sistema de drenaje. Esta secadora viene preparada de D,brica para el drenaje posterior.
Para que drene pot la parte inferior o hacia la izquierda, utilice el kit de drenaje accesorio. El kit viene
acompanado de instrucciones. Es importante asegurarse de que en la habitaci6n circule suficiente aire
fresco. La secadora debe estar ubicada donde el aire pueda fluir sin inconvenientes.
Para las secadoras a gas, se debe mantener el espacio libre suficiente tal como figura en la placa de
informaci6n para garantizar que haya aire suficiente para la combusti6n y el funcionamiento adecuado de la
secadora.
NO SE DEBE INSTALAR O GUARDAR LA SECADORA EN UN AREA DONDE QUEDE EXPUESTA AL
AGUA Y/O A LOS FACTORES CLIMATICOS. EL AREA DE LA SECADORA DEBE MANTENERSE LIBRE
DE MATERIALES COMBUSTIBLES, GASOLINA Y OTROS VAPORES Y LiQUIDOS INFLAMABLES.
UNA SECADORA PRODUCE PELUSA COMBUSTIBLE. NO DEBE HABER PELUSAS EN EL AREA
CIRCUNDANTE DE LA SECADORA.
INSTALACION
UN HUECO
DEL ELECTRODOMI_STICO
EN UN GABINETE
O EN
/'_
La secadora debe tenet un drenaje con salida hacia el exterior para reducir el riesgo de incendio
.....
"--_,EN
,Acuando se instala en un gabinete o en un hueco.
No se debe instalar ningun otto electrodomestico
secadora.
que queme combustible en el mismo gabinete de la
ADVERTENCIA: Para reducir el riesgo de incendio, esta secadora DEBE TENER UN DRENAJE CON
SALIDA HACIA EL EXTERIOR.
Consulte la secci6n INFORMACI©N ACERCA DEL DRENAJE.
Los espacios libres minimos entre la secadora y las paredes adyacentes u otras superficies deben tenet
las siguientes dimensiones:
2" (5,08 cm) en el frente, 17" (43,18 cm) en la parte superior, 1" (2,54 cm) a ambos lados y 2,375" (12,7
cm) en la parte posterior.
El frente del gabinete debe contar con dos aberturas sin obstrucciones para que ingrese el aire, para
1O...p_4_i@re_@JSI
8e_@
minima de 72 pulg 2 (183 cm2), con 3" (7,62 cm) de abertura minima
en la parte superior y en la parte inferior. Se acepta una puerta tipo persiana con un espacio libre
equivalente.
INSTALACi0N
EN CASAS RODANTES
La instalacion de la secadora en casas rodantes debe cumplir con la Norma de Construccion y Seguridad
de Casas Fabricadas, Titulo 24 CFR, Parte 32-80 [denominada anteriormente Norma Federal para la
Construccion y la Seguridad de Casas Rodantes, Titulo 24, HUD (Parte 280), 1975] (para los Estados
Unidos) o las Normas CSA Z240 (para Canada,).
Cuando se instala una secadora en una casa rodante, se debe tenet la precaucion de asegurar la secadora
al piso.
Ubique un a,rea en la que circule suficiente aire fresco.
Se requiere un espacio minimo de 72 pulg 2 (465 cm _)sin obstrucciones.
Llame al 1-800-SAMSUNG(726-7864)para obtener ma,s informacion acerca de la compra del kit de anclaje al
piso como accesorio.
Todas las instalaciones en casas rodantes deben tenet un drenaje con salida hacia el exterior y la
terminacion del conducto de drenaje debe estar firmemente asegurada a la estructura de la casa rodante
mediante materiales que no resulten inflamables.
El conducto de drenaje no puede terminar debajo de la casa rodante.
Consulte la seccion Drenaje a fin de obtener ma,s informacion.
DRENAJE
Si la secadora tiene un drenaje con salida hacia el exterior se evitara, que ingrese una gran cantidad de
pelusa y humedad a la habitacion.
En los Estados
•
Unidos:
Todas las secadoras deben tenet un drenaje con salida hacia el exterior.
El conducto de drenaje requerido tiene 4 pulgadas (102 mm) de dia,metro.
S01ose utilizara,n conductos flexibles tipo D,mina meta,lica, si los hubiera, identificados
especificamente para su utilizacion con el electrodomestico pot el fabricante y que cumplan
con el Esquema para conductos de transicion de secadora de ropa, Tema 2158A.
El conducto no se montara, con tornillos u otros medios de sujecion que se extiendan dentro
del conducto y atrapen pelusa.
En Canada.:
S01ose utilizara,n aquellos conductos flexibles tipo D,mina meta,lica, si los hubiera,
especificamente identificados pot el fabricante para su uso con el electrodomestico.
Todas las secadoras deben tenet un drenaje con salida hacia el exterior.
El conducto de drenaje debe tenet 4 pulgadas (102 mm) de dia,metro.
Fuera de los EE.UU. y Canada.:
Remitase a los codigos locales.
/_
La secadora debe tenet un drenaje con salida hacia el exterior para reducir el riesgo de
.....
"'_T_,
,Aincendio cuando se instala en un gabinete o en un hueco.
NUNCA UTILICE UN CONDUCTO FLEXIBLE DE PLASTICO O DE UN MATERIAL QUE NO
SEA EL METAL.
Si su red de conductos existente es de pD,stico, de un material que no sea el metal o es
inflamable, reempD,cela pot una que sea de metal.
Utilice unicamente un conducto de drenaje de metal que no sea inflamable para asegurar la
contencion del aire expulsado, el calor y la pelusa.
instaacion
de a secadora 11
/
REQUISITOS
EN CUANTO AL GAS
Utilice unicamente gas natural o gas LP (gas licuado de propano).
LA INSTALACION DEBE REALIZARSE EN CONFORMIDAD CON LOS CODIGOS LOCALES, O
EN AUSENCIA DE ELLOS, CON EL CODIGO NACIONAL PARA GAS Y COMBUSTIBLES ANSI/
Z223.1, LA REVISION M/_S RECIENTE (PARA LOS ESTADOS UNIDOS), O CON LOS CODIGOS DE
INSTALACION CAN/CGA-B149 (PARA CANADA).
Las secadoras a gas esta,n equipadas con un orificio para el quemador de modo que puedan set utilizadas
con gas natural. Si tiene pensado utilizar su secadora con gas LP (gas licuado de propano), deber_t
efectuarse la conversion para Iograr un funcionamiento adecuado y seguro, dicha tarea debera, estar a
cargo de un tecnico calificado.
Se recomienda usar un conducto de suministro de gas de 1/2" (1,27 cm) y el mismo debe reducirse
para la conexion con el conducto de gas de 3/8" (1 cm) de su secadora. El Codigo Nacional para Gas y
Combustibles exige que se instale una va,lvula manual de cierre del gas, aprobada y de fa,cil acceso, dentro
de los 6' de distancia de la secadora.
Las secadoras
cm) del piso.
a gas instaladas en garajes residenciales
deben estar elevadas a 18 pulgadas
(46
Adema,s, se debe instalar una conexion roscada macho N.RT. (rosca nacional para tubos) de 1/8" (0,3 cm),
accesible para la conexion del medidor de prueba, inmediatamente contra corriente de la conexion del
suministro de gas de la secadora.
Su secadora debe estar desconectada del sistema de suministro de gas durante las pruebas de presion del
sistema.
NO vuelva a utilizar el viejo conducto de gas de metal flexible. El diseno del conducto de gas flexible debe
estar certificado pot la Asociacion Americana del Gas (CGA en Canada,).
Todo compuesto de union de tuberias utilizado debe set resistente a la accion del gas licuado de
petroleo.
A modo de cortesia, la mayoria de las empresas locales de gas inspeccionara, n la instalacion del
artefacto a gas.
ENCENDIDO
DEL GAS: la secadora utiliza un sistema de encendido autom_ttico para encender el
quemador.
No existe un piloto que permanezca constantemente encendido.
Instrucciones
de instalacion
de la comunidad
de Massachusetts
La instalacion de la secadora debera, estar a cargo de un plomero o un gasista matriculado.
Se deber_t instalar una v_tlvula de gas manual con una manija en forma de "T" en el conducto
de suministro de gas de la secadora. Si se utiliza un conector de gas flexible para instalar la
secadora, el conector debe tenet una Iongitud m_txima de 3' (36").
ADVEBTENC_A
Se pueden producir perdidas de gas en su sistema que ocasionen una situacion
peligrosa.
Las perdidas de gas pueden no set detectadas unicamente pot el clot.
Los proveedores de gas recomiendan que compre e instale un detector de gas
aprobado pot UL.
Instale y use de acuerdo con las instrucciones del fabricante.
12 instalacOn de a secadora
REQUISITOS
ELI CTRICOS
El diagrama del cableado se encuentra en la parte posterior de la secadora.
ADVERTENCIA
La conexion inadecuada del conductor de conexion a tierra del equipo puede generar una
descarga electrica.
Consulte a un electricista o tecnico calificado si le surgen dudas acerca de si la conexion a tierra
de su secadora es correcta. No modifique el enchufe provisto con la secadora; si no entra en el
tomacorriente, solicite a un electricista calificado que instale el tomacorriente adecuado.
Para evitar el riesgo innecesario de incendio, descarga electrica o lesiones fisicas, todo el cableado
y la conexion a tierra deben realizarse en conformidad con los codigos locales, o en ausencia
de ellos, con el Codigo Electrico Nacional, ANSI/NFPA Nro. 70, la revision ma,s reciente (para los
EE.UU.) o el Codigo Electrico Canadiense CSA C22.1, las revisiones ma,s recientes y los codigos
y ordenanzas locales. Es su responsabilidad proveer los servicios electricos adecuados para su
secadora.
Todas las instalaciones de gas deber_tn realizarse en conformidad con el Codigo Nacional para
Combustibles ANSI/Z2231, su ultima revision (para los EE.UU.) o con los Codigos de Instalacion
CAN/CGA - B149, su ultima revision (para Canada,) y los codigos y ordenanzas locales.
CONEXION
A TIERRA
Esta secadora debe conectarse a tierra. En caso de que el electrodomestico funcione mal o se
descomponga, la conexion a tierra reducira, el riesgo de descarga electrica al ofrecer una via de menor
resistencia a la corriente electrica.
Modelos
a gas
Su secadora tiene un cable con un conductor de conexion a tierra del equipo y un enchufe de
conexion a tierra.
El enchufe debe conectarse a un tomacorriente adecuado que este correctamente instalado y
conectado a tierra en conformidad con todos los codigos y ordenanzas locales.
No modifique el enchufe provisto con la secadora; si no entra en el tomacorriente, solicite a un
electricista calificado que instale el tomacorriente adecuado.
NUNCA CONECTE UN CABLE A TIERRA A TUBER[AS DE PLOMER[A, TUBER[AS DE GAS O
CANER[AS DE AGUA CALIENTE DE PLASTICO.
Modelos
electricos
La secadora tiene un cable con un conductor de conexion a tierra del equipo y un enchufe de
conexion a tierra, de venta pot separado.
El enchufe debe conectarse a un tomacorriente adecuado que este correctamente instalado y
conectado a tierra en conformidad con todos los codigos y ordenanzas locales.
Si no se utiliza un cable de alimentacion y la secadora electrica debe estar permanentemente
cableada, se la debe conectar a un sistema de cableado de metal con conexion a tierra, o se
debe conectar un conductor con conexion a tierra del equipo a los conductores del circuito y a
la terminal con conexion a tierra del equipo.
instaacion
de a secadora 13
/
CONEXIONES
ELC:CTRICAS
Antes de poner al electrodomestico en funcionamiento o realizar pruebas, siga las instrucciones de
conexion a tierra de la seccion Conexion a tierra.
Se recomienda que se destine un circuito derivado individual (o separado) sOlo para la secadora. NO
UTILICE UN CABLE PROLONGADOR.
Modelos
a gas - EE,UU, y Canada
Se requiere un servicio electrico aprobado de CA de 120 voltios, 60 Hz, con un fusible o
disyuntor de 15 A.
Modelos
electricos
- $61o EE,UU,
La mayor parte de las secadoras estadounidenses requieren un servicio electrico aprobado de
CA de 120/240 voltios, 60 Hz. Algunas requieren un servicio electrico aprobado de 120/208
voltios, 60 Hz. Los requisitos del servicio electrico pueden encontrarse en la etiqueta con
informacion ubicada detra,s de la puerta. Se requiere un fusible o disyuntor de 30 A a ambos
lados del conducto.
•
Si se utiliza un cable de alimentacion, el cable debe enchufarse a un tomacorriente de 30 A.
NO se provee el cable de alimentacion con los modelos electricos de secadoras
estadounidenses.
IM PORTANTE:
Si Io permiten los codigos locales, el suministro electrico de la secadora puede estar conectado
pot medio de un nuevo kit de cable de alimentacion electrica, rotulado para que se Io utilice con
la secadora, es decir que cuente con certificacion U.L. y categorizado en un minimo de 120/240
voltios, 30 amperes con tres conductores de cobre Nro. 10 que finalicen en terminales de bucle
cerrado, pernos de pala de tipo abierto con extremos rebatidos o con conductores de estano.
1. Tamano de los conductores y el tipo de cable.
2. Dispositivo de alivio de tension con certificacion UL de 3/4" (1,9 cm)
No vuelva a utilizar un cable de alimentacion electrica de una secadora vieja. El cable de
alimentacion electrica debe conservarse en el gabinete de la secadora con un dispositivo de
alivio de tension con certificacion UL adecuado.
La conexion a tierra a traves del conductor neutro esta, prohibida para (1) instalaciones
nuevas con circuito derivado, (2) casas rodantes, (3) vehiculos recreativos y (4) a,reas en las
que los codigos locales prohiban la conexion a tierra a traves de un conductor neutro. (Utilice
un enchufe de 4 pines para el tomacorriente de 4 ranuras, tipo NEMA 14-30%.
Modelos
electricos
- $61o Canada
Se requiere un servicio electrico aprobado de CA de 120/240 voltios, 60 Hz, equipado con
un fusible o disyuntor de 30 A a ambos lados del conducto.
Todos los modelos canadienses se envian con el cable de alimentacion adjunto. El cable de
alimentacion debe conectarse a un tomacorriente de 30 A.
_En
Canada,
no
esta, permitido convertir una secadora
14 instalacOn de a secadora
a
208 voltios.
REEMPLAZO
DE LAS PIEZAS Y LOS ACCESORIOS
Si es preciso reemplazar piezas o accesorios de la secadora, comuniquese con el distribuidor al que le
compro la secadora o con el centro de atencion al cliente de SAMSUNG al 1-800-SAMSUNG(726-7864).
INSTALACi0N
Re0na las herramientas y piezas necesarias antes de comenzar la instalaoion.
Lea y siga las instrucciones provistas con cualquier herramienta enumerada aqui.
Herramientas
y piezas
Pinzas
Llave inglesa para
tuberias (s61o de gas}
CQter
Nivel
Destornillador
Para realizar una instalaci6n
adecuada,
Phillips
Llave de tuercas
Cinta para conductos
recomendamos
contratar
Llave inglesa
a un profesional.
Para instalar:
1.
Mueva la secadora al lugar adecuado para la instalacion. Considere instalar la secadora y la lavadora
lado a lado. Esto permitira, el acceso a las conexiones de gas, electricas y de drenaje.
Coloque dos de las protecciones superiores de carton en el piso. Incline la secadora hacia uno de los
laterales, de modo tal que quede atravesando ambas protecciones.
2. Vuelva a colocar la secadora en posicion vertical.
3.
La secadora debe estar nivelada para garantizar un secado optimo. Para minimizar las vibraciones, los
ruidos y los movimientos indeseados, el suelo debe set una superficie solida perfectamente nivelada.
Para colocar la secadora a la misma altura que la lavadora, retraiga
completamente las patas niveladoras gira,ndolas en sentido contrario
alas agujas del reloj, luego afloje las patas gira,ndolas en sentido de
las agujas del reloj.
Nivel
I
Retraer
completamente
i
_
Luegoaflojar
juste las patas niveladoras s01oIo necesario para nivelar la
secadora. Extender las patas niveladoras ma,s de Io necesario puede
hacer que la secadora vibre.
Patas niveladoras
instaacion
de a secadora 15
4, Consulte la seccion Drenaje antes de instalar el sistema de drenaje. Instale la red de conductos desde
la secadora hasta la tapa de drenaje. El extremo con reborde de las secciones del conducto deben
apuntar hacia afuera de la secadora.
NO utilice tornillos con recubrimiento de metal cuando realice el montaje de los conductos. Se les debe
colocar cinta a las uniones.
Nunca utilJce material de pl&stico flexible para el drenaje.
Sugerencia para que las instalaciones queden bien ajustadas: conecte una seccion del sistema de
drenaje a la secadora antes de colocarla en su lugar.
Utilice cinta para conductos para asegurar esta seccion a la secadora, pero no cubra las aberturas del
gabinete de la secadora.
5. Consulte la seccion Requisitos electricos.
ANTES DE PONER EL ELECTRODOMt2STICO EN FUNCIONAMIENTO O REALIZAR PRUEBAS, siga
las instrucciones de conexion a tierra de la seccion Conexion a tierra.
MODELOS
ESTADOUNIDENSES:
IMPORTANTE: Todos los modelos estadounidenses fueron fabricados para una CONEXlON
DE SlSTEMAS DE 3 CABLES.
El armazon de la secadora esta, conectado a tierra al conductor neutro del bloque de terminales.
Se requiere una CONEXlON DE SlSTEMAS DE 4 CABLES para las construcciones nuevas
o remodeladas, las casas rodantes o si los codigos locales no permiten la conexion a tierra a
traves del conductor neutro. Si se utiliza un sistema de 4 cables, el armazon de la secadora
no puede set conectado a tierra al conductor neutro del bloque de terminales. Remitase alas
siguientes instrucciones para las CONEXIONES DE SISTEMAS DE 3 Y 4 CABLES.
Retire la tapa del bloque de terminales.
Inserte el cable de alimentacion con un dispositivo de alivio de tension con certificacion UL a traves del
orificio provisto en el gabinete cerca del bloque de terminales.
Se debe utilizar un dispositivo de alivio de tension.
6_
No afloje las tuercas ya instaladas en el bloque de terminales. Asegurese de que esten ajustadas.
Utilice un tomacorriente para huecos profundos de 3/8" (1 cm).
Consulte la seccion Requisitos en cuanto al gas.
Retire la cubierta protectora de la rosca para tubos.
Aplique compuesto de union de tuberias o 1 1/2 vueltas aproximadamente de cinta de teflon en todas
las conexiones roscadas.
El compuesto de union de tuberias utilizado debe set resistente a la accion del gas licuado de
petroleo.
Conecte el suministro de gas a la secadora.
Se requiere un accesorio adicional para conectar el extremo de la rosca hembra de 3/4" (1,9 cm) de un
conector flexible al extremo de la rosca macho de 3/8" (1 cm) de la secadora.
Ajuste firmemente el accesorio de la tuberia de gas sobre las roscas.
Abra el suministro de gas. Controle todas las conexiones de gas para detectar si presentan perdidas
usando una solucion jabonosa.
Si aparecen burbujas, ajuste las conexiones y vuelva a controlar.
NO use la llama abierta para verificar si hay perdidas de gas.
16 instalacOn de a secadora
Conexiones
de sistemas
de 3 CABLES
1. Afloje o retire el tornillo central del bloque de terminales.
2. Conecte el cable neutro (cable blanco o central) del cable de alimentaci6n a la terminal de
tornillo central de color plateado del bloque de terminales. Ajuste el tornillo.
3. Conecte los dema,s cables a los tornillos extemos del bloque de terminales. Ajuste los tomillos.
4o Ajuste los tornillos con dispositivo de alivio de tensi6n.
5. Inserte la lengOeta de la cubierta del bloque de terminales en la ranura del panel posterior de
la secadora.
Asegure la cubierta con un tornillo de sujecion.
1. Conector a tierra externo
2. Cable a tierra neutro (verde/amarillo)
3. Tornillo central de color plateado del bloque de terminales
4. Cable neutro (cable blanco o central)
5. Dispositivode aliviode tensi6ncon cer_ificaci6n
ULde 3/4" (1,9cm)
realizadelaconexi6n
conversi6n
del sistema
electrico
de 4 cables
a 3 cables,
volvera a
conectar
Ao&Si ,Alacinta
a tierra
al soporte
del bloque
de terminales
paradebe
conectar
tierra
el
armazon de la secadora al conductor neutro.
Conexiones
de sistemas
de 4 CABLES
1. Retire el tornillo central del bloque de terminales.
2. Conecte el cable a tierra (verde o sin cubierta) del cable de alimentaci6n al tornillo conductor
a tierra externo.
3. Conecte el cable neutro (cable blanco o central) del cable de alimentaci6n y el cable a tierra del
electrodomestico (verde con franjas amarillas) debajo del tomillo central del bloque de terminales.
4. Conecte los dema,s cables a los tornillos extemos del bloque de terminales. Ajuste los tomillos.
5. Ajuste los tornillos con dispositivo de alivio de tensi6n.
6. InsertelalengOetade la cubiertadel bloque de terminalesen laranura del panel posterior de lasecadora.
Asegure la cubierta con un tornillo de sujecion.
4
1. Conector a tierra externo
2. Cable verde o de cobre desnudo del cable de alimentaci6n
3. Dispositivo de alivio de tension con certificacion UL de
3/4 pulgadas (1,9 cm)
4. Tomillo central de color plateado del bloque de terminales
6
5. Cable a tierra (verde/amarillo)
6. Cable neutro (cable blanco o central)
7.
Con un nivelador, controle la secadora y haga los ajustes necesarios alas patas niveladoras.
8. En ese momento, asegurese de que todas las conexiones de gas (en los modelos a gas), y las
conexiones electricas y del drenaje esten completas. Enchufe la secadora y controle el funcionamiento
utilizando la lista de verificaci6n que figura ma,s abajo.
9.
(SOLO MODELOS A GAS: DV210AG*, DV220AG*)
Es posible que al principio el quemador no se encienda debido a la presencia de aire en el conducto de
gas. Permitir que la secadora funcione con la opci6n de calor purgara, el conducto. Si en el lapso de 5
minutos el gas no se enciende, apague la secadora y espere 5 minutos. Asegurese de que el suministro
de gas hacia su secadora este abierto. Para confirmar que el gas esta, encendido, controle que se
sienta calor en el drenaje.
LiSTA DE VERIFICACi0N
[]
[]
[]
[]
[]
[]
[]
FINAL DE LA INSTALACi0N
La secadora esta,enchufada a un tomacorriente y esta, conectada a tierra correctamente.
Los conductos de drenaje esta,n conectados y se ha colocado cinta alas uniones.
No se us6 un conducto flexible de pD,stico.
Se us6 material de metal rigido o flexible con un recubrimiento de metal resistente para la ventilaci6n.
La secadora esta, nivelada y apoyada firmemente sobre el piso.
Modelos a gas: el gas esta, abierto y no hay perdidas de gas.
Encienda la secadora para confirmar que funciona, calienta y se apaga.
instaaci6n
de a secadora 17
SUGERENCIAS
ACERCA
DEL DRENAJE
DE LA SECADORA
Un conducto flexible de pla,stico o de un material que no sea el metal presenta un potencial
...........riesgo de incendio.
1. Asegurese de que su secadora este instalada correctamente
para que extraiga el aire fa,cilmente.
2.
Utilice un conducto de metal rigido, de 4" Coloque cinta en
todas las uniones, incluso en la secadora.
Nunca use tornillos que atrapen pelusa.
3.
Mantenga los conductos Io ma,s recto posible.
4.
Limpie todos los viejos conductos antes de instalar la nueva
secadora.
Asegurese de que la ventilaci6n se abra y se cierre sin
inconvenientes.
Inspeccione y limpie el sistema de drenaje todos los aries.
No permita
que un sistema
de drenaje
defectuoso
[
demore
el secado:
1. restringiendo a la secadora con un sistema de
drenaje defectuoso.
2. utilizando un conducto flexible de pla,stico, con un
recubrimiento delgado o de un material que no es el
metal.
3. utilizando conductos innecesariamente largos que
tienen muchos codos.
4.
Usando conductos y ventilaciones aplastados u
obstruidos.
18 instalacOn de a secadora
3
4
INVERSION
DE LA PUERTA
1.
Desconecte el cable de
alimentaciOn.
2. Retire los dos tornillos de
la bisagra de la puerta.
3.
Levante la puerta y
retirela.
8. Vuelva a colocar los
tornillos negros en los
otros orificios.
/:i
'¢
/
/J
/
4.
Retire un tornillo del frente
delantero.
9. Vuelva a colocar el tornillo
(paso 4) en el marco
delantero.
Retire los dos tornillos
del lado opuesto de la
bisagra de la puerta.
10. Coloque la puerta sobre
el lado contrario y vuelva
a fijar a la secadora.
6.
Retire los dos tornillos de
la placa de apoyo.
11. Vuelva a conectar la placa
de apoyo.
7.
Retire un tornillo negro de
la bisagra de la puerta.
12. Vuelva a colocar los
tornillos en los orificios
restantes.
5.
instaacion
de a secadora 19
ua do 'nstFuoo'ones,
c:Acjerencac
I
DESCRIPCi0N
/
GENERAL
sensor
@
Man.al
"_Dry
___ Adjus
, Mo_eDry
•
Normal Dry
OHigh
O 40rain.
O Medium
I
__
_
30 rnin.
Time Dry
•
Wrinkle
o Release
/
O Damp Dry
•
Extra Low
i • Air Fluff
Perm Press •
Deiicates
[_
Dry _
Normal
Heavy Duty
DEL PANEL DE CONTROL
® "\\
\
_ .....
f
@
©
@ @@®
@
©
®@®
Para seleccionar un ciclo, gire el disco Selector de ciclos hasta Ilegar al ciclo
deseado.
La luz del indicador junto al nombre del ciclo se iluminar& Los ciclos Normal
(Normal), Heavy Duty (Potencia extra), Perm Press (Plancha permanente) y
Delicates (Prendas delicadas) son ciclos Sensor Dry (Secado con sensor).
La opci0n Sensor Dry (Secado con sensor) detecta automa, ticamente la
humedad en la carga y apaga la secadora cuando alcanza el nivel de secado
seleccionado (more dry (ma,s seco) a damp dry (centrifugado parcial)).
Normal (Normal): utilice este ciclo para secar cargastales como algod0n,
ropa interior y lino.
Heavy Duty (Potencia extra): use este ciclo para obtener ma,s calor para las
telas resistentes, tales como los jeans, el corderoy y la ropa de trabajo.
Perm Press (Plancha permanente): seca automa,ticamente prendas de
algod0n sin arrugas, telas sinteticas, tejidos y telas que requieren planchado
permanente. El ciclo minimiza la formaci0n de arrugas al ofrecer un periodo
de enfriamiento sin calor ma,s prologando al final del ciclo.
Delicates (Prendas delicadas): este ciclo fue disenado para secar prendas
iiiiiiiiiiiiiiiiiiiiiiiiiiiiiiiiiiiiiiiiiiiiiiiiiiiiiiiiiiiiiiiiiiiiiiiiiiiiiiiiiiiiiiiiiiiiiiiiiiiiiiiiiiiiiiiiiiiiiiiiiiiiiiiiiiiiiiiiiiiiiiiiii
sensibles al calor a baja temperatura de secado.
__________________________________________________________________________________________________________________________________________________
Time Dry(Secadocon
temporizador): esteciclo le perrniteseleccionarel
tiempodelciclodeseadoenminutos.
Gireel disco SelectordeciclosaTime
Dry(Secado con temporizador), a
continuaci6n, presionelaflechahaciaarribadeAdjustTime(Ajustartiempo)
paradeterminareltiempodesecado.
Presionelaflecharepetidamenteparadesplazarseporlasopcionesde
tiempo.
WrinkleRelease(Quitararrugas):estecicloeliminaralasarrugasde
prendasqueestan
limpias, secasysolo levementearrugadas, talescomo
prendasqueextrajodeunarmariolleno,
unamaletaoprendasquehan
estado en la secadorademasiado tiempo despues de lafinalizacion del
ciclo. ElcicloWrinkleRelease(Quitararrugas)
sepuedeusarconcualquier
temperatura.
Air Fluff(Secadoatemperaturaambiente):
aire a temperatura ambiente.
20 operatng
Instructions, tps
esteciclo secalacargacon
Se puede agregar o restar tiempo a los tiempos configurados
automa,ticamente en los ciclos de Manual Dry (Secado manual) (ciclos Time
Dry (Secado con temporizador), Wrinkle Release (Quitar arrugas) o Air Fluff
(Secado a temperatura ambiente)).
Para agregar o restar tiempo al ciclo, presione la tecla Adjust Time (Ajustar
tiempo) con la flecha hacia arriba o hacia abajo hasta que aparezca el tiempo
deseado.
i_re
_
i_
_
90 minutos de secado intermitente con aire fresco al final de ciclo para
reducir la formaci0n de arrugas. Presione el bot0n Wrinkle Prevent
(Prevenci0n de arrugas) para activar dicha funci0n.
La luz del indicador arriba de la tecla se iluminar_t cuando se seleccione
Wrinkle Prevent (Prevenci0n de arrugas). La carga esterseca y puede set
retirada en cualquier momento durante el ciclo Wrinkle Prevent (Prevenci0n
de arrugas).
Ea pantalla digital muestra el tiempo restante del ciclo calculado despues de
presionar el bot0n Start/Pause (Inicio/Pausa). El tiempo restante calculado
puede fluctuar a medida que avance el ciclo.
Se iluminara, la luz de Drying (Secar) y se mantendra, iluminada hasta que se
haya cumplido el ciclo. Cuando la secadora este en la fase de enfriamiento,
se iluminar_t la luz de Cooling (Refrescar). Cuando la secadora este en la fase
de prevenci0n de arrugas, se iluminara, la luz de Wrinkle Prevent (Prevenci0n
de arrugas).
Cuando el ciclo haya finalizado, aparecera, la palabra "END" (Fin) en la
pantalla hasta que se abra la puerta de la secadora o se presione el bot0n
Power (Encender).
Si su secadora se detiene durante un ciclo, las luces del indicador
parpadeara, n hasta que se presione el bot0n Start/Pause (Inicio/Pausa).
Eseleccionar el nivel de secado en los ciclos Normal (Normal), Heavy Duty
(Potencia extra), u otros ciclos Sensor Dry (Secado con sensor), presione
el bot0n Dry Level (Nivel de secado). Se iluminara, una luz en el indicador
junto al nivel de secado deseado. Presione el bot0n repetidamente para
desplazarse pot las opciones. Las cargas ma,s grandes o ma,s voluminosas
posiblemente requieran la opci0n More Dry (Ma,s seco) para que el secado
sea completo. La opci0n Less Dry (Menos seco) es la ma,s adecuada para
telas livianas, o paraque quede algo de humedad en las prendas al final del
ciclo. Utilicela para las prendas que deban secarse en posici0n horizontal o
colgarse.
Para seleccionar la temperatura correcta para la carga, presione el bot0n
Temp (Temperatura). Se iluminara, una luz del indicador junto a la temperatura
deseada. Presione el bot0n repetidamente para desplazarse pot las
opciones.
High (Alta): para los algodones resistentes o aquellos con el r0tulo "Tumble
Dry" (Secar en secadora).
Medium (Media): para telas que requieren planchado permanente, telas
sinteticas, algodones livianos u otras prendas rotuladas "Tumble Dry Medium"
(Secar en secadora a temperatura media).
Low (Baja): para prendas sensibles al calor rotuladas "Tumble Dry Low"
(Secar en secadora a temperatura baja) o "Tumble Dry Warm" (Secar en
secadora a temperatura c_tlida).
Extra Low (Extrabaja): ofrece la menor temperatura de secado con calor
posible.
operatng
Instructons,
tips 21
ua de 'nstFuoo'ones,
c:Agerencac
I
Cuando utiliza los ciclos Manual Dry (Secado manual), se puede ajustar el
tiempo presionando el boton de seleccion de tiempo. Durante el ciclo Sensor
Dry (Secado con sensor), el indicador luminico del tiempo se encuentra
apagado porque el tiempo de secado exacto se determina segun los niveles
de humedad fluctuantes.
Presionelo para detener y reiniciar los programas.
Presionelo una vez para encender la secadora y presionelo nuevamente para
apagarla. Si la secadora permanece encendida durante ma,s de 10 minutos
sin que se toque ninguno de los botones, se apagara, automa, ticamente.
Es una alarma que notifica al usuario del tiempo cuando el nivel de secado
promedio es centrifugado parcial (80% seco). Es util cuando el lavado
contiene diversos tipos de telas que no se desean secar completamente.
Suena una alarma durante cinco (5) segundos mientras continua el ciclo. Esta
funcion sOlo puede seleccionarse en el ciclo Sensor Dry (Secado con sensor)
y el nivel de secado sOlo puede seleccionarse desde Normal Dry (Secado
normal) y More Dry (M_ts seco).
SEGURO
PARA NINOS
Una funci6n para evitar que los ni_os jueguen con la secadora.
Configuraci6n/Liberaci6n
Si desea configurar o liberar esta funcion, presione simulta,neamente los botones Temp.
(Temperatura) y Time (Tiempo) durante 3 segundos.
Como configurarla:
1.
2.
Puede configurarse mientras su secadora esta, en funcionamiento.
Una vez que configure la funcion Seguro para ninos, no respondera, ningun boton, excepto el
boton Power (Encender), hasta que libere dicha funcion.
3. Se iluminara, el indicador de Seguro para ninos.
1. encendida.
Si se vuelve a encender el electrodomestico,
2.
la funcion Seguro para ninos continuara,
Para liberar dicha funcion, siga las instrucciones detalladas a continuacion.
Cuando
botones,
salvo
el boton Power (Encender), no respondan, verifique el
indicador otros
del Seguro
para
ninos.
22 operatng
hstructions,
tps
SECADO
EN ESTANTE (PIEZA OPCIONAL)
Instalaci6n del estante de secado
1. Abra la puerta.
2. Coloque el estante de secado en el tambor, con el borde superior del estante de secado
encima del filtro para pelusas.
3. Coloque las patas traseras en las dos a,reas empotradas de la pared trasera de la secadora y
luego empuje hacia abajo en el centro del estante de secado para ajustar.
4. Coloque las prendas que se secara,n sobre el estante, dejando espacio entre elias para que
el aire pueda circular.
5. Cierre la puerta.
6.
Utilice el ciclo Time Dry (Secado con temporizador). Seleccione el tiempo seg0n la humedad
y el peso de las prendas. Encienda la secadora. Posiblemente sea necesario reajustar el
temporizador si se requiere ma,s tiempo de secado.
Sueteres lavables
(d0blelos y col0quelos en posici0n horizontal
sobre el estante)
Low (Baja) o Extra Low (Extrabaja)
Munecos de peluche
(rellenos con fibras de algod0n o poliester)
Low (Baja) o Extra Low (Extrabaja)
Munecos de peluche
Secado a temperatura ambiente
(rellenos con goma espuma o goma)
Almohadas de goma espuma
Secado a temperatura ambiente
Zapatillas
Air Fluff (Secado a temperatura ambiente) o
Heat (Calor) (Extra Low (Extrabajo))
//_
Secar articulos de goma espuma, pD,stico o goma con la opci0n de calor puede ocasionar
Ao_,_,Adanos al articulo y generar un peligro de incendio.
El estante de secado no se suministra con este modelo. El estante de secado es opcional.
Lo puede adquirir en un centro de servicio. (Pieza c0digo : DC61-02773A)
operatng
hstmctons,
tips 23
do 'nctFuoo'ono¢,
I
LIMPIE EL FILTRO PARA PELUSAS
•
•
•
Despues de cada carga.
Para reducir el tiempo de secado.
Para hacer uso de la energia con mayor eficacia.
Limpieza
dei fiitro para peiusas
1. Tire de la caja del filtro de la secadora.
2. Quite el polvo de la parte superior del filtro con los dedos.
3. Abra la tapa inferior y quite el polvo de la misma manera.
4. Sacuda el polvo, cierre la tapa e instale la caja del filtro en su lugar.
/_
Cuando vuelva a insertar el filtro en la caja del filtro, compruebe la direccion
_1
PnECAUClON de instalacion. (Inserte lacaja del filtro de modo que la flecha apunte hacia
el interior del producto.)
_No
haga funcionar la secadora sin el filtro para pelusas colocado.
CARGUE LA SECADORA
*
o
*
......
............
DE MANERA ADECUADA
Coloque s01ouna carga de ropa en la secadora por vez.
Las cargas de telas pesadasy livianasmezcladasse seoan en forma diferente, Io que puede ocasionar que las
telas livianasesten seoasmientras que lastelas pesadas queden humedas al final del ciolo de seoado.
Agregue una o ma.sprendas similaresa laseoadora cuando necesite seoar s01ouna o dos prendas.
Esto mejorael funoionamiento de la seoadoray la efioaoiadel seoado.
Sobreoargarla seoadora limita su funoionamientoy ocasiona un seoado desparejo asicomo laformaciOn excesiva
de arrugas en algunas telas.
COMO COMENZAR
1,
2.
3.
4.
5.
6.
Cargue lasecadora dejando algo de espacio libre. NO lasobrecargue.
Cierre la puerta.
Seleooioneel oiolo y las opoiones adeouadas para lacarga (oonsultelas pa.ginas20, 21).
Presioneel bot0n de Inicio/Pausa.
Se iluminara,laluz del indioador de laseoadora.
El tiempo del ciolo caloulado apareoera,en la pantalla.
Es posible que el tiempo fluotLiepara indicar mejor eltiempo de seoado restante en el ciclo.
o
o
o
Ouandohayafinalizadoel ciclo,lahz de laTrabade lapuertase apagaray lapalabra"End" (Fin)apareceraen la
pantalla.
Si presionaPower(Encender),se cancelaraelciclo y lasecadorasedetendra.
Los indicadoresde Drying(Secado),0ooling(Refrescar)y Done (Finalizado)
se ihminarandurantetalesfases delciclo.
24 operatng
hstructions,
tps
PANEL DE CONTROL
Limpie con un pano suave y humedo. No utilice sustancias abrasivas.
No rocie el panel directamente con limpiadores en aerosol.
El acabado del panel de control puede danarse a causa de algunos productos removedores de suciedad y
manchas de tratamiento previo al lavado.
Aplique dichos productos lejos de la secadora y limpie el liquido derramado o el rocio inmediatamente.
TAMBOR
Elimine todas las manchas, tales como las de crayon, tinta o tintura de la tela (proveniente de articulos
nuevos, tales como toallas o jeans) con un limpiador com0n.
Posteriormente, seque las toallas o prendas viejas para eliminar todo exceso de manchas o solucion de
limpieza.
Una vez que se hayan seguido estos pasos, es posible que las manchas aun sean visibles, pero no se
transferira,n a las cargas subsiguientes.
TAMBOR ACABADO
CON PINTURA
EN POLVO
Para limpiar el tambor acabado con pintura en polvo, use un pano humedecido con un limpiador suave, no
abrasivo, adecuado para las superficies del acabado con pintura en polvo.
Elimine los residuos del limpiador y seque con un pano limpio.
EXTERIOR
DE LA SECADORA
Toda la secadora tiene un acabado brillante. Limpie con un pano suave y h0medo. No utilice sustancias
abrasivas. Proteja la superficie de objetos afilados ya que estos podrian rayar o danar la superficie. No
coloque objetos pesados ni afilados ni tampoco el paquete de detergente sobre la secadora. Mantengalos
apartados sobre el pedestal o en una caja de almacenaje, que puede adquirir pot separado.
SISTEMA
DE DRENAJE
DE LA SECADORA
Para mantener un optimo desempeno, se Io debe inspeccionar y limpiar todos los anos.
La tapa de drenaje exterior debe limpiarse con ma,s frecuencia para garantizar un funcionamiento
adecuado.
cudadoy
mpeza
25
p ndas
SUGERENCIAS
PARA PRENDAS
ESPECIALES
Siga las instrucciones del fabricante o de la etiqueta de indicaciones
prendas especiales. Si no se dispone de etiquetas con indicaciones,
sigubnte informaci6n como guia.
Cubrecamas
y edredones
para secar
use la
Siga las instrucciones de la etiqueta o seque en el ciclo Normal
(Normal) y con temperatura High (Alta).
Asegurese de que la prenda este completamente seca antes de
usarla o guardarla.
Tal vez deba volver a colocarla para garantizar un secado uniforme.
Ropa de cama
Utilice el ciclo Normal (Normal) y seque de a una sola frazada pot vez
para Iograr un mejor funcionamiento de la secadora.
Asegurese de que la prenda este completamente seca antes de
usarla o guardarla.
Cortinas
y patios de tela
Utilice el ciclo Perm Press (Plancha permanente) y la temperatura
Low (Baja) o Extra Low (Extrabaja) para reducir la formaci0n de
arrugas.
Seque en tandas pequeflas para obtener mejores resultados y
retirelos Io antes posible.
Pafiales de tela
Utilice el ciclo Normal (Normal) y la temperatura High (Alta) para
paflales suaves y mullidos.
Prendas con relleno de
plumas (chaquetas, bolsas
de dormir, edredones, etc.)
Utilice el ciclo Normal (Normal) y la opci0n de temperatura Low (Baja)
o Extra Low (Extrabaja).
Agregar toallas secas acorta el tiempo de secado y absorbe la
humedad.
Goma espuma (reverso de
alfombras, mufiecos de
peluche, hombreras, etc.)
NO seque con el ciclo de secado con calor. Use el ciclo Air Fluff
(Secado a temperatura ambiente) (sin calor).
ADVERTENCIA - Secar un articulo de goma con calor puede
daflarlo u ocasionar un riesgo de incendio.
Almohadas
Utilice el ciclo Normal (Normal).
Agregue un par de toallas secas para mejorar el funcionamiento de
la secadora y secar el articulo.
NO seque almohadas de capoc o de goma espuma en la secadora.
Utilice el ciclo Air Fluff (Secado a temperatura ambiente).
Pl_.sticos (cortinas de bafio,
cubiertas de muebles para
exteriores, etc.)
ARTICULOS
•
Utilice el ciclo Air Fluff (Secado a temperatura ambiente) o el ciclo
Time Dry (Secado con temporizador) y la opci0n de temperatura
Low (Baja) o Extra Low (Extrabaja) de acuerdo con las instrucciones
de la etiqueta.
QUE SE DEBEN EVITAR:
•
•
Articulos de fibra de vidrio (cortinas, patios de tela, etc.).
Lanas, salvo que se recomiende en la etiqueta.
•
Articulos embebidos en aceite vegetal o de cocina.
26 sugerencias para prendas especiates
/
CONTROLE
No fu nciona.
/
ESTOS PUNTOS SI SU SECADORA...
o
o
o
o
No calienta.
•
Asegurese de que la puerta este cerrada con traba.
Asegurese de que el cable de alimentaci0n este enchufado a un tomacorriente
que funcione.
Controle los disyuntores y fusibles de la casa.
Presione el boton Start/Pause (Inicio/Pausa) nuevamente si la puerta se abre
durante el ciclo.
,,
Controle los disyuntores y fusibles de la casa.
Seleccione una opci0n de secado con calor distinta de Air Fluff (Secado a
temperatura ambiente).
En una secadora a gas, verifique que el suministro de gas este abierto.
,,
Limpie el filtro para pelusas y el conducto de drenaje.
La secadora puede haberse desplazado a la fase de enfriamiento del ciclo.
No seca.
Verifique todos los item anteriores y, adema,s ....
Asegurese de que la tapa de drenaje hacia el exterior de la casa se pueda abrir y
cerrar sin inconvenientes.
Verifique que el sistema de drenaje no presente obstrucciones.
deben inspeccionarse y limpiarse todos los anos.
Utilice un conducto de drenaje de metal rigido, de 4".
Los conductos
No la sobrecargue. 1 carga de lavado = 1 carga de secado.
Separe los articulos pesados de los articulos livianos.
Es posible que se deban reubicar los articulos grandes y voluminosos, como las
frazadas o los edredones, para garantizar un secado uniforme.
Verifique que la lavadora este drenando en forma correcta para extraer el agua
de la carga adecuadamente.
Es posible que la carga sea demasiado pequena como para secarse
correctamente. Agregue algunas toallas.
Hace ruido.
,,
Verifique si en la carga hay objetos tales como monedas, botones flojos, clavos,
etc. Retirelos de inmediato.
Es normal escuchar el ruido de lava, lvula de gas de la secadora o que el ciclo
del dispositivo de calor se enciende o se apaga durante el ciclo de secado.
Asegurese de que la secadora este correctamente nivelada tal como se
describe en las instrucciones de instalaci0n.
Es normal que la secadora emita un zumbido debido a alta velocidad del aire
que se mueve pot el tambor de la secadora y el sistema de drenaje.
No seca de
manera uniforme.
Es posible que las costuras, los bolsillos y otras a,reas resistentes similares
no se sequen pot completo cuando el resto de la carga ha Ilegado al nivel de
secado seleccionado. Esto es normal. Seleccione la opci0n More Dry (Ma,s
seco) si Io desea.
Si se seca un articulo pesado con una carga liviana, pot ejemplo una toalla con
sa,banas, es posible que el articulo pesado no se seque completamente cuando
el resto de la carga ha alcanzado el nivel de secadoseleccionado. Separe los
articulos pesados de los articulos livianos para obtener mejores resultados.
gua de soiuci6n de prob emas 27
/
/
Tiene olor.
•
Los olores del hogar, ya sea que provengan de pintura, barniz, limpiadores
potentes, etc., pueden ingresar en la secadora con el aire del ambiente. Esto
es normal puesto que la secadora extrae el aire de la habitaci0n, Io calienta y Io
hace circular pot el tambor y Io expulsa a traves del drenaje hacia el exterior.
Cuando estos olores permanecen en el aire, ventile la habitaci0n
completamente antes de usar la secadora.
Se apaga antes
de que la carga
est6 seca
............
,,
La carga de la secadora es demasiado pequena. Agregue m_ts prendas o
algunas toallas y reinicie el ciclo.
,,
La carga de la secadora es demasiado grande. Retire algunas prendas y vuelva
encender la secadora.
CODIGOS
DE INFORMACi0N
Pueden aparecer c0digos de informaci0n para ayudarle a comprender mejor que ocurre con la secadora.
tS
Filtro para pelusas obstruido
La ventilaci0n esta, obstruida
Limpie el filtro o el conducto de ventilaci0n.
Si el problema continua, Ilame al servicio
tecnico.
dO
dE
La secadora funciona con la puerta
abierta
Cierre la puerta y luego reinicie.
dF
La puerta no esta, bien cerrada
Solicite servicio tecnico.
bE
bE2
La unidad detecta un bot0n que se
ha presionado ma,s de 30 segundos
o que esta, trabado
Asegurese de que NO haya botones
_resionados constantemente. Pruebe
reiniciar el ciclo.
tO
Si el problema continua, Ilame al servicio
tecnico.
Si el problema continua, Ilame al servicio
tecnico.
od
Tiempo de secado no va,lido
Solicite servicio tecnico.
hE
Temperatura no va,lida
Solicite servicio tecnico.
Et
FE
EEPROM no se comunica
Pruebe reiniciar el ciclo.
correctamente
Si el problema continua, Ilame al servicio
tecnico.
Frecuencia de fuente de alimentaci0n
Pruebe reiniciar el ciclo.
no va,lida
Si el problema continua, Ilame al servicio
tecnico.
Para los c0digos que no figuran m_ts arriba, Ilame al 1-800-SAMSUNG(726-7864).
28 gua de soIucion de prob emas
ap ndae
TABLA DE INDICACIONES
SOBRE LA TELA
Los siguientes simbolos ofrecen indicaciones acerca de las prendas. La etiqueta de indicaciones de la
prenda incluye simbolos para lavado, blanqueado, secado y planchado, o limpieza a seco cuando sea
necesaria. El uso de simbolos garantiza la consistencia entre los fabricantes textiles de articulos nacionales
e importados. Siga las indicaciones de la etiqueta para prolongar la vida util de la prenda y reducir los
problemas del lavado.
Normal (Normal)
Secar colgado/tender
No lavar
Plancha permanente /
Antiarrugas / Control de
arrugas
[]
Colgar para que escurra
No retorcer
delicadasPrendas
shaves /
[]
Secar
en posicion
horizontal
No usar lejia
Hand Wash (Lavado a
Mano)
No secar en secadora
Alto
Sin vapor (agregado a la
plancha)
,,,,,,,, Hot
Media
No planchar
eo
Ca.lida
Bajo
Fria
Cualquier calor
@
I
®}
0
Sin calor / aire
Limpiar en seco
No limpiar en seco
Cualquier lejia (cuando
sea necesaria)
Secar colgado/tender
S01o lejia sin cloro (con
proteccion para ropa de
color)
(cuando sea necesaria)
Alto
Ciclo de secado en
secadora
Media
[]
Colgar para que escurra
Secar en posicion
horizontal
Bajo
Antiarrugas
Plancha
pert_anente
/ Control /de
arrugas
Prendas
suaves
J
m
delicadas
** Los simbolos con punto representan las temperaturas del agua del lavado apropiadas para diversas
prendas. El tango de temperatura para Caliente es de de 41 o a 52 ° C (105 ° a 125° F), para Tibia es de
29 ° a 41 o C (de 85 ° a 105° F)y para Fria es de 16 ° a 29 ° C (de 60 ° a 85 ° F). (La temperatura del agua del
lavado debe alcanzar un minimo de 16° C (60° F) para que se active el detergente y se Iogre un lavado
eficaz).
apend ce 29
DV220AE-02810A-03
MES.mdd
29
2010-06-28
_;._t_._ 5:52:52
PROTECCi0N
DEL MEDIO AMBIENTE
Este electrodomestico se fabrica con materiales reciclables. Si decide deshacerse de este
electrodomestico,
siga la normativa local relacionada con la eliminaci0n de desechos. Corte el cable de alimentaci0n para que
el electrodomestico no pueda
conectarse a una fuente de alimentaci0n. Quite la puerta para que los animales y los ninos pequenos no
puedan quedar atrapados
dentro del electrodomestico.
DECLARACi0N
Este electrodomestico
DE CONFORMIDAD
cumple con la norma UL2158.
ESPECi Fi CACIO NES
A
B
Pulgadas (cm.)
DIMENSIONES
A. Altura
38,3" (97,1)
Div
Pulgadas (cm.)
C. Profundidad
con la puerta
49" (124,5)
abierta a 90 °
B. Ancho
PESO
D. Profundidad
30,3" (76,8)
119,01b (54,0kg)
POTENClA D EL
CALENTADOR
CONSUMO
27" (68,6)
DE
ENERGiA
5300 W
SiN CALOR
268 W
CON CALOR
5445 W
30 ap6ndice
DV220AE-02810A-03
MES.mdd
30
2010-06-28
_;.2&t_.X,
5:52:53
TABLA DE CICLOS
Normal
High (Medium)
(Alta (Media))
Normal dry
(Secado normal)
42 min
39 min
3 min
High (No change)
(Alta (Sin cambios))
Normal dry
(Secado normal)
58 min
55 min
3 min
Plancha
permanente
Medium (No
change)
(Media (Sin
cambios))
Normaldry (Secado
normal)
32 min
29 min
3 min
Delicates
(Prendas
delicadas)
Low (No change)
(Baja (Sin cambios))
Normal dry
(Secado normal)
27 min
24 min
3 min
Alto
40 min
35 min
5 min
Media
25 min
20 min
5 min
(Normal)
Secado con
sensor
temporizador
Wrinkle
Release
_ ,
_uu_ar
arrugas)
.
_ecaao
manuaR
Secado a
temperatura
ambiente
(sin cambios)
20 min
90 min
20 min
apend ce 31
DV220AE-02810A-03
MES.mdd
31
2010-06-28
_;.2_t_._5:52:53
SECADORA SAMSU NG
GARANTIA LIMITADA PARA EL COMPRADOR
ORIGINAL
El presente producto de la marca SAMSUNG, tal como Io provee y distribuye SAMSUNG ELECTRONICS
AMERICA, INC. (SAMSUNG) y Io entrega nuevo, en su embalaje de carton original al comprador o
consumidor original, esta. garantizado por SAMSUNG contra defectos de fabricacion de los materiales y la
mano de obra durante el periodo limitado de la garantia de:
Un (1) aflo para las piezas y la mano de obra
Dos (2) aflos para el panel de control (piezas)
La presente garantia limitada comienza en la fecha original de compra y es va,lida unicamente para
productos comprados y usados en los Estados Unidos.
Para recibir el servicio tecnico de la garantia, el comprador debe comunicarse con SAMSUNG con el fin de
que se determine el problema y los procedimientos del servicio.
El servicio tecnico de la garantia sOlo puede set prestado pot un centro de servicio tecnico autorizado de
SAMSUNG.
Se debe presentar la factura de compra original como prueba de compra a SAMSUNG o al servicio tecnico
autorizado de SAMSUNG.
SAMSUNG prestaro, servicio tecnico a domicilio durante el periodo de la garantia sin costo, sujeto a la
disponibilidad dentro de los Estados Unidos contiguos.
El servicio tecnico a domicilio no esta, disponible en todas las a,reas.
Para recibir el servicio tecnico a domicilio, el producto no debe presentar obstrucciones y debe set
accesible para el agente del servicio tecnico.
Si el servicio tecnico no esta, disponible, SAMSUNG puede optar pot transportar el producto hasta y desde
el servicio tecnico autorizado.
SAMSUNG reparar& reemplazara, el producto u ofrecera, un reembolso a su criterio y sin cargo adicional,
tal como se establece en la presente garantia, con piezas o productos nuevos o reacondicionados si se
comprueba que es defectuoso durante el periodo limitado de la garantia especificado anteriormente.
Todas las piezas y los productos reemplazados pasan a set propiedad de SAMSUNG y deben set
devueltos a SAMSUNG.
Las piezas y los productos reemplazados asumen la garantia original restante, o noventa (90) dias, el
periodo que sea el ma,s prolongado.
La presente garantia limitada cubre defectos de fabricacion de los materiales y la mano de obra
encontrados durante el uso normal y domestico de este producto y no sera, va,lida para Io siguiente:
daflos que ocurran durante el envio; entrega e instalacion; aplicaciones y usos para los cuales el presente
producto no fue destinado; numeros de serie o producto alterados; daflo cosmetico o acabado exterior;
accidentes, abuso, descuido, incendio, inundacion, caida de rayos, u otros casos fortuitos o de fuerza
mayor; uso de productos, equipo, sistemas, utilidades, servicios, piezas, suministros, accesorios,
aplicaciones, instalaciones, reparaciones, cableado externo o conectores no provistos ni autorizados pot
SAMSUNG que darien este producto o que acarreen problemas en el servicio; voltaje de la linea electrica
incorrecto, fluctuaciones y sobretension; ajustes del cliente e incumplimiento de Io establecido en el manual
de instrucciones, instrucciones de mantenimiento y ambientales que esta,n cubiertas y recomendadas en el
manual de instrucciones; traslado y reinstalacion del producto; problemas causados pot plagas.
La presente garantia limitada no cubre problemas derivados de la corriente, el voltaje o el suministro
electrico incorrectos, las bombillas de luz, los fusibles de la casa, el cableado de la casa, el costo del
servicio tecnico para recibir instrucciones o corregir errores en la instalacion.
SAMSUNG no garantiza el funcionamiento ininterrumpido o sin errores del producto.
32 garantia
DV220AE-02810A-03
MES.indd
32
2010-06-28
_;.2_t_._5:52:53
EXCEPTO LO ESTABLECIDO EN EL PRESENTE, NO EXISTEN GARANT[AS SOBRE ESTE PRODUCTO,
YA SEAN EXPRESAS O TACITAS, Y SAMSUNG DESCONOCE TODAS LAS GARANTiAS QUE INCLUYEN,
AUNQUE NO EN CARACTER TAXATIVO, CUALQUIER GARANTiA TACITA DE QUE EL PRODUCTO SE
ENCUENTRA EN CONDICIONES APTAS PARA LA VENTA, DE DEFRAUDACION DE DERECHOS O DE
QUE EL PRODUCTO SE ADECUA A LOS FINES ESPECiFICOS PARA LOS CUALES SE ADQUIERE.
NINGON AVAL O GARANTiA OTORGADOS POR PERSONA, COMPAi_[A O CORPORACION ALGUNA
CON RESPECTO AL PRESENTE PRODUCTO REVESTIRA CARACTER VlNCULANTE PARA SAMSUNG.
SAMSUNG NO SERA RESPONSABLE POR PI2RDIDA DE INGRESOS O LUCRO CESANTE,
IMPOSIBILIDAD DE GENERAR AHORROS U OBTENER OTROS BENEFICIOS, O CUALQUIER DANO
DERIVADO DE CIRCUNSTANCIAS ESPECIALES, DANO IMPREVlSTO O DERIVADO CAUSADO
POR EL USO, USO INCORRECTO, O INCAPACIDAD PARA USAR EL PRESENTE PRODUCTO,
INDEPENDIENTEMENTE DE LA TEOR[A LEGAL EN QUE SE FUNDE EL RECLAMO Y AUN CUANDO SE
LE HAYA NOTIFICADO A SAMSUNG DE LA POSIBILIDAD DE TALES DAI_OS.
NINGON RESARCIMIENTO DE NINGUNA [NDOLE CONTRA SAMSUNG SUPERARA EL PRECIO DE
COMPRA DEL PRODUCTO VENDIDO POR SAMSUNG Y CAUSANTE DEL PRESUNTO DAi_O.
SIN LIMITAR LO PRECEDENTE, EL COMPRADOR ASUME TODO EL RIESGO Y LA RESPONSABILIDAD
POR PERDIDA, DANO O LESION AL COMPRADOR Y A LOS BIENES DEL COMPRADOR Y A TERCEROS
Y A SUS BIENES DERIVADOS DEL USO, USO INCORRECTO O INCAPACIDAD PARA USAR EL
PRESENTE PRODUCTO.
LA PRESENTE GARANTiA LIMITADA NO SE EXTENDERA A NINGUNA PERSONA DISTINTA DEL
COMPRADOR ORIGINAL DEL PRESENTE PRODUCTO, ES INTRANSFERIBLE Y ESTABLECE SU
EXCLUSIVA REPARACION.
Algunos estados no permiten limitaciones en cuanto al plazo de una garantia implicita, o la exclusion o
limitacion de daflos imprevistos o derivados, pot Io tanto las limitaciones o exclusiones antedichas pueden
no aplicarse en su caso. Esta garantia le otorga derechos especificos, y adema,s puede tenet otros
derechos que varian segun el estado en el que se encuentre.
Para recibir servicio tecnico de garantia, comuniquese
con SAMSUNG a:
SAMSUNG ELECTRONICS AMERICA, INC. - CONSUMER ELECTRONICS CUSTOMER
105 Challenger Road Ridgefield Park, NJ 07660-0511
1-800-SAMSU
www,sa
SERVICE
NG(726-7864)
msung,cor'i3
garantia 33
DV220AE-02810A-03
MES.mdd
33
2010-06-28
_;.2_t_._5:52:53
sTiENE PREGUNTAS
O COMENTARiOS?
U.S.A
1-800-SAMSUNG(726-7864)
www,samsung,com
MEXICO
01-800-SAMSUNG(726-7864)
www,samsung.com
N. ° de c0digo:
DV220AE-02810A-03
MES.mdd
34
DC68-02810A-03_MES
2010-06-28
_;.2_t_._5:52:53