1
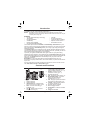
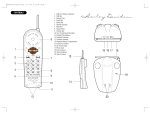
XS1210
OWNER'S
MANUAL
OWNER'S MANUAL
Introduction
Uniden 2.4GHz cordless phones are designed and engineered to exacting standards
for reliability, long life, and outstanding performance.
NOTE: Illustrations in this manual are used for explanation purposes. Some
illustrations in this manual may differ from the actual unit. The color of your
cordless phone may vary.
Features
•
•
•
•
•
•
2.4 GHz Extended Range Technology
Tone Dialing
Last Number Redial
AutoStandby
Hearing Aid Compatible
One Touch RocketDial Number
•
•
•
•
•
AutoTalk
20 Channel Autoscan
10-Number Memory Dialing
Earpiece Volume Control
Find Handset Locator
The cordless phone features AutoTalk and AutoStandby. AutoTalk allows you to
answer a call by just removing the handset from the base so you don't have to waste
time pushing buttons. AutoStandby allows you to hang up by simply returning the
handset to the base.
The UltraClear Plus true compander circuitry virtually eliminates background noise.
This innovative technology, together with 20 different channels, provides you with the
best possible reception during all your conversations.
To protect you against misbilled calls which might result from your phone being
activated by other equipment, the cordless phone has Random Code digital security
which automatically selects one of 262,144 digital security codes for the handset and
base. Also, the AutoSecure feature electronically locks your phone when the
handset is in the base.
RocketDial is a one-touch speed dial key that automatically dials your most
important or frequently called number. The number dialed, is a preset number stored
by the user.
For more information on Uniden products and accessories, be sure to visit our web
site: www.uniden.com.au or www.uniden.co.nz
Controls and Functions
1
2
3
8
13
1.
2.
3.
4.
5.
4
5
6
7
9
10
11
12
6.
14
7.
8.
9.
10.
15 16
11.
Handset antenna
Handset earpiece
talk/batt low LED - indicates when
phone is in use or the battery is low
flash - accesses call waiting (if
available) (p. 5)
vol/
- sets the ringer tone and
earpiece volume (p. 5)
12.
13.
14.
15.
16.
[1]
redial/pause - redials the last
number /adds a timed pause in a
memory dialing sequence. (p. 5, 7)
memory - enters or recalls
numbers in memory (p. 6, 7)
Handset Microphone
talk - answers or places calls (p. 5)
Rocketdial/call wait - one touch
priority key/call waiting key
(Australia only) (p. 7, 5)
end - hangs up a phone call /mutes
the ringing tone temporarily (p. 5)
channel - selects another channel
for clearer reception (p. 5)
Handset charging contacts
Base charging contacts
find handset - locates the handset
(p. 6, 8)
charge / in use LED
Included with Your Phone
• Base Unit
• Rechargeable Battery
• This owner’s manual
• Handset
• Telephone Cord
• AC adaptor
• Wall Mount adaptor
Terminology
Throughout this manual, terms such as Standby and Talk Mode are used. Below is
the terminology explanation.
• Talk Mode -
The handset is off the base and the talk key has been pressed,
enabling a dial tone.
• Standby Mode - The handset may be sitting in or off the base, but is NOT in use.
The talk key has not been pressed and there is no dial tone.
Installing the Phone
Do the following steps:
A. Choose the best location
B. Install the rechargeable battery pack into the handset
C. Connect the base unit and charge the handset
D. Mount the base unit on a wall
A. Choose the best location
When choosing a location for your new phone, here are some important guidelines
you should consider:
Avoid noise sources such as a window
by a street with heavy traffic
Avoid heat sources, such as radiators,
air ducts, and sunlight
Avoid microwave ovens
Avoid television sets and
other electronic equipment
Avoid excessive moisture, extremely
low temperatures, dust, mechanical
vibration, or shock
Avoid personal computers
Choose a central location
•
•
•
•
Avoid other cordless telephones
The location should be close to both a phone jack and a continuous power
outlet (one which is not connected to a switch).
The base and handset should be kept away from sources of electrical noise
such as motors and fluorescent lighting.
The base can be placed on a desk, tabletop, or mounted on a standard wall
plate. For better reception, place the base as high as possible.
The base should be placed in an open area for optimum range and reception.
[2]
B. Install the rechargeable battery pack into the handset
The handset is powered by a rechargeable battery pack. The battery recharges
automatically when the handset is placed in the base unit.
NOTE: If your home has specially wired alarm equipment
connected to the telephone line, be sure that
installing the system does not disable your alarm
equipment. If you have questions about what will
disable your alarm equipment, contact your
telephone company or a qualified installer.
1. Press down on the handset battery case cover
(use the finger indention for a better grip) and
slide the cover downward to remove.
2. Plug the battery pack connector (red & black wires) into
the jack inside the battery compartment (the connector
notches fit into the grooves of the jack only one way).
Match the wire colours to the polarity label in the battery
compartment, connect the battery and listen for a click
to insure connection.
3. Before replacing the battery cover, pull on the battery
wires slightly. If the connection is secure, the jack will
stay in place. Then place the battery case cover back on
the handset by sliding it upwards until it clicks into place.
NOTE: For optimum performance, use only the Uniden
battery (BT- 905) supplied with your phone.
C. Connect the base unit and charge the handset
1. Connect the AC adaptor to the DC IN 9V jack
and a standard 240V AC wall outlet.
2. Set the base unit on a desk or tabletop, and
place the handset in the base unit with the
keypad facing forward.
3. Make sure the charge/in use LED illuminates.
If the LED does not illuminate, check to see that the
AC adaptor is plugged in and the handset makes
good contact with the base charging contacts.
R oute the cor d.
NOTICE: Do not place the power cord where it creates
a trip hazard or where it could become chafed and
create a fire or electrical hazard.
NOTE:
• Use only the supplied AAD-210 AC adaptor.
Do not use any other AC adaptor.
• Connect the AC adaptor to a continuous power supply.
• Place the base unit close to the AC outlet to avoid long extension cords.
4. Charge your handset at least 15-20 hours before plugging the phone line.
When fully charged the battery will provide up to 7hrs talk time and 14
days standby time.
[3]
5. Once the handset battery pack
is fully charged, connect the
telephone line cord to the TEL
LINE jack and a telephone
outlet.
Australia
Tel Line Adaptor (Not supplied)
D. Mount the base unit on a wall
Standard wall plate mounting
This phone can be mounted on any standard wall plate.
1. Locate the base unit on the wall mount adaptor
as shown and slide the wall mount adaptor into
the notches on the base bottom with the tab
pressed.
2. Plug the AC adaptor into the DC IN 9V jack.
3. Route the AC adaptor cord through the molded
wiring channel as shown.
1
4. Plug the AC adaptor into a standard 240V AC
wall outlet.
5. Plug the telephone line cord into the TEL LINE
jack. Route the cord through the molded wiring
channel as shown.
6. Plug the telephone line cord into the telephone
outlet (socket image shown is indicative only).
7. Align the mounting slots on the base with the
mounting posts on the wall. Then push in and
down until the phone is firmly seated.
2
5
7
6
3
7
4
Direct wall mounting
If you don't have a standard wall plate, you can mount your phone
directly to the wall. Before doing this, consider the following:
•
•
•
•
Avoid electrical cables, pipes, or other items behind the mounting
location that could cause a hazard when inserting screws into the wall.
Try to mount your phone within 1.5m of a working phone jack to
avoid excessive cord lengths.
Make sure the wall material is capable of supporting the weight of
the base and handset.
Use #10 screws (minimum length of 35mm) with anchoring
devices suitable for the wall material where the base unit will be
placed.
1. Insert two mounting screws into the wall, (with their appropriate
anchoring device), 100mm apart. Allow about 3mm between
the wall and screw heads for mounting the phone.
2. Refer to steps 1 through 7 above to mount the telephone.
[4]
35mm
3mm
100mm
Making and Receiving Calls
Making a call
1. Remove the handset from the base.
2. Press the talk key. The talk/batt low LED flashes and turns on.
3. Listen for the dial tone.
4. Dial the number.
Receiving a call
If the handset is in the base, simply remove the handset from the base. AutoTalk will
automatically answer the call.
If the handset is off the base, press the talk key or any number key.
Hanging up
Press the end key or return the handset to the base.
Redialing the last dialed number
1. Remove the handset from the base.
2. Press the talk key. The talk/batt low LED flashes and turns on.
3. Listen for the dial tone.
4. Press the redial/pause key.
Flash and Call Waiting
If a call waiting tone sounds while you are on a call:
Australia:
Press Rocketdial/call wait to switch
between callers.
New Zealand: Press flash to switch between callers.
NOTE:
You must subscribe to call waiting through your telephone company.
Adjusting the Ringer and Earpiece Volume
Ringer tone and volume
When the phone is in standby mode, press the vol/
key repeatedly to listen to the
four ringer tones and volume combinations. The last ringer tone heard will be
selected as the phone’s ring tone setting.
Earpiece volume
The handset earpiece volume settings (low, medium and high) can only be adjusted
during a call. Use the vol/
key to scroll through the volume levels and select the
one that works best for you. When you hang up, the phone keeps the volume
setting.
Temporarily Mute Ringer
If the handset is off the base, simply press the end key to temporarily mute the
incoming ring. The ringer will sound with the next incoming call.
Travelling Out-of-Range
During a call, as you begin to move your handset too far from your base unit, noise
increases. If you pass the range limits of the base, your call will terminate within one
minute.
Selecting a Different Channel
If you encounter interference while using your phone, you can manually change the
phone’s channel for clear operation. This function works only when the phone is in
use. Press the channel key. The talk/batt low LED flashes, indicating the phone is
changing to another channel.
[5]
Find Handset
To locate the handset, press the find handset key on the base. The handset beeps
for 60 seconds. The handset stops beeping when any key is pressed, when it is
returned to the base, or when the find handset key is pressed. The handset also
stops beeping when an incoming call is received.
Low Battery Alert
When the battery pack is very low and needs to be charged, the phone is
programmed to eliminate functions in order to save power. If the phone is not in use,
the talk/batt low LED flashes when the battery pack is low. If the phone is in use, the
talk/batt low LED flashes and the handset beeps. Complete your conversation as
quickly as possible and return the handset to the base for charging.
NOTE:
•
•
Even when the battery pack is not being used, it will gradually
discharge over a long period of time. For optimum performance, be
sure to return the handset to the base unit after each telephone call.
Last number dialed and numbers stored in memory locations (including
RocketDial), are retained for up to one minute while you replace the
battery pack.
Cleaning the battery charging contacts
To maintain a good charge, clean the charging contacts
on the handset once a month.
Dampen a cloth with plain water.
Gently rub the damp cloth over the charging contacts
until all visible dirt is removed.
Dry the contacts thoroughly before returning the handset
to the base.
Caution: Do not use paint thinner, benzene, alcohol, or other chemical
products. Doing so may discolour the surface of the telephone and damage
the finish.
Using the Speed Dial Memory and RocketDial
Storing Numbers in Speed Dial/RocketDial Memory
Your cordless phone can store up to ten numbers in the speed dial memory. An
additional number can be stored in the one-touch RocketDial memory. Store your
most frequently dialed number in the one-touch RocketDial location.
1. When the phone is in standby mode, press the memory key. The talk/batt low
LED flashes.
2. Use the keypad to enter the phone number; each number can be up to 20 digits.
[6]
3. If you need the phone to pause during the dialing sequence,
press the redial/pause key to insert a two-second delay
between the numbers. You can enter multiple pauses to
increase the delay. Each pause counts as a digit.
4. Press the memory key again.
5. To store this number in the RocketDial memory, press the
Rocketdial/call wait key. You will hear a confirmation tone
indicating that the number has been stored.
6. To store this number as one of the ten speed dial numbers,
enter a digit from 0 to 9. If there is already a number in that
speed dial setting, it will overwrite the previously stored
number without warning. You will hear a confirmation tone
indicating that the number has been stored.
NOTE:
When storing numbers into memory, if the handset is idle (i.e., no key is
pressed) for more than 30 seconds, it will beep rapidly, and the phone
will return to standby mode.
Dialing a Speed Dial Number
1. When the phone is in standby mode, press the talk key, and listen for a dial tone.
2. Press the memory key and enter the speed dial entry (0-9) that has the stored
number you want to dial. (If you enter a digit that does not contain a stored
number, the handset will beep rapidly, and the phone will not dial.)
Chain Dialing
The speed dial memory is not limited to phone numbers. You can store any number
(up to 20 digits) that you need to enter once your call connects. This is referred to as
Chain Dialing.
For example, you can save your bank account number to speed dial memory. When
you call your bank's telephone teller service and are prompted to enter your account
number, simply press the memory key and the speed dial number where you stored
your account number.
Making Calls With Rocketdial/call wait
When the phone is in the standby mode, simply press Rocketdial/call wait. The
number stored in the RocketDial memory location is instantly dialed.
Erasing a Stored Number from Memory
1. With the phone in standby mode, press the memory key twice.
2. Press the number of the speed dial entry or the Rocketdial/call wait key. A tone
indicates that the stored number is erased from memory.
[7]
Changing the Digital Security Code
The digital security code is an identification code used to connect the handset and
the base unit. Normally, setting the code is not necessary.
The first time you charge your handset, the security code is automatically set. In the
rare situation that you suspect another cordless telephone is using the same security
code, you can change the code.
1. Remove the handset from the base unit. Press and hold the find handset key on
the base.
2. While holding the find handset key, place the handset in the base unit. Leave
the handset in the base for more than three seconds. A new random security
code is set.
NOTE:
If the handset battery pack is completely discharged or the battery pack
is removed, the digital security code will be lost. If this happens, a new
security code is set automatically next time the battery pack is charged.
Warning!
Uniden DOES NOT represent this unit to be waterproof. To reduce the risk of fire,
electrical shock, or damage to the unit, DO NOT expose this unit to rain or moisture.
[8]
Troubleshooting
If your cordless telephone is not performing to your expectations, please try these simple steps
first. If these steps do not solve your problem, please visit our website www.uniden.co.au or
www.uniden.co.nz
NOTE: Do not attempt to service this unit yourself. Servicing must be performed by qualified
personnel.
Symptom
Suggestion
The charge/in use LED won’t
illuminate when the handset is
placed in the base.
• Make sure the AC adaptor is plugged into the base and a wall
outlet.
• Make sure the handset is properly seated in the base.
• Make sure that the charging contacts on the handset are clean.
The audio sounds weak and/or
scratchy.
• Move the handset and/or base away from metal objects or
appliances and try again.
• Press the channel key to help eliminate background noise.
• Check both ends of the telephone line cord.
Can’t make or receive calls.
• Make sure the AC adaptor is plugged into the base and a wall
outlet.
• Disconnect the AC adaptor for a few minutes. Then reconnect it.
• Change the digital security code. (see page 8.)
• Make sure that the handset is not too far from the base.
• Check the dialing mode used by your telephone company.
The handset doesn’t ring or
receive a page.
• The battery pack may be weak. Charge the battery for 15-20
hours.
• The handset may be too far away from the base.
• Move the base away from appliances or metal objects.
• Change the digital security code. (see page 8.)
Severe noise interference
• Keep the handset away from microwave ovens, computers,
remote control toys, wireless microphones, alarm
systems, intercoms, room monitors, fluorescent lights, and
electrical appliances.
• Move the base to another location or turn off the source of
interference.
Liquid Damage
Moisture and liquid can damage your cordless phone. In case of accidental submersion,
please follow these steps.
Case
Action
If the handset or base is exposed
to moisture or liquid, but it only
affects the exterior plastic housing.
Wipe off the liquid, and use as normal.
If moisture or liquid has entered
the plastic housing (i.e. liquid can
be heard in the phone or liquid has
entered the handset battery
compartment or vent openings on
the base).
Handset:
1. Remove the battery cover and leave it off for ventilation.
2. Remove the battery pack by disconnecting.
3. Leave the battery cover off and the battery pack disconnected
for at least 3 days.
4. Once the handset is completely dry, reconnect the battery pack
and the battery cover.
5. Recharge the handset’s battery pack for 20 hours before using again.
Base:
1. Disconnect the AC adaptor from the base unit, cutting off electrical
power.
2. Disconnect the telephone cord from the base unit.
3. Let dry for at least 3 days.
IMPORTANT: You must unplug the telephone line while recharging
the battery pack to avoid charge interruption.
CAUTION:
DO NOT use a microwave oven to speed up the drying process. This will
cause permanent damage to the handset, base and the microwave
oven.After following these steps, if your cordless telephone does not
work, please visit our website www.uniden.co.au or www.uniden.co.nz
[9]
Warranty
UNIDEN XS1210 Cordless Phone
Limited One Year Warranty
Note:
Please keep your sales docket as it provides evidence of warranty.
Warrantor: Uniden Australia Pty Limited ABN 58 001 865 498
Uniden New Zealand Lmited
Warranty only available in original country of purchase
Elements of Warranty: Uniden warrants to the original retail owner for the duration
of this warranty, its XS1210 Cordless Phone (hereinafter referred to as the Product)
to be free from defects in materials and craftsmanship with only the limitations or
exclusions set out below.
Warranty Duration: This warranty to the original retail owner only, shall terminate
and be of no further effect ONE (1) Year after the date of original retail sale. This
warranty will be deemed invalid if the product is; (A) Damaged or not maintained as
reasonable and necessary, (B) Modified, altered or used as part of any conversion
kits, subassemblies, or any configurations not sold by Uniden, (C) Improperly
installed, (D) Repaired by someone other than an authorised Uniden Repair Agent
for a defect or malfunction covered by this warranty, (E) Used in conjunction with any
equipment or parts or as part of a system not manufactured by Uniden, (F) Installed,
programmed or serviced by anyone other than an authorised Uniden Repair Agent,
or (G) Where the Serial Number label of the product has been removed or damaged
beyond recognition.
Parts Covered: This warranty covers for 1 year, the Handset and Base Unit only.
Accessories: Batteries, AC adaptor etc are covered for 90 days.
Statement of Remedy: In the event that the product does not conform to this
warranty at any time while this warranty is in effect, the warrantor at its discretion,
will repair the defect or replace the product and return it to you without charge for
parts and service. THIS WARRANTY DOES NOT COVER OR PROVIDE FOR THE
REIMBURSEMENT OR PAYMENT OF INCIDENTAL OR CONSEQUENTIAL
DAMAGES. THIS GUARANTEE IS IN ADDITION TO AND DOES NOT AFFECT
YOUR RIGHTS UNDER THE CONSUMER GUARANTEES ACT.
Procedure for obtaining performance or warranty: In the event that the Product
does not conform to this warranty, the Product should be shipped or delivered,
freight prepaid, with evidence of original purchase, (eg. a copy of the sales docket),
to the warrantor at:
UNIDEN NEW ZEALAND LTD
Service Division
150 Harris Road, East Tamaki,
Auckland
Fax (09) 274 4253
www.uniden.co.nz
UNIDEN AUSTRALIA PTY LTD
Service Division
345 Princes Highway,
Rockdale, NSW 2216
Fax (02) 9599 3278
www.uniden.com.au
Customers in other states should ship or deliver the Product freight pre-paid to the
nearest Uniden Authorised Repair Centre. (Contact Uniden for the Warranty Agent
nearest you.)
[10]
© 2005 Uniden Australia Pty Limited/Uniden New Zealand Limited
Printed in China UPZZ01059ZZ