1
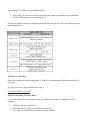
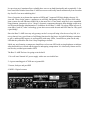
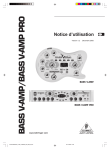
Tip #1: Master Input Gain
The default master gain for the unit is set at 50%. This is very inadequate for most basses.
The built-in tuner will work poorly and the amp models will be gain-starved if this problem is not
corrected.
If you use passive pups or if you have relatively low-output active tone controls then fix this
immediately!
To set the master input gain, enter CONFIG mode, hold TAP and turn GAIN knob all the way up: Low
= -6 dB, Mid = 0 dB, High = +12 dB
Your basses (like mine) may be ones that require a +12 dB boost in order to adequately feed a signal to
the unit.
Tip #2: Operating Modes
Like any modeling pre/amp, the Bass V-AMP must be configured to output the best signal for use with
your other gear.
By default, most are set to connect straight into a mixer/recorder and unfortunately, most people connect
them to some type of real bass/guitar amp, never change the operating mode, and then they are quick to
proclaim that, "Modeling devices sound horrible! Nothing compares to a real amp!"
My Bass V-AMP is set to "Live 3" (L3), where cabinet simulation is off (because I'm using a real cab)
and the XLR DI jacks output Behringer's ULTRA-G cabinet simulator, which is actually quite good.
Unlike other modelers, like Line 6 Pod X3, the Bass V-AMP totally removes cabinet selection
functionality from the user when it is set to L2 or L3, which I think is how it should be.
The Bass V-AMP has six powerful operating modes, all worth exploring or reading about.
But which ever you choose, use the right one for your setup else it will really sound horrible, and you,
too, will hate modelers! :-)
Tip #3: Getting Started
The user manual is horrible, but it is a necessary evil.
The built-in presets are equally horrible, but they had to pre-load it with something.
The good news is that it is quite possible to overcome all of this, figure out how to work the unit, create
your first few patches, and you WILL get the tones you want!
Looking back now at the manual, I totally get it! It's all in there for sure, but laid out terribly, things are
confusing, omitted, and inadequately explained.
There is a lot hiding and to be discovered in the Bass V-AMP.
Some people or persons at Behringer really put some thought into this unit and it shows.
Even if you don't care to get all nerdy with it, the tones are impressive!
Start by taking a single preset, de-crapify all the hidden parameters that may be enabled in it, construct a
basic, effect-free tone, learn how to save it, and then go from there.
If it sounds right to you then it is right, and although some of the available amp models are very realistic
and musical, it will only sound as good as you play your bass!
Tip #4: Undocumented Stomp Boxes
The manual tells you the Bass V-AMP has 4 renowned stomp box models, but nowhere does it tell you
what they are.
I contacted Behringer and they actually replied back the next day!
DRIVE Simulations:
1.
2.
3.
4.
Electro-Harmonix Hog's Foot
Electro-Harmonix Big Muff Pi Fuzz
Pro Co Rat
T.C. Electronics Booster + Line Driver + Distortion
Effect parameters are DRIVE, BOOST, SPLIT, TONE
SPLIT sets distortion bypass crossover
Left = Off, Turning Right = 41-600 Hz
press both arrows <- -> (between tuner and tap) to enter the edit mode.
press the "B" button for drive.
Then use the arrows to select the stomp box.
The stomp box controls will be the knobs lit up on the lower left
press "exit" to close.
Tip #5: Patch Creation
Besides the basic parameters assigned to each knob on the Bass V-AMP (e.g. Gain, Bass, Mid, Treble,
etc.) there exist a bunch more under the TAP button.
Additionally, there are other parameters imparted by the DRIVE, CABINETS, X-OVER, DE-NOISER
sections on the pre (should they be enabled on the current patch) as well as EFFECTS and
COMPRESSOR.
In other words, you may not easily be able to see what is on or not, and what may be affecting the tone
of the current AMP model.
My tip is to create a virgin patch for yourself, free of all extraneous sonic contaminants, except for a
base AMP model + flat EQ, and then USE THAT patch to help you create new ones or to experiment.
If that SVT Model doesn't quite sound like an SVT or sounds strange, I bet something is turned on
elsewhere that is spoiling it all -- and I say this from personal experience!
Tip #6: Internal Battery
The Bass V-AMP has an internal battery that is used to retain your settings in memory when the unit is
off or un-plugged.
Should this battery die or loosen from the battery holder then you will most likely experience sporadic
or consistent memory loss issues, as well as other operational side-effects.
Open the unit, replace the easily locatable CR-2032 button-type battery, and you should be back to
normal once again.
Tip #7: Multiple EQ's
The Bass V-AMP makes EQ available to you in three distinct areas:
1. The tone controls used by the AMP model (Bass, Mid, Treble, Deep, Mid-Shift, Presence)
This is most likely where most users will tweak their tones
2. Bass + Treble under the Cabinet model
If you are running Cabinet Simulation, you have the ability to further EQ your tone here,
but I suggest you leave these flat (less is more)
3. LIVE EQ: Bass, Mid + Treble when you set the Operational Mode to "Live" modes 1, 2 + 3
This is a global EQ that affects all of your patches, over and above what you've stored.
This is helpful for when you move your rig to a gig and need to compensate for overlydead or bright rooms. With one quick-fix you can compensate all of your saved patches
so they sound right without having to re-tweak every patch.
Sure, brand reliability may be suspect, but the Behringer folks who designed this unit really put some
thought into it!
Tip #8: More Than Bass
The Bass V-AMP Pro does more than just bass guitar.
If you play electric guitar, acoustic guitar with a pickup, keyboards, or even do vocals then there are
tools in the V-AMP for you.
The built in Tube Preamp simulator can warm-up just about any signal you throw at it and provides
some very decent effects.
Tip #9: Charlie's Quick Start Guide
I created a PDF document for all of you who own this unit and who have yet to hear how good it can
sound when un-cluttered!
http://www.zinfanus.com/vamp/guide.pdf
All I ask in return is that if you like what you hear (or not) to please post about it on this thread :-)
Tip #10: Built-In Tuner
The Bass V-AMP Pro features a built-in chromatic tuner that you may have previously written-off for
various functional reasons (or non-functional reasons as the case may be.)
Provided that you followed my advice from the "Tip #1: Master Input Gain" post on Page-1 of this
thread, here are some tips for your now-functional tuner :-)
1. The tuner supports both silent + quiet operation modes. With the tuner engaged, the VOLUME knob
will allow you to either completely mute or hear what you are doing
2. The tuner's chromatic operation will assist you with both standard and non-standard tunings, and it
additionally supports slight variations from A-440
3. The LED display is great on dark stages, but not so much for very bright outdoor gigs
... and finally
4. Should you still dislike the built-in tuner, have a bright outdoor gig, or just want to use your own
tuner, the Bass V-AMP Pro has you covered!
a. Connect your tuner to the rear jack marked SEND/LINE OUT (under the PRE DSP
INSERT section)
b. Press the TUNER button on the V-AMP to mute your rig
c. Use your external tuner
d. Press the TUNER button again to un-mute your rig
Tip #11: The Compressor
Bassists either love or hate compression and the Bass V-AMP comes with a very effective compressor
on-board should you choose to use it. I highly suggest that you use a little bit of it, as it really adds some
extra thickness to the tones provided by the V-AMP. As with any effect, moderation is key.
The COMPRESSOR knob controls the density, or amount of compression. With higher settings the
threshold is lowered, while the ratio is augmented in six steps from 1.2:1 - 4.5:1
The ATTACK parameter, however, lies underneath the TAP button on the same knob. ATTACK
determines the rate by which the compressor responds to the signal. The attack time can be adjusted
within a range from 0 to 127 ms. Fast compressor settings will reduce the dynamics of the entire signal,
while slower settings will ensure that the first attack transients remain unaffected. Slow compressor
settings are recommended in order to achieve a crispy and punchy signal.
Love it or leave it, the V-AMP handily provides a compressor to use, just like it does with its built-in
tuner. This means less to bring to the gig and I wish more manufacturers similarly provided these two
necessities in their bass products!
Tip #12: Preamp Bypass
Even though the Bass V-AMP Pro offers 32 available AMP models to choose from, there may be
situations where "none" would be best.
To bypass the pre-amp section and remove all tonal coloring imparted by it, press the [TUNER] + [TAP]
buttons simultaneously. This state could be considered the 33rd available AMP model and the one most
truthful to the signal you are feeding the V-AMP. Pressing the same keys again will bring back the preamp section.
When the pre-amp is bypassed, you may still use the other effects and features provided by the V-AMP,
and best of all, the resulting configuration may be saved to a user patch.
Tip #13: The Clip Light
When tweaking your Bass V-AMP tones, pay attention to the red CLIP indicator LED. Adding too much
EQ or boost via GAIN or VOLUME knobs may push the output of the unit into un-desirable distortion.
When this happens, turn down the amp VOLUME knob (which differs from the MASTER VOLUME
knob) until the CLIP light no longer comes on when you play. This will ensure that you are working
with an optimum internal signal level, which in turn provides the optimum output level for your power
amp or other external devices.
Bonus Tip: Instead of boosting frequencies, try reducing other complimentary ones. (e.g. turn down
MID + TREBLE instead of boosting BASS)
Tip #14: Timing Is Everything
I'm providing this tip, not only because I am running-out of Bass V-AMP tips to share, but because I'd
like to bring this thread back down to business :-)
As a bonus, it's a universal tip and need not apply just to the Bass V-AMP.
I've noticed that certain on-line, big-name, musical retailers (yes, you know) usually offer 15% off
coupon codes or similar sales about 4-times a year that seem to coincide with some type of holiday.
This would mean that a new Behringer Bass V-AMP would sell for $145, and if you like these sort of
things for your bass rig, the Behringer FCB1010 MIDI foot controller would sell for $128, most likely
with free shipping, no state tax + 45-days to return it all if not 100% satisfied.
Tip #15: Bi-Amping
The Bass V-AMP Pro features integrated bi-amping capabilities not even found in bass preamps costing
2 to 3 times more (e.g. Line 6 POD X3.)
The cut-off frequency of the 18dB/octave Butterworth crossover is configured in EDIT mode under the
X-OVER section. Adjustments are made using the Bank Up/Down arrow keys. The display shows the
selected frequency divided by a factor of 10. The display will show "--" when the crossover point is not
set/activated.
Volume balance between the high pass and low pass are adjusted using the EFFECTS knob also while
under the X-OVER section. All the way to the left = low pass signal only, all the way to the right = high
pass signal only.
After configuring the X-OVER, you must set the operating mode of the V-AMP to either S2 (Studio 2)
or L2 (Live 2) so that the Left + Right outputs will individually send the high and low signals. See my
other tips for how to set the V-AMP's operating mode. Below is a chart of all the available operating
modes that I cobbled together from Behringer's after I corrected a few mistakes.
The integrated X-OVER is so well-thought-out that...
1. Any EFFECTS you use are only sent to the high pass signal, leaving the low pass untouched
2. All X-OVER settings are stored at patch-level
I do not know which employees at Behringer developed this unit, but they did a fine job and really put
some thought into it!
Tip #16: Use Your Ears!
Forget for a moment that the Behringer Bass V-AMP Pro is manufactured by Behringer and sells for
only $169
Use your ears on my "Amp Model Demos" page :-)
http://www.zinfanus.com/vamp
Tip #17: Performing A Factory Reset
For various reasons, there may be times when you want to reset the Bass V-AMP Pro to factory
condition.
1. Make sure the unit is turned off
2. Hold both the [D] + [E] keys and then turn on the unit
3. The value "CL" should now be shown in the center display
4. Release the [D] + [E] keys
5. Simultaneously press both [<] + [>] keys to execute the reset
All user presets will be erased/overwritten as part of this process.
Tip #18: SYNTH Bass Effect
The other day I priced synth bass pedals online and discovered that they ranged anywhere from $89 to
$269 for a stomp box that took batteries or a wall wart.
The SYNTH effect built into the V-AMP is really juicy, flexible, programmable, and tracks very well
provided you know the secret:
Be sure to use a very clean or low-gain AMP model, or better yet, no AMP model (see a previous tip)
and the results are spectacular!
Other Information
The Bass V-AMP Pro features 16-distinct bass amp tones that are modeled after the following
amplifiers:
1. '68 Marshall Super Bass
2. '69 Marshall Major
3. Trace Elliot (80's)
4. Vox AC-100
5. Behringer Thunderbird
6. Ampeg B-15
7. Ampeg SVT
8. Ampeg SVT Pro II
9. '67 Fender Bassman
10. Gallien-Krueger 800RB
11. SWR SM-400
12. Eden Traveller WT-300
13. Mesa Boogie 400+
14. Polytone A101
15. Justin Meldal-Johnsen Style
16. Classic Tube Preamp
The Bass V-AMP Pro features 15-distinct bass speaker/cabinet simulations that are modeled after the
following equipment:
1.
2.
3.
4.
5.
6.
'97 Ampeg SVT 8 x 10"
Trace Elliot 4 x 10"
SWR Goliath 4 x 10"
Ampeg 4 x 10"
Gallien-Krueger B120
'68 Marshall 4 x 12"
7. Ampeg B15 1 x 15"
8. Polytone A101 1 x 15"
9. Vox AC100 2 x 15"
10. Mesa/Boogie 2 x 15"
11. Fender Bassman 2 x 15" w/JBLs
12. Leslie 760 1 x 15" + HF
13. SWR 1 x 18"
14. Ampeg SVT-18E 1 x 18"
15. Sunn Coliseum 1 x 18" + 1 x 12"
All but one knob on the Bass V-AMP Pro feature nicely-implemented LED rings around the individual
controls to indicate their current setting.
The red glow from the LEDs is especially nice on dark stages, but they actually provide an additional
benefit. When you recall a preset or power on the unit, the LEDs move to the current settings of the
current patch. This also means that subsequent turning of a knob begins where its LED is currently set
at, so there are no wild jumps! This is a feature that surprisingly not many other programmable preamps
have and to me it is a pet peeve when I operate those other units.
The Bass V-AMP Pro's face panel employs dozens upon dozens of individual red LEDs around its
knobs, under buttons and in the center bezel area.
In a previous post I mentioned how valuable these were to me both functionally and cosmetically. I also
have stated that I think a future Bass V-AMP successor would really benefit aesthetically from a modern
day face-lift. I am now rethinking this!
I have electronics in my home that contain red LEDs and 7-segment LED digit displays that are 30+
years old. These clocks, games + appliances are still fully functioning today. My old Atari 2600 video
game system also still functions should I be in the mood for it. These items, most likely were assembled
using common, inexpensive (a.k.a. "cheap") electronic components that most folks thought would never
see life past the Reagan Administration. I would hate for the Bass V-AMP 2.0 to drop LEDs in favor of
some fancy, back-lit, "other" technology, given their success with the unit and LEDs thus far. Why spoil
a good thing?
Since the Bass V-AMP is not my only preamp, nor do I see myself using it for the rest of my life, it is
nice to know it has a good chance of still being functional in the future. And while Behringer continues
to sell it, and hopefully improve it, and hopefully with many LEDs, I would like to point out the only
LED that they and others like Line 6 keep forgetting to include:
I think any unit featuring a compressor should have at least one LED with varying brightness to indicate
when threshold/s are crossed and the signal is undergoing compression. It is a necessary feature and it's
not like they couldn't spare another LED!
The Bass V-AMP Pro has a lot going on in the back!
1. No wall wart! Internal AC power supply with a user-serviceable fuse
2. A great-sounding pair of XLR outs w/ground-lift
3. Inserts, both pre and post DSP
4. MIDI + Digital connects