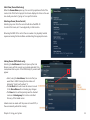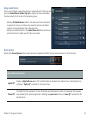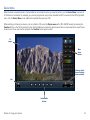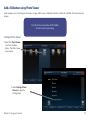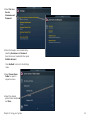
1
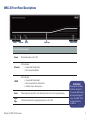
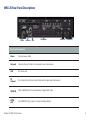
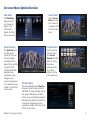
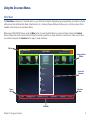
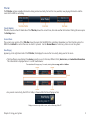
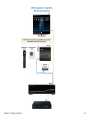
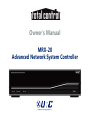
Owner’s Manual
MRX-20
Advanced Network System Controller
MRX-20 Advanced Network System Controller Owner's Manual © 2014 Universal Remote Control, Inc.
The information in this Owner’s Manual is copyright protected. No part of this manual may be copied or reproduced in any form without prior written consent from
Universal Remote Control, Inc.
UNIVERSAL REMOTE CONTROL, INC. SHALL NOT BE LIABLE FOR OPERATIONAL, TECHNICAL OR EDITORIAL ERRORS/OMISSIONS MADE IN THIS MANUAL.
The information in this Owner’s Manual may be subject to change without prior notice.
URC - Control the Experience is a registered trademark of Universal Remote Control, Inc.
Total Control is a registered trademark of Universal Remote Control, Inc.
All other brand or product names are trademarks or registered trademarks of their respective companies or organizations
ii
Programmable Only by URC Professional Installers
To fully automate your audio/video system, the installer must have detailed knowledge of each component, LAN configuration, Wi-Fi
optimization, the URC product, its accompanying software and how the system is connected and operated.
URC software is available ONLY to a trained and certified professional audio/video installer. Although technical assistance is available, it
is offered to our certified professional installers who can install a URC controller in a timely and efficient manner.
About URC
For 25 years URC has been setting the higher standard for control technology
with continuous research and development. Headquartered in Harrison, N.Y.,
the company has been the leading supplier of high quality remotes and is
broadly regarded as the leading control manufacturer by consumers,
subscription broadcast providers, retailers, custom installation professionals
and OEM partners.
• Celebrating 25 years as the leading supplier of universal remote controls
• More than 100 million remotes supplied in the past 10 years alone
• Solutions that span every control market, from subscription broadcast to
complete home and commercial automation
• Consistently ranked the #1 brand in custom remote and whole-house
control markets
Need Help?
If you are in need of assistance,
please be sure to contact your URC Professional Installer.
Installer’s Name:_____________________
Contact Info:________________________
Installation Date:____________________
Serial #:____________________________
MAC Address (if any):________________
URC Tech Support is also there for you.
Contact us by phone or email at:
Toll Free: 1-800-801-0900
Email: [email protected]
Our mission across all of our products and markets is to be the best provider of integrated control solutions that make life better and
easier for our customers worldwide.
Subscribe to Automated Living with URC
Our e-publication brings you the latest in home automation, technology and control solutions. See inspiring featured
homes, have a chance to win prizes and interact with URC staff.
Sign up today at www.universalremote.com and get your free issue now. See link at bottom of the webpage.
iii
Chapter 1: MRX-20 Overview
Congratulations!
1
Features and Benefits
1
Parts Guide
1
Expanding your System
2
Front Panel Descriptions
5
Rear Panel Descriptions
6
Chapter 2: Using Your System
Navigating the On-screen Menu
8
On-screen Menu Options Overview
9
Using the On-screen Menus
10
Add a Slideshow using Photo Viewer
20
Adjusting the Settings
23
Chapter 3: Settings and More...
Installation
28
Specifications
30
End User Agreement
33
Chapter 1: MRX-20 Overview
Congratulations!
Thank you for purchasing URC’s Total Control MRX-20 Advanced Network System Controller. The unit features an intuitive and
interactive on-screen interface providing control of every connected device throughout the entire home. Now you can control your
home theatre, lights, view the front door and so much more... from the comfort of your seat.
Features and Benefits
• Control the MRX-20’s on-screen interface using a TRG-100/200 Umotion remote.
• Store and issue commands and macros for IP, IR, RS-232, Relay, Sensor and 12V controlled devices connected to MRX series base
stations or controllers.
• View your favorite pictures stored on Google+ using the Photo Viewer screensaver.
• Can be programmed off premises via the internet.
• Easy rack-mounting via optional RMK-2 rack mounting kit.
Parts Guide
The MRX-20 Advanced Network System Controller includes:
1 - MRX-20 Advanced Network System Controller
1 - Power Cord
10 - IR Emitters with standard 3.5mm plugs
Chapter 1: MRX-20 Overview
1
Expanding your System
Expand the MRX-20’s capabilities throughout the entire home by using our URC user interfaces, in-wall controllers, z-wave devices and music
players. Simply integrate any of just a few of the URC products listed below for extensive control.
In-Wall Controllers
Keypads provide you with convenient access to
anything your URC system can control. These
are available as simple keypads or fully
functional graphic displays.
User Interfaces
Combine our handheld
controllers along with
your new technology to
control your home
theatre, lighting and
more, right from the
comfort of your seat.
Z-Wave
Easily integrate and control an extensive
collection of Z-Wave devices ranging
from lights and door locks to
thermostats and so much more. The
TRF-ZW1 takes your system to the next
level of automation.
Chapter 1: MRX-20 Overview
,
Music
Listen to your favorite music services
like Rhapsody, SiriusXM, Pandora and
more while using the SNP-2
streaming music player.
*Also listen to your personal playlists
using the PSX-2 iPod/iPhone dock.
*Compatible with iPhone 2G to 4S.
2
MRX-20 Front Panel Descriptions
Power
Ethernet
HDMI
Light Pipe
Reset Button
Front Panel Description
Power
Illuminates when unit is ON.
Ethernet
LED indicates:
• Connected: Illuminated
• Not connected: Blinks
HDMI
LED indicates:
• Connected: Illuminated
• Not connected: No illumination
• Flashes: Issue, check source
Reset
When pressed, resets the unit. Resetting does not lose its programming.
Light
Pipe
Attractive illumination signaling when the unit is ON.
Chapter 1: MRX-20 Overview
WARNING!!
Pressing and holding
the Reset button for
15 seconds WILL erase
all programming and
return the MRX-20 to
its original factory
condition.
3
MRX-20 Rear Panel Descriptions
Power
Network
USB
IR Outputs
HDMI IN
HDMI OUT
Rear Panel Descriptions
Power
Connect power cable.
Network
Connect ethernet cable to communicate over the network.
USB
For future use!
IR
Outputs
Ten 3.5mm IR emitter ports each (Each with output level attentuators.)
HDMI IN
Three HDMI IN ports for transmission of digital HD video
HDMI
OUT
One HDMI OUT port used to connect a display device.
Chapter 1: MRX-20 Overview
4
MRX-20 Rear Panel Descriptions
12 Volt
Relays
Sensors
RS-232
Trigger RFTX-1
Rear Panel Descriptions
12 Volt
Two programmable 12V/0.2A outputs. Each may be programmed to turn ON, OFF or momentarily
TOGGLE its output.
Relays
Four programmable relays that maybe set to normally opened (NO), normally closed (NC) or
momentary contacts. A maximum of 30V/.5A per relay.
Sensors
Four sensor ports allow programming of state dependent and triggered macros. Compatible with
URC Sensors: Audio(SEN-AUD),Video (SEN-VID), Voltage (SEN-VOLT), Current (SEN-CMF), Contact
Closure (SEN-CCLS) and Light (SEN-LITE).
RS-232
Four RS-232 ports support TX (Transmit), RX (Receive) and GND (Ground) connections for oneway/two-way communication. Compatible with URC cables RS232F and RS232M.
Trigger IN For future use!
RFTX-1
Attach an optional RFTX-1 transmitter to work with compatible URC devices.
Chapter 1: MRX-20 Overview
5
Chapter 2: Using Your System
Navigating the MRX20’s On-screen Menu
Navigating the MRX20’s on-screen menu is very simple with our URC User Interfaces
such as the TRG-100/TRG-200 Umotion remotes, or URC’s wide assortment of
handheld, in-wall, Android and iOS controllers.
Using the TRG-100/200
While using the TRG-100/TRG-200 remote, press the Umotion
button to activate the on-screen cursor and Umotion
movement. Point the remote at the on-screen display and
move the remote. The cursor is synchronized with the remote’s
movement. Move the cursor around the interface. Hover over a
button to reveal it’s hovered state. Then press the Umotion
button again to make a selection.
Using other Total Control User Interfaces
Use the interfaces navigational buttons (up, down, left or
right) to move the cursor around the on-screen interface.
Then press the select button to make a selection.
Cursor
Umotion
button
Hard button remotes
Hovered
State
Touch screen remotes
Chapter 2: Using your System
6
On-screen Menu Options Overview
Device Menu
Main Menu
Use the Device
Menu to access
all of a device’s
commands. Click
the title to learn
more.
The Main Menu
allows control of
any “connected
device” in the
Total Control
System. Click the
title to learn more.
Quick Bar Menu
The Quick Bar menu
was designed to
contain up to ten of
the most needed
commands for the
device that is currently
in use. Your URC
Professional Installer
programs these
commands, so any
changes to your
current view will need
to be adjusted by your
installer. Click the title
to learn more.
Chapter 2: Using your System
Favorites Menu
Use this menu for
instant access to
your Favorite
Channels, like ABC,
HBO, etc... These
channels are
previously set by
your custom
installer. Click the
title to learn more.
Shortcuts Menu
This user adjustable menu, Shortcuts,
allows you to add common activities
(like Watch TV, Listen to Radio, etc.) for
easy access. Although any of these
actions can be accomplished using the
Main Menu (see below), this would be
a multi-step navigation process as
opposed to a single-click action. Click
the title to learn more.
7
Using the On-screen Menus
Main Menu
The Main Menu accesses any “connected device” in your Total Control System. Depending upon programming, most device /activities
will be placed into subfolders (like Music, Entertainment, etc.). Accessing these subfolders will allow you to control any device that is
available in the chosen room (see Rooms Menu).
While using a TRG-100/200 remote, press the Main button to access the Main Menu’s on-screen interface. Pressing the Umotion
button activates the remote’s motion control. Move the remote around the on-screen interface to reveal the on-screen cursor. Hover
over a button and press the Umotion button again to make a selection.
Title Bar
Category/Device
Ribbon
Device List/
Submenu
Rooms
Menu
Shortcuts
Menu
Status Bar
Chapter 2: Using your System
8
Title Bar
The Title Bar contains valuable information during normal use. Easily find out the time, weather, now playing information and the
room that the MRX is controlling.
Time & Weather
This data, found on the left-hand side of the Title Bar, shows the current time, date and weather information. Clicking this area opens
the Settings menu.
Current Room
The current room portion of the Title Bar shows the room that the MRX-20 is controlling. Remember, in a Total Control system, the
MRX-20 will default to control the room in which it is placed. Use the Rooms Menu to control any other room in the system.
Now Playing
Appearing on the right-hand side of the Title Bar, this displays the source that is currently being used in the room.
• The Now Playing area display’s the device currently in use (in this case, William’s iPod), device icon, and metadata information.
This information is displayed since it is a URC media device.
The metadata will change, every 5 seconds, rotating between song, artist and album.
• Any current room activity, like DVD or Cable, is shown within the Now Playing section.
Displays current activity within a room, such as Watching Cable TV.
Chapter 2: Using your System
9
Categories/Devices Ribbon
This ribbon shows the various categories of control that are available to the selected room. The quantity of categories is determined by
the system setup and can vary from one to multiple categories programmed by the system designer. Although only seven categories
can fit on the screen at any moment, navigate left or right to other categories, if available.
Select a category by hovering over the icon then pressing the Umotion button or using the five-way navigation cursor to select; this
reveals the devices/activities available for that category (submenus).
Device List
Submenus contain the devices/activities that were placed in the chosen category by the system programmer. With the Umotion
control, use the device list’s Up or Down arrows to move the list in the desired direction. Hover over a device/activity to select its icon
by pressing the Umotion button.
Chapter 2: Using your System
10
Status Bar
The Status Bar, located at the bottom of the screen, provides valuable status and feedback of the Total Control system. The four
sections of the Status Bar are determined by the system programmer.
Status Bar Descriptions
Sunrise Time
Sunset Time
Updated at midnight every day, this shows the sunrise time for the next day.
Updated at midnight every day, this shows the sunset time for the next day.
URC
Thermostat
Temperature
Displays the current temperature status based upon the internal sensor, optional wired sensor, or the
average temperature of both when a THZ-100 (URC’s Thermostat) is included in your home.
Alarm Clock
Displays an alarm clock icon and the next scheduled time/day when the room being controlled has
an Alarm that is set to activate.
Surround
Mode
Displays the current surround mode when used with URC’s DMS-AV Surround Processor.
Room
Linked
Status
Displays a link acknowledgment and icon whenever the chosen room/area is “linked” to other rooms.
Weather
Alerts
Based on the current location entered by the system programmer, the words “Weather Alert”
appears if an automatic alert is received via the Internet.
Vacation
Mode
Displays “Vacation Mode: ON” when activated.
Chapter 2: Using your System
11
Rooms Menu
The Rooms Menu offers the user control of every room throughout the home. It is now easier to turn off lights throughout the home
while in the Master Bedroom.
The Rooms Menu is used to:
• Temporarily Link rooms in a Total Control DMS
system. This allows all of the linked rooms to
listen to the same audio source and join the
volume commands into a single interface.
• Monitor the status of other rooms in the Total
Control project.
• Control any other room in a Total Control
project as if it were a remote in that room. This
is dependent upon the programming
done by the Custom Installer.
Links
Room List Buttons
• Each room listing will have an associated box
and action buttons.
• The Exit button will return the user to the last
screen used.
• Selecting the room name will allow for control
of that room (see Selecting a Room.)
Rooms
Chapter 2: Using your System
Options
12
Initial View (Room Monitoring)
When the Rooms Menu opens up, the room list populates with all of the
rooms in the Total Control project. Each room displays its status so the user
can visually see what is “going on” in a specific location.
Selecting a Room (Room Control)
Selecting any room from the room list will allow the MRX-20
to control that room, as if it were physically in that location.
Returning the MRX-20 to control the room where it is physically located
requires accessing the Rooms Menu and selecting the appropriate room.
Linking Rooms (DMS Audio only)
Selecting the Link Rooms button will open up the Link
Rooms screen with the current room already selected. Only
rooms/areas that are part of the DMS family of products will
appear.
• Select, using the check boxes, the rooms that you
would like to LINK. Pressing the check box will
alternately “check” and“uncheck” it.
• The Go Back button will cause the screen to revert
to the Room Menu without making any changes.
• The Done button will temporarily save the checked
rooms as a linked group that can be controlled
from any of the linked rooms.
Linked rooms are saved until the power is turned OFF, or
the user manually unlinks the room(s).
Chapter 2: Using your System
13
Using Linked Rooms
Once a room is linked, pressing the volume or mute buttons for that room will
cause the Linked Rooms Volume Pop-Up to display. This menu will display
the volume levels for all rooms in the temporary group.
• Selecting All Linked Rooms results in the volume and mute commands
to operate ALL rooms (e.g. Volume Up causes the volume in all linked
rooms to rise simultaneously, and at the same rate).
• Selecting an individual room in the Linked Room List allows the volume
and mute buttons to adjust sound for the room chosen.
Room Options
Selecting the Room Options button causes the menu to expand and offers the user various options to control the room.
Room Option Descriptions
Lights Off
Displays a light bulb icon when URC controlled lights are located in the selected room. Selecting this icon
will issue a “lights off” command for the chosen room.
Power Off
The default for this command is to turn off all audio and video devices in that room, however this may have
been altered by the system programmer. Selecting the power icon will issue a “room off” command for the
selected room.
Chapter 2: Using your System
14
Device Menu
When the basic commands found in the Quick Bar do not include the action you need to perform, use the Device Menu to access all
of that device’s commands. For example, your custom programmer may not have included an EJECT command in the DVD’s Quick Bar
menu. Use the Device Menu to see additional commands like ejecting a DVD.
While watching or listening to a device, such as a Cable or CD, access the Device menu with a TRG-100/200 remote by pressing the
Umotion button or the Full Screen button from the Quick Bar menu. Move the remote around the on-screen interface to reveal the onscreen cursor. Hover over a button and press the Umotion button again to select.
TV
image
More
device
buttons
Shortcuts, Quick
Bar and Favorites
(when available.)
Exit
Customizable
buttons
Chapter 2: Using your System
15
Device Menu Descriptions
Exit
Closes the Device menu.
Customizable These buttons vary based on the type of device (Cable, DVD, etc...) A maximum of ten buttons can be
Buttons
modified by your URC Professional Installer.
Shortcuts
Opens the Shortcuts menu with a list of user selected favorite devices.
Favorites
This option is only available when using a device with stored favorites. Pressing Favorites will close
the Device menu and open the Favorite channel menu.
Quick Bar
Press to toggle between the Quick Bar and Device’s Full Screen menu.
TV image
Select the TV image to close the full screen Device Menu.
More Device
Buttons
The full screen option provides the customer with more device commands that are unavailable
using the Quick Bar menu
Chapter 2: Using your System
16
Quick Bar Menu
While watching or listening to a device, such as a Cable or CD, access the Quick Bar menu with a TRG-100/200 remote by pressing the
Umotion button. The Quick Bar menu opens. Move the remote around the on-screen interface to reveal the on-screen cursor. Hover
over a button and press the Umotion button again to select.
TV
image
Customizable
buttons
Exit
Chapter 2: Using your System
Shortcuts, Full
Screen and
Favorites (when
available.)
17
Quick Bar Menu Descriptions
Exit
Closes the Quick Bar menu.
Customizable These buttons vary based on the type of device (Cable, DVD, etc...) A maximum of ten buttons can be
Buttons
modified by your URC Professional Installer.
Shortcuts
Opens the Shortcuts menu with a list of user selected favorite devices.
Favorites
This option is only available when using a device with stored favorites. Pressing the Favorites button
closes the Quick Bar and opens the Favorite channel menu.
Full screen
Press to toggle between the Quick Bar (current view) and device’s Full Screen menu.
TV image
Select the TV image close to the Quick Bar Menu.
Chapter 2: Using your System
18
Shortcuts Menu
There are a maximum of six (6) shortcuts per room location. Remember, the MRX-20 can access any room in the Total Control system
regardless of its physical location.
Only items that appear in the currently selected room are available to be added to the Shortcuts menu.
Using the Shortcuts Menu
With the TRG-100/200 remote, open the Shortcuts menu by pressing the Shortcuts icon.
If nothing is selected after 60 seconds, the Shortcut menu closes and performs the same action as selecting the item on the main menu.
Editing Shortcuts
To add devices/activities to Shortcuts, select the Add/Edit button in the Shortcut menu.
Chapter 2: Using your System
19
This opens the Shortcuts Add/Edit screen, which allows the user to scroll through all of the devices/activities available to that room.
Select up to 6 devices/activities by selecting the check box shown for each possibility. Once all 6 are chosen, the remaining
devices/activities will be grayed out to show there are no more choices to be made. Press the Save icon to save your selections.
Reorder devices by selecting the reorder icon at the top of the Add/Edit window; this opens the Reorder Items list.
If you would like to change the order in which the activities/devices appear, drag the items, using the “grabber” on the right side of the
boxes to rearrange them.
If you would like to remove an item from the list, select the X (delete) icon to the left of the device/activity name.
Selecting the Go Back option will revert to the Add/Edit screen without making any changes.
Selecting the Save option will make the requested changes and revert back to the Add/Edit screen.
Chapter 2: Using your System
20
Favorites Menu
While watching a device such as Cable or Satellite, press the Umotion button on the TRG-100/200 remote. Press the Favorites button,
from either the Quick Bar or Device menu, to access the favorite channel list.
Chapter 2: Using your System
21
Add a Slideshow using Photo Viewer
Easily integrate your stored images via Google+. Simply add the user credentials and select a folder for the MRX-20 to showcase your
images.
The URC Professional Installer MUST ENABLE
this feature before proceeding.
Configure Photo Viewer
1. Select the Photo Viewer
icon from the Main
Menu. The Photo Viewer
menu opens.
2. Select Settings (Photo
Viewer) to open the
Settings page.
Chapter 2: Using your System
22
3. Select On-Line
Service
Username and
Password.
4. Enter the Google+ user credentials by
selecting Username and Password.
Save the account credentials then press
Validate Account.
Press Go Back to return to the Settings
menu.
5. Select Screen Saver
Folder to open its
respective menu.
6. Select the desired
photo folder checkbox
and Save.
Chapter 2: Using your System
23
7. Configure the other slideshow
playback options (speed, order
and effect).
Choose a speed between 3
and 15 seconds.
Turn the display effect
OFF or ON.
Select whether the photos are
shown randomly or in order.
8. Follow the MRX-20 screen saver settings step on page 21 to turn ON Use Photo Slideshow as Screensaver. Then the
photo slideshow will begin to work after the designated screen saver time.
Chapter 2: Using your System
24
Chapter 3: Settings and More...
Adjusting the Settings on the MRX-20
Access the Settings menu using the TRG-100/200 Umotion button to select the Date/Time area.
Press the UMotion button
on the TRG-100/200 then
select the Date/Time
on-screen area.
Settings Menu
The MRX-20 Settings Menu contains user adjustable configuration settings. Select an option by using the 5-way navigation buttons (up,
down, left or right) or hover over an icon. If no icon is pressed for 45 seconds, the unit will return to the Main Menu screen.
The Settings Menu is broken down into the following categories:
General: Contains
settings for Date, Time,
and Temperature scale.
Screen Saver: Manage the
type of screen saver (Generic
or Photo slideshow) to use
and when it should turn on.
Motion Speed: Adjust the
TRG-100/200
on-screen reaction speed.
Network: View
information about the
connected network.
Exit: Closes the
Settings Menu.
Chapter 3: Settings and More...
System: Quickly view the
Memory Usage, Firmware
Version and other details
about the MRX-20.
25
Screen Saver
The Screen Saver settings menu has three configuration options; use the system’s screensaver, use your own photos or do not use a
screen saver.
• Use Generic Screen Saver: Selecting this option enables the system’s default images.
• Use Photo Slide Show as Screen Saver: Select a Google+ account folder to view stored images and set a turn ON time.
• Do Not Use Screen Saver: Screen Saver is turned OFF.
Enable the features below by selecting the radio buttons found on the right side of each property.
Exit: Closes Screen Saver and
returns to the Settings menu.
Selecting Exit returns the user
to the Main menu without
incorporating any changes.
Do Not Use Screen Saver:
Turns off the screen saver.
OK: Selecting OK will accept
any changes made and
return to the Main menu.
Chapter 3: Settings and More...
Use Generic Screen Saver:
Uses URC’s generic slide
show after the time
specified in Turn On After.
Use Photo Slide Show as
Screen Saver: Configure
the Google+ photo
slideshow to Turn On After
a selected amount of time.
Turn On After: Select a
time, between 15 to 120
minutes, to turn on the
screen saver. Press the +
(plus) or - (minus)
buttons to increase or
decrease the time.
26
General
The General settings screen allows for setting the Date,
Time and Temperature scale (Fahrenheit/Celsius). To
view more of this settings menu, press the down arrow
or use the Umotion capability of your TRG-100/200
remote to hover over the down arrow at the bottom of
the screen.
Using the arrow found at the left and right sides of each
property (hour, minutes, month, etc.) adjusts the value
up, or down, respectively.
Exit: Closes Screen Saver and
returns to the Settings menu.
Selecting Exit returns the user
to the Main menu without
incorporating any changes.
OK: Selecting OK will accept
any changes made and
return to the Main menu.
Arrow: Indicates there are
more options to view.
Chapter 3: Settings and More...
27
Motion Speed
Adjust the TRG-100/200 Umotion speed by selecting one of the
options (slow, medium or fast) on the MRX-20 user interface.
OK: Selecting OK will accept
any changes made and
return to the Main menu.
Network
This option will show important information about the current
network, its settings and give the ability to edit the IP address of
the MRX-20.
Exit: Selecting Exit will
The Network Information screen will
return the user to the
display the status of the network
Main menu.
connection (connected, not connected),
current address type (DHCP or Static), IP
address, Subnet Mask, Gateway and DNS.
Chapter 3: Settings and More...
28
System
Although none of the information can be
modified, these System Pages will show
important information about your MRX-20.
These pages should only be needed by a
URC Professional Installer, or a technical
support representative.
Chapter 3: Settings and More...
Exit: Selecting Exit will
return the user to the
Main menu.
29
Installing the MRX-20
Physical Installation of the MRX-20 and Accessories
The MRX-20 Advanced Network System Controller can be installed anywhere in the home with a Cat-5 cable. Up to eight MRX-20’s can
be installed, where the first unit is the master controller and the other seven units are auxiliary controllers. Once installed it can then be
programmed to operate all local equipment using IR, RS-232, Relays or 12V Triggers. It can either be placed on top of the equipment or
rack mounted (using the optional rack-mount adapter.) It must receive power using the included power supply. All IR emitters, HDMI,
RS-232 cables and sensors are plugged into their respective ports on the back. Wires are connected to the detachable connectors for
use of the relays.
Network Installation
1. Connect an Ethernet cable (RJ45) to the rear of the MRX-20 and into the network router or switch.
2. Connect your laptop into the same network router as the MRX-20.
3. Plug flashers into any of the ten flasher ports on the rear of the MRX-20.
Locating the MAC Address
The network MAC Address is a unique number that identifies a device on a network. By listing the MAC address during programming,
URC network devices can use DHCP. The MAC address of the MRX-20 can be discovered over the network through programming. The
unit’s MAC address can be found on a label on the side of the unit (left side when facing rear).
MAC Address
Chapter 3: Settings and More...
30
Optimizing IR Flasher Levels
Test a few commands for each device before fixing the flasher in place on the front panel of a device. Since Satellite Receivers and Cable
Boxes are extremely sensitive to IR overload or saturation, you should test them thoroughly. Put up the cable or satellite on-screen guide
and test the navigation arrows. Compare operation via RF to the original remote control. Operation should be identical. If operation is
inconsistent or sluggish, lower the IR line output and/or reposition the flasher.
If you still have sluggish operation, check that the remote control is set to a particular LINE OUT, rather than ALL. When IR commands
are sent to all the flashers in a cabinet, you can have difficulty adjusting the IR Output. Reprogram the remote control to send IR
commands only via a specific (1-8) Line Output, then readjust the IR Line Output level.
1. Connect an IR emitter to each IR output and run the emitter wire to the front panel of each component. DO NOT STICK the
emitter in place. Adjust the level first.
2. Adjust each of the IR Output levels with the included adjustment tool for best operation. If the component operates best at
minimum level, but is still operating sluggishly or intermittently, move the emitter farther away from the component’s IR sensor.
RS-232 Connection
The MRX-20 can operate equipment via RS-232 communication. This allows
discrete serial commands to be triggered from a Total Control remote and sent
from the MRX-20 over the network connection. The signal is then sent to the
device over proprietary URC RS-232 cables. These use either male or female
DB-9 connections with standard pin-outs. Programming is done in the
Accelerator software.
Using Sensors with the MRX-20
The MRX-20 can use either a Video (composite) or Voltage signal to determine the power status of the equipment it controls. This can
then be used to alter the function of a Macro by using IF/ELSE statements in the programming software. Using a VID-1 Video Sensor
cable, the MRX-20 can detect a video signal from a Composite or Component video output. The VS-100 Voltage Sensor will detect a
Voltage of 3-25V either AC or DC.
Wiring to the Relay on the MRX-20
The MRX-20 has a Relay with three contacts, NO, NC, and COM. These can be used as dry contacts or to send a current to an electrical
switch or motor for use with screens, blinds, curtains, etc.
The Relay can be used as either a latching contact or a momentary contact depending on the programming. The command to actuate
the Relay is programmed using the Accelerator software and is sent from the MRX-20 when triggered by any Total Control system
remote.
Chapter 3: Settings and More...
31
MRX-20 Applications
The following diagrams depict several installation options showcasing a single source, multiple sources and more. Each diagram
shows the MRX-20 as the last connected point before the television to gain optimum performance.
Chapter 3: Settings and More...
32
Chapter 3: Settings and More...
33
Chapter 3: Settings and More...
34
Specifications
Microprocessor : ARM Cortex-A8 Core
Memory : 512MByte
Input & Outputs:
• IR : Ten adjustable output
• USB : One (for future use)
• Ethernet : One 10/100 RJ45 port (Indicator 2LED)
• RS-232 : Four, supporting TX, RX and GND
• Sensor : Four, supporting Video or Voltage sensing (requires
URC sensors)
• Relays : Four, NO, NC or COM
• HDMI : Three Input , One Output
RF:
• Frequency : 2425-2475 MHz
• Range : 50 to 100 feet, depending upon the environment
Others
• Power Supply : AC 100-240V 50/60 Hz
• Weight : 7.2 lbs (3.3 Kg)
• Size : 17.04” x 8.70” x 3.70” (W X D X H)
• Environmental Condition : 0 - 40
Chapter 3: Settings and More...
35
Limited Warranty Statement
1. Limited Warranty and Disclaimers
Universal Remote Control, Inc. (“URC”) warrants that the URC equipment shall be free from defects in material and workmanship under
normal usage for two (2) years from purchase when such is purchased from URC. This limited warranty is valid only in the United States
of America. URC warrants that the software will substantially conform in any material respect to its functional specifications at the time
of delivery. URC SHALL NOT BE LIABLE FOR OPERATIONAL, TECHNICAL OR EDITORIAL ERRORS AND/OR OMISSIONS MADE IN THE URC
DOCUMENTATION. URC DOES NOT WARRANT THAT THE URC SOFTWARE IS BUG-FREE OR ERROR FREE OR THAT THERE ARE NO
ERRORS/BUGS IN THE URC SOFTWARE.
URC warrants that at the time of purchase the URC equipment and the URC software complied with all applicable regulations and
policies of the Federal Communications Commissions (“FCC”) regarding electromagnetic interference caused by electronic/computing
devices and to the extent that the URC equipment and/or the URC software fails to so comply, URC shall, at its own expense, take all
reasonable measures to promptly cause such to comply.
URC equipment purchases from other than an authorized URC dealer or distributor are without warranty.
THIS LIMITED WARRANTY DOES NOT COVER TECHNICAL ASSISTANCE FOR HARDWARE OR SOFTWARE USAGE EXCEPT AS EXPRESSLY
PROVIDED FOR HEREIN, THE EQUIPMENT, SOFTWARE AND DOCUMENTATION OF URC ARE SUPPLIED “AS IS” WITHOUT ANY
WARRANTY, EXPRESS, STATUTORY OR IMPLIED, OF ANY KIND. TO THE MAXIMUM EXTENT PERMITTED BY APPLICABLE LAW, URC
EXPRESSLY DISCLAIMS ALL WARRANTIES, EXPRESS, STATUTORY OR IMPLIED, INCLUDING BUT NOT LIMITED TO THE WARRANTIES OF
MERCHANTABILITY AND FITNESS FOR A PARTICULAR PURPOSE. URC DOES NOT WARRANT, GUARANTEE, OR MAKE ANY
REPRESENTATIONS REGARDING THE USE OF, OR THE RESULTS OF THE USE OF, THE EQUIPMENT, SOFTWARE OR DOCUMENTATION IN
TERMS OF CORRECTNESS, ACCURACY, RELIABILITY OR OTHERWISE.
EXCEPT AS EXPRESSLY PROVIDED FOR HEREIN, TECHNICAL SERVICES ARE SUPPLIED “AS IS”, WITHOUT ANY WARRANTY, EXPRESS,
STATUTORY OR IMPLIED, OF ANY KIND. TO THE MAXIMUM EXTENT PERMITTED BY APPLICABLE LAW, URC EXPRESSLY DISCLAIMS ALL
WARRANTIES, EXPRESS, STATUTORY OR IMPLIED, INCLUDING BUT NOT LIMITED TO THE WARRANTIES OF QUALITY OR REASONABLE
SKILL AND CARE, OR OUTCOME OR RESULTS.
WITHOUT IN ANY WAY LIMITING THE GENERALITY OF THE OTHER PROVISIONS HEREIN, WARRANTY DOES NOT COVER: (I) DAMAGE
FROM MISUSE, NEGLECT OR ACTS OR NATURE, (II) MODIFICATIONS, (III) INTEGRATION WITH THIRD PARTY CONTENT (IV) BEYOND THE
WARRANTY PERIOD AND/ OR FAILURE TO FOLLOW URC WARRANTY CLAIM PROCEDURE.
The warranty limitations and warranty disclaimers may not apply to end user in whole or in part, where such are restricted or excluded
by applicable law and such shall apply to the maximum extent permitted by applicable law.
Chapter 3: Settings and More...
36
In the event of any warranty claim, URC will, at its sole option, repair the URC equipment using new or comparable rebuilt parts, or
exchange the URC equipment for new or rebuilt equipment. In the event of a defect, these are the end user’s exclusive remedies.
All the URC equipment returned for service, exchange or repair require an RGA number. To obtain an RGA number, you must complete a
Return Request Form which you may obtain by calling (914) 835-4484 or contacting URC at [email protected]. To
obtain warranty service, end user must deliver the URC equipment, freight prepaid, in its original packaging or packaging affording
adequate protection to URC at 420 Columbus Avenue, Valhalla, NY 10595. It is end user’s responsibility to backup any macro
programming, artwork, software or other materials that may have been programmed into the unit. It is likely that such data, software, or
other materials will be lost during service and URC will not be responsible for any such damage or loss. A dated purchase receipt, bill of
sale, installation contract or other verifiable proof of purchase is required. For the URC equipment support and other important
information, please visit URC's website available at www.universalremote.com or call the Customer Service Center at (914)
835-4484.
This limited warranty only covers the URC equipment issues caused by defects in material or workmanship during ordinary consumer
use. It does not cover product issues caused by any other reason, including but not limited to product issues due to commercial use,
acts of God, third-party installation,misuse, limitations of technology, or modification of or to any part of the URC equipment. This
limited warranty does not cover the URC equipment sold as used, as is, refurbished, so called "B stock" or consumables (such as
batteries).This limited warranty is invalid if the factory applied serial number has been altered or removed from the URC equipment. This
limited warranty specifically excludes the URC equipment sold by unauthorized resellers.
With the exception of URC’s IR-only, broad-based consumer remotes, none of URC’s PC programmable remotes or any of our Total
Control® whole-house equipment are authorized for online internet sales. Buying URC’s PC programmable remotes or any of our Total
Control® whole-house equipment online means buying equipment that does not have a URC’s limited warranty. Such equipment is not
eligible for URC tech support or software support, either.
2. URC’S Limitations of Liability
IN NO EVENT SHALL URC BE LIABLE FOR INDIRECT, SPECIAL, INCIDENTAL, EXEMPLARY, PUNITIVE OR CONSEQUENTIAL DAMAGES OF
ANY KIND OR LOSS OF PROFITS OR BUSINESS OPPORTUNITY, EVEN IF URC IS ADVISED OF THE POSSIBILITY OF SUCH DAMAGES.
IN NO EVENT SHALL URC BE LIABLE FOR LOSS OF OR DAMAGE TO DATA, COMPUTER SYSTEMS OR COMPUTER PROGRAMS. URC’S
LIABILITY, IF ANY, FOR DIRECT DAMAGES OF ANY FORM SHALL BE LIMITED TO ACTUAL DAMAGES, NOT IN EXCESS OF AMOUNTS
PAID BY END USER FOR THE URC EQUIPMENT.
IN NO EVENT SHALL URC BE LIABLE FOR ANY EVENTS BEYOND ITS CONTROL, INCLUDING ANY INSTANCE OF FORCE MAJEURE. IN NO
EVENT SHALL URC BE LIABLE FOR THE ACTS OR OMISSIONS OF END USER OR ANY THIRD PARTY.
Chapter 3: Settings and More...
37
THE LIMITATIONS OF LIABILITY MAY NOT APPLY TO END USER IN WHOLE OR IN PART, WHERE SUCH ARE RESTRICTED LIMITED OR
EXCLUDED BY APPLICABLE LAW AND SUCH SHALL APPLY TO THE MAXIMUM EXTENT PERMITTED BY APPLICABLE LAW.
URC SHALL NOT BE HELD RESPONSIBLE FOR THE STATEMENTS MADE BY OTHERS.
SOME STATES OR JURISDICTIONS DO NOT ALLOW THE EXCLUSION OR LIMITATION OF INCIDENTAL OR CONSEQUENTIAL DAMAGES,
OR ALLOW LIMITATIONS ON HOW LONG AN IMPLIED WARRANTY LASTS, SO THE ABOVE LIMITATIONS OR EXCLUSIONS MAY NOT
APPLY TO END USER. THIS LIMITED WARRANTY GIVES END USER SPECIFIC LEGAL RIGHTS AND END USER MAY HAVE OTHER RIGHTS
WHICH VARY FROM STATE TO STATE OR JURISDICTION TO JURISDICTION.
End User Agreement
The terms and conditions of the End User Agreement available at www.universalremote.com/eua.php shall apply.
Chapter 3: Settings and More...
38
Federal Communication Commission Interference Statement
This equipment has been tested and found to comply with the limits for a Class B digital device, pursuant to part 15 of the FCC Rules.
These limits are designed to provide reasonable protection against harmful interference in a residential installation. This equipment
generates, uses and can radiate radio frequency energy and, if not installed and used in accordance with the instructions, may cause
harmful interference to radio communications. However, there is no guarantee that interference will not occur in a particular installation.
If this equipment does cause harmful interference to radio or television reception, which can be determined by turning the equipment
off and on, the user is encouraged to try to correct the interference by one more of the following measures:
• Reorient or relocate the receiving antenna.
• Increase the separation between the equipment and receiver.
• Connect the equipment into an outlet on a circuit different from that to which the receiver is connected.
• Consult the dealer or an experienced radio/TV technician for help.
Warning!
Changes or modifications not expressly approved by the manufacturer could void the user's authority to operate the equipment.
Note : The manufacturer is not responsible for any Radio or TV interference caused by unauthorized modifications to this equipment.
Such modifications could void the user's authority to operate the equipment.
FCC Caution
This device complies with Part 15 of the FCC Rules. Operation is subject to the following two conditions: (1) this device may not cause
harmful interference,
and (2) this device must accept any interference received, including interference that may cause undesired operation. Any changes or
modifications not expressly approved by the party responsible for compliance could void the authority to operate equipment. The
antenna(s) used for this transmitter must not be co-located or operating in conjunction with any other antenna or transmitter.
Federal Communication Commission (FCC) Radiation Exposure Statement
The device and the antenna for this device must be installed to ensure a minimum separation distance of 20 cm or more form a person's
body. Other operating configurations should be avoided.
Chapter 3: Settings and More...
39
Declaration of Conformity
Company Name
:
OH SUNG ELECTRONICS CO., LTD.
Company Address
:
#181 GONG DAN-DONG, GUMI, GYEONG BUK,
REPUBLIC OF KOREA
Contact Information
:
Phone: +82-54-468-7281, Fax: +82-54-461-8368
Brand Name
:
UNIVERSAL remote control
Product Name
:
Advanced Network System Controller
Model Name
:
MRX-20
This product herewith complies with the requirements of EMC Directive (2004/108/EC)
and R&TTE Directive(1995/5/EC) issued by the Commission of the European Community
Compliance with these directives implies conformity to the following European Community
n EMC Directive
l EN 55022 (2010)
l EN 55024 (2010)
l EN 61000-3-2 (2006) + A1 (2009) + A2 (2009)
l EN 61000-3-3 (2008)
l AS/NZS CISPR 22 (2009) + A1(2010)
n R&TTE Directive
l
ETSI EN 301-489-1 V1.9.2(2011)
l
ETSI EN 301 489-17 V2.2.1(2012)
l
ETSI 300 328 V1.7.1(2006)
l
ETSI 50385(2002)
l
EN 60950-1(2006)+A11(2009)+A1(2010)+A12(2011)
l
ETSI EN 50383(2010)
List of test reports and/or certificate verified compliance with the standards above
n EMC Directive
l
Report No.
l
Testing Laboratory
: Gumi College EMC Center
n R&TTE Directive
l
Certificate No.
l
Certificate Body
: SIEMIC (No. 2200)
Date of issue
:
Name and signature of authorized person
:
May.1.2013
Quality Assurance Team
OH SUNG ELECTRONICS CO., LTD.
Chapter 3: Settings and More...
40
500 Mamaroneck Avenue, Harrison, NY 10528
Phone: (914) 835-4484 Fax: (914) 835-4532
www.universalremote.com
OCE-0141A Rev 01