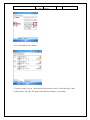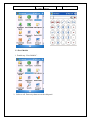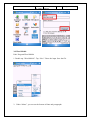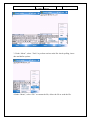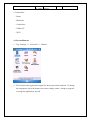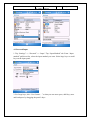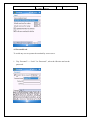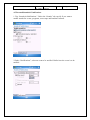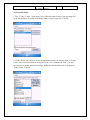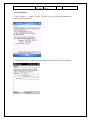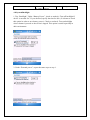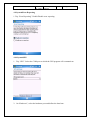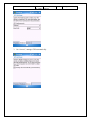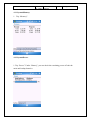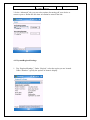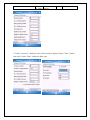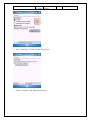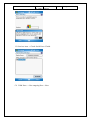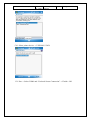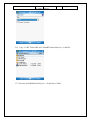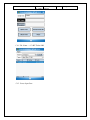
1
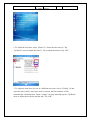
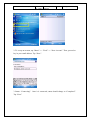
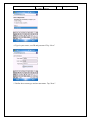
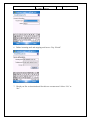
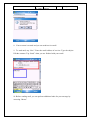
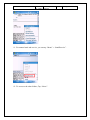
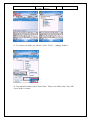
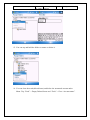
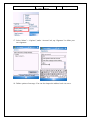
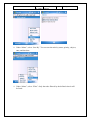
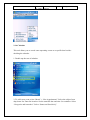
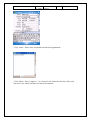
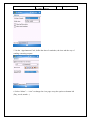
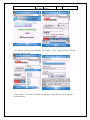
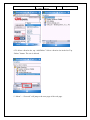
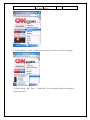
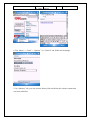
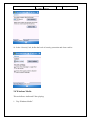
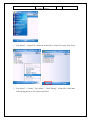
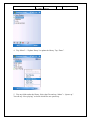
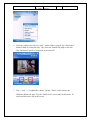
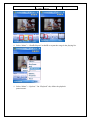
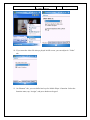
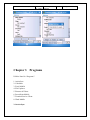
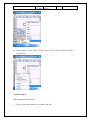
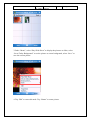
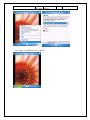
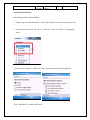
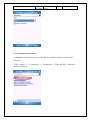
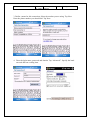
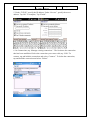
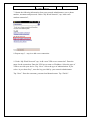
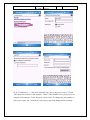
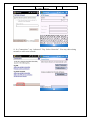
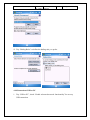
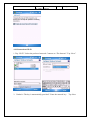
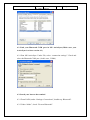
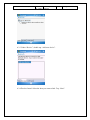
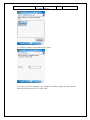
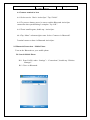
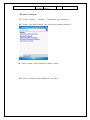
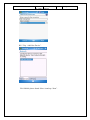
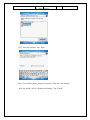
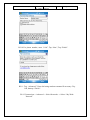
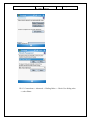
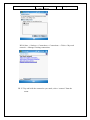
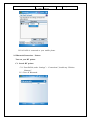
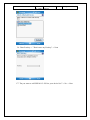
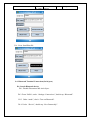
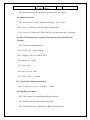
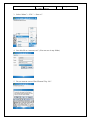
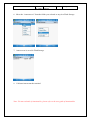
Unitech Electronics Co., Ltd
Created
by Yukiko
PA500 Operation
Manual
V2.0
Page 1 of 123
PA500 Operation Manual
Author: Yukiko Goh
Date Created: 4th October 2006
Last Modified: 23rd January 2007
Unitech Electronics Co., Ltd
Created
by Yukiko
PA500 Operation
Manual
V2.0
Page 2 of 123
History of Records
Version
Updates
1.0
Initial Release
1.1
Correct grammar
2.0
Add Autoinstaller trouble shooting
Chapter
Page No.
10
120
Unitech Electronics Co., Ltd
Created
by Yukiko
PA500 Operation
Manual
V2.0
Page 3 of 123
Table of Contents
Chapter 1 Introduction
5
Chapter 2 Start Menu
2.1
Today
2.1.1 Clock
2.1.2 Wireless Manager
2.1.3 Owner Information
2.1.4 Mail Box
2.1.5
Task
2.1.6
Calendar
2.2 Contacts
2.3 Internet Explorer
2.4 Windows Media
6
6
6
9
9
11
20
21
30
33
38
Chapter
3.1
3.2
3.3
3.4
3.5
3.6
3.7
3.8
44
44
48
48
53
54
58
59
61
3 Programs
ActiveSync
Calculator
Excel Mobile
File Explorer
Pictures and Video
Powerpoint Mobile
Terminal Service Client
Word Mobile
Chapter 4 Settings
4.1
Personal/Button
4.2
Personal/Input
4.3
Personal/Lock
4.4
Personal/Menus
4.5
Personal/Sounds & Notifications
4.6
Personal/Today
4.7
System/About
4.8
System/Backlight
4.9
System/Error Reporting
4.10 System/GPS
63
64
65
67
68
69
70
71
72
73
73
Unitech Electronics Co., Ltd
4.11
4.12
4.13
4.14
4.15
4.16
4.17
4.18
4.19
Created
by Yukiko
PA500 Operation
Manual
System/Memory
System/Power
System/Regional Settings
System/Screen
Connections/Beam
Connections/Bluetooth
Connections/Connections
Connections/USB to PC
Connections/Wi-Fi
V2.0
Page 4 of 123
75
75
76
78
80
81
84
90
91
Chapter 5 Find and Help
5.1 Find
5.2 Help
93
93
94
Chapter 6 Taskbar Icon
95
Chapter 7 Available Function Keys
7.1 Software Keyboard
7.2 Notes
7.3 Tasks
7.4
Calendar
7.5 Mail Box
7.6 Today
96
96
96
96
96
97
97
Chapter 8 Wireless LAN settings
98
Chapter 9 Bluetooth Settings
9.1 Bluetooth Connections - ActiveSync
9.2 Bluetooth Connections – Mobile Phone
9.3 Bluetooth Connections - Printer
9.4 Bluetooth Terminal Connections(Serial Port)
99
99
103
110
117
Chapter 10 Autoinstaller Trouble Shooting
120
Unitech Electronics Co., Ltd
Created
by Yukiko
PA500 Operation
Manual
V2.0
Page 5 of 123
Chapter 1 Introduction
This operation manual aims at instructions of using some useful application programs
and available function keys in Mobile 5.0
Unitech Electronics Co., Ltd
Created
by Yukiko
PA500 Operation
Manual
V2.0
Page 6 of 123
Chapter 2 Start Menu
This chapter introduces some applications which are listed in start menu by default.
2.1 Today
Path: Start/Today
Some utilities are listed on the desktop of PA500. They are:
1.
2.
3.
4.
5.
6.
Clock
Wireless Manager
Owner information
Mail Box
Tasks
Calendar
2.1.1 Clock
This tool shows the current date and time.
1. To adjust the date and time, tap the row of clock.
Unitech Electronics Co., Ltd
Created
by Yukiko
PA500 Operation
Manual
V2.0
Page 7 of 123
2. To adjust the local time, select “Home”(1). Select the time zone(2). Tap
“Up/Down” arrow to adjust the time(3). Tap to adjust the date(4). Tap “OK”.
3. To adjust the time when you are in a different time zone, select “Visiting” (5) and
select the time zone(6). Once time zone is selected, the time and date will be
automatically calculated from “Home” setting. You may manually tap the “Up/Down”
arrow to adjust the local time and the date. Tap “OK”.
Unitech Electronics Co., Ltd
Created
by Yukiko
PA500 Operation
Manual
V2.0
Page 8 of 123
4. To set the alarm, tap “Alarms”.
5. Tap the event(1), tap on “Description” and edit the event(2). Select the day(3) and
set the time(4). Tap OK. The alarm will sound according to your setting.
Unitech Electronics Co., Ltd
Created
by Yukiko
PA500 Operation
Manual
V2.0
Page 9 of 123
2.1.2 Wireless Manager
Turn on or turn off the Wi-Fi power and Bluetooth power. (Default: Off)
2.1.3 Owner Information
Display user ’s information and notes when terminal is power on/warm start.
1. Double tap the row of owner information.
Unitech Electronics Co., Ltd
Created
by Yukiko
PA500 Operation
Manual
V2.0
Page 10 of 123
2. Under “Identification”, enter your name, company’s name, address, telephone
number and email address. Tap OK.
3. Tap “Notes”. Enter the words/sentence to display.
Unitech Electronics Co., Ltd
Created
by Yukiko
PA500 Operation
Manual
V2.0
Page 11 of 123
4. Tap “Options ”. When the device is turned on, displa y:. Check “Identification
information”. Tap OK.
5. Restart the terminal. You will see the information of the owner.
6. Tap the screen to go back to the desktop.
2.1.4 Mail box
This utility allows you to receive/send emails.
1. Double tap the row of mail box. Mailbox will be opened.
Unitech Electronics Co., Ltd
Created
by Yukiko
PA500 Operation
Manual
V2.0
Page 12 of 123
2. To set up an account, tap “Menu” >> “Tools” >> “New Account”. Then, proceed to
key in your email address. Tap “Next ”.
3. Status: “Connecting”. Once it is connected, status should change to “Completed”.
Tap “Next”.
Unitech Electronics Co., Ltd
Created
by Yukiko
PA500 Operation
Manual
4. Type in your name, user ID and password. Tap “Next”.
5. Define the account type and account name. Tap “Next”.
V2.0
Page 13 of 123
Unitech Electronics Co., Ltd
Created
by Yukiko
PA500 Operation
Manual
V2.0
Page 14 of 123
6. Define incoming mail and outgoing mail server. Tap “Finish”.
7. Would you like to download mail for this new account now? Select “Yes” or
“No”.
Unitech Electronics Co., Ltd
Created
by Yukiko
PA500 Operation
Manual
V2.0
Page 15 of 123
8. Your account is created and you can send/receive email.
9. To send mail, tap “New”. Enter the email address of receiver. Type the subject.
Edit the contents. Tap “Send ” when you are finished with your email.
10. Before sending mail, you can perform additional tasks for your message by
accessing “Menu”.
Unitech Electronics Co., Ltd
Created
by Yukiko
PA500 Operation
Manual
V2.0
Page 16 of 123
11. For manual send and receive, you can tap “Menu” > “Send/Receive”.
12. To access to the other folders, Tap “Inbox”.
Unitech Electronics Co., Ltd
Created
by Yukiko
PA500 Operation
Manual
V2.0
Page 17 of 123
13. To create a new folder, tap “Menu”. Select “Tools” > “Manage Folders”.
14. Tap and hold a folder, select “New Folder”. Enter a new folder name. Tap “OK”.
A new folder is created.
Unitech Electronics Co., Ltd
Created
by Yukiko
PA500 Operation
Manual
V2.0
Page 18 of 123
15. You can tap and hold the folder to rename or delete it.
16. You can clear the trash (deleted items) and delete the unwanted account under
Menu. Tap “Tools” > Empty Deleted Items and “Tools” > Clear “Account name”.
Unitech Electronics Co., Ltd
Created
by Yukiko
PA500 Operation
Manual
V2.0
Page 19 of 123
17. Select “Menu” > “Options”, under “Account ” tab, tap “Signature” to define your
own signature.
18. Define options of message. You can also import the address book via server.
Unitech Electronics Co., Ltd
Created
by Yukiko
PA500 Operation
Manual
V2.0
Page 20 of 123
19. To manage the mail/message in the each folder, you can do it in “Menu” >
“Delete”, “Reply”, “Forward”, “Move ”, “Mark as Read” etc.
2.1.5 Task
This utility allows you to record/check task to do/completed. This is very similar to
“Calendar”.
1. Tap the entry bar field to enter a new task, then tap “Enter”.
Unitech Electronics Co., Ltd
Created
by Yukiko
PA500 Operation
Manual
V2.0
2. To edit existing task, double tap the task name and tap “Edit”.
Page 21 of 123
Unitech Electronics Co., Ltd
Created
by Yukiko
PA500 Operation
Manual
V2.0
Page 22 of 123
3. You may tap and hold on the task name and select the action from the pull down
menu. There are three actions available: Create copy, delete task and beam task. You
may change the priority as well.
4. Tap “Create copy” to duplicate the task.
Unitech Electronics Co., Ltd
Created
by Yukiko
PA500 Operation
Manual
V2.0
Page 23 of 123
5. Tap “Beam Task”. Double tap “Infrared”. Place the terminal near the IrDA port of
the host and tap the host name. Once infrared is connected, the task will be sent to the
host.
Unitech Electronics Co., Ltd
Created
by Yukiko
PA500 Operation
Manual
V2.0
Page 24 of 123
6. After the task has been completed, tap “Complete”. To Activate, tap “Activate”.
7. Tap “Menu”. Select “Options ”. You can define reminders for new items, show start
and due dates and show Tasks entry bar. Tap OK.
Unitech Electronics Co., Ltd
Created
by Yukiko
PA500 Operation
Manual
V2.0
Page 25 of 123
8. Under “Menu”, select “Sort By”. You can sort the tasks by status, priority, subject,
start, and due date.
9. Under “Menu”, select “Filter”. Only the tasks filtered by the defined criteria will
be listed.
Unitech Electronics Co., Ltd
Created
by Yukiko
PA500 Operation
Manual
V2.0
Page 26 of 123
2.1.6 Calendar
This tool allows you to record some upcoming events on a specific date besides
checking the calendar.
1. Double tap the row of calendar.
2. To add a new event, select “Menu” > “New Appointment”. Select the subject from
drop down list. Enter the location. Set the start/end date and time. Set reminder. Select
“Categories and Attendees”. Select “Status and Sensitivity”.
Unitech Electronics Co., Ltd
Created
by Yukiko
PA500 Operation
Manual
V2.0
Page 27 of 123
3. Tap “Notes”. Enter some words that describe this appointment.
4. Tap “Menu”. Select “Options ”. On “General” tab, define the first day of the week
and week view. Show half hour slot and week numbers.
Unitech Electronics Co., Ltd
Created
by Yukiko
PA500 Operation
Manual
V2.0
Page 28 of 123
5. On the “Appointments” tab, define the time of reminders, the icon and the way of
sending a meeting request.
6. Select “Menu” > “view” to change the view page or tap the option on bottom left
(Day, week, month…).
Unitech Electronics Co., Ltd
Created
by Yukiko
PA500 Operation
Manual
V2.0
Page 29 of 123
7. Tap the day bar to jump to the particular day. Tap “>” to skip to the week after or
tap “<” to reverse to the previous week.
Unitech Electronics Co., Ltd
Created
by Yukiko
PA500 Operation
Manual
V2.0
Page 30 of 123
2.2 Contacts
This utility allows you to key in the contact information of friends, customers, and
partners (Like Address Book) and it can be used in mailbox for sending emails.
1. Tap “Contacts”.
2. Tap “New”. In “Details” tab, enter all the information of the person that you want
to list. In “Notes” tab, enter more descriptions about this person. Tap OK. A new
contact is added.
Unitech Electronics Co., Ltd
Created
by Yukiko
PA500 Operation
Manual
V2.0
Page 31 of 123
3. To send an email to a contact person, tap and hold the contact’s name in the list.
Select “Send E- mail”. Follow the steps of Inbox to send the email message.
4. To edit the information, double tap the contact name. Select “Menu” > “Edit”.
Unitech Electronics Co., Ltd
Created
by Yukiko
PA500 Operation
Manual
V2.0
Page 32 of 123
5. To search a particular contact, type the name of the contact you are searching.
6. Tap “Menu” > “Option”. Define the display style and default area code.
Unitech Electronics Co., Ltd
Created
by Yukiko
PA500 Operation
Manual
V2.0
Page 33 of 123
7. Tap “Menu” > “View By” to view the contacts by name or by their company.
2.3 Internet Explorer
This utility allows you to browse an internet website.
Make sure the terminal is connected to the network.
1. Tap “Internet Explorer”. On the field of address bar, type the URL of the home page
you want to view, then tap the arrow icon.
Unitech Electronics Co., Ltd
Created
by Yukiko
PA500 Operation
Manual
V2.0
Page 34 of 123
2. To add the website to your favorites, Tap “Menu”, select “Add to Favorite”. Define
the name and tap “Add”.
3. Tap “Menu” > “Favorites”. Double tap the name of the favorite link to view the
favorite website.
Unitech Electronics Co., Ltd
Created
by Yukiko
PA500 Operation
Manual
V2.0
Page 35 of 123
4. To delete a favorite site, tap “Add/Delete”. Select a favorite site in the list. Tap
“Delete” button. The site is deleted.
5. “Menu” > “Forward” will jump to the next page of the web page.
Unitech Electronics Co., Ltd
Created
by Yukiko
PA500 Operation
Manual
V2.0
Page 36 of 123
6. Under “Menu” > “View”, please select the way you want to view the web page.
7. Under “Menu”, tap “Tools” > “Send Link ”. You can send the link of web page to
anyone by email.
Unitech Electronics Co., Ltd
Created
by Yukiko
PA500 Operation
Manual
V2.0
Page 37 of 123
8. Tap “Menu” > “Tools” > “Options ”, on “General” tab, define the homepage.
9. On “Memory” tab, you can clear the history link and delete the website content that
was browsed before.
Unitech Electronics Co., Ltd
Created
by Yukiko
PA500 Operation
Manual
V2.0
Page 38 of 123
10. In the “Security” tab, define the level of security protection and clear cookies.
2.4 Windows Media
This tool allows Audio and Video playing.
1. Tap “Windows Media ”.
Unitech Electronics Co., Ltd
Created
by Yukiko
PA500 Operation
Manual
V2.0
Page 39 of 123
2. Tap “Menu” > “Open File”. Select the Audio file or Video file to play. Tap “Play”.
3. Tap “Menu” > “Library”. Tap “Menu” > “Now Playing”. All the files of the same
folder being played or to be played are listed.
Unitech Electronics Co., Ltd
Created
by Yukiko
PA500 Operation
Manual
V2.0
Page 40 of 123
4. Tap “Menu” > “Update library” to update the library. Tap “Done”.
5. Tap any folder under the library. Select the files and tap “Menu” > “Queue up ”.
You can tap “Now playing” to check which files are queued up.
Unitech Electronics Co., Ltd
Created
by Yukiko
PA500 Operation
Manual
V2.0
Page 41 of 123
6. Select any audio/video file, tap “Play”. Audio/Video is played. Tap “Play/Pause”
button to hold or resume the play. Tap “Forward” button will jump to next file.
Tap “Backward” button to jump back to previous file.
7. Tap “+” and “—“ to adjust the volume. Tap the “Earth” icon to browse the
Windows Media web page. Tap the “Full Screen” icon to play in full screen. To
exit from full screen, tap on the screen.
Unitech Electronics Co., Ltd
Created
by Yukiko
PA500 Operation
Manual
V2.0
Page 42 of 123
8. Select “Menu” > “Shuffle/Repeat” to shuffle or repeat the songs in the playing list.
9. Select “Menu” > “Options”. On “Playback” tab, define the playback
pause/resume.
Unitech Electronics Co., Ltd
Created
by Yukiko
PA500 Operation
Manual
V2.0
Page 43 of 123
10. If you want the video file always played in full screen, you can adjust in “Video”
tab.
11. On “Buttons ” tab, you can define hot keys for Media Player ’s function. Select the
function name, tap “Assign”, and press hardware keypad.
Unitech Electronics Co., Ltd
Created
by Yukiko
Chapter 3 Programs
Utilities listed in “Programs ”:
1. ActiveSync
2. Calculator
3. Excel Mobile
4. File Explorer
5. Pictures & Videos
6. PowerPoint Mobile
7. Terminal Service Client
8. Word Mobile
3.1 ActiveSync
PA500 Operation
Manual
V2.0
Page 44 of 123
Unitech Electronics Co., Ltd
Created
by Yukiko
PA500 Operation
Manual
V2.0
Page 45 of 123
Allow connection between terminal and other devices.
Path:\Start\Programs\ActiveSync
Connect the terminal to your device by USB or IrDA Connection. The ActiveSync
will automatically connect the terminal and the device and start sync.
1. Double tap “ActiveSync ”. Tap “Sync ” to synchronize manually.
2. On “Menu”, select “Options ”, select the items that you want to sync.
3. On “Menu”, select “Connections”, check “Synchronize all PCs using this
connection”. Select USB or baud rate default.
4. On “Menu”, select “Connection via IR”. Face the IrDA port to the IrDA port of
your host. Terminal is connected to host via IrDA.
Connect ActiveSync via Bluetooth
A. Bluetooth ActiveSync
A1 Check or define your host’s Bluetooth COM port
A1.1 If your host (PC or notebook) has built in Bluetooth function, turn on(Or
Enable) the Bluetooth function.
Unitech Electronics Co., Ltd
Created
by Yukiko
PA500 Operation
Manual
V2.0
Page 46 of 123
A1.2 If your host (PC or notebook) does not have built in Bluetooth function,
please attach an external Bluetooth dongle at your host and install the driver.
A1.3 Your taskbar should have a Bluetooth icon.
A1.4 Right click this icon and select “Advanced configuration”. (As different
user might use different brand of Bluetooth dongle, please find this according to
the manual of your Bluetooth dongle.)
A1.5 Select “Local Device Service”. Check which COM port is applied to
Bluetooth. (Ex: COM4). If you want to change the COM port, you can click
“Properties” and change it.
A2 Link your Bluetooth COM port in MS ActiveSync.
(Make sure your
Unitech Electronics Co., Ltd
Created
by Yukiko
PA500 Operation
Manual
V2.0
Page 47 of 123
ActiveSync is at least version 4.1)
A2.1 Run MS ActiveSync. Under File, select “connection settings”. Check and
select the Bluetooth COM port. (In this case, COM5)
A3 Search your host on the terminal
A3.1 On the PA600, under “Settings>Connections”, double tap “Bluetooth”.
A3.2 Under “Mode”, check “Turn on Bluetooth”.
A3.3 Under “Device”, double tap “New Partnership ”.
A3.4 Devices found. Select the host you want to link. Tap “Next ”.
A3.5 Enter passkey (any number), tap “Next ”.
A3.6 On your host, you should see dialog prompt for the passkey. Enter the same
key as in A3.5, click “OK”.
A4 Connect terminal to host
Unitech Electronics Co., Ltd
Created
by Yukiko
PA500 Operation
Manual
V2.0
Page 48 of 123
A4.1 Select service. Check “ActiveSync ”. Tap “Finish”.
A4.2 To preserve battery power, be sure to end the Bluetooth ActiveSync
connection when synchronizing is complete. Tap “OK”.
A4.3 From /start/Program, double tap “ActiveSync.
A4.4 Tap “Menu” at bottom right corner. Select “Connect via Bluetooth”.
Terminal connect to host via Bluetooth ActiveSync.
3.2 Calculator
Path: Programs \Calculator
1. Double tap “Calculator” to perform mathematic calculation.
Unitech Electronics Co., Ltd
Created
by Yukiko
PA500 Operation
Manual
3.3 Excel Mobile
1. Double tap “Excel Mobile”.
2. Select a cell. Enter any character on the edit panel.
V2.0
Page 49 of 123
Unitech Electronics Co., Ltd
Created
by Yukiko
PA500 Operation
Manual
V2.0
3. You can shift to other sheets or do a mathematics task.
4. Under “View”, select “Full Screen” to view in full screen.
Page 50 of 123
Unitech Electronics Co., Ltd
Created
by Yukiko
PA500 Operation
Manual
5. You can split a cell or freeze the panes.
6. Select “Show” to show/hide headings and scroll bar.
V2.0
Page 51 of 123
Unitech Electronics Co., Ltd
Created
by Yukiko
PA500 Operation
Manual
V2.0
Page 52 of 123
7. Under “Menu”, select cut, copy, paste or Edit.
8. Under “Menu”, select “Insert”. You can insert cells, chart, Symbol, Function or
Define Name.
Unitech Electronics Co., Ltd
Created
by Yukiko
PA500 Operation
Manual
V2.0
Page 53 of 123
9. Under “Menu”, select “Format”. You can format cells, Row, Column, Chart or
Sheets.
10. Under “Menu”, select “Tools” to sort or filter the data.
Unitech Electronics Co., Ltd
Created
by Yukiko
PA500 Operation
Manual
V2.0
Page 54 of 123
11. Under “Menu”, select “Files” to open a new file, save the file, delete the file or
send the file.
3.4 File Explorer
Path: Programs \File Explorer
1. Tap it to view and organize your folders and files.
Unitech Electronics Co., Ltd
Created
by Yukiko
3.5 Pictures and Video
Path: Programs \Pictures and Video
1. Double tap Pictures and Video.
2. Tap each picture to enlarge.
PA500 Operation
Manual
V2.0
Page 55 of 123
Unitech Electronics Co., Ltd
Created
by Yukiko
PA500 Operation
Manual
V2.0
Page 56 of 123
3.Under “Menu”, select “Play Slide Show” to display the pictures as slides, select
“Set as Today Background ” to set the picture as screen background, select “Save ” to
save the current picture.
4. Tap “Edit” to enter edit mode. Tap “Rotate” to rotate picture.
Unitech Electronics Co., Ltd
Created
by Yukiko
PA500 Operation
Manual
V2.0
Page 57 of 123
5. Tap “Menu” to crop or auto-correct the picture.
6. Exit edit mode. Under “Menu”, select “Options ”. Define the sending size, rotating
direction.
Unitech Electronics Co., Ltd
Created
by Yukiko
PA500 Operation
Manual
7. Tap “Send ” to send the picture by email.
V2.0
Page 58 of 123
Unitech Electronics Co., Ltd
Created
by Yukiko
PA500 Operation
Manual
V2.0
Page 59 of 123
3.6 PowerPoint Mobile
Path:/Programs/PowerPoint Mobile
1. Double tap “PowerPoint Mobile”. Select the directory to open the PowerPoint file.
2. Tap on the arrow menu. Tap “Next”, “Previous ” and “Go to Slide” to change the
slide.
3. Select “Show Options ”. Define the slide orientation and the way of playback.
4.Tap “End Show” to end the slide show.
Unitech Electronics Co., Ltd
Created
by Yukiko
PA500 Operation
Manual
V2.0
Page 60 of 123
5. Back to file list. Under menu, you can rename the file, delete the file or send the
file.
3.7 Terminal Service Client
Path: Program\Terminal Services Client
Make sure your terminal is connected via network or modem.
1. Tap “Terminal Service Client”. Enter the server name you want to connect. Or
select the recent server if you have connected before. Tap Connect.
Unitech Electronics Co., Ltd
Created
by Yukiko
PA500 Operation
Manual
V2.0
Page 61 of 123
3.8 Word Mobile
Path: Program\Word Mobile
1. Double tap “Word Mobile”. Tap “New”. Enter the input. Save the file.
2. Under “Menu”, you can set the format of fonts and paragraphs.
Unitech Electronics Co., Ltd
Created
by Yukiko
PA500 Operation
Manual
V2.0
Page 62 of 123
3. Under “Menu”, select “Tools” to perform various tasks like check spelling, insert
date and define options
4.Under “Menu”, select “File” to rename the file, delete the file or send the file.
Unitech Electronics Co., Ltd
Created
by Yukiko
PA500 Operation
Manual
V2.0
Page 63 of 123
Unitech Electronics Co., Ltd
Created
by Yukiko
Chapter 4 Settings
There are 3 tabs under settings:
1. Personal
- Button
- Input
- Lock
- Menus
- Sounds & Notifications
- Today
2. System
- About
- Backlight
- Clock & Alarms
- Error Reporting
- GPS
- Memory
- Power
- Regional Settings
- Screen
PA500 Operation
Manual
V2.0
Page 64 of 123
Unitech Electronics Co., Ltd
Created
by Yukiko
PA500 Operation
Manual
V2.0
Page 65 of 123
3. Connections
- Beam
- Bluetooth
- Connections
- USB to PC
- Wi-Fi
4.1 Personal\Button
1. Tap “Settings” >> “Personal” >> “Button”.
2. The list shows the application assigned to the keypad on the terminal. To change
the assignment, select the button you want to change, under “Assign a program”,
re-assign the application, tap OK.
Unitech Electronics Co., Ltd
Created
by Yukiko
PA500 Operation
Manual
V2.0
Page 66 of 123
4.2 Personal/Input
1. Tap “Settings” >> “Personal” >> “Input ”. Tap “Input Method” tab. From “Input
method” pull down list, select the input method you want. Select large keys or small
keys on the input panel.
2. For Large keys, tick “Use Gesture…” so that you can enter space, shift key, enter
and backspace by dragging the panel’s keys.
Unitech Electronics Co., Ltd
Created
by Yukiko
PA500 Operation
Manual
V2.0
Page 67 of 123
3. Tap “Word Completion” tab. Check “Suggest word when entering text” and define
how many characters to key before word is suggested and how many words to be
suggested. Check “Add a space after suggested word” and “Replace text as you type”.
4. Tap “Options” tab. Select the appropriate voice recording format and default zoom
level . Check “Capitalize first letter of sentence” and “Scroll upon reaching the last
line”.
Unitech Electronics Co., Ltd
Created
by Yukiko
PA500 Operation
Manual
V2.0
Page 68 of 123
4.3 Personal\Lock
To avoid any user to operate the terminal by screen saver.
1. Tap “Personal” >> “Lock”. In “Password”, select the idle time and set the
password.
Unitech Electronics Co., Ltd
Created
by Yukiko
PA500 Operation
Manual
V2.0
Page 69 of 123
2. In the “Hint” tab, type the hint of the password.
4.4 Personal\Menus
1. Tap “Personal” >> “Menus ”. Check the applications that you want to show on Start
menu. Tap OK.
Unitech Electronics Co., Ltd
Created
by Yukiko
PA500 Operation
Manual
V2.0
Page 70 of 123
4.5 Personal\Sounds & Notifications
1. Tap “Sounds & Notifications ”. Under the “Sounds” tab, specify if you want to
enable sounds for events, programs, screen taps and hardware buttons.
2.Under “Notifications”, select an event to be notified. Define how the event is to be
notified.
Unitech Electronics Co., Ltd
Created
by Yukiko
PA500 Operation
Manual
V2.0
Page 71 of 123
4.6 Personal\Today
1. Tap “Today”. Under “Appearance” tab, select the today screen or use an image file
as the background. You may beam/delete today screen as you like. Tap OK.
2. Under “Items” tab, check to select the applications that you want to show on Today
screen. You may move them to arrange the order. For Calendar and Task , you may
tap “Option” to define advanced settings. Define the terminal idle time to display the
Today screen. Tap OK.
Unitech Electronics Co., Ltd
Created
by Yukiko
PA500 Operation
Manual
V2.0
Page 72 of 123
4.7 System\About
1. Tap “System” >> “About ”. Under “Version”, you can view the information of
processor and memory etc.
2. Under Device ID, you may enter the name for the device and the description.
Unitech Electronics Co., Ltd
Created
by Yukiko
PA500 Operation
Manual
V2.0
Page 73 of 123
4.8 System\Backlight
1. Tap “Backlight”. Under “Battery Power”, check or uncheck “Turn off backlight if
device is not used for”. If you checked, specify the time for idle. (It is better to check
this option in order to save battery power). Check or uncheck “Turn on backlight
when a button is pressed or the screen is tapped. This option is useful especially in
dark environment.
2. Under “External power”, repeat the same steps as step 1.
Unitech Electronics Co., Ltd
Created
by Yukiko
PA500 Operation
Manual
V2.0
Page 74 of 123
4.9 System\Error Reporting
1. Tap “Error Reporting”. Enable/Disable error reporting.
4.10 System\GPS
1. Tap “GPS”. Select the COM port to which the GPS program will communicate.
2. On “Hardware”, select the hardware port and define the baud rate.
Unitech Electronics Co., Ltd
Created
by Yukiko
PA500 Operation
Manual
3. On “Access”, manage GPS automatically.
V2.0
Page 75 of 123
Unitech Electronics Co., Ltd
Created
by Yukiko
PA500 Operation
Manual
V2.0
Page 76 of 123
4.11 System\Memory
1. Tap “Memory”.
4.12 System\Power
1. Tap “Power”. Under “Battery”, you can check the remaining power of both the
main and backup batteries.
Unitech Electronics Co., Ltd
Created
by Yukiko
PA500 Operation
Manual
V2.0
Page 77 of 123
2. In the “Advanced” tab, you can select options for turning off your device to
conserve power. Define the idle time of terminal to turn off the unit.
4.13 System\Regional Settings
1. Tap “Regional Settings ”. Under “Region”, select the region you are located.
Under “Number”, specify the options of numeric display.
Unitech Electronics Co., Ltd
Created
by Yukiko
PA500 Operation
Manual
V2.0
Page 78 of 123
2. Under “Currency”, define the style of the currency display. Under “Time”, define
time style. Under “Date”, define the date style.
Unitech Electronics Co., Ltd
Created
by Yukiko
PA500 Operation
Manual
V2.0
Page 79 of 123
4.14 System\Screen
1. Tap “Screen”. Define the orientation. Tap “Align Screen” when you want to
recalibrate the screen.
Unitech Electronics Co., Ltd
Created
by Yukiko
PA500 Operation
Manual
2. Tap “ClearType”. Check “Enable Clear Type”.
3. In the “Text Size” tab, adjust the font size.
V2.0
Page 80 of 123
Unitech Electronics Co., Ltd
Created
by Yukiko
PA500 Operation
Manual
V2.0
Page 81 of 123
4.15 Connections \Beam
1. Tap “Connections ” >> “Beam”. Check “Receive all incoming beams”. You will be
prompted to accept the incoming beams. If you do not want to be prompted, uncheck
this option.
Unitech Electronics Co., Ltd
Created
by Yukiko
PA500 Operation
Manual
V2.0
Page 82 of 123
4.16 Connections \Bluetooth
1. Tap “Bluetooth”. Under “Mode”, check “Turn On Bluetooth” and check “Make
this device discoverable to other devices”.
2. Under “Devices”, tap “Add new device” to search new Bluetooth devices. Your
terminal will search for other Bluetooth devices and display them in the list.
Unitech Electronics Co., Ltd
Created
by Yukiko
PA500 Operation
Manual
V2.0
Page 83 of 123
3. Select the device you want to connect. Tap “Next”.
4. Select the service you want to use. Tap “Finish”.
5. Under “COM Ports”, select “New Outgoing port” or “New Incoming port”.
Unitech Electronics Co., Ltd
Created
by Yukiko
PA500 Operation
Manual
6. Select the device you want to add. Tap “Next ”.
7. Select the COM port to assign. Tap “Finish”.
V2.0
Page 84 of 123
Unitech Electronics Co., Ltd
Created
by Yukiko
PA500 Operation
Manual
V2.0
Page 85 of 123
4.17 Connections \Connections
1. Obtain the information from your ISP: ISP server phone number, username and
password.
2. Tap “settings” >> “Connections ” >> “Connections”. Under My ISP, “Add a new
modem connection”.
Unitech Electronics Co., Ltd
Created
by Yukiko
PA500 Operation
Manual
V2.0
Page 86 of 123
3. Define a name for this connection. Select the modem you are using. Tap Next.
Enter the phone number you should dial. Tap Next.
4. Enter the login name, password and domain. Tap “Advanced”. Specify the baud
rate and dial tone waiting time.
Unitech Electronics Co., Ltd
Created
by Yukiko
PA500 Operation
Manual
V2.0
Page 87 of 123
5. Under “TCP/IP”, specify the IP address. Under “Servers”, specify the server
address. Tap OK. To complete, Tap “Finish”.
6. On Connections, tap “Manage existing connections ”. The list shows the connection
that has been established. Select the connection you want to edit, tap “Edit”. To
connect, tap and hold the connection and select “Connect”. To delete the connection,
tap and hold the connection and select “Delete”.
Unitech Electronics Co., Ltd
Created
by Yukiko
PA500 Operation
Manual
V2.0
Page 88 of 123
7. Obtain the following information from your network administrator: server phone
number, username and password. Under “My Work Network”, tap “Add a new
modem connection”,
8. Repeat step 3 ~ step 6 to add a new connection.
9. Under “My Work Network”, tap “Add a new VPN server connection”. Enter the
name for the connection. Enter the VPN server name or IP address. Select the type of
VPN to use with your device. Tap “Next”. Select the type of authentication. If you
select “A pre-shared key”, enter the key provided by your network administrator.
Tap “Next ”. Enter the username, password and domain name. Tap “Finish”.
Unitech Electronics Co., Ltd
Created
by Yukiko
PA500 Operation
Manual
V2.0
Page 89 of 123
10. In “Connection” >> “My work network”, tap “Set up my proxy server”. Check
“This network connects to the internet”. Check “This network uses a proxy server to
connect to the internet”. Enter the proxy server name. To change the port number or
proxy server type, tap “Advanced”, select proxy type and change desired settings.
Unitech Electronics Co., Ltd
Created
by Yukiko
PA500 Operation
Manual
V2.0
Page 90 of 123
11. In “Connections ”, tap “Advanced”. Tap “Select Networks”. You may edit existing
network or add a new network.
Unitech Electronics Co., Ltd
Created
by Yukiko
PA500 Operation
Manual
V2.0
Page 91 of 123
12. Tap “Dialing Rules” to define the dialing rule you prefer.
4.18.Connections \USB to PC
1. Tap “USB to PC”, check “Enable advanced network functionality” for an easy
USB connection.
Unitech Electronics Co., Ltd
Created
by Yukiko
PA500 Operation
Manual
V2.0
Page 92 of 123
4.19.Connections \Wi-Fi
1. Tap “Wi-Fi”. Select the preferred network. Connects to “The Internet”. Tap “Next ”.
2. Uncheck “The key is automatically provided”. Enter the network key.
Tap Next.
Unitech Electronics Co., Ltd
Created
by Yukiko
PA500 Operation
Manual
V2.0
Page 93 of 123
3. Tap Finish.
4. In “Network Adapters”, select the “NE2000 Compatible Ethernet Driver”.
OK.
Tap
Unitech Electronics Co., Ltd
Created
by Yukiko
PA500 Operation
Manual
V2.0
Page 94 of 123
Chapter 5 Search and Help
Search: Find any document or files of any type in the terminal.
Help: A guide for your Mobile 5.0.
5.1 Search
1. Tap “Start” >> “Help”. Tap “Search”. Find the files or data you want.
Unitech Electronics Co., Ltd
5.2 Help
1. Tap “Start” >> “Help”.
Created
by Yukiko
PA500 Operation
Manual
V2.0
Page 95 of 123
Unitech Electronics Co., Ltd
Created
by Yukiko
PA500 Operation
Manual
V2.0
Page 96 of 123
Chapter 6 Taskbar Icon
1. Tap “Volume” icon. You may turn the sounds on/off or adjust the volume. Tap the
icon again to hide the adjust tool.
2. Tap “RF connection” icon. The message shows you the RF connection. To edit the
setting of RF connection, tap “Settings” to adjust.
Unitech Electronics Co., Ltd
Created
by Yukiko
PA500 Operation
Manual
V2.0
Chapter 7 Available Function Keys
7.1 Software Keyboard
1. Press the keyboard button to pop up software keyboard.
7.2 Notes
1. Press “Notes” key to call “Note Pad”.
7.3 Tasks
1. Press “Tasks” key to call “Tasks”.
7.4 Calendar
1. Press “Calender” key to call “Calendar”.
Page 97 of 123
Unitech Electronics Co., Ltd
Created
by Yukiko
PA500 Operation
Manual
V2.0
Page 98 of 123
7.5 Mail Box
1. Press “Mail Box” key to call “Mail Box”.
7.6 Today
1. Press “Today” key to call “Today” screen.
All these button assignment can be changed by /Settings/Personal/Button.
Unitech Electronics Co., Ltd
Created
by Yukiko
PA500 Operation
Manual
V2.0
Page 99 of 123
Chapter 8 Wireless LAN Settings
PA500 has a built- in RF functionality. After setting the network successfully, it will
connect to a LAN network automatically. Suspend and warm start will always resume
the auto-reconnection.
Make the network setting
1.
2.
3.
4.
5.
Once the RF card is detected, a dialog box will pop up.
Select a network SSID to connect to. Select one of the networks.
Select “The internet”. Tap “Connect”.
Enter the network key. Tap “Connect”.
The icon changes into a double arrow, indicating that the RF connection is
running.
Unitech Electronics Co., Ltd
Created
by Yukiko
PA500 Operation
Manual
V2.0
Page 100 of 123
Chapter 9 Bluetooth Settings
9.1 Bluetooth Connection – ActiveSync
A1 Check or define your host’s Bluetooth COM port
A1.1 If your host (PC or notebook) has built in Bluetooth function, turn it on (Or
Enable) the Bluetooth function.
A1.2 If your host (PC or notebook) does not have built in Bluetooth function,
please attach an external Bluetooth dongle at your host and install the driver.
A1.3 Your taskbar should have a Bluetooth icon.
A1.4 Right click this icon and select “Advanced configuration”. (As different
user might use different brand of Bluetooth dongle, please find this according to
your dongle’s manual)
A1.5 Select “Local Device Service” , check which COM port is applied to
Bluetooth. (Ex: COM5). If you want to change the COM port, you can click
“properties” and change it.
Unitech Electronics Co., Ltd
Created
by Yukiko
PA500 Operation
Manual
V2.0
Page 101 of 123
A2 Link your Bluetooth COM port in MS ActiveSync.(Make sure your
ActiveSync is at least version 4.1)
A2.1 Run MS ActiveSync. Under File, select “connection settings”. Check and
select the Bluetooth COM port. (In this case, COM4)
A3 Search your host on the terminal
A3.1 From PA500, under “Settings>Connections”, double tap “Bluetooth”.
A3.2 Under “Mode”, check “Turn on Bluetooth”.
Unitech Electronics Co., Ltd
Created
by Yukiko
PA500 Operation
Manual
V2.0
Page 102 of 123
A3.3 Under “Device”, double tap “Add new device”.
A3.4 Devices found. Select the host you want to link. Tap “Next ”.
Unitech Electronics Co., Ltd
Created
by Yukiko
PA500 Operation
Manual
V2.0
Page 103 of 123
A3.5 Enter a passkey (any number), tap “Next ”.
A3.6 On your host computer, you should see dialog prompt for the passkey.
Enter the same key as in A3.5, click “OK”.
Unitech Electronics Co., Ltd
Created
by Yukiko
PA500 Operation
Manual
V2.0
Page 104 of 123
A4 Connect terminal to host
A4.1 Select service. Check “ActiveSync ”. Tap “Finish”.
A4.2 To preserve battery power, be sure to end the Blue tooth ActiveSync
connection when synchronizing is complete. Tap “OK”.
A4.3 From /start/Program, double tap “ActiveSync.
A4.4 Tap “Menu” at bottom right corner. Select “Connect via Bluetooth”.
Terminal connect to host via Bluetooth ActiveSync.
9.2 Bluetooth Connection – Mobile Phone
Turn on the Bluetooth on your mobile phone.
B1. Search Mobile Phone
B1.1 From PA500, under “Settings” > “Connections ”, double tap “Wireless
Manager”.
B1.2 Turn on Bluetooth.
Unitech Electronics Co., Ltd
Created
by Yukiko
PA500 Operation
Manual
V2.0
Page 105 of 123
B2. Make Connection
B2.1 Under “Settings ” > “System” > Connections, tap “connection”.
B2.2 Under “My Work Network”, tap “Add a new modem connection”.
B2.3 Enter a name for the connection, define a name.
B2.4 Select a modem. Select “Bluetooth”. Tap “Next ”.
Unitech Electronics Co., Ltd
Created
by Yukiko
PA500 Operation
Manual
B2.5 Tap “Add New Device”.
B2.6 Mobile phone found. Select it and tap “Next ”.
V2.0
Page 106 of 123
Unitech Electronics Co., Ltd
Created
by Yukiko
PA500 Operation
Manual
V2.0
Page 107 of 123
B2.7 Enter the passkey. Tap “Next ”.
B2.8 Your mobile phone prompt for passkey. Enter the same number.
B2.9 On PA500, Select “Dialup Networking”. Tap “Finish”.
Unitech Electronics Co., Ltd
Created
by Yukiko
PA500 Operation
Manual
V2.0
Page 108 of 123
B2.10 For phone number, enter “*99#”. Tap “Next ”, Tap “Finish”.
B2.11 Tap “Advanced”. Enter dial string modem command if necessary. Tap
OK, then tap “Finish”.
B2.12 Connections-> Advanced -> Select Networks -> Select “ My Work
Network”
Unitech Electronics Co., Ltd
Created
by Yukiko
PA500 Operation
Manual
V2.0
Page 109 of 123
B2.13 Connections-> Advanced -> Dialing Rules -> Check Use dialing rules
-> select Home
Unitech Electronics Co., Ltd
Created
by Yukiko
PA500 Operation
Manual
V2.0
Page 110 of 123
B2.14 Start -> Settings-> Connections-> Connections -> Tasks-> My work
network -> Manager existing connections
B2.15 Tap and hold the connection you made, select “connect” from the
menu.
Unitech Electronics Co., Ltd
Created
by Yukiko
PA500 Operation
Manual
V2.0
Page 111 of 123
B2.16 PA500 is connected to your mobile phone.
9.3 Bluetooth Connection – Printer
Turn on your BT printer.
C1. Search BT printer
C1.1 From PA500, under “Settings” > “Connections ”, double tap “Wireless
Manager”.
C1.2 Turn on Bluetooth.
Unitech Electronics Co., Ltd
Created
by Yukiko
PA500 Operation
Manual
V2.0
Page 112 of 123
C3. Start -> Setting -> Connections -> Bluetooth -> Mode -> Check “Turn on
Bluetooth” and “Make this device discoverable to other devices”.
C4. Devices -> Check “Add New Device”
C5. Select Printer device-> Next
Unitech Electronics Co., Ltd
Created
by Yukiko
PA500 Operation
Manual
V2.0
Page 113 of 123
C6. Enter Passkey -> ”Don’t enter any Passkey” -> Next
C7.” Do you want to add UHLN0-15-5054 to your device list?”-> No -> Next
Unitech Electronics Co., Ltd
Created
by Yukiko
PA500 Operation
Manual
C8. Services item -> Check Serial Port-> Finish
C9. COM Ports -> New outgoing Port-> Next
V2.0
Page 114 of 123
Unitech Electronics Co., Ltd
Created
by Yukiko
PA500 Operation
Manual
V2.0
Page 115 of 123
C10. Select printer device -> UHLN0615-5054
C11.Port -> Select COM9 and “Uncheck Secure Connection” -> Finish-> OK
Unitech Electronics Co., Ltd
Created
by Yukiko
PA500 Operation
Manual
V2.0
Page 116 of 123
C12. Copy “C2-BT- Ticket.LBL”and “ZebraBTPrinterUtility.exe ” to PA500.
C13. Execute ZebraBTPrinterUtility.exe -> Serial Port, COM9:
Unitech Electronics Co., Ltd
Created
by Yukiko
PA500 Operation
Manual
C14. File Name -> C2-BT-Ticket.LBL
C15. .Press Open Port
V2.0
Page 117 of 123
Unitech Electronics Co., Ltd
Created
by Yukiko
PA500 Operation
Manual
V2.0
Page 118 of 123
C16. .Press Send/Print file
9.4. Bluetooth Terminal Connection (Serial port)
D1. Search Bluetooth device
D1.1 Disable/Disconnect MS ActiveSync.
D1.2 From PA500, under “Settings>Connections”, double tap “Bluetooth”.
D1.3 Under “mode”, check “Turn on Bluetooth”.
D1.4 Under “Device”, double tap “New Partnership”.
Unitech Electronics Co., Ltd
Created
by Yukiko
PA500 Operation
Manual
V2.0
Page 119 of 123
D1.5 Devices found. Select the host you want to link. Tap “Next ”.
D2. Define Serial port
D2.1. Select Service. Select “Dialup Networking”. Tap “Finish”.
D2.2. Go to “COM Ports” tab, tap “New Outgoing Port”
D2.3. Select the COM port: COM8. Tap OK. (You may select any COM port)
D3. Run VBTerminal tool to connect (VBTerminal can be obtained from
Unitech)
D3.1 Double tap VBterminal tool.
D3.2 Under “Set”, select “setting”.
D3.3 Comport: select 8 (same as D2.3)
D3.4 Buad rate: 115200
D3.5 Tap “Save ”.
D3.6 Save set. Tap “OK”.
D3.7 Select “File” > Connect
D4. Search Host’s Bluetooth com port
Refer to chapter 9.1 A1. (ex: Com port = COM5)
D5. Run Hyper Terminal
D5.1 On your host, run Start/Program/ HyperTerminal.
D5.2 Define a name for the terminal connection.
D5.3 Connection: select COM5 (Host’s Bluetooth COM port)
Unitech Electronics Co., Ltd
Created
by Yukiko
PA500 Operation
Manual
V2.0
Page 120 of 123
D5.4 Ba ud rate: 115200, flow control: none. Click “Apply” and “OK”.
D5.5 On your HyperTerminal, start to enter char. You should see char output
on host and your terminal device’s VBterminal as well.
D5.6 On your terminal, enter some chars on VBterminal. You sho uld see char
output on host and your terminal device’s VBterminal as well.
Unitech Electronics Co., Ltd
Created
by Yukiko
PA500 Operation
Manual
V2.0
Page 121 of 123
Chapter 10 Autoinstaller Trouble Shooting
While using the autoinstaller in Mobile 5.0, a message always prompt the users to
make the authentication. To get rid of this prompting, please follow the steps as
below:
1. Execute Mobile Word.
2. Type “/Windows/certoff.exe ”
Unitech Electronics Co., Ltd
Created
by Yukiko
PA500 Operation
Manual
V2.0
3. Select “Menu” > “File” > “Save as”.
4. Save this file as “autoexec.txt”. (You can save in any folder)
5. Do you want to save as Word Format? Tap “No”.
Page 122 of 123
Unitech Electronics Co., Ltd
Created
by Yukiko
PA500 Operation
Manual
V2.0
Page 123 of 123
6. Move the “Autoexec.txt ” from the folder you selected as step 4 to Flash Storage.
7. Autoexec.txt is saved in Flash Storage.
8. Cold start/warm start the terminal.
Note: For more details of Autoinstaller, please refer to the user guide of Autoinstaller.