1
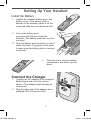
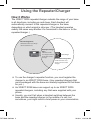
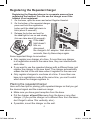
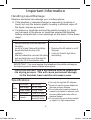
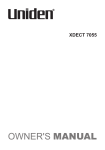
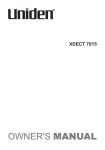
ECT R005 OM.indd 1 XDECT R005 22/9/11 11:37:31 AM XDECT R005 Accessory Handset Owner's Manual What's in the box? XDECT R005 accessory handset and repeater with charger Battery cover Rechargeable battery pack (BT-694 or BT-694s) Belt clip Desk stand/wall mount bracket Repeater/Charger AC adapter (AAD-041S(M)) If any items are missing or damaged, contact your place of purchase. Never use damaged products! Need Help? Get answers at our website: www.uniden.com.au for Australian model or www.uniden.co.nz for New Zealand model. Important Safety Instructions! When using your telephone equipment, basic safety precautions should always be followed to reduce the risk of fire, electric shock and injury to persons, including the following: This unit is NOT waterproof. DO NOT expose this unit to rain or moisture. Do not use this product near water, for example, near a bath tub, wash bowl, kitchen sink or laundry tub, in a wet basement or near a swimming pool. Avoid using a telephone (other than a cordless type) during an electrical storm. There may be a remote risk of electric shock from lightning. Do not use the telephone to report a gas leak in the vicinity of the leak. Use only the power cord and batteries indicated in this manual. Do not dispose of batteries in a fire. They may explode. Check with local codes for possible special disposal instructions. Do not place the handset in any charging cradle without the battery installed and the battery cover securely in place. ECT R005 OM.indd 2 SAVE THESE INSTRUCTIONS! 2 22/9/11 11:37:32 AM Setting Up Your Handset Install the Battery 111 Unpack the handset, battery pack, and battery cover. If the battery cover is already on the handset, press in on the notch and slide the cover down and off. 222 Line up the battery pack connector with the jack inside the handset. (The battery connector only fits one way.) 333 Push the battery pack connector in until it clicks into place. Tug gently on the wires to make sure the battery pack is securely connected. 444 Place the cover over the battery compartment and slide it up into place. Connect the Charger 111 Connect the AC adapter to the charger's DC IN 9V jack and route the cord as shown. (This adapter might already be connected.) 222 Plug the other end of the adapter into a standard 240V AC power outlet. ECT R005 OM.indd 3 3 22/9/11 11:37:32 AM 333 Place the handset in the charger with the display facing forward. The charge light should turn on. If... Try... the charge light does not turn on -- reseating the handset. -- checking the AC adapter connection. Charge the handset completely (about 15 hours) before using it. Registering the Handset The accessory handset will not work until you register it to a base! Registering the handset is a separate process from registering the Repeater/ charger. You can use the handset normally even if the charger is not registered. Compatible Bases This handset is designed for use with Uniden's XDECT R055 base. For the most up-to-date list of compatible bases for this handset, see our website. Register the handset Place the handset in the base. The display should say Handset Registering. After about 30 seconds, the handset display should say Registration Complete. Test the connection Pick up the handset and press Talk. Make sure you get a dial tone. (Press End to hang up.) If... -- you don't hear a dial tone -- the display says Registration Failed Try... Making sure the handset is fully charged, then trying again. Attaching the Belt Clip Line up the holes on each side of the handset. Insert the belt clip into the holes on each side of the handset. Press down until it clicks. To remove the belt clip, pull either side of the belt clip to release the tabs from the holes. ECT R005 OM.indd 4 4 22/9/11 11:37:33 AM Using the Repeater/Charger How it Works The XDECT R005 repeater/charger extends the range of your base in all directions, including up and down. Each handset will automatically connect to the repeater/charger or the base, depending on which signal is stronger. (The handset operates exactly the same way whether it's connected to the base or to the repeater/charger.) Base Coverage Area Handsets in this area always connect to the base. Base Overlap Coverage Area Handsets in this area might connect to the base or the charger. Repeater/charger Extended Coverage Area Handsets in this area always connect to the charger. To use the charger's repeater function, you must register the charger to an XDECT R055 base. (Any repeater/chargers that came packaged with the base are already registered to that base for you.) An XDECT R055 base can support up to six XDECT R005 repeater/chargers, including any that were supplied with your phone. Usually, you can't tell when a handset switches between the base and the repeater/charger in the middle of a call, but sometimes, you might notice a brief pause in your conversation. ECT R005 OM.indd 5 5 22/9/11 11:37:33 AM Registering the Repeater/charger Registering the Repeater/charger is a separate process from registering the handset. You can use the charger even if the handset is not registered. 111 On the base, open the menu and select Register Handset. 222 On the bottom of the repeater/charger, press and hold the registration button until the Link light starts to blink (about 2 seconds). 333 Release the button and wait for the Link light to turn on and steady (this can take about 90 seconds). If the Link light doesn't turn on, disconnect the charger's AC adapter. Wait about ten seconds, then try these steps again. Some important things to remember: Only register one charger at a time. If more than one charger is in registration mode at the same time, they can interfere with each other. If you want to use the repeater/charger with a different base, just register the charger to the new base. The charger automatically erases the link to the old base when it registers to the new one. Only register chargers to one base at a time. If more than one base is in registration mode at the same time, you can't control which base the charger registers to. Placing the repeater/charger Here are a few tips for placing your repeater/charger so that you get the clearest signal and the maximum range: Make sure you have good reception from the base. Put the charger at least 10m away from the base or any other charger. (If you put the charger on a different floor from the base, don't forget to allow 10m vertically, also.) If possible, mount the charger on the wall. ECT R005 OM.indd 6 6 22/9/11 11:37:34 AM Picking the best spot The best spot for the repeater/ charger is as far from the base as possible while still maintaining a good signal, or near the edge of the base’s coverage area. To find the edge of the coverage area: 111 Stand near the base and make a call on the handset. 222 While on the call, carry the handset away from the base towards the general area where you want to put the charger. 333 Watch the signal strength icon on the handset. Make a note where the icon drops from 4 bars to 3 bars. 444 Continue walking away from the base. Make a note where the signal strength icon drops from 3 bars to 2 or if you start to hear noise on the line (which indicates the signal is getting weaker). 555 Place the charger anywhere inside the range where the signal strength icon showed 3 bars and the handset had a clear signal with no noise. Testing the location Connect the charger's AC adapter and make sure the Link light comes on steadily. If the light flashes, the repeater/charger is not getting a good signal from the base. The charger may be too far away from the base, there may be interference from electronic devices, or the signal might be blocked by thick walls or metal objects. Try moving the charger to another location. ECT R005 OM.indd 7 7 22/9/11 11:37:35 AM Wall Mounting the Repeater/charger If you want mount the charger on the wall, you need to adjust the desk stand: 111 Pull the locking tab up and back (see the black arrow in the illustration to the right), and slide the desk stand straight off. 222 Flip the stand over so the locking tabs that say wall are facing the charger with the arrows pointing down. 333 Align the stand with the notches on the charger. 444 Slide the stand onto the notches until it clicks into place. 555 Insert two #10 screws into the wall, 30 mm apart. (For best results, use a level to ensure the screws are even.) Remember to use appropriate anchors for the wall material. 666 Keeping the AC adapter cord out of the way, place the charger over the screw heads and slide it down into place. Switching back to the desk stand If you want to switch back to using the charger on a desktop: 111 Remove the stand. 222 Rotate the stand so that the locking tabs that say Desk are facing the charger with the arrows pointing up. 333 Align the stand with the notches on the charger. 444 Slide the stand onto the notches until it clicks into place. ECT R005 OM.indd 8 8 22/9/11 11:37:36 AM Important Information Handling Liquid Damage Moisture and liquid can damage your cordless phone. If the handset or repeater/charger is exposed to moisture or liquid, but only the exterior plastic housing is affected, wipe off the liquid, and use as normal. If moisture or liquid has entered the plastic housing (i.e. liquid can be heard in the phone or liquid has entered the handset battery compartment or vent openings on the base), follow these steps: Handset Repeater/charger 111 Remove the battery cover and disconnect the battery. 222 Let dry for at least 3 days with the battery 111 Disconnect the AC adapter to cut off the power. disconnected and the cover off for ventilation. 222 Let dry for at least 3 days before reconnecting. 333 After the handset dries, reconnect the battery pack and replace the cover. Recharge the battery fully (15-20 hours) before using. IMPORTANT: You must unplug the telephone line while recharging the battery pack to avoid charge interruption. CAUTION! DO NOT use a microwave oven to speed up the drying process. This will cause permanent damage to the handset, base and the microwave oven. Specifications AC adapter Battery pack ECT R005 OM.indd 9 Part number Input voltage Output voltage Part number Capacity AAD-041S(M) 240V AC, 50Hz 9V DC@ 350mA BT-694 or BT-694s 650mAh (BT-694) or 500mAh (BT-694s) Use only the supplied AC adapters. sure to use the proper adapter for the base and any chargers. Do not place the power cord where it creates a trip hazard or where it could become chafed and create a fire or electrical hazard. Do not place the unit in direct sunlight or subject it to high temperatures. Be 9 22/9/11 11:37:36 AM Battery Information Fully charged, the battery should provide about 8 hours of talk time and about 7 days of standby time. For best results, return the handset to the cradle after each call to keep it fully charged. Keep an eye on the battery status icon. When the battery gets too low, the handset shows a low battery alert. If you hear a strange beep during a call, check the display: if you see the low battery alert, finish your conversation as quickly as possible and return the handset to the cradle. If the handset is in standby, none of the keys will operate. With normal use, the battery should last about one year. Replace the battery when the talk time becomes short even when the battery is charged. To buy a replacement battery, visit the website; www.uniden.com.au for Australian model or www.uniden. co.nz for New Zealand model. Rechargeable Nickel-Metal-Hydride Battery Warning CAUTION! Risk of explosion if battery is replaced by an incorrect type! Dispose of used batteries according to the instructions. Do not open or mutilate the battery. Disconnect the battery before shipping this product. This equipment contains a rechargeable Nickel-Metal-Hydride battery. The rechargeable batteries contained in this equipment may explode if disposed of in a fire. Do not short-circuit the battery. Do not charge the rechargeable battery pack used in this equipment with in any charger other than the one designed to charge this battery pack as specified in the owner's manual. Using another charger may damage the battery pack or cause the battery pack to explode. Rechargeable Batteries Must Be Recycled or Disposed of Properly. Uniden works to reduce lead content in PVC coated cords in our products & accessories. One-year Limited Warranty UNIDEN XDECT R005 IMPORTANT Satisfactory evidence of the original purchase is required for warranty service Please refer to our Uniden website for any details or warranty durations offered in addition to those contained below. ECT R005 OM.indd 10 10 22/9/11 11:37:36 AM Warrantor The warrantor is either Uniden Australia Pty Limited ABN 58 001 865 498 (“Uniden Aust”) or Uniden New Zealand Limited (“Uniden NZ”) as the case may be. Terms of Warranty Uniden Aust/NZ warrants to the original retail purchaser only that the XDECT R005 (“the Product”), will be free from defects in materials and craftsmanship for the duration of the warranty period, subject to the limitations and exclusions set out below. Warranty Period This warranty to the original retail purchaser is only valid in the original country of purchase for a Product first purchased either in Australia or New Zealand and will expire one (1) year from the date of the original retail sale. If a warranty claim is made, this warranty will not apply if the Product is found by Uniden to be: (A) Damaged or not maintained in a reasonable manner or as recommended in the relevant Uniden Owner’s Manual; (B) Modified, altered or used as part of any conversion kits, subassemblies or any configurations not sold by Uniden Aust or Uniden NZ; (C) Improperly installed contrary to instructions contained in the relevant Owner’s Manual (D) Repaired by someone other than an authorized Uniden Repair Agent in relation to a defect or malfunction covered by this warranty; or (E) Used in conjunction with any equipment, parts or a system not manufactured by Uniden. Parts Covered This warranty covers the Product and included accessories. User-generated Data This warranty does not cover any claimed loss of or damage to user-generated data (including but without limitation phone numbers, addresses and images) that may be stored on your Product. Statement of Remedy If the Product is found not to conform to this warranty as stated above, the Warrantor, at its discretion, will either repair the defect or replace the Product without any charge for parts or service. This warranty does not include any reimbursement or payment of any consequential damages claimed to arise from a Product’s failure to comply with the warranty. Our goods come with guarantees that cannot be excluded under the Australian Consumer Law. You are entitled to a replacement or refund for a major failure and for compensation for any other reasonably foreseeable loss or damage. You are also entitled to have the goods repaired or replaced if the goods fail to be of acceptable quality and the failure does not amount to a major failure. This warranty is in addition to and sits alongside your rights under either the COMPETITION AND CONSUMER ACT 2010 (Australia) or the CONSUMER GUARANTEES ACT (New Zealand) as the case may be, none of which can be excluded. Procedure for Obtaining Warranty Service Depending on the country in which the Product was first purchased, if you believe that your Product does not conform with this warranty, you should deliver the Product, together with satisfactory evidence of your original purchase (such as a legible copy of the sales docket) to Uniden at the addresses shown below. You should contact Uniden regarding any compensation that may be payable for your expenses incurred in making a warranty claim. Prior to delivery, we recommend that you make a backup copy of any phone numbers, images or other data stored on your Product, in case it is lost or damaged during warranty service. UNIDEN AUSTRALIA PTY LTD Service Division 345 Princes Highway, Rockdale, NSW 2216 Phone number: 1300 366 895 Email address: [email protected] ECT R005 OM.indd 11 UNIDEN NEW ZEALAND LTD Service Division 150 Harris Road, East Tamaki Auckland 2013 Phone number: (09) 273 8377 Email address: [email protected] 11 22/9/11 11:37:36 AM © 2011 Uniden Australia Pty Ltd/Uniden New Zealand Limited Printed in Vietnam UUZZ01208BB(0) ECT R005 OM.indd 12 22/9/11 11:37:36 AM