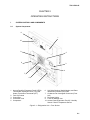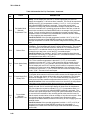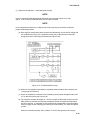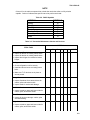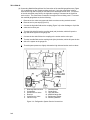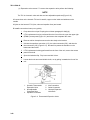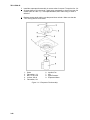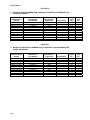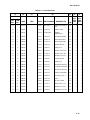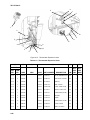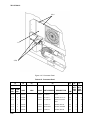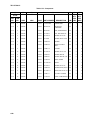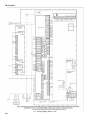
1
TM 11574A-OI U.S. MARINE CORPS TECHNICAL MANUAL OPERATION AND UNIT MAINTENANCE INSTRUCTIONS WITH ILLUSTRATED PARTS BREAKDOWN LARGE FIELD REFRIGERATION SYSTEM 4130-01-562-9914 THIS PUBLICATION IS REQUIRED FOR OFFICIAL USE OR FOR ADMINISTRATIVE OR OPERATIONAL PURPOSES ONLY. DISTRIBUTION IS LIMITED TO U.S. GOVERNMENT AGENCIES. OTHER REQUESTS FOR THIS DOCUMENT MUST BE REFERRED TO: COMMANDANT OF THE MARINE CORPS (ARD), WASHINGTON, D.C. 20380-0001. DESTRUCTION NOTICE - FOR UNCLASSIFIED, LIMITED DOCUMENTS, DESTROY BY ANY METHOD THAT WILL PREVENT DISCLOSURE OF CONTENTS OR RECONSTRUCTION OF THE DOCUMENTS. FOR OFFICIAL USE ONLY FEBRUARY 2100 PCN 500 115740 00 THIS PAGE INTENTIONALLY LEFT BLANK TM 11574A-OI TABLE OF CONTENTS CHAPTER/SECTION PAGE CHAPTER 1 GENERAL INSTRUCTIONS..........................................................................................................1-1 I. GENERAL DESCRIPTION AND SPECIFICATION DATA........................................................................1-1 1-1. SCOPE ......................................................................................................................................1-1 1-2. ORIENTATION ..........................................................................................................................1-2 1-3. PHYSICAL DESCRIPTION AND SPECIFICATION DATA ........................................................1-3 II. PUBLICATION.........................................................................................................................................1-7 1-4. 1-5. 1-6. 1-7. 1-8. 1-9. COPYRIGHT INFORMATION ...................................................................................................1-7 REQUISITIONING OF PUBLICATIONS ....................................................................................1-7 PUBLICATIONS FEEDBACK ....................................................................................................1-7 REPORT OF ERRORS, OMISSIONS, AND RECOMMENDATIONS........................................1-7 CHANGES .................................................................................................................................1-7 APPLICABLE PUBLICATIONS..................................................................................................1-7 III. WARRANTY ...........................................................................................................................................1-8 IV. PREPARATION FOR USE.....................................................................................................................1-8 1-10. 1-11. 1-12. 1-13. 1-14. 1-12. VISUAL INSPECTION UPON INITIAL RECEIPT ....................................................................1-8 INITIAL CHECKOUT AND INVENTORY .................................................................................1-9 MAINTENANCE FORMS, RECORDS, AND REPORTS .........................................................1-9 FOR SHIPPING DISCREPANCIES .........................................................................................1-9 FOR PACKING DISCREPANCIES ..........................................................................................1-9 INSTALLATION AND RELOCATION.....................................................................................1-10 V. PREPARATION FOR STORAGE..........................................................................................................1-12 1-13. PREPARATION FOR LIMITED STORAGE AND RESHIPMENT ..........................................1-12 1-14. PREPARATION FOR LONG TERM STORAGE ....................................................................1-12 VI. DESTRUCTION TO PREVENT ENEMY USE......................................................................................1-12 CHAPTER 2 OPERATING INSTRUCTIONS .....................................................................................................2-1 I. SYSTEM CONTROLS AND COMPONENTS ...........................................................................................2-1 2-1. SYSTEM COMPONENTS .........................................................................................................2-1 2-2. SYSTEM CONTROLS ...............................................................................................................2-7 II. THEORY OF OPERATION....................................................................................................................2-14 2-3. 2-4. 2-5. 2-6. 2-7. 2-8. 2-9. THEORY OF OPERATION......................................................................................................2-14 20-FOOT INSULATED CONTAINER.......................................................................................2-14 REFRIGERATION UNIT ..........................................................................................................2-14 PERISHABLE MODE COOLING .............................................................................................2-14 PERISHABLE MODE HEATING..............................................................................................2-15 FROZEN MODE COOLING .....................................................................................................2-15 DEFROST................................................................................................................................2-15 III. PRE-OPERATING PROCEDURES ......................................................................................................2-16 2-10. GENERAL..............................................................................................................................2-16 2-11. FLUID AND LUBRICATION REQUIREMENTS .....................................................................2-16 IV. OPERATING CHECKS ........................................................................................................................2-17 2-12. BEFORE, DURING, AND AFTER OPERATION CHECKS....................................................2-17 i TM 11574A-OI CHAPTER/SECTION PAGE V. CONTROLLER AND SOFTWARE FUNCTIONS ..................................................................................2-19 2-13. CHECK CONTROLLER FUNCTION CODES........................................................................2-19 2-14. DATACORDER OPERATION................................................................................................2-20 2-15. PRE-TRIP DIAGNOSIS .........................................................................................................2-42 VI. NORMAL OPERATING PROCEDURES..............................................................................................2-44 2-16. 2-17. 2-18. 2-19. MODES OF OPERATION......................................................................................................2-44 STARTUP ..............................................................................................................................2-47 SHUTDOWN..........................................................................................................................2-66 EMERGENCY SHUTDOWN..................................................................................................2-66 VII. OPERATION UNDER UNUSUAL CONDITIONS ................................................................................2-67 2-20. UNUSUAL CONDITIONS ......................................................................................................2-67 CHAPTER 3 MAINTENANCE INSTRUCTIONS ................................................................................................3-1 I. GENERAL INFORMATION.......................................................................................................................3-1 3-1. 3-2. 3-3. 3-4. SCOPE ......................................................................................................................................3-1 MAINTENANCE FORMS, RECORDS, AND REPORTS ...........................................................3-1 CORROSION PREVENTION AND CONTROL (CPAC) ............................................................3-1 PRODUCT QUALITY DEFICIENCY REPORTING (PQDR) ......................................................3-1 II. PREVENTIVE MAINTENANCE CHECKS AND SERVICES (PMCS) ......................................................3-2 3-5. EXPLANATION OF PMCS TABLE COLUMNS .........................................................................3-2 3-6. PREVENTIVE MAINTENANCE TASKS ....................................................................................3-4 III. CORRECTIVE MAINTENANCE PROCEDURES ...................................................................................3-5 3-7. CORRECTIVE MAINTENANCE TASKS (CM)...........................................................................3-5 a. Repair the Container ........................................................................................................3-5 b. Repair the Refrigeration System ......................................................................................3-6 c. Replace the Refrigeration Unit .......................................................................................3-42 d. Maintenance of Painted Surfaces...................................................................................3-44 e. Repair Interior Lighting ...................................................................................................3-44 f. Repairing the Air Curtain ................................................................................................3-47 g. Replacing the Floor Drain...............................................................................................3-48 IV. TROUBLESHOOTING AND FAULT ISOLATION PROCEDURES ......................................................3-49 3-8. TROUBLESHOOTING.............................................................................................................3-49 3-9. TROUBLESHOOTING QUICK REFERENCE..........................................................................3-67 CHAPTER 4 REPAIR PARTS SECTION ...........................................................................................................4-1 I. REPAIR PARTS INFORMATION .............................................................................................................4-1 4-1. SCOPE ......................................................................................................................................4-1 II. ITEM IDENTIFICATION LISTING............................................................................................................4-1 4-2. REPAIR PARTS LIST AND ILLUSTRATIONS ..........................................................................4-1 III. DEFINITIONS AND APPLICATION OF SOURCE, MAINTENANCE, AND RECOVERABILITY CODES (SMRC) ....................................................................................................................................4-4 4-3. SOURCE CODES......................................................................................................................4-4 4-4. MAINTENANCE CODES ...........................................................................................................4-6 4-5. RECOVERABILITY CODES ......................................................................................................4-7 ii TM 11574A-OI CHAPTER/SECTION PAGE IV. NATIONAL STOCK NUMBER (NSN) TO MANUFACTURER’S PART NUMBER CROSS REFERENCE.........................................................................................................................................4-8 V. MANUFACTURER’S PART NUMBER TO NSN CROSS REFERENCE .................................................4-8 VI. IDENTIFICATION OF PARTS ................................................................................................................4-9 4-6. REPAIR PARTS LIST AND ILLUSTRATIONS ..........................................................................4-9 APPENDIX A. SCHEMATICS ............................................................................................................................ A-1 APPENDIX B. MANUFACTURERS .................................................................................................................... B-1 APPENDIX C. TROUBLE SHOOTING QUICK REFERENCE ............................................................................ C-1 iii TM 11574A-OI LIST OF ILLUSTRATIONS Figure 1-1 2-1 2-2 2-3 2-4 2-5 2-6 2-7 2-8 2-9 2-10 2-11 2-12 2-13 2-14 2-15 2-16 2-17 2-18 2-19 2-20 2-21 2-22 2-23 2-24 2-25 2-26 2-27 2-28 3-1 3-2 3-3 3-4 3-5 3-6 3-7 3-8 3-9 3-10 3-11 3-12 3-13 iv Title Page ISO Container ...........................................................................................................................................1-2 Refrigeration Unit – Front Section .............................................................................................................2-1 Refrigeration Unit – Center Access ...........................................................................................................2-2 Compressor Section..................................................................................................................................2-3 Condenser Section....................................................................................................................................2-4 Control Box Section...................................................................................................................................2-5 Rear Doors ................................................................................................................................................2-6 RU Controller Control Panel ......................................................................................................................2-8 START/STOP Switch ................................................................................................................................2-9 START/STOP Switch ..............................................................................................................................2-11 Circuit Breaker.........................................................................................................................................2-12 Interior Lighting........................................................................................................................................2-13 Defrost Cycle...........................................................................................................................................2-15 Standard Configuration Report................................................................................................................2-25 Data Reader ............................................................................................................................................2-26 Autotransformer.......................................................................................................................................2-48 Make Up Air Flow Chart ..........................................................................................................................2-48 Controller Operation – Perishable Mode .................................................................................................2-52 Controller Operation – Frozen Mode .......................................................................................................2-52 Perishable Mode Cooling ........................................................................................................................2-53 Perishable Mode Cooling ........................................................................................................................2-54 Frozen Mode ...........................................................................................................................................2-55 Defrost.....................................................................................................................................................2-56 Temperature Control System ..................................................................................................................2-58 Keypad ....................................................................................................................................................2-59 Display Module........................................................................................................................................2-60 Micro-Link 3 Controller ............................................................................................................................2-61 Operating Emergency Escape Door ........................................................................................................2-64 Operating the Interior Lighting .................................................................................................................2-65 Emergency Repairs...................................................................................................................................3-5 Service Valve ............................................................................................................................................3-6 Manifold Gauge Set...................................................................................................................................3-7 Refrigeration System Service Connections ...............................................................................................3-8 Compressor Service Connections ...........................................................................................................3-12 Compressor.............................................................................................................................................3-16 High Pressure Switch Testing .................................................................................................................3-18 Thermostatic Expansion Valve Bulb........................................................................................................3-21 Thermostatic Expansion Valve ................................................................................................................3-22 Hermetic Thermostatic Expansion Valve Brazing Procedure ..................................................................3-23 Evaporator Fan Assembly .......................................................................................................................3-26 Suction Modulation Valve (SMV).............................................................................................................3-28 DPRV Replacement Value Chart ............................................................................................................3-32 TM 11574A-OI LIST OF ILLUSTRATIONS Figure 3-14 3-15 3-16 3-17 3-18 3-19 3-20 3-21 3-22 3-23 3-24 3-25 3-26 4-1 4-2 4-3 4-4 4-5 4-6 4-7 4-8 4-9 4-10 4-11 4-12 4-13 4-14 4-15 4-16 4-17 4-18 4-19 4-20 4-21 4-22 4-23 4-24 Title Page Controller Section of the Control Box ......................................................................................................3-33 Sensor Temperature/Resistance Chart ...................................................................................................3-36 Sensor Types ..........................................................................................................................................3-37 Sensor and Cable Splice .........................................................................................................................3-38 Supply Sensor Positioning.......................................................................................................................3-39 Return Sensor Positioning.......................................................................................................................3-39 R-134a Compressor Pressure and Motor Current Curves versus Ambient Temperature (Sheet 1 of 2) .3-41 R-134a Compressor Pressure and Motor Current Curves versus Ambient Temperature (Sheet 2 of 2) .3-42 Replacing the Refrigeration Unit..............................................................................................................3-43 Replacing the Glass Dome......................................................................................................................3-45 Repairing the Interior Lighting Switch ......................................................................................................3-46 Repairing the Air Curtain .........................................................................................................................3-47 Replacing Floor Drain Screen .................................................................................................................3-48 RU Mounting Hardware ...........................................................................................................................4-10 Container Components ...........................................................................................................................4-11 Control Box Door.....................................................................................................................................4-12 Control Box .............................................................................................................................................4-14 Display Module........................................................................................................................................4-15 Control Box, Shield Removed .................................................................................................................4-16 Control Module ........................................................................................................................................4-18 Condenser Fan and Condenser Coil .......................................................................................................4-20 Compressor Tubing.................................................................................................................................4-22 Receiver ..................................................................................................................................................4-24 SRS and TST Section .............................................................................................................................4-26 Thermostatic Expansion Valve ................................................................................................................4-27 Fresh Air Makeup Vent............................................................................................................................4-28 Transformer Panel...................................................................................................................................4-30 Document Panel......................................................................................................................................4-31 Evaporator Fan Assembly .......................................................................................................................4-32 Evaporator Coil........................................................................................................................................4-34 Back Panel Assembly..............................................................................................................................4-36 Compressor.............................................................................................................................................4-38 Compressor Gauges and Transducers ...................................................................................................4-40 Voltage Cable..........................................................................................................................................4-41 Autotransformer.......................................................................................................................................4-42 RU Labels and Decals.............................................................................................................................4-44 Interrogator Receptacle...........................................................................................................................4-46 v TM 11574A-OI LIST OF TABLES Table 1-1 1-2 2-1 2-2 2-3 2-4 2-5 2-6 2-7 2-8 2-9 2-10 2-11 2-12 2-13 3-1 3-2 3-3 3-4 4-1 4-2 4-3 4-4 4-5 4-6 4-7 4-8 4-9 4-10 4-11 4-12 4-13 4-14 4-15 4-16 4-17 4-18 4-19 4-20 4-21 4-22 4-23 4-24 vi Title Page Table of Leading Particulars......................................................................................................................1-4 Visual Inspection Upon Initial Receipt .......................................................................................................1-8 Operating Controls and Indicators.............................................................................................................2-7 Before, During, and After Operational Checks ........................................................................................2-17 DataCORDER Configuration Variables ...................................................................................................2-21 DataCORDER Standard Configurations..................................................................................................2-22 Controller Configuration Variables...........................................................................................................2-27 Controller Function Codes.......................................................................................................................2-28 Controller Alarm Indications ....................................................................................................................2-31 Controller Pre-Trip Test Codes ...............................................................................................................2-35 DataCORDER Function Code Assignments............................................................................................2-39 DataCORDER Pre-Trip Result Records..................................................................................................2-40 DataCORDER Alarm Indications.............................................................................................................2-41 Pre-Trip Selection Menu..........................................................................................................................2-42 Before Operation Checks ........................................................................................................................2-50 Tool Requirements ....................................................................................................................................3-1 PMCS Symbols .........................................................................................................................................3-3 Preventive Maintenance Checks and Services .........................................................................................3-3 R134a Saturation Temperature – Pressure Chart ...................................................................................3-40 RU Mounting Hardware ...........................................................................................................................4-10 Container Components ...........................................................................................................................4-11 Control Box Door.....................................................................................................................................4-13 Control Box .............................................................................................................................................4-14 Display Module........................................................................................................................................4-15 Control Box, Shield Removed .................................................................................................................4-17 Control Module ........................................................................................................................................4-19 Condenser Fan and Condenser Coil .......................................................................................................4-21 Compressor Tubing.................................................................................................................................4-23 Receiver ..................................................................................................................................................4-24 SRS and STS Section .............................................................................................................................4-26 Thermostatic Expansion Valve ................................................................................................................4-27 Fresh Air Makeup Vent............................................................................................................................4-29 Transformer Panel...................................................................................................................................4-30 Document Panel......................................................................................................................................4-31 Evaporator Fan Assembly .......................................................................................................................4-33 Evaporator Coil........................................................................................................................................4-36 Back Panel Assembly..............................................................................................................................4-37 Compressor.............................................................................................................................................4-39 Compressor Gauges and Transducers ...................................................................................................4-40 Voltage Cable..........................................................................................................................................4-41 Autotransformer.......................................................................................................................................4-43 RU Labels and Decals.............................................................................................................................4-45 Interrogator Receptacle...........................................................................................................................4-46 TM 11574A-OI HOW TO USE THIS MANUAL This manual is designed to provide instructions to perform set-up, operation, and scheduled maintenance procedures on the Large Field Refrigeration System (LFRS). This manual also provides corrective maintenance, troubleshooting, and component adjustment procedures for the refrigeration unit aboard the LFRS. The information contained in this manual is the latest available information at the time of publication. This manual is arranged into four chapters with the following titles: Chapter 1 General Instructions This chapter describes the general and physical description, provides reference data, and provides an illustration of the major components of the entire unit. Warranty and request for publications are also discussed. Chapter 2 Operating Instructions This chapter discusses the theory of operation, system controls and displays, operator service requirements, operation under normal and unusual conditions, shut-down, and emergency shut-down procedures. Chapter 3 Maintenance Instructions This section provides maintenance forms, tools required, maintenance procedures, operator maintenance and service instruction, troubleshooting procedures, and component adjustment procedures. Chapter 4 Repair Parts List This section lists the repair parts information for the component parts in exploded views and digital pictures, SMR codes, NSN to manufacturer cross reference, and manufacturer to NSN cross reference. Throughout this manual the reader will see the following symbols, used to emphasize important and critical instructions: NOTE ------------------------- This indicates a condition that is essential to highlight. CAUTION ---------------- This indicates a condition that may cause equipment damage. WARNING ------------------------- THIS INDICATES A CONDITION THAT MAY CAUSE PERSONNEL INJURY OR DEATH. vii TM 11574A -OI SAFETY SUMMARY GENERAL SAFETY PRECAUTIONS This safety summary contains general safety warnings and hazardous material warnings that must be understood and applied during operation and maintenance of the LFRS. Failure to observe these precautions could result in equipment damage and / or serious injury or death to personnel. KEEP AWAY FROM LIVE CIRCUITS Operating personnel must observe safety regulations at all times. Do not replace components or make adjustments inside the equipment with the power supply connected or the voltage supply turned on. Under certain conditions, dangerous potentials may exist when the power control is in the OFF position. To avoid casualties, always remove power and ensure the unit is discharged. CHECK A CIRCUIT BEFORE TOUCHING IT. Never operate equipment with any cover, screen, or panel removed unless instructions specifically direct you to do so. Remove power and check circuit with a meter. After checking with a meter, ground the circuit before touching components or wires. DO NOT SERVICE OR ADJUST ALONE Under no circumstances should any person enter the container or reach into the equipment for the purpose of servicing or adjusting except in the presence of someone who is capable of rendering aid. RESUSCITATION Personnel working with or near high voltages should be familiar with modern methods of resuscitation. Such information may be obtained from the Bureau of Medicine and Surgery. SAFETY STEPS TO FOLLOW FOR THE VICTIM OF ELECTRICAL SHOCK Do not try to pull or grab the individual. If possible, turn OFF the electrical power. If you cannot turn OFF the electrical power, pull, push, or lift the person to safety using a dry wooden pole, dry rope, or some other insulating material. Send for help as soon as possible. After the injured person is free of contact with the source of electrical shock, move the person a short distance away. Immediately start artificial respiration if necessary. viii TM 11574A-OI SPECIFIC SAFETY PRECAUTIONS Warnings used in this manual are repeated here to stress how important they are. Study these warnings carefully; they can save lives. WARNING • When loaded, the refrigerated container is extremely heavy. To prevent injury to personnel and damage to equipment, use a hoist and sling rated at a minimum capacity of 26.45 tons (52,900 lbs./ 24,000 kg). • Commercial container handling equipment (cranes, top lift devices, front and side lift loaders and self-loading transporters) are suitable for handling the refrigeration unit. • Container must be lifted vertically from all four corners. • Do not lift container with cable slings at an angle. • Never use a forklift to move, lift, and or push the container unless the forklift is compatible for use with the container. WARNING Be extremely careful with explosives and incendiary devices. Use these items only when the need is urgent. WARNING Beware of unexpected starting of the fans motors. The unit may cycle the fan motors as control requirements dictate. WARNING Do not attempt to remove power plug(s) before turning OFF start-stop switch (ST), unit circuit breaker(s) and external power source. WARNING Make sure the power plugs are clean and dry before connecting to any power receptacle. WARNING Never use air for leak testing. It has been determined that pressurized mixtures of refrigerant and air can undergo combustion when exposed to an ignition source. WARNING Make sure power to the unit is OFF and power plug disconnected before replacing the compressor. ix TM 11574A -OI WARNING Do not open the condenser fan grille before turning power OFF and disconnecting power plug. WARNING Always turn OFF the unit circuit breakers (CB-1 & CB-2) and disconnect main power supply before working on moving parts. WARNING Make sure power to the unit is OFF and power plug disconnected before servicing capacitor(s). WARNING With power OFF discharge the capacitor before disconnecting the circuit wiring. WARNING Pieces of a broken glass dome may be sharp and cause injury. Take care in handling any glass sections to avoid cuts or other injury. x TM 11574A-OI ABBREVIATIONS The following abbreviations are used throughout this manual. Abbreviation Definition AC A BER BTU BTR/hr C cm. CAGEC CPC CFM ft³ Dtd. dBA °C °F DC DTR EA EFM EIR F FSC FSCM ft. Gal GPH GFCI Hz HTT hp hrs ID IAW in. ISO ID kW L LG MAM MCO Max m MOS mm Min MWO MTOE MTG NIIN NMP Alternating Current Ampere(s) Beyond Economical Repair British Thermal Unit British Thermal Unit Per Hour Celsius Centimeter Commercial and Government Entity Code Corrosion Prevention and Control Cubic Feet Per Minute Cubic Foot/Feet Dated Decibels, A-weighted Degrees Celsius Degrees Fahrenheit Direct Current Defense Transportation Regulation Each Evaporator Fan Motor Equipment Improvement Recommendation Fahrenheit Federal Supply Classification Federal Supply Code for Manufacturer Foot/Feet Gallon(s) Gallon(s) Per Hour Ground Fault Circuit Interrupter Hertz Heater Termination Thermostat Horsepower Hour(s) Identification In Accordance With Inch(es) International Organization for Standardization Item Designator Number Kilowatt Liter Long Maintenance Advisory Message Marine Corps Order Maximum Meters Military Occupational Specialty Millimeters Minimum Modification Work Order Modified Table of Organization and Equipment Mounting National Item Identification Number National Maintenance Point xi TM 11574A -OI ABBREVIATIONS - Continued xii Abbreviation Definition NSN NLT N/A NS No. POLs Lb(s) PSI PSIG PDB pf qt RPM RPS RU ft² SCFM SMV TAMCN TQG TXV USMC V VAC National Stock Number No Later Than Not Applicable Not Shown Number Petroleum, Oils and Lubricants Pound(s) Pound-Force Per Square Inch Pound-Force Per Square Inch Gauge Power Distribution Box Power Factor Quart Revolutions Per Minute Ruggedized Power Supply Refrigeration Unit Square Foot/Feet Standard Cubic Feet Per Minute Suction Modulation Valve Table of Authorized Materiel Control Number Tactical Quiet Generator Thermal Expansion Valve United States Marine Corps Volt(s) Volt(s) Alternating Current TO 11574A-OI CHAPTER 1 GENERAL INSTRUCTIONS I. GENERAL DESCRIPTION AND SPECIFICATION DATA 1-1. Scope a. The Large Field Refrigeration System (LFRS) is a large, insulated, high payload container system with built in refrigeration. The mission of the LFRS is to provide the capability to transport and store large, perishable cargo in a climate controlled, ISO standard container. b. This technical manual provides operation and maintenance instructions for the LFRS (TAMCN B0049, NSN 4130-01-562-9914). This manual covers instructions for the operation, inspection and maintenance, with illustrated parts breakdown, for large field refrigerated systems and components and other related equipment. This equipment is manufactured by Sea Box Inc. 802 Industrial Highway, East Riverton, NJ, USA. c. Instructions include all necessary operation, maintenance and test procedures; specific subject matter may be located by reference to the Table of Contents. For procurement and identification purposes, parts and assemblies can be identified through use of the Illustrated Parts Breakdown, Chapter 4. d. This technical manual is the only source of guidance for the Large Field Refrigeration System and components, therefore, it is recommended that the following requirements are followed. TASK Storage RESPONSIBILITY User Issue User User Control User User Repair User Inspection Responsibility User Inspection Form User will annotate inspections on NAVMC 10560. Periodic Inspection and Maintenance User. Refer to paragraph 2-12 and 3-8. 1-1 TO 11574A OI 1-2. Orientation EVAPORATOR SECTION REFRIGERATION UNIT FRONT SECTION FRESH AIR MAKEUP VENT CONTROL BOX SECTION FORKLIFT POCKETS MANUAL HOLDER DOCUMENT HOLDER CONDENSER FAN HORIZONTAL CONDENSER COIL COMPRESSOR SECTION Front View PRESSURE RELIEF VALVE ISO CONTAINER DOOR HANDLES ACCESS DOORS ROOF ACCESS STEPS TYPE S20-155F MAX GROSS USA / AB - 642 / 07-01 1 / 2008 REINSPECTION SHALL BE BEFORE 01 / 2013 APPLY REINSPECTION DECAL HERE USMU 020453 - 8 24,000 KG 192 ,000 KG 52,9 10 LBS 4 23,280 LBS 15,240 KG 33,600 LBS OWNED OR OPERATED BY: UNITED STATES MARINE CORP QUANTICO, VIRGINIA TIMBER COMPONENT TREATMENT NO EXPOSED TIMBER TARE SEA BOX, INC. MANUFACTURED BY: SEA BOX, INC. 802 INDUSTRIAL HWY. EAST RIVERTON, NJ 08077-1910 www.seabox.com TELE: 856-303-1101 FAX: 856-303-1501 E-MAIL [email protected] TOLL FREE IN THE U.S. 1-800 SEA BOX 8 = 1-800-732-2698 CU.CAP 0FXA9 X A pply UID decal here CARC 01/08 Rear View Figure 1-1. ISO Container. 1-2 24,000 KGS 52,910 LBS 3,501 KGS 7,720 LBS 26.7 CU.M 944 CU.FT ESCAPE HATCH DOOR TO 11574A-OI 1-3. Physical Description and Specification Data a. ISO Container. The ISO container is a 20 ft long, 8 ft wide, 8 ft tall ISO certified insulated container. Interior electrical lighting system is provided for low light conditions. Collapsible access steps lead to the non-slip roof for easy safe access and an emergency escape hatch is provided for emergency situations. Interior T-grade floors are installed to meet sanitary requirements. b. Refrigeration Unit. The Refrigeration Unit is designed to maintain interior temperatures between -22°F and 86°F using R-134A refrigerant. The refrigeration unit uses an advanced reciprocating semi hermetic compressor, thermal expansion valve, suction modulation valve, refrigerant to air heat exchangers, and a liquid reciever to provide heating and cooling capabilities. It features a quick connect dual voltage transformer to provide either 190/230 volt or 380/460 volt 3 phase 50/60 Hz power. A microprocessor controller and integral data recorder are provided for state of the art temperature control. A main power circuit breaker is provided to protect equipment from damage. c. Forklift Pockets. Forklift pockets are provided for ease of installation and removal. There are two forklift pockets provided on the front of the RU which are used to remove and install the RU into the container. There are three forklift pockets on the sides of the container used for moving the container. d. Refrigeration Unit - Front Section. The front section of the refrigeration unit gives access to many of the components that run the Large Field Refrigeration System. The unit model number, serial number, and parts identification number can be found on the serial plate to the left of the compressor. e. Fresh Air Makeup Vent. The purpose of the makeup air vent is to provide adequate ventilation for the commodities that require fresh air circulation. f. Evaporator Section. The evaporator section houses all of the components that allow the refrigerant to be changed from liquid to vapor. The evaporator section contains the return temperature sensor, humidity sensor, thermostatic expansion valve, dual-speed evaporator fans (EM1 and EM2), evaporator coil and heaters, defrost temperature sensor, heat termination thermostat, and heat exchanger. The evaporator fans circulate air through the container by pulling it in the top of the unit, directing it through the evaporator coil where it is heated or cooled, and discharging it at the bottom. The evaporator components are accessible by removing the upper rear panel. g. Compressor Section. The compressor section houses all of the components required to compress the refrigerant, the power cable storage compartment and the autotransformer. The compressor section includes the compressor (with high pressure switch), power cable storage compartment, and autotransformer. This section also contains the suction modulating valve, discharge pressure regulating valve, discharge temperature sensor, and discharge/suction pressure transducers. The supply temperature sensor, supply recorder sensor, and ambient sensor are located at the right side of the compressor. A three way valve is located after the receiver which allows a low-side pump down. h. Air-cooled Condenser Section. The air-cooled condenser section consists of the condenser fan, condenser coil, receiver with sight glass/moisture indicator, quench valve, manual liquid line valve, filter-drier, condenser pressure transducer, and fusible plug. The condenser fan pulls air in through the bottom of the coil and discharges it horizontally out through the condenser fan grille. i. Control Box Section. The control box houses the manual operation switches, circuit breaker (CB1), compressor, fan and heater contactors, control power transformer, fuses, keypad, display module, current sensor module, and controller module. A document holder is located on the inside of the control box door. 1-3 TO 11574A OI j. Rear Access Doors. The rear access doors provide access to the storage section of the refrigeration unit. The right-hand access door includes an escape hatch. k. Escape Hatch Door. The escape hatch provides a means of escape from the inside of the storage section if the rear access doors are closed while an operator is still inside. Table 1-1. Table of Leading Particulars. ISO CONTAINER Weight: Gross Weight ....................................................................................52,910 lbs (24,000 Kg) Tare Weight ..........................................................................................6,922 lbs (3,140 Kg) Payload .............................................................................................45,988 lbs (29,860 Kg) Exterior Dimensions: Height.................................................................................................................8 ft (2.44 m) Length .................................................................................................. 19 ft 10.5 in (6.06 m) Width..................................................................................................................8 ft (2.44 m) Interior Dimensions: Height................................................................................................. 6 ft 11.31 in (64.7 cm) Length .............................................................................................. 18 ft 0.38 in (134.6 cm) Width.................................................................................................... 7 ft 6.31 in (58.4 cm) Door Opening Height ............................................................................... 6 ft 9.8 in (2.08 m) Door Opening Width .............................................................................. 7 ft 6.31 in (2.29 m) Capacity: Cubic Capacity............................................................................................ 944 ft3 (26.7 m3) Input Requirements: Power.................................................................... 380/480 VAC or 190/230 VAC (3 phase) Refrigerant ...................................................................... 10.8 lbs (4.9 kg) Receiver R-134a Lubricant ................................................................7.6 US pints (3.6 liters) Castrol Icematic REFRIGERATION UNIT Compressor/Motor Assembly: Number of Cylinders ........................................................................................................... 6 Model ........................................................................................................................... 06DR CFM .................................................................................................................................. 41 Weight (Dry)................................................................................................ 260 lbs (118 kg) Approved Oil ............................................................................................... Castrol Icematic Oil Charge Degrees ........................................................................ 7.6 US pints (3.6 Liters) Oil Sight Glass .......................................................The oil level range, with the compressor off, should be between the bottom and one-eighth level of the sight glass. Heater Termination Thermostat: Opens .............................................................................................................. 130 F = 54 C Closes ....................................................................................... 100 (+/− 7) F = 38 (+/− 4) C High Pressure Switch: Cutout ......................................................................350 (+/− 10) psig = 25 (+/− 1.0) kg/cm2 Cut-In .......................................................................250 (+/− 10) psig = 18 (+/− 0.7) kg/cm2 1-4 TO 11574A-OI Table 1-1. Table of Leading Particulars – Continued. Refrigerant Charge: Charge Requirements ............................................................................................... R-134a Unit Configuration..................................................................................... 3 Row Condenser Receiver ..................................................................................................... 10.8 lbs (4.9 kg) Fusible Plug: Melting Point..................................................................................................... 210 F = 99 C Torque ................................................................................... 45 to 50 ft-lbs (6.2 to 6.9 mkg) Sight Glass/Moisture Indicator: Torque ................................................................................... 65 to 70 ft-lbs (8.9 to 9.7 mkg) Water Pressure Switch: Cut-In................................................................................................................... 7 +/- 3 psig 3 row condenser (0.5 +/− 0.2 kg/cm2) Cutout.................................................................................. 22 +/− 5 psig (6 +/− 0.4 kg/cm2) Discharge Pressure Regulating Valve: Factory Setting ............................................................ 72 +/− 5.5 psig (32.7 +/− 2.5 kg/cm2) Circuit Breaker: CB-1 Trips at ........................................................................................................... 29 amps CB-2 (50 Amps) Trips at....................................................................................... 62.5 amps CB-3 (70 Amps) Trips at....................................................................................... 87.5 amps Compressor Motor: Full Load Amps (FLA) ...................................................................... 17.6 amps @ 460 VAC Condenser Fan Motor: 380 VAC, Single Phase, 50 Hz: Full Load Amps ................................................................................................. 1.3 amps Horsepower .......................................................................................................... 0.43 hp Rotations Per Minute......................................................................................... 1425 rpm Voltage and Frequency ..............................................................360-460 VAC +/− 2.5 hz 460 VAC, Single Phase, 60 Hz: Full Load Amps ................................................................................................. 1.6 amps Horsepower .......................................................................................................... 0.75 hp Rotations Per Minute......................................................................................... 1725 rpm Voltage and Frequency ..............................................................400-500 VAC +/− 2.5 hz Bearing Lubrication ................................. Factory lubricated, additional grease not required Rotation ...................................................... Counter-clockwise when viewed from shaft end Evaporator Coil Heaters: Number of Heaters .............................................................................................................. 6 Rating .......................................................................750 watts + 5/− 10% each @ 230 VAC Resistance (cold)...............................................................66.8 to 77.2 ohms @ 68 F (20 C) Type ...........................................................................................................................Sheath 1-5 TO 11574A OI Table 1-1. Table of Leading Particulars – Continued. Evaporator Fan Motor(S): 380 VAC, Single Phase, 50 Hz: Full Load Amps High Speed ....................................................................................... 1.6 Full Load Amps Low Speed ........................................................................................ 0.8 Nominal Horsepower High Speed ............................................................................. 0.70 Nominal Horsepower Low Speed.............................................................................. 0.09 Rotations Per Minute High Speed ..................................................................... 2850 rpm Rotations Per Minute Low Speed...................................................................... 1425 rpm Voltage and Frequency ............................................................360-460 VAC +/− 1.25 hz Voltage and Frequency using power autotransformer .............180-230 VAC +/− 1.25 hz 460 VAC, Single Phase, 60 Hz: Full Load Amps High Speed ....................................................................................... 2.0 Full Load Amps Low Speed ........................................................................................ 1.0 Nominal Horsepower High Speed ............................................................................. 0.84 Nominal Horsepower Low Speed.............................................................................. 0.11 Rotations Per Minute High Speed ..................................................................... 3450 rpm Rotations Per Minute Low Speed...................................................................... 1750 rpm Voltage and Frequency ............................................................400-500 VAC +/− 1.25 hz Voltage and Frequency using power autotransformer .............200-250 VAC +/− 1.25 hz Bearing Lubrication ................................. Factory lubricated, additional grease not required Rotation ............................................................................. CW when viewed from shaft end Fuses: Control Circuit.......................................................................................7.5 amps (F3A, F3B) Controller/DataCORDER .......................................................................... 5 amps (F1 & F2) Emergency Defrost..........................................................................................5 amps (FED) Drain Line Heater ............................................................................................5 amps (FDH) Humidity Power Transformer............................................................................. 5 amps (FH) Compressor Crankcase Heater..................................................................180 watts @ 460 VAC 1-6 TO 11574A-OI II. PUBLICATION 1-4. Copyright Information Carrier Transicold and Sea Box®, Inc. grant the U.S. Government permission to reprint the information in this Technical Manual (TM) for use by the military services. This permission also includes the right to post the TM on controlled government "limited access" websites. This information is not intended for disclosure to the public or commercial entities, companies and / or organizations that are considered to be competitors of Carrier Transicold and Sea Box®, Inc. 1-5. Requisitioning of Publications To view or print the TM, SL-3, or any other printed publications, use the on-line access to MCLB, Albany Georgia publications website at https://pubs.ala.usmc.mil. Refer to the SL-1-2 under equipment ID numbers or TM numbers for a listing of related publications. 1-6. Publications Feedback Technical publications play a critical role in achieving system and equipment readiness. Because of this factor, the currency and accuracy of the data published in these documents are essential. Form NAVMC 10772, recommended Changes to Publications / Logistics-Maintenance Data Coding provides a medium for accelerating information feedback to effect the necessary corrections, changes, and / or revisions, as appropriate. Typographical errors need not be reported. The NAVMC 10772 may be submitted via the internet using website https://pubs.ala.usmc.mil/navmc/ , scrolling down to the NAVMC Tracking Program, and following instructions provided or by electronic mail to [email protected]. A paper copy may be mailed to Commander, Marine Corps Systems Command, Attn: Assistant Commander Acquisition and Logistics (LOG/TP), 814 Radford Blvd, Suite 20343, Albany, Georgia 31704-0343. 1-7. Report of Errors, Omissions, and Recommendations Report of errors, omissions, and recommendations for improvement of this manual by its user is encouraged. Such reports should be submitted by using Marine Corps NAVMAC 10772, directly on-line at https://pubs.logcom.usmc.mil. 1-8. Changes Changes will be forwarded as required. Changes to Marine Corps Stocklist and Marine Corps Technical Manuals will be numbered consecutively beginning with number 1. Each change will show the new effective date of this RPL and latest Marine Corps Modification Technical Instructions for which repair parts are included. When changes are received, annotate the Record of Changes sheet. a. Changes to other service publications and commercial manuals, adapted for Marine Corps use, will be identified by Alpha letters beginning with letter A. These changes will be handled the same as changes to Marine Corps Stocklist. b. Changes to Marine Corps Stocklists for NSNs will not be made on an as received basis. Changes to NSNs, initiated by replacement parts, substitute parts, standardization and other actions that are denoted by phrase code actions in the MCML and CMDN Files, will be held until it has been determined that a sufficient number of changes warrant such action. 1-9. Applicable Publications For full information concerning the Marine Corps Stocklist publications, see the current edition of MCO P5215.17C, The Marine Corps Technical Publications System. 1-7 TO 11574A OI III. WARRANTY For warranty provisions refer to SI 11574A/11609A-OI. IV. PREPARATION FOR USE 1-10. Visual Inspection Upon Initial Receipt Visually inspect for the following to ensure the LFRS is intact, and there are no broken/damaged items. Table 1-2. Visual Inspection Upon Initial Receipt. Component Inspection/Service EXTERIOR Container Check for damage or corrosion on the container surfaces. Check for structural damage that is a hazard or degrades container performance. Cargo Doors Inspect door hardware (cargo doors) for bent or broken door release handles. Refrigeration Unit Check refrigeration unit for security. Install and secure loose or missing mount bolts. Evaporator Fan Motor Check evaporator fan motor mounting bolts for security. Install and secure loose or missing mount bolts. Evaporator Fan or Fan Deck Check for dirt or grease on evaporator fan or fan deck and clean if necessary. Evaporator Coil Check evaporator coil for cleanliness or obstructions. Drain Pans and Drain Lines Check defrost drain pans and drain lines for obstructions and clear if necessary. Condenser Coil Check condenser coil for cleanliness. Control Box Open control box door. Check for loose electrical connections or hardware. 220 VAC Electrical Cable (yellow cable) Check electrical cable for cuts, deep abrasions, burned or discolored wiring. 460 VAC Electrical Cable (black cable) Check electrical cable for cuts, deep abrasions, burned or discolored wiring. Moisture-Liquid Indicator Check color of moisture-liquid indicator (lower sight glass). Compressor Sight Glass Check oil level in compressor sight glass. Condenser And Evaporator Fans Check rotation of condenser and evaporator fans. 1-8 TO 11574A-OI Table 1-2. Visual Inspection Upon Initial Receipt – Continued. Component Inspection/Service INTERIOR Cargo Doors Inspect cargo doors for obvious damage such as cracks and holes affecting serviceability. Check seals for damage. Lighting Check light for security of components. Container Interior Inspect container floor, walls, and ceiling for punctures and obvious damage. Inspect floor for blocked or clogged drains. 1-11. Initial Checkout and Inventory a. Check the equipment against the packing slip to see if the shipment is complete. Report all discrepancies in accordance with the instructions of sections 1-13 and 1-14 as applicable. Retain a copy of the packing slip and/or hand receipt in the manual holder. b. Check to see if the equipment has been modified. c. 1-12. Check to ensure wiring diagram and schematic are tethered to the inside of the control box door. Maintenance Forms, Records, and Reports Marine Corps Units using Asset Tracking Logistics and Supply System (ATLASS) will maintain the forms and records information in accordance with the applicable ATLASS requirements. All other Marine Corps Units will maintain forms and records associated with the operation and maintenance of ground equipment as prescribed by TM 4700-15. 1-13. For Shipping Discrepancies Marine Corps users fill out and forward SF 361 as prescribed in UM 4400-124, and MCO P4610.1GE, uniform settlement of Military Freight Loss and Damage claims to the Source of Supply (SOS). 1-14. For Packaging Discrepancies Marine Corps users fill out and forward SF 364 as prescribed in UM 4400-124 and SECNAVINST 4355.18, via Supply Discrepancy Report Procedures. 1-9 TO 11574A OI 1-15. Installation and Relocation a. Siting. (1) Transport. The refrigerated container system is designed for highway, railway and water transport of perishable materials. Transport the refrigerated container system only on equipment compatible with DTR 4500.9-R and MCO P4600.7_ transport requirements. (2) Fixed Site. Although there are no specific siting requirements for the placement of the Large Field Refrigeration System, there are several factors that should be considered during site selection. Place the LFRS on firm, flat, and level ground. Choose a site that is firm and dry, away from any potential flood areas, and clear of trees that may create problems in high winds. The site must be free of debris. The ground should be level, varying no more than three (3) inches in ten (10) feet on unprepared soil. To prevent the danger of excess exposure to moisture, do not site the LFRS near a water feature. Consider condensate drainage from the RU when siting. Also consider the need for power. Place the LFRS close enough to an appropriate power source so that the unit may be operated properly. Consider the need for vehicular and personnel access. Vehicle access and proximity to a roadway is important. However, concealment and other factors may be more important. Place the container so that the single swing door can be fully opened and personnel can load the container with the least amount of interference. Ensure that container placement allows for vehicular access as needed. b. Input Requirements. Power. There are two different power installation options available to operate the LFRS: (1) 380/460 VAC, 3 phase. Black cable. (2) 190/220 VAC, 3 phase. Yellow cable. Ensure the proper cable is used based on voltage available. c. Installation Procedure. When siting the LFRS set up the container as follows: (1) Site the LFRS on flat, level, and stable ground. (2) Consider the need for electrical connections when selecting a site. The container should be sited near an appropriate power source. (3) Consider vehicular and personnel traffic. Site the container so that the door may be fully opened and personnel may easily gain access to the interior of the container. Keep vehicles from driving over power cables. (4) Use the forklift pockets to lift the container. Ensure correct forklift capacity and capability. (5) Move the container into place with two personnel, one to drive the forklift and move the container and the other to assist and ensure proper placement. (6) Once properly sited, uncoil and remove the plug end of the power cord from the bottom right corner of the RU and connect to the power source. 1-10 TO 11574A-OI (7) Once power is connected there are no additional adjustments required. Grounding of the unit is accomplished through the power cable connections and the unit is commissioned before leaving the factory eliminating the need for initial adjustments to the equipment. d. Installation Checkout. After installation perform a general inspection to verify proper siting and connection. Ensure the container is level, the doors can be properly operated and will be held open by straps, and the power is connected with the cable out of the way and protected. e. Preparation for Movement. Prepare the LFRS for movement as follows: CAUTION To prevent damage to container cargo, make sure cargo is securely packed in container. (1) Check container to make sure all boxes and packages are properly secured. (2) Verify that no personnel are inside the container. (3) Verify that all doors are closed and securely fastened. (4) Verify container temperature is correct for type of cargo being stored. If required, allow refrigeration unit to operate until temperature has stabilized. CAUTION To prevent damage to cargo, make sure electrical power, external or generator set is available at next work site. Refrigeration should only be shut down for short periods of time as required to load/unload container from transportation vehicle. (5) Disconnect power cord from power source. (6) Secure all cargo with tie downs. (7) Close and latch the container door. WARNING • When loaded, the refrigerated container is extremely heavy. To prevent injury to personnel and damage to equipment, use a hoist and sling rated at a minimum capacity of 26.45 tons (52,900 lbs./ 24,000 kg). • Commercial container handling equipment (cranes, top lift devices, front and side lift loaders and self-loading transporters) are suitable for handling the refrigeration unit. • Container must be lifted vertically from all four corners. • Do not lift container with cable slings at an angle. • Never use a forklift to move, lift, and or push the container unless the forklift is compatible for use with the container. 1-11 TO 11574A OI (8) The container may now be transported. (9) If refrigerated container will be operated off external power, connect refrigerated unit power cable to power source. V. PREPARATION FOR STORAGE 1-16. Preparation for Limited Storage and Reshipment There are no specific procedures for limited storage and reshipment of the LFRS. 1-17. Preparation for Long Term Storage There are no specific procedures for long term storage of the LFRS. VI. DESTRUCTION TO PREVENT ENEMY USE a. Authority for Destruction Demolition of the equipment will be accomplished only upon the order of the commander. The destruction procedures described below will be used to prevent further use of the equipment. b. Methods of Destruction Use of any of the methods of destruction given below. The time available for destruction is the major factor in determining the method of destruction. (1) Smash. Smash the cabinet, meters, and controls. Use sledges, axes, hammers, crowbars, and other heavy tool available. Remove the top panel, and smash the internal components. (2) Cut. Cut the wiring of the LFRS. Use axes, hand axes, or machetes. WARNING Be extremely careful with explosives and incendiary devices. Use these items only when the need is urgent. (3) Burn. Burn the technical manuals first. Burn as much of the equipment as is flammable; use gasoline , oil, flamethrowers, and similar materials. Pour gasoline on the cut cables and internal wiring and ignite them. Pour gasoline on spares and ignite them. Use incendiary grenades to complete the destruction of the unit. (4) Dispose. Bury or scatter destroyed parts, or throw them into nearby waterways. 1-12 TM 11574A-OI CHAPTER 2 OPERATING INSTRUCTIONS I. SYSTEM CONTROLS AND COMPONENTS 2-1. System Components 11 1 10 9 2 8 3 4 7 6 5 1. Access Panel for Evaporator Fan #1 (EFM) Thermostatic Expansion Valve (TXV) and Heater Termination Thermostat (HTT) 2. Fork Lift Pockets 3. Control Box 4. Condenser Coils 5. Compressor 6. Unit Serial Number, Model Number, and Parts Identification Number (PID) Plate 7. Condenser Fan Interrogator Connector (Front Left) 8. Document Holder 9. Fresh Air Makeup Vent 10. Access Panel (Evaporator Fan #2) / Humidity Sensor / Return Temperature Sensor Figure 2-1. Refrigeration Unit – Front Section. 2-1 TM 11574A-OI 4 3 5 6 2 1 7 8 9 TXV BULB (UNDER INSULATION) 11 10 1. Evaporator Fan Motor #1 2. Return Recorder Sensor (RRS) / Return Temperature Sensor (RTS) 3. Humidity Sensor 4. Evaporator Fan Motor #2 5. Heater Termination Thermostat 6. 7. 8. 9. 10. 11. Defrost Temperature Sensor Evaporator Coil Hermetic Thermostatic Expansion Valve TXV Bulb Routing Evaporator Coil Heaters Heat Exchanger Figure 2-2. Refrigeration Unit – Center Access. 2-2 TM 11574A-OI 1 5 6 7 2 10 9 3 11 4 12 8 20 13 14 15 19 16 18 17 1. 2. 3. 4. 5. 6. 7. 8. 9. 10. Autotransformer Power Cables Compressor Sight Glass View Port Compressor Guard Supply Temperature Sensor Supply Recorder Sensor Ambient Sensor Discharge Service Valve Discharge Temperature Sensor Discharge Pressure Regulating Valve 11. 12. 13. 14. 15. 16. 17. 18. 19. 20. Suction Temperature Sensor Quench Valve Temperature Bulb Quench Valve Access Valve Suction Modulating Valve Suction Service Valve Compressor Motor Suction Pressure Transducer High Pressure Switch Discharge Pressure Transducer Figure 2-3. Compressor Section. 2-3 TM 11574A-OI 6 7 5 2 4 3 1 8 15 9 10 11 12 13 14 1. 2. 3. 4. 5. 6. 7. 8. Grille and Venturi Assembly Condenser Fan Key Condenser Fan Motor Condenser Coil Cover Condenser Coil Condenser Motor Mounting Bracket Receiver 9. 10. 11. 12. 13. 14. 15. Sight Glass Fusible Plug (Rupture Disc – Alternate) Condenser Pressure Transducer Sight Glass/Moisture Indicator Filter-Drier Liquid Line Service Valve Quench Valve Figure 2-4. Condenser Section. 2-4 TM 11574A-OI 2 1 14 1. 2. 3. 4. 5. 6. 7. 13 4 3 12 11 5 10 Compressor Contactor Fuses Heater Contactor Display Module Controller/DataCORDER Module (Controller) Key Pad Start-Stop Switch 9 8. 9. 10. 11. 12. 13. 14. 8 6 7 Controller Battery Pack Control Transformer Evaporator Fan Contactor – E1 Evaporator Fan Contactor – S1 Condenser Fan Contactor Circuit Breaker – 460V Current Sensor Module Figure 2-5. Control Box Section. 2-5 TM 11574A-OI 1 2 7 6 3 4 5 1. 2. 3. 4. Cargo Doors Pressure Relief Port Escape Hatch Door Handle 5. Door Lanyard 6. Locking Cam 7. Fold Up Steps Figure 2-6. Rear Doors. 2-6 TM 11574A-OI 2-2. System Controls a. Details for operating controls and indicators Large Field Refrigerated System (LFRS) and associated components are given in Table 2-1 and shown in Figure 2-9 through Figure 2-13. Table 2-1. Operating Controls and Indicators 1 2 Item No. Description Code Select Pre-Trip Type Component Electrical Electrical 3 Alarm List Electrical 4 Manual Defrost/Interval Electrical 5 Enter Electrical 6 Arrow Up Electrical 7 Arrow Down Electrical 8 Return/Supply Electrical 9 Degrees C / Degrees F Electrical 10 Battery Power Electrical 11 ALT. Mode Electrical Function Accesses function codes. Displays the pre-trip selection menu. Discontinues pre-trip in progress. Displays alarm list and clears the alarm queue. Displays selected defrost mode. Depressing and holding the Defrost interval key for five seconds will initiate defrost using the same logic as if the optional manual defrost switch was toggled on. Confirms a selection or saves a selection to the controller. Change or scroll a selection upward. Pretrip advance or test interruption. Change or scroll a selection downward. Pre-trip repeat backward. Displays non-controlling probe temperature (momentary display). Displays alternate English/Metric scale (momentary display). When set to degrees Fahrenheit, pressure is displayed in psig and vacuum in “/hg. “P” appears after the value to indicate psig and “i” appears for inches of mercury. Initiate battery backup mode to allow set point and function code selection if AC power is not connected. This key is pressed to switch the functions from the temperature software to the DataCORDER Software. The remaining keys function the same as described above except the readings or changes are made to the DataCORDER programming. 2-7 TM 11574A-OI 1 2 3 4 5 6 7 8 9 10 11 Figure 2-7. RU Controller Control Panel. LEGEND 1. 2. 3. 4. 5. 6. 7. 8. 9. 10. 11. 2-8 Code Select Pre-Trip Alarm List Manual Defrost/Interval Enter Arrow Up Arrow Down Return/Supply Degrees C / Degrees F Battery Power ALT. Mode TM 11574A-OI Table 2-1. Operating Controls and Indicators - Continued Item No. 1 2 3 Description START/STOP Selector Switch ON (START) Indicator OFF (STOP) Indicator Type Component Electrical Function Selects RU operational condition. Electrical Indicates RU ON condition. Electrical Indicates RU OFF condition 1 2 3 Figure 2-8. START/STOP Switch. LEGEND 1. 2. 3. START/STOP Selector Switch ON (START) Indicator OFF (STOP) Indicator 2-9 TM 11574A-OI Table 2-1. Operating Controls and Indicators - Continued 1 Item No. Description COOL (White LED) Type Component Electrical 2 Heat (Orange LED) Electrical 3 Defrost (Orange LED) In-Range (Green LED) Electrical 5 Alarm (Red LED) Electrical 6 Supply (Yellow LED) Electrical 7 Return (Yellow LED) Electrical 8 SETPOINT/Code Electrical 9 AIR TEMPERATURE/ Data Electrical 4 2-10 Electrical Function LED energized when refrigerant compressor is energized. LED energized when heater operation in heat or defrost mode. LED energized when RU is in defrost mode. LED energized when the controller temperature probe is within specified tolerance set point. LED energized when there is an active or inactive shutdown alarm in the alarm queue. LED energized when the supply air probe is being used for control. When illuminated, AIR TEMPERATURE displays the reading at the supply air probe. LED energized when the return air probe is being used for control. When illuminated, AIR TEMPERATURE displays the reading at the return air probe. Displays set point value or controller function codes. Displays air temperature at the supply and return air probes or data value indicated by function code display. TM 11574A-OI 2 1 3 4 5 6 7 9 8 Figure 2-9. START/STOP Switch. LEGEND 1. 2. 3. 4. 5. 6. 7. 8. 9. COOL (White LED) Heat (Orange LED) Defrost (Orange LED) In-Range (Green LED) Alarm (Red LED) Supply (Yellow LED) Return (Yellow LED) SETPOINT/Code AIR TEMPERATURE/ Data 2-11 TM 11574A-OI Table 2-1. Operating Controls and Indicators - Continued Item No. 1 2 Description Circuit Breaker Selector Switch Circuit Breaker ID plate Type Component Electrical Function Selects circuit breaker condition. Electrical Identifies circuit breaker and indicates circuit breaker ON condition. 2 1 Figure 2-10. Circuit Breaker. LEGEND 1. 2. 2-12 Circuit Breaker Selector Switch Circuit Breaker ID plate TM 11574A-OI Table 2-1. Operating Controls and Indicators - Continued Item No. 1 Description Light Switch Type Component Electrical Function Controls condition of interior light. Switch to Left = OFF Switch to Center = ON (Takes power from main power) Switch to Right = ON (Takes power from 110 V) 1 Figure 2-11. Interior Lighting. LEGEND 1. Light Switch 2-13 TM 11574A-OI II. THEORY OF OPERATION 2-3. Theory Of Operation The Large Field Refrigerated System (LFRS) is a climate controlled, insulated container system comprised of an electrically powered refrigeration/freezing/heating unit and a 20-ft. ISO compliant, insulated container. 2-4. 20 Foot Insulated Container The insulated container is designed and built to the requirements of ISO 1496-2 standards. The container is built to an 8 ft x 8 ft x 20 ft footprint, with eight reinforced corner fittings and a set of double doors on one end with an emergency escape hatch. The interior of the container is a “food grade” corrosion resistant, NSF approved stainless steel with aluminum T-grade floors that assist in circulating airflow in and around the cargo to ensure uniform distribution of conditioned air. The container floor is leak proof and has floor drains to provide complete drainage. An air curtain is provided using removable, commercial grade, heavy-duty vinyl strips to block the evaporator air exiting the container when the doors are open. Two lights are provided to illuminate the interior of the container. Cargo restraints are provided on the floor and container walls to secure cargo during transport. Foot holds and handles are affixed to the roof and container doors to allow access to the roof. The container is painted with a military tan CARC paint IAW MIL-DTL-53072. Forklift pockets are provided for transportation and markings identifying the center of balance when empty are given to assist container transport. 2-5. Refrigeration Unit The RU removes heat from the container (refrigerates) using a vapor compression cycle which uses the refrigerant R134a. The compressor compresses a low-pressure superheated vapor into a high-pressure superheated vapor. This superheated vapor is then cooled in the condenser coil, and is condensed and subcooled, thus leaving as a subcooled liquid and directed into the receiver tank. The subcooled liquid refrigerant is first routed through the Suction Line Heat Exchanger (SLHX), and then is expanded through the thermal expansion valve into the evaporator as a low temperature saturated mixture. Heat is absorbed from the conditioned space by heat transfer from the air to the evaporator coil. Heat is absorbed by the evaporated as refrigerant absorbs latent heat and becomes a superheated vapor. After leaving the evaporator, the refrigerant flows through the Suction Modulation Valve (SMV), which is a microlink-controlled stepper motor, which modulates the refrigerant flow rate, and thus the RU cooling capacity. Upon startup of the SMV will reset to a known open position. This is accomplished by assuming the valve was fully open, driving it fully closed, resetting the percentage open to zero, then opening to a known 21% staging position. The RU is equipped with a Quench valve, which operates similarly to the TXV, and meters refrigerant into the compressor suction port to cool the compressor during high temperature operation. A 3-way Liquid Service Valve, sometimes called a "King Valve", is located at the receiver tank, but before the Filter/Drier, which allows a low-side pump down. This causes all of the refrigerant to be pumped into the receiver tank, and allows for servicing of the Filter/Drier, SLHX, TXV, and Evaporator. Refer to section 3-10.b paragraph 2b. 2-6. Perishable Mode Cooling The controller monitors the supply air. When the supply air temperature increases to 0.4 F (0.2 C) above the set point and the three minute off time has elapsed, relays are energized to restart the compressor and condenser fan motors. Lights indicate when air is cooling or in-range. 2-14 TM 11574A-OI 2-7. Perishable Mode Heating If the air temperature decreases 0.9 F (0.5 C) below the set point, the system enters heating mode. The controller closes the contacts to energize the heaters. The HEAT light is illuminated. The evaporator fan circulates the warm air throughout the container. When the temperature reaches 0.4 F (0.2 C) the contact opens to de-energize the heaters. The HEAT light is also deenergized. The evaporator fan continues to circulate air throughout the container. 2-8. Frozen Mode Cooling With supply air temperature above set point and decreasing, the unit will be cooling with the condenser fan motor, compressor motor, evaporator fan motors energized and the COOL light illuminated. When the air temperature decreases to a predetermined tolerance above set point, the in-range light is illuminated. Contacts are opened to de-energize the compressor and condenser fan motors when the air temperature decreases to 0.4 F (0.2 C) below set point. The COOL light is also de-energized. The evaporator fan motors continue to run to circulate throughout the container. The in-range light remains illuminated as long as the return air is within tolerance of set point. When the return air temperature increase to 0.4 F (0.2C) above set point and the three minute off time has elapsed, relays are energized to start the compressor and condenser fan motors. The cool light is also illuminated. 2-9. Defrost The processing of the defrost request is controlled by software that acts as a thermostat. The defrost cycle may consist of up to three distinct operations. The first is de-icing of the coil, the second is a probe check cycle, and the third is snap freeze. Figure 2-12. Defrost Cycle. 2-15 TM 11574A-OI III. PRE-OPERATING PROCEDURES 2-10. General This section contains theory of operation, startup, normal operation and shutdown procedures for the Large Field Refrigerated System and associated components. Two personnel are the minimum number recommended to safely and efficiently setup the Large Field Refrigerated System (LFRS). 2-11. Fluid and Lubrication Requirements Check oil sight glass for oil level range, with the compressor off, oil level should be between the bottom and one-eighth level of the sight glass. Add Castrol Icematic oil as necessary. 2-16 TM 11574A-OI IV. OPERATING CHECKS 2-12. Before, During, and After Operation Checks WARNING Beware of unexpected starting of the fans motors. The unit may cycle the fan motors as control requirements dictate. Table 2-2. Before, During, and After Operation Checks Interval Item Action EXTERIOR Before Cargo Doors Inspect hardware for bent or broken door release handles. Before Rear Doors Inspect hardware for bent or broken door release handles. Before Refrigeration Unit Check refrigeration unit for security. Install and secure loose or missing mount bolts. Before Evaporator Fan Check for dirt or grease on evaporator fan or fan deck and clean if necessary. Before Evaporator Coil Check evaporator coil for cleanliness or obstructions. Wash with fresh water. Before Defrost Drain Pans and Lines Check defrost drain pans and drain lines for obstructions and clear if necessary. Wash with fresh water. Before Condenser Coil Check condenser coil for cleanliness. Wash with fresh water. Before Control Box Open control box door. Check for loose electrical connections or hardware. Before Electrical Cables Check electrical cable for cuts, deep abrasions, burned or discolored wiring. Before Moisture-Liquid Indicator Check color of moisture-liquid indicator. Before Compressor Check oil level in compressor sight glass. Before Condenser/ Evaporator Fans Check rotation of condenser and evaporator fans. 2-17 TM 11574A-OI Interval Item Action INTERIOR Before Cargo Doors Inspect cargo doors for obvious damage such as cracks and holes affecting serviceability. Check seals for damage. Before Lights Check light for security of components. Before Floor Inspect container floor for punctures and obvious damage. Inspect floor for blocked or clogged drains. EXTERIOR During Refrigeration Unit Ensure Refrigeration unit is operational. INTERIOR During Container Check container for free flow of air over cargo. There must be at least one foot of space between top of cargo and container ceiling. Make sure cargo does not block evaporator section of refrigeration unit on front container wall. After 2-18 Refrigeration Unit If the refrigeration unit is not going to be used for several days, it must be pumped. TM 11574A-OI V. CONTROLLER AND SOFTWARE FUNCTIONS 2-13. Check Controller Function Codes The controller software is a custom designed program that is subdivided into the configuration software and the operational software. The controller software performs the following functions: a. Control supply or return air temperature to required limits, provide modulated refrigeration control, electric heat control and defrost. Defrost is performed to clear buildup of frost and ice from the coil to ensure continuous conditioned air delivery to the load. b. Provide default independent readouts of set point and supply or return air temperatures. c. Provide ability to read, and if applicable, modify the configuration software variables, operating software function codes, and alarm code indications. d. Provide a pre-trip step-by-step checkout of refrigeration unit performance, including proper component operation, electronic and refrigeration control operation, heater operation, probe calibration, pressure limiting, and current limiting settings. e. Provide battery-powered ability to access or change selected codes and set points without AC power connected. f. Provide the ability to reprogram the software through the use of a memory card. (1) Configuration Software (Configuration Variables). The configuration software is a variable listing of the components available for use by the operational software. This software is factory-installed in accordance with the equipment fitted and options listed on the original purchase order. Changes to the configuration software are required only when the original software has been lost or a physical change has been made to the unit, such as the addition or removal of an option. A configuration variable list is provided in Table 2-2. A change to the factory-installed configuration software is achieved via a configuration card. (2) Operational Software (Function Codes). The operational software is the actual operation programming of the controller, which activates or deactivates components in accordance with current unit operation conditions and operator selected modes of operation. The programming is divided into function codes. Some of the codes are read only while the remaining codes may be user configured. The value of the user configurable codes can be assigned in accordance with user desired mode of operation. A list of the function codes is provided in Table 2-5. To access the function codes, perform the following: 1. Press the CODE SELECT key, then press an arrow key until the left window displays the desired code number. 2. The right window will display the value of this item for five seconds before returning to the normal display mode. 3. If a longer time is desired, press the ENTER key to extend the time to 30 seconds. 2-19 TM 11574A-OI 2-14. DataCORDER Operation a. DataCORDER. (1) Description. The Carrier Transicold “DataCORDER” software is integrated into the controller and serves to eliminate the temperature recorder and paper chart. The DataCORDER functions may be accessed by keypad selections and viewed on the display module. The unit is also fitted with interrogation connections (see Figure 2-24), which may be used with the Carrier Transicold Data Reader to download data. A personal computer with Carrier Transicold Data View software may also be used to download data and configure settings. The DataCORDER consists of: • • • • • • • • Configuration Software Operational Software Data Storage Memory Battery Low (Battery Pack) Real--Time Clock (with internal battery backup) Six thermistor inputs Interrogation Connections Power Supply (battery pack) The DataCORDER performs the following functions: 1. Logs data at 15, 30, 60 or 120 minute intervals and stores two years’ of data (based on one hour interval). 2. Records and displays alarms on the display module. 3. Records results of pre-trip testing. 4. Records DataCORDER and temperature control software generated data and events as follows: • • • • • • • • • • • • • • • • • • • • 2-20 Container ID Change Software Upgrades Alarm Activity Battery Low (Battery Pack) Data Retrieval Defrost Start and End Power Loss (w/ or w/o battery pack) Power Up (w/ or w/o battery pack) Return Air Temperature Set Point Change Supply Air Temperature Real Time Clock Battery (Internal Battery) Replacement Real--Time Clock Modification Trip Start ISO Trip Header (When entered via Interrogation program) Economy Mode Start and End “Auto 2” Pre-Trip Start and End Bulb Mode Start Bulb Mode changes Bulb Mode End TM 11574A-OI (2) DataCORDER Software. The DataCORDER Software is subdivided into the configuration software, operational software and the Data Memory. (a) Operational Software The operational software reads and interprets inputs for use by the configuration software. The inputs are labeled Function Codes. There are 35 functions (see Table 2-8), which the operator may access to examine the current input data or stored data. To access these codes, do the following: 1. Press the ALT. MODE & CODE SELECT keys. 2. Press an arrow key until the left window displays the desired code number. The right window will display the value of this item for five seconds before returning to the normal display mode. 3. If a longer time is desired, press the ENTER key to extend the time to 30 seconds. (b) Configuration Software The configuration software controls the recording and alarm functions of the DataCORDER. Reprogramming to the factory-installed configuration is achieved via the same configuration card as the unit control module software. Changes to the software may be made using the Data View integration device. A listing of the configuration variables is provided in Table 2-2. Descriptions of DataCORDER operation for each variable setting are provided in the following paragraphs. Table 2-3. DataCORDER Configuration Variables. CONFIGURATION NO. dCF01 dCF02 dCF03 dCF04 dCF05 TITLE (Future Use) Sensor Configuration Logging Interval (Minutes) Thermistor Format Thermistor Sampling Type DEFAULT -2 60 Short A OPTION -2,5,6,9,54,64,94 15,30,60,120 Low, Normal A, b, C (3) Sensor Configuration (dCF02). Two modes of operation may be configured, the Standard Mode and the Generic Mode. (a) Standard Mode In the standard mode, the user may configure the DataCORDER to record data using one of seven standard configurations. The seven standard configuration variables, with their descriptions, are listed in Table 2-3. The six thermistor inputs (supply, return, and cargo probe) and the humidity sensor input will be generated by the DataCORDER. An example of a report using a standard configuration is shown in Figure 2-14. 2-21 TM 11574A-OI NOTE The DataCORDER software uses the supply and return recorder sensors. The temperature control software uses the supply and return temperature sensors. (b) Generic Mode The generic recording mode allows user selection of the network data points to be recorded. The user may select up to a total of eight data points for recording. A list of the data points available for recording follows. Changing the configuration to generic and selecting which data points to record may be done using the Carrier Transicold Data Retrieval Program. 1. 2. 3. 4. 5. 6. 7. 8. 9. 10. 11. 12. 13. 14. 15. 16. 17. 18. 19. 20. Control mode Control temperature Frequency Humidity Phase A current Phase B current Phase C current Main voltage Suction modulation valve percentage Discrete outputs (See Note ) Discrete inputs (See Note ) Ambient sensor Compressor suction sensor Compressor discharge sensor Return temperature sensor Supply temperature sensor Defrost temperature sensor Discharge pressure transducer Suction pressure transducer Condenser pressure transducer NOTE Bitmapped -- require special handling if used Table 2-4. DataCORDER Standard Configurations. Standard Configuration 2 sensors (dCF02=2) 5 sensors (dCF02=5) 6 sensors (dCF02=6) 9 sensors (dCF02=9) 6 sensors (dCF02=54) 7 sensors (dCF02=64) 10 sensors (dCF02=94) 2-22 Description 2 thermistor inputs(supply & return) 2 thermistor inputs(supply & return) 2 thermistor inputs(supply & return) 1 humidity input Not Applicable 2 thermistor inputs(supply & return) 1 cargo probe (thermistor input) 2 thermistor inputs(supply & return) 1 humidity input 1 cargo probe (thermistor input) 2 thermistor inputs(supply & return) 1 humidity input 1 cargo probe (thermistor input) TM 11574A-OI (4) Logging Interval (dCF03). The user may configure four time intervals between data recordings. Data is logged at exact intervals in accordance with the real-time clock. The clock is factory set at Greenwich Mean Time. (5) Thermistor Format (dCF04). The user may configure the format in which the thermistor readings are recorded. The low resolution is a 1 byte format and the normal resolution is a 2 byte format. The low resolution requires less memory and records temperature in 0.45 F (0.25 C) increments when in perishable mode or 0.9 F (0.5 C) increments when in the frozen mode. The normal resolution records temperature in 0.01 degrees C (0.02 degrees F) increments for the entire range. (6) Sampling Type (dCF05 & dCF06). Two types of data sampling are available –average and snapshot. When configured to average, the average of readings taken every minute over the recording period is recorded. When configured to snapshot, the sensor reading at the log interval time is recorded. (7) Alarm Configuration (dCF07 -- dCF10). The cargo probe alarm may be configured to OFF, ON or AUTO. If a probe alarm is configured to OFF, then the alarm for this probe is always disabled. If a probe alarm is configured to ON, then the associated alarm is always enabled. If the probes are configured to AUTO, they act as a group. This function is designed to assist users who keep their DataCORDER configured, but do not install the probes for every trip. If all the probes are disconnected, no alarms are activated. As soon as one of the probes is installed, then all of the alarms are enabled and the remaining probes that are not installed will give active alarm indications. The DataCORDER will record the initiation of a pre-trip test (refer to paragraph 2-15) and the results of each of the tests included in pre-trip. The data is time-stamped and may be extracted via the Data Retrieval program. Refer to Table 2-9 for a description of the data stored in the DataCORDER for each corresponding pre-trip test. (8) DataCORDER Power-Up. The DataCORDER may be powered up in any one of four ways: 1. Normal AC power: The DataCORDER is powered up when the unit is turned on via the stop-start switch. 2. Controller DC battery pack power: If a battery pack is installed, the DataCORDER will power up for communication when an interrogation cable is plugged into an interrogation receptacle. 3. External DC battery pack power: A 12--volt battery pack may also be plugged into the back of the interrogation cable, which is then plugged into an interrogation port. No controller battery pack is required with this method. 4. Real-time Clock demand: If the DataCORDER is equipped with a charged battery pack and AC power is not present, the DataCORDER will power up when the realtime clock indicates that a data recording should take place. When the DataCORDER is finished recording, it will power down. 2-23 TM 11574A-OI During DataCORDER power-up, while using battery-pack power, the controller will perform a hardware voltage check on the battery. If the hardware check passes, the Controller will energize and perform a software battery voltage check before DataCORDER logging. If either test fails, the real-time clock battery power-up will be disabled until the next AC power cycle. Further DataCORDER temperature logging will be prohibited until that time. An alarm will be generated when the battery voltage transitions from good to bad indicating that the battery pack needs recharging. If the alarm condition persists for more than 24 hours on continuous AC power, the battery pack needs replacement. (9) Pre-Trip Data Recording. The DataCORDER will record the initiation of a pre-trip test (refer to paragraph 2-15) and the results of each of the tests included in pre-trip. The data is time-stamped and may be extracted via the Data Retrieval program. Refer to Table 2-9 for a description of the data stored in the DataCORDER for each corresponding pre-trip test. (10)DataCORDER Communications. Data retrieval from the DataCORDER can be accomplished by using one of the following; DataReader, DataLine/DataView or a communications interface module. NOTE A DataReader, DataLine/DataView, or a communications interface module display of Communication Failed is caused by faulty data transfer between the DataCORDER and the data retrieval device. Common causes include: 1. Bad cable or connection between DataCORDER and data retrieval device. 2. PC communication port(s) unavailable or misassigned. 3. Chart Recorder Fuse (FCR) blown. (a) DataReader The Carrier Transicold Data Reader (see Figure 2-15) is a simple to operate hand held device designed to extract data from the DataCORDER and then upload it to a personal computer. The Data Reader has the ability to store multiple data files. Refer to Data Retrieval manual 62-10629 for a more detailed explanation of the DataReader. 2-24 TM 11574A-OI Figure 2-13. Standard Configuration Report. 2-25 TM 11574A-OI Figure 2-14. Data Reader. (b) DataBANKTM Card The DataBANKTM card is a PCMCIA card that interfaces with the controller through the programming slot and can download data at a much faster rate when compared to the PC or DataReader. Files downloaded to the DataBANK card files are accessible through an Omni PC Card Drive. The files can then be viewed using the DataLine software. (c) DataLine The DataLINE software for a personal computer is supplied on both floppy disks and CD. This software allows interrogation, configuration variable assignment, screen view of the data, hard copy report generation, cold treatment probe calibration, and file management. Refer to Data Retrieval manual 62-10629 for a more detailed explanation of the DataLINE interrogation software. The DataLine manual may be found on the Internet at www.container.carrier.com. (11)DataCORDER Alarms. Alarm display is an independent DataCORDER function. I f an operating parameter is outside of the expected range or a component does not return the correct signals back to the DataCORDER an alarm is generated. The DataCORDER contains a buffer of up to eight alarms. A listing of the DataCORDER alarms is provided in Table 2-7. To display alarm codes: a. While in the Default Display mode, press the ALT. MODE&ALARMLIST keys. This accesses the Data-CORDER Alarm List Display Mode, which displays any alarms stored in the Alarm Queue. b. To scroll to the end of the alarm list, press the UP ARROW. Depressing the DOWN ARROW key will scroll the list backward. c. The left display will show “AL#” where # is the alarms number in the queue. The right display will show “AA##,” if the alarm is active, where ## is the alarm number. “IA##,” will show if the alarm is inactive. d. “END” is displayed to indicate the end of the alarm list if any alarms are active. “CLEAr” is displayed if all the alarms in the list are inactive. e. If no alarms are active, the Alarm Queue may be cleared. The exception to this rule is the DataCORDER Alarm Queue Full alarm (AL91), which does not have to be inactive in order to clear the alarm list. 2-26 TM 11574A-OI To clear the alarm list: 1. 2. 3. 4. Press the ALT. MODE & ALARM LIST keys. Press the UP/DOWN ARROW key until “CLEAr” is displayed. Press the ENTER key. The alarm list will clear and “-- -- -- -- -- ” will be displayed. Press the ALARM LIST key. “AL” will show on the left display and “ -- -- -- -- -- ” on the right display when there are no alarms in the list. 5. Upon clearing of the Alarm Queue, the Alarm light will be turned off. Table 2-5 Controller Configuration Variables CONFIGURATION NUMBER CnF01 CnF02 CnF03 CnF05 CnF06 CnF07 CnF08 CnF09 CnF10 CnF11 CnF12 CnF13 CnF14 CnF15 CnF16 CnF17 CnF18 CnF20 CnF21 CnF22 CnF23 CnF24 CnF25 CnF26 CnF27 CnF28 CnF30 CnF31 CnF32 CnF33 CnF34 CnF36 CnF38 CnF39 CnF40 CnF41 CnF42 CnF47 CnF48 CnF49 CnF50 CnF51 TITLE Bypass Valve Enable Evaporator Fan Speed Control Sensors Reserved for future use Condenser Fan Speed Select Unit Selection, 20FT/ 40FT/45FT Single Phase/Three Phase Motor Refrigerant Selection Two Speed Compressor Logic Defrost “Off” Selection TXV/Solenoid Quench Valve Unloader Condenser Pressure Control (CPC) Discharge Temperature Sensor DataCORDER Present Discharge Pressure Sensor Heater Suction Pressure Sensor Autotransformer Economy Mode Option Defrost Interval Timer Save Option Advanced Pre-Trip Enhanced Test Series Option Pre-Trip Test Points/Results Recording Option Heat Lockout Change Option Suction Temperature Display Option Bulb Mode Option Compressor Size Probe Check Option Single Evaporator Fan Option Snap Freeze Option Degree Celsius Lockout Option SMV Type Quench Bypass Valve Expanded Current Limit Range Demand Defrost Lower DTT Setting Auto Pre-trip Start Fresh Air Vent Position Sensor CFS Override DataCORDER Configuration Restore Enhanced Bulb Mode Selection Timed Defrost Disable DEFAULT In dS (Dual) FOUr --------OFF (Single) 40ft 1Ph r134a Out (Single) noOFF Out (TXV) Out In Out On (Yes) Out (No) Old (Low Watt) Out (No) Out OFF noSAv Auto rSLtS Set to -10 C Out NOr 41 CFM Standard 2EF0 OFF bOth 1 (standard) Out Out Out Out Out OFF OFF OFF OFF 0 OPTION Out SS (Single) duAL n/a On (Variable) 20ft,45 3Ph r12, r22, bLEnd In (Dual) OFF In (Solenoid) In Out In OFF (No) In (Yes) nEW (High Watt) In (Yes) In Standard, Full SAv Auto2, Auto 3 dAtA Set to-5C In bULb 37 CFM SPEC 1EF0 SnAP F 2, 3 (stepper) In In In In In UPP, LOW On On Bulb, dEHUM 0-out, 1-in 2-27 TM 11574A-OI Table 2-6 Controller Function Codes Code No. TITLE DESCRIPTION Note: If the function is not applicable, the display will read “---------” Display Only Functions Cd01 Suction Modulation Valve Opening (%) Cd02 Cd03 Cd04 Quench Valve Not Applicable Line Current, Phase A Cd05 Line Current, Phase B Cd06 Line Current, Phase C Cd07 Main Power Voltage Main Power Frequency Ambient Temperature Compressor Suction Temperature Compressor Discharge Temperature Compressor Suction Pressure Condenser Pressure Compressor Discharge Pressure Unloader Valve(On-Off) Compressor Motor Hour Meter Relative Humidity (%) Cd08 Cd09 Cd10 Cd11 Cd12 Cd13 Cd14 Cd15 Cd16 Cd17 Cd18 Software Revision # Cd19 Battery Check Cd20 Config/Model # Cd21 Cd22 Cd23 2-28 Humidity Water Pump/Atomizer Status Compressor Speed Evaporator Fan Displays the SMV percent open. The right display reads 100% when the valve is fully open and 0% when the valve is fully closed. The valve will usually be at 21% on start up of the unit except in very high ambient temperatures. Displays state of the solenoid quench valve, open or closed. Not used The current sensor measures current on two legs. The third unmeasured leg is calculated based on a current algorithm. The current measured is used for control and diagnostic purposes. For control processing, the highest of the Phase A and B current values is used for current limiting purposes. For diagnostic processing, the current draws are used to monitor component energization. Whenever a heater or a motor is turned ON or OFF, the current draw increase/reduction for that activity is measured. The current draw is then tested to determine if it falls within the expected range of values for the component. Failure of this test will result in a pre-trip failure or a control alarm indication. The main supply voltage is displayed. The value of the main power frequency is displayed in Hertz. The frequency displayed will be halved if either fuse F1 or F2 is bad (alarm code AL21). The ambient sensor reading is displayed. Compressor suction temperature sensor reading is displayed. Compressor discharge temperature sensor reading is displayed. Compressor suction pressure transducer reading is displayed. Condenser pressure transducer reading is displayed. Compressor discharge pressure transducer reading is displayed. Not used in this application Records total hours of compressor run time. Total hours are recorded in increments of 10 hours (i.e., 3000 hours is displayed as 300). Humidity sensor reading is displayed. This code displays the relative humidity, as a percent value. The software revision number is displayed. This code checks the Controller/DataCORDER battery pack. While the test is running, “btest” will flash on the right display, followed by the result. “PASS” will be displayed for battery voltages greater than 7.0 volts. “FAIL” will be displayed for battery voltages between 4.5 and 7.0 volts, and “---------” will be displayed for battery voltages less than 4.5 volts. After the result is displayed for four seconds, “btest” will again be displayed, and the user may continue to scroll through the various codes. This code indicates the dash number of the model for which the Controller is configured (i.e., if the unit is a 69NT40-541-100, the display will show “41100”). This code displays the status of the humidity water pump (---------,forward, reverse or off). If not configured, the mode is permanently deactivated and will display “---------.” The status of the compressor is displayed (high, low or off). Displays the current evaporator fan state (high, low or off). TM 11574A-OI Table 2-6 Controller Function Codes - Continued Code No. Cd25 Cd26 TITLE DESCRIPTION Compressor Run Time Remaining Until Defrost Defrost Temperature Sensor Reading This code displays the time remaining until the unit goes into defrost (in tenths of an hour). This value is based on the actual accumulated compressor running time. Defrost temperature sensor reading is displayed. Configurable Functions NOTE Cd27 Function codes Cd27 through Cd37 are user-selectable functions. The operator can change the value of these functions to meet the operational needs of the container. There are two modes for defrost initiation, either user-selected timed intervals or automatic control. The user-selected values are (OFF), 3, 6, 9, 12, or 24 hours while the factory default is 12 hours. Automatic defrost starts with an initial defrost at three hours and then adjusts the interval to the next defrost based on the accumulation of ice on the evaporator coil. Following a start-up or after termination of a defrost, the time will not begin counting down until the defrost temperature sensor (DTS) reading falls below set point. If the reading of DTS Defrost Interval rises above set point any time during the timer count down, the interval is reset (Hours or and the countdown begins over. If DTS fails, alarm code AL60 is activated and Automatic) control switches over to the the return temperature sensor. The controller will act in the same manner as with the DTS except the return temperature sensor reading will be used. Defrost Interval Timer Value (Configuration variable CnF23): If the software is configured to “SAv” (save) for this option, then the value of the defrost interval timer will be saved at power down and restored at power up. This option prevents short power interruptions from resetting an almost expired defrost interval, and possibly delaying a needed defrost cycle. NOTE The defrost interval timer counts only during compressor run time. Cd28 Temperature Units (Degrees C or Degrees F) Cd29 Failure Action (Mode) Cd30 In-Range Tolerance Cd31 Stagger Start Offset Time (Seconds) This code determines the temperature units (C or F) which will be used for all temperature displays. The user selects C or F by selecting function code Cd28 and pushing the ENTER key. The factory default value is Celsius units. NOTE This function code will display “--------------“ if Configuration Variable CnF34 is set to degrees F. If all of the control sensors are out of range (alarm code AL26) or there is a probe circuit calibration failure (alarm code AL27), the unit will enter the shutdown state defined by this setting. The user selects one of four possible actions as follows: A -- Full Cooling (stepper motor SMV at maximum allowed opening) B -- Partial Cooling (stepper motor SMV 11% open) C -- Evaporator Fan Only D -- Full System Shutdown -- Factory Default The in-range tolerance will determine the band of temperatures around the set point which will be designated as in-range. If the control temperature is in-range, the in-range light will be illuminated. There are four possible values: 1 = +/- 0.9 F (+/- 0.5 C) 2 = +/- 1.8 F (+/- 1.0 C) 3 = +/- 2.7 F (+/- 1.5 C) 4 = +/- 3.6 F (+/- 2.0 C) -- Factory Default The stagger start offset time is the amount of time that the unit will delay at startup, thus allowing multiple units to stagger their control initiation when all units are powered up together. The eight possible offset values are: 0 (Factory Default), 3, 6, 9, 12, 15, 18 or 21 seconds 2-29 TM 11574A-OI Table 2-6 Controller Function Codes – Continued Code No. TITLE Cd32 Current Limit (Amperes) Cd34 Economy Mode (On--Off) Cd38 Secondary Supply Temperature Sensor Cd39 Secondary Return Temperature Sensor Cd40 Container Identification Number Cd41 Cd42 Not Applicable Cd43 AutoFresh Mode Cd44 AutoFresh Values Cd45 Vent Position Sensor (VPS) Cd46 Not Used Cd47 Variable Economy Temperature Setting Cd49 Days Since Last Successful Pre-trip 2-30 DESCRIPTION The current limit is the maximum current draw allowed on any phase at any time. Limiting the unit’s current reduces the load on the main power supply. This is accomplished by reducing the SMV position until current draw is reduced to the set point. When desirable, the limit can be lowered. Note, however, that capacity is also reduced. The five values for 460 VAC operation are: 15, 17, 19, 21 (Factory Default), 23 Economy mode is a user selectable mode of operation provided for power saving purposes. Code Cd38 will display the current secondary supply temperature sensor reading for units configured for four probes. If the unit is configured with a DataCORDER, Cd38 will display “---------.” If the DataCORDER suffers a failure, (AL55) Cd38 will display the supply recorder sensor reading. Code Cd39 will display the current secondary return temperature sensor reading for units configured for four probes. If the unit is configured with a DataCORDER, Cd39 will display “---------.” If the DataCORDER suffers a failure, (AL55) Cd39 will display the return recorder sensor reading. Code Cd40 is configured at commissioning to read a valid container identification number. The reading will not display alpha characters, only the numeric portion of the number will display. Scroll Units Only Code Cd43 is a user selectable mode of operation that allows the opening and closing of a mechanical air vent door via a stepper motor. These selection modesare as follows: OFF -- Air makeup vent will remain closed. User -- Allows for manual selection of the setting. Delay --The opening of the door is based on selected time, return temperature and flow rate (percent opened). gASLM -- The opening is based percent open and CO2 and O2 selectable limits (LM). This selection is only active if the unit has a CO2 sensor. TEST / CAL (CO2 sensor option units only) -- The door will fully open and close to allow the user to inspect its operation. If CAL is selected, the controller will zero calibrate the CO2 sensor input. If the unit is not configured with AutoFresh, the CD43 will display “--------” Code Cd44 will display CO2 and O2 concentrations and limits. If the unit is not configured for AutoFresh or a CO2 sensor is not installed, CD44 will display “--------” Code Cd45 will display whenever the control detects movement via the sensor unless alarm 50 is active. The code will display for 30 seconds, then time out and return to the normal display mode. If the Temperature unit is degrees F, the VPS units will be CFM and in degrees C the VPS units shall be CMH. The variable temperature “degrees C or degrees F” setting is used with economy mode. Function code is “--------” when unit is not configured for economy mode. Code CD49 will display the number of days since the last successful Auto1, Auto2 or Auto3 pre-trip sequence. TM 11574A-OI Table 2-7 Controller Alarm Indications Code No. AL11 AL12 AL20 AL21 AL22 AL24 AL25 AL26 AL27 AL50 AL51 AL52 TITLE DESCRIPTION Alarm 11 is applicable to units with Single Evaporator Fan Capability (CnF32 set to Evaporator Motor 1 1EFO) only. The alarm is triggered if the evaporator fan motor #1 internal protector IP Trip opens. If the alarm is active, probe check is deactivated. Alarm 12 is applicable to units with Single Evaporator Fan Capability (CnF32 set to Evaporator Motor 2 1EFO) only. The alarm is triggered if the evaporator fan motor #2 internal protector IP Trip opens. If the alarm is active, probe check is deactivated. Alarm 20 is triggered by control power fuse (F3A, F3B) opening and will cause the Control Circuit Fuse software shutdown of all control units. This alarm will remain active until the fuse is Open (24 VAC) replaced. Alarm 21 is triggered by one of the fuses (F1/F2) being opened on 18 volts AC Micro Circuit Fuse power supply to the Controller. The suction modulation valve (SMV) will be opened Open (18 VAC) and current limiting is halted. Temperature control will be maintained by cycling the compressor. Alarm 22 responds to the evaporator motor internal protectors. On units with Normal Evaporator Fan Operation (CnF32 set to 2EFO) the alarm is triggered by opening of Evaporator Fan either internal protector. It will disable all control units until the motor protector Motor Safety resets. On units with Single Evaporator Fan Capability (CnF32 set to 1EFO), the alarm is triggered by opening of both internal protectors. It will disable all control units until a motor protector resets. Alarm 24 is triggered by the opening of the compressor motor internal protector. Compressor Motor This alarm will disable all control units except for the evaporator fans and will remain Safety active until the motor protector resets. This alarm triggers the failure action code set by Function Code Cd29. Alarm 25 is triggered by the opening of the condenser motor internal protector and Condenser Fan will disable all control units except for the evaporator fans. This alarm will remain Motor Safety active until the motor protector resets. All Supply and Alarm 26 is triggered if the Controller determines that all of the control sensors are Return temperature out-of-range. This can occur for box temperatures outside the range of -50 C to +70 Control Sensors C (-58 F to +158 F). This alarm triggers the failure action code set by Function Code Failure Cd29. Check the connector at the back of the controller, if it is loose or unplugged, reconnect it. Then run a pre trip test (P5) to clear AL26. The Controller has a built-in Analog to Digital (A-D) converter, used to convert analog readings (i.e. temperature sensors, current sensors, etc.) to digital readings. Probe Circuit The Controller continuously performs calibration tests on the A-D converter. If the ACalibration Failure D converter fails to calibrate for 30 consecutive seconds, this alarm is activated. This alarm will be inactivated as soon as the A-D converter calibrates. Alarm 50 is activated whenever the sensor is outside the valid range. There is a five minute adjustment period where the user can change the vent position without Fresh Air Position generating an alarm event. The sensor requires five minutes of no movement to Sensor (VPS) confirm stability. If the vent position changes at any point beyond the five minute adjustment period, the sensor will generate an alarm event. The alarm is triggered off when the unit power cycles and the sensor is within valid range. During start-up diagnostics, the EEPROM is examined to determine validity of its contents. This is done by testing the set point and the alarm list. If the contents are invalid, Alarm 51 is activated. During control processing, any operation involving Alarm List Failure alarm list activity that results in an error will cause Alarm 51 to be activated. Alarm 51 is a “display only” alarm and is not written into the alarm list. Pressing the ENTER key when “CLEAr” is displayed will result in an attempt to clear the alarm list. If that action is successful (all alarms are inactive), Alarm 51 will be reset. Alarm 52 is activated whenever the alarm list is determined to be full; at start-up or after recording an alarm in the list. Alarm 52 is displayed, but is not recorded in the Alarm List Full alarm list. This alarm can be reset by clearing the alarm list. This can be done only if all alarms written in the list are inactive. 2-31 TM 11574A-OI Table 2-7 Controller Alarm Indications - Continued Code No. AL53 AL54 TITLE DESCRIPTION Alarm 53 is caused by the battery pack charge being too low to provide sufficient power for battery-backed recording. Renew replaceable batteries. If this alarm Battery Pack Failure occurs on start up, allow a unit fitted with rechargeable batteries to operate for up to 24 hours to charge rechargeable batteries sufficiently to deactivate the alarm Alarm 54 is activated by an invalid primary supply temperature sensor reading that is sensed outside the range of -58 F to +158 F (-50 to +70 C) or if the probe check logic has determined there is a fault with this sensor. If Alarm 54 is activated and the primary supply is the control sensor, the secondary supply sensor will be used Primary Supply for control if the unit is so equipped. If the unit does not have a secondary supply Temperature temperature sensor, and AL54 is activated, the primary return sensor reading, Sensor Failure minus 2 C will be used for control. (STS) NOTE AL56 Primary Return Temperature Sensor Failure (RTS) The P5 Pre-Trip test must be run to inactivate the alarm Alarm 56 is activated by an invalid primary return temperature sensor reading that is outside the range of -58 F to +158 F (-50 to +70 C). If Alarm 56 is activated and the primary return is the control sensor, the secondary return sensor will be used for control if the unit is so equipped. If the unit is not equipped with a secondary return temperature sensor or it fails, the primary supply sensor will be used for control. NOTE The P5 Pre-Trip test must be run to inactivate the alarm AL57 Ambient Temperature Sensor Failure AL58 Compressor High Pressure Safety AL59 Heat Termination Thermostat AL60 Defrost Temperature Sensor Failure AL61 Heaters Failure AL62 Compressor Circuit Failure 2-32 Alarm 57 is triggered by an ambient temperature reading outside the valid range from -58 F to +158 F (-50 to +70 C). Alarm 58 is triggered when the compressor high discharge pressure safety switch remains open for at least one minute. This alarm will remain active until the pressure switch resets, at which time the compressor will restart. Alarm 59 is triggered by the opening of the heat termination thermostat and will result in the disabling of the heater. This alarm will remain active until the thermostat resets. Alarm 60 is an indication of a probable failure of the defrost temperature sensor (DTS). It is triggered by the opening of the heat termination thermostat (HTT) or the failure of the DTS to go above set point within two hours of defrost initiation. After one-half hour with a frozen range set point, or one-half hour of continuous compressor run time, if the return air falls below 45 F (7 C), the Controller checks to ensure the DTS reading has dropped to 10 C or below. If not, a DTS failure alarm is given and the defrost mode is operated using the return temperature sensor. The defrost mode will be terminated after one hour by the Controller. Alarm 61 is triggered by detection of improper amperage resulting from heater activation or deactivation. Each phase of the power source is checked for proper amperage. This alarm is a display alarm with no resulting failure action, and will be reset by a proper amp draw of the heater. Alarm 62 is triggered by improper current draw increase (or decrease) resulting from compressor turn on (or off). The compressor is expected to draw a minimum of 2 amps; failure to do so will activate the alarm. This is a display alarm with no associated failure action and will be reset by a proper amp draw of the compressor. TM 11574A-OI Table 2-7 Controller Alarm Indications - Continued Code No. AL63 AL64 AL65 AL66 AL68 AL69 TITLE Current Over Limit Discharge Temperature Over Limit Discharge Pressure Transducer Failure Suction Pressure Transducer Failure Condenser Pressure Transducer Failure Suction Temperature Sensor Failure DESCRIPTION Alarm 63 is triggered by the current limiting system. If the compressor is ON and current limiting procedures cannot maintain a current level below the user selected limit, the current limit alarm is activated. This alarm is a display alarm and is inactivated by power cycling the unit, changing the current limit via the code select Cd32, or if the suction modulation valve (SMV) is open beyond the controller desired point. Alarm 64 is triggered if the discharge temperature sensed is greater than 135 C (275 F) for three continuous minutes, if it exceeds 300 F(149 C), or if the sensor is out of range. This is a display alarm and has no associated failure action. Alarm 65 is triggered by a compressor discharge transducer reading outside the valid range of 30 in Hg (73.20 cm Hg) to 460 psig (32.34 Kg/cm2). This is a display alarm and has no associated failure action. Alarm 66 is triggered by a suction pressure transducer reading outside the valid range of 30 in Hg (73.20 cm Hg) to 460 psig (32.34 Kg/cm2). This is a display alarm and has no associated failure action. Alarm 68 is triggered by a condenser pressure transducer reading outside the valid range of 30 in Hg (73.20 cm Hg) to 460 psig (32.34 Kg/cm2). This is a display alarm and has no associated failure action. Alarm 69 is triggered by a suction temperature sensor reading outside the valid range of -76 F (-60 C) to 302 F (150 C). This is a display alarm and has no associated failure action. NOTE If the controller is configured for four probes without a DataCORDER, the DataCORDER alarms AL70 and AL71 will be processed as Controller alarms AL70 and AL71. Internal The controller performs self-check routines. If an internal failure occurs, an “ERR” alarm will appear on the display. This is an indication the controller needs to be ERR # Microprocessor Failure replaced. Internal ERROR DESCRIPTION ERR # Microprocessor Indicates that the controller working Failure ERR 0 – RAM failure memory has failed. 2-33 TM 11574A-OI Table 2-7 Controller Alarm Indications - Continued Code No. TITLE DESCRIPTION ERROR EER 1 – Program Memory EER 2 -- Watchdog time-out EER 3 -- N/A EER 4 -- N/A EER 6 -- IO Board failure N/A The Controller’s Analog to Digital (A-D) converter has failed. Internal program/update failure. EER 7 -- Controller failure Internal version/firmware incompatible. EER 8--DataCorder failure Internal DataCorder memory failure. EER 5 -- A-D failure ERR # Entr StPt LO 2-34 Internal Microprocessor Failure Enter Setpoint (Press Arrow & Enter) Low Main Voltage (Function Codes Cd27-38 disabled and NO alarm stored.) DESCRIPTION Indicates a problem with the controller program. The controller program has entered a mode whereby the controller program has stopped executing. N/A EER -- 9 Controller failure Internal controller memory failure. In the event that a failure occurs and the display cannot be updated, the status LED will indicate the appropriate EER code using Morse code as shown below. E R R 0 to 9ERR0 = . .--. .--. ---------ERR1 = . .--. .--. . -------ERR2 = . .--. .--. . . -----ERR3 = . .--. .--. . . . ---ERR4 = . .--. .--. . . . . -ERR5 = . .--. .--. . . . . . ERR6 = . .--. .--. -- . . . . ERR7 = . .--. .--. ---- . . . ERR8 = . .--. .--. ------ . . ERR9 = . .--. .--. -------- . The controller is prompting the operator to enter a set point. This message will be alternately displayed with the set point whenever the supply voltage is less than 75% of its proper value. TM 11574A-OI Table 2-8 Controller Pre-Trip Test Codes Code No. TITLE DESCRIPTION NOTE P P1-0 P1-1 P2-0 P2-1 P3 “Auto” or “Auto1” menu includes the: P, P1, P2, P3, P4, P5, P6 and rSLts. “Auto2” menu includes P, P1, P2, P3, P4, P5, P6, P7, P8, P9, P10 and rSLts.“Auto3 menu includes P, P1, P2, P3, P4, P5, P6, P7, P8 and rSLts All lights and display segments will be energized for five seconds at the start of the Pre-Trip Initiated pre-trip. Since the unit cannot recognize lights and display failures, there are no test codes or results associated with this phase of pre-trip. Setup: Heater must start in the OFF condition, and then be turned on. A current Heaters Turned draw test is done after 15 seconds. On Pass/Fail Criteria: Passes if current draw change is within the range specified. Setup: Heater must start in the ON condition, and then be turned off. A current draw Heaters Turned test is done after 10 seconds. Off Pass/Fail Criteria: Passes if current draw change is within the range specified. Requirements: Water pressure switch (WP) input must be closed. Setup: Condenser Fan Condenser fan is turned ON, a current draw test is done after 15 seconds. Pass/Fail On Criteria: Passes if current draw change is within the range specified. Condenser Fan Setup: Condenser fan is turned OFF, a current draw test is done after 10 seconds. Off Pass/Fail Criteria: Passes if current draw change is within the range specified. Requirements: The unit must be equipped with a low speed evaporator fan, as determined by the Evaporator Fan speed select configuration variable. Low Speed Evaporator Fans P3-0 Low Speed Evaporator Fan Motors On P3-1 Low Speed Evaporator Fan Motors Off P4-0 High Speed Evaporator Fan Motors On P4-1 High Speed Evaporator Fan Motors Off P5-0 Supply/Return Probe Test NOTE If the unit is configured for single evaporator fan operation, Pre-Trip tests P30, P3-1, P4-0 and P4-1 will fail immediately if Controller alarm codes AL11 or AL12 are active at the start of testing. Setup: The high speed evaporator fans will be turned on for 10 seconds, then off for two seconds, then the low speed evaporator fans are turned on. A current draw test is done after 60 seconds. Pass/Fail Criteria: Passes if change in current draw is within the range specified. Fails if AL11 or AL12 activates during test. Setup: The low speed Evaporator Fan is turned off, a current draw test is done after 10 seconds. Pass/Fail Criteria: Passes if change in current draw is within the range specified. Fails if AL11 or AL12 activates during test. Setup: The high speed Evaporator Fan is turned on, a current draw test is done after 60 seconds. Pass/Fail Criteria: Passes if change in current draw is within the range specified. Fails if AL11 or AL12 activates during test. Setup: The high speed Evaporator Fan is turned off, a current draw test is done after 10 seconds. Pass/Fail Criteria: Passes if change in current draw is within the range specified. Fails if AL11 or AL12 activates during test. Setup: The High Speed Evaporator Fan is turned on and run for eight minutes, with all other outputs de-energized. Pass/Fail Criteria: A temperature comparison is made between the return and supply probes. NOTE If this test fails, “P5-0” and “FAIL” will be displayed. If both Probe tests (this test and the PRIMARY/ SECONDARY) pass, the display will read “P5” “PASS.” 2-35 TM 11574A-OI Table 2-8 Controller Pre-Trip Test Codes - Continued Code No. TITLE DESCRIPTION Requirements: For units equipped with secondary supply probe only. Pass/Fail Criteria: The temperature difference between primary and secondary probe (supply) is compared. P5-1 NOTE Supply Probe Test If this test fails, “P5-1” and FAIL will be displayed. If both Probe tests (this and the SUPPLY/ RETURN TEST) pass, because of the multiple tests, the display will read ’P 5’ ’PASS’. Requirements: For units equipped with secondary return probe only. Pass/Fail Criteria: The temperature difference between primary and secondary probe (return) is compared. NOTE P5-2 Return Probe Test P-6 1. If this test fails, “P5-2” and “FAIL” will be displayed. If both Probe tests (this test and the SUPPLY/ RETURN) pass, because of the multiple tests, the display will read “P 5,” “PASS.” 2. The results of Pre-Trip tests 5-0, 5-1 and 5-2 will be used to activate or clear control probe alarms. P6-2 Suction Modulation Valve (Open and Closed) P6-3 Quench Valve Test P6-4 Not Applicable Not Applicable Setup: A current draw test is performed before the compressor is started. The compressor is started. SMV is opened and another current draw test is performed. Pass/Fail Criteria: Passes if the change in compressor current draw is within the specified range. Not Applicable Setup: The compressor and fans continue to run from the previous test. The quench valve (if configured) will operate as in normal control mode. The SMV is closed to 0% open, current and condenser pressure readings are taken. The SMV is opened to 50% with continuous current and condenser pressure readings taken to establish maximum values. The SMV is returned to 0% open and final readings are taken. Pass/Fail Criteria: Passes if the calculated difference in current at the 50% open position are above a specified value before and after opening of the SMV, OR the calculated difference in condenser pressure at the 50% open position are above a specified value before and after opening of the SMV Setup: The compressor suction temperature is measured with the Quench valve closed. The Quench valve is energized and the suction temperature drop is checked. Pass/Fail Criteria: Passes if suction temperature is within the valid range. Not Used P6-5 Not Applicable Not Used P6-0 Compressor On P6-H & P6L NOTE P7-0 & P8 are included with the “Auto2 & Auto 3” only. P9-0 through P10 are included with “Auto2” only P7-0 2-36 High Pressure Switch Closed Setup: When the unit is running, the condenser fan is de-energized, and a 15 minute timer is started. The right display shows discharge pressure if the unit is equipped with a discharge pressure transducer (DPT). If no DPT is installed, the condenser pressure transducer (CPT) reading will be displayed. Pass/Fail Criteria: The test fails if high pressure switch fails to open in 15 minutes. TM 11574A-OI Table 2-8 Controller Pre-Trip Test Codes - Continued Code No. TITLE DESCRIPTION Note, this test is skipped if the unit does NOT have: A compressor discharge sensor (CPDS). A discharge pressure transducer (DPT). Condenser pressure transducer (CPT). In addition, this test is skipped if: The sensed ambient temperature is less than 45 F (7 C). The return air temperature is less than 0F (-17.8 C). Pass/Fail Criteria: Under conditions of the above NOTE; the test immediately fails if the following inputs are sensed to be invalid: P7-0 High Pressure Switch Closed (Continued) Compressor discharge sensor (CPDS). Discharge pressure transducer (DPT). Condenser pressure transducer (CPT). OR, if any one of the following inputs are sensed to be invalid: Return temperature sensor (RTS). Ambient sensor (AMBS). In addition, the test will fail if: The high pressure switch (HPS) fails to open within 15 minutes. The discharge temperature exceeds 280 F (138 C). The discharge temperature is less than or equal to ambient temperature plus 9 F (5 C). P7-1 High Pressure Switch Open P8-0 Perishable Mode Heat Test P8-1 Perishable Mode Pull Down Test The condenser pressure transducer (CPT) or discharge pressure transducer (DPT) pressure exceeds 390 psig (27.42 kg/cm2). Requirements: Test P7-0 must pass for this test to execute. Setup: The condenser fan is started and a 60 second timer is started. Pass/Fail Criteria: Passes the test if the high pressure switch (HPS) closes within the 60 second time limit, otherwise, it fails. Setup: If the container temperature is below 60 F (15.6 C), the set point is changed to 60 F (15.6 C) and a 60 minute timer is started. The left display will read “P8-0.” The control will then heat the container until 60 F (15.6 C) is reached. If the container temperature is above 60 F (15.6 C) at the start of the test, then the test proceeds immediately to test P8-1 and the left display will change to “P8-1.” Pass/Fail Criteria: The test fails if the 180 minute timer expires before the control temperature reaches set point. The display will read “P8-0,” “FAIL.” Requirements: Control temperature must be at least 60 F (15.6 C). Setup: The set point is changed to 32 F (0 C), and a 180 minute timer is started. The left display will read “P8-1,” the right display will show the supply air temperature. The unit will then start to pull down the temperature to the 32 F (0 C) set point. Pass/Fail Criteria: The test passes if the container temperature reaches set point before the 180 minute timer expires. 2-37 TM 11574A-OI Table 2-8 Controller Pre-Trip Test Codes - Continued Code No. TITLE P8-2 Perishable Mode Maintain Temperature Test P9-0 Defrost Test P100 Frozen Mode Setup Test P101 Frozen Mode (Pull Down) Test P102 Frozen Mode Maintain Temperature Test 2-38 DESCRIPTION Requirements: Test P8-1 must pass for this test to execute. Setup: The left display will read “P8-2,” and the right display will show the supply air temperature. A 60 minute timer is started. The unit will be required to maintain the 32 F (0 C) temperature to within +/- 0.9 F (+/- -0.5 C) of set point until a DataCORDER recording is executed. The recorder supply probe temperature running total (and its associated readings counter) will be zeroed out for the remainder of the recording period at the start of this test, so that the actual value recorded in the DataCORDER will be an average of only this test’s results. Once a recording interval is complete, the average recorder supply temperature will be recorded in the DataCORDER, as well as stored in memory for use in applying the test pass/fail criteria. Pass/Fail Criteria: If the recorded temperature is within +/-0.9 F (+/-0.5 C) of set point from test start to DataCORDER recording, the test passes. If the average temperature is outside of the tolerance range at the recording, the test fails. Setup: The defrost temperature sensor (DTS) reading will be displayed on the left display. The right display will show the supply air temperature. The unit will run FULL COOL for 30 minutes maximum until the DTT is considered closed. Once the DTT is considered closed, the unit simulates defrost by running the heaters for up to two hours, or until the DTT is considered open. Pass/Fail Criteria: The test fails if: the DTT is not considered closed after the 30 minutes of full cooling, HTT opens when DTT is considered closed or if return air temperature rises above 120 F (48 C). Setup: After completion of the defrost test, the testing proceeds directly to test P10-1 if the container temperature is above 45 F (7.2 C). If the container temperature is below 45 F (7.2 C), a 180 minute timer will be started, the set point will be set to 45 F (7.2 C) and the control will be placed in normal heat. The left display will read “P10-0” and the unit will continue in operation until the temperature is raised to set point. Pass/Fail Criteria: If the temperature does not reach set point less 6.7 F (-0.3 C) before the timer times out display will read “P100,” “FAIL.” The test will not auto-repeat. Setup: When the container temperature is greater than or equal to the 45 F (7.2 C) set point which was set in the frozen mode heat test, the left display will read “P10-1” and the right display will show the return air temperature. The set point will then be changed to 0 F (-17.7 C). The unit will then have a maximum of three hours to pull the container temperature down to the 0 F (-17.7 C) set point. Pass/Fail Criteria: If this occurs within the three hour time limit, the test passes. If pull down is not completed within the three hour time, the test fails. Setup: After the unit has successfully completed frozen pull down test, the left display will read “P10-2” and the right display will show return air temperature. The unit will then be required to maintain 0 F (-17.7 C) temperature within =+/0.9 F (+/-0.5 C) of set point until a DataCORDER recording is executed. The recorder return probe temperature running total (and its associated counter) will be zeroed for the remainder of the recording period at the start of this test, so that the actual recorded value will be an average of only this test’s results. Once the recording interval is complete, the average return temperature will be recorded in the DataCORDER, and stored in memory for use in applying the test pass/fail criteria. Pass/Fail Criteria: If the recorded temperature is within +/- 0.9 F (+/-0.5 C) of set point from test start to DataCORDER recording, the test passes. If temperature is outside of the tolerance range at the DataCORDER recording, the test fails. TM 11574A-OI Table 2-9 DataCORDER Function Code Assignments NOTE Inapplicable Functions Display “---------” To Access: Press ALT. MODE key Code No. dC1 dC2 dC6-13 TITLE Recorder Supply Temperature Recorder Return Temperature Network Data Points 1-8 DESCRIPTION Current reading of the supply recorder sensor. Current reading of the return recorder sensor. Current values of the network data points (as configured). Data point 1 (Code 6) is generally the humidity sensor and its value is obtained from the Controller once every minute. dC25 CargoProbe4 Temperature Future Expansion Temperature Sensors 1-5 Calibration Future Expansion dC26,27 S/N, Left 4, Right 4 dC28 Minimum Days Left dC29 Days Stored dC30 Date of last Trip start dC31 Battery Test dC32 Time: Hour, Minute This code is for future expansion, and is not in use at this time. The DataCORDER serial number consists of eight characters. Function code dC26 contains the first four characters. Function code dC27 contains the last four characters. (This serial number is the same as the Controller serial number) An approximation of the number of logging days remaining until the DataCORDER starts to overwrite the existing data. Number of days of data that are currently stored in the DataCORDER. The date when a Trip Start was initiated by the user. In addition, if the system goes without power for seven continuous days or longer, a trip start will automatically be generated on the next AC power up. Shows the current status of the optional battery pack. PASS: Battery pack is fully charged. FAIL: Battery pack voltage is low. Current time on the real-time clock (RTC) in the DataCORDER. dC33 Date: Month, Day Current date (month and day) on the RTC in the DataCORDER. dC34 Date: Year Cargo Probe 4 Calibration Current year on the RTC in the DataCORDER. Current calibration value for the Cargo Probe. This value is an input via the interrogation program. dC14 dC15-19 dC20-24 dC35 Current reading of the cargo probe #4. These codes are for future expansion, and are not in use at this time. Current calibration offset values for each probe: supply and return. These values are entered via the interrogation program. 2-39 TM 11574A-OI Table 2-10 DataCORDER Pre-Trip Result Records Test No. 1-0 1-1 2-0 2-1 3-0 TITLE Heater On Heater Off Condenser Fan On 6-4 6-5 7-0 Condenser Fan Off Low Speed Evaporator Fan On Low Speed Evaporator Fan Off High Speed Evaporator Fan On High Speed Evaporator Fan Off Supply/Return Probe Test Secondary Supply Probe Test Secondary Return Probe Test Compressor On Not Applicable Suction Modulation Valve Open and Closed Not Applicable Not Applicable High Pressure Switch Closed 7-1 High Pressure Switch Open 8-0 8-1 8-2 Perishable Heat Perishable Pull Down Perishable Maintain 9-0 Defrost Test 10-0 10-1 10-2 Frozen Mode Set-up Frozen Mode Pull Down Frozen Mode Maintain 3-1 4-0 4-1 5-0 5-1 5-2 6-0 6-1 6-2 2-40 DATA Pass/Fail/Skip Result, Change in current for Phase A, B and C Pass/Fail/Skip Result, Change in currents for Phase A, B and C Pass/Fail/Skip Result, Water pressure switch (WPS) - Open/Closed, Change in currents for Phase A, B and C Pass/Fail/Skip Result, Change in currents for Phase A, B and C Pass/Fail/Skip Result, Change in currents for Phase A, B and C Pass/Fail/Skip Result, Change in currents for Phase A, B and C Pass/Fail/Skip Result, Change in currents for Phase A, B and C Pass/Fail/Skip Result, Change in currents for Phase A, B and C Pass/Fail/Skip Result, STS, RTS, SRS and RRS Pass/Fail/Skip Result Pass/Fail/Skip Result Pass/Fail/Skip Result, Change in currents for Phase A, B and C Not Used Pass/Fail/Skip Result, Is current or pressure limit in effect (Y,N) Not Used Not Used Pass/Fail/Skip Result, AMBS, DPT or CPT (if equipped) Input values that component opens Pass/Fail/Skip Result, STS, DPT or CPT (if equipped) Input values that component closes Pass/Fail/Skip Result, STS, time it takes to heat to 60 F (16 C) Pass/Fail/Skip Result, STS, time it takes to pull down to 32 F (0 C) Pass/Fail/Skip Result, Averaged DataCORDER supply temperature (SRS) over last recording interval. Pass/Fail/Skip Result, DTS reading at end of test, line voltage, line frequency, time in defrost. Pass/Fail/Skip Result, STS, time unit is in heat. Pass/Fail/Skip Result, STS, time to pull down unit to 0 F (-17.7 C). Pass/Fail/Skip Result, Averaged DataCORDER return temperature (RRS) over last recording interval. TM 11574A-OI Table 2-11 DataCORDER Alarm Indications To Access: Press ALT. MODE key Code No. dAL70 TITLE Recorder Supply Temperature Out of Range DESCRIPTION The supply recorder sensor reading is outside of the range of -58 F to +158 F (-50 C to 70 C) or, the probe check logic has determined there is a fault with this sensor. NOTE dAL71 Recorder Return Temperature Out of Range The P5 Pre-Trip test must be run to inactivate the alarm. The return recorder sensor reading is outside of the range of -58 F to +158 F (-50 C to 70 C ) or, the probe check logic has determined there is a fault with this sensor. NOTE dAL75 dAL76, 77 Cargo Probe 4 Out of Range Future Expansion dAL78-85 Network Data Point 1 - 8 Out of Range dAL86 RTC Battery Low dAL87 RTC Failure dAL88 DataCORDER EEPROM Failure dAL89 Flash Memory Error dAL90 dAL91 Future Expansion Alarm List Full The P5 Pre-Trip test must be run to inactivate the alarm. The cargo probe temperature reading is outside of -58 to 158F (-50 C to 70 C) range. These alarms are for future expansion, and are not in use at this time. The network data point is outside of its specified range. The DataCORDER is configured by default to record the supply and return recorder sensors. The DataCORDER may be configured to record up to 8 additional network data points. An alarm number (AL78 to AL85) is assigned to each configured point. When an alarm occurs, the DataCORDER must be interrogated to identify the data point assigned. When a humidity sensor is installed, it is usually assigned to AL78. The Real Time Clock (RTC) backup battery is too low to adequately maintain the RTC reading. An invalid date or time has been detected. This situation may be corrected by changing the Real Time Clock (RTC) to a valid value using DataLINE. A write of critical DataCORDER information to the EEPROM has failed. An error has been detected in the process of writing daily data to the non-volatile FLASH memory. This alarm is for future expansion, and is not in use at this time. The DataCORDER alarm queue is determined to be full (eight alarms). 2-41 TM 11574A-OI 2-15. Pre-Trip Diagnosis CAUTION Pre-trip Inspection should not be performed with critical temperature cargoes in the container. Pre-Trip diagnosis provides automatic testing of the unit components using internal measurements and comparison logic. The program will provide a “PASS” or “FAIL” display to indicate test results. The testing begins with access to a pre-trip selection menu. The user may have the option of selecting one of three automatic tests (depending on software revision installed). These tests will automatically perform a series of individual pre-trip tests. The user may also scroll down to select any of the individual tests. The contents of the menus are as follows: Table 2-12. Pre-Trip Selection Menu Auto or Auto 1 P1, P2, P3, P4, P5, P6, rSLts Auto 2 P, P1, P2, P3, P4, P5, P6, P7, P8, P9, P10, rSLts Auto 3 P, P1, P2, P3, P4, P5, P6, P7, P8, rSLts A detailed description of the pre-trip test codes is listed in Table 2-7. If no selection is made, the pre-trip menu selection process will terminate automatically. Scrolling down to the “rSLts” code and pressing ENTER will allow the user to scroll through the results of the last pre-trip testing run. If no pre-testing has been run (or an individual test has not been run) since the unit was powered up, “--------” will be displayed a. To start a pre-trip test, do the following: NOTE Prior to starting tests, verify that unit voltage (Function Code Cd 07) is within tolerance and unit amperage draw (Function Codes Cd04, Cd05, Cd06) is within expected limits. Otherwise, tests may fail incorrectly. All alarms must be rectified and cleared before starting tests. (a) Press the PRE-TRIP key. This accesses a test selection menu. (b) TO RUN AN AUTOMATIC TEST: Scroll through the selections by pressing the UP ARROW or DOWN ARROW keys to display AUTO, AUTO 2 or AUTO 3 as desired and then press the ENTER key. 1. The unit will execute the series of tests without any need for direct user interface. These tests vary in length, depending on the component under test. 2. While tests are running, “P#-#” will appear on the left display, where the #’s indicate the test number and sub-test. The right display will show a countdown time in minutes and seconds, indicating how much time there is left remaining in the test. 2-42 TM 11574A-OI CAUTION When a failure occurs during automatic testing the unit will suspend operation awaiting operator intervention. When an automatic test fails, it will be repeated once. A repeated test failure will cause “FAIL” to be shown on the right display, with the corresponding test number to the left. The user may then press the DOWN ARROW to repeat the test, the UP ARROW to skip to the next test or the PRE-TRIP key to terminate testing. The unit will wait indefinitely until the user manually enters a command. CAUTION When Pre-Trip test Auto 2 run to completion without being interrupted, the unit will terminate pre-trip and display “Auto 2” “end”. The unit will suspend operation until the user depresses the ENTER key. When an Auto test runs to completion without a failure, the unit will exit the pre-trip mode and return to normal control operation. If configuration variableCnF42 is set to IN, a datacorder trip start will be entered. If CnF42 is set to OUT, the trip start will not be entered. (c) TO RUN AN INDIVIDUAL TEST: Scroll through the selections by pressing the UP ARROW or DOWN ARROW keys to display an individual test code. Pressing ENTER when the desired test code is displayed. 1. Individually selected tests, other than the LED/Display test, will perform the operations necessary to verify the operation of the component. At the conclusion, PASS or FAIL will be displayed. This message will remain displayed for up to three minutes, during which time a user may select another test. If the three minute time period expires, the unit will terminate pre-trip and return to control mode operation. 2. While the tests are being executed, the user may terminate the pre-trip diagnostics by pressing and holding the PRE-TRIP key. The unit will then resume normal operation. If the user decides to terminate a test but remain at the test selection menu, the user may press the UP ARROW key. When this is done all test outputs will be de-energized and the test selection menu will be displayed. 3. Throughout the duration of any pre-trip test except the P-7 high pressure switch tests, the current and pressure limiting processes are active. (d) Pre-Trip Test Results. At the end of the pre-trip test selection menu, the message “P,” “rSLts” (pre-trip results) will be displayed. Pressing the ENTER key will allow the user to see the results for all subtests (i.e., 1-0, 1-1, etc). The results will be displayed as “PASS” or “FAIL” for all the tests run to completion since power up. If a test has not been run since power up, “ -- -- -- -- -- ” will be displayed. 2-43 TM 11574A-OI V. NORMAL OPERATING PROCEDURES 2-16. Modes of Operation The operational software responds to various inputs. These inputs come from the temperature and pressure sensors, the temperature set point, the settings of the configuration variables, and the function code assignments. The action taken by the operational software will change if any one of the inputs changes. Overall interaction of the inputs is described as a “mode” of operation. The modes of operation include perishable (chill) mode and frozen mode. Descriptions of the controller interaction and modes of operation are provided in the following sub paragraphs. a. Temperature Control -- Perishable Mode. With configuration variable CnF26 (Heat Lockout Temperature) set to +14F (-10 C), the perishable mode of operation is active with set points above +14 F (-10 C). With the variable set to +23 F (-5 C), the perishable mode is active above +23 F (-5 C) (refer to Table 2-4). When in the perishable mode, the controller maintains the supply air temperature at set point, the SUPPLY indicator light will be illuminated on the display module, and the default reading on the display window will be the supply temperature sensor reading. When the supply air temperature enters the in-range temperature tolerance (as selected at function code Cd30), the in-range light will energize. b. Evaporator Fan Operation. Opening of an evaporator fan internal protector will shut down a unit with Normal Evaporator Fan Operation. (CnF32 set to 2EFO). On units equipped with Single Evaporator Fan Capability (CnF32 set to 1EFO), additional relays are installed to allow the unit to continue to operate on a single fan (refer to Table 2-4). c. Defrost Interval. Controller function code Cd27 sets two modes for defrost initiation -- either user-selected timed intervals or automatic control. The user-selected values are 3, 6, 9, 12, or 24 hours and the factory default for the timed interval is 12 hours (some units may be configured to allow defrost to be disabled altogether; in this case a user-selected value of OFF will be available) (refer to Table 2-6). In perishable mode, perishable-pull down mode, or frozen-pull down mode, automatic defrost starts with an initial defrost set to three hours and then adjusts the interval to the next defrost based on the accumulation of ice on the evaporator coil. In this way, defrosts are scheduled to occur only when necessary. Once set point has been reached in frozen operation, the automatic selection will set the time interval to 12 hours for the first two defrosts once the return probe is reading below the frozen set point and then adjust to 24 hours thereafter. All defrost interval times reflect the number of compressor runtime hours since the last defrost de-ice cycle. The minimum defrost interval under the automatic setting is three hours, while the maximum is 24. In frozen mode, the amount of wall-clock time necessary to accumulate a given amount of defrost interval time will exceed the defrost interval time by a factor of two to three depending on the compressor duty-cycle. Defrost interval time is not accumulated in any mode until the defrost termination sensor reads less than 50 F (10 C). d. Failure Action. Function code Cd29 may be operator set to allow continued operation in the event the control sensors are reading out of range. The factory default is full system shutdown (refer to Table 2-6). e. Generator Protection. Function codes Cd31 and Cd32 may be operator set to control start-up sequence of multiple units and operating current draw. The factory default allows on demand starting of units and full current draw (refer to Table 2-6). 2-44 TM 11574A-OI f. Condenser Pressure Control. When configuration variable CnF14 is set to “In,” the condenser pressure control logic is activated to maintain discharge pressures above 130 psig when the ambient temperature is low. The logic turns the condenser fan on or off in accordance with the condenser pressure transducer reading (refer to Table 2-4). The function is enabled when the following conditions are met: 1. The ambient sensor reading is less than or equal to 80 F (27 C), and 2. Voltage/Frequency ratio is less than or equal to 8.38. When the above conditions are met, either pressures or timers may dictate a change of state from OFF to ON or ON to OFF. If the condenser fan is OFF, it will be energized if saturated condensing pressure is greater than 200 psig OR if the condenser fan has been OFF for a variable time period of up to 60 seconds depending on the ambient temperature. As the ambient temperature increases, the amount of time that the condenser fan is energized will correspondingly increase towards the maximum. If the condenser fan is ON, it will deenergize only if the saturated condensing pressure is less than 130 psig and the condenser fan has been running for a minimum of thirty seconds depending on the ambient temperature. g. Perishable Mode -- Conventional. The unit is capable of maintaining supply air temperature to within +/- 0.5 F (+/- 0.25 C) of set point. Supply air temperature is controlled by positioning of the suction modulation valve (SMV), cycling of the compressor, and cycling of the heaters. When pulling down from a temperature that is more than 9 F (5 C) above set point, the SMV will open to reduce the pull down time. However, pressure and current limit functions may restrict the valve if either exceeds the preset value. The operational software is designed so the SMV will begin to close as the set point is reached. The SMV will continue to close and restrict refrigerant flow until the capacity of the unit and the load are balanced. If the temperature drops below the set point, the compressor will remain running for a few minutes. This is to accommodate any initial undershoot which might occur. After this time has expired and the temperature is 0.4 F (0.2 C) or greater below the set point, the compressor will be turned OFF. If the temperature drops to 0.9 F (0.5 C) below set point, the heaters will be energized. The heaters will deenergize when the temperature rises to 0.4 F (0.2 C) below the set point. The compressor will not restart until the temperature rises to 0.4 F (0.2 C) above the set point and three minutes have elapsed since the last compressor turn off. h. Perishable Mode -- Economy. The economy mode is an extension of the conventional mode and is applicable to units with two speed evaporator fan motors. The mode is activated when the setting of function code Cd34 is “ON.“ Economy mode is provided for power saving purposes. Economy mode could be utilized in the transportation of temperature tolerant cargo or non-respiration items that do not require high airflow for removing respiration heat. There is no active display indicator that economy mode has been activated. To check for economy mode, perform a manual display of code Cd34. In order to achieve economy mode, a perishable set point must be selected prior to activation. When economy mode is active, the evaporator fans will be controlled as follows: At the start of each cooling or heating cycle, the evaporator fans will be run in high speed for three minutes. They will then be switched to low speed any time the supply air temperature is within +/- 0.45 F (/- 0.25 C) of the set point and the return air temperature is less than or equal to the supply air temperature +5.4 F (+ 3 C). The fans will continue to run in low speed for one hour. At the end of the hour, the evaporator fans will switch back to high speed and the cycle will be repeated. 2-45 TM 11574A-OI i. Temperature Control -- Frozen Mode. With configuration variable CnF26 set to -10 C, the frozen mode of operation is active with set points at or below +14 F (-10 C). With the variable set to +23 F (-5 C), the frozen mode is active at or below +23 F (-5 C). When in the frozen mode, the controller maintains the return air temperature at set point, the RETURN indicator light will be illuminated on the display module, and the default reading on the display window will be the return air probe reading. When the return air temperature enters the in-range temperature tolerance as selected at function code Cd30, the in-range light will energize. j. Frozen Mode -- Conventional. Frozen range cargoes are not sensitive to minor temperature changes. The method of temperature control employed in this range takes advantage of this fact to greatly improve the energy efficiency of the unit. Temperature control in the frozen range is accomplished by cycling the compressor on and off as the load demand requires. The unit will operate in the conventional frozen mode when the controller set point is at or below the frozen range and function code CD34 is set to “OFF.” If the return air temperature in the container drops 0.4 F (0.2 C) below the set point, the compressor is cycled off. When the temperature is greater than 0.4 F (0.2 C) above the set point and the three minute time delay has been met, the compressor will restart. The unit will always operate at full capacity and the suction modulation valve will open as allowed by current and pressure limiting. NOTE On start up of the unit, SMV will reset to a known open position. This is accomplished by assuming the valve was fully open, driving it fully closed, resetting the percentage open to zero, then opening to a known 21% staging position. To prevent rapid cycling of the compressor, a three minute compressor off time must be satisfied before the compressor will restart. Under a condition of rapidly changing return air temperature, the time delay may allow the return air temperature to rise slightly above set point temperature before the compressor can restart. k. Frozen Mode -- Economy. In order to activate economy frozen mode operation, a frozen set point temperature must be selected. The economy mode is active when function code Cd34 is set to “ON.” When economy mode frozen is active, the system will perform normal frozen mode operations except that the entire refrigeration system, excluding the controller, will be turned off when the control temperature is less than or equal to the set point 28.4 F (-2 C). After an off-cycle period of 60minutes, the unit will turn on high speed evaporator fans for three minutes and then check the control temperature. If the control temperature is greater than or equal to the set point 32.6 F (0.2 C), the unit will restart the refrigeration system and continue to cool until the previously mentioned off-cycle temperature criteria are met. If the control temperature is less than the set point 32.6 F (0.2 C), the unit will turn off the evaporator fans and restart another 60 minute off-cycle. 2-46 TM 11574A-OI 2-17. Startup a. Power Connections. WARNING Beware of unannounced starting of the evaporator and condenser fans. The unit may cycle the fans and compressor unexpectedly as control requirements dictate. WARNING Do not attempt to remove power plug(s) before turning OFF start-stop switch (ST), unit circuit breaker(s) and external power source. WARNING Make sure the power plugs are clean and dry before connecting to any power receptacle. (1) Connection to 380/460 VAC Power (a) Make sure start-stop switch (ST, on control panel) and circuit breaker (CB-1, in the control box) are in position “O” (OFF). (b) Plug the 460 VAC (yellow) cable into a de-energized 380/460 VAC, 3-phase power source. Energize the power source. Place circuit breaker (CB-1) in position “I” (ON). Close and secure control box door. (2) Connection to 190/230 VAC Power. An autotransformer (1, Figure 2-16) is required to allow operation on nominal 230 volt power. It is fitted with a 230 VAC cable and a receptacle to accept the standard 460 VAC power plug. The 230 volt cable is black in color while the 460 volt cable is yellow. The transformer may also be equipped with a circuit breaker (CB-2). The transformer is a step-up transformer that will provide 380/460 VAC, 3-phase, 50/60 hertz power to the unit when the 230 VAC power cable is connected to a 190/230 VAC, 3-phase power source. (a) Make sure that the start-stop switch (ST, on control panel) and circuit breakers CB-1 (in the control box and CB-2 (on the transformer) are in position “O” (OFF). Plug in and lock the 460 VAC power plug at the receptacle on the transformer. (b) Plug the 230 VAC (black) cable into a de-energized 190/230 VAC, 3-phase power source. Energize the power source. Set circuit breakers CB-1 and CB2 to position “I” (ON). Close and secure control box door. 2-47 TM 11574A-OI Figure 2-15. Autotransformer. LEGEND 1. 2. 3. Dual Voltage Modular Autotransformer Circuit Breaker (CB-2) 230V 460 VAC Power Receptacle b. Adjusting Fresh Air Makeup Vent. The purpose of the fresh air makeup vent is to provide ventilation for commodities that require fresh air circulation. The vent must be closed when transporting frozen foods. Air exchange depends on static pressure differential, which will vary depending on the container and how the container is loaded. Two slots and a stop are designed into the disc for air flow adjustments. The first slot allows for a 0 to 30% air flow and the second slot allows for a 30 to 100% air flow. To adjust the percentage of air flow, loosen the wing nut and rotate the disc until the desired percentage of air flow matches with the arrow. Tighten the wing nut. To clear the gap between the slots, loosen the wing nut until the disc clears the stop. Figure 2-17 gives air exchange values for an empty container. Higher values can be expected for a fully loaded container. For 60Hz operation multiply curves by 1.2 Figure 2-16. Make Up Air Flow Chart. 2-48 TM 11574A-OI c. Starting the Unit. Do not attempt to remove power plug(s) before turning OFF start-stop switch (ST), unit circuit breaker(s) and external power source. (1) With power properly applied and the fresh air damper set connected (refer to paragraphs 217a and 2-17b), place the START-STOP switch to “I” (ON). (2) Continue with Start Up Inspection (refer to paragraph 2-17d). d. Startup Inspection. (1) Physical Inspection. (a) Perform before operation checks in accordance with table 2-12. (b) Check rotation of condenser and evaporator fans. (c) Check compressor oil level (refer to paragraph 2-11). (2) Check Controller Function Codes. Check and, if required, reset controller Function Codes (Cd27 through Cd39) in accordance with desired operating parameters (refer to paragraph 213f(2)). DataCORDER (a) Check, and if required, set the DataCORDER Configuration in accordance with desired recording parameter (refer to paragraph 2-13f(2)). (b) Enter a “Trip Start.” To enter a “Trip Start,” do the following: 1. Depress the ALT MODE key and scroll to Code dC30. 2. Depress and hold the ENTER key for five seconds. 3. The “Trip Start” event will be entered in the Data-CORDER. (3) Complete Inspection. Allow unit to run for five minutes to stabilize conditions and perform a pre-trip diagnosis in accordance with section 2-15. 2-49 TM 11574A-OI Table 2-13. Before Operation Checks Interval Item Action EXTERIOR Before Cargo Doors Inspect hardware for bent or broken door release handles. Before Rear Doors Inspect hardware for bent or broken door release handles. Before Refrigeration Unit Check refrigeration unit for security. Install and secure loose or missing mount bolts. Before Evaporator Fan Check for dirt or grease on evaporator fan or fan deck and clean if necessary. Before Evaporator Coil Check evaporator coil for cleanliness or obstructions. Wash with fresh water. Before Defrost Drain Pans and Lines Check defrost drain pans and drain lines for obstructions and clear if necessary. Wash with fresh water. Before Condenser Coil Check condenser coil for cleanliness. Wash with fresh water. Before Control Box Open control box door. Check for loose electrical connections or hardware. Before Electrical Cables Check electrical cable for cuts, deep abrasions, burned or discolored wiring. Before Moisture-Liquid Indicator Check color of moisture-liquid indicator. Before Compressor Check oil level in compressor sight glass. Before Condenser/ Check rotation of condenser and evaporator fans. Evaporator Fans INTERIOR Before Cargo Doors Inspect cargo doors for obvious damage such as cracks and holes affecting serviceability. Check seals for damage. Before Lights Check light for security of components. Before Floor Inspect container floor for punctures and obvious damage. Inspect floor for blocked or clogged drains. 2-50 TM 11574A-OI e. Observe Unit Operations – Probe Check. If the DataCORDER is off or in alarm mode, the controller will revert to a four probe configuration, which includes the DataCORDER supply and return air probes as the secondary controller probes. The controller continuously performs probe diagnosis testing, which compares the four probes. If the probe diagnosis result indicates a probe problem exists, the controller will perform a probe check to identify the probe(s) in error. (1) Probe Diagnostic Logic – Standard If the probe check option (controller configuration code CnF31) is configured for standard, the criteria used for comparison between the primary and secondary control probes is: 1.8 F (1 C) for perishable set points or 3.6 F (2 C) for frozen set points. If 25 or more of 30 readings taken within a 30minute period are outside of the limit, then a defrost is initiated and a probe check is performed. In this configuration, a probe check will be run as a part of every normal (time initiated) defrost. (2) Probe Diagnostic Logic – Special If the probe check option is configured for special, the above criteria are applicable. A defrost with probe check will be initiated if 25 of 30 readings or 10 consecutive readings are outside of the limits In this configuration, a probe check will not be run as a part of a normal defrost, but only as a part of a defrost initiated due to a diagnostic reading outside of the limits. (3) The 30 minute timer will be reset at each of the following conditions: • At every power up • At the end of every defrost • After every diagnostic check that does not fall outside of the limits as outlined above. (4) Probe Check: A defrost cycle probe check is accomplished by energizing just the evaporator motors for eight minutes at the end of the normal defrost. At the end of the eight minute period, the probes will be compared to a set of predetermined limits. The defrost indicator will remain on throughout this period. Any probe(s) determined to be outside the limits will cause the appropriate alarm code(s) to be displayed to identify the probe(s) that needs to be replaced. The P5 Pre-Trip test must be run to inactivate alarms. f. Sequence of Operation. General operation sequences for cooling, heating, and defrost are provided in the following subparagraphs. Schematic representation of controller action are provided in Figure 2-18 and Figure 2-19. Refer to section 2-16 for detailed descriptions of special events and timers that are incorporated by the controller in specific modes of operation. 2-51 TM 11574A-OI Figure 2-17. Controller Operation – Perishable Mode. Figure 2-18. Controller Operation – Frozen Mode. 2-52 TM 11574A-OI (1) Sequence Of Operation – Perishable Mode Cooling NOTE In the conventional Perishable Mode of Operation, the evaporator motors run in high speed. In the economy Perishable Mode, the fan speed is varied. NOTE In low temperature ambient, the condenser fan will be cycled by the controller to maintain proper condensing pressure. (a) With supply air temperature above set point and decreasing, the unit will be cooling with the condenser fan motor (CF), compressor motor (CH), evaporator fan motors (EF) energized, and the COOL light illuminated (see Figure 2-20). Figure 2-19. Perishable Mode Cooling. (b) When the air temperature decreases to a predetermined tolerance above set point, the in-range light is illuminated. (c) As the air temperature continues to fall, modulating cooling starts at approximately 4.5 F (2.5 C) above set point (see Figure 2-20). (d) The controller monitors the supply air. Once the supply air falls below set point and 0% SMV position is reached, the controller periodically records the supply air temperature, set point, and time. A calculation is then performed by subtracting the set point reading from the supply air and multiplying the result by the time reading. The result is negative number. When the calculation reaches -250, contacts TC and TN are opened to de-energize. 2-53 TM 11574A-OI (e) compressor and condenser fan motors. The cool light is also de-energized. (f) The evaporator fan motors continue to run to circulate air throughout the container. The in-range light remains illuminated as long as the supply air is within tolerance of set point. (g) When the supply air temperature increases to 0.4 F (0.2 C) above set point and the three minute off time has elapsed, relays TC and TN are energizes to restart the compressor and condenser fan motors. The cool light is also illuminated. (2) Sequence Of Operation – Perishable Mode Heating NOTE The unit will heat only when in the Perishable Mode, relay TH is electronically locked out when in the Frozen mode. (a) If the air temperature decreases 0.9 F (0.5 C) below set point, the system enters the heating mode (see Figure 4-13). The controller closes contacts TH (see Figure 2-21) to allow power flow through the heat termination thermostat (HTT) to energize the heaters (HR). The HEAT light is also illuminated. The evaporator fans continue to run to circulate air throughout the container. (b) When the temperature rises to 0.4 F (0.2 C) below set point, contact TH opens to deenergize the heaters. The HEAT light is also de-energized. The evaporator fans continue to run to circulate air throughout the container. (c) A safety heater termination thermostat (HTT), attached to an evaporator coil support, will open the heating circuit if overheating occurs. Figure 2-20. Perishable Mode Cooling. 2-54 TM 11574A-OI (3) Sequence Of Operation – Frozen Mode Cooling NOTE Prior to starting tests, verify that unit voltage (Function Code Cd07) is within tolerance and unit amperage draw (Function Codes Cd04, Cd05, Cd06) is within expected limits. Otherwise, tests may fail incorrectly. All alarms must be rectified and cleared before starting tests. (a) With supply air temperature above set point and decreasing, the unit will be cooling with the condenser fan motor (CF), compressor motor (CH), evaporator fan motors (ES) energized and the COOL light illuminated (see Figure 2-22). (b) When the air temperature decreases to a predetermined tolerance above set point, the in-range light is illuminated. Figure 2-21. Frozen Mode. (c) Contacts TC and TN are opened to de-energize the compressor and condenser fan motors when the return air temperature decreases to 0.4 F (0.2 C) below set point. The cool light is also de-energized. (d) The evaporator fan motors continue to run to circulate air throughout the container. The in-range light remains illuminated as long as the return air is within tolerance of set point. (e) When the return air temperature increases to 0.4 F (0.2 C) above set point and the three minute off time has elapsed, relays TC and TN are energizes to restart the compressor and condenser fan motors. The cool light is also illuminated. 2-55 TM 11574A-OI (4) Sequence Of Operation – Defrost The defrost cycle may consist of up to three distinct operations. The first is de-icing of the coil, the second is a probe check cycle, and the third is snap freeze. Defrost may be requested by any one of the following methods: The manual defrost function (also manual defrost switch function if equipped) is initiated and ended by the user using the keypad or manual defrost switch (if equipped). NOTE The Manual Defrost/Interval key can be used to initiate a manual defrost. Minimum Software release version #5126 is required in order to use this function. Manual Defrost/Interval Key Operation: (a) Depressing and holding the Defrost Interval key for five seconds will initiate defrost. If the defrost interval key is released in less than five seconds, defrost interval (code 27) shall be displayed. (b) The defrost interval timer (controller function code Cd27) reaches the defrost interval set by the user. (c) The controller probe diagnostic logic determines that a probe check is necessary based on the temperature values currently reported by the supply and return probes. (d) The controller Demand Defrost configuration variable (CnF40) is set to “In” and the unit has been in pull down operation for over 2.5 hours without reaching set point. Figure 2-22. Defrost. 2-56 TM 11574A-OI The processing of a defrost request is controlled by the defrost termination thermostat. The defrost termination thermostat is not a physical component. It is a software point that acts as a thermostat, allowing defrost when it is considered “closed” and preventing or terminating defrost when it is considered “open.” The actual temperatures used to make the “open” or “closed” determinations are dependent on the type of defrost request made and the operator setting of configuration variable CnF41. Configuration variable CnF41 may be factory set at the default value of 78 F (25.6 C) or a lower value of 64 F (18 C). When a request for defrost is made by the use of the Manual Defrost Switch, the unit will enter defrost when the reading at the defrost temperature sensor is at or below the CnF41 setting. Defrost will terminate when the defrost sensor temperature reading rises above the CnF41 setting. When a request for defrost is made by probe check, the unit will enter defrost when the defrost temperature sensor reading is at or below 78 F (25.6 C). The unit will terminate defrost when the Defrost Temperature Sensor reading rises above 78 F (25.6 C). When a request for defrost is made by demand defrost, the unit will enter defrost when the reading at the defrost temperature sensor is at or below 64.4 F (18 C). Defrost will terminate when the defrost sensor temperature reading rises above the CnF41 setting. When a defrost has terminated, the defrost interval timer will begin counting when the reading at the defrost temperature sensor is at or below 50 F (10 C). Once the timer has counted the required time, the unit will enter defrost if the Defrost Temperature Sensor is at or below 78 F (25.6 C). Defrost will terminate when the defrost sensor temperature reading rises above the CnF41 setting. When the unit enters defrost, the controller opens contacts TC, TN, and TE (or TV) to deenergize the compressor, condenser fan and evaporator fans (see Figure 4-13). The COOL light is also de-energized. The controller then closes TH to supply power to the heaters. The defrost light is illuminated. When the defrost temperature sensor reading rises to the applicable defrost termination thermostat “opening” point, the de-icing operation is terminated. If defrost does not terminate correctly and temperature reaches the set point of the heat termination thermostat (HTT), the thermostat will open to de-energize the heaters. If termination does not occur within two hours, the controller will terminate defrost. An alarm will be given of a possible DTS failure. If probe check (controller function code CnF31) is configured to special, the unit will proceed to the next operation (snap freeze or terminate defrost). If the code is configured to standard, the unit will perform a probe check. The purpose of the probe check is to detect malfunctions or drift in the sensed temperature that is too small to be detected by the normal sensor out of range tests. The system will run for eight minutes in this condition. At the end of the eight minutes, probe alarms will be set or cleared based on the conditions seen. 2-57 TM 11574A-OI g. Operation of Temperature Control Microprocessor System. The temperature control Micro-Link 3 microprocessor system (see Figure 2-24) consists of a keypad, display module, control module (controller), and interconnecting wiring. The controller houses the temperature control software and the DataCORDER Software. The temperature control software functions to operate the unit components as required to provide the desired cargo temperature and humidity. The DataCORDER software functions to record unit operating parameters and cargo temperature parameters for future retrieval. Coverage of the temperature control software begins with section 2-16a. Coverage of the DataCORDER software is provided in section 2-14. The keypad and display module serve to provide user access and readouts for both of the controller functions, temperature control, and DataCORDER. The functions are accessed by keypad selections and viewed on the display module. The components are designed to permit ease of installation and removal. Figure 2-23. Temperature Control System. 2-58 TM 11574A-OI (1) The keypad (Figure 2-25) is mounted on the right-hand side of the control box. The keypad consists of 11 push button switches that act as the user’s interface with the controller. Descriptions of the switch functions are provided in Table 2-1. Figure 2-24. Keypad. (2) Display Module. The display module (Figure 4-16) consists of five digital displays and seven indicator lights. The indicator lights include: (a) Cool -- White LED: Energized when the refrigerant compressor is energized. (b) Heat -- Orange LED: Energized to indicate heater operation in the heat or defrost mode. (c) Defrost -- Orange LED: Energized when the unit is in the defrost mode. (d) In-Range -- Green LED: Energized when the controlled temperature probe is within specified tolerance of set point. (e) Supply -- Yellow LED: Energized when the supply air probe is used for control. When this LED is illuminated, the temperature displayed in the AIRTEMPERATURE display is the reading at the supply air probe. 2-59 TM 11574A-OI (f) Return -- Yellow LED: Energized when the return air probe is used for control. When this LED is illuminated, the temperature displayed in the AIRTEMPERATURE display is the reading at the return air probe. (g) Alarm -- Red LED: Energized when there is an active or an inactive shutdown alarm in the alarm queue. Figure 2-25. Display Module. LEGEND KEY 1. 2. Code Select Pre-Trip 3. 4. Alarm List Manual Defrost/Interval 5. Enter 6. Arrow Up 7. Arrow Down 8. Return/Supply 9. Degrees C/Degrees F 10. Battery Power 11. ALT. Mode 2-60 FUNCTION Accesses function codes. Displays the pre-trip selection menu. Discontinues pre-trip in progress. Displays alarm list and clears the alarm queue. Displays selected defrost mode. Depressing and holding the Defrost interval key for five seconds will initiate defrost using the same logic as if the optional manual defrost switch was toggled on. Confirms a selection or saves a selection to the controller. Change or scroll a selection upward Pre-trip advance or test interruption. Change or scroll a selection downward. Pre-trip repeat backward. Displays non-controlling probe temperature (momentary display). Displays alternate English/Metric scale (momentary display). When set to degrees Fahrenheit, pressure is displayed in psig and vacuum in “/hg. “P” appears after the value to indicate psig and “i” appears for inches of mercury. When set to degrees Celsius, pressure readings are in bars “b” appears after the value to indicate bars. Initiate battery backup mode to allow set point and function code selection if AC power is not connected. This key is pressed to switch the functions from the temperature software to the DataCORDER Software. The remaining keys function the same as described above except the readings or changes are made to the DataCORDER programming. TM 11574A-OI NOTE The controlling probe in the perishable range will be the SUPPLY air probe and the controlling probe in the frozen range will be the RETURN air probe. (3) Controller. CAUTION Do not remove wire harnesses from controller unless you are grounded to the unit frame with a static safe wrist strap. CAUTION Unplug all controller wire harness connectors before performing arc welding on any part of the container. NOTE Do not attempt to service the controller. Breaking the seal will void the warranty. NOTE Do not attempt to use an ML2i PC card in an ML3 equipped unit. The PC cards are physically different and will result in damage to the controller. The Micro-Link 3 controller is a single module microprocessor as shown in Figure 2-27. It is fitted with test points, harness connectors and a software card programming port. Figure 2-26. Micro-Link 3 Controller. LEGEND 1. Mounting Screw 2. Micro-Link 3 Controller 3. Connectors 4. Test Points 5. Fuses 6. Control Circuit Power Connection (Located in back of controller) 7. Software Programming Port 8. Battery Pack 2-61 TM 11574A-OI h. Controller Alarms. Alarm display is an independent controller software function. If an operating parameter is outside of expected range or a component does not return the correct signals back to the controller, an alarm is generated. A listing of the alarms is provided in Table 2-6. The alarm philosophy balances the protection of the refrigeration unit and that of the refrigerated cargo. The action taken when an error is detected always considers the survival of the cargo. Rechecks are made to confirm that an error actually exists. Some alarms requiring compressor shutdown have time delays before and after to try to keep the compressor on line. An example is alarm code “LO,” (low main voltage), when a voltage drop of over 25% occurs, an indication is given on the display, but the unit will continue to run. An alarm is indicated by flashing an alarm code on the display panel, and for some alarms, by the alarm light illuminating. When an Alarm Occurs: 1. The red alarm light will illuminate for “20 series” alarms. 2. If a detectable problem is found to exist, its alarm code will be alternately displayed with the set point on the left display. 3. The user should scroll through the alarm list to determine what alarms exist or have existed. Alarms must be diagnosed and corrected before the Alarm List can be cleared. To Display Alarm Codes: 1. While in the Default Display mode, press the ALARM LIST key. This accesses the Alarm List Display Mode, which displays any alarms archived in the Alarm Queue. 2. The alarm queue stores up to 16 alarms in the sequence in which they occurred. The user may scroll through the list by depressing an ARROW key. 3. The left display will show “AL##,” where ## is the alarm number sequentially in the queue. 4. The right display will show the actual alarm code. “AA##” will display for an active alarm, where “##” is the alarm code. Or “IA##” will display for an inactive alarm (refer to Table 2-6). 5. “END” is displayed to indicate the end of the alarm list if any alarms are active. 6. “CLEAr” is displayed if all alarms are inactive. The alarm queue may than be cleared by pressing the ENTER key. The alarm list will clear and “ -- -- -- -- -- ” will be displayed. Check the connector at the back of the controller, if it is loose or unplugged, reconnect it. Then run a pre trip test (P5) to clear AL26. 2-62 TM 11574A-OI i. Unit Pre-Trip Diagnostics. Pre-trip diagnostics is an independent controller function that will suspend normal refrigeration controller activities and provide preprogrammed test routines. The test routines include Auto Mode testing, which automatically performs a pre-programmed sequence of tests or Manual Mode testing, which allows the operator to select and run any of the individual tests. CAUTION Pre-trip inspection should not be performed with critical temperature cargoes in the container. Testing may be initiated by use of the keypad. At the end of a pre-trip test, the message “P,” “rSLts” (pretest results) will be displayed. Pressing the ENTER key will allow the user to see the results for all subtests. The results will be displayed as “PASS” or “FAIL” for all the tests run to completion. A detailed description of the pre-trip tests and test codes is provided in Table 2-7. Detailed operating instructions are provided in section 2-15. j. Operating Double Cargo Doors. (1) Open the right cargo door first by lifting both handles and rotating to the right. This will disengage the locking cams at the top and bottom of the door. (2) Pull the cargo door all the way open and secure in place with door lanyards. (3) Repeat for left cargo door. 2-63 TM 11574A-OI k. Operating Emergency Escape Door. (1) The emergency escape door provides a means of emergency egress should someone become trapped inside the container. The door can only be opened from the inside. (2) To open the emergency escape door, grasp both spring loaded door handles and pull to the left, disengaging each handle from its locking catch. (3) Swing the emergency escape door outwards. Figure 2-27. Operating Emergency Escape Door. 2-64 TM 11574A-OI l. Operating Interior Lighting. (1) To operate the interior lighting when the system is being powered via the large system power cables, rotate the lighting switch to the center position. (2) If the system is being powered via the 110 VAC power cable, rotate the lighting switch to the far right position. (3) Rotate the lighting switch to the left to turn the interior lighting off. Figure 2-28. Operating the Interior Lighting. 2-65 TM 11574A-OI m. Operating Air Curtain. (1) The air curtain provides a means to enter and exit the container when refrigerated while minimizing the loss of refrigerated air from the interior of the container. (2) To deploy the air curtain, grasp and slide the vertical vanes to the right, closing off the opening to the container. Simply part the vanes when entering and exiting the container. (3) Slide the air curtain fully to the left to move it completely out of the way when entering or exiting with cargo. 2-18. Shutdown a. Stopping the Unit. (1) To stop the unit, place the START-STOP switch in position “O” (OFF). (2) If the RU is not going to be used for several days, it must be pumped. 2-19. Emergency Shutdown a. Stopping the Unit. (1) To stop the unit, place the START-STOP switch in position “O” (OFF). 2-66 TM 11574A-OI VII. OPERATION UNDER UNUSUAL CONDITIONS 2-20. Unusual Conditions Refer to this section for steps and precautions to take in the event of adverse or unusual environmental conditions. a. Operation in Heavy Rain or Flooding. (1) Keep container doors closed and secure whenever possible. (2) Keep refrigeration unit controller protected from rain. (3) To minimize the effects of flooding or heavy rain, dig a trench around the container to evacuate excess water. (4) Keep power cable and plug away from water or excess moisture. (5) Keep circuits and electrical components covered and protected from moisture. b. Operation in Extreme Moist Heat (1) Keep power cable and plug away from water or excess moisture. c. Operation in Extreme Dry Heat There are no specific operational requirements or restrictions for operation in extreme dry heat. d. Operation in Extreme Cold (1) Keep power cable and plug away from water or excess moisture. (2) Do not touch bare metal surfaces with bare hands. e. Operation in Salt Air or Sea Spray (3) Keep power cable and plug away from water or excess moisture. (4) Clean components that are exposed to salt more frequently. f. Operation in Dust Storms or Sand Storms (1) Keep container doors closed and secure whenever possible. (2) Keep power plug free of sand and other particles. g. Operation in High Altitude There are no specific operational requirements or restrictions for operation in high altitudes. h. Operation in Snow (1) Keep power cable and plug away from water or excess moisture. (2) Keep plug clear of ice and other particles. 2-67 TM 11574A-OI i. Operation in Mud (1) Keep power cable and plug away from water or excess moisture. Keep plug clear of mud and other particles. (2) Clean floor more frequently. Keep floor free of mud whenever possible. j. Interim Nuclear, Biological, and Chemical (NBC) Decontamination Procedures (1) If chemical or biological contamination is expected, close and secure container door. (2) Close and secure the fresh air make-up vent. 2-68 TM 11574A-OI CHAPTER 3 MAINTENANCE INSTRUCTIONS I. INTRODUCTION 3-1. Scope This chapter of the Technical Manual (TM) contains instructions for Preventive Maintenance Checks and Services (PMCS) for the Large Field Refrigeration System and associated components. Additionally, troubleshooting procedures, corrective maintenance, and component adjustment procedures for the Large Field Refrigeration System are provided. 3-2. Tools Required for Maintenance Procedures Table 3-1. Tool Requirements TAMCN 3-3. NOMEN NSN B0061 Cooling and Refrigeration Expeditionary Kit 4120-01-558-5664 C7073 Common #1 Tool Set 4910-01-238-8115 C7911 Shop Equipment, Tool Room, Common #24 4940-01-550-4900 Corrosion Prevention and Control (CPAC) CPAC of Marine Corps Material is a continuing concern. It is important that any corrosion problems with this item be reported so that the problem can be corrected and improvements can be made to prevent the problem in future systems. Refer to MIL-HDBK-138B for corrosive failure definitions. If corrosion is detected refer to section 3-4 for PQDR reporting procedures. 3-4. Product Quality Deficiency Reporting (PQDR) Materiel Defects Reporting. The Using Unit will submit all form, fit, or function deficiencies in accordance with standard Product Quality Deficiency Reporting (PQDR) procedures contained in TM 4700-15/1_, Ground Equipment Record Procedures, and MCO 4855.10B, PQDR, via the Product Data Reporting and Evaluation Program (PDREP) at http://www.nslcptsmh.navsea.navy.mil/pdrep/pdrep.htm. Another option that is available for the submission of PQDRs is the Easy (EZ) PQDR, which can be accessed at the USMC PQDR Screening Point website at http://www.logcom.usmc.mil/pqdr. PDREP access is not required for EZ PQDR. If web access is not available, PQDRs should be submitted to the PQDR Screening Point via email attachment to: [email protected]. The PQDR form is available at website: http://www.logcom.usmc.mil/pqdr. Disposition for the failed item will be furnished to the user based on the PQDR. Submit Supply Discrepancy Reports (SDR), SF 364, per Users Manual (UM)-4400-124, Fleet Marine Force (FMF) Supported Activities Supply System (SASSY) Using Unit Procedures and Secretary of the Navy Instruction (SECNAVINST) 4355.18, Reporting of Item and Packaging Discrepancies, on shortages, overages, packaging, and preservation discrepancies. Any damage due to improper packaging will be submitted via SDR procedures. Damage due to shipping discrepancies will be submitted as a Transportation Discrepancy Report, SF 361 in accordance with UM-4400-124 and MCO P4610.16E, Uniform Settlement of Military Freight Loss and Damage Claims. 3-1 TM 11574A-OI II. PREVENTIVE MAINTENANCE CHECKS AND SERVICE (PMCS) To ensure the Large Field Refrigeration System is ready for operation at all times, it must be inspected so that defects are discovered and corrected before they result in damage or equipment failure. Any effective preventive maintenance program must begin with instructions to all operators to report all unusual conditions noted during daily checks or actual operation to the appropriate maintenance personnel. A system should be established to record all problems, defects, and deficiencies noted by operators and discovered during maintenance inspections, together with the corrective actions taken. Table 3-3 list the Preventive Maintenance Checks and Service Schedule required for the Large Field Refrigeration System which must be done at the specified times if possible. If operational requirements prevent doing the scheduled maintenance at the specified time, make the required checks and services at the first available opportunity. The PMCS items in the table have been arranged in a logical sequence to provide for greater personnel efficiency and the least amount of required maintenance downtime. Additionally, Table 2-5 list the before, during, and after operation checks that must be performed during operation of equipment. 3-5. Explanation of PMCS Table Columns a. Column 1, contains the specific Large Field Refrigeration System component that the maintenance task pertains to. b. Column 2, (Item / Task) provides a list of all items requiring maintenance and the specific task which is to be performed. c. Column 3, (Interval) contains the interval in which to perform the task. Table 3-2 below is a list of symbols used to indicate specific intervals. 3-2 TM 11574A-OI NOTE Column 3 for the trailer component lists criteria that render the trailer not fully mission capable. Column 4 indicates the specific interval to perform each task. Table 3-2. PMCS Symbols INTERVAL Hourly Weekly Monthly Quarterly Semiannually Annually Other SYMBOLS H W M Q S A O Table 3-3. Preventive Maintenance Checks and Services INTERVAL ITEM / TASK H W Cargo Doors (Exterior) Inspect for broken or missing handle locks. Inspect for broken or missing handle locks. Inspect door hinges for cracked or broken hinges. X Refrigeration Unit X M Q S A OTHER Check refrigeration unit for security. Install and secure loose or missing mount bolts. Make sure T.I.R. devices are in place on access panels. Cargo Doors X Inspect Container frame around doors for cracks, splits and broken welds. Inspect seals for cracks and damage. Left Side Panel X Inspect container upper and lower sides for cracks, splits, and broken welds. Roof Panel X Inspect for obvious damage, cracks, splits and delaminating. Right Side Panel X Inspect container upper and lower sides for cracks, splits, and broken welds. 3-3 TM 11574A-OI Table 3-3. Preventive Maintenance Checks and Services - Continued Container X Inspect for corrosion and condition of paint. Name plates X Inspect for missing, damaged or illegible name plates. Container (Interior) X Check for damage, corrosion, and punctures. Escape door (Interior) X Check for security, damage and missing hardware. 3-6. Preventive Maintenance Tasks a. Cleaning The following paragraphs provide cleaning instructions for the Large Field Refrigeration System and associated components. (1) Cleaning the Container Exterior. Wash with soap and water. Hard bristle brushes may be used, scratch pads or metallic bristle brushes are not recommended. (2) Cleaning the Container Interior. Wash with soap and water. Hard bristle brushes may be used, scratch pads or metallic bristle brushes are not recommended. b. Inspect Carry out inspection of the Large Field Refrigeration System and associated components as follows: (1) Generally inspect all metal parts, as applicable, for breaks, cracks, nicks, gouges, scoring, stripped or crossed threads, corrosion, distortion, pitting and other obvious damage. Inspect all fabric for tears, wear, and other obvious damage. 3-4 TM 11574A-OI III. CORRECTIVE MAINTENANCE PROCEDURES 3-7. Corrective Maintenance Tasks (CM) a. Repair the Container. Emergency repairs can be performed to prevent additional damage to container panels. All other container repair is performed by contractor. (1) Emergency Repairs. Damage to the coating of the container panel that does not expose or puncture the lining of the panel should not be repaired. Any damage to the container panel that exposes or punctures the lining should be repaired immediately to prevent further damage. Adhesive aluminum tape or foil can be used to repair any damage to the container panel that exposes or punctures the lining. The tape or foil thickness should exceed 90 microns. If using thinner tape or foil, a second or third layer should be applied. Repair damage to the container panel that exposes or punctures the lining as follows: (a) Prepare the area to be repaired by clearing it of all loose particles or jagged edges that may prevent the tape or foil from properly adhering to the container. (b) Affix the adhesive tape or foil to the damaged container panel in a manner that fully covers the damage and surrounding area. SIDE WALL : ALUMINUM TAPE STRIPES CLEANED AREA ROOF : ALUMINUM TAPE STRIPES SEALER ALUMINUM TAPE STRIPES SEALER CLEANED AREA Figure 3-1. Emergency Repairs. 3-5 TM 11574A-OI b. Repair the Refrigeration System. WARNING Never use air for leak testing. It has been determined that pressurized mixtures of refrigerant and air can undergo combustion when exposed to an ignition source. NOTE To avoid damage to the earth’s ozone layer, use a refrigerant recovery system whenever removing refrigerant. When working with refrigerants, you must comply with all local government environmental laws. In the US, refer to EPA section 608. (1) Service Valves. The compressor suction, compressor discharge, and liquid line service valves (Figure 3-2) are provided with a double seat and a gauge connection, which enable servicing of the compressor and refrigerant lines. Turning the valve stem clockwise (all the way forward) will front seat the valve to close off the suction, discharge or liquid line and open the gauge port to the compressor or low side. Turning the stem counterclockwise (all the way out) will open (backseat) the valve to open the connections and close off the port with the valve stem midway between closed (front seat) and open (backseat), the lines are open to both the connections and the gauge connection. For example, the valve stem is first fully open (back seated) when connecting a manifold gauge to measure pressure. Then, the valve is opened 1/4 to 1/2 turn to measure the pressure. 1. Suction, Discharge or Liquid Line Connection 2. Service Port 3. Stem Cap 4. Valve Stem 5. Compressor Or Filter Drier Inlet Connection Figure 3-2. Service Valve. (2) Manifold Gauge Set. The manifold gauge set is used to determine system operating pressure, add refrigerant charge, and to equalize or evacuate the system. When the suction pressure hand valve is front seated (turned all the way in), the suction (low) pressure can be checked. When the discharge pressure hand valve is front seated, the discharge (high) pressure can be checked. When both valves are open (turned counterclockwise all the way out), high pressure vapor will flow into the low side. When the suction pressure valve is open and the discharge pressure valve shut, the system can be charged. Oil can also be added to the system. 3-6 TM 11574A-OI (a) Preparing Manifold Gauge/Hose Set For Use If the manifold gauge/hose set is new or was exposed to the atmosphere, it will need to be evacuated to remove contaminants and air as follows: 1 Back seat (turn counterclockwise) both field service couplings (Figure 3-4) and mid seat both hand valves. 2 Connect the yellow hose to a vacuum pump and refrigerant 134a cylinder. 3 Evacuate to 10 inches of vacuum and then charge with R-134a to a slightly positive pressure of 1.0 psig @ (0.1 kg/cm). 4 Front seat both manifold gauge set valves and disconnect from cylinder. The gauge set is now ready for use. 1. Manifold Gauge Set 2. Hose Fitting (0.5-16 Acme) 3. Refrigeration and/or Evacuation Hose (SAE J2196/R134a) 4. Hose Fitting w/ O-ring (M14 x 1.5) 5. High Side Field Service Coupling 6. Low Side Field Service Coupling Figure 3-3. Manifold Gauge/Hose Set. 3-7 TM 11574A-OI (b) Connecting Manifold Gauge/Hose Set Connection of the manifold gauge/hose set (Figure 3-5) is dependent on the component being serviced. If only the compressor is being serviced, the high side coupling is connected to the discharge service valve. For service of the low side (after pump down), the high side coupling is connected to the liquid line service valve. The center hose connection is brought to the tool being used. To connect the manifold gauge/hose set, do the following: 1 Remove service valve stem caps and check to make sure they are back seated. Remove service port caps (Figure 3-2). 2 Connect the high side field service coupling (Figure 3-4) to the discharge or liquid line valve service valve port. 3 Turn the high side field service coupling knob (red) clockwise, which will open the high side of the system to the gauge set. 4 Connect the low side field service coupling to the suction service valve port. 5 Turn the low side field service coupling knob (blue) clockwise, which will open the low side of the system to the gauge set. 6 To read system pressures, slightly mid seat the high side and suction service valves. 1. 2. 3. 4. 5. 6. Discharge Service Valve Compressor Suction Service Valve Receiver Liquid Service Valve Vacuum Pump 7. 8. 9. 10. 11. 12. Low Side Hose Center Hose High Side Hose Manifold Gauge Set Refrigerant Cylinder Recovery Machine Figure 3-4. Refrigeration System Service Connections. 3-8 TM 11574A-OI (c) Removing the Manifold Gauge Set if performed following the steps below: 1 While the compressor is still ON, open (backseat) the high side service valve. 2 Mid seat both hand valves on the manifold gauge set and allow the pressure in the manifold gauge set to be drawn down to suction pressure. This returns any liquid that may be in the high side hose to the system. 3 Open (backseat) the suction service valve. Open (backseat) both field service couplings and front seat both manifold set valves. Remove the couplings from the service ports. 4 Install both service valve stem caps and service port caps (finger-tight only). (d) Pumping the unit down. To service the filter-drier, moisture-liquid indicator, expansion valve, suction modulation valve, quench valve, or evaporator coil, pump the refrigerant into the high side as follows: 1 Attach manifold gauge set to compressor service valves (refer to Manifold gauge set paragraph 3-10b(2)). 2 Start the unit and run in a cooling mode for 10 to 15 minutes. Front seat the liquid line service valve. Place start-stop switch in the OFF position when the suction reaches a positive pressure of 1.0 psig@ (0.1 kg/cm). 3 Front seat (fully closed) the suction service valve. The refrigerant will be trapped between the compressor suction service valve and the liquid line valve. 4 Before opening up any part of the system, a slight positive pressure should be indicated on the pressure gauge. If a vacuum is indicated, emit refrigerant by cracking the liquid line valve momentarily to build up a slight positive pressure. 5 When opening up the refrigerant system, certain parts may frost. Allow the part to warm to ambient temperature before dismantling. This avoids internal condensation, which puts moisture in the system. 6 After repairs have been made, be sure to perform a refrigerant leak check (refer to Refrigerant leak check paragraph 3-10b(2)(e)), and evacuate and dehydrate the low side (refer to Evacuation and dehydration paragraph 3-10b(3)). 7 Check refrigerant charge (refer to Refrigeration charge paragraph 3-10b(4)). 3-9 TM 11574A-OI (e) Refrigerant leak checking. WARNING Never use air for leak testing. It has been determined that pressurized, air-rich mixtures of refrigerants and air can undergo combustion when exposed to an ignition source. 1 The recommended procedure for finding leaks in a system is with an R-134a electronic leak detector. Testing joints with soapsuds is satisfactory only for locating large leaks. 2 If the system is without refrigerant, charge the system with refrigerant 134a to build up pressure between 30 to 50 psig @ (2.1 to 3.5 kg/cm). Remove refrigerant cylinder and leak-check all connections. NOTE Only refrigerant 134a should be used to pressurize the system. Any other gas or vapor will contaminate the system, which will require additional purging and evacuation of the system. 3-10 3 If required, remove refrigerant using a refrigerant recovery system and repair any leaks. 4 Evacuate and dehydrate the unit (refer to Evacuation and dehydration paragraph 310b(3)). 5 Charge unit per Refrigeration charge paragraph 3-10b(4) . TM 11574A-OI (3) Evacuation and dehydration. Moisture is the deadly enemy of refrigeration systems. The presence of moisture in a refrigeration system can have many undesirable effects. The most common are copper plating, acid sludge formation, “freezing-up” of metering devices by free water, and formation of acids, resulting in metal corrosion. (a) Preparation. To prepare the refrigeration system for evacuation and dehydration, follow the steps below: 1 Evacuate and dehydrate only after pressure leak test (refer Refrigerant leak check paragraph 3-10b(2)(e)). 2 A vacuum pump is essential to properly evacuate and dehydrate any system. 3 If possible, keep the ambient temperature above 60 F (15.6 C) to speed evaporation of moisture. If the ambient temperature is lower than 60 F (15.6 0C), ice might form before moisture removal is complete. Heat lamps or alternate sources of heat may be used to raise the system temperature. 4 Additional time may be saved during a complete system pump down by replacing the filter-drier with a new filter drier. This temporary filter drier will be disposed of and replaced after total system evacuation. (b) Complete system procedure. To perform the evacuation and dehydration cycle on the complete refrigeration system, follow the steps below: 1 Remove all refrigerant using a refrigerant recovery system. 2 The recommended method to evacuate and dehydrate the system is to connect three evacuation hoses (Figure 3-6) to the vacuum pump and refrigeration unit. Be sure the service hoses are suited for evacuation purposes. 3 Test the evacuation setup for leaks by back seating the unit service valves and drawing a deep vacuum with the vacuum pump and gauge valves open. Shut off the pump and check to see if the vacuum holds. Repair leaks if necessary. 4 Mid seat the refrigerant system service valves. 5 Open the vacuum pump unit. Start the vacuum pump. Evacuate unit for 3 hours. Close vacuum pump valve. Shut off the vacuum pump. Wait a 15-20 minutes to be sure the vacuum holds. 6 Break the vacuum with nitrogen. Raise system pressure to approximately 2 psig @ (0.2kg/- cm), monitoring it with the compound gauge. 7 Remove nitrogen from system. 8 Repeat steps 5 and 6 one time. 9 Remove the temporary filter drier and replace with a new filter-drier. Evacuate using vacuum pump for 24 hours. Shut off the vacuum pump. Wait 10 minutes to see if vacuum holds. This procedure checks for residual moisture and/or leaks. 10 With a vacuum still in the unit, the refrigerant charge may be drawn into the system from a refrigerant container on weight scales. Continue to Refrigeration Charge paragraph 3-10b(4). 3-11 TM 11574A-OI 1. 2. 3. 4. 5. Reclaimer Discharge Service Valve Compressor Suction Service Valve Receiver or Condenser 6. Liquid Service Valve 7. Vacuum Pump 8. Electronic Vacuum Gauge 9. Manifold Gauge Set Refrigerant Cylinder Figure 3-5. Compressor Service Connections. (c) Partial system procedure. To perform a partial evacuation and dehydration cycle on the complete refrigeration system, follow the steps below: 3-12 1 If the refrigerant charge has been removed from the compressor for service, evacuate only the compressor by connecting the evacuation set-up at the compressor service valves. Follow evacuation procedures of the preceding paragraph except leave compressor service valves front seated until evacuation is completed. 2 If refrigerant charge has been removed from the low side only, evacuate the low side by connecting the evacuation set-up at the compressor service valves and liquid service valve except leave the service valves front seated until evacuation is completed. 3 Once evacuation has been completed and the pump has been isolated, fully open (backseat) the service valves to isolate the service connections and then continue with checking and, if required, adding refrigerant in accordance with normal procedures. TM 11574A-OI (4) Refrigeration Charge. (a) Checking the refrigerant charge. To check the refrigeration charge, follow the steps below: NOTE To avoid damage to the earth’s ozone layer, use a refrigerant recovery system whenever removing refrigerant. When working with refrigerants you must comply with all local government environmental laws. In the US, refer to EPA section 608. 1 Connect the gauge manifold to the compressor discharge and suction service valves. 2 Bring the container temperature to approximately 35 F (1.7 C) or 0 F (-17.8 C). Set the controller set point to -13 F (-25 C) to ensure that the suction modulation valve is at maximum allowed open position. 3 Partially block the condenser coil inlet air. Increase the area blocked until the compressor discharge pressure is raised to approximately 175 psig @ (12 kg/cm@). 4 On units equipped with a receiver, the level should be between the glasses. If the refrigerant level is not correct, continue with the following paragraphs to add or remove refrigerant as required. (b) Fully charging the refrigeration system. To fully recharge the refrigeration system, follow the steps below: 1 Evacuate unit and leave in deep vacuum (refer to Evacuation and dehydration paragraph 3-10b(3)). 2 Place cylinder of R-134a on scale and connect charging line from cylinder to liquid line valve. Purge charging line at liquid line valve and then note weight of cylinder and refrigerant. 3 Open liquid valve on cylinder. Open liquid line valve half-way and allow the liquid refrigerant to flow into the unit until the correct weight of refrigerant (refer to Refrigeration system data table paragraph) has been added as indicated by scales. NOTE It may be necessary to finish charging unit through suction service valve in gas form, due to pressure rise in high side of the system (refer to Partial charging refrigeration system section paragraph). 4 Open (backseat) manual liquid line valve (to close off gauge port). Close liquid valve on cylinder. 5 Start unit in cooling mode. Run approximately 10 minutes and check the refrigerant charge. (c) Partial charging the refrigeration system. To partially recharge the refrigeration system, follow the steps below: 1 2 Examine the unit refrigerant system for any evidence of leaks. Repair as necessary (refer to Refrigerant leak checking paragraph). Maintain the conditions outlined in Checking the refrigerant charge paragraph 3103b(4). 3-13 TM 11574A-OI 3 Fully open (backseat) the suction service valve and remove the service port cap. 4 Connect charging line between suction service valve port and cylinder of refrigerant R-134a. Open VAPOR valve. 5 Partially front seat (turn clockwise) the suction service valve and slowly add charge until the refrigerant appears at the proper level. (5) Compressor. WARNING Make sure power to the unit is OFF and power plug disconnected before replacing the compressor. (a) There are several points that must be covered prior to performing any maintenance on the compressor, those points are as follows: 1 The compressor should not operate in a vacuum greater than 500 mm/hg (20 inches/hg). 2 The service replacement compressor is sold without shutoff valves (but with valve pads), and without terminal box and cover. Customer should retain the original terminal box, cover, and high pressure switch for use on replacement compressor. 3 Check oil level in service replacement compressor (refer to Compressor oil level paragraph 3-10b(5)(e)). 4 A compressor terminal wiring kit must be ordered as a separate item when ordering replacement compressor. Appropriate installation instructions are included with kit. 5 Refer to Table 3-8 for charts on compressor pressure, temperature and Figure 3-21 for motor current curves. (b) Removal and replacement of the compressor. To remove and replace the compressor perform the following steps: 3-14 1 Remove the protective guard from lower section of the unit. 2 Pump down low side (refer to Pumping the unit down paragraph 3-10b(2)(d)) or front seat compressor service valves and remove refrigerant from compressor using a refrigerant recovery system. 3 Locate the compressor junction box. Tag and disconnect wiring from compressor terminals and remove compressor junction box. 4 Loosen service valve mounting bolts, break seal, and then remove bolts. 5 Remove compressor plate mounting bolts. TM 11574A-OI 6 Remove compressor and mounting plate. Refer to Refrigeration system data table 11 for weight of compressor. 7 Remove high pressure switch (HPS) from compressor and check operation of switch (refer to Checking high pressure switch section 3-10b(6)). 8 Remove compressor mounting bolts from mounting plate and install mounting plate on replacement compressor. 9 Install replacement compressor terminal wiring kit, following instructions included with kit. 10 Install high pressure switch on compressor. 11 Install compressor and mounting plate in unit. 12 Connect junction box(es) to compressor and connect all wiring per wiring diagram. Install junction box cover(s). 13 Install new gaskets on service valves. 14 Install mounting bolts in service valves and torque to 20-30 ft/lb (2.77 to 4.15 mkg). 15 Attach two hoses (with hand valves near vacuum pump) to the suction and discharge service valves. Dehydrate and evacuate compressor for 2 hours. Turn off valves on both hoses to pump. 16 Fully open (backseat) both suction and discharge service valves. 17 Remove vacuum pump lines. 18 Start unit and check refrigerant charge (refer to Refrigeration charge paragraph 310b(4)). 19 Check moisture-liquid indicator for wetness. Change filter-drier if necessary (refer to Filter drier paragraph). 20 Check compressor oil level per Compressor Oil Level paragraph 3-10b(5)(e). Add oil if necessary. 3-15 TM 11574A-OI 1. Discharge Valve Flange 2. High Side Pressure Connection 3. Low Side Pressure Connection 4. Suction Valve Flange 5. Motor End Cover 6. Serial/Model No. Plate 7. Crankcase Heater 8. 9. 10. 11. 12. 13. 14. 15. 16. Bottom Plate Sight Glass Oil Drain Plug Oil Charging Valve Bearing Head Oil Pump Oil Fill Plug Cylinder Head Valve Plate Figure 3-6. Compressor. (c) Checking compressor oil level. To check the compressor oil level perform the following steps: CAUTION Use only Castrol Icematic SW20 compressor oil with R-134a. When using this hygroscopic oil, immediately reseal. Do not leave container of oil open or contamination will occur. 3-16 1 Operate the unit in cooling mode for at least 20 minutes. 2 Check the front oil sight glass on the compressor to ensure that no foaming of the oil is present after 20 minutes of operation. If the oil is foaming excessively after 20 minutes of operation, check the refrigerant system for flood-back of liquid refrigerant. Correct this situation before performing step 3. 3 Turn unit off to check the oil level. The correct oil level range should be between the bottom to one-eighth level of the sight glass. If the level is above one-eighth, oil must be removed from the compressor. To remove oil from the compressor, follow step f in this section. If the level is below the bottom of the sight glass, add oil to the compressor following step e below. TM 11574A-OI (d) Compressor cleanup after mild burnout. WARNING Observe all safety precautions while working on system. Avoid contact with refrigerant/oil mixture since acid burns may result. Wear safety glasses and work gloves. NOTE There are two types of burnout cleanup covered in the following section; Mild Burnout and Severe Burnout. Mild burnout is a non-running motor burn with the motor contaminants confined to the compressor. Severe burnout is a running motor burn where the contaminants are pumped through the system. This type of failure accounts for 3 to 5% of all motor burnouts. 1 Shut off power, then remove refrigerant charge from compressor using suitable refrigerant recovery device. Do not blow charge to the atmosphere. 2 Remove compressor leaving service valves. 3 Replace compressor. 4 Replace liquid line filter with one size larger in capacity than the unit being worked on. 5 Triple evacuate down to 29 inches of mercury, breaking twice with refrigerant. Pull a deep vacuum of 500 microns before recharging. 6 Recharge unit compensating for larger liquid line filter. 7 Run a minimum of one hour and replace liquid line filter. 8 Acid check oil. If acid is present, change oil. (e) Compressor cleanup after severe burnout. WARNING Observe all safety precautions while working on system. Avoid contact with refrigerant/oil mixture since acid burns may result. Wear safety glasses and work gloves. NOTE There are two types of burnout cleanup covered in the following section; Mild Burnout and Severe Burnout. Mild burnout is a non-running motor burn with the motor contaminants confined to the compressor. Severe burnout is a running motor burn where the contaminants are pumped through the system. This type of failure accounts for 3 to 5% of all motor burnouts. 1 Shut off power, then remove refrigerant charge from compressor using suitable refrigerant recovery device. Do not blow charge to the atmosphere. 2 Remove compressor leaving service valves. 3 Replace compressor. 3-17 TM 11574A-OI 4 Replace liquid line filter with one size larger in capacity than the unit being worked on. 5 Add suction line filter of appropriate size, mounted vertically with pressure taps on both inlet and outlet. 6 Depending on the severity of the burnout, components may need to be changed put or cleaned. 7 Triple evacuate as discussed in the mild burnout procedure. 8 Recharge unit compensating for additional volume in larger liquid line filter drier. 9 Run for one hour minimum. Change liquid line and suction line filter plus oil. 10 Run a minimum of two more hours and change liquid filter again. Remove suction line filter entirely. Acid check oil and change. Depending on acid check, you may require an additional oil change. (6) High Pressure Switch. (a) Replacing high pressure switch. To replace the high pressure switch, perform the following steps: 1 Turn unit start-stop switch OFF. Front seat both suction and discharge service valves to isolate compressor. Remove the refrigerant from the compressor. 2 Disconnect wiring from defective switch. The high pressure switch is located on the center head and is removed by turning counterclockwise (refer to Figure 2-3). 3 Install a new high pressure switch after verifying switch settings (refer to Checking high pressure switch in section 3-10b(6)). 4 Evacuate and dehydrate the compressor per Evacuation and Dehydration paragraph 3-10b(3). 1. Cylinder Valve and Gauge 2. Pressure Regulator 3. Nitrogen Cylinder 4. Pressure Gauge (0 to 36 kg/cm² = 0 to 400 psig) 5. Bleed-Off Valve 6. 1/4 Inch Connection Figure 3-7. High Pressure Switch Testing 3-18 TM 11574A-OI (7) Condenser Coil. (a) Condenser coil replacement. The condenser consists of a series of parallel copper tubes expanded into copper fins. The condenser coil must be cleaned with fresh water or steam so the air flow is not restricted. To replace the coil, do the following: WARNING Do not open the condenser fan grille before turning power OFF and disconnecting power plug. 1 Using a refrigerant reclaim system, remove the refrigerant charge. 2 Remove the condenser coil guard. 3 Unsolder discharge line and remove the line to the receiver. 4 Remove coil mounting hardware and remove the coil. 5 Install replacement coil and solder connections. 6 Leak-check the coil connections per Refrigeration leak checking paragraph 310b(2)(e). Evacuate the unit per Evacuation and dehydration paragraph 3-10b(3) then charge the unit with refrigerant per Refrigeration charge paragraph 3-10b(4). (8) Condenser Fan and Motor Assembly. WARNING Do not open condenser fan grille before turning power OFF and disconnecting power plug. (a) Condenser fan replacement. The condenser fan rotates counter-clockwise (viewed from front of unit), pulls air through the condenser coil and discharges horizontally through the front of the unit. To replace motor assembly perform the following steps: 3-19 TM 11574A-OI 1 Open condenser fan screen guard. 2 Loosen two square head set screws on fan (thread sealer has been applied to set screws at installation). Disconnect wiring from motor junction box. CAUTION Take necessary steps (place plywood over coil or use sling on motor) to prevent motor from falling into condenser coil. 3 Remove motor mounting hardware and replace the motor. It is recommended that new locknuts be used when replacing motor. Connect wiring per wiring diagram. 4 Install fan loosely on motor shaft (hub side in). DO NOT USE FORCE. If necessary, tap the hub only, not the hub nuts or bolts. Install venturi. Apply “Loctite” to fan set screws. Adjust fan within venturi so that the outer edge of the fan projects 3/16 to 1/8 in (3.2 to 6.4 mm) back from edge of the venturi. Spin fan by hand to check clearance. 5 Close and secure condenser fan screen guard. 6 Apply power to unit and check fan rotation. If fan motor rotates backward, reverse wire numbers 5 and 8. (b) Condenser Pressure Transducer Inspection. This maintenance procedure does not exist in the commercial manual. It is to be developed at a later date. (c) Remove Condenser Pressure Transducer. This maintenance procedure does not exist in the commercial manual. It is to be developed at a later date. (d) Replace Condenser Pressure Transducer. This maintenance procedure does not exist in the commercial manual. It is to be developed at a later date. (9) Filter Drier. (a) To replace filter-drier perform the following steps: 1 Pump down the unit (refer to Pumping the unit down paragraph 3-10b(2)(d)) and replace filter-drier. 2 Evacuate the low side in accordance with Evacuation and dehydration paragraph 310b(3). 3 After unit is in operation, inspect for moisture in system and check charge. (10)Thermostatic Expansion Valve. (a) The thermostatic expansion valve (Figure 3-9) is an automatic device that maintains constant superheat of the refrigerant gas leaving the evaporator, regardless of suction pressure. The function of the thermostatic expansion valve is: 3-20 1 Automatic control of the refrigerant flow to match the evaporator load. 2 Prevention of liquid refrigerant entering the compressor. Unless the valve is defective, it seldom requires maintenance other than periodic inspection to ensure that the thermal bulb is tightly secured and properly insulated (Figure 3-9). TM 11574A-OI NOTE TXV Bulb Clamp is soldered to the suction line. 1. Suction Line 2. Thumbscrew 3. TXV Bulb Clamp 4. TXV Bulb 5. Foam Insulation Figure 3-8. Thermostatic Expansion Valve Bulb. (b) Checking Superheat. To check the superheat function of the thermostatic expansion valve perform the following: NOTE Proper superheat measurement should be completed at 0 F (-17.8 C) container box temperature where possible. 1 Open the upper right Evaporator Fan Motor (EFM#1) access panel (Figure 2-1) to expose the expansion valve. 2 Attach a temperature sensor near the expansion valve bulb and insulate. Make sure the suction line is clean and that firm contact is made with the sensor. 3 Connect an accurate gauge to the service port directly upstream of the suction modulating valve. 4 Set the temperature set point to 0 F (-17.8 C) and run unit until conditions stabilize. 5 The readings may cycle from a high to a low reading. Take readings of temperature and pressure every three to five minutes for a total of 5 or 6 readings. 6 From the temperature/pressure chart (Table 3-8), determine the saturation temperature corresponding to the evaporator outlet test pressures at the suction modulation valve. 7 Subtract the saturation temperatures determined in step 6 from the temperatures measured in step 5. The difference is the superheat of the suction gas. Determine the average superheat. It should be 8 to 12 F (4.5 to 6.7 C). 3-21 TM 11574A-OI (c) Expansion valve removal. To remove the expansion valve perform the following: NOTE The TXV is a hermetic valve and does not have adjustable superheat (Figure 3-10). All connections on the hermetic TXV are bi-metallic, copper on the inside and stainless on the outside. All joints on the hermetic TXV (inlet, outlet and equalizer lines) are brazed. Bi-metallic connections heat up very quickly. 1 Pump down the unit per Pumping the unit down paragraph 3-10b(2)(d). 2 If TXV replacement is to be performed from the front of the unit, open the upper right (EFM#1) access panel (Figure 2-1) and remove the evaporator fan motor. 3 Remove cushion clamp that secures the valve body to the bracket. 4 Unbraze the equalizer connection (1/4”), the outlet connection (5/8”), and then the inlet connection (3/8”) (Figure 3-10). Be careful to protect the insulation on the heaters and their wires. 5 If TXV replacement is being performed from the front of the unit, remove the access panel for the bulb. 6 Open the insulation flap. Flap is secured with Velcro. 7 Loosen the thumb screw and slide the bulb, out by pulling it towards the front of the unit. 1. Hermetic Thermostatic Expansion Valve 2. Non-adjustable Superheat Stem 3. Equalizer Connection 4. Inlet Connection 5. Outlet Connection 6. Hermetic Expansion Valve Bulb Figure 3-9. Thermostatic Expansion Valve. 3-22 TM 11574A-OI Figure 3-10. Hermetic Thermostatic Expansion Valve Brazing Procedure. (d) Expansion valve installation. To install the expansion valve perform the following: 1 Braze inlet connection to inlet line (Figure 3-11). 2 Braze outlet connection to outlet line. 3 Braze the equalizer connection to the equalizer line. 4 Reinstall the cushion clamp. 5 Thread the thermal bulb through the opening above the evaporator coil (refer to Figure 2-2), and slide it under the strap and secure the thumb screw. Close the insulation flap. Reinstall bulb access panel. 6 Check superheat. (e) Equalizer Line Cleaning. This maintenance procedure does not exist in the commercial manual. It is to be developed at a later date. (11)Evaporator Coil and Heater Assembly. NOTE The evaporator section, including the coil, should be cleaned regularly. The preferred cleaning fluid is soapy water or steam. The drain pan hose is routed behind the condenser fan motor and compressor. The drain pan line must be open to ensure adequate drainage. (a) Evaporator coil removal. To remove the evaporator coil, perform the following steps: 1 Pump unit down (refer to Pumping the unit down paragraph 3-10b(2)(d)). 2 With power OFF and power plug removed, remove the screws securing the panel covering the evaporator section (upper panel). 3 Disconnect the defrost heater wiring. 4 Disconnect the defrost temperature sensor (Figure 2-2) from the coil. 5 Remove middle coil support. 6 Remove the mounting hardware from the coil. 3-23 TM 11574A-OI 7 Unsolder the two coil connections, one at the distributor and the other at the coil header. 8 After defective coil is removed from unit, remove defrost heaters and install on replacement coil. 9 Install coil assembly by reversing above steps. 10 Leak check connections per Refrigeration leak checking paragraph 3-10b(2)(e). Evacuate the unit per Evacuation and dehydration paragraph 3-10b(3), and add refrigerant charge per Refrigeration charge paragraph 3-10b(4). (b) Evaporator heater replacement. The heaters are wired directly back to the contactor. If a heater failure occurs during a trip, the heater set containing that heater may be disconnected at the contactor. The next pre-trip will detect that a heater set has been disconnected and indicate that the failed heater should be replaced containing that heater may be disconnected at the contactor. The next pre-trip will detect that a heater set has been disconnected and indicate that the failed heater should be replaced. To replace a heater, perform the following. 1 Before servicing unit, make sure the unit circuit breakers (CB-1 & CB-2) and the startstop switch (ST) are in the OFF position, and that the power plug is disconnected. 2 Remove the upper back panel. 3 Determine which heater(s) need replacing by checking resistance of each heater set. Refer to Table 1-1 for heater resistance values. Once the set containing the failed heater is determined, cut the splice connection and retest to determine the actual failed heater(s). 4 Remove hold-down clamp securing heater(s) to coil. 5 Lift the bent end of the heater (with the opposite end down and away from coil). Move heater to the side enough to clear the heater end support and remove. (c) Manual Defrost Switch Inspection. This maintenance procedure does not exist in the commercial manual. It is to be developed at a later date. 1 Manual Defrost Switch Removal. This maintenance procedure does not exist in the commercial manual. It is to be developed at a later date. 2 Manual Defrost Switch Replacement. This maintenance procedure does not exist in the commercial manual. It is to be developed at a later date. (d) Defrost Temperature Sensor Inspection. This maintenance procedure does not exist in the commercial manual. It is to be developed at a later date. 1 Defrost Temperature Sensor Removal. This maintenance procedure does not exist in the commercial manual. It is to be developed at a later date. 2 Defrost Temperature Sensor Replacement. This maintenance procedure does not exist in the commercial manual. It is to be developed at a later date. (e) Heat Exchanger Inspection. This maintenance procedure does not exist in the commercial manual. It is to be developed at a later date. 1 3-24 Removing Heat Exchanger. This maintenance procedure does not exist in the commercial manual. It is to be developed at a later date. TM 11574A-OI 2 Replacing Heat Exchanger. This maintenance procedure does not exist in the commercial manual. It is to be developed at a later date. (12)Evaporator Fan and Motor Assembly NOTE The evaporator fans circulate air throughout the container by pulling air in the top of the unit. The air is forced through the evaporator coil where it is either heated or cooled and then discharged out the bottom of the refrigeration unit into the container. The fan motor bearings are factory lubricated and do not require additional grease. (a) Replacing the Evaporator Fan Assembly. To remove the evaporator fan assembly, perform the following: WARNING Always turn OFF the unit circuit breakers (CB-1 & CB-2) and disconnect main power supply before working on moving parts. 1 Remove access panel (Figure 2-2) by removing mounting bolts and T.I.R. locking device. Reach inside of unit and remove the Ty-wrap securing the wire harness loop. Unplug the connector by twisting to unlock and pulling to separate. 2 Loosen four 1/4-20 clamp bolts that are located on the underside of the fan deck at the sides of the of the fan assembly. Slide the loosened clamps back from the fan assembly. 3 Slide the fan assembly out from the unit and place on a sturdy work surface. (b) Disassemble the Evaporator Fan Assembly. To disassemble the evaporator fan assembly, perform the following steps: 1 Attach a spanner wrench to the two 1/4-20 holes located in the fan hub. Loosen the 5/8-18 shaft nut by holding the spanner wrench stationary and turning the 5/8-18 nut counter-clockwise (Figure 3-12). 2 Remove the spanner wrench. Use a universal wheel puller and remove the fan from the shaft. Remove the washers and key. 3 Remove the four 1/4-20 x 3/4 long bolts that are located under the fan that support the motor and stator housing. Remove the motor and plastic spacer. (c) Assemble the Evaporator Fan Assembly. To assemble the evaporator fan assembly, perform the following steps: 1 Assemble the motor and plastic spacer onto the stator. 2 Apply loctite to the 1/4-20 x 3/4 long bolts and torque to 70 inch pounds. 3 Place one 5/8 flat washer on the shoulder of the fan motor shaft. Insert the key in the keyway and lubricate the fan motor shaft and threads with a graphite-oil solution. 4 Install the fan onto the motor shaft. Place one 5/8 flat washer with a 5/8-18 locknut onto the motor shaft and torque to 40 foot-pounds. 3-25 TM 11574A-OI 5 Install the evaporator fan assembly in reverse order of removal. Torque the four 1/420 clamp bolts to 70 inch pounds. Apply power momentarily to check for proper fan rotation (refer to Table 1-1). If fan spins backward, then motor wiring or motor is defective. 6 Replace access panel making sure that panel does not leak. Make sure that the T.I.R. locking device is lock wired. 1. 2. 3. 4. 5. Stator Flat washer, 1/4 Bolt, 1/4-20 x 3/4 Locknut, 5/8-18 Flat washer, 5/8 6. 7. 8. 9. Impellor Fan Key Mylar Protector Evaporator Motor Figure 3-11. Evaporator Fan Assembly. 3-26 TM 11574A-OI (13)Evaporator Fan Motor Capacitor Units are equipped with single permanent –split capacitor fan motors. (a) When to Check for a Defective Capacitor. 1 When the fan motor will not change speed, for example: in the conventional perishable mode, the motors should run in high speed. In the economy perishable mode they should switch speeds and in the frozen mode, the motors should run in low speed. NOTE Units are equipped with single permanent-split capacitor fan motors. The evaporator fan motors will always start in high speed. 2 Motor running in wrong direction (after checking for correct wiring application). 3 Motor will not start and IP-EM’s are not open. (b) Removing the Capacitor. To remove the evaporator fan motor capacitor, perform the following steps: WARNING Make sure power to the unit is OFF and power plug disconnected before servicing capacitor(s). WARNING With power OFF discharge the capacitor before disconnecting the circuit wiring. Capacitors must be discharged properly before testing. To discharge the capacitor, first turn the unit power OFF and disconnect the unit power plug. Then place a 20,000 ohm, 2 watt resistor across the terminals of the capacitor for approximately 30 seconds. The capacitors are located on the motor and may be removed by two methods: 1 If container is empty, open upper rear panel of the unit. 2 If container is full, turn the unit power OFF and disconnect power plug. Remove the evaporator fan motor access panel (Figure 2-1). For removal of the evaporator fan assembly, refer to section 3-10b(12). (c) Checking the Evaporator Fan Motor Capacitor. If the capacitor is suspected of malfunction, you may choose to simply replace it. Direct replacement requires a capacitor of the same value. Two methods for checking capacitor function are: 1 Volt-ohmmeter set on RX 10,000 ohms. a. Connect ohmmeter leads across the capacitor terminals and observe the meter needle. If the capacitor is good, the needle will make a rapid swing toward zero resistance and then gradually swing back toward a very high resistance reading. b. If the capacitor has failed open, the ohmmeter needle will not move when the meter probes touch the terminals. If the capacitor is shorted, the needle will swing to zero resistance position and stay there. 3-27 TM 11574A-OI 2 Capacitor analyzer. a. The function of the analyzer is to read the microfarad value of a capacitor and to detect insulation breakdown under load conditions. The important advantages of an analyzer are its ability to locate capacitors that have either failed to hold their microfarad ratings or those that are breaking down internally during operation. It is also useful in identifying capacitors when their microfarad rating marks have become unreadable. (14)Suction Modulation Valve NOTE On start up of the unit, the valve will reset to a known open position. This is accomplished by assuming the valve was fully open, driving it fully closed, resetting the percentage open to zero, then opening to a known 21% staging position. Figure 3-12. Suction Modulation Valve (SMV). (a) Pre-check Procedure. To check the suction modulation valve, perform the following steps: 3-28 1 Check unit for abnormal operation. 2 Check charge. If refrigerant is low repair as required and again check operation. 3 If sufficient capacity cannot be maintained or unit is tripping excessively on high pressure switch (HPS) in high ambient temperatures, check coils and clean if required. 4 If capacity or control cannot be maintained, turn unit OFF, then back ON. This will reset the valve in the event the controller lost communication with the valve, and may correct the problem. TM 11574A-OI NOTE Carefully listen to the valve. During reset, the valve will make a ratcheting noise that may be heard or felt as it is attempting to close. If this can be heard or felt, it indicates that the controller and drive module are attempting to close the valve, and may serve as a quick indication that the drive module is in working order. 5 During the first few minutes of unit operation, compressor reliability enhancement logic (CREL) may be in effect. This places the valve at a 21% staging position and is sufficient to drive the temperature of the supply probe down several degrees during this interval. 6 After the CREL time-out has been met, the valve will start responding to the control logic and open or close relative to the demand. Scrutinize the unit operation for a few minutes. While in pull down, the unit will open the SMV to a maximum discharge pressure of 325 psig in high ambient conditions, or as much as the current setting and control logic will allow. The current level should be high. A lower discharge pressure will be seen in lower ambient temperatures. Once the unit has reached set point, the SMV will go into control mode. Both the discharge/suction pressures, and current draw will go significantly lower. Once below set point, the suction pressure should go into a vacuum within several minutes. Should the operation differ as mentioned, the SMV, controller, or wiring, may be faulty. 7 Check for correct wire location at the stepper motor plug and the environmental connector (EC). Make sure that the wires terminate in accordance with the wire markings (addresses). 8 Attach a manifold gauge set (refer to Manifold gauge set paragraph 3-10b(2)). If the unit is operating in the perishable mode, proceed to step 9. If the unit is operating in the frozen mode, proceed to step 10. 9 Perishable operation: If the operation of the unit is in question, place the set point to approximately 11 F (6 C) less than the current box temperature, so the unit goes into pull down. Run the unit for approximately one minute. Record readings on gauges and current draw. The current draw and pressures should go up. Place set point 0.9 F (0.5 C) above current box temperature to fully modulate valve, and run for approximately one minute. NOTE The unit may shut off for a short time. Wait until the unit self starts and sufficient time has elapsed to cause the valve to fully modulate. Record new gauge readings and current draw. The suction pressure should go into a vacuum and the current draw should have gone down. If little or no change to the suction pressure or current draw occurs, this is an indication of a malfunctioning SMV. 10 Frozen operation: In frozen mode the valve tends to stay open as much as possible. Again, this is dependent upon current limit setting and control logic. Turn the unit OFF and ON, as in the perishable mode, and watch the gauges. The valve will run at 21% open if CREL logic is active, and will open to maximum allowable after this. Depending on ambient conditions, there should be an increase in suction pressure and current draw as the valve opens. However, at times, this may be difficult to fully determine. 11 If the unit still does not operate properly, stop unit and proceed to the following step to check out the SMV system. 3-29 TM 11574A-OI (15)Checking the Stepper Valve. (a) Checking with ohmmeter 1 Disconnect the 4-pin connector to the stepper SMV. With a reliable digital ohmmeter, check the winding resistance. In normal ambient, the valve should have 72 to 84 ohms measured on the red/green (a-b terminals) and on the white/black (c-d terminals) leads. If an infinite or zero reading occurs, check connections and replace the motor. If near normal or normal reading occurs, proceed to step 3-10b(14)(d) to check out the controller. (b) Check Operation Stepper Valve. To check the operation of the stepper valve, perform the following steps: 1 Stop the unit, disconnect the 4-pin connector from the stepper module to the valve (Figure 3-13) and attach the SMA-12 stepper drive to the connector going to the valve. 2 Set the SMA-12 pulse per second (PPS) to one PPS and either open or close valve. Each LED should light sequentially until all four are lit. Any LED failing to light indicates an open on that leg, which indicates a poor connection or an open coil. Repair or replace as required to achieve proper operation. 3 Restart unit, set the step rate to 200PPS on SMA-12 for the valve, and close stepper valve while watching the suction gauge. Within one minute the suction pressure will go into a vacuum. This is an indication that the valve is moving. 4 If no change in suction pressure is detected, check for resistance (refer to 310b(14)(a)), and check connections for proper continuity and retest. If the valve is functioning, and all connections and motor resistance are good, check the drive module (refer to 3-10b(13)(a)). 5 If the valve is determined to be faulty after completing the above steps, perform a low side pump down. Remove valve power head assembly, and replace with a NEW valve power head assembly, torque nut to 35 ft-lb, evacuate low side, and open all service valves. CAUTION DO NOT disassemble piston from NEW suction modulating valve power head assembly. Doing so may result in damage to piston. (c) Checking the Controller. To check the controller, perform the following steps: 3-30 1 Turn unit OFF. 2 With voltmeter set to read 20 volts DC, attach the positive lead to MC1 of the 4-pin connector and the negative lead to the TP9. Turn ON unit and watch the volt meter. After a short delay, the reading should remain unchanged at 0 volts. If 5 VDC, check jumper wire form MC1 to MC8 is in place; if not, install and retest. TM 11574A-OI (d) Emergency Repair Procedures. In the event that the SMV system has a failure and replacement components are not readily available, the system can be bypassed by removing the valve piston. To remove the piston, do the following: 1 Perform a low side pump down (refer to Pumping the unit down paragraph 310b(2)(d)). 2 Remove SMV power head by loosening the 2-1/8 inch diameter nut (Figure 3-13) to relieve any pressure and then sliding the power head out. 3 Remove the piston by loosening the Allen screw and removing the piston and screw. 4 Install the power head assembly (without the piston) and torque to 35 to 40 foot-lbs. 5 Open all valves. 6 Start the unit. 7 Adjust the suction service valve so that the approximate temperature OR current limit is maintained. For perishable loads, it is recommended that the adjustment be made so that the available capacity is slightly larger than the load. The unit will cycle OFF and ON. 8 Once repair parts become available, repair as required. (16)Discharge Pressure Regulator Valve (a) Checking the discharge pressure regulating valve (DPRV). The DPRV is designed to maintain a minimal level of pressure within the compressor. Refer to Table 1-1 for valve setting. The following procedure can be used to perform a functional check: 1 Install a high pressure gauge at the discharge service valve. 2 Install another high pressure gauge at the liquid line service valve. 3 Run unit with 0 F (-17.8 C) set point. 4 After five minutes, read both gauges and subtract the liquid line pressure from the discharge pressure. This is the actual differential pressure. 5 Using the ambient temperature and the chart below, determine the replacement differential pressure. 3-31 TM 11574A-OI Figure 3-13. DPRV Replacement Value Chart. NOTE This test should not be run below 30 F (-1.1 C) or above 120 F (49 C). If the actual differential pressure is close to the replacement differential pressure, it is recommended that the readings be taken several times at two minutes intervals. If valve cap is found to be leaking it may be replaced using cap & O-ring (Carrier Part Number 4050024-00). (17)Autotransformer (a) If the Autotransformer unit does not start, check the following: 3-32 1 Make sure the 460 VAC (yellow) power cable is plugged into the receptacle (Figure TBA, Item 3) and locked in place. 2 Make sure that circuit breakers CB-1 and CB-2 are in the “ON” position. If the circuit breakers do not hold in, check voltage supply. 3 There is no internal protector for this transformer design; therefore, no checking of the internal protector is required. 4 Using a voltmeter and with the primary supply circuit ON, check the primary (input) voltage (460 VAC). Next, check the secondary (output) voltage (230 VAC). The transformer is defective if output voltage is not available. TM 11574A-OI (18)Controller (a) Handling Controller. To safely handle the controller, perform the following steps: CAUTION Do not remove wire harnesses from controller unless you are grounded to the unit frame with a static safe wrist strap. CAUTION Unplug all controller connectors before performing arc welding on any part of the container. NOTE The guidelines and cautions provided herein should be followed when handling the Controller/DataCORDER module. These precautions and procedures should be implemented when replacing the module, when doing any arc welding on the unit, or when service to the refrigeration unit requires handling and removal of the controller. 1. Controller Software Programming Port 2. Mounting Screw 3. Controller 4. Test Points Figure 3-14. Controller Section of the Control Box. 1 Ground yourself by touching metal parts before touching the controller. 2 Disconnect and secure power to the unit. 3 Carefully remove the controller. Do not touch any of the electrical connections if possible. Place the module on the static mat. 3-33 TM 11574A-OI Controller Troubleshooting. A group of test points (TP) (Figure 3-15) are provided on the controller for troubleshooting electrical circuits (schematic diagram, Appendix A). A description of the test points follows: NOTE Use a digital voltmeter to measure AC voltage between TPs and ground (TP9), except for TP8. 3-34 1 TP2 This test point enables the user to check if the internal protector for the compressor motor (IP-CP) or high pressure switch is open. 2 TP3 This test point enables the user to check if the water pressure switch (WP) contact is open or closed. 3 TP 4 This test point enables the user to check if the internal protector for the condenser fan motor (IP-CM) is open or closed. 4 TP 5 This test point enables the user to check if the internal protectors for the evaporator fan motors (IP-EM1 or IP-EM2) are open or closed. 5 TP 6 This test point enables the user to check if the controller water tank heater relay (TQ) is open or closed. 6 TP 7 This test point is not used in this application. 7 TP 8 This test point is not applicable to the units covered herein. 8 TP 9 This test point is the chassis (unit frame) ground connection. 9 TP 10 This test point enables the user to check if the heat termination thermostat (HTT) contact is open or closed. 4.3.20.3 Controller Programming Procedure TM 11574A-OI (b) Removing the Controller. To remove the controller, perform the following steps: 1 Disconnect all front wire harness connectors and move wiring out of way. 2 The lower controller mounting is slotted. Loosen the top mounting screw (Figure 315) and lift up and out. 3 Disconnect the two back connectors (EC) and remove module. 4 When removing the replacement controller from its packaging, note how it is packaged. When returning the old controller for service, place it in the packaging in the same manner as the replacement. The packaging has been designed to protect the controller from both physical and electrostatic discharge damage during storage and transit. (c) Installing the Controller. To install the controller, perform the following steps: 1 Connect the two back connectors (EC). Torque the connectors to 10 inch pounds (0.12 mkg). 2 Position the module into the slot and tighten the screws. Torque the mounting screws to 20 inch pound (0.23 mkg) 3 Connect all front wire harness connectors to the module. (d) Removing Heat Termination Thermostat. This maintenance procedure does not exist in the commercial manual. It is to be developed at a later date. (e) Replacing Heat Termination Thermostat. This maintenance procedure does not exist in the commercial manual. It is to be developed at a later date. 3-35 TM 11574A-OI (19)Temperature Sensor Test (a) Temperature Sensor Test. To check the temperature sensor, perform the following steps: 1 Remove the sensor and place in a 32 F (0 C) ice-water bath. The ice-water bath is prepared by filling an insulated container (of sufficient size to completely immerse bulb) with ice cubes or chipped ice, then filling voids between ice with water and agitating until mixture reaches 32 F (0 C) measured on a laboratory thermometer. 2 Start unit and check sensor reading on the control panel. The reading should be 32 F (0 C). If the reading is correct, reinstall sensor; if it is not, continue with the following: a Turn unit OFF and disconnect power supply. b Refer to paragraph 3-10b(17) and remove controller to gain access to the sensor plugs. c Using the plug connector marked “EC,” that is connected to the back of the controller, locate the sensor wires (RRS, RTS, SRS, STS, AMBS, DTS, CPDS ORCPSS as required). Follow those wires to the connector and using the pins of the plug, measure the resistance. Values are provided in Figure 3-16. Figure 3-15. Sensor Temperature/Resistance Chart. NOTE Due to the variations and inaccuracies in ohmmeters, thermometers, or other test equipment, a reading within 2% of the chart value would indicate a good sensor. If a sensor is defective, the resistance reading will usually be much higher or lower than the resistance values given. (b) Temperature Sensor Removal. To remove the temperature sensor, perform the following steps: 3-36 1 Turn unit power OFF and disconnect power supply. 2 For two wire sensors, cut cable 2 in (5 cm) from shoulder of defective sensor and discard the defective sensor only. For 3-wire sensors, cut at 9 in (23 cm). Slide the cap and grommet off well mounted sensor and save for possible reuse. Do not cut the grommet. TM 11574A-OI 3 If required, prepare the replacement sensor by cutting sensor wire(s) back 1-/2 in (140 mm). For 3-wire sensors, the black wire should be cut at the middle length and the red/white wire cut to the shorter length (Figure 3-17). Figure 3-16. Sensor Types 4 Prepare the cables by cutting wires to the opposite of the sensor (Figure 3-18). NOTE When installing a single wire color two wire sensor, cut one wire of existing two wire cables 1-1/2 in (40 mm) shorter than the other wire. When replacing two single sensors with a combination (3-wire) sensor, the black wires of the cables should be cut to the same length and the red wire of one cable cut to the shorter length. When replacing an original 3-wire sensor, cut the black wire to the middle length and the red wire to the shorter length. 5 Strip back insulation on all wiring 1/4 in (6.3 mm). 6 Slide a large piece of heat shrink tubing over the cable, and place small pieces of heat shrink tubing, one over each wire, before adding crimp fittings as shown in Figure 3-18. 7 If required, slide the cap and grommet assembly onto the replacement sensor. If the replacement sensor is of a larger diameter than the original, a different grommet may be required. 8 Slip crimp fittings over dressed wires (keeping wire colors together). Make sure wires are pushed into crimp fittings as far as possible and crimp with crimping tool. 9 Solder spliced wires with a 60% tin and 40% lead Rosin core solder. 10 Slide heat shrink tubing over splice so that ends of tubing cover both ends of crimp as shown in Figure 3-18. 11 Heat tubing to shrink over splice. Make sure all seams are sealed tightly against the wiring to prevent moisture seepage. 3-37 TM 11574A-OI Slide large heat shrink tubing over both splices and shrink. CAUTION Do not allow moisture to enter wire splice area as this may affect the sensor resistance. NOTE The P5 Pre-Trip test must be run to inactivate probe alarms (refer to section 2-15). (c) Temperature Sensor Installation. To install the temperature sensor, perform the following steps: 1 Sensors STS/SRS a 2 Sensor RTS/RRS a 3 To properly position a supply sensor, the sensor must be fully inserted into the probe holder. This positioning will give the sensor the optimum amount of exposure to the supply air stream, and will allow the Controller to operate correctly. Insufficient probe insertion into the probe holder will result in poor temperature control due to the lack of air flow over the sensor. It is also necessary to ensure that the probe tip does not contact the evaporator back panel. The design minimum clearance of 1/4 in (6 mm) should be maintained (Figure 3-19). Reinstall the return sensor as shown in Figure 3-18. For proper placement of the return sensor, be sure to position the seal section of the sensor against the side of the mounting clamp. Sensor DTS a The DTS sensor must have insulating material placed completely over the sensor to insure the coil metal temperature is sensed. Figure 3-17. Sensor and Cable Splice 3-38 TM 11574A-OI Figure 3-18. Supply Sensor Positioning Figure 3-19. Return Sensor Positioning 3-39 TM 11574A-OI Table 3-4. R134a Saturation Temperature – Pressure Chart. 3-40 TM 11574A-OI Figure 3-20. R-134a Compressor Pressure and Motor Current Curves versus Ambient Temperature (Sheet 1 of 2). 3-41 TM 11574A-OI Figure 3-21. R-134a Compressor Pressure and Motor Current Curves versus Ambient Temperature (Sheet 2 of 2). c. Replace the Refrigeration Unit. (1) Replace the refrigeration unit. To replace the refrigeration unit, perform the following steps: (a) To replace the refrigeration unit, loosen and remove the 30 bolts that secure the unit to the container frame. (b) Slide a lifting device rated for the appropriate weight in place under the defective refrigeration unit. 3-42 TM 11574A-OI (c) Support the weight of the refrigeration unit with the lifting device and move out away from the container frame until the power connections are exposed. (d) Disconnect all power cables that run from the container to the refrigeration unit. (e) Move the defective refrigeration unit completely away from the container. (f) Move a new refrigeration unit in position in front of the refrigeration unit bay of the container. (g) Carefully move the unit into position until the power cables from the container can be connected to the unit. (h) Connect all power cables from the container to the refrigeration unit. (i) Move the unit completely in to the container bay and ensure that the bolt holes on the new refrigeration unit align with those on the container. (j) Install all 30 bolts and secure the new refrigeration unit in position on the container. Figure 3-22. Replacing the Refrigeration Unit. 3-43 TM 11574A-OI d. Maintenance of Painted Surfaces The refrigeration unit is protected by a special paint system against the corrosive atmosphere in which it normally operates. However, should the paint system be damaged, the base metal can corrode. In order to protect the refrigeration unit from the highly corrosive sea atmosphere or if the protective paint system is scratched or damaged, clean area to bare metal using a wire brush, emery paper, or equivalent cleaning method. Immediately following cleaning, spray or brush on zinc-rich primer. After the primer has dried, spray or brush on finish coat of paint to match original unit color. e. Repair Interior Lighting (1) Replacing Glass Dome. To replace the interior lighting glass dome follow the steps below: (a) Remove the two screws (Figure 3-29, Item 1) securing the protective cage (Figure 3-29, Item 2) to the lighting assembly. (b) Remove the protective cage and set aside. WARNING Pieces of a broken glass dome may be sharp and cause injury. Take care in handling any glass sections to avoid cuts or other injury. (c) Remove the damaged glass dome (Figure 3-29, Item 3) and discard. (d) Install a new glass dome, taking care to ensure that it is seated properly. Be sure to hold the glass dome in position until the protective cage is put in place. (e) Position the protective cage set aside earlier over the glass and secure with two screws 3-44 TM 11574A-OI 2 3 1 Figure 3-23. Replacing the Glass Dome. (2) Replacing Light Bulb. To replace the interior light bulb follow the steps below: (a) Remove the two screws (Figure 3-29, Item 1) securing the protective cage (Figure 3-29, Item 2) to the lighting assembly. (b) Remove the protective cage and set aside. (c) Remove the glass dome (Figure 3-29, Item 3) and set aside. (d) Unscrew the defective light bulb and discard. (e) Screw a new light bulb into the light socket. (f) Position the glass dome on the lighting fixture, taking care to ensure that it is seated properly. Be sure to hold the glass dome in position until the protective cage is put in place. (g) Position the protective cage set aside earlier over the glass and secure with two screws. 3-45 TM 11574A-OI (3) Replacing Interior Lighting Switch. To replace the interior lighting switch, follow the steps below: (a) To replace the interior lighting switch, remove the screws (Figure 3-30, Item 1) securing the upper switch housing (Figure 3-30, Item 2) to the lower switch housing (Figure 3-30, Item 3). (b) Separate the upper and lower switch housings. (c) Mark and tag all internal wires. (d) Disconnect the wires from the switch assembly mounted to the upper switch housing. (e) Remove the defective switch assembly. (f) Position a new switch assembly near the lower switch housing and attach wires as marked and tagged earlier. (g) Remove any tags. (h) Position the upper switch housing on the lower switch housing. (i) Secure upper switch housing to lower switch housing with screw removed earlier. 3 2 1 Figure 3-24. Repairing the Interior Lighting Switch. 3-46 TM 11574A-OI f. Repairing the Air Curtain (1) To repair one or more damaged interior air curtain vertical vanes (Figure 3-31, Item 1), loosen and remove the three screws, lock washers, and nuts (Figure 3-31, Item 2) that secure the vertical vane to the vane bracket (Figure 3-31, Item 3). Set the hardware aside. (2) Remove the damaged vertical vane and discard. (3) Position a new vertical vane in the vane bracket, aligning the holes in the bracket with those in the vertical vane. (4) Install the screws, lock washers, and nuts set aside earlier. Tighten securely. 3 2 1 Figure 3-25. Repairing the Air Curtain. 3-47 TM 11574A-OI g. Replacing the Floor Drain (1) To replace a floor drain screen (Figure 3-32, Item 1), pry the edges up around the perimeter with a flat blade screwdriver. (2) Remove the defective screen (Figure 3-32, Item 2). (3) Install the floor drain screen in position and press in place until seated. 1 Figure 3-26. Replacing Floor Drain Screen. 3-48 TM 11574A-OI IV. TROUBLESHOOTING AND FAULT ISOLATION PROCEDURES Troubles or operating malfunctions which may occur on the Large Field Refrigerated System and associated components. After remedial action has been taken, testing of affected equipment shall be carried out to insure that it is serviceable and in satisfactory operating condition. 3-8 Troubleshooting a. Compressor does not run. Step 1 Probable Cause Main power line open. Remedy Replace fuse or reset circuit breaker. If fault is not corrected proceed to step 2. 2 Safety thermostat tripped. Reset thermostat. If fault is not corrected proceed to step 3. 3 Control stuck open. Replace control. If fault is not corrected proceed to step 4. 4 Loose terminal connection. Check connections. If fault is not corrected proceed to step 5. 5 Improperly wired controls. Check wiring and rewire. If fault is not corrected proceed to step 6. 6 Low line voltage. Check line voltage. Determine location of voltage drop. If fault is not corrected proceed to step 7. 7 Compressor motor defective. Check motor winding for open or short. Replace compressor if necessary. If fault is not corrected proceed to step 8. 8 Seized compressor Replace compressor. b. Compressor cycles on low pressure control. Step 1 Probable Cause Low pressure control erratic in action. Remedy Raise differential setting, check capillary for pinches, replace control. If fault is not corrected proceed to step 2. 2 Suction shutoff valve partially closed. Open valve. If fault is not corrected proceed to step 3. 3-49 TM 11574A-OI Step 3 Probable Cause Low refrigerant charge. Remedy Add refrigerant. If fault is not corrected proceed to step 4. 4 Plugged suction strainer. Clean strainer. If fault is not corrected proceed to step 5. 5 c. Defective TXV. Compressor cycles on high pressure control. Step 1 Replace TXV. Probable Cause High pressure control erratic in action. Remedy Check capillary tube for pinches, set control as required. If fault is not corrected proceed to step 2. 2 Discharge valve partially closed. Adjust valve. If fault is not corrected proceed to step 3. 3 Air in system. Recover. If fault is not corrected proceed to step 4. 4 Condenser scaled (or airflow restricted). Clean condenser. If fault is not corrected proceed to step 5. 5 Refrigerant overcharge. Recover refrigerant. d. Insufficient capacity. Step 1 Probable Cause Low refrigerant charge. Remedy Add refrigerant. If fault is not corrected proceed to step 2. 2 Control set too high. Reset control. If fault is not corrected proceed to step 3. 3 Expansion valve plugged. Clean or replace expansion valve. If fault is not corrected proceed to step 4. 4 Inefficient compressor. Check valves and pistons. If fault is not corrected proceed to step 5. 3-50 TM 11574A-OI Step 5 Probable Cause Expansion valve setting too high. Remedy Lower setting. If fault is not corrected proceed to step 6. 6 Iced or dirty evaporators. Defrost or clean evaporators. e. Unit operates long or continuously. Step 1 Probable Cause Low refrigerant charge. Remedy Add refrigerant. If fault is not corrected proceed to step 2. 2 Control contacts fused. Replace controls. If fault is not corrected proceed to step 3. 3 Air in system. Recover. If fault is not corrected proceed to step 4. 4 Partially plugged or plugged expansion valve or strainer. Clean or replace expansion valve or strainer. If fault is not corrected proceed to step 5. 5 Defective insulation. Replace or repair insulation. If fault is not corrected proceed to step 6. 6 Service load. Keep doors and windows closed. If fault is not corrected proceed to step 7. 7 Inefficient compressor. Check valves. If fault is not corrected proceed to step 8. 8 Condenser scaled. Clean condenser. If fault is not corrected proceed to step 9. 9 Restricted evaporator air. Defrost coil, clean filters and ductwork. 3-51 TM 11574A-OI f. Step 1 System noises. Probable Cause Piping vibration. Remedy Support piping as required, check for plugged liquid line strainer. If fault is not corrected proceed to step 2. 2 Expansion valve hissing. Add refrigerant, check for plugged liquid line strainer. If fault is not corrected proceed to step 3. 3 Compressor noisy. Check valve plates for valve noise, replace compressor (worn bearings), check for loose compressor hold down bolts. If fault is not corrected proceed to step 4. 4 Insufficient compressor oil. Add oil. g. Compressor loses oil. Step 1 Probable Cause Leak in system. Remedy Repair leaks. If fault is not corrected proceed to step 2. 2 3 Plugged or stuck compressor oil return check valve. Repair or replace. Oil trapping in line. Check piping for oil traps. If fault is not corrected proceed to step 3. h. Frosted suction line. Step Probable Cause 1 Expansion valve admitting excess refrigerant. 3-52 Remedy Adjust expansion valve. TM 11574A-OI i. Hot liquid line. Step 1 j. Step 1 2 k. Step 1 Probable Cause Shortage of refrigerant. Remedy Repair leak and recharge. Frosted liquid line. Probable Cause Remedy Receiver shutoff valve partially closed or restricted. Open valve or remove restiction. Restricted strainer dryer. Replace strainer dryer. If fault is not corrected proceed to step 2. Frosted expansion valve. Probable Cause Ice plugging TXV orifice. Remedy Apply hot wet cloth to TXV. If fault is not corrected proceed to step 2. 2 3 Moisture indicated by increase in suction pressure. Install dryer. Plugged TXV strainer. Clean strainer or replace TXV. If fault is not corrected proceed to step 3. 3-53 TM 11574A-OI l. RU will not start or starts then stops. (1) No power to unit. Step 1 Probable Cause External power source OFF. Remedy Ensure external power source is ON. If fault is not corrected proceed to step 2. 2 Start-Stop switch OFF or defective. Check start-stop switch is in the ON position and not defective. If fault is not corrected proceed to step 3. 3 Circuit breaker tripped or OFF. Check circuit breaker is set to ON. If fault is not corrected proceed to step 4. 4 Autotransformer not connected. Ensure Autotransformer is connected IAW 2-17a(2). If fault is not corrected proceed to a (2). (2) Loss of control power. Step 1 Probable Cause Circuit breaker OFF or defective. Remedy Check circuit breaker is set to ON. If fault is not corrected proceed to step 2. 2 Control transformer defective. Replace control transformer IAW 310b(18)(g). If fault is not corrected proceed to step 3. 3 Fuses (F3A, F3B) blown. Check for blown fuses IAW WP 3-10b(18)(i). Replace blown fuse IAW 3-10b(18)(j) If fault is not corrected proceed to step 4. 4 Start-Stop switch OFF or defective. Check start-stop switch is in the ON position and not defective IAW 3-10b(18)(l). Replace defective start-stop switch IAW 310b(18)(m). If fault is not corrected proceed to a (3). 3-54 TM 11574A-OI (3) Component(s) not operating. Step Probable Cause 1 Evaporator fan motor internal protector open. Remedy Replace evaporator fan IAW 3-10b(12). If fault is not corrected proceed to step 2. 2 Condenser fan motor internal protector open. Replace condenser fan motor IAW 3-10b(8). If fault is not corrected proceed to step 3. 3 Compressor internal protector open. Replace Compressor internal protector IAW 3-10b(5). If fault is not corrected proceed to step 4. 4 High pressure switch open. Check high pressure switch IAW 3-10b(6). If necessary, replace high pressure switch IAW 3-10b(6). If fault is not corrected proceed to step 5. 5 Heat termination thermostat open. Check heat termination thermostat IAW 310b(17)(b). If necessary, replace heat termination thermostat IAW 3-10b(18)(o) If fault is not corrected proceed to a (4). (4) Compressor hums, but does not start. Step 1 Probable Cause Low line voltage. Remedy Check low line voltage IAW wiring diagram. If fault is not corrected proceed to step 2. 2 Single phasing. Check power source for single phasing. If fault is not corrected proceed to step 3. 3 Shorted or grounded motor windings or compressor seized. Replace compressor IAW 3-10b(5). m. Unit operates long or continuously in cooling. (1) Container. Step 1 Probable Cause Hot load (failure to pre-cool). Remedy Normal. Pre-cool hot load. If fault is not corrected proceed to step 2. 2 Defective box insulation or air leak Repair box insulation or air leak IAW 3-10a. If fault is not corrected proceed to b (2). 3-55 TM 11574A-OI (2) Refrigeration System. Step 1 Probable Cause Shortage of refrigerant. Remedy Check refrigerant IAW 3-10b(2)(e). Recharge refrigerant IAW 3-10b(4). If fault is not corrected proceed to step 2. 2 Evaporator coil covered with ice. Refer to section 3-11d. If fault is not corrected proceed to step 3. 3 Evaporator coil plugged with debris. Refer to section 3-10b(11). If fault is not corrected proceed to step 4. 4 Evaporator fan(s) rotating backwards. Refer to section 3-10b(11)/3-10b(12). If fault is not corrected proceed to step 5. 5 Defective evaporator fan motor/capacitor. Refer to section 3-10b(13). If fault is not corrected proceed to step 6. 6 Air bypass around evaporator coil. Check for foreign air restrictions. If fault is not corrected proceed to step 7. 7 Controller set too low. Reset. If fault is not corrected proceed to step 8. 8 9 Compressor service valves or liquid line shutoff valve partially closed. Open valves completely. Dirty condenser. Refer to section 3-10b(7). If fault is not corrected proceed to step 9. If fault is not corrected proceed to step 10. 10 Compressor worn. Refer to section 3-10b(5). If fault is not corrected proceed to step 11. 11 12 Current limit (function code Cd32) set to wrong value. Refer to section 2-6e. Suction modulation valve malfunction. Refer to section 3-10b(14). If fault is not corrected proceed to step 12. n. Unit runs but has insufficient cooling. (1) Compressor. Step 1 Probable Cause Compressor valves defective. Remedy Refer to section 3-10b(5). If fault is not corrected proceed to c (2). 3-56 TM 11574A-OI (2) Refrigeration System. Step 1 Probable Cause Abnormal pressures. Remedy Refer to section 3-11g. If fault is not corrected proceed to step 2. 2 Controller malfunction. Refer to section 3-11i. If fault is not corrected proceed to step 3. 3 Evaporator fan or motor defective. Refer to section 3-10b(12). If fault is not corrected proceed to step 4. 4 Suction modulation valve malfunction. Refer to section 3-10b(14). If fault is not corrected proceed to step 5. 5 Condenser pressure transducer defective. Check Condenser pressure transducer IAW 3-10b(8)(b). Replace Condenser pressure transducer IAW 3-10b(8)(c). If fault is not corrected proceed to step 6. 6 Shortage of refrigerant. Check refrigerant IAW 3-10b(2)(e). Recharge refrigerant IAW 3-10b(4). o. Unit will not heat or has insufficient heating. (1) No operation of any kind. Step 1 Probable Cause Start-Stop switch OFF or defective. Remedy Check start-stop switch is in the ON position and not defective IAW 3-10b(18)(l). Replace defective start-stop switch IAW 310b(18)(m). If fault is not corrected proceed to step 2. 2 Circuit breaker OFF or defective. Ensure circuit breaker is set to ON. Check for damaged or defective circuit breaker IAW 3-10b(18)(q). If circuit breaker is found to be defective, replace IAW 3-10b(18)(r). If fault is not corrected proceed to step 3. 3 External power source OFF. Turn ON external power source. If fault is not corrected proceed to step d (2). 3-57 TM 11574A-OI (2) No control power. Step 1 Probable Cause Circuit breaker or fuse defective. Remedy Check for blown fuses IAW WP 3-10b(18)(i). Replace blown fuse IAW 3-10b(18)(j) Check for damaged or defective circuit breaker IAW 3-10b(18)(q). If circuit breaker is found to be defective, replace IAW 3-10b(18)(r). If fault is not corrected proceed to step 2. 2 Control transformer defective. Replace control transformer IAW 310b(18)(g). If fault is not corrected proceed to step 3. 3 Evaporator fan internal motor protector open. Refer to section 3-10b(12). If fault is not corrected proceed to step 4. 4 Heat relay defective. Check heat relay IAW 3-10b(18)(e)w. Replace heat relay IAW 3-10b(18)(e)x. 5 Heater termination switch open. Refer to section 3-10b(11). If fault is not corrected proceed to step d (3). (3) Unit will not heat or has insufficient heat. Step 1 Probable Cause Heater(s) defective. Remedy Refer to section 3-10b(11). If fault is not corrected proceed to step 2. 2 Heater contactor or coil defective. Replace contactor or coil IAW 3-10b(11)(b). If fault is not corrected proceed to step 3. 3 4 Evaporator fan motor(s) defective or rotating backwards. Refer to section 3-10b(12). Evaporator fan motor contactor defective. Replace evaporator fan motor contactor IAW 3-10b(11)(b) If fault is not corrected proceed to step 4. If fault is not corrected proceed to step 5. 5 Controller malfunction. Refer to section 3-10b(11)(i). If fault is not corrected proceed to step 6. 6 Defective wiring. Replace. If fault is not corrected proceed to step 7. 3-58 TM 11574A-OI Step 7 Probable Cause Loose terminal connections. Remedy Tighten. If fault is not corrected proceed to step 8. 8 Low line voltage. Refer to table 1-1. If fault is not corrected proceed to step e (1). p. Unit will not terminate heating. (1) Unit fails to stop heating. Step 1 Probable Cause Controller improperly set. Remedy Reset. If fault is not corrected proceed to step 2. 2 Controller malfunction. Refer to section 3-10b(11)(i). If fault is not corrected proceed to step 3. 3 Heater termination thermostat remains closed along with the heat relay. Refer to section 3-10b(11). If fault is not corrected proceed to step f (1). q. Unit will not defrost properly. (1) Will not initiate defrost automatically. Step Probable Cause 1 Will not initiate defrost automatically: Defrost timer malfunction (Cd27). Refer to table 2-5. Loose terminal connections. Tighten. 2 Remedy If fault is not corrected proceed to step 2. If fault is not corrected proceed to step 3. 3 Defective wiring. Repair or replace IAW wiring diagram. If fault is not corrected proceed to step 4. 4 Defrost temperature sensor defective or heat termination thermostat open. Check for defective defrost temperature probe IAW 3-10b(11)(d). If necessary, replace defrost temperature sensor IAW 3-10b(11)(d)1. Check heat termination thermostat IAW 310b(17)(b). If necessary, replace heat termination thermostat IAW 3-10b(18)(o). If fault is not corrected proceed to step 5. 3-59 TM 11574A-OI Step 5 Probable Cause Heater contactor or coil defective. Remedy Replace contactor or coil IAW 3-10b(11)(b). If fault is not corrected proceed to step f (2). (2) Will not initiate defrost manually. Step 1 Probable Cause Manual defrost switch defective. Remedy Check for defective manual defrost switch IAW 3-10b(11)(c). If necessary, replace manual defrost switch IAW 3-10b(11)(c)1. If fault is not corrected proceed to step 2. 2 Defrost temperature sensor open. Check for defective defrost temperature probe IAW 3-10b(11)(d). If necessary, replace defrost temperature sensor IAW 3-10b(11)(d)1. If fault is not corrected proceed to step f (3). (3) Initiates but relay (DR) drops out. Step 1 Probable Cause Low line voltage. Remedy Check line voltage IAW wiring diagram. If fault is not corrected proceed to step f (4). (4) Initiates but does not defrost. Step 1 Probable Cause Heater contactor or coil defective. Remedy Replace contactor or coil IAW 3-10b(11)(b). If fault is not corrected proceed to step 2. 2 Heater(s) burned out. Refer to section 3-10b(11). If fault is not corrected proceed to step 3. 3 3-60 Frequent Defrost: Wet load. Normal. TM 11574A-OI r. Abnormal pressures (cooling). (1) High discharge pressure. Step 1 Probable Cause Condenser coil dirty. Remedy Refer to section 3-10b(7). If fault is not corrected proceed to step 2. 2 Condenser fan rotating backwards. Refer to section 3-10b(8). If fault is not corrected proceed to step 3. 3 Condenser fan inoperative. Refer to section 3-10b(8). If fault is not corrected proceed to step 4. 4 Refrigerant overcharge or noncondensibles. Refer to section 3-10b(2)(e) and 310b(3)(b). If fault is not corrected proceed to step 5. 5 Discharge pressure regulator valve defective. Inspect discharge pressure regulator valve IAW 3-10b(16)(a). Replace discharge pressure regulator valve IAW 3-10b(16)(b). If fault is not corrected proceed to step 6. 6 Discharge service valve partially closed. Open discharge service valve. If fault is not corrected proceed to step 7. 7 Suction modulation valve malfunction. Refer to section 3-10b(14). If fault is not corrected proceed to step g(2). (2) Low suction pressure. Step 1 Probable Cause Suction service valve partially closed. Remedy Open suction service valve. If fault is not corrected proceed to step 2. 2 Filter-drier partially plugged. Refer to section 3-10b(9). If fault is not corrected proceed to step 3. 3 Low refrigerant charge. Check refrigerant IAW 3-10b(2)(e). Recharge refrigerant IAW 3-10b(4). If fault is not corrected proceed to step 4. 4 Expansion valve defective. Refer to section 3-10b(10). If fault is not corrected proceed to step 5. 3-61 TM 11574A-OI Step 5 Probable Cause No evaporator air flow or restricted air flow. Remedy Refer to section 3-10b(11). If fault is not corrected proceed to step 6. 6 Excessive frost on evaporator coil. Refer to section 3-11d. If fault is not corrected proceed to step 7. 7 Evaporator fan(s) rotating backwards. Refer to section 3-10b(11) and 3-10b(12). If fault is not corrected proceed to step 8. 8 Discharge pressure regulator valve defective. Inspect discharge pressure regulator valve IAW 3-10b(16)(a). Replace discharge pressure regulator valve IAW 3-10b(16)(b). If fault is not corrected proceed to step 9. 9 Suction modulation valve malfunction. Refer to section 3-10b(14). If fault is not corrected proceed to step g (3). (3) Suction and discharge pressures tend to equalize when unit is operating. Step 1 Probable Cause Heat exchanger defective. Remedy Inspect heat exchanger IAW 3-10b(11)(e). Replace heat exchanger IAW 3-10b(11)(e)1. If fault is not corrected proceed to step 2. 2 Compressor valves defective. Refer to section 3-10b(5). If fault is not corrected proceed to step 3. 3 s. Compressor cycling/stopped. Check IAW 3-10b(5). Abnormal noise or vibrations. (1) Compressor. Step 1 Probable Cause Loose mounting bolts. Remedy Check for loose mounting bolts. Tighten mounting bolts as necessary. If fault is not corrected proceed to step 2. 2 Worn bearings. Refer to section 3-10b(5). If fault is not corrected proceed to step 3. 3 Worn or broken valves. Refer to section 3-10b(5). If fault is not corrected proceed to step 4. 3-62 TM 11574A-OI Step 4 Probable Cause Liquid slugging. Remedy Refer to section 3-10b(10). If fault is not corrected proceed to step 5. 5 Insufficient oil. Refer to section 3-10b(5)(e). If fault is not corrected proceed to step h (2). (2) Condenser or evaporator fan. Step Probable Cause 1 Condenser or Evaporator Fan: Bent, loose or striking venturi. Check and adjust venturi IAW 3-10b(8). Worn motor bearings. Refer to section 3-10b(8) and 3-10b(11). 2 Remedy If fault is not corrected proceed to step 2. If fault is not corrected proceed to step 3. 3 t. Bent motor shaft. Refer to section 3-10b(8) and 3-10b(11). Controller malfunction. (1) Will not control. Step 1 Probable Cause Defective sensor. Remedy Refer to section 3-10b(19). If fault is not corrected proceed to step 2. 2 Defective wiring. Check wiring. If fault is not corrected proceed to step 3. 3 Fuse (F1, F2) blown. Inspect F1 and F2 Fuses IAW 3-10b(18)(t) Replace fuse as necessary IAW 3-10b(18)(u) If fault is not corrected proceed to step 4. 4 Stepper motor suction modulation valve circuit malfunction. Refer to section 3-10b(14). 3-63 TM 11574A-OI u. No evaporator air flow or restricted air flow. (1) Evaporator coil blocked. Step 1 Probable Cause Frost on coil. Remedy Refer to section 3-11d. If fault is not corrected proceed to step 2. 2 Dirty coil. Refer to section 3-10b(11). If fault is not corrected proceed to step j(2). (2) No or partial evaporator air flow. Step Probable Cause 1 Evaporator fan motor internal protector open. Remedy Refer to section 3-10b(12). If fault is not corrected proceed to step 2. 2 Evaporator motor(s) defective. Refer to section 3-10b(12). If fault is not corrected proceed to step 3. 3 Evaporator fan(s) loose or defective. Refer to section 3-10b(12). If fault is not corrected proceed to step 4. 4 v. Evaporator fan motor contactor defective. Replace evaporator fan motor contactor IAW 3-10b(11)(b) Thermostatic expansion valve malfunction. (1) Low suction pressure with high superheat. Step 1 Probable Cause Low refrigerant charge. Remedy Check refrigerant IAW 3-10b(2)(e). Recharge refrigerant IAW 3-10b(4). If fault is not corrected proceed to step 2. 2 External equalizer line plugged. Open external equalizer line IAW 3-b10(10)(e). If fault is not corrected proceed to step 3. 3 4 Wax, oil or dirt plugging valve or orifice ice formation at valve seat. Refer to section 3-10b(10). Superheat too high. Refer to section 3-10b(10). If fault is not corrected proceed to step 4. If fault is not corrected proceed to step 5. 3-64 TM 11574A-OI Step 5 Probable Cause Power assembly failure. Remedy Refer to section 3-10b(10). If fault is not corrected proceed to step 6. 6 Loss of element/bulb charge. Refer to section 3-10b(10). If fault is not corrected proceed to step 7. 7 Broken capillary. Refer to section 3-10b(10). If fault is not corrected proceed to step 8. 8 Foreign material in valve. Refer to section 3-10b(10). If fault is not corrected proceed to k (2). (2) High suction pressure with low superheat. Step 1 Probable Cause Superheat setting too low. Remedy Refer to section 3-10b(10). If fault is not corrected proceed to step 2. 2 External equalizer line plugged ice holding valve open. pen external equalizer line IAW 3-b10(10)(e). If fault is not corrected proceed to step 3. 3 Foreign material in valve. Refer to section 3-10b(10). If fault is not corrected proceed to step k (3). (3) Liquid slugging in compressor. Step 1 Probable Cause Superheat setting too low. Remedy Refer to section 3-10b(10). If fault is not corrected proceed to step k (4). (4) Fluctuating suction pressure. Step 1 Probable Cause Improper bulb location or installation. Remedy Refer to section 3-10b(10). If fault is not corrected proceed to step 2. 2 Low superheat setting. Refer to section 3-10b(10). 3-65 TM 11574A-OI w. Autotransformer malfunction. (1) Unit will not start. Step 1 Probable Cause Circuit breaker (CB-1 or CB-2) tripped. Remedy Check circuit breakers IAW 2-17a(2)(b). If fault is not corrected proceed to step 2. 2 Autotransformer defective. Refer to section 3-10b(17). If fault is not corrected proceed to step 3. 3 Power source not turned ON. Check power source IAW 2-17a. If fault is not corrected proceed to step 4. 4 3-66 460 VAC power plug is not inserted into the receptacle. Refer to section 2-17a(1). TM 11574A-OI 3-9 Troubleshooting Quick Reference 1. Will unit perform 5 sec. self-test? YES ___ NO ___ a. Check container ID # ___________ , b. Software # _________ , c Configuration _________ 2. Enter a perishable range (CHILL) set point. a. After self-test does the evaporator motor contactor (EF) energize? Current level leg 1 _____ Current level leg 2 _____ Current level leg 3 _____ ___ ___ b. 15 sec. later does the condenser motor contactor (CF) energize? Current level leg 1 _____ Current level leg 2 _____ Current level leg 3 _____ ___ ___ c. ___ ___ ___ ___ 15 sec. later does the compressor motor contactor (CH) energize? Current level leg 1 _____ Current level leg 2 _____ Current level leg 3 _____ 3. Enter a frozen range set point. a. Does the low speed evaporator motor contactor (ES) energize? Current level leg 1 _____ Current level leg 2 _____ Current level leg 3 _____ 4. Access Code 41 (FOR SCROLL UNITS SKIP STEP 4, 6, & 7), select tIM and set to “1 min”, select PCnt and set to “0” a. Does suction pressure fall? ___ ___ b. Does compressor current fall? RETURN PCnt to “AUTO” ___ ___ IF SUCTION PRESSURE and COMPRESSOR CURRENT DOES NOT FALL, CONTINUE TO STEP 6 & 7 AFTER COMPLETING STEP 5. 5. Change set point to its highest setting or initiate a manual defrost if possible. a. Does the heater contactor (HR) energize? Current level leg 1 _____ Current level leg 2 _____ Current level leg 3 _____ ___ ___ B-67 TM 11574A-OI 6. Turn unit “OFF” a. Unplug the valve from stepper drive module (4 pin plug) and measure resistance of the valve. A – B ________ Ω C – D _______ Ω 7. Turn unit “ON” a. During the first 40 seconds check voltage on the plug from the controller (driver module). A – B ________ VAC C – D _______ VAC 8. Scroll units only. YES NO With unit operating in the cool mode (not at set point), Select code 41. a. Press “ENTER” key to select tIM and set to up to 5 min at 30 sec intervals using arrow keys. b. Press “ENTER” key to select PCnt and set to “3” using the arrow key then press “ENTER” Does suction pressure along with compressor current fall? Return PCnt to “AUTO” using the arrow key and press “ENTER” c. ___ ___ ___ ___ ___ ___ ___ ___ ___ ___ ___ ___ ___ ___ Press “ENTER” key to select EEV and set to “0” using the arrow key then press “ENTER” Does suction pressure along with compressor current fall? Return EEV to “AUTO” using the arrow key and press “ENTER” d. Press “ENTER” key to select CAP and set to “STANDARD” using the arrow key then press “ENTER” NOTE COMPRESSOR CURRENT AND SUCTION PRESSURE Press arrow key to select “UNLOADED” and press “ENTER” Does USV energize? Press arrow key to select “STANDARD” and press “ENTER” then select “ECONOMIZED” and press “ENTER” Does ESV energize? Does EXV get cold? Return CAP to “AUTO” using the arrow key and press “ENTER” e. Press “ENTER” key to select Oil and set to “OPEn” using the arrow key then press “ENTER” Does oil appear in the oil sight glass? Return Oil to “AUTO” using the arrow key and press “ENTER” f. Press “ENTER” key to select LIV and set to “OPEn” using the arrow key then press “ENTER” Does LIV energize? Does LIV outlet get cold? Return EEV to “AUTO” using the arrow key and press “ENTER” g. Press “ENTER” key to select bPSV and set to “OPEn” using the arrow key then press “ENTER” Does the compressor discharge temperature fall? Return bPSV to “AUTO” using the arrow key and press “ENTER” B-68 TM 11574A-OI CHAPTER 4 REPAIR PARTS SECTION SECTION I I. REPAIR PARTS INFORMATION 4-1. Scope This section furnishes complete data, including items used in conjunction with and furnished as part of, or with, the equipment, to enable the user to perform required maintenance and supply support of the equipment described herein. It is comprised of the following parts: Item Identification Listing, Item Number Cross-Reference, National Stock Number (NSN) CrossReference, and Part Number (P/N) Cross-Reference. This preface furnishes explanations and application of the information contained in the succeeding parts of this RPL, defines Source Maintenance Recoverability (SMR) codes (Chapter 4, Section III). SECTION II II. ITEM IDENTIFICATION LISTING 4-2. Repair Parts Lists and Illustrations This listing comprises the main part of the RPL. It is arranged in columns which show stock numbers, item identification, and other data necessary to maintain this equipment in an operative condition. Illustrations are placed either before, or in close proximity to, the component or assembly. The items are arranged in top down breakdown sequence within the major combination. a. Repair Parts: This listing presents all repair parts contained in the equipment and is numbered in sequence by component. Repair parts need not be identical with parts of the original equipment, but as replacement parts they are considered suitable or preferred. b. Item Numbers (Column 1): This column specifies item numbers assigned in numerical sequence and in the order that each item appears in the RPL. The item numbers are provided for reference purposes. In emergencies, these item numbers may be used for RPL number and date on requisitions which combat units transmit by message. c. Model (Column 2): This column indicates by an alphabetical code the specific application of repair parts, components, or assemblies when more than one model of an assembly, component, or equipment is contained in this publication. d. Stock Number (Column 3): This column furnishes National Stock Numbers (NSNs) assigned to those centrally managed items required for support of the equipment. When they have been assigned, NSNs will be used in all supply operation, from original purchase to final disposal of the item. Absence of an NSN indicates the item is not normally stocked as a repair part, as indicated by the source code portion of the SMR codes. If an item without an NSN is required, it should be determined if the item can be obtained from assembly, manufacturer or salvage by referring to the source code. Items not stock numbered, that cannot be obtained from these sources, may be requisitioned using the manufacturer’s code and part number referencing the RPL number, date of the RPL and the line item number which applies. e. Reference Designator (Column 4): This column contains alphabetical and/or numerical designators for referencing an individual repair part to an illustration. The absence of a 4-1 TM 11574A-OI reference designator indicates there is not an illustration for the part. f. Indenture Code (Column 5): This column contains the Indenture Code Letter which indicates the relationship of a line item to the end item or to the preceding component, assembly, or subassembly. Visual indentation of the line item is not shown; however, the Indenture Code Letter will enable the user of the RPL to interpret the relationship of the line item with its next higher assembly. 1. Normally, the Indenture Code Letters indicate the following relationship: Code “A” Relationship End item “B” Component; attaching parts for component or detail parts of the end item not contained in a component “C” Assembly; attaching parts for assembly or detail parts of component not contained in a component “D” Subassembly; attaching parts for subassembly or detail parts of assembly not contained in subassembly “E” Detail parts of subassembly “F” And so forth g. Item Identification (Column 6): This column contains the item name and description of the repair part. When an item is duplicated, the abbreviation (S/A) is inserted after the noun name to indicate “same as”. S/A items refer to the line item number of the item’s first appearance in the major combination. When an item is fabricated from other items, the abbreviation FAB FR, followed by the item required for the fabrication, is inserted after the item identification. When an item is assembled from other items, the abbreviation ASSEM FR is used, followed by each item required for the assembly of the item. When the items comprise a kit or set, a complete list of the components will be given in alphabetical order immediately following the item, under the heading “Consist of “, abbreviated (C/O). h. Unit of Measure (Column 7): This column indicates the measure of quantity specified in column 8 and is not to be used for requisitioning purposes. When requisitioning parts, the Unit of Issue, Stores Account Code, and Unit Price should be obtained from the “Federal Supply Catalog, Management Data List (C-ML-MC).” i. Quantity (Column 8): This column is divided into sub-columns (1) and (2) and indicates the following: 1. The quantity of a maintenance or a non-maintenance part used in a specific application within the end item. 2. The consolidated quantity of a maintenance part used in an end item upon the item’s first appearance in this list. j. 4-2 Source Maintenance Recoverability Code (Column 9): This column contains a series of alphabetic letters which denote the uniform source, maintenance and recoverability coding structure. This Code is assigned to items subordinate to or associated with an end item, i.e., spares, repair, parts and support equipment. The uniform code format is composed of three parts consisting of a two (2) position Source Code, a two (2) position Maintenance Code and a one (1) position Recoverability Code. TM 11574A-OI 1. The code provides the user with information on each item relative to (1) the method of obtaining the item; for example, by requisition, fabrication or salvage; (2) the lowest maintenance echelon authorized to remove, replace and use the item and the lowest echelon capable to perform complete repair, and (3) disposition action on unserviceable items. 2. Definitions of SMR codes are listed on page viii of the preface. Sample SMR codes are: (1) Source PA PB PC AF MF KF XA XB XC (2) Maintenance Use Repair F F F H O Z F Z F F H Z F Z O F H Z (3) Recoverability A H Z Z F Z Z F Z 4-3 TM 11574A-OI SECTION III III. DEFINITIONS AND APPLICATION OF SOURCE, MAINTENANCE, RECOVERABILITY CODES (SMRC) 4-3. Source Codes Source codes are assigned to support items and indicate the manner of acquiring the item for maintenance or overhaul of end items. Source codes are entered in the first and second position of the SMR code. a. SERIES A: ASSEMBLE, COMPLETE ASSEMBLY NOT STOCKED 1. Code “A” entered in the first position of the source code applies to items that are not procured as assemblies but are assembled within the Marine Corps prior to installation. The code entered in the second position designates the lowest echelon authorized to assemble the item. All the parts used in the assembly will be “P” coded. Code Application/Explanation AO Assemble at organizational maintenance level 2nd echelon. AF Assemble at field maintenance level 3rd echelon. AH Assemble at field maintenance level 4th echelon. AD Assemble at depot maintenance 5th echelon. b. SERIES K: ITEMS OF A KIT, NOT PURCHASED SEPARATELY KD An item of depot overhaul/repair kit and not purchased separately. Depot kit defined as a kit that provides items required at the time of overhaul or repair. KF An item of a maintenance kit and not purchased separately. Maintenance kit defined as a kit that provides an item that can be replaced at organizational or intermediate levels of maintenance KB Items included in both a depot overhaul/repair kit and a maintenance kit. c. SERIES M: MANUFACTURE, PARTS NOT PRODUCED Code “M” entered in the first position of the source code applies to items that are not procured but are capable of being fabricated or manufactured within the Marine Corps. These items have relatively low usage and will generally be fabricated or manufactured only as required for immediate repair or replacement. The code entered in the second position designates the lowest echelon authorized to manufacture or fabricate the item. Units will requisition the bulk materiel under the NSNs and the quantities indicated to effect the fabrication or manufacture of the item. MO Manufacture or fabricate at organizational maintenance level 2nd echelon. MF Manufacture or fabricate at field maintenance level 3rd echelon. MH Manufacture or fabricate at field maintenance level 4th echelon. MD Manufacture or fabricate at field maintenance level 5th 4-4 TM 11574A-OI echelon. d. SERIES P: PARTS PROCURED, SUPPLY SYSTEM STOCK PA Applied to items procured for the Marine Corps supply system for anticipated or known usage. PB Applied to items for which no usage is anticipated, but procured for the Marine Corps supply system in limited quantity for issuing purposes. PC Applied to items procured for the Marine Corps supply system which would be coded PA except that they are deteriorative in nature. PG Applied to parts procured from the Marine Corps supply system to provide for the sustained support for the life of the equipment. It is applied to an item peculiar to the equipment which because of probable discontinuance or shutdown of production facilities would prove uneconomical to reproduce at a later time. SERIES X: NOT PROCURED, GENERALLY IMPRACTICAL FOR STOCKING, MAINTENANCE, OR MANUFACTURE Items listed in this publication, which are source coded XA or XB, may have been subsequently assigned an NSN because of other application in the Marine Corps. Therefore, if an item source coded in the XA or XB series in this publication is required, users are directed to first make the following investigations: Check the corresponding part number in the Master Cross-Reference List (MCRL), to determine if an NSN has been assigned. If an NSN has been obtained from the above check, refer to the Management Data List (MDL) for the latest supply management decision regarding the stock number. Check stock for availability of part(s) having a National Stock Number. If the review of stock discloses that materiel is not available, refer to the MDL for inventory record data regarding the preferred NSN which may have been obtained in the Master Cross-Reference List (MCRL) and Management Data List (MDL) review. Prepare a requisition citing the stock number shown in the Management Data list (MDL). The above review will assist the user in obtaining the correct item of supply from the supply system, when available, rather than through alternate methods such as obtaining the desired part from salvage, requisitioning the next higher assembly, or recommending that the equipment be overhauled or retired. If a stock number for the desired item does not exist, then the source of supply as defined below will prevail: XA Applied to items not maintained in the supply system; replacement of these parts is neither practical nor economical. Support of the end equipment will be affected by replacing the next higher assembly. XB Applied to items not procured for stock, but may be acquired for use through salvage. Activities requiring such items will attempt to obtain them from salvage, if not obtainable from salvage, all efforts to manufacture or assemble the item should be exhausted prior to requisitioning. Such items will be requisitioned through normal supply channels citing manufacturer’s code and part number with supporting justification. XC Applied to installation drawing, diagram, instruction sheet or field service drawing identified by a manufacturer’s part number. 4-5 TM 11574A-OI Maintenance Codes Maintenance codes are assigned to indicate the levels of maintenance authorized to use and repair support items. The maintenance codes are entered in the third and fourth position of the SMR code. a. (Third Position): The maintenance code entered in the third position will indicate the lowest maintenance level authorized to remove, replace, and use the support item. The maintenance code entered in the third position will indicate one of the following levels of maintenance: Code Application/Explanation C Crew 1st echelon O Organizational 2nd echelon F Field 3rd echelon H Field 4th echelon D Depot 5th echelon b. (Fourth Position): The maintenance code entered in the fourth position indicated whether the item is to be repaired and identifies the lowest maintenance level with the capability to perform complete repair. This does not preclude some repair which should be accomplished at a lower level of maintenance unless specifically excluded by the appropriate code (i.e., L). 4-6 Code Application/Explanation O Organizational 2nd echelon F Field 3rd echelon H Field 4th echelon D Depot 5th echelon L Repair restricted to designated Specialized Repair Activity. Z Non-reparable. No repair is authorized B No repair is authorized. The item may be reconditioned by adjusting, lubricating, etc., at the user level. No parts or special tools are procured for the maintenance of this item. TM 11574A-OI Recoverability Codes Recoverability codes are assigned to support items and indicate the disposition action for unserviceable items. The recoverability code is entered in the fifth position of the SMR code. Code Application/Explanation Z Non-reparable item. When unserviceable, condemn and dispose at the maintenance level indicated in position 3. O Reparable item. When uneconomically reparable, condemn at organizational level. F Reparable item. When uneconomically reparable, condemn and dispose at field maintenance level 3rd echelon. H Reparable item. When uneconomically reparable, condemn at field maintenance level 4th echelon. D Reparable item. When beyond lower level of repair capability, return to depot. Condemnation and disposal not authorized below depot level. L Reparable item. Repair, condemnation and disposal not authorized below Specified Special Repair Activity level. A Item requires special handling or condemnation procedures because of specific reasons (i.e., precious metal content, high dollar value, critical material or hazardous material). Refer to appropriate manuals/directives for specific instructions. 4-7 TM 11574A-OI SECTION IV IV. NATIONAL STOCK NUMBER (NSN) TO MANUFACTURER’S PART NUMBER (P/N) CROSS REFERENCE National Stock Number Manufacturer Part Number Manufacturer Cage Code 4130-01-550-7334 4820-01-122-3586 5310-01-575-3213 5310-01-575-3213 5310-01-575-3213 5905-01-550-7341 5905-01-550-7344 5905-01-550-7345 6105-01-550-7338 6105-01-576-0066 6120-01-550-7342 65-00144-00 EC39DM062 34-00663-11 34-00663-11 34-00663-11 12-00395-01-SV 12-01105-02 12-01104-05 54-00585-20 54-00586-20 10-00332-21SV 10855 10855 10855 10855 10855 1KCF7 1KCF7 1KCF7 10855 10855 1KCF7 Part Number Figure No. Item No. 4-10 4-16 4-10 4-11 4-18 4-15 4-17 4-17 4-11 4-18 4-19 25 24 9 3 28 1 20 19 11 6 13 Figure No. Item No. 4-19 4-15 4-17 4-17 4-10 4-11 4-18 4-11 4-18 4-10 4-16 13 1 19 20 9 3 28 11 6 25 24 SECTION V V. MANUFACTURER’S PART NUMBER (P/N) TO NATIONAL STOCK NUMBER (NSN) CROSS REFERENCE National Stock Number Manufacturer Part Number Manufacturer Cage Code 6120-01-550-7342 5905-01-550-7341 5905-01-550-7345 5905-01-550-7344 5310-01-575-3213 5310-01-575-3213 5310-01-575-3213 6105-01-550-7338 6105-01-576-0066 4130-01-550-7334 4820-01-122-3586 10-00332-21SV 12-00395-01-SV 12-01104-05 12-01105-02 34-00663-11 34-00663-11 34-00663-11 54-00585-20 54-00586-20 65-00144-00 EC39DM062 1KCF7 1KCF7 1KCF7 1KCF7 10855 10855 10855 10855 10855 10855 10855 4-8 Part Number TM 11574A-OI SECTION VI VI. IDENTIFICATION OF PARTS 4-4. Repair Parts Lists and Illustrations This listing comprises the main part of the RPL. It is arranged in columns which show stock numbers, item identification, and other data necessary to maintain this equipment in an operative condition. 4-9 TM 11574A-OI 3 7 6 4 1 3 7 6 5 4 2 Figure 4-1. RU Mounting Hardware. Table 4-1. RU Mounting Hardware (1) (2) (3) (4) (5) (6) (7) ILLUS QTY QTY PER PER UM ASSY EQUIP FIG NO. ITEM NO. SMR 4-1 1 XBOZZ 39428 91280A837 BOLT, M16 x 20 EA 2 2 4-1 2 XBOZZ 39428 91280A842 BOLT, M16 x 45 EA 28 28 4-1 3 PAOZZ 531015335758 39428 92497A600 NUT, HEXAGON EA 30 30 4-1 4 PAOZZ 531015335324 39428 91202A253 WASHER, SPRING EA 30 30 4-1 5 XBOZZ 39428 91455A170 WASHER, FLAT EA 30 30 4-1 6 XBOZZ 39428 95610A240 WASHER, FLAT EA 30 30 4-1 7 XBOZZ 39428 8694K136 TAPE, EPDM EA 9 9 4-10 NSN CAGE PART NUMBER DESCRIPTION TM 11574A-OI 2 1 4 3 5 6 7 9 8 10 Figure 4-2. Container Components. Table 4-2. Container Components (1) (2) (3) (4) (5) (6) (7) ILLUS QTY QTY PER PER UM ASSY EQUIP FIG NO. ITEM NO. SMR 4-2 1 XBOZZ 0FXA9 DC2-2 LIGHTING ASSEMBLY EA 2 2 4-2 2 XBOZZ 0FXA9 DC2-2-G GLOBE EA 2 2 4-2 3 XBOZZ 0FXA9 HS202-2 SWITCH ASSEMBLY EA 1 1 4-2 4 XBOZZ 0FXA9 S20-05SD-155F SMALL DOOR ASSY EA 1 1 4-2 5 XBOZZ 0FXA9 555-100 C1.0 VALVE, BREATHER EA 1 1 4-2 6 XBOZZ 0FXA9 SB1423.021 AIR CURTAIN FLAPS EA 4 4 4-2 7 PAOZZ 530515596861 39428 91280A222 SCREW EA 36 36 4-2 8 PAOZZ 531015746197 39428 91169A170 WASHER, LOCK EA 36 36 4-2 9 XBOZZ 39428 90592A012 NUT, HEXAGON EA 36 36 4-2 10 PAOZZ 0FXA9 SB3461.KVA03 TRANSFORMER EA 1 1 NSN CAGE PART NUMBER DESCRIPTION 4-11 TM 11574A-OI 2 1 3 4,5,7 20 7 4 6 22 21 14 Control Box Control Door Box 13 15 16 12 17 11 10 9 8 HINGE ASSEMBLY – SECTIONAL VIEW 23 DOOR ASSEMBLY – PARTIAL BACK VIEW Figure 4-3. Control Box Door. 4-12 10,11,18,19 TM 11574A-OI Table 4-3. Control Box Door (1) (2) (3) (4) (5) (6) (7) ILLUS QTY QTY PER PER UM ASSY EQUIP FIG NO. ITEM NO. SMR 4-3 1 PAOOO 1KCF7 69NT42-688-7 CONTROL BOX DOOR ASSY EA 1 1 4-3 2 XBOZZ 1KCF7 42-00270-02 GASKET, DOOR EA 1 1 4-3 3 XBOZZ 1KCF7 58-04366-00SV WINDOW, CONTROLLER EA 1 1 4-3 4 XBOZZ 1KCF7 34-06169-00 WASHER,RETAINING EA 2 2 4-3 5 XBOZZ 1KCF7 66U1-6811-8 SCREW RETAINING EA 2 2 4-3 6 XBOZZ 1KCF7 66U1-6811-15 SCREW, RETAINING EA 2 2 4-3 7 XBOZZ 1KCF7 34-06053-00 WASHER, MYLAR EA 4 4 4-3 8 XBOZZ 1KCF7 44-00300-01 HINGE, HALF EA 1 1 4-3 9 XBOZZ 1KCF7 66U1-2403-1 SCREW, TR HD 10-24 EA 4 4 4-3 10 XBOZZ 1KCF7 66U1-5331-3 WASHER, LOCK, #10 - EA 7 7 4-3 11 XBOZZ 1KCF7 66U1-5321-8 WASHER, FLAT, #10 - EA 7 7 4-3 12 XBOZZ 1KCF7 34-06053-05 WASHER, MYLAR EA 4 4 4-3 13 XBOZZ 1KCF7 44-00300-02 HINGE, HALF EA 1 1 4-3 14 XBOZZ 1KCF7 58-04101-01 PROTECTOR (MYLAR) EA 2 2 4-3 15 XBOZZ 1KCF7 34-01167-01 NUT,DOUBLE (SPECIAL EA 2 2 4-3 16 XBOZZ 1KCF7 58-04101-00 PROTECTOR (MYLAR) EA 2 2 4-3 17 XBOZZ 1KCF7 68-13577-00 POCKET, DOCUMENT EA 1 1 4-3 18 XBOZZ 1KCF7 34-00665-09 NUT, HEX, #10-32, S EA 3 3 4-3 19 XBOZZ 1KCF7 34-06107-00 RIVET EA 3 3 4-3 20 XBOZZ 1KCF7 44-00300-03 PIN ASSY, HINGE EA 1 1 4-3 21 PAOZZ 1KCF7 66U1-5371-7 SCREW, #10-24 x 1/2 EA 4 4 4-3 22 PAOZZ 1KCF7 66U1-5321-8 WASHER, FLAT, #10 - EA 4 4 4-3 23 PAOZZ 1KCF7 58-04346-00 FASTENER, 1/4" ELAS EA 1 1 NSN CAGE PART NUMBER DESCRIPTION 4-13 TM 11574A-OI 1 4,5 2 2 3 6,7 9 6,7 6,7 8 Figure 4-4. Control Box. Table 4-4. Control Box (1) (2) (3) (4) (5) (6) (7) ILLUS QTY QTY PER PER UM ASSY EQUIP FIG NO. ITEM NO. SMR 4-4 1 PAOZZ 1KCF7 79-01904-00 PLATE, SCHEMATIC & DIAGRAM EA 1 1 4-4 2 PAOZZ 1KCF7 66U1-2403 SCREW, TRUSS HEAD EA 2 2 4-4 3 XBOZZ 1KCF7 69NT43-125-1 PANEL, HI VOLTAGE EA 1 1 4-4 4 XBOZZ 1KCF7 44-00343-00 HINGE EA 2 2 4-4 5 XBOZZ 1KCF7 34-00928-02 BLIND RIVET EA 4 4 4-4 6 PAOZZ 1KCF7 34-50015-00 PKG,STUD and RETAINER EA 4 4 4-4 7 PAOZZ 1KCF7 34-06139-03 RECEPTACLE EA 4 4 4-4 8 XBOZZ 1KCF7 69NT43-124-4S V SHIELD, LOW VOLTAGE EA 1 1 4-4 9 PAOZZ 1KCF7 62-03957-02 DECAL, HIGH VOLTAG EA 1 1 4-14 NSN CAGE PART NUMBER DESCRIPTION TM 11574A-OI 1 2 5 3 4 6 7 9 8 Figure 4-5 Display Module. Table 4-5 Display Module (1) (2) (3) (4) (5) (6) (7) ILLUS QTY QTY PER PER UM ASSY EQUIP FIG NO. ITEM NO. SMR 4-7 1 PAOZZ 1KCF7 12-00433-00RP MODULE, DISPLAY EA 1 1 4-7 2 PAOZZ 1KCF7 66U1-5371-7 SCREW, HEX HEAD, #1 EA 4 4 4-7 3 PAOZZ 1KCF7 69NT35-2692-4 WASHER, FENDER EA 4 4 4-7 4 PAOZZ 1KCF7 22-01621-02 RECEPTACLE EA 1 1 4-7 5 PAOZZ 1KCF7 22-01621-03 RECEPTACLE, UNLOADE EA 1 1 4-7 6 PAOZZ 1KCF7 22-02396-03 CONNECTOR EA 1 1 4-7 7 PAOZZ 1KCF7 22-02396-02 CONNECTOR EA 1 1 4-7 8 PAOZZ 1KCF7 22-01556-00 CONNECTOR EA 1 1 4-7 9 PAOZZ 1KCF7 22-01713-02 HARNESS, WIRE EA 1 1 NSN CAGE PART NUMBER DESCRIPTION 4-15 TM 11574A-OI 2,3 1,2 4,5 23 24,25 10 14,19,20,21 34,14,18 11 22 15,16,17 2,3 2,3 12,13,14 8,9 6,7 Figure 4-6. Control Box, Shield Removed. 4-16 4,5 TM 11574A-OI Table 4-6. Control Box, Shield Removed (1) (2) (3) (4) (5) (6) (7) ILLUS QTY QTY PER PER UM ASSY EQUIP FIG NO. ITEM NO. SMR 4-5 1 PAOZZ 1KCF7 10-00431-07 CONTACTOR (30 AMP) EA 1 1 4-5 2 PAOZZ 1KCF7 34-06243-00 SCREW, SLOTTED ALLEN EA 10 10 4-5 3 PAOZZ 1KCF7 10-00431-06 CONTACTOR (12 AMP) EA 4 4 4-5 4 PAOZZ 1KCF7 68-14891-00 PANEL, CONTACTOR EA 1 1 4-5 5 PAOZZ 1KCF7 34-06224-01 SCREW, HEX HEAD, 1/4 x 5/8 EA 4 4 4-5 6 PAOZZ 1KCF7 34-00928-01 RIVET, BLIND, 0.125 EA 6 6 4-5 7 PAOZZ 1KCF7 34-01142-01 RECEPTACLE EA 1 1 4-5 8 PAOZZ 1KCF7 10-01129-07 SV SWITCH, TOGGLE EA 1 1 4-5 9 PAOZZ 1KCF7 66U1-9752 SEAL, BUSHING EA 1 1 4-5 10 PAOZZ 1KCF7 68-14796-00SV SWITCH PLATE EA 1 1 4-5 11 PAOZZ 1KCF7 69NT41-982-3 STRAP, COPPER EA 1 1 4-5 12 PAOZZ 1KCF7 10-00332-21SV TRANSFORMER, POWER EA 1 1 4-5 13 PAOZZ 1KCF7 66U1-5371-7 SCREW, HEX HEAD, #1 EA 10 10 4-5 14 PAOZZ 1KCF7 66U1-5321-8 WASHER, FLAT, #10 EA 10 10 4-5 15 PAOZZ 1KCF7 34-00663-07 WASHER,LOCK (#6) EA 4 4 4-5 16 PAOZZ 1KCF7 66U 1-7842-13 BREAKER,CIRC (25 A) EA 1 1 4-5 17 PAOZZ 1KCF7 66U1-6651-4 SCREW,SLTD PANHD,#6 EA 4 4 4-5 18 PAOZZ 1KCF7 69NT35-6278 BRACKET, CIRCUIT BR EA 1 1 4-5 19 PAOZZ 1KCF7 10-00439-02 TRANSFORMER EA 1 1 4-5 20 PAOZZ 1KCF7 66U1-5371-10 SCREW, SLOTTED HEX EA 2 2 4-5 21 PAOZZ 1KCF7 66U1-5321-8 WASHER, FLAT, #10 EA 2 2 4-5 22 PAOZZ 1KCF7 66CH1-1172-46 TRIM, FLEXIBLE EA 1 1 4-5 23 PAOZZ 1KCF7 79-01706-05SV KEYPAD ASSY EA 1 1 4-5 24 PAOZZ 1KCF7 34-06227-00 SCREW, PAN HEAD, #1 EA 6 6 4-5 25 PAOZZ 1KCF7 34-06053-05 WASHER, MYLAR EA 6 6 NSN 612015507342 CAGE PART NUMBER DESCRIPTION 4-17 TM 11574A-OI 22 21 20 8 1,2,3,4,7 30 15 16 19 5,6 18 14 10,11,12,13 9 11,13,17 NOT SHOWN 23 – Pin Assembly (Connects to ribbon cable) 24 – Kit, Battery Replacement (Located inside controller) 25 – Wire Harness (Connects controller to current sensing transformer) 26 – Wire Harness (Connects display module to controller) 27 – Label, Warning (Located on control box behind controller) 28 – Label, Warning (Located on shields) 29 – Label, Warning (Located on the bottom panel of the control box between the communications interface module and the switch panel) Figure 4-7. Controller Module. 4-18 TM 11574A-OI Table 4-7. Controller Module (1) (2) (3) (4) (5) (6) (7) ILLUS QTY QTY PER PER UM ASSY EQUIP FIG NO. ITEM NO. SMR 4-6 1 PAOZZ 1KCF7 12-55008 CONTROLLER, ML3 EA 1 1 4-6 2 PAOZZ 1KCF7 66U1-5371-7 SCREW, HEX HEAD, #1 EA 1 1 4-6 3 PAOZZ 1KCF7 69NT35-2692 WASHER, FENDER EA 1 1 4-6 4 PAOZZ 1KCF7 58-01184-00 RETAINER, SCREW EA 1 1 4-6 5 PAOZZ 592015748639 10855 22-02336-08 FUSE,CARTRIDGE EA 2 2 4-6 6 PAOZZ 592015749149 10855 22-02336-02 FUSE,CARTRIDGE EA 2 2 4-6 7 PAOZZ 1KCF7 12-55008C CORE, CONTROLLER, ML3 EA 1 1 4-6 8 PAOZZ 1KCF7 62-02719-00 LABEL, PROGRAM PORT EA 1 1 4-6 9 PAOZZ 1KCF7 12-00594-48 CARD, CONTROLLER EA 1 1 4-6 10 PAOZZ 1KCF7 22-01777-00SV CONNECTOR, EC (A-K) EA 1 1 4-6 11 PAOZZ 1KCF7 22-01777-03 TERMINAL,FEMALE EA 35 35 4-6 12 PAOZZ 1KCF7 22-50100-00 PIN,PLUG (FEMALE) EA 4 4 4-6 13 PAOZZ 1KCF7 22-01777-04 PLUG, SEALING EA 21 21 4-6 14 PAOZZ 1KCF7 22-4031-01 CONNECTOR EA 1 1 4-6 15 PAOZZ 1KCF7 22-01556-01 CONNECTOR EA 1 1 4-6 16 PAOZZ 1KCF7 22-4031-00 CONNECTOR EA 1 1 4-6 17 PAOZZ 1KCF7 22-01777-01 SV CONNECTOR, EC (L-Y) EA 1 1 4-6 18 PAOZZ 1KCF7 22-4031-02 CONNECTOR EA 1 1 4-6 19 PAOZZ 1KCF7 22-01556-02 CONNECTOR EA 1 1 4-6 20 PAOZZ 1KCF7 22-01622-00 CONNECTOR (8 POSIT) EA 1 1 4-6 21 PAOZZ 1KCF7 22-01622-02 CONNECTOR (16 POSIT EA 1 1 4-6 22 PAOZZ 1KCF7 22-01622-01 AMP MULTILCK EA 1 1 4-6 23 PAOZZ 1KCF7 22-01621-23 PIN ASSY. UNLOADED EA 1 1 4-6 24 PAOZZ 1KCF7 09-00369-00SV KIT, BATTERY REPLAC EA 1 1 4-6 25 PAOZZ 1KCF7 22-50157-00 HARNESS, WIRE EA 1 1 4-6 26 PAOZZ 1KCF7 22-01713-06 HARNESS, MA-MB EA 1 1 4-6 27 PAOZZ 1KCF7 62-02735-00 LABEL, WARNING EA 1 1 4-6 28 PAOZZ 1KCF7 62-02738-08 LABEL, WARNING EA 1 1 4-6 29 PAOZZ 1KCF7 62-02738-05 LABEL, WARNING EA 1 1 4-6 30 PAOZZ 1KCF7 30-00407-02SV PACK,BATTERY EA 1 1 NSN CAGE PART NUMBER DESCRIPTION 4-19 TM 11574A-OI 4-20 TM 11574A-OI 1,2,3,4 5 13 14 11 12 11 16 17,18,19,20,21,22 23 10 15 24 6,7,8 9 25,26,27,28 Figure 4-8. Condenser Fan and Condenser Coil. 4-21 TM 11574A-OI Table 4-8. Condenser Fan and Condenser Coil (1) (2) (3) (4) (5) (6) (7) ILLUS QTY QTY PER PER UM ASSY EQUIP FIG NO. ITEM NO. SMR 4-8 1 PAOZZ 1KCF7 66U1-5361-25 SCREW EA 10 10 4-8 2 PAOZZ 1KCF7 66U1-5321-7 WASHER, FLAT, 1/4 - EA 10 10 4-8 3 PAOZZ 1KCF7 34-06053-00 WASHER, MYLAR EA 10 10 4-8 4 PAOZZ 1KCF7 34-06053-03 WASHER, MYLAR EA 2 2 4-8 5 PAOZZ 1KCF7 69NT35-3547 BRACKET, MTR MOUNT EA 1 1 4-8 6 PAOZZ 10855 54-00586-20 MOTOR,ALTERNATING EA 1 1 4-8 7 PAOZZ 1KCF7 04-50027-00 BEARING, SHAFT END EA 2 2 4-8 8 PAOZZ 1KCF7 22-50088-02 CAPACITOR, MOTOR EA 1 1 4-8 9 PAOZZ 39428 98530A177 KEY, 3/16 SQUARE x 13/8 EA 1 1 4-8 10 PAOZZ 1KCF7 66U1-5361 SCREW, HEX HEAD, 5/ EA 4 4 4-8 11 PAOZZ 1KCF7 34-01181-01 WASHER, PLAIN 5/16 EA 8 8 4-8 12 PAOZZ 1KCF7 34-06053-02 WASHER, MYLAR EA 4 4 4-8 13 PAOZZ 1KCF7 34-00667-12 LOCKNUT 5/16-18 EA 4 4 4-8 14 PAOZZ 1KCF7 69NT35-6112 SHIELD, PROTECTOR EA 2 2 4-8 15 PAOZZ 1KCF7 38-00585-00 FAN, CONDENSER, 18.13 DI EA 1 1 4-8 16 PAOZZ 1KCF7 68-13454-03SV COVER, CONDENSER EA 1 1 4-8 17 PAOZZ 1KCF7 58-04481-00 PLUG, BUTTON EA 2 2 4-8 18 PAOZZ 1KCF7 81-01575-00SV KIT, CONDENSER COIL EA 1 1 4-8 19 PAOZZ 1KCF7 66CH1-1172-16 TRIM, FLEXIBLE EA 2 2 4-8 20 PAOZZ 1KCF7 69NT35-8693-7 SHIELD, PROTECTOR EA 4 4 4-8 21 PAOZZ 1KCF7 69NT35-8693-10 PROTECTOR EA 2 2 4-8 22 PAOZZ 1KCF7 58-04026-41 PROTECTOR, MYLAR EA 2 2 4-8 23 PAOZZ 1KCF7 76-00704-01 GRILLE ASSY, CONDENSER EA 1 1 4-8 24 PAOZZ 1KCF7 66U1-8912 LABEL, ROTATION EA 1 1 4-8 25 PAOZZ 1KCF7 69NT35-2692-1 WASHER, FENDER EA 4 4 4-8 26 PAOZZ 1KCF7 34-06053-03 WASHER,MYLR EA 4 4 4-8 27 PAOZZ 10855 WASHER, LOCK EA 4 4 4-8 28 PAOZZ SCREW EA 4 4 4-22 NSN 610515760066 531015753213 CAGE PART NUMBER 34-00663-11 1KCF7 66U1-5361-25 DESCRIPTION TM 11574A-OI 16 7,11,12,13 7,8,10 9 6,7,8 18, 19, 20, 21, 22, 23 17 4 5 15 1,2,3 14 Figure 4-9. Compressor Tubing. 4-23 TM 11574A-OI Table 4-9. Compressor Tubing (1) (2) (3) (4) (5) (6) (7) ILLUS QTY QTY PER PER UM ASSY EQUIP FIG NO. ITEM NO. SMR 4-9 1 PAOZZ 1KCF7 14-00263-00 VALVE, STEPPER MOTO EA 1 1 4-9 2 PAOZZ 1KCF7 14-00263-23 O-RING (STEPPER VALVE) EA 1 1 4-9 3 PAOZZ 1KCF7 14-00263-20 PISTON AND MOTOR ASSY EA 1 1 4-9 4 PAOZZ 1KCF7 22-02392-03 CONNECTOR, 6-WAY FE EA 1 1 4-9 5 PAOZZ 1KCF7 14-00263-22 CAP, MOTOR STEPPER EA 1 1 4-9 6 PAOZZ 1KCF7 34-00373-11 CLAMP,TUBE, 7/8 OD EA 1 1 4-9 7 PAOZZ 1KCF7 66U1-5381-1 SCREW, HEX HEAD, #1 EA 4 4 4-9 8 PAOZZ 1KCF7 34-06053-00 WASHER,MYLR(.25X.75 EA 3 3 4-9 9 PAOZZ 1KCF7 14-00204-02 VALVE, DISCHARGE (D EA 1 1 4-9 10 PAOZZ 1KCF7 66U1-3632-24 CLAMP, CUSHION EA 1 1 4-9 11 PAOZZ 1KCF7 69NT41-702 BRACKET ASSY EA 1 1 4-9 12 PAOZZ 1KCF7 66U1-5321-8 WASHER, FLAT, #10 EA 3 3 4-9 13 PAOZZ 1KCF7 34-06053-05 WASHER, MYLAR EA 3 3 4-9 14 PAOZZ 1KCF7 40-00520-02 CAP, LOW SIDE R-134 EA 1 1 4-9 15 PAOZZ 1KCF7 40-00542-00 ELBOW ASSY, R-134A EA 1 1 4-9 16 PAOZZ 1KCF7 81-01482-00 DISTRIBUTOR ASSY EA 1 1 4-9 17 PAOZZ 590515507345 1KCF7 12-01104-05 RESISTOR, THERMAL EA 1 1 4-9 18 PAOZZ 590515507344 1KCF7 12-01105-02 RESISTOR, THERMAL EA 1 1 4-9 19 PAOZZ 1KCF7 22-01566-01 TERMINAL, FEMALE EA 4 4 4-9 20 PAOZZ 1KCF7 22-02393-00 TERMINAL, MALE- EA 4 4 4-9 21 PAOZZ 1KCF7 22-02394-02 SEAL, CABLE, GREEN EA 1 1 4-9 22 PAOZZ 1KCF7 22-01835-00 CONNECTOR, MALE EA 1 1 4-9 23 PAOZZ 1KCF7 22-01566-00 TERMINAL, FEMALE EA 5 5 4-24 NSN CAGE PART NUMBER DESCRIPTION TM 11574A-OI 1,5,6,7,8,9 34 10,32,33 31 10,11,12 29,30 2 27,28 4 26 24,25 3 23 13 11,12,14 5,6,7,15 17 19,20,21,22 16,17 Figure 4-10. Receiver. Table 4-10. Receiver (1) (2) (3) (4) (5) (6) (7) ILLUS QTY QTY PER PER UM ASSY EQUIP FIG NO. ITEM NO. SMR 4-10 1 PAOZZ 1KCF7 65-00185-03 Receiver, Electro-C EA 1 1 4-10 2 PAOZZ 1KCF7 14-00220-01 SIGHTGLASS EA 1 1 4-10 3 PAOZZ 1KCF7 14-00221-04 INDICATOR, SIGHTGLA EA 1 1 4-10 4 PAOZZ 1KCF7 14-01032-14 PLUG,FUSIBLE 3/8FPT EA 1 1 NSN CAGE PART NUMBER DESCRIPTION 4-25 TM 11574A-OI (1) (2) (3) (4) (5) (6) (7) ILLUS PART NUMBER QTY QTY PER PER UM ASSY EQUIP FIG NO. ITEM NO. SMR 4-10 5 PAOZZ 1KCF7 66U1-5361-25 SCREW EA 1 1 4-10 6 PAOZZ 1KCF7 66U1-5321-7 WASHER, FLAT EA 3 3 4-10 7 PAOZZ 1KCF7 34-06053-00 WASHER,MYLAR.25X.75 EA 4 4 4-10 8 PAOZZ 1KCF7 68-86030-00 PROTECTOR, MYLAR EA 1 1 4-10 9 PAOZZ 1KCF7 22-02448-00SV CONNECTOR EA 1 1 4-10 10 PAOZZ 1KCF7 34-00373-05 CLAMP,TUBE (.50 OD) EA 1 1 4-10 11 PAOZZ 1KCF7 66U1-5371-6 SCREW, MACHINE, HEX EA 3 3 4-10 12 PAOZZ 1KCF7 34-06053-05 WASHER, MYLAR EA 4 4 4-10 13 PAOZZ 1KCF7 14-00222-01 VALVE,SERVICE EA 1 1 4-10 14 PAOZZ 1KCF7 34-00373-07 CLAMP,TUBE, 5/8 OD EA 1 1 4-10 15 PAOZZ 1KCF7 68-86030-00 BRACKET, LIQUID, LINE EA 1 1 4-10 16 PAOZZ 1KCF7 40-00520-01 COUPLING, M15 (HI) EA 1 1 4-10 17 PAOZZ 1KCF7 40-00520-03 CAP,COUPLING,HIGH P EA 1 1 4-10 18 PAOZZ 1KCF7 40-00501-50 CAP, KING VALVE, SE EA 1 1 4-10 19 PAOZZ 1KCF7 66U1-5361-7 BOLT, HEX HEAD, 3/8 EA 1 1 4-10 20 PAOZZ 1KCF7 AU11JR241 WASHER, SPLIT LOCK, EA 1 1 4-10 21 PAOZZ 1KCF7 66U1-5321-5 WASHER, FLAT, 3/8 EA 1 1 4-10 22 PAOZZ 1KCF7 34-06053-02 WASHER, MYLAR EA 1 1 4-10 23 PAOZZ 1KCF7 14-00341-07PK25 DRIER, FILTER EA 1 1 4-10 24 PAOZZ 1KCF7 12-00352-00 TRANSDUCER, PRESSURE EA 1 1 4-10 25 PAOZZ 10855 VALVE,CHECK EA 1 1 4-10 26 PAOZZ 1KCF7 12-00495-02SV KIT, AMBIENT/DEFROS EA 1 1 4-10 27 PAOZZ 1KCF7 69NT43-420 BRACKET ASSY, QUENCH VALVE EA 1 1 4-10 28 PAOZZ 1KCF7 34-00928-09 RIVET, BLIND EA 2 2 4-10 29 PAOZZ 1KCF7 66U2-1132-1 CONNECTOR EA 1 1 4-10 30 PAOZZ 1KCF7 66U1-3803 HEAT SHRINK EA 1 1 4-10 31 PAOZZ 1KCF7 14-00212-03SV VALVE, THERMAL EXP EA 1 1 4-10 32 PAOZZ 1KCF7 34-00373-54 CLAMP,TUBE (.44 OD) EA 1 1 4-10 33 PAOZZ 1KCF7 34-06053-03 WASHER, MYLAR (0.25 X 1) EA 1 1 4-10 34 PAOZZ 1KCF7 DE40BA203 TEE REDUCING EA 1 1 4-26 NSN 482011223586 CAGE EC39DM062 DESCRIPTION TM 11574A-OI 2 3 2 3 1 (STS) 1 (SRS) 5 4 6,7 Figure 4-11. SRS and STS Section. Table 4-11. SRS and STS Section. (1) (2) (3) (4) (5) (6) (7) ILLUS FIG NO. ITEM NO. SMR NSN 4-11 1 PAOZZ 590515507341 4-11 2 4-11 CAGE PART NUMBER DESCRIPTION QTY QTY PER PER UM ASSY EQUIP 1KCF7 12-00395-01-SV RESISTOR, THERMAL EA 2 2 PAOZZ 1KCF7 58-04277-00SV CAP, PROBE - W/GROM EA 2 2 3 PAOZZ 1KCF7 58-04278-00 GROMMET, PROBE EA 2 2 4-11 4 PAOZZ 1KCF7 58-04279-00 COVER, PROBE EA 1 1 4-11 5 PAOZZ 1KCF7 58-04276-00 HOLDER, SUPPLY PROB EA 1 1 4-11 6 PAOZZ 1KCF7 66U1-5321-7 WASHER, FLAT, 1/4 - EA 2 2 4-11 7 PAOZZ 1KCF7 66U1-5371-7 SCREW, MACHINE, HEX EA 2 2 4-27 TM 11574A-OI 9 6 1 6 1 2 10 6 11 3 12 4 6 6,8 5 6 7 Figure 4-12. Thermostatic Expansion Valve. Table 4-12. Thermostatic Expansion Valve (1) (2) (3) (4) (5) (6) (7) ILLUS QTY QTY PER PER UM ASSY EQUIP FIG NO. ITEM NO. SMR 4-12 1 PAOZZ 1KCF7 14-00273-01 VALVE, HERMETIC TXV EA 1 1 4-12 2 PAOZZ 1KCF7 58-04664-00 INSULATION, TXV BUL EA 2 2 4-12 3 PAOZZ 1KCF7 66U1-3882-3 WIRE TIE EA 2 2 4-12 4 PAOZZ 1KCF7 56-08347-00 TUBE, 0.50 OD EA 1 1 4-12 5 PAOZZ 1KCF7 44-00370-03Z CLAMP, TUBE 0.50 Di EA 1 1 4-12 6 PAOZZ 1KCF7 66U1-5381-1 SCREW, TF HEX. HD. EA 12 12 4-12 7 PAOZZ 1KCF7 34-00373-51 CLAMP,TUBE (.25 OD) EA 1 1 4-12 8 PAOZZ 1KCF7 68-14890-00 BRACKET EA 1 1 4-12 9 PAOZZ 1KCF7 68-15015-00 GUARD EA 1 1 4-12 10 PAOZZ 1KCF7 34-00373-59 CLAMP,TUBE (.75 OD) EA 1 1 4-12 11 XBOZZ 1KCF7 68-14892-00 PLATE, COVER EA 1 1 4-12 12 XBOZZ 1KCF7 62-10980-00 LABEL, TXV BULB EA 1 1 4-28 NSN CAGE PART NUMBER DESCRIPTION TM 11574A-OI 7 1 2 4 3 5 6 11 12 8 9 10 13 14 Figure 4-13. Fresh Air Makeup Vent. 4-29 TM 11574A-OI Table 4-13. Fresh Air Makeup Vent (1) (2) (3) (4) (5) (6) (7) ILLUS QTY QTY PER PER UM ASSY EQUIP FIG NO. ITEM NO. SMR 4-13 1 XBOZZ 1KCF7 79-01694-00 PANEL ASSY, W/DISC EA 1 1 4-13 2 XBOZZ 1KCF7 42-00296-01 GASKET, PANEL EA 1 1 4-13 3 XBOZZ 1KCF7 42-00327-00 GASKET, HALFMOON EA 1 1 4-13 4 PAOZZ 1KCF7 34-06053-13 WASHER, MYLAR .191I EA 8 8 4-13 5 PAOZZ 1KCF7 34-006212-12 WASHER, FLAT, 1 /4 EA 8 8 4-13 6 PAOZZ 1KCF7 34-06154-00 SCREW, CAP (TIR) EA 8 8 4-13 7 XBOZZ 1KCF7 66U1-2552-185 GASKET,.75 X 1.5 X EA 1 1 4-13 8 PAOZZ 1KCF7 62-02783-00 LABEL, FRESH AIR EA 1 1 4-13 9 PAOZZ 1KCF7 42-00407-00 GASKET, FRESH AIR D EA 1 1 4-13 10 PAOZZ 1KCF7 62-02783-00 LABEL, FRESH AIR EA 1 1 4-13 11 PAOZZ 1KCF7 34-06053-19 WASHER, MYLAR, 1.00 EA 1 1 4-13 12 PAOZZ 39428 WASHER, FLAT, 5/16 EA 1 1 4-13 13 PAOZZ 1KCF7 66U1 -5362-2 NUT, WING, 5/16-18 EA 1 1 4-13 14 PAOZZ 1KCF7 34-06185-01 SCREW, #8-32 X .50 EA 1 1 4-30 NSN CAGE PART NUMBER 91525A230 DESCRIPTION TM 11574A-OI 5 6 2,3,4 1 2,3,4,7 Figure 4-14. Transformer Panel. Table 4-14. Transformer Panel (1) (2) (3) (4) (5) (6) (7) ILLUS QTY QTY PER PER UM ASSY EQUIP FIG NO. ITEM NO. SMR 4-14 1 XBOZZ 1KCF7 69NT35-4047 PANEL, BLANK OFF EA 1 1 4-14 2 XBOZZ 1KCF7 66U1-5361-25 SCREW EA 3 3 4-14 3 XBOZZ 1KCF7 34-06053-18 WASHER, MYLAR, 1/4 EA 3 3 4-14 4 XBOZZ 1KCF7 66U1-5321-3 WASHER, FLAT, 1/4, EA 3 3 4-14 5 XBOZZ 1KCF7 69NT43-307 BRACKET, BLANK OFF EA 1 1 4-14 6 XBOZZ 1KCF7 42-00465-00 GASKET, PANEL EA 1 1 4-14 7 XBOZZ 1KCF7 69NT35-2692-1 WASHER, FENDER EA 1 1 NSN CAGE PART NUMBER DESCRIPTION 4-31 TM 11574A-OI 2,3,4 1 3,5,6 Figure 4-15. Document Panel. Table 4-15. Document Panel (1) (2) (3) (4) (5) (6) (7) ILLUS QTY QTY PER PER UM ASSY EQUIP FIG NO. ITEM NO. SMR 4-15 1 PAOZZ 1KCF7 68-12658-01 PANEL EA 1 1 4-15 2 PAOZZ 1KCF7 66U1-5321-7 WASHER, FLAT, 1/4 - EA 2 2 4-15 3 PAOZZ 1KCF7 66U1-5361-25 SCREW, CAP, HEX HEAD EA 4 4 4-15 4 PAOZZ 1KCF7 34-06053-13 WASHER, MYLAR EA 2 2 4-15 5 PAOZZ 1KCF7 69NT35-2692-1 WASHER, FENDER EA 2 2 4-15 6 PAOZZ 1KCF7 34-06053-03 WASHER, MYLAR EA 2 2 4-32 NSN CAGE PART NUMBER DESCRIPTION TM 11574A-OI 1 2 3 4 5 6 7 2 8 17 16 3 7 15 9 10 11,12,13,14 18,19,20,21,22,23,24,25 Figure 4-16. Evaporator Fan Assembly. 4-33 TM 11574A-OI Table 4-16. Evaporator Fan Assembly (1) (2) (3) (4) (5) (6) (7) ILLUS QTY QTY PER PER UM ASSY EQUIP FIG NO. ITEM NO. SMR 4-16 1 XBOZZ 1KCF7 69NT43-295 BRACKET, MTR MOUNT EA 4 4 4-16 2 PAOZZ 1KCF7 69NT35-2692-1 WASHER, FENDER EA 8 8 4-16 3 PAOZZ 10855 WASHER, LOCK EA 8 8 4-16 4 PAOZZ 1KCF7 34-06165-08P25 SCREW, CAP HEX HEAD, SS EA 8 8 4-16 5 XBOZZ 1KCF7 69NT43-284 FAN DECK ASSEMBLY (RIGHT) EA 1 1 4-16 6 PAOZZ 1KCF7 34-00795-17 NUT, SELF LOCK EA 2 2 4-16 7 PAOZZ 1KCF7 34-00616-06 WASHER (SPECIAL) EA 4 4 4-16 8 PAOZZ 1KCF7 38-00557-00 FAN, EVAPORATOR EA 2 2 4-16 9 PAOZZ 1KCF7 48-00262-00 STATOR, EVAPORATOR FAN EA 2 2 4-16 10 PAOZZ 1KCF7 58-04066-00 PROTECTOR (EVAPORATOR MOTOR) EA 2 2 4-16 11 PAOZZ 10855 MOTOR, AC EA 2 2 4-16 12 PAOZZ 1KCF7 04-50027-00 BEARING, SHAFT END EA 1 1 4-16 13 PAOZZ 1KCF7 22-50088-00 CAPACITOR, MOTOR, 2 EA 1 1 4-16 14 PAOZZ 1KCF7 22-01613-34 GROUNDING PIN, #16 EA 1 1 4-16 15 PAOZZ 1KCF7 66U1-5321-3 WASHER, FLAT, 1/4 EA 8 8 4-16 16 PAOZZ 1KCF7 34-06165-08P25 SCREW, CAP HEX HEAD, SS EA 8 8 4-16 17 XBOZZ 1KCF7 69NT43-285 FAN DECK ASSEMBLY (CENTRE) EA 1 1 4-16 18 XBOZZ 1KCF7 69NT43-283 FAN DECK ASSEMBLY (LEFT) EA 1 1 4-16 19 PAOZZ 1KCF7 22-01892-00 PLUG, MOTOR W/WIRE EA 1 1 4-16 20 PAOZZ 1KCF7 22-01614-03 PLUG, 9 PIN EA 1 1 4-16 21 PAOZZ 1KCF7 22-01613-15 SOCKET TERMINAL 16 EA 1 1 4-16 22 PAOZZ 1KCF7 22-01892-01 RECEPTACLE, MOTOR EA 1 1 4-16 23 PAOZZ 1KCF7 22-01614-02 RECEPTACLE, 9 PIN EA 1 1 4-16 24 PAOZZ 1KCF7 22-01614-05 RELIEF, STRAIN EA 1 1 4-16 25 PAOZZ 1KCF7 22-01613-14 PIN TERMINAL,16-18 EA 1 1 4-34 NSN 531015753213 610515507338 CAGE PART NUMBER 34-00663-11 54-00585-20 DESCRIPTION TM 11574A-OI 1 (RRS/RTS) 2,3 4,5 20 24 15 21 22 21 23 6,7,8,9 25 9,10,11,12,13,14 19 18 17 16 Figure 4-17. Evaporator Coil. 4-35 TM 11574A-OI Table 4-17. Evaporator Coil (1) (2) (3) (4) (5) (6) (7) ILLUS QTY QTY PER PER UM ASSY EQUIP FIG NO. ITEM NO. SMR 4-17 1 PAOZZ 1KCF7 12-00500-01 SV SENSOR, COMBINATION EA 1 1 4-17 2 PAOZZ 1KCF7 12-00495-02SV KIT, AMBIENT/DEFROS EA 1 1 4-17 3 PAOZZ 1KCF7 34-01178-23 SCREW, HEX HEAD, #8 EA 3 3 4-17 4 PAOZZ 1KCF7 66U1-6912-16 SWITCH, THERMOSTAT EA 1 1 4-17 5 PAOZZ 1KCF7 34-01178-22 SCREW,TF HX HD #8-3 EA 1 1 4-17 6 PAOZZ 1KCF7 66U1-5361-25 SCREW EA 9 9 4-17 7 PAOZZ 1KCF7 81-01925-00 COIL W/O VARNISH EA 1 1 4-17 8 PAOZZ 1KCF7 66U1-5321-3 WASHER, PLAIN 1/4N EA 9 9 4-17 9 PAOZZ 10855 WASHER, LOCK EA 12 12 4-17 10 PAOZZ 1KCF7 69NT35-2692-1 WASHER, FENDER EA 3 3 4-17 11 PAOZZ 1KCF7 24-00006-02 HEATER,750W (230V) EA 6 6 4-17 12 PAOZZ 1KCF7 68-13600-00 RETAINER, DEFROST EA 1 1 4-17 13 PAOZZ 39428 SCREW, MACHINE HEX HEAD EA 3 3 4-17 14 PAOZZ 1KCF7 66U1-3803-1 TUBE, HEAT SHRINK - EA 1 1 4-17 15 PAOZZ 1KCF7 58-00616-00 PLUG, HOLE (2" DIA) EA 1 1 4-17 16 PAOZZ 1KCF7 69NT35-4027-1 TUBE, 1/2"OD x .035 EA 1 1 4-17 17 PAOZZ 1KCF7 56-07323-00 TUBE, SUCTION EA 1 1 4-17 18 PAOZZ 1KCF7 44-00370-10 CLAMP, TUBE 1.25 Di EA 1 1 4-17 19 PAOZZ 1KCF7 66U1-5371-6 SCREW, MACHINE. HEX HEAD EA 1 1 4-17 20 PAOZZ 1KCF7 56-08347-00 TUBE, LIQUID LINE EA 1 1 4-17 21 PAOZZ 1KCF7 44-00370-03Z CLAMP, TUBE 0.50 Di EA 1 1 4-17 22 PAOZZ 1KCF7 66U1-5381-1 SCREW, TF HEX HEAD #10 EA 2 2 4-17 23 PAOZZ 1KCF7 44-00370-08 CLAMP, TUBE 1.125 D EA 1 1 4-17 24 PAOZZ 1KCF7 56-08343-00 TUBE, SUCTION LINE EA 1 1 4-17 25 PAOZZ 10855 HEAT EXCHANGER EA 1 1 4-36 NSN 531015753213 530515171505 413015507334 CAGE PART NUMBER 34-00663-11 92620A544 65-00144-00 DESCRIPTION TM 11574A-OI 1 13,14 2 3 3 4 13,14 5,6,7 3 3 8 8 9 9 12 8 8 8,11 10 Figure 4-18. Back Panel Assembly. 4-37 TM 11574A-OI Table 4-18. Back Panel Assembly (1) (2) (3) (4) (5) (6) (7) ILLUS QTY QTY PER PER UM ASSY EQUIP FIG NO. ITEM NO. SMR 4-18 1 PAOZZ 1KCF7 69NT43-464 GRILLE, EVAP (TOP) EA 1 1 4-18 2 PAOZZ 1KCF7 34-00928-09 RIVET, BLIND EA 21 21 4-18 3 PAOZZ 1KCF7 66U1-7982-2 RIVET, TIR, 3/16 Di EA 4 4 4-18 4 PAOZZ 1KCF7 62-02822-01 DECAL EA 1 1 4-18 5 PAOZZ 1KCF7 69NT41-942-3 PANEL ASSEMBLY, ALUM BL (UPPER) EA 1 1 4-18 6 PAOZZ 1KCF7 42-00334-00 GASKET, UPPER PANEL EA 1 1 4-18 7 PAOZZ 1KCF7 66U1-8075 GASKET (25 ft., CUT) EA 1 1 4-18 8 PAOZZ 1KCF7 34-00928-02 BLIND RIVET EA 46 46 4-18 9 PAOZZ 1KCF7 34-00928-03 RIVET,BLIND,1/4 DIA EA 3 3 4-18 10 PAOZZ 1KCF7 68-13475-00 PANEL, BACK LOWER EA 1 1 4-18 11 PAOZZ 1KCF7 69NT35-2257 DUCT, AIR EA 1 1 4-18 12 PAOZZ 1KCF7 68-13475-01 PANEL, BACK LOWER EA 1 1 4-18 13 PAOZZ 1KCF7 66U1-2403 SCREW, MACHINE, TRUSS HEAD EA 20 20 4-18 14 PAOZZ 1KCF7 69NT35-2692 WASHER, FENDER EA 20 20 4-38 NSN CAGE PART NUMBER DESCRIPTION TM 11574A-OI 1 2 8 14,15,16 3,4,5,6,7 9 12 10 1 3 11 16,17,18,19 Figure 4-19. Compressor. 4-39 TM 11574A-OI Table 4-19. Compressor (1) (2) (3) (4) (5) (6) (7) ILLUS QTY QTY PER PER UM ASSY EQUIP FIG NO. ITEM NO. SMR 4-19 1 PAOZZ 1KCF7 18-10129-20SV COMPRESSOR EA 1 1 4-19 2 PAOZZ 1KCF7 69NT35-6132 PROTECTOR (COMPRESS EA 1 1 4-19 3 PAOZZ 1KCF7 69NT43-469 BASE, COMPRESSOR EA 1 1 4-19 4 PAOZZ 1KCF7 66U1-5361-7 BOLT, HEX HEAD, 3/8 EA 7 7 4-19 5 PAOZZ 1KCF7 66U1-5321-5 WASHER, FLAT, 3/8 - EA 7 7 4-19 6 PAOZZ 1KCF7 AU11JR241 WASHER, SPLIT LOCK, EA 7 7 4-19 7 PAOZZ 1KCF7 34-06053-02 WASHER EA 7 7 4-19 8 PAOZZ 1KCF7 34-00849-22 SCREW, CAP HEX HEAD EA 2 2 4-19 9 PAOZZ 1KCF7 34-00667-14 LOCKNUT EA 2 2 4-19 10 PAOZZ 1KCF7 66U1-5321-8 WASHER, FLAT, 7/16 EA 4 4 4-19 11 PAOZZ 1KCF7 34-06053-07 WASHER, MYLAR EA 2 2 4-19 12 PAOZZ 1KCF7 34-06053-01 WASHER, MYLAR, 0.43 EA 2 2 4-19 13 PAOZZ 1KCF7 68-12993-00 PANEL, GUARD EA 1 1 4-19 14 PAOZZ 1KCF7 66U1-5361-25 SCREW EA 1 1 4-19 15 PAOZZ 1KCF7 66U1-5321-7 WASHER, FLAT, 1/4 - EA 9 9 4-19 16 PAOZZ 1KCF7 34-06053-00 WASHER,MYLR(.25X.75 EA 9 9 4-19 17 PAOZZ 1KCF7 66U1-5361-11 SCREW,CAP HX HD 1/4 EA 4 4 4-19 18 PAOZZ 1KCF7 34-00667-11 NUT, SELF LOCKING, EA 4 4 4-19 19 PAOZZ 1KCF7 68-12432-00 GUARD, COMPRESSOR EA 1 1 4-40 NSN CAGE PART NUMBER DESCRIPTION TM 11574A-OI 1 2,3 Figure 4-20. Compressor Gauges and Transducers. Table 4-20. Compressor Gauges and Transducers (1) (2) (3) (4) (5) (6) (7) ILLUS QTY QTY PER PER UM ASSY EQUIP FIG NO. ITEM NO. SMR 4-20 1 PAOZZ 1KCF7 40-00123-02 PLUG,PIPE,HEX HD, 1 EA 1 1 4-20 2 PAOZZ 1KCF7 12-00309-06 SWITCH,PRESS W/SNUB EA 1 1 4-20 NS PAOZZ 1KCF7 22-02392-00SV CONNECTOR (2 PIN) U EA 1 1 NSN CAGE PART NUMBER DESCRIPTION 4-41 TM 11574A-OI 13,17 11,15 12,16 10,14 4,5,6,7, 8,9 1,2,3 Figure 4-21. Voltage Cable. Table 4-21. Voltage Cable (1) (2) (3) (4) (5) (6) (7) ILLUS QTY QTY PER PER UM ASSY EQUIP FIG NO. ITEM NO. SMR 4-21 1 PAOZZ 1KCF7 34-00373-59 CLAMP,TUBE (.75 OD) EA 1 1 4-21 2 PAOZZ 1KCF7 66U1-5381-1 SCREW, HEX HEAD, #1 EA 1 1 4-21 3 PAOZZ 1KCF7 34-06053-03 WASHER, MYLAR EA 1 1 4-21 4 PAOZZ 1KCF7 69NT35-6412-2 CLAMP, CABLE CUTTER EA 1 1 4-21 5 PAOZZ 1KCF7 58-04026-07 PROTECTOR, MYLAR EA 1 1 4-21 6 PAOZZ 1KCF7 66U1 -5361-11 SCREW, CAP HEX HEAD ¼ EA 1 1 4-21 7 PAOZZ 1KCF7 34-00667-11 NUT, SELF LOCKING, EA 1 1 4-21 8 PAOZZ 1KCF7 66U1-5321-7 WASHER, FLAT, 1/4- EA 1 1 4-21 9 PAOZZ 1KCF7 34-06053-03 WASHER, MYLAR EA 1 1 4-21 10 XBOZZ 1KCF7 66U1-2583 HEAT SHRINK TUBE, 230V EA 1 1 4-21 11 XBOZZ 1KCF7 22-02324-01 BUSHING, .142 ID X EA 1 1 4-21 12 XBOZZ 1KCF7 66UI-9782 CABLE,POWER, YELLOW 460V EA 1 1 4-21 13 XBOZZ 1KCF7 CEE17 PLUG EA 1 1 4-21 14 XBOZZ 1KCF7 66UI-2583-1 HEAT SHRINK TUNBE EA 1 1 4-21 15 XBOZZ 1KCF7 22-02324-02 BUSHING EA 1 1 4-21 16 XBOZZ 1KCF7 66UI-9782-1 CABLE,POWER BLACK, EA 1 1 4-42 NSN CAGE PART NUMBER DESCRIPTION TM 11574A-OI 4-21 17 XBOZZ 74545 HBL560P9W PLUG EA 1 4-43 1 TM 11574A-OI 1 5,6,7,8 2 through 25 23 4,23 8,18, 24,25 2,3 8,17,18, 19 22 12 8,9,13,14, 15,16 20,21 9 10 11 Figure 4-22. Autotransformer. 4-44 8 TM 11574A-OI Table 4-22. Autotransformer (1) (2) (3) (4) (5) (6) (7) ILLUS QTY QTY PER PER UM ASSY EQUIP FIG NO. ITEM NO. SMR 4-22 1 PAOZZ 1KCF7 76-00670-02 KIT, TRANSFORMER - EA 1 1 4-22 2 PAOZZ 1KCF7 69NT--40--914-4 TRANSFORMER,MODU LAR EA 1 1 4-22 3 PAOZZ 1KCF7 22-01778-00 TERMINAL EA 1 1 4-22 4 XBOZZ 1KCF7 69NT43-470-1 BOX ASSY, DV MODULE EA 1 1 4-22 5 XBOZZ 1KCF7 66U1-5371-7 SCREW HEX HEAD, #1 EA 4 4 4-22 6 XBOZZ 1KCF7 66U1-5321-8 WASHER FLAT, #10 - EA 4 4 4-22 7 XBOZZ 1KCF7 34-06053-05 WASHER, MYLAR EA 4 4 4-22 8 PAOZZ 1KCF7 66U1-5321-7 WASHER FLAT, 1/4 - EA 1 1 4-22 9 PAOZZ 1KCF7 34-06053-00 WASHER,MYLR(.25X.75 EA 5 5 4-22 10 PAOZZ 1KCF7 AU11JR171 LOCK WASHER EA 5 5 4-22 11 PAOZZ 1KCF7 AA06JA170 SCREW,HX HD (1/4-20 EA 5 5 4-22 12 PAOZZ 1KCF7 66U1-2603 STRAP, TIE DOWN EA 1 1 4-22 13 PAOZZ 1KCF7 69NT35-6412-2 CLAMP, CABLE CUTTER EA 1 1 4-22 14 PAOZZ 1KCF7 58-04026-07 PROTECTOR, MYLAR EA 1 1 4-22 15 PAOZZ 1KCF7 66U1-5361-11 SCREW,CAP HX HD 1/4 EA 2 2 4-22 16 PAOZZ 1KCF7 34-00667-11 NUT, SELF LOCKING, EA 2 2 4-22 17 PAOZZ 1KCF7 69NT35-5992 CLAMP, TIE DOWN STRAP EA 1 1 4-22 18 PAOZZ 1KCF7 66U1-5361-25 SCREW EA 1 1 4-22 19 PAOZZ 1KCF7 34-06053-03 WASHER,MYLR (.25 X EA 2 2 4-22 20 PAOZZ 1KCF7 69NT43-374 BRACKET, DV TRANS M EA 1 1 4-22 21 PAOZZ 1KCF7 58-04026-17 PROTECTOR, MYLAR EA 1 1 4-22 22 PAOZZ 1KCF7 10-01139-04 TRANSFORMER, DUAL VOLTAGE EA 1 1 4-22 23 PAOZZ 1KCF7 69NT43-470-1 BOX ASSEMBLY EA 1 1 4-22 24 PAOZZ 1KCF7 69NT-35-8382 CLIP, CABLE RESTRAI EA 1 1 4-22 25 PAOZZ 1KCF7 58-04026-22 PROTECTOR (MYLAR) EA 1 1 NSN CAGE PART NUMBER DESCRIPTION 4-45 TM 11574A-OI 13 1 12 2 11 3 4 5 6 10 9 8 7 Figure 4-23. RU Labels and Decals. 4-46 TM 11574A-OI Table 4-23. RU Labels and Decals (1) (2) (3) (4) (5) (6) (7) ILLUS QTY QTY PER PER UM ASSY EQUIP FIG NO. ITEM NO. SMR 4-23 1 PAOZZ 1KCF7 62-10769-00 LABEL EA 1 1 4-23 2 PAOZZ 1KCF7 69NT35-3867 ECONOMY MODE LABEL EA 1 1 4-23 3 PAOZZ 1KCF7 69NT35-3907 LABEL, HUMIDITY CON EA 1 1 4-23 4 PAOZZ 1KCF7 62-02721-00 LABEL, FUNCTION COD EA 1 1 4-23 5 PAOZZ 1KCF7 62-02721-03 LABEL, FUNCTION COD EA 1 1 4-23 6 PAOZZ 1KCF7 62-10902-02 LABEL USUA COLDe EA 1 1 4-23 7 PAOZZ 1KCF7 62-10902-03 LABEL, MICRO LINK 3 EA 1 1 4-23 8 PAOZZ 1KCF7 62-10902-04 LABEL MICRO LINK 3 EA 1 1 4-23 9 PAOZZ 1KCF7 62-02444-01 LABEL (R-134A) EA 1 1 4-23 10 PAOZZ 1KCF7 62-10259-00 LABEL, OZONE PROTEC EA 1 1 4-23 11 PAOZZ 1KCF7 62-02530-01 LABEL,R134A EA 1 1 4-23 12 PAOZZ 1KCF7 62-02458-00 LABEL, COMP OIL EA 1 1 4-23 13 PAOZZ 1KCF7 69NT35-8218 LABEL EA 1 1 4-23 14 PAOZZ 1KCF7 62-02785-00 CE EUROPE LABEL EA 1 1 4-23 15 PAOZZ 1KCF7 69NT35-6118 LABEL (Location - B EA 1 1 4-23 16 PAOZZ 1KCF7 62-02743-18 LABEL, OPER.INSTR. EA 1 1 4-23 17 PAOZZ 1KCF7 62-02723-00 LABEL, FRESH AIR EA 1 1 4-23 18 PAOZZ 1KCF7 62-10532-00 LABEL, WELD PRECAUT EA 1 1 NSN CAGE PART NUMBER DESCRIPTION 4-47 TM 11574A-OI 1, 2, 3, 4 Figure 4-24. Interrogator Receptacle. Table 4-24. Interrogator Receptacle (1) (2) (3) (4) (5) (6) (7) ILLUS QTY QTY PER PER UM ASSY EQUIP FIG NO. ITEM NO. SMR 4-24 1 XBOZZ 1KCF7 22-01660-03 RECEPTACLE, 5 PIN S EA 1 1 4-24 2 XBOZZ 1KCF7 22-01613-14 PIN TERMINAL,16-18 EA 5 5 4-24 3 XBOZZ 1KCF7 69NT43-176 CAP,W/TETHER (5-PIN EA 1 1 4-24 4 XBOZZ 1KCF7 69NT41-192 BRACKET, INTERROGATOR EA 1 1 4-48 NSN CAGE PART NUMBER DESCRIPTION TM 11574A-OI APPENDIX A SCHEMATICS A-1 TM 11574A-OI A-1. Wiring Diagram (Sheet 1 of 2) A-2 TM 11574A -OI LEGEND A-3 TM 11574A-OI A-1. Wiring Diagram (Sheet 1 of 2) A-4 TM 11574A -OI LEGEND A-5 TM 11574A-OI A-2. Schematic Diagram. A-6 TM 11574A -OI LEGEND A-7 TM 11574A-OI A-3. Schematic Diagram (Emergency Bypass). A-8 TM 11574A -OI LEGEND A-9 TM 11574A-OI A-4. Refrigeration Schematic. A-10 TM 11574A -OI A-4. Lighting Schematic. A-11(/12 Blank) THIS PAGE INTENTIONALLY LEFT BLANK TM 11574A-OI APPENDIX B MANUFACTURERS CAGE MANUFACTURER CAGE MANUFACTURER 10855 CARRIER CORPORATION DIVISION OF CARRIER TRANSICOLD 6304 THOMPSON RD EAST SYRACUSE, NY 13057-0000 1-315-432-6441 CARRIER TRANSICOLD 700 OLYMPIC DR ATHENS, GA 30601 1-781-246-1400 0FXA9 SEA BOX INC 802 INDUSTRIAL HIGHWAY RIVERTON, NJ 08077-1910 1-856-303-1101 39428 MCMASTER-CARR SUPPLY COMPANY 600 COUNTY LINE RD ELMHURST, IL 60126-2034 1-630-833-0300 1KCF7 74545 HUBBELL INC WIRING DEVICE DIV 185 PLAINS RD MILFORD, CT 06460 1-203-882-4800 B-1/(B-2 Blank) THIS PAGE INTENTIONALLY LEFT BLANK TM 11574A-OI APPENDIX C TROUBLESHOOTING QUICK REFERENCE 1. Will unit perform 5 sec. self-test? YES ___ NO ___ a. Check container ID # ___________ , b. Software # _________ , c Configuration _________ 2. Enter a perishable range (CHILL) set point. a. After self-test does the evaporator motor contactor (EF) energize? Current level leg 1 _____ Current level leg 2 _____ Current level leg 3 _____ ___ ___ b. 15 sec. later does the condenser motor contactor (CF) energize? Current level leg 1 _____ Current level leg 2 _____ Current level leg 3 _____ ___ ___ c. ___ ___ ___ ___ 15 sec. later does the compressor motor contactor (CH) energize? Current level leg 1 _____ Current level leg 2 _____ Current level leg 3 _____ 3. Enter a frozen range set point. a. Does the low speed evaporator motor contactor (ES) energize? Current level leg 1 _____ Current level leg 2 _____ Current level leg 3 _____ 4. Access Code 41 (FOR SCROLL UNITS SKIP STEP 4, 6, & 7), select tIM and set to “1 min”, select PCnt and set to “0” a. Does suction pressure fall? ___ ___ b. Does compressor current fall? RETURN PCnt to “AUTO” ___ ___ IF SUCTION PRESSURE and COMPRESSOR CURRENT DOES NOT FALL, CONTINUE TO STEP 6 & 7 AFTER COMPLETING STEP 5. 5. Change set point to its highest setting or initiate a manual defrost if possible. a. Does the heater contactor (HR) energize? Current level leg 1 _____ Current level leg 2 _____ Current level leg 3 _____ ___ ___ C-1 TM 11574A-OI 6. Turn unit “OFF” a. Unplug the valve from stepper drive module (4 pin plug) and measure resistance of the valve. A – B ________ Ω C – D _______ Ω 7. Turn unit “ON” a. During the first 40 seconds check voltage on the plug from the controller (driver module). A – B ________ VAC C – D _______ VAC 8. Scroll units only. YES NO With unit operating in the cool mode (not at set point), Select code 41. a. Press “ENTER” key to select tIM and set to up to 5 min at 30 sec intervals using arrow keys. b. Press “ENTER” key to select PCnt and set to “3” using the arrow key then press “ENTER” Does suction pressure along with compressor current fall? Return PCnt to “AUTO” using the arrow key and press “ENTER” c. ___ ___ ___ ___ ___ ___ ___ ___ ___ ___ ___ ___ ___ ___ Press “ENTER” key to select EEV and set to “0” using the arrow key then press “ENTER” Does suction pressure along with compressor current fall? Return EEV to “AUTO” using the arrow key and press “ENTER” d. Press “ENTER” key to select CAP and set to “STANDARD” using the arrow key then press “ENTER” NOTE COMPRESSOR CURRENT AND SUCTION PRESSURE Press arrow key to select “UNLOADED” and press “ENTER” Does USV energize? Press arrow key to select “STANDARD” and press “ENTER” then select “ECONOMIZED” and press “ENTER” Does ESV energize? Does EXV get cold? Return CAP to “AUTO” using the arrow key and press “ENTER” e. Press “ENTER” key to select Oil and set to “OPEn” using the arrow key then press “ENTER” Does oil appear in the oil sight glass? Return Oil to “AUTO” using the arrow key and press “ENTER” f. Press “ENTER” key to select LIV and set to “OPEn” using the arrow key then press “ENTER” Does LIV energize? Does LIV outlet get cold? Return EEV to “AUTO” using the arrow key and press “ENTER” g. Press “ENTER” key to select bPSV and set to “OPEn” using the arrow key then press “ENTER” Does the compressor discharge temperature fall? Return bPSV to “AUTO” using the arrow key and press “ENTER” C-2 TM 11574A-OI COMPRESSOR DOES NOT RUN • Main power line open – replace fuse or reset circuit breaker • Safety thermostat tripped – reset thermostat • Control stuck open – replace control • Loose terminal connections – check connections • Improperly wired controls - Check wiring and rewire • Low line voltage – Check line voltage. Determine location of voltage drop • Compressor motor defective – Check motor winding for open or short. Replace compressor if necessary • Seized compressor – Replace compressor COMPRESSOR CYCLES ON LOW PRESSURE CONTROL • Low pressure control erratic in action – Raise differential setting, check capillary for pinches, replace control • Suction shutoff valve partially closed – Open valve • Low refrigerant charge – Add refrigerant • Plugged suction strainer – Clean strainer • Defective TXV – Replace TXV COMPRESSOR CYCLES ON HIGH PRESSURE CONTROL • High pressure control erratic in action – check capillary tube for pinches, Set control as required • Discharge valve partially closed – Adjust valve • Air in system – recover • Condenser scaled (or airflow restricted) – Clean condenser • Refrigerant Overcharge – Recover INSUFFICIENT CAPACITY • Low refrigerant charge – Add refrigerant • Control set too high – reset control • Expansion valve plugged – clean or replace • Inefficient compressor – check valves and pistons • Expansion valve setting too high – lower setting • Iced or dirty evaporator – defrost or clean UNIT OPERATES LONG OR CONTINUOUSLY • Low refrigerant charge – Add refrigerant • Control contacts fused – replace controls • Air in system – recover • Partially plugged or plugged expansion valve or strainer – clean or replace • Defective insulation – replace or repair • Service load – Keep doors and windows closed • Inefficient compressor – check valves • Condenser scaled – clean condenser • Restricted evaporator air – defrost coil, clean filters and ductwork SYSTEM NOISES • Piping vibration – Support piping as required, check for plugged liquid line strainer • Expansion valve hissing – add refrigerant, check for plugged liquid line strainer • Compressor noisy – check valve plates for valve noise, replace compressor (worn bearings), check for loose compressor hold down bolts • Inefficient compressor oil – add oil COMPRESSOR LOSES OIL • Leak in system – repair leak • Plugged or stuck compressor oil return check valve – repair or replace • Oil trapping in line – check piping for oil traps FROSTED SUCTION LINE • Expansion valve admitting excess refrigerant – adjust expansion valve HOT LIQUID LINE • Shortage of refrigerant – repair leaks and recharge FROSTED LIQUID LINE • Receiver shutoff valve partially closed or restricted – Open valve or remove restriction • Restricted strainer dryer – replace FROSTED EXPANSION VALVE • Ice plugging TXV orifice – apply hot wet cloth to TXV • Moisture indicated by increase in suction pressure – install drier • Plugged TXV strainer – clean strainer or replace TXV C-3/(C-4 Blank) THIS PAGE INTENTIONALLY LEFT BLANK