1
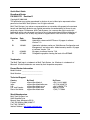
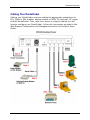
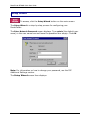
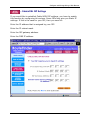
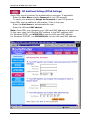
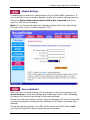
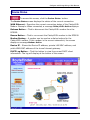
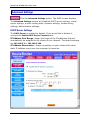
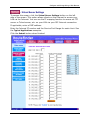
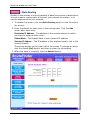
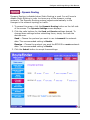
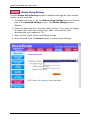
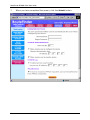
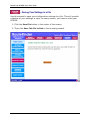
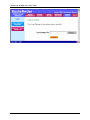
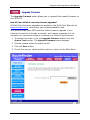
Model RF500S
Broadband Router
Quick Start Guide
Quick Start Guide
Broadband Router
PN S000127D Revision D
Copyright © 2000-2002
This publication may not be reproduced, in whole or in part, without prior expressed written
permission from Multi-Tech Systems, Inc. All rights reserved.
Multi-Tech Systems, Inc. makes no representations or warranties with respect to the contents
hereof and specifically disclaims any implied warranties of merchantability or fitness for any
particular purpose. Furthermore, Multi-Tech Systems, Inc. reserves the right to revise this
publication and to make changes from time to time in the content hereof without obligation of
Multi-Tech Systems, Inc. to notify any person or organization of such revisions or changes.
Revision
Date
Description
A
10/09/00
B
10/26/01
C
D
01/03/02
07/16/02
Updated for release with MTS case. All pages at software
Version 7.12
Updated to include a section on “Web Browser Configuration and
Management” and minor edits. Added warranty section. All pages
at software Version 7.26
All pages at software Version 7.29
Changed the graphics showing the back of the RF500S.
Trademarks
The Multi-Tech logo is a trademark of Multi-Tech System, Inc. Windows is a trademark of
Microsoft. All other trademarks are owned by their respective companies.
Record Router Information
Model Number: _______________________
Serial Number: _______________________
Technical Support
Country
France:
India:
U.K.:
U.S. and Canada:
Rest of the World:
By Email
[email protected]
[email protected]
[email protected]
[email protected]
[email protected]
World Headquarters
Multi-Tech Systems, Inc.
2205 Woodale Drive
Mounds View, Minnesota 55112
(763) 785-3500 or (800) 328-9717
Fax (763) 785-9874
Internet Address: http://www.multitech.com
By Phone
+(33) 1-64 61 09 81
+91 (124) 6340778
+(44) 118 959 7774
(800) 972-2439
+(763) 717-5863
RouteFinder RF500S Quick Start Guide
Contents
Introduction ................................................................................................................... 1
Related Documentation ................................................................................................ 1
Hardware Installation .................................................................................................... 2
Safety Warnings ........................................................................................................... 2
Unpacking Your RouteFinder ....................................................................................... 2
Requirements ............................................................................................................... 2
Cabling Your RouteFinder ............................................................................................ 3
Cabling Directions ........................................................................................................ 4
Application Examples ................................................................................................... 5
Example 1 – Connecting a Local LAN to the Internet ................................................... 5
Example 2 – Local LAN to the Internet / Remote Site .................................................. 6
Example 3 – LAN to LAN via an Async Port ................................................................. 7
Configuration and Management .................................................................................. 8
Configure and Manage Using a Web Browser............................................................ 9
Setup Wizard .............................................................................................................. 10
Device Information...................................................................................................... 16
Device Status ............................................................................................................. 17
Advanced Settings...................................................................................................... 18
System Tools.............................................................................................................. 27
Multi-Tech Systems, Inc. Warranty ............................................................................ 35
Introduction
Introduction
The Multi-Tech Broadband RouteFinder connects a cable modem or DSL
modem to an Ethernet LAN to provide high-speed broadband access to the
Internet for up to 253 users. The Broadband Router features a built-in 4-port
10/100M bps switch, one asynchronous port for backup Internet access or
dial-in remote access, firewall services, and network security. This product
is ideal for any business looking for cost-effective broadband access to the
Internet for every user on the LAN or for the home user looking to share
their DSL cable connection.
The RouteFinder RF500S
Related Documentation
This guide is intended to be used by systems administrators and network
managers. It provides the information for a qualified person to unpack,
cable, install software, and configure the device for proper operation.
User Guide
A detailed User Guide in Adobe Acrobat PDF format is provided on the
System CD included in your RouteFinder package. The User Guide provides
in-depth information on the features and functions available on your router.
It also includes the product warranty statement, software user license
agreement, ordering accessories, regulatory compliance, tools for your
RF500S, cabling diagrams, a glossary, and sections on troubleshooting and
frequently asked questions. The User Guide can be displayed using Adobe
Acrobat Reader. You can save the .pdf file to your PC or print a copy.
Adobe Acrobat Reader
Adobe Acrobat Reader is a free program used to view documents created in
Adobe PDF format. Adobe Acrobat Reader can be installed from the System
CD (click on the Install Manuals option and select Install Adobe Acrobat
Reader) or downloaded from Adobe’s Web site at:
http://www.adobe.com
1
RouteFinder RF500S Quick Start Guide
Hardware Installation
Safety Warnings
1. Never install telephone wiring during a lightning storm.
2. Never install telephone jacks in a wet location unless the jack is
specifically designed for wet locations.
3. This product is to be used with UL and cUL listed computers.
4. Never touch uninsulated telephone wires or terminals unless the
telephone line has been disconnected at the network interface.
5. Avoid using a telephone during an electrical storm. There may be a
remote risk of electrical shock from lightening.
7. Do not use the telephone to report a gas leak in the vicinity of the leak.
8. To reduce the risk of fire, use only No. 26 AWG or larger
Telecommunications line cord.
9. Use only the power source supplied with your product or an equivalent
power source supplying the minimum power requirements.
Unpacking Your RouteFinder
The RF500S shipping box contains the following items:
• System CD
• Power Supply
• The RouteFinder RF500S
• This Quick Start Guide
• A serial cable
If any item is missing or damaged, please contact Multi-Tech Systems.
Requirements
• Intel 486 or higher processor.
• 10/100 BaseT cable to connect the RF500S to the network.
• One DSL or Cable Modem.
• A networked computer with Windows 95/98/2000, Windows NT 3.5 or
higher and TCP/IP protocol installed, (or a non-Windows system with
TCP/IP properly installed to enable Telnet configuration).
• Any Windows communication application for Dial-Out operation.
• Any PPP supported communication application for Dial-In operation.
• TCP/IP installed and configured on each PC accessing the Internet.
2
Hardware Installation
Cabling Your RouteFinder
Cabling your RouteFinder requires making the appropriate connections to
PCs, Cable or DSL modem, analog modem or ISDN TA (optional), AC power
and the RouteFinder. Then, after your device is properly cabled, you will
have to configure your RouteFinder. Follow the instructions provided in the
Web Browser Configuration and Management section of this Quick Start
Guide.
3
RouteFinder RF500S Quick Start Guide
Cabling Directions
Before beginning, turn the power off on all network devices (PCs, Cable/DSL
modems, analog modems, ISDN TAs, and the router).
1. Connect the Ethernet port of each PC or network device to one of the 4
LAN ports.
Important: If you are using the Uplink option, Port Number 1 cannot
be used as a LAN port).
2. If you are using an analog modem, connect it to the Serial Async port.
3. If you are using the Uplink option to connect to another network
segment, slide the Uplink/Normal switch into the Uplink position.
Connect the LAN cable to LAN Port Number 1. Plug the other end of
the LAN cable into another hub, router, or switch.
Note: If you are not using the Uplink feature, place the switch in the
Normal position.
4. Connect a network cable from the cable or DSL modem to the 10 BT
WAN port.
5. Connect the provided power supply cable to the 5VDC power port on
the back of the router. Plug the power supply into an AC power outlet
as shown above.
Power and Reset Button
1. Power on your cable or DSL modem.
2. If you are using an analog modem or ISDN TA, power on the device.
3. Press and hold the RouteFinder’s Reset button for 3 seconds to restore
the default settings.
4
Hardware Installation
Application Examples
The following examples provide information about RF500S typical
applications. The three examples include:
1. Connecting a local LAN to Internet.
2. Connecting a local LAN to the Internet and setting up a remote site.
3. Setting up a LAN to LAN via the Async Port.
Example 1 – Connecting a Local LAN to the Internet
5
RouteFinder RF500S Quick Start Guide
Example 2 – Local LAN to the Internet / Remote Site
6
Hardware Installation
Example 3 – LAN to LAN via an Async Port
Note: Set the modem type to leased line.
See the Complete User Guide for Example 3 Setup Directions
7
RouteFinder RF500S Quick Start Guide
Configuration and Management
The RF500S can be configured and managed using one of two methods.
1. Launch your Web browser and type the device IP address
http://192.168.2.1 in the browser address box. This IP address is the
default value of your gateway. Press Enter. The RouteFinder wizard
main screen displays.
This Quick Start Guide walks you through the Web browser method of
configuring and managing your RF500S.
OR
2. Install the Multi-Tech software, which consists of the RouteFinder
Setup Wizard, the RouteFinder Manager, and the RouteFinder Monitor.
This method of configuring and managing your RF500S is documented
in the complete User Guide. The software is included on the system CD
packaged with your RouteFinder.
8
Configure and Manage Using a Web Browser
Configure and Manage Using a Web Browser
Launch your Web browser and type the device IP address http://
192.168.2.1 in the browser’s address box. This IP address is the default
value of your gateway. Press Enter.
Note: Make sure your PC’s address is in the same network as the router’s. In
Windows 95/98/Me you can type WINIPCFG. In Windows 2000/NT, you can
type IPCONFIG.
The main menu displays. It contains the setup, configuration, management,
and display functions for your RouteFinder and home Internet gateway.
9
RouteFinder RF500S Quick Start Guide
Setup Wizard
To access, click the Setup Wizard button on the main screen.
The Setup Wizard is a step-by-step process for configuring your
RouteFinder.
The Enter Network Password screen displays. Type admin (the default user
name) in the user name box and leave the password box empty. Click OK.
Note: For information on how to change your password, see the ISP
Additional Settings section.
The Setup Wizard screen then displays.
10
Configure and Manage Using a Web Browser
– Time Zone Selection
Choose the local time zone (see screen above). Select the time zone, and
then click the Next button to continue. You can also click the buttons on the
left side of the screen. These buttons are useful when you want to change
the information on individual screens or to choose your own setup order.
11
RouteFinder RF500S Quick Start Guide
– Device IP Settings
You must set your Internet gateway an IP address on your network. This is
not the IP address from your ISP but the local internet LAN IP address. The
IP address 192.168.2.1 is the default value of your gateway.
Device IP Address
The internal LAN IP address of your Internet gateway.
Device IP Subnet Mask
The subnet mask can usually be left as its default entry 255.255.255.0
12
Configure and Manage Using a Web Browser
– Cable/xDSL ISP Settings
If you would like to establish Cable/xDSL ISP settings, you have to enable
this function by configuring this screen. Some ISPs may give you Static IP
settings. If this is the case for your ISP, then you need to:
Enter the IP address that is assigned by your ISP.
Enter the IP subnet mask.
Enter the ISP gateway address.
Enter the DNS IP address.
13
RouteFinder RF500S Quick Start Guide
– ISP Additional Settings (PPPoE Settings)
Some ISPs use this protocol for authentication purposes. If applicable:
Enter the User Name and the Password of your ISP account.
To verify your password, Retype the Password of your ISP account.
Some ISPs require additional information; if this is the case:
Enter the Host Name to authenticate the user.
Enter the LAN card MAC address.
Note: Some ISPs may recognize your LAN card MAC address as a legal user.
In this case, copy the LAN card MAC address in the MAC address field.
For Windows 95/98, run WINIPCFG to see the LAN card MAC address.
For Windows 2000/NT, run IPCONFIG/ALL for the LAN card MAC address.
14
Configure and Manage Using a Web Browser
– Modem Settings
A modem can be used as a dialup backup to the Cable/xDSL connection. If
you would like to use a modem backup, enable the modem settings function.
Check the Dialup Modem When Cable/xDSL Is Not Connected box. Then
input the ISP account settings.
Note: If you change the baud rate settings, please check the initial string.
(You can refer to your modem manual or TA.)
– Save and Restart
After you have finished making all the changes on the various pages, click
Save & Restart to save the settings and restart the device. After restarting,
the device will function according to the saved settings.
During the save and restart process, system messages will let you know that
you have successfully configured the settings for the device and saved the
settings.
During the startup process, the LEDs of the device will blink. Please wait
until the blinking of the device stops before proceeding.
15
RouteFinder RF500S Quick Start Guide
Device Information
Click the Device Information button on the main screen. The
Device Information screen displays the current settings of the RF500S.
Device Name – The host name of the Internet gateway.
IP Address – The IP address of the Internet gateway.
Private LAN Mac Address – The Mac address of the Internet gateway
LAN Ethernet port. This address cannot be changed; it is assigned by
Multi-Tech.
Public WAN (Cable/xDSL) Mac Address – The Mac Address of the
WAN Ethernet port. This address cannot be changed; it is assigned by
Multi-Tech.
Firmware – The current firmware’s version number and its release date.
16
Configure and Manage Using a Web Browser
Device Status
To access this screen, click the Device Status button.
The Device Status screen displays the status of the current connection.
WAN Ethernet – Describes the current connection status of the Cable/xDSL
Modem. Example: When connected, a message Cable/xDSL: Active displays.
Release Button – Click to disconnect the Cable/xDSL modem from the
RF500S.
Renew Button – Click to re-connect the Cable/xDSL modem to the RF500S.
Modem Backup – A modem can be used as a dialup backup for the
Cable/xDSL modem. If this modem is the current connection, the screen
displays a message Modem: Active.
Device IP - Shows the Device IP address, private LAN MAC address, and
public WAN MAC address of the home Internet gateway.
DHCP Log Button – Click this button to view the current DHCP client
information. The log will display at the button of the screen.
17
RouteFinder RF500S Quick Start Guide
Advanced Settings
Click the Advanced Settings button. The DHCP screen displays.
The Advanced Settings options will establish DHCP server settings, virtual
server settings, a static routing table, dynamic settings, modem string
settings, administrative settings.
DHCP Server Settings
The DHCP Server is enabled by default. If you would like to disable it,
uncheck the Enable DHCP Server Functions box.
IP Address Pool Range - Assign the range of the IP addresses that will
automatically be assigned to the clients of your network. The default settings
are 192.168.2.2 to 192.168.2.100.
IP Address Reservation - Assign computers on your network the same
static IP address every time the computer is turned on.
18
Configure and Manage Using a Web Browser
– Virtual Server Settings
To access this screen, click the Virtual Server Settings button on the left
side of the screen. This option allows clients on the Internet to access your
LAN via the Internet. You can use the IP mapping function to access an FTP
server or Telnet server, etc. on your LAN via your ISP Internet connection.
If applicable, enter a DMZ address.
Enter the Internal IP number and the Service Port Range for each client. See
the Typical Applications examples.
Click the Submit button when finished.
19
RouteFinder RF500S Quick Start Guide
– Static Routing
Routing is the process of moving packets of data from source to destination.
You can create a routing table to connect your network to another, or to
connect subnets within your network.
1. To access this screen, click the Static Routing button on the left side of
the screen.
2. Enter the details for each entry in the routing table. Click the Add
button after each entry.
Destination IP Address – The address of the remote network to which
you want to assign a static route.
Subnet Mask – The Subnet Mask of your network IP address.
Gateway IP Address – The IP address of the interface used to link to the
remote network.
The entries display on the lower half of the screen. To change an entry,
click the Delete (Del) button, and then re-enter the information.
3. When the table is complete, click the Submit button.
20
Configure and Manage Using a Web Browser
– Dynamic Routing
Dynamic Routing is disabled when Static Routing is used. You will have to
disable Static Routing in order to choose one of the dynamic routing
protocols. The Dynamic Routing protocol adjusts automatically to the
changes in the network topology or traffic.
1. To access this screen, click the Dynamic Routing button on the left side
of the screen. The Dynamic Settings screen displays.
2. Click the radio buttons for the Send and Receive settings desired. To
change these settings before submitting them, simply re-check the
desired ones.
Send – Choose the protocol you want to use to transmit the network
data. The recommended setting is Disable.
Receive – Choose the protocol you want the RF500S to receive network
data. The recommended setting is Disable.
3. Click the Submit button to accept these settings.
21
RouteFinder RF500S Quick Start Guide
– Filter Settings
The LAN Filter Settings function allows the network administrator to define
whether local users have the permission to access the Internet.
To access this screen, click the Filter Settings button on the left side of the
Advanced Settings screen.
1. Check the LAN Side Filter Enabled box to begin.
2. Select the LAN side filter: Block or Pass.
3. Select the client filter settings: Block or Pass.
4. Select the protocol to be used from the Protocol drop-down list box.
5. Enter the client IP Address Range and Destination Port Range.
6. Click the Add button. The entry displays on the lower part of the screen.
7. Continue adding table entries. When complete, click the Submit button.
Example - To prevent the local users in IP address range 101 to 200 from
accessing port 80 (HTTP), set up the following parameters:
LAN Side Filter Enabled: Enabled
Default LAN Side Filter: Pass
Filter: Block
22
Protocol: TCP
IP Address Range: 101 - 200
Destination Port Range: 80 - 80 (HTTP)
Configure and Manage Using a Web Browser
– WAN Filter Settings
The WAN Filter Settings function allows the network administrator to define
whether remote/outside users have the permission to access the local
network. To activate, check the WAN Side Filter Enabled box. Then define
the policy.
1. To access this screen, click the Filter Settings button on the left side of
the Advanced Settings screen. Then click the WAN Filter Settings.
2. Check the WAN Side Filter Enabled box to begin.
3. Select the WAN side filter: Block or Pass.
4. Select the client filter settings: Block or Pass.
5. Select the protocol to be used from the Protocol drop-down list box.
6. Enter the client IP Address Range and Destination Port Range.
7. Click the Add button. The entry displays on the lower part of the screen.
8. Continue adding table entries. When complete, click the Submit button.
23
RouteFinder RF500S Quick Start Guide
- Modem String Settings
Use the Modem String Settings screen to establish settings for your modem
and to set the baud rate.
1. To access this screen, click the Modem String Settings button on the left
side of the Advanced Settings screen. The Modem Settings screen
displays.
2. Select the baud rate from the drop-down list box. If you want to change
the baud rate, check the initial string. Refer to the manual that
accompanied your modem or TA.
3. Enter the Pre-Initial, Initial, and Dialup Strings.
4. When finished, click the Submit button to accept these settings.
24
Configure and Manage Using a Web Browser
– Administrative Settings
Use this screen to change your RF500S password, set the HTTP port
number, set remote user configuration, and establish system log settings.
1. To access this screen, click the Administrative Settings button on the
left side of the Advanced Settings screen.
2. Password: To set a new password, type the new one in the New
Password box and re-type it for verification in the Retype Password
box. If you do not want to change any other item on this screen, click
the Submit button to accept the password change.
Important: It is important to remember your password. If for any reason
you lose or forget it, press the small reset button on the back of the RF500S.
Hold the reset button until the serial LEDs of the RF500S blink, and then
release the reset button. This reset action will re-initialize the settings.
However, all configurations, including the password, will be reset. You will
have to reconfigure all of your RF500S settings.
3. System Administration: The settings in this portion of the screen can be
used to give a remote user(s) the ability to configure and administrate
the RF500S through the Internet. The default IP address of the remote
administration host is 0.0.0.0. This address means that any remote user
can access and manage the RF500S.
HTTP Port Number: The default value is 80.
Allow Remote User to Configure the Device Check Box: To give remote
users the ability to configure and administrate the RF500S, you have to
check this box.
IP Address: Type the RF500S WAN IP address into the browser of any or a
specific PC on the network.
http://192.168.100.1:1023
http://<WAN IP Address>: <Port Number>
Important: Once the HTTP port number (NOT Port 80) is changed and the
users of the LAN terminal want to configure the RF500S, the users have to
type the LAN IP address with the port number: 192.168.2.3.:1023
4. If you want to allow a remote user to PING the device, check the
corresponding box. See information about PING in the Appendix in the
complete User Guide.
5. If you want to enable the system log function, check the corresponding
box, and enter the Log Server IP Address.
6. If you want enable a Detail Debug IPSec Log, check the corresponding
box.
25
RouteFinder RF500S Quick Start Guide
7.
26
When you have completed the screen, click the Submit button.
Configure and Manage Using a Web Browser
System Tools
Click the Systems Tools button on the main screen. The Intruder
Detection Log displays first.
System Tools allow you to view the Intruder Detection Log, the Routing
Table, and a System Diagnosis screen. You can also choose to save your
settings, load the RF500S default settings, upgrade firmware, and reset the
device.
– Intruder Detection Log
The event messages show the possible hacker attacks that have occurred on
your Internet gateway. Up to 32 hacker attacks may be logged in this
manner.
27
RouteFinder RF500S Quick Start Guide
– Display Routing Table
This table shows the current routing configuration that you setup on the
Routing Table screen.
1. To access this screen, click the Display Routing Table button from the
System Tools screen. The Display Routing Table screen displays.
2. To exit this screen, select another button on the left side of the screen.
28
Configure and Manage Using a Web Browser
– System Diagnosis
When selected, the System Diagnosis function performs a check-up on your
RF500S to make sure that everything is functioning properly.
29
RouteFinder RF500S Quick Start Guide
– Saving Your Settings to a File
Use this screen to save your configuration settings to a file. This will provide
a backup of your settings in case, for some reason, you have to reset your
RF500S.
1. Click the Save File button in the center of the screen.
2. Then click Save This File to Disk in the browsing wizard.
30
Configure and Manage Using a Web Browser
– Load Default Settings
Use this screen to load the original RF500S factory defaults.
1. To access this screen, click the Load Default Settings button from the
System Tools screen. The Load Default Settings screen displays.
2. Click the Start button to load the default settings.
– Load Settings from a File
1. To load settings from a file, click the Load Settings From File button.
The screen displays.
2. Select the browse button to locate the file.
3. When the file is located, click the Start button.
31
RouteFinder RF500S Quick Start Guide
32
Configure and Manage Using a Web Browser
– Upgrade Firmware
The Upgrade Firmware option allows you to upgrade the newest firmware to
your RF500S.
How will I be notified of new router firmware upgrades?
All Multi-Tech firmware upgrades are posted on the Multi-Tech Web site at
www.multitech.com, where they can be downloaded for free.
Your RouterFinder does NOT need the latest firmware upgrade if your
Internet connection is already successful, as firmware upgrades will not
increase your connection speed or enhance your Router’s performance.
1. To access this screen, click the Upgrade Firmware button from the
System Tools screen. The Upgrade Firmware screen displays.
2. Use the browse button to locate the file.
3. Click the Start button.
4. To exit this screen, select another option or return to the Main Menu.
33
RouteFinder RF500S Quick Start Guide
– Reset Device
Resetting the device will restart it.
1. To access this screen, click the Reset Device button from the System
Tools screen. The Reset Device screen displays.
2. Click on the Start button to reset the device. Hold the reset button until
the serial LEDs of the RF500S blink, and then release the reset button.
34
Warranty
Multi-Tech Systems, Inc. Warranty
Multi-Tech Systems, Inc., (hereafter “MTS”) warrants that its products will
be free from defects in material or workmanship for a period of two, five, or
ten years (depending on model) from date of purchase, or if proof of
purchase is not provided, two, five, or ten years (depending on model) from
date of shipment.
MTS MAKES NO OTHER WARRANTY, EXPRESS OR IMPLIED, AND ALL
IMPLIED WARRANTIES OF MERCHANTABILITY AND FITNESS FOR A
PARTICULAR PURPOSE ARE HEREBY DISCLAIMED.
This warranty does not apply to any products which have been damaged by
lightning storms, water, or power surges or which have been neglected,
altered, abused, used for a purpose other than the one for which they were
manufactured, repaired by Customer or any party without MTS’s written
authorization, or used in any manner inconsistent with MTS’s instructions.
MTS’s entire obligation under this warranty shall be limited (at MTS’s option)
to repair or replacement of any products which prove to be defective within
the warranty period or, at MTS’s option, issuance of a refund of the purchase
price. Defective products must be returned by Customer to MTS’s factory –
transportation prepaid.
MTS WILL NOT BE LIABLE FOR CONSEQUENTIAL DAMAGES, AND UNDER NO
CIRCUMSTANCES WILL ITS LIABILITY EXCEED THE PRICE FOR DEFECTIVE
PRODUCTS.
Note: See the User Guide for the entire Multi-Tech Systems, Inc. Warranty
and Repairs Policies statement.
Patents
This device
6,219,708;
5,815,567;
5,764,627;
5,644,594;
5,577,041;
5,535,204;
5,450,425;
5,355,363;
is covered by one or more of the following patents:
6,031,867; 6,012,113; 6,009,082; 5,905,794; 5,864,560;
5,815,503; 5,812,534; 5,809,068; 5,790,532; 5,764,628;
5,754,589; D394,250; 5,724,356; 5,673,268; 5,673,257;
5,628,030; 5,619,508; 5,617,423; 5,600,649; 5,592,586;
5,574,725; D374,222; 5,559,793; 5,546,448; 5,546,395;
5,500,859; 5,471,470; 5,463,616; 5,453,986; 5,452,289;
D361,764; D355,658; D355,653; D353,598; D353,144;
5,355,365; 5,309,562; 5,301,274. Other Patents Pending
S000127D


![カタログダウンロード[PDF6.65MB]](http://vs1.manualzilla.com/store/data/006551170_2-083b111e024a2811fc9b6f96e4725084-150x150.png)