1
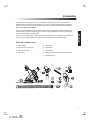
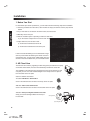
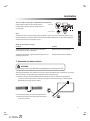
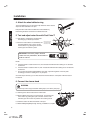
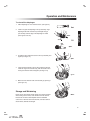
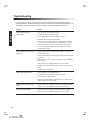
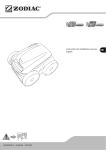
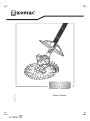
H0379900 Rev B Owner’s Manual Important Information English WARNING RISK OF SUCTION HAZARD, WHICH IF NOT AVOIDED, CAN RESULT IN SERIOUS INJURY OR DEATH. READ THIS MANUAL IN ITS ENTIRETY BEFORE INSTALLING AND OPERATING THE CLEANER. Do not block the suction fittings in the pool, the suction opening on the cleaner, or the cleaner hoses with any part of your body. Do not expose your hair, loose clothing, jewellery, etc, to any suction outlet fittings in the pool/ spa or on the cleaner. Notice for Vinyl Liner Pools: Before installing your pool cleaner, examine the interior of your pool carefully. If the vinyl liner is brittle or has stones, wrinkles, roots or metal corrosion in contact with the underside of the liner, or has damage to the base material or supporting walls, do not install the cleaner before having a qualified professional perform the necessary repairs or liner replacement. Zodiac Group Australia Pty Ltd (Zodiac) will not be responsible for liner damage caused by a cleaner which is in disrepair, pattern removal from a vinyl liner, or a cleaner used in a pool having an aged or deteriorated liner. Please see Limited Warranty. • Clean the skimmer basket, pump basket and pool filter before installing the cleaner and on a regular basis thereafter. • Always disconnect the cleaner from the pool wall or skimmer before cleaning or backwashing the pool filter. After cleaning or backwashing, let the filtration system run for at least five (5) minutes before re-connecting the cleaner. • Remove the cleaner from the pool before chemical or shock treatments. Wait a minimum of four (4) hours after super chlorination before re-installing the cleaner. Read owner’s manual completely before operating the cleaner. Remove cleaner before entering the pool. Do not operate outside of the pool. Do not let children play with cleaner. For customer service or support: Zodiac Group Australia 219 Wood park Road Smithfield, NSW 2164 1800 688 552 2 Introduction Congratulations on the purchase of your new Zodiac B3 automatic pool cleaner. Your Zodiac B3 is designed and manufactured for easy installation, and years of carefree operation. Before installing the cleaner, please take a few moments to become familiar with its components and to review the items listed under Important Information. Always insist on genuine Zodiac® replacement parts. Non-Zodiac parts are not made to our specifications. They may have an adverse effect on the operation of your Zodiac B3 or may even damage it. Zodiac B3 Complete Cleaner 1. Cleaner Body 5. Hose Weight 2. AD Flow Valve & Connector 6. Pool Pulse™ 3. Universal Weir Cuff 7. Hose Section 4. Hose mesh 8. Rotating Wheel Deflector with Quick Connector English Like most mechanical devices, the Zodiac B3 requires periodic adjustments, routine maintenance, and the replacement of certain hardworking parts. Be sure to have the Zodiac B3 checked occasionally by your local Zodiac dealer or service center. 9. 90 Degree Elbow 3 Installation 1. Before You Start For best Zodiac pool cleaner performance, you will need to follow the following steps of the installation. 1.1 Following manufacturer’s instructions, clean the filter and empty the skimmer and the pump strainer basket. English 1.2 If your main drain is connected to the skimmer box, block off access. 1.3 Manually vacuum the pool. 1.4 Ensure circulation system is operating at maximum water flow, or you will need to re-adjust when it comes to clean the filter baskets. 1.5 Adjust water flow, from all return inlets: a) Downward and toward each other OR b) Downward and toward the centre of the pool. If return inlet directional fittings can’t be directed far enough down to prevent water flow affecting the natural movement of the Zodiac hose, you will need to install Zodiac return line diverters. These are available from your local Zodiac dealer. 2. AD Flow Valve 2 1 3 The AD Flow valve works by regulating the flow through the pool cleaner to the pump. As the filter collects debris, the valve will automatically maintain the correct flow. The installation of the AD Flow valve will depend upon the type of skimmer box and Vac plate you have. It is either installed straight in from the top of the Vac plate or from the bottom of the Vac plate. See the 4 different cases below. 1st case: with Waterco Skimmer Box 4 Screw in the AD Flow valve connector into the top of the Vac plate 6 5 4 3 2 1 0 2nd case: with Poolrite Skimmer Box 0 1 2 3 4 5 6 Screw in the AD Flow valve connector into the bottom of the Vac plate. 5 3rd case: with Speed Regulator/Skimtrol Vac Plate Simply connect the 90 Degree Elbow into the top of the Vac Plate. 90 Degree Elbow 6 Speed Regulator 4 Installation 2 1 4th case: with any other type of Skimmer Box and Vac plate Simply insert the AD Flow valve directly into the universal weir cuff which will then fit into the top of 1 the Vac plate. 3 AD Flow valve 3 2 4 Universal Weir Cuff 6 5 4 3 2 1 0 Note: 0 1 2 3 4 5 6 6 English The AD Flow valve has three settings: High (3), Medium (2) and Low (1). To deliver the maximum pool 5 cleaning efficiency, the AD Flow valve comes preset at a factory setting of 2. You will need to adjust the AD Flow valve when and if a problem occurs. 4 6 5 4 3 2 1 0 AD Flow valve trouble shooting 0 1 2 3 4 5 6 Problem Solution The Zodiac pool cleaner is performing too fast and/ or climbing above the level of the water. The Zodiac pool cleaner is performing slowly and /or is not climbing the pool walls. 5 Reduce AD Flow valve to setting 1 6 Increase AD Flow valve to setting 3 3. Assemble the hose sections WARNING To avoid any serious injury, turn off the pool pump before proceeding to this step. The hoses are fitted with easy Twist-Lock connectors. Push and twist the hose connectors on each hose section until they lock into position with a clicking sound. See drawing below. 3.1 Assemble the hose sections starting from the skimmer box until you reach the furthest point of your pool and add 2 extra sections. Add the hose weight on the last section as per drawing below, approximately 1m away from the cleaner. 3.2 Connect the hose to the valve in the skimmer box. 3.3 Submerge the whole hose under water until there is no air left in the hose. 5 Installation 4. Attach the wheel deflector ring The wheel deflector ring can be used to help direct the cleaner around steps and other obstacles in the pool. English Keep the hose under water and attach the wheel deflector by twist‑locking the Quick connector to the female hose cuff. 5. Test and adjust water flow with Pool Pulse™ 5.1 Pool Pulse™ measures the required water flow through your Zodiac pool cleaner. 5.2 Once the hose sections are assembled, and the wheel deflector ring in place, connect the Pool Pulse™ by pushing the connector into the pipe until it clicks in place. Extremity of the hose with Wheel Deflector and Quick Connector. Pool Pulse™ IMPORTANT: Turn on the pump to measure suction. For best performance, the Pool Pulse™ needs to read 2.5. NOTE: a. If the Pool Pulse™ reads more than 2.5, then decrease the AD Flow Valve setting at 1 to decrease suction flow. b. If the Pool Pulse™ reads less than 2.5, then increase the AD Flow Valve setting at 3 to increase the suction flow. c. For 3rd case with speed regulator/Skimtrol Vac plate - adjust the regulator on the Vac plate accordingly to receive a reading of 2.5 on pool pulse Once this step is achieved, you can then disconnect the Pool Pulse™ and replace it with the head of the cleaner. 6. Connect the cleaner head WARNING To avoid any serious injury and before starting step 6, turn off the pool pump. 6.1 Submerge the cleaner head and flow it with water. 6.2 When bubbles stop coming out of the cleaner, connect the hose to the cleaner by pushing the quick connector onto the outer extension pipe until it locks into position with a clicking sound. 6.3 Allow the cleaner to drift to the bottom of the pool. 6.4 Turn on the pool pump to begin cleaning. Installation is complete. 6 Operation and Maintenance Fine Tuning Cleaner Performance The B3 cycles on/off with the pool filtration pump vacuuming and cleaning all surfaces randomly throughout the pool. The coverage of the cleaner is dependent on the pool’s shape and available water flow. In some pools, adjustments may be necessary to optimise cleaning coverage. A properly balanced hose will create a 45º angle to the cleaner and the bottom of the pool. In pools 8 ½ ft. (2.5 m) or deeper, an extra hose weight may be necessary. Attach the extra weight 5 - 8 ft. (1.5 - 2.5 m) from the cleaner. English Properly Balanced Hose Return Line Installed A return line can be used to guide the cleaner away from steps or areas with V-shaped corners, and reduce patterning. Direct the return line to gently push the cleaner hose by positioning the return directional eyeball so it aims towards the wall on the opposite side of the pool. Adjust until surface movement is visible 8 ft. (2.5 m) out from the return. In this example, any return within the grey area can be used. Routine Maintenance To maintain performance: • Never coil the hose. Straighten coiled or kinked hoses with warm water or by laying hoses straight in the sun for several hours until heated, then reshape manually. A kinked or coiled hose will adversely affect the cleaner’s coverage of the pool. • When the cleaner is not in the pool, keep the disc flat to avoid warping. • Periodically inspect cleaner parts for wear. Replace the footpad when the depths of the channels between the treads are 1/16 in. (1.6 mm) or less. • Thoroughly clean the skimmer basket, pump basket and filter regularly. • Always disconnect the cleaner from the pool wall or skimmer before cleaning or backwashing the pool filter. After cleaning or backwashing, let the filtration system run for at least five (5) minutes before re-connecting the cleaner. 7 Operation and Maintenance Clearing the Diaphragm WARNING English To avoid serious injury, turn off the suction pump for the cleaner before performing this step. If the cleaner stops, turn off the suction pump and remove the cleaner from the water, then check the diaphragm for blockage. 1. Turn cleaner over (see Figure 1). 2. Inspect diaphragm and push through debris or obstacles to clear. If the diaphragm is not blocked, check it for wear or damage. To remove the diaphragm: 1. Unthread the handnut and slide it off the engine outer extension tube (see Figure 2), and set aside. The upper thrust washer is designed to stay inside the handnut and detach as a single unit. (See Figure 3.) 2. Remove the engine (Figure 4) from the cleaner body. 3. Unscrew the cup assembly, remove outer extension tube and set aside (see Figure 5). 4. Pull inner extension tube firmly away from cup assembly to separate (see Figure 6), and set aside. 5. Remove diaphragm from cup assembly (see Figure 7) and inspect for foreign objects or wear. Rinse thoroughly with clean water before reinstalling. Replace diaphragm if necessary. 8 Operation and Maintenance To reinstall the diaphragm: 1. Attach diaphragm to inner extension tube (see Figure 8). English 2. Insert inner pipe and diaphragm into cup assembly. Align diaphragm tabs with notches and pull straight through (do not twist) until the edge of the diaphragm is visible (see Figures 9 and 10). 3. Thread the outer extension tube onto the cup assembly and tighten (see Figure 11). 4. Verify the thrust washer is still in place inside the handnut. Insert the engine into cleaner body, slide the handnut over the engine extension tube and tighten (see Figure 12). 5. Make sure the extension tube swivels freely by spinning it (see Figure 13). Storage and Winterizing Never coil the hose. Store the B3 cleaner out of direct sunlight. When storing for the winter, drain all water from the cleaner. Remove all connectors and adapters from the dedicated suction line or skimmer. Store the disc flat, and hose sections disconnected, drained and straight. 9 Troubleshooting English you experience a problem with your Zodiac B3, please follow the troubleshooting steps below to If restore performance. If further assistance is required, contact Zodiac® Technical Support Department at 1800 688 552. Please have your serial number and date of purchase available when you call. Problem Solution Cleaner does not move or moves slowly. • Use Pool Pulse™ to verify proper flow. • Confirm that the main drain is closed. • Check diaphragm for blockage, damage or wear. • Backwash filter and empty pump basket. • Check for air in system. If water level in pump basket drops or you see excessive air bubbles in the pump basket or coming from the return lines, there is air in the system. Check hose connections, tighten all fittings at pump and check o-ring at pump basket for wear. Cleaner patterns, does not cover entire pool. • Use Pool Pulse™ to verify proper flow. Reduce flow to move cleaner off the walls • Ensure return fittings are directed down. Add a return diverter if necessary. • Make sure hose is not coiled or kinked. Lay in sun to straighten if necessary. • Verify correct hose weight positioning: 1 m from cleaner. • Verify that the engine assembly spins freely inside the cleaner body. • Confirm proper hose length. Cleaner gets stuck at steps. • Use Pool Pulse™ to verify proper flow. • Confirm proper hose length. Shorten if necessary. • Use return jets to guide cleaner. • Reposition the wheel deflector along the hose to better contact steps and push the cleaner aside. Cleaner stays on walls or edge of pool. • Using Pool Pulse™ as guide, reduce flow to number 2 setting. Cleaner won’t climb walls. • Use Pool Pulse™ to verify proper flow, number 2.5 setting. • Verify correct hose weight positioning: 1 m from cleaner. • Verify correct hose weight positioning: 1 m from cleaner. 10 Notes English 11 Zodiac is a registered trademark of Zodiac Group Australia Pty Ltd ABN 87 002 641 965 219 Woodpark Rd, Smithfield, NSW 2164 Australia Tel: 1800 688 552 www.zodiac.com.au © Copyright Zodiac Australian Ltd 2013