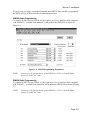
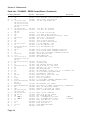
1
ZR350
Installation Manual
Part No. 025-9375C
Please check for change information at the front of this manual.
Copyright © 1996 - 2001 by Zetron, Inc.
All Rights Reserved
TABLE OF CONTENTS
CHANGE INFORMATION
FOREWORD
SCOPE ...................................................................................................................F-1
RELATED MANUALS .............................................................................................F-1
TECHNICAL SUPPORT .........................................................................................F-1
SERVICE ................................................................................................................F-1
ORDERING PARTS................................................................................................F-2
1. INTRODUCTION
OVERVIEW.............................................................................................................1-1
STANDARD FEATURES ........................................................................................1-2
SPECIFICATIONS ..................................................................................................1-3
Telephone Interface .........................................................................................1-3
Local Telephone Interface ...............................................................................1-3
Radio Interface.................................................................................................1-3
Selective Calling...............................................................................................1-3
General ............................................................................................................1-4
2. INSTALLATION
INSTALLATION WARNING ....................................................................................2-1
OVERVIEW.............................................................................................................2-1
EQUIPMENT REQUIRED FOR INSTALLATION....................................................2-2
RADIO CONFIGURATION AND PROGRAMMING FOR SIMPLEX SYSTEMS .....2-3
Simplex Assembly............................................................................................2-7
RADIO CONFIGURATION AND PROGRAMMING FOR DUPLEX SYSTEMS ......2-8
Duplex Receive GM300 Radio.........................................................................2-8
Duplex Transmit GM300 Radio......................................................................2-12
Duplex Assembly ...........................................................................................2-15
MOTOROLA GM350 AND GM950 CONNECTION NOTES .................................2-16
ZR350 Connections .......................................................................................2-16
GM350 Radio Programming ..........................................................................2-17
GM950 Radio Programming ..........................................................................2-17
Additional Radio Notes ..................................................................................2-18
INITIAL TURN-ON ................................................................................................2-19
ADJUSTMENTS....................................................................................................2-19
Setting the Receive Level ..............................................................................2-19
Setting the Transmit Tone Level ....................................................................2-20
Setting the Dial Click Decode Level ...............................................................2-20
Setting the VOX Level....................................................................................2-21
FINAL ASSEMBLY................................................................................................2-21
PROGRAMMING ..................................................................................................2-21
TABLE OF CONTENTS
(Continued)
3. OPERATION
OVERVIEW ............................................................................................................ 3-1
MULTI-USER INTERCONNECT ............................................................................ 3-1
Simplex Operation........................................................................................... 3-1
Duplex Operation ............................................................................................ 3-1
Phone-to-Radio Calls ...................................................................................... 3-2
Communication Equipment ............................................................................. 3-3
Answering a Call.............................................................................................. 3-4
Terminating a Call ........................................................................................... 3-5
Radio-to-Phone Calls ...................................................................................... 3-7
Radio-to-Radio Calls ....................................................................................... 3-9
Radio Access Code Summary....................................................................... 3-10
Private Tones (PL/DPL + CSQ)..................................................................... 3-10
SINGLE USER INTERCONNECT ........................................................................ 3-12
USER PROGRAMMING....................................................................................... 3-13
4. MAINTENANCE
OVERVIEW ............................................................................................................ 4-1
DISASSEMBLY ...................................................................................................... 4-1
PARTS LISTS ........................................................................................................ 4-2
Parts List - 702-9805C ZR350 Control Board................................................ 4-3
Parts List - 702-0023B Digital Voice Delay Board ......................................... 4-6
Parts List - 702-9807A Local Phone Ringer .................................................. 4-7
SCHEMATICS ........................................................................................................ 4-8
Schematic - 008-9805C ZR350 Control Board.............................................. 4-9
Schematic - 008-0023B Digital Voice Delay Board ..................................... 4-13
Schematic - 008-9807A Local Phone Ringer .............................................. 4-14
5. PROGRAMMING
OVERVIEW ............................................................................................................ 5-1
USER EQUIPMENT TYPE..................................................................................... 5-1
PROGRAMMING THE ZR350................................................................................ 5-2
Program Mode Access Code........................................................................... 5-2
Entering the Program Mode ............................................................................ 5-2
Entering a Command ...................................................................................... 5-3
Exiting the Program Mode ............................................................................... 5-4
DTMF Command Descriptions ........................................................................ 5-4
SYSTEM COMMANDS .......................................................................................... 5-5
Access and Disconnect Prefixes ..................................................................... 5-5
Radio-to-Phone, Pulse or DTMF Dialing ......................................................... 5-5
Pulse Dial Make / Break Ratio......................................................................... 5-6
Rings-to-Answer .............................................................................................. 5-6
Radio Answer Time ......................................................................................... 5-6
Disable Interconnect Operation ....................................................................... 5-6
Toll Restrict Digits............................................................................................ 5-6
TABLE OF CONTENTS
(Continued)
Radio Ring-out Method ....................................................................................5-7
Repeater Enable/Disable .................................................................................5-7
Repeater Hold Time.........................................................................................5-7
Repeater Transmitter Time-out ........................................................................5-8
Morse Code Station Identification ....................................................................5-8
Enable Station Identification ............................................................................5-9
Courtesy Tone ...............................................................................................5-10
Half-duplex Privacy Mask...............................................................................5-10
Call Limit Timer ..............................................................................................5-10
Radio Activity Timer .......................................................................................5-10
Operating Mode .............................................................................................5-11
VOX Hold Time ..............................................................................................5-11
Carrier Detect Hold Time ...............................................................................5-12
Tone+Voice Paging Talk Time.......................................................................5-12
Auto-Call User................................................................................................5-12
Single/Multi-User Operation ...........................................................................5-12
Busy Tone Disconnect ...................................................................................5-13
Program Mode Access Code .........................................................................5-13
Reset Memory to Defaults..............................................................................5-14
Tests and Adjustments ..................................................................................5-14
Exit Program Mode ........................................................................................5-14
Sign-on Mode.................................................................................................5-14
Local Phone Ringer Option ............................................................................5-14
Call Forward Gap ...........................................................................................5-15
USER COMMANDS ..............................................................................................5-16
Assigning Call Forward Users ........................................................................5-16
User Equipment Types...................................................................................5-16
Two-tone encode parameters ........................................................................5-16
Five-tone encode parameters ........................................................................5-17
FACTORY TEST SOFTWARE .............................................................................5-20
APPENDIX A. QUICK REFERENCE
SYSTEM PROGRAMMING COMMANDS ............................................................. A-1
USER PROGRAMMING COMMANDS .................................................................. A-3
SELECTIVE CALLING COMMANDS..................................................................... A-3
INSTALLATION COMMANDS ............................................................................... A-3
FIVE-TONE ENCODE (Tone Group/Timing Table) ............................................... A-4
TWO-TONE PAGING (Tone Group/Tone Number/Frequency Table) ................... A-5
WARRANTY
Zetron’s warranty is published in the current Zetron United States Price Book.
LIMITATION OF LIABILITY
Zetron makes no representation with respect to the contents of this document and/or the
contents, performance, and function of any accompanying software and specifically disclaims
any warranties, expressed or implied, as to merchantability, fitness for purpose sold,
description, or quality.
Further, Zetron reserves the right to revise this document or the accompanying software and
to make changes in it from time to time without obligation to notify any person or
organization of such revisions or changes.
This document and any accompanying software are provided “as is.” Zetron shall not under
any circumstances be responsible for any indirect, special, incidental, or consequential
damages or losses to the buyer or any third party arising out of or connected with the buyer’s
purchase and use of Zetron’s products or services.
COPYRIGHT
This publication is protected by copyright by Zetron, Inc. and all rights are reserved
worldwide. This publication may not, in whole or in part, be copied, photocopied,
reproduced, translated, or reduced to any electronic medium or machine-readable form
without prior written consent from Zetron, Inc.
The software in this product is protected by copyright by Zetron, Inc. and remains the
property of Zetron, Inc. Reproduction, duplication, or disclosure is not permitted without
prior written consent of Zetron, Inc.
TRADEMARKS
Zetron is a registered trademark of Zetron, Inc.
Motorola is a registered trademark of Motorola, Inc.
Private Line is a registered trademark of Motorola, Inc.
Digital Private Line is a registered trademark of Motorola, Inc.
All other product names in this document are trademarks or registered trademarks of their
respective owners.
FOREWORD
SCOPE
This manual is intended for use by experienced technicians familiar with similar types of
equipment. This equipment generates, uses, and can radiate radio frequency energy. If not
installed and used in accordance with the instruction manual, it may cause interference with
radio communications. The installation of the ZR350 should only be attempted by qualified
radio service personnel. All of the information contained in this manual is current as of the
date it was printed.
RELATED MANUALS
There are several manuals that are related to the equipment used in a ZR350, which might be
helpful during the installation. They are:
GR300/GR500 Repeater Stations (Motorola # 6880903Z42)
Radius GR300 and GR500 Repeater Stations (Motorola # 6880903Z43)
(Supplement to GM300 RSS Manual - 6880902Z36)
GM300 Service Manual (Motorola # 6880902Z32)
GM300 RSS Manual (Motorola # 6880902Z36)
TECHNICAL SUPPORT
To obtain technical support on the ZR350 you can call Motorola and ask for “ZR350
technical support”.
In order to aid the technical support personnel in helping you, we ask that you have the serial
number of the ZR350 available in case they need to track the file of the order it was sold
under. You should also have as much information as possible on the type of installation, how
far along it has gotten, what sort of programming or operating problems you are having, etc.
It is also helpful if the person making the call to Motorola is the technician doing the
installation or programming of the system. Technical support is almost never facilitated by
passing information back and forth through a third person.
SERVICE
If a malfunction occurs with the ZR350, during or after the warranty period, that cannot be
resolved over the phone with technical support personnel, then that unit should be returned to
Motorola for servicing. You must obtain authorization from the technical support person that
you work with in order to return a unit to Motorola.
Page F-1
Make sure that the unit is shipped in its original packaging or use careful packing procedures,
to eliminate the possibility of damage while en route.
During the warranty period, Motorola will either repair or replace the unit as required. If the
unit is out of warranty, then you must pay a service fee.
ORDERING PARTS
The manual lists all of the parts used in the ZR350 in the Maintenance section. In addition to
showing the Zetron part number, a description of the component and its manufacturer’s part
number will be listed. If you need a component that is not readily available in your area, you
may order it from Zetron by calling for technical support on the ZR350 and giving the parts
information to the technician.
Parts may also be ordered by FAX. Address the FAX to “Zetron - Business & Industrial
Division - Technical Support”. Be sure to identify the model for which you are ordering parts
and the parts themselves as completely as possible. Send the FAX to (206) 820-7031.
Page F-2
1. INTRODUCTION
OVERVIEW ..................................................................................................................1-1
STANDARD FEATURES..............................................................................................1-2
SPECIFICATIONS........................................................................................................1-3
Telephone Interface ...............................................................................................1-3
Local Telephone Interface .....................................................................................1-3
Radio Interface.......................................................................................................1-3
Selective Calling.....................................................................................................1-3
General ..................................................................................................................1-4
1. INTRODUCTION
OVERVIEW
The ZR350 is designed to provide any size of business with a convenient way to keep in
touch with their employees anywhere on the business site, even when the very nature of the
business requires that those employees be in motion about the site.
In order to simplify both the installation of the ZR350 and the planning of the entire system,
the ZR350 is designed specifically to interface to the Motorola GR300 or GR500 Repeater
Station, or in simplex situations to a single GM300 radio. The ZR350 interfaces directly to
the Auxiliary connectors on the radios and ready-made cables for this installation are
available from Motorola.
The ZR350 supports both Tone Only and Tone+Voice paging using the Two-tone and Fivetone sequential selective calling formats. It also supports both two-way Radio and Talkback
operation for radio users.
The ZR350 supports up to three dedicated telephone desksets for local control of the system.
Depending on telephone wiring and the specific telephone instruments used, the desksets may
be located as much as 700 meters away from the ZR350. The operator of the Local phone can
use it not only to make pages and talk to radio users, but also to monitor phone calls and
repeater operations on the station. In an emergency situation, the Local phone operator can
take priority control of the ZR350 with only a hook flash and cancel any operations in
progress so that emergency pages can be made without delay.
The ZR350 telephone input can be used to connect to either the PSTN “Central Office” or a
company PBX switch. This not only allows knowledgeable users to make calls and pages
from any phone on the site or from public telephones, it also allows DTMF equipped radios
to originate calls whenever the need arises. The PSTN/PBX line can also be programmed to
automatically call a single preselected user when the line rings so that this input can be used
to provide after-hours contact with night shift or security personnel, or an emergency line for
fire or medical teams.
Note
If the PBX/CO port (J1) of the ZR350 is connected to the Public Switched Telephone
Network (PSTN), the installer should use a telephone coupler that is approved in the
jurisdiction where the connection is being made. If no coupler is used, it is the installer’s
responsibility to determine whether or not local regulation allow this connection to be made.
The ZR350 can be programmed using a straightforward set of DTMF commands from either
of the phone inputs or from the radio channel. Programmable items include all of the access
and disconnect codes, the Program mode access code, the station Morse code identifier, the
Page 1-1
Section 1. Introduction
Radio Activity and Call Limit timers, and many additional parameters, giving the installing
technician considerable control in defining the final operation of the paging system.
STANDARD FEATURES
The following is a short list of the more significant features that come standard in every
ZR350.
•
Dial-access paging from any PBX extension or PSTN subscriber line.
•
Priority paging and supervisory control from up to three dedicated telephone desksets.
•
Interconnect circuitry allows radio users to initiate calls to the PBX or outside line, or to
make calls to other radios or pagers on the system. With the optional Local Phone Ringer,
radio users may initiate calls to the dedicated telephone desksets.
•
Quick interfacing to Motorola Radius GM300 radios (up to 40 watts) using purpose made
cables. Designed to fit into the accessory slot in the Motorola Radius GR300 or GR500
Repeater Station cabinets (see Figure 1-1).
•
Can use existing telephone wiring at the customer site for ease of installation.
•
Includes a 100-user database, with individual user validation and support for group call
paging.
•
Supports Radios, Tone-Only, Tone & Voice, and Talkback paging using Motorola Quick
Call II, and Five-tone sequential (Select V).
•
Comes standard with a built-in Dial Click decoder circuit to support callers overdialing
the user number of the pager they wish to call from pulse or rotary telephone instruments.
ZR350
01
01
GM300
GM300
Power Supply
GR300
Duplexer
Figure 1-1 ZR350 Installed in GR300 Repeater Station
Page 1-2
Section 1. Introduction
SPECIFICATIONS
Telephone Interface
Line type
Subscriber line, PBX extension.
Connector
RJ11 modular jack.
Incoming call
Ring detection on tip-ring pair, selectable number of rings to
answer.
Call answer
Off-hook, tip-ring current draw.
Call disconnect
Busy tone, call limit, radio activity time-out, “#0” from phone,
or local override.
Overdial decode
DTMF and rotary dial click decode.
Ringer Equivalence
0.4B
Local Telephone Interface
Number of desksets
0-3. Typical phone draws 13-20 mA. Depending on system,
distances of 700 meters from ZR350 may be achieved.
Line type
Loop start, 12V battery feed.
Connector
RJ11 modular jack.
Radio Interface
Connector
Standard GM300 16 pin plugs.
Connections
Selective Calling
Two tone
Flat RX audio, Mic audio, Flat TX audio, CSQ detect, PTT,
PL/DPL detect, +12 VDC, Ground.
Motorola Quick Call II, tone groups 1-6 supported.
Five tone
CCIR1, CCIR2, EEA, EIA, ZVEI1, ZVEI2, DZVEI, PZVEI,
ZVEI3
Equipment types
5-tone radio, 5-tone talkback, 5-tone tone-only pager, 5-tone
Tone+Voice pager, QCII group call radio, QCII radio, QCII
talkback, QCII tone only pager, QCII Tone+Voice pager.
Page 1-3
Section 1. Introduction
General
Size
220 x 177 x 34 mm. Fits in GR300 and GR500 enclosures.
Weight
700 g
Power
10.5 - 16 VDC, 200 mA (powered by GM300 radio), up to 280
mA may be drawn if all three local desksets are off-hook.
Operating Temperature
-30° to +70° Celsius.
Adjustments
Audio level, Encode level, VOX, and Dial Click.
Indicators
Power, Transmit, Receive, Phone, and VOX.
Controls
Connect/Disconnect.
Prompt tones
Progress tones, error tones and warning tones sent to radio or
phone.
Programming
Via DTMF phone or DTMF radio.
Data retention
EEPROM.
Page 1-4
2. INSTALLATION
INSTALLATION WARNING ....................................................................................2-1
OVERVIEW.............................................................................................................2-1
EQUIPMENT REQUIRED FOR INSTALLATION....................................................2-2
RADIO CONFIGURATION AND PROGRAMMING FOR SIMPLEX SYSTEMS .....2-3
Simplex Assembly ............................................................................................2-7
RADIO CONFIGURATION AND PROGRAMMING FOR DUPLEX SYSTEMS ......2-8
Duplex Receive GM300 Radio .........................................................................2-8
Duplex Transmit GM300 Radio ........................................................................2-12
Duplex Assembly ..............................................................................................2-15
MOTOROLA GM350 AND GM950 CONNECTION NOTES ...................................2-16
ZR350 Connections ..........................................................................................2-16
GM350 Radio Programming .............................................................................2-17
GM950 Radio Programming .............................................................................2-17
Additional Radio Notes .....................................................................................2-18
INITIAL TURN-ON ..................................................................................................2-19
ADJUSTMENTS......................................................................................................2-19
Setting the Receive Level .................................................................................2-19
Setting the Transmit Tone Level.......................................................................2-20
Setting the Dial Click Decode Level..................................................................2-20
Setting the VOX Level ......................................................................................2-21
FINAL ASSEMBLY..................................................................................................2-21
PROGRAMMING ....................................................................................................2-21
2. INSTALLATION
INSTALLATION WARNING
This equipment generates, uses, and can radiate radio frequency energy. If not installed and
used in accordance with the manual, it may cause interference to radio communications.
Installation of the ZR350 should only be attempted by qualified radio service personnel.
OVERVIEW
This section explains how to install the ZR350 EuroPatch into a system using either one or
two of the Motorola Radius radios, specifically the GM300 radios. There will be two separate
wiring diagrams, depending on whether or not the system will be using a single radio for
simplex operation or two radios for half-duplex operation. Refer to the GM300 Service
Manual (6880902Z32) for details on the radio and the GM300 RSS Manual (6880902Z36)
for information on using the Motorola Radio Service Software to program the radio(s). Refer
to the GR300/GR500 Repeater Station manual (6880903Z42) and the repeater programming
supplement to the RSS manual (6880903Z43) when using a GR300 repeater.
A complete telephone interconnect system requires;
1. A ZR350 EuroPatch Telephone Interconnect.
2. A fixed radio or duplex base station comprised of one or two Motorola GM300 radios.
3. An interface cable between the ZR350 EuroPatch and Motorola radio(s). One cable per
radio is required; one for simplex, two for duplex.
4. A 12 volt DC power supply for the radio(s) and EuroPatch.
5. A duplexer (if two radios are used) and antenna.
6. A Digital Voice Delay module for the EuroPatch if a single Motorola simplex radio is
being used.
7. Up to 3 local telephone units if direct connect dispatch is desired.
8. Field units e.g. handheld radios, radios, and/or pagers.
Quick-cabling is provided for the connection between the ZR350 EuroPatch and the radio(s).
Power is provided by the connection to the receive radio. The mounting holes (one on each
side) are aligned to match the holes on the Motorola repeater cabinet. Interface cables are
typically provided with the GR300 and GR500 cabinets, or may be optionally ordered from
Motorola.
The ZR350 is typically located in or near the telephone room and usually occupies a PBX
extension. Additionally, up to three telephone desksets may be directly connected. These
desksets are connected using normal two-wire cabling and thus may be placed nearly
anywhere in the building and take advantage of existing runs of telephone cable.
Page 2-1
Section 2. Installation
Simple DTMF programming commands allow the system manager to enable/disable users,
define the calling restrictions and otherwise exercise control over operation of the system.
EQUIPMENT REQUIRED FOR INSTALLATION
The following equipment is required for proper installation of the ZR350 to either one or two
Radius GM300 radios:
•
A radio communications service analyzer
•
An oscilloscope (or at least a VOM capable of reading Volts AC on an RMS scale) for
setting audio levels
•
A hand-held radio with DTMF encode capability programmed for the same channels as
the new system
•
A DTMF telephone to use in the Local Telephone input
•
Several sizes of cross-head screw driver to remove the top cover for configuration
You may include any other equipment and hand tools that your experience indicates might be
useful, but this is considered to be the minimum equipment necessary to perform a normal
installation without difficulty.
Page 2-2
Section 2. Installation
RADIO CONFIGURATION AND PROGRAMMING FOR SIMPLEX SYSTEMS
This section explains how to configure a single GM300 radio for operation with the
EuroPatch. The single radio will operate as a transceiver, providing the receive function,
transmit function, PL/DPL decoder, and Select V (five-tone) decoder.
CAUTION
The radio auxiliary connector must be programmed properly or damage may occur to the
radio or ZR350 EuroPatch!
A single PL/DPL decode may be programmed in the GM300 radio to provide protection
against co-channel interference or added system security. If a PL/DPL decode is programmed,
all units accessing the ZR350 must transmit this same PL/DPL.
The radio may also include a Select V (five-tone) decode address. This decoder may be used
to provide radio to phone access, and optional emergency number autodial. If this feature is
desired, pin 4 of the auxiliary connector should be programmed as "External Alarm" (as
shown in the following example). If the feature is not desired, either Pin 4 should be
programmed as NULL 2, or no Select V decode configured. In the programming example, a
Select V decode is enabled for CCIR address 12345.
The receiver section may be programmed for either "Local" or "Distant" sensitivity. The
installer should consider the application and select the appropriate mode.
Since the system will only operate on a single channel, only one "MODE" should be
installed. This will ensure the station does not end up on the wrong frequency.
Example Simplex GM300 Radio Setup: Configure hardware jumpers in GM300 radio as
shown in Table 2-1.
Table 2-1 Motorola GM300 Jumper Settings: Simplex
Jumper
JU551
JU651
JU701
Setting
B
A
A
Function
RX audio = de-emp and muted
Mic sensitivity = 80 mV
Flat TX audio through limiter
Page 2-3
Section 2. Installation
Example Simplex Radio Setup (continued):
MOTOROLA Radio Service Software
Radius GM300 Model:M44GMC29C3__
Use UP / DOWN Arrows To Enable.
CHANGE/VIEW:RADIO WIDE
RADIO WIDE CONFIGURATION
MODEL INFORMATION
M44GMC29C3__............40 WATT
UHF Band .........438.0-470.0 MHz
Squelch...............................Coded
Conventional Modes....................1
Serial Number...........159TSS0376
OPTIONS
TOT Rekey Time (s).........Off
Forced Monitor.................Off
Handset...............................N
ACCESSORY INFORMATION
ACC. Internal........................None
ACC. External.............General I/O
ACC. Custom..............................Y
F1
HELP
F2
F3
F4
F5
PRINT
SCREEN
MOTOROLA Radio Service Software
Radius GM300 Model:M44GMC29C3__
F6
F7
SCAN
OPTIONS
F8
F9
F10
OTHER
EXIT
ACCESSORY
Use UP / DOWN Arrows To Enable.
CHANGE/VIEW:RADIO WIDE:ACCESSORY
ACCESSORY CONNECTOR CONFIG
INT Accessory: None
PIN#
4
6
8
9
12
14
DESCRIPTION
External Alarm
NULL 1
PL/DPL & CSQ Det
NULL 1
CSQ Detect
NULL 1
EXT Accessory:
DATA DIR
Output
Input
Output
Input
Output
Input
Power-Up Delay (sec) : 0.204
F1
F2
F3
F4
F5
HELP
PREVIOUS NEXT
PRINT
ACC. EXT ACC. EXT SCREEN
Page 2-4
F6
General I/O
Custom: Y
DEBOUNCE
No
No
No
No
No
No
ACT LEVEL
High
Low
Low
High
Low
Low
F7
F8
F9
RESET
DEFAULT
F10
EXIT
Section 2. Installation
Example Simplex Radio Setup (continued):
MOTOROLA Radio Service Software
Radius GM300 Model:M44GMC29C3__
Enter Value.
CHANGE/VIEW:MODE
Model 001
Name...01
Type...................................Conventional
Rx Frequency.....................464.50000
Tx Frequency.....................464.50000
Rx Squelch Type................TPL
Rx Squelch Code................110.9 2Z
Rx Signaling System.......01
Rx Signaling Name.........SELECT V
Tx Squelch Type.................CSQ
Tx Signaling System.......00
Tx Signaling Name..........NONE
Busy Channel Lockout.........N
Local/Distance.....................DX
Time Out Timer (s)..............255
F1
F2
F3
F4
HELP GOTO PREVIOUS NEXT
MODE
MODE
MODE
F5
F6
PRINT SCAN
SCREEN LIST
MOTOROLA Radio Service Software
Radius GM300 Model:M44GMC29C3__
F7
F8
MODE
UTILITY
F9
F10
EXIT
Use UP / DOWN Arrows To Enable.
CHANGE/VIEW:SIG:RAD WIDE
SIGNALING RADIO WIDE
Voice Selcall Encode...................N
Call Alert Encode.........................N
Radio Check Encode....................N
Low Battery..................................N
Emergency Alarm.........................None
F1
HELP
F2
F3
F4
Auto Reset Timer (s)..........Off
PTT Repeat Timer (s)........Off
Tx Hold Time (s)................Off
Call List Time Out (s).........Off
Select V Sidetones.............Disabled
F5
PRINT
SCREEN
F6
F7
F8
F9
F10
EXIT
Page 2-5
Section 2. Installation
Example Simplex Radio Setup (continued):
MOTOROLA Radio Service Software
Radius GM300 Model:M44GMC29C3__
Use UP / DOWN Arrows To Adjust Value.
CHANGE/VIEW:SIG:DECODE
ID
A
EFT
TIME
0.00
F1
DECODE
GROUP GROUP GROUP
SEQUENCE DIGIT
TYPE POSITIONS
12345-- -------
F2
F3
F4
F5
F6
HELP GOTO
PREVIOUS NEXT
PRINT
SEQUENCE SEQUENCE SEQUENCE SCREEN
MOTOROLA Radio Service Software
Radius GM300 Model:M44GMC29C3__
ALERT
CALL
TONES LIGHT
Y Y
F7
F8
F9
F10
DELETE
ADD
SEQUENCE SEQUENCE
EXIT
Use UP / DOWN Arrows To Select Type.
CHANGE/VIEW:SIG:SIGNAL
System........................01
Type............................SELECT V
Call Type.....................Call Alert
Alert Tone Reset..........Automatic
Signaling Std.............100ms CCIR
Horn/Lights................Permanent
Horn/Lights Delay.......0.0
PTT ID........................No
PTT Sidetone..............Y
PTT Short Sidetone.....Y
Pretime (s)....................0.5PL/DPL Required.....N
Signaling Squelch........N
DOS Hold off.................0.0
Primary Decode.......... A
Secondary Decode.......-F1
F2
HELP
Page 2-6
F3
F4
Base Call Encode.........-PTT Encode.................-Ext Call Encode...........-F5
F6
PREVIOUS NEXT
PRINT
SYSTEM SYSTEM SCREEN
-- --- --- -F7
F8
DELETE
ADD
SYSTEM
SYSTEM
F9
F10
EXIT
Section 2. Installation
Simplex Assembly
1. Complete the connection of the radio to the power supply and the antenna cable. The
radio should be programmed for its channel assignment and the Auxiliary connector pin
functions before being connected to the ZR350.
2. If the ZR350 is still in the factory default configuration and no Digital Voice Delay board
is to be used, proceed directly to step 4, otherwise, remove the top cover from the ZR350.
Working from the rear of the unit, the radio connectors will be on the right and the
telephone connectors on the left. See Figure 2-1.
3. Locate the jumpers JP3, JP4, and JP5 (just behind P2), and verify that they are installed
(factory default). These jumpers pass signals from the Transmit connector P2 over to the
Receive connector P1. In the simplex application all signals enter and leave the unit via
the Receive connector.
If a Digital Voice Delay board is to be used, remove the installed jumper JP9, and install
the Digital Voice Delay board.
Once you have set/verified the positions of these jumpers, proceed with the assembly.
4. Connect the cable from the radio to the Receive connector, P1, on the far right of the
ZR350 chassis.
5. Connect the DTMF telephone set to the Local telephone jack, J2, on the far left of the
unit. This will be used to enter the programming mode on the ZR350, for adjustments and
configuring the unit.
This completes the initial assembly of the equipment. Final assembly will be done after the
tests and adjustments are complete. Proceed now to the Initial Turn-on.
Local
J2
PBX/CO
J1
Auxiliary
P3
Transmit
P2
Receive
P1
Figure 2-1 Rear of the ZR350
Page 2-7
Section 2. Installation
RADIO CONFIGURATION AND PROGRAMMING FOR DUPLEX SYSTEMS
This section explains how to configure a pair of GM300 radios for duplex operation. It is
broken up into two parts: one for the receive radio and one for the transmit radio.
Duplex Receive GM300 Radio
This radio will be used by the ZR350 EuroPatch to perform as a receiver, PL/DPL decoder,
and Select V (five-tone) decoder. It does not require any transmit capability.
CAUTION
The radio auxiliary connector must be programmed properly or damage may occur to the
radio or ZR350 EuroPatch!
A single PL/DPL decode may be programmed in the receive radio to provide protection
against co-channel interference or added system security. If a PL/DPL decode is programmed
in the receive radio, all units accessing the EuroPatch must transmit this same PL/DPL.
The receive radio may also include a Select V (five-tone) decode address. This decoder may
be used to provide radio to phone access, and optional emergency number autodial. If this
feature is desired, pin 4 of the auxiliary connector should be programmed as "External
Alarm" (as shown in the following example). If the feature is not desired, either Pin 4 should
be programmed as NULL 2, or no Select V decode configured. In the programming example,
a Select V decode is enabled for CCIR address 12345.
The receive radio may be programmed for either "Local" or "Distant" sensitivity. The
installer should consider the application and select the appropriate mode.
Since the system will only operate on a single channel, only one "MODE" should be
installed. This will ensure the station does not end up on the wrong frequency.
Example Duplex Receive Radio Setup: Configure the hardware jumpers in the GM300 radio
used for a receiver as shown in Table 2-2.
Table 2-2 Motorola GM300 Radio Jumper Settings: RX
Jumper
JU551
JU651
JU701
Page 2-8
Setting
B
A
A
Function
Rx audio = de-emp and muted
Mic sensitivity = 80 mV
Flat Tx audio through limiter
Section 2. Installation
Example Duplex Receive Radio Setup (continued):
MOTOROLA Radio Service Software
Radius GM300 Model:M44GMC29C3__
Use UP / DOWN Arrows To Enable.
CHANGE/VIEW:RADIO WIDE
RADIO WIDE CONFIGURATION
MODEL INFORMATION
M44GMC29C3__................40 WATT
UHF Band ..............438.0-470.0 MHz
Squelch...................................Coded
Conventional Modes........................1
Serial Number................159TSS0376
OPTIONS
TOT Rekey Time (s).........Off
Forced Monitor..................Off
Handset...............................N
ACCESSORY INFORMATION
ACC. Internal........................None
ACC. External.............General I/O
ACC. Custom.............................Y
F1
F2
F3
F4
HELP
F5
F6
PRINT
SCREEN
MOTOROLA Radio Service Software
Radius GM300 Model:M44GMC29C3__
F7
F8
SCAN
OPTIONS
F9
F10
OTHER
EXIT
ACCESSORY
Use UP / DOWN Arrows To Enable.
CHANGE/VIEW:RADIO WIDE:ACCESSORY
ACCESSORY CONNECTOR CONFIG
INT Accessory: None
PIN#
4
6
8
9
12
14
DESCRIPTION
External Alarm
NULL 1
PL/DPL & CSQ Det
NULL 1
CSQ Detect
NULL 1
Power-Up Delay (sec) : 0.204
F1
F2
F3
HELP
EXT Accessory:
F4
General I/O
DATA DIR
Output
Input
Output
Input
Output
Input
F5
PREVIOUS NEXT
PRINT
ACC. EXT ACC. EXT SCREEN
Custom: Y
DEBOUNCE
No
No
No
No
No
No
F6
F7
ACT LEVEL
High
Low
Low
High
Low
Low
F8
F9
F10
RESET
EXIT
DEFAULT
Page 2-9
Section 2. Installation
Example Duplex Receive Radio Setup (continued):
MOTOROLA Radio Service Software
Radius GM300 Model:M44GMC29C3__
Enter Value.
CHANGE/VIEW:MODE
Model 001
Name.........01
Type.........................................Conventional
Rx Frequency...........................469.50000
Tx Frequency...........................Blank
Rx Squelch Type......................TPL
Rx Squelch Code......................110.9 2Z
Busy Channel Lockout..............N
Local/Distance..........................Local
Time Out Timer (s)...................255
F1
F2
F3
F4
HELP
GOTO
MODE
PREVIOUS
MODE
NEXT
MODE
Rx Signaling System.......01
Rx Signaling Name.........SELECT V
F5
PRINT
SCREEN
MOTOROLA Radio Service Software
Radius GM300 Model:M44GMC29C3__
F6
F7
SCAN
LIST
F8
F9
F10
MODE
UTILITY
EXIT
Use UP / DOWN Arrows To Enable.
CHANGE/VIEW:SIG:RAD WIDE
SIGNALING RADIO WIDE
Voice Selcall Encode.............N
Call Alert Encode...................N
Radio Check Encode.............N
Low Battery...........................N
Emergency Alarm..................None
F1
F2
HELP
Page 2-10
F3
F4
Auto Reset Timer (s).......Off
PTT Repeat Timer (s).....Off
Tx Hold Time (s).............Off
Call List Time Out (s)......Off
Select V Sidetones..........Disabled
F5
PRINT
SCREEN
F6
F7
F8
F9
F10
EXIT
Section 2. Installation
Example Duplex Receive Radio Setup (continued):
MOTOROLA Radio Service Software
Radius GM300 Model:M44GMC29C3__
Use UP / DOWN Arrows To Adjust Value.
CHANGE/VIEW:SIG:DECODE
EFT
ID TIME
A 0.00
F1
HELP
DECODE
GROUP GROUP GROUP
ALERT
CALL
SEQUENCE DIGIT
TYPE POSITIONSTONES LIGHT
12345-------Y
Y
F2
F3
F4
F5
F6
GOTO PREVIOUS NEXT
PRINT
SEQUENCE SEQUENCE SEQUENCE SCREEN
MOTOROLA Radio Service Software
Radius GM300 Model:M44GMC29C3__
F7
F8
F9
F10
DELETE
ADD
SEQUENCE SEQUENCE
EXIT
Use UP / DOWN Arrows To Select Type.
CHANGE/VIEW:SIG:SIGNAL
System........................01
Type............................SELECT V
Call Type.....................Call Alert
Alert Tone Reset..........Automatic
Signaling Std..............100ms CCIR
Horn/Lights...................Permanent
Horn/Lights Delay.........0.0
PTT ID........................No
PTT Sidetone..............Y
PTT Short Sidetone.....Y
Pretime (s)................0.5
PL/DPL Required........N
Signaling Squelch.....N
DOS Hold off..............0.0
Primary Decode.......... A
Secondary Decode.......-F1
HELP
F2
F3
F4
Base Call Encode.......-- -- -PTT Encode...............-- -- -Ext Call Encode..........-- -- -F5
F6
F7
PREVIOUS NEXT
PRINT
SYSTEM SYSTEM SCREEN
F8
DECODE
ADD
SYSTEM SYSTEM
F9
F10
EXIT
Page 2-11
Section 2. Installation
Duplex Transmit GM300 Radio
This radio will be used by the ZR350 EuroPatch to perform as a transmitter. It may also be
used to provide transmit channel busy detection and lockout.
CAUTION
The radio auxiliary connector must be programmed properly or damage may occur to the
radio or ZR350 EuroPatch!
The transmit radio should not be programmed for any PL/DPL or Select V encode or decode.
If using the transmit radio to detect transmit channel busy and lockout, the receiver section
may be programmed for either "Local" or "Distant" sensitivity. The installer should consider
the application and select the appropriate mode.
Since the system will only operate on a single channel, only one "MODE" should be
installed. This will ensure the station does not end up on the wrong frequency.
Example Duplex Transmit Radio Setup: Configure the hardware jumpers in the GM300 radio
used for a transmitter as shown in Table 2-3.
Table 2-3 Motorola GM300 Jumper Settings: TX
Jumper
JU551
JU651
JU701
Page 2-12
Setting
B
A
A
Function
Rx audio = de-emp and muted
Mic sensitivity = 80 mV
Flat Tx audio through limiter
Section 2. Installation
Example Duplex Transmit Radio Setup (continued):
MOTOROLA Radio Service Software
Radius GM300 Model:M44GMC29C3__
Use UP / DOWN Arrows To Enable.
CHANGE/VIEW:RADIO WIDE
RADIO WIDE CONFIGURATION
MODEL INFORMATION
M44GMC29C3__...................40 WATT
UHF Band .................438.0-470.0 MHz
Squelch......................................Coded
Conventional Modes...........................1
Serial Number...................159TSS0375
OPTIONS
TOT Rekey Time (s)............Off
Forced Monitor....................Off
Handset.................................N
ACCESSORY INFORMATION
ACC. Internal..........................None
ACC. External...............General I/O
ACC. Custom...............................Y
F1
F2
F3
F4
HELP
F5
F6
PRINT
SCREEN
MOTOROLA Radio Service Software
Radius GM300 Model:M44GMC29C3__
F7
F8
SCAN
OPTIONS
F9
F10
OTHER
EXIT
ACCESSORY
Use UP / DOWN Arrows To Enable.
CHANGE/VIEW:RADIO WIDE:ACCESSORY
ACCESSORY CONNECTOR CONFIG
INT Accessory: None
PIN#
4
6
8
9
12
14
DESCRIPTION
NULL 2
NULL 1
CSQ Detect
NULL 1
NULL 1
NULL 1
Power-Up Delay (sec) : 0.187
F1
F2
F3
HELP
EXT Accessory:
DATA DIR
Output
Input
Output
Input
Input
Input
F4
F5
PREVIOUS NEXT
PRINT
ACC. EXT ACC. EXT SCREEN
General I/O
Custom: Y
DEBOUNCE
No
No
No
No
No
No
ACT LEVEL
High
Low
Low
Low
Low
Low
F6
F8
F7
F9
F10
RESET
EXIT
DEFAULT
Page 2-13
Section 2. Installation
Example Duplex Transmit Radio Setup (continued):
MOTOROLA Radio Service Software
Radius GM300 Model:M44GMC29C3__
Enter Value.
CHANGE/VIEW:MODE
Model 001
Name..............01
Type........................................Conventional
Rx Frequency..........................464.50000
Tx Frequency..........................464.50000
Phone Signaling System..............00
Phone Signaling Name................NONE
Rx Squelch Type....................CSQ
Rx Signaling System....................00
Rx Signaling Name......................NONE
Tx Squelch Type.....................CSQ
Tx Signaling System....................00
Tx Signaling Name......................NONE
Busy Channel Lockout.............N
Local/Distance.........................DX
Time Out Timer (s)..................250
F1
F2
F3
F4
HELP
GOTO
MODE
Page 2-14
PREVIOUS
MODE
NEXT
MODE
F5
PRINT
SCREEN
F6
SCAN
LIST
F7
F8
MODE
UTILITY
F9
F10
EXIT
Section 2. Installation
Duplex Assembly
1. Complete the connection of the two radios to their power supply and the appropriate
antenna cables. The radios should be programmed for their transmit and receive channel
assignments and their Auxiliary connector pin functions before being connected to the
ZR350.
2. Remove the top cover from the ZR350, working from the rear of the unit the radio
connectors will be on the right and the telephone connectors on the left. See Figure 2-2.
Local
J2
PBX/CO
J1
Auxiliary
P3
Transmit
P2
Receive
P1
Figure 2-2 Rear of the ZR350
3. Locate jumpers JP3, JP4, and JP5 inside the unit and remove the installed jumpers from
these positions. (Stow the jumpers in a safe place for possible, future simplex
installations.)
4. Connect the cable from the Receive radio to the Receive connector, P1, on the far right of
the ZR350 chassis.
5. Connect the cable from the Transmit radio to the Transmit connector, P2, on the right in
between the Auxiliary and the Receive connectors.
6. Connect the DTMF telephone set to the Local telephone jack, J2, on the far left of the
unit. This will be used to enter the programming mode on the ZR350, for adjustments and
configuring the unit.
7. This completes the initial assembly of the equipment. Final assembly will be done after
the tests and adjustments are complete. Proceed now to the Initial Turn-on.
Page 2-15
Section 2. Installation
MOTOROLA GM350 AND GM950 CONNECTION NOTES
The following subsections cover interfacing the ZR350 to several popular models of
Motorola radios.
ZR350 Connections
The ZR350 uses the same style connectors for interfacing to the radios the Motorola has
utilized for its GM-series radios. Table 2-4 shows which signals are available on the pins of
each separate port. Some of the pins have no signal connected, or only have signal if jumpers
have been set correctly inside the unit.
Local
J2
PBX/CO
J1
Auxiliary
P3
Transmit
P2
Receive
P1
Figure 2-3. Rear Panel of the ZR350
Table 2-4. Pinout of the ZR350 Connectors
PIN
Description
P3
ACC
P2
TX
P1
RX
1
SPKR-
Yes
NC
Yes
2
MIC
Yes
Yes
Yes*
3
PTT
Yes
Yes
Yes*
4
EXT ALARM
NC
NC
Yes
5
FLAT TX AUDIO
Yes
Yes
Yes*
6
I/O
Yes*
Yes*
Yes*
7
GND
Yes
Yes
Yes
8
COR/TX Busy
Yes
Yes
Yes
9
EM SW
NC
Yes
Yes
10
IGN
Yes
NC
Yes
11
RX AUDIO
Yes
NC
Yes
12
/16 CH COR
Yes
NC
Yes
13
+12Vdc
Yes
NC
Yes
14
MIC OFF HOOK
Yes
NC
Yes
15
INT SP+
NC
Yes
Yes
16
EXT SP +
Yes
Yes
Yes
* Jumper selectable
For Simplex installations use P1. Install JP3 JP4 JP5
For Duplex installations use P1 & P2. Remove JP3 JP4 JP5
Page 2-16
Section 2. Installation
P1 pin 4 is used to trigger a predefined Autodial in the ZR350. If no autodial is programmed
the ZR350 will go off hook and allow freedial when activated.
GM350 Radio Programming
To connect the ZR350 to the GM350 use direct pin to pin 16 way interface cables (supplied
with ELN4055 — available from Motorola ), and program the GM350 I/O as shown in
Figure 2-4.
Figure 2-4. GM350 Programming Parameters
NOTE:
Connect pin 10 (Ignition Sense) of the GM350 to +12VDC so that the Radio
powers-on in the “on” state.
GM950 Radio Programming
To connect the ZR350 to the GM950 use direct pin to pin 16 way interface cables (supplied
with ELN4055 — available from Motorola), and program the GM950 I/O as shown in Figure
2-5.
NOTE:
Connect pin 10 (Ignition Sense) of the GM950 to +12VDC so that the Radio
powers-on in the “on” state.
Page 2-17
Section 2. Installation
Figure 2-5. GM950 Programming Parameters
Additional Radio Notes
Motorola Software Release Note for Rapid PTT Patch (GM350) R01.00.00
Purpose for release
This utility updates adds a patch to codeplug patch space to address a problem that occurs
when the PTT is activated in rapid succession (less that 150 ms between PTTs). In this
situation the second PTT is ignored. This problem only occurs when PL is set on the channel
and really on has an impact on radio operating in a base station environment. This utility was
developed by Graeme Johnson in Feb 1997. This is a re-release of this tool.
Product:
Rapid PTT Patch DOS Utility
Version:
R01.00.00
Kit Number:
ENVN4023A
Date:
13/10/99
Contact:
Cathal [email protected]
Phone: EIRE 3531-7970337
Related Codeplugs:
Patch added to codeplug patch space.
Related Firmware:
No changes to existing firmware
Utility Code Information
Kit number for release ENVN4023A. Stored under Clearcase at:
/vobs/rss/ariane_conv/utility/rapid_PTT_Patch
This is a self extracting utility which runs on DOS.
Page 2-18
Section 2. Installation
INITIAL TURN-ON
1. Connect the power cable from the AC/DC power supply to an appropriate AC power
source.
2. Switch the power supply on.
3. Turn on the radio(s) by turning the volume controls clockwise.
4. Verify that the ZR350’s green Power LED is illuminated, and that the display windows
on the radios are illuminated.
ADJUSTMENTS
The following steps explain how to set the receive audio level, the (signaling) encode level,
and the dial click decode level. When it is necessary to enter the program mode during these
adjustments, you will do so from the Local phone, or a DTMF equipped radio or portable
radio. To enter the program mode, lift the handset on the Local phone instrument and enter
the program mode access code at the prompt. The default access code is 12350#. When you
have finished the setting the desired levels, press 99# to exit the program mode.
NOTE
At any time, while in the program mode, if no DTMF key is pressed for 60 seconds, the
ZR350 will exit the program mode automatically. To get back into the program mode, hang
up the Local phone, then just lift the handset and enter the program mode access code again.
Setting the Receive Level
This adjustment is necessary to ensure an adequate level of receive audio for reliable DTMF
decode from the radio and a good level of voice to the phone.
1. Using a service monitor, generate a 1 kHz tone at 60% of full deviation on the receive
channel of the ZR350 system.
2. Using an oscilloscope or DVM, adjust the RX control (R88) until a reading of 470 mV
rms (or 1.33V p-p) is present at pin 1 of the ZR350 programming connector, J2, on the
front of the unit, or on either pin of JP10 on the Controller Board inside. See Figure 2-6
for the location of J2-pin 1.
pin 1
pin 5 Ground
Figure 2-6 Programming Connector J2, Front View
Page 2-19
Section 2. Installation
Setting the Transmit Tone Level
This step is necessary to set the audible tone deviation levels transmitted from the
interconnect. If the optional encode is used, then this step will set both audible and
subaudible tone levels simultaneously.
1. Enter the program mode by lifting the handset on the Local phone and entering the DTMF
program mode access code (the default is 12350#). The unit should respond with five
quick beeps to indicate successful entry into the program mode.
2. Set the service monitor to measure the signal deviation on the transmit channel of the
ZR350 system.
3. Enter the command 92# from the phone to start the tone generation. The ZR350 will
generate a 1 kHz tone which can be observed on the transmit channel with the service
monitor.
4. Adjust the ENCODE control (R89) on the ZR350 to produce a reading of 60% of
maximum channel deviation on the service monitor (for example, set it to 3 kHz
deviation for 25 kHz channel spacing systems, or 1.5 kHz deviation on 12.5 kHz
systems).
5. Press a DTMF '#' on the phone to end the Encode test. Enter the command 99# to exit the
program mode.
Setting the Dial Click Decode Level
If the ZR350 is to be used in situations where some of the callers will be trying to over-dial
user numbers from rotary phones, the following steps will ensure the best possible decoding
of the dial clicks from rotary or pulse telephones. To perform this test, a call has to be made
to the PSTN line or PBX extension to which the ZR350 is connected from a separate line or
extension so that the dial click sensitivity can be set while decoding clicks that have actually
come through the switch. This is what happens on live calls. The test will use DTMF and
both rotary or pulse dialing so both kinds of phone instruments will need to be connected to
the line from where the call is being made from, or you may use a single telephone
instrument that is capable of being switched between the two modes of dialing.
1. Once the ZR350 has been connected to the phone line or PBX extension that it will be
using, and you have set up the DTMF and rotary phones on a separate line or extension,
call the ZR350 using the DTMF phone. When the ZR350 answers the ringing line, after
the first ring is default, enter the program mode access code (12350# is default) and listen
for the five beeps to confirm entry into the program mode.
2. Still using DTMF, enter the command 96# to start the dial click decode test. At this point,
pick up the rotary/pulse phone and hang up the DTMF phone (or switch modes on the
phone if it is capable of both styles of dialing).
3. Dial the digits one through zero on the rotary/pulse phone and listen after each digit for
the beeps coming back from the ZR350. The ZR350 should return a string of beeps that is
equal to the digit dialed.
Page 2-20
Section 2. Installation
4. If the ZR350 does not return the correct number of beeps for some or all of the digits
dialed, then adjust the CLICK control (R90) and try the missed digits again, continue this
procedure until all of the digits are decoded correctly.
5. Switch back to the DTMF phone and enter a DTMF "#" to end the test. Enter 99# to exit
the program mode.
Setting the VOX Level
The VOX detector in the ZR350 is used to operate the PTT when the unit is operating in the
simplex mode and to detect a Busy signal from the phone while operating in any mode. The
VOX is initially adjusted during production and in many cases should be adequate as it is.
However, checking that it operates correctly could save time in the future. This test can be
conducted from either the Local phone or the PBX/PSTN line. It should be done on
whichever line is getting a poor response from the VOX circuit.
1. Go off hook on the Local phone or dial the ZR350's phone number, when the unit
answers and prompts you enter the program mode access code (12350# is default) and
listen for the five beeps.
2. Speak into the phone in a normal tone of voice while watching the VOX LED. The LED
should illuminate when speaking into the phone and turn off during quiescent periods. If
the output of the VOX detector is not switching on and off as it should, then adjust the
VOX control (R87), until the detector responds correctly to the presence and absence of
voice audio on the phone line.
3. Press the DTMF command 99# to exit the programming mode and hang up the phone.
FINAL ASSEMBLY
The final assembly consists of replacing the top cover on the unit and installing it into
whatever equipment rack arrangement is being used on site. If the ZR350 is being used with
the Motorola GR300 or GR500 Repeater system, the top cover of the ZR350 is put on with
the beveled edge of the cover towards the rear of the unit, so that it can be slid all the way
forward in the top position of the GM300 chassis. If the ZR350 is being used with a single
radio or some other sort of rack arrangement, then fit the top cover with the beveled edge
facing towards the front of the unit.
PROGRAMMING
The programming of the ZR350 to customize it for a particular application is covered in
detail in Section 5. It is highly recommended that time be taken to review the next section on
the operation of the ZR350 before going on to programming the unit.
Page 2-21
3. OPERATION
OVERVIEW.............................................................................................................3-1
MULTI-USER INTERCONNECT.............................................................................3-1
Simplex Operation ............................................................................................3-1
Duplex Operation..............................................................................................3-1
Phone-to-Radio Calls........................................................................................3-2
Communication Equipment...............................................................................3-3
Answering a Call...............................................................................................3-4
Terminating a Call.............................................................................................3-5
Radio-to-Phone Calls........................................................................................3-7
Radio-to-Radio Calls.........................................................................................3-9
Radio Access Code Summary ..........................................................................3-10
Private Tones (PL/DPL + CSQ) ........................................................................3-10
SINGLE USER INTERCONNECT...........................................................................3-12
USER PROGRAMMING .........................................................................................3-13
3. OPERATION
OVERVIEW
This section of the manual explains how the ZR350 EuroPatch works in all of its various
modes. A thorough understanding of how the unit operates will make it simpler to plan the
unit’s programming.
NB: Throughout this section the word “radio” is used in its most basic sense describing a
radio user as anyone with a two-way radio that can both receive and make calls. This will
include persons carrying portables as well as people in vehicles.
MULTI-USER INTERCONNECT
The ZR350 EuroPatch is capable of supporting interconnect operations in two modes (multiuser and single user) on its PSTN/PBX line. This portion of the Operations section will deal
with how the ZR350 operates in the multi-user mode, which is the default mode.
Simplex Operation
The ZR350 defaults to operating in the simplex mode. It actually has two push-to-talk modes,
plain Simplex VOX and Simplex VOX with prekey. The difference between the two modes lies
in how the interconnect behaves after the radio unkeys each time.
In Simplex VOX, the interconnect will mute the receive audio path when the radio unkeys and
then just sit there and wait to see if the telephone VOX goes active or the Carrier detect goes
active in order to determine what the interconnect does next.
In Simplex VOX with Prekey, when the radio unkeys the interconnect mutes the receive audio
path and automatically keys the transmitter and opens the phone-to-radio audio path in
anticipation of the telephone party answering the radio right away. If the VOX does not detect
audio from the phone within the programmed VOX Hold Time (one second by default), then
the interconnect will unkey the transmitter and wait to see what happens, just as it does in the
Simplex VOX mode.
Most of the operations are altered in obvious ways when operating in the simplex mode.
When a phone-to-radio call is placed, the interconnect will unkey in between rings in order to
check for the radio answering the call. When a radio-to-phone access is made, the
interconnect will unkey after letting the radio hear two seconds of dial tone so that it can
receive the phone number the radio wants to dial.
Duplex Operation
The ZR350 is also capable of operating in the half-duplex mode. This means that the ZR350
itself is interfaced to a full duplex radio station and can support both repeater operations and
radio-to-radio calling.
Page 3-1
Section 3. Operation
Phone-to-Radio Calls
When a caller wants to place a page or talk to a radio, the caller dials the phone/extension
number of the ZR350 and it starts to ring. The ZR350 starts counting the number of rings on
the phone line and it checks the status of the receiver to see if the channel is currently in use.
If the channel is busy, then the ZR350 will not answer the phone line until the carrier detect
input has been idle for at least three seconds. If the channel is idle, then the unit will answer
the phone line after it has counted the number of rings it is programmed for.
When the necessary conditions have been satisfied (i.e. channel is idle and the proper number
of rings have been counted), then the ZR350 answers the phone and sends the caller a single
beep. This beep is a prompt to the phone caller to go ahead and enter the user number of the
radio to which they wish to speak. If the number entered by the caller is a valid user, the unit
will key the transmitter and selectively call the radio. After it has called the radio the ZR350
will send out a ringing sound until the radio answers the call. As an alternative, the
interconnect can be programmed to ring out just once and then wait silently for the radio to
answer the page. Regardless of which ring out mode is being used, the interconnect will only
wait for the programmed Radio Answer Time, which defaults to 30 seconds, before it either
terminates the call or forwards it on to another user. If the user number entered by the caller is
not valid, then the interconnect returns an error tone to the caller and hangs up.
In the event that the caller does not respond to the prompt from the ZR350 and makes no user
number entry, the ZR350 will wait for four seconds to hear the first digit of the overdial, and
if it does not hear anything, then the interconnect will try to call the user programmed in the
Auto-Call User field. If there is no Auto-Call User then the ZR350 will return an error tone to
the caller and hang up the line.
If the ZR350 answers the phone and then, while the caller is entering the user number, the
channel becomes busy with dispatch traffic, the ZR350 will send a double ring sound to the
phone caller while it is waiting for the channel to become idle again, for up to 30 seconds.
The caller can wait on the line for the channel to clear at which time the interconnect will
place the call.
Phone-to-Radio Call Example
USER
Dials extension number of ZR350.
ZR350
Waits for programmed number of rings, then answers with a BEEP.
USER
Enters the two digit user number of the equipment they want to call from their
phone.
ZR350
Checks for authorized user and calls the appropriate user.
Page 3-2
Section 3. Operation
Communication Equipment
The following list explains how the ZR350 behaves when calling equipment of different
types.
TONE ONLY PAGER
The interconnect checks for an idle channel and then keys up and makes the Two-tone
or Five-tone page. When the page is finished, the interconnect unkeys, sends a fivebeep prompt to the phone line to indicate that the page is finished, and then it hangs
up the phone.
TONE & VOICE PAGER
The interconnect checks for an idle channel and then keys up and makes the Two-tone
or Five-tone page. When the page is finished, the interconnect sends a single beep to
the phone caller to prompt them to start speaking their message. As long as the
interconnect detects voice activity from the phone, it will continue to allow the phone
party to speak until the pager Talk Time is reached (by default Talk Time is 10
seconds). When the limit is reached the ZR350 will unkey the transmitter, send a fivebeep prompt back to the phone caller, and hang up the phone. If the VOX circuit does
not indicate any audio coming from the phone for more than two seconds, then the
interconnect will end the call early regardless of how much time is left in the Talk
Timer.
TALKBACK PAGER
When a user is programmed as a Talkback user, the ZR350 sends a double beep
prompt to the phone caller after the page is done, as a go- ahead prompt to speak their
voice message, and will pass the caller’s voice to the transmitter for 30 seconds. If the
radio user decides to answer the caller, the user need only key up his or her radio
during the first thirty seconds of the call and the ZR350 will consider the presence of
carrier (with the proper PL/DPL) as an acknowledgment. Once the user answers, the
call proceeds the same way that a call to a radio equipment type would and is subject
to the same timers. If the ZR350 does not detect carrier during the first 30 seconds of
the call, then it terminates the call.
QCII RADIO
For the two-tone radio equipment type, after the paging tones are sent, the
interconnect transmits a ringout sound while waiting for the called radio to answer.
The answer sequence consists of the Connect Prefix, and depending upon the
programmed sign-on mode of the interconnect, may be followed by the two-digit user
number of the called radio. Only the called radio may answer the call. The QCII
format supports group call using extended single tone, accessed by double-digit
entries when the first and second tone groups are the same.
Page 3-3
Section 3. Operation
FIVE-TONE RADIO
Calls to five-tone radios are the same as QCII radios, except that the calls are
answered with carrier. The appropriate PL/DPL must accompany the carrier if
programmed in the receive radio. It is assumed that the five-tone radios are
programmed with busy channel lockout, and may not all have keypads. Group call is
supported through a group substitution digit (see the programming section).
QCII GROUP-CALL RADIO
The difference between this equipment type and the regular Radio equipment type is
that the ZR350 will accept the interconnect’s Connect Prefix to answer the call
without any user number being sent. The reason for this is that a number of radios are
going to unsquelch and this allows any unit to answer the call. When it comes time to
terminate the call, the users can send the Disconnect Prefix alone to hang the ZR350
up. This equipment type supports the Quick Call II format only. In Short Sign-on
mode, this equipment type is identical to the regular QCII Radio Type.
CALL FORWARD
Strictly speaking, this isn’t a separate equipment type, however, it needs to be
explained while on the subject of how the ZR350 behaves while trying to signal out to
users. When a call is made to a user and they do not answer within the allowed time,
the interconnect checks the user database to see if that user has a Call Forward user
assigned. If there is none, the interconnect simply terminates the call and hangs up. If
there is a Call Forward user assigned, then the interconnect places a new call out to
the Call Forward user and waits for it to answer. If there is no answer to the original
call, and the forwarded call, the interconnect will continue until the call has been
forwarded three times and then it will terminate the call. While a call can be
forwarded to a Tone Only or a Tone & Voice pager, users with these two equipment
types cannot have calls forwarded from them. The reason for this is that no response
is ever expected from pagers so there is no reason to ever forward their calls.
The Quick Call II and Select V code sent to the radio users is determined by both the
particular radio equipment type command used for that individual user and the user’s
number. There is more discussion of this topic in “User Commands” in Section 5.
Answering a Call
In general, a radio answers a selcall by using DTMF to send the interconnect’s Connect
Prefix. The exact digits that make up the Connect Prefix will be determined by how the
ZR350 was programmed when it was installed. The prefix can be from one to eight digits
long and can contain any combination of the numbers zero to nine and the “*” character. If
the ZR350 is programmed in full sign-on mode, a QCII radio is required to follow the
Connect Prefix with that user’s individual user number. The user number sent will always be
a two-digit entry (users one to nine will put a leading zero ahead of their number). When a
call to a Talkback or Five-tone radio is made, the interconnect considers the call to be
connected if it sees any carrier activity on the channel. There is no answer sequence for either
Page 3-4
Section 3. Operation
of the pager equipment types since the ZR350 never expects to get any response back from
Tone Only or Tone & Voice pagers.
Terminating a Call
When it comes time to end a call in progress, there are a number of ways by which it can be
terminated. Some of these involve voluntary actions on the part the persons involved in the
call, and some of these are automatic actions taken by the ZR350 itself when certain
conditions are met. The following list explains all of the ways in which calls are normally
terminated.
DTMF TERMINATION
Short Sign-on Mode: At any point in a conversation the radio user can terminate the
call by sending the DTMF Disconnect Prefix.
Full Sign-on Mode: In this mode, a user is required to follow the Disconnect Prefix
with appropriate user number to terminate the call. As an example, the default
Disconnect Prefix is a “#” and the call in progress involves user number 5, so to
disconnect the call the radio would send “#05”. The ZR350 will not accept a
disconnect request from any radio other than the one involved in the call. The
exception to this is when the call was initiated as a QCII Group-Call Radio, in which
case it will always allow anyone to terminate the call with just the Disconnect Prefix
and no user number.
PHONE TERMINATION
The phone caller can terminate the call in progress by entering a “#0” on a DTMF
phone, or terminate a call while it is still ringing out to the radio by entering just a
“#”. Callers who dialed in from a pulse or rotary phone are not able to disconnect the
call. Calls initiated from the Local Phone require only hanging up the phone
instrument to terminate the call.
AUTO CLEARDOWN
It is possible that a phone caller would hang up without disconnecting a call and that
the radio user involved (for a number of reasons) would not be able to disconnect it
either. The ZR350 deals with this possibility by using a Radio Activity timer. While a
call is in progress, this timer is reset every time carrier is detected from the radio. If
the timer ever makes it all the way down to zero before seeing carrier from the radio
again, then the interconnect will end the call in progress automatically.
The interconnect will start transmitting a single-beep prompt, every three seconds,
starting 12 seconds before the end of the call. All the radio needs to do to reset the
timer when the beeps start is to key up momentarily. The Radio Activity timer’s
duration is programmable to 30 seconds, 45 seconds, or one minute (the default is 30
seconds).
Page 3-5
Section 3. Operation
CALL LIMIT
The ZR350 can be programmed to limit the overall duration of a call and to
disconnect it automatically when the Call Limit timer expires. This timer can be
disabled in programming or set to three, five, or ten minute durations. The Call Limit
timer can also be programmed to allow the radio to reset the timer when it is about to
expire by entering a “*”. When the ZR350 receives this “*”, it will reset the timer and
extend the length of the call by whatever period the timer is currently set to. The
default programming for the Call Limit timer is for a three minute limit without the
radio being able to reset it. The ZR350 will indicate that the Call Limit timer is
running out by sending the radio a double-beep prompt every three seconds starting
fifteen seconds before the end of the call.
LOCAL CONTROLLED
The ZR350 is capable of supporting from one to three telephone instruments
connected directly to its Local phone port. The operators of these Local phones can
gain access to the ZR350 at any time by picking up the handsets of their phones. If the
system is idle, then the interconnect will give the operator a beep prompt and handle
the call just as it would a caller on the PSTN/PBX line. The Local Phone can
terminate a call at any time by going back on hook. If there is a call already in
progress, then the Local operator can monitor it and speak to both parties if necessary.
If the Local operator needs to take over the channel for a priority call, it is possible to
terminate the call in progress simply by doing a hook-flash. That is, by pressing the
hook switch on the Local phone instrument for approximately a half a second and
letting it up again.
If the ZR350 has been fitted with the optional Local Phone Ringer box then the radio
user may also originate calls to the Local Phone.
When a call is terminated normally (i.e. other than by a hook-flash on the Local phone), the
ZR350 will send a five-beep prompt to the phone party and to the radio. If the call is
terminated by the Local operator doing a hook-flash on the Local phone, then both parties
will hear a “Bee-Doo” error tone. The phone will be hung up right away. If there is a Morse
Code Station ID programmed and enabled, and the timer for the ID has expired, then the
ZR350 will transmit the ID before unkeying the transmitter.
Page 3-6
Section 3. Operation
Radio-to-Phone Calls
The ZR350 will allow radio users to originate calls to the PSTN/PBX line. The users do this
by using the interconnect’s Connect Prefix and a single “Steering Digit” to indicate the type
of call they want to make (if the interconnect is operating in the Full Sign-on mode instead of
the default Short Sign-on mode, then the user number will be required as well). The steering
digit is necessary because the interconnect will also allow radio-to-Local Phone and radio-toradio calls to be made. Phone calls can be initiated with either of two steering digits, a “9” or
a “*”. As an example, if a radio whose user number was 45 wanted to make a phone call on a
ZR350 system with a Connect Prefix of “*123”, and the interconnect was configured for Full
Sign-on mode, then the user would send either one of the following DTMF strings:
*123 45 9
Connect Prefix
Calling Radio’s
User # if
required
or
*123 45 *
Steering
Digit
Alternate
Steering
Digit
In response to receiving the proper Connect Prefix and steering digit along with a valid user
number, the ZR350 will take the PSTN/PBX line off hook, key the transmitter, and pass the
dial tone back to the radio. When the radio keys up and starts to dial the phone number, the
ZR350 checks the first and second digits received from the radio against the first and second
digit toll restrict groups, if any have been programmed. If a match is found to any of the toll
restricts, then the call is canceled and the interconnect hangs up the line. If no match is found,
then the interconnect lets all of the digits pass straight through to the phone line. If the
interconnect has been programmed to pulse dial on radio-to-phone calls, then the ZR350 will
keep the radio-to-phone audio path muted during the dialing and will convert the incoming
digits from the radio into pulse dialing to the phone line. There is no limit as to how many
digits the radio can dial, however, if pulse dialing is being used the ZR350 will stop
converting the incoming digits and unmute the receive audio path to the phone as soon as it
sees a gap of more than five seconds since the last digit was received from the radio. Once
the interconnect quits the pulse dialing routine, any further DTMF digits received will be
passed straight through to the phone just like voice audio.
At the beginning of the previous paragraph, the phrase “a valid user number” was used. For
the purposes of making a radio-to-phone call a valid user is any one whose equipment type
has been programmed. User numbers that have been programmed as pagers can initiate calls
and are treated as radio users for the duration of the call.
Select V Decode Initiated Calls
The Select V decode will cause the ZR350 to access the phone line and dial a programmable
telephone number. This is a single phone number of up to 16 digits. When the autodial takes
place, the EuroPatch will take the phone line off hook, wait 2 seconds, then begin dialing. If
no autodial phone number is programmed, the phone line will be taken off-hook, just as if a
Page 3-7
Section 3. Operation
valid DTMF Connect Code had been received. Dial tone will be passed to the radio user, and
the radio user may dial just as in a regular radio-to-phone call. Call disconnect may be
accomplished by sending the DTMF Disconnect Prefix, call limit time-out, radio activity
time-out, or “#0” from the phone side.
Radio to Local Phone Calls (Option)
If the Local Phone Ringer option is connected to the ZR350, then it is possible to make calls
from a radio to the Local Phone. Calls are initiated in the same way as calls to the PSTN/PBX
line, with the exception that a steering digit of “4” must be used. After entering the connect
code followed by a “4”, the radio will hear a series of double rings as the Local Phone is
rung. If the Local Phone is not answered within one minute, the call is automatically
terminated.
Once a radio-to-phone call is in progress, it will proceed under all the same rules and timers
that a phone-to-radio call would, and can be terminated in the same ways. If the Courtesy
Tone is enabled the interconnect will send it to the phone every time the radio unkeys. If the
Privacy Mask is enabled, then the interconnect will break the repeat audio path and send a
masking tone to the transmitter whenever it is receiving a signal from the radio.
Page 3-8
Section 3. Operation
Radio-to-Radio Calls
The sign on sequence for a radio-to-radio call is similar to the one for a radio-to-phone call
except for the steering digit. The radio will use a “7” as the steering digit for a radio-to-radio
call. When the interconnect receives its Connect Prefix followed by a valid user number and
the steering digit “7” (no user number is entered in the Short Sign-on mode), it will key the
transmitter and generate a fake dial tone to prompt the radio user to enter the user number of
the radio or pager that they wish to call. As an example, if a radio whose user number is 45
wants to call user 51 on a ZR350 system with a Connect Prefix of “*123”, and the
interconnect is configured for Full Sign-on mode, then the user would send the following
DTMF string:
*123 45 7
Fake Dial Tone
Connect Prefix
51
Radio to call
Calling Radio
Steering Digit
The following list explains how the call proceeds depending upon the equipment type of the
user requested.
RADIOS (FIVE-TONE, QCII, QCII GROUP-CALL)
The proper selective signaling for that user is sent over the channel, followed by
ringing for the rest of the Radio Answer time. If the called user does not answer this
call within the Radio Answer time, then the ZR350 either forwards the call or
terminates it. If the called user does answer, then the call proceeds in the same way
that a telephone call would and either one of the radios involved can terminate the call
by sending the Disconnect Prefix along with their user number. All of the phone call
timers, including Call Limit resetting if enabled, are still used. The one item from
phone calls that is not used in a radio-to-radio call is the Courtesy tone.
TONE ONLY PAGERS
The interconnect will transmit the appropriate paging tones followed by the five-beep
prompt back to the originating radio. Then it unkeys and return to its idle state.
TONE & VOICE PAGERS
The interconnect will transmit the appropriate paging tones, follow by a single “Talk”
beep prompt back to the originating radio. The radio keys up and begins sending his
voice message at this point. The interconnect will terminate the page and return to
idle when either the Talk Time limit is reached or the carrier detect from the radio
drops for more than two seconds.
Page 3-9
Section 3. Operation
TALKBACK USERS
The interconnect will transmit the appropriate selective call and then send the doublebeep “talk” prompt to the originating radio to let him or her know that they can now
start speaking to the called user.
Radio Access Code Summary
Equipment
Operation
Type
Radio Response
Radio Response
(Short Sign-on Mode)
(Full Sign-on Mode)
Five-tone Radio
Five-tone Talkback
QCII Talkback
Answer a call
Carrier
Carrier
QCII Radio
Answer a call
Connect Prefix
Connect Prefix + user #
QCII Group-call
Radio
Answer a call
Connect Prefix
Connect Prefix
All types
Initiate a Radioto-Phone call
Connect Prefix + 9, or
Connect Prefix + *
Connect Prefix + User # + 9
or
Connect Prefix + User # + *
All types
Initiate a Radioto-Radio call
Connect Prefix + 7
wait for Fake Dial Tone,
enter User # to call
Connect Prefix + User # + 7
wait for Fake Dial Tone, enter
User # to call
All types
Initiate a Radioto-Local Phone
call (with Local
Phone Ringer
option)
Connect Prefix + 4
Connect Prefix + User # + 4
Five-tone Radio
Five-tone Talkback
QCII Radio
QCII Talkback
Terminate a call
Disconnect Prefix
Disconnect Prefix + User #
QCII Group-call
Radio
Terminate a call
Disconnect Prefix
Disconnect Prefix
Private Tones (PL/DPL + CSQ)
Up to now, the operation of the ZR350 has been discussed in terms of looking for carrier
activity only on the receive frequency of the system. The ZR350 interconnect has no PL tone
or DPL code decoding capability of its own, however, it can make use it the single tone or
code decoding capability of the GM300 radio that it is using as a receiver. By programming
the receive radio to provide a PL/DPL + CSQ Output signal on pin 8 of its Auxiliary
(Accessory) connector, you can provide the ZR350 with the means of telling the difference
between general channel activity and a transmission from one of the radios belonging to the
Page 3-10
Section 3. Operation
ZR350 system. The ZR350 will always look at both the CSQ and the PL/DPL + CSQ inputs
on its Receive radio connector and check for a valid indication. If you decide to use this
feature, then all of radios being carried by users on this system must be programmed to
transmit the same PL tone or DPL code.
Page 3-11
Section 3. Operation
SINGLE USER INTERCONNECT
The Single User mode of operation does not affect operations initiated from the Local phone
or from the radios. It only affects how the ZR350 handles calls that come in on the
PSTN/PBX phone line.
When the phone line rings the necessary number of times, the ZR350 will look in the AutoCall User memory slot and immediately call that user. If the Auto-Call User’s equipment type
is defined as a radio then the interconnect will not answer the phone line until that user
responds to the call. The interconnect will either ring out continuously to the radio or ring out
once and then wait depending on how it is programmed. If the radio being called does not
respond within the Radio Answer time, then the interconnect will check to see if there is a
Call Forward User programmed. If there isn’t one then the interconnect stops right then and
returns to its idle state. If there is a Call-Forward User programmed then the interconnect
places a call to that user according to its equipment type.
If the equipment type of a user is programmed to anything other than radio, then the ZR350
will answer the phone line right away so that the caller can hear any prompt tones that the
interconnect makes concerning the progress of the call to the Auto-Call User.
If one of the Local phones is lifted to make call, the operator can still dial for any valid user
in the ZR350 database, just as in the Multi-user mode. Radio and Talkback users can still
sign on using the radio-to-radio steering digit (7) and make calls and pages to any other valid
user in the database.
NOTE
Placing the ZR350 in the Single-User mode of operation not only forces it to perform a
certain action whenever the telephone rings, it prevents the interconnect from being able to
support the initiating of any other sort of operation from the PSTN/PBX input. This means
that you will no longer be able to call in and enter into the Program mode from the
PSTN/PBX line once you program the interconnect for Single-User operation if the AutoCall User is anything other than a mobile. In most cases this will probably not matter, but you
should be aware that you will need to use the Local phone or the radio to program the ZR350
after you configure it in this manner.
Page 3-12
Section 3. Operation
USER PROGRAMMING
The purpose of this subsection is not to explain in detail every command for programming
the ZR350 (that will be covered in Section 5), but rather to explain how the programming of
individual users is organized. This explanation should make it easier to find the necessary
information in the correct tables when the time comes to start programming an interconnect
for use by the end users.
The ZR350 has the capacity for 100 individual users, which are numbered 00 to 99 for the
purposes of the database, programming, and selecting them for calls. The programmable
items for any given user are its equipment type, its selective signaling format, and its Call
Forward user.
Of the three items, the Call Forward user is the simplest with which to work. When the
programming command is entered for assigning a Call Forward user (50#), the interconnect
will prompt for the number of the user who originally received the call and then for the
number of the user to which the call is to be forwarded (if the original user does not answer).
The call forward entry for a user can be cleared by not entering any digits for the second user
number.
The commands for assigning user equipment types actually serve three functions. The first is
that they enable the user entered. Users without an equipment type assigned are by definition
disabled, which is the default condition of all users. The second thing that these commands
do is to define a user’s equipment type which determines how the interconnect will behave
when a call is placed to that user. The last thing that these commands do is to assign one of
the signaling formats supported by the ZR350 to that user’s equipment.
There is no command to allow the installer to program a particular tone, code, or page to an
individual user, the ZR350 will assign these automatically to users when their equipment type
are programmed based on the users’ numbers. What this means is that the user equipment
will have to be programmed to that particular tone, code or page. This will be described in a
little more detail in “User Commands” in Section 5. The tables in “Five-Tone Encode” and
“Two-Tone Paging” in Appendix A show the relationship between user numbers and paging
codes.
Page 3-13
4. MAINTENANCE
OVERVIEW.............................................................................................................4-1
DISASSEMBLY.......................................................................................................4-1
PARTS LISTS .........................................................................................................4-2
Parts List - 702-9805C ZR350 Control Board .................................................4-3
Parts List - 702-0023B Digital Voice Delay Board ..........................................4-6
Parts List - 702-9807A Local Phone Ringer ...................................................4-7
SCHEMATICS.........................................................................................................4-8
Schematic - 008-9805C ZR350 Control Board ...............................................4-9
Schematic - 008-0023B Digital Voice Delay Board.........................................4-13
Schematic - 008-9807A Local Phone Ringer..................................................4-14
4. MAINTENANCE
OVERVIEW
This section of the manual contains the information necessary to work on the ZR350 down to the
component level. For more technical information and assistance you can call Motorola and ask for
technical support on the ZR350.
DISASSEMBLY
While it is unlikely that you will need take your ZR350 apart in the field, if the need does arise, there
are a few tips that will make process of disassembling and reassembling the unit proceed smoothly
and calmly. The ZR350 has a single main circuit board and the Digital Voice Delay board (if
installed) will be mounted on stand-offs on top of it. The following steps are the easiest way to
accomplish this.
1. Remove the top cover by removing the four #440 screws located on the sides of the unit near the
corners and sliding the cover off.
2. If there is a Digital Voice Delay Board mounted in the unit on top of the Control Board, remove
the #440 screw holding it on and carefully remove the Digital Voice Delay Board by pulling it
straight up. Then remove the standoff in the middle of the Control Board.
3. Remove the remaining #440 screws that are holding the Control Board in bottom chassis of the
unit.
4. Now comes the step that requires a little finesse. Slide the circuit board towards the rear of the
chassis as far as it will go, until the Connect switch, modular jack, and leads are all clear of the
sheet metal and then carefully raise the front end of the circuit board out of the chassis. When the
front end of the circuit cards is high enough to clear the top of the chassis, pull the board forward
until the rear connectors come out.
When removing the Control Board, be careful not to put too much stress on the Connect button or it
could be damaged.
To reassemble the unit, start out by inserting the rear connectors into the rear of the bottom chassis
and then work your way backwards through all the previous steps.
Page 4-1
Section 4. Maintenance
PARTS LISTS
This subsection contains the parts lists for the Control Board used in the ZR350 terminal and also the
optional Digital Voice Delay and Local Phone Ringer boards. These parts lists describe the
characteristics of each part, list its Zetron part number, and, where applicable, list its original
manufacturer’s part number as well.
In order of appearance the parts lists are for:
1. The ZR350 Control Board.
2. The Digital Voice Delay Board.
3. The Local Phone Ringer Board.
If you are having difficulty in locating a part on the list, check to be sure that are looking on the
correct parts list for the assembly you are working with.
Page 4-2
Section 4. Maintenance
Parts List - 702-9805C ZR350 Control Board
LEGEND:
+
=
#
=
^
=
=
=
OPTION, INSTALL PER CUSTOMER ORDER
NOT INSTALLED
INSTALLED ON HIGHER ASSY
SUBSTITUTE PART
ZETRON ZR350 CONTROL BOARD PARTS LIST: 702-9805C
Item
1
2
3
4
5
6
7
8
Qty
1
1
3
1
3
1
2
11
9
10
11
12
13
14
15
16
1
1
3
1
3
1
1
14
17
18
19
20
21
22
23
24
25
26
27
1
1
1
1
1
3
1
2
1
5
6
28
29
30
31
32
33
34
35
36
37
38
39
40
41
42
43
44
45
46
47
5
1
1
2
1
1
1
0
1
1
2
1
1
1
2
2
1
2
2
2
Reference
R72
R4
R5,R31,R57
R23
R16,R69,R82
R8
R22,R32
R17,R19,R29,R30,R37,
R51,R59,R62,R64,R70,
R73
R83
R61
R7,R18,R84
R20
R35,R38,R63
R25
R71
R10,R15,R36,R50,R52,
R53,R54,R55,R56,R58,
R66,R67,R76,R80,R81#
R33
R78
R65
R49
R27
R11,R12,R13
R28
R44,R41
R43
R26,R39,R42,R47,R48
R24,R40,R68,R74,R75,
R79
R6,R45,R46,R85,R86
R60
R34
R77,R21
R3
R14
RV1
R1#,R2#
R9
R87
R88,R89
R90
RP5
RP6
RP4,RP3
RP7,RP1
RP2
C12,C13
C2,C1
C34,C35
Part No.
101-0010
101-0025
101-0033
101-0047
101-0067
101-0068
101-0069
101-0073
Description
1.O OHM 1/4W 5%CARBON FILM
10 OHM 1/4W 5% CARBON FILM
22 OHM 1/4W 5% CARBON FILM
47 OHM 1/4W 5% CARBON FILM
560 OHM 1/4W 5% CARBON FILM
620 OHM 1/4W 5% CARBON FILM
680 OHM 1/4W 5% CARBON FILM
1.OK 1/4W 5%CARBON FILM
101-0078
101-0080
101-0081
101-0086
101-0089
101-0092
101-0094
101-0097
1.8K 1/4W 5%
2.0K 1/4W 5%
2.2K 1/4W 5%
3.6K 1/4W 5%
4.7K 1/4W 5%
6.2K 1/4W 5%
7.5K 1/4W 5%
10K 1/4W 5%
101-0099
101-0100
101-0101
101-0104
101-0105
101-0106
101-0109
101-0111
101-0114
101-0117
101-0121
12K 1/4W 5% CARBON FILM
13K 1/4W 5% CARBON FILM
15K 1/4W 5% CARBON FILM
20K 1/4W 5% CARBON FILM
22K 1/4W 5% CARBON FILM
24K 1/4W 5% CARBON FILM
33K 1/4W 5% CARBON FILM
39K 1/4W 5% CARBON FILM
51K 1/4W 5% CARBON FILM
68K 1/4W 5% CARBON FILM
100K 1/4W 5% CARBON FILM
101-0123
101-0128
101-0133
101-0145
102-0471
103-0049
105-0001
106-0047
106-2231
107-0003
107-0010
107-0203
119-0008
119-0017
119-0021
119-0025
119-1040
150-0096
150-0471
151-0022
120K 1/4W 5% CARBON FILM
200K 1/4W 5% CARBON FILM
330K 1/4W 5% CARBON FILM
1.0M 1/4W 5% CARBON FILM
470 OHM 1/2W 5% CARBOM FILM
RESISTOR, 47 OHM 2W 5% CARBON FILM
VARISTOR 250V AC
4.7 OHM 1/2W 5% FUSIBLE
RESISTOR, 22K 1/2W 5% FLAME RESISTANT
2K POT 1 TURN R/A
10K POT 1 TURN R/A
200K 1 TURN R/A
10K x 7 BUSSED 8-PIN SIP
220 X 8 ISOLATED 16-PIN DIP
R/2R 100K/200K 10 PIN SIP
10K X 4 ISOLATED 8-PIN SIP
100K X 4 ISOLATED 8-PIN SIP
1000 PF 1KV +-10% CERAMIC DISC YSP
470 PF 3KV +-10% CERAMIC DISC YSP
22PF 100V/200V +-10%/5% CERAMIC NPO
CARBON
CARBON
CARBON
CARBON
CARBON
CARBON
CARBON
CARBON
Part Value
FILM
FILM
FILM
FILM
FILM
FILM
FILM
FILM
Page 4-3
Section 4. Maintenance
Parts List - 702-9805C ZR350 Control Board (Continued)
Item
48
49
50
51
Qty
2
1
1
22
52
53
4
7
54
55
56
57
58
59
60
61
62
63
2
1
1
3
1
1
1
4
1
8
64
65
66
67
68
69
2
1
1
3
2
14
70
71
72
73
74
75
76
77
78
79
80
81
82
83
5
1
1
5
1
1
0
0
1
2
1
2
2
8
84
85
86
87
88
3
5
1
1
7
89
90
91
92
93
94
95
96
97
98
4
3
1
1
1
1
2
1
3
1
Reference
Part No.
C51,C45
151-0028
C46
151-0047
C44
151-0091
C3,C4,C8,C17,C20,
151-0180
C21,C22,C23,C25,C27,
C29,C33,C36,C37,C38,
C40,C41,C43,C53,C58,
C59,C61
C39,C48,C54,C60
151-0199
C30,C49,C50,C62,C63, 152-0012
C64,C70
C56,C55
152-0015
C10
152-0021
C67
152-0050
C32,C65,C69
152-0085
C68
152-0089
C47
152-0152
C11
152-0224
C15,C31,C57,C66
154-0025
C6
154-0035
C5,C16,C18,C19,C24, 154-0100
C26,C28,C52
C42,C7
155-0083
C9
155-0084
C14
155-0090
E1,E14,E15
305-0001
T1,T2
305-0018
E2,E3,E4,E5,E6,E7,
305-0306
E8,E9,E10,E11,E12,E13,
E16,E17
DS2,DS3,DS4,DS5,DS6 311-0011
DS1
311-0012
U1
311-1001
U9,U10,U13,U16,U17
316-3074
VR1
316-4780
U3
321-0204
U5^
321-0451
U4 ^
322-7257
U11
322-9366
U14,U15
323-4053
U6
324-4373
U7,U8
324-4374
U2,U12
324-7414
Q1,Q3,Q5,Q6,Q10,Q11, 340-3904
Q12,Q13
Q4,Q14,Q15
340-3906
Q2,Q7,Q8,Q9#,Q16,Q17 340-7000
CR2
342-0001
CR12
342-0103
CR8,CR9,CR10,CR11,
342-3009
CR13,CR14,CR15
CR5,CR6,CR7,CR16
343-3035
CR1,CR3,CR4
343-3100
SW1
371-0024
Y1
NOTE 1
376-0358
Y2
NOTE 1
376-1106
K1
380-0030
J1,J2
401-0080
J4
401-0194
P1,P2,P3
401-0254
J3
401-6006
Page 4-4
Description
270PF 100V/200V +-5% CERAMIC NPO
470PF 100V/200V +-10%/5% CERAMIC NPO
.0033UF 100V +-5% CERAMIC NPO
.1UF 50V +-20% CERAMIC Z5U
Part Value
.47UF 50V +-5%, POLYESTER
.1 UF 50V +-5% POLYESTER
.015 UF 50V +-5% POLYESTER
.47 UF 250V +-10% POLYESTER
10 UF 100V 20% NON-POLAR ELECTROLYTIC, RADIAL
.01 UF 50V +- 5% POLYESTER
.001 UF 50V +-5%POLYESTER
.0015 UF 50V 5% POLYESTER
.22 UF 630VDC +/10% POLYESTER
1 UF 35V TANTALUM +- 10%
2.2UF 25V TANTALUM +-10%
10 UF 16V TANTALUM +-10%
470 UF 10 VOLT RADIAL ALUMINUM ELECTROLYTIC
470 UF 25V 20% RADIAL ALUMINUM ELECTROLYTIC
1000 UF 25V +-20% RADIAL ALUMINUM ELECTROLYTIC
FERRITE BEADS W/ LEADS
PHONE HYBRID XFMR
EMI SUPPRESSION FILTER
LED RED FLUSH
LED GREEN FLUSH
OPTO ISOLATOR, BI-POLAR H11AA1
QUAD HF OP-AMP EXT. TEMP 33074
REGULATOR, +5V, 1A EXT. TEMP7805
DTMF RECEIVER75T204
EXP CMOS MICRO, -40 +85C, PLCC, 3.5 TO 12 MHZASIC 002
32K X 8 EPROM EXT TEMP32KX8 EPROM
4K EEPROM EXT. TEMP93C66
ANALOG SWITCH, TRIPLE SPDT 4053
OCTAL LATCH 74HC373
OCTAL DFF REG74HC374
IC, HEX SCHMIDT, MOTOROLA THRESHOLDS 74HC14
NPN 40V/200MA, TO92 2N3904
PNP 40V/200MA, TO92 2N3906
XSTR, MOSFET, N-CHANNEL TO-92 60V/0.2A, 5 OHMS2N7000
DIODE, SILICON 1A 100V 1N4002
SCHOTTKY, 0.37V @ 1MA TYP SD103A
DIODE, SILICON 100V 250MW 1N4148
ZENER, 12V 1W +-5%1N4742A
ZENER, 8.2V 1W +-5% 1N4738A
SPST RA PWB MNT MOM PB
XTAL, 3.579545MHZ HC-49 CL=18PF
XTAL, 11.0592MHZ HC-49 CL=18PF
RELAY, DPDT MINI-DIP, 12 V COIL
6-PIN LO PRO R/A TELCO
8 PIN TELCO CON RA
ZR300 DOUBLE ROW HEADER
6-POS MALE
3.58MHZ
11.0592MHZ
Section 4. Maintenance
Parts List - 702-9805C ZR350 Control Board (Continued)
Item Qty Reference
99
0
TP1#,TP2#,TP3#,TP4#,
TP5#
100 4
JP1#,JP2#,JP3,JP4,
JP5,JP6#,JP9,JP10#
101 0
JP7#,JP8#
102 2
FX1,FX2
NOTE 2
103 1
XVR1
104 1
XVR1
105 4
XFX1-2 (2 EA) NOTE 2
106 4
XJP3,4,5,9 (IN)
107 1
XU1
108 1
XU11
109 1
XU4
110 1
XU5
111 5
XDS1-5
112 1
PCB
Part No.
403-0001
Description
1 OF 401-0052
Part Value
403-0002
2 OF 401-0052
403-0003
416-1303
210-0001
221-0108
305-0090
402-3040
407-0006
407-0008
407-0028
407-0068
417-0010
410-9805A
3 OF 401-0052
FUSE,3/4 AMP,SLO-BLO,SUBMINIATURE,AXIAL
0.75 AMP
4-40 KEP NUT ZINC
4-40 x 1/4 PAN HD PHIL, SEM, EXTERNAL TOOTH
BEAD, 4S2 FERRITE, 0.394 SLEEVE, NO LEADS
MINI JUMPER
SKT, 06 PIN DIP
SKT, 08 PIN DIP
SKT, 28 PIN DIP
SKT, 68 PIN PLCC
LED MOUNT RA
ZR350 CONTROL BOARD
NOTES: (Notes are for production use only.)
Page 4-5
Section 4. Maintenance
Parts List - 702-0023B Digital Voice Delay Board
LEGEND:
+ = OPTION, INSTALL PER CUSTOMER ORDER
# = NOT INSTALLED
^ = INSTALLED ON HIGHER ASSY
= = SUBSTITUTE PART
ZETRON DIGITAL VOICE DELAY BOARD PARTS LIST: 702-0023B
Item
1
2
3
4
5
6
7
Qty
3
2
1
1
2
1
10
8
9
10
11
12
13
14
15
16
17
18
19
20
21
22
23
24
1
1
4
1
1
0
1
1
1
1
0
1
0
0
0
1
1
Reference
R1,R2,R6
R3,R4
R5
RP1
C19,C18
C7
NOTE 5
C1,C2,C8,C9,C11,C12,
C13,C14,C15,C17 NOTE
C16
C3
NOTE 5
C4,C5,C6,C10 NOTE 5
U1
U3
NOTE 3
U4= NOTE 1
U6
U5
SW1
Y1
P1#
J1
NOTE 2
JP1#
U2#
NOTE 4
U4
PCB
NOTE 1
Part No.
101-0097
101-0113
101-0145
119-0008
151-0028
151-0180
151-0181
5
152-1474
154-0025
154-0100
321-5481
321-7257
322-5032
323-4049
324-4373
371-0023
376-0512
401-0181
401-6005
403-0003
N/A
061-0383
395-0025A
410-0023B
Description
RESISTOR,10K OHM,1/4W,5%,CARBON FILM
RESISTOR,47K OHM,1/4W,5%,CARBON FILM
RESISTOR,1.0M OHM,1/4W,5%,CARBON FILM
R-NETWORK,10K OHM x 7,BUSSED,SIP-08
CAP,270pF,100V,5%,CERAMIC,NPO
CAP,.1uF,50V,20%,CERAMIC Z5U
CAP,.1uF,50V,10%,CERAMIC X7R
CAP,.47uF,100V,5%,POLYESTER
.47uF 100V
CAP,1uF,35V,10%,TANTALUM
1 TANT
CAP,10uF,16V,10%,TANTALUM
10 TANT 16V
CODEC,5V PCM U/A LAW,SERIAL I/O,5V,SOG-20 145480
SRAM,256K(32K x 8),85nS,40uA,0-70 C
32K x 8 RAM
CPLD,32 MACROCELL,10nS,PLCC-44
PZ5032
INVERTER,UNBUFFER GATES,HEX,DIP-16
4049
LATCH,HC,3-STATE,NON-INVERTING,OCTAL
74HC373
SWITCH,ROTARY,16 POS,TOP ADJUSTED
RESONATOR,CERAMIC,512KHZ
512KHZ
CONN,HDR,.025SQRA,10POS[5x2],.100CTR,.230/.120
6-POS FEMALE
03 OF 401-0052
SRAM\EXPANSION\ENABLER
PRODUCT COMPATIBILITY SHEET
PROGRAMMED DIGITAL VOICE DELAY CPLD
DIGITAL VOICE DELAY
NOTES: (Notes are for production use only.)
Page 4-6
Part Value
10K
47K
1.0M
10K
270pF 100V
.1 50V
.1 50V
Section 4. Maintenance
Parts List - 702-9807A Local Phone Ringer
LEGEND:
# = NOT INSTALLED
^ = INSTALLED ON HIGHER ASSY
+ = OPTION (INSTALLED PER CUSTOMER ORDER)
Item
1
2
3
4
5
6
7
8
9
10
11
12
13
14
15
16
17
18
19
20
21
22
23
24
25
26
27
28
29
30
31
32
33
34
35
36
37
Qty
2
1
1
2
1
1
1
2
1
4
3
2
3
1
1
1
4
2
1
1
1
1
1
2
2
3
1
1
1
1
1
2
1
2
1
2
2
Reference
R12,R11
R4
R3
R8,R5
R6
R2
R9
R7,R1
R10
C3,C4,C5,C6
C2,C10,C12
C14,C15
C9,C11,C13
C8
C7
C1
E2,E3,E4,E5
E1,E6
T1
DS2
DS1
U2
U1
Q5,Q7 NOTE 1
Q4,Q6 NOTE 1
Q1,Q2,Q3
CR2
CR3
CR1
SW1
K1
J1,J2
F1
XU1,XU2
PCB
XF1
XDS1,XDS2
Part No.
101-0073
101-0074
101-0082
101-0097
101-0109
101-0121
101-0129
101-0135
101-0150
150-0096
151-0180
152-0010
152-0012
152-0021
154-0100
155-0140
305-0001
305-0306
305-1635
311-0011
311-0012
323-4049
323-4098
340-0172
340-0182
340-3904
342-0001
342-3009
342-5400
371-0024
380-0030
401-0080
416-1202
407-0016
410-9807A
416-3040
417-0010
Description
Part Reference
1.OK 1/4W 5%
CARBON FILM
1.2K 1/4W 5% CARBON FILM
2.4K 1/4W 5% CARBON FILM
10K 1/4W 5% CARBON FILM
33K 1/4W 5% CARBON FILM
100K 1/4W 5% CARBON FILM
220K 1/4W 5% CARBON FILM
390K 1/4W 5% CARBON FILM
2.7M 1/4W 5% CARBON FILM
1000 PF 1KV +-10% CERAMIC DISC YSP
.1UF 50V +-20% CERAMIC Z5U
.1 UF 250V +-10%
POLYESTER
.1 UF 50V +-5%
POLYESTER
.47 UF 250V +-10% POLYESTER
10 UF 16V TANTALUM +-10%
3300 UF 25V +50%-10% AXIAL ALUMINUM ELECTROLYTIC
FERRITE BEADS W/ LEADS
EMI SUPPRESSION FILTER
16V 6VA SPLIT BOBBIN XFMR
LED RED FLUSH
LED GREEN FLUSH
HEX INVERTER, UNBUFFER GATES
4049
DUAL MONOSTABLE
4098
PNP 3A 80V, 12.5W
MJE172
NPN 3A 80V, 12.5W, GAIN OVER 50
MJE182
NPN 40V/200MA, TO92
2N3904
DIODE, SIL 1A 100Y
1N4002
DIODE, SILICON 100V 250MW
1N4148
DIODE, SIL 3A 50V
1N5400
SPST RA PWB MNT MOM PB
DPDT 12V COIL MINI RELAY 360 OHM
6-PIN LO PRO R/A TELCO
FUSE AGC 2A FAST-BLOW
2A
SKT, 16 PIN DIP
LOCAL PHONE RINGER BOARD
FUSE CLIP
LED MOUNT RA
NOTES: (Notes are for production use only.)
Page 4-7
Section 4. Maintenance
SCHEMATICS
The remainder of this section contains the schematics of the three printed circuit boards used in the
ZR350.
Page 4-8
Section 4. Maintenance
Schematic - 008-9805C ZR350 Control Board
Page 4-9
Section 4. Maintenance
Schematic - 008-9805C ZR350 Control Board (Sheet 2 of 4)
Page 4-10
Section 4. Maintenance
Schematic - 008-9805C ZR350 Control Board (Sheet 3 of 4)
Page 4-11
Section 4. Maintenance
Schematic - 008-9805C ZR350 Control Board (Sheet 4 of 4)
Page 4-12
Section 4. Maintenance
Schematic - 008-0023B Digital Voice Delay Board
Page 4-13
Section 4. Maintenance
Schematic - 008-9807A Local Phone Ringer
Page 4-14
5. PROGRAMMING
OVERVIEW.............................................................................................................5-1
USER EQUIPMENT TYPE .....................................................................................5-1
PROGRAMMING THE ZR350 ................................................................................5-2
Program Mode Access Code............................................................................5-2
Entering the Program Mode..............................................................................5-2
Entering a Command........................................................................................5-3
Exiting the Program Mode ................................................................................5-4
DTMF Command Descriptions .........................................................................5-4
SYSTEM COMMANDS ...........................................................................................5-5
Access and Disconnect Prefixes ......................................................................5-5
Radio-to-Phone, Pulse or DTMF Dialing...........................................................5-5
Pulse Dial Make / Break Ratio ..........................................................................5-6
Rings-to-Answer ...............................................................................................5-6
Radio Answer Time ..........................................................................................5-6
Disable Interconnect Operation ........................................................................5-6
Toll Restrict Digits.............................................................................................5-6
Radio Ring-out Method.....................................................................................5-7
Repeater Enable/Disable..................................................................................5-7
Repeater Hold Time .........................................................................................5-7
Repeater Transmitter Time-out.........................................................................5-8
Morse Code Station Identification.....................................................................5-8
Enable Station Identification .............................................................................5-9
Courtesy Tone ..................................................................................................5-10
Half-duplex Privacy Mask .................................................................................5-10
Call Limit Timer.................................................................................................5-10
Radio Activity Timer..........................................................................................5-10
Operating Mode ................................................................................................5-11
VOX Hold Time.................................................................................................5-11
Carrier Detect Hold Time ..................................................................................5-12
Tone+Voice Paging Talk Time .........................................................................5-12
Auto-Call User ..................................................................................................5-12
Single/Multi-User Operation..............................................................................5-12
Busy Tone Disconnect......................................................................................5-13
Program Mode Access Code............................................................................5-13
Reset Memory to Defaults ................................................................................5-14
Tests and Adjustments .....................................................................................5-14
Exit Program Mode ...........................................................................................5-14
Sign-on Mode ...................................................................................................5-14
Local Phone Ringer Option...............................................................................5-14
Call Forward Gap..............................................................................................5-15
USER COMMANDS ............................................................................................... 5-16
Assigning Call Forward Users .......................................................................... 5-16
User Equipment Types..................................................................................... 5-16
Two-tone encode parameters .......................................................................... 5-16
Five-tone encode parameters .......................................................................... 5-17
FACTORY TEST SOFTWARE............................................................................... 5-20
5. PROGRAMMING
OVERVIEW
This section of the manual contains information and procedures that will be used by the
technician to program the ZR350 to match the particular needs of the end user. There is a
brief review of the various equipment types to aid the technician in choosing the correct user
programming commands for the application. The remainder of the section is devoted to
explaining the use and functions of the DTMF programming commands used to set up the
ZR350 itself.
USER EQUIPMENT TYPE
The ZR350 has a 100-user database, identified as users 00 through 99. In addition to being
able to individually define the type of selective call used to reach any one of these users, the
ZR350 also allows you to define what type of equipment that user is carrying. The equipment
type tells the ZR350 how to proceed once it has finished the selective call. That is, whether or
not it should ring on the channel or cut the telephone audio through immediately and what, if
any, kind of response the interconnect should expect to get back from the radio user. The
ZR350 supports nine types of equipment that you may already be familiar with. They are:
5-tone radio
Ring-outs follow paging tones, radio answers with PTT, terminates call via DTMF
disconnect code or phone party #0.
5-tone talkback
Call initiator voice hails, radio may talk-back via PTT, terminates call via DTMF
disconnect code or phone party #0.
5-tone tone-only pager
Caller hears alert beeps after paging tones are sent.
5-tone tone+voice pager
Call initiator may speak voice message after the prompt.
QCII group call radio
Ring-outs follow paging tones, radio answers with DTMF connect prefix, terminates call
via DTMF disconnect prefix or phone party #0.
QCII radio
Ring-outs follow paging tones, radio answers with DTMF connect code, terminates call
via DTMF disconnect code or phone party #0.
QCII talkback
Call initiator voice hails, radio may talk-back via PTT, terminates call via DTMF
disconnect code or phone party #0.
Page 5-1
Section 5. Programming
QCII tone only pager
Caller hears alert beeps after paging tones are sent.
QCII tone+voice pager
Call initiator may speak voice message after the prompt.
PROGRAMMING THE ZR350
The ZR350 cannot be programmed using the Motorola RSS system the way the radios are
programmed. All of the programming of the ZR350 is done using DTMF commands, either
from the radio or from one of the phone inputs. The simplest way for the installer to program
the interconnect is by plugging a regular DTMF telephone set into the Local port on the back.
This method also provides the installer with a good way to control the installation tests and
alignments.
While the DTMF programming method is convenient, it does not provide any way to
interrogate the ZR350 about what its programming currently is. The only thing that you can
do when you are unsure of what value is in memory for a certain command is to reprogram
that command to the value you want it to be. For this reason, a record should always be kept
for the initial programming of the unit, and of any changes that are made over time.
Program Mode Access Code
The Program mode can be accessed from either of the telephone inputs or from over the radio
using the same five digit DTMF code. The default code is 12350. Whenever the code is
entered, it is followed by a # just like any other programming command. There is a command
provided to allow the system operator to change this access code to a number of his or her
own choosing. The command is 90#.
WARNING:
If you change the Program mode access code to another number, BE SURE TO RECORD
THE NEW NUMBER IN A SECURE PLACE! If you forget what the new access code is,
then the only way to get back into the programming mode on the ZR350 will be to use the
CONNECT button on the front of the unit to force a reset of all programmable memory to
factory defaults. This move will also destroy all other programming in the unit and force you
to reprogram everything from scratch.
Entering the Program Mode
How to access the Program mode of the ZR350 from the phone will be covered first, and then
from the radio. When programming the interconnect from the radio, it is a good idea to have
a second radio, or a scanner, tuned to the transmit frequency of the interconnect to ensure that
the audible prompts and responses of the interconnect are heard while programming it. This
is recommended because of the DTMF keypad PTT delay that many portables and DTMF
microphones have, which would prevent them from returning to the receive mode soon
enough for the operator to hear the responses of the ZR350.
Page 5-2
Section 5. Programming
From the phone
1. Call the number of the phone line going into the interconnect or lift the handset on the
Local phone.
2. When the ZR350 answers the phone input that you called in on it will issue a beep as a
prompt for you to enter the Program mode access code. If the interconnect is in Single
User Mode, wait for the ringing to stop after the Radio Answer Time expires, and listen
for a double beep prompt.
3. From the DTMF keypad on your phone, enter the Program mode access code, followed
by a #. The default entry is 12350#. NOTE: Programming can only be done from a
DTMF phone, never from a Pulse or Rotary phone.
4. The ZR350 will respond with five quick beeps to confirm that you are now in the
Program mode. If the access code is incorrect, or was improperly entered, the
interconnect will respond with an error tone (commonly called a “bee-doo” tone because
of what it sounds like) and hang up. To be considered a valid entry, each digit in the
access code must be entered within one second of the preceding digit.
From the radio
1. Key the radio you are using and send the DTMF Program mode access code followed by
a #. The default is 12350#.
2. Unkey the radio and listen for the five quick beeps that indicate successful entry into the
Program mode. If the code sent is incorrect or is improperly entered, the ZR350 will
ignore it and not respond at all. In order to be considered a valid entry, each digit in the
access code must be entered within one second of the preceding digit.
Entering a Command
In order to execute a programming command, use DTMF to send the number of the
command followed by a #. Each time that a command is finished, the interconnect will return
the five quick beeps as a “go-ahead” prompt, to indicate that you were successful and that the
interconnect is waiting for the next programming command entry. If an error is detected, the
interconnect will return an error signal, a “bee-doo” sound.
As an example of how to enter a simple command, in order to program the ZR350 to convert
the phone numbers dialed by radio users into pulse dialing before sending them to the phone,
enter the DTMF command “05#” and the interconnect will return five beeps.
NOTE
While entering commands, the DTMF “*” digit can be used as a “clear entry” key, to cancel a
command or data that was entered in error.
Page 5-3
Section 5. Programming
Some commands, such as the station Morse code ID or changing the Program mode access
code, will require the entry of additional digits in order to complete the command. When
entering a command of this type, the ZR350 will return a two beep prompt to indicate that it
is waiting for more data. After it receives all the information that it needs to complete the
command, the interconnect will return the regular five beep “go-ahead” prompt. When
entering additional numbers, most cashes will not require leading zeros. The interconnect will
interpret 0001#, 001#, 01#, and 1# all to be the value one. However, there is one exception to
this rule. When using the command 25# to enter the station Morse code ID string, then the
ZR350 will require that all of the numbers that follow this command be two digit numbers.
This will be explained in more detail under command 25#.
IMPORTANT
At any time while programming the interconnect, if no DTMF digits are received for a period
of more than 60 seconds, then the interconnect will exit the programming mode automatically
and return to the normal idle state.
Programming Example
The following example shows the DTMF sequences entered for a short programming session.
12350#
91#
53# 1#
99#
Enter the DTMF Program Access Code
Reset the ZR350 to Default Settings
Enable User 01 as 5-tone Radio
Exit the Program Mode
Exiting the Program Mode
The command code to exit the Program mode is 99#. After completing a command entry,
while the ZR350 is waiting for the next command, use the 99# to exit the Program mode. If,
in the middle of a command that requires the entry of additional data, or using one of the test
commands to set levels during installation, then the command or test must be finished before
using the 99# to exit. The ZR350 will return a ringing sound as confirmation that it is exiting
the Program mode and then drop the transmitter or hang up the phone.
DTMF Command Descriptions
The following two subsections will provide a brief description of the purpose of each
command, and, when necessary for clarity, an example of how the command is used. The
commands have been divided into two groups, System and User, based on whether or not the
command acts on the system as a whole, or only changes the operation of a single user at a
time. The System commands include the test modes used during the installation for making
level adjustments.
Page 5-4
Section 5. Programming
SYSTEM COMMANDS
Access and Disconnect Prefixes
In order to initiate and terminate a phone call, a radio must key in a DTMF access or
disconnect prefix followed by his or her user number.
01# xx..xx# - CONNECT PREFIX (default = *1)
This command sets the Connect Prefix, which is used to initiate and answer calls from a
radio. The connect prefix code is entered before the user number and steering digit to sign-on
to the ZR350. The connect prefix may consist of the digits 0-9 and “*”, and may be from one
to eight digits in length. The default is “*1”. The steering digit allows the user to place radio
to phone calls and radio to radio calls.
02# xx..xx# - DISCONNECT PREFIX (default = #1)
The disconnect prefix code is entered before the user number to disconnect a call in progress.
It may consist of the digits 0-9 and “#”, and may be from one to eight digits in length. To
enter a DTMF “#” in the sequence, enter it as a “*” since “#” is used to terminate the
command. When the ZR350 writes the string to the EEPROM, it will convert all of the “*”s
to “#”s. The default is “#1”. For example, to set the Disconnect prefix to “#123”, you would
enter the following DTMF tones:
02# [beep-beep] * 1 2 3 # [beep-beep-beep-beep-beep]
03# xx..xx# - TOLL RESTRICT BYPASS PREFIX (default = 99)
The toll restrict bypass prefix code operates in the same fashion as the connect prefix code,
but allows the user to bypass all toll restrictions. The prefix may be from one to eight digits in
length. DTMF “#”s may not be entered although DTMF “*”s may. The default is “99”.
Radio-to-Phone, Pulse or DTMF Dialing
These commands select the dialing method that will be used for radio-to-phone calls. The
default mode is to pass the radio’s DTMF digits along to the phone line. The ZR350 can be
programmed to regenerate the radio’s telephone number as pulse dialing to accommodate
older phone systems. The radio audio to the phone is muted while this regeneration is going
on.
04# - DTMF DIAL RADIO ORIGINATED CALLS (default)
05# - PULSE DIAL RADIO ORIGINATED CALLS
This command causes the ZR350 to dial into the PSTN using rotary pulses at 10 pps.
Page 5-5
Section 5. Programming
Pulse Dial Make / Break Ratio
These commands are used to set the make/break ratio for pulse dialed mobile originated calls.
The default is to use the 39/61 ratio.
204# - SET MAKE/BREAK RATIO to 39/61 (default)
205# - SET MAKE/BREAK RATIO to 33/67
Rings-to-Answer
These commands set the number of rings required from the phone line before the ZR350 will
answer the call. If the interconnect is set to the Single-User mode of operation, this command
sets the number of rings before the interconnect calls the Auto-Call user. The default is one
ring.
06# - WAIT 1 RING BEFORE ANSWERING (default)
07# - WAIT 3 RINGS BEFORE ANSWERING
08# - WAIT 5 RINGS BEFORE ANSWERING
Radio Answer Time
The radio answer time is the amount of time (10-60 seconds) allowed for a radio to answer
the call before the call is forwarded to the Call Forward User, if one has been programmed
for the radio originally called. Calls may be forwarded three times before the call is
terminated. The default setting for this timer is 30 seconds.
10# xx# - RADIO ANSWER TIME (default = 30 seconds, range 10 to 60)
Disable Interconnect Operation
This command is used to disable all of the ZR350’s operations without changing any of its
programming. Once this command has been executed, the only thing that the ZR350 will
allow a caller or radio user to do is to enter the Program mode. To place the interconnect back
into normal operation, just enter into the Program mode, from the phone or the radio, and
then exit again. Once out of the Program mode, all normal ZR350 operations will return.
12# - DISABLE INTERCONNECT OPERATION
Toll Restrict Digits
These commands allow the system operator to define which digits, if any, are used for toll
restricting radio originated calls. The toll restrict routine checks the first and second digits of
the telephone number dialed against the digits entered with these two commands. If it finds a
match for either digit within the two groups defined here, then the interconnect aborts the
phone call. Each one of the groups can have up to four digits in it. The default condition for
each group is no digits entered.
14# xxxx# - FIRST DIGIT TOLL RESTRICT DIGITS (default = none)
15# xxxx# - SECOND DIGIT TOLL RESTRICT DIGITS (default = none)
Page 5-6
Section 5. Programming
To clear a group out that has previously had numbers entered in it, use the appropriate
command and enter the second # without putting any digits ahead of it. For example, to clear
out the First Digit Toll Restricts, enter the following:
14# [beep-beep] # [beep-beep-beep-beep-beep]
Radio Ring-out Method
This command determines how the ZR350 behaves on a phone-to-radio call. It can either
ring-out on the channel until the user who was called answers, or it can ring-out once and
then just wait for the user to answer. In either case, the ZR350 will only wait the Radio
Answer time to get a response from the user that was called. If the ZR350 does not get a
response from the user within that time, it either terminates the call or starts a call to the Call
Forward User if there is one programmed. The default mode for this is to ring on the channel
until the radio answers. When using the Call Forward feature, the ring-until-answer mode
(17#) should be used to ensure proper operation.
16# - RING ONCE ON AIR AND WAIT FOR RADIO ANSWER
17# - RING ON CHANNEL UNTIL RADIO ANSWERS (default)
Repeater Enable/Disable
This command enables the carrier repeat function of the Model 350. If a CTCSS tone or DCS
code has been programmed on the receive radio, only carrier with the correct tone or code
will be repeated. The default is disabled.
18# - ENABLE CARRIER REPEAT
19# - DISABLE CARRIER REPEAT (default)
Repeater Hold Time
These commands determine the delay before the ZR350 unkeys its transmitter after the radio
user unkeys in the Carrier Repeat mode. The default is for a three second hold time.
21# - NO REPEAT HOLD TIME
22# - 1 SECOND REPEAT HOLD TIME
23# - 3 SECOND REPEAT HOLD TIME (default)
24# - 5 SECOND REPEAT HOLD TIME
Page 5-7
Section 5. Programming
Repeater Transmitter Time-out
These commands enable or disable the three minute Transmitter Time-out timer that operates
during the Carrier Repeat mode (see command 18#). If the dispatch conversation lasts for
longer than three minutes, then the ZR350 will unkey the transmitter and wait for the radio
users to unkey before returning to service. The time-out is fixed at three minutes and may
only be enabled and disabled. The default condition is enabled.
51# - TRANSMITTER TIME-OUT TIMER ENABLED (default)
52# - TRANSMITTER TIME-OUT TIMER DISABLED
Morse Code Station Identification
If enabled, the ZR350 will transmit the call sign of the interconnected transmitter as
determined by the commands 60#, 61#, or 62#. The command 25# is used to program the
code string used for the station’s Morse code ID. When transmitted, the ID routine will use a
tone of 1000 Hz., at 30% deviation, and at a speed of 20 words per minute. In order to enter
the letters in the station call sign, they must first be converted into numbers. These letter-tonumber conversions are listed in Table 5-1. In order to avoid confusion, all of the digits in the
station’s call sign are entered as two-digit numbers with leading zeros. As a convenient
memory aid, all of the letter-to-number conversions are based on the key assignments used on
a DTMF telephone keypad. Looking at the tone pad picture in Table 5-1, notice that the first
digit of a letter code is selected from the top row of digits (1, 2 or 3). This is a “shift” key.
Now notice the letters above each key. By using the “shift” key plus a letter key, the code is
complete. The only letters not represented are Q and Z. Numbers are entered directly (i.e. 01,
02, etc.). Enter all digits and end with a “#” key.
25# xxxxxxxx# - MORSE CODE STATION IDENTIFICATION (default = none)
The following is an example of how to enter the station ID into the ZR350 using command
25#.
To set the ID to
Enter DTMF ⇒
Comments ⇒
WNCR-414
25#
19 26 32 27 04 01 04 #
ID# W N C R 4 1 4 done
In order to clear the station ID memory location, enter the second # without any digits ahead
of it, that is: 25# #.
Page 5-8
Section 5. Programming
Enable Station Identification
These commands are used to disable or enable the Morse Code Station ID, and to set the
requirements for transmitting the ID if enabled. The time limit between ID transmissions is
always ten minutes, however, command 61# requires that there be some activity on the
channel, within the timer period or after it expires, in order to make the ZR350 ID, and
command 62# will always ID after the timer times out. The default is to ID upon activity.
60# - DISABLE STATION IDENTIFICATION
61# - ENABLE STATION ID / 10 MINUTE INTERVAL / WITH ACTIVITY (default)
62# - ENABLE STATION ID / 10 MINUTE INTERVAL / NO ACTIVITY NEEDED
Table 5-1 Morse Code ID Key-Code Chart
Digits
00
01
02
03
04
05
06
07
08
09
30
#
#
0
1
2
3
4
5
6
7
8
9
Code
−−−−−
•−−−−
••−−−
•••−−
••••−
•••••
−••••
−−•••
−−−••
−−−−•
/
−••−•
END
Digits
12
22
32
13
23
33
14
24
34
15
25
35
16
Letter
A
B
C
D
E
F
G
H
I
J
K
L
M
Code
•−
−•••
−•−•
−••
•
••−•
−−•
••••
••
•−−−
−•−
•−••
−−
Digits
26
36
17
10
27
37
18
28
38
19
29
39
20
1
ABC
2
DEF
3
A
GHI
4
JKL
5
MNO
6
B
PRS
7
TUV
8
WXY
9
C
*
0
#
D
Letter
N
O
P
Q
R
S
T
U
V
W
X
Y
Z
Code
−•
−−−
•−−•
−−•−
•−•
•••
−
••−
•••−
•−−
−••−
−•−−
−−••
Page 5-9
Section 5. Programming
Courtesy Tone
When enabled, this feature sends a 1000 Hz beep tone to the telephone, every time the radio
unkeys during a phone-to-radio or a radio-to-phone call. This tone is provided to give the
phone party a positive indication that it is his or her turn to talk. This beep is not available
during radio-to-radio calls. The default condition for this feature is disabled.
26# - COURTESY TONE ENABLED
27# - COURTESY TONE DISABLED (default)
Half-duplex Privacy Mask
This feature is used to provide a limited degree of privacy during telephone conversations
with radio users. This feature is only available on systems that are set up for half-duplex
operation since it depends on the receive audio to the ZR350 coming in on a different carrier
frequency than the transmit uses. When this feature is enabled, the ZR350 will mute the
repeat audio path while the radio user is speaking and transmit an annoying cover tone in its
place to discourage idle monitoring of the channel. When the radio user unkeys and the phone
party starts to speak, the cover tone is dropped and the phone audio is transmitted in the clear.
The default condition for this feature is disabled.
28# - PRIVACY MASK ENABLED
29# - PRIVACY MASK DISABLED (default)
Call Limit Timer
The ZR350 has a Call Limit timer that may be used to restrict the length of telephone calls.
The timer may be enabled or disabled, and may be programmed to allow the radio user to
extend the time by sending a DTMF “*”. Starting 15 seconds before the call is to be
terminated, the ZR350 will transmit double warning beeps every 3 seconds to let the user
know that he or she is about to time out. Commands 30#, 31#, and 32# are used to
enable/disable the timer, and commands 33#, 34#, and 35# are used to set the limit of the
timer if enabled. The default is 3 minutes without the ability to reset it (command 30# then
33#).
30# - ENABLE CALL LIMIT TIMER (default)
31# - ENABLE CALL LIMIT TIMER/ALLOW RADIO TO RESET WITH “*”
32# - NO CALL LIMIT
33# - 3 MINUTES (default)
34# - 5 MINUTES
35# - 10 MINUTES
Radio Activity Timer
During a phone call, the radio user is expected to be in control of and responsible for the use
of the radio channel. In order to ensure that the radio user is still in range and available to do
this, the ZR350 requires that it receive some carrier from the radio user (it is enough just to
key up momentarily) at least every 30 seconds, or it will terminate the call in progress. These
commands are used to set the maximum time the interconnect will go without seeing a
Page 5-10
Section 5. Programming
transmission from the radio user without terminating the call. When there are only 15 second
left to the timer, the interconnect starts sending single beep warning tone, every three
seconds, until the radio user either keys up or the call is terminated. The default value for this
timer is 30 seconds.
36# - 30 SECOND RADIO ACTIVITY (default)
37# - 45 SECOND RADIO ACTIVITY
38# - 1 MINUTE RADIO ACTIVITY
Operating Mode
These commands are used to set the operating mode of the ZR350 to match the kind of base
station radio it is interfaced with. The default mode is Simplex VOX. The difference between
Simplex VOX and VOX with pre-key is that, when set to “pre-key”, whenever the carrier
detect signal goes away the ZR350 will go ahead and key the transmitter right away, in
anticipation of the phone caller starting to speak. In the Simplex VOX mode, the interconnect
will not key until it detects VOX activity from the phone.
40# - HALF DUPLEX MODE
42# - SIMPLEX VOX (default)
43# - SIMPLEX VOX with PRE-KEY
VOX Hold Time
When the ZR350 is operating in the Simplex VOX or Simplex VOX w/pre-key mode, a VOX
hold timer is used to smooth out the operation of the interconnect. The VOX hold time will
keep the transmitter keyed during small gaps or pauses in the telephone party’s speech, by
requiring the VOX output to go false for longer than the hold time before it will unkey the
transmitter. The default value for this timer is 1 second.
44# - VOX HOLD TIME .5 SECONDS
45# - VOX HOLD TIME .8 SECONDS
46# - VOX HOLD TIME 1 SECOND (default)
47# - VOX HOLD TIME 1.3 SECONDS
48# - VOX HOLD TIME 1.5 SECONDS
Page 5-11
Section 5. Programming
Carrier Detect Hold Time
These commands are used to set the value of the COR Hold Timer. This timer is used to desensitize the carrier detect input (COR) during simplex operation when the radio is fading or
picket-fencing. The ZR350 will not shift from radio-to-phone over to phone-to-radio until the
COR input has been false for longer than the time period programmed here. The default value
for this feature is no hold time.
83# - NO COR HOLD TIME (default)
84# - 100 MSEC COR HOLD TIME
85# - 300 MSEC COR HOLD TIME
86# - 500 MSEC COR HOLD TIME
Tone+Voice Paging Talk Time
When calling a Tone+Voice pager, the Talk Time determines the maximum amount of time
that the phone caller has to speak his or her voice message on the channel. If a gap of 2
seconds is detected in the caller’s voice (using the VOX circuit) then the call is terminated,
even if there is Talk Time remaining. The default setting is 10 seconds. Range is ten to thirty
seconds.
67# xx# - TALK TIME (default = 10 seconds, range 10 to 30)
Auto-Call User
The Auto-Call User is used for two purposes. The first one is as the default user, to be called
in the event that a phone caller does not enter a user number after the access prompt when the
ZR350 is operating in the multi-user mode. The Auto-Call User is also used to specify which
user gets called when the ZR350 is operating in single user mode and the phone rings. The
default setting is “00” and the range is 00 to 99. If you wish to disable the Auto-Call feature,
you must either disable the user to whom the Auto-Call assigned, or reassign the Auto-Call to
a user who is currently disabled.
68# xx# - AUTO-CALL USER NUMBER (default = 00)
Single/Multi-User Operation
These two commands determine what the ZR350 will do when the phone line rings. If set to
Multi-User, then the interconnect will answer the phone and wait for the caller to enter the
user number of the person they wish to call. If it does not receive a number from the caller,
then the interconnect will call the Auto-Call user (if there is one). If set to Single User, then
the interconnect will immediately call the user number programmed into the Auto-Call user
slot. The default setting is for Multi-User.
81# - SINGLE USER OPERATION
82# - MULTI-USER OPERATION (default)
Page 5-12
Section 5. Programming
Busy Tone Disconnect
The ZR350 can use the VOX detector to detect a busy signal from the phone and terminate a
radio originated call without any further action on the part of the radio user. The ZR350 can
be programmed to only react to a busy tone during the first 20 seconds of the call, to ignore
busy tone altogether, or to react to busy tone at any time throughout the whole call. The
default for this feature is to only look for a busy tone during the first 20 seconds.
87# - DISCONNECT ON BUSY FOR FIRST 20 SECONDS (default)
88# - DISABLE BUSY DETECT
89# - DISCONNECT ON BUSY FOR DURATION OF CALL
Program Mode Access Code
This command allows the installer or system operator to change the access code used to enter
into the Program mode. The default entry is 12350.
90# xxxxx# - PROGRAM ACCESS CODE (default = 12350)
Page 5-13
Section 5. Programming
The following are DTMF commands for initial setup and test:
Reset Memory to Defaults
This command resets all programmable items to the factory defaults and clears all of the user
database and call forwarding database.
91# - RESET MEMORY TO DEFAULTS
The ZR350 may be reset manually by holding in the “CONNECT” button while cycling
power. The button must be held in until the “PHONE” LED begins flashing. Release the
button to place the ZR350 into its normal operating mode.
Tests and Adjustments
These commands are used to perform various test and level adjustments when the ZR350 is
installed. They are explained completely in the installation procedure in Section 2.
92# - TX LEVEL TEST
96# - DIAL CLICK TEST
Exit Program Mode
This command will make the ZR350 exit the Program mode and return to the normal idle
state. In order to use this command, you must have finished all entries associated with any
other command or test and be at the point that the ZR350 is waiting for a new programming
command.
99# - EXIT PROGRAM MODE
Sign-on Mode
This command selects whether mobiles are required to enter their user number following the
Connect or Disconnect Prefix. In the Short Sign-on mode, mobiles never need to follow the
prefix with their user number. In the Full Sign-on mode, the requirement is dependent upon
the equipment type. The default mode is Short Sign-on.
100# - Short Sign-on Mode (default)
101# - Full Sign-on Mode
Local Phone Ringer Option
If the Local Phone Ringer option is installed with the ZR350, it must be enabled with this
command. This option allows mobiles to ring the Local Phone instrument by using a steering
digit of “4”. The default condition is disabled.
102# - Local Phone Ringer Enabled
103# - Local Phone Ringer Disable (default)
Page 5-14
Section 5. Programming
Call Forward Gap
These commands are used to enable or disable a one second gap between call forwards.
When the transmitter is dropped, there is a slight chance that another user may acquire the
channel. The ZR350 does not check carrier again before proceeding with the call forwarding,
therefore, the ZR350 can interfere with other users on the channel if a gap is used. Default is
no gap.
201# - ENABLE GAP BETWEEN CALL FORWARDS
202# - DISABLE GAP BETWEEN CALL FORWARDS (default)
Page 5-15
Section 5. Programming
USER COMMANDS
The following commands are used to assign specific attributes to individual users. Any user
programming done with these commands is cleared back to the default settings whenever the
memory of the ZR350 is reset.
Assigning Call Forward Users
This command is used to assign the call forward user number for any user. After the
command has been entered, the ZR350 will give two beeps to indicate that it is waiting for
the user number of the user who has been called. After that number is entered, the ZR350 will
issue two more beeps indicating that it is ready for the user number to forward the call to.
Remember that the second user number is the user who will be called in the event that the
first user does not answer. If you wish to disable call forwarding on a particular user, simply
press the “#” key when the ZR350 is asking for the second user number. Because calls to
pagers are not expected to be answered, call forwarding is not used on Tone Only or
Tone+Voice pagers.
Examples:
50# 22# 46# (if user 22 doesn’t answer, call user 46)
50# 30# # (clear any call forward for user 30)
50# uu# xx# - ASSIGN CALL FORWARD USER NUMBER
User Equipment Types
The following commands serve two purposes. They enable users and they specify what
equipment type each user has. The equipment type tells the ZR350 how to operate when it is
asked to call a particular user. The default condition of all users is that they are disabled.
There are 100 slots numbered from 00 to 99. When one of the commands is entered, two
beeps are sent indicating that the ZR350 is ready for a user number. The user number and
equipment type determine the method of selectively signaling the user.
70# xx# - USER DISABLED (default condition for all users)
53# xx# - FIVE-TONE RADIO
54# xx# - FIVE-TONE TALKBACK PAGER
55# xx# - FIVE-TONE TONE-ONLY PAGER
56# xx# - FIVE-TONE TONE+VOICE PAGER
69# xx# - QCII GROUP-CALL RADIO
73# xx# - QCII RADIO
74# xx# - QCII TONE-ONLY PAGER
75# xx# - QCII TONE+VOICE PAGER
78# xx# - QCII TALKBACK PAGER
Two-tone encode parameters
These two commands are used to set which Quick Call II paging tone groups are used by the
ZR350 to make up the QCII pages it transmits. When a call is placed to a user that is assigned
Page 5-16
Section 5. Programming
QCII as their paging format, then the interconnect uses the two digits of the user number to
select tones from the two tone groups specified with these commands. The first digit of the
user number selects a tone from the group specified by the command 65#, and the second
digit of the user number selects a tone from the group specified by the command 66#. If both
the first and the second tones end up being the same, then the interconnect will make a Group
Call page (one tone, 8 seconds long) instead of making a regular page (1 second 1st tone,
zero gap, 3 second 2nd tone). The default is Motorola Tone Group 1 for command 65# and
Tone Group 2 for command 66#. The allowable range is Motorola Tone Groups 1 through 6.
65# x# - QCII GROUP 1 (default = 1)
66# x# - QCII GROUP 2 (default = 2)
MOTOROLA TONE GROUPS:
The ZR350 supports paging tones from the first six Motorola Quick Call II tone groups. Table
5-2 shows the tones of those groups for convenient reference. The table does not show the usual
diagonal tones for these tone groups because the ZR350 does not allow the assignment of
diagonal tone. If the first and second tones of the page are the same, the ZR350 will send an
extended single tone group call page.
Table 5-2. Two-Tone Group Frequencies
TONE #
0
1
2
3
4
5
6
7
8
9
1
330.5
349.0
368.5
389.0
410.8
433.7
457.9
483.5
510.5
539.0
MOTOROLA TONE GROUP NUMBER
2
3
4
5
569.1
1092.4
321.7
553.9
600.9
288.5
339.6
584.8
634.5
296.5
358.6
617.4
669.9
304.7
378.6
651.9
707.3
313.0
399.8
688.3
746.8
953.7
422.1
726.8
788.5
979.9
445.7
767.4
832.5
1006.9
470.5
810.2
879.0
1034.7
496.8
855.5
928.1
1063.2
524.6
903.2
6
1122.5
1153.4
1185.2
1217.8
1251.4
1285.8
1321.2
1357.6
1395.0
1433.4
Five-tone encode parameters
These commands are used to configure the five-tone encode functions in the ZR350. A
description of each parameter follows;
a) 5-tone tone series and timing. Nine selections are supported. Use Table 5-3 to select the
proper tone series and tone timing.
Page 5-17
Section 5. Programming
Table 5-3. Five-Tone Group Frequencies
Tone set CCIR1 CCIR2 EEA EIA ZVEI1 ZVEI2 DZVEI PZVEI ZVEI3
1
2
3
4
5
6
7
8
9
Tone #
1981
1981 1981 600
2400
2400
2200
2400
2400
0
1124
1124 1124 741
1060
1060
970
1060
1060
1
1197
1197 1197 882
1160
1160
1060
1160
1160
2
1275
1275 1275 1023 1270
1270
1160
1270
1270
3
1358
1358 1358 1164 1400
1400
1270
1400
1400
4
Selection #
5
6
7
8
9
1446
1540
1640
1747
1860
1446
1540
1640
1747
1860
1446
1540
1640
1747
1860
1305
1446
1587
1728
1869
1530
1670
1830
2000
2200
1530
1670
1830
2000
2200
1400
1530
1670
1830
2000
1530
1670
1830
2000
2200
1530
1670
1830
2000
2200
A Group
B
C Reset
D
E Repeat
F
2400
930
2247
991
2110
1055
2400
930
2247
991
2110
1055
1055
930
2400
991
2110
2247
2151
2433
2010
2292
459
1091
2800
810
970
885
2600
680
885
810
740
680
970
2600
825
740
2800
885
2400
680
970
810
2800
885
2600
680
885
810
2800
680
970
2600
Tone
Period
70ms
100ms 40ms 33ms
70ms
70ms
70ms
70ms
70ms
b) 5-tone leading digit straps. The 5-tone selcall sent is three preset leading digits, followed
by two “user” digits.
First digit strap ___ (0-9)
Second digit strap ___ (0-9)
Third digit strap ___ (0-9)
Fourth digit
_x_ (from user input)
Fifth digit
_x_ (from user input)
c) Group translation digit. This selectable digit provides the user a mechanism to send a
five-tone group call. If a user enters a match to this digit, the EuroPatch will substitute the
Group tone. For Example: Leading straps = 123, Group digit = 9, users = 5-tone radio
User enters 45, EuroPatch sends 12345 = individual call
User enters 91, EuroPatch sends 123G1 = group of 10
User enters 99, EuroPatch sends 123GR = group of 100
Page 5-18
Section 5. Programming
d) Extended First Tone. The ZR350 may be configured to extend the first selcall tone of all
outbound selcalls to the transmitter. When Scanning Radios are being used on a system,
the radios monitor each channel in their scan list for RF Carrier, CTCSS, and a Selcall
Tone. When all three are detected the radio stops scanning and waits for the remainder of
the call sequence to see if the call is for itself or not. If it is, the radio opens up its squelch
and remains stopped on that channel for the duration of the call. If not, the radio remains
squelched/muted and resumes scanning. To allow all radios to collect on to the channel
and reliably decode the selcall, the first tone in the selcall sequence must be extended.
The Extended First Tone duration is programmed as the number of “tone periods” to
extend the first tone, 0 to 99. When set to zero, the first tone duration is not extended and
is the same as all subsequent tones. When set to 1, the first tone duration is doubled.
Some example settings are:
EFT Setting
1st Tone Duration
Standard Duration
CCIR 100ms
0
100ms
100ms
CCIR 100ms
1
200ms
100ms
EEA 40ms
24
1 second
40ms
ZVEI 1 70ms
35
2.52 seconds
70ms
Tone Set
e) Select V decode access mode. The EuroPatch is typically accessed using DTMF ANIs,
but may also be accessed using Motorola Select V (5-tone) decode. This feature (when
enabled) requires the installer to program a Select V Call Alert in the GM300 receive
radio as;
Call Type = Call Alert
Alert Tone Reset = Automatic
Horn / Lights = Permanent
Horn / Lights Delay = 0 sec
Pin 4 on the auxiliary connector = External alarm, output high
Select V decode capcode and tone series as required
The Select V decode will cause the ZR350 to access the phone line and dial a programmable
telephone number. This is a single phone number of up to 16 digits. When the autodial takes
place, the EuroPatch will take the phone line off hook, wait 2 seconds, then begin dialing. If
no autodial phone number is programmed, the phone line will be taken off-hook, just as if a
valid DTMF Connect Code had been received. Dial tone will be passed to the radio user, and
the radio user may dial just as in a regular radio-to-phone call. Call disconnect may be
accomplished by sending the DTMF Disconnect Prefix, call limit time-out, radio activity
time-out, or “#0” from the phone side. A two second pause may be inserted in the dialing
string by entering a DTMF “*” (multiple delays may be used).
Five tone selective calling parameters;
Page 5-19
Section 5. Programming
11# n# - FIVE-TONE TONE SERIES / TIMING (1-9)
13# n# - FIVE-TONE GROUP TRANSLATION DIGIT (0-9, OR # = NONE)
39# n# - EXTENDED FIRST TONE (0 - 99, Default = 0)
49# n# - FIVE-TONE DECODE EMERGENCY AUTODIAL PHONE NUMBER
(up to 16 digits)
57# n# - FIVE-TONE ENCODE FIRST DIGIT STRAP (0-9)
58# n# - FIVE-TONE ENCODE SECOND DIGIT STRAP (0-9)
59# n# - FIVE-TONE ENCODE THIRD DIGIT STRAP (0-9)
FACTORY TEST SOFTWARE
The commands that follow are used for factory testing of the telephone interface, however,
they are still accessible from the basic Program mode so that they can be used whenever it
would be helpful. For the purposes of giving an example, it is assumed that the interconnect’s
programming is still at defaults.
1. Call the ZR350 on the PSTN/PBX line, or pick up the Local Phone. If using the Local
Phone, a hook flash may be performed instead of pushing the CONNECT button in the
following steps.
2. When the interconnect answers and prompts you for a number, enter 12350# from the
phone’s DTMF keypad. You will get a quick five-beep acknowledgment that you have
entered the Program mode.
3. Enter the DTMF command 203# to leave the normal Program mode and enter into the
telephone test mode. The interconnect will respond with a double-beep prompt.
4. At this point, the phone line is “off-hook”, the PHONE LED is lit, and the interconnect is
idling (which it will continue to do indefinitely if it receive no further input), waiting for
you to push the CONNECT button on the front of the unit to start the telephone tests.
5. Push the CONNECT button on the front of the interconnect. The ZR350 will respond
with a quick five-beep prompt to indicate that it is now waiting for telephone test
commands. As with normal Program mode commands, all telephone test commands end
with a #.
The following is a list of the commands available in the telephone test mode and what they
will do.
1# This command causes the ZR350 to dial the number sequence 9-8-7-6-5-4-3-2-1-0 using
pulse mode dialing, and then it returns to idle, waiting for another test command.
2# This command opens up the audio path from the radio input to the telephone. It remains
open until the CONNECT button is pushed.
Page 5-20
Section 5. Programming
3# This command sends one sequence of the “End-of-Programming” tone to the telephone
and then returns to idle, waiting for another command.
4# This command sends one sequence of the “Programming Error” tone to the telephone
and then returns to idle, waiting for another test command.
5# This command will continuously send a tone in a two seconds on, four second off
pattern, until the CONNECT button is pressed, at which time the interconnect returns to
idle, waiting for another command.
6# This command will continuously send the “Busy Ring” tone sequence to the telephone
until the CONNECT button is pushed, at which time the interconnect returns to idle,
waiting for another command.
7# This command will continuously send the “Normal Ring” tone sequence to the telephone
in a two seconds on, four seconds off pattern until the CONNECT button is pressed, at
which time the interconnect will return to idle, waiting for another command.
8# This command continuously sends the “Normal Ring” tones to the telephone without any
break, until the CONNECT button is pressed, at which time the interconnect returns to
idle, waiting for another command.
9# This command sends a continuous tone to the telephone, until the CONNECT button is
pressed, at which time the interconnect returns to idle, waiting for another command.
10#
This command sends a continuous “Programming Error” tone sequence to the
telephone, until the CONNECT button is pressed, at which time the interconnect returns
to idle, waiting for another command.
11#
This command will send the “End-of-Program-Mode” tones to the telephone
continuously, until the CONNECT button is pressed, at which time the interconnect
returns to idle, waiting for another command.
12#
This command will send a continuous “beep” tone (1 kHz) to the telephone until the
CONNECT button is pressed, at which time the interconnect returns to idle and waits for
another command.
13#
This command will make the interconnect repeatedly pulse dial the digit “0” until the
CONNECT button is pressed, at which time the interconnect returns to idle and waits for
another command.
203# This command is used to exit the Telephone Test mode as well as to enter it. When
this command is entered, from within the Telephone Test mode, the ZR350 will return
an “Error” tone and then return to the normal Program mode.
Once you return to the normal Program mode, you can either work with the commands in that
mode, or exit back to the Normal operating mode by entering a 99#. The ZR350 will return
Page 5-21
Section 5. Programming
an “End-of-Program-Mode” tone (ringing) and the return to its normal idle state, waiting for
a call to come in.
Page 5-22
APPENDIX A. QUICK REFERENCE
SYSTEM PROGRAMMING COMMANDS ..............................................................A-1
USER PROGRAMMING COMMANDS ...................................................................A-3
SELECTIVE CALLING COMMANDS......................................................................A-3
INSTALLATION COMMANDS ................................................................................A-3
FIVE-TONE ENCODE (Tone Group/Timing Table) ................................................A-4
TWO-TONE PAGING (Tone Group/Tone Number/Frequency Table) ....................A-5
APPENDIX A. QUICK REFERENCE
SYSTEM PROGRAMMING COMMANDS
01# _ _ _ _ _ _ _ _ #
02# _ _ _ _ _ _ _ _ #
03# _ _ _ _ _ _ _ _ #
04#
05#
Connect Prefix (default = *1)
Disconnect Prefix (default = #1)
Toll Restrict Bypass Prefix (default = 99)
DTMF Dial Radio Originated Calls (default)
Pulse Dial Radio Originated Calls
204# - Set Make/Break Ratio to 39/61 (default)
205# - Set Make/Break Ratio to 33/67
06#
07#
08#
Wait 1 ring before answering (default)
Wait 3 rings before answering
Wait 5 rings before answering
10# _ _ #
12#
Radio Answer Time (default = 30 seconds, 10-60)
Disable Interconnect
14# _ _ _ _ # First Digit Toll Restrict digits (default = none)
15# _ _ _ _ # Second Digit Toll Restrict digits (default = none)
16#
17#
Ring once on air and wait for radio answer
Ring on channel until radio answers (default)
201# Enable gap between call forwards
202# Disable gap between call forwards (default)
18#
19#
21#
22#
23#
24#
51#
52#
Enable single user (CSQ, PL, DPL) repeat
Disable carrier repeat (default)
No repeat hold time
1 second repeat hold time
3 second repeat hold time (default)
5 second repeat hold time
Time-out timer enabled, 3 minute (default)
Time-out timer disabled
25# _ _ _ _ _ _ _ _ #
Morse code station identification (default = none)
60# Disable station identification
61#
Station id / 10 minute interval / with activity (default)
62#
Station id / 10 minute interval / no activity
Page A-1
Appendix A. Quick Reference
26#
27#
Courtesy tone enabled
Courtesy tone disabled (default)
28#
29#
Privacy mask enabled
Privacy mask disabled (default)
30#
31#
32#
33#
34#
35#
Enable call limit timer (default)
Enable call limit timer w/ “*” reset
No call limit
3 minutes (default)
5 minutes
10 minutes
36#
37#
38#
30 second radio activity (default)
45 second radio activity
1 minute radio activity
40#
42#
43#
Half duplex mode
Simplex vox (default)
Simplex vox with pre-key
44#
45#
46#
47#
48#
83#
84#
85#
86#
Vox hold time .5 seconds
Vox hold time .8 seconds
Vox hold time 1 second (default)
Vox hold time 1.3 seconds
Vox hold time 1.5 seconds
No COR hold time (default)
100 msec carrier hold time
300 msec carrier hold time
500 msec carrier hold time
49# _ _ _ _ _ _ _ _ _ _ ... #
Select V decode autodial number (16 digits)
67# _ _ #
68# _ _ #
Talk time (default = 10 seconds, range 10 to 30)
Auto-call user number (default = 0)
81# - Single User Operation
82# - Multi-User Operation (default)
87#
88#
89#
Disconnect on busy for first 20 seconds (default)
Disable busy detect
Disconnect on busy for duration of call
99#
Exit program mode
100# - Short Sign-on Mode (default)
101# - Full Sign-on Mode
Page A-2
Appendix A. Quick Reference
102# - Local Phone Ringer Enabled
103# - Local Phone Ringer Disable (default)
USER PROGRAMMING COMMANDS
50# _ _ # _ _ #
70# _ _ #
53# _ _ #
54# _ _ #
55# _ _ #
56# _ _ #
Assign call forward user number
User disabled (default condition for all users)
5-tone radio (answer via COR, disconnect via DTMF)
5-tone talkback (voice hail, COR answer, DTMF disconnect)
5-tone tone only pager
5-tone tone + voice pager
69# _ _ #
73# _ _ #
74# _ _ #
75# _ _ #
78# _ _ #
QCII group-call radio equipment type
QCII radio equipment type
QCII tone only pager equipment type
QCII tone & voice pager equipment type
QCII talkback pager equipment type
99#
Exit program mode
SELECTIVE CALLING COMMANDS
11# _ #
13# _ #
39# _ _#
57# _ #
58# _ #
59# _ #
5-tone tone series / timing (1-9, default = 1)
5-tone group translation digit (none or 0-9, default = none)
Extended First Tone (0-99, default = 0)
5-tone encode first digit strap (0-9, default = 1)
5-tone encode second digit strap (0-9, default = 2)
5-tone encode third digit strap (0-9, default = 3)
65# _ #
66# _ #
QCII group 1 (1-6, default = 1)
QCII group 2 (1-6, default = 2)
99#
Exit program mode
INSTALLATION COMMANDS
90# _ _ _ _ _ #
Program access code (default = 12350)
91# Reset memory to defaults
92# Tx level test
96# Dial click test
Page A-3
Appendix A. Quick Reference
FIVE-TONE ENCODE (Tone Group/Timing Table)
Tone set CCIR1 CCIR2 EEA EIA ZVEI1 ZVEI2 DZVEI PZVEI ZVEI3
Selection #
1
2
3
4
5
6
7
8
9
Tone #
1981
1981 1981 600
2400
2400
2200
2400
2400
0
1124
1124 1124 741
1060
1060
970
1060
1060
1
1197
1197 1197 882
1160
1160
1060
1160
1160
2
1275
1275 1275 1023 1270
1270
1160
1270
1270
3
1358
1358 1358 1164 1400
1400
1270
1400
1400
4
5
6
7
8
9
1446
1540
1640
1747
1860
1446
1540
1640
1747
1860
1446
1540
1640
1747
1860
1305
1446
1587
1728
1869
1530
1670
1830
2000
2200
1530
1670
1830
2000
2200
1400
1530
1670
1830
2000
1530
1670
1830
2000
2200
1530
1670
1830
2000
2200
A Group
B
C Reset
D
E Repeat
F
2400
930
2247
991
2110
1055
2400
930
2247
991
2110
1055
1055
930
2400
991
2110
2247
2151
2433
2010
2292
459
1091
2800
810
970
885
2600
680
885
810
740
680
970
2600
825
740
2800
885
2400
680
970
810
2800
885
2600
680
885
810
2800
680
970
2600
Tone
Period
70ms
100ms 40ms 33ms
70ms
70ms
70ms
70ms
70ms
Page A-4
Appendix A. Quick Reference
TWO-TONE PAGING (Tone Group/Tone Number/Frequency Table)
1
TONE GROUP NUMBER
2
3
4
5
6
TONE
#
0
1
2
3
4
330.5
349.0
368.5
389.0
410.8
569.1
600.9
634.5
669.9
707.3
1092.4
288.5
296.5
304.7
313.0
321.7
339.6
358.6
378.6
399.8
553.9
584.8
617.4
651.9
688.3
1122.5
1153.4
1185.2
1217.8
1251.4
5
6
7
8
9
433.7
457.9
483.5
510.5
539.0
746.8
788.5
832.5
879.0
928.1
953.7
979.9
1006.9
1034.7
1063.2
422.1
445.7
470.5
496.8
524.6
726.8
767.4
810.2
855.5
903.2
1285.8
1321.2
1357.6
1395.0
1433.4
Page A-5