1
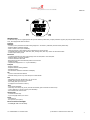
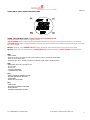
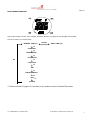
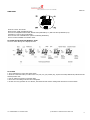
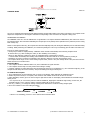
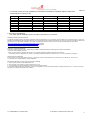
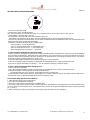
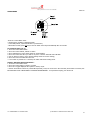
ENGLISH
VS-1 Chronograph
(Series v2)
Instructions &
2/4/6 YEAR Warranty Information
VS-1 CHRONOGRAPH v2.0 INSTRUCTIONS
© COPYRIGHT ST. MORITZ WATCH CORP. 2008
1
ENGLISH
INSTRUCTION MANUAL for MOMENTUM® VS-1 CHRONOGRAPH (4-Button) English
Congratulations on your purchase of this MOMENTUM® VS-1 CHRONOGRAPH. This watch represents the state-of-the-art in recreational sensor
watches. We use the finest Swiss sensors to create the most accurate and dependable products possible.
The VS-1 unit features an altimeter/barometer/weather station along with a full selection of advanced watch and chronograph functions. The VS-1
also features a highly accurate digital compass.
Please keep in mind, your watch is a sensitive technical instrument. With proper care and maintenance, it will last for many years. However,
improper care and handling can cause the various sensors to be damaged and to stop functioning.
Please read all sections of this manual carefully and become fully familiar with the operation of the watch before using it in the field.
NOTE: Before starting any exercise program or performing any vigorous physical activity, we strongly recommend you visit your doctor for a
complete physical and to discuss your plans.
CAUTION: Your watch is designed to be water resistant to a static pressure of 5 ATM and can be worn while showering and light swimming.
However, we recommend that extensive use of the unit in the water be avoided whenever possible as water could enter the unit through the
altimeter sensor port and damage the unit.
The unit should not be worn while snorkeling or scuba diving as these activities can damage the altimeter sensor.
CAUTION: Care should be taken not to press any pushbuttons while the unit is wet or submerged as this can force moisture past the pushbuttonseals and damage the unit.
CAUTION: Exposure to strong magnetic fields will cause the compass unit to malfunction and may even permanently damage the compass
sensor. Keep the unit away from magnetic sources (TV, large metal objects, etc.).
WARNING: This product is NOT designed to be used as a PRIMARY altitude instrument for flying, skydiving, hang gliding or other sports where
significant changes in altitude may occur suddenly, or when there is a need for industrial precision.
Your VS-1 CHRONOGRAPH should be protected from shocks, extreme heat and extended exposure to direct sunlight. Other than simple battery
exchange, all servicing procedures should only be carried out by an authorized Service Center. NEVER attempt to disassemble or otherwise
service your watch, as this may void your warranty. Store your watch in a clean, dry area at room temperature.
Normal battery life is approximately 12-18 months.
NOTE: Heavy usage of the Altimeter, Compass or Backlight system may reduce battery life.
NOTE: A blank display or inaccurate altimeter or compass readings are indications that the battery is getting weak and should be replaced.
VS-1 CHRONOGRAPH v2.0 INSTRUCTIONS
© COPYRIGHT ST. MORITZ WATCH CORP. 2008
2
ENGLISH
INTRODUCTION
The Momentum® VS-1 is a digital product that provides Altimeter, Barometer, Compass, Altimeter Log Data, Ski, Sail (CountdownTimer), Dual
Time, Chronograph And Alarm Functions.
Features:
Altimeter
- 1 meter (or foot) resolution and with working range from -700 meters (-2296 feet) to 9000 meters (29520 feet).
- Graphical display of altitude changes.
- Units in meters or feet (user selectable.)
- Show ASC (ascent) / DSC (descent) rate in feet/minute or meters/ minute
- 20 logbook data memories, with total ASC / DSC, Average ASC / DSC rate, number of hills and total time.
- 24 hour Graph memory recall
Barometer
- 1 mbar/hPa resolution and with working range from 300 mbar/hPa to 1100 mbar/hPa.
- Graphical display of changes provided.
- 24 hours barometric data recall
- Both sea level pressure and absolute pressure can be shown.
- Weather forecast.
- Temperature displayed in °F or °C (user selectable.)
Compass
- Bearing in degrees
- Graphical direction bearing indicator
- Declination setting
- Auto deviation of direction calculation and display
Ski
- 1 press to record the base altitude
- Automatic timing of a ski run, from start point to base altitude
Sail
- Adjustable count down period from 1 min to 120 min
- Audible warning signal at end of countdown.
- Auto sailing timer up to 120 hours
- 50 waypoint can be stored in memory
Time
- 2 time modes selectable.
- Shows day of the week, day, hours, minutes and seconds (year and month can also be set).
- 12-hour (AM-PM), or 24-hour format (user selectable).
- Auto-calendar from 2006 to 2055.
Chronograph
- 24 hours with auto stop.
- Up to 50 lap/split memory for chrono.
Alarm
- 2 daily alarms.
- Hourly chime (user option).
Electro-luminescent backlight
- EL backlight with 3 second delay.
VS-1 CHRONOGRAPH v2.0 INSTRUCTIONS
© COPYRIGHT ST. MORITZ WATCH CORP. 2008
3
ENGLISH
OVERVIEW OF BASIC OPERATION OF BUTTONS
USING THE PUSHBUTTONS – QUICK PRESS vs. PRESS AND HOLD
There are two actions used to operate or program the watch:
QUICK PRESS: Button is pressed quickly and immediately released. This is the most common action and is used for most operations.
PRESS & HOLD: Button is pressed and held for 2-3 seconds. This action is generally used to initiate a programming sequence, or to change
an on-screen variable.
NOTE 1: Generally, when a PRESS & HOLD action is required, the word HOLD will appear on the center line of the display.
NOTE 2: In this manual we will indicate when a PRESS & HOLD is required. Otherwise, a QUICK PRESS should be assumed.
(S3)
-MODE CHANGE
-PRESS S3 TO SELECT SETTING VALUE ON TIME, COMPASS, BARO, ALTITUDE AND ALARM MODE.
-PRESS TO SELECT NEXT MODE
-PRESS AND HOLD FOR 3 SECONDS TO RETURN TO NORMAL “TIME” MODE. (FROM ANY MODE)
(S4)
-PRESS AND HOLD FOR 3 SECONDS TO SET
-EXIT SETTING
-DELETE FILE
-TO STOP SCROLLING
- TURN ON BACK LIGHT
(S2)
-SELECT VIEWS OR DISPLAY OPTION
-REVERSE (DECREASE) SETTING
-STOP/RESET
-SELECT AL1/AL2/CHIME
(S1)
-START/STOP
-REACTIVATE COMPASS FUNCTION
-ALARM ON/OFF
-FORWARD (INCREASE) SETTING
VS-1 CHRONOGRAPH v2.0 INSTRUCTIONS
© COPYRIGHT ST. MORITZ WATCH CORP. 2008
4
ENGLISH
MODE CHANGE OPERATION
This product provides 9 modes: Time, Compass, Barometer, Altimeter, Log Data, Ski, Chronograph, Sail and Alarm.
Press S3 to select to your desired mode.
NORMAL TIME (T1)
Hold S1
DUAL TIME (T2)
S3
COMPASS
S3
BAROMETER
S3
ALTIMETER
S3
S3
LOG DATA
S3
SKI
S3
CHRONOGRAPH
S3
SAIL
S3
ALARM
***Press and hold S3 (approx 3-4 seconds) in any mode to return to Normal Time mode.
VS-1 CHRONOGRAPH v2.0 INSTRUCTIONS
© COPYRIGHT ST. MORITZ WATCH CORP. 2008
5
ENGLISH
TIME MODE
Press S3 to enter Time mode.
Mode prompt “TIME” is displayed briefly.
There are 2 independent time modes, Normal Time (indicated by T1) and Dual Time (indicated by T2).
(Seconds in T1 and T2 are synchronized.).
There are five user-selectable views (shown in following illustration)
There is an auto-calendar from 2006 to 2055.
To switch among the 5 time displays/ views
Use S2 to switch among the 5 displays for time.
To set time
1. Press and hold S4 to enter time setting mode.
2. Press S3 to select the value you want to set: hour, min, sec, year, month ,day, 12/24 hour format, altitude unit, barometric unit
and temperature unit.
3. Use S1 and S2 to increase or decrease value.
4. Press S4 to exit setting mode and save setting data
5. If there is no key operation for 2-3 minutes, the watch will auto exit the setting mode and return to normal mode.
VS-1 CHRONOGRAPH v2.0 INSTRUCTIONS
© COPYRIGHT ST. MORITZ WATCH CORP. 2008
6
ENGLISH
COMPASS MODE
The VS-1 is equipped with a highly accurate digital magnetic compass with reading in one degree increments. The compass can be
adjusted to compensate for the magnetic declination corresponding to the area where the compass is being used.
CALIBRATING THE COMPASS
The COMPASS of the VS-1 must be calibrated on a regular basis. The compass should be calibrated any time it does not seem to
be working properly. We recommend calibrating the compass prior to any activity where optimal accuracy is desired, such as a long
back country trip.
NOTE: For the optimum accuracy, the compass must be held completely level, both during the calibration process and when taking
a bearing. While performing the calibration, we recommend placing the unit on top of a drinking glass to hold it level and turn it.
Press S3 to select Compass mode.
* Mode prompt “COMP” is displayed briefly. Calibration mode will start automatically when selecting Compass mode
for the first time (e.g. after resetting the watch, or after installing a new battery.)
- When you take bearings, readings are shown in graphical direction, with bearing in degrees.
* Hold the watch horizontal/ level: Reading shown indicates the direction that the 12 o’clock position is pointing to.
- Declination correction is provided. (Declination is the difference between true north and magnetic north.)
- The compass offset range: 00-90°. Check setting compass offset, if offset >90°, then change offset to 90°,and wait 2 minutes.
Watch will return to normal function.
Important Note:
1. The compass should be calibrated before use, then recalibrated at regular intervals.
2. The compass must be kept in a level position when taking a reading.
3. Compass readings are easily affected by large metal objects and sources of magnetism (e.g. CRT Television magnets), so the
compass should always be used in outdoors, away from buildings and large metal objects.
To calibrate the compass
1. Press and hold down S4 until “ROTATE CAL” is shown on the display, which indicates the calibration screen.
2. Rotate the product slowly for 2 complete, slow rotations. Each rotation must last for at least 15 seconds.
3. After calibration/ rotation, press S3: the ten-degree digit starts to flash on the display, which indicates the declination angle
setting screen.
* Do not press S4, S1 or S2 at this point: this will end calibration, skipping the declination angle setting. In this case, the
declination angle is set to 0 degree and the compass reading will not be as accurate.
4. Use S1(+) and S2 (-) to change the setting. Holding down either button scrolls the setting at high speed.
5. Press S3 to advance to the next setting as follows:
S3
TENS OF DEGREE
S3
DEGREE
S3
E/W
* When E or W is flashing, press S2 or S1 to switch between East and West.
VS-1 CHRONOGRAPH v2.0 INSTRUCTIONS
© COPYRIGHT ST. MORITZ WATCH CORP. 2008
7
ENGLISH
* You should consult your local organization for information of declination. Declination angles for major cities
are listed below for reference only.
City
Anchorage
Atlanta
Bombay
Boston
Calgary
Chicago
Denver
Jerusalem
Declination Angle
22° E
4° W
1° W
16° W
18° W
3° W
10° E
3° E
City
London
Little Rock
Livingston, MT
Munich
New York City
Orlando
Oslo
Paris
Declination Angle
4° W
3° E
14° E
1° E
14° W
5° W
2° W
2° W
City
Rio De Janeiro
San Francisco
Seattle
Shanghai
Toronto
Vancouver
Washington DC
Waterbury, CT
Declination Angle
21° W
15° E
19° E
5° W
11° W
20° W
10° W
14° W
6. Press S4 to end calibration.
*exit: watch will exit calibration mode if no button is pressed for 2 to 3 minutes
MAGNETIC DECLINATION Explained
A magnetic compass points to the earth’s magnetic north pole. Depending on your location, this may differ from True North shown on your map.
Adjusting the MAGNETIC DECLINATION allows you to compensate for this variation. Declination can change over time and distance. Make sure
the source for your declination settings is up to date. The following websites are good sources for finding local Magnetic Declination.
http://www.geolab.nrcan.gc.ca/geomag/apps/mdcal_e.php (English)
http://www.geolab.nrcan.gc.ca/geomag/apps/mdcal_f.php (français)
http://www.ngdc.noaa.gov/seg/geomag/jsp/Declination.jsp
TAKING A COMPASS BEARING
Press S3 to enter Compass mode. * Mode prompt “COMP” is displayed briefly and bearing will be taken automatically.
- Compass mode indicator is shown.
- When you take bearings, readings are shown in 16 cardinal indications together with bearing in degrees.
* The bearing shown in degrees in the center of the display indicates the direction that the VS-1’s 12 o’clock position is pointing to.
REACTIVATING COMPASS
To save power, the compass feature of the VS-1 will remain active for approximately 10 seconds after you release S1, then turn off.
To reactivate the compass display, QUICK PRESS S1.
IMPORTANT NOTES to ensure Accurate Compass Bearings
1. The compass should be calibrated before use.
2. The compass must be held in a level position when in use.
3. Correct setting of magnetic declination ensures more accurate bearings.
4. Compass readings are easily affected by sources of magnetism, such as large metal objects, buildings, televisions, etc. To ensure accurate
bearings, the compass should be used outdoors.
VS-1 CHRONOGRAPH v2.0 INSTRUCTIONS
© COPYRIGHT ST. MORITZ WATCH CORP. 2008
8
ENGLISH
BAROMETER MODE
Press S3 to enter Barometer mode.
* Mode prompt “BARO” is displayed briefly.
- Barometer mode indicator is shown.
-The barometer resolution is 1 mbar/hPa, with a working range from 300 mbar/hPa to 1100 mbar/hPa.
-12 hours of air pressure changes/history are required to calculate the weather forecast for the next 6 hours and to ensure accuracy
of weather forecast.
-There are five user-selectable display “views” (shown in following illustration)
- To switch between the 5 display views for barometer mode
Press S2 to switch between the 5 displays for barometer mode.
Reading the graph of sea level pressure
The graph shows the relative changes in sea level pressure with the current pressure shown on the right. Each horizontal point
represents one hour, while each vertical point represents the relative pressure reading pressure at that time.
* The graph is not intended to show exact pressure readings, but rather to show the trend of pressure changes.
To recall Barometric Data from the past 24 hours
(Recall the barometric data for past 24 hours with graph and pressure reading.)
1. Press S3 to enter to Barometer mode.
2. Press S2 to switch to the RECALL display.
3. Press S1 to scroll through historic data.
To switch between mbar/hPa and in Hg
1. Use S2 to switch to the barometer display with Sea level and actual pressure.
2. Hold down S1 until the “unit” indicator (mbar/hPa or in Hg) stops flashing, to switch readout between mbar/hPa and in Hg.
VS-1 CHRONOGRAPH v2.0 INSTRUCTIONS
© COPYRIGHT ST. MORITZ WATCH CORP. 2008
9
ENGLISH
To set sea level pressure reading
1. Hold down S4 until “SET WEATHER” is displayed, which indicates the weather setting screen.
* The weather indicators start to flash.
2. Press S3 to set the current barometric pressure. The current sea level pressure reading starts to flash.
3. Use S1 (+) and S2 (-) to change the setting. Holding down either button scrolls the setting at high speed.
4. Press S4 to exit the setting screen.
* If there is no button operation for 2-3 minutes from the setting screen, the display will return to Barometer mode automatically.
To set current weather
1. Hold down S4 until “SET WEATHER” is displayed
* The weather indicators start to flash.
2. Use S1 (+) and S2 (-) to change the setting
3. Press S4 to exit the setting screen.
* If there is no button operation for 2-3 minutes at setting screen, the display will return to the Barometer mode automatically.
VS-1 CHRONOGRAPH v2.0 INSTRUCTIONS
© COPYRIGHT ST. MORITZ WATCH CORP. 2008
10
ENGLISH
ALTIMETER MODE
Press S3 to select Altimeter mode.
* Mode prompt “ALTI” is displayed briefly.
- Altimeter mode indicator is shown.
- The altimeter has 1 meter (or foot) resolution and a working range from -700 meters (-2296 feet) to 9000
meters (29,520 feet).
- Altitude reading in meters or feet is user-selectable.
- A graph showing the changes in altitude is provided.
- Graph data/ altitude history can only be cleared after the watch is reset.
- 24 hour graphic memory recall
- user able to select and preset Altitude values (Local 1, Local2, and Local 3) in setting mode for quick and easy calibration.
- The watch automatically switches between Altimeter and Barometer in Altimeter mode
To set Alti (Altimeter)
-1. In the Alti mode, press and hold S4 for 2 seconds, “CURRENT” flag will begin to flashing,
-2. Use S1 (+) and S2 (-) to display the value you wish to set (flag will flash in order shown below):
CURRENT
LOCAL 1
LOCAL 2
ALTI
MAX
ACC
LOCAL 3
ALARM
-3. When flag for the value you wish to set flashes, press S3 to select and set that value. (Number/ value will flash)
-4. Use S1 (+) and S2 (-) to change the setting. Holding down either button scrolls the setting at high speed.
-5. Once the value is set, press S3 to store the new value.
-6. Press S1 or S2 to display the altitude value (Current, Local 1, Local 2, or Local 3) you may wish to set, then repeat procedure
above.
-7. To reset stored MAX altitude: Press S1 or S2 until MAX flashes. Then Press S3 (stored Max altitude value will flash). Then Press
S1 or S2 to reset Max altitude to zero. Finally, press S3 to exit and store.
-8. To reset ACC (accumulated) altitude: Press S1 or S2 until ACC flashes. Then Press S3 (stored ACC altitude value will flash). Then
Press S1 or S2 to reset ACC altitude to zero. Finally, press S3 to exit and store.
-9. To set an altitude Alarm, press S1 or S2 until ALRM flashes. Press S3 to select Altitude Alarm for setting. Press S1 or S2 to toggle
alarm ON or OFF. Then Press S3 again. (Altitude value will flash). Set value for altitude at which you wish the altitude alarm to
sound by pressing S1 (+) or S2 (-). When altitude value is set, and alarm is on or off, press S3 to save and exit altitude alarm
setting.
10. Press S1 or S2 to recall the desired current altitude to the screen, then Press S4 to exit altitude setting.
IMPORTANT NOTE: The last altitude value shown on the screen, before you press S4 to exit setting mode will be set as the new
CURRENT altitude.
* If there is no button operation for 2-3 minutes at setting screen, the display will return to normal Altimeter mode automatically
Reading the altitude graph
The altitude graph shows recent changes in altitude, with the current altitude represented on the right. Each horizontal point
represents 15 minutes, while each column represents the relative altitude reading at that time.
* The graph is not intended to give an exact altitude: it provides an overview of the trend of change in altitude.
To switch between meters and feet
Press and hold down S1 until the unit indicator (M or Ft) stops flashing to switch altitude between meters and feet.
VS-1 CHRONOGRAPH v2.0 INSTRUCTIONS
© COPYRIGHT ST. MORITZ WATCH CORP. 2008
11
ENGLISH
To start /stop the logbook function
Press S3 to select Altimeter mode. After selecting Altimeter mode, wait approximately 3 seconds, and you will see your current
altitude in the centre of the display, and LOG will begin to flash at the bottom of the display. Then press and hold S1: ”LOG 1
START” will flash. (IMPORTANT: Continue holding S1 until ”LOG 1 START” disappears from screen; if you release too early, the LOG
recording will not start and “LOG” will continue to flash at the bottom of the screen.) Log 1 is now running.
When you wish to stop the log, press and hold S1: “LOG 1 STOP” will flash. (IMPORTANT: Continue holding S1 until “LOG 1 STOP”
disappears from screen. When LOG recording is stopped, current altitude will be shown in the centre of the screen, and “LOG” will
flash at the bottom of the screen. If you release S1 too early, the log recording will NOT be stopped. )
Once you have stopped the LOG, you can press and hold S1 to start a second Logbook entry (”LOG 2 START”), etc..
To view different display
1, Press S3 to enter Altimeter mode, use S2 to choose your desired view. There are five views for user selection (shown in the
following illustration):
To Review data recorded in Altitude Logbook memory.
1. Ensure that the logbook recording has been stopped (above.)
2. Press S3 to select Altitude Logbook mode. The words “LOG DATA” will appear briefly on the screen.
3. The most recent LOG will be displayed. You will see the year and date above and below, with the LOG number shown in
the centre of the screen. (LOG 1, LOG 2, etc.)
4. Press S1 to select the desired LOG entry number, then press S2 to scroll through the recorded data as follows:
a) TOTAL ALTITUDE Ascent (ASC) and descent (DSC)
b) AVG RATE (average rate of climb (ASC) or descent (DSC).
c) HILL (number of hills)
d) TOTAL TIME (total time for the ascent or descent)
To erase/ clear data from the Altitude Logbook memory.
1.
2.
3.
4.
Press S3 to select Altitude Logbook mode. The words “LOG DATA” will appear briefly on the screen.
Use S1 to select the LOG number you wish to erase/ delete.
Press and Hold S4. The words CLR HOLD will flash, and the selected LOG Data will be erased.
If you wish to erase all recorded LOG data, continue to press and hold S4 after the selected LOG Data is erased, then the
words CLR ALL, HOLD will begin to flash. Continue pressing S4, then all recorded log data will be erased/ deleted, and the
display will show “----”.
VS-1 CHRONOGRAPH v2.0 INSTRUCTIONS
© COPYRIGHT ST. MORITZ WATCH CORP. 2008
12
ENGLISH
SKI MODE
FT
The VS-1 is equipped with an automatic timer for timing ski runs.
Press S3 to select SKI mode
* Mode prompt “SKI” is displayed briefly.
- Press S1 to start 10 seconds auto count down, then start skiing when countdown reaches 00:00. Timing starts.
* Beep tone gives audible countdown for start
- The Ski mode timer will stop automatically and record run /descent time when you reach the pre-set “base” altitude
To start Skiing
- To set the "BASE" altitude: At the base of the run, press and hold down S2. “Store Alti” will flash. Keep holding S2 to set current
altitude as new BASE altitude. *always set BASE altitude prior to your run.
- Alternatively, you can set BASE altitude to a known altitude by Pressing and Holding down S4. “Set Hold” will flash. Keep holding
until altitude display flashes, then use S1(+) and S2(-) to set* desired BASE altitude.
*Set BASE altitude prior to starting skiing.
- Press S1 to start skiing
*10 seconds auto count down with Beep tone will signal your start
- Press S2 to stop ski timer manually, if desired.
* Altitude reading is taken every second in the first 8 minutes, then it is taken every 1 minute thereafter.
* Timing is automatically stopped after 60 minutes.
* Timing is automatically stopped when you descend to the base altitude.
VS-1 CHRONOGRAPH v2.0 INSTRUCTIONS
© COPYRIGHT ST. MORITZ WATCH CORP. 2008
13
ENGLISH
CHRONOGRAPH MODE
The VS-1 includes a highly accurate chronograph (stopwatch) function, capable of recording up to 100 split/lap times. It can time
events up to 23 hours, 59 minutes and 59 seconds. It can be used to time simple single events, show intermediate (split) times,
or show two or more finishing times.
Use S3 to select Chronograph mode.
* Mode prompt “CHRO” is displayed briefly.
- The chronograph gives 1/100-second resolution for the first hour and 1-second resolution thereafter. Working range is up to 24
hours, then the chronograph stops automatically.
- For the first hour, the chronograph shows minutes, seconds and 1/100-seconds*, then it shows hours, minutes and seconds.
(* Leading zeros will not be shown.)
- The chronograph lets you measure elapsed time, record up to 100 lap/split times** and can show two (or more) finishes.
** When you take lap/split times, the display freezes for approximately 6 seconds to show lap time, split time and lap number,
then the display will release automatically to show the current running time.
To Start / Stop chronograph
1. Press S1 to start the chronograph
2. Press S2 to stop the chronograph
* You can resume timing by pressing S1
3. With chronograph stopped, press & hold S2 to reset chronograph to zero
To take laps or split/intermediate times
1. Press S1 to start the chronograph
2. Press S1 to take lap/split when chronograph is running
*You may take up to 50 laps by pressing S1
3. Press S2 to stop the chronograph
4. Make sure chronograph is stopped, then Press and Hold S2 to reset to zero.
To review the chronograph data / splits
1. Press S1 to start the chronograph
2. Press S1 as required to take lap /splits (up to 50 laps)
3. Press S2 to stop chronograph
4. Press S4 to recall lap / split times, with best and average lap from data memory
* If the chronograph is reset/ cleared, all data will be cleared
Resetting the Chronograph to 00:00
With chronograph stopped, press & hold S2 to reset chronograph to zero.
IMPORTANT: note that when you reset the chrono, all times from the previous event are erased! Please review and take note of
any results you may require, prior to resetting the chrono!
VS-1 CHRONOGRAPH v2.0 INSTRUCTIONS
© COPYRIGHT ST. MORITZ WATCH CORP. 2008
14
ENGLISH
SAILING TIMER (COUNTDOWN) MODE
- Press S3 to select SAIL mode
* Mode prompt: “SAIL” is displayed briefly.
VS-1 will count down from a pre-set time, then, once countdown reaches 00:00, will count up to time the race
- The maximum countdown time is 120 min
-The stopwatch / race timer will count up to maximum 120:00’00
- A maximum of 50 split times can be taken (and automatically stored) to record way points during the race.
- Only one race can be stored in the memory. As soon as the countdown function is restarted for a new race, the information from
the previous race will be erased from the memory.
- During the countdown, the timer will give audible signals.
every full minute – 2 short double beeps
every 10 sec during the last min – 1 short double beep
every sec during the last 10 sec – 1 short single beep.
at the completion of the countdown – 1 long beep.
To set new base countdown time and start Sailing
1. Ensure countdown is stopped. Press S2 once to reset to previously set base countdown time. If desired, press S2 repeatedly to
set a new base countdown time. (With each press of the S2 button, VS-1 will cycle down from 120:00”00 minutes to 60:00”00
minutes in 10:00 minute increments; then from 60:00”00 to 15:00”00 minutes in 5:00 minute increments; then in 1:00 minute
increments for base countdown times of 15:00”00 or less.
2. Once the desired base countdown time is displayed, press S1 to start count down
3. After the countdown reaches 00:00’00, the Stopwatch will automatically start to count up and time the race.
4. Press S1 to stop the stopwatch/ race timing. ( * You can restart the timing by pressing S1 again.)
To take a split/ intermediate time during the race
1. Press S1 to start count down
2. After the countdown reaches 00:00’00, the Stopwatch will automatically start to count up and time the race.
3. With the stopwatch counting upwards, press S2 to take split time
* the split time will show for 10 seconds, then display will revert to running time
4. Press S2 again to take another split time. (Each split time is recorded in memory, and can be recalled, until the SAIL timer is
cleared/ reset. Up to 50 split/ intermediate times can be recorded per race.)
To Recall the Race Split times from Memory.
1. Take split times during race as noted above.
2. Press S1 to stop stopwatch/ race timing
4. Press S2 to reset Sail Timer to preset base countdown time.
5. Press S4 to enter memory mode, and view recorded split times. Start date/time, total elapsed time of most recent race shows
on screen when you enter memory mode. From Memory mode, scroll up to 50 split/ intermediate times from memory by pressing
S1 (+) or S2 (-).
6. After reviewing race splits, press S4 again to exit memory mode and start new race countdown.
VS-1 CHRONOGRAPH v2.0 INSTRUCTIONS
© COPYRIGHT ST. MORITZ WATCH CORP. 2008
15
ENGLISH
ALARM MODE
-Press S3 to select Alarm mode
* Mode prompt: “ALARM” is displayed briefly.
- Total 2 daily alarms, synchronized with T1 (normal time).
- When alarm sounds, press any key to turn off. Alarm sound stops automatically after 20 seconds.
To Set Alarm time (1 or 2)
1. Press S3 to select Alarm mode.
2. Press S2 to select Alarm1, Alarm2 or Chime.
3. Press and hold S4 to enter setting mode for selected Alarm.
4. Press S3 to select the value you want to set, hour or minute. Selected value will flash.
5. Use S1 and S2 to adjust, (S1 for forward setting and S2 for reverse setting)
6. Press S4 to save new alarm time and exit.
** If no button is pressed for 2-3 minutes, the watch will exit the setting mode.
Arming/ disarming Alarm and Chime**
1. Press S3 to select Alarm mode
2. Press S2 to select Alarm 1, Alarm 2 or Chime
3. Press S1 to toggle displayed value (alarm or chime) on/off
** NOTE: when Chime is turned on, watch will beep briefly, every hour on the hour. Also note that, when Chime is turned on, ALL
BUTTONS WILL GIVE A BRIEF BEEP TO CONFIRM WHEN PRESSED. To stop buttons beeping, turn Chime off.
VS-1 CHRONOGRAPH v2.0 INSTRUCTIONS
© COPYRIGHT ST. MORITZ WATCH CORP. 2008
16
ENGLISH
VS-1: FULL RESET /ALL-RESET FUNCTION
To RESET the watch back to its default values PRESS & HOLD the SI, S2, S3 and S4 buttons all at the same time. The display will
light up, showing all segments, followed by a sequence of screens showing various numbers. The watch will then automatically
change to the TIME OF DAY screen at 12 o’clock on the first of January.
NOTE: Resetting the watch will clear ALL information stored in the watch. This should be done only to clear the watch after a
malfunction, or after a battery change. The time and date will need to be set again after any ALL-RESET.
* After reset, there will not be any measurement of altitude, pressure or temperature until S1 or S3 is pressed.
* After reset, entering Compass mode for the first time will automatically change to calibration screen.
BATTERY REPLACEMENT
This new series VS-1 watch is equipped with a user-friendly battery hatch, which allows you to change the battery yourself, should
you not have time to send it in to one of our authorized Service Centers for service. If you decide to do the battery change yourself,
take special care when removing the battery hatch, then, after battery replacement, screw the back on firmly, taking special care
not to cross-thread or damage the o-ring, as this ensures the ongoing, reliable water-resistance of your watch. NOTE: Should you
prefer to have your watch thoroughly checked and serviced by our Service Centre, we would be pleased to provide a Factory Full
Service, including new battery installation. We can also provide original replacement bands, replacement crystals if yours is
scratched, etc., at the time of any service.
Replace the dead battery with a CR2032 cell or equivalent. NOTE: Very frequent use of display backlight, alarms, compass or
altimeter can reduce expected battery life.
Altimeter mode with altitude change: measures every 2 seconds
Altimeter mode without altitude change (barometer mode): every 2.5 minutes
Barometer mode: measures every 4 minutes. Changes to Time mode after 24 hours
Temperature: measures every 2.5 minutes.
CE
VS-1 CHRONOGRAPH v2.0 INSTRUCTIONS
© COPYRIGHT ST. MORITZ WATCH CORP. 2008
17
ENGLISH
TWO YEAR WARRANTY
Great care has been taken to ensure that your watch will give you years of reliable service. It is guaranteed for two years against
any defect caused by a fault in its manufacture*. The best possible materials and components have gone into your watch. To keep
it in top condition, please treat it with care and have it professionally serviced at regular intervals.
* Loss or damage caused by accident, negligence, or any repair or attempted repair by unauthorized persons is excluded from this
warranty, as is cosmetic deterioration of the case or bracelet caused by wear & tear or abuse. The caseback is designed to allow
you to change your own battery. Damage caused by cross-threading of the battery hatch or user failure to re-secure the battery
hatch correctly is not covered under this warranty.
NOTE: Replacement batteries are not covered under the warranty. Increased use of alarm, backlight, or compass may shorten
battery life.
FULL SERVICE - SIX YEAR EXTENDED WARRANTY
After the regular 2 year warranty expires, we recommend that you extend your warranty for an additional 2 years by sending your
watch to a St. Moritz / Momentum Service Center for a Factory Full Service. This includes: battery replacement; cleaning,
lubrication or replacement of all seals; accuracy tuning check; waterproof testing to original specification; return shipping and
insurance. At the end of 4 years, send it in for another Full Service and extend the warranty for another 2 years (to 6 years total).
Nobody knows your watch like we do! Expert technicians, original parts and the latest equipment will ensure that your watch is
serviced right.
RETURNING YOUR WATCH FOR SERVICE OR MAINTENANCE:
If your watch requires service, please return it to the nearest St. Moritz / Momentum Service Center. The most current Service
addresses are available on our website at http://www.st-moritz.com/pages/servicelocations.php.
A service return form is also available on our website at http://www.st-moritz.com/pages/serviceinformation.php . Our
Service Centers can provide repairs, service and replacement bands promptly, at reasonable prices. To return your watch, please
print and fill out the form and include it with the watch: please do not send the gift box.
Questions?
1-800-663-1881 (Weekdays, 9am-5pm Pacific Time)
Email: [email protected]
VS-1 CHRONOGRAPH v2.0 INSTRUCTIONS
website: www.st-moritz.com or www.momentumwatch.com
© COPYRIGHT ST. MORITZ WATCH CORP. 2008
18