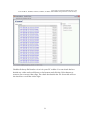
1
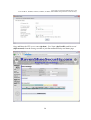
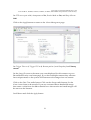
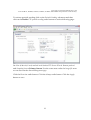
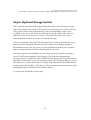
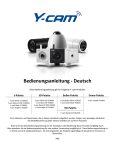
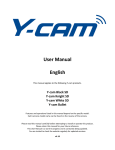
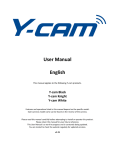
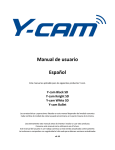
Y-cam YCBL03, YCBLB3, YCK003,
YCB003, YCW003, and YCEB03
Network Camera Setup Manual
for the RavenShoeSecurity.com
Internet Recording Service
Copyright © 2012 RavenShoeSecurity.com
Y-cam YCBL03, YCBLB3, YCK003, YCB003, YCW003, and YCEB03 Setup Manual v2012-04-09(1)
Notice
Copyright © 2012 RavenShoeSecurity.com.
All rights reserved. No part of this document may be reproduced by any
mechanical, photographic, or electronic process without the prior written
permission of the publisher. This document is authorized solely for 1) the use of
RavenShoeSecurity.com customers or 2) review by potential customers.
Y-cam
Y-cam is a trademark of the Y-cam Solutions Ltd. United Kingdom. Y-cam is not
connected in any way to RavenShoeSecurity.com. The camera configuration
information included in this document has not been reviewed by Y-cam and
serves solely as a record of our endeavours to use Y-cam cameras with our
service.
Disclaimer
While best efforts have been made to ensure that the content of this document is
accurate and free of errors, the publisher is not responsible for any consequential
or incidental damages arising from the information presented here-in.
Publisher Contact Info
RavenShoeSecurity.com
Box 82, Suite 437
130 Davis Dr.
Newmarket, Ontario
Canada L3Y 8V4
[email protected]
2
Copyright © 2012 RavenShoeSecurity.com
Y-cam YCBL03, YCBLB3, YCK003, YCB003, YCW003, and YCEB03 Setup Manual v2012-04-09(1)
Table of Contents
Introduction ...................................................................................................................... 4
Preparation ........................................................................................................................ 6
Admin Login Credentials ................................................................................................ 6
Internet Connection ......................................................................................................... 6
Access to Camera’s Internal Website ............................................................................. 8
Y-cam Setup Software ................................................................................................ 8
Network Places ......................................................................................................... 10
Camera Setup Procedure .............................................................................................. 11
Step 1: Initial Power Up ................................................................................................ 11
Step 2: Access the Camera’s Admin Functions ............................................................ 12
Step 3: Camera Section ................................................................................................. 14
Step 4: Network Section ............................................................................................... 15
Optional WiFi ........................................................................................................... 16
Step 5: Alarm Section ................................................................................................... 18
Motion Detection ...................................................................................................... 18
Alarm Management .................................................................................................. 19
Optional Periodic Sending ........................................................................................ 22
Step 6: Optional Storage Section .................................................................................. 24
Storage Setup ............................................................................................................ 25
Record on Alarm ....................................................................................................... 26
Step 7: Tools Sections ................................................................................................... 27
System Identity ......................................................................................................... 27
Date & Time ............................................................................................................. 28
Format SD Card .............................................................................................................. 29
Browsing Video Clips .................................................................................................... 30
Glossary ........................................................................................................................... 32
3
Copyright © 2012 RavenShoeSecurity.com
Y-cam YCBL03, YCBLB3, YCK003, YCB003, YCW003, and YCEB03 Setup Manual v2012-04-09(1)
Introduction
The Y-cam SD family of network cameras (models YCBL03, YCBLB3, YCK003,
YCB003, YCW003, and YCEB03) are capable of sending motion activated pictures
over the Internet to RavenShoeSecurity.com while at the same time recording
video clips with sound to a built in DVR (Digital Video Recorder).
Within this document the entire SD family of cameras is simply referred to as “Ycam” with distinctions being called out as needed.
The YCBL03 (white) and YCBLB3 (black) are bullet style outdoor cameras with
night vision and built in IR (Infrared) illuminators.
The YCK003 (white) and YCB003 (black) are block style gimbal mounted
network cameras with night vision and IR illuminators. The YCW003 (white) is a
daylight camera only.
The YCEB03 (white) is a wall or ceiling surface mounted dome camera with a
unique push and twist mechanism that makes for easy pointing of the lens. This
camera does not have night vision or IR illuminators, but it does have moonlight
vision which passively captures images in very low light situations.
All the cameras feature a built-in DVR that records video and sound (from a
integrated microphone) to a micro SD chip. At the time of this writing the largest
supported chip size is 8GB. In tests that we have performed, an 8GB chip will
hold 13 hours of video clips from a hi-resolution stream (640x480 at 30fps). At a
low resolution (320x240 at 10fps) an 8GB chip will hold 11 days of video clips.
When the micro SD is full the Y-cam automatically removes older clips to make
room for the new ones.
All the cameras have B/G WiFi. The YCEB03 (eyeball) has a hidden built-in WiFi
antenna.
All the cameras have a single DO (Digital Output) and single DI (Digital Input).
The DO is like a switch that closes when the camera detects motion. DOs are
typically used to signal alarm systems but could also be used (with the right
interface) to turn on a light, open a door, turn on a sprinkler, and so forth. The
camera’s DO circuitry is designed for low current and low voltage applications.
Therefore to control anything that requires 120VAC power, a relay or other such
4
Copyright © 2012 RavenShoeSecurity.com
Y-cam YCBL03, YCBLB3, YCK003, YCB003, YCW003, and YCEB03 Setup Manual v2012-04-09(1)
interface is required between the camera and the subject device for safety reasons
as well as avoiding the frying of the camera’s internal circuitry.
The DI is a pair of contacts that when closed cause the camera to send a picture
to RavemShoeSecurity.com as well as record a video clip to the micro SD. DIs are
typically used with a sensor that better targets interesting activity than motion
detection. For example if you are interested in monitoring who goes through a
door then a door switch connected to the DI will cause the camera to record
when ever the door is open. If people are milling about around the door, the
camera will not take pictures. Only when the door is open will images be
captured.
DIs are typically used by an alarm system to tell the camera(s) to record and send
pictures to RavenShoeSecurity.com whether they detect motion or not. Another
popular DI usage is for a PIR (Passive InfraRed) sensor. The PIR detects the heat
signature of people and animals. You may be familiar with motion activated
lighting that uses this same PIR technology.
This document gives the step by step instructions needed to set up a Y-cam to
send motion activated pictures to RavenShoeSecurity.com as well as optionally
record motion activated video clips to the onboard micro SD chip.
The skills required to follow these instructions would include:
1) Be able to use a web browser and have experience with the advanced user
features and settings of Gmail, Hotmail, Yahoo, eBay, Facebook, LinkedIn,
and so forth.
2) Be able to identify and physically access the Internet router or modem
provided by your telephone or cable company. Be comfortable with
connecting computer devices using RJ45 cables.
5
Copyright © 2012 RavenShoeSecurity.com
Y-cam YCBL03, YCBLB3, YCK003, YCB003, YCW003, and YCEB03 Setup Manual v2012-04-09(1)
Preparation
In order to set up the camera to operate with RavenShoeSecurity.com you will
need the following items:
Admin Login Credentials
Internet Connection
Access to the Camera’s Internal Website
Optional WiFi Network Name (SSID) and key
RavenShoeSecurity.com ftp Account
Admin Login Credentials
For a Y-cam out of the box the administrator userID is “admin” and the
password is “1234”. If this has been changed and you do not have this
information it will be necessary to hard reset the camera.
A hard reset is performed by pressing the RESET button on the camera for 1 to 2
seconds (not longer) while it is powered up. This will set all parameters back to
their factory default values including the admin password. For the bullet style
cameras you will need to unscrew the lens cover to access the reset button. On
the eye style and block style cameras the reset button is accessed via a small hole
in the outside case marked RESET. Use an unfolded paper clip to press the
button.
Refer to the user manual for specific instructions on resetting the camera.
Internet Connection
Y-cams require either an RJ45 Ethernet connection or good B/G WiFi coverage
that provides access to the Internet in the physical area where the camera is being
deployed. If your WiFi router requires a special login each time a device connects
(as often is the case in coffee shops or airports) you will be out of luck as the
camera has no provision for this extra protocol. In these cases the camera will
have to be hard wired to the router.
6
Copyright © 2012 RavenShoeSecurity.com
Y-cam YCBL03, YCBLB3, YCK003, YCB003, YCW003, and YCEB03 Setup Manual v2012-04-09(1)
If you are planning to use WiFi you will need to physically connect the camera to
the router during the initial setup operation to access the camera’s internal
website.
Using a PoE (Power Over Ethernet) injector the Ethernet cable can also provide
power, making for a single wire installation.
The router is usually a single box that your ISP (Internet Service Provider)
installs to provide Internet service. These single boxes are actually a combo of
modem and router all-in-one. Other times the ISP provides just a modem, and
you add your own router to the mix, which may or may not provide a WiFi
access point. For the purposes of this discussion the router and modem are
assumed to be integrated into one appliance referred to as simply a router.
The router does require power and generally has a few flashing lights. The router
can be identified by a connection from your physical cable TV wire or physical
phone line into the router. This physical wire is the electronic path to and from
the Internet. In a home environment the router is often installed near a TV, if it
has been provided by a cable TV company. In an office environment there is
often a Telephone Room where routers and other telecom equipment are
installed.
Routers generally have 4 or more RJ45 Ethernet connectors to plug in devices
(computers, Internet radios, etc). Some routers also provide wireless access using
WiFi and may or may not have one to three antennae. Any devices connected to
the router either physically with an RJ45 Ethernet cable or wirelessly through
WiFi are said to be on the LAN (Local Area Network).
Devices on the LAN can initiate connections with other devices on the LAN or
the Internet (known as the WAN [Wide Area Network]). However devices on the
WAN are not permitted to initiate connections with devices on the LAN as the
router will not allow it. In this capacity the router functions as a firewall.
7
Copyright © 2012 RavenShoeSecurity.com
Y-cam YCBL03, YCBLB3, YCK003, YCB003, YCW003, and YCEB03 Setup Manual v2012-04-09(1)
Access to Camera’s Internal Website
During the setup you will need to connect a computer browser (Internet
Explorer, Firefox, Chrome, Safari (Mac)) to the internal admin website of your
camera. While each camera has a full blown computer inside, there is no
keyboard, mouse, or screen. To provide a human interface for this computer the
camera has an “internal website” with admin and setup functions as well as
access to live video and sound. You can access the admin functions of the camera
from a computer connected to the same LAN (Local Area Network) as the subject
camera.
Note that Y-cam internal website access requires a specific Y-cam ActiveX control
when used with Internet Explorer. You will be asked to install this plug-in the
first time you connect to the camera. For Firefox, Chrome, or Safari (Mac)
browsers the more generic Apple QuickTime browser extension is needed. If
QuickTime is not already installed you will be prompted the first time you
connect to install the necessary plug-ins.
Y-cam Setup Software
To access the camera first download and install the Y-cam Setup Software for
Windows XP and Windows 7 or Mac Software for Apple computers:
http://www.y-cam.com/product-downloads/
Scroll down to the PC Software section or further to the Mac Software section
download and install the Y-cam Setup Software. Run the Y-cam Setup once to make
sure it is working.
8
Copyright © 2012 RavenShoeSecurity.com
Y-cam YCBL03, YCBLB3, YCK003, YCB003, YCW003, and YCEB03 Setup Manual v2012-04-09(1)
The software will analyze your LAN and report the all the Y-cam network
cameras found as shown in the example below:
If you do not have any Y-cams connected to your LAN then the Y-cam Setup
Software should show that as well. The Name and Location columns above are
assigned an arbitrary value by the user during setup in the Tools section. The Mac
Address can be found stamped on the outside body of the camera.
Double click the subject camera to get Internet Explorer to connect to the
camera’s internal website. Alternatively you can use the IP Address value as a
URL in any browser (FireFox, Chrome, Safari) on any device (PC, Laptop, Mac,
iPad, Netbook, etc) that is connected to the same LAN.
The main purpose of the Y-cam Setup Software will be to find the LAN IP address
of the camera when it powers up and connects to your router. Keep in mind that
the IP address of the camera is assigned by the router. The router may decide to
change that assignment if it is rebooted or devices are added/removed from the
LAN. Therefore it may be necessary to use the Y-cam Setup Software from time
to time to find your camera(s) if their IP addresses have been re-assigned.
9
Copyright © 2012 RavenShoeSecurity.com
Y-cam YCBL03, YCBLB3, YCK003, YCB003, YCW003, and YCEB03 Setup Manual v2012-04-09(1)
Network Places
If you are a PC user you may get lucky with Network Places (Windows 7) or My
Network Places (Windows XP). If you have a compatible router and favourable
planetary alignments then if this feature (known as uPNP) is working it will list
all your network cameras (regardless of the manufacturer) and link to them
when double clicked.
If this feature is not working then it would seem best to just abandon and use the
tried and true Y-cam Setup Software method. Debugging uPNP can be a very
frustrating experience.
10
Copyright © 2012 RavenShoeSecurity.com
Y-cam YCBL03, YCBLB3, YCK003, YCB003, YCW003, and YCEB03 Setup Manual v2012-04-09(1)
Camera Setup Procedure
Step 1: Initial Power Up
To start the camera setup process, first install the micro SD chip as described in
the associated user manual for the given camera if you want to use the built-in
DVR (Digital Video Recorder) function.
Next connect the camera to the router using the supplied RJ45 Ethernet cable.
The PC or Mac that is being used for setup must be connected to the same router
(either with Ethernet or WiFi). It is recommended that you connect both using
Ethernet initially (if possible) to eliminate WiFi problems during setup.
Power the camera up and wait a minute or so for it to boot up.
11
Copyright © 2012 RavenShoeSecurity.com
Y-cam YCBL03, YCBLB3, YCK003, YCB003, YCW003, and YCEB03 Setup Manual v2012-04-09(1)
Step 2: Access the Camera’s Admin Functions
Use the IP Address of the subject camera as a URL any device on the same LAN
as the camera. If you do not know the camera’s IP Address then use Network
Places (Windows only) or the Y-cam Setup Software (PC or Mac) to discover the
IP addresses of all the Y-cam cameras on your LAN.
The home page for the camera looks like the following. If your camera is the
bullet or block style the graphic will match the device. In this example the
EyeBall (M#YCEB03) version of the camera is shown.
12
Copyright © 2012 RavenShoeSecurity.com
Y-cam YCBL03, YCBLB3, YCK003, YCB003, YCW003, and YCEB03 Setup Manual v2012-04-09(1)
Click on the Settings link to be prompted for the admin User Name and Password:
For a new camera out of the box or one that has been “hard reset” the User Name
is “admin” and the Password is “1234”.
You should then see the settings main page:
13
Copyright © 2012 RavenShoeSecurity.com
Y-cam YCBL03, YCBLB3, YCK003, YCB003, YCW003, and YCEB03 Setup Manual v2012-04-09(1)
Step 3: Camera Section
Click on the Camera menu. Click on the Stream Setup submenu.
The Primary Stream will be used to send pictures to your
RavenShoeSecurity.com account. Under Primary stream set the Image size to
640x480, Frame rate to 30, MPEG4 bit rate to 2048, MJPEG quality to 90, Snapshot
quality to 90, Audio to Enable, and RTSP authentication to Enable.
The Secondary Stream will be used to record motion activated video clips to the
micro SD. The example shows this stream at a high resolution setting, which will
yield least amount of recording time on the micro SD. Feel free to reduce the
Image size and Frame rate to get lower quality with extended recording time
capacity.
Click on the Apply button at the bottom of the page.
14
Copyright © 2012 RavenShoeSecurity.com
Y-cam YCBL03, YCBLB3, YCK003, YCB003, YCW003, and YCEB03 Setup Manual v2012-04-09(1)
Step 4: Network Section
Click on the Network menu option and then the UPNP Setup option to see the
following page:
Set UPNP to Enable, Gateway HTTP/RTSP port forwarding to Enable, External
HTTP/RTSP port range to 8150 – 8350, Gateway RTP port forwarding to Enable.
Click on the Apply button to save.
15
Copyright © 2012 RavenShoeSecurity.com
Y-cam YCBL03, YCBLB3, YCK003, YCB003, YCW003, and YCEB03 Setup Manual v2012-04-09(1)
Optional WiFi
If you are not using WiFi to connect the camera to the Internet then skip ahead to
the Alarm section.
Click on the Wireless Setup option to see the following page:
16
Copyright © 2012 RavenShoeSecurity.com
Y-cam YCBL03, YCBLB3, YCK003, YCB003, YCW003, and YCEB03 Setup Manual v2012-04-09(1)
Click on the Search button to see the available WiFi networks:
We have observed that sometimes the Y-cam displays the SSID (aka WiFi
Network Name) in hexadecimal as shown above. In that case just pick any
network and click the Apply button. Then edit the SSID, Security mode, and
Encryption type manually.
If the SSID does get picked-up properly on a Search then all the parameters will
be pre-set correctly with the exception of the WPA key when you press the Apply
button. The WPA key must be entered manually. Remember that upper and
lower case letters are different with WiFi key values.
Click Apply. Then click the Test button. After a minute you should see the
following confirmation:
17
Copyright © 2012 RavenShoeSecurity.com
Y-cam YCBL03, YCBLB3, YCK003, YCB003, YCW003, and YCEB03 Setup Manual v2012-04-09(1)
Step 5: Alarm Section
Motion Detection
Click on the Alarm menu option and then click on the Motion Detection sub-menu.
You should see a page similar to the following:
There are 4 separate rectangular motion windows, each with a Threshold and
Sensitivity setting. Click the check boxes in the right margin to toggle between
enabling/disabling a given motion window. Click and drag the lower right
corner of a motion window to adjust it’s size. Click and drag the blue bar at the
top of a motion window to move it around.
For first time setup and becoming familiar with how the Y-cam motion detection
works it is recommended to use a single motion window that covers the whole
scene with the shown above Sensitivity and Threshold settings as a starting point.
Click on the Apply Settings button to save.
18
Copyright © 2012 RavenShoeSecurity.com
Y-cam YCBL03, YCBLB3, YCK003, YCB003, YCW003, and YCEB03 Setup Manual v2012-04-09(1)
Alarm Management
Click on the Alarm Management sub-menu and then click on the Enable FTP alarm
management radio button to see the following page:
Set the FTP server ID to 1 and then click the Setting button to see the following
page:
19
Copyright © 2012 RavenShoeSecurity.com
Y-cam YCBL03, YCBLB3, YCK003, YCB003, YCW003, and YCEB03 Setup Manual v2012-04-09(1)
Copy and Paste the FTP server name (ftp host), User Name (ftp UserID), and Password
(ftp Password) from the Settings section of your RavenShoeSecurity.com home page.
20
Copyright © 2012 RavenShoeSecurity.com
Y-cam YCBL03, YCBLB3, YCK003, YCB003, YCW003, and YCEB03 Setup Manual v2012-04-09(1)
Set FTP server port to 21, Anonymous to No, Passive Mode to On, and Keep Alive to
3600.
Click on the Apply button to return to the Alarm Management page:
Set Trigger Time to 1, Trigger FPS to 2, Remote path to /, and Snapshot from Primary
stream.
Set the Image file name to the name you want displayed for this camera on your
RavenShoeSecurity.com home page. If you have multiple cameras they all must
have unique names or the system will interweave the images into one stream.
Click on the Date Time radio button. Click on the Always radio button. Set the
Alarm interval time to 0 seconds. If you are concerned about bandwidth usage
then enter a value from 1 to 30 to throttle how often motion activated images will
be sent over the Internet.
Scroll down and click the Apply button.
21
Copyright © 2012 RavenShoeSecurity.com
Y-cam YCBL03, YCBLB3, YCK003, YCB003, YCW003, and YCEB03 Setup Manual v2012-04-09(1)
Optional Periodic Sending
When the camera does not detect motion it does not send any pictures. As a
result when you check you RavenShoeSecurity.com account you may wonder if
there really is no activity or if there is a malfunction such as an Internet outage.
To verify that the camera and everything between it and your
RavenShoeSecurity.com account is working you can program the camera to send
a picture on a set interval. Typically this interval is an hour. So if you see at least
1 picture every hour from your camera in the RavenShoeSecurity.com hourly
summary, you can be assured then everything is working.
In the following example the Hourly Summary is showing some sort of problem
where pictures were not received for 3 hours on 2012-04-10.
22
Copyright © 2012 RavenShoeSecurity.com
Y-cam YCBL03, YCBLB3, YCK003, YCB003, YCW003, and YCEB03 Setup Manual v2012-04-09(1)
To activate periodic sending click on the Periodic Sending sub-menu and then
click on the Enable FTP periodic sending radio button to see the following page:
Set H to 1, M to 0, S to 0, and mS to 0. Set the FTP Server ID to 1. Remote path to /
and Snapshot from to Primary Stream. Use the exact same value for Image file name
as was used on the Alarm Management page.
Click the Date time radio button. Click the Always radio button. Click the Apply
button to save.
23
Copyright © 2012 RavenShoeSecurity.com
Y-cam YCBL03, YCBLB3, YCK003, YCB003, YCW003, and YCEB03 Setup Manual v2012-04-09(1)
Step 6: Optional Storage Section
The Y-cam has a built in DVR (Digital Video Recorder) that will capture video
clips with sound (from a built in microphone) and write them to a micro SD. For
every picture sent to RavenShoeSecurity.com a corresponding video clip is
recorded on the micro SD. When the SD chip fills up the older video clips are
deleted to make room for the new. Refer to the user manual for your exact
camera model for details of where to install the SD chip.
We do recommend using this DVR functionality as a backup should there be an
Internet service disruption that prevents the camera from sending images to
RavenShoeSecurity.com. However you can consider this section to be optional
and can setup the built-in DVR at another time if you wish.
To further improve the reliability of your camera system consider powering it
with a UPS (Uninterruptible Power Supply). These devices automatically
provide power for a period of time should the main power fail. Since the cameras
typically use less than 5 watts, an inexpensive 425 VA UPS (about $50) can power
the camera for 3+ hours based on our testing. If the camera has the DVR function
running and is powered by a UPS then it will record motion activated video clips
during both a power failure and an Internet failure.
To activate the DVR follow these steps:
24
Copyright © 2012 RavenShoeSecurity.com
Y-cam YCBL03, YCBLB3, YCK003, YCB003, YCW003, and YCEB03 Setup Manual v2012-04-09(1)
Storage Setup
Install the micro SD chip as per the user manual for your model of camera.
Click on the Storage menu and then click on the Storage Setup sub-menu option.
Click on the Enable radio button. Click the SD card radio button.
Click on the Apply button to save these settings.
25
Copyright © 2012 RavenShoeSecurity.com
Y-cam YCBL03, YCBLB3, YCK003, YCB003, YCW003, and YCEB03 Setup Manual v2012-04-09(1)
Record on Alarm
Click on the Record on Alarm menu option to see the following page:
Click on the Arm radio button. Click on the Enable radio button.
Record time specifies the length of the video clip. 10 is a good starting value for
this parameter, but feel free to adjust to better suit your circumstances.
Set Record from to Secondary Stream.
The value that you enter for the Record file name will be used to name the files
written to the micro SD. If you have multiple cameras this is handy when you
download the files to your PC to identify which video clip came from which
camera. Assign a different name for each camera.
Click on the Date time & record time length radio button.
Split time of record file specifies that the video clips are to be cut up into small
segments. When it is set to 10, for example, if the camera records motion for 74
seconds then 8 separate video clips will be written to the micro SD. The first 7
26
Copyright © 2012 RavenShoeSecurity.com
Y-cam YCBL03, YCBLB3, YCK003, YCB003, YCW003, and YCEB03 Setup Manual v2012-04-09(1)
clips will be 10 seconds each. The last clip will be 4 seconds. 10 is a good starting
value for this parameter.
Click on the Always radio button.
Click on Apply to save these changes.
Step 7: Tools Sections
System Identity
Click on the Tools menu option and then the System Identity sub-menu option to
see the following page:
The System Name and System Location fields are displayed by the Y-cam setup
program when it scans for Y-cam devices on the LAN. If you have multiple
cameras it is good to fill these two fields in and click Apply so they are easier to
tell apart when using the Y-cam Setup program.
None of the information recorded under System Identity is displayed by Network
Places on Windows XP and Windows 7.
27
Copyright © 2012 RavenShoeSecurity.com
Y-cam YCBL03, YCBLB3, YCK003, YCB003, YCW003, and YCEB03 Setup Manual v2012-04-09(1)
Date & Time
Click the Tools menu option. Then click the Date & Time sub-menu option to see
the following page:
In the Select to change the time zone for the device location: list box pick the time zone
that is appropriate for where the camera is installed. Check the Daylight saving
time checkbox if the camera location is north enough for this to apply.
Click the dd/mm/yy hh:mm:ss radio button. Click the Enable radio button. Enter
time.nist.gov into the Time server field. Click the Apply button to save.
Camera setup is now complete! Do your best happy dance in front of the camera
and then refresh your RavenShoeSecurity.com home page to see the images.
28
Copyright © 2012 RavenShoeSecurity.com
Y-cam YCBL03, YCBLB3, YCK003, YCB003, YCW003, and YCEB03 Setup Manual v2012-04-09(1)
Format SD Card
Click on the Storage menu option and then click Format SD Card sub-menu to see
the following page:
This page displays stats about the micro SD card. Click on the Format button if
you wish to erase all the video clips. You will be asked to confirm:
It is good practice to format new micro SD chips as a means of testing them out.
29
Copyright © 2012 RavenShoeSecurity.com
Y-cam YCBL03, YCBLB3, YCK003, YCB003, YCW003, and YCEB03 Setup Manual v2012-04-09(1)
Browsing Video Clips
To view the video clips on your PC your may need to install Apple Quicktime or
VLC beforehand. You can download these programs for free at these sites:
Apple Quicktime
VLC Media Player
http://www.apple.com/quicktime/download/
http://www.videolan.org/vlc/
Login to the camera’s internal website and click on the Storage menu option.
Click on the Browse Storage menu option. Another window will pop up as shown
below:
Click on the Record on Alarm menu option to retrieve a listing of the video clips
stored on the micro SD. If there are no clips then the page will remain blank. If
there are clips, a page similar to the following will be displayed:
30
Copyright © 2012 RavenShoeSecurity.com
Y-cam YCBL03, YCBLB3, YCK003, YCB003, YCW003, and YCEB03 Setup Manual v2012-04-09(1)
Double click any file listed to view it in your PC or Mac. You can check the box
beside any video and scroll down to the bottom and click the Delete button to
remove one or more video clips. The check box beside the File Name title will set
the check box on all the video clips.
31
Copyright © 2012 RavenShoeSecurity.com
Y-cam YCBL03, YCBLB3, YCK003, YCB003, YCW003, and YCEB03 Setup Manual v2012-04-09(1)
Glossary
DI – Digital Input: A pair of contacts that close to signal an event such as a door
switch or PIR sensor. When the DI is closed the camera starts recording.
DO – Digital Output: A pair of contacts that is closed by the camera when motion
is detected.
DVR – Digital Video Recorder: Device that records video (and optionally sound)
from one or more network cameras.
GB – GigaByte (1,000,000,000 bytes)
IP – Internet Protocol
IR – Infrared: A type of light that network cameras can see but the human cannot
see that is used for night vision.
ISP – Internet Service Provider: Company that provides your Internet Service.
Usually the telephone or cable company.
KB – KiloByte (1,000 bytes)
LAN – Local Area Network: Computer network that is isolated from the Internet
by a router/firewall. A home based WiFi service or Ethernet jacks on the office
wall would be examples of LAN connections.
MB – MegaByte (1,000,000 bytes)
RJ45 – Physical Ethernet connector. Looks like a telephone connector, but bigger.
SSID – Service Set Identifier: Also known as the name of your WiFi network.
UPS - Uninterruptible Power Supply: A device that provides continuous power
to computer equipment during short power outages.
URL – Universal Resource Locator: What you type into a browser to go to a
website. Example: www.RavenShoeSecurity.com
32
Copyright © 2012 RavenShoeSecurity.com
Y-cam YCBL03, YCBLB3, YCK003, YCB003, YCW003, and YCEB03 Setup Manual v2012-04-09(1)
VA – Volt Amps: A measure of UPS capacity.
WAN – Wide Area Network. A network that interconnects LANs. Generally
known as the Internet.
WEP/WPA/WPA2 – Encryption methods used for WiFi.
WiFi – Wireless IP protocol used in homes and businesses
WPS – Wireless Protected Setup: A feature where a button is pressed on the WiFi
router and a new WiFi device at the same time. This causes the router to send the
SSID/key info to the new WiFi device.
33