1
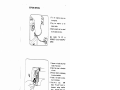
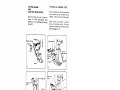
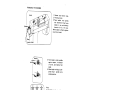
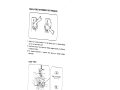
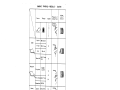
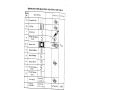
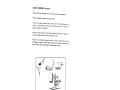
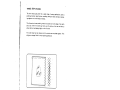
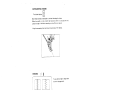
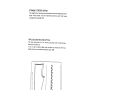
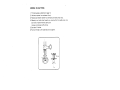
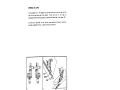
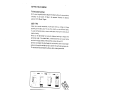
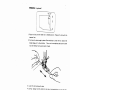
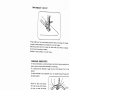
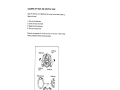
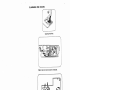
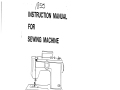
INSTRUCTION MANUAL
FOR
SEWING MACHINE
/iV
•
1
•
WHITE
IMPORTANT SAFETY
INSTRUCTIONS
When using
an electrical appli
ance, basic safety
folowed, including the
precautions should
following:
always be
Read all instructions
before using
(this appliance)
DANGER To re
duce the risk of elec
tric shock:
An appliance should ne
ve
r be left unattended
when plugged in. Always
appliance from the ele
ctric outlet immediately
unplug this
after using and before
Always unplug before
cleaning.
relamping, Replace
bulb with same type rat
ed 15 watts.
WARNING
To reduce the risk
of burns, fire,
electric shock, or in
jury to persons:
1. Do
not allow to be used
as a toy. Close atten
tion is necessary wh
is used by or near chi
en this appliance
ldren.
2. Use this appliance
only for its intende
d use as described
attachments recomme
in this manual. Use
nded by the manufac
only
turer as contained in
a Never operate this appli
this manual.
ance if it has a dama
ged cord or plug, if
properly, if it has be
it is not working
en dropped or dama
ged, or dropped int
appliance to the neare
o water, Return the
st authorized dealer
or service center for
electrical or mechan
examination, repair,
ica
4. Never operate the ap l adjustment.
pliance with any air op
enings blocked, Ke
ings of the sewing ma
ep ventilation open
chine and foot contro
ller free from the ac
dust, and loose cloth.
cumulation of lint,
5. Never drop or insert
any object into any
opening.
6. Do not use outdoors.
7. Do not operate wh
ere aerosol (spray) pro
ducts are being us
being administered
ed or where oxygen is
.
8. To disconnect, turn
all controls to the
off (“0”) position, the
outlet.
n remove plug from
9. Do not unplug by
pulling on cord. To
unplug, grasp the plu
10. Keep fingers aw
g, not the cord.
ay from all moving par
ts.
Special care is requir
machine needle.
ed around the ‘ewing
ii. Always use the pro
per needle plate. The
wrong plate can ca
12, Do not use ben
use the needle to bre
t needles.
ak.
13. Do not pull or
push fabric while stit
chi
ng.
It
may deflect the need
break.
le causing it to
14. Unplug the
sewing machine wh
en
making any adjustm
such as threading
ents in the needle
needle, changing
area,
needle, threading
presser foot, etc.
bobbin, or changin
g
15. Always unplug
sewing machine fro
m
the
ele
ctr
lubricating, or when
ical outlet when rem
making any other us
oving covers,
er servicing adjustm
instruction manual.
ents mentioned in the
SAVE THESE INST
RUCTIONS
CONTENTS
Name of Parts
Accessories
1
2
Removing the extension table
Before sewing (Power supply and Sewing
lamp)
Fitting shank and quilting seam
guide. Fitting of presser
feet
Winding the bobbin
Removing bobbin case and bobbin
Inserting bobbin into bobbin case
3
4
5
6
.
7
7
Inserting bobbin case into shuttle race
Changing needle
8
8
Threading upper thread & Twin needle threa
ding
Drawing up bobbin thread
Changing sewing directions
9
10
10
Adjusting.thread tensions
Regulating the presser foot pressure
Darning plate
Fabric. Thread, Needle guide
Sewing (pattern selector) and operation
table
To start sewing
To finish a seam
Blind hemming
Three step zig-zag
Overcasting edges-binding
Straight stretch stitch
Sewinq on buttons
Sewing in zips
Button hole sewing
Hemming
Twin needle-freehand embroidery
Cleaning of race.and shuttle hook
Cleaning and oiling
Trouble shooting guide
11
12
12
13
14
15
16
17
18
19
20
21
22
23
24
25
26
27
28
NAME OF PARTS
(FRONT SIDE)
1
2
3
4
Pattern selector dial
Take up lever
Thread tension dial
Thread guide for upper
threading
/
5
6
Presser foot
Shuttle Cover
7
Face cover
8
Spool pin (Puit. OUT)
9
Top cover
10
Handle
11
Reverse button
1—
(REAR VIEW
Bobbin winder stopper
Bobbin winder spindle
Upper thread guide
Stop Motion knob
Hand wheel
Thumb screw
Needle plate
Needle clamp screw
Presser foot lever
Exten table
Accessories Box
—
1A—
ACCESSOR I ES
0
Bobbin
Button foot
/
Button hole cutter
Felt
Zigzag foot
(On machine)
Machine Oil
Button hole foot
Zipper foot
Screw driver
Needle
#11
—2—
#14
REMOVING EXTENSION TABLE
To convert the macrune from flat-btd
to free-arm use simply remove the
tension table as shown.
THIS IS ONLY APPLICABLE TO MACHINES MANUFACTURED FOR THE UNITED
KINGDOM
IMPORTANT
The wires in this mains lead are coloured in accordance with the following code:
BLUE
NEUTRAL
—
BROWN
—
LIVE
NOTE. As the colours of the mains lead of thit appliance may not correspond with
the coloured
markings identifying the terminals in your plug. proceea as follows:
Connect BROWN wire to terminal m.rked L or coloured RED.
Connect BLUE wire to terminal marked N or coloured BLACK.
FIT CORRECT PLUG TO POWER CORD
WHEN USING A B.S 1363 FUSED PLUG. A 3 AMP. FUSE MUST BE FIllED.
If the terminals of the plug are unmarked consult a qualified electrician
before use.
Vkien leaving the sewing machine unattended, the plug must be removed
from the socket outlet
Vv$en servicing the sewing machine, or when removing covers or changing
lamps, the machine or
the electrical set must be disconnected from the supply by removing the
plug from the socket
outlet
THE MAXIMUM INPUT OF LAMP: 240 V 15W.
THIS APPLIANCE CONFORMS TO THE STATUTORY RADIO INTERFERE
NCE
SUPPRESSION REGULATIONS.
—3—
BEFORE SEWING
1. Fit the machine plug into
the machine.
2. Plug
the machine to the
power supply.
3. Sewing speed can be varied
by the speed controller.
(BE
SURE
TO
FIT
A
CORRECT PLUG TO SUPPLY
CORD)
4
-J
Important:
1. Remove or install lamp from
inside of face cover.
2. Open face cover in direction
of arrow.
3. Remove lamp by unscrewing
it counter clockwise.
4. Install a new bulb by screw
ing it in clockwise.
5. Use only a 120V.
15W
(Max) “Hi-Light” brand re
placement sewing machine
lamp. Available from your
Riccar stockist.
When leaving the machine unattended,
servicing, changing lamps
or removing covers, disconnect from
the supply by removing
plug from the socket outlet.
—4—
FITTING SHANK
AND
QUILTING SEAM GUIDE
FITTING OF PRESSER FEET
Raise the presser bar and fit shank as
shown. (1) Insert quitting/seam guide
carefully so as not to damage the holding
spring. (2>
f
Presser bar
Tighten
Loosen
Shank
1
One-touch
lever
3
—5
Raise the presser foot. Pull the one-touch
lever towards you and the foot will be
released. Centre new foot under shank.
Lower shank until groove is directly
above and touching the pin. Pull onetouch lever towards you and the foot will
become engaged. (3, 4)
WINDING THE BOBBIN
1. Release stop motion knob.
2. Thread as shown.
3. Place bobbin onto spindle
and har,d.wind thread onto
bobbin in an anti-clockwise
direction for 5 or 6 turns.
(When bobbin is filled re-tighten
stop motion knob)
r8obbin
4. Push bobbin winder spindle
against stopper, in direction
of arrow, and depress foot
pedal.
5. When bobbin winding is com
pleted return spindle to its
original position.
spinde
x
Note:
If the bobbin winding should be
uneven (it is factory set) the
thread guide can be raised or
lowered to achieve the correct
winding.
Remove the top cover and adjust
with a suitable tool.
orrect 477 ri
screw
I
I
J
—8—
REMOVING BOBBIN CASE AND BOBBIN
Hinged latch
1. Raise needle to its highest
position and open the
shuttle race cover.
2. Open hinged latch of
bobbin case and pull bob
bin case out of machtrie.
3. Release the latch and bob
bin will fall out easily.
INSERTING BOBBIN INTO BOBBIN CASE
1. Pull off 5cm of thread
from bobbin and insert it
into bobbin case as shown.
2. Guide the end of thread
into slot.
Tension spring
3.
Pull into slot and under
tension spring and draw
out about 10 cm of
thread.
—7—
INSERTING BOBBIN CASE INTO SHUTTL
E RACE
Hinged latch
1. Ensure needle is at its highest position.
Pulling thread to the front, open the
latch of bobbin case and hold it.
Et
2. Holding latch open, place bobbin case
onto centre pin in shuttle and release
latch.
CHANGING NEEDLE
1. Raise needle to its highest position.
2. Loosen needle clamp screw and re
move old needle.
3. With the flat side of the needle facing
away from you, insert needle as far up
as it will go.
4. Tighten the needle clamp screw
securely.
Note:
At the first sign of any stitchin
g
irregularity always change the needle
for
a new good quality one.
—8—
THREADING UPPER THREAD
4
Thread the machine from A to G as illustrated.
A. Through the thread guide.
B. Between the tension discs.
C. Up and into the tension spring.
D. Into the thread take-up lever from right to left.
E. Down behind the thread guide.
F. Behind the-needle clamp thread guide.
G. Through the needle from front to backFig. 1 & 2
also illustrates threading for twin needle sewing
4
(see page 25)
F
G
—9—
DRAWING UP BOBBIN THREAD
Hold the top thread with a slight tension in your left hand and rotat
e the hand
wheel towards you so that the needle goes down and up again, then
gently pull
your thread out towards the rear and under your sewing foot and you are
ready
to start sewing.
%—
CHANGING SEWING DIRECTIONS
1. Lower needle down into fabric and
raise presser foot, pivot the fabric
around the needle to change direction
as desired.
—10—
2. Put down presser foot and
start to sew.
ADJUSTING UPPER THREAD TENSIO
N
It is only normally nece
ssary to adjust
the upper thread tension
to achieve the
correct balance between the
upper and
lower threads.
The higher the number on
the dial the
greater the tension.
S
Correct
Incorrect
Inside of fabric
Upper thread
Fabric
Upper thread
Bobbin thread
ADJUSTING
LOWER
THREAD
TENSION
Lower thread tension can be adjusted
by
turning the screw on the bobbin
case
slightly to the right (clock-wise)
to
increase tension, (Anti-clockwise)
to the
left to decrease tension.
As a general guide only, the user can
achieve the correct
tension for normal sewing, by caref
ully suspending the
wound bobbin in its case by the
thread. If the bobbin
and case immediately fall to the grou
nd, the tension is too
loose and should be increased.
The correct tension is
obtained when a slight jerk of the
thread causes the bobbin
to drop a short distance only. If this
action does not move
the bobbin the tension is too tight
and should be loosened
until the desired effect is achieved.
—
11
—
Increase
Decrease
REGULATING THE PRES
SER FOOT PRESSURE
1. Adjust lever to desire
d pressure. For light
fabrics use 0.1, for me
use 1-2, for heavy fabric
dium fabrics
s use 3.
2. Insufficient pressure
may cause poor fee
ding, skipped stitch
in guiding the fabric.
es, or difficulty
3. No. pressure adjus
tment is required
when darning or
embroidery.
sewing freehand
DROP FEED
I
Lower feed dog
by pushing lever, dow
n in direction of
(No feeding of fabric)
arrow.
Used when sewing
on buttons, free
hand embroidery,
etc.
For general sew
rng, raise height
of
feed dog by lift
direction of arrow
ing lever in
—12—
FABRIC THREAD
\
Fabric
Thread
NEEDLE
Needle
\
GUIDE
Pressure of
presser foot
Indica
ton of
tension
Prcssure
regulation
Nylon
80 Cotton
Tricot
60S. Fibe
Silk
50 silk
Light
cç—\\,
11
T
50
Fibe
Wool silk SilkS.
Medium
Ging ham
60-80
Cotton
11
11
or
Thin Jerse 60 S. Fibe
14
Gabardine 50 Silk
Heavy
)
Denim
50 cotton
14
Jersey
50S. Fiber
14
Tweed
50 Silk
14
As a general rule use shorter stitch lengths on finer fabrics and longer stitch lengths
with heavier fabrics, finer thread and needle with finer fabrics and heavier thread
and
needles with heavier fabrics. Use special ‘ball point’ or ‘stretch’ needles on difficult
stretchy fabrics.
13—
—
SEWING (PATTERN SELECTOR> AND OPERATION
TABLE
—14—
TO START SEWING
Important Hints.
1. Raise the take-up lever to its
highest position when starting and
stopping
sewing.
2. Hold both threads about 10 cms to
the rear of machine for the first two
or
three stitches.
3. Sufficient fabric should be placed unde
r needle before lowering presser
foot.
4. Depress foot/Speed control and start
to sew.
5. Test the machine stitches on a scrap of
fabric you plan to use, adjusting the
machine for the length of stitch and
tension suitable to your fabric.
Attention.
1.
2.
3.
When turning the hand wheel manually
, always turn it toward you.
Guide the cloth gently with your hand
.
To prevent breaking needle always
stop with the needle out of the fabri
c.
—15—
TO FINISH SEAM
S
1. Sew to the edge of seam.
2. Push the reverse button and sew in reverse
for about 3—4 cms.
3. Raise needle to its highest position.
4. Lift presser foot and pull out the fabric to
rear of machine.
5. Cut threads as shown on the thread cutter.
—
16—
BLIND HEMMING (optional)
Fold the fabric as illustrated with the “wrong
’ side facing upwards.(I)
Place the folded fabric under the foot as shown
.
Turn the hand wheel towards you by hand, until
the needle swings over to
far left. It should then just pierce the fold of the
fabric. (2) If it does not, t
adjust the position of the fabric.
Once the correct position àf the fabric has been
set, position the “guide” of
foot (3) up against the fold (2) by turning the nut
(4).
Proceed to sew carefully feeding the fabric to ensure
it retains the correct p
tion against the guide. (3) Note: Some practice
will be needed to obtain the b
results. Always test the stitch first on a spare
piece of fabric.
H4r
‘2
—17
—
THREE STEP ZIG-ZAG
The three step zig-zag stitch has a wide range of sewing
applications, such as
pitching, darning, repairing tears, mending, sewing on elastic and
lace, oversew
ing edges etc. on a wide range of fabrics.
The illustration shows patching, where the stitches are to the edge of the
patch
and a tear, where the stitches go firstly over the centre of the tear and then
to
either side but overlapping slighly on the first row.
The stitch length can be reduced until the stitches are very c’ose together.
This
will give a stronger finish for most repairing operations.
V
vvvwv
V
V
a
V
-
C
•
-
C
*
C
-
--
—
18—
-
4
--
OVERCASTING EDGES
For thicker fabrics
E1J
Both these stitches are designed to overlock the edge of a fabric.
When the needle is at its extreme right position, allow t to lust pass over or I
pierce the edge of the fabric according to the effect you require.
Using the overcasting foot will prevent puckering of thin fabrics.
To sew fabrics edge to edge seleci
the multi zig-zag stitch.
—19—
STRAIGHT STRETCH STITCH
The straight stretch sews two stitches forward and one stitch backwards, thereby
giving “triple” strength. Use it for stretch fabrics and for areas of “stress” where
a strong stitch is required. (2A)
TRIPLE ZIG-ZAG (RIC-RAC) STITCH
The triple zig-zag stitch is a very strong zig-zag stitch used for
seaming heavy
fabrics such as canvas etc.
It can be used to oversew edges where the seam has already
been sewn by a
straight stitch, or as an attractive decorative stitch.
(2B)
Ill
Ill
III
III
II
Ill
2
A
B
—20—
SEWING ON BUTTONS
Fit darning plate as described on page 12.
Use button presser foot and attach firmly.
Place button between presser foot and fabric and lower presser foot.
Manually turn hand wheel towards you ensuring that the needle enters nto
both holes of button without obstruction.
(Increase or decrease width setting).
5. Sew about 7 stitches.
6. Pull both threads to the underside and tie together.
1.
2.
3.
4.
‘Ion
Tie
—21
—
SEWING IN ZIPS
Fit the Zipper foot. The Zipper foot can be moved to the ‘eft or right. (2> To
sew on the right hand side of the zipper, move foot over to the right as
illustrated and reverse the procedure to sew the left hand side of the zipper. (3)
To move the “zip slider” out of the way, leave needle in the fabric, raise foot
and slide it behind the foot. Lower the foot and continue.
—22—
BUTTON HOLE SEWING
Fit the button hole foot
Set the stitch length dial within the green marking
to achieve the correct density
(closeness) of satin stitch. (1) Sew in the sequence
illustrated (1) selectinc
patterns 18, 19, 20 and 19 again.
USER TIPS
Always sew a sample buttonhole on some spare fabric as
settings will change
according to the fabric used. For very thin, stretchy or
other difficult fabrics,
try using interfacing (vilene) or tissue or other paper underneath
the fabric to aid
machine feeding.
Always use the Buttonhole foot using its calibrated markin
gs to measure the
buttonhole length. On suitable fabric, a corded buttonhole
can be sewn taking
care that the zig-zag stitches of the buttonhole oversew the
cord. (2)
Carefully cut between the sides (beads) of the buttonhole
with the seam ripper
using a pin through the end bar tack (2) to prevent the
seam ripper going too far.
The top tension may be reduced to achieve a better lookin
g buttonhole.
—23—
HEMMING (optioraI)
A
c,
V
—
1. Raise the foot and the needle to its highest position. Replace the toot with the
hemmer foot.
2. Fold over the fabric edge by about 3mm and place it under the foot. Secure the
folded edge with a few stitches.
Take out the workpiece and draw the hem
into the hemmer foot by pulling the threads.
3. Lower the foot and sew the hem.
4. During sewing, fold the fabric to the left a little and allow
hemmer foot.
it
to run into the
5. Make sure that the fabric does not move under the right halt of
the toot. The
fabric must be fed into the scroll of the hemmer sufficiently
so that the work
piece edge runs freely through the groove under the toot.
Only suitable materials can be used and some practice may
be necessary to acheive
best results.
—
24—
TWIN NEEDLE (optional)
Thread machine as for normal sewrng using both
spool pins and pass the threads
through the same procedure but through the eye of each
needle.
NB. Sewing width should not exceed the third
widest stitch width, exceeding
this will result in breaking of needles.
Suitable for stitch numbers 1, 2, 3 and 13 only.
FREEHAND EMBROIDERY
In freehand embroidery, unlike mechanically controlled stitching, feeding of the
fabric is done by hand without assistance from feed dogs.
Fit darning plate as described on page 12 and set stitch patterns from 1-5 as
desired.
A round embroidery hoop is generally ued. Use wooden or plastic hoops with
an adjusting screw.
Stretch the fabric tight accross
the hoop and sew whilst moving
the hoop to create the desired
effect.
—25
—
CLEANING OF RACE AND SHUTTLE HOOK
Raise the needle bar to its highest point by turning the hand wheel toward you.
Open shuttle cover.
1)
2)
3)
4)
Take out the bobbin case.
Unlock the shuttle race holder.
Release the shuttle race cover.
Take out the shuttle hook
Clean dust and gummed oil off each part with an oiled cloth, When finished
cleaning, reassemble reversing the above procedure.
Shuttle race
cover
Bobbin case
o
o
©
Shuttle
holder
©
race
Shuttle hook
Shuttle race cover
Shuttle hook
—
26—
IL
‘4
0
0
N
aa.
0
C)
2
C)
0
z
C)
z
z
r
m
C,
2
3
4
3
5
‘1
3
4
5
1
2
3
4
1
2
3
4
1
2
3
4
1
2
3.
Bobbin case is improperly threaded
Bobbin tension is too tight
Needle is not inserted correctly
Needle is domaged
Wrong type of needle is used
Wrong foot is used
Foot pressure is wrong
Needle is damaged
Needle is not inserted correctly
Fabric too heavy/wrong needle size
Fabric is being pulled by operator
Wrong sewing foot is used
Needle is not threaded correctly
Bobbin is not threaded correctly
Needle/fabric/thread rotia is incorrect
Incorrect tensions
Foot pressure is too heavy
Needle is too forge for fabric
Wrong stitch length is used
Tension is too heavy
Thread is of poor quality
Foot pressure is too light
Bobbin is threaded incorrectly
Material is being pulled byaperolor
Machine needs oil
tint and oil residue have c&tecied in hook or on needle bar
Inferior oil has been used and gums-up machine.
CAUSE
Machine is threoded incorrectly
2 Tension is too tght
3 Threod is too heovy for needle size
4 Needle is inserted incorrectly
5 Thread may he caught on reel holder
6 Needle is damaged
Bobbin case is not inserted correctly
TROUBLE-SHOOTING GUIDE
CONDITION
Top thread breaks
Lower thread breaks
Skipped stitches
Needle breakage
Stitching forms loops
Seams shrink or pucker
Irregular stitching/feeding
Machine is noisy
and rough
4 Needle is donaged
5. Machine requires servrcrn9.
2.
3
4
S
6
REMEDY
Rethreod machine and needle.
Reduce tension on top (smaller numbers).
Use larger needle
Reinsert needle (flat side toword back).
Remove spool, rewind excess thread
Insert new needle.
__________
1 Reposition bobbin. Check by pulling thread. If it pulls
smoothly it is correct
2. Check for correct threading
3 Change bobbin tension according to instructions.
1 Reinsert needle (flat side toward back).
2 Insert new needle.
3 Match needle size to fabric and thread weight.
4 Check to see if proper sewing foot i used.
5 Check foot pressure regulation for proper setting.
1. Insert new needle.
2 Reinsert needle correctly (flat side toward back)
3 Match needle size to thread & fabric weight
4 Do not pull on cloth. Check for proper foot pressure
5 Use correct foot
1 Thread needle front to bock.
2. Thread bobbin according to chart.
3. Match needle size to thread S. fabric weight
4 Set correct tensions.
1 Reduce foot pressure (smaller numbers)
2. Use smaller needle.
3’ Adjust length for proper stitches
4 ChECk tensions.
Use quality thread!
2. Increase foot pressure (larger numbers)
3. Thread bobbin again and check for proper insertion.
4 Do not pull on fabric Let it feed automatically
1. Oil according to instructio,
9. Clean race and hook according to instructions.
3 Clean and au again only with fine sewing machine a/
(not 3-in-i oil)
4. Replace needle.
5. Consult your specialist dealer.
C•4