1
More for your money
PLTV-3750
37" Liquid
Crystal
Display
User's Manual
Q I_
II
II
+
+
Protron
PLTV-3750 Liquid Crystal Display User's Manual.
© 2006 Protron Digital Corporation.
All rights reserved.
Under copyright law, this manual may not be reproduced in any form, in whole or in part,
without the prior written consent of Protron Digital Corporation.
Disclaimer
Protron
Digital
Corporation
operation.
All statements,
any guides
or related
thereof
has reviewed
technical
documents
are not guaranteed
understood
are believed
or warranted,
to be, representations
Specifications
are subject
this manual
information,
to change
reliable,
and they
or warranties
without
and provides
it only
and recommendations
but the accuracy
are not intended
concerning
as a guide
in this
and in
and completeness
to be, nor should
the products
to
manual
they
be
described.
notice.
Trademarks
Protron
is a trademark
of Prosonic Group Corporation.
Protron Digital Corporation
2133 S. Green Privado
Ontario,
CA 91761
Printed in China
------I}--
I
-II--
I
+
+
Important
Safety
Instructions
,
Read these instructions.
2.
Keep these instructions.
3.
Heed all warnings.
4.
Follow all instructions.
5.
Do not use this apparatus near water.
6.
Clean only with a dry cloth.
7.
Do not block any ventilation
instructions.
openings. Install in accordance with the manufacturer's
Do not install near any heat sources such as radiators, heat registers, stoves, or other
apparatuses (including amplifiers) that produce heat.
Do not defeat the safety purpose of the polarized
A polarized
or grounding-type
plug.
plug has two blades, one wider than the other.
A grounding-type
plug has two blades and a third grounding
prong.
The wide blade or the third prong are provided for your safety. If the provided plug does not
fit into your outlet, consult an electrician for replacement of the obsolete outlet.
10. Protect the power cord from being walked on or pinched, particularly
receptacles, and the point where they exit from the apparatus.
11. Only use attachments/accessories
-----I}--
at plugs, convenience
specified by the manufacturer.
12. Use only with the cart, stand, tripod, bracket, or table specified by the
manufacturer
or sold with the apparatus. When a cart is used, use
caution when moving the cart/apparatus combination to avoid injury
from tip-over.
13. Unplug this apparatus during
long periods of time.
lightning
storms or when unused for
14. Refer all servicing to qualified service personnel. Servicing is required when the apparatus
has been damaged in any way, such as when the power supply cord or plug is damaged,
liquid has been spilled or objects have fallen into the apparatus, the apparatus has been
exposed to rain or moisture, the apparatus does not operate normally, or the apparatus has
been dropped.
15. To reduce the risk of fire or electric shock, do not expose this appliance to rain or moisture.
16. Do not expose apparatus to dripping
on the apparatus.
17. Only use apparatus with battery
or splashing and do not place objects filled with liquid
specified by manufacturer.
+
+
Product
I
|
Q
Cautions
TO PREVENT POSSIBLE DANGER,
HANDLING YOUR DISPLAY, PLEASE BE AWARE
PRECAUTIONS LISTED BELOW.
Never
Never
high
®
ELECTRIC SHOCK, AND OTHER
spill any liquid
insert
voltage
anything
nodes
of any kind
into
OF OF ALL WARNINGS
AND
SAFETY
on the display.
the display,
or damage
INJURIES WHEN
where
internal
objects
can come
into
contact
with
components.
Do not attempt to service the display yourself. Opening or removing covers
exposes high voltage nodes and other hazards. Refer all servicing to qualified
service personnel.
Do not touch the display or antenna during thunderstorms.
Unplug the display
during thunderstorms,
or if it will not be used for extended
do so may result in electric shock or fire.
periods. Failure to
Before
cleaning
cleaning.
Never
the display,
use liquid
unplug
or aerosol
it from
the walt.
Use a damp
cloth
for
cleaners.
To prevent overheating and ensure reliable operation, place the display only in
a well ventilated location. Avoid cramped or inadequately ventilated locations.
Place the display at least 10 cm (4") from walls or other objects. Always keep the
vent clean. Never place the display upside down.
Note:
I
Read all safety
and operating
instructions
before
operating
your
new display.
I
Conformity
and Compliance
FCC Compliance
Statement
This equipment
pursuant
has been tested
to Part
against
harmful
equipment
interference
generates,
in accordance
However,
with
there
equipment
when
off
the receiving
installation.
and, if not installed
interference
or television
device,
protection
to radio
in a particular
reception
This
and used
communications.
installation.
If this
(this can be
to try to correct
the
measures:
Reorient
•
Increase
•
Connect the equipment
is connected.
•
Consult the dealer or an experienced
between
reasonable
in a residential
energy
and on), the user is encouraged
•
the separation
for a Class B digital
to provide
will not occur
to radio
by one or more of the following
or relocate
frequency
interference
interference
the limits
is operated
radio
may cause harmful
that
the device
with
are designed
the equipment
the instructions,
is no guarantee
by turning
interference
to comply
uses, and can radiate
does cause harmful
determined
and found
15 of the FCC Rules. These limits
antenna.
the equipment
to an outlet
and the receiver.
on a circuit
different
radio/TV technician
from
that
to which
the receiver
for help.
Caution:
----I}--
To comply with the limits for an FCC Class B computing device, the user should use the shielded
signal cable and power cord supplied with the unit. The FCCwarns that changes or modifications
of the unit not expressly approved by the party responsible for compliance could void the user's
authority to operate the equipment.
Radio
Frequency
Interference
Statement
Warning:
This is a Class B product.
which
In a domestic
case the user may be required
Canadian
DOC Notice
This digital
apparatus
This device
include
F
and
complies
does not exceed
may cause radio
interference,
in
measures.
the Class B limits
Interference
Declaration
with
this product
adequate
for Class B Computing
apparatus
as set out in the Radio
Communications.
CE Marking
environment
to take
Devices
for
Regulations
radio
noise emissions
of the Canadian
from
Department
a digital
of
of Conformity
the requirements
of related
European
standards,
which
the following:
•
Emission:
•
Immunity:
•
Safety:
EN 55022,
EN 61000-3-2,
EN 61000-3-3
EN 50082-1
EN 60950
Low-Voltage
Directive
(73/23/EEC)
F
+
+
Table of Contents
Introduction .....................................................................
Features .....................................................................
Unpacking Your New Display .......................................................
Setting Up the Display .............................................................
Connecting a Digital TV (HDTV) Signal Source ......................................
Connecting an Analog TV Signal Source ...........................................
Connecting Composite Video Devices .............................................
Connecting S-Video Devices .....................................................
Connecting Component Video Devices ............................................
Connecting HDMI Devices ......................................................
Connecting to an Audio System ..................................................
Connecting to a Video Input System ..............................................
Connecting a PC ..............................................................
Operating the Display .............................................................
Turning the Display On and Off ..................................................
Selecting the Video and Audio Source ............................................
Adjusting the Volume ..........................................................
Selecting the Television Channel .................................................
Accessing the On-Screen Display ................................................
Using Your Display for the First Time ................................................
Setting up Digital Television Channels ...........................................
Setting up Analog Television Channels ...........................................
Using the Remote Control .........................................................
Replacing the Remote Batteries .................................................
Configuring the Display ..........................................................
Video ......................................................................
Audio ......................................................................
Miscellaneous ...............................................................
TV .........................................................................
PC .........................................................................
DTV ........................................................................
Troubleshooting
................................................................
Support Information ..........................................................
Specifications ...................................................................
General ....................................................................
Picture-in-Picture
Combinations .................................................
Supported VGA Modes ........................................................
Limited Warranty ................................................................
i;
I
I
2
3
3
4
4
5
5
6
6
7
7
9
9
9
9
9
10
11
11
11
13
15
16
17
17
18
22
22
23
26
27
28
28
29
29
30
;i
+
+
Introduction
Congratulations
on purchasing your new Protron
Liquid Crystal Display!
You can use your new display as a television, in a home theater system, or even as a computer
monitor. With HDMI, component, composite, and S-Video video inputs, you can connect
numerous devices to your display, including DVD players, VCRs, HDTV receivers, video game
systems, camcorders, and so on. And with video and audio output, you can connect your display
to a home stereo system with a subwoofer, or even record what is displayed on the screen.
The built-in HDTV tuner allows you to simply connect a standard
clarity and brilliance of modern digital television.
HDTV antenna to enjoy the
The progressive scan HDMI and component video inputs on your display give you the highest
quality video available, allowing you to enjoy crystal-clear DVDs and other media.
Features
• 37" viewable
display area
• 1366 x 768 resolution
• Built-in
HDTV tuner with coaxial input
• Analog TV tuner with coaxial input
• HDMI audio/video
• 2 progressive
input
scan component
video inputs
° 3 composite video inputs
• S-Video input with optical audio input
• 6 audio inputs, one for each video input
• Composite video output
• Audio output
with subwoofer
output
• Surround sound simulation
• VGA computer
video input
• 1/8" stereo audio input jack for computer
audio
• VESA DPMS-compliant power saving--automatically
configurable period of inactivity
• Windows
turns off the display after a
95198120001XP Plug and Play compliant
• Conforms to VESA standards and supports the DDC1 and DDC2B specifications
• Wide viewing angle
• Versatile, functional,
and user-friendly
On-Screen Display (OSD)
£
_.,
1+
( )MPLT\
3-q)
b,>,4c
Pa;e
2 Thul.d.,_
- Feblu.u_ - l(, 2€)))(, 9 44 \M
#
+
_'"
_'_
-.d_-y
+
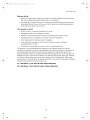
Unpacking
Your
New
Display
Before using your new display, you should unpack the contents of the box and check to make
sure everything is present and undamaged.
To unpack
the
display:
1.
Set the box upright
location.
2.
Open
3.
Remove the accessories
and set it aside.
4.
Lift the display
5.
Remove
the top
seller
display
of the box.
box from
behind
the display
out of the box.
the pads and set the display
The accessories
below.
near the intended
box should
contain
If any items are missing
aside.
the items
or damaged,
indicated
contact
the
',,'
immediately.
Remote
,
,i,
h'
Control
\
Power
....
"1
Cord
\
_'
[I, -,_
r,,,
....
,,°
PLT"
'_"'4, "_
3350
37" Ltqutd Ciystal
0 '_2 0
U_er,
Dtsplay
r,,l_rl_l-I
A
lu _¢o)#
c,q: "--">>'o
h
/
I
/
2 x AAA Battery
I
\
User's
Manual
I
+
+
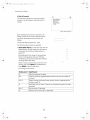
Setting
Up the
Display
The display requires a stable, level, and clean surface near a power outlet, 10 cm (4") away from
walls or other large objects. The rear ventilation grid should be unobstructed, and the display
should not be exposed to water or heat. Before setting up the display, prepare such a space.
To set up the display:
1.
Remove the power cord from the accessories box,
insert the appropriate end into the power (AC IN)
connector on the bottom of the display, and then
insert the other end into a free power outlet.
O
2.
Turn on the power switch on the bottom
display.
of the
X\
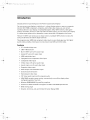
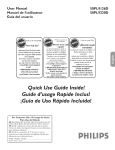
Connecting
a Digital
TV (HDTV)
Signal
To connect an HDTV signal source to the
display, connect a coaxial cable between
ATSC input and the TV signal source.
Source
\
the
\
\
//
e
+
+
Setting
Up the D/splay
Connecting
an Analog
An analog
TV signal
box, satellite
device.
To connect
display,
may come
receiver,
an analog
connect
ANT input
TV Signal
or similar
IV signal
source
a coaxial
a cable
a cable
antenna,
to the
cable between
and the TV signal
example,
from
source
box, satellite
Source
the
(for
receiver,
or
antenna).
QOOO
Note:
If you
would
like to be able to record
the TV signal
recorder,
a VCR, DVD
device,
connect
the TV signal
source to the input
the recording
device
then
the output
connect
recording
device
the display
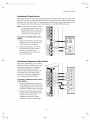
Connecting
Many
with
or similar
video
players,
Composite
with
devices,
of the
another
cable.
Video
Devices
such as VCRs, DVD
game
systems,
and
have composite
video
of
one cable,
to the ANT jack on
Composite
video
camcorders,
with
video
outputs.
uses one RCA cable
to
transmit
video
information
and generally
provides
lower
quality
S-Video,
component
video,
than
and HDMI
To connect a composite
the display:
1.
.
(see below).
video source to
Using an RCA cable, connect the
composite video output (yellow) on the
source device to the corresponding jack
in one of the three composite video
blocks on the display (AV 1 IN, AV 2 IN, or
AV 3 IN).
Using
right
two
(red)
other
RCA cables,
and left (white)
on the source
connect
audio
to the corresponding
in the same composite
above.
video
the
m
outputs
block
jacks
used
1
j
j'l!'
t _0}}
+
+
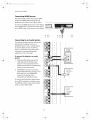
Setting
Connecting
S-Video
Up the Dtsplay
Devices
Many video devices that have composite video outputs also have S-Video outputs. S-Video uses a
single four-wire cable to transmit video information.
Two of the wires are used to transmit video.
Because it splits the video signal into two components, S-Video generally provides higher quality
than composite video, but lower quality than component video and HDMI (see below).
Note" The pins used in S-Video connectors
are somewhat fragile. Take care to
avoid bending the pins, as a bent or
broken pin can cause loss of color
information or total signal loss.
To connect an S-Video
l ( I"g;]l { i
source to the
S-VIDEO
display:
1.
2.
Using an S-Video cable, connect the SVideo output on the source device to
the S-Video jack on the display.
Using two RCA cables, connect the
right (red) and left (white) audio
outputs on the source to the
corresponding jacks in the S-Video
block on the display.
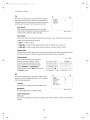
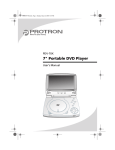
Connecting
Component
Video
OUT
mm
I ]:;I_1
iiiiiiiiiiiiiiiiiiiiiiiiiii1,,,
L_
Zm
tkJ_)k_
T
ll' Im
Devices
-41-----
High-quality video devices, such as HDTV
receivers and high-end DVD players, have
component video outputs. Component
video uses three RCA connections to
transmit video information.
Because the
information
is split into three signals,
component video offers higher quality
than composite video and S-Video.
To connect a component
to the display:
F
video source
1.
Using three RCA cables, connect the
three component video outputs to the
corresponding jacks in one of the two
component video blocks on the display.
2.
Using two other RCA cables, connect
the right (red) and left (white) audio
outputs on the source to the
corresponding jacks in the same
component video block used above.
F
2
=
_.,
1+
( )MPLT\
3-;I)
b,>,4c
Pa;e
I, Thul.da_
- Feblu.u_ . l(, 21)H(, *J 44 \M
#
+
_'"
_'_
-._.y
+
Setting
Up the D/splay
Connecting
HDMI
Devices
The highest-quality
video devices have HDMI
outputs. An HDMI cable carries audio and
progressive scan video of the highest quality.
To connect an HDMI signal source to the display,
use an HDMI cable to connect the source device
to the HDMI input on the bottom
ih
@
to an Audio
_
of the display.
o
Connecting
,,
o
o
o
o
System
Your display has audio outputs that may be
used to play the display's audio on a
peripheral system, such as a stereo system
or a home theater system. In addition,
there is a subwoofer output that can be
connected to a powered (amplified)
subwoofer to fill out the bass.
To connect
system:
1.
2.
STEREO
S _'STEM
the display to an audio
Using two RCA cables, connect the
right (red) and left (white) audio
outputs in the output block on the
display (AV OUT) to the corresponding
inputs on your audio system.
-III_
R
(OPTIONAL) If you have a powered
(amplified) subwoofer, connect a third
RCA cable from the SUBWOOFER
POWERED
SUBWOOFER
AUDIO
IN
h
output on the display to the
subwoofer's (or amplifier's) input.
To listen to the high-quality digital audio
of an HDTV transmission, instead connect
the OPTICAL output to your stereo system
using an optical digital cable.
illl
•
Q
l
STEREO
O
illlllllllllllllllllllllllllllllllllm_
m
111111111
D_PUT
®
o
illlll_
€% _
,.,- ;?>
I;
I
o
I;
I
+
+
Setting
Connecting
to a Video
Input
Up the Dtsplay
System
There is a composite video output on the
display that may be used to transmit the
currently displayed video to other video input
devices, such as video recorders or other
displays.
To connect
system:
the display to a video input
1.
Using an RCAcable, connect the composite
video output (yellow) in the output block
on the display (AV OUT) to the
corresponding jack on the video input
system.
2.
Using two other RCA cables, connect the
right (red) and left (white) audio outputs
in the AV OUT block to the corresponding
inputs on the video input system.
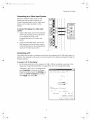
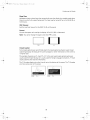
Connecting
a PC
Your display can be used as a computer monitor for any computer with a VGA video output. In
addition, the computer's audio output can be connected to the display and played through the
display's speakers.
To connect
1.
a PC to the
Set the video
display
select
right-click
Properties
Properties
Adjust
resolution
(see "Supported
In Windows,
select
display:
window.
the Screen
Apply,
then
on the computer
VGA Modes"
on the desktop
to bring
to 1280 x 1024 or less before
on page 29 for a full
connecting
list of supported
to the
modes).
and
up the Display
Select the Settings
resolution
tab.
Theme;
De:Hop
ScreenS_.e[
_ppe3r3nce I 3e,]r[g
'
as needed,
select OK.
Pl,_g _nd PI_>,blonlt0[ on' ']q 'S3G Un,Chrome IGP
.',_=r. le
Le .
.luh..r.
]280 b_.1024 p_xel-
F, ,:,r q, __i r,,
_lo[e
i HigheJ 132 bkll
•
_(_,
I Trouble;hc,,_l_
I
_Illlllll;
1[
,,,_,,,
#d.zancea
I
I
2
=
_.,
t_
{}MPLTK
3-qtbook
Pa;eb
Thtu,d.,x
- Febnt.u, - D, 2un_,
*J44
\I\[
#
+
_'"
-'_
--d_-y
+
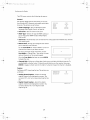
Setting
Up the D/splay
In Mac OS X, select
System Preferences
under the Apple menu.
Open the Displays panel
and select the Display tab.
Select the desired
resolution from the list.
CPD
D rpla'_;
_,31_r,_
[4u _'' _rk
_r_u_,
(
5dOGS
DI ;_
D)spta¥
Color
R_sot_tlOrl_
oO'J
_ bOO
5]2
_ b2|
Uk"4
115,.,,,
Cofo[s
I',
Refresh
Rate
Mdhons
T,
b0 L}Her:z
T_
_. 7b8
_ bZ'f
i,'
izSJ
_ lOz'_
Ib_O
_ ligO
179L
_ 1344
Sho',', dlspla,,,x
"
,
I
_ Of
gt_ceqt
baF
r';_odes
Connect a VGA cable between the VGA
output on the computer
on the display.
,
Nufrbe
r_ ment_
and the VGA input
(OPTIONAL) Using a 1/8" stereo audio cable,
connect the computer's audio output
(LINE OUT) to the audio input on the bottom
of the display (PC AUDIO IN).
\
0000
0
0
00_0
o
o
®000
O
\
\
\
\
I
+
+
Operating
Turning
the
the
Display
Display
On and Off
There is a power switch on the bottom of the display and a power button on the top of the
display and on the remote. The power switch is used to cut off power completely, whereas the
power button turns the screen off but allows the remote to continue working.
To turn the display
on:
1.
If the power light on the front of the display is off, turn on the power switch on the bottom
of the display.
2.
Press the POWER button.
To turn the display off:
1. Press the POWER button.
2.
If the display will be unused for an extended period of time, turn off the power switch on the
bottom of the display and disconnect the power.
Selecting
the
Video
and Audio
Source
The signal source may come from any of the input blocks on the sides or bottom
The SOURCE button cycles through these.
To change the audio/video source, press the SOURCE button
The SOURCE button cycles through the following sources:
of the display.
until the correct source is selected.
.TV
• AVl
• AV2
° AV3
° S-Video
° YPbPrl
° YPbPr2
° HDMI
° DTV
° VGA
Adjusting
the
Volume
The audio volume may be adjusted from the remote or the top of the display.
To change the volume,
Selecting
The television
press the VOL _ and VOL 1_buttons.
the Television
Channel
channel may be selected from the remote or the top of the display.
To change the channel, press the CH A and CH Y buttons.
To change to a particular channel directly, enter the desired channel number
keypad, then press ENTER.
I;
on the remote's
I;
+
+
Operating
the
Accessing
Display
the
On-Screen
Display
The On-Screen Display allows you to configure the operation of the display. You can change
video and audio settings, activate and configure closed captioning, select television channels,
control access to mature programming,
and configure other general display behavior. See
"Configuring
the Display" on page 16 for more information.
To access the OSD, press the MENU button.
10
2
_,
t_
()MPLT\
3-qtb,,,,tc
Pa_e
iI
Tlml_da_
- Feblu.]l_ . l_
2ctn_
_)44
\M
#
+
1,'
-,._
,_£%,
+
Using
Your
Display
for the
First Time
When you turn on your LCD for the first time, you will need to set up the display for proper
operation by scanning the television spectrum for available channels.
Setting
up Digital
Television
Channels
Once the HDTV signal is connected to the display, you should scan all channels to find strong
signals. This will make it much easier to navigate through the channels.
To scan all channels:
1.
Turn the display on using the POWER button.
2.
Press SOURCE until the signal source is set to DTV.
3.
Press MENU to bring up the On-Screen Display
(OSD).
Contrast
50
Brightness
50
Saturation
50
Hue
50
Sharpness
30
Phase
20
Flesh Tone
ON
Color Temperature
Warm
Select
4.
Press the I_ button
shows.
5.
Press V until Time Zone is highlighted
_tcJ
and then press
Enghsh
T_(n_ Zor, e
Pde,fl, T1rn_
SPDhTcpe
1_ until the correct time zone is selected.
PCM
Auto Scan
Press v until Auto Scan is highlighted and then press
ENTER to begin scanning for available television
channels.
Scan
Ma,_ual Scdn
P_ess _Ent_
Channel
Press _En{_
S_0
Selecti_
Setting
up Analog
I£'Er_
until the DTV General menu
AudTo Language
6.
Exit
Television
Exl_
Channels
Once an analog television signal is connected to the display, if you are connecting directly to a
wall jack or antenna, you should scan the signal spectrum to weed out channels with insufficient
signal strength. This will make it much easier to navigate through the channels.
To scan the signal spectrum:
rlllll
•
'
P
L,
1.
Turn the display on using the POWER button.
Contrast
50
2.
Press SOURCE until the signal source is set to TV,
Bllghtness
Saturation
50
50
3.
Press the MENU button
Display (OSD).
Hue
50
Sharpness
Phase
30
20
Flesh Tone
ON
Color Temperature
Warm
to bring up the On-Screen
Select
11
[_I #JI_xIt I't Egr'q
2
=
_.,
1+
()MPLT\
3-q)b,>,4c
Pa;e
12
Tluu.da_
- Febut.u_ . l(, 2€)))(, *J 44 \M
#
+
_'"
_'_
-.£.y
+
Using Your Display for the First Time
4.
Press the _ button
5.
Press the ENTER button
6.
Press V until
Tuner
ENTER again
to select
7.
until
the-iV
to enter
Mode
shows.
_l_l I
the menu.
is highlighted,
then
until
_;
iii
Auto Search
then
press
it.
Press the A and Y buttons
system is highlighted,
to select it.
menu
Tuner Mode
Channel
Channel
Air
Skl_
Name
the appropriate
press the ENTER button
Select Air if you are using an antenna,
se_°t""_ Ex_t_
Select one of the Cable options if you are connecting directly to a cable TV wall outlet.
Contact your cable service provider to find out which system is in use in your area. Cable or
Cable IRC will work with most systems.
,
9.
Press ,11to return to the TV menu.
Press A until Auto Search is highlighted
and then press ENTER to select it.
The display will automatically scan all television channels for those with a strong signal. You
can press ENTER at any time to stop the process.
-II--
12
I
I
+
+
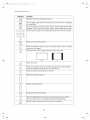
Using
the
The remote
more
control
functionality
The following
Remote
Control
can be used to control
than
the controls
every
aspect
of the display's
operation
and includes
on the top of the display.
is a list of all buttons on the remote and their functions:
Button(s)
Function
Turns the display on and off
These buttons activate and configure
_q-S_r.c
3-p
_
_,,',.p
FpEEZE
C:3 CZ3CC3CC)
Picture-in-Picture
• PIP--Selects the PIP mode: Off, Standard
Picture)
(PIP), as follows:
PIP, or PBP (Picture-by-
1
D
PIP
° S-SOURCE--Selects the signal source used for the secondary window.
See "Picture-in-Picture
Combinations"
on page 29 for a list of possible
signal source combinations for the main and secondary windows.
• S-POS--When PIP is set to Standard PIP mode, adjusts the position
the secondary PIP window
of
• SWAP--Swaps the primary and secondary sources
• FREEZE--Freezes the content of the main window
13
I
I
i
.,
t+
( )MPLT\
3-q)
b,>,4c
Pa;e
14
Tluu.da_
- Febtuat_ . I(, 2€)))(, *J 44 \M
#
+
_'"
_'_
..£.>,
+
Using
the Remote
Button(s)
Control
Function
v-c,,p
Brings up the V-Chip configuration
SLEEP
Sets the display sleep timer. The timer can be turned off or set to 30, 60, 90,
or 120 minutes.
SOURCE
[_)
Selects the signal source (the signal source for the main window when PIP is
enabled): TV, AV1, AV2, AV3, S-Video, YPbPrl, YPbPr2, HDMI, DTV, or VGA
CZ3
@@@
®@@
@®@
@
RECALL
@
©
_SPECT
©
menu
Used to enter numbers on the display and to select the television
channel
Returns to the previous channel
When viewing HDTV, used to jump to a television
entered on the keypad
channel once it has been
Selects the aspect ratio used by the display: 4:3 or Full (16:9)
i i
FULL
43
flUTE
Mutes the audio
EP,s
k._
When viewing HDTV, brings up the HDTV program guide, which displays
program schedules and information
for each channel
s:L,,0
Turns surround sound simulation
0
©
cH
VOL
Selects the television
on and off
channel
Adjusts the audio volume
MENU
Brings up the On-Screen Display
MTS
O
Selects the MTS (Multichannel Television Sound) audio channel used for
television: Mono, Stereo, or SAP (Secondary Audio Programming)
0
Displays current source and television
O
channel information
DISPLAY
14
I
I
+
+
Using
Button(s)
the Remote
Control
Function
O
Cycles through
the closed
captioning
modes:
Off, C1-4,
and T1-4
cc
__)
Used to navigate
display
menus
Selects the highlighted
item or confirms
Note" To use a universal remote with your display, program
television.
Replacing
the
Remote
adjustment
the remote to control any NEC
Batteries
The remote
requires two AAA batteries,
enclosure
on the rear of the remote.
To replace
the current
which
are held in a small
the batteries:
1.
Release the tab and pull the enclosure
out of the remote.
2.
Remove the old batteries
and replace them
batteries.
Ensure the batteries
are oriented
with the new
as indicated
in the
enclosure.
3.
Snap the enclosure
back
into
the remote.
F_
15
I
I
2
=
_.,
1+
()MPLT\
3-q)
b,>,4c
Pa;e
i(,
Tlnu.da_
- Febutu_ - l(, 21)))(, *J 44 \M
#
_'-.d_-y
_'_
+
+
Configuring
the
Display
The On-Screen Display (OSD) allows you to configure the operation of the LCD. You can change
video and audio settings, activate and configure Picture-in-Picture
(PIP) and closed captioning,
select television channels, control access to mature programming,
and configure other general
display behavion
To use the OSD:
1.
Press the MENU button
on the remote or the top of the display.
2.
Once the OSD appears, use the _1and I_ buttons to navigate the menus represented
at the top of the OSD.
3.
Press the ENTER button
4.
Use the A and V buttons to navigate the menu items.
5.
Press the ENTER button
6.
If no text is displayed next to the item name, a sub-menu will appear upon pressing ENTER.
Repeat steps 4 and 5 to navigate the sub-menu.
by icons
to enter the selected menu.
to select the desired item.
If the selected item is an adjustable
parameter,
one of two things will happen:
A pop-up box will appear, in which case use 41and I_ to adjust the parameter
ENTER to accept the value.
and then press
The parameter will edit in place, in which case use A and V to adjust the value and then press
ENTER to accept. Then press 4 to return to the menu. While editing the parameter,
mark will show next to the currently selected value.
7.
Press _1to exit a menu.
8.
Press MENU to exit the OSD.
Note"
-II
--
a check
The currently selected source determines which menus are available in the OSD. The
following table lists the menus available for each source:
Menu
Source
Video
Audio
Misc.
TV
PC
TV
Q
Q
Q
AVI
"
"
"
AV2
"
"
"
AV3
"
"
"
S-Video
•
•
•
YPbPrl
•
•
•
YPbPr2
"
"
"
HDMI
,
,
,
DTV
•
•
•
VGA
,
,
,
DTV
Q
•
16
I
I
2
_,
t_
{}MPLT\
3-qt
b,.,.tc
Pa_e
1-
Tlnu_da_
- Feblu.]l_ . l_, 2ctn_, _)44
\M
#
+
1,'
-,._
,_£_
+
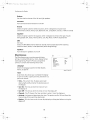
Configuring
the Display
Video
I]Jli
The Video menu allows you to change the display's video
settings. You can adjust the following
parameters:
Contrast
Sets the variation
between
light and dark colors
I
_'r
ii
Contrast
50
Brightness
50
Saturat=on
50
Hue
50
Sharpness
30
Phase
20
Flesh Tone
ON
Color Temperature
Warm
Brightness
Sets the brightness of the display image
Select
'_
Exit I_
Saturation
Sets the saturation
of color in the display image
Hue
Sets the intensity of color in the display image
Sharpness
Sets the image sharpness
Phase
(YPbPrl and YPbPr2 only)
Adjusts the phase of the video synchronization
Flesh Tone
Turns on and off image filtering
to improve flesh tones in the image
Color Temperature
Sets the color temperature
setting.
used by the display: Cool, Normal, Warm, or a user-defined
To set the user-defined
color temperature,
User option
the levels of red, green,
and adjust
blue to be used to produce
white.
select
the
and
L
f_
select
a color,
then
J0
£
Use A and V to
use 4 and I_ to adjust
L
]0
the level.
0
/.
Audio
rl
The Audio menu allows you to change the way audio is
played, including balance, equalization, and other sound
processing. You can change the following settings:
J
B_ss
50
Treble
50
Balance
0
Surround
OFF
Reverb
OFF
Bass
Equalizer
MTS
OFF
Adjusts the volume of bass in the audio
Speakels
ON
Stereo
Treble
Select
'_1
Exit
_E_
Adjusts the volume of treble in the audio
17
I
I
+
+
Conflgunng
the Display
Balance
Sets the relative volumes of the left and right speakers
Surround
Turns surround
sound simulation
on and off
Reverb
Selects the preset used for reverb simulation, which is designed to simulate room
environments: Church, Arena, Cave, Bathroom, Hall, Living Room, Concert, or Off (no reverb)
Equalizer
Selects the preset used for the equalizer, which is designed to enhance the type of audio
being played: Soft, Classic, Techno, Dance, Live, Pop, Rock, or Off (no equalization
MTS
(TV only)
Selects the MTS (Multichannel Television Sound) channel played back while watching
television: Mono, Stereo, or SAP (Secondary Audio Programming)
Speakers
Turns the built-in
speakers on and off
Miscellaneous
The Miscellaneous menu contains general display
settings, including OSD options, timers, display format,
closed captioning, Picture-in-Picture, and parental
controls. It contains the following menu items:
---_)-
Language
TIITI_T
Enghsh
Sleep Time
OFF
OSD Tlmeotlt
30 Sec
Format
Full
C}osed Caption
OFF
V=Chlp&ParentaJ
All Reset
Language
Selects the language used for the OSD: English,
French, or Spanish
Select
_
Exit I_I
Timer
A sub-menu that allows you to schedule the display
to turn on or off at a particular time, and switch to a
particular channel:
• Time--The
current time. To adjust, select each
digit using 41and _ and enter the desired value on
the keypad.
• Turn On--The
time at which the timer will turn
the display on
• Turn Off--The
time at which the timer will turn the display off
• Channel--The
TV channel the timer
switches to when it turns the display on
• Activate--Activates
and deactivates the timer. The options are On, Off, and Once (the
timer will go off once and then deactivate).
• Display--Tells
display off
the timer to ask the user (by displaying
a dialog box) before turning
the
18
I
I
+
+
Configuring
the Display
Sleep Time
Activates and sets a sleep timer that automatically
puts the display into standby mode when
there is no activity for a specified period. The timer may be turned off or set to 30, 60, 90, or
120 minutes.
OSD Timeout
Sets the inactivity
timeout
for the OSD: 10, 20, or 30 seconds
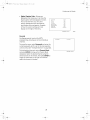
Format
Controls the aspect ratio used by the display: 4:3 or Fult (16:9--widescreen).
Note"
You cannot change the aspect ratio when PIP is active.
FULL
4 3
Closed Caption
Turns closed captioning on and off and selects the closed captioning channel used. Closed
captioning displays the dialog of the current program or other information on the screen so
it may be read.
The available channels are C1-4 and T1-4. C1 is the most-used closed captioning channel,
usually used for English dialog. C2 is usually used for foreign language translations. T1-4 are
usually used for other channel information.
The C1-4 modes display only a few lines of text at the bottom
scroll text across most of the screen.
of the screen. The T1-4 modes
(2_ ',}
m
MODE
Cl-4
MODE
T1-4
19
I
I
2
=
_.,
1+
( )MPLT\
3-q)
b,>,4c
Pa;e
21) Tlnu.da_
- Febut.u_ . I(, 2€)))(, *J 44 \M
#
+
_'"
_'_
-.£.y
+
Conflgunng
the Display
V-Chip & Parental
This sub-menu allows you to control access to
television content based on industry maturity
ratings.
,
,,,,,,,
Block
MPAA Rating
IB_ock TV Rating
Channel
Lock
Change Password
Clear All
Select
_
Back _ Adjust '_
Upon attempting to enter the sub-menu, the
display wilt ask for the current password. Once
you enter the password, the sub-menu will
display.
The factory-default
The following
password is '1234'.
menu items are available:
• Block MPAA Rating--A
sub-menu that sets the
MPAA (Motion Picture Association of America)
rating level the V-Chip wilt block without a
password.
x
x
X
Blocking a particular rating will automatically
block all ratings above that level. Similarly,
unblocking a rating will automatically unblock
all ratings below that level.
x
x
x
Select a rating using the arrow controls on the
remote, then press ENTER to block/unblock it.
Press MENU to exit this sub-menu.
The ratings are as follows:
Rating
Level
Significance
G
General audiences (all ages)
PG
Parental guidance
children)
PG-13
Parents strongly cautioned (some material
children under 13)
R
Restricted (minors under 17 require an accompanying
guardian)
NC-17
No one under 17 admitted
X
Adults only (no one under 17 admitted)
suggested (some material may not be suitable for
may be inappropriate
for
parent or adult
20
I
I
2
_,
t_
{ }MPLT\
3-qt
b,,,,tc
Pa_e
21
Tlnu_da_
- Feblu.]l_ . l_
2ctn_
_) 44
\M
#
Configuring
Block TV Rating--A
sub-menu that sets the -IV
PG rating level (listed on the left) the V-Chip will
block without a password.
Specific types of mature content (listed across
the top) can be blocked for some of the ratings.
For example, programs rated TV-Y7 with violent
content can be blocked.
Blocking a particular rating will automatically
block all ratings above that level. Similarly,
unblocking a rating will automatically unblock
all ratings below that level.
the Display
x
x
x
x
x
×
x
x
x
x
x
X
x
x
x
x
Select a rating using the arrow controls on the remote, then press ENTER to block/unblock
it. Press MENU to exit this sub-menu.
The ratings are as follows:
Rating
Level
Significance
TV-Y
All children
TV-Y7
Children 7 years and older
TV-G
General audience
TV-PG
Parental guidance
TV-14
Parents strongly
TV-MA
Mature audience only
Content
Type
suggested
cautioned
Significance
FV
Fantasy violence
V
Violence
S
Sexual content
L
Foul language
D
Suggestive dialog
° Channel Lock--Allows you to block individual
blocked, a lock icon will appear next to it.
• Change Password--Sets the V-Chip
password. To change the password, enter the
current password, then enter and confirm the
new password.
The factory-default
password is '1234'.
° Clear All--Resets all V-Chip settings to factory
defaults (unblocked)
All Reset
Resets all display options to factory-default
settings
21
channels. When you select a channel to be
i,',_£%,
-,._
2
_.,
1+
( )MPLT\
3-q)
b,>,4c
Pa;e
22
Tlnu.da_
- Febut.u_ - I(, 2€)))(, *J 44 \M
#
+
t,,-.d%"
_,_
+
Conflgunng
the Display
TV
The TV menu allows you to select the television signal
type, select which television channels are available for
viewing, manually or automatically,
and give a name to
each channel. It contains the following menu items:
Auto Search
Tuner Mode
Channel
Channel
Atr
Skip
Name
Auto Search
When selected, automatically scans all television
channels for valid signals and makes unavailable
channels with insufficient signal strength
any
Select
_'
Exit '_
Tuner Mode
A sub-menu that sets the type of television
° Air--A
standard television
° Cable--A
antenna
cable TV signal
° Cable-IRC--A
type of cable signal primarily
° Cable-HRC--A
Channel
signal source in use. The options are as follows:
used on the East Coast of the US
type of cable signal primarily
used on the West Coast of the US
Skip
Allows you to manually adjust which channels are available when flipping through
A check mark next to a channel number indicates that the channel is available.
Channel
channels.
Name
A sub-menu that allows you to assign a
name to the current channel. Enter
characters by selecting them with the
arrow controls on the remote and then
pressing ENTER. Select Backspace to
delete characters. Select OK when finished
or Cancel to abort.
PC
The PC menu allows you to change the video options
used with a VGA or HDMI video source. You can adjust
the following
parameters:
Contrast
Contlast
50
Color Temperature
User
Auto Setting
Phase
Manual Clock
Display
Sets the variation
50
Brightness
between
light and dark colors
Brightness
Sets the brightness
128
Adjustment
Select
_
Exit =_--_J
of the display image
Color Temperature
(VGA only)
Sets the color temperature
setting).
used by the display: Cool, Normal, Warm, or User (a user-defined
22
I
I
Configuring
the
To set the user-defined color temperature,
select the
User option and adjust the levels of red, green, and
blue to be used to produce white. Use A and Y to
I
/_
L
select a color, then use _ and _ to adjust the level.
Auto
•
Display
]o
]0
Setting
(VGA on ly)
When turned
position
on, automatically
adjusts the image
Phase
(VGA on ly)
Adjusts the phase of the video clock
Manual
Clock
(VGA on ly)
Adjusts the frequency
of the video clock
Display Adjustment
A sub-menu that controls the position of the image on the screen. The two parameters
Horizontal Position and Vertical Position.
are
DTV
The DTV menu is a separate menu system for HDTV configuration
that allows you to configure
the available channels, closed captioning, parental controls, and other HDTV options.
Note"
The navigation
follows.
procedure for the DTV menu differs from that of the main OSD, as
To use the DTV menu:
1.
Use the _1 and I_ buttons to navigate the sub-menus represented
menu.
2.
Press the V button to enter the selected menu.
3.
Use the A and V buttons to navigate the menu items.
4.
If "Press <Enter>" appears to the right of the selected item, a dialog box will appear upon
pressing ENTER. Repeat steps 3 and 4 to navigate the dialog box.
If the selected item is an adjustable
5.
Press A repeatedly
6.
Press MENU to exit the OSD.
parameter,
to exit a sub-menu.
23
by icons at the top of the
use the _ and _ buttons to adjust the value.
2
_.,
1+
( )MPLT\
3-q)
b,>,4c
Pa;e
24
Tlnu.da_
- Febut.u_ . I(, 21)))(, *J 44 \M
#
+
+
Configunng
the Display
The DTV menu contains the following
sub-menus:
General
Sets general HDTV options and allows you to scan
for available HDTV channels and enable and disable
Aualo
channels. The options are as follows:
• Audio Language--Sets
the broadcast audio
language used: English, French, or Spanish
• Time Zone--Sets
Language
Englmh
Time Zon_
PacFkc Time
SPDIF Type
PCM
A_o
Sc_,
M_nual
Channel
Sran
Sran
Press _EnLer>
Skip
Pre_s _En_er>
the current time zone
SPDIF Type--Selects the type of S/PDIF audio put
out on the optical S/PDIF output: Dolby Digital,
PCM, or Off
° Auto Scan--Automatically
with weak signals
Select
_
E×rt I_1
scans all channels for strong signals and disables any channels
• Manual Scan--Brings up a dialog box that allows
you to manually scan channels.
Set the Scan Mode
channels
that
to "Add-on
Scan Mode
range
to "Range
and end channels
° Channel
of channels,
Scan,"
then
on the remote
Once the Scan Mode
to begin
Mode"
to scan all
have not yet been scanned.
To scan a particular
set the
enter
0%
the start
[
keypad.
]
has been set, press ENTER
Scan IP _ !
the scan.
Skip--Brings
enable/disable
up a dialog
a channel,
ENTER to toggle.
A check
select
mark
box allowing
you to disable
it using the arrow
to the right
buttons
of a channel
individual
channels.
on the remote,
means the channel
then
Exlt_-r _r_A
To
press
is disabled.
Caption
Configures
as follows:
HDTV closed captioning.
The options are
gnalog
Closed CaptLon
Diglt_d Closed
° Analog Closed Caption--Selects the analog
caption channel to be displayed on-screen. You
can select CC1-4 or turn analog closed captioning
off.
• Digital Closed Caption--Selects
the digital
caption channel to be displayed on screen. You
can select Service1-6 or turn digital closed
captioning off.
Digital
Cap[ion
Caption
Slyle
OFF
OFF
Press _-n_er_
Select [4,1_
Exit ir, vr 'q
24
,,,,,,_....
_'"
_'_
-.£.y
_I_
_
-_ ....
2
_,
t_
{)MPLT\
3-qt
b,,,,tc
Pa_e
25
Tlnu_da_
- Feblu.]l_ . l_
2ctn_
_)44
\M
#
+
i,',_£%,
-,._
+
Configuring
• Digital Caption Style--Brings up a
dialog box that allows you to set how the
digital caption will be displayed on-screen.
You can set the font size, color, and
opacity; background color and opacity;
and window color and opacity. A sample
of how the current settings will look
displays to the right of the menu.
Cap[ion
_ont
S_yle
the Display
Cus[om
Slze
Large
_on[ Color
51a-k
cont Opacity
Sohd
8ac_ c_ound Color
White
Background
Opacr[y
Window
Colo_
Window
Opaclty
Sobd
White
Translucent
Select _
ABC
E_lt_
Parental
Configures parentalcontrolsfor
HDTV
programming,
allowing you to blockindividual
channels.
To access the menu,
current
controls
password,
menu
To block/unblock
select
which
Password
is set in the
(see "V-Chip
channels,
and enter
Channel
Block
Press <Enter.
the
main parental
& Parental"
on page
select Channel
20).
Block
Select I_
and press ENTER to bring
up the Channel
dialog
box. Select the desired
channel
arrow
buttons
then
toggle.
means
A check mark to the right
the channel is blocked.
on the remote,
Block
using the
press ENTER to
of a channel
25
Exit I_
2
=
_.,
1+
( )MPLT\
3-q)
b,>,4c
Pa;e
2(,
Tlnu.da_
- Febut.u_ - l(, 2€)))(, *J 44 \M
#
+
_'"
_'_
-.d_-y
+
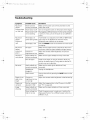
Troubleshooting
Symptom
Possible
No picture
Power
(power
securely
Cause
cord
Resolution
not
Make
connected
sure the power
socket
indicator
does
Power
switch
is off
Turn on the power
not
up)
Power
outlet
is off
Try plugging
light
or not working
No picture
The display
(power
power-saving
indicator
it turns
outlet.
is in
mode
is
red)
is off
switch
a different
is firmly
inserted
If connected
on the bottom
device
on. If not, turn
to a computer
into
the
button
of the display.
the outlet
and see if
or use a different
and in VGA or HDMI
press a button
Press the POWER
into
on the outlet
press a key on the keyboard
Otherwise,
The display
cord
and outlet.
or move
mode,
the mouse.
on the remote.
on the remote
or on the top of
the display.
No picture
No signal
Make
(power
indicator
is
green)
Contrast
or
brightness
Unclear
noisy
or
picture
Signal
Adjust
too
cable(s)
securely
No sound
Audio
appears.
not
Make
cable(s)
not
connected
plugged
is too
or too
bright
Display
is selected.
cable(s)
and/or
brightness
sure the signal
Check the TV signal.
Headphones
Display
source
the signal
cable(s)
If there
and signal
until
are firmly
is still
source.
picture
connected.
connected
securely
Audio
check
the contrast
low
Poor TV signal
dark
sure the proper
no picture,
position
for
contact
your
Make
If using an antenna,
better
signal.
service
If using
adjust
the
cable or satellite
-II--
TV,
provider.
sure the audio
signal
cable(s)
are firmly
connected.
Unplug
the headphones.
in
muted
Contrast
Unmute
remote.
or
brightness
too
the audio
Adjust
the contrast
the image
by pressing
and/or
the MUTE
brightness
button
on the
to desired
setting.
low
or too high
Position
incorrectly
Adjust
centered
not
adjusted
in OSD
(see "PC"
Image
Signal
vibrating
securely
Power
cable(s)
not
Make
on page
position
in the PC menu
in the OSD
22).
sure the signal
cable(s)
are firmly
connected.
connected
voltage
high or too low
too
Check the power
display specification.
different
circuit.
source to make
Try a different
sure it matches
power
outlet
the
on a
26
I
I
+
+
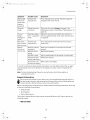
Troubleshooting
Symptom
Possible
Cause
Resolution
After-image
remains on
screen after
Inherent
LCD
characteristics
This is characteristic of an LCD. The after-image
disappear after a few minutes.
wilt
display is
turned off
Distorted
Display
image
incorrectly
format
set
Check that
page
"Out
of
VGA input
Range"
message
screen
on
signal
is
Adjust
the resolution
not in a supported
match
a supported
mode
on page
Inherent
characteristics
malfunction.
Remote
Batteries
Make
not
LCD
improperly
Batteries
is selected
and refresh
mode,
This is characteristic
inserted
Format
in the
in the OSD (see "Miscellaneous"
on
listed
rate
on the PC to
under
"Specifications"
28.
blue, or white
dots on screen
functioning
menu
18).
Red, green,
control
the correct
Miscellaneous
of an LCD and wilt
sure the batteries
are inserted
not cause a
and oriented
properly.
low on
Replace
the batteries.
A button
is stuck
Jog any stuck
Obstacle
between
Remove
remote
and display
energy
The remote
far from
If none
of the resolutions
using the power
resolved.
Note:
switch
Move
on the remote
to unstick
them.
closer to the display.
the display
above
resolves
on the bottom
Further troubleshooting
www.protronusa.com.
Support
is too
buttons
the obstacle.
the problem,
of the display,
information
turn
then
the display
off and then
check to see if the problem
on again
has
can be found on the Protron website at
Information
Do not return this product to your retailer until you have performed the steps laid out in
the Easy Setup Instructions and contacted the Customer Service Center. Merchandise may
not be returned to Protron without a return form authorization.
Before contacting Protron Customer Service, please record the following
be found on the back of your display:
information,
which may
• Model Number
• Serial Number
• Date of Manufacture
The Protron Customer Service Center may be contacted
following number:
1-888-257-8899
27
24 hours a day, 7 days a week at the
2
=
_.,
1+
( )MPLT\
3-q)
b,>,4c
Pa;e
2"_ Tlnu.da_
- Febut.u_ . I(, 2€)))(, *J 44 \M
#
+
_'"
_'_
-.£.y
+
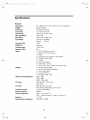
Specifications
General
Dimensions
37.4" (950mm) W x 29.7" (755mm) H x 10.0" (255mm) D
Weight
82.21bs (37.3kg)
Active Matrix TFT LCD
Panel Type
Screen Size
37" widescreen (16:9)
24 bits (16.7 million colors)
1366 x 768
Color Range
Max, Resolution
Pixel Pitch
Sync Range
0.60mm (H) x 0.60mm (V)
Horizontal:
30-80kHz
Vertical:
50-75Hz
Contrast
1200:1
Ratio
Brightness
500 cd/m 2
Viewing
+/-89 ° (H/V)
Angle
Response Time
8ms
Inputs
lx
lx
lx
2x
3x
lx
6x
lx
lx
progressive scan component
composite video (RCA)
S-Video
video (RCA)
stereo audio (RCA)
SVGA (15-pin D-Sub)
stereo audio line in, 0 dBV nominal
(1/8" TRS)
lx composite video (RCA)
lx optical S/PDIF audio (TOSLINK TM)
lx stereo audio (RCA)
lx subwoofer (RCA)
Outputs
Video Formats
Supported
TV Tuners
TV Audio
Parental
ATSC TV (75 ohm coaxial F)
NTSC-M TV (75 ohm coaxial F)
HDMI
1 x headphone
SDTV: 480i
(1/8" TRS)
EDTV: 480p
HDTV: 720p, 1080i
NTSC-M, CATV, 125 channels
ATSC HDTV
NTSC: Mono, Stereo, SAP
ATSC: Stereo, Dolby Digital 5.1 Surround
Controls
Picture-In-Picture
Closed Captioning
V-Chip (TV PG, MPAA)
PIP, PBP
Speakers
NTSC: CC1-4, TEXT1-4
ATSC: Analog channels 1-4, digital channels 1-6
2x 10W
Plug and Play Compliance
VESA DDC1, DDC2B
28
I
I
+
+
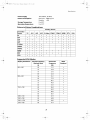
Specifications
Power Supply
100-240VAC, 50-60Hz
Power Consumption
Operation:
Standby:
0 to 60°C
Storage
Temperature
Operating
5 to 35°C
Temperature
Picture-in-Picture
288W typical
<3W
Combinations
Primary
Secondary
Source
TV
TV
AV1
•
AV2
AV3
•
•
•
•
AV1
•
AV2
•
•
AV3
•
•
•
S-Video
•
•
•
•
YPbPrl
•
•
•
•
YPbPr2
•
•
•
•
HDMI
•
•
•
•
DTV
•
•
•
•
VGA
•
•
•
•
Supported
YPbPrl
Horizontal
Vertical Frequency
(Refresh Rate)
Hz
Frequency
kHz
31.5
72
37.9
75
37.5
85
43.3
56
35.1
60
37.9
72
48.1
75
46.9
85
53.7
60
48.4
70
56.5
75
60.0
85
68.7
1280 x 720
60
47.7
1280 x 768
60
44.8
1280 x 1024
6O
64.0
1366 x 768
6O
47.7
1024 x 768
HDMI
•
60
800 x 600
YPbPr2
VGA Modes
Display Resolution
640 x 480
S-Video
Source
29
VESA
Standard
DTV
VGA
2
=
_.,
1+
( )MPLT\
3-q)
b,>,4c
Pa;e
3,)
Tlnu.da_
- Febut.u_ . l(, 2€)))(, *J 44 \M
#
+
_'"
_'_
-.£.y
+
Morc foryOUr money
Limited
Warranty
Protron warrants this product to be free from manufacturing
workmanship under normal use for the term stated below.
How to obtain
defects in material and
service:
• Visit the Protron Customer Service Portal at www.protronusa.com
support tab or call
Protron Customer Support at 1-888-257-8899. If the issue cannot be resolved over the
phone with trouble-shooting
techniques, you may be eligible for warranty service. To
request warranty repair, you may also contact us by e-mail at [email protected].
All
warranties must be authorized by Protron prior to service and will result in the issuance of
an authorization
number for service.
• For televisions with screen sizes of 37" or less, you will be requested to ship your television
to our National Return Center.
• For televisions with screen sizes 40" and above, you may be eligible for in-home service.
Our Customer Service Representative will locate an authorized Protron Service Center,
provided that your television is located within the geographic territory covered by an
authorized Protron Service Center. If in-home service is not available in your area, you must
either take your television to the Service Center location at your own expense, pay for the
additional cost that the Service Center may charge to transport your television to and from
your home, or send the unit to our National Return Center for repair.
• Proof of purchase in the form of a bill of sale or receipted invoice with product name,
model and/or serial number, which provides evidence that the product is within the
warranty period, must be presented to obtain warranty service.
This warranty
does
not cover:
•
Physical
or cosmetic
•
Damage
caused
•
Ordinary
customer
adjustments
•
Damage
to equipment
•
Any cost incurred
•
Signal
•
Incompatibility
•
Batteries
•
Images
•
Initial
installation
•
Power
surge and/or
•
Force majeure
•
Product
reception
burnt
damages
by abuse
and/or
neglect
as outlined
in the owners
not properly
in shipping
problems
connected
the product
caused
due to a change
manual
that
can be performed
by the
to the product
for repair
by external
antenna,
in IV/CA IV broadcast
cable systems
systems
after
or interference
the product
was sold
on to the screen
shipped
and related
damage
adjustments
by lightning
or uncontrollable
for service with
external
force
inadequate
damage
packaging
or packaging
materials
3O
I
I
2
_,
t_
{ }MPLT\
3-qt
b,,,,tc
Pa_e
31
Thm_da_
- Feblu.]l_ . l_
2ctn_
_) 44
\M
#
+
1,'
-,._
,_£%,
+
Limited
Warranty
What we will do:
• Protron will repair and/or replace your product at our National Return Center with new,
like new, or refurbished product and/or parts, at our discretion.
• For models 40" and above, Protron will reimburse
an authorized
obtained by Protron for you, for the new or, at our discretion,
parts required to repair your television.
This warranty
replacement
is void if:
• Product is used in a commercial
• Damaged through
• Modified
Protron Service Center,
refurbished
application
misuse, negligence
or repaired
or abuse.
by anyone other than authorized
• Damaged because it is improperly
• If the original
or rental.
connected
Protron Service Center.
to any other equipment.
proof of purchase cannot be supplied.
• If the identifiable
markings on the TV such as the serial number
unrecognizable,
or missing.
• The product
is used outside the country in which it was originally
are defaced,
sold.
This warranty is not transferable and only applies to the original purchase. Any implied
warranties, including the warranty of merchantability,
are limited in duration to the period of
this expressed warranty and no warranty whether expressed or implied shall apply to the
product thereafter. Under no circumstance shall Protron be liable for any loss or consequential
damage arising out of the use of this product. This warranty gives specific legal right. However,
you may have other rights that may vary from state/province to state/province. Some states/
provinces do not allow limitations on implied warranties or exclusions of consequential damage.
Therefore these restrictions may not apply to you.
37" and
Below:
1 year
Parts
& Labor
Depot
40" and Above:
1 year
Parts
& Labor
In-Home
31
Warranty
Warranty
2
= _.,
1+
( )MPLT\
3-q)
b,>,4c
Pa;e
3(,
Tluu.da_ -
Febut.u_ . l(,
2€)))(, *J 44
\M
#
+
_'"
_'_
-.£.y
+
----I}--
Protron
Digital
Corporation
htt p://www.protronusa.com/
PLTV-3750
OMPLTV3750
I
I