1
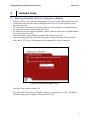
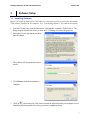
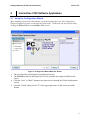
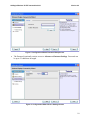
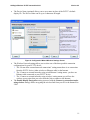
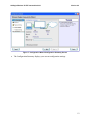
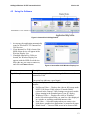
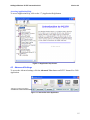
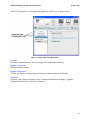
Addlogix Wireless PC2TV InternetVue 2100
User’s Guide
Version 3.01.10 or later
Addlogix Wireless PC2TV InternetVue 2100
Version 0.2
Table of Contents
1
1.1
1.2
1.3
2
2.1
3
3.1
3.2
4
4.1
4.2
4.3
INTRODUCTION
PRODUCT DESCRIPTION
PRODUCT SPECIFICATION
MINIMUM SYSTEM REQUIREMENTS
HARDWARE SETUP
ATTACHING INTERNETVUE 2100 TO A TELEVISION OR MONITO
SOFTWARE SETUP
INSTALLING SOFTWARE
UNINSTALLING THE SOFTWARE
INTERNETVUE 2100 SOFTWARE APPLICATION
USING THE CONFIGURATION WIZARD
USING THE SOFTWARE
ADVANCED SETTINGS
4
4
4
5
6
6
7
7
8
9
9
13
15
5
TROUBLESHOOTING
22
6
FAQ
25
2
Addlogix Wireless PC2TV InternetVue 2100
Version 0.2
List of Figures
FIGURE 1: HARDWARE D ESCRIPTION _____________________________________________________________4
FIGURE 2:INTERNETVUE 2100 SPLASH SCREEN ____________________________________________________6
FIGURE 3: CONFIGURATION WIZARD W ELCOME SCREEN _____________________________________________9
FIGURE 4: CONFIGURATION W IZARD PASSWORD SETUP SCREEN _____________________________________10
FIGURE 5: CONFIGURATION WIZARD DEVICE SETTINGS SCREEN ______________________________________10
FIGURE 6: CONFIGURATION WIZARD W IRELESS SETTINGS SCREEN ____________________________________11
FIGURE 7: CONFIGURATION WIZARD CONFIGURATION SUMMARY SCREEN ______________________________12
FIGURE 8: INTERNETVUE 2100 APPLICATION ______________________________________________________13
FIGURE 9: INTERNETVUE 2100 W IRELESS DISPLAY LIST ____________________________________________13
FIGURE 10: APPLICATION HELP SCREEN _________________________________________________________15
FIGURE 11: INTERNETVUE 2100 APPLICATION_____________________________________________________15
FIGURE 12: INTERNETVUE 2100 APPLICATION_____________________________________________________16
FIGURE 13: GENERAL – VIDEO SETTINGS SCREEN _________________________________________________17
FIGURE 14: GENERAL – CONFIGURATION SUMMARY SCREEN_________________________________________18
FIGURE 15: DISPLAY CONNECTION – WIRELESS CHANNEL NUMBER SCREEN ____________________________19
FIGURE 16: INTERNET CONNECTION – TCP/IP SCREEN _____________________________________________19
FIGURE 17: INTERNET CONNECTION – W IRELESS SETTINGS SCREEN __________________________________20
FIGURE 18: ADVANCED – PASSWORD SETUP SCREEN ______________________________________________21
FIGURE 19: ADVANCED – UPGRADE FIRMWARE SCREEN ____________________________________________21
3
Addlogix Wireless PC2TV InternetVue 2100
1
Version 0.2
Introduction
1.1 Product Description
The Addlgoix Wireless PC2TV InternetVue 2100 device is a graphics/video converter that
enables you to wirelessly connect your desktop or laptop computer to any display such as a
television, projector, or computer monitor.
The device has its own software (Wireless PC2TV InternetVue 2100 application) that allows you
to control viewing options and configure predefined settings so that future connections are
simple and easy.
1.2 Product Specification
Hardware Overview
Video Connector
Audio Connector
Network
Power Supply
•
•
•
•
•
•
•
DVI-I
VGA
1 x 3.5mm audio jack
2 channel stereo
RJ45 10/100 Mbps Ethernet
Wireless 802.11 g
DC 5V 2A
Figure 1: Hardware Description
4
Addlogix Wireless PC2TV InternetVue 2100
Version 0.2
1.3 Minimum System Requirements
Operating System
•
•
•
Microsoft Windows 2000 Professional (SP4)
Windows XP Home / Professional Edition SP2
Windows Vista
Computer System
•
•
•
•
1
2
Pentium 4 or M >1.5 GHz1
512 MB of RAM
802.11b/g capability (built-in or external adapter)2
10MB free hard drive space
Dual-core recommended
802.11g is required for full-motion video
5
Addlogix Wireless PC2TV InternetVue 2100
2
Version 0.2
Hardware Setup
2.1 Attaching InternetVue 2100 to a Television or Monitor
1. Connect a DVI or VGA cable to the appropriate DVI or VGA port on the InternetVue 2100.
2. Connect the other end of the cable to the appropriate DVI or VGA port on the television,
projector or monitor.
3. To enable audio, connect a stereo cable from the television, monitor or external speakers to
the stereo jack connector on the InternetVue 2100.
4. To enable access to the Internet (optional), connect a network cable to the 10/100M Ethernet
port on the InternetVue 2100.
5. Connect the power supply to the power port on the InternetVue 2100.
6. After connecting power, the television or monitor to which the Internet 2100 is attached
shows the PC2TV screen, This indicates that the InternetVue 2100 is connected.
PC2TV-2998
Figure 2:InternetVue 2100 Splash Screen
Note the screen contains a display ID.
This display ID, also known as the SSID, is unique to each InternetVue 2100. The SSID is
needed to connect your computer to the InternetVue 2100.
6
Addlogix Wireless PC2TV InternetVue 2100
3
Version 0.2
Software Setup
3.1 Installing Software
Before you install the InternetVue 2100 software, remove any earlier version of the InternetVue
2100 software installed on the computer. See “Uninstalling Software” for removal instruction.
1. Load the CD that came with the InternetVue 2100 into the computer CD/DVD drive. The
Setup program should Auto-Start (or click on PC2TVSetup.exe to start the program)
2. Select the License Agreement checkbox
and click Next.
3. The software will automatically start to
install.
4. Click Reboot when the installation is
complete.
5. Click on
, the InternetVue 2100 icon to launch the application and your computer screen
should be projecting on the television, projector or computer monitor.
7
Addlogix Wireless PC2TV InternetVue 2100
Version 0.2
3.2 Uninstalling the Software
1. Click Start and navigate to All Programs > PC2TV
2. Click Uninstall and the software removal process will begin.
3. When the un-installation process is finished, reboot your PC.
8
Addlogix Wireless PC2TV InternetVue 2100
4
Version 0.2
InternetVue 2100 Software Application
4.1 Using the Configuration Wizard
After installing InternetVue 2100 software, on the first application start, the Configuration
Wizard will appear to guide you through the initial setup. The Wizard can also be selected by
clicking the Wizard button in the Advance View screen.
Figure 3: Configuration Wizard Welcome Screen
The wizard guides you through each configuration screen.
The Tutorial section (on the right of the screen), describes the settings available on the
screen.
Click the “Next” or “Back” buttons at any time to move through the Wizard configuration
screens.
Click the “Finish” button (or the “X” in the upper right corner of the screen) to end the
Wizard.
9
Addlogix Wireless PC2TV InternetVue 2100
Version 0.2
Figure 4: Configuration Wizard Password Setup Screen
The Password (optional) restricts access to Advance and Internet Settings. Password can
be up to 32 characters in length.
Figure 5: Configuration Wizard Device Settings Screen
10
Addlogix Wireless PC2TV InternetVue 2100
Version 0.2
The Device Name (optional) allows you to use a name in place of the PC2TV’s default
display ID. The Device Name can be up to 4 characters in length.
Figure 6: Configuration Wizard Wireless Settings Screen
The Wireless Network settings allow you to select one of the three possible connection
configurations for your PC2TV device:
1. The “Do not allow external network connections” setting means there is no connection
from the PC2TV device (either wireless or Ethernet cable) to the Internet.
2. The “Connect to external networks using wired Ethernet“ setting means you have an
Ethernet cable connected to your PC2TV device.
3. The “Connect to external networks using wireless“ setting means you will use the
wireless access point (that you select from the list) to connect to the Internet.
The Enable Display Encryption setting (not used with the Connect to external networks
using wireless setting) allows encrypting the wireless link from your PC to the InternetVue
2100
11
Addlogix Wireless PC2TV InternetVue 2100
Version 0.2
Figure 7: Configuration Wizard Configuration Summary Screen
The Configuration Summary displays your current configuration settings
12
Addlogix Wireless PC2TV InternetVue 2100
Version 0.2
4.2 Using the Software
Figure 8: InternetVue 2100 Application
1. At start-up, the application automatically
scans for Wireless PC2TV InternetVue
2100 devices.
2. If one InternetVue 2100 is located, the
SSID of that device will appear in the
Wireless Display List.
3. If multiple InternetVue 2100s are
located, the Wireless Display List
appears with the SSID of each device.
Select the one you want to connect to,
and click on Connect button.
Figure 9: InternetVue 2100 Wireless Display List
Feature
Description
Signal Strength
Indicates the strength of the wireless signal of the connected
InternetVue 2100.
Four green bars indicates a good signal.
Display Modes
Changes the display on the connected television, projector, or
monitor:
Full Screen Video — Displays the video in full-screen mode.
NOTE: Full Screen Video requires “Extended Mode”
(selected in the General, Video Settings screen) and a media
player running in the Extended part of your PC display.
Windowed Video — Displays the video in “Windows”
mode. Select this option when you want live video displayed
in a window or watching embedded internet video.
Non-Video — Select this option when you want to view
slide shows, graphics/text applications, or normal web pages.
Blank Screen — Causes a blank screen to be shown on the
13
Addlogix Wireless PC2TV InternetVue 2100
Version 0.2
display. Select this option when you want to “hide” the
screen.
Advanced View (button)
Expands the InternetVue 2100 application, allowing you to
configure advanced settings such as:
General - Resolution, Desktop Display, Device Settings, and
Configuration Summary.
Display Connection - Wireless Channel Number.
Internet Connection - External Network Connection Wired
or Wireless, TCP/IP, and Wireless Settings.
Advanced - Password Setup (Password restricts access to
Advanced and Internet Settings.), Upgrade (Upgrade the
Wireless PC2TV InternetVue 2100 firmware.)
Select Display (button)
Opens the Wireless Display List, allowing you to search for
additional InternetVue 2100 Devices.
Stop Display (button)
Stops the computer from projecting to the television, projector, or
monitor. (Your computer remains wirelessly connected to the
InternetVue 2100.)
Connection Status
Displays the SSID of the currently connected InternetVue 2100.
Close
Disconnects your computer from the InternetVue 2100 and closes
its application.
Application Help
Opens the Application Help information window.
Change Display Modes
Display modes control how your computer projects on the connected television, projector, or
monitor.
To change your display mode, click the desired video mode button on the application.
Stopping the Display
To stop your computer from displaying on the connected television or computer monitor without
disconnecting from the InternetVue 2100, click the Stop Display button on the on the
application.
Disconnecting from InternetVue 2100
To disconnect your computer from the InternetVue 2100 and close the application:
1. Click the Close button on the Wireless PC2TV application.
2. Click OK when prompted to confirm the disconnection.
14
Addlogix Wireless PC2TV InternetVue 2100
Version 0.2
Accessing Application Help
To access Application Help, click on the “?” (Application Help) button.
Figure 10: Application Help Screen
4.3 Advanced Settings
To access the Advanced settings, click the Advanced View button on PC2TV InternetVue 2100
Application.
Figure 11: InternetVue 2100 Application
15
Addlogix Wireless PC2TV InternetVue 2100
Version 0.2
The PC2TV InternetVue 2100 application expands to its full view, as shown below:
Figure 12: InternetVue 2100 Application
General
Resolution, Desktop Display, Device Settings, and Configuration Summary.
Display Connection
Wireless Channel Number.
Internet Connection
TCP/IP, and Wireless Settings (External Network Connection Wired or Wireless).
Advanced
Password Setup (Password restricts access to Advanced and Internet Settings.), Upgrade
(Upgrade the InternetVue 2100 device firmware.)
16
Addlogix Wireless PC2TV InternetVue 2100
Version 0.2
Video Settings
Figure 13: General – Video Settings Screen
Resolution sets the quality of the image sent from your PC to your TV or Monitor.
Increasing the Resolution, increases the amount of data sent over your wireless connection,
and may exceed the capability of your wireless network. You should select the lowest
resolution that gives acceptable image quality on your TV or Monitor.
The “Display Properties” button opens your PC Windows Operating System Display
Properties screen. Increasing the “Screen Resolution” setting reduces the size of objects on
your PC display and increases the total viewing area. Reducing the “Screen Resolution”
setting increases the size of objects on your PC display and reduces the total viewing area.
You should select the “Screen Resolution” setting that provides the desired image quality on
your TV or Monitor.
Desktop Display configures your PC display mode to: Duplicate, Duplicate with Pan and
Scan, or Extended.
Duplicate Mode
The Duplicate setting sends a copy of your PC display to your TV or Monitor.
Duplicate with Pan and Scan
The Duplicate with Pan and Scan setting creates a “Pan and Scan window” that is a small
section of your PC display, and sends a copy of the “Pan and Scan window” to your TV or
Monitor. You can move the “Pan and Scan window” to any part of your PC display. For
example, your PC display may be set to 1024x768, while the “Pan and Scan window” is
640x480.
Extended Mode
Extended Mode must be used to send DVD video to your TV or Monitor. The Extended
setting creates a virtual display area outside of the normal viewing area of your PC display,
and sends a copy of whatever you drag into the virtual display area to your TV or Monitor.
You can use your PC Windows Operating System Display Properties screen to select the
17
Addlogix Wireless PC2TV InternetVue 2100
Version 0.2
location of the Extended Mode virtual display area (for example, to the right or left of the
normal viewing area of your PC display). To send DVD video to your TV or Monitor, start
playing the DVD in your media player, and drag the media player into the Extended Mode
virtual display area.
Device Settings
Figure 14: General – Configuration Summary Screen
Network Connection LAN shows the connection from your PC to the PC2TV device.
Network Connection Internet shows the connection from the PC2TV device to an
External Network.
Security shows if Encryption is being used for each Network Connection.
SSID shows the PC2TV Device Name.
Network Key displays the Encryption Key, if Encryption is being used.
The “Show keys as clear text” check box hides the Encryption key display.
18
Addlogix Wireless PC2TV InternetVue 2100
Version 0.2
Wireless Channel Number
Figure 15: Display Connection – Wireless Channel Number Screen
Channel selects one of the wireless channels to use for the connection from your PC to the
PC2TV device. You may need to change the wireless channel number to improve video
quality, if too many wireless access points in your area are using the same channel number.
TCP/IP
Figure 16: Internet Connection – TCP/IP Screen
The Obtain an IP address for this device automatically setting is recommended
The Use the following IP address configuration setting should only be used by an IT
Network Administrator, when required
19
Addlogix Wireless PC2TV InternetVue 2100
Version 0.2
Wireless Settings
Figure 17: Internet Connection – Wireless Settings Screen
The Wireless Network settings allow you to select one of the three possible connection
configurations for your PC2TV device.
1. The “Do not allow external network connections” setting means there is no connection from
the PC2TV device (either wireless or Ethernet cable) to the Internet.
2. The “Connect to external networks using wired Ethernet“ setting means you have an Ethernet
cable connected to your PC2TV device.
3. The “Connect to external networks using wireless“ setting means you will use the wireless
access point (that you select from the list) to connect to the Internet.
Wireless access points shown with a “lock” icon require an Encryption Key. When you
select a “locked” item, the Wizard prompts you to enter the Encryption Key required by this
wireless access point.
The “Enable Display Encryption“ setting (not used with the “Connect to external networks
using wireless“ setting) allows encrypting the wireless link from your PC to the PC2TV
device.
20
Addlogix Wireless PC2TV InternetVue 2100
Version 0.2
Password Setup
Figure 18: Advanced – Password Setup Screen
Password restricts access to Advanced and Internet Settings. Password can be up to 32
characters in length.
Upgrade
Figure 19: Advanced – Upgrade Firmware Screen
The “Upgrade Now!” button causes the PC2TV InternetVue 2100 application software to
search for firmware updates from the Internet (if “Upgrade from the Internet” is selected) or
from your PC (if “Upgrade from this computer” is selected).
If an upgrade is found, click OK to begin the upgrade.
Follow the prompts on the screen to complete the upgrade.
21
Addlogix Wireless PC2TV InternetVue 2100
5
Version 0.2
Troubleshooting
Be sure your PC is on and it’s in not standby or hibernate mode. In addition, make sure the PC’s
wireless network interface is enabled and it supports either 802.11g or 802.11b specification.
Installation Questions and Issues
Do I have to reboot after installing the Wireless PC2TV InternetVue 2100 application?
After the application is installed, the application checks if the driver installation requires a
reboot or not. This determination is made by the Windows operating system. The Wireless
PC2TV InternetVue 2100 application simply looks for the Windows' indication. If required,
the installation prompts you to reboot your computer. If it’s not required, the application
launches automatically.
I can’t complete the installation of the PC2TV InternetVue 2100.
There are instances where the wireless install of software/drivers may not be allowed in your
network. For example, a laptop may be configured so that third-party software cannot be
installed (this is generally the case in corporate environments). In this case, the MIS staff
may provide access to the software over a network drive or provide you with an installation
CD. The auto-install feature described in the next field allows you to download and install
the application from the Wireless PC2TV InternetVue 2100.
Will the Wireless PC2TV InternetVue 2100 work behind a firewall?
Windows Firewall must be configured to allow the Wireless PC2TV InternetVue 2100 to
access the Internet. If third-party firewalls are installed (such as Zone Alarm), they can
restrict access to the Wireless PC2TV InternetVue 2100. Either completely disable the
firewall or configure it to allow FTP and HTTP traffic through to the device. Also make sure
it allows complete network access to/from the Wireless PC2TV InternetVue 2100
application.
Connection Questions and Issues
My display monitor does not show splash screen
Make sure the wireless video adapter is firmly connected to the display monitor.
Please check the power adapter is connected.
If your connection to the InternetVue 2100 is intermittent
Make sure the wireless video adapter is not placed nearby a wireless network router.
Try changing the wireless video display adapter’s channel in network settings.
1. Click Settings on the main wireless video application window.
2. In the Settings window, click Network Settings and use the drop down menu to select a
different channel.
Be sure your wireless video adapter is located at a reasonable distance between the PC.
Please refer to 802.11b/g standards for more information.
22
Addlogix Wireless PC2TV InternetVue 2100
Version 0.2
What WiFi configuration is necessary to use the Wireless PC2TV InternetVue 2100?
On the computer, check the WiFi configuration to ensure that the wireless radio is enabled
and set to Infrastructure mode.
Each Wireless PC2TV InternetVue 2100 must have a unique SSID. Identical SSIDs on more
than one unit will cause unpredictable application behavior. The application may not connect
to the desired Wireless PC2TV InternetVue 2100 if more than one has the same SSID. Each
Wireless PC2TV InternetVue 2100 is configured with a default SSID embedded in the
firmware that cannot be changed. However, through the Wireless PC2TV InternetVue 2100
application, a new SSID can be assigned to the device.
When the Wireless PC2TV InternetVue 2100 application is launched, it disables the WZC
utility and uses Windows NDISUIO to scan for Wireless PC2TV InternetVue 2100s. Some
laptop wireless adapter vendors may provide proprietary NDIS utilities and corporate IT
departments may use third-party NDIS utilities that may interfere or block Windows
NDISUIO functionality.
When the application cannot locate APs through the NDISUIO API, it generates a message
to the user. The user needs to manually connect to the Wireless PC2TV InternetVue 2100
prior to launching the application. Refer to your computer user guide for connection
instructions for third-party wireless NDIS module for configuration and management utility.
The Wireless PC2TV InternetVue 2100 application does not connect to the Wireless
PC2TV InternetVue 2100
Check to see if the wireless LAN is activated on the computer. If so, attempt to connect to the
device manually via the computer’s wireless utility.
The Wireless PC2TV InternetVue 2100 that is powered on does not appear on the list of
available wireless networks
The Windows wireless driver may not update its list of available access points. To correct this:
1. Exit the Wireless PC2TV InternetVue 2100 application (if launched).
2. Open the Microsoft WZC utility (or third-party utility that is controlling the wireless access
function) and view available wireless networks.
3. Press the Refresh button to update the list of available APs (it may be necessary to refresh
once more if the Wireless PC2TV InternetVue 2100 does not appear in the available AP list).
If the Wireless PC2TV InternetVue 2100 still does not appear in the available list, a fresh start is
recommended by using the following steps:
Exit the Wireless PC2TV InternetVue 2100 application (if launched).
Disable the wireless adapter from Windows "Network and Dialup Connections" dialog box.
Enable the wireless adapter again.
Open the WZC window and view available wireless networks to ensure that the Wireless
PC2TV InternetVue 2100 is available.
Re-launch the Wireless PC2TV InternetVue 2100 application.
Cannot connect to the Internet while projecting
If your computer is not projecting to the television or projector, make sure that:
A wireless connection to the Wireless PC2TV InternetVue 2100 is established.
23
Addlogix Wireless PC2TV InternetVue 2100
Version 0.2
An Ethernet network cable is connected either to the Wireless PC2TV InternetVue 2100 or
your computer.
The Wireless PC2TV InternetVue 2100 application is launched.
If you are projecting:
Check the bullet items listed above.
Stop projecting from within the application, and then project again.
If the Internet connection still does not work, close the Wireless PC2TV InternetVue 2100
application, and restart it.
What network settings do I need to connect to the Wireless PC2TV InternetVue 2100?
The following changes must be made on the computer to ensure proper operation of the Wireless
PC2TV InternetVue 2100 application:
Under WLAN network properties, enable DHCP.
Eliminate all proxy server settings manually. (The Wireless PC2TV InternetVue 2100
application does not manage or use proxy settings.) Start Internet Explorer, open Tools >
Internet Options > Connections tab. In the Local Area Network (LAN) Settings, the
Automatic Configuration setting should be set to Automatic and the Proxy Server should be
turned off (unselected).
Video performance seems sluggish, what can be the cause?
Some laptops have settings that bring down CPU performance when operating on battery
power. When this feature is enabled (mostly through default setting), the frame rate is likely
reduced and you will see degradation in transitions between images. Check your computer
documentation and disable these settings for higher quality.
How do I resolve misc. wireless connection issues?
Make sure you have the latest Intel wireless driver. You can update your Intel driver at:
http://www.intel.com/support/wireless/wlan/sb/cs-010623.htm
Issues have been found with the following WLAN adapters:
Intel PRO/Wireless 2915BG Network Connection
Intel PRO/Wireless 2200BG Network Connection
To determine the wireless adapter that is in use on your computer:
1. Open Windows Start menu.
2. Right-click on My Computer.
3. Select Properties.
4. Choose the Hardware tab.
5. Click on Device Manager.
6. Expand Network adapters.
7. Find the wireless network connection. The model number should be in the title. If not, rightclick on the wireless network connection, and choose Properties, General tab. The model
number should be displayed.
24
Addlogix Wireless PC2TV InternetVue 2100
6
Version 0.2
FAQ
General Operation
Can more than one computer project to the same Wireless PC2TV InternetVue
2100/projector combination at the same time?
The Wireless PC2TV InternetVue 2100 manages users on a first-come, first-served basis.
This implies that if one user is projecting, others must wait until the first user closes their
Wireless PC2TV InternetVue 2100 application or stops projection.
If more than one user wants to project to the same display, a window on their computer
screen informs them that the Wireless PC2TV InternetVue 2100 is in use (wait mode). Click
the Display button after the first user has stopped displaying.
The Wireless PC2TV InternetVue 2100 supports multiple connections to the same unit, but
only one computer is able to project at a time.
What resolutions are supported?
The current release supports 640x480, 800x600 and 1024x768 for DVI/VGA, 640x480 and
800x600 composite video outputs, and 720x480, 720x576, and 1280x720 for component
video output.
Which video players are supported?
The Wireless PC2TV InternetVue 2100 supports players that use DirectDraw. It does not
support players that use DirectShow.
It is recommended to use WinDVD 6 or Media Player Classic version 6.4.9.0. You can
download this player at: http://www.divx-digest.com/software/media_player_classic.html
To obtain good quality video, the computer setup and DVD playback should have the
following:
For showing video playback, the computer must be connected to AC power.
For Windows XP, make sure Service Pack 2 is installed.
For Windows XP, increase the RAM beyond 512 MB and configure the virtual memory to
the maximum setting.
The recommended player is installed, but it still does not work
Check to see if DirectDraw is enabled.
1. Open Windows Start, Run, and type: dxdiag
2. Wait for the diagnostic to run.
3. Click on the Video 2 tab, which should correspond to the Wireless PC2TV InternetVue 2100.
If DirectDraw is disabled, click on the Enable button. The DirectDraw players such as
WinDVD should now work.
25
Addlogix Wireless PC2TV InternetVue 2100
Version 0.2
Can the Internet be accessed while projecting through the Wireless PC2TV InternetVue
2100?
The Internet can be accessed either through the computer, the Wireless PC2TV InternetVue
2100, or a wireless access point (if one already exists while being projected onto the display).
If the Internet is accessed via the Wireless PC2TV InternetVue 2100, it is advised that the
Ethernet cable be connected to the Wireless PC2TV InternetVue 2100 before it is powered
up.
Note the following special cases:
The Ethernet port on the board can have DHCP enabled or STATIC addresses. This can be
accomplished from within the Wireless PC2TV InternetVue 2100 application.
Port 80 should be open on the LAN to allow access to the Internet.
Port 21 should be open on the LAN to allow Wireless PC2TV InternetVue 2100 firmware
updates.
The DHCP allocation range is 10.0.0.2 through 10.0.0.254 (IP/subnet of Wireless PC2TV
InternetVue 2100 Ethernet port should be different than 10.0.0.x).
The Wireless PC2TV InternetVue 2100 Ethernet port has a ‘dummy’ MAC address by
default. During the manufacturing process, each device is programmed with a unique MAC
address. This is necessary to avoid MAC address conflict and improper operation of the
device. Note that with a dummy MAC address, there may be some computers which may not
be able to connect to the device.
How are firmware and applications updated?
To check for firmware/application updates:
1. Power on the Wireless PC2TV InternetVue 2100 and make sure it has an active Internet
connection and FTP port open.
2. Start the Wireless PC2TV InternetVue 2100 application and select the Settings option.
3. Select Firmware update.
The application checks if a newer firmware version is available for download. If a new
version is available, the Wireless PC2TV InternetVue 2100 application prompts you for
download permission and starts downloading.
After the firmware update is complete, the Wireless PC2TV InternetVue 2100 must be power
cycled.
The Wireless PC2TV InternetVue 2100 reboots on the new firmware, but the Wireless
PC2TV InternetVue 2100 application on the computer must still be updated. This can be
done by uninstalling the old version and executing the "auto-install' procedure.
Why is the SSID different when the firmware is upgraded?
On an upgrade of firmware, the SSID is changed back to its original default. This is done to
simplify the software for the upgrade process.
Does Power-Save mode interfere with Wireless PC2TV InternetVue 2100 operations?
Most laptops have a power management feature (power-save mode) that allows the
management of power to its subsystems when the laptop is running on battery power.
26
Addlogix Wireless PC2TV InternetVue 2100
Version 0.2
One of the settings is to put the onboard wireless adapter on "power save mode". When this
is enabled (default setting in most cases), it makes the wireless adapter go to sleep several
times a second to reduce power consumption. This behavior is acceptable for data but for
'real time' applications, like graphics & video display, there is significant adverse impact on
the link quality and performance required for this type of application.
When the Wireless PC2TV InternetVue 2100 application is launched, it disables the "power
save" feature of the wireless adapter and enables it when the application is exited. This only
applies if the feature is enabled at the time of Wireless PC2TV InternetVue 2100 launch.
After the Wireless PC2TV InternetVue 2100 application closed, my laptop wireless utility
stopped working
If a third-party wireless configuration utility is in control, refer its user's guide to set it to
proper operation.
However, if your computer uses the Windows wireless utility, note the following:
The Wireless PC2TV InternetVue 2100 application controls the computer’s wireless device
with standard Windows APIs.
The application disables the Wireless Zero Configuration (WZC) to ensure Windows does
not override any attempt to connect with a Wireless PC2TV InternetVue 2100.
WZC is an application supplied by Microsoft with the Windows XP platform to scan and
associate with desired access points.
Upon exiting, the Wireless PC2TV InternetVue 2100 application restores the WZC
configuration. Typically, WZC starts automatically. If it does not, follow these steps to
enable Microsoft WZC manually: Select: Start, Control Panel, Administrative Tools,
Services, Wireless Zero Configuration, and select Start the Service.
How can I resolve wireless performance issues in a crowded WLAN environment?
To resolve performance issues, try changing the channel. (You can change the channel in the
Wireless PC2TV InternetVue 2100 application under Device Settings, Network Settings.)
In crowded WLAN environments, collisions with other APs and clients (stations) and the
resultant need for packet retransmissions can result in lower effective throughput between the
computer and the Wireless PC2TV InternetVue 2100.
2.4GHz WLAN has several available channels. In many cases, changing to a different
channel can reduce congestion and improve throughput, improving performance
significantly.
Are there configuration parameters to be set for the Audio area?
The audio settings may need to be configured manually for non-English version of Windows.
1. Open Volume Control and select Options, Properties.
2. Select Adjust Volume for Recording.
3. Click OK and select Stereo Mixer in the Recording Control Panel to capture and play PC
Laptop audio from the Wireless PC2TV InternetVue 2100.
4. Select Mute All under the Volume Control in the Volume Control Panel.
27
Addlogix Wireless PC2TV InternetVue 2100
Version 0.2
If I have set but forgot my password setting how do I reset it?
Factory default can be restored by press and hold the “Factory Reset Switch” for the
VGA/DVI units or the “Component/Composite Video Switch” for the component/composite
units, for five seconds. Once the default setting is restored, you can then reconfigure the
settings.
Why does the background text resolution look unclear when video is playing in Windowed
mode?
The software algorithm automatically detects video playing and optimizes for video rather
than text/graphics. Quality text/graphics resume whenever the mouse is moved.
How can I play a DVD in extended mode?
To play a DVD in extended mode, enable DirectDraw:
1. Open Windows Start menu and select Run.
2. Enter the following command: dxdiag
3. Go to the Display tab and click the Enable button.
28