1
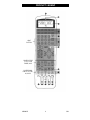
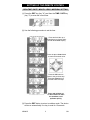
VRC8DP
Universal
Learning Remote Control
User Manual
CONTENTS
INTRODUCTION
PRODUCT LEGEND
INSTALLING BATTERIES
SETTING UP THE REMOTE CONTROL
- REALTIME / DATE / MONTH / YEAR / WEEKDAY
SETTING
- LEARN MODE
- SPECIAL MULTI-CODE LEARNING KEYS
- KEY-NAME EDITING
- EDITING OF STORAGE KEY NAMES
- TABLE OF CHARACTERS
- RENAMING SPECIAL MULTI-CODE KEYS
- KEY NAMES : PAGE SELECTION
- MACRO SETTING
- SETTING A MACRO WITH A MULTI-CODE KEY
- USING THE TIMER WITH BUZZER OR MACRO
- SLEEP FUNCTION
OPERATING THE REMOTE CONTROL
-
NORMAL OPERATION
OPERATION OF THE SPECIAL MULTI-CODE KEYS
MACRO OPERATION
OTHER FUNCTIONS
-
CLEARING STORED DATA
KEY-TONE
KEY AND LCD BACK LIGHTING
BATTERY-LOW DETECTION
RESETTING THE VRC8DP
VRC8DP
1
GB
INTRODUCTION
Thank you for buying the VRC8DP Universal Learning Remote
Control. We are convinced that this powerful & flexible unit is
able to incorporate the functions of all your infrared remote
controls.
The unit is very user-friendly thanks to its unique design. The
main function keys are located on the upper portion and a sliding
cover hides the sub-function keys.
The VRC8DP provides memory banks for 10 devices, each
device disposing of a max. of 47 storage keys (including 6
special multi-code keys). It also allows users to store the codes
for more than 1 original remote under the same unit.
Pressing a device or storage key will display that key’s default
name (page 1 or 2). This feature enables the user to change the
name of the key at will, using a max. of 8 characters.
The VRC8DP is equipped with 20 macro memories. The unit
automatically transmits a series of commands by pressing only
two buttons : MACRO & button 0 - 9 or a device button. Each
macro memory supports a max. of 20 programmed steps. The
user can insert a delay time of 1 to 99 seconds between the
various steps (default 0.5 sec.). Some devices will not respond to
a code if the unit is warming up.
The VRC8DP is equipped with a timer and a sleep function. The
user can set the timer to activate the buzzer or a macro at a
chosen moment in order to remind him of e.g. the start of a TV
show.
The sleep function can deactivate the selected device
automatically (range 60 minutes).
Please read this user manual carefully and enjoy the
programming procedures. We think you will find this unit to be
quite sophisticated…
VRC8DP
2
GB
PRODUCT LEGEND
/,*+7
%87721
&29(583)25
79&799&5
781(5$8;
&29(5'2:1
)25&'/'9'3
$9$8;
VRC8DP
3
GB
A. INFRARED WINDOW
B. LIGHT SENSOR
C. DISPLAY (LCD)
D. DEVICE BUTTONS
E. STORAGE BUTTONS
F. SPECIAL MULTI-CODE BUTTONS
G. MACRO BUTTON
H. EDIT BUTTON
I.
ON/OFF TIMER BUTTON
J. TIME/DATE BUTTON
K. SLEEP BUTTON
L. LEARN BUTTON
M. CLEAR BUTTON
N. KEY NAME LOCATION BUTTON / LANGUAGE BUTTON
O. TONE BUTTON
P. RESET BUTTON
Q. FLIPPING COVER
INSTALLING BATTERIES
(1) Remove the battery cover.
(2) Insert 4 (AAA) batteries. Please observe the polarity.
(3) Closing the battery cover should produce an audible click.
All previously stored data will be protected while the batteries are
being replaced.
VRC8DP
4
GB
SETTING UP THE REMOTE CONTROL
REALTIME / DATE / MONTH / YEAR / WEEKDAY SETTING
(1) Press the EDIT key (key "H") and then the TIME / DATE key
(key "J") to enter the current time.
(2) Use the following procedure to set the time :
Press and hold the up or
down button to choose either
the 12- or 24- hour display.
Press the up or down button
to reach the desired value.
Press the left button to
return to the previous step.
Press the right button to
proceed to the next step.
Press and hold the up
or down button to make
the numbers scroll
up/down quickly.
(3) Press the EDIT button to return to realtime mode. The device
will do so automatically if no key is used for 15 seconds.
VRC8DP
5
GB
LEARN MODE
The VRC8DP is equipped with memory banks for 10 devices. Each
device can hold a max. of 41 single data (code) keys and 6 special
multi-code keys. It also enables the user to store the codes for
multiple original remotes under 1 single device.
When a storage key is pressed, the display will show EMPTY if it
does not contain any data. The introduction of a new code will
erase the current code for that particular storage key.
Place an original remote "headto-head" with the VRC8DP’s IR
sensor window at a distance of
approx. 5–8cm (2-3 inches).
ORIGINAL
1. Press the LEARN button to
initiate the learn mode and the
LCD's "LEARN” mark will flash.
2. Press a device button (e.g. TV)
to select the memory bank of a
particular device.
3. Press the desired storage
button (e.g. button 1). The
LCD's LEARN mark will stay lit.
(The unit will return to the learn
mode if no data are received
within 30 seconds).
4. Press and hold a corresponding
button from the original remote
(e.g. button 1) until the LCD
displays “OK!”
The LCD's LEARN mark will
flash again when the sequence
has been learnt. Repeat step
(3) for the next storage key.
VRC8DP
6
GB
If the LCD displays "ERROR" :
make sure you have executed
the procedure correctly and
then repeat step 3.
If the LCD displays "NO
DATA", this means that no data
were received from the original
remote. Verify whether the keys
of the original remote function
properly and make sure that the
two remotes are "head-tohead". Repeat step 3.
5. Exit the learn mode : Press the
LEARN button or wait at least
15 seconds before pressing the
next key.
SPECIAL MULTI-CODE LEARNING KEYS
The POWER button & buttons S1 to S5 are multi-code keys.
Each of these buttons can store 5 different codes in sequential
fashion.
Some remotes have 2 separate
POWER buttons (e.g. POWER
ON and POWER OFF). We can
store these two codes under a
single key as a toggle function.
The user should store the
power-off code in the 2nd
memory location of the POWER
key.
The device is ready to
learn the first code.
VRC8DP
7
GB
LEARNING STEPS :
(1) Follow the previous learning steps.
(2) When the learning sequence is completed, press the same
multi-code key again and repeat step 3 to install the second
function to be memorised (max.5).
The device is ready to learn
the second code.
REMARK : If more than one code in a multi-code sequence
needs to be changed, the user will have to
programme all 5 codes again.
KEY NAME EDITING
The LCD will display the default name of any device or storage
key that is pressed. This feature enables the user to change the
names of these keys at will, using a max. of 8 characters. Refer
to the table of characters on page 9.
A thin cover attached to a
hinge and printed on both
sides lists the names of the
various keys it covers :
When the cover is up, it
indicates the buttons for
the following devices : TV,
CTV, VCR, TUNER, AUX1.
When the cover is down, it
indicates the buttons for
the following devices : CD,
LD, VDP, AV, AUX2
EDITING OF STORAGE KEY NAMES
(1) Press the EDIT button
to initiate the edit
mode.
(2) Press the desired
device or storage
button e.g. when
you want to
change the name of
the AUX1 key to DVD.
VRC8DP
8
GB
(3) The first digit of the key name will flash.
Press the up or down button
to locate the desired
character.
Press the left or right button
to select the various digits.
Press the button marked "C" to clear a
particular position or leave an open space.
After editing, the key names will automatically appear in the
centre of the display during operation.
(4) Exit edit mode : press the EDIT button or wait longer than 15
seconds before pressing the next key.
IMPORTANT :Editing the name of a key will automatically erase
the old name.
TABLE OF CHARACTERS
VRC8DP
9
GB
RENAMING SPECIAL MULTI-CODE KEYS
(1) Press the EDIT button and subsequently press the desired
special multi-code button once (e.g. S1).
(2) Use STEP 3 of "Editing of Storage Key Names" in order to
select the character or number in question.
(3) When the last character has been entered : press the same
special multi-code button again to edit the key name in
memory location n°2, etc. (max. 5 memory locations).
(4) Press the EDIT button to return to the realtime mode when
you are done.
KEY NAMES : PAGE SELECTION
Press the language button (button N) to select the name on page
1 or 2 for a particular key (the default language is ENGLISH). We
recommend that the user store his personal names for the keys
on page 2 : editing the default names on page 1 will erase them
permanently.
MACRO SETTING
The VRC8DP is equipped with 20 macro memories and
automatically transmits a series of commands by pressing just
two buttons : either MACRO & button 0 - 9 or MACRO & a
device button. Each macro memory supports a max. of 20
programmed steps. The user can insert a delay time of 1 to 99
seconds in between steps (accuracy : 0.5 seconds). Some
devices will not respond to certain commands when warming up.
Here is an example of how to programme a macro :
(1)
(2)
(3)
(4)
(5)
(6)
Turn on the TV.
Select the video input at the back of your TV.
Switch on the LD.
Open the device drawer of the LD… etc.
Switch on the AV processor's amplifier (delay 5 seconds).
Select the AV's input or output source.
Press the LEARN and then the MACRO button to engage the
MACRO LEARNING MODE. The LCD will display "MACRO ?"
and the user should enter 0-9 or press a device button.
VRC8DP
10
GB
Select button 0-9 or
device button.
Step 5:Press the
POWER button.
Step 1:Press
the TV button.
Step 6:Press the
OPEN button.
Step 2:Press the
POWER button.
Step 7:Press the
AV button.
Step 3:Press the
TV / VIDEO button.
Step 8:Press the POWER
button & hold for 5 sec.
(displayed delay time is "05").
Step 4:Press the
LD button.
Step 9:Press the
AUDIO MODE button
Press the LEARN button to return to the realtime mode.
SETTING A MACRO WITH A MULTI-CODE KEY
It is possible to use a special multi-code key to programme a
macro (e.g. select the fourth function of button S1 : Press the ’S’button 4 times in rapid succession and then perform the next
step.
VRC8DP
11
GB
USING THE TIMER WITH BUZZER OR MACRO
The timer will stand you in good stead. The buzzer can remind
the user of e.g. an appointment. The timer can even be used to
initiate a certain macro that will activate the desired A/V system.
The timer has a max. range of 24 hours.
(1) Press EDIT and then the ON/OFF TIMER button to initiate
the timer mode. The alarm symbol appears on your screen.
(2) Use the up/ down button
to install the desired time
…and the left/ right button
to select hours or minutes.
OR
Press the MACRO
button and install the
macro : select 0-9 or a
device button. The
VRC8DP automatically
returns to the realtime
mode.
(3) Press EDIT to return
to the realtime mode
when you are not
using a macro. The
audible signal is
armed.
(4) Press the ON/OFF TIMER button to (de)activate the timer
function. The timer is activated when the LCD displays the
alarm symbol.
IMPORTANT: When using the timer with a macro, the user
should place the VRC8DP head-to-head with the
selected A/V system.
At the appropriate moment, the alarm signal will sound for 15
seconds or the macro will be activated. It is possible to stop the
alarm by pressing the ON/OFF TIMER button.
VRC8DP
12
GB
SLEEP FUNCTION
The SLEEP function can only switch the device off (POWER off)
after 15, 30, 45 or 60 minutes. When the sleep time has elapsed,
the unit will automatically transmit the power-off code of the
device mentioned on the lower half of the LCD.
SETTING THE SLEEP TIMER
The TV will be deactivated
in 15 minutes.
Press the SLEEP button once to activate the sleep timer for 15
minutes. Each additional press will add 15 min. to the timer.
Press the SLEEP button five times to deactivate the sleep timer
and exit the sleep timer mode.
While the time is running : press the SLEEP button once to check
the remaining sleep time. Some units have separate power on &
off buttons. In this case, the user should store the power-off code
on the second page of the power key. The unit automatically
transmits the code on page n°2 if the power key contains more
than one code.
REMARK : Make sure the selected device is activated and
verify whether the VRC8DP is head-to-head with the
device in question.
OPERATING THE REMOTE CONTROL
NORMAL OPERATION
(1) Select a device button.
(2) Press the appropriate storage button.
The LCD will display "EMPTY" if the storage key does not
contain any data.
OPERATION OF THE SPECIAL MULTI-CODE KEYS
(1) Select a device button.
(2) Press the special multi-code button once to activate the
function in the 1st memory location.
(3) Press again to activate the function in the 2nd location.
Press three times to transmit the data in the 3rd, etc. (max 5
memorised functions).
MACRO OPERATION
(1) Press the MACRO button. The LCD will show "MACRO ?"
and the user has to wait 2 seconds before entering the
desired macro number (0 - 9) or pressing the device button
in question.
VRC8DP
13
GB
IMPORTANT : When MACRO is pressed, the user should place
the unit head-to-head with the selected A/V
systems.
OTHER FUNCTIONS
CLEARING STORED DATA
When CLEAR is pressed, the LCD will show "CLEAR ?". There
are 3 ways of clearing stored data.
(a) Clearing a device bank - press a device button to clear all
data for a particular device.
(b) Clearing a storage key - press a storage button to clear the
memory of that key.
(c) Clearing a macro memory – press the MACRO button and
then 0 - 9 or a device button to clear a macro memory.
The unit will automatically exit the CLEARING MODE if no button
is pressed within 15 seconds.
KEY-TONE
Pressing the KEY-TONE button toggles between the
activation/deactivation of the key-tone function. The key-tone is
activated when the LCD displays the V\PERO
VRC8DP
14
GB
KEY AND LCD BACK LIGHTING
The VRC8DP is equipped with an automatic light sensing
function. When it is (getting) dark, the back light of the keys and
the LCD will come on for 6 seconds whenever the pad is used.
BATTERY-LOW DETECTION
Replace the batteries when the battery-low symbol is displayed.
Battery-low symbol
stays lit --- tells the user
that the batteries are low
and need to be
replaced. If the batteries
are low, the unit will still
operate but the KEY
BACK LIGHTING
function will be disabled
in order to save power.
Battery low symbol
flashes --- the unit will
lock all functions until
the batteries have been
replaced.
RESETTING THE VRC8DP
Press the RESET button to reset the unit. The RESET button
does not erase previously stored data, but the clock and the
calendar will have to be set again.
VRC8DP
15
GB