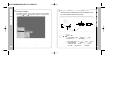
1
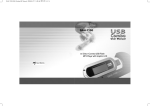
P/N : SAFF022M0GQ
User Manual
DAH-220
Cassette Tape Type MP3/WMA Player
Digital Voice Recorder / Direct Music Encoder
FM Radio & FM Recorder / Mass Storage Drive
Avoid exposure to direct sunlight or
heater. (High heat applied to the
product can damage it.)
Avoid places with high moisture or
dust level. (It can cause damage to
the product.)
Do not drop the product and avoid
any heavy inpact to the product. (It
may cause serious damage)
Don’t connect the product to the power
nor touch the product with wet hands.
(There is a risk of an electric shock.)
Safety Warnings and Cautions
Please be aware of these safety instructions and use the product
properly in order to prevent risks of injury or damages to the property.
Don’t wash the product with chemicals
or a detergent in order to protect the
outer surface paint from cracks or
deterioration.
Never disassemble, repair nor
rebuild. Contact to our A/S center if
the product is out of order.
listening to music at high volume for
long periods of time using headphones
may cause hearing problems.
We are not responsible for the loss of
data stored on the product due to
user’s carelessness (please backup
important data)
Sharing music without permition is
against copyright.
The earphone must be attached to a long
string, and when using such earphones, the
string must be let behind your neck.
Safety Warnings and Cautions
Safety Warnings and Cautions
Don’t wear the headset when
driving a car or riding a motorbike
or a bicycle.
When carrying the product in a
pocket with the batteries in place,
avoid contact with other metal items
such as coins or keys. as this may
cause fire.
Welcome to the World of Digital Audio
What is a Digital Audio Player?
Special Features of the Product
Product Specification
Hardware Descriptions
PC System Requirements and Accessories
Simple Use of the Player
How to Use?
1
2
3
5
6
7
8
Software
Software Installation
USB Cable Separation
File Download/Upload
Formatting
File Converting
OS Update
10
14
17
20
26
29
How to Use?
Charging Rechargeable Battery (AC/DC)
About Power Supply
Power On & Playing Music
32
33
35
Volume Control
Selecting Next & Previous Music
Voice Recording & Music Recording
FM Radio
Recording FM Radio
A-B Book marking feature
Using the Player with an Audio Deck
Using Removable Memory Card (MMC)
36
37
38
43
45
46
47
50
Services
Trouble shooting
Warranty Services
FCC RF INTERFERENCE STATEMENT
51
54
55
Contents
Contents
Product
Thank you for purchasing the MP3 Player, a cassette tape-shaped
portable digital audio player.
This product has been designed for you to enjoy high quality digital sound
with normal analog audio system without using any adapter or subsidiary
device. Memory capacity can be easily increased using a Multi Media Card
(MMC) along with a built-in memory. The product can be upgraded with the
new software whenever required and supports various formats (MP3,
WMA, ADP). Using the Mass Storage system the product can be
recognized directly by your PC without using any installation CD. Welcome
to the new World of Digital Audio!
What is a Digital Audio Player?
What is the MP3/WMA file?
MP3 stands for MPEG1-Layer3 and it uses a compression technology that converts
conventional CD music data into an MP3 file format that is used on a PC, at 1/12
compression ratio. It provides near CD-quality music at 128kbps.
CD Data
1/12
1/2
MP3 Data
WMA Data
What is a WMA file?
It is a multimedia compression method from Microsoft. The technology specifically
compresses music data from the window Media Technologies”. As it provides sound quality
equivalent to 128Kbps using only 64Kbps format, it takes only half as much space as MP3
file format for compressing music data.
What is a Digital Audio Player?
Welcome to the World of Digital Audio
Welcome to the World of Digital Audio
What is a Portable Digital Audio Player?
It is a portable device that stores and plays digital audio files, which once were only playable
on a PC.
Digital Audio
File
Digital Audio
File
Internet PC
Communication
Digital Audio Player
1
2
Cassette Tape-like Design
In addition to its self-playing function, the newly developed unique gear
mechanism in the product enables the same FF/ REW/ PLAY/ REC functions
as those of a normal cassette tape, like in-car or domestic audio systems.
Without connecting to a PC the product enables to record FM radio, CD or cassette tape
sounds in digital format while enjoying them. It is also very helpful for those who are
learning languages etc.
FM Radio Listening/Recording
Easy Memory Extension (Memory Extension Slot)
In the memory expansion slot, additional memory can be easily added. 32/64/128 MB
MMC are available.
The F.M Radio Recording feature, enables you to record directly from the On-board F.M
Radio. The stored recording can then be replayed via the player itself or your P.C.
Equalizer Function
Mass Storage Function
This function enables easy file upload/download as the PC recognize the product as a
“Removable disk” without requiring any software to be installed in the PC.
Multi Codec for Various Digital File
The product supports many of digital files including over 8kbps MP3, over 32kbps WMA
and ADPCM(Voico Recording) using the Multi Codec.
Firmware Upgrade
Additional functions or file formats can be available by updating the firmware through
internet.
Two-Touch Voice Recording (256MB-1040minutes)
TWO-touch (REC Ready – REC) manipulation activates the voice recording function with
a built-in high performance microphone.
3
MP3 Direct Encoding (Music Recording)
Using one of the built in equalizer settings :- Live, Dance, Jazz, Latin or Rock, You can enjoy
your music as applicable, or customise to your own music taste using the “User 1&2” settings.
Power-Save Mode and Auto Power On
This function is activated to save the battery power when the player is not in use. Auto Power
ON function starts when using with an audio deck.
Special Features of the Product
Special Features of the Product
Special Features of the Product
Repeat Function for Educational Purpose
The player supports the functions such as repeat for one track or all tracks, random play for
all items, high speed search (FF/REW: 4 - 8 - 16 - 32) and ranged repeat.
High Speed USB Transferring Rate: 4Mbps
With this USB interface, it takes only 8 seconds to download a MP3 file (approx. 4MB) at its
highest rate of 4Mbps.
4
Category
Item
Specification
External Memory(MMC) Slot
Volume Controller
FM Frequency Range 87.5MHz~108.0MHz
FM TUNER
Headphone output Max. 7mW (16 ) at max. volume
S/N
Antenna
Frequency Characteristics
Play/Stop/Pause/Power
LED
50dB
Headphone/earphone cord antenna
FF/REW
REC/ RPT A-B
20Hz ~ 20KHz
High Sensitivity Microphone
Headphone output
Audio
USB
Max. 7mW (16 ) at max. volume
S/N
90db
File type
MP3, WMA no DRM
Bit Rate
MP3: 8Kbps or higher
Download speed
4Mbps(USB Version 1.1)
File Support
Slide Switch (FM/MUSIC)
WMA: 32Kbps or higher
Recording time
Voice recording 1040 min. (based on 256MB,
when the recording MODE is 32kbps)
Max. play time
Approximately 8 hours
Operating temp. range
Dimensions(WxHxD)
Weight(without battery)
Battery
5
Hardware Descriptions
Hardware Descriptions
Product Specification
Product Specification
Battery Compartment Cover
Head Adjusting Switch (Rear)
-5 ~70
80 40 17.2mm (3.15” 1.58” 0.7”)
35g
1.2V Ni-MH Rechargeable
USB Port
Head
Earphone Port
6
You may use the player in the following methods;
1
1. Microsoft OS (Windows 98SE, ME, 2000, XP)
2. CD-ROM Drive
3. Pentium 200MHz or higher CPU
4. 32MB (64MB for Windows ME or 2000) or higher RAM
5. Available hard disk space of more than 128 MB
(Additional hard disk space is needed for storing music files)
6. Sound Card
7. USB Port
2
3
Accessories
4
Earphones
Portable
Case
instruction
manual
Encoder Cable
USB cable
AC Adapter
Software CD
1.2V Ni-MH
Rechargeable
Battery
5
Install the software CD included in the package to your PC.
Fully charge the battery for more than 2 and a half hours and insert it to the player.
Press and hold the PLAY button ( II for seconds to turn the power on.
(The blue LED blinks for 2 second and goes out)
Move the slide switch to “MUSIC” and press the PLAY button ( II) again but
shortly and the music plays. (Blue LED keeps blinking)
Simple Use of the Player
PC System Requirements and Accessories
Simple Use of the Player
PC System Requirements
PC system requirements for the player are as follows:
Connect the larger end of the USB cable to a USB port and the smaller end to the
player. On the PC screen it appears as a “Removable disk”.
After downloading MP3 or WMA files from the Internet or from a converted Audio
C.D onto your hard drive, transfer your chosen file(s) to the “removable disc” in the
Windows Explorer option on your P.C (drag and drop). And/or create “sub folders”
on the removable disc to segregate albums or artists.
Remote controller Cigar Jack Charger
(Optional)
(Optional)
The optional items may not be included depending on areas and markets.
7
8
7
After disconnecting the USB cable from the player, press PLAY button ( II) to turn
the power on. Press the Play button again to listen to your music. (Blue LED keeps
blinking)
Enjoy digital sound with an earphone or by inserting the player into an audio deck.
Please Note!
Push the earphone jack completely into the player
If the player does not start even when pressing The PLAY
( II) button with the slide switch in “MUSIC” position, press
the PLAY ( II) button. Remove and replace the battery By
doing this, the player may work correctly after rebooting itself.
Don’t use the player simultaneously with other USB
connections such as a digital camera or a scanner to prevent
any possible communication error.
Visit our webpage for more information.
Software Installation
Please Note!
With the Mass Storage Function of the player files can be
downloaded / uploaded without using any software
installed in the PC.
To update and format the player please follow below
procedure;
- When using Windows 98SE: Install the software from the CD before using the
player. (The PC can not recognize the player)
- When using Windows ME, 2000 and XP: Install the software to format the player.
Software Installation
Simple Use of the Player
6
software will automatically run showing language selection
1 The
box by inserting the CD to the PC. Click on OK after selecting the
language.
Click!
Click!
9
10
3
11
clicking the OK button, the window system will restart at the
4 By
completion of installation.
Click!
Click!
Click on NEXT after selecting a folder wherein the software will be
installed.
Click!
Click!
Software Installation
Software Installation
2 Click on NEXT.
Click!
Click!
of windows XP version the following box will appear when
5 Inthecase
window system restarts.
Click!
Click!
12
After installing the software, click on Convert or Format shortcut by selecting
indows Start Program DAH-220 Utility’ in sequent to run the program.
Connecting the Player to a PC using a USB Cable
Connect one end of a USB cable to one of the USB ports on the
PC, and connect the other end to the player.
Player USB Port
USB Cable Separation
Software Installation
5 Completion of Installation
USB Cable
PC USB Port
Caution
What’s USB?
This Universal Serial Bus technology has been newly
developed to connect a PC with peripheral devices.
In order to assure smooth operation of the product, connect
the USB cable directly to the USB port behind the PC.
Connecting the USB cable to the front-side USB port or
through USB hub may cause connection problems.
13
14
separating the USB cable from the PC, double
1 Before
click on the green arrow on the toolbar located at the
the message “Hardware Safe Removal”
3 When
appears, click on OK and disconnect the USB cable.
bottom right of the Windows screen.
Click!
Click!
When using Windows 98SE;
Double
DoubleClick!
Click!
the USB device to be separated and click on
2 Select
STOP and OK button.
If you can’t find the green
arrow on the right bottom of
the screen, run My Computer
or Explorer to select
“Removable disk” and use the
right button of the mouse to
select “Disconnect” to
disconnect the USB cable.
USB Cable Separation
USB Cable Separation
Separating the USB cable from the Player
Click!
Click!
Please Note!
Click!
Click!
15
Click!
Click!
If you disconnect the USB cable without following above procedures,
an error message will appear and it may cause a critical error to the
player.
The player may have a fatal error when disconnecting the USB cable
while downloading, uploading, formatting or OS updating.
16
Please Note!
on PASTE using the right button of the mouse in
2 Click
the Removable disk as shown on the figure.
This player also enables data (.jpg .xls .doc and etc) upload/download
as a portable storage disk.
In the root folder of the removable disk up to 256 files with less than 8
characters in their file names can be saved. There is no limit number of
files in the sub folder.
1 After connecting the USB cable, select a file to be
Click!
Click!
downloaded from the PC and click on COPY using the
right button of the mouse.
File Download/Upload
File Download/Upload
File Download/Upload
Please Note!
The player will be recognized as a “Removable disk” driver under
the “My Computer”.
Two Removable disks (Built-in Memory Disk/ Multi Media Card
Disk) will appear.
Click!
Click!
The blue LED will blink while transferring a file. Remove the USB
cable only after the LED stops blinking.
Never remove the USB cable during file transferring. This can
cause the, player or PC a fatal error.
17
18
Completion of Installation (For Windows XP)
Connect the player to the PC in its Recovery Mode.
To enable Recovery Mode;
Turn the power on
Formatting
File Download/Upload
saving has been completed in the player as
3 File
shown below.
Press VOL+ and FF buttons simultaneously for more than 2 seconds.
if the orange colored LED blinks, the player is in Recovery Mode.
1 The following wizard will appear. Please follow the
instructions.
Please Note!
By taking following the steps shown above, files can be saved from the
player to the PC.
Mouse Drag & Drop is enabled to upload/download the files.
Don’t delete or modify config.sys file (hidden) in the memory as the file is
a system file of the player.
19
Click!
Click!
20
wizard program has been completed. Click on
3 The
FINISH button.
Formatting
Formatting
Windows XP, the following message will appear.
2 For
Press CONTINUE button to keep on the process.
Click!
Click!
Click!
Click!
21
22
After connecting the player to the PC using a USB cable,
select and execute “DAH220 Utility Format” from
START PROGRAMS.
1 Click on ‘Start’ by selecting the function.
Verify the OS version that you’re currently using.
(Recovery Mode – See page 20)
Formatting
Formatting
Formatting the Internal Memory (recommended)
Click!
Click!
Click!
Click!
Caution!
Please note that formatting the player will delete all files.
23
2 Click on ‘OK’ on the validation box.
Click!
Click!
24
File Converting
Click on and execute CONVERT file by selecting START
PROGRAM DAH220 Utility CONVERT.
File Converting
Formatting
3 Format is in process.
Please Note!
Click!
Click!
A fatal error may occur if the USB cable is removed during
Memory Format.
has been completed.
4 Format
Click on OK button.
Please Note!
Click!
Click!
Click!
25
When converting ADP to WAV, save the file to
the PC first and proceed to convert using your PC
26
format (ADP
WAV, WAV
2 Select the folder where the files are to be saved.
File Converting
File Converting
1 Select the file to be converted after choosing the desired
ADP) to convert to.
Select the type to be
converted.
3 Starting file converting. Click on START button.
4 File conversion has
been completed.
Select the type to be
converted.
Click!
Click!
27
Click!
Click!
28
(Recovery Mode – See page 20)
Please Note!
OS Update
OS Update
2 Connect the USB cable to the PC while in Recovery Mode.
OS Update
Before starting the update check the following:
- Quit all the programs currently in operation.
- Disconnect any USB device from the PC.
1 Execute DAH220_xxxxxx.exe file which can be
downloaded from the website www.mobiBLU.com and
click on NEXT button.
Click the NEXT button once activated.
Click!
Click!
29
Click!
Click!
Click!
30
Charging Rechargeable Battery (AC/DC)
Charging battery with an AC adapter
- The Charger LED will go out when the battery is fully charged for 2-3 hours.
- When using the battery for the first time, fully charge the battery for more than
2 hours. NOTE:To ensure battery is completely re-charged, charge for a
further 30 minutes AFTER the led goes out.
- Disconnect the power cord when not using the adapter.
Note!
Click!
Click!
4 Once Completed, Click Finish to complete the update
- Not using the battery for more than one week, it can be
partly or entirely dis-charged.
- Charging the battery repeatedly without using its entire
capacity may cause short battery life. Approx 500 charges
are available for 1.2V Ni-MH rechargeable battery.
- The battery life may be reduced after a period of time.
- Don’t touch the charger with wet hands.
Charging Rechargeable Battery (AC/DC)
OS update
3 Click the NEXT button once activated.
Click!
Click!
31
32
1 Open the battery compartment cover by sliding it away
from the player.
2
Press and hold the PLAY ( II) to turn the power on. The
blue LED blinks for 2-3seconds and then goes out.
Playing Music
1 Play
Press the PLAY button again to play the file. The blue LED will blink.
Insert the batteries ensuring polarity is correct.
3 Push and close the cover.
2 Pause
Press the PLAY button again while a music is playing to pause the track. (LED
stops blinking)
Power On & Playing Music
About Power Supply
Power On
Inserting the Battery
In normal conditions, on AVARAGE, expect 7 hours play from each
battery charge. This varies according to use. When used in a cassette
deck, the battery life will reduce slightly.
Caution!
Inserting the batteries
incorrectly, may cause
damage to the product.
33
34
Stop
By pressing the PLAY ( II) button while playing music, the player pauses. By
pressing and holding the PLAY ( II) button once for longer seconds the player
turns off. (Blue LED turns on for 2-3 seconds and then off)
Volume Control
Adjust the volume using
the VOL +/- button on the
player.
Please Note!
If the player is idle for more than five minutes in pause or stop mode, the
player automatically turns off. (Auto Power-Save Mode)
To resume playback, press and hold the PLAY button, the player will
now resume from the point in the track where play stopped (RESUME
FUNCTION)
Auto Power Off
Volume Control
Power Off & Stop
Power Off/ Stop
- The volume can be adjusted in a range from Min (00) to Max (30).
- By pressing the button intermittently the volume is adjusted in steps.
- By pressing and holding the button down the volume levels are
continuously increased/decreased
Pause/Power-save Mode
By pressing the PLAY ( II) button for more than 5 seconds, or leaving the
player without use for more than 5 minutes, the player automatically switches
to Power-save mode.
When the slide switch is in the MUSIC position, press and hold PLAY ( II)
button and press again to start playing the file in the Power-save mode.
35
Please Note!
Turning the player off will save the last used volume
setting.
36
1 Searching a certain part
of a file
- Press and hold the FF/REW
button for a longer period to
search a certain part of the
music while it is playing.
- release the button to continue
play
1 Starting voice recording
By turning the power on, press
and hold REC/A-B button until
an orange LED turns on, and
press the button once more to
start the voice recording. Then
the orange LED will blink.
2 Searching a file in the play mode
- Press REW/FF button while the track is in playing to play the next track.
- Press REW button within five seconds from start of a track to play the previous
track from the beginning.
3 Searching a file in pause mode
- Press REW/FF button once shortly in pause status to search the file you
need by moving to the next/previous track.
37
Voice Recording
2 Voice recording stop
Press PLAY ( II) button to stop
the voice recording creating a
new voice file. (V001, V002,
V003…)
Voice Recording & Music Recording
Selecting Next & Previous Music
Selecting Next/Previous Music
38
Recording with an encoder cable
1 Turn the power on by
moving the slide switch
to MUSIC and press
REC/A-B button for
longer seconds to make
the player ready to
record with an orange
LED on.
2 Connect one end of the
encoder cable to an
earphone port of a normal
audio system. Connect
the other end to INPUT
AUDIO of the player.
3 Press and hold REC/A-B
button to start music
recording and the
orange LED will blink.
4 Press PLAY (
II) button
to stop the recording,
this will create a new
sound file. (E001, E002,
E003….)
Voice Recording & Music Recording
Voice Recording & Music Recording
Music Recording
Caution!
What is Loop Back Function?
39
This enables you to verify if the sound source is properly being
recorded with the earphone. It may make minor noises, however,
the noises will not be present on playback of the recording.
40
1
About Recorded File
Please Note!
Turn the power on after
switching the slide switch
to MUSIC.
2 Press and hold REC
button until the orange
LED turns on and insert
the player to the deck.
3 Continue the recording according to the key functions of
the audio deck.
Recorded voice will be saved as an ADPCM file with
the file extension of *.ADP.
Recorded music will be saved with the file extension of
*.MP3.
The process of voice recording will be automatically
stopped if the memory is full. The file is saved to the
point until it was stopped.
Removing the battery in the recording statues may
cause malfunctions. Saved file can not be played.
Recording volume is adjusted automatically without the
need for manual adjustment.
Sound quality may vary according to the distance
between the player and voice source.
Voice Recording & Music Recording
Voice Recording & Music Recording
Recording in an Audio Deck
4 At completion of the recording according to the key
functions of the audio deck a new sound file is created.
(E001, E002, E003,.. )
41
42
Move the slide switch on the
upper side of the player to
FM and press PLAY ( II)
button once shortly to turn
on the FM radio.
1 FM Listen / Stop
- Move the slide switch to FM to initialize the player with a pink LED blinking for
2-3 seconds. (Pause Status) Press PLAY ( II) button once shortly in the
pause status to turn on the FM radio with a pink LED blinking.
- Press and hold PLAY ( II) button for longer seconds to turn off the radio.
2 Searching Frequencies Manually
- You can search frequencies you
desire by pushing the REW/FF
button shortly.
FM Radio
FM Radio
FM Radio
3 Searching Frequencies
Automatically
- You can search frequencies
automatically by pushing and
holding REW/FF button for
longer seconds. While
searching a frequency the pink
LED blinks frequently.
4 Press REC (
) button to select the frequencies which has
been saved by free-set function. (This can be only set after
connecting with the LCD remote controller)
Note!
What’s Free-Set Function?
43
- Saving frequencies
- Up to twenty frequencies can be saved.
- Mono/Stereo modes are selected automatically.
44
1 Press the REC (
) button
while listening to the radio.
(Orange LED turns on)
- Press the button again to start the
recording the orange LED will blink.
- The FM sound resource you’re
currently listening to will be
recorded as a MP3 file.
2 Press PLAY (
II)) after
recording the sound
source.
- Then the recording stops creating
a file.
- Files will be saved as E001,
E002,… in sequence. When the
memory gets full of files, it stops
automatically.
45
A – B BOOKMARKING FEATURE
1 When you press the
REC/A-B ( ) button once
shortly while a file is
playing in MUSIC mode,
the range ‘A’ is set with
the orange LED blinking
once.
2 After 3 seconds or longer, press the REC button again to
Setting Ranged Repeat
Recording FM Radio
Recording FM Radio
set the range ‘B’ with the orange LED blinking once, and
the player will repeat the range A-B. If ‘B’ is not set, the
end of the music will be set as B position by default.
3 Pressing the REC/A-B button in ranged repeat play will
release the REPEAT MODE.
46
the deck for more than 4
seconds for fast
forward/rewind.
1 Insert the player in the direction of the arrow (
Selecting a file from the deck
) marked
on the front side of the player.
Please Note!
Check if the play direction of the audio deck is ( ).
If the play direction is ( ) change the direction by
pressing PLAY button on the deck.
1
Press REW/FF button on the audio deck for less than 4
seconds and press PLAY to move to next/previous song.
Using the Player with an Audio Deck
Using the Player with an Audio Deck
2 Press REW/FF button on
Playing the Player in an Audio Deck
2 Press REW/FF button on the deck for more than 4
seconds for fast forward/backward.
47
48
The volume can be controlled by the volume controller
mounted on the deck. The volumes may vary as the files
have been converted with different volumes.
Note!
Power-save mode when playing in the audio deck
The player will be in power-save mode while it is not being used for
more than five minutes.
To use the player again in the audio deck press PLAY button on the
deck.
Auto Power On Function
You don’t need to turn the power on after pulling the player out.
1
You can extend the memory
easily by using removable
Multi Media Cards (MMC).
2 The memory can be damaged
if inserting or removing the
MMC from the player when
the player is on. Turn the
power off to insert or remove
the MMC.
3 Make sure the MMC card is inserted correctly into the
player.
RESUME Function
The player plays a track from the point where it was stopped.
Caution : Please get your player out of the deck before stopping car
engine.If you do not use the player in the deck for long, it
may not work again due to low battery.In this case, slimply
take it out and exchange the battery with a charged one.
49
Using Removable Memory Card (MMC)
Note!
- Always use the MMC cover enclosed in the package to protect
the card slot from any internal damage when the card is not in
use.
- External memory cards are available at our website or shops.
Using Removable Memory Card (MMC)
Using the Player with an Audio Deck
Controlling Volume from the Deck
50
The player is not working.
Can not turn the power on or play a file
Check if the battery is flat.
- Reinsert the battery.
- Check the polarity of the battery
- Execute OS update or format after connecting to the PC.
- Check if the slide switch is in MUSIC position
- Check the polarity of the battery
- Check if the battery is flat.
- Reinsert the battery.
Cannot download a file
- Check the USB connection
“PLAY” is not working.
- Check available memory capacity
- Check if the slide switch is in MUSIC position
- Check if the battery is flat.
- Check the polarity of the battery
- Check the polarity of the battery
Troubleshooting
Troubleshooting
TROUBLESHOOTING
- Check if the battery is flat.
- Check if the player was properly inserted into an audio deck
Can not listen to the music properly or there are noises
- Check the play direction of the audio deck.
- Push the earphone jack completely into the port
- When using a MMC check if it is properly mounted in the slot.
- Check if there is any foreign material on/in the jack/port
- Check the polarity of the battery
- Check if the file has been damaged
- Check the volume
Cannot Connect to the PC
Can not listen to FM radio properly
- Check if the battery is flat.
- Check the earphone connection. The earphone acts as the antenna.
- Check the USB connection
- Change the direction of the player and earphone. Keep the player away from
any other electrical product.
- Reinstall the software CD if you are using Windows 98SE.
51
52
- Check the USB connection
- Reinstall the software CD
Warranty Services
Customers are entitled to warranty service for a period of one year from the
date of purchase. Warranty service does not apply to defects resulting from
customer fault or acts of God.
Bad sound quality when playing with an audio deck
Non-warranty service shall apply to defects resulting from :
- Adjust the position of the head using the headcrontrol switch on the
player.
1. Infiltration of foreign matter, such as water, liquid, or sand.
2. Breakage due to dropping or severe impact.
3. Damage to or deformation of the outer case caused by
organic solvents, such as benzene.
4. Use of parts other than those certified by the manufacturer.
5. Loss or breakage of any parts or components caused by
unauthorized disassembly.
6. Repair or modification done by any persons other than
manufacturer authorized personnel.
7. Acts of God, such as lightning, storm or flood.
8. Purchase from unauthorized retailers.
- Change the play direction by pressing AUTO-REVERSE.
How to upgrade the memory?
- The built in flash memory sizes are varied. Including 128, 256 and
512MB.
- You may easily buy MMC a card (32/64/128MB) in a shop or a
website and mount the card into the slot of the player to extend the
memory.
- turn off the power to insert/remove the card.
Warranty Services
Troubleshooting
The player is not recognized as a “Removable Disk” in
the Windows Explorer.
For more warranty information and RMA service,
please visit the our web site at http//:www.hyunwon.com.
Can not use the MMC
- If the message “Please format the MMC” appears when using the
MMC, connect the player to a PC to upload the files from the MMC
,and format the memory. (if the files are not uploaded, they will be
lost during formatting)
53
54
This equipment has been tested and found to comply with the limits for a Class B
digital device, pursuant to Part 15 of the FCC Rules. These limits are designed to
provide reasonable protection against harmful interference in a residential
installation.
This equipment generates, uses and can radiate radio frequency energy and, if
not installed and used in accordance with the instructions, may cause harmful
interference to radio communications. However, there is no guarantee that
interference will not occur in a particular installation.
If this equipment does cause harmful interference to radio or television reception
which can be determined by turning the equipment off and on, the user is
encouraged to try to correct the interference by one or more of the following
measures.
- Reorient or relocate the receiving antenna.
- Increase the separation between the equipment and receiver.
- Connect the equipment into an outlet on a circuit different from that to which
the receiver is connected.
- Consult the dealer or an experienced radio, TV technical for help.
- Only shielded interface cable should be used.
Finally, any changes or modifications to the equipment by the user not expressly
approved by the grantee or manufacturer could void the users authority to operate
such equipment.
Memo
FCC RF INTERFERENCE STATEMENT
Note
CAUTION
Changes or modifications not expressly approved by the party responsible for compliance
could void the user's authority to operate the equipment.
THIS DEVICE COMPLIES WITH PART 15 OF THE FCC RULES. OPERATION IS SUBJECT TO
THE FOLLOWING TWO CONDITIONS: (1) THIS DEVICE MAY NOT CAUSE HARMFUL
INTERFERENCE, AND (2) THIS DEVICE MUST ACCEPT ANY INTERFERENCE RECEIVED
INCLUDING INTERFERENCE THAT MAY CAUSE UNDESIRED OPERATION.
55
56
Memo
WARRANTY FORM
Warranty Term: 1 year from the date of purchase Product
Model :
Date of Purchase :
Name of purchaser :
Address :
Place Purchased :
Address :
(month)
(day)
Phone Number :
(year)
Phone Number :
Hyunwon Incorporated
You need to show this Warranty Certificate with the date of purchase when
requesting service, in order to receive satisfactory services. Please keep the
Warranty Certificate in a safe place.
1. The warranty service on this product is provided based on the information
contained in the Warranty Certificate.
2. The warranty service takes effect from the date of purchase, so please make
sure you enter the date of purchase on the Warranty Certificate at the time of
purchase. (If the date of purchase cannot be verified, the date 6 months from the
date of manufacturing will be use instead.)
3. This Warranty Certificate is not reissued.
The exterior or dimensions are subject to change without prior notice to the
customer in order to improve the product quality.
57