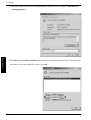
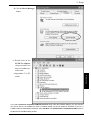
1
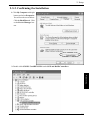
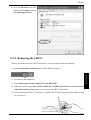
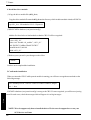
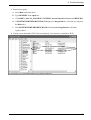
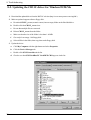
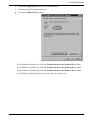
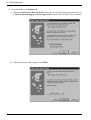
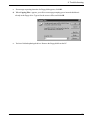
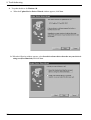
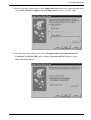
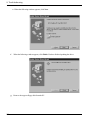
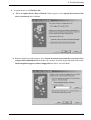
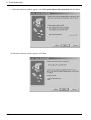
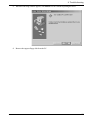
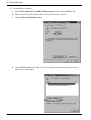
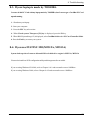
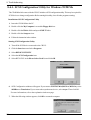
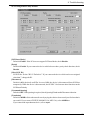
Ultra SCSI (FAST-20) CardBus PC Card
CB31U
User’s Guide
March 2005
Rev. 4.0
CB31U
1. Introduction..................................................................................1
1-1. Package Confirmation ............................................................................................................... 1
1-2. System Requirements ............................................................................................................... 1
2. Setup..............................................................................................2
2-1. Windows 95 Setup ..................................................................................................................... 3
2-2. Windows 98 Setup ................................................................................................................... 10
2-3. Windows Me Setup ................................................................................................................. 19
2-4. Windows 2000 Setup .............................................................................................................. 24
2-5. Windows Xp Setup .................................................................................................................. 36
3. Using SCSI devices .....................................................................48
3-1. Connecting the SCSI device ................................................................................................... 48
3-2. Confirming SCSI device Connection ...................................................................................... 50
4. SCSI Format Utility ...................................................................51
5. Installing Windows 95/98/Me ...................................................54
5-1. Making a startup floppy disk with utility ............................................................................... 54
5-2. Making a Windows 95 startup floppy disk ............................................................................. 56
5-3. Making a Windows 98 startup floppy disk ............................................................................. 57
6. Installing Windows 2000 ...........................................................62
6-1. Upgrade Windows 98, Windows NT to Windows 2000 .......................................................... 62
6-2. Install a new copy of Windows 2000 ....................................................................................... 63
6-3. Install Windows 2000, using Windows 95/98 startup disk .................................................... 63
7. Linux ...........................................................................................64
7-1. How to install the driver for Linux .......................................................................................... 64
7-2. SCSI Configuration Utility for Linux:asccong ...................................................................... 67
8. Troubleshooting..........................................................................70
9. Registration and Tech-Support................................................ 98
10. Options ......................................................................................99
11. Specifications ..........................................................................100
1. Introduction
1. Introduction
This User’s Guide describes how to install, use, and troubleshoot the RATOC CB31U Ultra SCSI CardBus PC
Card(called CB31U in this User’s Guide).
1-1. Package Confirmation
Check package contents:
• CB31 Ultra SCSI CardBus PC Card
• CB31 setup CD-ROM 1, floppy disk 1
• CB31U startup guide
• High-Density 50-pin cable
NOTE
If any of these items are missing from the CB31U retail package, contact your supplier
immediately.
1-2. System Requirements
•
•
PC with a CardBus slot
Windows 95B / Windows 95C / Windows 98 / Windows98 SE (Second Edition)
Windows Xp / Windows 2000 / Windows Me (Millennium Edition)
NOTE
If the version of your Windows 95 is 4.00.950 or 4.00.950 A, you can not use the CB31U.
1
2. Setup
2. Setup
When you use Windows 95, go to Chapter 2-1.
When you use Windows 98, go to Chapter 2-2.
When you use Windows Me, go to Chapter 2-3.
When you use Windows 2000, go to Chapter 2-4.
When you use Windows Xp, go to Chapter 2-5.
Restrictions
• At least one SCSI device must supply termination power to the SCSI bus. Read the SCSI device
manual if you are not sure whether the SCSI device provides termination power. But, there is an exception.
You can connect Iomega Zip drive to the CB31U, though the Zip drive can not provide termination
power.
• You can not boot up system from a SCSI device connected to the CB31U. Do not install Operating
System into a SCSI device connected to the CB31U because you can not boot up system from it.
• You can not format a HDD, Jaz, Zip drive connected to the CB31U with FDISK command. And you
can not use software using DISK-BIOS(INT 13h). If you want to format and create partition, use our
SCSI utility. Refer to Chapter 4.
• Do not enable virtual memory setting for a HDD, Jaz, Zip drive connected to the CB31U.
• The CB31U does not support DOS mode of Windows 98/95.
• The total length of cabling on the SCSI bus should not exceed 5ft(1.5m).
• It is not recommended that you connect more than two SCSI devices in daisy-chain.
• If your PC has only one PC card slot which is connected to a floppy disk drive, you have to copy the
files in the floppy disk supplied from us onto your HDD before you set up the CB31U.
• Do not turn off your SCSI device connected to the CB31U when you have the PC in suspend(resume).
If you want to have the PC in suspend mode, remove the CB31U from the PC.
2
2. Setup
2-1. Windows 95 Setup
Windows95
Here’s how to get started with the CB31U and SCSI devices on Windows 95:
1. Check the restrictions before you install the CB31U.
2. Install the CB31U into the PC. Refer to Chapter 2-1-1.
3. Confirm the installation. Refer to Chapter 2-1-2.
4. Remove the CB31U from the PC. Refer to Chapter 2-1-3.
5. Connect the CB31U to the PC. Refer to Chapter 3-1.
6. Confirm the SCSI connection. Refer to Chapter 3-2.
2-1-1. Installing the CB31U on Windows 95
1. Check your Version of Windows 95.
a. Click My Computer with the right button.
b. Select Properties. You will see the System Properties window below.
c. Click the General tab.
d. If you can find 4.00.950 B or 4.00.950 C, you can use the CB31U.
NOTE
If the version of your Windows 95 is 4.00.950 or 4.00.950 A, you can not use the CB31U.
3
2. Setup
2. Check to see if your PCMCIA Controller supports CardBus PC Cards.
Windows95
a. In the System Properties window shown above, click the Device Manager tab.
b. Double-click on the PCMCIA socket string and make sure there is a CardBus controller
name string without “!” or “X” marks.
NOTE
If a CardBus controller name string does not appear, or if it appears with a “!” or “X” mark next
to it, enable the CardBus controller with PC Card (PCMCIA) Wizard. For more information,
please contact your PC manufacturer.
If you find a PCIC or compatible PCMCIA controller string under the PCMCIA socket, your PC
Card slot may not be able to use CardBus PC Card or CardBus setting may be set disable in the
BIOS of your PC. If CardBus setting is disable in the BIOS, select CardBus from Disable/PCIC
Compatible/CardBus option in the BIOS to set CardBus setting enable.
4
2. Setup
c. Double-click the CardBus controller name string to show the property window. If This device is
Windows95
working properly appears under the Device status, you can use the CB31U.
3. Grasp the CB31U by the edges with the label facing upward. Insert the CB31U into the slot and push it in
until it is firmly seated. If the CB31U can not be firmly seated, check to see if the PC Card slot supports
CardBus PC Cards. If the following window do not appear, the PC may not support CardBus PC
Cards. For more information, contact your PC manufacturer.
5
2. Setup
Windows95
4. When the Update Device Driver Wizard Window Appears
a. When the Update Device Driver Wizard window appears, insert the CD-ROM or the floppy disk
included in this package and click Next.
b. When SCSI CardBus PC Card REX CB31 appears in the window, click Finish.
6
2. Setup
c. If a message requesting insertion of a floppy disk appears, click OK.
e. Wait until the PC Card (PCMCIA) icon appears on the Windows taskbar. This icon indicates that
the CB31U is recognized.
f. Remove the floppy disk or the CD-ROM from the PC.
7
Windows95
d. When Copying Files... appears, you will see a message prompting you to insert the setup disk. Then
type a:\ as floppy drive letter or type CD-ROM drive letter for the source of files and click OK.
2. Setup
Windows95
2-1-2. Confirming the Installation
1. Click My Computer with the right button.
2. Select Properties. You will see the System Properties window below.
3. Click the Device Manager tab.
4. Double-click SCSI Controllers in the list.
5. Make sure there is a SCSI CardBus PC Card REX CB31 string without “!” or “X” marks.
6. Double-click the SCSI CardBus PC Card REX CB31 string to show the property window.
8
2. Setup
2-1-3. Removing the CB31U
When you want to remove the CB31U from the PC, you have to follow these steps through.
1. Click the PC Card icon on the Windows taskbar.
2. You will see the message saying Stop REX CB31.
3. Select Stop SCSI CardBus PC Card REX CB31.
4. When the window saying You may safely remove this device appears, you can remove the
CB31U from the PC.
5. Press an eject button of the PC Card slot (1). Grasp the CB31U by the edge and pull it straight out
of the PC Card slot (2).
9
Windows95
7. Click on the General tab. If This Device is working properly appears under Device status, you
installed the CB31U driver correctly.
2. Setup
Windows95
2-2. Windows 98 Setup
Here’s how to get started with the CB31U and SCSI devices on Windows 98:
1. Check the restrictions before you install the CB31U.
2. Install the CB31U into the PC. Refer to Chapter 2-2-1.
3. Confirm the installation. Refer to Chapter 2-2-2.
4. Remove the CB31U from the PC. Refer to Chapter 2-2-3.
5. Connect the CB31U to the PC. Refer to Chapter 3-1.
6. Confirm the SCSI connection. Refer to Chapter 3-2.
2-2-1. Installing the CB31U on Windows 98
1. Check to see if your PCMCIA Controller supports CardBus PC Cards.
a. Click My Computer with the right button.
b. Select Properties. You will see the System Properties window below.
c. Click the Device Manager tab.
d. Double-click on the PCMCIA socket string and make sure there is a CardBus controller name
string without “!” or “X” marks.
NOTE
If a CardBus controller name string does not appear, or if it appears with a “!” or “X” mark next
to it, enable the CardBus controller with PC Card (PCMCIA) Wizard. For more information,
please contact your PC manufacturer.
10
2. Setup
If you find a PCIC or compatible PCMCIA controller string under the PCMCIA socket, your
PC Card slot may not be able to use CardBus PC Card or CardBus setting may be set disable in
the BIOS of your PC. If CardBus setting is disable in the BIOS, select CardBus from Disable/
PCIC Compatible/CardBus option in the BIOS to set CardBus setting enable.
working properly appears under the Device status, you can use the CB31U.
2. Grasp the CB31U by the edges with the label facing upward. Insert the CB31U into the slot and push it in
until it is firmly seated. If the CB31U can not be firmly seated, check to see if the PC Card slot supports
CardBus PC Cards. If the following windows do not appear, the PC may not support CardBus PC
Cards. Check to see if the PC Card slot supports CardBus PC Cards. For more information, contact
your PC manufacturer.
11
Windows98
e. Double-click the CardBus controller name string to show the property windows. If This device is
2. Setup
3. When the Add New Hardware Wizard Window Appears
Windows98
a. When the Add New Hardware Wizard window appears, insert the floppy disk or the CD-ROM
included in this package and click Next.
b. When the following window appears, select Search for the best driver for your device
(Recommended) and click Next.
12
2. Setup
c. When the following window appears, check Floppy disk drives or CD-ROM drive and click Next.
Windows98
d. When the following window appears, select The updated driver (Recommended)
SCSI CardBus PC Card REX CB31 and click Next.
If AdvanSys PCI SCSI Host Adapter appears instead of SCSI CardBus PC Card REX CB31
under The updated driver (Recommended), see When you select One of the other drivers.
13
2. Setup
Windows98
e. When the following window appears, click Next.
f. When the following window appears, click Finish.
g. Wait until the PC Card (PCMCIA) icon appears on the Windows taskbar. This icon indicates that
the CB31U is recognized.
h. Remove the floppy disk from the PC.
14
2. Setup
When you select one of the other drivers.
If AdvanSys PCI SCSI Host Adapter appears instead of SCSI CardBus PC Card REX CB31
under The updated driver (Recommended) at step d. in 3., you have to select one of the other drivers.
Windows98
1. Select One of the other drivers. Click the View List button.
2. Select SCSI CardBus PC Card REX CB31.
15
2. Setup
Windows98
3. SCSI CardBus PC Card REX CB31 will appear. Click Next.
4. You will see the following
window. Click Next.
5. You will see the following
window. Click Finish.
16
2. Setup
2-2-2. Confirming the Installation
1. Click My Computer with the right button.
2. Select Properties. You will see the System Properties window below.
Windows98
3. Click the Device Manager tab.
4. Double-click SCSI Controllers in the list.
5. Make sure there is a SCSI CardBus PC Card REX CB31 string without “!” or “X” marks.
6. Double-click the SCSI CardBus PC Card REX CB31 string to show the property window.
17
2. Setup
Windows98
7. Click on the General tab. If This Device is working properly appears under Device status, you
installed the CB31U driver correctly.
2-2-3. Removing the CB31U
When you want to remove the CB31U from the PC, you have to follow these steps through.
1. Click the PC Card icon on the Windows taskbar.
2. You will see the message saying Stop REX CB31.
3. Select Stop SCSI CardBus PC Card REX CB31.
4. When the window saying You may safely remove this device appears, you can remove the
CB31U from the PC.
5. Press an eject button of the PC Card slot (1). Grasp the CB31U by the edge and pull it straight out
of the PC Card slot (2).
18
2. Setup
2-3. Windows Me Setup
Here’s how to get started with the CB31U and SCSI devices on Windows Me:
1. Check the restrictions before you install the CB31U.
2. Install the CB31U into the PC. Refer to Chapter 2-3-1.
3. Confirm the installation. Refer to Chapter 2-3-2.
4. Remove the CB31U from the PC. Refer to Chapter 2-3-3.
5. Connect the CB31U to the PC. Refer to Chapter 3-1.
6. Confirm the SCSI connection. Refer to Chapter 3-2.
2-3-1. Installing the CB31U on Windows Me
Windows Me
1. Check to see if your PCMCIA Controller supports CardBus PC Cards.
a. Click My Computer with the right button.
b. Select Properties. You will see the System Properties window below.
c. Click the Device Manager tab.
d. Double-click on the PCMCIA socket string and make sure there is a CardBus controller name
string without “!” or “X” marks.
If you find a PCIC or compatible PCMCIA controller string under the PCMCIA socket, your PC
Card slot may not be able to use CardBus PC Card or CardBus setting may be set disable in the
BIOS of your PC. If CardBus setting is set disable in the BIOS, select CardBus from Disable/PCIC
Compatible/CardBus option in the BIOS to set CardBus setting enable.
19
2. Setup
e. Double-click the CardBus controller name string to show the property windows. If This device is
Windows Me
working properly appears under the Device status, you can use the CB31U.
2. Grasp the CB31U by the edges with the label facing upward. Insert the CB31U into the slot and push it in
until it is firmly seated. If the CB31U can not be firmly seated, check to see if the PC Card slot supports
CardBus PC Cards. If the following windows do not appear, the PC may not support CardBus PC
Cards. Check to see if the PC Card slot supports CardBus PC Cards. For more information, contact
your PC manufacturer.
20
2. Setup
3. When the Add New Hardware Wizard Window Appears
a. When the Add New Hardware Wizard window appears, insert the floppy disk or the CD-ROM
included in this package and select Automatic search for a better driver(Recommended).
Click Next.
Windows Me
b. When the following window appears, click Finish.
c. Wait until the PC Card (PCMCIA) icon appears on the Windows taskbar. This icon indicates that
the CB31U is recognized.
d. Remove the floppy disk from the PC.
21
2. Setup
2-3-2. Confirming the Installation
1. Click My Computer with the right button.
2. Select Properties. You will see the System Properties window below.
Windows Me
3. Click the Device Manager tab.
4. Double-click SCSI Controllers in the list.
5. Make sure there is a SCSI CardBus PC Card REX CB31 string without “!” or “X” marks.
6. Double-click the SCSI CardBus PC Card REX CB31 string to show the property window.
22
2. Setup
7. Click on the General tab. If This Device is working properly appears under Device status, you
installed the CB31U driver correctly.
Windows Me
2-3-3. Removing the CB31U
When you want to remove the CB31U from the PC, you have to follow these steps through.
1. Click the PC Card icon on the Windows taskbar.
2. You will see the message saying Stop REX CB31.
3. Select Stop SCSI CardBus PC Card REX CB31.
4. When the window saying You may safely remove this device appears, you can remove the
CB31U from the PC.
5. Press an eject button of the PC Card slot (1). Grasp the CB31U by the edge and pull it straight out
of the PC Card slot (2).
23
2. Setup
2-4. Windows 2000 Setup
Here’s how to get started with the CB31U and SCSI devices on Windows 2000:
1. Check the restrictions before you install the CB31U.
2. Install the CB31U into the PC. Refer to Chapter 2-4-1.
3. Confirm the installation. Refer to Chapter 2-4-2.
4. Remove the CB31U from the PC. Refer to Chapter 2-4-3.
5. Connect the CB31U to the PC. Refer to Chapter 3-1.
6. Confirm the SCSI connection. Refer to Chapter 3-2.
2-4-1. Installing the CB31U on Windows 2000
1. Check to see if your PCMCIA Controller supports CardBus PC Cards.
a. Click My Computer with the right button.
b. Select Properties. You will see the System Properties window below.
Windows2000
c. Click the Hardware tab.
24
2. Setup
d. Click the Device Manager button.
e. Double-click on the PCMCIA adapters string and make sure there is a CardBus controller name
string without “!” or “X” marks.
Windows2000
If you find a Intel PCIC compatible PCMCIA controller string under the PCMCIA adapter, your
PC Card slot may not be able to use CardBus PC Card or CardBus setting may be set disable in the
BIOS of your PC. If CardBus setting is set disable in the BIOS, select CardBus from Disable/PCIC
Compatible/CardBus option in the BIOS to set CardBus setting enable.
25
2. Setup
f. Double-click the CardBus controller name string to show the property windows. If This device is
Windows2000
working properly appears under the Device status, you can use the CB31U.
2.Grasp the CB31U by the edges with the label facing upward. Insert the CB31U into the slot and push it in
until it is firmly seated. If the CB31U can not be firmly seated, check to see if the PC Card slot supports
CardBus PC Cards. If the following windows do not appear, the PC may not support CardBus PC Cards.
Check to see if the PC Card slot supports CardBus PC Cards. For more information, contact your PC
manufacturer.
3. You will see the screen below.If
this screen will not appear, restart
your PC.
26
2. Setup
4. You will see the screen
below.Click Yes to restart.
5. Click My Computer with right button and select Properties.You will
see the screen below.
Click the HardWare tab. And click
on the Device Manager button.
27
Windows2000
6. Double-click on the SCSI and RAID controllers and find a Advansys SCSI Host Adapter string.
Double-click the Advansys SCSI Host Adapter string.
2. Setup
Windows2000
7. You wll see the screen below. You will find This device is working properly under the Device status.
If Device status is error,click the Troubleshooting button.
8. Click Driver tab.You will see the screen below.Click the Update Driver button.
28
2. Setup
9.You will see the screen
below.Click Next.
10.You will see the screen below. Check “Search for a
suitable driver for my
device(Recommended)
” and click Next.
Windows2000
11.You will see the screen below. Insert the floppy disk
or the CD-ROM included
in this package.
Check “Floppy disk
drives” or “CD-ROM
drive”and click Next.
29
2. Setup
Windows2000
12.You will see the screen below.Click Next.
13.You will see the screen below. Ignore this message and just click Yes .
30
2. Setup
14.You will see the screen below. Remove the floppy disk and click Finish.
15.Click the Driver tab on the SCSI PC Card REX CB31 WIN2000 Properties window.
You can find a SCSI PC Card REX CB31 WIN2000 string. After that, click OK.
Windows2000
31
2. Setup
16. If you find a SCSI PC Card REX CB31 WIN2000 string under the SCSI and RAID controllers in
the Device Manager, the CB31U is recognized.
17. Wait until the PC Card (PCMCIA) icon appears on the Windows taskbar. This icon indicates that
Windows2000
the CB31U is recognized.
18. Remove the floppy disk from the PC.
32
2. Setup
2-4-2. Confirming the Installation
1.Click My Computer with right button and select Properties.You will see the screen below.
Click the HardWare tab. Click on the Device Manager button.
Windows2000
2.You will see the screen below.Double-click the SCSI PC Card REX CB31 Win2000 string.
33
2. Setup
Windows2000
3. You will see the screen below.Click the General tab.Make sure Device status is “This device is
working properly. ”.
4.Click Driver tab and Driver details button on the previous window shown at step 3.. You will see the
screen below. You can find the File version. Click OK.
34
2. Setup
5.Click the Resources tab and Make
sure Conflicting device list is No
conflict.
2-4-3. Removing the CB31U
Windows2000
When you want to remove the CB31U from the PC, you have to follow these steps through.
1. Click the PC Card icon on the Windows taskbar.
2. You will see the message saying Stop REX CB31.
3. Select Stop SCSI CardBus PC Card REX CB31.
4. When the window saying You may safely remove this device appears, you can remove the CB31U
from the PC.
5. Press an eject button of the PC Card slot (1). Grasp the CB31U by the edge and pull it straight out of the
PC Card slot (2).
35
2. Setup
2-5. Windows Xp Setup
Here’s how to get started with the CB31U and SCSI devices on Windows Xp:
1. Check the restrictions before you install the CB31U.
2. Install the CB31U into the PC. Refer to Chapter 2-5-1.
3. Confirm the installation. Refer to Chapter 2-5-2.
4. Remove the CB31U from the PC. Refer to Chapter 2-5-3.
5. Connect the CB31U to the PC. Refer to Chapter 3-1.
6. Confirm the SCSI connection. Refer to Chapter 3-2.
2-5-1. Installing the CB31U on Windows Xp
1. Check to see if your PCMCIA Controller supports CardBus PC Cards.
a. Click My Computer with the right button.
b. Select Properties. You will see the System Properties window below.
WindowsXp
c. Click the Hardware tab.
36
2. Setup
d. Click the Device Manager
button.
e. Double-click on the
PCMCIA adapters
string and make sure
there is a CardBus controller name
WindowsXp
string without “!” or “X”
marks.
If you find a Intel PCIC compatible PCMCIA controller string under the PCMCIA adapter, your PC Card slot
may not be able to use CardBus PC Card or CardBus setting may be set disable in the BIOS of your PC. If
CardBus setting is set disable in the BIOS, select CardBus from Disable/PCIC Compatible/CardBus option in
the BIOS to set CardBus setting enable.
37
2. Setup
f. Double-click the CardBus controller name string to show the property windows. If This device is
working properly appears under the Device status, you can use the CB31U.
WindowsXp
2.Grasp the CB31U by the edges with the label facing upward. Insert the CB31U into the slot and push it in
until it is firmly seated. If the CB31U can not be firmly seated, check to see if the PC Card slot supports
CardBus PC Cards. If the following windows do not appear, the PC may not support CardBus PC Cards.
Check to see if the PC Card slot supports CardBus PC Cards. For more information, contact your PC
manufacturer.
3. The driver included in Windows Xp will be installed automatically.
38
2. Setup
4. Click My Computer with right button and select Properties. You will see the screen below. Click the
HardWare tab. And click on the Device Manager button.
5. Double-click on the SCSI and RAID controllers and find a Advansys SCSI Host Adapter string.
Double-click the Advansys SCSI Host Adapter string.
WindowsXp
39
2. Setup
6. You will see the screen below. You will find This device is working properly under the Device status.
If Device status is error, click the Troubleshooting button.
WindowsXp
7. Click Driver tab. You will see the screen below. Click the Update Driver button.
40
2. Setup
8. Select Install from a list or specific location and click Next.
9. Select Don’t search. I will
choose the driver to install and
click Next.
WindowsXp
10. Insert the floppy disk or the
CD-ROM included in this
package. Click Have
Disk button.
41
2. Setup
11. Type CD-ROM drive letter.
(Type A:\, if you insert floppy
disk.) and click Next.
WindowsXp
12. Click Next.
13. Click Continue Anyway on this
screen.
42
2. Setup
14. You will see the screen below. Take out the floppy disk or the CD-ROM and click Finish.
15. Click the Driver tab and make sure if SCSI PC Card REX CB31 is shown. Click OK.
WindowsXp
43
2. Setup
WindowsXp
16. If you find a SCSI PC Card REX CB31 under the SCSI and RAID controllers on the Device
Manager, the CB31U is recognized.
44
2. Setup
2-5-2. Confirming the Installation
1. Click My Computer with right
button and select Properties.
You will see the screen below.
Click the HardWare tab. Click
on the Device Manager button.
2. Double click SCSI PC Card REX CB31 under SCSI and RAID Controllers.
WindowsXp
45
2. Setup
3. Click the General tab. Make sure
Device status says “This device
is working properly. ”.
WindowsXp
4. Click Driver tab and Driver details button. You can find the driver version. Click OK.
46
2. Setup
5. Click the Resources tab and
Make sure No conflict is shown
at Conflicting device list.
2-5-3. Removing the CB31U
When you want to remove the CB31U from the PC, you have to follow these steps through.
1. Click the Safely Remove Hardware icon on the Windows taskbar.
WindowsXp
2. You will see a list of hardware.
3. Select Safely remove SCSI CardBus PC Card REX CB31.
4. When the window saying The “SCSI CardBus PC Card REX CB31”device can now be safely
removed from the system appears, you can remove the CB31U from the PC.
5. Press an eject button of the PC Card slot (1). Grasp the CB31U by the edge and pull it straight out of the
PC Card slot (2).
47
3. Using SCSI devices
3. Using SCSI devices
3-1. Connecting the SCSI device
1. Attach an external active terminator to the SCSI device, as shown below. If the SCSI device has an
internal terminator and the switch, set it on state. Refer to the SCSI device manual if you are not sure how
to activate termination.
2. Be sure that at least one SCSI device connected to the CB31U supplies termination power to the SCSI
bus. Refer to the SCSI device manual if you are not sure whether the SCSI device provides termination
power.
3. Be sure that each SCSI device has a unique SCSI ID, ranging from 0 to 6. The CB31U uses SCSI ID 7.
You can usually change a SCSI ID with a switch on the back of the SCSI device. For more information,
refer to the SCSI device’s manual.
4. Connect the PCMCIA connector at the end of the SCSI cable to the CB31U, as shown below.
48
3. Using SCSI devices
5. Attach the SCSI connector on the other end of the SCSI cable into a SCSI device. If you have a SCSI
device with a DB 25-pin, you can order the cable. Refer to Chapter 10.
6. Turn on all the SCSI devices connected to the CB31U.
7. Wait until ACCESS lights of the SCSI devices are turned off.
8. Turn your PC on and insert the CB31U into your PC.
49
3. Using SCSI devices
3-2. Confirming SCSI device Connection
1. Open Device Manager.
2. Make sure the SCSI device name string appears in the Device Manager.
The following Device Manager in Windows 2000 shows Iomega Zip drive is connected to the CB31U.
3. Double-click the SCSI device name string. The device properties window will appear.
4. If you can find The device is working properly under the Device status, the SCSI device is
working fine. The following SCSI device properties window in Windows 2000 also shows SCSI ID No.
Target ID xx means SCSI ID No.
If you have connected a HDD, CD-ROM, Removable Disk such as Jaz, Zip drive, you can also find the
icon in My Computer.
NOTE
Never remove the CB31U while the ACCESS LED of the SCSI device is lighting on.
50
4. SCSI Format Utility
4. SCSI Format Utility
You can format a HDD, Jaz, MO, Zip drive, etc., with format utility named REXFMT95.EXE.
NOTE:
You can not format CD-R, CD-RW or DVD-RAM.
Follow these steps through to format your SCSI drive.
1. Make sure the SCSI device is connected and powered on.
2. If the device is a removable disk and a media is not inserted, insert a media.
3. Insert the floppy disk for Windows 98/95 included in this package.
4. Open My Computer and double-click the floppy disk icon.
Double-click on the REXFMT95.EXE file.
5. You will see the window below and select the disk you want to format. And click the Select button.
NOTE:
The drive list shows all the disks connected to USB, SCSI port besides the CB31U. Make sure
the disk you have selected is the one connected to the CB31U.
51
4. SCSI Format Utility
6.You will see the window below. Select [Initialize/Format media] from the [Edit] menu.
7.You will see the window below. Choose format type. If you want to do Low Level Format simultaneousely,
check the Low level format check box. Then click OK.
52
4. SCSI Format Utility
8. a. If you have selected IBM-PC/AT FDISK Format at the step 7.,
the message box saying [You should create partition next] appears. Click OK. You will see the
screen shown at the step 6. and select [Create partition] from the [Edit] menu to create partition.
You will see the screen below. Select [File System] from the list box and set Partition size, using the
slider bar. Then, click OK.
b. If you have selected Super FD Format at the step 7., you will see a screen similar to the following.
Select [File System] from the list box.
Slider bar
NOTE:
If you select FAT32 in [File System], MS-DOS/Windows 3.1, Windows NT can not access to the
for FAT32 media.
9. To take efect, restart your computer or take the CB31U out and into the slot.
53
5. How to install Windows 95/98
5. Installing Windows 95/98
This chapter explains how to make a startup floppy disk, how to access to a SCSI CD-ROM
connected to the CB31U with the startup floppy disk. If you can accees to a SCSI CD-ROM
with the startup floppy disk, you can install Windows 95/98/Me from the SCSI CD-ROM connected
to the CB31U.
If you are not accustomed to DOS command, refer to Chapter 5-1.
If you are accustomed to DOS command and use Windows 95, refer to Chapter 5-2.
If you are accustomed to DOS command and use Windows 98, refer to Chapter 5-3.
5-1. Making a startup floppy disk with utility
With startup disk tool named MKDISK.EXE, you can make a startup floppy disk with which you can
access to a SCSI CD-ROM.
NOTE:
1.You can not use RECOVERY CD which may be bundled in your computer with this startup
MS-DOS
disk tool named MKDISK.EXE. Contact to your PC manufacturer when you install the
RECOVERY CD to install OS.
2.This MKDISK.EXE does not work on Windows Me. You can use this tool with Windows95,
Windows 98 only.
To access to a SCSI CD-ROM connected to the CB31U with the startup floppy disk, follow these steps:
1.Insert a floppy disk.
2.Open My Computer and click the floppy disk icon with the right button.
3.Select Format.
54
5. How to install Windows 95/98
4.You will see the screen below. Select Full in Format type and Check Copy system files.
5.Click the Start button.When Format finish, remove the formatted disk and insert the the floppy disk for
Windows 95/98 included in this package.
6.Double-click the floppy disk icon in My Computer and double-click MKDISK.EXE.
7. Hit any key to start MKDISK.EXE.
8.When the message saying “Remove the SCSI Setup Disk .Insert the formated diskkette (in system)”
appears, remove the floppy disk for Windows98/95 included in this package and insert the formatted disk
you have made at the step 4, 5.
9.After that, hit any key to make the startup floppy disk.
10.Shut down your PC and insert the CB31U connected to a SCSI CD-ROM into the PC Card slot.
MS-DOS
11.Turn on the SCSI CD-ROM and insert the startup floppy disk you have just made.
12. Restart your PC. You can now access to your SCSI CD-ROM drive
NOTE:
If this MKDISK.EXE does not work, make a startup flopply disk on your own. Refer the next
explanations in such a case.
55
5. How to install Windows 95/98
5-2. Making a Windows 95 startup floppy disk
This section gives you information on how to make a startup flopply disk on your own when the
MKDISK.EXE does not work. With the startup floppy disk, you can access to the SCSI CD-ROM drive
connected to the CB31U and install Windows 95 from the SCSI CD-ROM drive connected to the CB31U.
Follow the steps through to make a Windows 95 startup floppy disk
1.Edit Config.sys file in a Windows 95 startup floppy disk
Edit config.sys file in a Windows 95 startup floppy disk as shown below.(This is an example)
DEVICE = HIMEM.SYS
DEVICE = EMM386.EXE X = CC00-CFFF
BUFFERS = 10
FILES = 20
DEVICE = CBENABLE.EXE IRQ = A MEM = CC00
DEVICE = ASPCB3x.SYS /V
DEVICE = REXCD.SYS /D:MSCD001 /E
NOTE:
CBENABLE.EXE is CardBus Enabler. Refer to CBENABLE.EXE parameter.
ASPCB3x.SYS is ASPI Manager. Refer to ASPCB3x.SYS parameter.
REXCD.SYS is CD-ROM driver. Refer to REXCD.SYS parameter.
MS-DOS
2.Make Autoexec.bat file in the Windows 95 startup floppy disk and edit it as shown below.
@echo off
MSCDEX.EXE /D:MSCD001
3. a.Copy the CBENABLE.EXE, ASPCB3x.SYS, REXCD.SYS in the [Dos] folder in the CB31U
floppy disk for Windows98/95 to the Windows 95 startup floppy disk.
b.Copy the EMM386.EXE and MSCDEX.EXE in your system to the Windows 95 startup floppy disk.
4.Insert the Windows95 startup floppy disk and start your PC.
The SCSI CD-ROM will be assigned and you can access to the SCSI CD-ROM drive. You can install
Windows 95 from the SCSI CD-ROM drives.
56
5. How to install Windows 95/98
5-3. Making a Windows 98 startup floppy disk
This section gives you information on how to make a startup flopply disk on your own when the
MKDISK.EXE does not work. With the startup floppy disk, you can access to the SCSI CD-ROM drive
connected to the CB31U and install Windows 98 from the SCSI CD-ROM drive connected to the CB31U.
Follow the steps through to make a Windows 98 startup floppy disk
1.Edit Config.sys file in a Windows 98 startup floppy disk
Edit config.sys file in a Windows 98 startup floppy disk as shown below.(This is an example)
[CD]
DEVICE = HIMEM.SYS /testmem:off
DEVICE = EMM386.EXE X = CC00-CFFF
BUFFERS = 10
FILES = 20
DEVICE = CBENABLE.EXE IRQ = A MEM = CC00
DEVICE = ASPCB3x.SYS /V
DEVICE = REXCD.SYS /D:MSCD001 /E
CBENABLE.EXE is CardBus Enabler. Refer to CBENABLE.EXE parameter.
ASPCB3x.SYS is ASPI Manager. Refer to ASPCB3x.SYS parameter.
REXCD.SYS is CD-ROM driver. Refer to REXCD.SYS parameter
2.a.Copy the CBENABLE.EXE, ASPCB3x.SYS, REXCD.SYS in the [Dos] folder in the CB31U
floppy disk for Windows98/95 to the Windows 98 startup floppy disk.
b.Copy the EMM386.EXE and MSCDEX.EXE in your system to the Windows 98 startup floppy disk.
3.Insert the Windows98 startup floppy disk and start your PC.
When you start your system, select Start computer with CD-ROM support.
The SCSI CD-ROM will be assigned and you can access to the SCSI CD-ROM drive. You can install
Windows 98 from the SCSI CD-ROM drive.
57
MS-DOS
NOTE:
5. How to install Windows 95/98
----------------------------- CBENABLE.EXE parameter --------------------------
Format:
DEVICE = <directory path>: \ CBENABLE.EXE [IRQ] [IO] [MEM]
Parameter
[IRQ]
Set IRQ number used by the CB31U. If you don’t set anything to this parameter, Ah(10) is set as IRQ
number. If this doesn’t work, you have to set IRQ number from among IRQ numbers which any
devices don’t use. e.g.) IRQ = A
[IO]
Set IO port address used by the CB31U. If you don’t set anything to this parameter, 1300h is set as IO port
address. If this doesn’t work, you have to set IO port address from among IO port address which any devices
don’t use. e.g.) IO = 1000
[MEM]
MS-DOS
Set memory address used by the CB31U. If you don’t set anything to this parameter, the CB31U try to assign
memory address which any devices don’t use automatically. If the CB31U failed to assign memory address,
memory address is not assigned. e.g.) MEM = CC00
58
5. How to install Windows 95/98
--------------------------- ASPCB3x.SYS parameter ------------------------------
Format:
DEVICE = <directory path>: \ ASPCB3x.SYS [/L] [/P] [/V]
Parameter
[/L]
LUN(Logical Unit No). When you set this parameter, All LUN will be searched. If you don’t set anything to
this parameter, only LUN=0 will be searched. When you use PD drives, CD-ROM Changers, set this /L
parameter.
[/P]
Pause. When you set this /P parameter, pause the screen and you can check the result of the execution.
[/V]
View. When you set this /V parameter, the CB31U displays information including IO port address,
IRQ,and the SCSI device connected to the CB31U as shown below.
Card Bus Enabler Vx.xx
IRQ = 0A IO BASEAddress =1000 MEMORY BASE Address = CC00
MS-DOS
Enable Success
REX Universal ASPI Manager x.xx
ASPI HOST Adapter#0 I/O Port 1000h IRQ 10 SCSI ID 7
SCSI ID #4 TYPE 5: MATSUSHITA PD-2 LF-D100 A106
59
5. How to install Windows 95/98
----------------------------- REXCD.SYS parameter -----------------------------REXCD.SYS is a CD-ROM driver based on ASPI manager for DOS.
Format:
DEVICE = <directory path>: \ REXCD.SYS [/D:<Device name>][/U:1]
[/ScanID:id + id + …… ] [/NoScanID: id + id + ……][/N:1][/E][/HA:0]
Parameter
[/D:<Device name>] Set your CD-ROM device name.Use the same name written after /D: at
MSCDEX.EXE in Autoexec.bat file.
[/U:1]
If you connect only one SCSI CD-ROM drive, be sure to set /U:1.
If you don’t set anything to this parameter, all SCSI CD-ROM drives will
be registered after searching SCSI ID from 0 to 6.
[/ScanID:id + id + …… ] If you don’t set anything to this parameter, REXCD.SYS search SCSI ID
from 0 to 6 to find the SCSI CD-ROM connected to the CB31U.
But, if you set this parameter like /ScanID:0+1,REXCD.SYS skip searching SCSI
ID from 2 to 6.
[/NoScanID: id + id + ……] If you set this parameter like /NoScanID:5+6, REXCD.SYS skips searching
SCSI ID 5 and 6.
If you set this parameter, REXCD.SYS will not search Logical Unit for SCSI
CD-ROM drives. REXCD.SYS finds logical drive number of CD-ROM drive,
searching Logical Unit No from 0 to 7. But there are some old types of CD-ROM
drives having trouble when REXCD.SYS accesses to the CD-ROM drives at the
Logical Unit No except 0. In this case, set this parameter /N:1. Don’t set this
parameter when you use drives which need to be set for Logical Unit like
CD-Changers.
[/E]
Be sure to set this parameter /E
MS-DOS
[/N:1]
[/HA:0]
[/NoPreFetch]
60
Set Host Adapter number.If you don’t set anything to this parameter, 0 is set.
If you set this parameter, Prefetch command does not issued to SCSI drives.
If you use CD-R drives named CD-R824SK, CD-R56S made by TEAC, be sure
to set this parameter.
5. How to install Windows 95/98
--------------------------- REXDISK.SYS parameter -----------------------------REXDISK.SYS is a driver for Hard Drives/MOs based on ASPI manager for DOS. REXDISK.SYS
can use only FAT12, FAT16 file system. REXDISK.SYS can not use FAT32 file system.
Format:
DEVICE = <directory path>: \ REXDISK.SYS [/ScanID:id + id + …… ]
[/NoScanID: id + id + ……] [/E][/HA:0]
Parameter
[/ScanID:id + id + …… ] If you don’t set anything to this parameter, REXDISK.SYS searchs SCSI ID
from 0 to 6 to find the Hard Drive/MO connnected to the CB31U.
But, if you set this parameter like /ScanID:0+1, REXDISK.SYS skips searching
SCSI ID from 2 to 6.
[/NoScanID: id + id + …] If you set this parameter like /NoScanID:5+6, REXDISK.SYS skips searching
SCSI ID 5 and 6.
[/HA:0]
Be sure to set this parameter /E
Set Host Adapter number.If you don’t set anything to this parameter, 0 is set.
MS-DOS
[/E]
61
6. How to install Windows 2000
6. Installing Windows 2000
This chapter explains how to install Windows 2000 from a SCSI CD-ROM connected to the CB31U.
If you upgrade Windows 98, Windows NT to Windows 2000 , refer to Chapter 6-1.
If you install a new copy of Windows 2000(Clean Install), refer to Chapter 6-2.
If you install Windows 2000, using a Windows 95/98 startup floppy disk, refer to Chapter 6-3.
6-1. Upgrade Windows 98, Windows NT to Windows 2000
Follow these steps through:
1.Connect your CD-ROM to the CB31U first. Then start Windows98/WindowsNT.
2.Copy [i386] directory in the Windows2000 CD-ROM to the internal HDD.
3.Remove the CB31U and start the [WINNT32.EXE] file in the [i386] directory copied from Windows2000
CD-ROM.
Windows2000
4.When setup starts, you can see two ways to install Windows2000 on the screen:
-[Upgrade to Windows2000(Recommended)]
-[Install a new copy of Windows2000(Clean Install)]
5.Select [Upgrade to Windows2000(Recommended)].
6.Install Windows 2000, following the instructions.
7.When you finish installing it,set up the CB31U if you need it.
62
6. How to install Windows 2000
6-2. Install a new copy of Windows 2000
Follow these steps through:
1.Format the HDD where you want to install Windows2000 first.
2.Start setup program of Windows2000 from the SCSI CD-ROM connected to the CB31U.
3.When setup starts,you can see two ways to install Windows2000 on the screen:
-[Upgrade to Windows2000(Recommended)]
-[Install a new copy of Windows2000(Clean Install)]
4.Select [Install a new copy of Windows2000(Clean Install)].
5. After typing in the Product Key, click [Advanced Options] on the [Select Special Options] screen
saying [To review or change the default Setup options for copying files,click (Advanced
Options)].
6.Check [Copy all setup files from the setup CD to the hard drive] on the [Advanced Options]
screen and click [OK] button.
7.Install Windows 2000, following the instructions.
8.Before you restart your system, remove the CB31U.
9.When you finish installing it,set up the CB31U if you need it.
6-3. Install Windows 2000, using Windows 95/98 startup disk
Windows2000
Follow the steps below:
1. Make a Windows 95/98 startup floppy disk, refering Chapter 6-2 or 6-3 and have your CD-ROM
recognized by the Windows 95/98 startup floppy disk.
2. Format your internal HDD, if necessary.
3. Start [WINNT.EXE] file in the [i386] directory in the Windows2000 CD-ROM.
4. Install Windows 2000, following the instructions.
5. Before you restart your system, remove the CB31U.
6. When you finish installing it,set up the CB31U if you need it.
63
7. Linux
7. Linux
7-1. How to install the driver for Linux
This chapter explains how to install the CB31U driver for Linux. To install the driver, development module
is required for your Linux. If you do not know how to set up development module, ask the distributor of your
Linux. Following is an example how to install the driver to RedHat 6.1.
The version of [Kernel] and [PCMCIA-CS] of RedHat 6.1 is as follows.
Kernel version 2.2.12
PCMCIA-CS version 3.0.14
1.Download the file
2.Extract the file
3.Make driver module
4.Install the driver module
5.Confirm the installation
1.Download the file
Download the Linux driver for the CB31U at our web site(www.ratocsystems.com/english).
You will get the file named cb31_cb.tar.gz. But please note this driver is β version.
2.Extract the file
Extract the cb31_cb.tar.gz ,following the procedure below.
Linux
# gunzip cb31_cb.tar.gz
# tar xvf cb31_cb.tar
You will get the following files below.
README-E-cb31 (Setup guide)
cb31_cb.c
(Linux driver source for the CB31U)
64
7. Linux
3.Make driver module
(1)Copy the driver source file (cb31_cb.c)
Copy the driver source file named cb31_cb.c to the directory which includes PCMCIA Client Driver
source.(The directory normally means pcmcia clients directory)
If there is the extracted driver source file named cb31_cb.c in the directory /root/cb31, type the command as
written below.
# cd /usr/src/linux-2-2.12/pcmcia-cs-3.0.14/clients
# cp /root/cb31/cb31_cb.c .
The cb31_cb.c file will be copied.
(2)Edit Makefile
Add the three lines below to Makefile in the clients directory to compile cb31_cb.
cb31_cb.o : cb31_cb.c
$(CC) -MD -c $(XFLAGS) $(CPPFLAGS) I$(LINUX) $ <-o $@
@mkdir -p .depfiles ; mv cb31_cb.d.depfiles
(3)Execute Makefile
Compile cb31_cb with make command.
# make cb31_cb.o
(Caution)
If you get the following error message,
Makefile:8: ../config.mk:No such file or directory
make: *** Nu rule to make target ‘../conifg.mk’. Stop
Linux
Move up one directory and execute [make config].You will get config.mk.
Move back to the clients directory and execute make command.
# cd ..
# make config
# cd clients
65
7. Linux
4.Install the driver module
(1)Copy the driver module file (cb31_cb.o)
Copy the driver module file named cb31_cb.oto the directory which includes module related to PCMCIA.
# cp cb31_cb.o /lib/modules/2.2.12-32/pcmcia/.
(2)Edit PCMCIA database (/etc/pcmcia/config)
Add the five lines below to load module so that the CB31U will be recognized.
device “cb31_cb”
class “scsi” module “cb_enabler”, “cb31_cb”
card “RATOC CardBus UltraSCSI CB31”
manfid 0xc015, 0x0100
bind “cb31_cb”
(3)Reboot your system for your changes to take effect.
# reboot
You have now completed the installation.
5.Confirm the installation
When you insert the CB31U while pcmcia module is running, you will hear a recognition sound and see the
following message.
scsi0: AdvanSys SCSI 3.2M : PCI Ultra 16 CDB: IO E400/F, IRQ10
scsi: 1 host
Linux
If PCMCIA database (/etc/pcmcia/config) is wrong or the CB31U is not recognized, you will hear a rejecting
sound. In such a case, check the message which will appear in /var/log/messages.
NOTE: We tech-support only how to install the driver. We do not tech-support how to use your
SCSI devices on Linux
66
7. Linux
7-2. SCSI Configuration Utility for Linux:ascconf
This section explains the instructions to set up the CB31U SCSI Configuration Utility on RedHat 6.1.
Log in as root before setting up the CB31U SCSI Configuration Utility.
* Instructions for making CB31U SCSI Configuration Utility(ascconf).
Step1: Copying the source files
Copy the following files to ascconf/src directory.
ascconf.c -- source file of ascconf
eepasc.h
Makefile
-- header file for eeprom
-- make file
Step2: Running makefile
Execute make and compile ascconf.c.
# make ascconf
Note: You might see some warning messages. If you can build ascconf, don't worry about it.
Step3: Copying ascconf
Copy ascconf to the directory you can execute it. (for example : /usr/local/bin)
Linux
# cp ascconf /usr/local/bin/.
67
7. Linux
* Restriction
To execute ascconf
To execute ascconf, the driver modules of the CB31U need to be loaded. If the modules are not loaded
, error message shows up like below.
Not found host adapter
Sometimes, you might see following messages.
Driver module does not active.
You must connect some scsi devices, then reboot system.
At that time, connect a SCSI device and turn on the device power and reboot the system.
* Executing ascconf
[format]
ascconf <command=parameter>
[command, parameter]
-v
To show the status of current setting
-x
To show the value of EEPROM (Hex)
--disc_all=<on | off>
To set enable/disable of Disconnect for all SCSI ID
(for example)
--disc_all=on : enable Disconnect with SCSI-ID 0-7
Linux
--disc_all=off : disable Disconnect with SCSI-ID 0-7
--disc<n>=<on | off>
To set enable/disable of Disconnect for specific SCSI ID
(for example)
68
7. Linux
--disc5=off : disable Disconnect only with SCSI-ID 5
--sync_all=<20 | 10 | 5 | async>
To set Transfer rate for all SCSI ID
(for example)
--sync_all=10 : 10MB/sec for all SCSI-ID
--sync_all=async : Async. transfer for all SCSI-ID
--sync<n>=<20 | 10 | 5 | async>
To set Transfer rate for spesific SCSI ID
(for example)
--sync3=10 : 10MB/sec only for SCSI-ID 3
--sync5=async : Async.transfer only for SCSI-ID 5
[format]
# ascconf -v
PCI30HX, CB31 scsi configuration utility ....
AdvanSys ASC3050/ASC3350 found. I/O Base = 0800
View EEPROM Setting : ID-0 ID-1 ID-2 ID-3 ID-4 ID-5 ID-6 ID-7
Enable Disconnect : on off off on on on on on
Synchronous transfer: 10MB 5MB 20MB 20MB 20MB Async 20MB 20MB
# ascconf --disc_all=on --sync3=10
PCI30HX, CB31 scsi configuration utility ....
Linux
AdvanSys ASC3050/ASC3350 found. I/O Base = 0800
View EEPROM Setting : ID-0 ID-1 ID-2 ID-3 ID-4 ID-5 ID-6 ID-7
Enable Disconnect : on on on on on on on on
Synchronous transfer: 10MB 5MB 20MB 10MB 20MB Async 20MB 20MB
69
8. Troubleshooting
8. Troubleshooting
8-1. Deleting the CB31U driver completely
If you use Windows 95/98/Me, refer to Chapter 8-1-1.
If you use Windows 2000, refer to Chapter 8-1-2.
If you use Windows Xp, refer to Chapter 8-1-3.
8-1-1. Deleting the CB31U driver on Windows 95/98/Me
If you failed to install the CB31U driver and want to re-install it from the start, delete it first.
Follow the steps through to delete the CB31U driver completely.
1. Remove the CB31U from the Device tree.
a. Click My Computer with the right button.
b. Select Properties.
c. Select the Device Manager tab.
d. Double-click SCSI controllers.
e. Select SCSI CardBus PC Card REX CB31.
f.
Click the Remove button.
g. If you can not find it under SCSI controllers, check to see if there is SCSI CardBus PC Card REX
CB31 under Other Devices. If you find it, select it and click the Remove button.
h. Remove the CB31U from the PC.
2. Remove the driver file and INF file.
a. Double-click the My Computer icon.
b. Select (Folder)Options in the View menu.
c. Check the Show all files.
d. Select Find(Search) and (For)Files or Folders on the start menu.
e. Type REXCB3x.MPD in the Named box.
f.
Type the drive letter in which Windows 95/98/Me is installed in Look in box.
g. Click the Find Now(Search Now) button.
h. If REXCB3x.MPD appears, select it and press the Delete key.
70
i.
Type CB31RATOCREXCB31.INF in the Named box.
j.
Type the drive letter in which Windows 95/98/Me is installed in Look in box.
8. Troubleshooting
3. Remove the registry.
a. Select Run on the start menu.
b. Type REGEDIT in the Open box.
c. Click HKEY_LOCAL_MACHINE, Enum and PCI.
d. If SCSI CardBus PC Card REX CB31 appears at DeviceDesc line, select the key and
press the Delete key. The example indicates that VEN_10CD&DEV_1300 is selected.
e. If no SCSI Card Bus PC Card REX-CB31 is listed under DeviceDesc line, finish the
registry editor.
4. You have now deleted the CB31U driver completely. You can now re-install the CB31U.
71
8. Troubleshooting
8-1-2. Deleting the CB31U driver on Windows 2000
If you failed to install the CB31U driver and want to re-install it from the start, delete it first.
Follow the steps through to delele the CB31U driver completely.
1. Remove the CB31U from the Device tree.
a. Click My Computer with the right button.
b. Select Properties.
c. Select the Hardware tab.
d. Click the Device Manager button.
e. Double-click SCSI and RAID controllers.
f.
Select SCSI PC Card REX CB31.
g. Press the Delete key.
h. Remove the CB31U from the PC.
2. Remove the driver file and INF file.
a. Double-click the My Computer icon.
b. Select Folder Options in the Tools menu and select the View tab.
c. Check the Show hidden files and folders .
d. Select For Files or Folders of Search on the start menu.
e. Type REXCB3x.SYS in the Named box.
f.
Type the drive letter in which Windows 2000 is installed in Look in box.
g. Click the Search Now button.
h. If REXCB3x.SYS appears, select it and press the Delete key.
i.
Type OEM*.INF in the Named box and CB31 in the Containing text box.
j.
Type the drive letter in which Windows 2000 is installed in Look in box.
k. Click the Search Now button.
l. When appearing, open these files to see the content. If the file is related to the CB31U, select it and
press the Delete key.
72
8. Troubleshooting
3. Remove the registry.
a. Select Run on the start menu.
b. Type REGEDIT in the Open box.
c. Click HKEY_LOCAL_MACHINE, SYSTEM, CurrentControlset, Services and REXCB3x.
d. If SYSTEM32\DRIVERS\REXCB3x.SYS appears at ImagePath line, select the key and press
the Delete key.
e. If no SYSTEM32\DRIVERS\REXCB3x.SYS is listed under ImagePath line, finish the
registry editor.
4. You have now deleted the CB31U driver completely. You can now re-install the CB31U.
73
8. Troubleshooting
8-1-3. Deleting the CB31U driver on Windows Xp
If you failed to install the CB31U driver and want to re-install it from the start, delete it first.
Follow the steps through to delele the CB31U driver completely.
1. Remove the CB31U from the Device tree.
a. Click My Computer with the right button.
b. Select Properties.
c. Select the Hardware tab.
d. Click the Device Manager button.
e. Double-click SCSI and RAID controllers.
f.
Select SCSI PC Card REX CB31.
g. Press the Delete key.
h. Remove the CB31U from the PC.
2. Remove the driver file and INF file.
a. Double-click the My Computer icon.
b. Select Folder Options in the Tools menu and select the View tab.
c. Check the Show hidden files and folders .
d. Select All Files and Folders of Search on the start menu.
e. Type REXCB3x.SYS in the All or part of the file name box.
f.
Select the drive letter in which Windows Xp is installed in Look in box.
g. Click the Search button.
h. If REXCB3x.SYS appears, select it and press the Delete key.
i.
Type OEM*.INF in the All Files and Folders box and CB31 in the A word or phrase in the file
box.
j.
Type the drive letter in which Windows Xp is installed in Look in box.
k. Click the Search Now button.
l. When appearing, open these files to see the content. If the file is related to the CB31U, select it and
press the Delete key.
74
8. Troubleshooting
3. Remove the registry.
a. Select Run on the start menu.
b. Type REGEDIT in the Open box.
c. Click HKEY_LOCAL_MACHINE, SYSTEM, CurrentControlset, Services and REXCB3x.
d. If SYSTEM32\DRIVERS\REXCB3x.SYS appears at ImagePath line, select the key and press
the Delete key.
e. If no SYSTEM32\DRIVERS\REXCB3x.SYS is listed under ImagePath line, finish the
registry editor.
4. You have now deleted the CB31U driver completely. You can now re-install the CB31U.
75
8. Troubleshooting
8-2. Updating the CB31U driver for Windows95/98/Me
1. Download the updated driver from the RATOC web site.(http://www.ratocsystems.com/english/)
2. Make an updated support software floppy disk.
a. Download CB31U_xx.exe (tentative name) into an empty folder on the Hard disk drive.
b. Double-click the CB31U_xx.exe icon.
c. Be sure that multiple files are extracted.
d. Delete CB31U_xx.exe from the folder.
e. Make sure that the size of the folder is less than 1.44 MB.
f.
Get ready for an empty 1.44 floppy disk.
g. Select all files in the folder, then copy them to the floppy disk.
3. Update the driver.
a. Click My Computer with the right button and select Properties.
b. Click the Device Manager tab.
c. Double-click SCSI Controllers in the list.
d. Check to see that SCSI CardBus PC Card REX CB31 appears in the list.
76
8. Troubleshooting
e. Click on the Properties button, then select the Driver tab.
f.
Check the date before updating the driver.
g. Click on the Update Driver... button.
If your Windows is Windows 95, follow 4. To update the driver for Windows 95 procedure.
If your Windows is Windows 98, follow 4. To update the driver for Windows 98 procedure.
If your Windows is Windows Me, follow 4. To update the driver for Windows Me procedure.
If your Windows is Windows 2000, refer to the step 8 in Chapter 2-4-2.
77
8. Troubleshooting
4. To update the driver for Windows 95.
a. When the Update Device Driver Wizard window appears, insert the floppy disk made in the step
2. Make an updated support software floppy disk into the PC and select Yes. Then click Next.
b. When the following window appears, click Finish.
78
8. Troubleshooting
c. If a message requesting insertion of a floppy disk appears, click OK.
d. When Copying Files... appears, you will see a message prompting you to insert the disk that is
already in the floppy drive. Type a:\ for the source of files and click OK.
e. You have finished updating the driver. Remove the floppy disk from the PC.
79
8. Troubleshooting
4. To update the driver for Windows 98.
a. When the Update Device Driver Wizard window appears, click Next.
b. When the following window appears, select Search for a better driver than the one your device is
using now.(Recommeded) and click Next.
80
8. Troubleshooting
c. When the following window appears, check Floppy disk drives and insert the floppy disk made in the
step 2. Make an updated support software floppy disk into the PC and click Next.
d. When the following window appears, check The updated driver (Recommended) SCSI
CardBus PC Card REX CB31 and click Next. If AdvanSys PCI SCSI appears, check
One of the other drivers.
81
8. Troubleshooting
e. When the following window appears, click Next.
f.
When the following window appears, click Finish. You have finished updating the driver.
g. Remove the support floppy disk from the PC.
82
8. Troubleshooting
4. To update the driver for Windows Me.
a. When the Update Device Driver Wizard window appears, select Specify the location of the
driver (Advanced) and click Next.
b. When the following window appears, select Search for a better driver than the one your device is
using now.(Recommended) and check Specify a location. Insert the floppy disk made in the step 2.
Make an updated support software floppy disk into the PC and click Next.
83
8. Troubleshooting
c. When the following window appears, select The updated driver(Recommeded) and click Next.
d. When the following window appears, click Next.
84
8. Troubleshooting
e. When the following window appears, click Finish. You have finished updating the driver.
f.
Remove the support floppy disk from the PC.
85
8. Troubleshooting
5. Verify the driver is updated.
a. In the SCSI CardBus PC Card REX CB31 properties window, click the Driver tab.
b. Make sure the date is later than the date you checked in the step 3-f before.
c. Click the Driver File Details... button.
d. Check the File version of the CB31U driver. You may need to know this version when you
want to have a tech-support.
86
8. Troubleshooting
8-3. If your laptop is made by TOSHIBA
I can use 16-bit PC Card with my laptop made by TOSHIBA, but I can not get a CardBus PC Card
up and running.
1. Shut down your laptop.
2. Start your computer.
3. Press the ESC key at boot time.
4. When Check system. Then press [F1] key is displayed, press the F1 key.
5. When BIOS-SystemSetup(1/2) is displayed, select CardBus/16-bit under PC Card Controller Mode.
6. Press the End key to restart your system.
8-4. If you use FUJITSU MO(M2512A, M2513A)
System locks up when I connect old model MO of which drive engine is M2512A, M2513A
You need to install our SCSI configuration utility and change transfer rate with it.
If you are using Windows 95/98/Me, refer to Chapter 9-4-1 and set transfer rate to 10MB/sec.
If you are using Windows 2000, refer to Chapter 9-4-2 and set transfer rate to 10MB/sec.
87
8. Troubleshooting
8-4-1. SCSI Configuration Utility for Windows 95/98/Me
The CD-ROM which comes with the CB31U includes a SCSI configuration utility. This may be required for
SCSI devices to change configuration. Before starting this utility, close all other programs running.
Installation of SCSI Configuration Utility
1. Insert the CD-ROM into the PC.
2. Double-click the My Computer icon and the Floppy disk icon.
3. Double-click the Win9x folder and open SCSIUT folder.
3. Double-click the Setup.exe icon.
4. Follow the instruction in the window.
Starting SCSI Configuration Utility
1. Turn off the SCSI device connected to the CB31U.
2. Click the Start button and select Programs.
3. Select REXSCSI UTILITY.
4. Select the SCSI Configuration item.
5. Select REX-CB31 in the Please Select Card list and click OK.
6. SCSI Configuration windows will appear. If you connect FUJITSU MO(M2512A, M2513A), select
10MB/sec.at Translation. If you connect the asynchronous device, select Async. Then click OK.
For more information, refer to the explanation in the next page.
7. When the following window appears, click OK to restart the computer.
88
8. Troubleshooting
SCSI Configuration Utility Window
[PCI Burst Mode]
Default is Enable. If the PC does not support PCI Burst Mode, check Disable.
[Parity]
Default is Enable. If you connect the device which does not have parity check function, check
Disable.
[Host SCSI ID]
SCSI ID No. for the CB31U. Default is 7. If you connect the device which can be not assigned
other than 7, change the ID.
[Disconnect]
Default is ON (checked) at all IDs. In case of ON, the device is disconnected from SCSI bus
temporarily. While the device is disconnected, the SCSI PC Card can run other functions on the
SCSI bus efficiently.
[Command Queuing]
Default is OFF. If the queuing is required, check Queuing ID and enable Disconnect function.
[Translation]
Default is 20MB/s. Select the transfer rate by trying the choices shown until you find one that is
successful. If you connect FUJITSU MO(M2512A, M2513A), select 10MB/sec.
If you connect the asynchronous device, select Async.
89
8. Troubleshooting
8-4-2. SCSI Configuration Utility for Windows 2000/Xp
The CD-ROM which comes with the CB31U includes a SCSI configuration utility. This may be required for
SCSI devices to change configuration. Before starting this utility, close all other programs running.
Installation of SCSI Configuration Utility
1. Insert the CD-ROM which comes with the CB31U into the PC.
2. Double-click the My Computer icon and the CD-ROM icon.
3. Double-click the Win2k folder and open SCSIUT folder.
3. Double-click the Setup.exe icon.
4. Follow the instruction in the window.
Starting SCSI Configuration Utility
1. Turn off the SCSI device connected to the CB31U.
2. Click the Start button and select Programs.
3. Select REXSCSI.
4. Select the REXSCSI Configuration Utility item.
5. Select REXCB3x in the list and click OK.
6. SCSI Configuration windows will appear. If you connect FUJITSU MO(M2512A, M2513A), select
10MB/sec.at Translation. If you connect the asynchronous device, select Async. Then click OK.
For more information, refer to the explanation in the next page.
7. When the following window appears, click OK to restart the computer.
90
8. Troubleshooting
SCSI Configuration Utility Window
[PCI Burst Mode]
Default is Enable. If the PC does not support PCI Burst Mode, check the Disable button.
[Parity]
Default is Enable. If you connect the device which does not have parity check function, check the Disable
button.
[Host SCSI ID]
SCSI ID No. for the CB31U. Default is 7. If you connect the device which can be not assigned other than
7, change the ID.
[Disconnect]
Default is ON (checked) at all IDs. In case of ON, the device is disconnected from SCSI bus temporarily.
While the device is disconnected, the SCSI PC Card can run other functions on the SCSI bus efficiently.
[Command Queuing]
Default is ON (checked). If the queuing is required, check Queuing ID and enable Disconnect function.
[Translation]
Default is 20MB/s. Select the transfer rate by trying the choices shown until you find one that is successful.
If you connect FUJITSU MO(M2512A, M2513A), select 10MB/sec.
If you connect the asynchronous device, select Async.
91
8. Troubleshooting
8-5. ? PCMCIA Card Services appears
There is “? PCMCIA Card Services” appears under Other devices in Device Manager.
This is not error.
If PC Cards which are not CardBus compatible are inserted, ? PC Card Services appears under
Other devices. If it is removed, you cannot use PC Cards.Never remove it.
8-6. The CB31U is registered as PCI Bridge
The CB31U is registered as PCI Bridge in Other devices in Device Manager window.
I have not installed the CB31U driver yet.
Remove the PCI Bridge and restart your PC.
Hardware wizard will appear. Install the CB31U driver, refering to Chapter 2.
8-7. The CB31U is registered as PCI SCSI BUS Controller
The CB31U is registered as PCI SCSI BUS Controller in Other devices in Device Manager
window. I have not installed the CB31U driver yet.
Select the PCI SCSI BUS Controller and update the CB31U driver, refering Chapter 9-2.
8-8.When I try to capture image,I get an error on Windows 98
When I try to capture image with scanner software, I get an error saying Scanner is not
ready. But, the SCSI Scanner is recognized in the Device Manager.
If the same SCSI scanner names coexist in the Scanners and Cameras in the Control Panel.
Delete the same SCSI scanner names until only one SCSI scanner name is present there.
92
8. Troubleshooting
8-9. Unknown Device Window appears
When I connect a SCSI Scanner to the CB31U and start PC, the Add New Hardware Wizard
saying [This wizard searches for new drives for Unknown Device] appears and I do not know what
to do.
If Unknow Device means your SCSI Scanner. So, you need to install your SCSI Scanner driver.
For more information, refer to the SCSI Scanner manual.
93
8. Troubleshooting
8-10. When you can not finish Windows 95/98
If your PC has an USB port and PC Card inserted at the same time, you may not be able to
shut down your PC.
1. Disable fast shut down. Refer to the Help file for information on how to do it.
2. If you can not resolve this issue at the Step 1., change USB resources.
a. Start the PC without the CB31U when you can shut down the PC if you remove the CB31U.
b. When you can not shut down the PC even if you remove the CB31U, start Safe Mode.
You can start Safe Mode by pressing the F8 key at boot time.
3. Click My Computer with the right button and select Properties.
4. Click the Device Manager tab.
5. Double-click on the Universal Serial Bus controllers and Intel 82371AB/EBPCI to USB Universal
Host Controller.
94
8. Troubleshooting
6. Select the Resources tab and remove the check mark at the Use automatic settings.And doubleclick Input/Output Range.
7. Set Value number larger than 1600 by clicking up/down button.
8. Make sure Conflicting device list shows No conflict.
9. Click OK and restart your PC. If a warning message box appears, just click OK.and restart your PC.
95
8. Troubleshooting
8-11. Slow access to Ultra SCSI hard disk
Access to the Ultra SCSI hard disk is slower than that to the Fast SCSI hard disk
Access speed depends on the computer.
Try to uncheck Command Queuing on the SCSI Configuration Utility.
8-12. When I can not detect a SCSI Scanner on Windows 2000/Xp
When I try to start Scanner software, I get an error saying Failed to detect the SCSI Scanner.
You need to install ASPI manager for Windows 2000/Xp.
To install it, log in as an administrator or same level user.
1. Insert the CD-ROM which comes with the CB31U to PC.
2. Open My Computer and double-click the CD-ROM icon.
3. Double-click the aspi32 folder.
4. Click the WNASPI32.INF with the right button and select Install.
If you can not install it with this procedure, copy the WNASPI32.DLL in the aspi32 folder to the folder
named WINNT\SYSTEM32.
5. Remove the floppy disk from the PC.
When you want to uninstall it, follow the steps through.
1. Start Add/Remove programs in the Control Panel.
2. Select RATOC WinASPI32 for Windows 2000/NT4.0
3. Click the Change/Remove button.
96
8. Troubleshooting
8-13. When you can not assign a drive letter
I can find the device name string in the Device Manager, but the drive icon does not appear in
My Computer.
1. If your computer is in a network and all the driver letters are full, the drive icon does not appear in My
Computer. To resolve this issue, remove the Network card and install the CB31U driver.
2. If all the drive letters are not full, your CD-ROM drive may be D drive and the drive letter is fixed. In this
case, the drive icon does not appear in My Computer. To resolve this issue, do not fix the drive letter or
assign your CD-ROM to other drive letter than D drive, following the steps below.
a. Double-click the Administrative Tools in Control Panel.
b. Start Computer Management and select the Disk Management under the Storage.
c. Click the CD-ROM drive with the right button and select Change Drive letter and Path.
97
9. Registration and Tech-Support
9. Registration and Tech-Support
9-1. How to Register
We highly recommend to register yourself as our customer through our on-line registration.
1. On the Internet, access our site (http://www.ratocsystems.com/english/)
2. Follow window menu guide to register.
3. Fill out and submit the registration form.
9-2. Driver Update and Support
-Driver UpdateThe latest driver and utility are subject to change for improvement or bug fix.
You can download the latest version from our web site.
(http://www.ratocsystems.com/english/)
-Technical SupportYou can get a Tech support from RATOC at the following
Open 9:30AM-5:00PM(PST) Mon-Fri(except holidays)
RATOC Systems, International Tech support
2000 Wyatt drive
Suite 9
Santa Clara, CA 95054
Phone: 408-986-9040
FAX: 408-986-9042
E-mail : http://www.ratocsystems.com/english/contact/support.html
NOTE:
Please include the following information to help us to assist you in the event of a problem:
•Our product name, serial number, and product description
•Host Computer Name, Windows version
•Utility/Driver version
98
10.Options
10. Options
Optinal SCSI cables are available (sold separately) at the web site:
http://www.firewireshop.com
-HD 50P SCSI-II cable (2 feet)
-Centronics 50P SCSI-I cable (2 feet)
-DB 25P SCSI-I cable (2 feet)
-HD 50P female to Centronics 50P male adapter
If you have any questions about these options, contact to:
RATOC Systems Insternational,
TEL : (408)986-9040
FAX: (408)986-9042
E-mail: http://www.ratocsystems.com/english/contact/sales.html
99
11. Specifications
11. Specifications
Specifications of the CB31U
SCSI Interface
•Ultra SCSI (FAST-20)
•Single ended
SCSI PC Card
•PC Card Standard Compliant CardBus (Type II)
Data Transfer Rate
•Up to 20MB/sec with Ultra SCSI devices (synchronous)
•Up to 10MB/sec with SCSI-II devices (synchronous)
•Up to 132MB/sec between host and CB31
Power Consumption
•Voltage +3.3V (Supplied from PC Card slot)
•300mA (TYP) - at Reading/Writing
•130mA (TYP) - at Idling
•77mA (TYP) - at Power save mode
Termination Power
•Internal active termination embedded
Interrupt/I/O address
•Use IRQ assigned by CardBus Controller
Operation Temperature
32°F to 131°F (0°C to 55°C)
Storage Temperature
-4°F to 158°F (-20°C to 70°C)
100
11. Specifications
SCSI Cable Connector Pin Assignment
The following figure indicates the pin assignment of the CB31U SCSI cable(PC Card side). The
connector uses a Hirose NX30TA-25PAA or compatible connector.
Do not use any other SCSI cables than the supplied one.
1
2
10 11 12
3
14 15 16
PIN
1
2
3
4
5
6
7
8
9
10
11
12
13
13
23 24 25
SIGNAL
REQ
MSG
I/O
RST
ACK
BSY
GND
DB0
GND
DB3
DB5
DB6
DB7
PIN
14
15
16
17
18
19
20
21
22
23
24
25
SIGNAL
GND
C/D
GND
ATN
GND
SEL
DBP
DB1
DB2
DB4
GND
TERMPWR
101
Appendix
Trademarks
-Windows and MS-DOS are registered trademarks of Microsoft Corporation.
-AdvanSys is a registered trademark of ConnectCom Solutions, Inc.
-BIOS and miniport driver are copyrighted by ConnectCom Solutions, Inc.
-Other brand and product names may be registered trademarks or trademarks of their respective holders.
This equipment has been tested and found to comply with the limits for a Class B digital device, pursuant to Part 15 of the FCC Rules.
These limits are designed to provide reasonable protection against harmful interference in a residential installation. This equipment
generates, uses and can radiate radio frequency energy and, if not installed and used in accordance with the instructions, may cause
harmful interference to radio communications. However, there is no guarantee that interference will not occur in a particular installation.
If this equipment does cause harmful interference to radio or television reception, which can be determined by turning the equipment
off and on, the user is encouraged to try to correct the interference by one or more of the following measures:
(1) Reorient or relocate the receiving antenna.
(2) Increase the separation between the equipment and receiver.
(3) Connect the equipment into an outlet on a circuit different from that to which the receiver is connected.
(4) Consult the dealer or an experienced radio/TV technician for help.
Shielded cables and certified Class B peripherals must be used on this product.
Using unshielded cables or uncertified peripherals may result in this unit not complying with FCC Rules Part 15.
Changes or modifications not expressly approved by the party responsible for compliance may result in this unit not complying with
FCC Rules Part 15.
FCC ID : M9AREXCB31SCSIPC