1
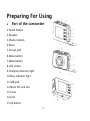
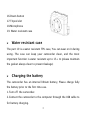
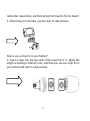
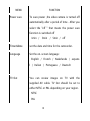
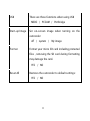
USER MANUAL
DIGITAL VIDEO CAMERA
1
Preparing For Using
➢
Part of the camcorder
1.Power button
2.Speaker
3.Shutter button
4.Reset
5.AV out jack
6.Menu button
7.Mode button
8.LCD screen
9.Charging indicator light
10.Busy indicator light
11.USB jack
12.Micro SD card slot
13.Cover
14.Lens
15.Up button
2
16.Down button
17.Tripod slot
18.Microphone
19. Water resistant case
➢
Water resistant case
The part 19 is a water resistant TPU case, You can wear on it during
using. The case can keep your camcorder clean, and the most
important function is water resistant up to 15+ m (please maintain
the gasket always clean to prevent leakage)
➢
Charging the battery
The camcorder has an internal lithium battery, Please charge fully
the battery prior to the first time use.
1.Turn off the camcorder.
2.Connect the camcorder to the computer through the USB cable to
for battery charging.
3
3.when charging ,the power indicator light will turn red, and when
the power indicator light turns off , it indicate charging full.
4.Unplug the USB cable.
The camcorder body may be warm after charging or extended use.
This is normal.
➢
Inserting the Memory Card
This camcorder does not equipped with internal memory. A micro
SD card must be inserted for this sport camcorder to operate. If a
card has not been inserted,this sportive camcorder can not
record.
1.Turn off the camcorder.
2. Open the rubber cover at the side of the camcorder . Find the
micro SD card slot, and then insert the card.
If the memory card has successfully be inserted, you can hear a
sound buzzer.
4
➢
Mounts (optional)
In order to use the camcorder more convenient in outdoor sports or
in under water situations, using some mounts fixed the camcorder
to make it. There are three kinds of mounts packaged in this the
camcorder.
a
b
c
By installing these mounts, the camcorder can fix to bikes or
helmets. The operating steps as follow:
How to fix the sportive camcorder to the bike?
1: Open the round (1) of the mount(a) , insert the rubber pad into it
and fix them to handlebars of bike, then wring the arew to fix it.
2: Fix the metal screw of the mount to the tripod slot of the
5
camcorder respectively, and then wring the thread to fix the mount
3: After fixing it to the bike, you can start to take pictures.
How to use a strap fix to your helmet?
1: Insert a strap into the two ends of the mount (b or c), adjust the
length according to helmet’s size, and then you can use strap fix to
your helmet and start to take pictures.
6
➢
How to use a sticker fix to your helmet?
1: Use the side of a sticker paste to the mount(b or c), and the
other side paste to your helmet , then start to take pictures.
TIPS: Do you remember the water resistant case? If necessary, you
can lock it with the sport camcorder, then fix them to a bike or a he
Capture mode
For taking still photos.
Video mode
For recording movie clips.
7
Audio mode
For recording audio files
Playback mode
For playing recorded files.
.
8
Basic Operation
➢
Turn Power On and Off
1.Press the POWER button to turn on the camcorder.
2.Press the POWER button again to turn the power off.
➢
Change the mode of the camcorder
Current camcorder settings will be displayed on the LCD screen.
The camcorder has 4 different modes : capture mode, video mode,
audio mode and playback mode. Press the MODE button repeatedly
to select between those modes.
9
MENU
Power
Beep save
FUNCTION
To
savesetting:
power ,the video camera is turned off
Sound
automatically
after a period of time . After you
Shutter :【On】/【Off】
select
the "off " that means the power save
Start-up:【None】/【1】/【2】/【3】
function
is switched off
Beep :【On】/【Off】
Auto Review
1min / 3min / 5min / off
set the displayed time after taking a image,
Timer&Date
set
thechoose
date and
time
theshow
camcorder.
when
“off”,
it for
won’t
the recorded
Language
image after taking .
Set the on-screen language:
1 Sec / 2 Sec / off
English / French / Nederlands / espano
Power
lLight
/ Italian
/ Portuguese
Deutsch
Frequency
should be /setted
depending
Frequency
on your region:
TV Out
50HZ / 60HZ
You can review images on TV with the
supplied AV cable. TV Out should be set to
either NTSC or PAL depending on your region.
NTSC
PAL
10
USB
There are three functions when using USB
MSDC / PCCAM / Pictbridge
Start-up Image
Set on-screen image when turning on the
camcorder
off / system /
Format
My image
Format your micro SD card including protected
files , removing the SD card during formatting
may damage the card.
YES
Reset All
/ NO
Restores the camcorder to default settings:
YES
/ NO
11
➢ Setting the camcorder
Before taking photographs or recoding videos and audios, press
the POWER button to switch on the camcorder first, Pressing the
MODE button after pressing the OK/MENU button to bring up the
setup menu as below, and press the SHUTTER button to ensure the
settings. At last, you can press the OK/MENU button again to exit
and return to the last menu .
➢
Take a still image.
1.Turn on the camcorder and press the MODE button to set the
camera to capture mode .
2. Use the LCD screen to view your subject, press and hold the
UP/DOWN button to zoom in/zoom out on your subject . And then
press the SHUTTER button to take a still image.
3.After the image has been taken, the LCD will display the image
for a brief second.
12
4.The memory capacity in the top right of screen will decrease as
each image is taken.
➢
Capture mode menu
MENU
FUNCTION
Resolution
Allow to change the image resolution for taking still
photos:
【5M】/【3M】/【1M】/【VGA】
Quality
Select a lower image quality to decrease the image
size in order to take more images. There are three
options for choice:
Super Fine / Fine / Normal
13
Metering
Change
the
metering
method
to
change
the
brightness of the picture:
Center / Multi / Spot
White
Adjust the white balance to suit different light
balance
sources. There five items for option:
Auto / Daylight / Cloudy / Fluorescent / T
ungsten
Exposure
Set the exposure value manually to compensate for
unusual lighting conditions :
-2 / -1.7 / -1.3 / -1 / -0.7 / 0.3 / 0 / +0.3 / +0.7 / +1 / +1.3 / +1.
7
+2
14
Driver
Set the camera have a delay after pressing the
Mode
shutter button :
【Off】/【Self-timer
2S】/【Self-timer
10S】/【Burst】
Effect
Set the color effect to add a color tone to the video:
Normal / B&W / Sepia / Negative / Red /
Green / Blue
Date
This function can be used to add a date to your files
Stamp
as you take them
Date / off / Date&Time
➢
15
➢
Recording Movie Clips
1.Turn on the camcorder and press the MODE button to set the
camera to video mode .
2. Use the LCD screen to view your subject, press and hold the
UP/DOWN button to zoom in/zoom out on your subject , Then
press the SHUTTER button to start recording.
3.The LCD monitor will displays how long it has been recording for
.
4.Press the SHUTTER button again to stop recording.
5.The camcorder will stop recording automatically when the
memory capacity is full.
16
➢
Video mode menu
MENU
FUNCTION
Movie Size
Changing
the
video
resolution
for
the
recording. Select small movie size to record
longer time.
【HD】/【640】/【320】
Frame Rate
Select low frame rate to record longer time.
There are two items for option:
【High】/ 【Low】
Metering
Refer to capture mode menu
White balance
Refer to capture mode menu
Effect
Refer to capture mode menu
17
Date Stamp
➢
Refer to capture mode menu
Recording audio files
1.Turn on the camcorder and press the MODE button to set the
camera to audio mode .
2.Press the SHUTTER button to start to record audio files .
3.Don’t cover the microphone hole when recording audio files, or
else you won’t get the audio files you want to record for .
➢
Playback mode
➢
Playback recorded files
1.Turn on the camcorder and press the MODE button to set the
camera to playback mode .
2.Press the UP/DOWN button to view all the photos and video files
one by one .
18
3.When playing video files, you can press the SHUTTER button to
play the video file, then press the UP button to have a pause. Press
it again to replay again . and you can press the MENU button to
stop playing the video file.
4.When viewing the images, you will see a icon
on the bottom
left of the screen .
5.When hearing the audio file , the icon
will appear on the
screen. By pressing the UP button to have a pause , pressing it for
the second time it will play again , also you can press the MENU
button to stop hearing the audio file.
➢
Playback mode menu
MENU
FUNCTION
Lock
【Lock/Unlock one】/【Lock All】/【Unlock All】
19
Delete
Use this function to delete a single file or all files.
【One】/【 All】
Slide
Use the function to set the option in the slide show.
Show
【Start】:start play
【Interval】:press MODE button to set the intervals
between two images (up to 10 seconds).
【Repeat】:【YES 】/【NO】
Effect
Set the color effect to add a color tone to the file:
【B&W】/【Sepia】/【Negative】/【Red】/【Green】
/【Blue】/【Binarize】/【Sunset】/【Warm】/【Cold
】/【Contrast】
Rotate
【Rotate】:Press the SHUTTER button to rotate the
image, one time for 90°
【Save】: save this image .
【Back】: get back to the playback page.
20
Resize
Resize the current image to a litter size one .
【5M】/【3M】/【1M】/【VGA】
Voice
Add a background music for the current file:
Memo
【Add】/【Delete】
Start-up
Set the current image to the on-screen image when
Image...
turning on the camcorder
【Set】/【Cancel】
Making Connections
➢
Connecting the Camcorder to a TV
When plug in the TV-out cable to the camcorder AV out jack , the
LCD screen turns black, Connect the camcorder to a TV and the TV
screen now performs as the camcorder LCD screen.
1.Connect the camcorder to a TV via the AV cable .
21
2.Turn on the TV and the camcorder, and then set the TV to “AV”
mode.
3.When the camcorder is set to record mode, you can preview the
subjects you want to record on the TV screen.
4.When the camcorder is set to Playback mode, you can review all
the files stored in the camera on the TV.
➢
Connecting the Camcorder to a PC
There are two ways to download files from the camcorder's internal
memory or memory card to a computer:
❖
By inserting the memory card into a card reader
❖
By connecting the camera to a computer using the supplied
USB cable.
Using a Card Reader
1. Eject the memory card from the camcorder and insert it into a
card reader that is connected to a computer.
22
2. Open [My Computer] or [Windows Explorer] and double-click the
removable disk icon that represents the memory card.
3. Copy images from the card into a directory of your choice on the
computer’s hard disk.
Connecting the Camcorder to a PC with the USB Cable
1. Connect the supplied USB cable to the computer's USB port and
turn the camcorder on.
2. After the camcorder turning on, it will appears “MSDC” on the
screen, if not ,please press the MODE button to choose this .
3. Open [My Computer] or [Windows Explorer]. A"Removable Disk"
appears in the drive list. Double-click the "Removable Disk" icon to
view its contents. Files stored on the camera are located in the
folder named "DCIM".
4. Copy the files that you want to your computer.
23
➢
How to use the PC Camera function
1: Connect the camcorder to a computer with the supplied USB
cable.
2: Turn on the camcorder. then press the MODE button to switch
between “MSDC”and “PC CAM”.
3: Choose the “PC CAM” option, the screen will turn black totally .
At this time, Open [My Computer], there will be a file named "
USB video tool".
4: Double click it. The camcorder will work as a webcam.
NOTE: The Cam function can supported in Windows XP, Windows 7,
Windows Vista, Window 8, the icon
only appeared in Windows XP,
in other platforms please use the third software(MSN etc )to make
it.
© Woxter Technology Co., Ltd. All rights reserved. Woxter®, the Eagle Logo, iWXT®, WXT® and
other Woxter ® trademarks are property of Woxter Technology Co., Ltd and are registered. All
other trademarks, products and images are property of their respective owners.
www.wxtpro.com
24
Specification
Sensor
1.3 Mega Pixels CMOS
LCD display
1.77" TFT Screen
Lens
F/3.2 , f=7.5mm
Shutter
Electronic Shutter: 1/2 ~ 1/800 sec
Digital zoom
4×
Resolution
Image: 5M/3M/1M/VGA
Video: 【HD】/【640】/【320】
White balance
Auto/Daylight/Cloudy/Incandescent/Tungsten
Exposure
-2.0 ~ +2.0EV
Continue shot
3 Frames/Shot
25
Storage
External memory: micro SD card (Up to 32GB,not
include)
Power source
Li-ion battery(built in)
Ambient
Operating: 0° C to 40° C
temperature
Storage: -20 to 60° C
Microphone
Built-in
Speaker
Built-in
Dimension
71.8x46.6x31(mm)
Weight
About 55 g
26