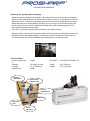
1
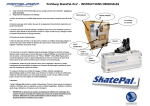
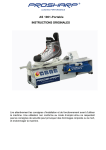
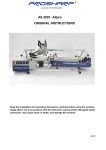
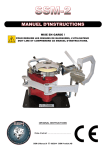
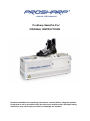
ProSharp SkatePal-Pro² ORIGINAL INSTRUCTIONS Read the installation and operating instructions carefully before using the machine. Usage that is not in accordance with the instruction manual and/or disregard safety instruction, may cause injury or death, and damage the machine. 1. Read the Instructions Manual featured on the next page carefully! Continue from here after that. 2. Setup and sharpening: A. Place the machine on a flat and steady workbench, with a height between 80 and 100 cm. B. Make sure that your ear, eye and breathing protection gear is being worn correctly! C. Make sure that the installed grinding wheel has the hollow radius you wish to receive by opening the grinding wheel door and look on the text on it .(if it has not, change it according to the instructions manual on the next page). D. Plug in the power cord. E. Clamp the skate in the slot on the top of the machine using the quick-release handle, and make sure that the blade reaches below the clamp-steels .You can to this by looking inside the grinding wheel door. F. If you are about to sharpen figure skates or long-distance skates also make sure that the wheel is made for this type of sharpening. The wheel should be 60 mm in cross section, and the text on it should say either “FIG” or “BANDY”. To sharpen figure skates you must also have a type of device to measure in the height of the skate for the grinding wheel will miss the toe picks. How to do this is featured on the last page. G. Now put the grinding wheel door back on. Attach the vacuum cleaner, turn it on, Turn the machines power switch on and press the start button the amount of cycles you wish the machine to run. H. When the machine has stopped grinding, turn it OFF, release the quick-release handle and take the skate out, look on the result, and if it is satisfying, repeat the same procedure with your next skate, if it is not, sharpen it again until you have achieved a satisfying result. 3. Maintenance: After sharpening unplug the power cord. Open the grinding wheel door and clean the machine inside with a vacuum cleaner or with a magnetic stick. Clean the machine after use, and always before transport. IMPORTANT! Machine’s life time is directly reflected to the maintenance of the machine! Always lock the machines locks on both ends when transporting. Disconnect the power cord before changing the grinding wheel. Never start the machine without a skate. Original Instruction Manual Read the operating instructions carefully before using the machine. Operations that are not in accordance with the manual and/or disregard safety instructions may cause injury or death, and damage the machine. Description of the machine: Ice skate sharpener. Safety Information ProSharp SkatePal-Pro² may only be used for sharpening skates. Only the original ProSharp EP- grinding wheels are to be used in the machine. No modifications or design changes are allowed. All operators must read and understand instructions, regarding operation and maintenance contained in this manual, before using the machine. Operators under 18 years of age are NOT allowed to use the machine. Hazards Before using the machine, ensure there are no damages caused, for example, during transport. The SkatePal is equipped with grinding tools which may cause injury. The operator must stand in front of the machine. Children and others than the machine operator must be kept away from the machine at a safe distance of 2 meters. The operator may never bend over or place hands on the machine during skate sharpening. Grinding dust can escape from the machine; therefore the operator must wear protective eyewear and breathing protection when machine is in use. It is also highly recommended to use ear protection, when the machines sound-level during sharpening due to differences in the skate-steels, can exceed beyond pleasant level, or in worst case harm your hearing. Connection Connect the power cord, 1-phase, 100-240 volt, 50 - 60 Hz. Placement The machine must be placed on a flat, steady work bench with a height between 80 to 100 cm. Maintenance Control and clean the machine daily after the usage, and always after every 30 pairs of skates. Remove the plug before carrying out any adjustment, servicing or maintenance. After grinding Unplug the power cord. Clean the machine from dust with a dust cleaner or you can also use a magnetic stick. Unplug the power cord. Clean the machine from dust with a dust cleaner or you can also use a magnetic stick. Note Every B64 wheel lasts around 1000~ cycles. Change the grinding wheel according to the instructions. It is worn out when it is no longer taking away material from the steel and/or gives an unsatisfying result. After 1-3 years or around 10,000~ cycles. Service should be made by an authorized service technician. Sharpening of skates 1. Clamp the skate into the middle, sideways, of the skate holder, always with the heel of the skate placed towards the grinding wheel. 2. Choose the sharpening cycles from 1 to 5 by quickly pushing the start button. 1 push is worth of 1 cycle and 5 pushes are worth of 5 cycles. Grinding is finished when the wheel is back in the start position and the motor has stopped. Push of the start button during sharpening = turn direction, e.g. for getting rid of nicks on the blade. 3. Check the sharpening result on the skate blade. (if not perfect, repeat the sharpening) Emergency stop Push once the start button when the motor is doing the first half-cycle (going to left). Grinding will stop and the wheel comes back to the home position. One push after the first half-cycle (going to right) resets counter and takes the wheel back to start position after the cycle is finished. Two pushes after the first half-cycle will stop the grinding and takes the wheel back to home position. Hollow settings and changing of the grinding wheel Changing of the SkatePal EP- grinding wheel, Should only be done when the power cord is disconnected. 1. Choose a grinding wheel with a hollow from 3XS to 2XL. It correlates to a hollow radius from 7mm hollow = XXS (7mm) to 28mm =2XL (28mm) to entirely flat = XX. Other radius of hollows can be ordered from ProSharp with an 8 weeks delivery time. 2. Open the grinding wheel door; release the grinding wheel thumbscrew by turning to the left. Remove the wheel and replace it with another wheel. Return the thumbscrew and tighten it gently by turning to the right. Adjusting the grinding wheel sideways Adjust the grinding wheel in small steps, 1/8 round at the time. An easy way of changing position of the grinding wheel is to first drive the wheel to the left, so you get more room to adjust the screw. To do this, push start button for five seconds and keep the button down. Wheel will start go to the left without grinding. Once you let go off of the start button, the wheel will stop. (If you want the wheel even further left, push the button again for five seconds and repeat previous steps). Push once more and the wheel will come back to the home position Adjusting of the centering of the grinding wheel can be done by screwing the thumb screw. Clockwise moves the wheel towards you and anti-clockwise moves the wheel from you. The thumb-screw can be found beside the grinding wheel, see picture below. Technical Data Power supply unit A Weight Length Noise level GRINDING WHEEL DOOR 150W AC INPUT 100-240 VAC 50/60hz 3.6 32.6 lbs (14.8 kg) 27.5” (700 mm) 80dB Width Height 8.6” (220 mm) 12.6” (320 mm) QUICK-RELEASE HANDLE/CLAMP VACUUM CLEANER INPUT ON/OFF START/STOP CYCLE POWER CORD INPUT Read the installation and operating instructions carefully before using the machine. Usage that is not in accordance with the instruction manual and/or disregard safety instruction, may cause injury or death, and damage the machine. Installation instructions Unpacking and installation: 1. Open the SkatePal by unlocking the locks on both sides of the machine with one of the two(identical) included keys. 2. Plug the power cord of the machine on the right side of the machine. Connect a hose of a vacuum cleaner to the right side of the machine. Use the machine in a warm, dry and well lit room. 3. The SkatePal-Pro includes: SkatePal-Pro skate sharpener, 1 x EP-grinding wheel (mounted), 2 x key and an instruction manual. 4. After usage of the machine clean the machine and the working space properly. Unplug the power cord and vacuum cleaner hose. Lock the locks on both sides of the machine. Operation instructions and Safety precautions: WARNING! When using electric tools basic safety precautions should always be followed to reduce the risk of fire, electric shock and personal injury. Read all these instructions before attempting to operate this product and save these instructions. The use of any accessory or attachment other than one recommended in this instruction manual may present a risk of personal injury. 1. Always use eye, ear and breathing protection. Always connect a vacuum cleaner to the machine to minimize dust occurring outside the machine. 2. Wear proper apparel. Do not wear loose clothing, gloves, neckties, rings, bracelets, or other jewelry which may get caught in moving parts. Non slip footwear is recommended. Wear protective hair covering to contain long hair. 3. Do not expose the machine to rain. Do not use the machine in damp or wet environment. Keep work area well lit. Do not use the machine in the presence of flammable liquids or gases. 4. Guard against electric shock. Avoid body contact with earthed or grounded surfaces (e.g. pipes, radiators, ranges, refrigerators) 5. Keep other persons away. Do not let persons (especially children) not involved in the work touch the machine or the extension cord, and keep them away from the work area. Make workshop child proof with padlocks or master switches. Do not overreach. Keep proper footing and balance at all times. Do not stand on the machine. 6. Never leave machine running unattended. Turn power off. Don’t leave the machine until it comes to a complete stop. 7. 8. 9. Don’t force the machine. It will do the job better and safer at the rate for which it was designed. When not in use always disconnect the power cords. Stay alert. Watch what you are doing, use common sense and do not operate the machine when you are tired. 10. Check damaged parts. Before further use of the machine, it should be carefully checked to determine that it will operate properly and perform its intended function. Check for alignment of moving parts, binding of moving parts, breakage of parts, mounting and any other conditions that may affect its operation. A guard or other part that is damaged should be properly repaired or replaced by an authorized service centre (contact us for the location of your nearest service centre) otherwise indicated in this instruction manual. Have defective switches replaced by an authorized service centre. Do not use the machine if the switch does not turn it on and off. 11. Store the machine properly in a dry locked-up place, out of reach of children. 12. Never yank the cord to disconnect it from the socket. Keep the cord away from heat, oil and sharp edges. 13. Avoid unintentional starting. Ensure the switch is in “off” position when plugging in the cord. 14. This electric machine should be repaired by qualified persons using original spare parts, otherwise this may result in considerable danger to the user. 15. Maintain the machine with care. Follow instruction for lubricating and changing accessories. Inspect machine cords periodically and if damaged have them repaired by an authorized service facility. Inspect extension cords periodically and replace if damaged. 16. Disconnect the machine before servicing and when changing accessories, such as grinding wheels. Do not touch the motor of the grinding wheel directly after sharpening because it can be hot. Detailed instructions how to change the grinding wheel are on page 2. When servicing use only identical replacement parts. Other parts than those recommended by the manufacturer may present a risk of personal injury. 17. Keep work area clear- Cluttered areas and benches invite injuries. 18. Use right tool- Do not use the tool for purpose not intended. Figure skate sharpening PUT ON YOUR EAR EYE AND BREATHING PROTECTION BEFORE PERFORMING FOLLOWING STEPS! Take the grinding wheel door off and make sure that the smaller 60 mm wheel is installed, it should say “FIG” on it. Put the bridge in the toe end side of the slot and put the lowest spike in the bridge, then clamp the skate firmly, make sure it is not easily moved. Look inside the machine to make sure that the heel sits around 2-3 mm below the clamping steel, that way it will not damage the clamping steels, and not round the heel of the skate. Then carefully take away the toe protector device, press and hold the start/stop button, and it will drive the grinding wheel towards the toe picks without the grinding wheel spinning. This will allow you to make sure that the grinding wheel will miss the toe picks, and also at what point it will hit the heel of the skate. When you release the button it will stop and when you push again, it will return to start position. It will take some adjustment before you can obtain a satisfying result so please be patient, after you have found the correct setting it will not be necessary to adjust it anymore for your SkatePal, so make sure you have tightened the nuts firmly. When you are ready to start sharpening continue to the first page. A tip is to start by using an old skate, that way you will not take the risk of damaging more expensive skates. ProSharp Toe Pick protector is not included with the machine, call us, or visit our website for details. To make the wheel come further away from the toe picks, adjust the screws down. Adjust the height in small steps by using a 7mm spanner. To make the grinding wheel come closer to the toe picks, adjust the screws up. Explanation of symbols marked on the skate sharpener ProSharp SkatePal-Pro² Business name and manufacturer Authorized service representative Eriksson Teknik AB ProSharp AB Hirsvägen 4 Hirsvägen 4 862 41 Njurunda 862 41 Njurunda SWEDEN SWEDEN T. +46 60 15 85 80 T. +46 60 15 85 80 F. +46 60 15 83 80 E. [email protected] E. [email protected] E. [email protected] Warranty The warranty applies for one year for materials and workmanship. The manufacturer is not responsible for defects or faults that arise from normal usage, negligent maintenance or other neglect, unauthorized tampering, improper use, service or repairs performed by others than those approved by the manufacturer, as well as variations in electrical voltage or other electrical disorders. The manufacturer is not responsible for costs such as travel expenses, transport costs or costs for repairs not performed by the manufacturer during the warranty period, or for inaccessibility to the machine during the service period in connection with measures to repair any faults covered by the warranty. The manufacturer will not bear any costs that arise in the form of damage to skates or other property. The buyer shall, at own risk and cost, send the machine or component in question to the manufacturer for assessment of warranty coverage and repair. The machine or component will be returned to the buyer at the manufacturer's expense.