1
OPERATION MANUAL
(for printer)
LASER PRINTER
Be sure to become thoroughly familiar with this manual to gain
the maximum benefit from the product.
Before installing this product, be sure to read the installation
requirements and cautions sections of the "Operation manual
(for general information and copier operation)".
Be sure to keep all operation manuals handy for reference
including this manual, the "Operation manual (for general
information and copier operation)" and operation manuals for any
optional equipment which has been installed.
Downloaded From ManualsPrinter.com Manuals
Warranty
While every effort has been made to make this document as accurate and helpful as possible, SHARP Corporation
makes no warranty of any kind with regard to its content. All information included herein is subject to change without
notice. SHARP is not responsible for any loss or damages, direct or indirect, arising from or related to the use of this
operation manual.
© Copyright SHARP Corporation 2004. All rights reserved. Reproduction, adaptation or translation without prior
written permission is prohibited, except as allowed under copyright laws.
Trademark Acknowledgments
Sharpdesk is a trademark of Sharp Corporation.
Microsoft®, Windows®, Windows® 95, Windows® 98, Windows® Me, Windows NT® 4.0, Windows® 2000, Windows®
XP, Windows® Server 2003 and Internet Explorer® are registered trademarks or trademarks of Microsoft Corporation
in the U.S.A. and other countries.
Netscape Navigator is a trademark of Netscape Communications Corporation.
Macintosh, Power Macintosh, Mac OS, LaserWriter, and AppleTalk are registered trademarks of Apple Computer, Inc.
IBM, PC/AT, and PowerPC are trademarks of International Business Machines Corporation.
Pentium is a registered trademark of Intel Corporation.
PCL is a trademark of the Hewlett-Packard Company.
PostScript is a registered trademark of Adobe Systems Incorporated.
Acrobat® Reader Copyright© 1987-2002 Adobe Systems Incorporated. All rights reserved.
Adobe, the Adobe logo, Acrobat and the Acrobat logo are trademarks of Adobe Systems Incorporated.
NetWare is a registered trademark of Novell, Inc.
Agfa and the Agfa Rhombus, are registered trademarks of Agfa-Gevaert, A.G.
All other trademarks and copyrights are the property of their respective owners.
The display screens, messages, and key names shown in the manual may differ from those on the actual machine
due to product improvements and modifications.
Downloaded From ManualsPrinter.com Manuals
TABLE OF CONTENTS
CHAPTER 1
BASIC PRINTING PROCEDURES
CHAPTER 5
KEY OPERATOR PROGRAMS
SETTING THE PRINTER DRIVER............................. 1-2
● Printer driver settings in Windows (selecting and
setting print conditions) ....................................... 1-2
● Using the Help file to view explanations of the
settings................................................................ 1-3
● Printing................................................................ 1-4
● Using options to print .......................................... 1-6
KEY OPERATOR PROGRAMS ..................................
● Key operator program list ....................................
● Procedure for using key operator programs........
● Key operator program menu ...............................
DESCRIPTION OF SETTING PROGRAMS ...............
● Printer settings ....................................................
● Network settings..................................................
CHAPTER 2
SETTING THE PRINTER DRIVER
PROPERTIES
SELECTING PRINTING FUNCTIONS .......................
● Settings in the [Main] tab ....................................
● Settings in the [Paper] tab...................................
● Settings in the [Advanced] tab ............................
● Settings in the [Job Handling] tab .......................
● Settings in the [Watermarks] tab.........................
CHAPTER 6
TROUBLESHOOTING
TROUBLESHOOTING ................................................ 6-2
● Checking the IP address ..................................... 6-4
2-2
2-2
2-6
2-9
2-12
2-15
CHAPTER 7
APPENDIX
PRINTER SPECIFICATIONS...................................... 7-2
NOTICE PAGE PRINTING.......................................... 7-3
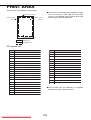
PRINT AREA............................................................... 7-4
CHAPTER 3
WEB PAGES IN THE PRINTER
REMOTE OPERATION VIA A NETWORK................. 3-2
● How to access the Web page and view Help .......... 3-2
ABOUT THE WEB PAGES (FOR USERS) ................ 3-3
● Directly printing a file on a computer................... 3-4
ABOUT
THE
WEB
PAGES
(FOR
THE
ADMINISTRATOR) ..................................................... 3-5
● Protecting information programmed in the Web
page ([Passwords]) ............................................. 3-6
● Directly printing a file on an FTP server.............. 3-7
● E-mail Print ......................................................... 3-9
● E-mail Status and E-mail Alert settings............... 3-10
CHAPTER 4
PRINTER BASIC SETTINGS
MAKING CONFIGURATION SETTING ...................... 4-2
● Operation procedure common to all printer
configuration settings (items that can be set from
the operation panel) ............................................ 4-2
● Printer Default settings........................................ 4-4
● PCL settings........................................................ 4-5
● PostScript settings .............................................. 4-5
Downloaded From ManualsPrinter.com Manuals
5-2
5-2
5-3
5-4
5-5
5-5
5-7
0-1
CHAPTER 1
BASIC PRINTING
PROCEDURES
This chapter explains how to configure printer driver settings at your
computer, and provides basic information on printing.
Page
SETTING THE PRINTER DRIVER ................................................................1-2
● Printer driver settings in Windows (selecting and setting print conditions) ..1-2
● Using the Help file to view explanations of the settings .........................1-3
● Printing ...................................................................................................1-4
● Using options to print .............................................................................1-6
Downloaded From ManualsPrinter.com Manuals
1-1
SETTING THE PRINTER DRIVER
This section describes the method of changing the printer driver settings from your computer. If you have not yet
installed the printer driver, read the accompanying "SOFTWARE SETUP GUIDE (for printer)" and install the printer
driver from the CD-ROM.
Printer driver settings in Windows
(selecting and setting print conditions)
Change the settings using the printer properties.
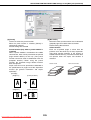
■ Windows 95/98/Me
■ Windows NT4.0 / 2000 / XP / Server
2003
The procedure for adjusting the settings in
Windows Me is explained in the following.
The procedure for adjusting the settings in
Windows XP is explained in the following.
the [Start] menu, select [Settings] and
1 On
then [Printers].
[Printers and Faxes] from the [Start]
1 Select
menu.
the installed printer driver and
2 Right-click
select [Properties] in the pop-up menu.
the installed printer driver and
2 Right-click
select [Printing Preferences].
Click the [Setup] tab in the printer driver
properties.
The screen shows the example of selecting
SHARP AR-M451N PCL6.
The SHARP AR-M451N PCL6 properties is
shown as an example.
3 Set each item.
3
For setting items, see the printer driver help. For
information on viewing Help, see the following
page 1-3. An example of always using the
document filing function is explained on page 1-3.
Set each item.
For setting items, see the printer driver help. For
information on viewing Help, see the following
page 1-3. An example of always using the
document filing function is explained on page 1-3.
4 Click the [OK] button.
4 Click the [OK] button.
NOTE
To configure settings for installed peripheral devices such as a saddle stitch finisher, finisher, and large capacity
tray, right-click the printer driver, select [Properties], and select the [Configuration] tab. (In Windows 95/98/Me,
select [Properties] and then the [Configuration] tab in the [Setup] tab.) If the machine is being used as a network
printer, click the [Auto Configuration] button in the [Configuration] tab to automatically set the peripheral device
configuration. To display the latest tray information (paper size, paper type, and paper remaining), click the [Tray
Status] button in the [Paper] tab.
Downloaded From ManualsPrinter.com Manuals
1-2
SETTING THE PRINTER DRIVER
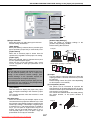
■ Selecting document filing
The procedure for always using the document filing function is explained below as an example. This setting is
selected in the [Job Handling] tab of the printer driver window.
1 Follow steps 1 and 2 on page 1-2.
2 Click the [Job Handling] tab.
a user name and a job name in the
4 Enter
"Job ID" field.
5 Click the [Apply] button.
3 Select the [Document Filing] checkbox.
6 Click the [OK] button.
The document filing function will now be used
each time you print a job.
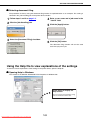
Using the Help file to view explanations of the settings
To view on-screen explanations of the settings in the printer driver, open the Help file.
■ Opening Help in Windows
This window is the SHARP AR-M451N PCL6 Properties in Windows Me.
Click [Help] to display the
Help screen.
You can search for information using
various methods from the tabs.
Downloaded From ManualsPrinter.com Manuals
1-3
SETTING THE PRINTER DRIVER
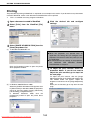
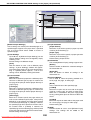
Printing
The procedure for printing in WordPad*1 is explained as an example in this section. If you do not have any documents
created in WordPad, create a text document in WordPad that can be printed.
*1 This is a standard accessory program in Windows
1 Open a document created in WordPad.
[Print] from the WordPad [File]
2 Select
menu.
the
4 Click
settings.
desired tab and configure
[SHARP AR-M451N PCL6] from the
3 Select
[Name] drop-down list.
(1)
In Windows 95/98/Me/NT 4.0
NOTES
● When the properties are opened from an
application, the settings that you configure in the
properties will remain in effect only while you use
the application.
● For information on the settings in the properties,
see "SETTING THE PRINTER DRIVER
PROPERTIES" in chapter 2.
Click the [Properties] button to open the printer
driver properties window.
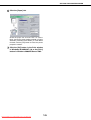
adjust the print contrast, follow the
5 To
procedure below. If you do not need to
adjust the print contrast, go to step 6 on
the next page.
To adjust the print contrast, click the [Image
Adjustment] button in the [Advanced settings] tab.
The window below will appear. Adjust the
brightness and contrast in the [Image Adjustment]
field.
When you are finished, go to step 6 on the next
page.
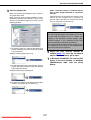
(2) In Windows 2000/XP/Server 2003
Select the [SHARP AR-M451N PCL6] printer icon
in [Select Printer].In Windows 2000, the properties
consist of five tabs: [Main], [Paper], [Advanced],
[Job Handling], and [Watermarks].
In Windows XP/Server 2003, click the
[Preferences] button to open the printer driver
properties.
Downloaded From ManualsPrinter.com Manuals
1-4
SETTING THE PRINTER DRIVER
6 Click the [Paper] tab.
Check the paper size to make sure it is correct.
Next, specify the paper feeding method in [Paper
Selection]. Normally [Auto Select] is used. When
finished, click the [OK] button to close the printer
properties window.
the [OK] button in the Print window
7 Click
in Windows 95/98/Me/NT 4.0, or the [Print]
button in Windows 2000/XP/Server 2003.
Downloaded From ManualsPrinter.com Manuals
1-5
SETTING THE PRINTER DRIVER
Using options to print
The procedure for using a peripheral device (option) to print is explained below using WordPad*1 as an example. If
you do not have any documents created in WordPad, create a text document in WordPad that can be printed.
*1 WordPad is a software application that is included in Windows as a standard accessory.
a document
1 Open
WordPad.
2 Select
menu.
that was created in
the
4 Click
settings.
desired tab and configure
[Print] from the WordPad [File]
"SHARP AR-M451N PCL6" from the
3 Select
[Name] drop-down list.
NOTES
● When the properties are opened from an
application, the settings that you configure in the
properties will remain in effect only while you use
the application.
● For information on the settings in the properties,
see "SETTING THE PRINTER DRIVER
PROPERTIES" in chapter 2.
(1) In Windows 95/98/Me/NT 4.0
To use the optional duplex module/bypass tray
to print, configure the settings in the following
window:
Click the [Properties] button to open the printer
driver properties window.
(2) In Windows 2000/XP/Server 2003
In [Select Printer], select the "SHARP AR-M451N
PCL6" printer icon.
In Windows 2000, the properties consist of five tabs:
[Main], [Paper], [Advanced], [Job Handling], and
[Watermarks].
In Windows XP/Server 2003, click the [Preferences]
button to open the printer driver properties.
Downloaded From ManualsPrinter.com Manuals
(1) To use a two-sided printing function, open the
"Main" tab and select the desired two-sided
printing radio button.
1-6
SETTING THE PRINTER DRIVER
5 Click the [Paper] tab.
When a mail-bin stacker is installed and you
wish to have output delivered to a particular
mail bin:
Make sure that the selected paper size is correct in
the [Paper Size] field.
Next, select the paper feeding method in [Paper
Selection]. Normally [Auto Select] is used. If you
wish to use the optional paper tray, select it in the
following window.
Click the [Paper] tab and select the mail bin (each
mail-bin has an assigned use) in [Output]. For
general output that does not need to be sorted,
you can select the mail-bin top tray.
NOTE
The size and type of paper and whether or not a tray
can be used for printing are set in "Paper tray
setting" in the machine's custom settings. (See
"Custom settings" in the "Operation manual (for
general information and copier operation)".)
If you select [Paper Source] or [Paper Type], be sure
to configure the tray settings in the [Configuration]
tab of the printer driver properties.
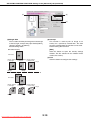
(1) To select a paper tray, select [Paper Source] in
[Paper Selection] and then select the desired
tray from the list.
the print contrast settings as
6 Adjust
needed (page 1-4). If you do not need to
Example: Selecting the bypass tray
adjust the print contrast, go to step 7.
Windows 95/98/Me/NT 4.0, click the [OK]
7 Inbutton
in the print window. In Windows
2000/XP/Server 2003, click the [Print]
button.
(2) To select the paper type, select [Paper Type] in
[Paper Selection] and then select the desired
paper type from the list.
Example: Selecting recycled paper
(3) To select the output tray installed on the duplex
module, set [Output] to [Left side tray].
Downloaded From ManualsPrinter.com Manuals
1-7
CHAPTER 2
SETTING THE PRINTER
DRIVER PROPERTIES
This chapter explains how to configure settings in the printer driver. The
settings are changed in the software application.
Page
SELECTING PRINTING FUNCTIONS...........................................................2-2
● Settings in the [Main] tab........................................................................2-2
● Settings in the [Paper] tab......................................................................2-6
● Settings in the [Advanced] tab ...............................................................2-9
● Settings in the [Job Handling] tab ........................................................2-12
● Settings in the [Watermarks] tab ..........................................................2-15
Downloaded From ManualsPrinter.com Manuals
2-1
SELECTING PRINTING FUNCTIONS
Almost all print functions are selected in the print driver properties window that appears when printing from an
application. The print functions can also be selected in the printer driver properties window that appears when
[Properties] is selected in the printer icon menu. The printer driver settings are grouped on tabs in the printer driver
properties window.
The procedure for selecting settings after opening the printer driver properties from an application is explained in this
section. (The windows that are shown are the AR-M451N PCL6 printer driver in Windows Me.)
The following optional peripheral devices are installed in the printer driver windows:
B/W scanner module/DSPF + Saddle stitch finisher + Mail-bin stacker + Punch module + Duplex module
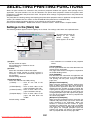
Settings in the [Main] tab
The following window appears when the [Main] tab is clicked. The settings and buttons are explained below.
Click this button to return all
settings to the factory
default
settings.
This
button appears on all tabs.
(1)
(2)
(3)
(1) Copies
Set the number of copies.
Any number from 1 to 999 can be set.
Default setting: 1
*1
[Tiled Pamphlet]
Print on paper double the size of the document size
selected in the application.
The page order will be rearranged as required for
the middle binding format.
(2) Collate
Select this checkbox to collate the copies.
When the staple function or punch function is
turned on, a checkmark automatically appears in
the checkbox.
Default setting: Selected
[2-Up Pamphlet]
The document size selected in the application will
be reduced in the same way as in 2-Up printing,
and printing will take place using the selected
paper size.
(3) Document Style
Select one-sided or two-sided printing.
[1-Sided]...................Print on one side of the
paper.
[2-Sided (Book)] .......Print on both sides of the
paper and bind at the side.
[2-Sided (Tablet)] .....Print on both sides of the
paper and bind at the top.
*1
[Pamphlet Style] .....Print on both sides of the
paper and bind down the
middle.
Default setting: 1-Sided
Downloaded From ManualsPrinter.com Manuals
Four selections are available for the pamphlet
format.
[Multiple Tiled Pamphlet]
When using the pamphlet function, printing takes
place on paper that is twice the size of the paper
specified in the application. When this function is
selected and the number of pages exceeds the
stapling limit, the pages are divided into groups that
can be stapled, and the pages in each group are
arranged pamphlet style and stapled. The groups
can then be put together to form a pamphlet with
the correct page order.
[Multiple 2-Up Pamphlet]
When using the pamphlet function, the pages are
reduced and printed 2-Up style on the size of the
paper specified in the application. When this
function is selected and the number of pages
exceeds the stapling limit, the pages are divided
into groups that can be stapled, and the pages in
each group are arranged pamphlet style and
stapled. The groups can then be put together to
form a pamphlet with the correct page order.
2-2
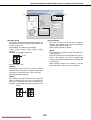
SELECTING PRINTING FUNCTIONS Settings in the [Main] tab (continued)
(5)
(4)
(5) User Settings
The user can store up to 30 sets of settings,
allowing the settings to be easily changed by
simply selecting the desired set.
Default setting: Factory Defaults
(4) N-Up Printing
Each page is reduced to allow multiple pages to be
printed on each sheet. The pages are printed in "Z"
order on each sheet.
The following five settings are available:
[1-Up], [2-Up], [4-Up], [6-Up], [8-Up], [9-Up],
[16-Up].
Example: 4-Up [Right, and Down]
[Save]
Save the settings under the name that appears in
"User Settings".
Up to 20 characters can be entered for the name. If
none of the settings have been changed (the
settings are still the factory defaults), this button will
be greyed out.
When [Delete] appears in the button, it can be
clicked to delete a stored set of user settings.
Border
Default setting: 1-Up
[Border]
This setting is greyed out when [1-Up] is selected.
Select whether or not to print a border around each
page when a setting other than 1-Up is selected.
Default setting: Not selected
[Order]
This setting is greyed out when 1-Up is selected.
When a setting other than 1-Up is selected, the
layout of the pages on the sheet can be selected.
Example: Changing the layout of 4-Up to [Left, and
Down].
Downloaded From ManualsPrinter.com Manuals
2-3
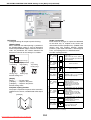
SELECTING PRINTING FUNCTIONS Settings in the [Main] tab (continued)
(6)
Staple sort function
Each sorted set of pages is stapled and delivered
to the offset tray, or stapled at the center and
delivered to the lower pamphlet tray. (Saddle stitch
finisher only) The relations between stapling
positions, paper feed orientations, allowed paper
sizes, and stapling limits are indicated below.
(6) Finishing
Configure settings for staple or punch finishing.
[Binding Edge]
When automatic two-sided printing is performed,
the [Binding Edge] setting is used to determine
how the top and bottom edges of the front and back
sides are positioned. The relation between the
document and each of the settings is as follows:
Vertical paper feeding
Possible stapling positions
Original image
[Left]
Left binding
[Right]
Right binding
[Top]
Top binding
Binding edge
Binding edge
Binding edge
Default setting: Left
Horizontal paper feeding*
[Staple]
[None] ............ Do not staple.
[1 Staple]........ Staple in one place.
[2 Staples] ...... Staple in two places.
Default setting: None
Pamphlet stapling function
The paper is stapled in two places at the centreline,
folded in half as shown, and delivered to the output
tray.
[Example]
6
4
2
7
9
One staple
at top left
corner
Possible paper sizes: A4, B5,
8-1/2" x 11"
Staple limit: 50 sheets (When a
finisher is installed, up to 30 sheets
can be stapled.)
One staple
at
bottom
left corner
Same as above
Two staples
at left edge
Same as above
Two staples
at centreline*
Pamphlet style is not possible
using vertically fed paper
One staple
at top left
corner
Possible paper sizes: A3, B4, A4R,
11" x 17", 8-1/2" x 14", 8-1/2" x 13"
and 8-1/2" x 11" R
Stapling capacity: Up to 50
sheets for 8-1/2" x 11"R, A4R
and B5R, and up to 25 sheets
for other sizes
One staple
at
bottom
left corner
Possible paper sizes: A3, B4, A4R,
11" x 17", 8-1/2" x 14", 8-1/2" x 13",
8-1/2" x 11"R
Stapling capacity: Up to 50
sheets for 8-1/2" x 11"R, A4R
and B5R, and up to 25 sheets
for other sizes
Two staples
at left edge
Possible paper sizes: A3, B4, 11" x
17" and 8-1/2" x 13"
Stapling capacity: Up to 25
sheets for any sizes
Two staples
at centreline
Possible paper sizes: A3, B4, A4R,
11" x 17", 8-1/2" x 11"R
Staple limit: 10 sheets
11
* Not possible when a finisher is installed (only possible when a
saddle stitch finisher is installed).
Downloaded From ManualsPrinter.com Manuals
2-4
SELECTING PRINTING FUNCTIONS Settings in the [Main] tab (continued)
(7)
(8)
(7) [Punch]
Use this to select the punch function.
When the punch function is selected, [Collate] is
automatically selected.
Default setting: Not selected
(8) [No Offset]
Select this when you do not wish sets of collated or
grouped pages to be offset from each other.
Default setting: Not selected
Offset function
Each set of printed pages is offset from the
previous set in the offset tray for easy separation.
(The offset function operates in the finisher or
saddle stitch finisher tray.) The offset function does
not operate when the staple sort function is
selected.
Punch function (only when a punch module is
installed)
When a punch module is installed on the saddle
stitch finisher, holes can be punched in the printed
pages before delivery to the tray. (The punch
function cannot be used in combination with the
pamphlet function.) When using the punch
function, the automatic image rotation function
does not operate.
Paper sizes that can be punched are indicated in
the specifications on page 3-15 of the "Operation
manual (for general information and copier
operation)".
Offset mode
[Example]
{Original 1}
{Punch positions}
{Original 2}
{Punch positions}
Downloaded From ManualsPrinter.com Manuals
2-5
Non-offset mode
SELECTING PRINTING FUNCTIONS
Settings in the [Paper] tab
The following screen appears when the [Paper] tab is selected. The settings and buttons in this screen are explained
below.
(1)
(2)
(3)
(1) Paper Size
Select the size of paper to be printed on.
Click one of the paper sizes that appear in the box.
Default setting: A4
(3) Image Orientation
Set the orientation of the document.
Click the radio button for [Portrait] or the radio
button for [Landscape].
[Portrait].......... Select portrait orientation.
[Landscape].... Select landscape orientation.
Default setting: Portrait
[Custom]
A custom paper size can also be set.
Only one custom paper size can be stored.
Click this button to open the window for setting the
custom paper size.
[Rotate 180 degrees]
Rotate the image 180° before printing.
Default setting: Not selected
(2) Fit To Paper Size
This field is used for the Fit to Page function. This
function automatically enlarges or reduces the
printed image to match the paper being used.
Enlargement or reduction takes place with the
image centred on the page.
To use this function, select the [Fit to Page]
checkbox and then select the size of paper to be
used.
Printing result
Landscape
Rotate 180 degrees
ABCD
NOTE
Printing normally takes place using the paper size
set in the application, regardless of the paper size
selected in the printer driver. When the paper size is
not specified in the application, the paper size setting
in the printer driver is used.
[Fit To Page]
When this checkbox is selected, the print image
corresponding to the paper size selected in [Paper
Size] is automatically reduced or enlarged to fit the
paper selected in [Fit To Paper Size].
Default setting: Not selected
Downloaded From ManualsPrinter.com Manuals
2-6
Landscape
Rotate 180 degrees
ABCD
SELECTING PRINTING FUNCTIONS Settings in the [Paper] tab (continued)
(4)
(5)
(6)
(7)
[Carbon Copy Settings]
Click this button to configure settings in the
[Carbon Copy Settings] window.
Default setting: Not selected
(4) Paper selection
Select the paper tray and paper type in this item.
Default setting: Auto Select
[Auto Select]
When [Auto Select] is selected, the tray containing the
paper specified in [Paper Size] is automatically used.
Print job
[Paper Source]
When this is selected, paper is drawn from the
specified tray regardless of the paper size setting.
[Paper Type]
When this selected, paper is fed from the tray that
has the specified type of paper.
There are also 7 user type settings, and a name
can be assigned to each type (maximum of 14
characters).
Result (when [Collate] is selected)
NOTE
The size and type of paper and whether or not a tray
can be used for printing are set in "Paper tray
setting" in the machine's custom settings. (See
"Custom Settings" in the Operation manual (for
general information and copier operation.))
If you select [Paper Source] or [Paper Type], be sure
to configure the tray settings in the [Configuration]
tab of the printer driver properties.
(6) Output
Use this setting to select the output tray. When the
stapling function is selected, the centre tray cannot
be selected.
Default setting: Centre Tray (This varies depending
on what options are installed.)
(7) Transparency Inserts
The printer can be instructed to separate the
transparencies by inserting blank sheets of paper.
Click this button to open the window for selection of
transparency insert settings.
This cannot be selected when two-sided printing,
the staple function, or the punch function is
selected.
[Tray Status]
Click this button to display the paper size, paper
type, and paper remaining in the machine's paper
trays.
This function operates when the machine is used
on a network.
(5) Carbon copy
Select this function to print multiple copies of the
same document on paper from different trays. Click
the [Carbon Copy Settings] button to configure the
carbon copy settings. For example, if regular paper
is loaded in tray 1 and coloured paper is loaded in
tray 2, you can print an original and a copy of an
invoice. You can also load regular paper in tray 1
and recycled paper in tray 2 to print a copy for
presentation and a copy for retention.
Downloaded From ManualsPrinter.com Manuals
Original
Inserts
2-7
SELECTING PRINTING FUNCTIONS Settings in the [Paper] tab (continued)
(1)
(2)
(3)
(5)
(6)
(4)
[Different Paper Settings]
These settings are used to print selected pages on a
specified type of paper or on paper from a specified
tray, or to have blank sheets added as inserts at
specified pages.
(3) Paper Selection
[Paper Source]
Select this if you wish to specify a paper tray to be
used for [Insert Position] (2).
[Paper Type]
Select this if you wish to specify a paper type to be
used for [Insert Position] (2).
Default setting: Paper Source
(1) User Settings
Up to 30 sets of [Different Paper Settings] can be
stored, allowing settings to be changed by simply
selecting a set.
Default settings: No Different Paper
(4) Information
The stored [Different Paper] settings appear here.
[Save]
Click this button to save a set of different paper
settings. A [User Settings] window will appear.
User setting text entries can be up to 20 characters
long. If a [Delete] button appears, a set of user
settings can be deleted by clicking this button.
[Delete]
Click this button to delete the selected settings in
the Information list.
[Delete All]
Click this button to delete all settings in the
Information list.
(2) Insert Position
[Cover Page]
When this is selected, paper from a different paper
source or a different type of paper is used for the
first page of the print job. Select [Paper Source] or
[Paper Type].
(5) Printing Method
This is used to select the printing method for a
cover page, last page, or other page.
[Blank]
Insert a blank sheet at the specified page.
[Last Page]
When this is selected, paper from a different paper
source or a different type of paper is used for the
last page of the print job. Select [Paper Source] or
[Paper Type].
[1-Sided]
Select this to print only on one side of the paper
used for a cover page, last page, or other page.
When this is selected for the [Last Page] (back
cover), printing takes place on the back side of the
sheet.
[Other Page]
When this is selected, specify the pages where you
wish to insert a different type of paper. If the [Printing
Method] (5) is set to [Blank], the sheet will be inserted
in front of the specified page. If [1-Sided] is selected,
the specified page will be printed on the front side of
the inserted sheet. If [2-Sided] is selected, the
specified page and the following page will be printed
on the front side and back side of the inserted sheet.
Default setting: Cover page
Downloaded From ManualsPrinter.com Manuals
[2-Sided]
Select this to print on both sides of the paper used
for a cover page, last page, or other page.
Default setting: No
(6) [Add]
Click this button to save a set of [Different Paper]
settings. The settings will be added to the
Information list.
2-8
SELECTING PRINTING FUNCTIONS
Settings in the [Advanced] tab
The following screen appears when the [Advanced] tab is selected. The settings and buttons in this screen are
explained below.
(1)
(2)
(3)
(4)
(1) Image Quality
This item is used to select the [Resolution Settings]
and [Graphics Mode] for printing.
(3) Text To Black
Use this setting to have all text other than white text
printed in black. (This setting is useful when
printing faint coloured text that is difficult to read.)
[Resolution Settings]
Select 300 dpi or 600 dpi.
Default setting: 600 dpi
Printing result
Print data
[Graphics Mode]
Select [Raster] or [Vector] (HP-GL/2). [Raster] is
used to print with raster graphics, and [Vector] is
used to print with Vector (HP-GL/2) commands.
Default setting: Vector (HP-GL/2)
ABCD
EFGH
Text To
Black
ABCD
EFGH
Text To
Black
ABCD
EFGH
(2) Image Adjustment
This field is used to adjust the brightness and
contrast.
(4) Vector To Black
Use this setting to have all lines or areas other than
white lines areas printed in black. (This setting is
useful when printing faint coloured lines or areas
that are difficult to recognize.)
[Brightness]
This adjusts the brightness of colours. The
brightness can be set from 0 to 100. Colours will
appear closer to white as the number is increased.
Default setting: 50
Printing result
[Contrast]
The contrast can be set from 0 to 100. The higher
the number, the higher the contrast.
Default setting: 50
Downloaded From ManualsPrinter.com Manuals
Print data
2-9
Vector To
Black
Vector To
Black
SELECTING PRINTING FUNCTIONS Settings in the [Advanced] tab (continued)
(5)
(6)
(7)
(5) Margin Shift
This is used to shift the print image to create margin
at the left, right, or top of the paper. Select [None],
[10 mm], [20 mm], or [30 mm].
Default setting: None
[Edit]
Click this button to open the overlay settings
window. The file selected in this window will be
used as the overlay.
One-sided copying
Print data
Image shifted
to the right
Image shifted Image shifted
to the left
to the bottom
(7) Font
Click this button to configure font settings.
Margin
Margin
Margin
Two-sided copying
Print data
Image shifted
to the right
Image shifted
to the left
Image shifted
to the bottom
Margin
Margin
(6) Overlays
This function is used to print an image as an
overlay on a previously created form. The form
must be created before the function can be used.
Default setting: Not selected
Margin
Downloaded From ManualsPrinter.com Manuals
2-10
SELECTING PRINTING FUNCTIONS Settings in the [Advanced] tab (continued)
(8)
(9)
(10)
(11)
(8) Smoothing
Check "Smoothing" to smooth the edges of text or
graphics and reduce jagged lines in order to
obtain virtually high resolution.
(9) Photo Enhancement
This mode is most useful when printing
Photographic Image. The image quality might be
down for Line Art.
(10) Toner Save
Select this to save toner. Solids will be printed in
halftone to reduce toner consumption.
Downloaded From ManualsPrinter.com Manuals
2-11
(11) Tandem Print
Two machines that are connected in a system
that allows tandem copying (sharing a large copy
job between two machines) can also be used for
tandem printing. To use tandem printing, settings
must be configured in the key operator programs.
(See "Tandem setting" in "Network settings" on
page 5-7 of the key operator program.)
Default setting: Not selected
To cancel a tandem printing job
Touch the [STOP/DELETE] key in the job status
screen of both the server machine and the client
machine. Printing will be cancelled and the job
deleted.
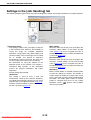
SELECTING PRINTING FUNCTIONS
Settings in the [Job Handling] tab
The following window appears when the [Job Handling] tab is clicked. The settings and buttons are explained below.
(1)
(1) Document Filing
This setting is used to save a print job as a data file
in the hard disk of the machine. Two methods of
saving the image are available: Automatic
temporary saving [Quick File], [Main Folder] and
[Custom Folder]. The saved image can be called
up as needed and printed or otherwise
manipulated. A name (user name, file name, etc)
can be assigned to the file for easy searching.
For information on using this function at the
operation panel of the machine, see chapter 7,
"Document filing function", of the "Operation
manual (for general information and copier
operation)".
Default setting: Not selected.
[Quick File]
This setting is used to have a print job
automatically saved to the automatic temporary
save folder when printing is finished. A user name
and job name can assigned to the file (page 2-14);
however, the job cannot be saved as a confidential
file with a password (page 2-13).
Downloaded From ManualsPrinter.com Manuals
2-12
[Main Folder]
Select this when you wish to save a print job in the
machine's "Main Folder". A user name and job
name (page 2-14) can be assigned to the file. A
confidential print job can be saved in this folder with
a passcode (page 2-13).
[Custom Folder]
Select this when you wish to save a print job in the
machine's "Custom Folder". A user name and job
name (page 2-14) can be assigned to the file. A
confidential print job can be saved in this folder with
a passcode (page 2-13).
[Stored to]
When "Custom Folder" is selected, click this button
to open the "Stored to" window. This window is
used to select the folder for saving the file, and to
enter a passcode if one has been established for
the folder. The folder (Main Folder or Custom
Folder) is selected from the list in the "Folder
Selection" screen. " " appears next to folders
that have passcodes.
SELECTING PRINTING FUNCTIONS Settings in the [Job Handling] tab (continued)
(2)
(2) Retention
[Hold Only]
This setting is used to prevent a print job from being
misplaced. When a print job is sent to the
computer, the machine will hold it in a Filing folder
without printing it. The user can initiate printing as
needed using the operation panel of the machine.
The job can also be deleted without printing it.
[Hold After Print]
This setting is used to hold a print job in a Filing
folder after it is printed. The file can be printed
again or deleted as needed.
[Sample Print]
This setting is used to prevent the occurrence of
excessive misprints when printing a large number
of copies. When this setting is selected and a print
job is sent to the machine, only the first set of
copies is printed and then the job is stored in a
Filing folder. After checking the first set of copies to
make sure that the margins, staple positions, and
other aspects of the job are satisfactory, the user
initiates printing from the operation panel of the
machine and the remaining sets are printed. (The
sample set is included in the total number of sets.)
If the sample set is not satisfactory, the job can be
deleted.
Downloaded From ManualsPrinter.com Manuals
2-13
[Pass Code] (5-digit number)
To require that a passcode be entered at the
operation panel of the machine to print a job stored
in a Filing folder, enter the passcode (5-digit
number) in [Pass Code].
• When a passcode is set in "Hold Only" mode
The passcode must be entered at the operation
panel of the machine to print the job.
• When a passcode is entered in "Hold After
Print" mode
After the initial printing, the passcode must be
entered at the operation panel of the machine to
print the job again.
• When a passcode is set in "Sample Print"
mode
After printing the sample set, the passcode must
be entered at the operation panel of the machine
to print the remaining sets.
Default setting: Hold Only
SELECTING PRINTING FUNCTIONS Settings in the [Job Handling] tab (continued)
(5)
(6)
(3)
(4)
(3) Notify Job End
This is used to select whether or not you wish to be
notified when a print job is finished. This setting is
only effective when the printer status monitor is
running.
If the printer status monitor is not running, the
setting will not operate even if selected.
Default setting: Selected
(6) Default Job ID
Use this to set the default user name and job name
that appear in the operation panel of the machine.
Note that if [User Name] and [Job Name] are not
selected, your Windows login name and the file
name selected in the application will be
automatically used. The names that appear in the
dialog box that appears when printing is executed
will appear in the operation panel of the machine.
(4) Auto Job Control Review
Select this to have the job control screen always
open when printing from the printer driver.
If you changed the account number, user name,
job name, or passcode, you can also save your
changes.
Default setting: Not selected
[User Name]
Use this to set the default user name that appears in
the operation panel of the machine. Select this
checkbox to have the [User Name] entered in this
window appear in the operation panel of the
machine. If not selected, your Windows login name
will be automatically used. The name that appears
in [Job ID] in the [Job Control] window (which
appears when printing is executed) will appear in
the operation panel of the machine. Up to 16
characters can be entered for the name.
Default setting: Not selected
(5) Account Number Settings
When "Auditing mode" is enabled in the key
operator programs, a count is kept of the number of
pages printed by each account. Enter your account
number for printing that was established in the key
operator programs. When the [Account Number]
checkbox is selected, the number entered in this
tab will be used.
To establish account numbers, see the key
operator program manual.
If a limit for the number of pages that your account
can print is set in the key operator programs,
printing will not be possible after the limit is
reached.
If "Cancel jobs of invalid accounts" is enabled in the
key operator programs and an incorrect account
number or no account number is entered, printing
will not take place. If you do not wish to restrict use
of the machine, disable the setting. Pages printed
without entering a valid account number will be
added to the "OTHERS" count.
Downloaded From ManualsPrinter.com Manuals
2-14
[Job Name]
Use this to set the default job name that appears in
the operation panel of the machine. Select this
checkbox to have the [Job Name] entered in this
window appear in the operation panel of the
machine. If not selected, the file name selected in
the application will be automatically used. The
name that appears in [Job ID] in the [Job Control]
window (which appears when printing is executed)
will appear in the operation panel of the machine.
Up to 30 characters can be entered for the name.
Default setting: Not selected
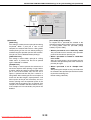
SELECTING PRINTING FUNCTIONS
Settings in the [Watermarks] tab
The following window appears when the [Watermarks] tab is clicked. The settings and buttons are explained below.
(4)
(5)
(1)
(6)
(7)
(8)
(9)
(10)
(2)
(3)
(1) Watermark preview
The watermark function is used to print a
watermark (a faint, shadowlike text image) on the
paper. This shows a preview of the currently
selected watermark.
The position of the watermark can be adjusted by
directly dragging the image with your mouse, or by
using the scrollbars at the right and bottom of the
preview screen.
Default setting: x: 0, y: 0
[Update]
Click this button to adjust the size or angle of the
text of a stored watermark.
[Delete]
Click this button to delete a stored watermark.
(5) Text
When you wish to create a custom watermark,
enter the text of the watermark here. Up to 100
characters can be entered. To store the entered
text as a watermark, click the [Add] button
explained in (4) above.
NOTE
The image that appears in the Watermark Preview is
an approximate representation of what will appear in
the print.
(6) Gray Scale
Use this setting to adjust the colour of the font of
the currently selected watermark.
Any value from 0 to 255 points can be selected.
Default setting: 192
[Center]
Select this setting to have the watermark printed in
the centre of the paper.
(7) Edit Fonts
Use this setting to select the font of the currently
selected watermark.
(2) Size
Use this setting to adjust the size of the characters
of the currently selected watermark.
Any number from 6 points to 300 points can be
selected.
Default setting: 200 (points)
(8) Transparent Text
Select this checkbox when you wish to have the
characters of the watermark printed faintly in the
background of the text.
Default setting: Selected
(3) Angle
Use this setting to adjust the angle of the text of the
currently selected watermark.
Select any angle from -90° to 90°.
Default setting: 45°
(4) Watermark
Select a watermark from the watermarks that
appear in the box.
Default setting: None
[Add]
Click this button to create a custom watermark.
Downloaded From ManualsPrinter.com Manuals
(9) On First Page Only
Select this checkbox when you want to have a
watermark printed on only the first page of a print
job.
Default setting: Not selected
(10)As Outline Only
Select this checkbox when you want to print only
the outline of the characters of a watermark.
Default setting: Not selected
This setting cannot be selected when setting (8) is
selected.
2-15
CHAPTER 3
WEB PAGES IN THE
PRINTER
This chapter explains various functions that allow you to access the
Web pages in the printer from your computer.
Page
REMOTE OPERATION VIA A NETWORK ....................................................3-2
● How to access the Web page and view Help.........................................3-2
ABOUT THE WEB PAGES (FOR USERS)....................................................3-3
● Directly printing a file on a computer......................................................3-4
ABOUT THE WEB PAGES (FOR THE ADMINISTRATOR) ..........................3-5
● Protecting information programmed in the Web page ([Passwords]).....3-6
● Directly printing a file on an FTP server .................................................3-7
● E-mail Print.............................................................................................3-9
● E-mail Status and E-mail Alert settings................................................3-10
Downloaded From ManualsPrinter.com Manuals
3-1
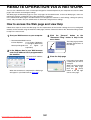
REMOTE OPERATION VIA A NETWORK
You can use a Web browser such as Netscape Navigator or Internet Explorer on your computer to access the Web
page in the machine and configure settings.
The Web pages include both pages for users and pages for the administrator. In the user Web pages, users can
monitor the machine, and directly print a file specified on a computer.
In the administrator Web pages, the administrator can configure the machine's e-mail settings, settings for print by
e-mail, and passwords. Only the administrator is allowed to configure these settings.
How to access the Web page and view Help
Follow these steps to access the Web page. To view explanations of the function settings that can be configured
remotely via the network using the machine's Web page, click the "General" button or the "Document Filing" button
in Help in the menu frame.
1 Start your Web browser on your computer.
the "General" button or the
3 Click
"Document Filing" button in Help in the
menu frame.
• Recommended Web browser
Internet Explorer:
5.5 or higher (Windows),
5.1 or higher (Macintosh)
Netscape Navigator: 6.0
or
higher
(or
equivalent)
The Help page provides
detailed explanations of
the settings.
the Address box in your Web browser,
2 Inenter
the IP address that is programmed in
the machine.
To check the IP address,
see page 5-7.
4 Close the Help page
In the menu frame, select
a setting that you wish to
configure.
When you have finished
using the Web page,
click the
(close)
button in the top right
corner of the page.
When the connection is completed, the Web page
will appear in your Web browser.(page 3-3)
Downloaded From ManualsPrinter.com Manuals
3-2
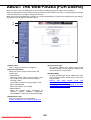
ABOUT THE WEB PAGES (FOR USERS)
When you access the user Web pages in the machine, the following page will appear in your browser.
A menu frame appears on the left side of the page. When you click an item in the menu, a screen appears in the right
frame that allows you to configure settings for that item.
When you have finished configuring settings, be sure to click [Submit] to save them. For explanations of the settings,
click [General] under [Help] in the menu frame.
(1)
(2)
(3)
(4)
(5)
(4) Printer Test Page
The "Printer Settings List", which shows printer
condition settings and key operator settings, and
various font lists can be printed.
(1) Menu frame
Click a setting in the menu to configure it.
(2) System Information
Shows the current status of the machine and
model name.
• Device Status
Shows the current status of the machine, paper
trays, output trays, toner and other supplies,
and page counts.
Out of paper and other warnings appear in red.
• Device Configuration
Shows what options are installed.
• Network Status
Shows the network status. Information on
"General", "TCP/IP", "NetWare", "AppleTalk",
and "NetBEUI" is shown on the respective pages.
(5) Admin Mode
To open the Web pages for the administrator, click
here and then enter the administrator's user name
and password.
ABOUT THE WEB PAGES (FOR THE
ADMINISTRATOR) (page 3-5)
Protecting information programmed in the Web
page ([Passwords]) (page 3-6)
(3) Submit Print Job
A file on a computer can be printed out.
Directly printing a file on a computer (page 3-4)
Downloaded From ManualsPrinter.com Manuals
3-3
ABOUT THE WEB PAGES (FOR USERS)
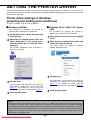
Directly printing a file on a computer
The address of a file that can be accessed from your computer can be specified to directly print the file without using
the printer driver.
In addition to files on your computer, files on any other computer on the same network that can be accessed from
your computer can be printed in this way.
To directly print a file on a computer, follow these steps:
[Submit Print Job] in the link menu of
1 Click
the menu frame.
the address of the file that you wish
3 Enter
to print in [Enter Filename].
The "Submit Print Job" page appears.
You can also click [Browse] to browse for the file.
2 Select print settings in [Job Detail].
4 Click [Print].
The settings are described in the table below.
Printing begins.
NOTE
• Only PDF and TIFF files can be printed.
• To print PDF files, the optional PS3 expansion kit must be installed. Encrypted PDF files cannot be printed.
Advanced job settings
Item
Factory default
setting
Description
Copies
Set the number of copies from 1 to 999.
1
Paper Size
Select the size of paper to be used for printing.
Not Specified
Orientation
Select the printing orientation. (Portrait / Landscape)
Portrait
Binding Edge
Select the binding position for two-sided printing. (Left / Top / Right)
Left
Duplex
To print on both sides of the paper, select this checkbox. (Only for
models that support the two-sided printing.)
Not selected
Staple
Select a staple setting. (Off / 1 Staple / 2 Staples)
Off
Account Number
When "AUDITING MODE" is enabled in the key operator programs,
-
enter your 5-digit account number.
Quick File
To save a job using Quick File of the document filing function, select
this checkbox.
Downloaded From ManualsPrinter.com Manuals
3-4
-
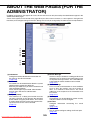
ABOUT THE WEB PAGES (FOR THE
ADMINISTRATOR)
In addition to the menus that appear for users, other menus that can only be used by the administrator appear in the
administrator Web pages.
A menu frame appears on the left side of the page. When you click an item in the menu, a screen appears in the right frame
that allows you to configure settings for that item. Settings that can only be configured by the administrator are explained here.
(1)
(2)
(3)
(4)
(5)
(6)
(7)
(8)
(1) Information
Configure machine identification information for
the status & alert E-mail function.
(page 3-10)
(2) Passwords
Passwords can be established to allow the system
administrator to protect the Web site.
Enter the passwords that you wish to establish and
click the [Submit] button.
There are two types of password authentication:
one for users and one for administrators.
(page 3-6)
(3) Pull print (Panel)
The machine has a direct print function that lets
you print a PDF file or TIFF file from the operation
panel without using the printer driver. This screen
is used to enter the FTP servers that store the files.
Up to four FTP servers can be entered.
(page 3-7)
Downloaded From ManualsPrinter.com Manuals
(4) Status Message
Use this to set up a schedule for sending specified count
information such as the total count and the output counts
for the printer and copy functions. The e-mail addresses
of the recipients and the schedule must be entered.
(page 3-11)
(5) Alerts Message
This is used to send information on error conditions
such as when the machine runs out of paper or
toner, or a misfeed or failure occurs. The e-mail
addresses of the recipients of the information must
be entered.
(page 3-11)
(6) Security
Unused ports can be disabled for greater security
and port numbers can be changed.
(7) Services
Configure information concerning the e-mail
system.
(page 3-10)
(8) Print Port
This is used to configure settings for E-mail print.
(page 3-9)
3-5
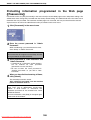
ABOUT THE WEB PAGES (FOR THE ADMINISTRATOR)
Protecting information programmed in the Web page
([Passwords])
Passwords can be set (click [Passwords] in the menu frame) to restrict Web page access and protect settings. The
administrator must change the password from the factory default setting. The administrator must also take care to
remember the new password. The next time the Web pages are accessed, the new password must be entered.
A password can be set for the administrator and a password can be set for users.
1 Click [Passwords] in the menu frame.
the current
2 Enter
Password".
password in "Admin
When establishing a password for the first time,
enter "Sharp" in "Admin Password".
CAUTION
Be sure to enter "S" in upper case and "harp" in lower
case (passwords are case sensitive).
passwords in "User Password" and
3 Enter
"Admin Password".
• A maximum of 7 characters and/or numbers
can be entered for each password
(passwords are case sensitive).
• Be sure to enter the same password in
"Confirm Password" as you did in "New
Password".
you have finished entering all items,
4 When
click [Submit].
The entered password is stored.
After setting the password, turn the machine
power off and then back on.
When prompted to enter a password, a user should
enter "user" and an administrator should enter
"admin" in "User Name". In "Password", the
respective password for the entered user name
should be entered.
For more information, click [Help] in the upper righthand corner of the window.
Downloaded From ManualsPrinter.com Manuals
3-6
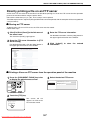
ABOUT THE WEB PAGES (FOR THE ADMINISTRATOR)
Directly printing a file on an FTP server
A FTP server can be stored in the machine to enable direct printing of a file on the FTP server from the operation
panel of the machine without using the printer driver.
Files with the extensions pcl, ps*, pdf*, tiff, tif, and prn can be printed.
*The PS3 expansion kit is required. (Encrypted PDF files cannot be printed, with the exception of files encrypted with
a null password.)
■ Storing an FTP server
To directly print a file on an FTP server, the FTP server must be stored.
Follow these steps:
[Pull Print (Panel)] in the link menu of
1 Click
the menu frame.
3 Enter the FTP server information.
For detailed information, click the [Help] button in
the upper right-hand corner of the window.
The "Pull Print (Panel)" page appears.
the FTP server information in [FTP
2 Store
Server Setup].
[submit]
4 Click
information.
For detailed information, click the [Help] button in
the upper right-hand corner of the window.
to store the entered
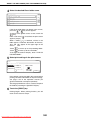
■ Printing a file on an FTP server from the operation panel of the machine
the [DOCUMENT FILING] key twice
1 Press
to display the global access screen.
3 Select the desired FTP server.
GLOBAL ACCESS
Technical dept. server
FTP
2 Touch the [FTP] key.
GLOBAL ACCESS
This screen will not
appear if an FTP server
has not been stored.
FTP
Downloaded From ManualsPrinter.com Manuals
3-7
PPD1_FTP_server
ABOUT THE WEB PAGES (FOR THE ADMINISTRATOR)
4 Select the desired file or folder name.
PPD1_FTP_server
FILE OR FOLDER NAME
1/2
Data base
User_area
Product_info.tiff
Reply.pdf
If the file or folder does not appear in the screen,
press the
or
key until it appears.
To return to the global access screen, touch the
key.
When a file name (
appears (step 5).
) is touched, the print screen
When a folder (
) is touched, all files in the
folder appear. Touch the desired file. At this time,
and
appear in the upper right of the
screen.
Touch
Touch
to move up to the preceding folder.
to move up to the root folder.
To change the order of display, touch "FILE OR
FOLDER NAME".
5 Select print settings in the print screen.
CANCEL
PRINT
Basic specifications
AUTO A4
PAPER SELECT
OUTPUT
NUMBER OF PRINTS
2-SIDED
1 (1~999)
QUICK FILE
TANDEM PRINT
PRINT
Print settings can be changed in this screen before
printing. For more information on the print settings,
see page 7-16 of the operation manual (for
general information and copier operation).
The image printed here can be saved in the quick
file folder by touching the [QUICK FILE] key.
6 Touch the [PRINT] key.
Printing begins. When printing finishes, you will
return to the screen of step 4.
Downloaded From ManualsPrinter.com Manuals
3-8
ABOUT THE WEB PAGES (FOR THE ADMINISTRATOR)
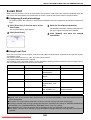
E-mail Print
When an e-mail account is set up for the machine, this function is used to have the machine periodically check the
mail server and automatically print attachments to e-mails it receives without the need for the printer driver.
■ Configuring E-mail print settings
To use E-mail Print, the machine's e-mail account information must be configured in the machine. Follow these
steps:
[Print Port] in the link menu of the
1 Click
menu frame.
3 Enter the E-mail print information.
For detailed information, click the [Help] button in
the upper right-hand corner of the window.
The "Print Port Setup" page appears.
2 Click [E-mail Print].
[Submit]
4 Click
information.
and store the entered
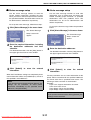
■ Using E-mail Print
In the "To:" line of your e-mail program, enter the e-mail address of the machine, attach the file that you wish to print,
and send the e-mail
Files with the extensions pcl, ps*, pdf*, tiff, and tif can be printed.
*The optional PS3 extension kit is required.
The number of copies and other settings can be specified by entering control commands in the message of the email. The following control commands can be entered:
Function
Command
Values
Example
Number of copies
COPIES
1-999
COPIES=2
Staple
JOBSTAPLE
STAPLENO,
STAPLELEFT
JOBSTAPLE=STAPLENO
Two-sided printing
DUPLEX
OFF, TOP, LEFT,
RIGHT
DUPLEX=TOP
Account number
ACCOUNTNUMBER
5-digit number
ACCOUNTNUMBER=11111
File type
LANGUAGE
PCL, PCLXL,
POSTSCRIPT, PDF,
TIFF
LANGUAGE=TIFF
Paper
PAPER
Useable paper type
(A4, LETTER, etc.)
PAPER=A4,
PAPER=LETTER
Quick File
QUICKFILE
OFF, ON
QUICKFILE=ON
NOTES
● Specify "Text" for the format of the e-mail message. If rich text format (HTML) is used, the entered commands
will be disregarded.
● To receive a list of the control commands, send an e-mail with "config" entered in the message.
● If nothing is entered in the message, printing will take place according to the settings in "PRINTER CONDITION
SETTINGS" in the "PRINTER DEFAULT SETTINGS" menu of the user settings.
● Encrypted PDF files cannot be printed, with the exception of files encrypted with a null password.
● Only specify a file type when specifying a page description language. Normally a file type does not need to be
specified.
Downloaded From ManualsPrinter.com Manuals
3-9
ABOUT THE WEB PAGES (FOR THE ADMINISTRATOR)
E-mail Status and E-mail Alert settings
These functions send information on machine use (print count, copy count, etc.) and error conditions (paper misfeed,
out of paper, out of toner, etc.) via e-mail to the administrator of the machine or the dealer.
■ Information setup
■ SMTP setup
Machine identification information for the status
and alert e-mail functions is configured in the
"Information Setup" screen. The entered
information will be included in status and alert email messages.
1 In the menu frame, click [Information].
The "Information Setup"
screen will appear.
2 Enter the machine information.
For detailed information, click the [Help] button in
the upper right-hand corner of the window.
[Submit]
3 Click
information.
The status and alert e-mail functions use SMTP
(Simple Mail Transport Protocol) to send e-mail.
The following procedure is used to set up the email environment. This must be done by the
system administrator or other person familiar with
the network.
1 Click [Services] in the menu frame.
The "Services Setup"
screen will appear.
2 Click [SMTP].
to store the entered
the information required to set up
3 Enter
the e-mail environment.
For detailed information, click the [Help] button in
the upper right-hand corner of the window.
[Submit]
4 Click
information.
Downloaded From ManualsPrinter.com Manuals
3-10
to store the entered
ABOUT THE WEB PAGES (FOR THE ADMINISTRATOR)
■ Status message setup
■ Alerts message setup
Use the status message function to send the
current counter information, including the copy
count, print count, and total output count, based on
the specified schedule. The destinations can be set
for administrators and dealers respectively.
Use the alert message function to send alert
information, such as empty toner and paper and
trouble including paper misfeeds, to specified
destinations when such problems occur. The
destinations can be set for administrators and
dealers respectively.
To set up the status message, follow these steps.
1
To set up the alert message, follow the procedure
below.
Click [Status Message] in the menu frame.
1 Click [Alerts Message] in the menu frame.
The "Status Message
Setup" screen will
The "Alerts Message
appear.
Setup" screen will
appear.
the required information, including
2 Enter
the destination addresses and time
schedule.
2 Enter the destination addresses.
For detailed information, click the [Help] button in
the upper right-hand corner of the window.
[Submit]
3 Click
information.
For detailed information, click the [Help] button in
the upper right-hand corner of the window.
to store the entered
When the E-mail Status settings are completed, printer
count information will be sent periodically by e-mail to
the specified e-mail addresses.
NOTE
If you quit the browser before clicking [Submit], the
settings will be cancelled. To send printer
information immediately to the specified e-mail
addresses, click [Send Now].
[Submit]
3 Click
information.
to store the entered
If these parameters are set, event information for the
printer will be transmitted to the specified addresses
via E-mail each time a specified event occurs. The
meaning of each event item is shown below.
Example:
Paper Jam: A paper misfeed has occurred.
Toner Low: Toner is low.
Toner Empty: Toner must be added.
Paper Empty: Paper must be loaded.
NOTE
If you quit the browser before clicking [Submit], the
settings will be cancelled.
Downloaded From ManualsPrinter.com Manuals
3-11
CHAPTER 4
PRINTER BASIC SETTINGS
This chapter describes the printer configuration settings.
Page
MAKING CONFIGURATION SETTING .........................................................4-2
● Operation procedure common to all printer configuration settings
(items that can be set from the operation panel)....................................4-2
● Printer Default settings...........................................................................4-4
● PCL settings...........................................................................................4-5
● PostScript settings .................................................................................4-5
Downloaded From ManualsPrinter.com Manuals
4-1
MAKING CONFIGURATION SETTING
The printer configuration setting allows basic printer settings to be made. The items set with the printer configuration
settings are shown below.
● Printer default settings .........Basic settings used in printing (See page 4-4.)
● PCL settings .........................Sets a PCL symbol set. (See page 4-5.)
● PostScript settings* ..............Sets whether a PostScript error page is printed or not when a PostScript error has
occurred. (See page 4-5.)
* An optional PS3 expansion kit is needed.
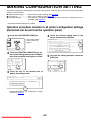
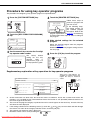
Operation procedure common to all printer configuration settings
(items that can be set from the operation panel)
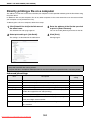
1 Press the [CUSTOM SETTINGS] key.
the desired setting item
4 Touch
screen and touch the [OK] key.
The custom setting
menu screen will
appear.
CUSTOM SETTINGS
PRINTER DEFAULT SETTINGS
COPIES
ORIENTATION
DEFAULT PAPER SIZE
the [PRINTER CONDITION] key on
2 Touch
the custom setting menu screen to display
PAPER TRAY
SETTING
ATE
FORWARD
PRINTER
CONDITION
3
EXIT
CUSTOM SETTINGS
PRINTER CONDITION SETTINGS
PCL SETTINGS
PostScript SETTINGS
Detailed descriptions for configuration settings
start on the page 4-4.
Downloaded From ManualsPrinter.com Manuals
PORTRAIT
A4
finish the setting operation, touch the
5 To
[EXIT] key.
Touch the key of the desired item to
display its setting screen.
PRINTER DEFAULT SETTINGS
1
To set another item, repeat steps 3 and 4.
the printer condition setting menu screen.
PRINT
on the
4-2
T
PAPER TRAY
SETTING
ARD
PRINTER
CONDITION
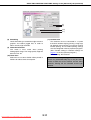
MAKING CONFIGURATION SETTING
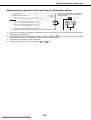
Supplementary explanation of key operation for configuration setting
These keys and indicator are available on
setting screens that require the entry of
numerical values.
CUSTOM SETTINGS
PRINTER DEFAULT SETTINGS
A
DEFAULT OUTPUT TRAY
DEFAULT PAPER TYPE
LINE THICKNESS
20
CENTRE TRAY
B
C
D
999)
B
PLAIN
5
C
A
(1
D
The name of the program category or particular item to be set will appear on the touch key. A touch of the key
will select the item displayed.
If the settings continue on the following screen(s), touch the
and
keys to move back and forth through
the screens. To return to the category selection screen, touch the [OK] key.
The currently set numerical value is displayed.
Numerical values can be set by touching the
and
keys.
Downloaded From ManualsPrinter.com Manuals
4-3
MAKING CONFIGURATION SETTING
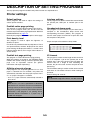
Printer Default settings
The default settings are used to set specific print conditions for printing in an environment where the print driver is
not used (such as printing from MS-DOS or from a computer that does not have the provided print driver installed).
NOTE
When the printer driver is used for printing and the printer driver settings conflict with the printer default settings,
the printer driver settings take precedence. For items that can be set in the printer driver, perform the settings in
the printer driver.
The following settings are available:
■ Copies
■ Default paper type
COPIES sets the number of print to make.
The paper type to be used for printing under normal
conditions is set. Printing will be performed on the
specified type of paper unless otherwise specified.
Default setting: 1
The number of copies can be set from 1 to 999.
Default setting: PLAIN
■ Orientation
PLAIN, PRE-PRINTED, RECYCLED, LETTER
HEAD, PRE-PUNCHED or COLOUR can be set.
ORIENTATION allows portrait orientation or
landscape orientation to be selected for printing.
■ 2-SIDED PRINT
Default setting: PORTRAIT
Printing mode, 1-SIDED or 2-SIDED, to be used for
printing in the normal condition is set.
PORTRAIT or LANDSCAPE can be set.
Default setting: 1-SIDED
■ Default paper size
1-SIDED, 2-SIDED (BOOK) or 2-SIDED (TABLET)
can be set.
The paper size to be used for printing under normal
conditions is set.
Printing will be performed on the specified size of
paper unless otherwise specified.
■ Smoothing
SMOOTHING reduces jaggies seen at roundish
curved portions of characters and images to be
printed and improves pseudo resolution.
Default setting: A4 or 8-1/2 x 11
A3, B4, A4, B5, A5, 11X17, 8-1/2X14, 8-1/2X13, 8-1/
2X11, 7-1/4X10-1/2 or 5-1/2X8-1/2 can be set.
Default setting: Off
■ Default output tray
Smoothing on or off can be selected.
The output tray to be used for printing under normal
conditions is set. Printed sheets will be output to
the specified tray unless otherwise specified by
application software.
Default setting: CENTRE TRAY
The trays that can be selected depend on
installation of peripheral devices.
Downloaded From ManualsPrinter.com Manuals
4-4
MAKING CONFIGURATION SETTING
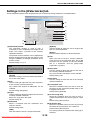
■ Line thickness
This setting is used to adjust the line width of vector graphics. For example, if you desire a finer line, select a value
from 0 to 4. If you desire a thicker line, select a value from 6 to 9. To return to the standard line thickness, select 5.
Use this setting for special applications such as CAD when lines do not appear with sufficient clarity. For regular
applications, there is usually no need to change the setting.
Default setting: 5
The relation between the setting values and the change of line thickness are as follows.
Value
0
Thickness change 1dot
*1
1
50%
2
75%
3
90%
4
95%
5
100%
6
105%
7
110%
8
125%
9
150%
*1 All lines are 1-dot lines.
PCL settings
■ PCL symbol set setting
This setting is used to select which country's characters are used for certain of the symbols in the character code
table of the PCL symbol set. (Use this setting when you need to select symbols that differ by country.)
Default setting: "3" (PC-8)
See page 7-4 for the symbol set settings.
You can also print the "PCL SYMBOL SET LIST" in "LIST PRINT" (see page 2-15 of "Operation manual (for
general information and copier operation)") for a table that shows correspondences between numeric values and
symbol sets.
■ PCL font setting
This setting is used to select the font for printing.
Default setting: "0" (Courier) (resident font)
If the optional extended font kit is installed, you can also select from these fonts. In addition, the "PCL INTERNAL
FONT LIST" in "PRINTER TEST PAGE" of "LIST PRINT" (see page 2-13 of "Operation manual (for general
information and copier operation)") can be printed.
When the optional extended font kit is installed, the "PCL EXTENDED FONT LIST" can be printed.
■ PCL LINE FEED CODE
This setting is used to select how the printer responds when a line break command is received.
Default setting: 0.CR=CR; LF=LF; FF=FF
■ WIDE A4
When this setting is enabled, up to 80 characters can be printed on one line of A4 size paper using 10 CPI font
(8 bit characters). When disabled, up to 78 characters can be printed.
Default setting: Disabled
PostScript settings
This setting specifies whether an error page describing the cause of an error is printed or not when a PostScript
error has occurred.
Selections are available to choose printing or not printing of error pages.
Default setting: Not print
Downloaded From ManualsPrinter.com Manuals
4-5
CHAPTER 5
KEY OPERATOR
PROGRAMS
This chapter explains the key operator programs for the printer function.
Key operators should read this chapter to ensure correct use of the key
operator programs.
Page
KEY OPERATOR PROGRAMS.....................................................................5-2
● Key operator program list.......................................................................5-2
● Procedure for using key operator programs...........................................5-3
● Key operator program menu ..................................................................5-4
DESCRIPTION OF SETTING PROGRAMS ..................................................5-5
● Printer settings .......................................................................................5-5
● Network settings.....................................................................................5-7
Downloaded From ManualsPrinter.com Manuals
5-1
KEY OPERATOR PROGRAMS
Key operator programs related to the printer function are explained here. For key operator programs for general use
of the machine, see the key operator's guide.
NOTE
The key operator programs that can be accessed depend upon how the product is configured with optional
equipment.
Key operator program list
Program name
Page
Printer settings
Default settings
Prohibit notice page printing
Print density level
Prohibit test page printing
A4/letter size auto change
5-5
5-5
5-5
5-5
Interface settings
Hexadecimal dump mode
I/O timeout
Enable parallel port
Parallel port emulation switching
Enable USB port
USB port emulation switching
Enable network port
Network port emulation switching
Port switching method
Parallel port ECP setting
5-5
5-5
5-6
5-6
5-6
5-6
5-6
5-6
5-6
5-6
Network settings
IP address setting
Enable TCP/IP
Enable NetWare
Enable EtherTalk
Enable NetBEUI
Reset the NIC
Tandem setting
PING command
Downloaded From ManualsPrinter.com Manuals
5-7
5-7
5-7
5-7
5-7
5-7
5-7
5-7
5-2
KEY OPERATOR PROGRAMS
Procedure for using key operator programs
The procedure for configuring a key operator program is explained below.
1 Press the [CUSTOM SETTINGS] key.
4 Touch the [PRINTER SETTINGS] key.
Follow these steps to
select the program that
you wish to use.
PRINTER
SETTINGS
In the following steps,
the setting screens for
the selected program
KEY OPERATOR
will appear. Refer to the
CODE CHANGE
program explanations on page 5-5 and following,
and then follow these steps to select a setting for
the program.
the [KEY OPERATOR PROGRAMS]
2 Touch
key.
DEFAULT
SETTINGS
LIST PRINT
SENDER CONTOROL
FAX DATA
RECEIVE/FORWARD
desired
5 Make
program.
Select the desired program from the programs
shown on page 5-2.
KEY OPERATOR PROGRAMS
Detailed descriptions for program settings start on
the next page.
the numeric keys to enter the five-digit
3 Use
key operator code number.
KEY OPERATOR CODE
settings for the selected
6 Press the [CA] key to exit the program.
The
factory
default
setting for the key
operator
code
is
indicated on page 2 of
the key operator's guide.
Supplementary explanation of key operation for key operator programs
These keys and indicator are
available on setting screens that
require the entry of numerical
values.
KEY OPERATOR PROGRAMS
A
HEXADECIMAL DUMP MODE
I/O TIMEOUT
20
ENABLE PARALLEL PORT
PARALLEL PORT EMULATION
SWITCHING
AUTO
USB PORT EMULATION
SWITCHING
AUTO
ENABLE USB PORT
20
OK
INTERFACE SETTINGS
(1
999)
1/2
C
D
E
B
A
B
C
D
E
Check mark boxes are touch keys that show the status of selections. A box with a check mark means the
function is "on" (enabled) and an unchecked box means the function is "off" (disabled). Alternate touches of a
box will change the on/off status.
The name of the program category or particular item to be set will appear on the touch key. A touch of the key
will select the item displayed.
If the settings continue on the following screen (s), touch the
and
keys to move back and forth through
the screens. To return to the category selection screen, touch the [OK] key.
The currently set numerical value is displayed.
Numerical values can be set by touching the
and
keys.
Downloaded From ManualsPrinter.com Manuals
5-3
KEY OPERATOR PROGRAMS
Key operator program menu
The key operator programs are accessed via the following menu structure.
Refer to this menu when changing the settings explained on the following pages.
Enter Key Operator Code
Level 1
Level 2
DEFAULT SETTINGS
PROHIBIT NOTICE PAGE PRINTING
PRINT DENSITY LEVEL
PROHIBIT TEST PAGE PRINTING
A4/LETTER SIZE AUTO CHANGE
INTERFACE SETTINGS
HEXADECIMAL DUMP MODE
I/O TIMEOUT
ENABLE PARALLEL PORT
PARALLEL PORT EMULATION SWITCHING
ENABLE USB PORT
USB PORT EMULATION SWITCHING
ENABLE NETWORK PORT
NETWORK PORT EMULATION SWITCHING
PORT SWITCHING METHOD
PARALLEL PORT ECP SETTING
PRINTER SETTINGS
NETWORK SETTINGS
Level 3
IP ADDRESS SETTING
ENABLE TCP/IP
ENABLE NetWare
ENABLE EtherTalk
ENABLE NetBEUI
RESET THE NIC
TANDEM SETTING
PING COMMAND
For information on the following settings, see the indicated manuals.
General settings/copy settings/
Key operator's guide
document filing settings
Operation manual (for facsimile) and
Image send settings
Operation manual (for network scanner)
Downloaded From ManualsPrinter.com Manuals
5-4
DESCRIPTION OF SETTING PROGRAMS
The key operator programs related to the printer function are explained here.
Printer settings
Default settings
Interface settings
These programs are used to adjust the settings of
various printer functions.
These programs are used to control data transmitted to
the parallel port, USB port or network port of this
printer.
Prohibit notice page printing
Hexadecimal dump mode
This program is used to disable notice page printing.
Turn on this program when you do not want the
machine to print the notice page explained in "NOTICE
PAGE PRINTING" on page 7-3.
Normally this program is set to not print a notice page.
This program is used to output the print data from a
computer in the hexadecimal dump format with
corresponding characters (ASCII). This program is
used to check proper transmission of print data from
the computer to the printer.
Print density level
This program is used to adjust the lightness or
darkness of prints.
Five levels are provided for density adjustment. These
are represented by numbers displayed on the touch
panel. Among the displayed numbers, a smaller value
indicates lighter density and a larger value indicates a
darker density.
Output example of hexadecimal dump mode
Prohibit test page printing
I/O timeout
This program is used to disable test page printing.
When the program is turned on, the PRINTER TEST
PAGE in the custom settings cannot be printed. (See
page 2-15 of "Operation manual (for general
information and copier operation)")
This program is used to set the length of time to wait for
an I/O to complete a job on the parallel port or the
network port. If the data stream to the port does not
transmit data for a length of time exceeding the
timeout, the job will cancel and the next job will start
processing.
The I/O timeout setting is used to set the amount of time
after which an I/O timeout will occur when waiting for
print data.
Default setting: 20 seconds
A4/letter size auto change
If this program is set, and printing onto 8-1/2" x 11" size
paper is selected but not available, the printer will
automatically substitute A4 size paper in place of 8-1/
2" x 11" paper if A4 paper is available.
* 8-1/2" x 11" paper cannot be automatically selected in
place of A4.
NOTE
The allowable range of the time is 1 to 999 seconds.
NOTE
When 8-1/2" x 11" size is specified for a document
attached to an E-mail that has been transmitted from
a foreign country and A4 size paper is not installed in
the printer, printing cannot be done without operator
intervention. If this program is set, printing will be
executed without intervention if a paper tray is
loaded with A4 paper.
Downloaded From ManualsPrinter.com Manuals
5-5
DESCRIPTION OF SETTING PROGRAMS
Enable parallel port
Port switching method
This program is used to enable or disable printing from
the parallel port.
Default setting: Enable
The machine can use the three ports shown below for
printing. This program is used to select when switching
between ports will take place. "SWITCH AT END OF
JOB" or "SWITCH AFTER I/O TIMEOUT" can be
selected. When "SWITCH AT END OF JOB" is
selected, the port will be automatically selected after
each print job is completed. When "SWITCH AFTER I/
O TIMEOUT" is selected, the port will be automatically
selected if the time set in the I/O Timeout program
elapses.
● Parallel port
● USB port
● Network port
Parallel port emulation switching
This program is used to specify a printer language to
emulate when the printer is connected to a computer
through the parallel port.
Setting items
Auto
PostScript
PCL
Description
The printer language will switch
automatically in accordance with the
data from the computer.
PostScript emulation is used to print
the data from the computer. (An
optional PS3 expansion kit is
needed.)
PCL emulation is used to print the
data from the computer.
Parallel port ECP setting
This is used to enable bi-directional communication
through the Centronix interface.
Select "Parallel port ECP setting" to enable data
transmission both from the computer to the printer and
from the printer to the computer.
Normally ECP mode is not selected.
NOTE
It is recommended to set "AUTO" (default setting)
unless an error due to this setting occurs frequently.
Enable USB port
This program is used to enable or disable printing from
the USB port.
Default setting: Enable
USB port emulation switching
If the machine is connected using the USB port, select
the emulated printer language.
The setting items are the same as those of "Parallel
port emulation switching".
NOTE
It is recommended to set "AUTO" (default setting)
unless an error due to this setting occurs frequently.
Enable network port
This program is used to enable or disable printing from
the network port.
Default setting: Enable
Network port emulation switching
This program is used to specify a printer language to
emulate when the printer is connected to a computer
through the network port.
The setting items are the same as those of "Parallel
port emulation switching".
NOTE
It is recommended to set "AUTO" (default setting)
unless an error due to this setting occurs frequently.
Downloaded From ManualsPrinter.com Manuals
5-6
DESCRIPTION OF SETTING PROGRAMS
Network settings
Reset the NIC
These programs are set when this product is used as a
network printer.
After you complete the setting for one program, you
must exit the key operator programs, turn off the main
switch, wait briefly, and then turn on the main switch
again before any other programs can be set. The
program that was set will be effective after the power is
turned on.
This program is used to reset all setting items of NIC
(Network Interface Card) of this product to the factory
default settings.
NOTE
If any of the [NETWORK SETTINGS] were changed
prior to execution of this program, you must turn off
the power switch after exiting the key operator
program, wait briefly, and then turn on the power
switch to make the factory default settings take
effect.
NOTE
For setting and modification of "Network settings",
be sure to consult with the network administrator.
IP address setting
Tandem setting
When using this product in a network that uses the
TCP/IP protocol, use this program to set the IP address
(IP address, IP subnet mask, and IP gateway) of this
product. The program is set to ENABLE DHCP by
factory default setting, which obtains the IP address
setting automatically. When using this product on a
TCP/IP network, be sure to turn on the "Enable TCP/
IP" program below.
This setting is used to configure the IP address and
port number of the client printer when you wish to have
two machines (which are used as TCP/IP network
printers) print in tandem.
Tandem printing is not possible if the other machine is
a different model than your machine.
The factory default setting for the port number is
[50001]. Unless you experience difficulty with this
setting, it does not need to be changed.
The tandem function can also be prohibited, or the
reception of tandem data from the other machine can
be prohibited. (Normally this is not necessary.)
To prohibit the tandem function, select "DISABLING
OF MASTER MACHINE MODE".
To prohibit reception of tandem data from the other
machine, select "DISABLING OF SLAVE MACHINE
MODE".
If DHCP is used, the IP address assigned to the
machine may be changed automatically on occasion.
If this happens, printing will not be possible.
Enable TCP/IP
When using this product in a network that uses the
TCP/IP protocol, set this program. Also set the IP
address using the program "IP address setting" above.
Default setting: Enable
Enable NetWare
NOTE
To use the tandem function when auditing mode is
enabled, the same account number must be entered
on both machines. If the same account number is not
entered, only the server machine may print or the
printed pages may not be added to the correct
account.
When using this product in a network that uses the
NetWare protocol, set this program.
Default setting: Enable
Enable EtherTalk
When using this product in a network that uses the
EtherTalk protocol, set this program.
Default setting: Enable
PING command
Enable NetBEUI
This program is used to check if the machine and a
computer connected to the network can communicate.
Enter the IP address of the computer that you wish to
check and touch the [START] key. A message will
appear indicating whether or not there was a response
from the computer.
When using this product in a network that uses the
NetBEUI protocol, set this program.
Default setting: Enable
Downloaded From ManualsPrinter.com Manuals
5-7
CHAPTER 6
TROUBLESHOOTING
This chapter provides solutions to problems you may encounter when
using the machine. Be sure to read this chapter whenever you
encounter a problem.
Page
TROUBLESHOOTING ...................................................................................6-2
● Checking the IP address ........................................................................6-4
Downloaded From ManualsPrinter.com Manuals
6-1
TROUBLESHOOTING
The following problems may not be due to a machine failure, so please check again before calling for service. In the
event that service is required, turn off the machine main power switch and power switch, unplug the power plug from
the outlet. Problems related to the printer function are described in this chapter. For troubleshooting related to
general machine use, the copier function, document filing function or the network scanner function, please read
"Troubleshooting" in the corresponding manuals.
Problem
Check
Solution or cause
Printer is on but data is Is the interface cable correctly connected?
not received.
Make sure the USB or parallel cable is correctly
connected to the machine and your computer.
For more information, consult your network
administrator.
Has the printer driver been installed correctly? Install the appropriate printer driver. (See the
"SOFTWARE SETUP GUIDE (for printer)".)
Is the printer driver correctly selected? / Has it Make sure that this printer is selected in the software
been configured in the network (when using application software or use an appropriate utility to
as a network printer)?
check that the printer is registered on the network.
For more information, consult your network
administrator.
Data is received but not Has the specified size and type of paper been Load paper, select another paper size or cancel
printed.
loaded?
printing.
Printer
cannot
be Has the printer driver been installed correctly? Install the appropriate printer driver. (See the
selected
from
"SOFTWARE SETUP GUIDE (for printer)".)
computer.
The orientation of the Are the print orientation settings in the printer Correct the orientation in the printer driver.
image is incorrect on driver correct?
the print.
The printed image is An incorrect ratio has been selected.
Select a suitable ratio when printing.
cut off.
The edges of the There are margins around the edges of the Change the print area.
printed
image
are paper where printing is not possible. Does the
missing.
image overlap those margins?
Printer prints in reverse Has reverse page order been selected in the Cancel the reverse order printing in the application
order.
software application?
software.
Printer stops in the Has the tray full sensor activated and stopped Remove the paper from the exit tray.
middle of a print job.
printing because too many pages are in the
exit tray?
Is the tray out of paper?
Load paper. (see page 2-2 of "Operation manual (for
general information and copier operation)")
Printing is not on Has paper selection been set to Automatic in Ensure that the desired paper is set in a paper tray of
desired paper size.
the printer driver?
the printer and select "Auto Select" in the paper
selection of the printer driver.
Printer
write
error Is the timeout setting for the printer driver too Set a longer time in the timeout setting in the printer
occurs when printing short?
driver.
from the parallel port.
Password
entry
is Did you enter a password for the retention Password is needed when executing printing. If the
requested.
function?
password is not known, printing cannot be executed.
Downloaded From ManualsPrinter.com Manuals
6-2
TROUBLESHOOTING
Problem
Check
Solution or cause
The
printer
driver Is there sufficient free space on your hard
cannot be installed.
drive?
Are you using an operating system that is not
supported?
Delete any unneeded files and applications to increase
free space on your hard drive.
Make sure your operating system is supported. (See
the SOFTWARE SETUP GUIDE (for printer) that
accompanied the machine.)
Two-sided printing is Is [2-Sided (Book)] or [2-Sided (Tablet)] Select [2-Sided (Book)] or [2-Sided (Tablet)] (page 2not possible.
selected in the "Main" tab of the printer driver? 2).
Has two-sided printing been prohibited in the "Disabling of Duplex" has been enabled in the key
key operator programs?
operator programs. Consult the key operator.
Not all of the image is Are multiple applications running at once?
Quit all applications that you are not using and try
printed.
printing again.
Stapling does not take Has use of the staple been prohibited in the "Disabling of Stapler" has been enabled in the key
place.
key operator programs?
operator programs. Consult the key operator. The
inserter does not operate (when an inserter is
installed).
Did you attempt to staple more than the Check the maximum number of pages that can be
maximum number of pages?
stapled (page 2-4).
The mail-bin stacker Has the mail-bin stacker been disabled in the "DISABLING OF MAIL-BIN STACKER" has been
cannot be used.
key operator programs?
enabled in the key operator programs. Consult your
key operator and take action accordingly.
Punching does not take Is the "Punch" checkbox selected in the Select the "Punch" checkbox. (page 2-5)
place (when a punch "Main" tab of the printer driver?
module is installed).
Has use of the punch module been prohibited "Disabling of punch" has been enabled in the key
in the key operator programs?
operator programs. Consult the key operator.
Document filing is not Has the printer driver been set to use the Select the "Document Filing" checkbox in the "Job
possible.
document filing function?
Handling" tab of the printer driver. (page 2-12)
Do user folders created in the machine Click the "Get Folder Name" button in the document
appear in "Folder Information"?
filing screen to call up the folders created in the
machine. (page 2-12)
Does the user folder have a password?
Enter the password in "Folder Pass Code" in the
document filing screen. (page 2-12)
Downloaded From ManualsPrinter.com Manuals
6-3
TROUBLESHOOTING
Checking the IP address
There are three ways to check the IP address:
1. Using [LIST PRINT] in [CUSTOM SETTINGS] in the operation panel
Select NIC PAGE to print a list of the machine settings. The IP address that has been set for the machine can be
found in this list. Follow the procedure below to check the IP address using NIC PAGE.
2. Using the key operator programs
The IP address can be verified using the key operator programs. To use this procedure, consult your key operator.
3. Using the NIC Manager utility in the Software CD-ROM (2)
The NIC Manager utility in the Software CD-ROM (2) can be used to check the IP address. For details, see the
online manual (Print Server Card Users Manual) in the Software CD-ROM (2).
Checking the IP address from the [CUSTOM SETTINGS] screen of the operation
panel
1 Press the [CUSTOM SETTINGS] key.
4 Touch the [NIC PAGE] key.
The custom setting
menu
screen
will
appear.
PCL EXTENDED
FONT LIST
NIC PAGE
2 Touch the [LIST PRINT] key.
NOTE
There are a variety of different types of network
environments. When using the machine in a network
environment, refer to the detailed explanations in the
online manual (Print Server Card Users Manual) in
the Software CD-ROM (2).
LIST PRINT
L
FAX DATA
RECEIVE/FORWARD
3 Touch the [PRINTER TEST PAGE] key.
PRINTER TEST PAGE
DOCUMENT FILING
USER/FOLDER LIST
Downloaded From ManualsPrinter.com Manuals
PROCESSING
PRINT
DATA appears in the
message screen and
printing begins. To cancel
printing,
touch
the
[CANCEL] key.
6-4
CHAPTER 7
APPENDIX
This chapter contains product specifications and other technical
information.
Page
PRINTER SPECIFICATIONS ........................................................................7-2
NOTICE PAGE PRINTING ............................................................................7-3
PRINT AREA .................................................................................................7-4
Downloaded From ManualsPrinter.com Manuals
7-1
PRINTER SPECIFICATIONS
Memory capacity (standard)
Standard 128MB
DIMM slots for additional memory
One (64 MB to 256 MB memory can be mounted.)
Page description language
PCL6, PCL5e, PS3 emulation*
Resident font
For PCL: Outline fonts: 80
Barcode fonts (option): 28
Bitmap font: 1
PostScript compatible fonts (option): 136
Interface
IEEE-1284 compatible parallel interface (P1284B connector)
USB1.1 (Windows98/ME/2000/XP/Server 2003)
USB2.0 (Windows2000/XP/Server 2003)
LAN connection
10Base-T/100Base-TX
Supported protocols: IPX/SPX, TCP/IP, EtherTalk, NetBEUI
For detailed network specifications, see the manual for the print server
card. (The manual is provided in PDF format in the Software CD-ROM
(2).)
Operating system
IBM PC/AT or compatible computer: Windows® 95/98/Me, Windows NT®
4.0 (ServicePack5 or later), Windows® 2000 Server/Professional,
Windows® XP Professional/Home Edition, Windows® Server 2003
Macintosh series*: Mac OS 8.6 to 9.2.2, 10.1.5, and 10.2 to 10.2.8
(except 10.2.2), 10.3 to 10.3.3
Continuous print speed
AR-M351N: 35 pages/min, AR-M451N: 45 pages/min
(Print speed during printing of the second sheet and following sheets
when using A4 (8-1/2" x 11") plain paper and performing continuous onesided printing of the same page; excluding use of offset output.)
Resolution
Data processing: 600 x 600 dpi
Printing: 600 x 600 dpi, 1200 dpi equivalent x 600 dpi
* An optional PS3 expansion kit is needed.
Some discrepancies may exist in the illustrations and content due to improvements to the machine.
Downloaded From ManualsPrinter.com Manuals
7-2
NOTICE PAGE PRINTING
A notice page will be printed when the current print job cannot be run due to a system limitation and an explanation
of the limitation is too lengthy to be shown in the message display. A notice page will describe the limitation and other
possible ways instead of possibilities to run the job.
Printing of the notice page is initially disabled in the key operator programs (see "PROHIBIT NOTICE PAGE
PRINTING" on page 5-5).
A notice page will be printed in the following cases.
●When the print data of a single job is so large that it cannot be held in memory. (When there are other jobs
occupying memory, notice pages may tend to be printed more frequently even for jobs with small amounts of
data.)
●When different paper sizes have been selected for printing within a print job and one or more of the sizes cannot
be delivered to the selected exit tray or to the stapler compiler. In these cases printed paper will be delivered
partly to the specified destination (tray or compiler) and partly to another exit tray.
●When a function is selected that has been disabled using the key operator programs, such as disabling of twosided printing, disabling of the staple function, or disabling of a specified exit tray.
●An invalid account number is entered when the auditing mode has been set.
Downloaded From ManualsPrinter.com Manuals
7-3
PRINT AREA
The print area of this product is shown below.
●The print area is the entire page excluding a margin
of 4.2 mm (11/64") at each edge. The actual print
area may vary depending on the printer driver used
and the type of software application.
Approx. 4.2mm (11/64")
Approx. 4.2mm
(11/64")*
Approx. 4.2mm
(11/64")*
Approx. 4.2mm (11/64")
Paper size
Printable area
PCL symbol set
No.
symbol set
No.
symbol set
1
Roman-8
21
Pi Font
2
ISO 8859-1 Latin 1
22
ISO 8859-2 Latin 2
3
PC-8
23
ISO 8859-9 Latin 5
4
PC-8 Danish/Norwegian
24
ISO 8859-10 Latin 6
5
PC-850
25
PC-852
6
ISO 6 ASCII
26
PC-775
7
Legal
27
PC Turkish
8
ISO 21 German
28
MC Text
9
ISO 17 Spanish
29
Windows 3.1 Latin 1
10
ISO 69 French
30
Windows 3.1 Latin 2
11
ISO 15 Italian
31
Windows 3.1 Latin 5
12
ISO 60 Norwegian v1
32
Windows Baltic (not 3.1)
13
ISO 4 United Kingdom
33
Windows 3.0 Latin 1
14
ISO 11 Swedish : names
34
Symbol
15
PC1004 (OS/2)
35
Wingdings
16
DeskTop
17
PS Text
18
Microsoft Publishing
19
Math-8
20
PS Math
Downloaded From ManualsPrinter.com Manuals
●These symbol sets are trademarks or registered
trademarks of their respective owners.
7-4
OPERATION MANUAL (for printer)
ARM451N-EX-PRINTER
Downloaded From ManualsPrinter.com Manuals