1
OWNER'S MANUAL
SEWING MACHINE
MODEL 1340 / 1345 / 1350 / 1355 / 1358
1561/1595
69548
.
KNOWING
YOUR SEWING MACHINE
Machine identification ..............................................
Parts list ................................................................
Setting up your machine .................
: ...........................
Spool pins, Foot control, Light/power switch
Installing extension table .............................................
Winding bobbin ........................................................
Removing bobbin case from shuttle ...............................
Inserting bobbin into bobbin case ..................................
Inserting bobbin case into shuttle ..................................
Threading top th read ..................................................
Picking up bobbin thread .............................................
2 -3
4- 5
6
6
7
8
9
9
10
11
CONTROLS
Thread tension control ................................................
Stitch selector, Stitch length control ..............................
Reverse stitch control, Pressure regulator ........................
Seam guides, Presser foot lever, Feed dog control .............
ACCESSORIES
Needles ...................................................................
Placement of needle ...................................................
Needle, thread and fabric chart .....................................
Feed cover plate, Presser feet ......................................
CARING FOR THE MACHINE
Cleaning feed dogs and shuttle .....................................
Oiling ................................................................
Changing light bulb ....................................................
CHECKING PERFORMANCE
PROBLEMS .............
2_
12
13
14
15
16
16
17
18
19
20 - 21
21
22-23
STARTING
TO SEW ...............................................
24
Straight stitching .................................................
25 - 27
Fastening a seam, Turning a square corner,
Removing fabric, Top stitching, Darning,
Temporary sewing by machine, Zipper application-Cording
Zigzag stitching ...................................................
28 - 30
Checking thread tension, Overcasting, Satin stitching,
Bar tacking, Appliqueing, Button sewing
Blind Hemming ...................................................
;..... 31
Mending and overcast stitching (three-step zigzag) ............ 32
Shell stitching ...........................................................
33
Box stitch ................................................................
34
Stretch stitches ...................................................
35- 38
Adjusting stitch length, Straight stretch stitch,
Rick-rack stretch, Smocking stretch, Overcast stretch,
Serging {or pine leaf) stretch, Elastic stretch
Where to use which stretch stitch: A check-chart ..............
Buttonhole making ...............................................
Free-arm sewing ........................................................
39
40 - 47
48
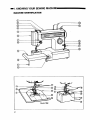
==1. KNOWING YOUR SEWING MACHINE
MACHINE
IIII IIIIII
IIIII
IDENTIFICATION
O
®.
@
@
®
®
®
@
@
@
Model 1358
2
I IIIIIIIII
IIIII
II I IIIII
IIII III
®
Model 1595
.@
1. Top cover
2. Bobbin winder tension disc
3.
4,
5.
6.
Thread guide
Pressure regulator
Take-up lever
Face cover
7, Face cover thread guide
8, Top thread tension control
9. Guide pin
10, Extension table
11. Support leg
12, Guide pin
13. Spool pins
14. Bobbin winder
15. Stitch selector
16. Reverse stitch lever
17.
Stitch length dial
18.
19.
20.
21.
Light/power
switch
Thread cutter
Presser foot thumb screw
Presser foot
_.
23.
Needle clamp screw
Needle
24,
Needle plate
25.
26.
27.
28.
29.
30,
31.
32.
Feed dogs
Shuttle cover
Hand wheel
Clutch knob
Nomenclature plate
Electric cord receptacle
Presser foot lever
Foot control
33.
34.
Accessory box
Owner's manual
I
IIIIIII
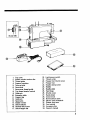
PARTS LIST
PARTS
1
AND ACCESSORIES
2
PROVIDED
WITH
4
8
6
15
20
12
11
10
19
MACHINE
16
21
23
OPTIONAL ACCESSORIES
24
30
4
25
26
31
27
32
28
29
33
34
13
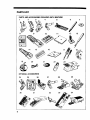
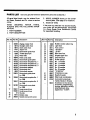
PARTS LIST
(Useonly genuine
Kenmore replacement parts and accessories,)
All parts listed herein may be ordered from
any Sears, Roebuck and Co. store or service
center.
WHEN
ALWAYS
MATION:
ORDERING
GIVE THE
REPAIR
FOLLOWING
PARTS,
INFOR-
1. PART NUMBER
2. PART DESCRIPTION
_lef. NO, Part No. Description
3.
MODEL
NUMBER
4.
NAME
OF ITEM
If the parts you need are not stocked locally,
your order will be electronically transmitted
to a Sears Repair Parts Distribution Center
for expedited handling.
Refo No. Part No.
Description
iiiiii i
1
2
3
4
5
40390
6873
6870
6757
47149
6
8286
7
8
2273
9
10
Zigzag presser foot
Straight stitch foot
Satin stitch foot
Zipper foot
Buttonhole guide foot
Thread spool pin
Nylon disc
45846 Feed cover plate
11
12
13
14
58232
45195
45196
45197
58700
42679
6830
55824
15
35346 Buttonhole template No. 1
Buttonhole
Buttonhole
Buttonhole
Buttonhole
Buttonhole
Buttonhole
guide plate
template No. 1
template No. 2
template No. 3
adapter
foot
Buttonhole opener
Buttonhole guide plate
for 1358
for 1358
35347
Buttonhole template No. 2
for 1368
16
68183
Buttonhole cover plate
for 1358
17
55501
18
19
2O
47
6510
36353
Large screw driver
Small screw driver
Shuttle
Bobbin case
Needle clamp with screw
shown on the nomen-
clature plate. (See page 3 for location.)
21
23
24
25
26
27
28
29
30
31
32
33
34
ii i
i
1939
6797
6811
6782
6882
6885
Bobbin winder rubber ring
Light bulb
Foot control
"Q FOOT"
"Q SET"
Blind hem foot
6792
6887
6891
6550
6551
6552
6553
6554
6746
6862
6864
6889
6736
Hinged zipper foot
Even feed foot
Ruffler pleater
No. 9 needles
No. 11 needles
No. 14 needles
No. 16 needles
No. 18 needles
"Q NEEDLE"
10 bobbins in case
Needle threader
Oiler-brush combination
Automatic buttonholer
makes 3 styles in 10 sizes
Accessory set (not shown)
for heming, edgestitching,
binding, gathering, quilting,
attaching braid, lace,
zippers incl. "Q SET".
6840
5
•
I IIIIIIIIIIIIIIIIIIIII
J
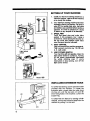
SETTING
1.
Install your Kenmore sewing machine in a
Kenmore cabinet, case or set the machine
on a sturdy flat surface.
2.
Your Kenmore sewing, machine has been
throughly oiled at the factory. Be sure to
wipe off the needle plate area, bed plate
and bobbin case carefully before sewing a
garment, It is wise to practice on a scrap
of fabric so any surplus oil is absorbed,
SPOOL PINS
You'll find spool pins and nylon discs
packed in the accessory box. Using a
screwdriver, attach spool pins securely on
the top cover and position nylon discs
over the spool pins as indicated.
3.
Light(power
switch
UP YOUR MACHINE
4.
FOOT CONTROL
Plug foot control into machine receptacle.
Then connect cord into any 110-120 volt
A. C. wall outlet,
5.
LIGHT/POWER
SWITCH
Your machine will not operate unless the
light/power switch is turned on. Turning
on the power automatically
illuminates
the whole
stitching
area.
If you're
interrupted or stop sewing, turn off the
light/power switch.
Model 1358
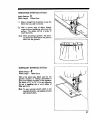
INSTALLING
(A)
EXTENSION
TABLE
For all fiat-bed sewing use the extension table
provided with the machine. To install the
extension table, simply slide the table along
the free arm until the two pins (A) and (B)
enter fitting holes in the machine, Lower the
support leg.
To utilize free-arm feature for sewing tubular
material, remove the extension table from the
machine by pulling it to the left.
II
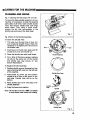
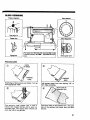
WINDING
IH II H IIIIII
I
I
IIII
IIIIIIIIIIIIIIIIIII
IHIIIIIHI
I
BOBBIN
®
O
®
i
I i
t
®
®
!.
Release clutch by pulling hand wheel
turning clutch knob toward you.
2.
Draw thread from spool through
winder tension disc as shown.
bobbin
Pull end of thread through hole in bobbin
as shown.
4.
Push bobbin
shaft
to
Start machine. The thread that is held
will snap. Bobbin will cease turning when
completely filled. Push shaft to left to
remove bobbin.
5.
3.
winder
coming from top of bobbin. Push bobbin
winder shaft to right until it clicks. Hold
onto end of thread.
or
far
left
position, if it is not already them. Place
bobbin onto shaft with end of thread
,
Push in hand wheel or tighten clutch knob
and remove bobbin.
7
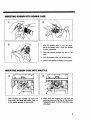
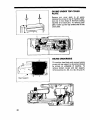
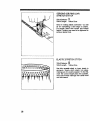
REMOVING
BOBBIN
CASE FROM SHUTTLE
®
®
®
1,
Raise needle to its highest
position
rotating hand wheel toward you.
4.
To remove bobbin case from shuttle, pull
open latch of bobbin case.
2.
Remove the extension table from machine
5.
Pull bobbin case straight out of shuttle.
by pulling it to the left.
3.
8
Open shuttle cover.
6. Release the latch and bobbin wilt come
out from bobbin case.
I
IIII
I
IMH
HI
I
II
INSERTING BOBBIN INTO BOBBIN CASE
®
With the bobbin case in your left hand,
place the bobbin into it with the thread
running clockwise.
,
Feed the thread through
case.
*
INSERTING
BOBBIN
the slot in the
3.
Pull the thread under the tension plate.
4.
Draw 3 to 4 inches of thread from bobbin,
CASE INTO SHUTTLE
i
With locating pin straight up, hold the
latch open, and slide the bobbin case on
to the center spindle of the shuttle.
.
Make sure the locating pin fits into the
locating groove at the top of the shuttle.
Release the latch to lock the bobbin case
into place.
9
IIIIIIII
THREADING
IIIII
IIIII I
IIII IIIIIIIIII
IIIII II
TOP THREAD
...........
Raise thread take-up lever to its highest
position by turning hand wheel toward you.
Raise presser foot lever. Place thread spool
on spool pin,
Draw thread through
thread
guide
1.
Holding spool stationary
with right hand,
pull thread through the tension discs. Pull
the end of the thread taut with the left hand.
10
2_
3_
This will pull the spring wire up and past the
end of the hook. The thread will then slip
into the hook when the spring is released.
Draw thread up through thread guide 4 takeup lever 5 and down through lower thread
guides 6, 7, 8 to needle.
The needle must be threaded from front to
rear, Draw 3 to 4 inches of thread through
the eye of needle.
....
IIIIIIIIIIIIII I
PICKING
UP BOBBIN
IIIIIIIIIHIIIIIII
IIIIIIIIIIIIIIII
I
II I
THREAD
1. Raise presser foot lever. Hold needle
thread loosely in left hand and rotate
handwheel
toward you one complete
turn.
.
3.
Bring bobbin
thread.
thread up by pulling
upper
®
Pull both threads under and to the back
of the presser foot,
of thread clear.
leaving 3 to 4 inches
If you can not pick up bottom thread
following above steps, then check:
®
by
1. Is thread through needle ?
2. Is thread tangled around needle ?
3. Is there 3 to 4 inches of thread coming out
of bobbin case ?
4. Is thread from bobbin case tangled ?
11
j
IIIIII
UlIHHHIIIIIII
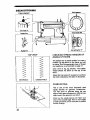
ADJUSTING
TENSION
q>
An ideal straight stitch will have
threads locked between the two
layers of fabric.
Upper thread
too tight
®
Decrease tension
Upper
IIIIII
TOP THREAD
Probably the most important control on your
machine is this one that regulates your top
thread tension.
There are many reasons for having to reset
your tension. The best tension for one fabric
may not I_e correct for another. The required
tension depends upon the stiffness of the
fabric, thickness of the fabric, numbers of
layers of fabric being sewn, as well as the
type of stitch you are making.
It is best to test the stitching on a scrap of the
fabric you are using before starting to make a
garment. Use the straight stitch function as
shown at the right.
thread too loose
®
)
Increase Tension
ADJUSTING
TENSION
Increase
Decrease
BOBBIN
THREAD
When stitching is unsatisfactory in figures 2
and 3 above, adjust the upper thread tension.
LOWER
THREAD
TENSION
REQUIRES
ADJUSTMENT
LESS FREQUENTLY
THAN
THE UPPER THREAD TENSION.
When stitch is satisfactory, as in Fig. 1 and
seam is badly puckered, the cause may be
tight tensions and both upper and lower may
have to be adjusted.
When adjusting the tension on the bobbin
case, make slight adjustments with a screwdriver.
12
I
I
!
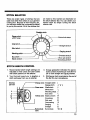
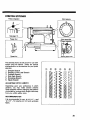
STITCH
III
I
SELECTOR
There are certain types of stitches that are
used more often than others in your garment
construction. Because of their frequent use,
you will soon realize the convenience offered
to you by this control. All of the stitches that
are made by this machine are illustrated on
the stitch selector dial. You can obtain your
desired stitch by simply turning the stitch
selector dial.
Straight stitch
Zigzag stitch.
width range
Buttonhole
steps
Shell stitch
Straight
stretch
Blind 1
Serging stretch
Mending stitch
stretch
Rick-rack stretch
Elastic stretch
Smocking
stretch
STITCH LENGTH CONTROL
.
,
Recommended stitch length settings are
indicated in three colors and color-coded
with stitch patterns on the selector.
3. Orange graduation indicates the approximate number of stitches per inch (6-8-1224) of both straight.and zigzag stitches.
Turn the knob toward you to lengthen
stitch and away from you to shorten.
4.
Stitches
per inch
a
Orange zone
°
Straight stitch
[
Zigzag stitch
i'
Green zone
Shell stitch
Yellow zone
Blind stitch
Mending stitcll
Box stitch
Elastic stretch
6
8
t2
24
Stitches per inch are printed on the end of
the dial for your convenience,
I
Buttonhole
zone
Smocking
Rick-rack
'_'" J
<_
iii
|
Overcasting
:_
Serging
_:
Straight
|
Buttonhole
II] 0 [k
13
I
I ]11[11!11111111
IIII
REVERSE STITCH CONTROL
It is best to begin and end seams with a few
stitches taken in reverse. This is called back
tacking. Back tacking fastens the ends of the
seams firmly and prevents raveling.
J
When reverse stitching is needed, turn the
control clockwise and hold there during
sewing. The fabric will immediately
start
feeding
backwards
and
seam
will be
fastened.
PRESSURE
REGULATOR
Push down the outer ring of the pressure
regulator. This will release the pressure on
the presser foot. To increase the pressure,
push down inner pin until a suitable pressure
is obtained.
insufficient pressure may cause poor feeding
of the fabric, skipped stitches, or difficulty in
guiding the fabric. If feed dogs or presser
foot marks appear on the fabric, reduce the
pressure.
For sewing of medium weight fabric,
the
inner pin should be pushed all the way down.
When sewing multiple thicknesses or heavy
fabric, reduce the pressure with the pin ½
way down.
Light weight
fabrics need full
pressure,
unless feed dog marks are visible on fabric.
Reduce slightly to eliminate marks, but retain
good feeding.
14
IIII
SEAM
IIIIII
I
I III
III
II
GUIDES
Seam guides are printed on needle plate, at
both sides of needle, to help you line up the
fabric and keep it straight. The standard
seam width is 5/8".
So these lines are
emphasized, easy to follow.
Also the cross lines are "cornering
guides" to
help when turning a square corner 5/8" from
the fabric edge. (For details on cornering, see
page 25.)
_ornering Guide
Cornering Guide
PRESSER FOOT LEVER
Presser foot lever has a two position lift,
tn order to place heavy fabric under the
presser foot or to change the presser foot
raise the presser foot lever to its maximum
upward position as shown.
\
FEED DOG CONTROL
(Model1358)
The feed dog control is located on the right
front of the machine bedplate, There are a
few times when you want to control the
feeding of the fabric yourself. When
the
control is turned to the left, the feed dogs
drop and do not move the fabric.
For most of your sewing,
right.
turn knob to the
m
15
,*- ACCESSORIES
ill
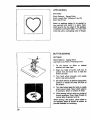
NEEDLES
1
1
Use KENMORE
needles. The size of the
needle should conform with the size of the
thread and both should be suitable to the
fabric. Kenmore needles are color-coded by
size for your convenience
(See chart on
next page).
Never use a bent needle or one with
a dull
point.
If you do not have a Kenmore needle, please
use this illustration to be sure your needle is
the right size. Distance from top of needle to
needlehole should be this exact length.
You will find among your accessories a
•'O._EEDLE",. with blue shank. This special
needle is to be used when sewing knits and
certain difficult synthetic fabrics. If you
experience skipped stitches in any of your
sewing, use "o NEEDLE",=and "O FOOT",. •
PLACEMENT
OF NEEDLE
Raise needle bar to its highest position by
turning the hand wheel toward you. Loosen
the needle clamp screw. Holding the needle
with the flat side away from you, slip the
needle into the needle bar. When it is in as far
Flat
side
away
from
you
16
!
as it will go, tighten the needle clamp screw
with
small screwdriver
provided
in the
accessory box.
NEEDLE,
i.i MIIIII
IIII
I
IIII
THREAD
I
I
ii
LIGHTWEIGHT:
Batiste, Dimity,
Chiffon. Silks. Synthetic
Jerseys,
Fine Lace. Organza, Crepe,
Taffeta. Voile, Organdy
MEDIUMWEIGHT: Cotton,
Cotton Blends. Percale. Gingham,
Shantung. Pique, Seersucker,
Satin, Knits. Vinyl, Suitings,
Linen, Wool Crepe. Leather
iiii
i
MEDIUM HEAVYWEIGHT:
Corduroy, Denim, Woot,
Sailcloth, Wool Flannel,
Gabardine. Velvets, Leather
iiiiiii iiii
FABRIC
ii
i
iii
i
I
9- BROWN
or
11 -ORANGE
Polyester Core/Cotton Wrap
Fine Mercerized Cotton
Silk A
Polyester Core/Cotton
50 Mercerized Cotton
Silk A
14-RED
12 stitches
per inch
Wrap
10 to 12 stitches
per inch
iiiiiiiiiii
14-RED
or
16-PURPLE
Polyester Core/Cotton Wrap
50 Mercerized Cotton
Mercerized Heavy-Duty
Silk A
i i
18-GREEN
16-PURPLE
18- GREEN
or
ii.lll
Polyester Core/Cotton Wrap
Heavy-Duty Mercerized Cotton
Polyester Synthetic
Silk A
II
Deco_-ativetop-stitchi_l or= all
type= of falxic
i = i
RECOMMENDED
STITCH LENGTH
SETTING
THREAD SIZE
]1
HEAVYWEIGHT:
Coatings,
Upholstery,
Cotton Duck,
Heavy Twills, Canvas
CHART
=
NEEDLE
SIZE AND
COLOR
FABRIC
iiiiiiiiiiii
i
AND
IIIIIIIIII ,,
I
8 to 10 stitches
per inch
i =
8 stitches
per inch
II IIII
6 stitches
per klch
Buttonhole Twist
Q-BLUE
I
Synthetic Knits and Stretch:
Polyester Double Knits, Nylon
Tricot, Jersey, Stretch Terry,
Spandex. Cire Tricot
iiiii
Q-BLUE
with
"'Q FOOT ....
i
Polyester Core/Cotton
50 Mercerized Cotton
Wrap
i
10 for Regular
or
6 for Stretch
Stitches
FEED COVER
PLATE
There are a few times when you want to
control
the feeding of the fabric yourself.
Raise needle to its highest position and raise
presser foot,
Place feed cover plate over
needle plate aligning two pins of feed cover
plate with holes of needle plate. You may
then determine
the movement
of the fabric
yourself,
PRESSER
FEET
To change the various presser feet, raise the
presser bar to its highest position by lifting
the presser foot lever (See page 15). Loosen
the presser foot thumb screw, choose the
proper foot, insert from the front. Lower the
presser foot lever and tighten the screw using
the large screw driver to make certain the
foot is secure.
You have a variety of presser feet:
A. Zigzag Foot
B. Straight Stitch Foot
C. Satin Stitch Foot
D. Zipper Foot
E. Buttonhole
Guide Foot
F. Buttonhole
Foot
A
D
18
B
E
C
Applications
are
sewing section.
F
provided
in
appropriate
==CARING FOR THE MACHINE
CLEANING
AND
IIII
OILING
Fig. 1 Cleaning the feed dogs with a brush.
To insure the best possible operation of your
machine, it is necessary to keep the essential
parts clean at all times. Open shuttle access
cover and remove needle plate with large
screw driver. Then using a small brush,
remove the lint that accumulates
in the
shuttle area and around the feed dogs.
Fig. i
Fig, 2 Parts of the Shuttle Assembly
To Clean the Shuttle
Area:
1. This area must be kept free of dust, lint
and occasional tangled thread. Raise the
needle bar to its highest point and remove
the bobbin case.
2.
Push levers of shuttle race aside and lift
shuttle race cover and shuttle out.
3.
Clean the shuttle race with small brush.
,
Put a drop of Kenmore sewing machine
oil only on the center pin of the shuttle
and shuttle race (see arrows on two
bottom illustrations).
To Replace Shuttle Assembly:
1, Position shuttle race as illustrated so that
race is forming half moon on the left side
of the machine,
Shuttle Race Cover
Hold shuttle by center pin and position
shuttle so as to form a half moon on the
right side. Pointed hook will be on the
bottom.
3. Place shuttle race cover into place over
shuttle assembly,
pointed _....,
4.
Snap the levers into position.
hook
Shuttle
Note: Oil and lint brush No. 6889 is available
at most Sears retail stores and catalog.
shuttle driver
Shuttle Race
Fig. 2
19
i
...............................................................
OILING UNDER TOP COVER
PLATE
Remove
indicated
Use one
machine
arm cover plate
to oil points
by arrows in top of machine head.
to two drops of Kenmore sewing
oil at each part, To remove cover
plate, loosen up two top screws and lift the
cover plate.
OiUNG
UNDERSIDE
Tilt machine head back and remove bottom
covers and rear support to oil points indicated
by arrows on underside of machine. To
remove bottom covers and rear support,
remove screws (A), (B), (C), (D), (E)and (F).
J
Rear Support
20
D
I
OILING
IN FACE COVER
PLATE
Swing face cover plate open and oil points
indicated by arrows in illustration.
CHANGING
LIGHT
BULB
The sewing light is located inside the face
cover plate as shown. To replace the bulb,
push switch to off, unplug machine and
swing the face cover plate open. Push up on
the bulb slightly and,turn bulb to the left.
Withdraw
bulb from socket. Push in new
bulb and turn to the right.
21
iCHECKING PERFORMANCE PROBLEMS
SUSPECTED
PROBLEM
IRREGULAR
STITCHES
PROBABLE
CAUSE
Incorrect size needle.
Improper threading.
Loose upper thread tension.
Pulling fabric.
Light pressure on presser foot,
Loose presser foot.
Unevenly wound bobbin.
Nicks or burrs at needleplate opening.
BREAKING
NEEDLE
Pulling fabric.
Incorrect size needle.
Incorrect setting of needle.
Loose presser foot.
BUNCHING
THREAD
OF
PUCKERING
Upper and lower threads not drawn back under presser
foot before starting seam.
Incorrect thread tension(s).
Light pressure on presser foot.
Using two different sizes or kinds of thread,
Bent or blunt needler
Loose presser foot.
Fabric too sheer or too soft.
SKIPPING
STITCHES
Incorrect size needle,
Certain knits and synthetics.
Bent or blunt needle.
Incorrect setting of needle.
Tight upper thread tension.
Light pressure on presser foot.
BREAKING UPPER
THREAD
Starting to stitch too fast.
Improper threading,
Tight upper thread tension.
Incorrect size needle.
Sharp eye in needle.
Nicks or burrs at needleptate opening.
BREAKING
THREAD
BOBBIN
Improper bobbin case threading.
Lint in bobbin case or shuttle.
FABRIC NOT
MOVING
Feed cover plate attached or feed dog down.
Light pressure on presser foot.
Thread knotted under fabric.
MACHINE JAMMING,
KNOCKING NOISE
Thread caught in shuttle.
Damaged needle.
Bent needle plate.
MACHINE DOES
NOT SEW
Power cord not connected,
22
Power/light
switch off.
I II
IIII
POSSIBLY
II
II
HIIIIII I
IIIIIIIIIIIIIIIIUII
IIIIIII
EASY CORRECTION
Choose correct size needle for thread and fabric.
Rethread machine; check tension spring threading.
Tighten upper thread tension.
Do not pull fabric; guide it gently.
Increase pressu re on presser foot.
Reset presser foot.
Rewind bobbin.
Replace needleplate,
or polish off burrs completely.
Do not pull fabric; guide it gently.
Choose correct size needle for thread and fabric.
Reset needle.
Reset presser foot.
When starting a seam be sure to draw both threads under and back of presser foot
about 4" and hold until a few stitches are formed.
Reset thread tension(s).
Increase pressure on presser foot.
Upper thread and bobbin thread should be same size and kind.
Insert new needle.
Reset presser foot.
Use underlay of tissue paper.
Choose correct size needle for thread and fabric.
Use "Q NEEDLE '''M and "Q FOOT"'".
Insert new needle.
Reset needle.
Loosen upper thread tension.
Increase pressure on presser foot.
Start to stitch at a medium speed.
Rethread machine.
Loosen upper thread tension.
Choose correct size needle for thread and fabric.
Insert new needle.
Replace needleplate,
or polish off burrs completely.
Check bobbin case threading.
Clean bobbin case and shuttle.
Remove feed cover plate or raise feed dog.
Increase pressure on presser foot.
Place both threads back under presser foot before beginning to stitch.
Disassemble and clean shuttle.
Replace needle.
Replace needle plate.
Check plug.
Push to on position.
23
STARTING TO SEW
Now that you are familiar with the controls
on your machine and with the accessories
pr,ovided for the machine, you are ready to
start to sew with your sewing machine,
Below are some good habits to follow each
time you sit down to sew:
1, Check the needle-it should be straight,
properly set and sharp on the point.
it should be the correct size for the fabric
and thread being used, Do not be afraid
to change your needle frequently. Many
of the new fabrics made of synthetic
blends tend to dull the needles more
easily than fabrics made of natural fibers,
.
Before placing
the material
on the
machine, see that the ends of the threads
have been drawn about 3 -4 inches to the
rear of the machine, Hold on to threads
during the sewing of the first 3 or 4
stitches of the seam.
.
Test the machine stitch on a scrap of
fabric you plan to use, The fabric should
be double thickness, Adjust the machine
for the length of stitch and tension
suitable to your fabric,
.
Fabric should be placed under the presser
foot with the bulk of the material to the
left of the needle and the right edge of the
material placed on the 5/8" seam marking
on the needle plate when making a simple
seam.
5_
Run the machine at a slow even speed.
The more pressure you put on the foot
control, the faster the machine will sew.
6.
Fasten each seam by back tacking at the
beginning and end of the seam.
7.
Always finish sewing each seam with the
needle at its highest point.
8.
Guide the fabric gently with your hand in
front of the needle. Never pull or hold the
fabric in such a way, that the normal
feeding is altered.
,
24
When turning the hand wheel manually,
always turn it toward you.
STRAIGHT STITCHING
Stitch selector
Pressure regulator
See page 14.
Stitch length dial
Presserfoot
"Straight, zigzagfoot
or O foot
*You may use zigzag, straight stitch foot or Q foot but
for best control of fabric, best looking straight stitches
and best .feeding of fabric use Straight Stitch Foot,
Any setting but "0"
FASTENING A SEAM
Be sure both threads are drawn
back under
the presser foot. Lower needle into fabric
about 1/2 inch from beginning of seam.
Depress the reverse stitch lever and stitch in
reverse until needle reaches beginning of
seam, Release control and complete seam.
When you reach the end, depress the reverse
stitch lever and sew back (backtack) over 1/2
inch of completed
TURNING
seam.
A SQUARE
CORNER
To turn a square corner 5/8" from the fabric
edge, stop stitching with the needle piercing
the fabric, when reaching the cornering guide
as shown. Raise the presser foot, turn fabric.
New stitching line will align with 5/8" seam
guide on side of needle plate, Lower the
presser foot and begin stitching in new
direction.
25
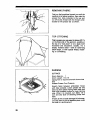
REMOVING FABRIC
First turn the handwheet toward you until the
needle is at its highest position, then raise the
presser foot, draw materials to the rear and
cut off excess thread with the thread cutter
located on the presser bar as shown.
TOP- STITCHING
This is a seam you may want to show off! It's
on the front side of the garment, possibly at
the top of a "kick pleat" or on a lapel, both
functional and decorative.
Usually, it's a
simple, forward stitchwith an extra-long
stitch length, or with special thread, matching or contrasting.
DARNING
SETTINGS
i
Stitch Selector - I
Stitch Length - 8 to 10
Zigzag foot or square automatic
foot
Release Presser Foot Pressure.
buttonhole
Stretch fabric between
embroidery
hoops
with hole centered. Lower presser bar and
sew at a slow speed moving fabric back and
forth with a steady rhythm to cover darning
area. When it is covered, turn fabric 1/4 a
turn and sew layer of stitching across first
layer.
If fabric is thin or badly damaged in hole area,
you may want to put a separate piece under
the hole for reinforcement.
26
IIIIIIIIIIII
IIIIIIII
III
IIIIIII
TEMPORARY SEWING BY
MACHINE
No longer do you need to baste by hand!
Basting by machine is easy-simply
use
straight
stitching
with
longest
available
length setting.
PiN BASTING
You can sew over pins easily (if done
correctly) because your presser feet are
hinged. Pins must be inserted at right angles
to seam line. Tip of pin should just touch
seam line. Sew over tip of pins. Pins must not
come in contact with feed dogs: Never pin on
the under-side of the fabric. Sew slowly. If in
doubt about sewing over pins, remove each
pin as you approach it.
STAY- STITCHING
"Stay-stitching"
is a form of temporary
seaming that prevents stretching of curved
edges of garments. Usually this is on a single
layer of fabric, so reduce top thread tension
slightly to prevent puckering. Baste about
I/4" away from intended seamline.
/
ZIPPER APPLICATION - CORDING
REGULAR
ZIPPER
The foot is adjustable for use on the right or
left side of needle when sewing regular type
of zipper. Adjust the foot so the needle clears
the side notch on the foot. Carefully follow
directions given on the zipper package.
CORDING
To make cording for slipcovers, etc., cover a
cord with a strip of true bias. Adjust the foot
to the left of the needle.
J
27
il
II
IIIIMIIII
I
III
ZIGZAG STITCHING
f
Stitch selector
Pressureregulator
See page 14.
Presserfoot
Stitch length dial
Zigzagfoot
Any setting but "0"
TOP VIEW
CHECKING THREAD
ZIGZAG STITCHES
TENSION
OF
The easiest way to check tension is to sew a
medium zig zag stitch on the fabric you will
be using. °Use the appropriate type of thread
and needle as recommended on page 17.
Sew a line of zig zag stitches. The bobbin
thread should not show on the top of the
fabric.
Adjust the top tension if necessary to achieve
the stitch indicated at left side of illustration.
DESIRABLE
UNDESIRABLE
OVERCASTING
This
is one of the
more
frequently
used
zigzag stitches on garment
construction:
You may want to overcast along the raw
edge of each seam allowance or fold the raw
edge toward the garment and stitch.
Stitch so the needle pierces the fabric just
short of the outside edge, Raw or worn edges
of older garments can be overcast to prevent
further raveling,
28
III
IIII
I
I
IIIIII
SATIN STITCHING
SETTINGS
Stitch Selector - Zigzag Stitch
Stitch Length Dial - Between 0 and 24
Satin Stitch Foot
Closely spaced zigzag stitches are called satin
stitches. This is an attractive stitch used for
appliqueing,
bar tacking.
Satin stitch
foot
Whenever you are using this stitch, it is well
to remember to loosen the tension of the top
thread slightly. The wider the stitch you
make, the looser the tension should be.
I
I
I
"
1
| I'
*_'
,
i
'1
If you are stitching on a very soft fabric, use a
backing of tissue paper or interfacing for a
well formed stitch. Puckering of the material
will be eliminated and the bobbin thread will
not be visible on the right side of the fabric.
As with all special stitches, it is best to make
a sample design on your fabric before starting
the design on the garment.
BAR TACKING
SETTINGS
_
i
-
,
,,,,,,,,
•
L
=
ii
I/
Stitch Selector - Zigzag Stitch
Stitch Length Dial - Between 0 and 24
Satin Stitch Foot
This stitch is similar to a very short satin
stitch and is used to reinforce points of strain
such as corners of pockets and straps on
lingerie.
0
Sew 4 to 6 zigzag stitches.
I
H
HHHNHI
29
HIIIIIIIIIIIIIII!IIIIIIIII
I II I
IIIIIIIII
APPLIQUEING
SETTINGS
Stitch Selector - Zigzag Stitch
Stitch Length Dia! - Between 0 and 24
Satin Stitch Foot
Select an applique design to be applied to
your garment and baste it in place. Satin
stitch around the raw edge of the-applique
completely covering the edge. You may want
to do this with a contrasting
color of thread.
BUTTON SEWING
SETTINGS
Stitch Selector - Zigzag Stitch
Use Feed Cover Plate or Feed Dog Down.
1. Fix
the
button
on
fabric
at
desired
position with clear tape.
2.
Align two holes of button with slot of
presser foot and lower foot to hold the
button securely.
3.
Turn hand wheel manually
point is just above button.
4.
Set stitch selector at desired zigzag stitch
position so needle will enter one hole of
the button.
5.
Turn hand wheel again by hand so needle
enters second hole. Reset stitch selector
if necessaw. Stitch a number of times.
6.
Finish sewing with an extra two inches of
thread remaining. Draw these threads to
reverse side of garment and tie.
until
needle
When sewing a flat button, place needle or
pin between holes of button as shown to
provide flexibility for buttoning,
3O
IIIIIIIIIIIIIIIIIII
II
BLIND HEMMING
Pre_zsure
regulator
Stitch setector
a
See page 14.
Presserfoot
Zigzagfoot
Stitch length dial
J
optionalaccessoryitem6885 - adjustableblindhem
JFor easierbJindhemmingit is recommendedto usej
foot.
Within green zone
PROCEDURE
q>
INSIDE
®
FINISHED
EDGE
Finish edge of hem anyway you desire. Turn up
hem appropriate width,
®
Place garment under presser foot in such a
manner that straight stitches will be sewn on
extended edge. The zigzag stitch should just
catch the fold of the garment.
FINISHED
EDGE
Fold garment away from hem leaving 1/8" of
hem edge extending.
®
RIGHT SIDE OF
:INISHED HEM
Press both sides of the finished hem. The right
side of the garment will show only the blind
stitches.
31
__
I
MENDING
AND OVERCAST
I
STITCHING
II IIIIIIH
IIIIIII
III
IIIIIIIIIIIIIIIIIIIII
II
(THREE-STEP
ZIGZAG)
Pressureregulator
Stitch selector
0
See page 14.
Presserfoot
Stitch length dial
_gzagfoot
Within greenzone
MENDING
iiJ_ii_3JiJi__Jiiii_iiiii__iJiiiiifiiii!_i_!i__i
To repair a straight or three.cornered
tear,
position the tear under the needle in such a
way that the stitching catches both sides of
the tear. When mending a three-cornered
tear, stitch from each end to the center. It is
well to use a piece of fabric under the tear for
reinforcement.
OVERCASTING
">
32
:
<'._
J
>
L.>
:
<"
'"
I
]
.>
<,
,-:>
I
<-
,.:> i
<.
,,.>
,.>
<.
<;_
I
I
WITH
MENDING
STITCH
Three-step zig-zag is a strong stitch because,
as its name implies, it takes three short
stitches where normal zig-zag takes one.
For this reason it is highly recommended for
overcasting, i.e. finishing a raw edge, on all
types of fabric.
IIIIIII
IIIIll
I
I
SHELL STITCHING
Pressureregulator
Stitch selector
See page 14.
Presser foot
Stitch length dial
Zigzagfoot
Within green zone
PROCEDURE
This shell-stitched edge is a popular finish for
lingerie and nightgowns.
To achieve this
multiple scalloped effect, allow needle to just
clear the right edge of the fabric when it
zigzags.
33
J
II II
IHIIIII
II IIIIIIIIIIIIIIIIIIIIIIII
HIIIIIIII
I HIIIIIIII
IIIIIIIIIIIHIIII
• BOX STITCH
Stitch selector
Pressure regulator
{)
See page 14.
Presserfoot
Stitch length dia!
Zigzagfoot
Within green zone
OVERLAPPED
SEAM
Box stitch
is ideal for producing
flat
overlapped seams on almost any type of
fabric and a bolder effect wilt result from
sewing with a contrasting thread.
Overlap the raw edges of two pieces of fabric
2" and pin or tack. Place the fabric right side
up with the middle of the overlap under the
center of the presser foot, so that the stitch
sews just over the top and bottom raw edges.
DECORATIVE
%
J
I
34
EDGING
Turn the raw edge under 2" and press, Place
the fabric right side up with the middle of the
turnover under the center of the presser foot,
so that the stitch sews on to the fold and just
over the raw edge underneath.
_
Ill
STRETCH
STITCHES
Pressureregulator
Stitch selector
0
See page 14.
Presserfoot
Stitch length dial
Zigzag foot
Within yellow zone
The stitches shown at left are all for use with
stretch and knit fabrics,
These are special
stitches built in to the machine for your quick
selection.
1.
2.
3.
4.
5.
6,
Straight Stretch
Serging or Pine Leaf Stretch
Overcast Stretch
Rick-Rack Stretch
Smocking Stretch
Elastic Stretch
ADJUSTING
STITCH
@ ®
®
®
®
®
LENGTH
Depending upon your preference in stitch
patterns, you may make stretch stitches
closer together without changing the balance
of stitches by turning stitch length dial away
from you within yellow zone.
RECOMMENDATION
It is recommended to use ..Q NI_:F:I)LF;",. and
•'Q FOOT",, for sewing on knit and synthetic
fabric.
35
III I
IIIIIIII/ IIIIIIIIIIIIIIIIIIIIL
III
!111111
IIIIIIIIIIIIIIIIIIIIII
STRAIGHT STRETCH STITCH
SETTINGS
Stitch Selector Stitch Length - Yellow Zone
You may use either a zig zag or straight stitch
foot BUT-- for best control of fabric, best
looking straight stitches and best feeding of
fabric use Straight Stitch Foot.
Use this stretch stitcl_ with knit or synthetic
fabric. Sew as you do with regular straight
stitch.
This is also a good stitch to use on curved
seams regardless of the type of fabric. Any
seam that will receive a great deal of strain
when worn should be sewn with the stretch
stitch, Use in children's shorts and slacks as
well as adult sports clothes.
RICK-RACK STRETCH STITCH
Stitch Selector Stitch Length -
Yellow Zone
Sew on stretch fabrics in any area that you
might use a zig zag stitch. This stitch can be
used as a decorative top stitch as well.
It is useful also on lapped or abutted seams
where you lap one edge of a seam over
another with seamtines meeting in the center.
_
36
,,, i i
IIIIIII
RMOCKING
_Stitch Selector
STRETCH STITCH
-
Stitch Lengthi!.
Yellow Zone
Make a straight line of gathers across the
fabric that you wish to smock,
With a narrow strip of fabric directly
under the line of gathering, stitch over the
gathers. The design will be a series of
small diamonds.
Note: When smocking e garment, the stitch *
ing should be done before the piece is
sewn into the garment.
/
t
i
OVERCAST STRETCH STITCH
Stitch Selector Stitch Length -
Yellow Zone
This is the same type stitch used by the
garment industry in making sportswear-it
forms and finishes the seam in one operation
!(for seams of 1/4" to 3/e"). It's very effective
for use in repaidng raw or worn edges of
i:older garments.
_ote:
To sew overcast stretch stitch in the
opposite direction, use serging (or pine
leaf) stretch stitch.
37
IIIIIIIIIIIIIIII
III
II II
II
II
IIIIII
II
IIII
IIIIIIIIIIIIIIIIIIIII
SERGING (OR PINE LEAF)
STRETCH STITCH
Stitch Selector Stitch Length -
Yellow Zone
Great in making elastic swimwear-as
well
as for overcasting a neat edge on seams,
It's equally useful with woven and knitted
fabrics, Tension may need to be tightened to
achieve desired look.
ELASTIC STRETCH STITCH
Stitch Selector Stitch Length -
Yellow Zone
Use this versatile
stitch
to insert elastic in
garments. Simply stitch elastic into place.
making sure it is evenly spaced, To do this,
mark the correct length piece into quarters,
then match these markings with center front
and side seams,
38
II
III IIIIIIIIIIIII
WHERE TO USE WHICH
STRETCH STITCH:
stretchy suggestions...
constructed knits sometimes catch
toes of presser foot. To remedy this,
short strip of transparent tape around
foot encasing both toes.
avoid tangled threads when working with
tits, start seams carefully. Position fabric
td lower needle before lowering presser
A CHECK-CHART
It is always a good idea to test thread tension
and stitches on a scrap of the fabric being
used.
Knits contain more yarn than woven fabrics,
so you will need to take greater care to keep
your machine clean specially in feed dog and
bobbin case area.
_t.
Specially for Stretch
!_
................
,, ,_ ,,
Use on stretch and knit fabrics and to repair ready made
"IB_"lma-'III_'ID_
-IIIl_
STRAIGHT
-enl.
STRETCH
A basic multi-purposestretch
/VVV'
RICK-RACK
garments at stress points. Basic stitch for atl garment
seams requiring "give" (i. e. armholes, crotch area, etc.},
Use also to sew center seam of men's neck ties and seams
cut on the bias.
stitch with 'same usage as
zigzag stitch, especially for lightweight
stretch fabrics.
STRETCH
A decorative stitch for use on Children's Ciothing, lingerie,
yokes of blouses, dress bodice.
SMOCKING
STRETCH
Use to apply etastic io top 0f iingerie
or-to
repair ready-
made lingerie and replace or restitch elastic.
ELASTIC
STRETCH
VVVVVVV
OVERCAST
STRETCH
Use for overcasting fabrics that ravel or fray easily.., and
for seams that need a great deal of stretch (i.e.
swimwear, other sportswear, girdles). Also good-iookingl
JJJ[ _L L
SERGING
Use on sportswear where _" seams are required. Makes
and finishes seams at same time.
OR PINE LEAF
"Everyday"
Stitches with Stretch Applications
Use for all-purpose
stretch sewing,
seam finishing,
edge
finishing, or attaching stretch laces.
PLAIN ZIGZAG
A good finishing stitch for nylon tricot lingerie.
SHELL STITCH
39
!
IH
I
IIIIIIIIIIIIIIIII
IIIIIIIII
IIIIIIIIIIIIIIIII
IIIIIIIIIIIIIIIIIIIIII
IIIIII
I
I
BUTTONHOLE MAKING - BUILT-IN SYSTEM (BAR-TACK
BUTTONHOLES)
Pressureregulator
Stitch selector
See page t4.
Presserfoot
Stitch length dial
Buttonholeguide
foot
Within buttonhole zone
PREPARATION
Carefully mark the buttonhole length on your
garment, Place the fabric with the buttonhole
marked under the buttonhole foot. Pull th(
guide foot (A) all the way forward so that th_
index mark (B) is aligned with the graduatior
(C), with thread to rear.
B
A
40
Reproduction of the identical size buttonhole.
is facilitated
with the aid of the graduation,
on the left side of the buttonhole guide foot
These
graduations
are
1/8"
apart
Graduations act as reference mark.
II
IIIIIIHI
PROCEDURE
0
Set
stitch
selector
at 0 and
sew several
times at the marked
beginning
of the
buttonhole.
Stop sewing at the left stitch.
Raise needle to its highest position by turning
handwheel toward you manually.
Step
1
Set stitch selector at |_]. Stitch
forward
until
you approach the front
marking of the
buttonhole, Stop sewing at the left stitch and
raise needle to its highest position.
Step 2
m
Set stitch selector at U again and sew
several times. Stop sewing at the right stitch
and raise needle to its highest position.
Step 3
Set stitch selector at lit
and finish
button-
hole.
0
Use buttonhole opener provided
box to open buttonhole.
in accessory
Step 4
41
iiiiiiiiii
ADJUSTING STITCH DENSITY
More density
l
®
®
Depending upon the fabrics on which
sewing, or your own preference in
holes, you may alter buttonhole stitch
by varying the original stitch length
within the green zone.
you are
buttondensity
setting
1. For more density, turn thediat away from
you.
2.
For less density, turn the d_al toward you.
Less density
CORDED
A
==
:LJIIL
ii
=1
N
U
=L_L¢. B
42
BUTTONHOLES
Hook filler cord (crotchet thread or buttonhole twist) to the spur (A), pull both ends of
cord forward under foot and tie to the spur
(B). Sew buttonhole
in such a way that
zigzag stitches cover the cord.
When stitching is completed,
release cord
from foot, pull ends of cord and snip off extra
length.
II
BUTTONHOLE
/I
IIIIlUlIIIIIIIIIIIIIII
IIII
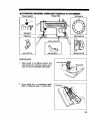
MAKING-USINGBUTTONHOLE
Pressureregulator
ATTACHMENT
(Model 1358)
Stitch selector
See page 12.
Presserfoot
Satin stitch foot
Stitch length dial
Feed dog down
Between 0 and 24
PROCEDURE
1. Raise needle to its highest position and
raise presser foot, Remove regular cover
plate and insert buttonhole cover plate.
2. Screw guide pin on buttonhole
guide
plate into guide pin hole on needle plate.
Guide pin hole
Pinion gear
Guide pin
\
43
I
I
3.
Insert a template into the slot of template
holder. Select the proper size of buttonhole by turning the template advance
knob.
4.
Pull the guide plate all the way forward so
that the guide pin is at °'S". This will
enable you to start at one end of the
buttonhole.
Drop guide plate into place
over the pinion gear,
Template
Holder
/
Template Advance Knob
I
Fig. 3
Fig. 4
.
Fig. 5
44
Pick up bobbin thread through guide plate
by turning
hand wheel
and drawing
thread to back of machine. Place fabdc
between
presser foot and guide plate.
Line up edge of fabric
with
marked
indentation
on guide.
If you wish all
buttonholes
to be 3/4 inch from edge of
garment,
line up fabric with 3/4 inch
marking
each time you start sewing a
buttonhole.
III1[
IIIlUlIIIIIIIIIIIIIIIIMII
I/I
I II II IIIIIIIHIIII I II IIIIP
BUTTONHOLE MAKING - USING BUTTONHOLE ATTACHMENT
PremJre
re.mr
Stitch lelector
0
See page 14,
Press_' foot
Buttonhole foot
Stitch length dial
Feed cover plate
SETTING
Tab
Release
lever
Any setting
STITCH
SELECTOR
PROCEDURE
®
,
Raise needle to its highest position and
raise the presser foot.
Remove
the
extension table from machine and open
shuttle cover.
Insert two tabs of buttonhole adapter into
slots under the needle plate pulling
density control knob toward you until the
adapter snaps into place. (when buttonholing is completed, remove the adapter
by pulling it toward you with release
lever lifted up.)
2,
Swing the shuttle cover up and away until
it is locked under the adapter as shown.
45
III
II
Select correct template for type buttonhole you want. Insert template into slot of
guide plate. Turn template advance knob
to desired size.
.
(__jGuide
®
II
plate
.
Slip guide plate onto machine so it fits in
place with pinion gear in the center of arc
hole of template. Be sure guide block is
inserted in guide slot.
Your machine
controls should
be set as
shown on page 44. You will note that the
stitch selector can be set for several stitch
widths.
This will result in thicker or
thinner
buttonholes
as illustrated
on
page 44. The type of fabric you use will
determine what width you use. Be sure to
make a practice buttonhole first.
®
46
.
Pick up bobbin thread through guide plate
by turning
hand wheel.
Place fabric
between presser foot and guide plate.
Align marked
buttonhole
with center
marking on foot. Line up edge of fabric
with markings on guide plate, If you wish
all buttonholes to be 3/4" from edge of
garment, for example, line up fabric with
3/4"
marking each time you start a
buttonhole.
ADJUSTING
STITCH DENSITY
\
Depending upon the fabrics on which you are
sewing, or your own preference in buttonholes, you may alter buttonhole stitch density
by turning stitch density control knob.
1. When delivered, stitch density control
knob will be tighterted completely. For
more density, turn the knob toward you.
If the knob should be loosened as far as it
can go during adjustment, retighten it by
a quarter to half a turn to assure smooth
operation.
2,
For less density, turn the knob away from
you.
®
Stitch density
control knob
CHOOSING BUTTONHOLE STYLE AND SIZE
Each buttonholing will be different so you will
want to experiment
with your garment,
considering fabric and placement of button.
Here are some basic applications:
Straight buttonholes are most popular for
everyday sewing - for series of buttons on
dress, blouse, vest, jacket or coat.
Keyhole
buttonholes
are a variation
to allow more room for button Shank. These
are normally used in tailored vests, jackets,
coats.
Eyelet buttonholes
(another
variation
of
"straight")
most often are used for studs on
skirts or holes for tongues of belt buckles.
of the
above, with an enlarged opening at one end
STRAIGHT
BUTTONHOLE
BUTTONHOLE
ROUND END
KEYHOLE
EYELET
BUTTONHOLE
47
III
II IIIIIIII
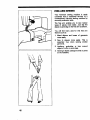
FREE-ARM
II
SEWING
Your Kenmore
sewing machine is easily
converted from a traditional flat-bed
to a
contemporary
free-arm sewing machine by
removing extension table.
The free arm enables you to sew tubular
types of pieces more easily. Just slip the
sleeve or pants leg on the free arm as shown.
You will find many
feature such as:
, \
\
48
uses for
and
knees
this free arm
1,
Mend elbows
more easily.
of
garments
2.
Sew in sleeves more easily.
especially
true when
sewing
garments.
This is
smaller
3.
Applique,
embroider
or hem
edges of cuffs or pants legs,
around
4.
Sewing in elastic casings in skirts or pants
at the waistline.
SEWING
MACHINE
Now that you have purchased your Kenmore Sewing Machine,
shouid anead ever exist for repair parts or ean_e, sinciy contect
any Seam Service Cen_r and most Sears, Roebuck and Co.
Stores. Be sum to Ixovide all pertinent facts when you call or
visit
The model number of your Sewing Machine will be shown on
your nomenclature plate on the back of your Sewing Machine.
See page3 for location.
WHEN ORDERING REPAIR
FOLLOWING INFORMATION:
*MOOEL NUMBER
PARTS,
*NAME OF ITEM
ALWAYS
GIVE
THE
*PART DESCRIPTION
If the parts you need are not stocked locally, your order will be
electronically transmitted to a Sears Repair Parts Distribtnion
Cemerfor handling.
SEARS,
S - 158
ROEBUCK
AND
CO., Chicago,
IL g0884 U.S.A.
Part No. 69548
6/91