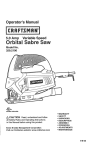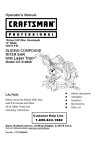
1
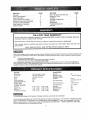
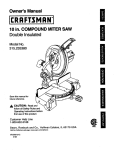
Operator's Manual
[cRR •T MR.
°
15 Amp - 3 HP (Max. Developed)
12" Blade
4000 R.P.M.
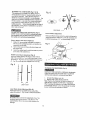
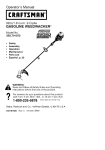
LASER COMPOUND MITER SAW
With Retractable Laser Trac®System
Model 137.212150
\
\
Safety Instructions
CAUTION:
Installation
Before using this Miter Saw,
Operation
read this manual and follow
Maintenance
atl its Safety Rules and
Parts List
Operating
Instructions
Sears, Roebuck
Visit our Craftsman
and Co., Hoffman
Estates,
website: www,sears.comlcraftsman
Part No. 137212150001
IL 60179 U.S.A.
SECTION
Warranty .................................
Product Specifications ....................
Power Tool Safety ..........................
Compound Miter Saw Safety ................
Electrical Requirements and Safely ,.
Accessories and Attachmenls .................
Tools Needed For Assembly .....................
Carlon Contents
......................
i
lUll
SECTION
Know '/our Compound Miter Saw........
Glossary of Terms ...............
Assembly ....................
Assembly & Adjustments ..........
Operation ..................
Maintenance ...................
Troubleshooling Guide ..............
Parts List......................................
PAGE
2
2
3
4
4-5
6
6
7
,nul
ii
nil,
]
iiiiiilululllll
ii]llnnlnlllln
PAGE
8
9
tO
11
16
22
23
24
"
i
i
i
FULL ONE YEAR WARRANTY
If this toot fails due to a defect in material or workmanship within one yea[ of date of purchase, Sears wil!
at its option repair or replace it free of charge.
Relurn lhis too] to a Sears Service Center for repair, or to place of purchase for replacement,
This warranty gives you specific legal righls, and you may also have other rights whiel) may vary from
slate to stale.
Sears,
Roebuck
i
im
and
Co,,
m m,,,,,mn
Dept,
817 WA,
i ,,,u
Hoffman
I
III,
Estates,
I,,m,l,I
IL 60179
I
I
m H"l
Some dust crea ,_d by power sanding, sawing, ,grinding. drillir=g and other construction
activities contains chemicals known
(to the State of California) to cause cancer, birti_ defects or other reproductive harm Some examples ef these chemicals
are:
, Lead from lead-based paints
,, Cryslalllne
silica from bricks, cement and oliver masonry products
,, Arsenic and chremiurn from chemically treated lumber
Your risk from these exposures varies., depending on how often you do this type of work. To reduce your exposure to
these chemicals, work in a ;,Jell ventilated area and work with approved safely equlpmenl
such as dust masks that are
specially designed to filler out microscopic
particles
MOTOR
Power Source ........
Horsepower
................
Speed .................
Brake .............
Do_te _nsulale,'lJ...........
Motor Arbor Shaft Size .....
t20 V AC f30HZ. 15 Amp
3HP {Max. Developed)
BLADE
SIZE
Diameler
..................
Blade Arbor Size ...........
40130 RPM [No _;ead)
Etecl_iC
Rotating
Diameler
Yes
Table:
.
t3-112"
0, 15, 22.5.31 6 45=
R &L
Miler Detent Stops
5t8"
t2"
1" w! a 518" RedUcer
MITER SAW
Bevel Pos_live Stops ...............
O.33 9. 450 Left
Cutting
Capacity:
Crosscut ..............
Miter 45 = R.8 t........
Bevel 45 _;L .........
/,5 _ Miter and _t,5_ Beve!
Base Dimensions
23' x 16-3/4"
To avoid electrical
hazards,
.
2-112" × 7-718";
2-112" x 5,1t2";
1_31,1"z 7-7/8";
1-314" z 5-1t2";
fire hazards
3-7/8" x 5-7/8
3-7/8" x4-118"
2-314" x 5-7/8"
2-314" x 4-118"
or damage
.....
Dual Bag ...........
Exlension Wings .....................
Sliding Fence
.......
Net Wetgllt
to the tool, use proper
Yes
Yes
Yes
47 Ibs
circuit protection
This tool is wired at the factory for t 10-120 Volt operation, It must be connected toa t 10_120 Volt t 15 Ampere time delay
fuse or ctrcuit breaker To avoid shock or fire, replace power cord immediately if it is worn, cut or damaged in any way.
Before using your Iool. it is critical that you read and understand these safety rules
Failure to follow these rules could
result in serious injury to you or damage to the tool
GENERAL SAFETY INSTRUCTIONS
BEFORE USING THE MITER SAW
Safely is a combination
of common sense,
and knowing how to use your miter saw.
"r""'_""
..1
could cause permanent
eye damage,
.....
!_)C,_([ii'J ALWAYS wear Safety Goggles (not
staying
alert
To avoid mistakes that could cause serious injury, do not
plug the tool in until you have read and understood
the
following,
t.
2.
READ and become famtliar with the entire Operators
Manual. LEARN the toots application, limitalions and
possible hazards
KEEP GUARDS
IN PLACE
and in working
order.
3. REMOVE ADJUSTING KEYS AND WRENCHES.
Form the habit of checking to see Ihat keys and
adjusting wrenches are removed from [he toot before
turning OFf,
4,
KEEP WORK AREA CLEAN
benches invite accidents
Cluttered
areas and
5
DON'T USE IN DANGEROUS
ENVIRONMENTS.
Don't use power tools in damp locations, or expose
t!]em to rain or snow Keep work area well lighted,
6. KEEP CHILDREN
AWAY, All visitors and bystanders
should be kept a safe distance from work area
7
MAKE WORKSHOP CHILD PROOF wilf_ padlocks,
master switches, or by removing starter keys
8
DON'T FORCE THE TOOL, It wil_ do the job belier
and safer al the rate for which it was designed,
glasses)
with ANSI
Safety
standard that
Z87 comply
1 Everyday
eyeglasses
have only impact ,-resistance
lenses
They ARE NOT safety glasses. Safety Goggles are
available at Sears. NOTE: Glasses or goggles not in
compliance
with ANSI Z87 1 could seriously injure
you when they break
13,WEAR A FACE MASK OR DUST MASK. Sewing
operation produces dust
14..SECURE WORK_ Use cfamps or a vise to hold work
when practical. It's safer than using your hand and it
frees both hands to operate reef
15,DISCONNECT
when changing
cutters
USE THE RIGHT
attachment
TOOL,, Do not force the tool or an
to do a job for which
_twas not designed
10°USE PROPER EXTENSION CORDS, Make sure
your extension cord is in good condition When using
an extension cord, be sure to use one heavy enough
[o carry the current your product will draw An
undersized cord will result in a drop in line voltage
and in loss of power which will cause the tool to
overheat Tile table on page 5 shows the correcl size
to use depending on cord length and nameplafe
ampere rating. If in doubt, use the next heavier gauge
The smaller the gauge number, the heavier the cord.
11.WEAR PROPER APPAREL. Do not wear loose
c!olhing, gloves, neckties, rings, bracelets, or other
jewelry which may gel caught in moving parts
Nonslip foolwear is recornrnended Wear protective
hair covering to contain long heir
12,ALWAYS
WEAR EYE PROTECTION
Any power
can throw foreign objects into the eyes and
roof
and
bets and
]&REDUCE
THE RISK OF UNINTENTIONAL
STARTING,
Make sure switch is in Ihe OFF position
before plugging the roof in
17.USE RECOMMENDED ACCESSORIES, Consul{ fl@s
Operators Manual for recommended accessories.
Tile use of improper accessories may cause risk of
injury to yourself or others
1&NEVER
STAND ON THE TOOL
Serious iniury could
occur if the tool is tipped or if the cutting tool is
uninlentionally
contacted.
19,CHECK
9.
TOOLS before the servicing
accessories
such as blades
FOR DAMAGED
PARTS° Before
farther use
of the tool a guard or other part that is damaged
should be carefully checked to delermine
Ihet il witl
operate properly and perform its intended funclion clleck for alignrner_! of moving pads, binding of
moving parts, breakage of parts, mounting, and any
other conditions that may alfect its operation
A guard
or other part thai is damaged
should be properly
repaired or replaced
20,NEVER
LEAVE
THE TOOL
RUNNING
UNA'T-fENED°
TURN THE POWER "OFF".
Dont w'alk away from a
running tool untii {he blade comes loa complete stop
& unplug the unit
2£DON'T
OVERREACH,
balance al all limes.
Keep proper fooling
and
22oMAINTAIN TOOLS WITH CARE, Keep tools sharp
and clean for best and safest performance Follov,,
instruclions for lubricaling and changing accessories
23.WARNING: Dust generaled from cerlain maleriais
can be hazardous to your health, Always operate saw
in well-ventilated area and provide for proper dust
removal
20,IMPORTANT; After compleling the cut, release the
power switch and wait for the blade to stop before
returning the saw to lhe raised position
1. USE ONLY
CROSS-CUTTING SAW BLADES,, When
using carbide tipped blades, make sure they have a
negative hook angle. IMPORTANT: DO NOT USE
THIN KERF BLADES- they can deflect and contact
guard and can cause possible injury to the operator
21,MAKE SURE the blade has come to a complete stop
before removing or securing the workpiece, changing
the workpiece angle, or changing the angle of the
blade,
2, DO NO']" operate lhe miter saw until it is completely
assembled and installed according to these
instructions
22.NEVER cut metals or masonry products with this too!
This miter saw is designed for use on wood and
wood-like products°
3. IF YOU ARE NOT thoroughly familiar with the
operation of miter saws, seek guidance from your
supervisor, inslructor, or other qualified person.
23.NEVER cut small pieces ]f tile workpiece being cut
would cause your hand or 5rigors to be within 8-112"
inches of the saw blade the workpiece is too small
4_ ALWAYS hold the work firmly against the fence and
table DO NOT perform any operation free hand (use
clamp wherever possible).
24.PROVIDE adequate support to the sides of the saw
table for long work pieces
5. KEEP HANDS out of the path of the saw blade If the
workpiece you are cutting would cause your hands to
be within 8°t12" inches of the saw blade, the
workpiece should be clamped in place before making
the cut
25, NEVER use the miter saw in an area with flammable
liquids or gases.
6, BE SURE the blade is sharp, runs freely, and is free
of vibration
26.NEVER
use solvents to clean p]aslic parts So{vents
could possibly dissolve or otherwise damage the
material
7, ALLOW the motor to come up to full speed belore
starting a cut
8.
KEEP THE
MOTORAIR
SLOTS
CLEAN
27,SHUT OFF the power before
1he tool
and free of
servicing
or adjusting
chips or dust
28DISCONNECT
the saw from the power source and
clean the machine when fln_shed using.
9. ALWAYS MAKE SURE ale handles are light before
cutting, even if the lable is positioned in one of the
positive stops.
10.BE SURE
both the blade and Ihe collar
the arbor bolt is lightened
I_USE
only blade collars
12, NEVER use blades
than 12-Inches
13, NEVER
apply
secarely
specified
30.SHOULD any part of you_ miter saw be missing.
damaged, or fail in any way. or any electrical
component fail to perform properly, shut off the switch
and remove the plug from the power supply outlet
Replace missing, damaged,, or failed parts before
resuming operation,
for your saw
larger or smaller
lubricants
29,MAKE SURE tile work area is clean before leaving
the machine
are clean and
in diameter
to the blade when
it is
running
14, ALWAYS check lhe blade for cracks
before ope_ration. Replace a cracked
blade immediately
15, NEVER use blades recommended
less _.han 4000 RPM
16
USE lhe blade guards
17,ALWAYS
or damage
or damaged
ELECTRICAL
POWER SUPPLY AND MOTOR
for operalion
SPECIFICATIONS
The AC motor used in this saw is a universal.
nonreversible type See "MOTOR" in the 'PRODUCT
SPECIFICATIONS" section on page 2,
at
at a_l times
keep the blade guards
REQUIREMENTS
in place
18,NEVER reach around the saw blade
To avoid electrical hazards, fire hazards, or damage to
the tool. use proper circuit protection Your saw is wired
at the factory for 120V operafion Connect to a t20V, 15
Amp circuit and use a 15 amp, time delay ruse or circuit
breaker To avoid shock or tire, if power cord is worn or
cut. or damaged in any way, have it repiaced
immediately.
19,MAKE SURE the blade is not contacling lhe
workpiece before the switch is turned ON
4
DOUBLE INSULATED
4. FUSES may "blow" or circuit breakers may trip
frequently if:
a MOTOR is overloaded - overloading can occur if
you feed too rapidly or make too many start/slops
[]
The power toot is double insuFated to provide a double
thickness of insulalion belween you and tool's electrical
syslem. At! exposed metal parts are isolated from the
Internal metal motor components with protecting insulalion
in a short time.
b LINE VOLTAGE is more than 10% above or below
the nameplale voltage rating For heavy toads, the
voltage at motor terminals must equal the voltage
specified on the nameplate
c, IMPROPER or dull saw blades are used,
Replacement parts - When servicing use only identical
replacement parts
Polarized plugs -This saw has a plug that looks like the
one shown below:
5. Most motor troubles may be lraced to loose or incorrect
connections, overload, low voltage or inadequale power
supply wiring. Always check the connections, the load
and supply circuit if the motor doesn't run well Check
minimum gauge for the length of cord you are using on
the chart below.
GUIDELINES
To reduce the risk of electrical shock, this saw has a
polarized plug (one blade is wider Ulan the other} Tills
plug will fit in a polarized outlet only one way If the plug
does not Fitfully in the culler, reverse the plug If it still
does not fit, contact a qualiFied electrician to install the
proper outlet De not change the plug in any way
overheating
the correct
Be sure your extension
cord is properly
good condition
Always replace a damaged
size to use
If
wired and in
extension cord
or have it repaired by a qualified person before using it
Protect your extension cords from sharp objects, excessive
heat and damp or wet areas
1, Use only identical replacement
parts when servicing a
tool with double insulation
Servicing should be performed
Use a separate electrical circuit for your tools. Tills
circuit must not be less than # t2 wire and should be
protecled with a 15Amp time delay fuse Before
connecting the tool to the power line, make sure the switch
is in the OFF position and the electric current is rated the
same as the current stamped on the motor nameplate,
running at a lower voltage will damage the motor.
or
for indoor use only
MOTOR
SAFETY PROTECTION
IMPORTANT:
To avoid motor damage, ihe motor should be blown out or
vacuumed frequently to keep sawdust from interfering with
lhe motor ventilation
1 CONNECT this saw to a t20V, 15 amp.. circuit with a 15
amp time delay fuse or circui! breaker, Using the wrong
size &Jse can damage the me|or
2- if the motor won't start, release the trigger switch
immediately. UNPLUG THE SAW. Ci_eck the saw blade
to make sure it turns freely. If the blade is free, try to
start the saw again., If the motor still does not start, refer
to the "TROUBLESHOOTING GUIDE
3. IF the tool suddenly stalls while cutting wood, release
the trigger switch, unplug the tool and free the blade
from the wood, The saw may now be started and the cut
finished,
The table below shows
depending on cord tength and nameplale
ampere rating
in doubt, use the next heavier gauge The smaller the
gauge number the heavier the cord.
To avoid eieclrocufion;
This tool is intended
CORDS
cord, Make sure your extension
When using an extension cord,
be sure to use one heavy enough to carry the current your
product will draw
An undersized
cord wilt cause a drop in
line voltage, resulling in loss of power and cause
Double insulation does not take the place of normal safety
precautions when operating this tool
by a qualified technician
2°Do not use power tools in wet or damp locations
expose them to rain or snow.
FOR EXTENSION
Use a proper extension
cord is in good condition
(When using 120 volts only}
f
,tAm Rating Fo_ta|
Ie mh
ofco,dInfeet
,=L_.
!_2.
tirolm._em_m
I#
I/ 2_'
'_
Io
_¢"
tOO'
_,_
__0
*,z
...............
_ f4
12
fil1_ t i}c,_ir,mt_;_d o#
CAUTION: In all cases make certain the receplacle in
question is properly grounded, If you are not sure have a
certified eleclrician, check the receptacle.
RECOMMENDED
o
o
ACCESSORIES
Use only accessories
recommended
Fotlowinstructions
that accompany
for this miler saw
accesserles
Use
of improper accessories
hazards,
may cause
The use of any cutting tool except 12 inch saw blades
tha_ meet the requirements
under recommended
accessories
is prohibited
Do not use accessories
such
as shaper
cullers
or dado sets, Ferrous
the use of abrasive wheels
products are prohibited,
e
metal cul:ling,
and the culling
of masonry
Do not attempt [o modify this tool or create
accessories
not recommended
for use with this tool.
Any such alleralior_ or modification
is misuse and could
result in a hazardous condition leading to possible
serious
injury
ACCESSORIES
Visit your Seats Hardware Deparlment or see timeSears
Power and Hand Tool Catalog
tO purchase recommended
accessories for this power tool
To avoid
time risk oi personal
iniury, do not modify
this
power tool or use accessories
not recommended
by Seats
Read warnings
on yoIJr CARBIDE
TIPPED
and condilions
SAW BLADE
Do not operate the saw wilhoul the proper
saw blade guard in place. Carbide is a very hard but brittle
malarial
Care should be taken while mounting, using, end
storing carbide lipped blades to prevent accidental
damage.
handtlng,
Slight shocks, such as striking the lip while
can seriously damage the blade Foreign objects
in the workplace,
such as wire or nat;s, can also cause tips
{o crack or break off. Before using, always visually
examine [he blade and tips for bent teeth, cracks,
breakage, missing or loose tips, or other damage
Do not
use it_damage is suspected.
Failure to hee_J safely
instructions
and warnings can result in serious bodily
injury
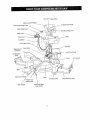
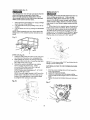
Phillips screwdriver
3_
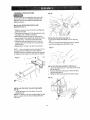
UNPACKING YOUR MITER SAW
To avoid injury from unexpected starting or electrical
shock, do not plug the power cord into a source of power
during unpacking and assembly This cord must remain
unplugged whenever you are working on the saw
1
2
Remove the miter saw from the carton iMPORTANT:
Do not liit lhe miter saw by the swilch I_andleor
miter table handle It may cause misalignment,
Always lift the machine by the built in carry handle,
Place the saw on a secure statiottary work surface.
Separate all parts from the packing material.. Check
each one with tile illustrationto make certain all
items are accounted for. before discarding any
packing material
if any part is missing or damaged, do not altempt to
assemble the miter saw, or plug in the power cord untie
the missing or damaged part is correclly replaced To
avoid electric shock, use only identical replacement parts
when servicing double insulated tools
Blade Wrench
(Stored behind
carry handle)
Dust Cof]ector
%
Elbow
_d.down
Ctamp
Miter Saw
=_
.........
__
Left & Right
Extension Wings
Arm Brackets
Extension
Wing
Locking Screws
ON t OFF Trigger
Switch
Safety
Lock-OFF
Button
Power
CordStorage
Ctips
Cutting
Head Handle
UpperBlade
Guard
Handle Locking Lever
Laser
guide
ArborLock
Motor
SawBlade
t
Lower
BladeGuard
Dust Bag
Sliding
Fence
Extension
Bevel Scale
Hold Down Clamp
LeftExtension
Fence
Arm Bracket
Base
Bevel Lock Handle
Table
Mounting Holes
Locking Lever
Miter Handle
Quick-Cam Miler
Lock Handle
Right Extension Wing
trigger switch and a safety lock-off slide switch The
CRAFTSMAN
TERMS
COMPOUND
MITER
SAW
ARBOR LOCK - Allows the user to keep the blade from
rotating while tightening or loosening the arbor locking boil
during blade replacement or removal
BASE - Supports the fable, holds accessories and allows
for workbench or lag set mounting
blade is lowered into the workpiece by pushing down on
the handle The saw wil! return to its upright position when
the ha_dle is released
WARNING LABELS - Read and undersland for your own
safety Always make certain these are in place & legible
BEVEL LOCKING HANDLE - Locks the miter saw at a
desired bevel angle
WRENCH STORAGE - Convenient
misplacing the blade wrench
BEVEL SCALE - To measure the bevel angle of the saw
blade 0_'to 45" left
WOODWORKING
COVER PLATE SCREW --Loosen this screw and rotate
the plale for access to the blade arbor locking bott
ARBOR - The shaft on which a blade is mounted
DUST CHUTE - Exhausts debris away from the user
EXTENSION WING - Extends the width of the work Iable
for support while cutting long work pieces They can be
used with or without a stop bbck as an additional side
fence
FENCE - Helps to keep the workpiece from moving when
sawing Scaled to assist with accurate cutting
SAFETY LOCK-OFF BUTTON - Yellow button on handle
must be pushed forward to activate the trigger switch
LOWER BLADE GUARD - Helps protect your hands from
Ihe blade in the raised position, it retracts as the blade is
lowered
MITER HANDLE
- Used to rotate
felt cutting position
the saw to the right or
MITER SCALE - 7b measure the miter angle 0° to 45" left,
0° to 45 _ right
MOUNTING HOLES - To mount the miter saw to a stable
surface
storage
to prevent
TERMS
BEVEL CUT - An angle cut made through the face of the
workplace
COMPOUND CUT - A simuItaneous bevel and miter cut
CROSS CUT - A cut made across the width or grain of the
wo_kpiece
FREEHAND - Performing a cut wiihout using a fence
(guide), hold down or other proper device to prevent the
werkpiece from twisling during the cutting operation
GUM -A sticky sap from wood products
HEEL - Misaiignment of the blade.
KERF - The amount of material removed by blade cut.
MITER CUT - An angle cut rnade across the width or grain
of the workplace
RESIN -A sticky sap _hat has hardened,
REVOLUTIONS PER MINUTE (RPM) - The number of
turns completed by a spinning object in one minute.
ON/OFF TRIGGER SWITCH - To prevent the trigger from
being accidentally engaged, a lock-off slide switch is
provided To sled the tool push the lock-off s_ide switch
forward and squeeze ttle trigger_ Release the trigger to
stop the mi_er saw.
SAW BLADE PATH - The area of the workpiece or table
top directly in line with the travel of tI_e blade or the part of
the workpiece which will be cut.
POSITIVE STOP LOCKING LEVER - Used in combination
SET - The distance between two saw blade tips, bent
outward in opposite directions to each other The further
apart the tips are, the greater the set
with the miter handle, it locks the miler saw at a preset
positive slop for the desired miter angle
STOP LATCH - Locks the miter saw _n the lowered
position for compact storage and transportation
SWITCH HANDLE - The cutting head handle contains the
WORKPIECE - The item being cut The surfaces of a
werkpiece are commoniy referred to as faces, ends, and
edges.
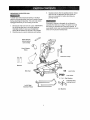
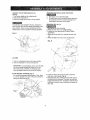
ASSEMBLY
INSTRUCTIONS
Fig. B
To avoid injury, do not connect this miter saw to the
power source until it is completely assembted and
adjusted, and you have read and understood this
Operators Manual
iNSTALLING
BRACKETS
EXTENSION
WINGS
& ARM
(FIG, A)
1Slide the extension wing (1) into the mounting holes
(2) of the saw base
2,Thread the locking screw (3) into the extension wing
then tighten with a Phitlipsscrewdriver_
3 Place one flat washer 14) onto one lock knob (5),
insert tllrough tt_earm bracket (5) and thread into the
extension wing. Repeat for second lock knob
4 Thread the extension wing {ock knob (7) inlo the
threadecJ bole in the base (8) to lock the extension
wing into place
5 Repeat steps I through ,1 for right side extension
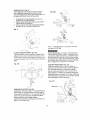
INSTALLING THE DUST BAG (Fig, C)
t Squeeze the metal collar wings (I) of the dust bag
(2)
t Place the dust bag neck opening around tile exhaust
port (3), and release lhe metat collar wings
Fig. C
NOTE: The arm brackets serve _,,o purposes: To act
as a stop block for repetilive cuts and to tore! the
workpiece when the extension wings are fulfy extended
for additionaf work support (see Operatior_ for details)
3
Fig. A
7
"
_:' ["
2
4
Fig. D
THE DUST
COLLECTION
ELBOW
(Fig° B)
1
Instal! the larger end of the elbow (1) onto the
exhaust port (2).
NOTE: The elbow can be used to attach either the dust
bag or a vacuum
work area
hose to remove
sawdust
;
from the
J'f_
INSTALLING THE HOLD-DOWN CLAMP (Fig. D)
1 Loosen two lock knobs (1) in each side on the rear of
the saw base (2).
2 Place the Hold-down Clamp (3) m'_either the left or
right moUnting hole (4)..
3 Tighten the lock knob to secure _heclamp in place_
3
INSTALLING
,fd
RAISING
THE CUTTING
Raising
1 Pustl down slightly
HEAD
(Fig.
on the cotling
REMOVING OR INSTALLATING 'THE BLADE
E)
handle,
1
2.
2, Pull oul the stop latch (1),,
3 Allow the cutting head to rise to tile up position
Onlyuse a 12-inch diameter blade
To avoid injury from an accidental stad, make sure
the switch is in the OFF position and plug is not
connected to the power source outlet
REMOVING (Fig, G, 14,t)
To avoid injury and damage to the saw, transport or
store the miter saw with the culling head Iocked in the
down position. Never use lhe stop latch to hold the
cutting head in a down position for cutting operations.
t Unplug the saw from the outlet.
2. Raise the miler saw to the upright posiLion.
3 Loosen the cover plate screw (2) wilh a PhilIips
screwdriver.
4 Rolate the cover plate (3) to expose the arbor bott
(4).
5_ Place the blade end wrench over the arbor boll
Fig. G
!
i ......
J
",_
z
/.,
o
.....
,,.......................
_/];
i'
"_
7
<>i
.,_,
_
z
LOCKING
'; i':'_
1 Push tile cLltling head down to its towesl position.
2 Push the slop latch (1) into the locking hole
....:J
IMPORTANT: To avoid damage, never carry U]e miter
saw by Abeswitch handle, the cutting arm, or the
miler table handle. ALWAYS use the designated
carrying handle tocaled on the top of the machine
/
BLADE WRENCH
STORAGE
(Fig- F)
For convenient storage and prevention
ii
d
•.....
_> .+
0':
,,,
/'
6. Locale li_a arbor lock (5) on the motor+ below the
miter saw switch handle. (Fig. H)
7 Press the arbor lock, holding it in firmly while turning
lhe blade wrench clockwise. The arbor lock wilf then
engage and lock Ihe arbor. Continue to l_old the arbor
lock while turning the wrench clockwise 1oloosen the
arbor boll
of loss. there
is a slot (1) located [n the rear of the carry handle for
storing lhe Made wrench (2)
11
t
iMPORTANT: Make sure the flats of the blade collars
are engaged with the flats on the arbor shaft. Also, the
fiat side of the arbor collar must be placed against the
blade..
3 P]ace the bJade wrencil on the arbor bolt
4_Press the arbor lock {5), holding it tn firmly while
turning the blade wrench counterclockwise.. When the
arbor lock engages, continue to press the arbor bck
in while tightening the arbor bo{t securely (Fig, H)
5, Rotaf-e the cover plate (3) back te its original position
until the slot in the cover plate engages with the
cover pJate screw (2). Tighten the screw ,,riCha
Phillips screwdriver- (Fig, G)
6 Be sure ti_e arbor lock is released so the blade turns
freely by spinning the blade until the arbor lock
disengages.
Fig, H
5
\iREMOVING - cont'd
8. Remove the arbor bolt (4), the outer blade collar (6),
and the blade (7) with the 5t8" reducer. DO not
remove the inner blade collar, {Fig, J)
9 Raise the lower clear plastic Diode guard (1) to the
upright position (Fig. G) to remove the blade.
To avoid injury from an accidental start, make sure the
switch is in the OFF position and the plug is not
connected to the power source outlet To avoid injury,
never use the sew without tile cover plate secure in
place, it keeps the arbor bolt from failing ou_if it
acc_dentalfy Jeosens, and helps prevent the spinning
blade from coming off the saw,
NOTI_: Pay attention to the pieces removed, noting
their position and direction they face Wipe the blade
collars clean of ant' sawdust before installing a new
Diode. Also, the f2" blade has a 1" arbor hole with a
5f8- reducer to mount onto the saw
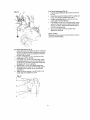
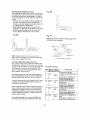
ADJUSTING
FENCE SQUARENESS
(Fig. J)
1 Sol tile bevel and miter angles at zero degrees.
Fig. 1
°\. S
2. Lower and lock {he cutting head into position
3 Using a square, lay the heel of the square against
"\
the
blade, and the rule against the fence [2) as shown.
NOTE: Be sure to rest the square against the body of
_he blade and not agaiIlst the teeth of the blade.
4./r the blade is not 9[;'_ _o _he Fence, loosen the three
fence tocking boils (1)
5 Adjust the fence 9(3_ to the blade and re-tighten
_hree fence locking
the
boils.
CAUTION: If the saw has not been used recentty,
recheck blade squareness to tile fence and readjust if
needed
4
7
Fig, J
2
INSTALLING BLADE (Fig, (3, H, I)
Un-plug the miter saw before changingt]nstalling tile
blade
! install a t2" blade witl_ a 518" arbor (or a I" arbor with
a 5/8" reducer) maktng sure the relation arrow on the
blade matches the clockwise rotation arrow on the
upper guard, and the blade teeth are pointing
downward,
2. Place the outer blade collar (6) against the blade and
on the arbor.. Ttlread the arbor bolt (4) on the arbor
(Fig. 1} in a counterclockwise direction
:
12
MITER SCALE (Fig. K)
The miter saw lable has nine of the most common
angle settings wilt} positive stops at 0", 15_,22.5 _, 3 t, 6°
and 45" These positive stops position the blade at the
desired angle quickly and accurately.
3,,
4,,
Miler Angle Pointer Adjustment (Fig_ K):
!
Place the miter table at the zero position making
sure the pasilive stop locking lever snaps into
position
2 Loosen tile miter angle indicator screw (t) and
adjust the indicator to the _O"mark on the miter
scale.
3 Tighlen miter angle indicator screw
Miter Quick-Cam Table Lock Adjustment; (Fig. M)
Note: Fig M is a view from undernealh [he saw
1. Press down and tock the miter quick-cam table lack
(1).
2
Turn the stop nut (2) to the left as shown using a
13ram wrench to extend the locking arm against lhe
base of the miler saw,
3 Test the quick cam miter lock to verify it Iocks the
table into position securely
4 Turn Ihe look nut (3) to the right as shown to lock
the miter locking mechanism into place
Fig. M
1
Fig. K
i
,
(t), grasp the miter handie (2) and move the miter
table left or right to the desired angle
Release the positive slop locking lever
Press down on the Miter Quick-Cam locking lever
(3) until it locks fhe miter table in place
NOTE: The miter Quick-Cam locking lever should
lock the tabie and prevent it from moving tell or
right If adjustment is needed, see next step
\
\
_
1
Positive Stop Miter Angle Adjustment:
(Fig L)
1 Unlock the miler [able by lifting up on the miler
quick-cam
table lock (3).
2
While holding the positive stop locking lever down
(1), grasp the miter Ilandte (2) and move the miter
tabte left or right to the desired angle
3
Release the positive stop Iocking lever and set the
failer at the desired angle making sure lhe lever
snaps inlo place, NOTE: The lever will only lock
into place at one of the nine positive stops,
To
lock the table at atl other degrees, see next section
90 _ BEVEL STOP ADJUSTMENT
To avoid injury from unexpected starting or electrical
shock, turn the swflch OFF and remove the power cord
from lhe power source.
90= Bevel adjustment (Fig. N}
l r Loosen the bevel lock handle (1) by relating it
clockwise and tilt the cutting arm completely to the
right Tigl_ten the bevel lock handle,
2 Place a combination square (2) on ti_e miter table
with the rule against U]e labia and the heel of the
square against the saw blade
3
If the blade is nol 90 '_square wilh the miter table,
loosen the bevel lock handle, remove the cover
plate (4), turn lhe bevel angle adjusting screw (3) in
or out wilh a 2 5mm ilex wrench until the blade is
square with the table
4 Repeat steps 1 & 2 to verify blade squareness and
replace the cover plate once alignment is achieved
5. When the blade is exactly 90" to the table loosen
[he felt bevel indicator screw (5) using Phil[ips
screwdriver.
6. Adjust the bevel indicator (5) to the "0" mark on the
bevel scale and retighlen lhe screw
Fig. L
!
l
2
(Fig. N)
1
3
Quick-Cam Miter Table Lock Operation: (Fig. L}
If miler angles required are NOT one of the nine
positive stops noted above, the miter table can be
locked at any angle between these positive slops by
using the Miter Oulck-Cam table lock
1 Unlock the miter table by tilting up on the miter
quick-cam table lock (3),
2 While holding the posilive stop locking lever down
13
•
Fig_ N
33,9° Bevel Adjustment (Fig, O)
1 Push the bevel detent pin (9) in toward the front of
the unit
2 Unlock the bevel tock handle and tilt the culling arm
to lhe crown molding posilive stop at 33 9"
3 Using a combination square, check to see if the
blade angle is 33,ga to the table.,
4 If the blade is not at 33.9 ° to the miter table, loosen
locknut (7) then turn the bevel angle adjusling bolt
(8) in or out with a lOmm wrench until the blade is
at 339 ° to the miler table,.
5 Secure the locking nut (7) inIo position after
alignment is achieved
6
BEVEL SCALE
There are two bevel scales
viewing
4,5° Bevel adjustment (Fig, O)
1 Unlock the bevel lock handle and tilt the cutting arm
as far to the left as possible making sure the crown
melding positive stop pin (9) is pulled out towards
the rear of the machine
2 Using a combination square, check to see if the
blade angle is 45" to the table
3 If ti_e blade is not at 45" !o the miter table, ioosen
the bevel locking lever, lurn the bevel adjustment
screw (10) in or out with a 2.Smm hex wrench until
the blade is 45 ° to the miter table,.
4, Repeat steps 1 & 2 to verify blade squareness
5 When the blade is exactly 45 ° to the table, loosen
the RIGHT bevel indicator screw using PhilLips
screwdriver,
6 Adjust the beve! indicator to the 450 mark on the
bevel scale and retighten the screw.
•
14
at all bevel angles
on this machine
for ease in
ALIGNING THE LASER GUIDE (FJ9, P, Q, R)
Thts adjustment v_s made _ Ih_ factor t ho,hevcr
miner adju._lmOr_!may be required before Ut0 l_)c_is
used for Lho lhst Lime. Also, Lh_laseratignme_t
shc,_td 13oCt',acked perlotJically i_ verify ac_ura_v, You
also IlOvu L'_eaplion to change _he _aser ptojectfc,hto
th9 10it,middle or righl side c,fthe b_ide acco.rdinO to
},our preference whun u._in_ ltle laser tn guide _he
Cutting ope_'_tlon
When u_h_g[l_ata_er on at,. edge of
the workplace,, it m_y reclUim recalibratton 1ocut at 1f_0
lax c? tiOhl of Ihe keri.
Fig+ Q
..... /1"\("\
La_et-beam .___.Jl
For your t_wn safety, never connettl Ihe plug to
power _ource outlet until all the adjustment 411ep_,
are complete as_dyou have read and understood
th_ safety and ¢_p_rational tnslrt4clions.
Laser Poaltlm'} Adjustment
If lh0 Laser Beam moves v:hei_ llio upp.=.rCutting arm is
tai,_d and IO¢.'er@_,adiU._1Fie '_crmv,(3) cautiously ','[!h
O_lot_ed screv#Jdver +/- 5" o_ aF.ptcximalely I/,3 turn
How to Check Laset.buam AlJgrtmcnt
't Find _ g{l _5qts_re scral), wcilkpiecE!_r'd ,%ribe a
gO_tTneas the colibrat._ngf;atlefn _nd pasi{tc,n tt/_
_rkp!_co on the1able
2. Turn on tl_e tasur and line tip Ihe t_s_r heath with
tile
scribec line.
3 Lower tll_" cutting he_l to ',_e@_
+;,he
bltid-3 is p_r,_lfOI
1o tt':_ _irJeOf tilt" ecribed line
.+.-
Parallel La_cr Beam Adjustment
{Fig, P)
Lower lh_ eu!llnfi' huad _o lhe bhldu is flush wi(ll the
___fle_,f th_ scribed line T_rr_ cn lh_ !_sor beam, I_osen
th_ s_rew
{4 - Fig. R1 b'( ;l.lrrl Olld a"ljust
/,2- Fig R} a_";Ofdillljly
Fig. P
then retlghlen
|h0 !lIUi'Tlb...3cr_v,*
3
lh-= screw/,.411.
:
i
CHANGING THE BATTERIES (FJ_, R}
a
;-4t_
ill
U_Iplug _,nur1Yfitersaw bef0,'e n_akin9 an7'adjuNments.
Failure. Ln tin plugyour saw @:)uldtesull hl accidental
starffrlg Oatjsislg po.=.sihle_,0rious per..1onelinju_,
1. Lift r_pen.:het)alleiy co_er [fiJ
2. Rem_'_e and i_;-place4heh_,o bal_ari=-_
Note; Replace the ba:l=-ries tll&t h;_ve a ratin 9 of 1..5
v'olt_i',Ntu_b_:14series #i,d DAA size or equb/alenQ,
When ropi'acing _,hebalt(:rios, the bolteq., Cover shOtilr.l
he li_0rotl_hly cfea¢,ed L'_e a ._of;pain[bi#sh er S)nlllar
devl_o, Iorerzave oUeaweust _(I d<-brir_.
La_er Beam Ar)gle Adjuslmo,d
(Fig, Q_
If ll_e lasur-beem
i5 tlOl_parallel tn tllr._ _ciib._d line,
adjust th'_ S_w
(1 - Ft_ ill v,_tk a Phi!f,pS screv;dti',,er
i_e carefUl not tOove_u_n the a_jus_m_l _._0w The
me_imurr) _ura ,'a._ 1tlo acrew (t - Fig. R} _s _-h5or
approximalG4y 118lurn tO prevent an_' possible ','Are
dam._I;e..
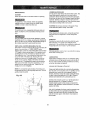
SAFETY INSTRUCTIONS
OPERATION
FOR BASIC SAW
Re#ace _arnaged. ml_smje, or defect;tee F_rts
bofore using _;hesaw again
Mafntsin tools V,tlh c_a_ Keep the mit_f _aw clean
bf best _nd s_,rc_l p_.dom_arlc8, Fel_m;,
insiruclton,_,for [ubri_iUng. Don't put tubricar_ls on
the blade while it's sl_nnlng.
BEFORE USING IIHE MITER SAW
76 a_'o_dr_istakes tIIC,t could cause _ericus, permanent
injury, do e.ot ptug the lool in un[:,lthe fr>_lawingsIe_s
ore completed:
o
Completely assemble and adjust _lle S_;Y,
fulbwtng
i;he
inBlrucbans. {ASSI_MBLY AN D,
A DJ USTt_ENTS)
o
Learn the, u_e and ffinction of the ON?OFF swi_ch.
lock-off switch, upper and fuwe_ bla_a guatd_.._,'.op
Mtch, beve! tack har_dte, and r.,ov_r p!_te ,_crC_,,,'_,.
e
Re'view and understand _1 eal'_ty tnstruo'Jons and
Operatit_g
procedures in LhtsOpera'_or'_ Manual
{I_AFETY & OPERATIONS)
D
Ru',iew the MAINTENANCE and
TRO'JBLESHOOTING GtilDE for your rmler s_w
•
To e'¢cid injure/or pc€Bible fle#.ll from £tesldcal
Rema;,e _1 adjU-,:'@.gv,_'unc_es from lt'_eteal
b_fote turning it on-
US_ ONLY RECOMMENDED ACCESSORIES
Cun._ult the ACCESSORIES and AT_ACFIM_ NTS
section of thisOperators Manual Oarreturns/leaded
acoe_o_-te._, Foliu'n the instructions that rome with
:he ac.oes,3ory The ,as0 of _rr,prc-_uraccessories
may c_'ase risk of ir_jury to 9urBane.
e
shoP_K:
Make _ur_ yOt.r fingers do not louch [lle
plug'_
_nelal
prong:when pie,YOung
nr Unpiuggir_g yr.ur
mitor saw (ELECTRICAL REQUIREMENTS AND
Choose thecorrect 12 inchs_diameter blade, fur
thematerial and the t_fpe,of culling 7ou plea to do
Oo nat use *thin Koff blades.
k_ake sure the blade is sharp, undamaged and
propedF _lignud
BEFORE EACH USE
!o _pect you r St=yr.
DfSconne_ the miter _w. 1-oa,ioid iruu_,,#am
accldemal sl>._dil/_,ur_plug t;70 ._.awbefor<',any
adjustments, includin_ se_-up an_ _Iade char'_[tes
e
Compare the direction of rotation _rrow on the
guard to the directl,an arrow on the blade.. The
etade teolh sl!ol_ld ah,,'ay8 paint dc,.,vnwaroat th_,
Ironl
of th_ -_aw.
e
Tighten th_ arbor heir,
•
Tighten the co_r plate screw,
•
Check for damaged _'_rt_.
Ch_cI{ for:
Alignment of movtr'g parts
e
Damaged electriu cords
=
Binding elreeving- Omt$
e
Mcun_ing ll0le_
o
Fort!!ion _f am!l returnspriing 8r,d towc_
guord:
Push the culling arm a'-_the: way do',vn, then
te_it rise un_,ilit stap_. Th_ lower guard
should fully close. Follow i.",SlPJclIOflS
in
TROUBLESHOOTING GUIDE for
adjuslment.
e
Ottler ¢end[liolls lhat r_y 8,1[P._3I
the ,,*_aytile
,miLer_aw works.
D
Keep all
gua_'ds in place, m v,\3rkingo_'der and
[;r<4;er adjus[mem
fl any part af this miler s_',,,'is mts_.ing, bent
dam_:gO¢ or broken in any v,tay. k,,tany elec_i'icot
paris don't vmrk, luretile saw off"and onplug it
e
Make sure the bI_',do and arbor co'tam are clear}.
e
,_.¢ake_re 01f efamps ant.' !orL_,sare li@ht _-_nd
Lh_r_
i_ no ex_e_$iv't?_ pl_y irl _ny' p_rt_
Ki_EP YOUR WORK
ARF.A CLEAN
Cluttered area_ and r_er,_Tes invite accidents
To avoid bum,_ er oih_r [ire damage, I_ver use [It_)
miter saw near flammable liquids, v_po_ .orgases.
o
Plan ahead IO protect your eyes, hand_, face
a!_J esre,
== Know your miter saw..
Read and Underatand tile Operatol_ Mar, u#. _ad labels
affixed to the 1,_el Learn II_ applicalion and i_mit_Iions
aS well as II',B 5rpee, t_]C polunUal haz_.rds pece_iar toIi",i_
tool ie avoid inju'y from a_;cidemal contact ,z,ilh m_vin.3
pat_s, don'_do layuut, assembly, or selup work on Lha
miter £#€,'
*
Avoid accidental sta_tlng
Make sure the swi[ch is OFF bert, re plugging the
m_ler saw into a power outlet,
16
PLAN YOUR WORK
e
U_o i;'_,_
right LocJDcNt force a 1col or a_taO1munt
tod'o a job it was f_0t
designed _odo,USe a
differenl !onl for any workpiece th_l can't be ,held in
a s_H.dlybraced, lixed p_._ilion
CAUTION: Thi_ machine is NOT des,-=c.:jned
f_r _ulr.tn@
m_sortry, masonb, produ¢ls & ferrous melal_, (steel,
lrofl, and _roc-b_sed n/elat.s.) Us=_lhi5 mi1,3¢saw [o,..xrt
only,acod. ',','god-like I'>ruducL_.or soft n'fotals like
aluminum OIr, er r'r_aterie!may sharer, bind the blade,
or cre_le other dangor_. Remove a.ll nat.Isthai may bu
in the workpigce Loprevenl s¢,arkir_ bhatcm,Hdc_uso a
6re,
e
m
USE EXTRA CAUTION WITH LARGE OR ODD
SHAPED WORKPIECE&
_,
DRESS FORSAFETY
,Any power tOO'.
con threw l'orEign
objeCr._into the ey___.
This can result in r:orrnane,_l eye cJa_1'la_l_Everyday
eyeglasses l_-_v_nnly i_paci:
re-siskm_lensesand are
c/_t softly gl_s_es G.L_sse_>
O{gaggles I_-_tin
camplk'mco ,,,_lhANSI Z87 I could sefieu._iy h',_utcyuu
whe_ lhBy break
o
Do col ,i_e.arloose ctoLhirg, 91o'.,t_ n_Jcki:iesor
je',velp., I'fie.g& watches}. They can get caught _n'.l
draw you into mc',4_g pads
WOOt non-slip foatwe&r
e, _o back .tnng hmr
_'
Roll tang ._leeve5 above _heetbr/,z
e
Noise le',,er_ vaiy widely.. Te _vol(l possible hearing
damage_ wear ear plugs v/nan usng any' mi-:Rr
SeW.
'_
For d=.'sb,eperalions, '.'_oa_u du;l mask aion_l wilh
_OMty _oggleso
INSPECT YOUR WORKPIECE
_,_eke surethere are no rail_ or foreign obje=ts _n l_'_e
pant ofthev,_rkpiece be;rig
CUt,
Plan your work to. wold small pieces thor may bind,
or that are too smoli to _lamp sod g_l a solid grasp
Make sum #_ere _re no gaps be_,'een 1he
;;_dtpicc=-, fence and tabl-9 Ibat ,,'_illlet the
','÷'o{kpiece_hif{ dudr)g the cut
Keep the cut off' piece f;ee to movu '..-tdeY,_a_,:._
Mter
k is out off OLher,';_e, iLCoUld gut wedged againsL
theblade and thrc_,vn,possibly causing _niury,
Only _l)owc.rkpiece _hotll_ bo on the saw lab!u
Secuf_ work. Use C!Or_)psor a _fi==_e
tO help hold
the 'z_orkv,_'en
It'_ t:_'Bcl.ieal
•
o
Use uxlre support< (tobies. sawhorses, blOCk& ok_.)
l_r ;','orkpiece_. large enaL, gh tn tip,
Never use arothur per_u.n as a Subsli!ute for a
tabl_ extension, or as an addilJuea! _.uppott fn; a
war,kpiece thaiis longer or wider than the ba,_rarer sew table, or tO tlop feed, ._upport, C{ pull the
wOtkpiece
Do no_use Ini5 _Ow to _utsmall pieces.. If :he
,/_crkpiece gait"9 _;ut weu_d _.,_use your heed or
Hngers k:_be within 8-112" t)l¢i"OL_of the saw blade
wnr.kpFjce is Ice ._mal], '_.OOphar_ds and fi)1_Ors"JUt
nf l;"o"rio [:ands zone' area m_rked m_ _llo saws
labia.
When culting odd L_l)aped','iorkpie_r_. plan your
v,o_k so 11'_,,ill;tot bind in1he blade and cause
p_ssible injury: Mu:ding, forexa_)ple, ml.lSt tie ll0l
or _e l)c;d by a fixture or jig that will n_t let il mu','e
when cut.
Properly
support)_ur)d materfaf s_:ch aS dowel
rods, _r tubing, which hove a lendency _,uruli when
c_L cau_in 9 ;he L,lude to "hP,e"
"IOavoid irOw1, foll0w all applicable safelymskuuti.nns.
VA"OIIcuffing non-fer,'Ous mela[=:
'_
U_e onE.,s,.'twblu_es _p_nir]cally recommended for
no_-l'e)) ou_ melel cuMir%.}
DO _')OtuuI metal "worKpleer._slhat ml.lSl he PO)IO
hL:Id Clamp vw_;kpte¢_ _ucurely
¢
Ou! non4err.ou8 mt;',uls unly if yOUa_e ur_de_
lhe
super;ision of or) oxpe, mn.._d pe)'sou
on.,
P_n the Way yOUwill grasp the worY,plece from s_r! tO
f_nish,&_,oid awkward operal:tor_sand hand p<,_itone.
A sudden _ip _ou_Jc;_LtSP.
',,,curfingers or hm_d 10rnove
_ntOIhu blade,
WHEN SAW 1S RUNNING
DON'T OVER-R_ACH
L)0r)'t aH_w ferrili,qrity from freq_._enlU.geof your miter
saw toresult _na _'_[E[ess mis['ake, A c&*ele_s fraol_r_n
•of a so:and Is enough ioc_use a Severe injury
Keep good _bol.ing and balance Keep ye,#r f_ce and
body _o cob side, o:._t_f the llrm of a p_ssible kickbackNEVER _and in the fk'o of lhe blade
._ef0ru culdng, if toe 5an,,makes an ,Jn_,_rr{H
iar noise or
vii>re{us, s[,upimm_lt0tel,.Zr Turn the ._aw OFF Unnlug
thta saw Do nol re4,'arI unlil fin_ing and c0rrecling Ihe
problem
Never out free bond:
e
Brace yourwur,kpiece
firmly against: lhefenceand
_ablo slop se it ,.,A_I_t rock or -'.wis_during Ihe cut,
•
Mak.u :_'urethere is rlo debris between the
workpiece and _he lablu or f=-nce
17
Fig. T
BODY AND HAND POSITION (Fi9,6)
P{CpeFl_35itbning
ofyourbody _nd hands when
ope_ming _h_ miter _a_','v_i!lmek_ cuP,i_g aasio_ an_
_afer. Navur place hands near thecu:t;ing O_oa, P_,ce
hm_d 0_,100.-,,I
8-1/2" awBy from the p0_hOf th_=hr..de.
Hotd woZ4piaco ,grrnly a9,-'tlr_.31
the fence to preven_
movemot;{lo',vard
theb`[adeKeep har'.ds
inposition
unli_the triG_ has been m_Bu_vJ and lhe blade has
completely
S'[Oppedr
Before making a cut. ,,,,,i_h[he
pcAvarsv,41ch
intheOFF poslti_n
brinelha_a_vbbde
down ka '_hov,'orkpiece to sea the _a[li_ D pa',h of the
bbde,
a
Keep onild_or_ orgy, Kee_ _llvisitors a _0fe
dislance from th_ mi;er _,/,r Mak_ ,sure
by_!anders _Te ctuar ul the mil_ s_w and
v,_rkpi¢ _
m
Dcm'! force the too,1 it will do _ho lob be,[,';or_-nd
._.'_ferm iL_designed _'aIo. F.m_._
fl_e s_v,"irdo _.he
•¢,'orkFiece
slowly w,'Ih :_5rm downward motion.
_,
o
o
e
=
1
3
Bt_fore freeing jammed raalorial
TJm _vi[_h OFF
Unplug lho rrfi,[er _L=.',v
Wail [or all moving pa,d_ to ,'_Iop
After ftnt_hing a out
l<e_ holdingth_ ;_uwOrhe0e. d_wn
Release lhD _,/_tlch ,3rid w_l for el:;moving
_Of_, _O._,lopbefore mDvit_! yk3UfI_,Oll_S,
l_lhB
blade
doasll'l
t_Iop v,dhin 0 s_cands,unplug
thes_w and followr'el'er toTHE
TROUDLE_;HOOTING GU{DE
Fig. S
I
_]"L-_
I
t _¸
:
;
'
f
4
2
6-'1/2'
5-112-
LASER ONSOFF SWITCH (F_g. T)
Laser radiation.
Avoid dlrecle_teexposure.
A|w_ys un-p|llg mltet saw from power source
bBfore making any adjustment,
1. Unlock the la_ guido leve_ (1) by pu_tingit oui
ta'z/ard tho !,:H_s<._e of the =.=_,.
2 81ida OUton the !_ser guide assembly by pulling an
lhe lBb (2]
3, Lack lholaser
9aldeassembI_i_topbce by
pu_Jhin.qthe locking lever in I_va_d tl)e rt_lhl _ids c,f
,I
TURNING 'THE SAW ON {Fig U)
To redurva fhc likelihood of accidental sfur_in9, 0 U_umb
aclivaled ,!alIc_v lock-OFF ._witch is Ior.-_t-_den [oI) of
die switch handle.. The _lleL_.' iock-OFF butlon (21 mUSt
be" pushed fonv_r_befor_ lho higges switch can be
activated _nd the miter _a','/sL_r[od. Make the svAtch
child-pro0_, lnser_ o p_dlor_,: Lhrcugh !he Ilcte (3) in th.=,
trigger sv,ibh and Io0k J,[ Th}_ wilt pr_v__nt cl111_fOJland
other unau.tho*izOd U::1OtS
from _uming the swP.cl/ON.
To lurethe la_Or ON a_"OFF, press the rocker
sv,'ilCI_(3).
18
SLIDING FENCE (Fig. V)
BEVEL CUT (Fig,X}
The s!iding fence must be fully extended to the I_eft
wher_ m_kfng any compound or bevel cul_,
Failure _o IffJtty extend the _liding fence will not
allow enough space for Itle blade to pass through,
which could_result in serious Injury,
I
Unlock the Fence¢em tocklng lover Ii } by pushing it
loWaffJ tile rearof_hemachine,
2. Fully exiT.rodt1_ofence (2) by sliding it out a_.tar as
Daesib]=_,
3, Lock lh_ bnce cam I¢_._K
l)y l)uShltl§ i_IN bward ]ha
fen0_,
NOTE:: When tcan_pontng IhD saw, air;aye secure ]he
sIIdin
D lence in ihe collapsed positiot_ (_o'tratd lhB s-,='m,v
Fig. V
The eliding fence musl be fully extended to lhe I_ft
when maklnEt any bevel cuts.
Failure io _ully
r_Xte_d the sliding fence will nol _llow enough
space f{_r the blade _o paso Ihro_gh, which could!
reeult in serious injury. Faituro to extend the fence
may cause the saw blade to make contact with the
fence,
i
When a bevel col is _'equlfe& loosen the bevel lock
I_andlo (1) by tu_ing fl ct_ckwise, Tilt the O_l.]i_gII_d
to the de._:?edon:_tbas shown on the b_vef scale (2),
The bled=_can be p.3sili0ned at any angle, from a g0 _
Sttalght cu,' [0__n the scale) Io_ 45" left bezel, TigNen
the lock ho¢_,'lle,',I) b bck ihe cutting head in p0_,iIiur,.
Peaitlw stops are provtd Od at O".33 g"and 45 °
Fig, X
%, _
MITER CUT {Fig.
W)
I
l.lnlo_ lhu miter qJick-cam l_':blelock (3) arld pm.._s
aild holt._,town the Fositive _Io0 :ockir=_IBvar(i).
2 While h_IfJing the pnsitivn _lop 10cMng_e;'er da,vn,
grasp the miler ,hanrIIe {2) o;_ m_ve the mi_er lab!_
leF:ar righ_ lo _l'le c'osiroJ ar:gle.
3. Refe0se Ule ._,u_itive slop locking lever, m_klng
5L]I'_3 it Ol't_.l_JgUB the
posil_¢e
stop,
_light
mo_,'cm_nl
oflife
_iterhend_eleft
orrighl,,,,'ill
or,_ure
positive
slopengagement
NOTE: Positice -mop_e[ providt>d .-ut0'_. t5", 22 5°,
31..6'_and 4_°dfJh[
end left.
NOTE: If tho mff._ar_ngle required is NOT one c_ ihe
peslUve_tops n_ledabove,"hemiter loblo
can bB
[ocked al any angle beb,veen those po'#live stops
by' u_ng themii_-quick,camtablelock..
__
_ _%, _,
NOTF..t The _a'_vcornea ,.,._tha 339 ° bevel detent
selling up crown mol[h no CUtg
3&g_ BEVEL DETENT
{Fig.
Y)
PIN FOR CROWI_ MOLDINGS
1. Pus.h_hecro',vn n'_tding st_ppin{1) tn toward the
from nf the m_cl_tne.
2, Loosen the be_et 10okhandlm
3, Rola|e lhe culting he_J ur_li._file cf_,'_r_rnolding
._Inp pin slope, lh_ bevel angl_=at 33,9 =OIl the bevel
sca_e.
€ Tighten the bevel lock ,"orFJle b-oforeyou make your
cut
Fig. W
Fig. Y
0
1
1
3
•
lg
pin for
COMPOUND
CUT (:Fig,
Z)
Th._s_iLlin9
[encem,us._
be fully
extended[e[l_e
lef{
when rn_ki1_any campDund cud Failure
tofully
e_-le
nd thesliding fott=e vail ha: all_v_ e_ough space for
the blaca which e.o_ddresul! in serious injur_,.
I.
FulLy exterd the 1.3nceby _dlding it out as far as
pos_ible,
,.See
"SLIO_NG FENCE",
2. Set1:he
_gsirs-.":I
bsvelan_luand lock_nlop_,siiion
with lhs be.iel l_ck handle ,[,i)
3. Set _ile dosbed miter ,_ngle using positive slop the
locking Isver (3) oTih-.-3
railer quick lock [2],
Fig, Z
"i
./
NOT_: When mounted
s,-_,;*:abls is 3-7,'B"I_!gl)
-- 2
01! a I_a[ SU'[Sr.e-
the m_ter
When _kina m_tL:pl_Ju; _el:eblive cuts that resJlt in
r4._t-eff#seas of O_leJnd_or lass. it is poss'_blc for _!le
saw blade to ¢_ch [he cut-off piece and throw il out of
[l_e s:_wor into _hebado 9u_rd and heus]ng, pc_sibly
cau_.{ng d_;nmgo Or iniu_i. To minimize this risk, l_.._rn
nff
tile m_¢:fline, wait [:ntil lhs blade comes Io _.camellia
-_1o17.,
unplug _heunit & _emove the r,:4tpisces.
Blade slot
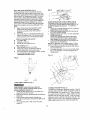
WORKPIEC5 SUPPORT (Fig. BB)
Long piecesr,_,dextra_upp:._I,
The sUpporl.,_houlc
be
old.cad under tile 'r'rodtpl,3<e,
Keep ye_Jrhand holding
tt_aVasrkplecepm_iiioned 5-1,_2" or m0ro away from 1he
bl_3deThe suppad mustlot _,h_
,,,,,orkpiece
lay"
fiat
or'
li",_ V,'Dr]{labia df.lrifl_ the cu_dng oper_l.i;stL
NOTE: WIlerl mounted on a Bat suff_,o0, _hemiler s_\,z
lshle is 3-i3_ 16 inches h!gh
\,
i
20
1"
Fig. EE
CUTTING BASLE MOLDING (Fi
B, DO)
Base moldlros an_ many ol.l_c._ rnofdng_ s;.#l be. cuL on
a con;puun_! rnifct _'_' The seklp of #;,e stay dBFends
on molding charac_edslics .and appficmion, _, shctwn.
Per/armpractice
cutson scrapmatedalto_ch_evebe_t
res31ts:
I Alwny._ make sure _oldm_-S re_.l hrmiy O0Oinstf0_9
_II_ 10hie
l.]._O1101d,dKY_vn,
crowllmo[dlllg
\,]$t_
o;
C<;lamps.;,;her,
overpassible,
_nd placelapean lhe
ar_a b_ing clamped iD avoid marPk_..
2 Reduce splin!e;in_
by ,:aFing
_hecutareaprbrIo
,making _hBcul Mark file cut line directly on the bal)e,
3,SpllnlednP,
lypi_lly
i1appensdue to an in_JuOC!
bladeap_ll¢otion
a_d lhinr.ess o{ tile me!arieL
--I
_._ i¸
Fig.OD
Fig. FF
Sailings
far -'d_nd,'_rd c ro_,;n -_eMin9
compound mil_r saw table
cle!orr%1
ne irll'_o
oi)¢I0110_I
be:rigO|I.[_IllpIc<.I
i_pust_iblo
bo_'ore pew0€ s applied 1o lho s_,,v
'.--.-::.'llI;_lHl'id
CIj_ I_TO_II
CUTTING CROWN MOLDING (FIG EE, FF)
_nu_ compc:_n_ miler s_w is _uiled _nr the diffi(',_:l La_k
P,fcutlingnmv/r, moldinB 1_ fit pm, pe.r_y, _rn,}_;'_m_')Idln
0
rnl.isl be compound-r_t[erc<l
v/,lP, oxlremo accuracy' Tile
two surfaces oP a piece O[ u_u;*m molding Ihu: Ii! flal
ageir_sl [ha uul'_ielg and walt a'a at angles
_ded fcgBther, Qcua_ e×aully 90'
BEVEL
tIIITER
l"
:l'i:)'<lln_
TYPE OF CU_ .......
BETTINGSETTlt'_G
I
Inside
In ord=_r [o accurately cut cro;vn molding for a go: inside
_r euLsid_, cor_r,
lay (he molding with ils broad back
_ufface fiat on _he s_,,_'tahte
tlat on
BevelR, liter Settin#_
f_aL whet]
I_,lmsI:
cro_n mafding has a lop re@r angle (lhe 8e_ion
Ibm fil_ flat against tile cei:ing) of 52"aP,,do bottom fool
_ngle (lhe seclion tidal [,Is fiat againsl. _tlo walt,',o{ 38'"
lying
I
!.
I
[
ilR
[33,9 _
l
£_llon sotlir, o lho bevof a,_:t miter angles {or camFound
:hirers, relnumbur that !,It_
su_ti{l_is _ra imardEpanda_l:
:hanging one changes iha u_her_as ,,'/ell.Also keep in
TI]ndth_.t ihmanglesfrom cr_\'n muldingare re6' easy
"c,:ihese angles to shi_ siig hl_s,',a:f selting_ should be
:e.._,edon scrap molding,
|
|
.......
cerneFLelt
side
12 ,,'1_r t_blos_ _._I
RIGHT 31 6"
.[3LIEFT _?dois fin6hed R!Et;O......
:31 Z?
L_-*I
t Po#tIa'_ !_,:lem cl melding
again._L fen.e
2 ,Yiiler table set at LEF." 2.t.6'
,3,LEFT _ide _s£::lished p_ece,
OtJ_e,ff..ll.,,
_Otlle¢.Ll_[t Jide
ILeal
I
Jag_ nst fence,
J2_'_zer I:able se: el LEFT 31 (?
13ulSide ¢,_rnor-Rtg.bt aidB
OR.
JSe o ".:;a[¢lyclamping '.'t_o. whurvJvur pos_ible, and
_lace tape on the s:rea being damped toavoid marks..
:339'
;
3R_;hLie"
I
I
21
I'I
pasl_'enlence,
tot, el rI1c_dtnr4.
==_ga[a_I,
12MiLe,t"lable _et ,':_tRIGHT 316.
mR IBHT
gh, i; lifli_,lli.Xl I':.[;:=C<'L
LOWER _kADE GUARD
Do no__,_e tile s_w v#lhou_ Ihe lower blade guard, Tlt¢
bwur blade 9uar_ is a[lachod to t,ho,J_._,_,
'lor ys'Jr
prolection Should the Icy;or guard bar,Doe d_maged,
do no[ use _he saw unit! ihe camagac guard has been
rep4aced. Develop a regular _heck Ie make _ure _he
bwer guard _ waning properly. Clem_ the tot,vet guard
ofany dUStC¢buildupwid_a damp cloth
MAINTENANC E
DANGER
Never pt_t Iubr_.3ntz. rn IhO blo'Jo wl)iP3 it iS _pinning
To avoid fire or lo_k'; reacUOll, never L|SOga_',Olfllo,
naphth8 acelone, lacquer {lliriner or simila_ hig.hlF
volatile s¢_veil_s _o clean Lhetailor saw
.................
CAUTION: Do no[ use seN'on,Is on Iha guard° T_;ey
could make the plastic "cloudy" and brillle.
% .........
To avoid ir,_ur_,_mm ur_xpe¢_Bd s_orlJr_
9 ,OrolOclr_cal
s!_ork, ur_pL9 1P,
o pc_'.vof,cord [';ot'oyowork!fig o;_ Ibe
SOw,
Wh_r_ cleaning lee tgwer g:_ard, Lmp[ug the saw from
_.hep-3wer snurc_ r_._pt_de I__void unexpecled
startup,
For your saf_o/, this sa,,'_ts douOle.tnsulaled Foavoid
e_ec[,"i_mlsllcck., liru or iniu[y, usu only part._iderdical to
thuae fdunlifi_d irl th_ _:;_rLsIieL Rea_,_:embleexactly as
the original assembly t0 _'oid electric.-31shack.
SAWD UST
P_ricdical y, .:,awdusi witl a_;P.uml,
tiGte under Ihe work
t,_[,,_e
and bade TPIs could ,",ausedi#ict_I[y i,_
_ho
nlovgmon: of lhe ',*_orkfgble when seLIing up a miter _:LIL
Frequentty b!ow out or vacuu_r_up lhe aav_ust.
REPLACING
CARBON BRUSH_S
(PIG, GG)
The ce.rben _ru_?_eS furni_,hod wif_ lat_t (_pp/oximaLofy 5D
houf._ of running tlrno, o," I D.DOD ON,'OFF cycl_._s
Ret&_acu both cs_ben brushes when either has _ess th_n
1N" lengfl'_ c4 ._rban remaining, 8." if ihe spring or wire
is dam=ged or burned T# inspect or _'ep_aCe hn._sh8_,
_:_1 _nplug the ._._,.,
Then remove LI_._:
black _)lasbcCgp
(1} r:.n lhR side of the mulct (2) Reraove tl_e ca_._
CallltOL;Sl,'4 bec#uSO _1IS Spfiag-IO_ded.. Then pull gut
lt'_u brush arid re#ace.
Reptar.a fhe athe: side in Ihe
_anlu mar_ne: To reassemble,, zevErse lh=_pfc.zedure.
If blo':,4n0 sawdu_,L v,_ar i.;:.oPe__yo p_otr..-_,tionie k,-up
debris Item erdodrlg oy4.'.s
LUBRICATION
All the rn_tc.," bearings in ";hi_ tom _:te tubri0ateg with a
_,[;fficient omount o,_high 0re.de lu bdcant for tile life o_
lho ui_Jt tmd0r r_ofnl_l oper_qtin9 o'.mdilions; tllerefore,
no lumber lubrication is required
_ne ears on _ne mela end of Ihe assemb!$t Ro in lhe
same hole the csrb,qr_ part fi_,._E_to. T _lhlen the eel)
snugb_, b,_.,I
do nat overli.ghtee,
Lubricate
NOTE: To ruinsLaJlLhosame brushe.% first meke sur_
the brushes gu. ha_._in the ,hay they came o_dtThi_ will
a,/oid _ breF_L-:-in
period
lhe FollcAving as Required:
C#0p A,_ot;light machtne oil or aef0so,1 'gilt p_ne{rate
flOl_ lit#,3ads of thejunsliorl
pei_iLs_
A queli[iudsurvfce
lochnician
can rBme_o fh-3 pivot ups[up to relieve
lensi3n, and 1he 2 metric eat scre,_,_shaldlng _he shoP,,
in order to ddve the shall abo_/3.,_4 '' righl. Exposed
surfaces
are lu brick.led v.',Ih a_tomoli'.'e
type Dill.
Ce.o,'.ralf.Wot o/,_{#_[,_cg_.t.3rd: Use _i[lhl h_dsehoN
0il
(_e','z_ng mach, ine oil ) on me,'.a]4o-metal
cr
mela_4o-plestic
_'Jar,d contact areas as required _or
smoolh, qui_ aper_lion
Aveid excessive _i, Io whi0h
._awduef will _ling
Lmk: (wt:,:{;;_actuates lhe lower guard rnovemenb may
be oiled at lhe rear pM3t, greased at ball beafirO
c_nlac_:,_nd oiled ,,._herethe lir_k ncluate5 the ,',...'xe.lyl
r_ller _f he Inwer guard, if the dot_,n.,.:nnpmolion is
fl;._rdtO sIarL
22
T'oavoid injure from 8coklental _slarUng,alwm,,s lure tl_e _w Lch OFF _nd unplug tho tool be(ors moving,, rep_acInotl_e b_ade
or rook n9 adju_Ireen_s
Consul.; your Sear_ 8orvice Cer_ler if for eny reasu:_ lhe molar will net run
TROUBLESHOOTING
GUIDE - MOTOR
PROBLEM
i
PROBLEM CAUSE
SIJGGESTI=D CORRECTIVE ACTI ON
i
$ Mntnr l;,-'USI_e_e
nol sealed c_"
lirjhtly slickin9
2_ M:_tof brake ovsrh_t_,d from
BFO_ dOeS not
stop blacfB wilhin
UL_U O[ _B[BDt_
I.
2
or V.'.tOI]_ SIZe
bl_de or rapid ONtOFF cycl_ng =
3 Arborbo! loose,
•1 Olhel,
,
,_,_Ot.Or
doe8 not
I. Fus_
st_ur-'.
12. Bru,_h ;,,_rr:
___13, Other.
I
sp_r_:s
when |
SV;ilch rele_.ed.
TROUBLESHOOTING
In_p0Ct / c!_an[ repl_cebr_l'lO._. Sos
MAINTENANCE _ec',im_
Use a recomme_,3e.d
blade
L_._:mntor coot r'own_
3 Re[gtttr_n
4.Cc,ntact Sears. Se/vK;o C,Jrt[er.
I, Check 15-Amp :im_ delay f_Jse,oi' ¢_'cui[ _
OrBE_eL
'2 Sue MAINTEN'ANCE _ecti_n..
:_. Cont_.c,!..Sear__ewico CurHen
1. l:4,_l.Hac'c
Bru.shes {See ]',_,atnle_ar_;e)
[
GUIDE
- SAW
OPERATION
1
PROBLEM CAUSE
SUGGESTED CORRECTIVE ACTION
Blada hiis table
1. M_salicnmenL
l, ;SeaADJUSTMENT _ectton..
^n91_ ol_c,_t not
t rMiter table unlcck,ad.
I, U_,o Mft_r Quick Lnck
S_B OPERATION So:::lion.
C_n't ,qdju.-,
' " mit=_r.
2. Sawdust
2. "_cuum or Blowout d[.,sl,
C,utling arm
v,_obbles.
Culling arm v,'on'l
fu:;_ false, or
blade guard '#_n'_
fu_y close.
1.,Loose p,i_,_ot
p0Inls.
PROBLt_M
/
a_our_|e
Blade binds, jams,
bums wood
S_v 'Abratasor
shak_.
I ....
T_',_ a_et"guido
wi:! r_[ lure on
under tab',o,
WEAR EYE PROTECTION.
1. See ADJUSTMENq" S_.ction,
I° P_d__'a._lure.
2. Pivol spffng not
replaced properly after
ser4ice.
3, Sawdust build-up,
......
1. Impropot operation.
2. Dul_blade,
3, Improper bladm
4. Warped blade,
1,Saw blade damaged
2r SaW btad _ OOOC=
3.Other
t. Contact.SearsS_.,-v2_CenleK
2..ContaclS_e.rsSorvice C_nten
1.The batlerie_, ar_ broken
1, SOO CHANGING THE LASER BATTERIES
section.
23
3. C!ean and tubnicule moving p_flss..
1..See BASIC SAW OPERATION _eclion
2, Replao_ at _.ha_sn blade,
3, Replacewith12" diamolor blade,
4. Repla_ bla_.
l..RBplac_ ble,
de,
2, Ti,qhlen
arbor bolt.
3.Contact Sea_ SeP/ice C_n_or
t2" CRAFTSMAN
COMPOUND
MITER ,SAW
MODEL: 137.212150
Whc_t soP,,icing use rJr@CRAFTSMAN repl_ceme_' p_s
Ll_ of _ny o_.horp,3tts may creale _ H_V.Lr_RDor _au_ proJu¢_
dam,_ce. Any" _i_an!_t to _epalr o_ replace el_t!i¢of celt:, on i,_{sMiler Stay _ay creata a HAZARD unt_=ssrepair t_ (tone b'_,a
q:ialifi_d set#leo l:ouhnician Repair so,vice ts availableat you nearest Sears S._i'vico CBnI_
Always have Model Number and LD, Number ready wrth placin8 an order for parts,
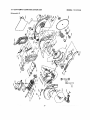
PARTS LIST FOR ,SCHEMATIC A
Stz_
LD, Noo
De.'_,'lpfion
2213
FI\",C;
;,:4;,
,:81 _
F_.'_
,',[tC ._l :':.EvE
_*n_3
L_3(Cq fill;
g_,t';'_;_,,,:.,
_,'
;'I_
FIrZ_.
[ASEL
0_EF
!)_:_'t
OC;'X
Qty
LD, No,
1
l
I
llze
_3:=0
_xfFI._.IC;HWH;G
J
}
Z_;X4
22.,;,:_
3:?X2
EI.';_:C
,sO):E
20;';1:
r_:rzc_
St:31H:'_,;Er.ICE
ARFAEt_z.UK_F
:.;iCtt: ;A;Cd
5_VEL L'L:C:_t!,:3H"
t,tEEDL_FO)tH£'4
_,_ FLDTE
)
i
IABU: _;_EPf
At LCIIOE _;L':-:C <
'.fl E:_ _'!J', [£
D,*s_rip_on
r.,JaJ
Li,"
A',_,_*:,_F>[
¢.IOX'.:Q,2
1
2 C.;
CJ,il;
HM
_'_',\:_
_ ,'=
::
O! Q,2C:,3
1
,,T;;tA
_',i_L SC a.LE
Z*J7,_
IbM W;_'<-;:_!
" "_:.lfiI"FLA; ',v,_.F.,4bk"
11.1:_-,_'_/_2
Y,'_;:_SqZI_2,ML,,:
±
:
"
-t,_.
>1 ;_._
P:u'_DI _-gq,'-,fT
CRO',Vt_ t_;UI
I}Ji9.1 }:D'_
1 _,'.',_ZMEt?
,ZjEu
".Ei!4(;
','}W-8
!!:&
2
}
22BL
. .,, ,,
5LISH
Pf_.',,IF'_'_ C,Lt.,_I L,_C _.'tl._ I :'v'_R
r.u,v'¢
g.:._!r:tg,
...............
Qly
,_/ L', 5."[=15
j'y:
..............
i
Z'L':'.
z:_
.......L=,.
......
77" r.-:-,.
_lt_M.
7'.
.....
DJt.lP
'11;k rig
P7
}
_:;';!
' _,11F
0J"E
i U
0._13
"2: HI). f_Oi f
lID" 5C'Z 17 CAP_';qJII
HI:i<_Q'Z :,I.
""r'_Z'_
.'='.E_,'
t4_:,:l.O .',9
cd6;_I.U,_L
td&+.l.O.!
5
I
5
{
):_9;
23/,,7
Y;2."+C
FIN
II!!X.
IID fi,:,3Lg
CR, F,
5.FAH HD. Y,L';PE','/
;','I,_,S
ILK7,_;
0}225
IIEI< '_OC. SE; h;':ia.l>¢
",
Itf_i", t_D _CRE'/,a, NL_ W,'._HEg'
Hk2+8,...
....
,.......
J" ! D ,.,'.P
.HeLl
,\'_6,, I'l :A'I
,',,'6_'..C-lfi
'2
?
'2L{!,N
_3P6
5,3Y.i
K'-IO£
Q'OtAg,_FSSf_':4_FRII4¢5
S_'QI>.,MCH
£'&%
0K2F
I_E?,':_L'DCKSI Hl_ (:.,'_P I!,C;tt
k'_-X."_Oq:}:_[ t_CICAP D._Lt
_2,_;<| 2;b-L4)
_'A_XI._.5-,I0
1
2"
._5_!:
.5,_'_p
,%;',N[_LE _ei,.T
'-"
* F ""_"' ""
Ot{AD
I)KI_,A
,Z.':_:
Rt" PA'_ '{L:. TAFPII;G SCreW
C£:_
_A14 -fD [APaIHL-_._Cm,EV_
M4X,?.'.2-_
M,5-d&,l'z
_(DG
EP. _E F/,lq 111.'*
'.',CRffw
,V,%,:t_,.2:
.7:
P,5:II4rER
.... -'_'Z_,
',_....... "Z-LIr.I_xD
b%,'- I $5 49
.....
I
12Kh'l_ ttl_;,: NUT
_2t',._',,'_.l HEX, I.II.Jl
,%'._0},1 fi
t
t
,%:A_.t_ 7_.;
,.V.'ci2>:lg T'8
(It;R I
0i.:P,-I
OIIR4
L,C':'; iqU_
I.,'.::._':
( N U"
LC,CK HIJ
Z£ISJ
l.O_!]ll_*H_.I,OL_A }:j"f
1
I
t
',,At#x2 ;5 l= ;A,
b',g_;1Z3 f =8
M_×I,25 T-Z_
•
24
12" CRAFTSMAN
COMPOUND
MITER SAW
MODEL: 137.212150
Schem atio A
!
i
i
i
i
/
t
12" CRAFTSMAN
COMPOUND
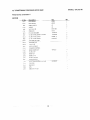
Parts list for Schematic
H#.I'.:OLk
I _P:._,HISIDE',
[tUII C.?I S?4_GH
I=_3_
Cg_i
CLA,M,P -CO+'!I)
II. ,.N_LE L:=T > ,,+,t:J
C_'G
HA N L':LI:5_:/,._
_=Lq'+!:'
MODEL;
size
QtJy
,_"t+z-l'+F H_ I.IOI+
;_
g,S;-.,"
CL3P!,+'IH
,,'@_l,
_5+,Y_
S_ FLA[E
:_tCP CL,\Y7
I.D. Nm.
Des,+dpllolll
Size,
CR.RE+PANHD.]AP=IN,_:_CRD"+
C R+F.E, P,".I'I H D+ I++'+,P_IH_+
+C R_W
M3d2-lO
=V4kq8 [6
+
2
[KP-_
CR, RE. PAN HD. 1AP+It+IG _C_E'+++
,
O_:l_r+L: CR.EErP,',,NIIDT/+,P+_ING_,T2_[:W
=Vn×P-O._3
,Y+%+I++'=
,25
3
.._
C_BM
CRrR =.PAN HL_ lAPPING
O,:.Dtl
CR. RE P_PI PD SCREW
2KC_',:
' LC+G< t'IU_
,V4,,:I_._e
,'./S_0._-2g
V,_t_.Bl=.5
5
2
l
'+._:l
I,_ •
I
I
UKAe
6<[_7
C^RP.rH:U'_DLE
_,IP
['_.I_
O_,,1J
137.212150
B
!.D, No. Descrlptton
C63'."
0_$_
MITER SAW
,_t',:_5
Ct:If
&CP.E,_/
L+D_,_,+'IU+
W _+tT_ +.
,++,.1+,_++
P
0(UX
TEP,,b,+,;'+'A
L
_,,+.:
+,_,'
i" ++
Et+.DWIF+,_
A35W
[_U2
LIt.II'_
_%+4TC:II
O_,IS
tILT !'4_:_${../,1 _"
012.X
[OCt:
CB_V
0_6
ElB++)'A
_AT].E_'_
_OX _,:<'_+t
+
_TZ
LAB.k:.
C+I!OI
CIJSItlL-+I_
'_O_SlO:-::+¢I-',
+-:HG
BLaD_
:CE:_
£f'itlH
f Oh, F._[S_ '2_ SP_ I4CSt|lb+
21_P
3_A3
2"3A5
?5!_R
D+:LJ2
:CI(5
OC';S
gDl,l
Slt!,,FT SIEP/E
5t:_,_f';() A' -!1_
OUST EAG A_._ '_"
POd PIG 'I,,I ZEL
2L',_
25#k _
SPRIt,t£:=GUAR3
SLI;_ aLAl[
GU/,._,D L_%'E_ &IOUHIF;C+ tS++Aq:+%E
";
,2D17
5E_ _tl'J:-_;
+_:
25 _',",'
25AZ
:25',,'2
HAtIF]I :'+:+'+_jW
Qly
D I =6
4
I
I
t
t
GU_ _.DLZ.:EP-
(::,',,
iJ
!ICN l ,%_EL
.cQ:,"A_mZJ_._L:,-L_
...........................
;:0%'1
++,_1_
BLADE V,+REHGH
• + tO :,+'g+REDUCE'_
O._=
_:++B_
b/_V[ '/+ i+.Stlt:t:t
_/,,P,,'_LL_L PIt,:'
Oj_t
Z,JP+
t+IJMQ
25b/+,,/
25X11
".. + 4 u,
P+J'_+,+ER
G_++BLI_
':'_#€-I 4
+.:'e3
,C,16
2._Z7
2G2tt
HOLt.".
_tO t+:k_ '_"
PO'/,E_ CO_ ['; +:.,:
_A++,+_P
7
_ RIt'+'+:3
+ELF.L(..';
(;Ie
"J(.'i
,qX,+q
++
S=t¢,,5
26b\+'+
2&!N
IRAD r+MA_'< LABEL
LABEL
l
t
0 E'fflG
P[';
2_LP+
:"¢._,+R
N HG
_+ 0L S__ .+HE>+:+
SO:+; _.X e.,,r' B_t_T .........
O_+':B HE;< SOC. SE++,L:RE'A'
O+qt4
A_hOk BOLT
,21:;2
tZIKtSL
;1:72
=
_4_9.B- [;:....
'+W;:dJ_l,5,
b'_:d+_,20
L:.+'RL
l',',lt
hD _L"_P,'/f-'#,+a_._E_. f.1_?d.,D+_,D
CR +_E+T_g+SSHD. ,Z'Z_E'+V
t+I4:_.').Z-B
CR,4.t+ IRI++_G:iD +CF_E+I
t,l+:;+::)t_'1:'_
::
: :
t+",,P.+
E+
I
+<_!+++,,_+:
It++._++Pt++
,+_
_
:t
+7.?,'
,3C'.3
2
_73Z
56+'+C
3C4_L 'A£ D +,_+_:_
+I+
NS'RUC+ION M+.
++`
"I+jAI
I
l
2
t
_'3
.... .....
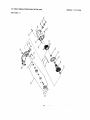
12" CRAFTSMAN
Schematic
COMPOUND
MITER SAW
MODEL: 137,212!5!)
B
i
/
i
/
/
\
,,,;¢
\
\
12" CRAFTSMAN
COMPOUND
Parts list for sct_ematic
MITER SAW
MODEL: 137.212150
C
MOTOR
|,D NO,
{::}esc6pIion
Size
I
O.Hvu
t
O,IVV
CU';_
SF-"f,
ll,lO WASF::_',
_"
._P_u.tGPtIJ
q:,;-2O
5
ajA6
O.JS_,
';JL'!
]
2
IY,4
2
,2|t3J
-
HL= ._,..E_k
{',_5".£J.'_- :2
.3
2
Clr:E_,
;EAD V#t_ ,",£_"t'_RED
.AR_'.tA_UP.
E ,'_
33"Y
:'JO:*.,5
_-:_O,_,
' C:l: :3E
:]OMFRES.S.:,8{tSFRIt,._G
[!RU_tl tlOLOERASS":
PLASTICCAP
:I_27_25
5
]
BRUSH,-'S':;':
E_LISHCG:/':
_.
Z,21_
t:,': A h'fH::"
_1 I::,H I;';(;_:
','.,l_i:P_.O':£Cf© _.
"2
._':,_.X
(;EVi. _ PIN
2 !AY
/qELDASSY
2_g
AR_2_
.SS"Y
X
ARffOP,
:::,-}h
:I,'-_S'Y
18' CRAFTSMAN
_ch_rnatic
COMPOUND
MITER SAW
MOD EL; 137, 212150
C
!
i
i
t
V