1
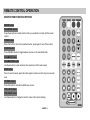
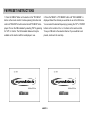
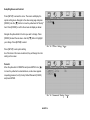
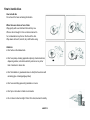
IMPORTANT NOTICE
■ Before operating the unit, please read these instructions carefully.
■ Retain the manual for future reference.
■ You are advised to follow the instructions carefully when operating the unit.
■ Do not use any chemical solvents, cleaning agents or corrosive detergents to clean dirt off the surface of the screen.
By doing so, you may cause irreversible damage to the surface of the TFT screen. To clean off dirt or fingerprints, we recommend
using a soft, damp, lens cleaning cloth.
■ Using spare parts from another manufacturer may cause permanent damage to the unit.
■ When operating the display unit, avoid touching or pressing the LCD glass panel.
■ Excessive force may cause irreparable damage to the LCD screen.
■ Some states restrict the use of video screens and televisions in vehicles. In the interest of safety, this monitor shouldnever be
installed where it will be visible, directly or indirectly, by the operator of the motor vehicle.
■ Lock the LCD screen in the fully closed position when it is not in use.
AHDM7/ 1
MAIN FEATURES
■ HEADREST 7.0” 16:9 WIDE SCREEN TFT-LCD MONITOR
■ BUILT IN DVD PLAYER
■ BUILT IN WIRELESS HEADPHONE IR TRANSMITTER
■ 1 AUDIO/VIDEO INPUT
■ FULL FUNCTION WIRELESS REMOTE CONTROL
■ (OSD) ON SCREEN DISPLAY FOR CONTROL OF PICTURE QUALITY AND FUNCTIONS
■ FULL BAND WIRELESS FM MODULATOR WITH 6 PRESETS MEMORY.
MAIN SPECIFICATIONS
■ DISPLAY: 7.0" wide screen TFT LCD active matrix
■ RESOLUTION: 480 (W) X 234 (H) x 3 (R.G.B.)
■ DOT PITCH: 0.107mm (W) X 0.370mm (H)
■ VIEWING ANGLE: 65°/50°/65°/65°( Top / Bottom / Left / Right )
■ BRIGHTNESS: 400 cd/m2
■ CONTRAST RATIO: 400:1
■ POWER SOURCE: DC 12V ( Negative Ground)
■ POWER CONSUMPTION: 20W ( Max.)
■ OPERATING TEMPERATURE: 0℃~60℃ (32℉~140℉)
■ STORAGE TEMPERATURE: -20℃~70℃ (-4℉~158℉)
■ DIMENSIONS: 185mm x 60mm x 155 mm (W x D x H)
AHDM7/ 2
DVD PLAYER
Supports DVD, VCD, AUDIO CD, and MP3.
MONITOR
7.0" wide screen TFT LCD active matrix
STANDARD ACCESSORIES PACKAGE CONTENTS
■ Remote control (AAA x 2 batteries)
■ Operating manual
■ A/V input cable
OPTIONAL ACCESSORIES
Single Channel Wireless IR Headphones — AE21
Dual Channel Wireless IR Headphones — AE22
CONTROLS & CONNECTORS
■ POWER button - Press to turn the selected on/off.
■ SOURCE button - Press to toggle between desired sources.
■ MENU button - Press menu button to activate and select OSD features.
■ UP/DOWN buttons - Adjustment buttons.
■ IR sensor - IR sensor for remote control.
■ IR transmitter - transmits audio to wireless headphones.
■ DVD player - Plays DVD, VCD, AUDIO CD, and MP3.
AHDM7/ 3
REMOTE CONTROL OPERATION
MONITOR FUNCTION DESCRIPTIONS
DRIVER button
PASSENGER button
Press these buttons to select which monitor you would like to control with the remote
control.
POWER button
Press this button to turn on the selected monitor, press again to turn off the monitor.
SOURCE button
Press SOURCE button to toggle between sources on the selected monitor.
VOLUME UP button
VOLUME DOWN button
Use these buttons to raise and lower the volume level of the audio output.
MUTE button
Press to mute the audio, press the button again to restore sound to the previous audio
level.
PIC MENU button
Press this button to activate the OSD menu screen.
CTRL LEFT button
CTRL RIGHT button
Use these buttons to change the function/ value of the monitor settings.
AHDM7/ 4
DVD FUNCTION DESCRIPTIONS
NUMBER buttons
Direct access for CD tracks, DVD chapters, and password setting.
PBC/MENU button
Toggles available subtitles when playing VCD 2.0, or shortcut to
DVD selection title menu.
TITLE button
Certain DVDs come with title selections. For such cases, the
TITLE button allows the user to select desired title.
SUBTITLE button
Toggles the displayed subtitles if available on your selection.
BACK button
Allows the user to search in a backward direction.
UP button
Moves the selection or cursor up.
FWD button
Allows the user to search in a forward direction.
LEFT button
Moves the selection or cursor left.
PLAY / PAUSE button
Starts playback or starts a feature while a disc is loaded in the
disc player or pauses media playback.
RIGHT button
Moves the selection or cursor right.
PREVIOUS button
Returns to the previous chapter or track.
DOWN button
Moves the selection or cursor down.
NEXT button
Advances to the next chapter or track.
STOP button
Media playback will be halted.
ENTER button
Press this button to confirm selection.
A-B button
Allows the user to repeat play of a DVD or CD from point A to
point B. Press button once to set point A once again to set point B.
REPEAT button
Allows the user to repeat play various positions of a DVD, CD or
MP3.(Track/Chapter/All)
SET UP button
Allows the user to select the DVD player's options. (General,
Audio, Video, Preference, Password, Exit Setup)
DISPLAY button
Press to display current media information.
ZOOM button
Allows the user to zoom in or zoom out the image, press the
"LEFT/RIGHT/UP/DOWN" buttons to move the zoomed image in
the direction of the remaining portion of the image.
AHDM7/ 5
MONITOR OPERATION
Adjust the monitor to a comfortable viewing angle free from glare or bright ambient light.
● Press the POWER button on the unit or remote to turn on the monitor.
● Press the SOURCE button to select viewing source.
● Press the MENU button to activate the OSD menu shown on the LCD screen.
● Press the MENU button again to select the adjustment item, press the "+" or "- " button to adjust the desired function/value.
● The DIMMER feature dims the backlight to reduce glare during operation in reduced lighting conditions.
AHDM7/ 6
● The BRIGHTNESS adjustment controls the intensity of the
backlight.
● The CONTRAST adjustment controls the black level ratio.
● The COLOR adjustment controls the balance of blue, yellow,
● The TINT adjustment controls the intensity of blue, yellow, and red.
and red.
AHDM7/ 7
● The FM MOD selection toggles the FM modulator on and off.
● The FM CHANNEL selects FM frequency that your source will
broadcasted on, Press < or > to change broadcast channel.
● The FM PRESETS toggles between 6 preset FM frequencies
set for source broadcast, Press > to scroll stored presets. Hold
< for 3 seconds to store desired preset.
● The RESET selection will return the unit to factory set defaults.
Press UP to activate this function.
AHDM7/ 8
FM PRESET INSTRUCTIONS
1. Press the "MENU" button on the monitor or the "PIC MENU"
button on the remote control. Continue pressing the button and
scroll until "FM MOD" is button and scroll until "FM MOD" is displayed. Turn on the FM modulator by selecting "ON" by pressing
the "UP" or < button. The FM modulator feature will only be
available on the monitor with the media player in use.
2. Press the "MENU" or "PIC MENU" button until "FM CHANNEL" is
displayed. Select the channel you would like to use in the OSD menu.
You can select the desired frequency by pressing the "UP" or "DOWN"
buttons on the monitor or the < or > buttons on the remote control.
Tune your FM radio to the selected channel. If you would like to set
presets, continue to the next step.
AHDM7/ 9
3. Press the "MENU" or "PIC MENU" button until "FM PRESETS" is displayed. Select the preset location you would like to
save the desired channel at. Selecting the preset location is
accomplished by pressing the > button on your remote control or
pressing the "UP" button on the monitor. There are six preset
locations available. The previous entry in that location will be
overwritten.
4. To save the preset, press and hold the < button on your remote control or the "DOWN" button on the monitor for 3 seconds. The displayed
preset channel will change to reflect the selected channel to save as a
preset.
Note: Factory default presets: 88.1, 88.3, 88.7, 90.1, 91.3, 107.9MHz
AHDM7/10
DVD OPERATING
The DVD player has the ability to play DVD, VCD, Audio CD, and MP3 audio.
Make sure you read this section completely before using the DVD section.
REGIONAL CODING
Both the DVD player and DVD disc are coded by region. These regional codes must match in order for the disc to play. If the
codes do not match, the disc will not play. This DVD player will only play region 1(North America) DVD discs.
TO PLAY A DVD OR VCD
■ Press the SOURCE button on the remote control or unit until DVD is displayed.
■ Insert DVD or VCD disc (Label Up), the disc will automatically load.
■ Press the "PLAY" button on the remote to play selected title.
NOTE: The On Screen Display will show "INVALID DISC" or "WRONG REIGON" if the disc region code is not correct.
■ Press the "PAUSE" button to pause, press the "PLAY' button to resume play.
■ Press the "STOP" button to stop play
ADJUST DVD SETUP MENU
DVD SETTING AND ADJUSTMENT
This chapter describes how to set and how to adjust using the on-screen SETUP menu.
Using the Setup Menu
■ Press the SETUP button to display the "SETUP MENU" on the display screen.
■ Select the main item you want using the cursor left and right buttons, and then press the ENTER button.
■ To exit setup menu, Press the SETUP button on the remote again.
AHDM7/11
General setting
Press [SETUP]. The screen will display the system setting menu.
To navigate the menu, use [ § ]/[ © ] the buttons. To confirm your
selection, press [ENTER]. In the sub-menus, use the [ ¶ ]/[ Ä ]
buttons to make your selection, press [ENTER] to enter the item to
be changed. To navgate up and down use the [ ¶ ]/[ Ä ] buttons.
Highlight your selection and press [ENTER] as conformation.
Press [ § ] to escape the sub-menu and make another selection,
or press [SETUP] to exit the SETUP menu.
Provided below are examples of settings and the instruction on
changing common setting.
TV display ratio adjustment
Press [SETUP] to enter the menu. Press [ENTER] to make your
selection. Use [ ¶ ]/[ Ä ] to navigate to TV Display.
Press [ © ] to enter sub-menu on the right. To change the screen
settings, use [ Ä ] to navigate to your selection. Highlight your
selection and press[ENTER].
AHDM7/12
Press [SETUP] to exit system setting.
Note:three screen ratio modes are available (16:9 WIDE, 4:3PS,
4:3L) It enables user to select the disc to match your screen. Below
is chart showing the various formats. The recommended setting is
wide.
Last Memory Function
The DVD player can identify the last format of the disc being used
to store the last frame shown in its memory prior to unit being powered off. This unique function, memorizes the point at which the
disc was stopped.
If the DVD player is connected to the vehicle's lighter socket, the
last memory function will only operate when the DVD is powered off
by means of the power button on th remote control or on the DVD.
To operate the last memory function, press [SETUP] to access the menu. The screen will display the system setting menu "General setup
page". Press [ENTER]/[ Ä ] to enter the sub-menu. Press [ Ä ] to move the yellow band to "Last Memory" item. Press [ © ] to enter the
selection sub-menu and set it as ON or OFF.
AHDM7/13
Setup Brightness and Contrast
Press [SETUP] to access the menu. The screen will display the
system setting menu. Navigate to the video setup page and press
[ENTER]. Use the [ Ä ] button to move the yellow band to "Quality"
item. Press [ENTER] to confirm the screen will display as below:
Navigate the yellow band to the item you want to change. Press
[ENTER] to select the sub-menu. Use the [ Ä ] button to highlight
your change. Press [ENTER] to select.
Press [SETUP] to exit system setting.
As of the items in this menu are altered, they will change the color
setting on the screen.
Parental
Move the yellow bar to PARENTAL and press ENTER. Use [ © ]
to move the yellow bar to extended menu, a sub-menu appears
requesting password; verify Factory Default Password (136900)
and press ENTER.
AHDM7/14
How to handle discs
How to hold disc
Do not touch the face containing information.
When there are stains on face of disc
Wipe gently with a wet cloth and then with dry one.
When a disc is brought in from a cold environment to
hot, condensation may form on the face of the disc.
Wipe down with a soft, smooth, dry cloth before using.
Attention:
● Don't write on the labeled side.
● Don't use pickup cleaning preparation.phenyl, chemical solution,
dispersing solution, anti-static electricity solution or any other
kind of solutions to clean disc.
● Don't stick labels or glue-based notes on disc(Don't use discs with
remaining glue or damaged gluey label).
● Don't use scratching-preventing materials or covers.
● Don't put or store disc in harsh environments.
● Do not store in direct sunlight. Protect from heat, dust and humidity.
AHDM7/15
LIMITED ONE-YEAR WARRANTY (NON-TRANSFERABLE)
Myron & Davis warrants to the original purchaser a non-transferable warranty to repair or replace, free of charge, the video product(s)
in materials and workmanship under normal use and conditions for a period of one (1) year from date of purchase.
Limited warranty excludes:
■ Labor cost for removal, reinstallation, and trouble shooting of the video product(s).
■ Damage to DVD discs, CDs, videotapes, accessories, or vehicle electrical parts.
■ Damage due to improper installation, modification of existing equipment, abuse, neglect, or improper service.
■ Damage due to accidents, fire, theft or vandalism.
TROUBLE SHOOTING
PROBLEM
SOLUTION
PROBLEM
● Check the condition of the vehicle's radio
No sound or dis-
antenna.
● Verify that the antenna is fully raised.
torted sound
(FM modulator
installed)
● Try change the FM modulator's frequency
Poor in vehicle
radio reception
properly. Make sure all cables are securely
inserted into the appropriate jacks.
● Make sure Modulator is ON and the proper
● Verify that the batteries in the remote are
Frequency has been selected.
fresh.
● Verify that the remote sensor eye is not
obstructed.
● Verify that the infrared transmitter is affixed
over the sensor eye of the component to be
controlled.
Disc won't play
Can't advance
through a movie
● You can't advance through the opening
credits and warning information that appears
at the beginning of movies because the disc
is programmed to prohibit that action.
● Check the type of disc you putinto disc tray.
This DVD player only plays DVD's, audio CDs
region. If the regional coded don't match, the
disc can't be played. This DVD player is
Region Number 1.
The icon ( )
appears on
screen
● The feature or action cannot be completed at
this time because:
1.The disc's software restricts it.
2.The disc's software dosen't support the fea
ture (e.g., angles)
3.The feature is not available at the moment.
4.You've requested a title or chapter number
Play starts, but
● The disc is dirty. Clean it.
then stops
● Condensation has formed. Allow player to dry
out.
immediately
SOLUTION
during forward or reverse scan.
No forward or
reverse scan
● Some discs have sections that prohibit rapid
scanning or title and chapter skip.
● If you try to skip though the warning
information and creaits at the beginning of a
● Insert a disc with the label side facing up.
and MP3s.
● Both the unit and the disc are coded by
PROBLEM
Picture is distort- ● The disc right be damaged. Try another disc.
ed
● It is normal for some distortion to appear
● If you are using the IR headphones, make
sure you turn on the IR power.
from the OSD menu.
IR sensor inoperative
SOLUTION
● Make sure your DVD player is connected
that is out of range.
AHDM7/16
movies, you won't be able to. This part of the
movie is often programmed to prohibit
skipping through it.