1
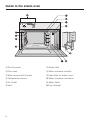
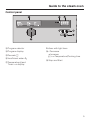
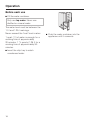
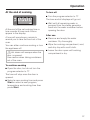
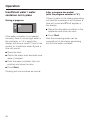
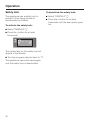
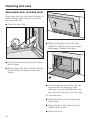
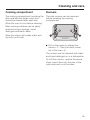
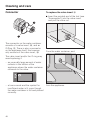
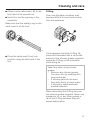
Operating instructions
Steam oven
DG 155
DG 155-1
DG 155-2
DG 155-3
To prevent accidents and
machine damage,
read these instructions
before
installation or use.
UV
M.-Nr. 05 229 041
Contents
IMPORTANT SAFETY INSTRUCTIONS
Guide to the steam oven
Control panel . . . . . . . . . . . . . . . . . . . . . . . . . . . . . . . . . . . . . . . . . . . . . . . . . . . . . . 9
Accessories
Before using for the first time
Setting the water hardness level . . . . . . . . . . . . . . . . . . . . . . . . . . . . . . . . . . . . . . 13
Setting the altitude . . . . . . . . . . . . . . . . . . . . . . . . . . . . . . . . . . . . . . . . . . . . . . . . . 14
Changing the temperature display . . . . . . . . . . . . . . . . . . . . . . . . . . . . . . . . . . . . 16
Operation
Before each use. . . . . . . . . . . . . . . . . . . . . . . . . . . . . . . . . . . . . . . . . . . . . . . . . . . 18
Turning the oven on . . . . . . . . . . . . . . . . . . . . . . . . . . . . . . . . . . . . . . . . . . . . . . . . 19
Selecting a program . . . . . . . . . . . . . . . . . . . . . . . . . . . . . . . . . . . . . . . . . . . . . . . 19
Program table . . . . . . . . . . . . . . . . . . . . . . . . . . . . . . . . . . . . . . . . . . . . . . . . . . . . 20
Adjusting the temperature . . . . . . . . . . . . . . . . . . . . . . . . . . . . . . . . . . . . . . . . . . . 21
Changing the preset temperature permanently . . . . . . . . . . . . . . . . . . . . . . . . . . 22
Setting the cooking time . . . . . . . . . . . . . . . . . . . . . . . . . . . . . . . . . . . . . . . . . . . . 23
Starting the cooking process . . . . . . . . . . . . . . . . . . . . . . . . . . . . . . . . . . . . . . . . 24
Changing a program . . . . . . . . . . . . . . . . . . . . . . . . . . . . . . . . . . . . . . . . . . . . . . . 26
At the end of cooking. . . . . . . . . . . . . . . . . . . . . . . . . . . . . . . . . . . . . . . . . . . . . . . 27
Insufficient water / water container not in place . . . . . . . . . . . . . . . . . . . . . . . . . . 28
Overheating protection . . . . . . . . . . . . . . . . . . . . . . . . . . . . . . . . . . . . . . . . . . . . . 29
Safety lock . . . . . . . . . . . . . . . . . . . . . . . . . . . . . . . . . . . . . . . . . . . . . . . . . . . . . . 30
Cooking tips
Suitable containers . . . . . . . . . . . . . . . . . . . . . . . . . . . . . . . . . . . . . . . . . . . . . . . . 31
Steaming . . . . . . . . . . . . . . . . . . . . . . . . . . . . . . . . . . . . . . . . . . . . . . . . . . . . . . . . 32
Defrosting. . . . . . . . . . . . . . . . . . . . . . . . . . . . . . . . . . . . . . . . . . . . . . . . . . . . . . . . 36
Meal planning
Preparing a whole meal . . . . . . . . . . . . . . . . . . . . . . . . . . . . . . . . . . . . . . . . . . . . . 38
2
Contents
Special uses
Canning . . . . . . . . . . . . . . . . . . . . . . . . . . . . . . . . . . . . . . . . . . . . . . . . . . . . . . . . . 40
Reheating. . . . . . . . . . . . . . . . . . . . . . . . . . . . . . . . . . . . . . . . . . . . . . . . . . . . . . . . 41
Blanching . . . . . . . . . . . . . . . . . . . . . . . . . . . . . . . . . . . . . . . . . . . . . . . . . . . . . . . . 41
Disinfecting baby bottles . . . . . . . . . . . . . . . . . . . . . . . . . . . . . . . . . . . . . . . . . . . . 42
Cleaning and care
Appliance front. . . . . . . . . . . . . . . . . . . . . . . . . . . . . . . . . . . . . . . . . . . . . . . . . . . . 43
Drip tray, rack and cooking containers . . . . . . . . . . . . . . . . . . . . . . . . . . . . . . . . . 43
Removable door and drip plate . . . . . . . . . . . . . . . . . . . . . . . . . . . . . . . . . . . . . . . 44
Cooking compartment . . . . . . . . . . . . . . . . . . . . . . . . . . . . . . . . . . . . . . . . . . . . . . 45
Runners . . . . . . . . . . . . . . . . . . . . . . . . . . . . . . . . . . . . . . . . . . . . . . . . . . . . . . . . . 45
Connector . . . . . . . . . . . . . . . . . . . . . . . . . . . . . . . . . . . . . . . . . . . . . . . . . . . . . . . 46
O-Ring. . . . . . . . . . . . . . . . . . . . . . . . . . . . . . . . . . . . . . . . . . . . . . . . . . . . . . . . 47
Descaling lock . . . . . . . . . . . . . . . . . . . . . . . . . . . . . . . . . . . . . . . . . . . . . . . . . . . . 48
Descaling . . . . . . . . . . . . . . . . . . . . . . . . . . . . . . . . . . . . . . . . . . . . . . . . . . . . . . . . 49
Frequently asked questions
Electrical connection
After sales service
Data Plate . . . . . . . . . . . . . . . . . . . . . . . . . . . . . . . . . . . . . . . . . . . . . . . . . . . . . . . 54
Help protect our environment
Disposal of packing materials . . . . . . . . . . . . . . . . . . . . . . . . . . . . . . . . . . . . . . . 55
Disposal of an old appliance . . . . . . . . . . . . . . . . . . . . . . . . . . . . . . . . . . . . . . . . 55
3
IMPORTANT SAFETY INSTRUCTIONS
WARNING- When using your
steam oven, follow basic
precautions, including the
following:
Read all instructions before
installation or use of the steam
oven to prevent injury and
machine damage.
Use the steam oven only for its
intended purpose. This appliance
is intended for residential cooking
only.
This appliance conforms to all
uniform safety codes and
regulations. The manufacturer
cannot be held responsible for
damage or injury caused by
improper use of this appliance.
Keep these operating instructions
in a safe place and pass them on
to any future user.
SAVE THESE INSTRUCTIONS
Electrical Safety
Before installation make sure that
the voltage and frequency listed on
the data plate correspond with the
household electrical supply. This data
must correspond to prevent injury and
machine damage. Consult a qualified
electrician if in doubt.
4
Installation, repair and
maintenance work should be by a
Miele authorized service technician.
Work by unqualified persons could be
dangerous and may void the warranty.
Before installation or service,
disconnect the power supply to the
work area by removing the fuse,
"tripping" the circuit breaker, or
switching off the power main. Ensure
that the power is not restored to the
appliance during maintenance or repair
work.
Be certain your appliance is
properly installed and grounded by
a qualified technician. To guarantee the
electrical safety of this appliance,
continuity must exist between the
appliance and an effective grounding
system. It is imperative that this basic
safety requirement be met. If there is
any doubt, have the electrical system of
the house checked by a qualified
electrician. The manufacturer cannot be
held responsible for damage caused
by the lack, or inadequacy of, an
effective grounding system.
Do not use an extension cord to
connect this appliance to
electricity. Extension cords do not
guarantee the required safety of the
appliance, e.g. danger of overheating.
Do not operate any appliance with
a damaged cord or plug, or if the
appliance has been damaged in any
manner. Return the appliance to the
nearest authorized service facility for
examination, repair or adjustment.
IMPORTANT SAFETY INSTRUCTIONS
Use
Scalding and Burning hazards
Inspect the steam oven for
shipping damage. Do not install or
operate a damaged unit. Contact your
Miele Dealer.
When in use, the oven, particularly
the inside of the door as well as the
outer side by the vent, may become
very hot and remain so for a while after
the oven has been turned off. Keep
children away.
The steam oven should be installed
at a safe height for users to safely
access all cooking levels and
containers. Otherwise spills could
cause burns or scalding and children
might be put at risk by the hot
appliance door.
This equipment is not designed for
maritime use or for use in mobile
installations such as recreational
vehicles or aircraft. However, under
certain conditions it may be possible for
an installation in these applications.
Please contact the nearest Miele dealer
or the Miele Technical Service
Department with specific requirements.
This appliance is intended for
domestic use only. It should not be
used for commercial purposes.
This appliance must only be
operated after it has been correctly
installed in cabinetry. This is necessary
to ensure that all electrical components
are shielded.
Allow the steam oven to cool
before putting in or taking out
racks.
Use pot holders when working with
a hot appliance.
Avoid hot steam, serious burns and
scalds could result.
Do not touch hot surfaces, use the
handles.
When handling cooking containers
take care not to let the contents
spill.
Extreme caution must be used
when moving hot liquids.
Do not use plastic containers. They
may melt at high temperatures in
the oven.
Only use the appliance for its
intended purpose. Any other use is
at the owner’s risk and could be
dangerous.
5
IMPORTANT SAFETY INSTRUCTIONS
Children
Appliance damage
To reduce the risk of injury, do not
allow children to play in, on, or
near the steam oven.
Do not heat unopened containers
of food in the oven. Pressure will
build up causing an explosion that will
damage the cooking compartment.
Do not store items of interest to
children in cabinets near the oven.
Children climbing on the oven to reach
items could be seriously injured.
Use the safety lock so that children
cannot turn the steam oven on or
change the settings.
The door hinges of the appliance
could be hazardous. Ensure that
children are kept at a safe distance.
Ensure that any plastic wrap, is
disposed of safely and kept out of
the reach of children. Danger of
suffocation!
Before discarding an old
appliance, disconnect it from the
electrical supply, cut off the power
cord, and remove any doors to prevent
hazards.
6
To prevent condensation which
could corrode the appliance; do
not leave cooked foods in the oven for
an extended period of time.
Do not use items in the steam oven
which might rust. This can lead to
corrosion of the appliance.
Do not lean, sit or place heavy
items on the open door of the
appliance. The door can support a
maximum weight of 17 lbs. (8 kg).
IMPORTANT SAFETY INSTRUCTIONS
Appliance maintenance
Further safety notes
When descaling the oven, only use
descaling agents with a citric acid
base or the descaling tablets available
from Miele. Do not use vinegar. Vinegar
will damage the appliance. Follow the
manufacturer’s safety instructions on
the packaging.
In the event of damage or a defect,
turn off the appliance immediately.
After it has been turned off, isolate it
from the main power supply and
contact the Miele Technical Service
Department. Ensure that the power is
not restored to the appliance during
maintenance or repair work.
Wipe out the appliance after each
use and leave the door open until
the moisture in the cooking
compartment has evaporated.
If the steam oven is not used for a
lengthy period, e.g. vacationing,
clean it to avoid odors.
See "Before using for the first time Setting the altitude" and leave the door
open until the cooking compartment is
dry.
Do not use a steam cleaner to
clean this appliance. The steam
from the cleaning appliance could
penetrate live components and
permanently damage the oven or cause
injury.
While the appliance is under
warranty repairs should only be
performed by a Miele authorized
service technician. Otherwise the
warranty will be void.
Do not tamper with electrical
connections, components or
mechanical parts. Never open the outer
casing of the appliance.
Be sure that cords of other
electrical appliances do not come
in contact with the steam oven door.
The insulation of the cords could
become damaged creating a hazard.
To protect against electric shock,
keep the appliance cord clear of
liquids.
Do not let the cord hang over the
edge of tables or counters, or
come in contact with hot surfaces.
The use of accessories not
recommended by Miele may cause
injury.
7
Guide to the steam oven
a Control panel
g Steam inlet
b Door seal
h Water container contact
c Side runners with 4 levels
i Feed tube for water return
d Temperature sensor
j Water container connector
e Air Outlet
k Water Valve
f Vent
l Drip channel
8
Guide to the steam oven
Control panel
m Program selector
Buttons with light bars:
n Program display
r - Decrease
+ Increase
z / x Temperature/Cooking time
o Descale k
p Insufficient water p
q Temperature z and
Timer x display
s Stop and Start
9
Accessories
Included
All the accessories can also be reordered if necessary.
Drip tray (3.5 pints, 1.7 l)
Side runners
For catching excess liquids
Cookbook
Rack
Water container
To place cooking containers on
2 cooking containers,
perforated (3.2 pints, 1.5 l)
For steaming
10
Accessories
Silicone grease
Connecting valve
For lubricating the O-Rings on the
connecting valve of the water container.
See, "Cleaning and care-O-Ring" for
more details.
with:
Valve insert, t, white
creates a bridge between the water
container, j, and the appliance, k.
O-Ring, u, black
These two parts along with the tool, see
"Accessories-optional" can be ordered
individually or together as a repair kit.
11
Accessories
Optional
The following stainless steel cooking containers for steaming can be ordered as
optional accessories:
Container
Capacity
in pt (l)
Height in inches (cm)
DGG 2
solid
4 (2.0)
2 3/8" (6)
DGG 3
solid
6.5 (3.1)
2 3/8" (6)
DGGL 4
perforated
6.5 (3.1)
2 3/8" (6)
Tool
For removing and inserting the valve insert.
This part can be ordered individually or together with the connecting valve parts,
see "Accessories-connecting valve," as a repair kit.
12
Before using for the first time
Setting the water hardness
level
For the steam oven to function properly,
the water hardness level must be
programmed into the unit.
You can use the supplied test strip to
check your water hardness level or your
local water company can tell you the
water hardness of your area.
The water hardness is shown as
settings I to IV, equivalent to the
following values:
Setting
Display
gr/gal
ppm
I
1
1-7
<20-130
II
2
8-14
140-250
III
3
15-21
270-380
IV
4
>21
>380
The steam oven is preset to water
hardness level IV (4). If your water is
softer than 21 gr/gal the setting should
be adjusted.
Please check that the program selector
is at "0".
^ Press and hold the – button while
turning the program selector to
DESCALE k.
4 1 will appear in the display.
The 1 represents the program number.
The 4 represents the water hardness
level.
^ Press – or + to select the level III (3),
II (2) or I (1) corresponding to your
water hardness.
The selected water hardness level will
be stored in memory as soon as the
program selector is turned to another
position.
13
Before using for the first time
Setting the altitude
The steam oven must be run through
the DESCALE k program before the
first use to set the unit for the altitude in
your area.
If this is not done, too much steam will
be released from the appliance during
use.
Do not turn the program selector
during this period or the descaling
program will have to be restarted.
A tone will sound when there are
8 minutes remaining and the following
will alternate in the display:
^ Fill the water container with a quart
(1 l) of water (do not add descaling
agent), place in the appliance and
close the door.
^ Select DESCALE k using the
program selector.
The following will be displayed:
^ Empty the water container, refill it with
another quart (1 l) of fresh water, and
close the door.
^ Press Start.
The above procedure must be repeated
two more times when the tone sounds.
Do not be alarmed at the amount of
steam emitted.
^ Press Start.
The time will count down from
33 minutes as shown in the display.
14
Before using for the first time
When the time has elapsed you will
see the following display:
^ Remove, empty and thoroughly dry
the water container.
^ Wipe out the oven interior with an
absorbent cloth. Remember to wipe
down the vent and the drip channel.
^ Turn the program selector to "0".
^ Leave the door open until the
moisture in the cooking compartment
has evaporated.
^ Wait until the oven has pumped the
residual water back into the water
container, then open the door.
,Hot steam will escape when the
door is opened.
15
Before using for the first time
Changing the temperature
display
The display is set to show the
temperatures in °F but it can be
programmed to show °C.
Please check that the program selector
is set to "0".
If you wish to revert back to °F follow
the previous instructions until C9
appears in the display.
^ Press the + button.
p
k
^ Press and hold the - button while
turning the program selector to
DESCALE k.
F9 will appear in the display.
^ Release the - button.
^ Turn the program selector to "0".
4 1 will appear in the display.
^ Press the z/g repeatedly until F9
appears in the display.
^ Press the - button.
C9 will appear in the display.
^ Turn the program selector to "0".
The conversion is now stored.
16
Before using for the first time
Selecting a temperature
In the cookbook, temperatures are
specified in °C, but are shown on the
appliance display in °F. Use the
following conversion table for setting
the temperature on your steam oven.
The temperature on the display can
only be shown in 10 °F increments.
Therefore, the temperature shown in °F
does not always correspond exactly
with the temperature specified in °C,
i.e. the actual measurable temperature.
This discrepancy in temperature is
nominal and will not cause a significant
difference in cooking time or results.
Temperature
in °C
Corresponding
Temperature in °F
100
boil
95
205
90
195
85
185
80
175
75
165
70
155
65
145
60
135
55
125
50
115
17
Operation
Before each use
^ Fill the water container.
Only use tap water. Never use
distilled or mineral water.
The water level must be between the
1.0 l and 1.25 l markings.
Never exceed the "max" level marker.
1 quart (1 l) of water is enough for a
cooking time of approximately
20 minutes, 1 1/2 quarts (1.25 l) for a
cooking time of approximately 60
minutes.
^ Insert the drip tray to catch
condensed water.
18
^ Push the water container into the
appliance until it connects.
Operation
Turning the oven on
Selecting a program
Do not worry if your appliance makes
unusual noises. This will occur when
the steam generating unit is being filled
or emptied and when the pump is
activated.
^ Turn the program selector to the
desired program, e.g. COOK - Veg.
When the oven is turned on, the fan
which extracts steam from the oven will
also be heard. The fan will continue
running for a while after the oven has
been turned off.
The preset temperature, e.g. 100 °C
(boil) will appear in the display for a
short time.
To use the oven follow these four steps:
1. Select a program
2. Adjust the temperature if necessary
3. Set the cooking time
4. Press Start
The lit bar between the buttons will
prompt you to set the next step.
The following pages describe these
steps in more detail.
19
Operation
Program table
Program
Preset
temperature
in °F (°C)
Temperature
range °F (°C)
Suggested use
COOK
Universal
212 (100)
175-212
(80-100)
For food which can be
cooked at high temperatures,
or for boiling
COOK Veg
212 (100)
195-212
(90-100)
For all types of vegetables
COOK
Poultry /
Meat
212 (100)
195-212
(90-100)
For all types of meat and
poultry suitable for steaming
COOK Fish
165 (75)
155-205
(70-95)
For all types of fish
COOK Bio
165 (75)
155-175
(70-80)
For food requiring very gentle
cooking
DEFROST
125 (55)
125-140
(50-60)
For defrosting meat, fish, fruit,
etc.
REHEAT
205 (95)
175-212
(80-100)
For reheating food
DESCALE
-
-
20
For descaling
Operation
Adjusting the temperature
To change the temperature:
The preset temperature can be
adjusted in 10 °F (5 °C) steps within the
range available for that program. See
the "Program table" for details.
^ While the preset temperature is
shown in the display, use the + or button to raise or lower the
temperature.
If the display has already changed from
preset temperature to cooking time or
current temperature you can call up the
preset temperature by pressing the
z/g button once.
You can adjust the preset temperature
at any time.
21
Operation
Changing the preset
temperature permanently
Please check that the program selector
is set to "0".
It is possible to permanently change
the preset temperature of a program,
but only within the range of
temperatures available for that
particular program (see the table
below).
^ Press and hold the - button while
turning the program selector to
DESCALE k.
Program
number
Preset
temp
in °F (°C)
Temp
range
in °F (°C)
Cook
Universal
2
212
(100)
175-212
(80-100)
REHEAT
3
205
(95)
175-212
(80-100)
DEFROST
4
130
(55)
115-135
(50-60)
Veg
5
212
(100)
195-212
(90-100)
Fish
6
165
(75)
155-205
(70-95)
Poultry /
Meat
7
212
(100)
195-212
(90-100)
Bio
8
165
(75)
155-175
(70-80)
Program
4 1 will appear in the display.
^ Press the z/g button.
1002 will appear in the display.
(2112 will appear if the temperature is
set to °F.)
The flashing figures in the first three
positions show the temperature, 100 °C
in the above example. The figure in the
fourth position, number 2 in the
example, shows the program number
(see table).
^ To change the preset temperature for
this program press - or +. For
example, to set 80 °C (175 °F) for
COOK Universal.
^ Press the z/g button to move to the
next program and change its
temperature as described above.
The new recommended temperature is
now stored in memory.
^ Turn the program selector to "0" if you
do not wish to change any other
temperatures.
The next time the changed program is
selected the new temperature will
appear in the display.
22
Operation
Setting the cooking time
Three zeros and the symbol for cooking
time g will appear in the display.
The light bar between the - and + will
illuminate.
The light bar between the Stop and
Start buttons will illuminate as soon as
a cooking time has been set.
The cooking time can be changed as
long as it appears in the display, i.e.
before the beginning of cooking as well
as during cooking. Press the z/g
button to switch between the
temperature and cooking time display.
To achieve favorable results using the
suggested cook times, do not cook
more than 6-8 servings at a time.
Regard the recommendations about the
cooking containers, see "Cooking
tips-Suitable containers".
^ Use the + or - button to enter the
desired time, (e.g. 20 minutes).
The cooking time does not depend on
the amount of food but on the size of it,
e.g. larger potatoes need a longer
cooking time than smaller ones.
A time of between 1 minute (0:01) and
4 hours 59 minutes (4:59) can be set.
23
Operation
Starting the cooking process
^ Press Start.
24
The two light bars will go out and the
display will change to show the current
temperature of the cooking
compartment and the temperature
symbol z.
Operation
Once the steam oven has begun to
operate you will hear a pumping noise
as water is pumped from the water
container into the steam generating
unit.
The appliance will then heat up. During
this heating time the rise in temperature
in the cooking compartment will be
shown in the display.
Please note that if the cooking
temperature selected is 185 °F (85 °C)
or higher and the cooking time is longer
than 30 minutes, the steam generating
unit will turn off 3 minutes before the
end of cooking to make use of residual
energy. This is indicated by the letters
EC in the display.
As soon as the set temperature has
been reached, the display will change
to show the cooking time and the time
will begin to count down. This is
indicated by the colon flashing between
the figures.
25
Operation
Interrupting a program
Changing a program
You can interrupt a program at any
time.
To change a program while the oven is
in use:
^ Press Stop.
^ Press Stop.
The colon in the display stops flashing.
The light bar between Stop and Start
comes on.
^ Turn the program selector to the new
program.
The heat is turned off and the remaining
cooking time is stored in memory.
^ Press Start.
You can now open the door, for
example, to stir something.
,Hot steam will escape when the
door is opened.
Use caution when taking containers
out of the oven.
To continue:
^ Close the door.
^ Press Start.
If you have only interrupted the
program briefly, you will see the time
remaining continue to count down after
the door has been closed.
If the program has been interrupted for
a longer period, the oven will have
cooled and will need to heat up again.
In this case, the display will show the
current oven temperature rising until it
reaches the set temperature. When the
set temperature has been reached, the
display will switch over to show the
remaining cooking time.
26
^ Enter the new cook time.
Operation
At the end of cooking
To turn off
^ Turn the program selector to "0".
The tone and all displays will go out.
At the end of the set cooking time a
tone sounds 5 times and 4 zeros
appear in the display.
A tone will sound every minute to
remind you to take the food out of the
oven.
You can either continue cooking or turn
the appliance off.
,Hot steam will escape when the
^ Wait until all remaining water is
pumped from the steam generator
back into the water container before
opening the door.
After use
^ Remove and empty the water
container. Dry thoroughly.
^ Wipe the cooking compartment, vent,
and drip tray with a soft cloth.
^ Leave the door open until cooking
compartment is dry.
door is opened.
Use caution when taking containers
out of the oven.
To continue cooking
^ Open the door, but do not turn the
program selector to "0".
The tone will stop once the door is
opened.
^ Select a new cooking time and press
Start or select a new program,
temperature and cooking time then
press Start.
27
Operation
Insufficient water / water
container not in place
During a program:
After a program has ended:
(with the program selector at "0")
If there is water in the steam generating
unit and the container is not in place, a
tone will sound and F1 will appear in
the display.
^ Reposition the water container in the
appliance and close the door.
If the water container is not seated
correctly, there is not enough water in
the container, or if it is empty the
display will show a small j next to the
symbol for insufficient water p and a
tone will sound.
^ Open the door.
^ Check the water level and add more
water if needed.
^ Push the water container fully into
position and close the door.
^ Press Start.
Cooking will now continue as normal.
28
^ Press Start.
Now the remaining water can be
pumped out of the steam generating
unit into the water container.
Operation
Overheating protection
To reset the oven
This appliance has a safety feature
which prevents overheating. If the
temperature in the steam generating
unit becomes too high the oven will
shut off automatically.
^ Turn the program selector to "0" and
allow the appliance to cool.
The oven has shut off if:
^ Restart the program.
If the appliance still does not heat
contact the Miele Technical Service
Department for assistance.
– during operation the display only
shows the temperature decreasing.
– after starting a new program the
oven temperature fails to rise.
29
Operation
Safety lock
To deactivate the safety lock:
The appliance has a safety lock to
prevent it from being turned on
accidentally by children.
^ Select "DESCALE" k.
To activate the safety lock:
^ Select "DESCALE" k.
^ Press the - button for at least
5 seconds.
The symbol a for the safety lock will
appear in the display.
^ Turn the program selector back to "0".
The appliance cannot be used again
until the safety lock is deactivated.
30
^ Press the – button for at least
5 seconds until the a symbol goes
out.
Cooking tips
Suitable containers
Stainless steel cooking containers are
supplied with the appliance.
Other containers, are available in a
variety of sizes, both perforated and
solid, as optional accessories.
– To achieve good results using the
suggested cook times, do not cook
more than 6-8 servings at a time.
– Use the perforated cooking
containers whenever possible, e.g.
for cooking vegetables. The steam
can reach the food from all sides and
cook evenly.
– Place the drip tray at the lowest
runner level to collect condensation.
Always use the drip tray when using
a perforated cooking container.
You can also use your own containers
and dishes. However, please note the
following:
– The container must be heat resistant
to 212 °F (100° C). Heat resistant
glass, ceramics, porcelain
(chinaware), stainless steel or
enamel dishes are all suitable.
– Food will take longer to cook in a
dish with thick sides.
Ensure that there is a gap of at least 1"
(3 cm) between the upper rim of the
container and the top of the cooking
compartment to allow sufficient steam
into the container.
– Larger and deeper containers can
be used for larger items. It is best to
space food as much as possible so
steam can surround each piece.
– Dense dishes such as casseroles, or
food such as peas or asparagus,
which have little space between
them will take longer to cook
because the steam has less space to
work in. It is best to use 2 or 3
shallow containers for these foods.
31
Cooking tips
Steaming
Food
Program
Temperature
in °F (°C)
Time in
minutes
COOK Veg
212 (100)
3-4
Cauliflower, whole
|
212 (100)
15-20
Cauliflower, florets
|
212 (100)
3-4
Broccoli, whole
|
212 (100)
10-18
Broccoli, florets
|
212 (100)
7-8
Peas
|
212 (100)
4-8
Green cabbage, shredded
|
212 (100)
4-10
Potatoes, unpeeled
|
212 (100)
15-20
Potatoes, peeled
|
212 (100)
10-15
Carrots, sliced
|
212 (100)
3-6
Carrots, whole
|
212 (100)
8-15
Brussels sprouts
|
212 (100)
8-15
Celery, sliced
|
212 (100)
8-10
Spinach
|
212 (100)
6-8
Asparagus
|
212 (100)
7-9
White cabbage, chopped
|
212 (100)
15-25
Savoy cabbage, chopped
|
212 (100)
10-15
Stuffed peppers
e
195 (90)
40-50
Tomatoes
Bio
165 (75)
2-5
Vegetables
Green beans
Note:
32
Temperatures and times in this table are for guidance only.
Cooking tips
Food
Program
Temperature
in °F (°C)
Time in
minutes
Poultry / Meat
212 (100)
80-100
Cutlets in gravy
|
212 (100)
15-20
Pork ribs
|
212 (100)
50-70
Sausage
|
205 (95)
3-5
Veal chops
|
212 (100)
6-12
Chicken breast
|
212 (100)
10-20
Chicken thighs
e
212 (100)
18-22
Cod, fillet
Fish
165 (75)
4-8
Sole, fillet
|
165 (75)
4-6
Salmon, fillet
|
165 (75)
8-12
Mussels
|
205 (95)
10-12
Trout, whole
|
165 (75)
10-18
Cod steaks
|
165 (75)
6-10
e
165 (75)
10-15
COOK Universal
212 (100)
50-60
|
212 (100)
25-35
e
212 (100)
30-40
Chicken pate
Bio
165 (75)
40-60
Fish pate
e
165 (75)
60-80
Meat and sausage
Beef stew
Fish and seafood
Mackerel, whole
Bakes
Macaroni bake
Cheesy rice bake
Apple bake
Pate
Note:
Temperatures and times given in this table are for guidance only.
33
Cooking tips
Food
Program
Temperature
in °F (°C)
Time in
minutes
COOK Universal
212 (100)
20-25
|
212 (100)
15-20
e
195 (90)
20-40
Pasta, rice and grains
Rice
Noodles
Soaking grains
Legumes
Beans, presoaked
COOK Universal
212 (100)
30-40
|
212 (100)
15-20
e
212 (100)
25-35
Potato dumplings, small
Bio
165 (75)
12-18
Potato dumplings, large
|
165 (75)
20-40
e
165 (75)
20-22
COOK Universal
212 (100)
4-10
e
212 (100)
12-15
COOK Universal
212 (100)
3-6
Apple slices
|
212 (100)
2-5
Pear halves
|
212 (100)
3-5
Peas, presoaked
Lentils, not presoaked
Side dishes
Bread dumplings
Eggs
Boiled
Casserole
Fruit
Apples
Peaches
|
212 (100)
2-4
Dried fruit
e
212 (100)
5-7
Creamy desserts, in portions COOK Universal
195 (90)
30-40
Soufflé, in portions
|
195 (90)
15-20
e
195 (90)
12-15
Desserts
Steam puddings
Note:
34
Temperatures and times given in this table are for guidance only.
Cooking tips
– You can cook on any level or on
multiple levels at a time. The cooking
time will not change.
– When cooking frozen food, e.g.
vegetables, break up large clumps
so that they cook evenly. The
cooking time is approximately the
same as for fresh vegetables.
– Since steam cooking retains flavors
so well, food should not be seasoned
until after it has been cooked.
– Fish should be cooked at 165°F
(75°C) to maintain its texture and
natural color. At this temperature you
should cook on only one level.
– To avoid any transfer of tastes
caused by moisture dripping from
above, solid containers should be
used under any perforated
containers.
– When cooking with fluids, fill solid
containers to the lower rim.
– Food like noodles or rice need to be
cooked in fluids. Rice, beans and
cereals need to be cooked in equal
amounts of food and water.
– Grease the perforated container
when cooking fish.
– Grease the solid container when
cooking eggs, e.g. scrambled eggs.
Fish can be cooked on more than
one level at 195°F (90°C). However,
when cooking at this temperature,
please note that cooking times will
be reduced by several minutes.
35
Cooking tips
Defrosting
Food to be defrosted
Program
Weight in
lb (g)
Temperature Defrost time
in °F (°C)
in
Minutes
Standing
time in
Minutes
Meat
Chopped meat
DEFROST
Chopped meat
|
Chopped meat
1
/2 lb (250 g)
125 (50)
15-20
10-15
1 lb (500 g)
125 (50)
20-30
10-15
|
2 lb (1000 g)
125 (50)
30-40
10-15
Stew
|
1
Stew
|
Stew
/2 lb (250 g)
135 (60)
20-25
10-15
1 lb (500 g)
135 (60)
30-40
10-15
|
2 lb (1000 g)
135 (60)
50-60
10-15
Liver
|
1
/2 lb (250 g)
135 (60)
20-25
10-15
Liver
|
1 lb (500 g)
135 (60)
25-35
10-15
Liver
|
2 lb (1000 g)
135 (60)
30-40
10-15
Rabbit
|
1 lb (500 g)
125 (50)
30-40
10-15
Venison
|
2 lb (1000 g)
125 (50)
40-50
10-15
Cutlets, sausages
|
1 3/4 lb
(800 g)
135 (60)
25-35
15-20
|
2 lb (1000 g)
135 (60)
40-50
15-20
Chicken legs
|
1
Turkey
|
Turkey drumsticks
Turkey drumsticks
Poultry
Chicken
/4 lb (150 g)
135 (60)
20-25
15
4 1/2 lb
(2000 g)
135 (60)
80-90
15-20
|
1 lb (500 g)
135 (60)
40-45
10-15
|
2 lb (1000 g)
135 (60)
45-55
10-15
Duck
|
2 lb (1000 g)
135 (60)
40-50
10-15
Goose
|
4 1/2 lb
(2000 g)
135 (60)
80-90
10-15
5-10
Fish
Fillet
|
3
/4 lb (300 g)
135 (60)
10-15
Trout
|
3
/4 lb (300 g)
135 (60)
15-20
5-10
Whole fish
|
2 lb (1000 g)
135 (60)
30-40
10-15
3
/4 lb (300 g)
135 (60)
20-25
10-15
3
/4 lb (300 g)
135 (60)
6-10
10-12
Vegetables
Frozen in a block,
e.g. spinach,
green cabbage
|
|
|
Fruit
Berries
e
Note: Temperatures and times given in this table are for guidance only.
36
Cooking tips
Defrosting
Frozen food can be defrosted in the
steam oven in considerably less time
than defrosting at room temperature.
^ Remove frozen food from the original
packaging and place it in a cooking
container or on the rack.
^ Select DEFROST.
^ If necessary adjust the temperature
(see table, "Defrosting").
^ Select the defrost time (see table,
"Defrosting").
^ Press Start.
Tips on defrosting
,Be careful when defrosting
poultry. Do not use the liquid from
defrosted poultry for cooking. Pour
liquid down the drain and thoroughly
wash the tray, sink and hands.
– Fish does not need to be fully
defrosted before cooking. Defrost it
so that the surface is sufficiently
thawed to take herbs and seasoning.
Fish coated with breadcrumbs
should be fully defrosted so that the
coating sticks.
– Turn, stir or separate food about
halfway through the defrosting
period.
– Allow food to stand at room
temperature after defrosting. This
standing time (see table) is
necessary to ensure that the food is
fully defrosted.
– Do not refreeze food once it has
been defrosted.
– Defrost deep frozen, precooked
meals according to the
manufacturer’s instructions.
– Defrost baked items such as pastry
or cakes in a closed freezer bag.
37
Meal planning
Preparing a whole meal
Menu suggestions
Program
Time in minutes
COOK Universal
|
23-35
10-15
1.
Veal chops and sauerkraut,
Boiled potatoes
2.
Green cabbage with smoked bacon,
Boiled potatoes
|
|
29-37
10-15
3.
Stuffed peppers,
Boiled potatoes
|
|
40-60
10-15
4.
Beef stew,
Boiled potatoes
|
|
100-140
10-15
5.
Stuffed cauliflower,
Potatoes boiled in their skins
|
|
40-50
20-40
6.
Macaroni bake,
Stewed apple with raisins
|
|
75-85
3-5
7.
Red mullet in wine & veg. sauce,
Boiled potatoes
|
|
15-20
10-15
8.
Fillets of flounder in dill sauce,
Rice
|
e
10-14
20-25
9.
Stuffed sole in a creamy sauce,
Rice with peas
Fish
|
10-12
20-25
|
|
12-18
10-15
|
e
35-45
20-25
10. Blue trout,
Parsley potatoes
11. Fish with oriental vegetables,
Rice
It is both economical and practical to cook a whole meal at the same time in the
steam oven. Only a few examples are given above. Consult the cookbook for more
information.
38
Meal planning
Preparing a whole meal
^ Press Start.
With some planning, an entire meal can
be cooked in the steam oven.
^ Set the cooking time for the food that
takes longer to cook, e.g. 30 minutes
in the above example.
^ Place cooking containers on different
levels or side by side on the rack.
^ When the tone sounds, the second
dish, the potatoes in this example,
should be placed in the oven.
^ Set the cooking time for the second
dish, e.g. 10 minutes.
^ Press Start again.
At the end of cooking a tone will sound
and both dishes can be removed.
^ Insert the drip tray at the lowest level.
In general, cooking times will vary
according to the type of food. This
means that you will need to open the
steam oven at different times to add
each dish. Calculate cooking times as
follows:
Stuffed peppers
with
Boiled potatoes
40 minutes
10 minutes
(See menu suggestion 3 in the table.)
^ First, place the dish with the longest
cooking time in the oven.
^ To calculate its cooking time, subtract
the shorter time from the longer time,
i.e. 40 minutes - 10 minutes = 30
minutes in the example given above.
39
Special uses
Canning
For detailed information on canning see
the supplied cookbook.
Canning should only be performed
by an experienced cook who has
received proper training in this
method of preserving fruit and
vegetables.
Important:
When canning in the steam oven a
maximum temperature of 208 °F
(98°C) must not be exceeded.
Program COOK Universal Q
Produce
Temp
in °F (°C)
Time
in minutes *
175 (80)
175 (80)
175 (80)
175 (80)
175 (80)
45
50
55
55
55
Berries
Strawberries
Red /
Black currants
Gooseberries
Blackberries
185 (85)
185 (85)
185 (85)
55
55
55
195 (90)
195 (90)
50
65
195 (90)
195 (90)
195 (90)
120
120
90
Fruit with stems
Apples
Pears
Vegetables
Beans
Peas
Carrots
* The given times are for 1 quart (1 l) glasses.
1 pint (0.5 l) glasses = times reduced by 15 min.
1 cup (0.25 l) glasses = times reduced by 20 min.
40
^ Put the prepared jars (all the same
size) on the rack, ensuring that they
do not touch one another.
^ Select COOK Universal and set the
recommended temperature
according to the table.
^ Set the time (see table).
^ Press Start.
Fruit with pits
Apricots
Cherries
Plums
^ Insert the drip tray at the lowest
runner and place the rack above it.
^ To make use of residual heat, wait
30 minutes after the oven has turned
off before removing the jars from the
oven.
^ Cover jars with a cloth and allow to
cool for 24 hours.
Special uses
Reheating
Blanching
The steam oven can be used to reheat
dishes.
The steam oven can also be used to
blanch vegetables to prepare them for
freezing.
^ Place the food on a flat plate and
cover it with a deeper plate or
aluminum foil.
^ Select REHEAT.
^ Select a time of between 5-8 minutes,
depending on the type of food.
^ Press Start.
^ Put the prepared vegetables
(cleaned, washed, chopped etc.) into
a perforated cooking container.
^ Place the container on the rack in the
oven and insert the drip tray at the
lowest level.
^ Blanch using COOK Universal at a
temperature of 195 °F (90 °C).
^ Set a time of 1-2 minutes.
^ Press Start.
^ Once blanched, plunge the
vegetables into cold water to cool
quickly. You can then freeze them
when they have dried thoroughly.
41
Special uses
Disinfecting baby bottles
The steam oven can be used to
disinfect baby bottles and other
containers. Check beforehand that all
parts are heat resistant to 212 °F
(100 °C).
^ Place the drip tray on the lowest
runner level and place the rack
above it.
^ Dismantle, clean and thoroughly
rinse the bottles. Space the individual
parts out on the rack, ensuring that
they do not touch one another. This
allows the hot steam to reach all
sides.
^ Select COOK Universal. The
recommended temperature of 212 °F
(100 °C) is suitable for disinfection.
^ Set a time of 15 minutes.
^ Allow to dry naturally and use as
soon as possible after disinfection.
All parts of the bottles must be
completely dry before they are
reassembled.
42
Cleaning and care
Let the appliance cool before
cleaning. Clean and dry the steam
oven after each use.
Close the door only after the cooking
compartment is completely dry.
Never use a steam cleaner to clean
the appliance. Pressurized steam
could damage electrical
components and cause a short
circuit.
Never use cleaners containing sand,
silica, soda, chlorides or scouring
agents. Hard brushes, scouring
cloths, steel wool and other abrasive
materials should not be used.
Appliance front
The front of the appliance and the
control area can be cleaned with a
sponge and a solution of warm water
and non abrasive liquid detergent. Dry
with a soft cloth.
Stainless steel
Stainless steel surfaces can be cleaned
using a non-abrasive stainless steel
cleaner.
To help prevent soiling, a conditioner
for stainless steel can also be used.
Apply sparingly with even pressure.
Stainless steel colored controls
Clean the buttons and knobs with a
sponge and a solution of warm water
and liquid soap.
These controls may become discolored
or damaged if not cleaned regularly.
Do not use a stainless steel cleaner on
the knobs or buttons.
Drip tray, rack and cooking
containers
The drip tray, rack and cooking
containers should be washed and dried
each time they are used.
They can be washed in the dishwasher.
43
Cleaning and care
Removable door and drip plate
Removing the door will make it easier to
reach into the oven interior to remove
the drip plate, w.
^ Open the door fully.
^ While holding the door with both
hands, lift the door until the hinges
disengage. Remove the door.
^ Flip up the clamps at the front of the
door hinges.
^ Slowly close the door until the clamps
are touching the frame of the oven
interior.
^ If necessary the drip plate, w, can
be removed for cleaning. After
cleaning, dry it and slide back into
the oven with the cut-out to the rear.
To refit the door:
^ Place the door on the hinges and
slide down.
^ Open the door fully and push the
clamps back down.
^ Close the door.
44
Cleaning and care
Cooking compartment
Runners
The cooking compartment including the
door seal and the steam oven door
should be cleaned after each use.
Allow the oven to cool before cleaning.
The side runners can be removed
before cleaning the cooking
compartment.
Most cooking residues can be easily
removed using a sponge, liquid
detergent and warm water.
Wipe the interior with clean water and
dry with a soft cloth.
^ Pull on the knobs to release the
runners, a. Then pull each runner
out of the oven, b.
The runners can be cleaned with water
and liquid detergent or in a dishwasher.
To refit the runners, reverse the above
steps. Insert them into the rear of the
oven and push in at the sides.
45
Cleaning and care
Connector
To replace the valve insert t
^ Insert the pointed end of the tool (see
"Accessories") into the valve insert
and pull the valve out.
The connector on the water container
consists of a valve insert, t, and an
O-Ring, u. There is also a connector
on the appliance itself, this however
only consists of the valve insert, t.
From the water container, and
The valve insert and/or the O-ring may
need replacing if:
– an unusually large amount of water
collects in the bottom of the
appliance where the water container
connects to the valve.
– a tone sounds and the symbol for
insufficient water is lit, even though
the water container is full and placed
correctly.
46
from the appliance.
Cleaning and care
^ Attach a new valve insert, t, to the
blunt end of the special tool.
^ Insert this into the opening of the
connector.
O-Ring
Over time the water container may
become difficult to insert and remove
from the appliance.
Make sure that the sealing ring on the
valve insert is at the front.
^ Press the valve insert firmly into
position using the blunt end of the
tool.
If this happens the black O-Ring, u,
should be lubricated with a very small
amount of the silicone grease supplied.
Leave the O-Ring on the connector
while doing do.
Take care when using silicone
grease.
– Remove any silicone grease
from your skin by washing with
soap and water.
– If silicone gets into the eyes
flush with plenty of clean water.
– If silicone is swallowed seek
medical attention.
When lubricating the O-Ring only use
the silicone grease supplied. Never use
margarine, oil, or any other grease or
fat on the O-Ring because they will
cause deterioration.
47
Cleaning and care
To change the O-Ring u on the water
container:
Descaling lock
If j 5 appears for a short time in the
display after selecting a program the
appliance needs to be descaled.
^ Lay the water container on its side.
^ Use a knife or small screwdriver to
get underneath the O-Ring.
^ Pull the old O-Ring off.
^ Slide the new O-Ring on to the
connector. Then lubricate it with the
silicone grease supplied.
The display indicates that the appliance
can be used 5 more times before it will
lock. If the appliance is not descaled
immediately a 4 will appear in the
display the next time the appliance is
used, and so on.
If the display shows a j 0, the
appliance is locked and a tone will
sound.
The machine cannot be used until the
descaling program has been run.
48
Cleaning and care
Descaling
Only use citric acid agents for
descaling.
Do not use vinegar or descaling
agents containing vinegar or acetic
acid; they will damage the
appliance.
A small j will appear in the display
next to the symbol for descaling k and
a program time of 33 minutes will also
appear. At the same time the light bar
between the Stop and Start buttons
will illuminate.
^ Use a household descaling agent
containing citric acid diluted with
water to make 1 quart (1 l) of solution,
or contact Miele to order descaling
tablets. Follow the manufacturer’s
instructions.
^ Place the solution in the water
container and push it into the
machine until it engages.
^ Turn the program selector to
DESCALE k.
^ Press Start.
The descaling program can only be
canceled during the 1st minute after
pressing the Start button. A new
program cannot be selected until the
descaling program has been
completed.
Do not turn the program selector
during the descaling process. If it is
turned before the end of the
program the entire process will have
to be restarted.
49
Cleaning and care
When 8 minutes show in the display a
tone will sound and the following will
alternate in the display:
Be careful of hot steam when
opening the door.
^ Take the water container out of the
appliance, empty and dry with a soft
cloth.
^ Wipe out the oven interior with an
absorbent cloth. Remember to wipe
down the vent and the drip channel.
^ Empty the water container and refill
with 1 quart (1 l) of fresh tap water,
reposition it in the appliance and shut
the door.
^ Press Start.
This procedure must be repeated two
more times when the tone sounds.
Do not be surprised at the amount of
steam that is emitted.
At the end of the process the
following will appear in the display:
^ Leave the door open until the
moisture in the cooking compartment
has evaporated and the interior is
dry.
If there is a power failure during the
descaling process, 33 minutes will
show in the display once power has
been restored. The light bars between
the Stop and Start buttons will come on.
^ To continue the process press the
Start button.
If the program selector is moved
during a power failure, the display will
remain dark after power has been
restored and the light bar between the
Stop and Start buttons will flash.
^ Turn the selector back to the
DESCALE k position and press the
Start button.
^ Turn the program selector to "0".
^ Wait until the appliance has pumped
any remaining water back into the
water container before opening the
door.
50
Frequently asked questions
Maintenance and repair work should
be by a Miele authorized service
technician. Work by unqualified
persons could be dangerous and
may void the warranty.
What to do if ...
... the fan can still be heard after the
appliance has been turned off?
The appliance has a fan which removes
steam from the oven.
The fan will continue to run for a while
after the oven has been turned off.
... a great deal of steam comes out of
the appliance while it is in use?
It is possible that the appliance was not
thoroughly rinsed during the
"Descaling" program before it was used
for the first time.
Refer to "Setting the altitude" and carry
out the procedure as described.
If this does not solve the problem, call
the Miele Technical Service
Department.
... steam escapes out of a closed
appliance door or any other part of
the steam oven?
... the appliance does not heat?
Check whether the door seal:
Check whether:
– is seated correctly. If necessary,
press it in all the way around the
door to make sure it is seated.
– the Start button has been pressed.
– the safety lock has been activated.
– the Overheating Protection has been
triggered (see, "Overheating
Protection").
– shows any signs of wear and tear,
(e.g. cracks). If so it must be
replaced. Call the Miele Technical
Service Department.
– the circuit breaker has tripped.
– the fuse has blown.
If one of these is not the cause then
disconnect the appliance from the
power supply for about 1 minute, by
switching off the power main or tripping
the circuit breaker.
Reconnect the power and turn the
appliance on. If it still does not heat,
contact the Miele Technical Service
Department.
51
Frequently asked questions
... the following symbols and figures
appear in the display and a tone
sounds:
... the oven cavity temperature and
the temperature symbol are flashing
in the display:
p j: Insufficient water
There was a power failure during a
program. Press Start.
Check whether:
– the water container has been pushed
in as far as it will go.
– there is sufficient water in the water
container.
– any parts of the connector are
deteriorated or broken and need
replacing.
See "Connector" section for details.
k j 0: The appliance has locked and
requires descaling (see "Descaling").
52
... after turning the appliance off
(program selector at the "0" position)
a continual tone is heard and F1
appears in the display?
Check whether the water container is in
the appliance to accept residual water
being pumped back out of the oven.
Electrical connection
All electrical work should be by a
licensed electrician, in strict
accordance with national and local
safety regulations and standards.
^ Note to installer:
Please leave these instructions with
the consumer.
^ Power supply:
Please check the data plate for
verification of:
240 VAC, 60 Hz, 15A,
L1, L2, Ground.
Caution:
Disconnect the main power supply
before servicing. To reduce the risk
of electric shock, make sure that the
appliance is properly grounded after
installation.
WARNING : THIS APPLIANCE
MUST BE GROUNDED
For USA only
The appliance is provided with 3
terminal leads, 1 black wire (L1), 1 red
wire (L 2) and 1 green wire (GND)
which have to be connected to a
dedicated junction box. Connect the
black wire to L1, the red wire to L2 and
the green wire to GND.
ALSO SEE THE WIRING DIAGRAM
PROVIDED WITH THE APPLIANCE.
For CDN only
The appliance is provided with 3
terminal leads, 1 black wire (L1), 1 red
wire (L 2) and 1 green wire (GND)
which have to be connected to a
dedicated junction box. Connect the
black wire to L1, the red wire to L2 and
the green wire to GND.
All hot wires (black and red) have to be
fused individually before connecting
them to the main power supply leads.
Use 15 Amp fuses or circuit
breakers for appliances rated 240
VAC.
ALSO SEE THE WIRING DIAGRAM
PROVIDED WITH THE APPLIANCE.
53
After sales service
In the event of a fault which you cannot
correct yourself please contact the
Miele Technical Service Department
USA 1-800-999-1360
[email protected]
CDN 1-800-565-6435
[email protected]
When contacting the Technical Service
Department, please quote the model
and serial number of your appliance.
These are shown on the data plate.
Data Plate
Please attach the data plate in the space provided below.
54
Help protect our environment
Disposal of packing materials
Disposal of an old appliance
The cardboard box and packing
materials are biodegradable and
recyclable. Please recycle.
Old appliances contain materials that
can be recycled. Please contact your
local recycling center about the
possibility of recycling these materials.
Disposal of an old appliance
Ensure that any plastic wrap, is
disposed of safely and kept out of the
reach of children. Danger of
suffocation!
Before discarding an old appliance,
disconnect it from the electricity supply,
cut off the power cord and remove any
doors to prevent hazards.
55
Alteration rights reserved / 4504
M.-Nr. 05 229 041 / 01