1
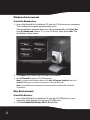
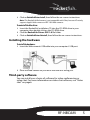
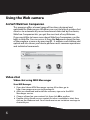
Notebook Web Camera
RF-NBCAM
User Guide
Rocketfish RF-NBCAM
Notebook Web Camera
Contents
Important safety instructions ..................................... 2
Web camera components ............................................ 3
Setting up the Web camera ......................................... 3
Using the Web camera................................................... 6
Legal notices ..................................................................... 8
One-Year Limited Warranty........................................11
Important safety instructions
Do not attempt to open the Web camera. Doing so voids your
warranty.
Do not allow moisture of any kind to come in contact with the Web
camera. Keep away from humidity and never immerse in water.
Do not drop the Web camera. A severe jolt may cause permanent
damage and is not covered by your warranty.
Place the Web camera on a flat, stable surface before setting it up.
Follow this User Guide carefully and keep it for future reference.
Follow the correct procedures when setting up the Web camera.
Have the Web camera checked by a service technician if any the
following conditions are true:
•
•
•
•
2
The Web camera has been exposed to moisture
The Web camera has been dropped and damaged.
The Web camera has obvious signs of breakage.
The Web camera is not working correctly or you can’t get it to work
according to this User Manual.
Web camera components
1
2
3
4
5
Item
Description
Function
1
Snapshot button
Use to capture still images.
2
LED indicator
Turns on when the Web camera is connected.
3
Lens
Provides the image to the Web camera.
4
Microphone
Provides sound reception for the Web camera.
5
Removable base
The base can be removed so you can clip the camera to your
notebook computer.
Setting up the Web camera
Installing the driver
Note: Install the driver first, then connect the Web camera to a USB port on your
computer.
RF-NBCAM
3
Windows Environment
To install the Windows driver:
1 Insert the Rocketfish Installation CD into the CD drive in your computer.
The installation program automatically starts.
If the installation program does not start automatically, click Start, Run,
type D:\Setup.exe (where “D” is your CD drive), then press Enter. The
installation screen opens.
2 Click Driver, then follow the on-screen instructions.
3 Install DirectX from the CD, if necessary.
Note: To remove the Windows driver, click Start, All Programs, Rocketfish, then click
Uninstall. Follow the on-screen instructions to remove the driver.
Note: Arcsoft Webcam Companion is automatically installed after the driver
installation.
Mac Environment
To install the Mac driver:
1 Insert the Rocketfish Installation CD into the CD-ROM drive in your
computer, then double click on the CD-ROM drive.
2 Click the Rocketfish Driver OSX 1.0 file folder.
4
3 Click on Rocketfish Driver Install, then follow the on-screen instructions.
Note: This Rocketfish Web camera is not compatible with iChat, because iChat only
supports Apple’s Web cameras or IEEE 1394 Web cameras.
To uninstall the Mac driver:
1 Insert the Rocketfish Installation CD into the CD-ROM drive in your
computer, then double click on the CD-ROM drive.
2 Click the Rocketfish Driver OSX 1.0 file folder.
3 Click on Rocketfish Driver Uninstall, then follow the on-screen instructions.
Installing the hardware
To install the hardware:
1 Insert the Web camera’s USB cable into your computer’s USB port.
2 Place the Web camera on your desk with the lens facing you.
Third-party software
You can install your choice of software for video conferencing or
video chat. For more information on video chat software, see “Video
chat” on page6.
RF-NBCAM
5
Using the Web camera
ArcSoft WebCam Companion
This program offers a broad range of functions designed and
optimized for Webcam use. Whether you use it to launch a video chat
client or to automatically record movement detected by the device,
WebCam Companion lets you get the most out of any Webcam.
If you would like to know more about WebCam Companion, use the
built-in Help file. You can access it from the Help menu along the top
of the program screen or by pressing F1. It explains each button and
option and also shows you how to perform most common operations
and individual commands.
Video chat
Video chat using MSN Messenger
To use MSN Messenger:
1 If you don’t have MSN Messenger version 6.0 or later, go to
http://messenger.msn.com to download it.
2 After you download and install the software, sign on to the MSN
Messenger service.
3 Choose a friend on your contact list, then click OK to confirm.
4 Double-click a friend on your contact list who is available to chat, then
click on the Webcam icon. Your friend receives an invitation message to
chat with you.
6
5 When your friend accepts, the video chat starts.
For additional information, go to http://messenger.msn.com .
Video chat using Yahoo Messenger
To use Yahoo Messenger:
1 If you don’t have Yahoo Messenger, go to http://messenger.yahoo.com
to download it.
2 After you register, download, and install the software, sign on to the
Yahoo Messenger service.
3 From the main window, click Tools, then select Start My Webcam.
4 Right-click on a friend’s name in your Messenger List, then choose View
Webcam. Your friend receives an invitation message to chat with you.
5 When your friend clicks YES, the video chat starts.
For additional information, go to http://messenger.yahoo.com .
Video chat using AOL Instant Messenger
To use AOL Instant Messenger:
1 If you don’t have AOL Instant Messenger, go to http://www.aim.com to
download it.
2 After you register, download, and install the software, sign on to the AOL
Instant Messenger service.
3 Click Show Messenger Lists, then choose the friend you want to video chat
with. Your friend receives an invitation message to chat with you.
4 When your friend accepts, the video chat starts.
For additional information, go to http://www.aim.com .
Adjusting Skype settings
To adjust Skype settings:
1 Open the Skype program and click Tools, Options, then Sound Devices.
2 Uncheck the Enable automating sound-device setting adjustment box.
Changing the Windows sound configuration
To change the Windows sound configuration:
1 Click Start, Programs, Accessories, Entertainment, then Volume Control.
RF-NBCAM
7
2
3
4
5
6
- OR Right-click the loudspeaker icon in the system tray. The Volume Control
menu opens.
Click Options, Properties, then click the Microphone button.
Check Microphone, then click OK.
In the Volume Control main menu, click Options, Advanced Properties, then
click the Advanced button under the Microphone slider.
Click Mic Boost, if available, then click Close.
Set the microphone volume manually to 50% or greater (ignore the fact
that the microphone is muted - it is controlled by Skype).
For additional information, go to http://www.skype.com .
Legal notices
FCC statement
United States Regulatory Information
This device complies with part 15 of the FCC Rules. Operation is
subject to the following two conditions: (1) This device may not cause
harmful interference, and (2) this device must accept any interference
received, including interference that may cause undesired operation.
ICES-003 Statement:
This Class B digital apparatus complies with Canadian ICES-003. Cet
appareil numérique de la classe B est conforme à la norme NMB-003
du Canada.
RSS Statement:
Operation is subject to the following two conditions : (1) this device
may not cause interference, and (2) this device must accept any
interference, including interference that may cause undesired
operation of the device.
8
Copyright
© 2008 Rocketfish. Rocketfish and the Rocketfish logo are trademarks
of Best Buy Enterprise Services, Inc. Other brands and product names
are trademarks or registered trademarks of their respective holders.
Specifications and features are subject to change without notice or
obligation.
For service and support call 1-800-620-2790.
RF-NBCAM
9
10
One-Year Limited Warranty
Rocketfish Products (“Rocketfish”) warrants to you, the original purchaser of this new
RF-NBCAM (“Product”), that the Product shall be free of defects in the original manufacture of
the material or workmanship for one (1) year from the purchase of the Product (“Warranty
Period”). This Product must be purchased from an authorized dealer of Rocketfish brand
products and packaged with this warranty statement. This warranty does not cover refurbished
Product. If you notify Rocketfish during the Warranty Period of a defect covered by this
warranty that requires service, terms of this warranty apply.
How long does the coverage last?
The Warranty Period lasts for one year (365 days), beginning on the date you purchased the
Product. The purchase date is printed on the receipt you received with the product.
What does this warranty cover?
During the Warranty Period, if the original manufacture of the material or workmanship of the
Product is determined to be defective by an authorized Rocketfish repair center or store
personnel, Rocketfish will (at its sole option): (1) repair the Product with new or rebuilt parts; or
(2) replace the Product at no charge with new or rebuilt comparable products or parts. Products
and parts replaced under this warranty become the property of Rocketfish and are not returned
to you. If service of Products and parts are required after the Warranty Period expires, you must
pay all labor and parts charges. This warranty lasts as long as you own your Rocketfish Product
during the Warranty Period. Warranty coverage terminates if you sell or otherwise transfer the
Product.
How to obtain warranty service?
If you purchased the Product at a retail store location, take your original receipt and the Product
to the store you purchased it from. Make sure that you place the Product in its original
packaging or packaging that provides the same amount of protection as the original
packaging. If you purchased the Product from an online web site, mail your original receipt and
the Product to the address listed on the web site. Make sure that you put the Product in its
original packaging or packaging that provides the same amount of protection as the original
packaging.
Where is the warranty valid?
This warranty is valid only to the original purchaser of the Product in the United States, Canada,
and Mexico.
What does the warranty not cover?
This warranty does not cover:
• Customer instruction
• Installation
• Set up adjustments
• Cosmetic damage
RF-NBCAM
11
• Damage due to acts of God, such as lightning strikes
• Accident
• Misuse
• Abuse
• Negligence
• Commercial use
• Modification of any part of the Product, including the antenna
This warranty also does not cover:
• Damage due to incorrect operation or maintenance
• Connection to an incorrect voltage supply
• Attempted repair by anyone other than a facility authorized by Rocketfish to service the
Product
• Products sold as is or with all faults
• Consumables, such as fuses or batteries
• Products where the factory applied serial number has been altered or removed
REPAIR REPLACEMENT AS PROVIDED UNDER THIS WARRANTY IS YOUR EXCLUSIVE REMEDY.
ROCKETFISH SHALL NOT BE LIABLE FOR ANY INCIDENTAL OR CONSEQUENTIAL DAMAGES FOR
THE BREACH OF ANY EXPRESS OR IMPLIED WARRANTY ON THIS PRODUCT, INCLUDING, BUT
NOT LIMITED TO, LOST DATA, LOSS OF USE OF YOUR PRODUCT, LOST BUSINESS OR LOST
PROFITS. ROCKETFISH PRODUCTS MAKES NO OTHER EXPRESS WARRANTIES WITH RESPECT TO
THE PRODUCT, ALL EXPRESS AND IMPLIED WARRANTIES FOR THE PRODUCT, INCLUDING, BUT
NOT LIMITED TO, ANY IMPLIED WARRANTIES OF AND CONDITIONS OF MERCHANTABILITY AND
FITNESS FOR A PARTICULAR PURPOSE, ARE LIMITED IN DURATION TO THE WARRANTY PERIOD
SET FORTH ABOVE AND NO WARRANTIES, WHETHER EXPRESS OR IMPLIED, WILL APPLY AFTER
THE WARRANTY PERIOD. SOME STATES, PROVINCES AND JURISDICTIONS DO NOT ALLOW
LIMITATIONS ON HOW LONG AN IMPLIED WARRANTY LASTS, SO THE ABOVE LIMITATION MAY
NOT APPLY TO YOU. THIS WARRANTY GIVES YOU SPECIFIC LEGAL RIGHTS, AND YOU MAY ALSO
HAVE OTHER RIGHTS, WHICH VARY FROM STATE TO STATE OR PROVINCE TO PROVINCE.
Contact Rocketfish:
For customer service please call 1-800-620-2790
www.rocketfishproducts.com
Distributed by Best Buy Purchasing, LLC
7601 Penn Avenue South, Richfield, Minnesota, U.S.A. 55423-3645
© 2008 Best Buy Enterprise Services, Inc.
All rights reserved. ROCKETFISH is a trademark of Best Buy Enterprise Services, Inc. Registered in
some countries. All other products and brand names are trademarks of their respective owners.
12
RF-NBCAM
13
14
RF-NBCAM
15