1
Owner's Use and Care Guide
Guide d'utiliser et soins de Proprietaire
Model • Modele
DDR30A1GP, DDR45A1GP
CAUTION:
PRECAUTION: Veuillez
Read and follow all
lire attentivement les
safety rules and operating consignes de securite et les
instructions before first
directives d'utilisation
use of this product.
avant 1'utilisation initiale
de ce produit.
PORTABLE DEHUMIDIFIER
Owner's Use and Care Guide
•Welcome
• Important Safety Information
• Installation Instructions
• Features
• Operating Instructions
• Care and Maintenance
• Troubleshooting
• Warranty
• .• . • .• . • .• . • .• . • .• . • .• . • .• . • .• . • .• . • ..... 1- 10
,
DESHUMIDIFICATEUR PORTATIF
Guide d'utilisation et soins de Proprietaire
• Bienvenue
• Consignes de Securite lmportante
• Consignes d'installation
• Caracteristiques
• Consignes de Fonctionnement
• Soins et Entretien
• Depannage
• Garantie
...............................11 - 20
KEEP THESE INSTRUCTIONS FOR FUTURE REFERENCE: If the Dehumidifier changes
ownership, be sure this manual accompanies the unit.
CONSERVER CES INSTRUCTIONS POUR CONSULTATION ULTERIEURE: En cas de revente du
deshumidificateur, ce manuel doit etre inclus avec l'appareil.
Danby Products Limited, Guelph, Ontario, Canada NIH 6Z9
Danby Products Inc. Findlay, Ohio, U.S.A.45840
v. 1.11.10 JF
WELCOME
Thank you for choosing a Danby appliance to provide you and your family with all of the "Home Comfort"
requirements of your home, cottage, or office. This Owner's Use and Care Guide will provide you with
valuable information necessary for the proper care and maintenance of your new appliance. If properly
maintained, your Danby appliance will give you many years of trouble free operation. Please take a few
moments to read the instructions thoroughly and familiarize yourself with all of the operational aspects of this
appliance.
This unit can be conveniently moved from room to room within your home and set up in just minutes.
For easy reference, may we suggest you attach a copy of your sales slip/receipt to this page, along with the
following information, located on the rear wall of the water tank compartment.
Model Number:
_
Serial Number: -----------Date of Purchase: ----------This information will be necessary if your unit requires servicing and/or for general inquiries.
To contact a Customer Service Representative, call Danby TOLL FREE:
1-800-26- Danbr
(1-800-263-2629)
KEEP THESE INSTRUCTIONS FOR FUTURE REFERENCE.
meAUTION:Do not leave this unit unattended or operate in an area where people or animals may
not be able to react quickly.A failed unit may cause over-heating, resulting in personal injury or
property damage.
IMPORTANTSAFETYINFO TION
NOTE
The WARNING instructions issued in this manual are not meant to cover all possible conditions and situations
that may occur. It must be understood that common sense, caution, and carefulness are factors that cannot be
built into all appliances. These factors must be supplied by the person(s) installing, maintaining, or operating
the appliance. Failure to install, maintain, and/or operate the equipment according to the manufacturer's
instructions may result in conditions which can produce bodily injury and/or property damage. Contact your
dealer, service agent, or the manufacturer about any problems or conditions you do not fully understand.
For Danby Customer Service calll-800-26-Dallb.r (1-800-263-2629)
ELECTRICAL To reduce the risk of fire, elecrric shock, or personal injury, all wiring and grounding
REQUIREMENTS must conform with the latest edition of Local and National Electricarcodes.
• It is the customer's responsibility to have the wiring and fuses checked by a qualified electrician to make
sure adequate electrical power is available.
• This appliance is designed to operate on a separate branch, polarized, three-wire, effectively gr<?unded 120
Volt 60Hertz (alternatin_g current) circuit protected by a 15 ampere fuse 1 equivalent fuse or circuit breaker.
The three-prong groundii:tg plug on the power cord should be p1ugged directly into a polarized, three slot,
effectively grounded receptacle rated 1f0/120 V.A.C.
FOR YOUR SAFETY: To reduce the risk of fire or explosion, do not store or use gasoline or other
flammable vapors or liquids in the vicinity of this or any other appliance.
GROUNDING hnpro_per connection of the equipment-grounding conductor can result in a risk of
INSTRUCTIONS electrical shock. Chek with a qUalified electrician or serviceman if you are in doubt as
to whether your appliance outlets are properly grounded.
• This appliance must be unded. In the event of malfunction or breakdown, grounding will reduce the risk of
electrical shock by providing a path of least resistance for electrical current. This appliance is equipped with a
cord having an equipment-grouniling conductor and 3 prong grounding plug. The plug must be connected into
an outlet that is properly installed and grounded in accordance with all local codes and ordinances.
• Do not modify the plug provided with this appliance. If it will not fit the outlet, have a proper outlet installed
by a qualified electrician.
• If the household electrical supply does not meet the above specifications, or it you are not sure your home
has an effective ground, have a qualified electrician or your local electrical utility company check it and
correct any problems.
SAVETHESEINSTRUCTIONS!
INSTALLATION INSTRUCTIONS
LOCATION
• Select a suitable location, making sure you have easy access to an electrical outlet (avoid the use of
extension cords). If it is absolutely necessary to use an extension cord, use an approved "air conditioner"
heavy duty extension cord ONLY (available at most local hardware stores).
• Make sure there are no obstructions restrictiog airflow through the front air intake grill. Maintain a minimum
clearance of at least 20 em (8'') between adjacent walls and the back of the
to allow for proper air
circulation and maximum efficiency. To obtain maximum operating efficiency rrom_your deliurmdifier, the
recommended (room ambient) operating temperatures should be between 6°C (42.80f')- 35°C (95°F).
uni;
• It is important to remember the efficiency of a dehumidifier will be effected/influenced by the rate at which
new humid air (moisture) is allowed to infiltrate the same space/area. To maintain efficiency, the dehumidifier
must be operated in an enclosed area. Keep all doors and wmdows closed.
FEATURES
• Soft touch (Electronic) Control Key Pads
• Full Bucket Indicator Light
• Auto-Sensing Humidity Control
• Easy Roll Castors (4)
• Adjustable Humidity Settings (30% - 90%)
• Front Mounted Water Tank (Removable)
• 2 Fan Speed Settings (High I Low)
• Direct Drain Option
• Delay Start Protection (Compressor)
• Quiet Operation
• Auto-Defrost (De-Icer)
• Removable Air Filter
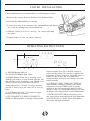
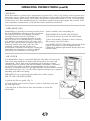
Control Panel
Handle
Dehumidified
Dry Air Vent
Drain Bucket
Castors
Continuous
Drain Outlet
CASTER INSTALLATION
Caster installation is recommended to avoid damage to floors.
!.Remove the casters from the bucket of the dehumidifier.
2. Position the dehumidifier on its side.
3. Locate the arrow on the bottom of the dehumidifier and insert
the caster according to the arrow direction.
4. Slide the caster in as far as it will go. The caster will snap
into place.
5. Repeat steps 1 to 4 for the other 3 casters.
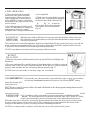
OPERATING INSTRUCTIONS
7
6
5
0 -1'
8--+-- -
1
00
2
3
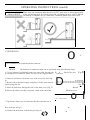
1) POWER Button:On I Off
2) FAN SPEED Button: High I Low
3) TIMER Button: When unit is operating, press
TIMER to set number of hours desrred until unit will
shut off.When unit is in stand-by, press TIMER to set
number of hours desired until unit will tum on.
Setting timer from 1-24 hours. To cancel the timer,
proceed as above but set the ''timer off'' to zero (0)
hours.
4) °CfOF Button:Press the 0C/°F button to toggle
between Celsius and Fahrenheit.
5) SET HUMIDITY/CURRENT HUMIDITY
DISPLAY:When machine is running, it displays the
4
current humidity. Press UP or DOWN buttons to
select humidity setting. The humidio/ is adjusted in
increments of 5% by each press. Adjustable range is
within 30% RH to 90% RH. 10 seconds after
setting humidity, the display will change back to the
current humidity.
6) CURRENT TEMP/ TIMER SET DISPLAY:
When machine is running, it displays the current
temperature. Press the TIMER outton to set the
machine to shut off automatically after SJ?ecified
amount of time. 10 seconds after displaymg the timer,
the display will change back to current tempetauture.
7) DEFROST LIGHT:When temperature is low,
unit enters defrost mode and defrost light illuminates.
8) BUCKET FULL LIGHT: When water tank is
full, bucket full light illuminates.
OPERATING INSTRUCTIONS (cont'd)
START OPERATION
1) Place the product in an upright
position on a flat, stable, ana neatresistant surface. Make sure there is
nothin2 flammable or heat sensitive
within ,oocm (39 inches).Onerating
the product in any other position coUld
cause a hazard
2) Insert the plug into a suitable wall
socket. The dehUmidifier is suitable for
ratingon an electricity supply
having tlie same voltage as tliat showm
on its rating label.
3) Make sure the water tank is correctly
located. After switchinon the machine
for the first time, if the 'Bucket Full''
L
l] :t' t;rer is
able to move freely, then return the
water tank to the correct position
(Fig. 1).
WATER FULL
INDICATOR
LIGHT (RED)
When the water tank is full and/or incorrectly positioned inside the cabinet, the water
full red light turns on and remains on until such time that the tank is emptied and/or
correctly re-positioned
This condition will result in the immediate shut down of the dehwnidifving system (both com_pressor and fan
motor erations are terminated).This is a safety feature. When the walerfarik is emptied andlor correctly
re-positioned, the dehumidifier Will resume operation automatically.
NOTE:It may take several minutes before operating conditions resume.
BUCKET
FULL LIGHT
• When the water tank is full the machine will stop and the"Bucket Full,light will
illuminate.
• The water tank should be carefully removed from the machine by slid4tg it outward
from the front of the unit, and it shOuld be emptied. When the eJ!!P.1y tank: is replaced
properly in the machine, the unit will start up and run normally (¥ig. 2).
NOTE:Please use both hands to carefully empty the water tank.
ALCTTSOERTYTING Each time the unit is disconnected/re-connected and/or in the event of a power failure,
DEFAFU
the electronic circuitboard automatically defaults to 1he following factorY setting:
Humidity Setting:60%
Fan Speed:Low
NOTE:In te event of a power failure, the unit will default to the last program setting that was used
when power ts restored.
WATER TANK ProJJC!: installation of the water tank is crucial in maintaining reliable dehumidifier
OPERATION
on. The water tank holds accumulated condensed water anc;!>Y means of a safety
switch, controls both the water level and operation of the dehumidification process.
When the water tank. is full and/or accidentally displaced inside the cabinet, the float switch actuator (inside
the tank) breaks contact with the safety switcli.This condition results in the immediate shut down of the
compressor and fan motor system, preventing moisture from being condensed.
NOTE:Never tamper with or attempt to defeat the water level (safety) float switch system.
OPERATING
OPERATING INSTRUCTIONS
INSTRUCTIONS (cont'd)
DEFROST
When the machine is operated at low temperatures (less than l8°C) (64.4°F), the surface of the evaporator may
accwnulate a layer of frost which would reduce the efficiency of the machine. When this hap ens the machine
will go into penodic defrost mode. The machine will operate in temperatures down to 5°C(41' F).The time taken
to deirost may vary. If the machine freezes up, it should be turned off at the power supply and re-started. If the
room temperature remains below 5°C(410f) the machine should be switched off.
DEHUMIDIFYING
Dehumidifyjng is a means of removing moisture from
the air. A dehumidifier will help to protect your home
and valued possessions from damage (swelling)
caused by moisture in the air. Essentially a
dehumidifier removes moisture from the air as the
moist air passes over a dehumidifying (evaporator)
coil. Moisture is condensed on the eva orator coill
drained, and collected inside an internal (removab e)
water tank located at the front of the unit. The
exhausted air being returned into the room
environment is elevated several degrees, causing the
surrounding air temperature to increase (slightly).
This process also contributes to lowering ilie
relative humidity of the surrounding air.
DEHUMIDIFYING MODE SELECTION:
1) To turn the unit on, press the ON I OFF button.
2) Press the humidity or buttons to select a desired
RH operating value (30%-90%).
FAN SPEED SELECTION:Select a fan speed on the
keypad. The speed you select is identified by the
(illummated) indicator light located directly above the
selection made.
AIR FILTER
Your dehumidifier features a removable Air Filter. This filter is located at the
front of the unit (behind the air intake grill) directly above the water tank
compartment. The air filter plays an important role in helping to reduce
(mirumize) dust/dirt particles :fiom the surrounding environment. A blocked I
cl ed arr filter reduces air intake, impacting!legatively on operating
efficiency. To maintain maximwn operating efficiency, the filter must be checked
and cleaned reguJ.arly (every 2 wee:Ks). More frequent cleaning may be required
depending upon indoor air quality.
IMPORTANT: Never operate the unit without the air filter in place.
AIR FILTER CLEANING STEPS:
1) Pull the air filter out gently (Fig. 3).
2) Clean the filter with a vacuwn cleaner, or wash it with clean water and
diy with a dry cloth.
3) Put the clean air filter back in place and continue to operate the
dehumidifier.
Fig.4
OPERATING INSTRUCTIONS (cont'd)
.
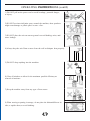
INSTALLING PVC When using the continuous drain function, the PVC hose must be placed horizontally
DRAIN HOSE
below the drainage hole. Avoid uneven ground and folding the hose. NOTE:Should
, you damage or rmsplace the pvc drain hose, a standard garden hose can be used.
CONTINUOUS
0 ·
hose to connect to the continuous drain connector.
DRAIN
The function of continuous drain can be performed using the following steps:
1) To save having to periodically empty the water tank, this unit can D · h
Back of the unit
be configured for continuous dririn. You can use the supplied drain
ram\i(se
2) Unscrew and remove the drain cover at the rear of the unit (Fig.
A).
3) Remove the soft rubber stopper, and place it in the water tank for
safe keeping (Fig. B).
4) Insert the drain hose through the hole of the drain cover (Fig. C).
D
cover
;;;;;;;; ============
IFig. Bl
5) Ensure the rubber seal ring is properly seated in the end of the
bber
_,.Drain cover
L Drain_·
o l
co-ver J-
7) Tig]:lten the drain cover in clockwise direction onto the rear of
hose as shown in Fig. C.
6) Connect the drain hose to the drain port (Fig. D).
IFig AI
w
the unit (Fig. D).
hose- -
,_ \\
8) Place the bucket in its original location (Fig. E).
IFig.Dl
'm--- J';;!II
Drain..
+
Drain cover
hose
1Fig. El
0-Bucket
OPERATING CAUTIONS
INSTRUCTIONS (cont'd)
1) DO NOT pull on the power cord to avoid breakage, potential danger,
or injury.
2) DO NOT use insect/oil/paint spray around the machine; these products
might cause damage to plastic parts or start a fue.
3) DO NOT place the unit on uneven ground to avoid shaking, noise, and
water leakage.
4) Always keep the unit 20cm or more from the wall to dissipate heat properly.
20cm
5) DO NOT drop anything into the machine.
6) Close all windows to allow for the masimum possible efficiency or
removal of moisture
7) Keep the machine away from any type of heat source.
8) When moving or putting in storage, do not place the dehumidifier on its
side, or upside down, to avoid shaking.
fiJ !!
CARE AND MAINTENANCE
CLEANING
CAUTION: Before attempting to clean and/or service this unit, always disconnect the
power supply cord from the electrical supply outlet.
1) DO NOT use oline1henezenl paint thinner, or any other chemicals to clean this unit, as these
substances will
age/oeform bom plastic components and luster finish.
2) N ver ttempt to cl.ean the unit by pouring war clirec.tly over any of the surface areas, as this will cause
detenoration of electrical components and wmng msulation.
3) Use only a mild dish washing detergent, lukewarm water, and a soft cloth to wipe the exterior surface of the
unit and diy thoroughly.
STORAGE When the dehumidifer is not being used for long time periods, please follow these instructions:
1) Disconnect the power cord from the power supply.
2) Empty the water tank and wipe (clean) thoroughly.
3) Clean air filter thoroughly.
4) Re-package the unit in the original carton.
5) Store the unit upright in a dry location.
TROUBLESHOOTING
Occasionally, you may encounter some problems that are of a minor nature and a service call may not be
necessary. Use this troubleshooting guide to identify possible problems you may be experiencing. If the unit
continues to operate improperly, call your local Danby Service Depot or
1-800-26..Danb.r (1-800-263-2629)
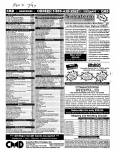
PROBLEM
1) Unit will not operate.
2) Dehumidifying capacity
(moisture removal) low.
3) Relative Humidity settinf not
reachep after long period o
operation.
POSSffiLE CAUSE
• Check power cord connection.
• Check electrical outlet for blown fuse.
• Check if water tank is full if yes, emf.ty).
• Check water tank is proper y mstalle .
• Air filter is
and/or blocked.
• AmbientAroom temperature too low (below 5°C/41°F).
• Poor air ow crrculationlobstruction of front grill.
• Relative humidity in surrounding environment very low.
• Check all doors and windows are closed.
• Area/room is too large for the capacity of the
dehumidifier.
=
Tniere.
LIMITED APPLIANCE WARRANTY
llli&CJIIIilypu!Ld isWIII!'Btadtl betill&m!Mlilai:U'a(a tlefacla il1T111181ial and mn.wlip. pMildlllllllle urit is uaad IJ'dallhencnnal
Qrldlin i1terde<l bf11\e manliac1ure1.
lllla'tiiiiiTIICy It Mllaliurijtllhe pe D ID fltum t.a uri!M S rdjdd by o.nl1jPnxiJdslin!lad{Cirtd)«Danbv Plc4JIS$ h:.(USA)(lleraeltar
'UtJVf)« byan <IIIJtiiJtrciDaJtlf,end 1e
'*"·are
flllllli:
lEAliSOFWAIIIWITY
llllllVmd for fli1y I'lldrjlcriJfrompun:illst fb,llitl!J)allliouaP'O'fided.
I)Jqlheftltweybu (24)riiCI1tll,IJTflurablalp.DCif11tls II'Qillclfoundtlbe<lefd/8,wll be repaired 01rapacecl, Ill
WIJT8J'ml's
«nodla!ge!0 lhe ORIGlNAI. p!I'Chaw.
hII!!Ibelti!CIIIliii.I!IIU""""'ltil'flOtllilll!lll11he li!IPiilllm (allhei'MIIjllliiii)IO lhe«ijnal r81aJer(point ol p\lthase)01II
1111\bdepcltlnlfll)'.Ccnid)!llr deOrmtnm)!llr llllwes pt.I'CIB!«l, «OO!Dd )WntU!tWIMrUidDenJot san.b
dep<t...WseM!z m\1!112p!doml!d byaqJI!ilied seM:et!dirilm
H81l1Wceis perbmedQ'lt.e llitlltf a1}Q18 ct.erf'llll11'18Jihc(izadSIM:e<lepci.«ttl!ll'iis used flrccml'<:illl applalticn,all
Cif Danbyutdr11tisWIItlfty WIbe\IOid.
t.klH1g IIM1 fils WIIJTIInty1111.1111111ltthll DIIJtttd blfiiiiCidllll«llble forany crdarnage !0 focxl crct.er CXII1IIII1s clllllsll!lPiml.wl\iiMr
<kle toanydale<:tCift.a .orb a,lht.arP"OP««mrtOI*'.
EICUISillll
Slieu Mainpi'Oitled, Darby,lmltw IJ)CICilei'II'IIIMiee, repowaaibiS
01 11Dea• ..-crmfled,IMie01
byDiuttjcrlls
dillriJWl and alo11ter Wll.lllriet, rep"""'CO.'"crg\1111818es,ill:bjingany11oW!rias,Qrldm,rep!aaen Cncrpn.rQes
under anySale ClfGGocbActcrltacrIIIUishenlbySaw•hlrei1
P'O'Iided.Di1.JVt elld!Q be 1113PCJ1dileb'filii daJnaaea
tl pnns CIIJ'OI*IY,ill:bjingltl!lll ilsef.1\owaoeYef C8UI8d«IJTfCQeQUIII'Iial fromhimalfunctm Clflile urit n bfltl!puldlued
lfle lfi.hipuldlua'Olellla1ibyaptlindeiMiftml iwlnrMss
DaJVtlil:m IJTfdimtf t) pnRIICIIJOI*!Ycausad bylfleri.
GEHBW. PIICMSIONS
Nowatra.iy or inuance hlrei1con1ailed«set Gill Slid apptj lllliln<lamaQ&«"!*r lcweed by Bfl'i o1tll8 :
1) !alua.
2) Dan1glllntranlll1oru m11\a
S) IIJMI!IS!W1Sldl as klwi'Dbge,delel:til'e imlelriingcrWs.
4) AccidM11, abllll&crniSIIsecit.eI!'Jimllllldluillll:dequauir
labin1t1e room 01lilmnal opRi1g OOidilnl
(6ldtemiltt «lollrm ).
5) Us&lor mm81tial«indlliiiiii)IIIICS88 (ia. Hille IIJIPiilllm is ncti'llllllllad i1adomeelt residence).
S) Fit.._.dl!laga,1hlll,war,rillf.l'os1ity,mciGOO
lu'ricns,lbxts«c.
a
mas
7) SinD!caJs -i1cuil!lnlretU:ml.
8) IhllllllllliOn{Ia. uq.il Clfa-applanoa oran applanoa Olilloclalhalis'*fiRI tt oli!IOol ap ).
Proof o1pll'lhlee dale llilbe ire<lttwatrll1Jd8rna; eo. please mblClf aal8. In1t1e IIW!iWBIMy aarw:eis reqJi'ed,presenllli$c»cunentto tl4l
AliTIO:UZEDSEfMCE DEPOT.
Premiere.
Model • Modele
DDR30A1GP,DDR45A1GP
PORTABLE DEHUMIDIFIER
The model number can be found on the serial plate located on the back
panel of the unit.
For service, contact your nearest
service depot or call:
1-800-26- Danby
(1-800-263-2629)
to nmillllltBi a depot in your
area.
All repair parts are available for purchase or special order when you visit
your nearest service depot. To request service and/or the location of the
service depot nearest you, call the TOLL FREE NUMBER.
When requesting service or ordering parts, always provide the following
information:
•
•
•
•
Product TYPe
Model Number
Part Number
Part Description
DESHUMIDIFICATEUR PORTATIF
Pour obtenir le service, consultez
votre centre de service le plus
rapproche ou composez le:
Le numero de modele se trouve sur la plaque d'information sur le panneau
arriere de 1'appareil.
1-800-26- Dilnb.r
(1-800-263-2629)
Toutes les pieces de rechange ou commandes speciales sont disponibles
votre centre de service regional autorise.
Pour obtenir le service et/ou Ia localire de votre centre de service regional,
signalez le NUMERO D'APPEL SANS FRAIS. Ayez les renseignements
suivants Ia portee de Ia main lors de Ia
commande de piece ou service :
vous recommendera un centre
regionaL
a
a
• TYPe de produit
• Numero de modele
• Numero de piece
• Description de Ia piece
Danby Products Limited, Guelph, Ontario, Canada NIH 6Z9
Danby Products Inc. Findlay, Ohio, U.S.A.45840
Printed in China (P.R.C.)