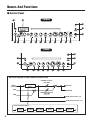
1
COMPLIANCE INFORMATION STATEMENT
(DECLARATION OF CONFORMITY PROCEDURE)
Responsible Party :
Address :
Telephone :
Type of Equipment :
Model Name :
Yamaha Corporation of America
6600 Orangethorpe Ave., Buena Park, Calif. 90620
714-522-9011
GUITAR AMPLIFIER
THR10/THR5
This device complies with Part 15 of the FCC Rules.
Operation is subject to the following two conditions:
1) this device may not cause harmful interference, and
2) this device must accept any interference received including interference that may cause
undesired operation.
See user manual instructions if interference to radio reception is suspected.
*This applies only to products distributed by YAMAHA CORPORATION OF AMERICA.
(FCC DoC)
FCC INFORMATION (U.S.A.)
1. IMPORTANT NOTICE: DO NOT
MODIFY THIS UNIT!
This product, when installed as indicated
in the instructions contained in this manual, meets FCC requirements. Modifications not expressly approved by Yamaha
may void your authority, granted by the
FCC, to use the product.
2. IMPORTANT: When connecting this
product to accessories and/or another
product use only high quality shielded
cables. Cable/s supplied with this product MUST be used. Follow all installation
instructions. Failure to follow instructions
could void your FCC authorization to use
this product in the USA.
3. NOTE: This product has been tested
and found to comply with the requirements listed in FCC Regulations, Part 15
for Class “B” digital devices. Compliance
with these requirements provides a reasonable level of assurance that your use
of this product in a residential environment will not result in harmful interference
with other electronic devices. This equipment generates/uses radio frequencies
and, if not installed and used according
to the instructions found in the users
manual, may cause interference harmful
to the operation of other electronic de-
vices. Compliance with FCC regulations
does not guarantee that interference will
not occur in all installations. If this product is found to be the source of interference, which can be determined by turning
the unit “OFF” and “ON”, please try to
eliminate the problem by using one of the
following measures:
Relocate either this product or the device
that is being affected by the interference.
Utilize power outlets that are on different
branch (circuit breaker or fuse) circuits or
install AC line filter/s.
In the case of radio or TV interference, relocate/reorient the antenna. If the antenna
lead-in is 300 ohm ribbon lead, change
the lead-in to co-axial type cable.
If these corrective measures do not produce satisfactory results, please contact
the local retailer authorized to distribute
this type of product. If you can not locate
the appropriate retailer, please contact
Yamaha Corporation of America, Electronic Service Division, 6600 Orangethorpe
Ave, Buena Park, CA90620
The above statements apply ONLY to those
products distributed by Yamaha Corporation of America or its subsidiaries.
*This applies only to products distributed by YAMAHA CORPORATION OF AMERICA.
2
(class B)
This device complies with Part 15 of the FCC Rules. Operation is subject to the following two
conditions:
(1) this device may not cause harmful interference, and (2) this device must accept any interference received, including interference that may cause undesired operation.
This Class B digital apparatus complies with Canadian ICES-003.
Cet appareil numérique de la classe B est conforme à la norme NMB-003 du Canada.
For U.K. customers
If the socket outlets in the home are not suitable for the plug supplied with this appliance, it
should be cut off and an appropriate 3 pin plug fitted. For details, refer to the instructions described below.
Note
The plug severed from the mains lead must be destroyed, as a plug with bared flexible cord is
hazardous if engaged in a live socket outlet.
SPECIAL INSTRUCTIONS FOR U.K. MODEL
IMPORTANT NOTICE FOR THE UNITED KINGDOM
Connecting the Plug and Cord
WARNING: THIS APPARATUS MUST BE EARTHED IMPORTANT.
The wires in this mains lead are coloured in accordance with the following code:
GREEN-AND-YELLOW : EARTH
BLUE : NEUTRAL
BROWN : LIVE
As the colours of the wires in the mains lead of this apparatus may not correspond with the
coloured markings identifying the terminals in your plug proceed as follows:
The wire which is coloured GREEN-and-YELLOW must be connected to the terminal in the
or colored GREEN or
plug which is marked by the letter E or by the safety earth symbol
GREEN-and-YELLOW.
The wire which is coloured BLUE must be connected to the terminal which is marked with
the letter N or coloured BLACK.
The wire which is coloured BROWN must be connected to the terminal which is marked with
the letter L or coloured RED.
(3 wires)
3
CAUTION: READ THIS BEFORE OPERATING YOUR UNIT.
To assure the finest performance, please read this
manual carefully. Keep it in a safe place for future
reference.
1
2
3
4
Install this unit in a well ventilated, cool, dry,
clean place - away from direct sunlight, heat
sources, vibration, dust, moisture, and/or cold.
(Do not use/keep this unit in a car etc.)
Locate this unit away from other electrical
appliances, motors, or transformers to avoid
humming sounds.
Do not expose this unit to sudden temperature
changes from cold to hot, and do not locate
this unit in an environment with high humidity
(i.e. a room with a humidifier) to prevent condensation inside this unit, which may cause an
electrical shock, fire, damage to this unit, and/
or personal injury.
13 Before connecting the instrument to other electronic components, turn off the power for all components. Before turning the power on or off for all
components, set all volume levels to minimum.
14 Be sure to set the volumes of all components
at their minimum levels and gradually raise the
volume controls while playing the instrument to
set the desired listening level.
15 Do not attempt to modify or fix this unit. Contact qualified Yamaha service personnel when
any service is needed. The cabinet should never
be opened for any reason.
−− Other components, as they may cause damage and/or discoloration on the surface of
this unit.
16 When not planning to use this unit for long periods of time (i.e. when going on vacation), disconnect the power cable from the AC wall outlet.
−− Burning objects (i.e. candles), as they may
cause fire, damage to this unit, and/or
personal injury.
17 Be sure to read the “TROUBLESHOOTING” section regarding common operating errors before
concluding that the unit is faulty.
Do not cover this unit with a newspaper, tablecloth, curtain, etc. in order not to obstruct heat
radiation. If the temperature inside this unit
rises, it may cause fire, damage to this unit,
and/or personal injury.
6
Do not operate this unit upside-down. They may
overheat, possibly causing damage.
7
Do not use force on switches, knobs, and/or cords.
8
When disconnecting the power cable from the wall
outlet, grasp the AC plug; do not pull the cord.
9
Do not clean this unit with chemical solvents; this
might damage the finish. Use a clean, dry cloth.
10 Only the voltage specified on this unit must
be used. Using this unit with a higher voltage
than specified is dangerous and may cause fire,
damage to this unit, and/or personal injury.
Yamaha will not be held responsible for any
damage resulting from use of this unit with a
voltage other than that specified.
4
12 Do not connect the instrument to an electrical
outlet using a multiple-connector. Doing so can
result in lower sound quality, or possibly cause
overheating in the outlet.
Avoid installing this unit where foreign objects
may fall onto this unit and/or this unit may be
exposed to liquid dripping or splashing. On the
top of this unit, do NOT place:
−− Containers with liquid in them, as they may
fall and liquid may cause electrical shock to
the user and/or damage to this unit.
5
11 If the power adaptor you are using has a grounded three-prong plug, make sure that the plug is
connected to an appropriate outlet with a protective grounding connection. Improper grounding
can result in electrical shock.
18 Before moving this unit, disconnect the power
cable from the wall outlet.
19 Be sure to use the AC adaptor supplied with this
unit. Using an AC adaptor other than the one
provided may cause fire or damage to this unit.
20 Do not use batteries other than those recommended on page 13. Using other types of batteries may result in an inability to achieve full function of the unit, cause unit failure, or damage.
21 Always replace all batteries at the same time. Do
not use new batteries together with old ones.
22 Do not mix battery types, such as alkaline
batteries with manganese batteries, or batteries from different makers, or different types of
batteries from the same maker, since this can
cause overheating, fire, or battery fluid leakage.
23 If the batteries do leak, avoid contact with the
leaked fluid. If the battery fluid should come in
contact with your eyes, mouth, or skin, wash
immediately with water and consult a doctor.
Battery fluid is corrosive and may possibly
cause loss of sight or chemical burns.
24 Always make sure all batteries are inserted in
conformity with the +/- polarity markings. Failure to do so might result in overheating, fire, or
battery fluid leakage.
25 When the batteries run out, or if the instrument
is not to be used for a long time, remove the
batteries from the instrument to prevent possible leakage of the battery fluid.
26 Install this unit near the wall outlet and where
the power cable can be reached easily.
27 For added protection for this product during a
lightning storm, or when it is left unattended and
unused for long periods of time, unplug it from
the wall outlet. This will prevent damage to the
product due to lightning and powerline surges.
28 The batteries shall not be exposed to excessive
heat such as sunshine, fire or the like. When
you dispose of batteries, follow your regional
regulations.
29 Do not use the instrument/device or headphones for a long period of time at a high or
uncomfortable volume level, since this can
cause permanent hearing loss. If you experience any hearing loss or ringing in the ears,
consult a physician.
There is a chance that placing this unit too close to a CRT-based (Braun tube) TV set might impair picture
color. Should this happen, move this unit away from the TV set.
WARNING
TO REDUCE THE RISK OF FIRE OR ELECTRIC SHOCK, DO NOT EXPOSE THIS UNIT TO RAIN OR MOISTURE.
CAUTION
Danger of explosion if battery is incorrectly replaced. Replace only with the same or equivalent type.
Yamaha cannot be held responsible for damage caused by improper use or modifications to the instrument, or data that is lost or destroyed.
The name plate is located on the bottom of the unit.
*Even when the power switch is in standby status, electricity is still flowing to the instrument at the minimum level. When you are not using the instrument for a long time, make sure you unplug the power cord
from the wall AC outlet.
Information
n
About copyrights
• Copying of the commercially available musical data including but not limited to MIDI data and/or audio data is strictly
prohibited except for your personal use.
• This product incorporates and bundles computer programs and contents in which Yamaha owns copyrights or with
respect to which it has license to use others' copyrights. Such copyrighted materials include, without limitation, all
computer software, style files, MIDI files, WAVE data, musical scores and sound recordings. Any unauthorized use of
such programs and contents outside of personal use is not permitted under relevant laws. Any violation of copyright
has legal consequences. DON'T MAKE, DISTRIBUTE OR USE ILLEGAL COPIES.
n
About this manual
• The illustrations and LCD screens as shown in this manual are for instructional purposes only, and may appear somewhat different from those on your instrument.
• Windows is a registered trademark of Microsoft® Corporation in the United States and other countries.
• Apple, Mac and Macintosh are trademarks of Apple Inc., registered in the U.S. and other countries.
• The company names and product names in this manual are the trademarks or registered trademarks of their respective
companies.
5
Thank you for purchasing the Yamaha THR10/5 Guitar Amp.
In order to get the most of this product, please read this Owner’s
Manual thoroughly before using. After you’ve finished reading the
manual, keep it in a safe place for future reference.
n Features
• Compact design delivers professional quality guitar and audio sound.
* The THR10/5 utilizes a newly developed amp-modeling technology made possible with
Yamaha’s original VCM technology*. With this new technology, the user interface is able to reproduce the operational characteristics of each control to deliver guitar amp sound with greater
realism.
* The THR10/5 offers high quality audio sound that only a company like Yamaha, with its expertise in advanced audio technologies, can deliver. Its ability to playback audio files on a computer via a USB connection, or playback audio files on a smartphone or other audio playback
device connected to the AUX IN jack, makes it feel like you are in the studio, playing along with
the musicians as they record. And because the THR10/5 is portable, you can enjoy this experience wherever you like.
• Incorporates VCM Effects similar to those found in Yamaha’s high-end mixers for high
quality effects.
• Utilizes Yamaha’s original Extended Stereo technology to deliver an unbelievably wide
stereo image, wider than the unit’s compact size.
• Includes Steinberg’s professional quality music production software Cubase AI that lets
you enjoy full-fledged recording in the convenience of your home.
• Two-way power system allows the unit to operate either on AC power or battery power so
you can use the amp outside and other places that lack access to AC power.
• Includes a chromatic auto tuner.
*What is VCM Technology?
An original physical modeling technology developed by Yamaha, VCM Technology reproduces the characteristics of
analog circuitry at a micro level to accurately reproduce the modeled equipment.
6
n Package Contents
n About the Supplied Disc
The following items are included in the package.
Make sure that all items are present.
Steinberg’s Cubase AI music editing software is
included on the supplied DVD-ROM.
• THR10 Package
Special Notices
q THR10 Main Unit
q Power Adaptor
q THR10/5 Owner’s Manual (this booklet)
q Stereo Mini Cable
q USB Cable
q Cubase AI DVD-ROM
• THR5 Package
q THR5 Main Unit
q Power Adaptor
q THR10/5 Owner’s Manual (this booklet)
q Stereo Mini Cable
q USB Cable
q Cubase AI DVD-ROM
CAUTION
• Steinberg and Yamaha make no representations or
warranties with regard to any problems while attempting to copy the disks or software and cannot be held
responsible for the results of attempts to copy the data.
• This disk is NOT for audio/visual purposes.
Do not attempt to play the disk on a CD/DVD player.
Doing so may result in irreparable damage to your audio
CD/DVD player.
• The software included in the Cubase AI DVD-ROM and
the copyrights thereof are under exclusive ownership by
Steinberg Media Technologies GmbH.
• Copying/reproduction of the software in whole or in part
by any means is expressly forbidden without the written
consent of the manufacturer.
• For the latest information of the software contained in
the accessory disk, please see the site below:
Future upgrades of application and system software and
any changes in specifications announced separately on
the web site.
http://www.steinberg.net
Contents
CAUTION..........................................................4
Features..........................................................6
Package Contents...............................................7
About the Supplied Disc.......................................7
Names And Functions..........................................8
Control Panel...................................................................................... 8
Rear Panel........................................................................................ 11
Connection..................................................... 12
Connection Examples....................................................................... 12
Power............................................................................................... 13
Connecting a Computer to the Unit......................... 14
Installing the Software...................................................................... 14
Connections and Operation.............................................................. 15
Troubleshooting............................................... 17
Specifications................................................. 18
7
Names And Functions
n Control Panel
q
THR10
!9
!8
!7
!6
w e
r
t
y
u
i
o
!1
!2
!3
!5
THR5
!8
q
!7
w
!6
e
r
t
y
!0
!1
!2
!4
l Block Diagram of Amp Simulation and Effects
GUITAR OUTPUT
VOLUME
Amp Simulation
/Effect
INPUT
(Guitar)
Speaker
AUX
PHONES
USB/AUX OUTPUT
VOLUME
USB
*THR10 only
USB (THR Guitar L, R)
USB (THR Guitar DI 1, 2)
Amp Simulation/Effect
Compressor
8
Amp
Simulation
Noise Gate
Effect
Delay
Reverb
Names And Functions
q
(Power Switch)
This is the unit’s power switch.
When the power is ON, the lamp corresponding to the selected amp type and the
Power Lamp in the speaker cabinet light.
*Extended Stereo: The Extended Stereo function
produces a much wider stereo field. Extended
Stereo effects the USB/AUX inputs as well as guitar sounds with DLY/REV or HALL effects applied.
*The Extended Stereo setting (ON/OFF) is saved
when the power is switched OFF.
*The Power Lamp in the speaker cabinet can be
switched ON or OFF using the THR Editor. (page 16).
r AMP
w LED Display
Indicates each of the THR’s settings and conditions.
e TAP/TUNER
n Tuner Function
Holding the switch for 1 second engages the
tuner function and lights the
indicators.
The tuner is calibrate to A4=440Hz. Tune the
guitar until the pitch that you want to tune to
appears in the display.
Tuning is complete when only the in the
center of the
display is visible.
Pitch is low
In tune
Pitch is high
Press the TAP/TUNER switch (less than one
second) to turn OFF the tuner function.
*When the tuner function is set ON, guitar sound to
the main speakers, PHONES, and USB is muted. Input received from the AUX and USB jacks is output.
n Tap Tempo Function
When a DLY or DLY/REV effect is selected
with the DLY/REV !2 control, the tempo of
the delay can be set by tapping (more than
twice) on the switch.
n Extended Stereo Setting
Hold the switch for more than three seconds
to switch the Extended Stereo* function ON/
OFF.
Selects the amp type. The lamp for the corresponding amp type lights.
*When the power is switched ON, the most recent
amp type is selected.
ON: “#” on LED w is off (default setting).
OFF: “#” on LED w is lit.
[About amp types]
THR’s GAIN t and MASTER y controls
work in the same way as the preamp and
master controls on a tube amp. The GAIN t
control provides preamp gain and distortion
while the MASTER y control affects power
amp level. The response of the MASTER y
control differs depending on the amp model
used but it affects volume, gain and power
amp compression.Using the GUITAR OUTPUT !3 control you can use the amp’s GAIN
t and MASTER y controls to set your tone
at any level.
THR utilizes a newly designed amp-modeling
technology using Yamaha’s Virtual Circuitry
Modeling (VCM) technology. VCM gives
THR the power to model real amps incredibly accurately, with each control working
and responding exactly as it does on the real
thing.
CLEAN: Rich, clean tones from a 6L6 power
section with gentle breakup for incredible
jazz, blues and country sounds.
*When the BASS, MIDDLE, and TREBLE controls
are all set to 0, there is no guitar sound output.
CRUNCH: Low-powered, class-A tube output
with bright, clear, dynamic power amp
distortion characteristics.
9
Names And Functions
LEAD: Classic British single channel tone. A
combination of a low-gain preamp section
and EL34s in the power section give rich,
controllable distortion with great midrange
definition.
BRIT HI: EL34s keep the classic British clarity
while a higher gain preamp allows you to
push the amp into serious distortion.
u BASS (THR10 only)
i MIDDLE (THR10 only)
MODERN: Ultra high-gain input section
combined with 6L6 output section delivers
smooth, powerful distortion and awesome
power amp compression.
namic, driving bass tone.
simulations for natural, clear tone.
sources, tone and effect controls allow
shaping of non-guitar sources.
Adjusts the amount of guitar distortion.
Rotate the knob clockwise to increase the
amount of distortion.
*On the THR10, the blend function, which blends
the pickup direct sound with the mic simulation
sound, is active when ACO is selected with the
AMP r control. (Setting the blend function to its
minimum level produces the pickup direct sound
only while a maximum setting produces the mic
sound only.)
Adjusts the volume for the amp section.
Rotate the knob clockwise to increase
volume while reproducing compression and
poweramp distortion of the simulated amp.
*Only adjusts the volume when BASS, ACO, or
FLAT is selected with the AMP r control (THR10
only).
10
Selects one of the four different effects;
CHORUS, FLANGER, PHASER, and TREMOLO. Rotate the knob clockwise to increase
the amount of each effect.
*Rotate the knob fully to the left (• position) to set
the effect OFF.
!2 DLY/REV
Selects one of the four different effects; DLY
(delay), DLY/REV (delay/reverb), SPRING
(spring reverb), and HALL (hall reverb).
Rotate the knob clockwise to increase the
amount of each effect.
* Rotate the knob fully to the left (• position) to set
the effect OFF.
* When DLY or DLY/REV is selected, the TAP/
TUNER e button can be used to set the delay
time freely.
y MASTER
Tone adjustment for the guitar’s sound.
Rotate the knob clockwise to brighten the
sound and counterclockwise to darken it.
!1 EFFECTS
t GAIN
Tone adjustment for the guitar’s sound.
Rotate the knob clockwise to enhance the
high-range frequencies.
!0 TONE (THR5 only)
ACO: Electro-acoustic optimized input with mic
FLAT: Flat response clean input for line
Tone adjustment for the guitar’s sound.
Rotate the knob clockwise to enhance the
mid-range frequencies.
o TREBLE (THR10 only)
*The following amp types are available
only on the THR10.
BASS: High-power all-tube design for dy-
Tone adjustment for the guitar’s sound.
Rotate the knob clockwise to enhance the
low range frequencies.
!3 GUITAR OUTPUT (THR10 Only)
Adjusts the overall volume of the guitar
sound.
Names And Functions
!4 VOLUME (THR5 only)
Adjusts the overall volume of the guitar
sound.
n Rear Panel
@0
@1
!5 USB/AUX OUTPUT (THR10 only)
Adjusts the audio playback volume for audio
from the computer connected to the USB
@0 jack or an audio device connected to the
AUX !8 jack.
!6 INPUT
This jack is used to connect a guitar to the
unit.
!7 PHONES
This a standard phone jack used to connect
a pair of stereo headphones to the unit. It
can also be used as a line out jack.
@0 USB
Use the supplied USB cable to connect a
computer to the unit.
@1 DC IN
Connects the supplied power adaptor.
*Main speaker sound is muted when a connector
is inserted into the PHONES jack.
!8 AUX
This is a stereo mini phone jack used for
audio input from an external device such as
an MP3 player, etc.
!9 USER MEMORY (THR10 only)
Saves up to five sets of amp section controller settings (GAIN, MASTER, BASS, MIDDLE,
TREBLE, EFFECT, DLY/REV). Press and hold
the number of the switch you want to save
your settings to (about 2 seconds). The save
operation is complete when the memory
number for the switch being pushed appears in the LED display. Press one of the
numbered switches (less than 2 seconds) to
recall the saved settings.
About the Default Settings
(THR10 only)
To reset user memory 1-5 contents to
their factory defaults, switch on the power
while holding down USER MEMORY
switches 1, 3, and 5.
Hold down switches 1, 3, and 5.
Switch on the
power.
11
Connection
n Connection Examples
* Before making any connections, make sure that the power on all devices is switched OFF.
* When connecting the unit to an external device, check the shape of the jack and use an
appropriate cable that matches with the jack’s specifications and connect surely.
USB Cable
(supplied)
USB Jack
Computer
*On the THR5, use the volume on the
audio device to adjust the volume for the
external audio source. If it is connected
to a computer via USB, you can adjust
the USB output volume with the THR
Editor. (page 16)
Audio output from an audio
player or computer
Electric Guitar/Bass/
Electric Acoustic
Guitar, etc.
Headphones
Precautions in regard to using the USB jack
Make sure you follow the points below when
connecting a computer to the THR10/5 USB
jack. Failing to do so may result in the computer
or the THR10/5 freezing or shutting down, as
well as corruption or even loss of data. If the
device or computer does freeze, restart the application or computer.
12
CAUTION
•Be sure to wake the computer from suspended/sleep/
standby mode before connecting a computer to the
USB jack.
•Always quit all applications that are running on the
computer before connecting or disconnecting the USB
cable and set the volume output on the computer to its
minimum level.
•When connecting or disconnecting the USB cable, be
sure to set the VOLUME and the USB/AUX OUTPUT on
the THR10/5 to their minimum levels.
•Wait at least 6 seconds between connecting or disconnecting the USB cable.
Connection
n Power
The THR10/5 can operate on either battery power or with the power adaptor.
*Power is automatically supplied from the power adaptor when the adaptor is connected to the unit with batteries
installed. To prevent batteries from leaking, we recommend that the batteries be removed from the unit when using the power adaptor.
l When using the power adaptor
Connect the supplied power adaptor to the DC IN jack located on the rear side of the THR10/5.
Connect the AC plug to a power outlet.
DC IN Jack
*Follow the “CAUTION” section (pages 4-5) to use the
product in a safe and proper manner.
AC Plug
Power Adaptor
(supplied)
AC Outlet
DC Plug
l When using batteries
Use AA alkaline batteries or nickel hydride batteries*.
Make sure that the batteries are installed with their +/- poles aligned properly as shown below.
*When using nickel hydride batteries, we recommend eneloop® batteries. When using eneloop batteries, please read
the eneloop battery instruction manual carefully. (eneloop® is a registered trademark of Sanyo Electric Co., Ltd.)
* Do not use manganese batteries.
*Follow the “CAUTION” section (pages 4-5) to use the product in a safe and proper manner.
The amp turns off automatically when battery power is depleted. After replacing the batteries or connecting the power adaptor, turn the power switch OFF and wait for ten seconds before turning the power switch
back ON again.
THR10 (Bottom)
THR5 (Rear)
AA Alkaline batteries or
nickel hydride batteries
x8
13
Connecting a Computer to the Unit
Connecting a computer to the THR10/5 makes the following possible:
1) Playback audio files on the computer through the THR10/5.
2) Edit THR10/5 amp settings using the editing application on a computer.
3) Record audio using the Cubase AI application.
The following software must be installed in the computer in order to carry out the functions listed
above.
n Installing the Software
[Installing the THR Editor]
l Driver Installation
1. Access the following web site and download
the THR Editor.
http://download.yamaha.com
Using the THR10/5 with a computer requires the
installation of a driver.
[Installing the Driver]
1. Access the following website and download
the latest version of the Yamaha Steinberg
USB Driver, the file will decompress and
open.
3. Refer to the THR Editor’s Owner’s Manual or
the Help Guide for information on settings
and operation of the THR Editor.
http://download.yamaha.com
*Check the above website for information on system
requirements.
*The Yamaha Steinberg USB Driver may be updated
without notice. Please visit the above website for
the latest details and updates.
2. Install the Yamaha Steinberg USB Driver in
your computer. Refer to the Installation Guide
that is included in the downloaded file.
3. After installing the driver, quit all applications
and then select the THR10 or the THR5 as
the computer’s audio output. Each OS has its
own setting display that can be accessed as
follows.
2. Start the downloaded file and follow the instructions that appear in the display to install
the THR Editor.
Windows
Control Panel g Sound g “Sound” tab
Mac
System Preferences g Sound g”Output” tab
l Cubase AI Installation
The THR10/5 comes bundled with Steinberg’s
Cubase AI music editing application. Using
Cubase AI you can record a guitar connected to
the THR10/5 and edit songs.
[Cubase AI System Requirements]
In order to install and run the Cubase AI application supplied on the accompanying DVD-ROM,
your computer must meet the following requirements.
Windows
OS:
Windows 7 (32-bit, 64-bit)
CPU:
Intel or AMD dual core CPU
Memory:
2 GB or more
Audio Device:
Windows compatible (ASIO, WDM)
Display Resolution: 1280 x 800 — full color
l THR Editor Installation
Interface:
Equipped with a USB connector
Using the THR Editor, you can edit effect and
tone settings for the THR10/5 in greater detail.
Edited settings can be saved in the THR10/5.
Hard Disk:
Free disk space of 4 GB or more;
high-speed hard disk
14
Connecting a Computer to the Unit
Mac OS X
OS:
Mac OS X 10.6
CPU:
Intel dual core CPU
Memory:
2 GB or more
Audio Device:
CoreAudio compatible
Display Resolution: 1280 x 800 — full color
Interface:
Equipped with a USB connector
Hard Disk:
Free disk space of 4 GB or more;
high-speed hard disk
*A DVD drive is required for installation.
*In order to have continuous use of Cubase AI,
including support and other benefits, you will need
to register the software and activate your software
license by starting it while the computer is connected to the internet.
*Note that the system requirements may be slightly
different from those described above depending on
the particular operating system.
n Connections and Operation
1) Playback audio files on the computer
through the THR10/5
Install the Yamaha Steinberg USB Driver, and
select the THR10 or THR5 as the audio output
(page 14).
Use the supplied USB cable to connect the computer’s USB jack to the USB jack on the THR10/5
as shown in the diagram below.
This lets you play audio files on the computer
through the speakers on the THR10/5. Connect
your guitar to the unit and play along. On the
THR10 the audio volume is controlled using the
USB/AUX OUTPUT control knob.
*On the THR5, use the volume control on the computer to adjust the audio volume.
[Installing Cubase AI]
1. Start the computer and log on to the Administrator account.
2. Insert the Cubase AI DVD-ROM into the DVDROM drive.
3. When the “WELCOME TO CUBASE AI”
window appears, choose your preferred
language by clicking on the corresponding
national flag icon.
4. Click “Install CUBASE AI.”
Playback an audio
file on the computer.
Use the USB/AUX
OUTPUT control knob
to adjust volume of the
audio file.
5. Follow the onscreen instructions to install the
software.
*In order to have continuous use of Cubase AI,
including support and other benefits, you will need
to register the software and activate your software
license by starting it while the computer is connected to the Internet. Click the “Register Now”
button shown when the software is started, then fill
in all required fields for registration. If you do not
register the software, you will be unable to use it
after a limited period of time expires.
Guitar sound
+
audio playback
15
Connecting a Computer to the Unit
2) Edit THR10/5 amp settings using the editing
application on a computer.
3) Record audio using the Cubase AI application.
Download and install the THR Editor (page 14).
Use the supplied USB cable to connect the computer’s USB jack to the USB jack on the THR10/5
as shown in the diagram below.
The THR Editor lets you change settings (parameters) in the THR10/5 using the display shown
below. After editing the settings with your computer, you can save them in your computer, and
create a library of sound settings. Holding down
the USER MEMORY button for a few seconds on
the THR10 saves the settings being edited to the
unit’s internal memory.
Install the Cubase AI application (page 14).
Use the supplied USB cable to connect the computer’s USB jack to the USB jack on the THR10/5
as shown in the diagram below.
Cubase AI lets you record what you play on a
guitar connected to the THR10/5 to a computer.
After recording, you can go back and edit the
recorded data.
*For more information on settings and operation, refer
to the THR Editor Owner’s Manual or its Help file.
The THR Editor lets you
edit all parameters on the
THR10/5 freely.
On the THR10, settings
made with the THR
Editor can be saved to
USER MEMORY 1-5.
16
*For more information on settings and operation, refer
to the THR Editor Owner’s Manual or its Help file.
Use Cubase AI to record
and edit what you play
on your guitar connected to the THR10/5.
Troubleshooting
No power
• Is the power adaptor properly connected?
(g page 13)
• Are the batteries properly installed? (g page
13)
No sound
1) No instrument sound
• Is the guitar properly connected to the INPUT
jack? (g page 12)
• Is the volume control on the instrument
turned up?
• If the GAIN, MASTER, GUITAR OUTPUT
(THR10), VOLUME (THR5) controls set to
0, the instrument will produce no sound. (g
page 10)
• If the AMP control is set to CLEAN and all of
the tone controls are set to 0, the instrument
will produce no sound. (g page 9)
• Are the headphones disconnected from the
PHONES jack? (g page 11)
• If the Compressor Output set to 0 with the
THR Editor the instrument will produce no
sound. (g page 16)
• Is the Tuner function switched OFF? (g page 9)
• Is the cable connecting the instrument to the
unit damaged?
2) No audio sound from the computer
• Is the USB cable properly connected to both
devices? (g page 12)
• With the THR10, is the USB/AUX OUTPUT
control turned up? (g page 11)
• Is the USB cable connecting the devices
damaged?
3) No audio sound from the AUX Input
• Is the cable connecting the device to the AUX
Input properly connected? (g page 12)
• Is the volume control on the connected
device turned up?
• With the THR10, is the USB/AUX OUTPUT
control turned up? (g page 11)
• Is the cable connecting the device to the AUX
Input damaged?
(THR5 only) Audio volume from the computer connected to the unit via USB is too
low or too high.
• Launch the THR Editor on the computer and adjust the volume output using the “USB Volume”
setting. (g page 16)
Cannot set the Tap Tempo
• Is DLY or DLY/REV selected? The tap tempo
cannot be set with any other effects. (g page 9)
The Power Lamp does not light
• In the THR Editor (g page 16) open the
Preferences and set the Power Lamp to ON.
A “#” appears in the LED display
• A “#” appears in the display when the Extended
Stereo setting is set to OFF. (g page 9)
• Is the Yamaha Steinberg USB Driver properly
installed in the computer? (g page 14)
Noise is heard during audio playback
• Is the proper audio output port selected in
the “Connecting a Computer to the Unit”
section? (g page 14)
Can not edit parameters with the THR Editor
• Is output from the computer or the application muted?
• Lower the volume on the guitar amp.
• Is the unit’s Tuner Function switched ON?
Switch the Tuner Function OFF. (g page 9)
17
Specifications
Digital Section
Input Level
•Built-in Amp Simulations
THR10: CLEAN, CRUNCH, LEAD, BRIT HI, MODERN, BASS, ACO, FLAT
THR5: CLEAN, CRUNCH, LEAD, BRIT HI, MODERN
• CHORUS, FLANGER, PHASER, TREMOLO
• DELAY, DELAY/REVERB, SPRING REVERB, HALL
REVERB
• COMPRESSOR*
• NOISE GATE*
*Only available in the THR Editor.
• Built-in Chromatic Auto Tuner
Controller/Switch
THR10: AMP, GAIN, MASTER, BASS, MIDDLE,
TREBLE, EFFECT, DLY/REV, GUITAR OUTPUT, USB/AUX OUTPUT, USER MEMORY
Switch x5, TAP/TUNER Switch
THR5: AMP, GAIN, MASTER, TONE, EFFECT,
DLY/REV, VOLUME, TAP/TUNER Switch
LED x1
Connections
INPUT (Standard Monaural Phone Jack)
PHONES (Standard Stereo Phone Jack)
AUX (Stereo Mini Jack)
USB 2.0
DC IN
A/D Converter
24-bit + 3 Bit Floating
D/A Converter
24-bit
Sampling Frequency
44.1 kHz
PHONES Output Level
10 mW
Rated Output
• Built-in Effects
Display
GUITAR IN: -10 dBu
AUX IN: -10 dBu
10 W (5 W + 5 W)
Power Source
Power Adaptor or Batteries
•Power Adaptor (EADP-38EB A or UIB345-1530)
• Input:
U.S.A. and Canada models: AC120 V, 60 Hz
Other models: AC100 V to 240 V, 50/60 Hz
• Output: DC 15 V
•Batteries (AA alkaline batteries or nickelhydride batteries (eneloop) x 8)
• Battery Life
Alkaline batteries: approx. 6 hours
Nickel-hydride batteries: approx. 7 hours
*Depending upon usage and conditions
Power Consumption
18 W
Dimensions (W x H x D)
THR10: 360 x 183.5 x 140 mm (14.2” x 7.2” x 5.5”)
THR5: 271 x 167 x 120 mm (10.7” x 6.6” x 4.7”)
Weight
THR10: 2.8 kg (6 lbs. 3 oz.)
THR5: 2.0 kg (4 lbs. 7 oz.)
Accessories
• Power Adaptor
• USB Cable
• Stereo-Mini Cable
• Owner’s Manual (This booklet)
• Cubase AI DVD-ROM
Memory Allocations (THR10 only)
User Memory: 5
* Specifications and appearance may change without notice.
18
For electrical and electronic products using batteries.
-----------------------------------------------------------------------------------------------------------------------------------------------------------------------
Information for Users on Collection and Disposal of Old Equipment and used Batteries
These symbols on the products, packaging, and/or accompanying documents mean that used electrical and electronic products and batteries should not be mixed with general household waste.
For proper treatment, recovery and recycling of old products and used batteries, please take them to applicable collection
points, in accordance with your national legislation and the Directives 2002/96/EC and 2006/66/EC.
By disposing of these products and batteries correctly, you will help to save valuable resources and prevent any potential negative effects on human health and the environment which could otherwise arise from inappropriate waste handling.
For more information about collection and recycling of old products and batteries, please contact your local municipality, your
waste disposal service or the point of sale where you purchased the items.
[For business users in the European Union]
If you wish to discard electrical and electronic equipment, please contact your dealer or supplier for further information.
[Information on Disposal in other Countries outside the European Union]
These symbols are only valid in the European Union. If you wish to discard these items, please contact your local authorities
or dealer and ask for the correct method of disposal.
Note for the battery symbol (bottom two symbol examples):
This symbol might be used in combination with a chemical symbol. In this case it complies with the requirement set by the
Directive for the chemical involved.
Cd
-----------------------------------------------------------------------------------------------------------------------------------------------------------------------
Information concernant la Collecte et le Traitement des piles usagées et des déchets d’équipements électriques
et électroniques
Les symboles sur les produits, l’emballage et/ou les documents joints signifient que les produits électriques ou électroniques
usagés ainsi que les piles ne doivent pas être mélangés avec les déchets domestiques habituels.
Pour un traitement, une récupération et un recyclage appropriés des déchets d’équipements électriques et électroniques et
des piles usagées, veuillez les déposer aux points de collecte prévus à cet effet, conformément à la réglementation nationale et
aux Directives 2002/96/EC et 2006/66/EC.
En vous débarrassant correctement des déchets d’équipements électriques et électroniques et des piles usagées, vous contribuerez à la sauvegarde de précieuses ressources et à la prévention de potentiels effets négatifs sur la santé humaine qui
pourraient advenir lors d’un traitement inapproprié des déchets.
Pour plus d’informations à propos de la collecte et du recyclage des déchets d’équipements électriques et électroniques et des
piles usagées, veuillez contacter votre municipalité, votre service de traitement des déchets ou le point de vente où vous avez
acheté les produits.
[Pour les professionnels dans l’Union Européenne]
Si vous souhaitez vous débarrasser des déchets d’équipements électriques et électroniques veuillez contacter votre vendeur
ou fournisseur pour plus d’informations.
[Information sur le traitement dans d’autres pays en dehors de l’Union Européenne]
Ces symboles sont seulement valables dans l’Union Européenne. Si vous souhaitez vous débarrasser de déchets d’équipements électriques et électroniques ou de piles usagées, veuillez contacter les autorités locales ou votre fournisseur et demander la méthode de traitement appropriée.
Note pour le symbole «pile» (deux exemples de symbole ci-dessous):
Ce symbole peut être utilisé en combinaison avec un symbole chimique. Dans ce cas il respecte les exigences établies par la
Directive pour le produit chimique en question.
Cd
-----------------------------------------------------------------------------------------------------------------------------------------------------------------------
Verbraucherinformation zur Sammlung und Entsorgung alter Elektrogeräte und benutzter Batterien
Befinden sich diese Symbole auf den Produkten, der Verpackung und/oder beiliegenden Unterlagen, so sollten benutzte elektrische Geräte und Batterien nicht mit dem normalen Haushaltsabfall entsorgt werden.
In Übereinstimmung mit Ihren nationalen Bestimmungen und den Richtlinien 2002/96/EC und 2006/66/EC, bringen Sie alte
Geräte und benutzte Batterien bitte zur fachgerechten Entsorgung, Wiederaufbereitung und Wiederverwendung zu den entsprechenden Sammelstellen.
Durch die fachgerechte Entsorgung der Elektrogeräte und Batterien helfen Sie, wertvolle Ressourcen zu schützen, und verhindern mögliche negative Auswirkungen auf die menschliche Gesundheit und die Umwelt, die andernfalls durch unsachgerechte
Müllentsorgung auftreten könnten.
Für weitere Informationen zum Sammeln und Wiederaufbereiten alter Elektrogeräte und Batterien, kontaktieren Sie bitte Ihre
örtliche Stadt- oder Gemeindeverwaltung, Ihren Abfallentsorgungsdienst oder die Verkaufsstelle der Artikel.
[Information für geschäftliche Anwender in der Europäischen Union]
Wenn Sie Elektrogeräte ausrangieren möchten, kontaktieren Sie bitte Ihren Händler oder Zulieferer für weitere Informationen.
[Entsorgungsinformation für Länder außerhalb der Europäischen Union]
Diese Symbole gelten nur innerhalb der Europäischen Union. Wenn Sie solche Artikel ausrangieren möchten, kontaktieren Sie
bitte Ihre örtlichen Behörden oder Ihren Händler und fragen Sie nach der sachgerechten Entsorgungsmethode.
Anmerkung zum Batteriesymbol (untere zwei Symbolbeispiele):
Cd
Dieses Symbol kann auch in Kombination mit einem chemischen Symbol verwendet werden. In diesem Fall entspricht dies den
Anforderungen der Direktive zur Verwendung chemischer Stoffe.
-----------------------------------------------------------------------------------------------------------------------------------------------------------------------
-----------------------------------------------------------------------------------------------------------------------------------------------------------------------
Informazioni per gli utenti sulla raccolta e lo smaltimento di vecchia attrezzatura e batterie usate
Questi simboli sui prodotti, sull’imballaggio, e/o sui documenti che li accompagnano significano che i prodotti e le batterie
elettriche e elettroniche non dovrebbero essere mischiati con i rifiuti domestici generici.
Per il trattamento, recupero e riciclaggio appropriati di vecchi prodotti e batterie usate, li porti, prego, ai punti di raccolta
appropriati, in accordo con la Sua legislazione nazionale e le direttive 2002/96/CE e 2006/66/CE.
Smaltendo correttamente questi prodotti e batterie, Lei aiuterà a salvare risorse preziose e a prevenire alcuni potenziali effetti
negativi sulla salute umana e l’ambiente, che altrimenti potrebbero sorgere dal trattamento improprio dei rifiuti.
Per ulteriori informazioni sulla raccolta e il riciclaggio di vecchi prodotti e batterie, prego contatti la Sua amministrazione
comunale locale, il Suo servizio di smaltimento dei rifiuti o il punto vendita dove Lei ha acquistato gli articoli.
[Per utenti imprenditori dell’Unione europea]
Se Lei desidera disfarsi di attrezzatura elettrica ed elettronica, prego contatti il Suo rivenditore o fornitore per ulteriori informazioni.
[Informazioni sullo smaltimento negli altri Paesi al di fuori dell’Unione europea]
Questi simboli sono validi solamente nell’Unione europea. Se Lei desidera disfarsi di questi articoli, prego contatti le Sue
autorità locali o il rivenditore e richieda la corretta modalità di smaltimento.
Noti per il simbolo della batteria (sul fondo due esempi di simbolo):
È probabile che questo simbolo sia usato in combinazione con un simbolo chimico. In questo caso è conforme al requisito
stabilito dalla direttiva per gli elementi chimici contenuti.
Cd
-----------------------------------------------------------------------------------------------------------------------------------------------------------------------
Información para Usuarios sobre Recolección y Disposición de Equipamiento Viejo y Baterías usadas
Estos símbolos en los productos, embalaje, y/o documentación que se acompañe significan que los productos electrónicos y
eléctricos usados y las baterías usadas no deben ser mezclados con desechos hogareños corrientes.
Para el tratamiento, recuperación y reciclado apropiado de los productos viejos y las baterías usadas, por favor llévelos a
puntos de recolección aplicables, de acuerdo a su legislación nacional y las directivas 2002/96/EC y 2006/66/EC.
Al disponer de estos productos y baterías correctamente, ayudará a ahorrar recursos valiosos y a prevenir cualquier potencial
efecto negativo sobre la salud humana y el medio ambiente, el cual podría surgir de un inapropiado manejo de los desechos.
Para mayor información sobre recolección y reciclado de productos viejos y baterías, por favor contacte a su municipio local,
su servicio de gestión de residuos o el punto de venta en el cual usted adquirió los artículos.
[Para usuarios de negocios en la Unión Europea]
Si usted desea deshacerse de equipamiento eléctrico y electrónico, por favor contacte a su vendedor o proveedor para mayor
información.
[Información sobre la Disposición en otros países fuera de la Unión Europea]
Estos símbolos sólo son válidos en la Unión Europea. Si desea deshacerse de estos artículos, por favor contacte a sus autoridades locales y pregunte por el método correcto de disposición.
Nota sobre el símbolo de la batería (ejemplos de dos símbolos de la parte inferior)
Este símbolo podría ser utilizado en combinación con un símbolo químico. En este caso el mismo obedece a un requerimiento
dispuesto por la Directiva para el elemento químico involucrado.
Cd
-----------------------------------------------------------------------------------------------------------------------------------------------------------------------
Informatie voor gebruikers van inzameling en verwijdering van oude apparaten en gebruikte batterijen
Deze tekens op de producten, verpakkingen en/of bijgaande documenten betekent dat gebruikte elektrische en elektronische
producten en batterijen niet mogen worden gemengd met algemeen huishoudelijk afval.
Breng alstublieft voor de juiste behandeling, herwinning en hergebruik van oude producten en gebruikte batterijen deze
naar daarvoor bestemde verzamelpunten, in overeenstemming met uw nationale wetgeving en de instructies 2002/96/EC en
2006/66/EC. Door deze producten en batterijen juist te rangschikken, helpt u het redden van waardevolle rijkdommen en voorkomt u
mogelijke negatieve effecten op de menselijke gezondheid en de omgeving, welke zich zou kunnen voordoen door ongepaste
afvalverwerking.
Voor meer informatie over het inzamelen en hergebruik van oude producten en batterijen kunt u contact opnemen met uw
plaatselijke gemeente, uw afvalverwerkingsbedrijf of het verkooppunt waar u de artikelen heeft gekocht.
[Voor zakelijke gebruikers in de Europese Unie]
Mocht u elektrische en elektronisch apparatuur willen weggooien, neem dan alstublieft contact op met uw dealer of leverancier
voor meer informatie.
[Informatie over verwijdering in ander landen buiten de Europese Unie]
Deze symbolen zijn alleen geldig in de Europese Unie. Mocht u artikelen weg willen gooien, neem dan alstublieft contact op met
uw plaatselijke overheidsinstantie of dealer en vraag naar de juiste manier van verwijderen.
Opmerking bij het batterij teken (onderkant twee tekens voorbeelden):
Cd
Dit teken wordt mogelijk gebruikt in combinatie met een chemisch teken. In dat geval voldoet het aan de eis en de richtlijn,
welke is opgesteld voor het betreffende chemisch product.
-----------------------------------------------------------------------------------------------------------------------------------------------------------------------
WZ25960-0
Printed in China