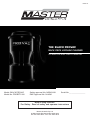
1
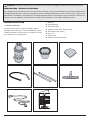
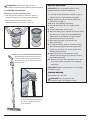
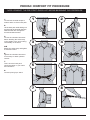
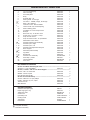
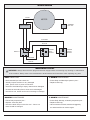
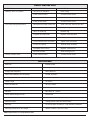
Issue: 2
THE BLACK PROVAC
BACK PACK VACUUM CLEANER
OPERATOR AND PARTS MANUAL
Model: BLACK PROVAC
Model No: PROBFT1000
Safety approval No: NSW21128
EMC Approval No: N14590
Serial No:________________
Before using machine:
For Safety - Read all safety and operator instructions
Master Australia Pty Ltd
45 Marrickville Rd Marrickville NSW 2204
Ph: 612 9550 5800 • Fax: 612 9550 5876
1
CONTENTS
IMPORTANT SAFETY PRECAUTIONS_____________________________________________________________________3
MODIFICATIONS________________________________________________________________________________________4
MACHINE INSTALLATION ____________________________________________________________________________4/5
Machine contents
Machine assembly
MACHINE OPERATION __________________________________________________________________________________5
STORING MACHINE ____________________________________________________________________________________5
PROVAC COMFORT FIT _________________________________________________________________________________6
INSTASWAP - REPLACE LEAD, SHOULDER PADS & WAIST BELT _________________________________________7
PARTS DIAGRAM ______________________________________________________________________________________8
PARTS NUMBERS _____________________________________________________________________________________9
OPTIONAL ACCESSORIES _______________________________________________________________________________9
WIRING DIAGRAM ____________________________________________________________________________________10
MAINTENANCE ADVICE _______________________________________________________________________________10
DAILY START & FINISH CHECK LIST ___________________________________________________________________11
TROUBLE SHOOTING GUIDE ___________________________________________________________________________12
SPECIFICATIONS ______________________________________________________________________________________12
WARRANTY STATEMENT _____________________________________________________________________________13
NOTES _______________________________________________________________________________________________14
2
INTRODUCTION
IMPORTANT SAFETY INSTRUCTIONS!
Your new Provac Backvac Vacuum Cleaner is designed
for the professional daily maintenance of carpets and hard
floors. Your Provac vacuum cleaner has been built with
quality and reliability in mind. If the safety precautions and
maintenance instructions are followed, you will enjoy many
years of trouble free operation.
The following information signals potentially dangerous
conditions to the operator or equipment
WARNING: To reduce the risk of fire, explosion,
electrical shock or injury
FOR SAFETY:
1.DO NOT operate the machine:
Please familiarise yourself with the features and operating
functions of your new Provac to further enhance your
satisfaction of this quality Provac product. It is important that
this manual is carefully read and understood by all operators.
In the unlikely event of technical defects or faults then please
contact your nearest Provac repair agent or distributor.
• Unless trained and authorized.
• Unless operator manual and safety instructions are read.
• If machine has been dropped, damaged, left outdoors or
dropped into water.
• To vacuum toxic, combustible or flammable material.
Thank you for choosing a Provac quality product.
• To vacuum liquids.
• With a damaged cord or plug.
SAFETY PRECAUTIONS
• If not in proper operating condition.
The Provac is designed for the vacuuming of non-explosive
dusts. It is designed for commercial vacuum cleaning
• On wet surfaces.
applications such as offices, hospitals, hotels, schools etc.
All electrical parts are thoroughly secured and protected and
can only be removed with the correct tools, by an
authorised and qualified service technician. The machine
conforms to AS/NZ 60335.1:2002 and AS/NZ
60335.2.2:2002.
• In outdoor areas.
• In the rain.
• Standing in water.
• Without dust bag..
2. When using the machine:
The following safety alert symbols are used throughout this
manual as indicated in their description:
• DO NOT pull cord around sharp edges or corners.
WARNING: To warn of hazards or unsafe practices
which could result in severe personal injury or death.
• DO NOT handle plug or machine with wet hands.
FOR SAFETY: To identify actions that must be followed for
safe operation of equipment.
• DO NOT unplug by pulling on cord.
• DO NOT vacuum anything burning or smoking,
such as live ashes, cigarette butts or matches.
• DO NOT leave machine when plugged in.
READ ALL INSTRUCTIONS BEFORE USING
THIS APPLIANCE
3. When using the machine:
FOR SAFETY: This appliance is not intended for use by
young children or inferm persons unless they have been
adequately supervised by a responsible person to ensure
that they can use the appliance safely.
• Keep cord away from heated surfaces.
Young children should be supervised to ensure that they
do not play with the appliance.
• Use only as described in this manual.
• Work within cord length to avoid cable stress
and damage.
• Report machine damage or faulty operation immediately.
4. Before leaving or servicing machine:
• Turn off machine.
• Unplug cord from wall socket outlet.
• Use manufacturer supplied or approved replacement
parts.
3
WARNING: Hazardous Voltage. Shock or electrocution can result. Unplugging machine before servicing IS A MUST.
MODIFICATIONS - REPAIRS OR SERVICING
Only original parts and accessories are to be used. Failure to adhere to these recommendations could result in machine failure
and damage that will not be covered by the appliance warranty. Damaged equipment could also result in injury to persons. The
manufacturer, its distributors and agents cannot be held responsible at all for any damage or injury whatsoever, caused by the
improper use of the appliance, unauthorised use, unauthorised modifications or non-original replacement parts..
MACHINE INSTALLATION
1. Machine contents:
Carefully check carton for signs of damage. Report
damage to the supervisor or carrier immediately. Check
machine contents to ensure carton is complete. Contact
your distributor for missing items.
1.
2.
3.
4.
5.
6.
7.
8.
Machine
Cloth filter bag
Secondary filter
Flexible suction hose with pistol grip
Hand tubes (two pieces)
Floor tool
Power Lead
Operator and parts manual
1
2
3
4
5
6
7
8
4
WARNING: Hazardous Voltage. Shock or
electrocution can result. Unplug machine before servicing.
2. ASSEMBLY OF MACHINE
Cloth filter bag and secondary filter:
• Twist the lid anti-clockwise to expose inside bag
compartment. Be sure that the vacuum filter bag
and secondary filter are inside the bag
compartment before vacuuming. Close lid.
MACHINE OPERATION
FOR SAFETY: Do not operate machine unless
operator manual is read and understood.
1. Fit lid with outlet positioned on the left or right of
machine for left or right handed vacuuming.
2. Wear machine as per the “Provac Comfort Fit
Procedure” on page 6.
3. Move to area requiring vacuuming.
4. Connect the plug to the main supply socket
outlet.
5. Turn the illuminated switch to ON.
6. Begin vacuuming floor. Operate the vacuum wand
and floor tool in a back and forth PENDULUM
LIKE motion whilst keeping your back upright.
DO NOT vacuum across your body.
7. Stay within the length of the power cord
when vacuuming.
8. To stop vacuuming, switch the machine off and
disconnect the plug from the main supply wall
socket. Do not pull on the cord as it will cause
damage. Pull from plug.
Suction hose, hand tubes and floor tool:
• Assemble the hand tubes and vacuum
hose by simply pushing them together.
Push the floor tool into the lower end of
the hand tubes.
9. Always wind up the cord starting from the
machine end [not plug end] and hang it around
the handle/cord holder.
10. Move to next area and follow steps 1-9 or refer
to operator machine check list on completing
vacuuming.
FOR SAFETY: When using machine, do not unplug
by pulling on cord.
STORING MACHINE
Store machine in a dry area.
WARNING: Do not expose to rain.
Store indoors. Keep out of children's reach.
• Connect the end of the suction
hose to the machine by turning
the hose connector one turn
anti clockwise.
5
PROVAC COMFORT FIT PROCEDURE
NOTE: CONDUCT THE PRE START CHECK LIST BEFORE BEGINNING THIS PROCEDURE
1.
Loosen both shoulder straps to
make it easier to fit the back pack.
1
2
3
4
5
6
7
8
2.
Lift the back pack while sliding one
arm through the shoulder harness.
Slide the other arm through the
second shoulder harness.
3.
Loosen the shoulder harnesses
before buckling the waist strap,
so the weight of the unit is sitting
comfortably on the waist.
4–5.
Buckle the waist strap and tighten
to desired comfort.
6.
Tighten the shoulder harnesses
if necessary to attain optimum
comfort.
7.
This is how the back pack
should be sitting on your waist
and shoulders.
8.
Connect pistol grip to wand.
6
InstaSwap
REPLACING THE POWER LEAD, SHOULDER PADS AND WAIST BELT
Removing the power lead:
1. Disconnect the connector plug
from the machine.
Installing the
power lead:
1. Feed approximately
45cm of lead between
back support and lower
body, then connect
plug into the socket.
Removing the shoulder straps:
1. Remove shoulder adjustment
strap from the buckle and loop
on the shoulder pad.
Installing the shoulder straps:
1. Start with the shoulder pad
loop entering the handle area.
Feed pad over the handle and
through the loop.
Removing the waist belt:
1. Manoeuvre the tri-slide to a
verticle position so it can slide out
through the slot.
Installing the waist belt:
1. Manoeuvre the tri-slide to a
vertical position so it can slide
into the slot.
7
2. Slide lead out between
back support and machine.
Remove from cable restraint.
2. Feed power lead
into cable restraint
leaving approximately
20cm of slack in the
cable at the plug end.
2. Remove shoulder pad from
the handle by feeding the pad
back through the loop end
around the handle.
2. Feed the shoulder
adjustment strap through
the loop and buckle on
the shoulder pad.
2. Push tri-slide out through
the slot.
3.Repeat on other side.
2. Push tri-slide in through
the slot.
3. Repeat on other side.
PROBFT1000 BLACK PROVAC
1
14
15
2
16
3
17
4
18
19
5
21
6
20
7
8
9
22
10
23
24
11
25
26
12
27
28
13
8
PROVAC PARTS LIST - PROBFT1000
1
2
3
4
5
6
7
l 8
l
9
10
11
12
13
14
15
16
17
l 18
l 19
l 20
21
22
l 23
l 24
25
l 26
27
28
Lid - incl. locking ring
Filter dust Bag
Secondary filter
Body
Exhaust filter - set
Motor gasket - flo through
Vac motor - 1000W, 2 stage, flo through
EMC - RFI capacitor
Thermal cut out - NOT SHOWN
Carbon brush set, self interrupting
Motor retaining plate
Insulation set - lower body & base
Bumper
Base end cap - for flo thru motor
Power lead - 15 metre, 7.5 amp
Snap in male socket
Snap in female socket - for powerhead
Illuminated rocker switch
Shoulder harness pad assembly
Shoulder pad - Right
Shoulder pad- Left
Shoulder pad adjustment strap,set
Back Support
Waist belt pad assembly
trig-slides
Belt buckle
Vacuum hose assembly
Pistol Grip - plastic
Chrome Wands
Floor Tool
PRO1001
PRO1027
PRO1035
PRO1026
PRO1014
PRO1010
PRO1039
PRO1036
PRO1044
PRO1047
PRO1007
PRO1038
PRO1009
PRO1004
PRO1031
PRO1033
PRO1034
PRO1022
PRO1028
PRO1045
PRO1046
PRO1030
PRO1006
PRO1029
PRO1020
PRO1019
HOSECOMP
PISTOLP
WANDCHR
PR01052
1
1
1
1
1
1
1
1
1
1
1
1
1
1
1
1
1
1
1
1
1
1
1
1
2
1
1
1
2
1
NOT SHOWN IN DIAGRAM
Screws for Motor Retaining Bracket -------------------------------------------------------------Screws 6 x 1 1/2" pan phillips
PRO1041
4
Screws, washers and nut for Back Support ----------------------------------------------------------------Screws - M4 x 12 combo ZP
PRO1042
4
Washer - M4 ext z/p ZP
PRO1050
4
Nut -M4 hex`steel std ZP
PRO1049
4
Screws for Base End Cap -------------------------------------------------------------------------------------------------Screws - Black 6 x 1/2" pan phillips
PRO1043
4
Decals - warning, dry vac, output
PRO1037
1
Thermal cut out
PRO1044
1
Wire Harness
PRO1051
1
OPTIONS AVAILABLE
Stainless Steel pistol grip
Paper bags [pk of 10]
Telescopic wand
Crevice tool
Upholstery Tool
Dusting brush
Turbohead
Powerhead
= Complete Assembly
l = Included in Assembly
9
PISTOL
PRO1051
WAND EXT
CREVICE
UPHOLSTERYS
UPHOLSTERY
TURBO
POWERHEAD
1
1
1
1
1
1
1
1
WIRING DIAGRAM
BLACK
MOTOR
THERMAL
CUT OUT
CAPACITOR RFI
BLACK
A BROWN
N BLUE
POWER
INLET
SOCKET
SWITCH
POWER
OUTLET
SOCKET
A BROWN
N BLUE
MAINTENANCE ADVICE
WARNING: Always disconnect the plug from the main supply before commencing any cleaning or maintenance
of the machine. Always refer to the manufacturers technical data and instructions when replacing any parts
DAILY INSPECTION
3 MONTH MAINTENANCE
• Refer attached pre start check list.
• Visually inspect machine for any damaged
parts, power cords or power connections.
• Check the cloth filter bag is empty, clean and not damaged.
• Check that secondary filter is clean and not damaged.
• Check floor tool, wands and hose for blockage or damage.
• Follow Daily and Monthly Inspection plus…
• Replace cloth bag.
MONTHLY MAINTENANCE
6 MONTH MAINTENANCE
• Follow Daily Inspection plus…
• Replace secondary filter.
• Check the brush strips on the floor tool - if worn out
these should be changed.
• Follow Daily, Monthly, 3 Monthly Inspection plus…
• Replace cloth bag.
• Have machine serviced, tested and tagged by
an authorised Provac service agent.
10
DAILY START & FINISH CHECK LIST
WARNING: HAZARDOUS VOLTAGE - SHOCK OR ELECTROCUTION
CAN RESULT FROM USING MACHINE WITH DAMAGED CORD
1
Check power lead and plug.
Replace damaged cord before
using machine.
2
Check the dust bag is empty.
Clean it if necessary before and
after vacuuming.
3
Check the secondary filter.
Replace or clean filter
as necessary.
4
Check floor tool, vacuum
hose and connector for
damage or blockage.
REPORT ANY DAMAGE OR REPAIR NEEDS IMMEDIATELY TO YOUR SUPERVISOR
OR CONTACT YOUR LOCAL PROVAC REPAIR AGENT AS SOON AS POSSIBLE.
11
TROUBLE SHOOTING GUIDE
PROBLEM
• Machine does not operate
• Poor Vacuuming Performance
• Noisey vacuum motor
POSSIBLE CAUSE
SOLUTION
Plug loose on machine
Push in plug
Faulty vacuum motor
Contact service centre
Faulty power cord
Replace power cord
Faulty power switch
Contact service centre
Blocked hose, wand or floor tool
Clean out hose, wand or floor tool
Full bag
Empty out bag
Worn out cloth bag
Replace bag
Clogged secondary filter
Replace secondary filter
Faulty vacuum motor
Contact Service centre
Loose vacuum hose connection
Tighten hose connection
Lid not on properly
Twist lid firmly clockwise
Damaged vacuum hose
Replace vacuum hose
Blocked lid intake
Clear blockage in lid
Faulty vacuum motor
Contact service centre
SPECIFICATIONS
Model No
PROBFT1000
Motor Type
2 Stage, flow through
Voltage and Frequency
240v, 50/60 Hz
Motor Rated Wattage and Amperage
1000W, 4.5amps
Dust Bag Capacity
5 Litres
Cable Length
15 metres
Airflow & Water-lift
42L/sec, 239cm
Sound level
72dB(A)
Filtration
98% down to 1 micron
Safety Electrical Approval No.
NSW21128
EMC Conformity – C tick No.
N14590
Machine weight
4.06kg [without cable and accessories]
Warranty
12 months parts and labour – refer warranty statement
Packaging Dimensions and weight
355cm x 300cm x 550 cm, 5.5Kg
NOTE: Specifications can change without notice
12
WARRANTY STATEMENT
Master Australia Pty Ltd warrants it's products against manufacturers defects in material and workmanship
for a period of 12 months, including labour, from date of original purchase, to the original purchaser.
Should a component fail within the warranty period, Master Australia Pty Ltd or its Authorised Service Agent:
1. Will evaluate the defective component to establish the reason for failure
2. Will replace or repair the component free of charge to the original purchaser should the defect or fault be of a
warrantable nature.
3. Upon inspection of the fault, deeming it non-warrantable, reserves the right to charge for the inspection service and, at
the original purchasers discretion to pursue the repair, subsequently charge for components and labour for the repair.
Without limiting the generality of the foregoing, but subject to any statute, the following components and conditions are
specifically not covered in this warranty:
1. Any electrical components found damaged from water.
2. Any components damaged from use of chemicals detrimental to its life.
3. Components that have normal wear and tear, or lack of maintenance upkeep, including but not limited to hoses,
floor tools and attachments, seals, gaskets and the like.
4. Damage caused by accident, misuse, negligence, abuse or fire.
5. Any Master Australia Pty Ltd products that have not been repaired by Master Australia Pty Ltd or it's Authorised
Service Agents.
6. Freight/transporting costs for delivery and return of the product.
This warranty is void should the products be used for anything other than what the product was intended.
There are no other warranties expressed or implied, including any implied warranties of merchantability or fitness
for a particular purpose. In no event shall Master Australia Pty Ltd be liable for incidental or consequential damages
to persons or property.
13
NOTES: _________________________________________________________________________
________________________________________________________________________________
________________________________________________________________________________
________________________________________________________________________________
________________________________________________________________________________
________________________________________________________________________________
________________________________________________________________________________
________________________________________________________________________________
________________________________________________________________________________
________________________________________________________________________________
________________________________________________________________________________
________________________________________________________________________________
________________________________________________________________________________
________________________________________________________________________________
________________________________________________________________________________
________________________________________________________________________________
________________________________________________________________________________
________________________________________________________________________________
________________________________________________________________________________
________________________________________________________________________________
________________________________________________________________________________
________________________________________________________________________________
________________________________________________________________________________
________________________________________________________________________________
________________________________________________________________________________
________________________________________________________________________________
14
Master Australia Pty Ltd
45 Marrickville Rd Marrickville NSW 2204
Ph: 612 9550 5800 • Fax: 612 9550 5876