1
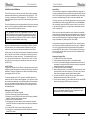
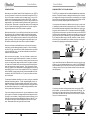
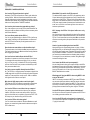
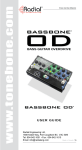
Radial Engineering Ltd. warrants this product to be free from defects
in material and workmanship and will remedy any such defects free of
charge according to the terms of this warranty. Radial Engineering will
repair or replace at its option any defective component(s) of this product,
excluding the finish, the tube, the footswitch (tubes and footswitches are
warranted for 90 days) and wear and tear from normal use, for a period
of three (3) years from the original date of purchase. In the event that a
particular product is no longer available, Radial Engineering reserves the
right to replace the product with a similar product of equal or greater value.
To make a request or claim under this limited warranty, the product must
be returned prepaid in the original shipping container (or equivalent) to
Radial Engineering or to an authorized repair centre and you must assume the risk of loss or damage. A copy of the original invoice showing
date of purchase and the dealer name must accompany any request for
work to be performed under this limited warranty. This limited warranty
shall not apply if the product has been damaged due to abuse, misuse,
misapplication, accident or as a result of service or modification by any
other than an authorized repair centre.
THERE ARE NO EXPRESSED WARRANTIES OTHER THAN THOSE
ON THE FACE HEREOF AND DESCRIBED ABOVE. NO WARRANTIES WHETHER EXPRESSED OR IMPLIED, INCLUDING BUT NOT
LIMITED TO, ANY IMPLIED WARRANTIES OF MERCHANTABILITY OR
FITNESS FOR A PARTICULAR PURPOSE SHALL EXTEND BEYOND
THE RESPECTIVE WARRANTY PERIOD DESCRIBED ABOVE OF
THREE YEARS.
RADIAL ENGINEERING SHALL NOT BE RESPONSIBLE OR LIABLE
FOR ANY SPECIAL, INCIDENTAL OR CONSEQUENTIAL DAMAGES OR
LOSS ARISING FROM THE USE OF THIS PRODUCT. THIS WARRANTY
GIVES YOU SPECIFIC LEGAL RIGHTS, AND YOU MAY ALSO HAVE
OTHER RIGHTS, WHICH MAY VARY DEPENDING ON WHERE YOU
LIVE AND WHERE THE PRODUCT WAS PURCHASED.
True to the Music
1638 Kebet Way, Port Coquitlam BC V3C 5W9
tel: 604-942-1001 fax: 604-942-1010 email: [email protected]
Tonebone PZ-Pre users guide V1.0 - Part #: R870 1205 00
www.radialeng.com
www.tonebone.com
RADIAL ENGINEERING
3 YEAR LIMITED WARRANTY
PZ-Pre
Acoustic Instrument Preamp
User Guide
Radial Engineering Ltd.
1638 Kebet Way, Port Coquitlam BC V3C 5W9
Tel: 604-942-1001 Fax: 604-942-1010
email: [email protected]
True to the Music
Radial PZ-Pre
Acoustic Instrument Preamp
Users Guide
Table of Contents
Page
Introduction.................................................................. 1
Feature Set.................................................................. 2
Input Section ............................................................... 4
Filter and EQ Section .................................................. 6
Output Section............................................................. 8
Instrument Connection ................................................ 9
Output Connection ...................................................... 11
Setting Up The PZ-Pre ................................................ 12
Controlling Feedback .................................................. 14
Stage Setups............................................................... 16
Adding Boost and Effects ............................................ 17
FAQ ............................................................................. 18
Specif cations .............................................................. 20
Warranty ................................................................Back Cover
Congratulations on your purchase of the Radial PZ-Pre, without
a doubt the most challenging pedal we have ever produced! Why?
Simply put, it is so jammed with features that it took us over two
years to get it right! And with all of these features, we absolutely
recommend that you take a few minutes to read through this
manual to familiarize yourself with all of the PZ-Pre functions
before you get started.
Like all Radial products, the PZ-Pre is built to the very highest
standards with the very best components, and provides the type
of durability you would expect for concert stage use. If, after reading this manual, you have a question please visit the FAQ in the
PZ-Pre section of our web site. This is where we post the latest
notes. If you have a question that is not covered please send your
email to [email protected] and we will do our very best to get
back to you promptly.
INTRODUCTION
The Radial PZ-Pre is a very unique pedal. Although the PZ-Pre
is likely to be the best sounding acoustic guitar preamp you
have ever experienced, it is not dedicated to just guitars. W e
designed the PZ-Pre from the ground up to work with all types of
instruments including violin, cello, contrabass, mandolin, Dobro,
bouzouki, harp, sitar and banjo! In fact it will likely do a smash-up
job on brass and woodwinds too! This is because the two inputs
have been designed to accept all types of pickups and the onboard equalizer is both very powerful and musical.You can even
combine the two inputs should you wish to use two pickups at
the same time!
Our quest for f exibility did not stop there; we also equipped the
PZ-Pre with four outputs so that it could drive four separate signal
paths at the same time! And each output is managed differently
to address different needs.
The instrument output is designed for the on-stage musician. An
electric f ddle player may have numerous effects pedals and an
over-driven guitar amp on stage to create various sonic textures
while a bouzouki player may have his vintage Twin. The tuner
output works with the mute footswitch for silent on-stage tuning
and instrument changeover.
There are also two built-in Radial direct boxes with balanced
XLR outputs. Output-1 is a pre-EQ, pre-effects output designed
to feed a clean signal to the PA system while output-2 is post-EQ
and post effects, to feed stage monitors and in-ear systems with
a completely different mix. For instance, when playing in a typical
arena, there is so much echo that the last thing you would want
would be to send a ‘wet instrument’ (sound with lots of echo and
reverb) into the PA system. On the other hand, adding reverb to
your in-ear system will often give you a better sense of space and
a more natural feel to the performance.
The built-in f exibility is further expanded with an ef fects loop,
power booster and probably the best sounding front end you have
ever encountered for your instrument. Best of all, it is all housed
in a super compact pedal that can f t in any gig bag and travel
with you wherever you go.
Now get ready to pluck, pick, bow, twang and strum till dawn!
Radial Engineering Ltd.
1638 Kebet Way, Port Coquitlam BC V3C 5W9
tel: 604-942-1001 fax: 604-942-1010 email: [email protected]
www.radialeng.com
Specifications and appearance subject to change without notice.
Copyright © 2007 Radial Engineering Ltd.
Radial Engineering Ltd.
1
PZ-Pre User Guide
True to the Music
True to the Music
FEATURES AND FUNCTIONS
13
12
11
9
10
8
7
6
5
4
3
14
2
15
1
16
17
18
19
20
1. INPUT-1: ¼" connection for f rst instrument.
2. PZB-1: recessed switch activates piezo buf fer for input-1.
Push in with tweaker to turn buffer on.
3. TOGGLE: footswitch selects between input-1 and input-2.
4. BLEND-MIX: recessed switch selects between toggle mode
and mix/blend mode.
5. INPUT-2: ¼" connection for second instrument.
6. LEVEL-1: gain control for input-1.
7. LEVEL-2: gain control for input 2.
8. NOTCH: used to sweep the frequency of the notch f lter.
9. HIGH: high frequency shelving EQ. Boosts or cuts treble.
10. MID: amplitude control for semi-parametric mid EQ.
11. FREQ: frequency control for semi-parametric mid EQ.
12. LOW: low frequency shelving EQ. Boosts or cuts bass.
13. BOOST: variable level control for the power booster.
14. MUTE: footswitch mutes all outputs except tuner out.
15. OUTPUT: ¼” out for instrument amplif er.
16. PHASE: (polarity) inverts the signal polarity at the ¼"
instrument output.
17. FOOTSWITCH ASSIGN: sets function of boost footswitch
between power boost, effects loop or both.
18. BOOST: activates power booster and/or ef fects loop
depending on setting of footswitch assign switch.
19. NOTCH Q: sets the depth of the notch f lter.
Select between normal, deep and bypass.
20. LO-CUT: high-pass f lter removes low frequencies to eliminate
resonant feedback. Select between bypass and two low-cut
settings.
Radial Engineering Ltd.
2
PZ-Pre User Guide
21
22
23
24 25
26
27
28
21. PZB-2: recessed switch activates piezo buf fer for input-2.
Push in with tweaker to turn buffer on.
22. LOOP SEND & RETURN: The built-in effects loop uses ¼”
jacks to connect effect pedals.
23. PRE-EQ: balanced XLR direct box out taps signal beforef lter,
EQ, effects loop and boost sections. Outputs an un-processed
signal to the "house" PA, or recording console.
24. LIFT: recessed ground lift switch disconnects pin-1 on both
XLR outputs to reduce hum and buzz from ground loops.
25. 180°: recessed switch reverses signal polarity at post-EQ
XLR output.
26. POST-EQ: balanced XLR direct box out taps signal after
f lter, EQ, loop and boost sections. Outputs a signal to the
monitor system so the player can control their on-stage tone
with the PZ-Pre.
27. TUNER: buffered ¼” output to feed an electronic tuner.
28. 15VDC-400mA: power supply connection 15 volts DC, center
pin positive. Use only with Radial power supply #R8009407
Radial Engineering Ltd.
3
PZ-Pre User Guide
True to the Music
INPUT SECTION
Tuner Output
This buffered output is dedicated
for an electronic tuner . Since it is
buffered, connecting a tuner won’t
load down your pickup's tone. The
TUNER output is always on to allow
silent tuning in conjunction with the
MUTE footswitch.
ON
PIEZO
BUFFER
IN 1
PIEZO
LEVEL 1
TUNER
TUNER OUT
ON
TOGGL E
MUTE
PIEZO
BUFFER
IN 2
PIEZO
MIX
LEVEL 2
True to the Music
MIX
Input-1 and 2
The PZ-Pre features two ¼” inputs, each equipped with its
own LEVEL control. The f exible dual input design lets a player
connect and switch between instruments simply by stomping on
the TOGGLE footswitch. Most performers, whether they play
acoustic guitar or mandolin, tend to have two instruments on
stage. The second instrument is often for backup should a string
break; in some cases, it may be tuned differently, or it may even
be a completely different instrument! The PZ-Pre is equipped to
be a control center for two instruments.
PZB-1 and 2 Piezo Pickup Buffers
Each PZ-Pre input features
a special piezoelectric
pickup (piezo) buffer that
can be switched into the
signal path when needed.
These 100% Class-A
buffers allow a passive
piezo pickup element to
be connected directly to
the PZ-Pre without the use Input-1 Piezo Blend Input-2
Piezo
Buffer 2
Buffer 1
of a separate preamp. The
piezo buffer increases the
gain while elevating the
input impedance to 10meg ohms. This ensures the piezo pickup
“sees” the optimum input impedance for signal transfer which will
result in better tone. To activate the piezo buf fer use a tweaker
(small screwdriver) to push in the recessed PZB switch.There is
a separate PZB switch for each input channel.
Mute Footswitch with LED
The MUTE footswitch allows silent
tuning on stage through theTUNER
output and may also be used for
instrument change-over. Depressing
this footswitch will mute all outputs
except the TUNER out. The LED
illuminates to indicate the PZ-Pre
is in mute mode.
Blend-Mix
The BLEND-MIX function is typically used with instruments that
have two pickup elements or two dif ferent pickup systems. It
allows you to blend the two input channels using the LEVEL
controls to set up a mix. For instance, you can use the MIX mode
to blend an active on-board pickup with a passive piezo to create
a more natural acoustic sound.Alternatively, you can use the MIX
mode to connect two guitars to one amp for jamming with another
player. The MIX mode is activated by depressing the recessed
BLEND-MIX switch using a small screwdriver or tweaker . The
TOGGLE footswitch will not work when the MIX mode is active.
Input-1 is specially equipped to allow a stereo TRS cable (Tip,
Ring, and Sleeve) to access both PZ-Pre channels. This feature
is designed for instruments that combine two pickup systems
through a stereo TRS jack. A stereo TRS cable will allow you
to connect both pickups to separate PZ-Pre inputs with a single
cable. From there you can toggle between the two pickup systems
or blend them together.
Saddle
Pickup
TRS Jack &
Plug
Piezo
Pickup
LEVEL-1 and 2
Separate level controls
adjust the volume of each
instrument input for the
proper on-stage balance.
Radial Engineering Ltd.
Tip
Saddle Pickup
Ring
Piezo Pickup
4
PZ-Pre User Guide
Radial Engineering Ltd.
5
PZ-Pre User Guide
True to the Music
True to the Music
FILTER and EQ SECTIONS
GAIN
FREQ
220 Hz
75 Hz
BYPASS
-8dB
-16dB
BYPASS
LOW-CUT FILTER
NOTCH FILTER
Bal.
Driver
PHASE REV
3-Band EQ
BOOST
F/X
LOOP
PRE-EQ
DI OUT
of the f lter from 56Hz to 220Hz while the NOTCH Q switch
controls the width and attenuation of the f lter. The NORMAL
setting introduces an -8dB notch, the DEEP setting introduces
a -15dB notch. The notch f lter can be removed from the signal
path by setting it to BYPASS.
3-Band Semi-Parametric EQ
This three-band semi-parametric EQ is shared between the two
inputs. HIGH and LOW are shelving type EQ and adjust the
treble and bass response. The sweepable midrange EQ uses
two controls: MID controls the amount of boost or cut, while FREQ
sweeps the frequency spectrum.
GN D LIFT
Phase Reverse (¼” Stage Amp Output only)
Technically speaking, this is actually a
polarity reverse switch that lets you control
the polarity of the signal at the ¼” instrument
OUTPUT. This switch is used to help reduce
feedback when the monitors or PA system
coincide with the instrument amp to cause
a feedback hot-spot where the performer is
situated on stage.
Pre-EQ Balanced XLR Output
This balanced XLR output is
essentially an active direct box. It
produces a 600 ohm, mic-level signal
suitable for connection to microphone
snakes and mixing consoles. It taps
the signal before the filters and
equalizer section and is not affected
by the PHASE, BOOST and LOOP
functions. It is intended to feed a PA
or recording system with a clean,
unprocessed signal.
Mixing Console
Ground Lift for Balanced XLR Outputs
The balanced XLR outputs are equipped with a recessed setand-forget ground LIFT switch on the rear panel to reduce hum
and buzz from ground loops. The best setting for this switch is
lifted (pushed in) to eliminate hum and buzz when connecting
your PZ-Pre to a mixing console.
Low-Cut Filter
The three position low-cut f lter (also known
as a hi-pass f lter) is designed to eliminate
low frequency resonant feedback. Selecting
either the 80Hz or 200Hz positions will rolloff low frequencies preventing uncontrolled,
run-away resonant feedback. The LO-CUT
f lter can be removed from the signal path
by setting it to BYPASS.
Boost and Effects Loop
The PZ-Pre is equipped with a power
booster and ef fects loop that can be
kicked in to create dynamic solos or avantgarde textures. The power boost and
effects loop may be activated together or
separately, depending on the position of the
FOOTSWITCH ASSIGN switch.
Boost
When the FOOTSWITCH ASSIGN is set to
BOOST, depressing the BOOST footswitch
will only turn on and off the variable power
booster (effects loop is bypassed). The
BOOST knob sets the level of the power
booster with a maximum of +12dB of clean
boost. When set to BOTH depressing the
footswitch will turn both the ef fects loop
and power booster on or of f. An LED
illuminates when the loop, booster , or
both, are active.
Notch Filter
To help control second order harmonic
feedback, a sweepable notch f lter allows
you to focus on a very narrow frequency
and surgically remove it without af fecting
the over-all tone of the instrument. The
notch f lter on the PZ-Pre has two controls:
NOTCH sweeps the frequency spectrum
Effects Loop
When the FOOTSWITCH ASSIGN
is set to LOOP , depressing the
BOOST footswitch will only turn
on and of f the ef fects loop (power
booster is bypassed). The ¼” effects
loop SEND and RETURN jacks are
used to interface with standard guitar
effects pedals such as reverb, chorus
and delay.
Radial Engineering Ltd.
Radial Engineering Ltd.
6
PZ-Pre User Guide
7
PZ-Pre User Guide
True to the Music
True to the Music
INSTRUMENT CONNECTIONS
OUTPUT SECTION
Because the PZ-Pre can accept dif ferent kinds of pickups it’ s
important to identify which type of pickup your instrument is
equipped with. Typical pickup systems include:
1/4"
INSTRUMENT
OUTPUT
POL REV
POST-EQ
DI OUT
Bal.
Driver
1. Magnetic (passive)
2. Piezo transducers (passive)
3. Magnetic or piezo with on-board preamp (active)
4. Combination magnetic and/or piezo with split output.
GROUND LIFT
Instrument Amp Output
The ¼” OUTPUT jack connects to the musician’ s on-stage
amplif er. This output is at the end of the PZ-Pre signal path and
is affected by all the controls.
Magnetic Pickups (Passive)
These types of pickups are sometimes mounted in the sound
hole of an acoustic guitar . They are referred to as passive
pickups because there are no electronics between the pickup
and instrument output jack. Magnetic pickups connect directly to
the PZ-Pre with an instrument cable.
Post-EQ Balanced XLR Output
This balanced XLR output is another active direct box. It produces
a 600 ohm, mic-level signal suitable for connection to mixing
consoles. The POST-EQ XLR OUT comes at the end of the PZPre signal path after the f lters, equalizer, PHASE, BOOST and
LOOP functions. It is intended to feed a stage monitoring system
or in-ear monitors allowing the player to control their on-stage
tone through the PZ-Pre controls.
Piezo Transducers (Passive)
Piezo transducer pickups can be permanently mounted inside
an instrument, embedded in the bridge or attached to the sound
board with double sided tape.A piezo is considered passive when
there are no active electronics between the transducer and the
instrument output jack. The piezo transducer pickup converts
vibration into a very small electrical current. The current a piezo
produces is so small that it needs a specially designed amplif er
or buffer to increase the signal to a workable level.
180° Polarity Reverse
The POST-EQ XLR balanced output features a polarity reverse
for absolute phase alignment. This recessed switch will invert the
signal polarity of the POST-EQ XLR output by reversing pins-2
and 3 at the XLR connector. The default position for the switch is
pushed out where pin-2 is positive. This is the AES standard for
XLR connectors and is sometimes called “pin-2 hot”.
XLR OUT
Ground Lift
Radial Engineering Ltd.
The PZ-Pre is equipped with a piezo buf fer on each input to
ensure the best possible tone from passive piezo pickups. When
connecting a piezo pickup to the PZ-Pre you should engage the
piezo buffer for the input you’re connecting to. Set the switch to
its “inward” position to engage the piezo buffer.
XLR OUT
Polarity Reverse
8
PZ-Pre User Guide
Radial Engineering Ltd.
9
PZ-Pre User Guide
True to the Music
Magnetic or Piezo Pickups with On-board Preamp
Many electrif ed acoustic instruments feature an on-board preamp
that works with internal pickup systems. The pickups may be
passive magnetic, piezo or a combination of both types. These
instruments are referred to as “active” because there is a preamp
between the pickups and the instrument output that requires a
power source such as a battery. The preamp controls are usually
mounted on the side of the instrument.
Active instruments produce a signal that can connect to the PZPre without the need to engage the piezo buf
fer. The instrument's
on-board preamp will buffer the signal and the output can connect
directly to the PZ-Pre with an instrument cable.
On-board Preamp
Controls
Combination Pickup Systems
Each type of pickup system has strengths and weaknesses, and
some players may use a combination of pickups to create a more
natural tone than either pickup system can produce alone.
You can connect both a magnetic and piezo pickup and use
the unique BLEND-MIX feature to blend the outputs together .
Alternatively, the PZ-Pre can toggle between the pickups to use
the one that best suits the song being played.
Stereo TRS
Output Jack
True to the Music
OUTPUT CONNECTIONS
The PZ-Pre is equipped with four outputs, each of which is
designed for specif c tasks to address various needs on stage.
Instrument Amplifier Output
This ¼” guitar level output is designed to feed an on-stage guitar
amplif er. Think of this output as your own personal ‘world’where
you create your sound and get inspired. You may even set up a
mic in front of your stage amp so the FOH engineer can mix in
your effects with his room mix.
Tuner Output
This ¼” output is separately buf fered so that connecting an
electronic tuner will not have any ef fect on the instrument tone
because of impedance loading. When the MUTE footswitch is
depressed, all other outputs are turned off while the tuner output
remains active. This lets you quietly tune on stage or change
instruments without disrupting the audience.
Pre-EQ and Effects XLR (Dry Direct Box) Output
This balanced mic level XLR output is designed to go into the P
A
system. It is ‘dry’ and unprocessed so that the FOH engineer can
treat this signal to optimize the sound in the P A. For instance,
you may want reverb on stage, but in an arena, this is likely the
last thing that is needed. This is also a great place to connect a
recorder if you plan to produce a CD afterwards. With a clean,
unprocessed track, you can add effects such as reverb or chorus
in post-production or even re-amplify the signal using the Radial
X-Amp. None of the ef fects, EQ or notch f lter will af fect this
output.
Post-EQ and Effects XLR (Wet Direct Box) Output
This is primarily designed to feed stage monitors, but is also where
you would connect your PZ-Pre to the PA if you do not have a FOH
engineer running the PA system. For monitoring, you can have all
of your effects on and create the stage mix that sounds best to
you without interfering with what the FOH engineer may require.
The FOH engineer can receive the dry, unprocessed signal from
the Pre-EQ XLR output. You can also send a wet mix to the house
PA and the FOH engineer can combine both feeds!
Magnetic Pickup
Bridge Saddle Piezo
Radial Engineering Ltd.
10
PZ-Pre User Guide
Radial Engineering Ltd.
11
PZ-Pre User Guide
True to the Music
SETTING UP THE PZ-PRE
Always make sure the equipment you are connecting to is either
turned off, or the volumes are set to zero. This will eliminate any
power-up transients from harming the loudspeakers. To avoid
potential for electric shock, only connect the PZ-Pre to properly
grounded audio equipment. If your instrument uses an on-board
preamp, ensure the battery is fresh and fully charged.
To start, set the PZ-Pre to a neutral setting as shown below .
Connect the power supply and toggle the MUTE and BOOST
footswitches to their off positions.
1.
2.
3.
4.
5.
Setting Instrument Levels
Start with your primary instrument connected to INPUT-1.
Determine the type of pickup you are connecting. If it is a passive
piezo pickup, activate the piezo buffer with the PZB-1 switch.
Stomp on the TOGGLE footswitch until LED-1 illuminates.
Turn on your instrument amplif er or sound system.
Slowly turn LEVEL-1 clockwise and set a comfortable listening
level.
True to the Music
the PA back into the instrument pickup system. This increases
exponentially when you add lots of bass or treble!
The MID control is very important to getting your sound right. Each
instrument tends to work within a given sonic range. For instance,
a violin’s range is much higher than that of a cello or double bass.
However, the character of all instruments is usually in the mid
range. This is also where human hearing is most effective.
The PZ-Pre has a semi-parametric mid-range EQ with one knob
that adjusts the center frequency (FREQ) and another that controls
the intensity (MID). You can cut or boost any frequency within
the controls' range of 82Hz to 5.6kHz. This is also where most
folks get into trouble. Because human ears are most sensitive to
mid-range, we tend to naturally cut it back. Now if you take out
the very essence of the instrument before it gets to the PA, what
do you expect the audience to hear? This is why we included a
separate Pre-EQ output for the front of house P A system. The
Pre-EQ output will give the house engineer a full-range signal to
mix with while the PZ-Pre EQ controls can be adjusted to suit you.
However, in any case be careful not to over-EQ your tone!
The sweep function of the FREQ control is designed to f nd the
range best suited to your instrument’s natural tone. Start by setting
the MID control at 2 o’clock and then sweep the FREQ control
until you f nd the spot where your instrument seems to resonate
at an unpleasant frequency . Then back-off the MID control to
approximately 10 o’clock and listen. Try playing at soft and then
louder volumes to see what happens. Then try f ne tuning the
FREQ control to see where it sounds best. Setting an EQ is more
of an art than a sience but you can not go wrong if you follow EQ
rule number 1: Less is Best!
USING THE PZ-PRE EQ CONTROLS
0 dB
Before you head off to your f rst gig with the PZ-Pre, it is a good
idea to familiarize yourself with the controls in your practice room
and investigate the various functions. Do this at a low volume level
f rst so that you do not cause feedback. Listen to the LO-CUT
(high-pass f lter) and how it af fects the tone of your instrument.
You will probably f nd that using it will clean up the bottom end
of your sound without af fecting the overall tone. In fact, if you
are playing with a drummer and bassist, you will likely f nd that
f ltering the lower registers of your instrument can really improve
the overall mix!
Now listen to the EQ. You will notice that the bass and treble
controls are quite powerful! So be careful! Less is always best
when it comes to equalization. Creating a big, fat sound with lots
of bottom end and a super crisp high end may sound good in
your basement, but live, these frequencies tend to muddy up the
bottom end, and cause the high end to get very harsh, especially
if you have mid-range horns in your PA. Furthermore, feedback
with acoustic instruments occurs when the sound resonates from
Radial Engineering Ltd.
12
PZ-Pre User Guide
Cut
Boost
TIP: The twelve o'clock position is neutral, or zero
boost/cut, for the BASS, TREBLE, and MID controls.
Turning these controls clockwise will increase, or
boost the amplitude while turning counter-clockwise
will decrease, or cut.
If the MID control is at the 12 o'clock position (zero
boost/cut) the FREQ control will have no effect. You
will need to set the MID control to a boost or cut position in order to hear the sweep of the FREQ control.
Radial Engineering Ltd.
13
PZ-Pre User Guide
True to the Music
CONTROLLING FEEDBACK
The PZ-Pre gives you low-cut and notch f lter tools to suppress
feedback and achieve the greatest amount of signal gain. This
concept is called gain before feedback. This section of the
manual will help you set up the PZ-Pre for maximum gain before
feedback.
To test for feedback you should be positioned in the area on stage
where you will be performing. Always test for feedback with your
amp, monitors and PA system turned on.
TIP: Feedback can be very unpleasant to listen to. The
MUTE footswitch can be used as a panic button in case of
uncontrolled run-away feedback. Dampening the strings with
one hand while you adjust the PZ-Pre controls is another
method to control feedback while testing.
Begin your feedback testing by increasing the LEVEL control to
the point where your instrument starts to feedback. Play your
instrument, move around on stage and experience the effect.
At this point, you will likely hear two types of feedback: feedback
when a specif c note sounds, usually on the bass strings, and a
low frequency run-away resonance. The feedback from a specif c note we will deal with later , using the notch f lter. For now,
we will focus on removing the runaway low resonance with the
LO-CUT f lter.
LO-CUT Filter
The goal for using the LO-CUTf lter is to be able to strum the open
strings loud and clear without run-away low frequency resonance
feedback. This type of feedback can often be eliminated simply
by engaging the LO-CUT f lter.
Try this by setting the LO-CUT control to the 80Hz position. Increase the volume and see what happens. If you get more of the
same resonance feedback, try the 200Hz position. In this position,
you can hear that more bass frequencies have been removed
from the signal but your instrument can have more gain before
the feeback starts.
Setting the LO-CUT Filter
1. Set the LO-CUT switch to bypass.
2. Perform this test by strumming open strings.
3. Slowly turn up the LEVELcontrol until low frequency feedback
starts to make the open strings resonate.
4. Set the LO-CUT switch to 80Hz.
5. While playing the open strings, continue to slowly increase
the LEVEL control to the point where low frequency feedback
re-occurs.
6. Turn the LEVEL control down a little from this point.
7. If more gain is needed set the LO-CUTto 200Hz and increase
the LEVEL control.
Radial Engineering Ltd.
14
PZ-Pre User Guide
True to the Music
Notch Filter
The notch f lter is designed to manage feedback by surgically removing an offending frequency while leaving the rest of the sound
intact. To f nd which note is going to feedbackf rst, play ascending
scales or chords starting from your instrument's lowest note.
If, during your tests, you hear that a particular note is more prone
to feedback than others, set the NOTCH Q to the NORMALposition and slowly rotate the NOTCH control to see if you can dial
in the offending frequency. This process is sometimes referred
to as "notching out".
When you have found the position on the dial that corresponds
to the frequency feeding back, play and hold a chord or simply let
all of the strings resonate. Now, turn the LEVEL control up some
more and see what happens. If the same frequency is still on the
verge of feedback, try setting NOTCH Q to DEEP.
An important point when using the NOTCH f lter is that the problem frequency will likely change each time you play in a different
venue or change instruments. So experiment and get familiar
with the NOTCH f lter functions. This will make sound-check go
more quickly and will reduce the occurrence of feedback when
you are performing!
Setting the Notch Filter
1. Set the NOTCH Q switch to bypass.
2. Test by playing ascending notes on the lowest strings.
3. Focus in on the note that tends to feedback before the rest. If
necessary, increase the LEVEL control to produce a perpetual
feedback ring at this note's frequency.
4. Set the NOTCH Q switch to NORM.
5. While holding the note, turn the NOTCH control until you have
tuned the f lter to the same frequency. The notch f lter is tuned
when the note decays naturally without feeding back.
6. Increase the LEVEL control until the same note starts to
feedback and then back off the level a little.
7. If more gain is needed, you can switch the NOTCH Q to DEEP
and try increasing the LEVEL control some more.
TIP: At some point, turning up the instrument level will
cause uncontrollable feedback at many frequencies and is
an indication levels should be lowered.
Radial Engineering Ltd.
15
PZ-Pre User Guide
True to the Music
True to the Music
STAGE SETUPS
ADDING EFFECTS TO YOUR SOUND
Now that you are familiar with all of the functions on your PZ-Pre,
you are set to take it out into the real world! Connect the PZ-Pre
to your PA system, monitors and/or on-stage amp. Turn your PA
system on and gradually start increasing the LEVEL control on
the PZ-Pre to a comfortable setting. If you are using monitors or a
stage amplif er, you should now bring these levels up so that you
can hear them. Remember - always start with your EQ settings at
the 12 o’clock neutral setting. Now set the tone to suit using the
slightest adjustments of the EQ controls as possible.
The PZ-Pre is equipped with a combination effects loop and power
booster. The power booster is designed to allow you to increase
your stage level during a solo and then revert back to your regular
volume with a single foot stomp. Most players will simply use the
boost on its own by adjusting the boost level to suit.
When the band joins in, you will likely need to have more volume.
So before they do, increase the stage level to the point where
feedback is beginning to occur . Back off your level slightly and
take note. This is pretty much the maximum level you should be
playing on stage. If you push the system beyond this point, you
will need to start using the Notch Filter to control feedback.
Keep in mind that most feedback occurs due to low frequency
resonance and the best approach to keep it in check is setting
the LO-CUT f lter to the 80Hz or 200Hz position before you start
using the NOTCH f lter. You will be surprised at how well this
helps to control feedback!
Now move around on stage. You may f nd that in certain positions, the sound really feeds back where in others, the sound is
somewhat muted. This occurs when various sound sources such
as your on stage amp, stage monitors and P A system combine
to create room modes where some frequencies will amplify and
other will cancel out as they intersect. This is known as combf ltering. A good f x can sometimes be accomplished by reversing
the polarity of one or more of the outputs.The PZ-Pre is equipped
with a PHASE reverse switch for the instrument amplifer out, and
another for the POST-EQ XLR out. Try one, the other or both to
see if this helps.
For extreme feedback conditions, you can try using an automatic
feedback eliminating device. These widgets digitally ‘listen’ for
feedback and then introduce digitally controlled f lters to hunt it
down. The problem is that even though they are doing their best
to eliminate the ‘bad sound’, no matter how good the f lter, some
of the ‘good sound’ will also be lost.
If you have to play at extreme levels, you are better to turn down
your system or eliminate on-stage amplif ers and stage monitors
by using in-ear monitors. Cutting frequency after frequency in an
effort to increase gain before feedback is often a Catch 22. You
will achieve more gain before feedback but at the cost of your
tone. Remember when using the EQ, less is best!
Radial Engineering Ltd.
16
PZ-Pre User Guide
You may want to introduce an effect such as reverb or echo with
or without the power boost to enhance the solo. This is what the
built-in effects loop was designed for. When effects are used in the
loop, they will be heard on the ¼" instrument out and the POST
-EQ
XLR (wet direct box) output, but will not be heard on the PRE-EQ
XLR (dry direct box) output. So before you decide on how you are
going to use the PZ-Pre effects loop, it is a good idea to consider
if you want the effects to go to the PA, monitors or both. Keep in
mind that if you put pedals in the ef fects loop, they can only be
accessed by engaging the effects/boost footswitch.
Post- PreWet Dry
If you would like to have an effect such as chorus or reverb on at
all times, you are best to position these at the ¼" INSTRUMENT
output between the PZ-Pre and your amp. If you want this effect
to also go to the P A, then you would connect a direct box after
the effect pedal.
Post- PreDry Dry
If you have an active instrument that does not need the PZB
piezo buffers, you can put ef fects in front of the PZ-Pre by f rst
connecting the instrument to the ef fect and then to the PZ-Pre.
In this case, the effect will be heard on all of the PZ-Pre outputs
for your f rst instrument only.
Post- PreWet Wet
Radial Engineering Ltd.
17
PZ-Pre User Guide
True to the Music
True to the Music
FREQUENTLY ASKED QUESTIONS
Can I use the PZ pre with an electric guitar?
Absolutely! The PZ-Pre will provide an electric guitar with noise
quieting buffers. With dual output instruments that have both
magnetic pickups and a piezo embedded in the bridge, you can
activate the piezo booster for the bridge pickup and select between
both sources easily with the TOGGLE footswitch!
Can I use the piezo booster that came with my pickup?
Sure. Just make sure you turn the PZ-Pre piezo boosters off as
driving one buffer into another will likely cause unnecessary noise
and increase distortion.
Can I use effects pedals with the PZ-Pre?
Yes. You can use pedals before or after the PZ-Pre just like any
other pedal. Positioning an EQ pedal between one instrument
and the PZ-Pre is the best way to add greater control over a
second instrument.
Does the booster come before or after the effects loop?
The power booster circuit is after the effects loop send and return.
This works best to keep your effects levels from causing distortion
when engaging the booster.
Can I use line-level studio effects with the PZ-Pre?
Sometimes. It depends on the ef fects processor. Check to see
if it is designed to accept instrument levels. If it is, you should
be f ne. If not, you may f nd that the PZ-Pre is not generating
suff cient level for the ef fects processor and therefore you will
likely encounter added noise.
Can I drive a power amplifier directly from the PZ-Pre?
No. The PZ-Pre is a unity-gain preamp and outputs a signal in the
-40dB range which is normal for connecting to musical instrument
amplif ers. Power amplif ers usually require -10dB or +4dB line
level signals to drive them to max output.
Why does the XLR output produce a mic-level signal?
This allows the PZ-Pre’s output to be treated like a microphone
signal for connection to PA and recording mixing consoles.
Can I use the PZ-Pre to record direct into my computer?
Yes, as long as you have a mic-level input on your computer
interface. Mic inputs are the most common form of input on a
mixer so this should not be a problem. Connect the POST -EQ
XLR output to your interface using an XLR mic cable.
Can I use the PZ-Pre with a bass guitar?
Yes. For electric bass consider the Tonebone Bassbone as well.
However, an acoustic string bass would be better served by the
PZ-Pre feature set.
Radial Engineering Ltd.
18
PZ-Pre User Guide
What Radial DI is used for the PZ-Pre outputs?
The balanced XLR outputs on the PZ-Pre are proprietary active
Class-A balanced drivers designed speci f cally to maximize the
performance of the PZ-Pre. They are similar to the active output
stage used on the Radial J48 direct box, except the PZ-Pre uses
a DC power supply instead of phantom power and therefore can
draw more current for even better signal to noise ratio and
headroom performance.
Will I damage the PZ-Pre if the piezo buffers are on by
mistake?
No. Connecting an active pickup with the piezo buf fer engaged
will result in excess unpleasant distortion but it will not harm the
PZ-Pre. For the best sound ensure the piezo buf
fers are switched
off when connecting active pickups and switched on for passive
pickups.
How do I go about adjusting the three band EQ?
Always start from the neutral setting shown on page 12. When
adjusting the EQ, you willf nd that the least amount of processing
will yield the most natural sound. Excessive EQ boost of one band
may contribute to feedback. Therefore, it is sometimes better to
cut out what is not wanted rather than boosting what is missing.
For example, if the tone lacks bass, consider rolling off the highs
instead of boosting the lows.
Can I control the EQ for each input separately?
No, not directly. However there are a couple of ways to do this.The
best way would be to add an EQ pedal in between the instrument
and PZ-Pre and activate it when needed. Alternatively, you can
insert an EQ pedal in the ef fects loop and activate it with the
BOOST footswitch when needed.
What happens if I plug into INPUT-2 when using INPUT-1 with
a stereo TRS cable?
INPUT-1 is internaly connected to INPUT-2 so a stereo TRS cable
can connect to both inputs with one cable.This internal connection
will be broken if a plug is inserted into INPUT-2. This could be a
quick way to connect a second guitar on thef y and still have one
pickup system connected from the guitar using the TRS cable.
Can the PZ-Pre power a phantom powered microphone?
No. But you can connect a dynamic microphone to the PZ-Pre or
use a battery powered condenser mic.
Can I use the PZ-Pre with a microphone for a harmonica?
Yes. You will need a dynamic microphone with a high-impedance
¼” plug for best results.
Radial Engineering Ltd.
19
PZ-Pre User Guide
True to the Music
Radial PZ-Pre Specifications
Inputs 1 & 2:
¼" Phone unbalanced
Input impedance:
Normal 6.8k ohm
Piezo 10Meg ohm
PZB buffers:
+10dB boost
Low-cut f lter:
75Hz / 220Hz
Notch f lter range:
56Hz - 220Hz
Notch Q:
-8dB / -16dB
Low EQ:
Shelving type +/-12dB (75Hz)
High EQ:
Shelving type +/-12dB (7.5kHz)
Mid EQ:
Semi-parametric
+/-12dB (82Hz - 5.6kHz)
Power Boost:
Unity gain to +12dB max.
Effects Loop:
¼" Phone unbalanced
Send 1k ohm / Return 15k ohm
Switching:
Opto-coupler assisted,
5msec rise time
Output (instrument):
¼" Phone unbalanced,
1k ohm output impedance
Tuner output:
¼" Phone unbalanced,
6.8k ohm output impedance
Pre-EQ output:
XLR, balanced,
600 ohm, mic-level
Post EQ output:
XLR, balanced,
600 ohm, mic-level
XLR pin-out:
pin 1 ground
(AES standard)
pin 2 hot (+)
pin 3 cold (-)
Power supply:
15VDC, 400mA (included),
center pin positive
Size (W x D x H):
8”x 4.25”x1.37” (203x108x35mm)
Weight:
2.65 lbs. (1.2 kg)
Warranty:
3 Years, transferable
Radial Engineering Ltd.
20
PZ-Pre User Guide