1
SHARP CORPORATION
Sharp SL-series Zaurus “Qtopia” Development Start-up Guide
Sharp SL-series Zaurus
“Qtopia” Development Start-up Guide
(ver.1.11 2003.02.28)
Ver 1.11, February 28, 2003, 1/63
SHARP CORPORATION
Sharp SL-series Zaurus “Qtopia” Development Start-up Guide
TRADEMARK NOTICE
XScale is a registered trademark of Intel Corporation.
StrongARM® is a registered trademark of ARM Ltd.
Linux™ is a registered trademark owned by Linus Torvalds.
Java™ and all Java-related marks are trademarks or registered trademarks of Sun Microsystems, Inc. in the United States
and other countries.
™
Embedix is a registered trademark of Lineo Inc.
Microsoft®, Windows® are registered trademarks of Microsoft Corporation in the United States and/or other countries.
Corporate names and product names belong to various corporates as trademarks.
REVISION HISTORY
Oct 16, 2001
Nov 20, 2001
April 4, 2002
Feb 28, 2003
Version 0.94, first release to public
Version 0.95, Qt/E and Qtopia version clarified.
Version 1.00, incorporating SL-5500 changes.
Version 1.11
Refreshed the document, incorporating changes and information about the SL-5600.
Ver 1.11, February 28, 2003, 2/63
SHARP CORPORATION
Sharp SL-series Zaurus “Qtopia” Development Start-up Guide
TABLE OF CONTENTS
Introduction ...........................................................................................................................................5
SL-series Zaurus Product Overview......................................................................................................................5
SL-Series Zaurus Architecture Overview ..............................................................................................................5
SL-5500 and SL-5600 Difference Summary ........................................................................................6
Hardware Specifications Differences.....................................................................................................................6
Software Specifications Differences ......................................................................................................................7
Target Reader of this Programming Guide............................................................................................................8
Overview of this Guidebook ..................................................................................................................................8
Reference and URLs.............................................................................................................................9
1.
Qt Application Development Tools and Compiler Setup...............................................................10
1.1.
Building Development Environment for Qt/Embedded Applications ......................................................10
1.1.1.
1.1.2.
1.1.3.
1.1.4.
1.1.5.
1.1.6.
1.2.
Testing the cross compiler......................................................................................................................15
1.2.1.
1.2.2.
2.
PC-Linux .........................................................................................................................................................10
Setting up the cross-compiler for ARM/XScale................................................................................................10
Qt/Embedded / Qtopia Build Environment ......................................................................................................12
Configuring Your Compiler Environment .........................................................................................................12
tmake, a cross-platform makefile tool..............................................................................................................13
Confirming Installation of the tools ..................................................................................................................14
Check compiler setup for x86..........................................................................................................................15
Check compiler setup for ARM........................................................................................................................16
Qt/Embedded Application Development Overview.................................................................17
2.1.
2.2.
2.2.1.
2.2.2.
2.2.3.
2.2.4.
2.2.5.
2.2.6.
2.3.
2.3.1.
2.3.2.
2.3.3.
2.4.
2.4.1.
2.4.2.
2.4.3.
2.4.4.
2.4.5.
2.4.6.
2.5.
2.6.
2.7.
2.7.1.
2.7.2.
2.8.
2.9.
Application Development Workflow........................................................................................................17
Useful Tools for the Development ..........................................................................................................18
The Qt Designer..............................................................................................................................................18
uic ...................................................................................................................................................................19
moc .................................................................................................................................................................19
qvfb (Qtopia Virtual Frame Buffer)...................................................................................................................20
progen .............................................................................................................................................................20
Tools for multi-language support .....................................................................................................................21
Special Recommendations for the SL-series Zaurus Applications.........................................................22
Operation of “Menu” Key .................................................................................................................................22
Operation of “OK” and “Cancel” key................................................................................................................26
Access to the device VRAM ............................................................................................................................26
Qtopia Development Tutorial..................................................................................................................27
Hello World!!....................................................................................................................................................27
Creating the Project File..................................................................................................................................27
Creating the Makefile ......................................................................................................................................28
Executing make to build the application ..........................................................................................................28
Running Hello World on the “qvfb” ..................................................................................................................29
Running Hello World on Qtopia environment ..................................................................................................29
Providing help file with your application .................................................................................................31
Converting character code (for local language support) ........................................................................31
Event handling: SIGNAL and SLOT .......................................................................................................32
Using already-defined SIGNAL and SLOT ......................................................................................................32
Creating your own SLOT.................................................................................................................................32
Sample application source .....................................................................................................................34
Development with the QtDesigner .........................................................................................................37
Ver 1.11, February 28, 2003, 3/63
SHARP CORPORATION
Sharp SL-series Zaurus “Qtopia” Development Start-up Guide
3.
Installing Applications to the SL-series Zaurus ......................................................................40
3.1.
3.1.1.
3.1.2.
3.1.3.
3.1.4.
3.1.5.
3.1.6.
3.2.
3.2.1.
3.2.2.
3.2.3.
3.3.
3.3.1.
3.3.2.
3.3.3.
3.3.4.
The ipkg package ...................................................................................................................................40
Making directories for .ipk package .................................................................................................................40
control File.......................................................................................................................................................41
desktop File.....................................................................................................................................................42
Special Considerations for SL-5600, SL-C700, and SL-B500 .........................................................................43
Creating ipk file ...............................................................................................................................................44
ipkg Script .......................................................................................................................................................45
Transferring the ipk package to the SL-series Zaurus ...........................................................................46
Copying the ipk package to CF memory card, or SL memory card .................................................................46
Download ipk package by using NFS..............................................................................................................47
Download the ipk package by the Synchronization software...........................................................................48
Install the ipk package on the SL-series Zaurus ....................................................................................48
Use “Add/Remove Software” application.........................................................................................................48
Manually install from the command line ..........................................................................................................48
Important notice for “after installation” .............................................................................................................49
Uninstalling applications from the SL-series Zaurus .......................................................................................50
Appendix A. SL-5600 Files and Directories ......................................................................................51
Access Permission List for SL-5600....................................................................................................................51
Ver 1.11, February 28, 2003, 4/63
SHARP CORPORATION
Sharp SL-series Zaurus “Qtopia” Development Start-up Guide
Introduction
SL-series Zaurus Product Overview
™
™
The SL-series Zaurus, Sharp’s Linux /Java based multimedia PDA, utilizes Linux 2.4.x as its operating system.
Qt/Embedded by Trolltech is the C++ embedded GUI development toolkit which provides developers the ability to
create stunning graphical user interfaces for embedded devices. Qt/Embedded runs on any device using
embedded Linux - without using X11.
Qt/Embedded features the same API as the well known Qt/Windows and Qt/X11 versions. Qt is also the basis for
the popular KDE desktop environment included in every major Linux distribution. This allows developers to write
Qt applications in the favorite desktop environment with only minor changes and a recompile for usage on the
SL-series Zaurus. This saves you significant development effort as it allows you to work productively on your
favorite programming environment from day one.
The SL-series Zaurus further implements Qtopia by Trolltech, a complete Window System, Window Manager,
Application Launcher, Input Methods (software keyboard, etc.), a GUI toolkit, and a collection of useful
applications. By implementing Qt/Embedded and Qtopia, a well-known C++ embedded application GUI toolkit
with complete a Window System, anyone can develop application software for the SL-Series Zaurus using
existing and available Qt tools.
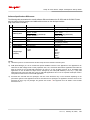
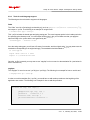
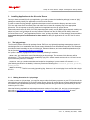
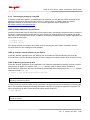
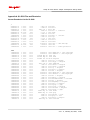
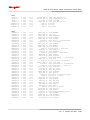
SL-Series Zaurus Architecture Overview
The figure below is a brief overview of the SL-Series Zaurus system architecture. The SL-Series Zaurus
implements Qt/Embedded and Qtopia on Linux 2.4.x. (see figure below). Applications developed with Qt or
possibly applications developed for KDE may run on the SL-Series Zaurus with less engineering effort. Only
minor adjustments such as fitting the user interface for the SL-Series Zaurus’s screen size is needed thanks to
Qt/Embedded API.
With regards to the available commands in Linux, the SL-Series Zaurus supports the commands in BUSYBOX
(http://www.busybox.net/). In addition, by using the network or a Compact Flash card, useful Linux tools can be
added.
Java apps
Appl.
PIM
Utilities
Media Player
MPEG-1
MP3
E-mail
Browser
Games
PC link
PC sync
Java Environment
Qtopia
GUI
Linux
Kernel
Qt/Embedded
Linux
Kernel
2.4.x
Power Manager (quick start etc.)
card I/F
drivers
KEY
LCD
display
touch
panel
mic.
speaker
SD
USB
slave
CF
serial
IrDA
cradle
comm.
unit
battery
LED
F/L
Ver 1.11, February 28, 2003, 5/63
SHARP CORPORATION
Sharp SL-series Zaurus “Qtopia” Development Start-up Guide
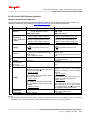
SL-5500 and SL-5600 Difference Summary
Hardware Specifications Differences
The following table summarizes the hardware difference between the SL-5500 and the SL-5600. Please also
consult the information on the website (http://www.sharpusa.com) for the features and details.
ITEMS
CPU
Memory
Dimensions
(with slide-cover
closed)
Weight
Audio in
H
A
R
D
W
A
R
E
Audio out
Buzzer
/dev/sharp_buz
(key click,
screen tap, alarm)
Battery
Data Backup
Reset button
SL-5500
Intel StrongARM (SA-1110, 206MHz)
ROM: 16MB Flash
(for OS, Applications, Driver)
RAM: 64MB SDRAM
Excluding the display protection cover:
Approx. 74(W) x 138(D) x 18(H) mm
Including the display protection cover:
Approx. 74(W) x 138(D) x 21(H) mm
Excluding the display protection cover:
194g
Including the display protection cover:
212g
Mic and stereo headphone jack
(external mic needed for audio input)
Sampling Rate:
8k, 11.025k, 16k, 22.05k
Mic and stereo headphone jack
Supported
<conditions >
SL-5500 turned off at < 25℃, a brand-new
battery fully charged.
approx. 10 days
<conditions>
The operating battery exhausted, and the
power can be turned on.
approx. 1 day
<condition>
The operating battery is not inserted, after
the rechargeable back-up battery fully
charged.
approx. 5 minutes
RAM backup battery required
work as full reset.
SL-5600
Intel Xscale (PXA250, 400MHz)
NAND Flash: 64MB
ROM: 512KB
RAM: 32MB SDRAM
Excluding the display protection cover:
Approx. 74(W) x 138(D) x 18(H) mm
(H: 22.7 at battery cover top)
Including the display protection cover:
Approx. 74(W) x 138(D) x 20.6(H) mm
(H: 25.3 at battery cover top)
Excluding the display protection cover:
210g
Including the display protection cover:
228g
Built-in Microphone
Sampling Rate:
8k, 11.025k, 16k, 22.05k, 24k, 32k, 44.1k,
48k
Built-in speaker (mono)
Stereo headphone jack
Supported
(No buzzer sound when /dev/dsp device is
open)
<conditions >
Display the “day view” of the Calendar
application continuously, with the frontlight
turned off.
approx. 18 hours
<conditions>
Play an MPEG1 file continuously with the
frontlight turned on at brightest llevel
approx. 2 hours
(Note: above values are all measured with
the SL-5600 turned on at < 25℃, without
any peripheral devices plugged in, and with
the rechageable battery fully charged.)
Not necessary
(stores data in NAND Flash)
*1)
work as reset.
(NOTE)
*1) All user data is stored in the Flash memory, and thus user data will not be lost by the RESET button nor the battery
discharge. Users must format the flash memory from its “maintenance menu” to fully reset the device.
Ver 1.11, February 28, 2003, 6/63
SHARP CORPORATION
Sharp SL-series Zaurus “Qtopia” Development Start-up Guide
Software Specifications Differences
The following table summarizes the overall software difference between the SL-5500 and the SL-5600. Please
also consult the following sections and additional documents on the developer website
(http://www.zaurus.com/dev/ ).
ITEMS
Linux Kernel
File System
Memory Area
S
O
F
T
W
A
R
E
PIM database
quickexec (*4)
Process Owner
USB
Screen Saver
Support style
(Theme)
SL-5500
Linux 2.4.6 (Embedix)
Internal RAM: ext2
Internal Storage:
approx. 31.8MB
Program Memory (work area):
approx. 28.1MB
XML based
Not supported
Root
Network
Not supported
- Windows
- Light
- QPE
SL-5600
Linux 2.4.18 (Embedix)
*2)
Internal Flash: JFFS2
Internal Flash Storage:
approx. 35MB
Program Memory (work area):
approx. 29.1KB
*3)
DTM based
Supported
user (as default *4))
(root privilege possible)
USB IO / Network
Supported
- Windows
- Light
- QPE
- SLStyle
- ZIvory
- ZBlue
- Zpurple
(NOTE)
*2) JFFS2 file system is not a block device and thus swap cannot be created on the file system.
*3) DTM (DaTa Manager) is a set of modules that provide database functions to the applications. User applications can
utilize the SL data manager class to easily implement store, sort, and search data entities. Applications that utilize the
XML file format for the SL-5500 PIM information can also run on the SL-5600. However, all of the default PIM
applications on the SL-5600 now adopt and are managed by the DTM (PIM database). Thus, any 3rd party PIM
applications that access the XML files of the SL-5500 PIM applications will not run as expected. Developers need to
incorporate the DTM access for those PIM applications.
*4)
Processes are executed with user privileges, and thus some directories may not be accessed depending on the
permissions granted. User applications must be executed with root privilege if the application will have access to the
directories at which only root privileges are granted. See section 3 and Appendix A for the details of the SL-5600
directories from “/”.
Ver 1.11, February 28, 2003, 7/63
SHARP CORPORATION
Sharp SL-series Zaurus “Qtopia” Development Start-up Guide
Target Reader of this Programming Guide
This document is intended for users who wish to develop applications with the C++ programming language within
Qt/Embedded and Qtopia for SL-series Zaurus. It is therefore assumed that you, the reader, have obtained:
•
Some C++ programming skills
•
Some introductory knowledge of, or experience with Qt and/or Qt/Embedded
•
Basic knowledge of SL-Series Zaurus PDA
Overview of this Guidebook
This document is intended to provide developers with the information on the tools, the workflow and tips to install
developed application to the SL-Series Zaurus, and the SL-series Zaurus specific file system so that developed
application can run on a variety of the SL-Series Zaurus.
Because there already exists many books on C++ development, Qt development, and because detailed
documentation on Qt/Embedded and/or Qtopia will come with these corresponding tools themselves, this
document is not intended to provide details on C++ programming or Qt programming, except for a few basic
tutorials for those who are not familiar with the Qt related tools as well as Qt specific programming. You are
encouraged to refer to any commercially available C++ programmer guidebook, and/or Qt programmer's
guidebooks, if necessary.
Section 1 provides a brief explanation on the OS, tools, and equipment that developers need to for a development
environment utilizing Qt/Embedded / Qtopia applications on their desktop.
Section 2 illustrates the basic workflow to develop and package Qtopia applications for the SL-series Zaurus. It
also includes a brief introduction of tools, Qt/Embedded specific tips, examples of necessary commands, and files
needed for packaging the application.
Section 3 guides you through the ways of adding a newly developed Qtopia applications to SL-series Zaurus.
Ver 1.11, February 28, 2003, 8/63
SHARP CORPORATION
Sharp SL-series Zaurus “Qtopia” Development Start-up Guide
Reference and URLs
Sharp Linux/Java PDA Developers Website:
http://www.zaurus.com/dev/
Trolltech
The following is the official WEB page URL:
http://www.trolltech.com/
Qt/Embedded
The following is the official WEB page URL:
http://www.trolltech.com/products/embedded/index.html
Qt/Embedded Whitepaper
Qt/Embedded Whitepaper can be found at:
http://www.trolltech.com/products/embedded/whitepaper.html
Ver 1.11, February 28, 2003, 9/63
SHARP CORPORATION
Sharp SL-series Zaurus “Qtopia” Development Start-up Guide
1.
Qt Application Development Tools and Compiler Setup
This chapter provides information on tools and equipment required to build the development environment for
Qt/Embedded and Qtopia applications on your desktop.
1.1.
Building Development Environment for Qt/Embedded Applications
The following are the tools and equipment needed to build a development environment on your desktop PC:
1.1.1.
PC-Linux
The development PC should have a Linux distribution pre-loaded on it. Preferably one that natively supports RPM
packages, such as RedHat, SuSE, Mandrake or Caldera. You can also use distributions such as Slackware and
Debian as well, but you may need to use a RPM conversion utility to support the RPM format. In this document,
RedHat 7.3 is used for the OS and "bash" is used for its shell.
Please also note that it is recommended that your PC that supports a PC card slot/reader, for use with a CF
memory card or SD memory card to install the developed applications onto the SL-series Zaurus.
If your Linux machine is equipped with USB, you may use the docking station and its USB connector to transfer
the developed applications to the SL-series Zaurus by installing the USB driver for the Linux PC. The USB driver
for the PC-Linux can be downloaded from the following URL. Note that this driver is also provided in the RPM
package and thus one may have to convert this package if your Linux distribution does not support the RPM
package by default.
http://www.zaurus.com/dev/tools/downloads/tools/kernel-zaurus-2.4.18.5-4a.i386.rpm
The following are some reference for the HDD, RAM, and CPU in preparing the PC to build your development
environment:
HDD:
CPU:
RAM:
1.1.2.
approx. 400MB free space or more
appropriate CPU to run the Linux distribution
appropriate CPU to run the Linux distribution
Setting up the cross-compiler for ARM/XScale
Because the SL-series Zaurus has an Intel StrongARM® or Intel Xscale® as its CPU, one needs to have an ARM
cross compiler for application development. The ARM cross compiler and the related tools for the SL-series
Zaurus can be found at the Sharp developer website (http://www.zaurus.com/dev). The following chapters will
provide you with the information on how to install and set up the tools required for development. All of the
directories and files explained in the following chapters are the default configuration of the tools. If you change the
directories or file names, you may have to make necessary adjustment in accordance with your changes.
Ver 1.11, February 28, 2003, 10/63
SHARP CORPORATION
Sharp SL-series Zaurus “Qtopia” Development Start-up Guide
Online documents for the cross compiler can be found at following URL:
http://www.gnu.org/
http://www.gnu.org/manual/binutils-2.10.1/binutils.html
http://www.gnu.org/manual/ld-2.9.1/ld.html
http://www.gnu.org/software/gcc/onlinedocs/
http://www.gnu.org/manual/glibc-2.2.3/libc.html
Once the target PC is ready, the following packages should be downloaded from the Sharp developer website:
•
gcc-cross-sa1100-2.95.2-0.i386.rpm (gcc compiler for ARM architecture)
•
binutils-cross-arm-2.11.2-0.i386.rpm (binary utilities for ARM architecture)
•
glibc-arm-2.2.2-0.i386.rpm (GNU C libraries for ARM architecture)
•
linux-headers-arm-sa1100-2.4.6-3.i386.rpm (linux header files for ARM architecture)
Each of the RPM files need to be installed from a command line prompt using the following command:
% rpm -Uvh filename.rpm
For example, to install the arm gcc compiler, one should execute:
% rpm -Uvh gcc-cross-sa1100-2.95.2-0.i386.rpm
By default, RPM installs the ARM toolchain in the /opt/Embedix/ folder. Please note that you need to be root to
install RPM packages. You may either have to login as root or, change your user privilege to root by executing su
command:
$ su
Password: (enter root password)
$ whoami
root
%
Ver 1.11, February 28, 2003, 11/63
SHARP CORPORATION
Sharp SL-series Zaurus “Qtopia” Development Start-up Guide
1.1.3.
Qt/Embedded / Qtopia Build Environment
Native development for the Zaurus is done using C++ and Qt by TrollTech. Qtopia comes with a virtual frame
buffer (qvfb) so that you can test applications under X11 without having to have a Zaurus. To run applications on
the Zaurus (and the qvfb) you need to link against QPE rather then Qt. See section 4 for more details about qvfb.
To start development you need to obtain the Qtopia SDK from Trolltech. GPL edition
(qtopia-free-1.5.0-1.i386.rpm) can be located at the following URL. Note that if you use this GPL version, you
have to follow the terms and conditions set forth in the GPL (GNU Public License, see http://www.gnu.org/ for
details). If you are doing commercial development you need to obtain the commercial SDK:
http://www.trolltech.com/developer/download/qtopia.html. (GPL edition Qtopia SDK)
https://www.regnow.com/softsell/nph-softsell.cgi?item=7131-1 (Commercial Edition)
Install the rpm in the same manner as to how the cross compiler was installed:
rpm -Uvh qtopia-free-1.5.0-1.i386.rpm
By default, RPM installs the Qtopia SDK in the /opt/Qtopia/ directory.
1.1.4.
Configuring Your Compiler Environment
After the toolchain and the SDK are installed, you should create the two batch files in your home directory. One
sets up the environment variables for compiling x86 versions of SL-series Zaurus applications (using the qvfb)
and the other for setting the environment variables for doing native ARM cross-compiling for the SL-series Zaurus.
More information can be found at (http://docs.zaurus.com/linux_compiler_setup_howto.shtml) The following are
examples of the scripts:
Batch file #1, dev-x86-qpe.sh
#!/bin/bash
# dev-x86-qpe.sh
# location : /usr/bin
if [ -z ${ORG_PATH} ]
then
ORG_PATH=${PATH}
export ORG_PATH
fi
if [ -z ${ORG_LD_LIBRARY_PATH} ]
then
ORG_LD_LIBRARY_PATH=${LD_LIBRARY_PATH}
export ORG_LD_LIBRARY_PATH
fi
CROSSCOMPILE=/opt/Embedix/tools:/usr/local/x86/2.95.3/bin:/opt/Embedix/tools
QPEDIR=/opt/Qtopia
QTDIR=/opt/Qtopia
PATH=/usr/local/x86/2.95.3/bin:$QTDIR/bin:$QPEDIR/bin:${ORG_PATH}:/opt/Embedix/tools/bin
TMAKEPATH=/opt/Qtopia/tmake/lib/qws/linux-x86-g++/
LD_LIBRARY_PATH=$QTDIR/lib:${ORG_LD_LIBRARY_PATH}
export QPEDIR QTDIR PATH TMAKEPATH LD_LIBRARY_PATH PS1
echo "Altered environment for Sharp Zaurus Development x86"
Ver 1.11, February 28, 2003, 12/63
SHARP CORPORATION
Sharp SL-series Zaurus “Qtopia” Development Start-up Guide
Batch file #2, dev-arm-qpe.sh
#!/bin/bash
# dev-arm-qpe.sh script
# location : /usr/bin
#
if [ -z ${ORG_PATH} ]
then
ORG_PATH=${PATH}
export ORG_PATH
fi
if [ -z ${ORG_LD_LIBRARY_PATH} ]
then
ORG_LD_LIBRARY_PATH=${LD_LIBRARY_PATH}
export ORG_LD_LIBRARY_PATH
fi
CROSSCOMPILE=/opt/Embedix/tools:/usr/local/x86/2.95.3/bin:/opt/Embedix/tools
QPEDIR=/opt/Qtopia/sharp
QTDIR=/opt/Qtopia/sharp
PATH=$QTDIR/bin:$QPEDIR/bin:$CROSSCOMPILE/bin:${ORG_PATH}
TMAKEPATH=/opt/Qtopia/tmake/lib/qws/linux-sharp-g++/
LD_LIBRARY_PATH=$QTDIR/lib:${ORG_LD_LIBRARY_PATH}
export QPEDIR QTDIR PATH LD_LIBRARY_PATH TMAKEPATH PS1
echo "Altered environment for Sharp Zaurus Development ARM"
When you want to compile and test x86 applications run source dev-x86-qpe.sh from your home directory.
Conversely, run source dev-arm-qpe.sh when you want to cross compile to run on the Zaurus.
1.1.5.
tmake, a cross-platform makefile tool
The tmake tool is an easy-to-use tool from Trolltech to create and maintain makefiles for software projects. It can
be a painful task to manage makefiles manually, especially if you develop for more than one platform or use more
than one compiler. The tmake tool automates and streamlines this process and lets you spend your valuable time
writing code, not makefiles.
The tmake tool can be found at http://www.trolltech.com/developer/download/tmake.html.
Ver 1.11, February 28, 2003, 13/63
SHARP CORPORATION
Sharp SL-series Zaurus “Qtopia” Development Start-up Guide
1.1.6.
Confirming Installation of the tools
Once you install the above tools, you will have the following directories for each tool. If you change the installation
directories, you need to change the PATH in accordance with your changes.
<Qtopia Envirpnment>
All of the related files are installed to /opt/Qtopia.
<cross compiler related>
All of the related files are installed to /opt/Embedix/.
<Batch files for configuring your development environment>
These files should be created in the user’s home directory. If the user name is “user1”, these files should be
created in /home/user1. You may want to execute these script files to configure compiler, libraries, and tmake
related PATH before you compile your applications depending on the target. You may create these batch files in
any directories where the PATH is already configured.
<tmake>
The tmake tool itself is a part of Qtopia, can be located in /opt/Qtopia/bin/tmake.
Ver 1.11, February 28, 2003, 14/63
SHARP CORPORATION
Sharp SL-series Zaurus “Qtopia” Development Start-up Guide
1.2.
Testing the cross compiler
To test the compiler, you will want to build the example application in the/opt/Qtopia/example/ directory. The
following are brief instructions to test the cross compiler.
1.2.1.
Check compiler setup for x86
First, run the x86 environment script in your home directory from a shell session to configure the variety of
environment variables:
$ cd /home/[user_home_directory]
$ ./dev-x86-qpe.sh
Next, within the same session and in the /opt/Qtopia/example/ directory, run tmake -o Makefile example.pro. This
creates the Makefile.
$ cd /opt/Qtopia/example
$ tmake –0 Makefile example.pro
To actually build the application, run make within that same directory.
$ make
Start qvfb (Qtopia Virtual Frame Buffer) and then start the example application to see if you have successfully
compiled the example for x86. The command “qvfb &” will launch the simulated SL-series Zaurus display on your
PC. Any Qtopia applications compiled for x86 you launch will now display in this window. If you see the following
screen displayed on your development machine, you have successfully complied the example.
$ qvfb &
$ ./example –qws example
Note that you could alternatively run the qpe application from /opt/Qtopia/bin to simulate an actual Qtopia
environment and then run the example app in non-server mode.
Ver 1.11, February 28, 2003, 15/63
SHARP CORPORATION
Sharp SL-series Zaurus “Qtopia” Development Start-up Guide
1.2.2.
Check compiler setup for ARM
Alternatively, you may want to build an ARM version to run on the SL-series Zaurus.First, run the ARM
environment script in your home directory from a shell session.
$ ./dev-arm-qpe.sh
If you are building an ARM version right after x86 build, you should have a Make file in the example directory. If
there is a Makefile, you need to remove it. It is essential that you do this, or make sure you do not have Makefile
before you execute tmake. Also, make sure to run “make clean” within /opt/Qtopia/example to clean out the old
temporary files from the x86 configuration.
$ cd /opt/Qtopia/example
$ make clean
$ rm Makefile
Run tmake again to create the Makefiles for ARM compiling.
$ tmake –o Makefile example.pro
To build the ARM binary, run make from within that directory.
$ make
Once it has built to run (you should have “example” file in the same directory), it will need to be copied over to the
Zaurus (e.g. /home/QtPalmtop/bin) and execute it from the console.
Ver 1.11, February 28, 2003, 16/63
SHARP CORPORATION
Sharp SL-series Zaurus “Qtopia” Development Start-up Guide
2.
2.1.
Qt/Embedded Application Development Overview
Application Development Workflow
The software development procedure workflow is summarized below:
FILE
TOOL
BUILDING
DEVELOPMENT
ENVIRONMENT
ARM cross compiler
tmake
Qt/Embedded
QPE
C++ source file
SOURCE CODE
Text Editor
CREATE
PROJECT FILE
tmake
GENERATE
MAKE FILE & BUILD
tmake / gcc
CREATE FILES for
PACKAGING
Editor
Image Editor
.control file
.desktop file
.png (icon) file
CREATE PACKAGE
gzip / tar
make file
RUN ON DEVICE
SL-5000
progen
tmake
make
project file
make file
As described above, once you built the development environment described in Section 1, the overall workflow is
the same as other platforms – creating project, source coding, build, and install package creation. For creating the
install packages, there are useful tools already made available in the Zaurus developer community.
(http://killefiz.de/zaurus/) You may want to take a look at the “Development” section to find some useful tools for
your development.
Ver 1.11, February 28, 2003, 17/63
SHARP CORPORATION
Sharp SL-series Zaurus “Qtopia” Development Start-up Guide
2.2.
Useful Tools for the Development
Once you have an ARM cross compiler, tmake, and the Qtopia SDK installed, you are ready to start developing
your Qtopia applications. The following are the tools and an overview that will be useful to your development.
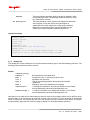
2.2.1.
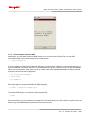
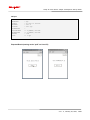
The Qt Designer
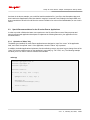
If your desktop already has Qt/X11 installed, the Qt Designer tool is useful to assist your development efforts. It
helps you to organize functionality visually so you can easily create a small yet logical and functional GUI, such as
list, buttons, combo-boxes. It also allows you to configure the GUI component attributes, including SIGNAL/SLOT
processes corresponding to the GUI component operation.
The Qt Designer tool is in $QTDIR/tools/designer (or /opt/Qtopia/bin/designer). You may find more information on
the Qt Designer at http://doc.trolltech.com/2.3/designer.html, and you will see how effectively you may organize
the functionality with the GUI. The following is a screenshot of the Qt Designer.
Once you design your application GUI using Qt Designer, you will have *.ui file created. You need to execute the
“uic” to these *.ui file in order for the compiler to handle.
Ver 1.11, February 28, 2003, 18/63
SHARP CORPORATION
Sharp SL-series Zaurus “Qtopia” Development Start-up Guide
2.2.2.
uic
The “uic” is a “User Interface Compiler” tool that generates source file(s) for the C++ compiler from the *.ui GUI
information file(s) created by Qt Designer.
In order to generate a header file, you may want to execute;
$ uic baseform.ui –o baseform.h
and in order to generate a source file, you may want to execute;
$ uic baseform.ui –i baseform.h –o baseform.cpp
2.2.3.
moc
The “moc” is a “Meta Object Compiler” tool that generates source file(s) for the C++ compiler from the file(s) that
defines Qt event process (SIGNAL/SLOT).
The C++ compiler cannot handle keywords such as “Q_OBJECT”, “signal” or “slot”, while the class libraries
provided by Qt already defines SIGNAL and SLOT, or these keywords are usually used to include SIGNAL or
SLOT in the class definition. The “moc” is used here so that it generates source file(s) for the C++ compiler to
handle these definitions correctly. The following is a header file example that uses the keywords mentioned
above.
class MyTestClass : public Qobject
{
Q_OBJECT
...
signals:
// SIGNAL
public slots:
// public SLOT
private slots:
In order to generate a source file by using “moc”, you may want to execute;
$ moc mytestclass.h –o moc-mytestclass.cpp
By executing the above, you will have the source file so that you can compile link. Alternatively, you may create
*.moc file by “moc” tool, and then include the created *.moc file in the source.
Ver 1.11, February 28, 2003, 19/63
SHARP CORPORATION
Sharp SL-series Zaurus “Qtopia” Development Start-up Guide
2.2.4.
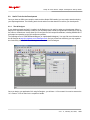
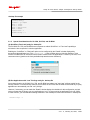
qvfb (Qtopia Virtual Frame Buffer)
The “qvfb” is a “Qtopia Virtual Frame Buffer” tool that allows you to simulate your application software on x11.
(Also see Section 1). As already described in Section 1, you may test and debug your application to a certain
extent without loading your application to the target device (SL-series Zaurus) by using the “qvfb”. The following is
a screen shot executing the “example” application that came with the Qtopia SDK.
Note that the “qvfb” uses the binary compiled for x86. Also you should note that the device specific part (such as
storage device name dev/hdc1) cannot be executed AS-IS on the SL-series Zaurus, and thus you need to make
necessary changes by #fdef … #endif.
2.2.5.
progen
The “progen” is a tool that generates *.pro file necessary for “tmake” to create a Makefile. The “progen” is located
in $QTDIR/tmake/progen (or /opt/Qtopia/tmake/progen).
The *pro file lists *.cpp and *.h files that you wish to make. However, when the project(s) or file(s) are newly
added, it is easy to make mistake if you add them manually. The “progen” will help and assist you doing this task,
as it scans the necessary files in the directory and add them to the *.pro file. It may also be worth while to create a
script that does “progen” and “tmake” in a series, so that you do not have to do them individually.
Ver 1.11, February 28, 2003, 20/63
SHARP CORPORATION
Sharp SL-series Zaurus “Qtopia” Development Start-up Guide
2.2.6.
Tools for multi-language support
The following are the tools used to support multi-languages:
findtr
The “findtr” a tool is to find string(s) enclosed by tr() (such as QObject::tr(“this is a test string.”) ),
and output to *.po file. The following is an example on using this tool:
$ findtr test.cpp > test.po
This *.po file includes the header part and string setting part. The most important portion in the header part is the
line specifying the character code. You will find the following line in the .po file. Make sure that you apply the
same encoding to the .po file with the one specified by this charset.
“ContentType= ~ charset=****¥n”
As to the string setting part, you will see a file name, line number, and the original string. You may want to set the
translations corresponding to the original string(s). The translation should be edited to msgstr.
#: test.cpp:36
msgid “test::this is a test”
msgstr “” //translations here
Once the .op file is created, you may want to use “msg2qm” tool to convert it to the translation file. (see below for
how to use this tool.)
msg2qm
The “msg2qm” is a tool to convert *.po file(s) to *.qm file(s). The following is an example for how to use this tool:
$ msg2qm test.po > test.qm
In order to use this translation file (*.qm file), you would have to add certain procedure at the beginning of the
application start routine. The following is an example for how to add this procedure.
int main( int argc, char *argv[] )
{
QPEApplication app( argc, argv );
QTranslator
translator( 0 );
translator.load( “test.qm” );
app.installTranslator( &translator );
…
}
Ver 1.11, February 28, 2003, 21/63
SHARP CORPORATION
Sharp SL-series Zaurus “Qtopia” Development Start-up Guide
As shown in the above example, you would first load the translation file (*.qm file) to the Qtranslator class, and
then install to the Qapplication class. Note that this “msg2qm” command is not included in the Qtopia SDK, and
thus you would have to build it for x86 from the source included in free verion of the Qt/Embedded, or use a tool in
Qt/X11.
2.3.
Special Recommendations for the SL-series Zaurus Applications
In order to provide unified and a better user experience to the SL-series Zaurus users, Sharp requests and
strongly recommends application developers to implement the following features in your application for the
SL-series Zaurus.
2.3.1.
Operation of “Menu” Key
The default (pre-installed) SL-series Zaurus applications are designed to “open” the “menu” of the application
itself, and “close” the opened “menu” of the application, when the “Menu” key is pressed.
In addition, the default applications implement a function allowing users to use cursor keys to change focus of the
“menu” if there are multiple menus on the application’s menu bar(e.g. “File” “Edit”, etc.). The following example
will allow you to use “menu” button to work as recommended.
main.cpp
#include <qpeapplication.h>
#include "appsample.h"
#include <qstring.h>
#include <stdio.h>
int main( int argc, char ** argv )
{
QPEApplication a( argc, argv );
AppSample mw;
a.showMainDocumentWidget( &mw );
return a.exec();
}
Ver 1.11, February 28, 2003, 22/63
SHARP CORPORATION
Sharp SL-series Zaurus “Qtopia” Development Start-up Guide
appsample.cpp
#include "appsample.h"
#include "resource.h"
#include
#include
#include
#include
#include
#include
#include
#include
#include
#include
#include
#include
#include
#include
#include
#include
#include
#include
#include
<qmenubar.h>
<qwidgetstack.h>
<qpetoolbar.h>
<qaction.h>
<qfiledialog.h>
<qmessagebox.h>
<qpopupmenu.h>
<qlabel.h>
<qpainter.h>
<qkeycode.h>
<qapplication.h>
<qclipboard.h>
<qtimer.h>
<qsizepolicy.h>
<qpeapplication.h>
<qcopenvelope_qws.h>
<qpedecoration_qws.h>
<config.h>
<qcolor.h>
//==================================================================
AppSample::AppSample( QWidget *parent, const char *name, int wFlags )
: QMainWindow( parent, name, wFlags )
{
setCaption( tr("Application Sample") );
setToolBarsMovable( FALSE );
// GUI Layout
QPEToolBar *toolBar = new QPEToolBar(this,"tool");
toolBar->setHorizontalStretchable( TRUE );
addToolBar(toolBar,"tool",QMainWindow::Top,TRUE);
QPEMenuBar *menuBar = new QPEMenuBar( toolBar );
QPopupMenu *listMenuFile = new QPopupMenu( menuBar );
QPopupMenu *listMenuOption = new QPopupMenu( menuBar );
menuBar->insertItem( tr("File"), listMenuFile);
menuBar->insertItem( tr("Options"), listMenuOption);
Ver 1.11, February 28, 2003, 23/63
SHARP CORPORATION
Sharp SL-series Zaurus “Qtopia” Development Start-up Guide
appsample.cpp (continued)
// File menu
actMenu1 = new QAction( tr( "Menu1" ), QString::null, 0, this, 0 );
connect( actMenu1, SIGNAL( activated() ), this, SLOT( slotMenu1() ) );
actMenu1->addTo(listMenuFile);
// Option menu
actMenu2 = new QAction( tr( "Menu2" ), QString::null, 0, this, 0 );
connect( actMenu2, SIGNAL( activated() ), this, SLOT( slotMenu2() ) );
actMenu2->addTo(listMenuOption);
}
AppSample::~AppSample()
{
}
void AppSample::setDocument(const QString& fileref)
{
}
void AppSample::slotMenu1()
{
QMessageBox::warning(this,tr("menu"),tr("Menu1"));
}
void AppSample::slotMenu2()
{
QMessageBox::warning(this,tr("menu"),tr("Menu2"));
}
// eof
Ver 1.11, February 28, 2003, 24/63
SHARP CORPORATION
Sharp SL-series Zaurus “Qtopia” Development Start-up Guide
appsample.h
#ifndef __APPSAMPLE_H__
#define __APPSAMPLE_H__
#include
#include
#include
#include
#include
#include
#include
#include
#include
#include
#include
#include
#include
#include
<sys/time.h>
<unistd.h>
<qwidget.h>
<qmainwindow.h>
<qimage.h>
<qlabel.h>
<qlayout.h>
<qpetoolbar.h>
<qaction.h>
<qpemenubar.h>
<qslider.h>
<qlibrary.h>
<qdatetime.h>
"applnk.h"
class AppSample : public QMainWindow
{
Q_OBJECT
public:
AppSample( QWidget *parent=0, const char *name=0, int wFlags=0 );
~AppSample();
private slots:
void setDocument(const QString& fileref);
void slotMenu1();
void slotMenu2();
protected:
QAction *actMenu1,*actMenu2;
};
#endif // end __APPSAMPLE_H__
Ver 1.11, February 28, 2003, 25/63
SHARP CORPORATION
Sharp SL-series Zaurus “Qtopia” Development Start-up Guide
2.3.2.
Operation of “OK” and “Cancel” key
The default (pre-installed) SL-series Zaurus applications implement the same functions on “OK” key on the device
and the (OK) button at the top-right corner of the application title bar. Likewise, the same function is implemented
with the “Cancel” key on the device and the (X) button on the top-right corner of the application title bar. It is
recommended to do so in your applications as well.
2.3.3.
Access to the device VRAM
You may want to consider direct access to the device VRAM in order to accelerate the drawing performance of
your application. However, VRAM access may vary among the SL-series Zaurus, and may cause your
applications to have device dependency.
In order to avoid the device dependency, it is recommended to use the QDirectPainter class in order to
resolve this problem. Please note that following method is added to Qt 3.0, and cannot be used on the SL-series
Zaurus (as it implements Qt/E 2.3.2).
void QDirectPainter::setAreaChanged(const QRect &);
Ver 1.11, February 28, 2003, 26/63
SHARP CORPORATION
Sharp SL-series Zaurus “Qtopia” Development Start-up Guide
2.4.
Qtopia Development Tutorial
Now that you know how to build the development environment, overall workflow, useful tools, and special
conditions for the SL-series Zaurus, you may want to develop your application. The following is a brief tutorial on
actually developing a Qtopia application following the overall workflow mentioned above.
Note that following tutorial assumes that you are working in /home/user1/work-dir.
2.4.1.
Hello World!!
The following is the source that only shows “Hello World!!” on the display. Once you complete editing, save this
file as main.cpp in the /home/user1/work-dir.
#include <qpe/qpeapplication.h>
#include <qlabel.h>
int main( int argc, char *argv[] )
{
QPEApplication app( argc, argv );
QLabel *label = new QLabel( “Hello World!!” ,
(Qwidget*)0 );
label->resize( 100, 50 );
2.4.2.
Creating the Project File
Use the “progen” tool to create a .pro file. In order to establish a PATH to the “tmake” directory, execute the
following commands. Note that following example assumes that you have the dev-x86-qpe.sh file in
/home/user1 directory.
$ . ../dev-x86-qpe.sh
$ progen –o qpe-test.pro
Once you execute the above commands, you have your environment configured to compile for x86, and have the
files listed in qpe-test.pro file. However, you have to add following the information to the the created
qpe-test.pro file so that you can actually use this file for further process.
Ver 1.11, February 28, 2003, 27/63
SHARP CORPORATION
Sharp SL-series Zaurus “Qtopia” Development Start-up Guide
DESTDIR = ./
INCLUDEPATH += $(QTDIR)/library
DEPENDPATH += $(QTDIR)/library
TARGET = qpe-test
LIBS += -lqpe
If you have a .ui file besides the source file, you may want to add INTERFACE tag in the .pro file, so that you will
have the contents of the procedure automatically added to the Makefile.
DESTDIR = ./
INCLUDEPATH += $(QTDIR)/library
DEPENDPATH += $(QTDIR)/library
TARGET = qpe-test
LIBS += -lqpe
INTERFACE = qpe-test.ui
2.4.3.
Creating the Makefile
Use the “tmake” tool to create the Makefile based on the .pro file generated by the “progen”:
$ tmake –o Makefile qpe-test.pro
Once you execute the above command, now you have the Makefile to build the main.cpp.
2.4.4.
Executing make to build the application
Use “make” command to build main.cpp using the created Makefile:
$ make
Once you execute, unless you modified the main.cpp file or delete the files created by tmake (such as .o file),
you cannot re-execute make. In such case, execute the following to initialize, and re-issue make command.
$ make clean
Ver 1.11, February 28, 2003, 28/63
SHARP CORPORATION
Sharp SL-series Zaurus “Qtopia” Development Start-up Guide
2.4.5.
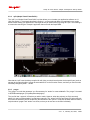
Running Hello World on the “qvfb”
Once you complete the building of your source file, you should have a qpe-test file in the
/home/user1/work-dir. You may use the “qvfb” tool to see how it runs on your PC. Execute the following
commands to see if you get the same of similar screenshot on your PC. Make sure to execute qpe-test after the
“qvfb” is booted:
$ qvfb &
$ ./qpe-test –qws qpe-test
The screenshot on the left is the one you will see after you run “qvfb”, and the right is the one when you run
qpe-test on the “qvfb”.
2.4.6.
Running Hello World on Qtopia environment
Qtopia would also run on the “qvfb”. If you run your application on the Qtopia running on “qvfb”, it would provide a
closer image of the application running on the target device. This will also allow you to check and confirm how to
writea .desktop file on the installing destination. (See section 3 for the install package details.)
(STEP 1) Layout necessary files
In order to run the applications in the Qtopia running on “qvfb” of PC-Linux, you would have to layout the following
files to the following directories. For the details of each file, including what and how to write, see Section 3.
Ver 1.11, February 28, 2003, 29/63
SHARP CORPORATION
Sharp SL-series Zaurus “Qtopia” Development Start-up Guide
directories
opt/Qtopia
Files to be located
apps/Applications
.desktop file
bin
executable binary
pics
icon file
i18n/en
.qm file (translation file)
help/en/html
help file (.html file)
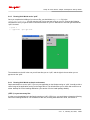
(STEP 2) Run both “qvfb” and “qpe”
The Qtopia environment (“qpe”) also runs on “qvfb”. Execute the following command to run Qtopia:
$ qvfb &
$ qpe
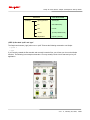
If you correctly created the files needed, and correctly locate the files, you will see your icon on the Qtopia
launcher. The following is an example screenshot. You may actually use the icon to start and you’re your
application.
Ver 1.11, February 28, 2003, 30/63
SHARP CORPORATION
Sharp SL-series Zaurus “Qtopia” Development Start-up Guide
2.5.
Providing help file with your application
The default (pre-installed) SL-series Zaurus applications have a (?) button on the top-right corner of the
application title bar. When you tap this (?) button, the application will show its help file to the users.
This function can be implemented simply by preparing the help file in an html document, and placing them in the
correct directory. /opt/QtPalmtop/help/en/html (in case of English) is the place to locate the html file(s).
You can create the html file(s) just like you do for websites. Make sure to apply the same character encoding to
the file as defined in charset tag in the html document.
2.6.
Converting character code (for local language support)
The translation file (*.qm file) can be used to support multi-language or local languages. However, you may also
directly use the local language characters in the application source. The following is an example of how to do so
by using the Japanese characters in the source. Note that multi-language support also requires the
corresponding font file as well.
In order to directly use Japanese characters in the application source, the fromUtf8() method of the QString
class is used. This method converts the UTF8 character set to its arguments to Unicode. Thus, the local character
(in this case Japanse) provided to the fromUtf8() method needs to be written in UTF8 format.
The following is an example on creating a label with the Japanese character “
”.
QLabel *mylabel= new QLabel( "dummylabel" , this );
mylabel->setGeometry( 10, 10, 100, 30 );
mylabel->setText( QString::fromUtf8( "
" ) );
Ver 1.11, February 28, 2003, 31/63
SHARP CORPORATION
Sharp SL-series Zaurus “Qtopia” Development Start-up Guide
2.7.
Event handling: SIGNAL and SLOT
In order for the application to interact with end-users, the application must have an event handling process. The
following sections briefly describe how to handle events, namely known as SIGNAL and SLOT.
2.7.1.
Using already-defined SIGNAL and SLOT
The Qt/Embedded, or Qtopia uses a framework so called SIGNAL and SLOT to handle events. The following is
an example of an event handle process that displays a button, and closes the application when the button is
pressed (or tapped).
QPushButton *quitbutton = new QPushButton( "quit" );
connect( quitbutton, SIGNAL(clicked()), qApp, SLOT(quit() );
The first line is the process to create [quitbutton], and the second line is the process to close the application when
the [quitbutton] is pressed.
When the [quitbutton] is clicked, a “clicked” SIGNAL is issued, and the closure process that is set by quit() on
qApp will be executed. The qApp is a pointer defined by the Qt that points at QApplication object. Because
clicked() SIGNAL and quit() SLOT are already defined by Qt, you simply need to state that in your code.
For the other defined SIGNAL and SLOT, you are encouraged to look up in the Qt reference documentation
provided on the Trolltech websites. You will see pressed, released, clicked, toggled, stateChanged
SIGNALs in the QButton class, or setText, setPixmap, and setPicture SLOTs for the QLabel class.
2.7.2.
Creating your own SLOT
If the already-defined SIGNAL or SLOT cannot quite handle the desired process, you can also create your own
SIGNAL or SLOT. As it is quite rare that you need your own SIGNAL, this document only describes how to create
your own SLOT. If you need to create your own SIGNAL, please refer to the Qt reference documentations.
In order to create your own SLOT, you need to do the following tasks:
•
Add SLOT definition to the class definition
•
Create the actual SLOT
•
Connect SIGNAL and SLOT
•
Use “moc” (Meta Object Compiler) to generate a source for the C++ compiler
Ver 1.11, February 28, 2003, 32/63
SHARP CORPORATION
Sharp SL-series Zaurus “Qtopia” Development Start-up Guide
Add SLOT definition to the class definition
In order to create your own slot, you would have to add a Q_OBJECT statement in the ordinary class definition. In
addition, you would also have to add a definition of your own SLOT that you are about to create, by stating the
SLOT name to either public slots: or private slots: .
class myMainWindow : public Qwidget
{
Q_OBJECT
public:
myMainWindow();
public slots:
void testSlot();
private:
Qlabel *mylabel;
};
Create the actual SLOT
You do not need any special tricks to implement your own SLOT. Code your SLOT just like you do for the
functions and methods you implement.
Connect SIGNAL and SLOT
Use connect method to connect the SIGNAL and the SLOT. The following is an example that executes the
created testSlot when mybutton is clicked.
Connect( mybutton, SIGNAL(clicked()), this, SLOT( testSlot()) );
Using “moc” (Meta Object Compiler)
The SIGNAL and SLOT framework is Qt specific, and thus you need to do the necessary task for the compilation.
As mentioned earlier, you need to use a “moc” tool to generate source file(s) so that the C++ compiler can
recognize and handle the code. (See section 2.2.3 for the “moc” tool information.)
Ver 1.11, February 28, 2003, 33/63
SHARP CORPORATION
Sharp SL-series Zaurus “Qtopia” Development Start-up Guide
Note that the “moc” procedure will automatically be executed when you use Makefile to compile, if you specify the
file in the project file (.pro file). The following is an example of .pro file that automatically does the “moc” procedure.
With this file, one can use “tmake” tool to create Makefile, and do the compile link.
TEMPLATE
CONFIG
HEADERS
SOURCES
INTERFACES
INCLUDEPATH
DEPENDPATH
TARGET
LIBS
2.8.
= app
= qt warn_on release
= tut1.h
= tut1.cpp
=
+= $(QPEDIR)/include
+= $(QPEDIR)/include
= tut1
+= -lqpe
Sample application source
As a summary of the above sections, the following is a set of sample application source that includes character
code conversion as well as own SLOT function.
This sample application changes “Hello Zaurus World” label when the “
” labeled button is pressed. It also
terminates the application when the “quit” button is pressed. This sample application consists of tut1.h, tut1.cpp,
and tut1.pro files.
tut1.h
class myMainWindow:public QWidget
{
Q_OBJECT
public:
myMainWindow();
public slots:
void changeLabelSlot();
private:
QLabel
*mylabel;
QPushButton *quitbutton;
QPushButton *mybutton;
};
Ver 1.11, February 28, 2003, 34/63
SHARP CORPORATION
Sharp SL-series Zaurus “Qtopia” Development Start-up Guide
tut1.cpp (saved in UTF8 code)
#include
#include
#include
#include
<qpe/qpeapplication.h>
<qlabel.h>
<qpushbutton.h>
"tut1.h"
void myMainWindow::changeLabelSlot()
{
mylabel->setText( QString::fromUtf8("
"));
}
myMainWindow::myMainWindow()
{
setGeometry( 0, 0, 240, 320 );
mylabel = new QLabel(this, "Hello Zaurus World" );
mylabel -> setGeometry( 50, 80, 160, 30 );
mybutton = new QPushButton( this, "button" );
mybutton -> setGeometry( 70, 140, 100, 30 );
mybutton -> setText( QString::fromUtf8("
quitbutton = new QPushButton(this, "quit" );
quitbutton -> setGeometry( 180, 5, 50, 30 );
") );
connect( quitbutton, SIGNAL( clicked()), qApp, SLOT( quit()) );
connect( mybutton, SIGNAL( clicked()), this,
SLOT( changeLabelSlot()) );
}
int main( int argc, char** argv )
{
QPEApplication myapp( argc, argv );
myMainWindow mywidget;
myapp.setMainWidget( &mywidget );
mywidget.show();
return myapp.exec();
}
Ver 1.11, February 28, 2003, 35/63
SHARP CORPORATION
Sharp SL-series Zaurus “Qtopia” Development Start-up Guide
tut1.pro
TEMPLATE
CONFIG
HEADERS
SOURCES
INTERFACES
INCLUDEPATH
DEPENDPATH
TARGET
LIBS
= app
= qt warn_on release
= tut1.h
= tut1.cpp
=
+= $(QPEDIR)/include
+= $(QPEDIR)/include
= tut1
+= -lqpe
Expected Result (running on the “qvfb” on Linux-PC)
Ver 1.11, February 28, 2003, 36/63
SHARP CORPORATION
Sharp SL-series Zaurus “Qtopia” Development Start-up Guide
2.9.
Development with the QtDesigner
The QtDesigner (also see section 2.2.1) is a useful tool that helps and assists you to design the application GUI
as well as to configure the event handling. When you use this tool, you may need to take somewhat different
steps than the ones described in the above sections.
When QtDesigner is used, the overall development procedure will be; (i) design application GUI by QtDesigner,
(ii) generate the source file and the header file from the QtDesigner file (*.ui), (iii) create subclasses to the
generated class and add procedures other than GUI design to the generated class file(s) to compile-link.
The following is an example of the development flow using the QtDesigner for application development.
(STEP 1) Invoking QtDesigner
You would first want to invoke the QtDesigner (/opt/Qtopia/bin/designer). Note that some Linux distributions
may have newer version of the QtDesigner (than the one that comes with the Qtopia SDK 1.5.0) depending on
the distribution. Please make sure to invoke the QtDesigner installed in the above location.
(STEP 2) Design GUI by the QtDesigner
Once you are done with designing the application GUI, you may want to save the GUI design in a .ui file. (This
application development flow assumes that the GUI design is saved in a “form1.ui” file.)
(STEP 3) Create main.cpp
The QtDesigner will generate a class when you design your application GUI by this tool (in case of this example,
Form1). The name put into the “name” field of the QtDesigner property editor is in fact the class name.
In the main.cpp file, you need to create an object corresponding to that class (see line #7). You would also have
to make an include statement so that it includes the header file of the created class (see line #2):
main.cpp
1:
2:
3:
4:
5:
6:
7:
8:
9:
10:
#include <qpe/qpeapplication.h>
#include "Form1.h"
int main( int argc , char **argv )
{
QPEApplication myapp(argc, argv);
Form1
w;
myapp.showMainWidget( &w );
return myapp.exec();
}
Ver 1.11, February 28, 2003, 37/63
SHARP CORPORATION
Sharp SL-series Zaurus “Qtopia” Development Start-up Guide
(STEP 4) Create project file
You may want to use the “progen” tool to create the project file for your application. Execute the following
command file you have form1.ui and main.cpp file in your current working directory.
$ progen -o demo.pro
The generated demo.pro file sets main.cpp file for the SOURCES tag, and form1.ui file for its INTERFACES
tag.You would also have to add elements described in the INCLUDEPATH and below:
demo.pro
TEMPLATE
CONFIG
HEADERS
SOURCES
INTERFACES
NCLUDEPATH
DEPENDPATH
TARGET
LIBS
= app
= qt warn_on release
=
= main.cpp
= form1.ui
+= $(QPEDIR)/include
+= $(QPEDIR)/include/qpe
= demo
+= -lqpe
(STEP 5) Create Makefile by “tmake”, and build
Once you have successfully created the project file, you would then want to create Makefile, and then make to
generate source and header file for the GUI design file (.ui). Use “tmake” to create Makefile, and the execute
“make”:
$ tmake -o Makefile demo.pro
$ make
When you execute “make” while the GUI design file (in this example, “form1.ui”) is specified in the INTERFACES
tag of the project file (.pro), it will automatically create the source file as well as the header file based on the
specified .ui file.
(STEP 6) Add other process(es) to the Form1 class (except for the GUI design)
You may want to add the necessary processes (such as SLOT handling etc.) to the generated source file by
executing make.
Ver 1.11, February 28, 2003, 38/63
SHARP CORPORATION
Sharp SL-series Zaurus “Qtopia” Development Start-up Guide
(STEP 7) Modify the project file
By executing the make in STEP 5 above, you now have form1.h header file and form1.cpp source file from the
form1.ui file. Thus, you may want to modify your demo.pro project file so that you can build your application
correctly.
Modifications that you need to take care of are; (i) add form1.h to the HEADERS tag, (ii) specify both main.cpp
and form1.cpp to the SOURCES tag, (iii) remove form1.ui statement from the INTERFACES tag. Make sure to
remove form1.ui statement from the INTERFACES tag, or it will automatically generate the source and header
files for form1.ui, and will remove all of the changes you added to the source file in STEP 6.
demo.pro (modified)
TEMPLATE
CONFIG
HEADERS
SOURCES
INTERFACES
INCLUDEPATH
DEPENDPATH
TARGET
LIBS
= app
= qt warn_on release
= form1.h
= main.cpp form1.cpp
=
+= $(QPEDIR)/include
+= $(QPEDIR)/include/qpe
= demo
+= -lqpe
(STEP 8) Re-create Makefile by “tmake”, and build
Once you have modified the project file, you would then want to recreate Makefile, and then make to build your
application. Use “tmake” to create Makefile, and the execute “make”:
$ tmake -o Makefile demo.pro
$ make
Note that you need to re-create the project file if you change the GUI design by the QtDesigner tool.
Ver 1.11, February 28, 2003, 39/63
SHARP CORPORATION
Sharp SL-series Zaurus “Qtopia” Development Start-up Guide
3.
Installing Applications to the SL-series Zaurus
Once you have successfully built your application, you need to create the installation package, known as “ipkg”
package to actually install your applications on the SL-series Zaurus.
In order to create the ipkg package, application developers must first make the directory structure on the
PC-Linux and create some necessary files, and make sure to locate all necessary files in the appropriate
directories. This is important to correctly install and run applications on the SL-series Zaurus.
Please also note that the SL-5600, SL-C700 (Japan domestic model), and SL-B500 (Japan domestic model) now
adopt “root” and “user” privileges for security reasons. Different from the SL-5500 (and SL-A300), these new
rd
SL-series Zaurus run 3 party applications with the “user” privilege by default. It is also strongly recommended to
incorporate the special considerations for thse models so that your application will run all of the SL-series
Zaurus.
3.1.
The ipkg package
The SL-series Zaurus uses the ipk package format. iPKG is a very lightweight package management system. It
was designed for Linux installations with severe storage limitations such as handheld computers. This document
provides the basic knowledge on how to build an ipk. Advanced features, and more detailed explanations of ipk
can be found at http://www.handhelds.org/z/wiki/iPKG.
An .ipk file is basically a gzipped tar archive containing following 3 members:
./data.tar.gz: contains the actual files belonging to this package. The contents of this directory will be
extracted to "/" (The root directory) when installed by ipkg. So it should contain entries such as ./usr and ./etc as
top-level directory entries, if necessary.
./control.tar.gz: contains meta-data and scripts for the package. It must contain a file named control
(see following sections for the details). It also may contain the following files: conffiles, preinst, postinst,
prerm, postrm.
./debian-binary: This file is currently ignored by ipkg. However, in all current ipkgs it is a text file with a single
line: 2.0
3.1.1.
Making directories for .ipk package
In order to create an .ipk package, you may first want to make the directory structure on your PC-Linux that is the
same directory structure as the on on the SL-seires Zaurus. On the SL-series Zaurus, because applications are to
be installed in the /opt/QtPalmtop directory, the following illustrates the typical directory struture that you should
make on your PC-Linux.
Note that following explanations and example assumes creation of very basic .ipk, and you are encouraged to
also refer to http://docs.zaurus.com/ipkg_howto.shtml or http://www.handhelds.org/z/wiki/iPKG for more
advanced usage:
Ver 1.11, February 28, 2003, 40/63
SHARP CORPORATION
Sharp SL-series Zaurus “Qtopia” Development Start-up Guide
directories
work-dir
3.1.2.
Files to be located
CONTROL
control
control file
opt/Qtopia
apps/Applications
.desktop file
bin
executable binary
pics
icon file
i18n/en
.qm file (translation file)
help/en/html
help file (.html file)
control File
The control file is a file that describes and specifies the details and contents of the ipk package. The SL-seires
Zaurus installing/uninstalling application (“Add/Remove Software”) uses the information in this file to install the
application. This package should contain the following entities. The entity marked with M are mandatory:
Entities
M Package:
Files:
Priority:
Section:
M Maintainer:
M Architecture:
M Version:
The name of the package and should match the regular expression
[a-z0-9.+-]¥+
Files included in the package, including directry.
This entity should be one of: required, standard, important,
optional, or extra. Most programs should use optional.
The catagory that best fits this type of package:
- Games
- Multimedia (Graphics, video/audio/picture viewer or player)
- Communications (Instant messaging, email, etc)
- Settings (anything that modifies the system)
- Utilities (more often smaller apps)
- Applications (Anything that couldn't fit in any of the above)
This entity should be the name and email address of the person
responsible for maintaining the package, (not necessarily the author
of the program).
This entity should specify the architecture for which the package is
compiled. Valid values currently include "arm" and "all".
This entity should have at least one digit and should match
[a-zA-Z0-9.+]*. Version may also contain an optional trailing
revision matching "-fam![0-9]¥+". This revision should be
incremented each time the package changes but the version does
not, (ie. a packaging tweak). It may be reset, (or simply omitted),
each time the version is incremented.
Ver 1.11, February 28, 2003, 41/63
SHARP CORPORATION
Sharp SL-series Zaurus “Qtopia” Development Start-up Guide
Depends:
M Description
This entity indicates packages which must also be installed in order
for this package to work. The packages should be listed on a single
line, separated by commas.
This entity should be a short, (less than 80 characters) description
of the program. It may also include a long description on
subsequent lines, (each indented by a single space character).
Blank lines in the long description may be indicated by a line
consisting of a space character followed by a period, ie " ."
control file example
Package: foobar
Priority: optional
Section: Misc
Version: 0.1
Architecture: arm
Maintainer: Familiar User [email protected]
Depends: libc6
Description: foo is the ever-present example program -- it does
Everything foo is not a real package. This is simply an example.
3.1.3.
desktop File
The .desktop file is used to define the icon and information that will be given to the Qtopia desktop (launcher). The
following entities should be included in this file.
Entities
[desktop Entry]
Comment =
Exec =
Icon =
Type =
Name =
CanFastload =
HidePrivilege =
Brief explanation of this application
Program file name, or executing script file name
Application icon file name
Type of the installing package. Most program should state
“Application”.
Application name to be displayed on the desktop
1 to display the checkbox or 0 to hide the checkbox in the “Details”
window displayed by tap-and-hold the application icon
1 to hide the checkbox or 0 to display the checkbox in the “Details”
window displayed by tap-and-hold the application icon
Note that you must make sure to state exactly the same file name for the program and the icon for the Exec entity
and Icon entity, or the ipk package will either fail to install or fail to execute. The icon file should be created and
saved in PNG format. You may use any size of the icon image so long as it is saved in PNG format. The system
will automatically adjust the size of the icon image to display it on the Qtopia desktop (launcher).
Ver 1.11, February 28, 2003, 42/63
SHARP CORPORATION
Sharp SL-series Zaurus “Qtopia” Development Start-up Guide
.desktop file example
[Desktop Entry]
Comment = Qt Sample
Exec = foobar
Icon = foobar
Type = Application
Name = Foobar
CanFastload = 1
HidePrivilege = 0
3.1.4.
Special Considerations for SL-5600, SL-C700, and SL-B500
(A) QuickExec (Fast Load) entity for .dektop file
The SL-5600, SL-C700, and SL-B500 now incorporate so called “QuickExec” or “Fast Load” capability to
minimize the time required to invoke the application.
Enabling the “QuickExec” or “FastLoad” option can be configured by the “Details” window displayed by
tap-and-hold the application icon. The CanFastload = entity will either show or hide this checkbox. If this
function is enabled, the SL-series Zaurus will remain cached even if the application is “closed” by the user, but it
consumes memory (and thus the freely available heap area becomes shortened).
(B) Run Applications with “root” Privilege entity for .desktop file
As mentioned earlier, the SL-5600, SL-C700, and SL-B500 now adopt “root” and “user” privilege model for the
rd
security reasons. For those security reasons, the SL-5600, the SL-C700, and SL-B500 will not install any 3 party
applications to automatically run with “root” privilege.
However, if necessary, you can make the “Details” window display the checkbox for this configuration, and ask
users to change the privilege to run your application as “root”. (Just as running the application on the SL-5500).
In order to do so, you must add the following statement in the .desktop file to show the checkbox in .desktop file:
HidePrivilege = 0
Ver 1.11, February 28, 2003, 43/63
SHARP CORPORATION
Sharp SL-series Zaurus “Qtopia” Development Start-up Guide
Unless the application calls for root privilege to execute and perform expected results, it is strongly
recommended that developers should state ”HidePrivilege = 1” in its .desktop file so to hide this
checkbox from users for security reasons.
Note that this checkbox for “user” or “root” privilege configuration is set to OFF (meaning execute application by
the “user” privilege) by default for user and system security reasons. This default value cannot be configured to
ON by default, and thus users must set “root” privilege manually upon their decision.
(C) The SL-5600 (SL-C700 and SL-B500) file system and access privileges
Because the SL-5600 (and SL-C700, SL-B500) incorporates “user” privilege to execute processes or to access
files in the system to enhance the security features, you must be careful about permission restrictions when
running applications, accessing files already on the device, or creating new files on the Zaurus.
The “Add/Remove Software” on the SL-5600 runs with “root” privilege, and thus all files in the ipk packages can
be stored or made in any directories. However, when installed, the system will try to execute the application
binaries with “user” privileges, and thus applications will fail to access files and directories if the correct privilege
or permissions are not given. Appendix. A provides access permission list for the SL-5600.
You may want to use specific files (ipkg script files) to resolve this permission problem. See section 3.1.6. for the
ipkg script file details.
3.1.5.
Creating ipk file
Once you’ve made the directory structure illustrated in section 3.1.1, and located all of the necessary files in the
corresponding directory, you are ready to create .ipk file for installation.
There is a useful tool in the developer community called “ipkg-build” to create the .ipk file. You may obtain this tool
from the following URL:
IPKG FIND: http://ipkgfind.handhelds.org/result.phtml?section=base
ipkg-build: http://ipkgfind.handhelds.org/details.phtml?package=ipkg-build&official=&format=
Ver 1.11, February 28, 2003, 44/63
SHARP CORPORATION
Sharp SL-series Zaurus “Qtopia” Development Start-up Guide
Once you’ve downloaded this tool (this tool is actually a command script), you should then extract this tool to the
directory where the PATH is enabled (such as /user/bin). The following is a basic usage of this tool. By executing
the above command, you will have the entire directory (/home/(your user name)/(working directory))
included in the .ipk file:
$ cd /home/(your username)
$ ipkg-build (working directory the directories for ipk file are made)
3.1.6.
ipkg Script
If needed, the package may include some scripts that will be involved by the package maintenance system. There
are four possible times a script will be run: just before the package is installed, just after the package is installed,
just before the package is removed, and just after the package is removed.
preinst
postinst
prerm
postrm
A script file that can be executed before ipk installation
A script file that can be executed after ipk installation
A script file that can be executed before ipk uninstallation
A script file that can be executed after ipk uninstallation
These scripts should be located in the CONTROL directory. The scripts should return 0 on success, (a non-zero
return value from preinst will prevent the package from being installed -- this can be useful in rare situations). The
scripts should not assume a tty is available so they may not prompt the user.
Each script file can be stated just like any other script file. The following is an example for a “postinst” file that
creates a “data” directory accessible by “user” privilege in /home/. This postinst file would be included in the
application ipk so that the directory would be created along with the application installation. Note that the variable
PKG_ROOT is set to the root of the package installation and can be used to refer to the packages contents in
their installed locations.
#!/bin/sh
mkdir /home/data
chmod +w /home/data
Ver 1.11, February 28, 2003, 45/63
SHARP CORPORATION
Sharp SL-series Zaurus “Qtopia” Development Start-up Guide
3.2.
Transferring the ipk package to the SL-series Zaurus
In order to install the application’s ipk package to the SL-series Zaurus, there are a couple of ways to do so. In
any case, you need to “transfer” the ipk file to the device itself or to a memory media that can be plugged into the
device. In order to do so, you may choose one or more of the following ways that best fits to your environment:
1.
CF memory card, or SD memory card
2.
LAN (by NFS)
3.
Synchronization Software (comes with the SL-series Zaurus)
3.2.1.
Copying the ipk package to CF memory card, or SL memory card
As the SL-series Zaurus has a CF card type-II slot and a SD card slot, the easiest way of installing the application
ipk package is to use these memory cards. You may simply copy the ipk package to its designated directory. Note
that these memory cards need to be FAT16 formatted.
The following is an example of the command that you need to execute on your PC-Linux to copy the .ipk package
to the memory cards. The following example assumes the device name of the memory card is /dev/hdc1, and its
mount point is /mnt/card.
$ mount –t vfat /dev/hdc1 /mnt/card
$ cp qpe-test_0.1-1_arm.ipk /mnt/card
To eject the memory card after copying the ipk package, you may want to execute the following command. You
may also want to execute sync command to completely output the date to the file:
$ sync
$ umount /mnt/card
NOTE) The file names will need to be recognizable within the SL-series Zaurus file system; make sure that the file
name is qualified as follows: characters must be 1 byte, "A - Z" (capital), "0 - 9", and "_"(underscore)
When completed, just insert the memory card to the SL-series Zaurus. The SL-series Zaurus will automatically
detect the memory card when inserted and a card icon will appear on the task bar. The memory card will be
automatically mounted at the following mount points:
CF Card
SD Card
./var/mnt/cf
./var/mnt/card
Ver 1.11, February 28, 2003, 46/63
SHARP CORPORATION
Sharp SL-series Zaurus “Qtopia” Development Start-up Guide
3.2.2.
Download ipk package by using NFS
If you have a local area network in your development environment, you may also use NFS to download the ipk
package to the SL-series Zaurus from your PC-Linux. In order to do so, you need to have the “terminal”
application installed on the SL-series Zaurus. The “terminal” application can be obtained from
http://www.myzaurus.com/downloads.asp.
(STEP 1) Enable LAN access on your Zaurus
Insert the network card to the SL-series Zaurus If the network card is successfully recognized upon its insertion to
the device, a card icon appears on the task bar. In the case the CF network card is not recognized, pull out the
card and re-insert to the SL-series Zaurus. In addition, the following commands from the “terminal” application will
also provide the same result:
# cardctl eject
# cardctl insert
If the device still does not recognize the network even by executing the above above commands, reset the
SL-series Zaurus to have cardmgr services available.
(STEP 2) Configure network interface of your Zaurus
Invoke the “Network” application from the “Settings” tab, and enable the TCP/IP networking service on the
SL-series Zaurus. See the Operation Manuals for how to configure the network interface of the SL-series Zaurus.
(STEP 3) Mounting file system by NFS
Invoke the “terminal” application on the “Applications” tab. When the application successfully invoked, a console
(shell) screen will appear. For instance, if the /server directory of the nfs server (whose IP address in
SS.SS.SS.SS) is exported for the client, the following command will allow client access to the /server directory
of the server under /mnt/net:
$ mount –t nfs SS.SS.SS.SS:/server /mnt/net
NOTE) The IP address in Figure 3-8 (SS.SS.SS.SS) must be the IP address of the actual server, and should be
entered by dicimal dot expression.
In order to make this command valid, the file system has to be exported on the server side prior to executing the
above. For the details, execute the following command to check how to configure to export the file system. The
above configuration will allow remote device file system access using NFS.;
$ man exports
NOTE) nfs daemon must be invoked at the server side prior to execution of above command. Please refer to the
manual for “exports”.
Ver 1.11, February 28, 2003, 47/63
SHARP CORPORATION
Sharp SL-series Zaurus “Qtopia” Development Start-up Guide
3.2.3.
Download the ipk package by the Synchronization software
You may also use the synchronization software (that comes with the SL-series Zaurus) to download the ipk
package to the SL-series Zaurus. You can simply transfer the ipk package to the device by using the file transfer
operation of the synchronizing software.
Once you complete the transfer, the ipk package should be stored in the designated location of the SL-series
Zaurus. See the Operation Manuals on the synchronization software for the details.
3.3.
Install the ipk package on the SL-series Zaurus
In order to install the application’s ipk package to the SL-series Zaurus, there ara a couple of ways to do so. You
may choose the one that best fits your purpose:
1.
Use “Add/Remove Software” application on the SL-series Zaurus
2.
Manually install from the “terminal” application
3.3.1.
Use “Add/Remove Software” application
In order to install the application from the SL-series Zaurus, you may want to use the “Add/Remove Software”
application on the SL-series Zaurus. This application will look for the ipk packages stored on the device, CF
memory card, and SD memory card, and gives you a listing of available applications to install.
Please see the Operation Manual that comes with the Zaurus for the details.
3.3.2.
Manually install from the command line
In order to install the application from the SL-series Zaurus, you may also use the “terminal” application to
manually install the ipk package. The “Add/Remove Software “application is easy enough to install, but does not
provide you wih the error log when you encounter an error during installation.
When you are about to release your application ipk, or when your ipk package has problems installing, it is
recommended to use this method to analyze the root case, and to resolve the problem. The following command
will allow you to manually install the ipk package:
$ ipkg install (ipk package name)
The following is an example of an error log when it encounters the memory-low error during the installation:
Ver 1.11, February 28, 2003, 48/63
SHARP CORPORATION
Sharp SL-series Zaurus “Qtopia” Development Start-up Guide
$ ipkg install qpe-test_0.1-1_arm.ipk
Unpacking qpe-test...Done.
Configuring qpe-test...tar: ./opt/QtPalmtop/bin/qpe-test: input/output
error -- No space left on device
tar: Bad tar header, skipping
tar: Bad tar header, skipping
tar: Error exit delayed from previous errors
rm: /: is a directory
rm: /opt: is a directory
rm: unable to remove `/opt/QtPalmtop': Read-only file system
rm: /opt/QtPalmtop/bin: is a directory
rm: /opt/QtPalmtop/apps: is a directory
rm: /opt/QtPalmtop/apps/Applications: is a directory
rm: /opt/QtPalmtop/pics: is a directory
$
3.3.3.
Important notice for “after installation”
The following are some of the important notices for the installation:
A. ipk package remains in the device storage
The ipk package copied to the SL-series Zaurus itself, or memory card remains even if the application is installed.
You may want to delete the installed ipk package(s) when your device storage or memory becomes low in the
free available space, or if you do not need the ipk package.
B. icon(s) for the applications installed on the memory card(s)
You may also install the applications to the CF memory card or SD memory card aside from the SL-series Zaurus
itself. If you install applications on the memory cards, the application icon appears on the Qtopia desktop
(launcher) even if the card is not inserted in the device. Note that you need to insert such memory cards to
execute the application.
C. Re-installing the applications installed on the memory card(s)
You may also install the applications to the CF memory card or SD memory card aside from the SL-series Zaurus
itself. If you install applications on the memory cards, the application is considered to be “already installed” on the
SL-series Zaurus even if the card is not inserted in the device. If you want to re-install such application to the
device itself, or to the different designation, you would first uninstall the application with the memory card inserted,
and then re-install the application.
Ver 1.11, February 28, 2003, 49/63
SHARP CORPORATION
Sharp SL-series Zaurus “Qtopia” Development Start-up Guide
D. Using the applications installed on the memory card(s)
You may also install the applications to the CF memory card or SD memory card aside from the SL-series Zaurus
itself. If you install applications on the memory cards, the application can only be used with the combination of the
SL-series Zaurus you executed during the installation.
3.3.4.
Uninstalling applications from the SL-series Zaurus
In order to uninstall the application from the SL-series Zaurus, you may want to use the “Add/Remove Software”
application on the SL-series Zaurus. Please see the Operation Manual that comes with the Zaurus for the details.
Ver 1.11, February 28, 2003, 50/63
SHARP CORPORATION
Sharp SL-series Zaurus “Qtopia” Development Start-up Guide
Appendix A. SL-5600 Files and Directories
Access Permission List for SL-5600
/
drwxrwsr-x
drwxrwxr-x
drwxrwxr-x
lrwxrwxrwx
drwxrwxr-x
drwxrwxr-x
lrwxrwxrwx
drwxrwxr-x
dr-xr-xr-x
drwxrwxr-x
drwxrwxr-x
lrwxrwxrwx
drwxrwsr-x
lrwxrwxrwx
2
2
5
1
12
3
1
2
54
5
2
1
10
1
root
root
root
root
root
root
root
root
root
root
root
root
root
root
root
root
root
root
root
root
root
root
root
root
root
root
root
root
0 May 20
0 Feb 10
7680 Jan 1
9 Feb 10
0 Jan 1
0 Feb 10
8 Feb 10
0 Feb 10
0 Jan 1
0 Feb 10
0 Feb 10
12 Feb 10
0 Feb 10
16 Feb 10
/bin
lrwxrwxrwx
lrwxrwxrwx
-rwxrwxr-x
-rwxrwxr-x
-r-xr-xr-x
lrwxrwxrwx
lrwxrwxrwx
-rwxrwxr-x
lrwxrwxrwx
lrwxrwxrwx
lrwxrwxrwx
lrwxrwxrwx
lrwxrwxrwx
lrwxrwxrwx
lrwxrwxrwx
lrwxrwxrwx
lrwxrwxrwx
lrwxrwxrwx
lrwxrwxrwx
lrwxrwxrwx
lrwxrwxrwx
lrwxrwxrwx
lrwxrwxrwx
lrwxrwxrwx
lrwxrwxrwx
-rwxrwxr-x
-rwxrwxr-x
lrwxrwxrwx
lrwxrwxrwx
lrwxrwxrwx
-rwxrwxr-x
1
1
1
1
1
1
1
1
1
1
1
1
1
1
1
1
1
1
1
1
1
1
1
1
1
1
1
1
1
1
1
root
root
root
root
root
root
root
root
root
root
root
root
root
root
root
root
root
root
root
root
root
root
root
root
root
root
root
root
root
root
root
root
root
root
root
root
root
root
root
root
root
root
root
root
root
root
root
root
root
root
root
root
root
root
root
root
root
root
root
root
root
root
14 Feb 10
14 Feb 10
108744 May 20
561156 May 20
233452 Oct 26
7 Feb 10
7 Feb 10
3600 Jun 27
7 Feb 10
7 Feb 10
7 Feb 10
7 Feb 10
7 Feb 10
14 Feb 10
14 Feb 10
7 Feb 10
7 Feb 10
8 Feb 10
7 Feb 10
7 Feb 10
7 Feb 10
4 Feb 10
7 Feb 10
7 Feb 10
4 Feb 10
15952 May 20
68456 May 20
4 Feb 10
4 Feb 10
7 Feb 10
9400 May 20
2002 bin
2003 boot
05:00 dev
2003 etc ->
1970 home
2003 lib
2003 mnt ->
2003 opt
1970 proc
2003 root
2003 sbin
2003 tmp ->
2003 usr
2003 var ->
/home/etc
/var/mnt
/dev/shm/tmp
/home/system/var
2003 addgroup -> /bin/tinylogin
2003 adduser -> /bin/tinylogin
2002 ash
2002 bash
09:10 busybox
2003 cat -> busybox
2003 chgrp -> busybox
2002 chkmntsh
2003 chmod -> busybox
2003 chown -> busybox
2003 cp -> busybox
2003 date -> busybox
2003 dd -> busybox
2003 delgroup -> /bin/tinylogin
2003 deluser -> /bin/tinylogin
2003 df -> busybox
2003 dmesg -> busybox
2003 dnsdomainname -> hostname
2003 du -> busybox
2003 dumpkmap -> busybox
2003 echo -> busybox
2003 egrep -> grep
2003 false -> busybox
2003 fdflush -> busybox
2003 fgrep -> grep
2002 fuser
2002 grep
2003 gunzip -> zcat
2003 gzip -> zcat
2003 head -> busybox
2002 hostname
Ver 1.11, February 28, 2003, 51/63
SHARP CORPORATION
Sharp SL-series Zaurus “Qtopia” Development Start-up Guide
lrwxrwxrwx
lrwxrwxrwx
lrwxrwxrwx
lrwxrwxrwx
lrwxrwxrwx
lrwxrwxrwx
lrwxrwxrwx
lrwxrwxrwx
lrwxrwxrwx
lrwxrwxrwx
-rwxrwxr-x
lrwxrwxrwx
lrwxrwxrwx
-rwxrwxr-x
-rwxrwxr-x
-rwxrwxr-x
lrwxrwxrwx
lrwxrwxrwx
lrwxrwxrwx
-r-sr-xr-x
-rwxrwxr-x
lrwxrwxrwx
lrwxrwxrwx
lrwxrwxrwx
-rwxrwxr-x
lrwxrwxrwx
lrwxrwxrwx
lrwxrwxrwx
lrwxrwxrwx
-r-sr-xr-x
lrwxrwxrwx
lrwxrwxrwx
lrwxrwxrwx
-rwxrwxr-x
-rwxrwxr-x
-r-sr-xr-x
-rwxrwxr-x
/boot
drwxrwxr-x
drwxr-xr-x
/dev
lrwxrwxrwx
crw------crw-rw---crw-rw-rwcrw-rw-rwcrw-rw-rwcrw-rw-rwlrwxrwxrwx
crw-r--r-lrwxrwxrwx
1
1
1
1
1
1
1
1
1
1
1
1
1
1
1
1
1
1
1
1
1
1
1
1
1
1
1
1
1
1
1
1
1
1
1
1
1
root
root
root
root
root
root
root
root
root
root
root
root
root
root
root
root
root
root
root
root
root
root
root
root
root
root
root
root
root
root
root
root
root
root
root
root
root
root
root
root
root
root
root
root
root
root
root
root
root
root
root
root
root
root
root
root
root
root
root
root
root
root
root
root
root
root
root
root
root
root
root
root
root
root
2 root
13 root
root
root
1
1
1
1
1
1
1
1
1
1
root
zaurus
root
root
root
root
root
root
root
root
root
root
root
root
root
root
root
root
root
root
7 Feb 10
14 Feb 10
7 Feb 10
7 Feb 10
7 Feb 10
7 Feb 10
7 Feb 10
7 Feb 10
7 Feb 10
7 Feb 10
95248 May 20
16 Feb 10
8 Feb 10
12428 Feb 10
6780 Feb 10
89312 May 20
7 Feb 10
7 Feb 10
7 Feb 10
7496 Oct 28
47496 May 20
3 Feb 10
7 Feb 10
7 Feb 10
25960 May 20
14 Feb 10
7 Feb 10
7 Feb 10
7 Feb 10
40108 Nov 16
7 Feb 10
7 Feb 10
7 Feb 10
26 May 20
13684 May 20
4700 Nov 16
55120 May 20
2003 ln -> busybox
2003 login -> /bin/tinylogin
2003 ls -> busybox
2003 mkdir -> busybox
2003 mknod -> busybox
2003 mktemp -> busybox
2003 more -> busybox
2003 mount -> busybox
2003 mt -> busybox
2003 mv -> busybox
2002 netstat
2003 pidof -> ../sbin/killall5
2003 ping -> sbusybox
2003 proxcfg
2003 proxnet
2002 ps
2003 pwd -> busybox
2003 rm -> busybox
2003 rmdir -> busybox
05:18 sbusybox
2002 sed
2003 sh -> ash
2003 sleep -> busybox
2003 sort -> busybox
2002 stty
2003 su -> /bin/tinylogin
2003 sync -> busybox
2003 tar -> busybox
2003 tee -> busybox
00:52 tinylogin
2003 true -> busybox
2003 umount -> busybox
2003 uname -> busybox
2002 uncompress
2002 usleep
00:36 utime
2002 zcat
0 Feb 10 2003 .
0 Jan 1 1970 ..
13 Jan 1 1970 MAKEDEV -> /sbin/MAKEDEV
134 Feb 10 2003 apm_bios
3 Feb 10 2003 atibm
4 Feb 10 2003 audio
20 Feb 10 2003 audio1
36 Feb 10 2003 audio2
52 Feb 10 2003 audio3
5 Jan 1 1970 audioctl -> mixer
254, 0 Feb 10 2003 collie-fl
4 Jan 1 1970 console -> tty1
10,
10,
14,
14,
14,
14,
Ver 1.11, February 28, 2003, 52/63
SHARP CORPORATION
Sharp SL-series Zaurus “Qtopia” Development Start-up Guide
crw-r--r-crw-r--r-crw-r--r-crw------crw-rw-rwcrw-rw-rwcrw-rw-rwlrwxrwxrwx
crw------crw--w--wcrw--w--wcrw--w--wcrw--w--wcrw--w--wlrwxrwxrwx
lrwxrwxrwx
crw-rw-rwbrw-rw---brw-rw---brw-rw---brw-rw---brw-rw---brw-rw---brw-rw---brw-rw---brw-rw---brw-rw---brw-rw---brw-rw---brw-rw---brw-rw---brw-rw---brw-rw---brw-rw---brw-rw---brw-rw---brw-rw---brw-rw---brw-rw---brw-rw---brw-rw---brw-rw---brw-rw---brw-rw---brw-rw---brw-rw---brw-rw---prw------crw-rw---crw------crw-rw---crw-r----crw-rw---brw-rw---brw-rw----
1
1
1
1
1
1
1
1
1
1
1
1
1
1
1
1
1
1
1
1
1
1
1
1
1
1
1
1
1
1
1
1
1
1
1
1
1
1
1
1
1
1
1
1
1
1
1
1
1
1
1
1
1
1
1
root
root
root
zaurus
root
root
root
root
zaurus
root
root
root
root
root
root
root
root
root
root
root
root
root
root
root
root
root
root
root
root
root
root
root
root
root
root
root
root
root
root
root
root
root
root
root
root
root
root
root
root
zaurus
root
root
root
root
root
root
205, 5 Feb 10 2003 cusa0
root
205, 6 Feb 10 2003 cusa1
root
205, 7 Feb 10 2003 cusa2
root
14, 3 Feb 10 2003 dsp
root
14, 19 Feb 10 2003 dsp1
root
14, 35 Feb 10 2003 dsp2
root
14, 51 Feb 10 2003 dsp3
root
3 Jan 1 1970 dspdefault -> dsp
root
29, 0 Feb 10 2003 fb0
tty
29, 1 Feb 10 2003 fb0autodetect
tty
29, 0 Feb 10 2003 fb0current
tty
29, 32 Feb 10 2003 fb1
tty
29, 33 Feb 10 2003 fb1autodetect
tty
29, 32 Feb 10 2003 fb1current
root
13 Jan 1 1970 fd -> /proc/self/fd
root
9 Jan 1 1970 fl -> collie-fl
root
1, 7 Feb 10 2003 full
operator 3, 0 Feb 10 2003 hda
operator 3, 1 Feb 10 2003 hda1
operator 3, 2 Feb 10 2003 hda2
operator 3, 3 Feb 10 2003 hda3
operator 3, 4 Feb 10 2003 hda4
operator 3, 5 Feb 10 2003 hda5
operator 3, 6 Feb 10 2003 hda6
operator 3, 7 Feb 10 2003 hda7
operator 3, 8 Feb 10 2003 hda8
operator 3, 9 Feb 10 2003 hda9
operator 3, 64 Feb 10 2003 hdb
operator 3, 65 Feb 10 2003 hdb1
operator 3, 66 Feb 10 2003 hdb2
operator 3, 67 Feb 10 2003 hdb3
operator 3, 68 Feb 10 2003 hdb4
operator 3, 69 Feb 10 2003 hdb5
operator 3, 70 Feb 10 2003 hdb6
operator 3, 71 Feb 10 2003 hdb7
operator 3, 72 Feb 10 2003 hdb8
operator 3, 73 Feb 10 2003 hdb9
operator 22, 0 Feb 10 2003 hdc
operator 22, 1 Feb 10 2003 hdc1
operator 22, 2 Feb 10 2003 hdc2
operator 22, 3 Feb 10 2003 hdc3
operator 22, 4 Feb 10 2003 hdc4
operator 22, 5 Feb 10 2003 hdc5
operator 22, 6 Feb 10 2003 hdc6
operator 22, 7 Feb 10 2003 hdc7
operator 22, 8 Feb 10 2003 hdc8
operator 22, 9 Feb 10 2003 hdc9
root
0 Jan 1 21:27 initctl
root
10, 2 Feb 10 2003 inportbm
root
161, 0 Feb 10 2003 ircomm
root
10, 4 Feb 10 2003 jbm
kmem
1, 2 Feb 10 2003 kmem
root
10, 0 Feb 10 2003 logibm
operator 7, 0 Feb 10 2003 loop0
operator 7, 1 Feb 10 2003 loop1
Ver 1.11, February 28, 2003, 53/63
SHARP CORPORATION
Sharp SL-series Zaurus “Qtopia” Development Start-up Guide
crw-rw---crw-rw---crw-r----lrwxrwxrwx
crw-rw-rwcrw-rw-rwcrw-rw-rwcrw-rw-rwcrw-rw-rwcrw-rw-rwcrw-rw-rwcrw-rw-rwcrw-rw-rwcrw-rw-rwcrw-rw-rwcrw-rw-rwbrw-r--r-brw-r--r-brw-r--r-crw-rw-rwcrw-rw-rwdrwxrwxr-x
crw-r--r-crw-r--r-crw-r--r-crw-r--r-brw-r--r-brw-r--r-brw-r--r-brw-r--r-crw-rw---crw-rw---crw-rw---crw-rw---crw-rw---crw-rw---crw-rw---crw-rw---crw-rw-rwcrw-rw---crw-rw---crw-rw---crw-r----crw-r--r-crw-rw---crw-rw-rwdrwxr-xr-x
crw-rw-rwcrw-rw-rwcrw-rw-rwcrw-rw-rwcrw-rw-rwcrw-rw-rwcrw-rw-rw-
1
1
1
1
1
1
1
1
1
1
1
1
1
1
1
1
1
1
1
1
1
2
1
1
1
1
1
1
1
1
1
1
1
1
1
1
1
1
1
1
1
1
1
1
1
1
2
1
1
1
1
1
1
1
root
root
root
root
root
root
root
root
root
root
root
root
root
root
root
root
root
root
root
root
root
root
root
root
root
root
root
root
root
root
root
root
root
root
root
root
root
root
root
root
root
root
root
root
root
root
root
root
root
root
root
root
root
root
lp
6, 1 Feb 10 2003 lp1
lp
6, 2 Feb 10 2003 lp2
kmem
1, 1 Feb 10 2003 mem
root
6 Jan 1 1970 midi -> midi00
root
35, 0 Feb 10 2003 midi0
root
14, 2 Feb 10 2003 midi00
root
14, 18 Feb 10 2003 midi01
root
14, 34 Feb 10 2003 midi02
root
14, 50 Feb 10 2003 midi03
root
35, 1 Feb 10 2003 midi1
root
35, 2 Feb 10 2003 midi2
root
35, 3 Feb 10 2003 midi3
root
14, 0 Feb 10 2003 mixer
root
14, 16 Feb 10 2003 mixer1
root
14, 32 Feb 10 2003 mixer2
root
14, 48 Feb 10 2003 mixer3
root
60, 0 Feb 10 2003 mmcda
root
60, 1 Feb 10 2003 mmcda1
root
60, 2 Feb 10 2003 mmcda2
root
31, 0 Feb 10 2003 mpu401data
root
31, 1 Feb 10 2003 mpu401stat
root
384 Jan 1 1970 msys
root
90, 0 Feb 10 2003 mtd0
root
90, 2 Feb 10 2003 mtd1
root
90, 4 Feb 10 2003 mtd2
root
90, 6 Feb 10 2003 mtd3
root
31, 0 Feb 10 2003 mtdblock0
root
31, 1 Feb 10 2003 mtdblock1
root
31, 2 Feb 10 2003 mtdblock2
root
31, 3 Feb 10 2003 mtdblock3
operator 9, 128 Feb 10 2003 nst0
operator 9, 224 Feb 10 2003 nst0a
operator 9, 160 Feb 10 2003 nst0l
operator 9, 192 Feb 10 2003 nst0m
operator 9, 129 Feb 10 2003 nst1
operator 9, 225 Feb 10 2003 nst1a
operator 9, 161 Feb 10 2003 nst1l
operator 9, 193 Feb 10 2003 nst1m
root
1, 3 Feb 10 2003 null
lp
6, 0 Feb 10 2003 par0
lp
6, 1 Feb 10 2003 par1
lp
6, 2 Feb 10 2003 par2
kmem
1, 4 Feb 10 2003 port
root
108, 0 Feb 10 2003 ppp
root
10, 1 Feb 10 2003 psaux
tty
5, 2 Feb 10 2003 ptmx
root
0 Jan 1 1970 pts
tty
2, 176 Jan 3 20:56 ptya0
tty
2, 177 Feb 10 2003 ptya1
tty
2, 178 Feb 10 2003 ptya2
tty
2, 179 Feb 10 2003 ptya3
tty
2, 180 Feb 10 2003 ptya4
tty
2, 181 Feb 10 2003 ptya5
tty
2, 182 Feb 10 2003 ptya6
Ver 1.11, February 28, 2003, 54/63
SHARP CORPORATION
Sharp SL-series Zaurus “Qtopia” Development Start-up Guide
crw-rw-rwcrw-rw-rwcrw-rw-rwcrw-rw-rwcrw-rw-rwcrw-rw-rwcrw-rw-rwcrw-rw-rwlrwxrwxrwx
brw-rw---brw-rw---brw-rw---brw-rw---cr--r--r-crw-rw-rwcrw-rw-rwcrw-rw-rwcrw-rw-rwlrwxrwxrwx
crw-r--r-brw-rw---brw-rw---crw-rw-rwbrw-rw---brw-rw---brw-rw---brw-rw---brw-rw---brw-rw---brw-rw---brw-rw---brw-rw---brw-rw---brw-rw---brw-rw---brw-rw---brw-rw---brw-rw---brw-rw---brw-rw---brw-rw---brw-rw---brw-rw---brw-rw---brw-rw---brw-rw---brw-rw---brw-rw---brw-rw---brw-rw---brw-rw---brw-rw---brw-rw---crw-rw-rw-
1
1
1
1
1
1
1
1
1
1
1
1
1
1
1
1
1
1
1
1
1
1
1
1
1
1
1
1
1
1
1
1
1
1
1
1
1
1
1
1
1
1
1
1
1
1
1
1
1
1
1
1
1
1
root
root
root
root
root
root
root
root
root
root
root
root
root
root
root
root
root
root
root
root
root
root
root
root
root
root
root
root
root
root
root
root
root
root
root
root
root
root
root
root
root
root
root
root
root
root
root
root
root
root
root
root
root
root
tty
tty
tty
tty
tty
tty
tty
tty
root
operator
operator
operator
operator
root
root
root
root
root
root
root
operator
operator
root
operator
operator
operator
operator
operator
operator
operator
operator
operator
operator
operator
operator
operator
operator
operator
operator
operator
operator
operator
operator
operator
operator
operator
operator
operator
operator
operator
operator
operator
operator
root
2,
2,
2,
2,
2,
2,
2,
2,
184 Feb 10 2003 ptya8
185 Feb 10 2003 ptya9
186 Feb 10 2003 ptyaa
187 Feb 10 2003 ptyab
188 Feb 10 2003 ptyac
189 Feb 10 2003 ptyad
190 Feb 10 2003 ptyae
191 Feb 10 2003 ptyaf
4 Jan 1 1970 ram -> ram1
1, 0 Feb 10 2003 ram0
1, 1 Feb 10 2003 ram1
1, 2 Feb 10 2003 ram2
1, 3 Feb 10 2003 ram3
1, 8 Feb 10 2003 random
35, 64 Feb 10 2003 rmidi0
35, 65 Feb 10 2003 rmidi1
35, 66 Feb 10 2003 rmidi2
35, 67 Feb 10 2003 rmidi3
9 Jan 1 1970 root -> mtdblock2
10, 135 Feb 10 2003 rtc
11, 0 Feb 10 2003 scd0
11, 1 Feb 10 2003 scd1
10, 240 Feb 10 2003 sd_slotstat
8, 0 Feb 10 2003 sda
8, 1 Feb 10 2003 sda1
8, 2 Feb 10 2003 sda2
8, 3 Feb 10 2003 sda3
8, 4 Feb 10 2003 sda4
8, 5 Feb 10 2003 sda5
8, 6 Feb 10 2003 sda6
8, 7 Feb 10 2003 sda7
8, 8 Feb 10 2003 sda8
8, 9 Feb 10 2003 sda9
8, 16 Feb 10 2003 sdb
8, 17 Feb 10 2003 sdb1
8, 18 Feb 10 2003 sdb2
8, 19 Feb 10 2003 sdb3
8, 20 Feb 10 2003 sdb4
8, 21 Feb 10 2003 sdb5
8, 22 Feb 10 2003 sdb6
8, 23 Feb 10 2003 sdb7
8, 24 Feb 10 2003 sdb8
8, 25 Feb 10 2003 sdb9
8, 32 Feb 10 2003 sdc
8, 33 Feb 10 2003 sdc1
8, 34 Feb 10 2003 sdc2
8, 35 Feb 10 2003 sdc3
8, 36 Feb 10 2003 sdc4
8, 37 Feb 10 2003 sdc5
8, 38 Feb 10 2003 sdc6
8, 39 Feb 10 2003 sdc7
8, 40 Feb 10 2003 sdc8
8, 41 Feb 10 2003 sdc9
14, 1 Feb 10 2003 sequencer
Ver 1.11, February 28, 2003, 55/63
SHARP CORPORATION
Sharp SL-series Zaurus “Qtopia” Development Start-up Guide
crw-rw-rwcrw-rw-rwcrw-rw-rwcrw-rw-rwdrwxrwxrwt
crw-rw-rwcrw-rw-rwcrw-rw-rwcrw-rw-rwcrw-rw-rwcrw-rw---crw-rw---crw-rw---crw-rw---crw-rw---crw-rw---crw-rw---crw-rw---lrwxrwxrwx
lrwxrwxrwx
lrwxrwxrwx
lrwxrwxrwx
crw-rw-rwcrw--w--wcrw-rw-rwcrw-rw-rwcrw-rw-rwcrw-rw-rwcrw-rw-rwcrw-rw-rwcrw-rw-rwcrw-rw-rwcrw-rw-rwcrw------crw------crw------crw------crw-r--r-crw-r--r-crw-r--r-crw-r--r-crw-r--r-crw-rw-rwcrw-rw-rwcrw-rw-rwcrw-rw-rwcrw-rw-rwcrw-rw-rwcrw-rw-rwcrw-rw-rwcrw-rw-rwcrw-rw-rwcrw-rw-rwcrw-rw-rw-
1
1
1
1
4
1
1
1
1
1
1
1
1
1
1
1
1
1
1
1
1
1
1
1
1
1
1
1
1
1
1
1
1
1
1
1
1
1
1
1
1
1
1
1
1
1
1
1
1
1
1
1
1
1
root
root
root
root
root
root
root
root
root
root
root
root
root
root
root
root
root
root
root
root
root
root
root
root
root
root
root
root
root
root
root
root
root
root
zaurus
zaurus
zaurus
root
root
root
root
root
root
root
root
root
root
root
root
root
root
root
root
root
root
10, 211 Feb 10 2003 sharp_buz
root
10, 214 Feb 10 2003 sharp_kbdctl
root
10, 210 Feb 10 2003 sharp_led
root
11, 0 Feb 10 2003 sharp_ts
root
0 Jan 1 1970 shm
root
35, 128 Feb 10 2003 smtpe0
root
35, 129 Feb 10 2003 smtpe1
root
35, 130 Feb 10 2003 smtpe2
root
35, 131 Feb 10 2003 smtpe3
root
14, 6 Feb 10 2003 sndstat
operator 9, 0 Feb 10 2003 st0
operator 9, 96 Feb 10 2003 st0a
operator 9, 32 Feb 10 2003 st0l
operator 9, 64 Feb 10 2003 st0m
operator 9, 1 Feb 10 2003 st1
operator 9, 97 Feb 10 2003 st1a
operator 9, 33 Feb 10 2003 st1l
operator 9, 65 Feb 10 2003 st1m
root
4 Jan 1 1970 stderr -> fd/2
root
4 Jan 1 1970 stdin -> fd/0
root
4 Jan 1 1970 stdout -> fd/1
root
8 Jan 1 1970 ts -> sharp_ts
tty
5, 0 Feb 10 2003 tty
tty
4, 0 Jan 1 05:00 tty0
tty
4, 1 Jan 1 21:27 tty1
tty
4, 2 Feb 10 2003 tty2
tty
4, 3 Feb 10 2003 tty3
tty
4, 4 Feb 10 2003 tty4
tty
4, 5 Feb 10 2003 tty5
tty
4, 6 Feb 10 2003 tty6
tty
4, 7 Feb 10 2003 tty7
tty
4, 8 Feb 10 2003 tty8
tty
4, 9 Feb 10 2003 tty9
root
4, 64 Jan 3 21:07 ttyS0
root
4, 65 Feb 10 2003 ttyS1
root
4, 66 Feb 10 2003 ttyS2
root
4, 67 Feb 10 2003 ttyS3
root
204, 5 Feb 10 2003 ttySA0
root
204, 6 Feb 10 2003 ttySA1
root
204, 7 Feb 10 2003 ttySA2
root
188, 0 Feb 10 2003 ttyUSB0
root
188, 1 Feb 10 2003 ttyUSB1
tty
3, 176 Jan 3 20:56 ttya0
tty
3, 177 Feb 10 2003 ttya1
tty
3, 178 Feb 10 2003 ttya2
tty
3, 179 Feb 10 2003 ttya3
tty
3, 180 Feb 10 2003 ttya4
tty
3, 181 Feb 10 2003 ttya5
tty
3, 182 Feb 10 2003 ttya6
tty
3, 183 Feb 10 2003 ttya7
tty
3, 184 Feb 10 2003 ttya8
tty
3, 185 Feb 10 2003 ttya9
tty
3, 186 Feb 10 2003 ttyaa
tty
3, 187 Feb 10 2003 ttyab
Ver 1.11, February 28, 2003, 56/63
SHARP CORPORATION
Sharp SL-series Zaurus “Qtopia” Development Start-up Guide
crw-rw-rwcrw-rw-rwcrw-rw-rwcr--r--r-crw-rw---crw-rw-rw-
1
1
1
1
1
1
root
root
root
root
root
root
tty
tty
tty
root
root
root
/etc -> /home/etc
drwxrwsr-x 10 root
root
drwxrwxr-x 12 root
root
-rw-rw-r-1 root
root
-r-------1 root
root
-rw-rw-r-1 root
root
-rw-rw-r-1 root
root
-rw-rw-r-1 root
root
drwxrwsr-x
2 root
root
-rw-rw-r-1 root
root
-rw-rw-r-1 root
root
drwxrwsr-x
2 root
root
-rw------1 root
root
lrwxrwxrwx
1 root
root
/opt/QtPalmtop/etc/ipkg.conf
-rw-rw-r-1 root
root
-rw-rw-r-1 root
root
-rw-rw-r-1 root
root
-rw-r--r-1 root
root
-rw-rw-r-1 root
root
lrwxrwxrwx
1 root
root
-rw-rw-r-1 root
root
-rw-rw-r-1 root
root
-rw-rw-r-1 root
root
drwxrwxr-x
3 root
root
-rw-r--r-1 zaurus qpe
drwxrwxr-x
3 root
root
-rw-rw-r-1 root
root
drwxrwsr-x 10 root
root
-rw-rw-r-1 root
root
-rwxrwxr-x
1 root
root
-rw-rw-r-1 root
root
-rw-rw-r-1 root
root
-rw-rw-r-1 root
root
drwxrwsr-x
2 root
root
drwxrwsr-x
2 root
root
-rw-rw-r-1 root
root
-rw-rw-r-1 root
root
-r-------1 root
root
-rwxrwxr-x
1 root
root
drwxrwsr-x
2 root
root
3,
3,
3,
1,
10,
1,
189
190
191
9
32
5
Feb
Feb
Feb
Feb
Feb
Feb
10
10
10
10
10
10
2003
2003
2003
2003
2003
2003
ttyad
ttyae
ttyaf
urandom
usbmouse
zero
0 Jan 2 13:53 .
0 Jan 1 1970 ..
7 Aug 30 05:06 HOSTNAME
29 Oct 15 04:15 busybox.conf
264 Dec 2 02:23 fstab
254 Sep 27 09:09 group
1106 Aug 30 05:06 hosts
0 Jan 1 05:00 hotplug
3368 May 20 2002 inetd.conf
1003 Sep 28 00:57 inittab
0 Jan 1 1970 intent
60 Jan 1 05:00 ioctl.save
28 Jan 1 1970 ipkg.conf ->
457 Nov 27 00:00 irda.conf
42 May 20 2002 issue
58 May 20 2002 issue.net
4745 Jan 2 13:53 ld.so.cache
35 Sep 12 05:22 ld.so.conf
12 Jan 1 1970 mtab -> /proc/mounts
132 May 20 2002 network-device
239 May 20 2002 nsswitch.conf
444 Sep 27 09:09 passwd
0 Jan 1 1970 pcmcia
39 Jan 1 05:05 pointercal
0 Jan 1 1970 ppp
894 May 20 2002 protocols
0 Jan 1 1970 rc.d
99 Jun 28 2002 resolv.conf
2649 Oct 29 11:22 sdcontrol
114 May 20 2002 securetty
8377 May 20 2002 services
320 Sep 27 09:09 shadow
0 Jan 1 1970 sync
0 Jan 1 1970 sysconfig
903 May 20 2002 syslog.conf
288451 May 20 2002 termcap
50 Oct 1 12:07 tinylogin.conf
682 Jun 12 2002 usbcontrol
0 Jan 1 1970 wlan
Ver 1.11, February 28, 2003, 57/63
SHARP CORPORATION
Sharp SL-series Zaurus “Qtopia” Development Start-up Guide
/home
drwxrwxr-x
drwxr-xr-x
drwxr-x--drwxrwsr-x
drwxrwxr-x
drwxrwxr-x
drwxrwxr-x
drwxrwxr-x
drwxrwxrwt
drwxrwxr-x
drwx------
12
13
16
10
5
2
7
3
3
2
6
root
root
root
root
root
root
root
root
root
root
zaurus
/lib
-rwxrwxr-x
1 root
lrwxrwxrwx
1 root
lrwxrwxrwx
1 root
-rwxrwxr-x
1 root
lrwxrwxrwx
1 root
lrwxrwxrwx
1 root
-rwxrwxr-x
1 root
-rwxrwxr-x
1 root
lrwxrwxrwx
1 root
-rwxrwxr-x
1 root
lrwxrwxrwx
1 root
lrwxrwxrwx
1 root
-rwxrwxr-x
1 root
lrwxrwxrwx
1 root
-rwxrwxr-x
1 root
-rwxrwxr-x
1 root
-rwxrwxr-x
1 root
lrwxrwxrwx
1 root
lrwxrwxrwx
1 root
-rw-rw-r-1 root
-rwxrwxr-x
1 root
lrwxrwxrwx
1 root
-rwxrwxr-x
1 root
lrwxrwxrwx
1 root
libnss_compat-2.2.2.so
-rwxrwxr-x
1 root
lrwxrwxrwx
1 root
-rwxrwxr-x
1 root
lrwxrwxrwx
1 root
libnss_files-2.2.2.so
-rwxrwxr-x
1 root
lrwxrwxrwx
1 root
-rwxrwxr-x
1 root
lrwxrwxrwx
1 root
-rwxrwxr-x
1 root
lrwxrwxrwx
1 root
lrwxrwxrwx
1 root
-rwxrwxr-x
1 root
-rwxrwxr-x
1 root
root
root
qpe
root
root
root
root
root
root
root
qpe
root
root
root
root
root
root
root
root
root
root
root
root
root
root
root
root
root
root
root
root
root
root
root
root
0
0
0
0
0
0
0
0
0
0
0
Jan
Jan
Jan
Jan
Jan
Jan
Jan
Jan
Jan
Feb
Jan
1
1
2
2
1
3
1
1
2
10
1
1970 .
1970 ..
13:53 QtPalmtop
13:53 etc
05:00 root
21:05 samba
1970 sharp
1970 system
13:53 tmp
2003 userdata
1970 zaurus
105908 May 20
11 Feb 10
11 Feb 10
1152532 Jan 15
13 Feb 10
17 Feb 10
6184 May 20
22624 May 20
17 Feb 10
10176 May 20
14 Feb 10
13 Feb 10
15052 May 20
16 Feb 10
74720 May 20
18832 Feb 10
163740 May 20
13 Feb 10
17 Feb 10
358620 May 20
75332 May 20
15 Feb 10
44300 May 20
22 Feb 10
2002 ld-2.2.2.so
2003 ld-linux.so.2 -> ld-2.2.2.so
2003 ld.so.2 -> ld-2.2.2.so
2003 libc-2.2.2.so
2003 libc.so.6 -> libc-2.2.2.so
2003 libcom_err.so.2 -> libcom_err.so.2.0
2002 libcom_err.so.2.0
2002 libcrypt-2.2.2.so
2003 libcrypt.so.1 -> libcrypt-2.2.2.so
2002 libdl-2.2.2.so
2003 libdl.so.2 -> libdl-2.2.2.so
2003 libe2p.so.2 -> libe2p.so.2.3
2002 libe2p.so.2.3
2003 libext2fs.so.2 -> libext2fs.so.2.4
2002 libext2fs.so.2.4
2003 libiw.so.25
2002 libm-2.2.2.so
2003 libm.so.6 -> libm-2.2.2.so
2003 libncurses.so.4 -> libncurses.so.4.2
2002 libncurses.so.4.2
2002 libnsl-2.2.2.so
2003 libnsl.so.1 -> libnsl-2.2.2.so
2002 libnss_compat-2.2.2.so
2003 libnss_compat.so.2 ->
root
root
root
root
12040 May 20 2002 libnss_dns-2.2.2.so
19 Feb 10 2003 libnss_dns.so.2 -> libnss_dns-2.2.2.so
40916 May 20 2002 libnss_files-2.2.2.so
21 Feb 10 2003 libnss_files.so.2 ->
root
root
root
root
root
root
root
root
root
41412 May 20 2002 libnss_nis-2.2.2.so
19 Feb 10 2003 libnss_nis.so.2 -> libnss_nis-2.2.2.so
90520 May 20 2002 libpthread-0.9.so
17 Feb 10 2003 libpthread.so.0 -> libpthread-0.9.so
60384 Jan 15 2003 libresolv-2.2.2.so
18 Feb 10 2003 libresolv.so.2 -> libresolv-2.2.2.so
12 Feb 10 2003 libss.so.2 -> libss.so.2.0
16496 May 20 2002 libss.so.2.0
7940 May 20 2002 libutil-2.2.2.so
Ver 1.11, February 28, 2003, 58/63
SHARP CORPORATION
Sharp SL-series Zaurus “Qtopia” Development Start-up Guide
lrwxrwxrwx
-rwxrwxr-x
lrwxrwxrwx
drwxrwxr-x
1
1
1
3
root
root
root
root
root
root
root
root
/mnt -> /var/mnt
lrwxrwxrwx
1 root
lrwxrwxrwx
1 root
drwxrwxr-x
2 root
lrwxrwxrwx
1 root
root
root
root
root
17
15
0
16
/opt
lrwxrwxrwx
lrwxrwxrwx
1 root
1 root
root
root
15 Feb 10 2003 QtPalmtop -> /home/QtPalmtop
15 Feb 10 2003 Qtopia -> /home/QtPalmtop
/proc
dr-xr-xr-x
dr-xr-xr-x
dr-xr-xr-x
dr-xr-xr-x
dr-xr-xr-x
dr-xr-xr-x
dr-xr-xr-x
dr-xr-xr-x
dr-xr-xr-x
dr-xr-xr-x
dr-xr-xr-x
dr-xr-xr-x
dr-xr-xr-x
dr-xr-xr-x
dr-xr-xr-x
dr-xr-xr-x
dr-xr-xr-x
dr-xr-xr-x
dr-xr-xr-x
dr-xr-xr-x
dr-xr-xr-x
dr-xr-xr-x
dr-xr-xr-x
dr-xr-xr-x
dr-xr-xr-x
dr-xr-xr-x
dr-xr-xr-x
dr-xr-xr-x
dr-xr-xr-x
dr-xr-xr-x
dr-xr-xr-x
dr-xr-xr-x
dr-xr-xr-x
dr-xr-xr-x
dr-xr-xr-x
3
3
3
3
3
3
3
3
3
3
3
3
3
3
3
3
3
3
3
3
3
3
3
3
3
3
3
3
3
3
3
3
3
3
3
root
root
root
root
root
root
root
root
root
root
root
root
root
root
root
root
root
root
qpe
qpe
qpe
qpe
qpe
qpe
qpe
qpe
qpe
qpe
qpe
qpe
root
root
root
root
root
root
root
root
root
root
root
root
root
root
root
root
root
bin
root
root
root
root
root
root
root
root
zaurus
zaurus
zaurus
zaurus
zaurus
zaurus
zaurus
zaurus
zaurus
root
root
root
root
root
14 Feb 10
12724 May 20
18 Feb 10
0 Feb 10
0
0
0
0
0
0
0
0
0
0
0
0
0
0
0
0
0
0
0
0
0
0
0
0
0
0
0
0
0
0
0
0
0
0
0
Jan
Jan
Feb
Jan
Jan
Jan
Jan
Jan
Jan
Jan
Jan
Jan
Jan
Jan
Jan
Jan
Jan
Jan
Jan
Jan
Jan
Jan
Jan
Jan
Jan
Jan
Jan
Jan
Jan
Jan
Jan
Jan
Jan
Jan
Jan
Jan
Jan
Jan
Jan
1
1
10
1
3
3
3
3
3
3
3
3
3
3
3
3
3
3
3
3
3
3
3
3
3
3
3
3
3
3
3
3
3
3
3
3
3
3
3
2003 libuuid.so.1 -> libuuid.so.1.2
2002 libuuid.so.1.2
2003 modules -> /home/root/modules
2003 modules.rom
1970
1970
2003
1970
21:08
21:08
21:08
21:08
21:08
21:08
21:08
21:08
21:08
21:08
21:08
21:08
21:08
21:08
21:08
21:08
21:08
21:08
21:08
21:08
21:08
21:08
21:08
21:08
21:08
21:08
21:08
21:08
21:08
21:08
21:08
21:08
21:08
21:08
21:08
card -> /usr/mnt.rom/card
cf -> /usr/mnt.rom/cf
ide
net -> /usr/mnt.rom/net
1
10
103
1050
1051
11
12
13
1327
134
15
153
163
174
2
204
205
206
226
227
228
244
245
246
247
248
249
250
251
252
275
3
4
44
5
Ver 1.11, February 28, 2003, 59/63
SHARP CORPORATION
Sharp SL-series Zaurus “Qtopia” Development Start-up Guide
dr-xr-xr-x
dr-xr-xr-x
dr-xr-xr-x
dr-xr-xr-x
dr-xr-xr-x
dr-xr-xr-x
-r--r--r-dr-xr-xr-x
-r--r--r-dr-xr-xr-x
-r--r--r-dr-xr-xr-x
-r--r--r-dr-xr-xr-x
-r--r--r--r--r--r--r--r--r-dr-xr-xr-x
dr-xr-xr-x
dr-xr-xr-x
-r--r--r--r--r--r--r--r--r--r--------r--------r--r--r--r--r--r--r--r--r--r--r--r--r--r--r--r--r--r--r--r--r--r--r--r--r--r--r-dr-xr-xr-x
-r--r--r--r--r--r-lrwxrwxrwx
-rw-r--r--r--r--r--r--r--r-dr-xr-xr-x
dr-xr-xr-x
dr-xr-xr-x
-r--r--r--r--r--r--r--r--r--r--r--r--r--r--r--r--r--r--r--r--r--
3
3
3
3
3
3
1
3
1
2
1
2
1
5
1
1
1
3
2
3
1
1
1
1
1
1
1
1
1
1
1
1
1
1
4
1
1
1
1
1
1
11
2
4
1
1
1
1
1
1
1
root
root
root
zaurus
zaurus
root
root
root
root
root
root
root
root
root
root
root
root
root
root
root
root
root
root
root
root
root
root
root
root
root
root
root
root
root
root
root
root
root
root
root
root
root
root
root
root
root
root
root
root
root
root
root
root
root
qpe
qpe
root
root
root
root
root
root
root
root
root
root
root
root
root
root
root
root
root
root
root
root
root
root
root
root
root
root
root
root
root
root
root
root
root
root
root
root
root
root
root
root
root
root
root
root
root
root
0 Jan 3 21:08 7
0 Jan 3 21:08 8
0 Jan 3 21:08 9
0 Jan 3 21:08 996
0 Jan 3 21:08 997
0 Jan 3 21:08 999
0 Jan 3 21:08 apm
0 Jan 3 21:08 bus
0 Jan 3 21:08 cmdline
0 Jan 3 21:08 cpu
0 Jan 3 21:08 cpuinfo
0 Jan 3 21:08 deviceinfo
0 Jan 3 21:08 devices
0 Jan 1 05:00 driver
0 Jan 3 21:08 execdomains
0 Jan 3 21:08 fb
0 Jan 3 21:08 filesystems
0 Jan 3 21:08 fs
0 Jan 3 21:08 hermes
0 Jan 3 21:08 ide
0 Jan 3 21:08 interrupts
0 Jan 3 21:08 iomem
0 Jan 3 21:08 ioports
33558528 Jan 3 21:08 kcore
0 Jan 3 21:08 kmsg
0 Jan 3 21:08 ksyms
0 Jan 3 21:08 loadavg
0 Jan 1 05:00 lock_fcs
0 Jan 3 21:08 locks
0 Jan 3 21:08 meminfo
0 Jan 3 21:08 misc
0 Jan 3 21:08 modules
0 Jan 3 21:08 mounts
0 Jan 3 21:08 mtd
0 Jan 3 21:08 net
0 Jan 3 21:08 partitions
0 Jan 3 21:08 power_mode
64 Jan 3 20:50 self -> 1327
0 Jan 3 21:08 slabinfo
0 Jan 3 21:08 stat
0 Jan 3 21:08 swaps
0 Jan 3 21:08 sys
0 Jan 3 21:08 sysvipc
0 Jan 3 21:08 tty
0 Jan 3 21:08 uptime
0 Jan 3 21:08 usb-condition
0 Jan 3 21:08 usb-devices
0 Jan 3 21:08 usb-functions
0 Jan 3 21:08 usb-monitor
0 Jan 3 21:08 usbd
0 Jan 3 21:08 version
Ver 1.11, February 28, 2003, 60/63
SHARP CORPORATION
Sharp SL-series Zaurus “Qtopia” Development Start-up Guide
/root
-rw-rw-r--rw-rw-r--rw-rw-r--rw-rw-r-drwxrwxr-x
drwxrwsr-x
drwxrwxr-x
1
1
1
1
2
4
2
root
root
root
root
root
root
root
root
root
root
root
root
root
root
/sbin
-rwxrwxr-x
-rwxrwxr-x
-rwxrwxr-x
-rwsrwxr-x
-rwxrwxr-x
lrwxrwxrwx
-rwxrwxr-x
-rwxrwxr-x
-rwxrwxr-x
-rwxrwxr-x
lrwxrwxrwx
-rwxrwxr-x
-rwxrwxr-x
lrwxrwxrwx
-rwxrwxr-x
-rwxrwxr-x
lrwxrwxrwx
-rwxrwxr-x
lrwxrwxrwx
-rwxrwxr-x
lrwxrwxrwx
lrwxrwxrwx
-rwxrwxr-x
-rwxrwxr-x
-rwxrwxr-x
-rwxrwxr-x
-rwxrwxr-x
lrwxrwxrwx
lrwxrwxrwx
-rwxrwxr-x
-rwxrwxr-x
-rwxrwxr-x
-rwxrwxr-x
-rwxrwxr-x
-rwxrwxr-x
lrwxrwxrwx
-rwxrwxr-x
-rwxrwxr-x
-rwxrwxr-x
-rwxrwxr-x
-rwxrwxr-x
-rwxrwxr-x
-rwxrwxr-x
1
1
1
1
1
1
1
1
1
1
1
1
1
1
1
1
1
1
1
1
1
1
1
1
1
1
1
1
1
1
1
1
1
1
1
1
1
1
1
1
1
1
1
root
root
root
root
root
root
root
root
root
root
root
root
root
root
root
root
root
root
root
root
root
root
root
root
root
root
root
root
root
root
root
root
root
root
root
root
root
root
root
root
root
root
root
root
root
root
root
root
root
root
root
root
root
root
root
root
root
root
root
root
root
root
root
root
root
root
root
root
root
root
root
root
root
root
root
root
root
root
root
root
root
root
root
root
root
root
133120 Feb 10 2003 .dev_default.tar
1597440 Feb 10 2003 .home_default.tar
313 Aug 30 05:06 .profile
10240 Feb 10 2003 .var_default.tar
0 Feb 10 2003 bin
0 May 20 2002 etc
0 Feb 10 2003 samba
36956 May 20
44876 Feb 10
14508 May 20
12056 Nov 12
38892 May 20
12 Feb 10
3088 May 20
40016 May 20
58644 May 20
42460 Aug 11
9 Feb 10
19300 May 20
7160 May 20
9 Feb 10
4260 May 20
5260 Aug 29
12 Feb 10
14264 May 20
9 Feb 10
484072 May 20
12 Feb 10
9 Feb 10
45216 Feb 10
5700 May 20
7336 May 20
36848 May 20
4672 May 20
14 Feb 10
6 Feb 10
1836 May 20
30368 May 20
4356 May 20
59816 Feb 10
3952 May 20
4840 May 20
7 Feb 10
27648 May 20
98152 May 20
359 May 20
11064 Feb 10
15404 Feb 10
18912 Sep 18
5712 Sep 18
2002 MAKEDEV
2003 arp
2002 badblocks
11:48 cardctl
2002 cardmgr
2003 chroot -> /bin/busybox
2002 consoletype
2002 debugfs
2002 depmod
05:12 dhcpcd
2003 dosfsck -> fsck.vfat
2002 dump_cis
2002 dumpe2fs
2003 e2fsck -> fsck.ext3
2002 e2label
08:28 eraseall
2003 freeramdisk -> /bin/busybox
2002 fsck
2003 fsck.ext2 -> fsck.ext3
2002 fsck.ext3
2003 fsck.minix -> /bin/busybox
2003 fsck.msdos -> fsck.vfat
2003 fsck.vfat
2002 ftl_check
2002 ftl_format
2002 genksyms
2002 getkey
2003 getty -> /bin/tinylogin
2003 halt -> reboot
2002 hotplug
2002 hwclock
2002 ide_info
2003 ifconfig
2002 ifport
2002 ifuser
2003 init -> telinit
2002 initlog
2002 insmod
2002 insmod_ksymoops_clean
2003 ipmaddr
2003 iptunnel
07:01 iwconfig
07:01 iwevent
Ver 1.11, February 28, 2003, 61/63
SHARP CORPORATION
Sharp SL-series Zaurus “Qtopia” Development Start-up Guide
-rwxrwxr-x
-rwxrwxr-x
-rwxrwxr-x
lrwxrwxrwx
-rwxrwxr-x
-rwxrwxr-x
-rwxrwxr-x
lrwxrwxrwx
-rwxrwxr-x
-rwxrwxr-x
lrwxrwxrwx
lrwxrwxrwx
lrwxrwxrwx
-rwxrwxr-x
lrwxrwxrwx
lrwxrwxrwx
-rwxrwxr-x
lrwxrwxrwx
lrwxrwxrwx
-rwxrwxr-x
lrwxrwxrwx
-rwxrwxr-x
lrwxrwxrwx
-rwxrwxr-x
-rwxrwxr-x
-rwxrwxr-x
-rwxrwxr-x
-rwxrwxr-x
-rwxrwxr-x
lrwxrwxrwx
-rwxrwxr-x
-rwxrwxr-x
-rwxrwxr-x
-rwxrwxr-x
-rwxrwxr-x
lrwxrwxrwx
-rwxrwxr-x
-rwxrwxr-x
-rwxrwxr-x
-rwxrwxr-x
-rwxrwxr-x
-rwxrwxr-x
-rwxrwxr-x
-rwxrwxr-x
-rwxrwxr-x
-rwxrwxr-x
-rwxrwxr-x
-rwxrwxr-x
-rwxrwxr-x
-rwxrwxr-x
-rwxrwxr-x
lrwxrwxrwx
lrwxrwxrwx
-rwxrwxr-x
1
1
1
1
1
1
1
1
1
1
1
1
1
1
1
1
1
1
1
1
1
1
1
1
1
1
1
1
1
1
1
1
1
1
1
1
1
1
1
1
1
1
1
1
1
1
1
1
1
1
1
1
1
1
root
root
root
root
root
root
root
root
root
root
root
root
root
root
root
root
root
root
root
root
root
root
root
root
root
root
root
root
root
root
root
root
root
root
root
root
root
root
root
root
root
root
root
root
root
root
root
root
root
root
root
root
root
root
root
root
root
root
root
root
root
root
root
root
root
root
root
root
root
root
root
root
root
root
root
root
root
root
root
root
root
root
root
root
root
root
root
root
root
root
root
root
root
root
root
root
root
root
root
root
root
root
root
root
root
root
root
root
13088 Sep 18 07:01 iwlist
11452 Sep 18 07:01 iwpriv
6504 Sep 18 07:01 iwspy
6 Feb 10 2003 kallsyms -> insmod
451 May 20 2002 kernelversion
8664 May 20 2002 killall5
26164 May 20 2002 klogd
6 Feb 10 2003 ksyms -> insmod
10232 Nov 6 02:32 launch
404748 Feb 10 2003 ldconfig
12 Feb 10 2003 loadkmap -> /bin/busybox
6 Feb 10 2003 lsmod -> insmod
12 Feb 10 2003 makedevs -> /bin/busybox
10480 Feb 10 2003 mii-tool
9 Feb 10 2003 mkdosfs -> mkfs.vfat
9 Feb 10 2003 mke2fs -> mkfs.ext2
20100 May 20 2002 mkfs.ext2
12 Feb 10 2003 mkfs.minix -> /bin/busybox
9 Feb 10 2003 mkfs.msdos -> mkfs.vfat
25004 Feb 10 2003 mkfs.vfat
12 Feb 10 2003 mkswap -> /bin/busybox
44876 May 20 2002 modinfo
6 Feb 10 2003 modprobe -> insmod
7676 Feb 10 2003 nameif
3492 Feb 10 2003 nwepgen
9376 Feb 10 2003 oncheck
30352 May 20 2002 pack_cis
4831 May 20 2002 pcinitrd
4836 Feb 10 2003 plipconfig
6 Feb 10 2003 poweroff -> reboot
6444 May 20 2002 probe
56 May 20 2002 qt
21288 Feb 10 2003 rarp
7628 May 20 2002 reboot
21192 May 20 2002 resize2fs
6 Feb 10 2003 rmmod -> insmod
45832 Feb 10 2003 route
3044 May 20 2002 runlevel
46 May 20 2002 scshotcf
532 Nov 2 12:37 scshotram
48 May 20 2002 scshotsd
4704 May 20 2002 scsi_info
6316 May 20 2002 sdmgr
14304 May 20 2002 setserial
2688 Feb 10 2003 shsync
14732 May 20 2002 shutdown
26436 Feb 10 2003 slattach
10156 Nov 27 06:08 sltime
11196 May 20 2002 spm
8644 May 20 2002 sulogin
4476 May 20 2002 survive
12 Feb 10 2003 swapoff -> /bin/busybox
12 Feb 10 2003 swapon -> /bin/busybox
32268 May 20 2002 syslogd
Ver 1.11, February 28, 2003, 62/63
SHARP CORPORATION
Sharp SL-series Zaurus “Qtopia” Development Start-up Guide
-rwxrwxr-x
lrwxrwxrwx
-rwxrwxr-x
-rwxrwxr-x
-rwxrwxr-x
-rwxrwxr-x
1
1
1
1
1
1
root
root
root
root
root
root
root
root
root
root
root
root
10064 May 20
12 Feb 10
61536 Feb 10
61176 Feb 10
59524 Feb 10
5152 Feb 5
2002 tune2fs
2003 update -> /bin/busybox
2003 wlancfg
2003 wlanctl-ng
2003 wland
2003 writerominfo
/tmp -> /dev/shm/tmp
srw------1 zaurus
drwx-----2 root
drwx-----2 zaurus
qpe
qpe
qpe
/usr
drwxr-x--lrwxrwxrwx
drwxrwxr-x
lrwxrwxrwx
lrwxrwxrwx
drwxrwxr-x
lrwxrwxrwx
drwxrwxr-x
drwxrwxr-x
lrwxrwxrwx
drwxrwxr-x
lrwxrwxrwx
drwxrwxr-x
lrwxrwxrwx
drwxrwxr-x
qpe
root
root
root
root
root
root
root
root
root
root
root
root
root
root
0
18
0
18
18
0
20
0
0
19
0
20
0
11
0
Feb
Feb
May
Feb
Feb
Feb
Feb
Feb
Feb
Feb
Feb
Feb
Feb
Feb
Feb
10
10
20
10
10
10
10
10
10
10
10
10
10
10
10
2003
2003
2002
2003
2003
2003
2003
2003
2003
2003
2003
2003
2003
2003
2003
/var -> /home/system/var
drwxrwxr-x
2 root
root
drwxrwxr-x
3 root
root
drwxrwxr-x
4 root
uucp
drwxrwxr-x
2 root
root
drwxrwxr-x
3 root
root
lrwxrwxrwx
1 root
root
drwxrwxr-x
2 root
root
drwxrwxr-x
3 root
root
0
0
0
0
0
12
0
0
Feb
Jan
Jan
Jan
Jan
Jan
Feb
Jan
10
1
1
1
1
1
10
1
2003
1970
1970
1970
1970
1970
2003
05:00
15
1
2
1
1
3
1
3
5
1
2
1
5
1
7
root
root
root
root
root
root
root
root
root
root
root
root
root
root
root
0 Jan 1 05:00 .quickexec
0 Jan 1 05:00 qtembedded-root
0 Jan 1 05:00 qtembedded-zaurus
QtPalmtop.rom
bin -> /home/root/usr/bin
bin.rom
etc -> /home/root/usr/etc
lib -> /home/root/usr/lib
lib.rom
local -> /home/root/usr/local
local.rom
mnt.rom
sbin -> /home/root/usr/sbin
sbin.rom
share -> /home/root/usr/share
share.rom
sharp -> /home/sharp
sharp.rom
home
lib
lock
log
mnt
run -> /dev/shm/run
smb
spool
Ver 1.11, February 28, 2003, 63/63