1
_
MITSUBISHI
Projection
TV
Owner's
/'-__-.__ A,-,
UIU_
RISK OF ELECTRIC SHOCK
DO NOT OPEN
CAUTION: TO REDUCE THE RISK OF ELECTRIC SHOCK,
DO NOT REMOVE COVER (OR BACK).
NO USER-SERVICEABLE
PARTS INSIDE.
REFER SERVICING TO QUALIFIED SERVICE PERSONNEL
The lightning flash with arrowhead
symbol within an equilateral
triangle is intended to alert the user to the presence of uninsulated
"dangerous voltage" within the product's enclosure that may be of
sufficient magnitude
to constitute
a risk of electric shock.
The exclamation
point within an equilateral
triangle
alert the user to the presence of important
operating
maintenance
(servicing) instructions
in the literature
the appliance.
_Warning:
is intended to
and
accompanying
Don't leave stationary
images, such as stock market reports, video
games, station logos, or the TV's displays, on-screen for more than 10
minutes. Still patterns
and repeated display of the same pattern can
scar the picture tube, causing permanent
damage to the TV.
WARNING:
TO REDUCE THE RISK OF FIRE OR ELECTRIC
TO RAIN OR MOISTURE
SHOCK,
DO NOT EXPOSE
THIS APPLIANCE
CAUTION:
TO PREVENT ELECTRIC
SHOCK HAZARD, DO NOT USE THIS UNIT'S (POLARIZED)
PLUG
WITH AN EXTENSION
CORD, RECEPTACLE
OR OTHER OUTLET UNLESS THE BLADES CAN
BE FULLY INSERTED
TO PREVENT BLADE EXPOSURE.
NOTE TO CATV gYSTEM INSTALI._R:
THIS REMINDER
IS PROVIDED
TO CALL THE CATV SYSTEM INSTALLER'S
ATTENTION
TO
ARTICLE 820-40 OF THE NEC THAT PROVIDES GUIDELINES
FOR PROPER
GROUNDING
AND, IN PARTICULAR,
SPECIFIES
THAT THE CABLE GROUND SHALL BE
CONNECTED
TO THE GROUNDING
SYSTEM OF THE BUILDING, AS CLOSE TO THE POINT
OF CABLE ENTRY AS PRACTICAL.
MITSUBISHI
OWNER'S
GUIDE
of--Co nte-n
Important
Preface:
Safeguards
Welcome
Unpacking
Your
A Few Words
Summary
to
HDTV
of Special
in Each
Some
Conventions
Mitsubishi
3
.......................................
5
TV ...................................................................
about
What's
.......................................................
Features
Chapter
6
........................................................
7
...................................................
8
...........................................................
10
in this
...................................
11
to Know Your TV ............................
13
Used
Chapter
1: Getting
Overview
of the
Control
Panel
Overview
of the
Remote
Control
Guide
................................................
14
.............................................
17
getting
ready to use the remote control ........................
remote control keys and functions
................................
using the remote
control to operate
VCRs, cable
boxes and other equipment
...........................................
Chapter
Getting
2: Operating
Started
Your
TV .......................................
Using
22
27
........................................................................
understanding
the ViewPoint*
on-screen
menus
the main menu ...............................................................
18
20
28
.........
29
30
the setup menu ..............................................................
memorizing
channels
.....................................................
changing
channels
.........................................................
setting
the clock ............................................................
31
32
34
35
creating
the AV connection
(Home Theater)
................
setting
the menu language
............................................
DTV channel
guide ........................................................
DTV channel
selection
...................................................
36
41
42
44
using the closed caption
decoder ...................................
channel
menu .................................................................
46
48
the Advanced
.................................................
52
............................................................
lock ..................................................
............................................................
54
56
60
Features
setting
the timer
using the parental
using video mute
the convergence
Audio/Video
setting
Settings
menu
...............................................................
the A/V Memory
customizing
...................................................
................................................
the A!V memory
settings
..........................
62
66
67
71
Chapter
3: Using
Understanding
Using
the
the Sleep
setting
Using
the Special
On-Screen
Timer
the sleep
77
.................................
78
79
timer
80
...................................................
(PIP)
Modes
for Models
............
81
activating
the PIP image ...............................................
selecting
the source of the PIP image ...........................
changing
channels
while using the PIP modes ............
freezing
the PIP image ..................................................
82
83
84
84
exchanging
the PIP and main image ...........................
changing
the screen format ...........................................
85
86
Special
VS-50803,
Displays
..........................
.............................................................
the Picture-in-Picture
VS-50800,
Features
Features
VS-60803,VS-70803,VS-80803
of Models
WS-65903,
WS-73903
.................
87
displaying
the POP image .............................................
changing
the screen format ...........................................
Diamond
Shield TM Removal
.....................................................
88
90
92
Chapter
............................................
93
.............................................................
96
4: Troubleshooting
caution
and
cleaning
calling
Appendix:
care
..........................................................................
for service
Procedure
96
...........................................................
for Bypassing
the
97
Parental
L__k**********************************************************************************
98
Index ................................................................................
99
Warranty
...............................................
Inside
Back Cover
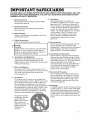
IMPORTANT
SAFEGUARDS
PLEASE READ ALL THESE INSTRUCTIONS
REGARDING
YOUR TELEVISION
SET AND
RETAIN FOR FUTURE REFERENCE.
FOLLOW ALL WARNINGS
AND INSTRUCTIONS
MARKED ON THE TV RECEIVER.
1.
2.
3.
4.
Read Instructions
Read all safety and operating
operating the appliance.
Retain Instructions
Retain the safety and operating
future reference.
Heed Warnings
Adhere to all warnings
operating instructions.
Follow
9.
instructions
before
instructions
on the appliance
for
and in the
Instructions
Follow all operating
and use instructions.
D*Warning:
5. Cleaning
Unplug this TV receiver from the wall outlet before
cleaning.
Do not use liquid or aerosol cleaners.
Cleaners can permanently
damage the cabinet or
screen. Use a damp cloth for cleaning.
6.
Attachments
and Equipment
Never add any attachments
and/or equipment
without approval of the manufacturer
as such
additions may result in the risk of fire, electric
or other personal injury.
shock
7. Water and Moisture
Do not use this TV receiver where contact with or
immersion in water is possible.
Do not use near bath
tubs, wash bowls, kitchen sinks, laundry tubs,
swimming pools, etc.
8.
Ventilation
Slots and openings in the cabinet are
provided for ventilation
and to ensure reliable
operation of the TV receiver and to protect it
from overheating.
Do not block these openings
or allow them to be blocked by placing the TV
receiver on a bed, sofa, rag, or other similar
surface.
Nor should it be placed over a radiator
or heat register.
If the TV receiver is to be
placed in a rack or bookcase, ensure that
there is adequate
ventilation
and that the
manufacturer's
instructions
have been
adhered to.
Accessories
Do not place this TV receiver on an unstable
cart,
stand, tripod, bracket, or table. The TV receiver may
fall, causing serious injury to a child or adult, and
serious damage to the appliance.
Use only with a
cart, stand, tripod, bracket, or table recommended
by
the manufacturer,
or sold with the TV receiver.
Any
mounting of the appliance
should follow the manufacturer's instructions,
and should use a mounting
accessory recommended
by the manufacturer.
An appliance
and cart
combination
should be
moved with care.
Quick stops, excessive
force, and uneven
surfaces may cause the
appliance and cart
combination
to
overturn.
10. Power Sources
This TV receiver should be operated only from
the type of power source indicated on the
marking label. If you are not sure of the type of
power supplied to your home, consult your
appliance
dealer or local power company.
11. Grounding
or Polarization
This TV receiver is equipped with a polarized
alternating
current line plug having one blade
wider than the other. This plug will fit into the
power outlet only one way. If you are unable to
insert the plug fully into the outlet, try
reversing the plug. If the plug should still fail
to fit, contact your electrician
to replace your
obsolete outlet. Do not defeat the safety
purpose of the polarized plug.
12. Power-Cord
Protection
Power-supply
cords should be routed so that
they are not likely to be walked on or pinched
by items placed upon or against them, paying
particular
attention
to cords at plugs, convenience receptacles,
and the point where they
exit from the appliance.
13.Lightning
For added protection for this TV receiver during
a lightning
storm, or when it is left unattended
and unused for long periods of time, unplug it
from the wall outlet and disconnect the antenna
or cable system.
This will prevent damage to
the TV receiver due to lightning
and power-line
surges.
Important
Safeguards
(cont.)
14. Power Lines
An outside antenna
system should not be located
in the vicinity of overhead power lines or other
electric light or power circuits, or where it can fall
into such power lines or circuits.
When installing
an outside antenna
system, extreme care should
be taken to keep from touching such power lines
or circuits as contact witl_ tl_em n_lght be fatal.
15. Overloading
Do not overload wall outlets and extension cords
as this can result in a risk of fire or electric shock.
16. Object
and Liquid Entry
Never push objects of any kind into this TV
receiver through openings as they may touch
dangerous
voltage points or short-out parts that
could result in a fire or electric shock. Never spill
liquid of any kind on the TV receiver.
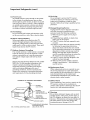
17. Outdoor
Antenna
Grounding
If an outside antenna
or cable system is connected
to the TV receiver, be sure the antenna
or cable
system is grounded so as to provide some protection against voltage surges and built-up static
charges.
Section 810 of the National Electrical Code, ANSI/
NFPA No. 70-1984, provides information
with
respect to proper grounding
of the mast and
supporting
structure,
grounding
of the lead in
wire to an antenna
discharge unit, size of
grounding
conductors,
location of antenna
discharge unit, connection to grounding
electrodes,
and requirements
for the grounding
electrode.
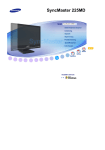
EXAMPLE OF ANTENNA GROUNDING
LEAD IN WIRE
(NEC SECTtON 810-20)
GROUNDING
CONDUCTORS
qECSECTION810-21)
NEC
4
NATIONAL
ELECTRICAL
CODE
ELECTRODE SYSTEM
(NEC ART 250, PART H)
18. Servicing
Do not attempt
to service this TV receiver
yourself as opening or removing covers may
expose you to dangerous
voltage or other
hazards.
Refer all servicing to qualified service
personnel.
19. Damage
Requiring
Service
Unplug this TV receiver from the wall outlet
and refer servicing to qualified service
personnel
under the following conditions:
(a) When the power-supply
cord or plug is
damaged
(b) If liquid has been spilled, or objects have
fallen into the TV receiver
(c) If the TV receiver has been exposed to rain
or water
(d) If the TV receiver does not operate normally
by following the operating instructions,
adjust only those controls that are covered
by the operating instructions
as an improper
adjustment
of other controls may result in
damage and will often require extensive
work by a qualified technician
to restore the
TV receiver to its no_nal operation.
(e) If the TV receiver has been dropped or the
cabinet has been damaged
(f) When the TV receiver exhibits a distinct
change in performance
-- this indicates a
need for service
20. Replacement
Parts
When replacement
parts are required, be sure
the service technician
has used replacement
parts specified by the manufacturer
or have the
same characteristics
as the original part.
Unauthorized
substitutions
may result in fire,
electric shock or other hazards.
21. Safety Check
Upon completion
of any service or repairs to this
TV receiver, ask the service technician
to
perform safety checks to determine
that the TV
receiver is in safe operating
condition.
Warning:
Do not leave stationary
images, such as stock
market reports, video games, station logos, or
the TV's displays, on-screen for more than 10
minutes.
Still patterns
and repeated display of
the same pattern can scar the picture tube,
causing pe_nanent
damage to the TV.
PREFACE
Welcome
to Mitsubishi
Congratulations
on your purchase of this Mitsubishi projection TV. Your TV
is designed for superb viewing pleasure as well as continued
reliability.
To become familiar with your TV and owner's guide, we suggest that you read
through the Preface, which provides the following important
information:
Unpacking
A Few
Words
Summary
What's
Some
Your
TV
About
of Special
in Each
Conventions
HDTV
Features
Chapter
Used
in this
Guide
Mitsubishi
has designed your TV to bring you years of viewing enjoyment.
Similarly, your owner's guide is designed to be user friendly, providing
guidance to help you take advantage
of all of your equipment
features.
Thank
you for selecting
our product
and once again,
welcome
to Mitsubishi!
€ Unpacking
Your
TV
What you will find
As you unpack
included:
your new TV, please
• Hookups
items are
book
• a Quick Reference
• a registration
• a remote
check to be sure the following
Guide
card
control
transmitter
• two AAA size batteries
for the remote
• an Active A/V Network
cable
• a TV Guide
control
Plus+ book
• two IR emitter assemblies,
for home theater features
one for TV GUIDE
Plus+*
and another
A few suggestions
Before you hook up your new TV, please
OComplete
number
to:
the registration
card. The registration
card asks for the serial
of the TV. You will find the number on the back of the unit.
OFile your sales receipt
service.
_Place
up.
take a few minutes
in a safe place.
the TV on a stable
surface
It may be required
with sufficient
lighting
for warranty
to do the hook-
* VCR Plus*, C _, PlusCode
and GUIDE Plus_ are trademarks
of Gemstar
Development
Corporation.
TV GUIDE
is a registered
trademark
of TV Guide Financial,
Inc. The VCR Plus* and GUIDE Plus* systems are
mamffactured
under license from Gemstar
Development
Corporation
and VCR Index System B.V., respec_
tively.
Preface:
Welcome
to Mitsubishi
a few
words
about
HDTV
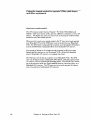
Your purchase of this upgradeable
Mitsubishi
HDTV puts you at the beginning of a revolutionary
new way to watch television.
Beginning in the Fall of
1998 digital broadcasting
will begin on a limited basis in selected major cities
in the United States.
By the year 2005, all stations must have 100 percent of
their programs available on their DTV channel.
Programs
will still be available through current analog (NTSC) TV sets at least until 2006.
Digital signals are sent over the airwaves,
the same way as the broadcast
stations you currently
receive. The similarity ends here, as digitally sent
pictures are of a much higher quality than analog signals.
Each Major (main)
channel will have several Minor (sub) channels.
When DTV is available in your area, you can purchase an optional Mitsubishi
HDTV receiver.
This allows you to buy the most advanced receiver technology when your area of the country is ready to receive digital signals.
Because digital television technology is so new, the way programs will be
broadcast
and the services that will be provided are subject to change.
Mitsubishi
Powering
Consumer
Electronics
the DigitaI
America,
Inc.:
RevoIution
Summary
of Special
Your top-rated
tures:
Features
Mitsubishi
projection
TV delivers
the following
special
fea-
HDTV Upgradeable
-- when used with a Mitsubishi HDTV
receiver, your television is capable of showing a High Definition
Television (HDTV) picture. HDTV signals provide a smoother,
more highly defined picture.
(HDTV signals will be broadcast
on
selected stations in major cities in the United States in the near
future).
3D Y/C Comb Filter -- digital based comb filter that improves
three aspects of the image: horizontal,
vertical and time. Produces higher horizontal
and vertical resolution
with less dot
crawl and color interference
when showing standard
television
signals
Component
Video Input .... provides three separate jacks, one
for luminance
(Y) and two for color difference (Cb and Cr). The
two color difference signals permit improved color bandwidth
information
that is not possible using composite or S-Video
connections.
Offers the highest possible picture resolution when
using a digital video source, such as DVD
Wide Screen
Television
-- can display a
(16:9) format, the same as a movie screen.
and WS-73903 will display in full format.
in a modified format (black bars above and
TV GUIDE Plus+ --- an interactive,
updated automatically
several times
picture in a letterbox
Models WS-65903
Other models display
below the picture).
on-screen
a day
program
guide,
Maximum
Channel Capacity
--- programs up to:
68 antenna channels and 125 cable channels
254 cable channels with TV GUIDE Plus+ and
99 DTV program channels
HDTV receiver and where
(when used with optional
available)
Mitsubishi
Illuminated
Multibrand
Remote
Control with TV/VCPJ
DVD/AUDIO
Control --- uses a single remote control transmitter to operate the TV, selected Mitsubishi
VCRs, DVD player and
audio components,
as well as certain VCRs, cable boxes, and
satellite receivers from other manufacturers
Preface:
Welcome
to Mitsubishi
Summary
of Special
Features
(cont.)
Color Temperature
Control --- provides 3 choices, including
precise 6500°K setting for optimum color tones
Front Reflective
brighter pictures
a
Surface
Mirror --- provides sharper and
by reflecting all light from the front surface
Intelligent
Room Illumination
Sensor (IRIS '_) --- automatically adjusts brightness
and contrast for an optimum picture
Auto Picture
--- automatically
adjusts sharpness
and color of
television picture according to the strength of the broadcast
signal
64-Point
Digital Convergence
--- allows you to finely adjust
the color convergence
at 64 different positions
Closed Caption
Decoder
--- decodes hidden text information
included with many TV programs and displays this text onscreen
2-Tuner Advanced
Pictnre-in-Picture
Mode
view two different broadcasts
at the same time
--- allows you to
Expanded
Sound Capability
--- allows you to connect the TV
to an external audio system for enhanced listening pleasure,
includes Level Sound to equalize differing program and channel
volume levels
PIP Audio Output--rear panel jacks provide the audio output
for the picture displayed in the PIP image. This allows connection to wireless headphones
or another external audio system.
If
PIP is not displayed on the screen, these jacks will output the
audio for the main TV picture
Active A/V Network
--- allows you to perform many of the
commonly used features of your TV and selected Mitsubishi
VCRs by pressing a single key
Summary
of Special
Features
t What's
in Each
Here's
Chapter
what you will find in this owner's
Chapter
1, Getting
Introduction
your TV
Chapter
to Know
to the locations
2, Operating
Your
guide:
TV
and functions
Your
of the buttons
and controls
of
TV
Guidance for using your Mitsubishi TV to achieve maximum viewing satisfaction. Procedures
that are unique to the operation of TV Guide Plus+ are
highlighted.
For instructions
on using the TV GUIDE Plus+ feature, see the
TV GUIDE Plus+ Operating Guide
Chapter
3, Using
the Special
Operating
instructions
TV, including Diamond
Chapter
Summary
them
Features
for using the advanced functions of your Mitsubishi
Shield removal for VS-50803 and VS-60803
4, Troubleshooting
of problems
you might encounter
and suggestions
for resolving
Appendix
Explains the procedure for bypassing the parental
detailed index at the back of the book.
Preface:
lO
Welcome
to Mitsubishi
lock.
You will also find a
t Some
Conventions
Used
in this
Guide
Mitsubishi
is pleased to provide you with an easy-to-follow, useful owner's
guide. You will find that different types of information
are treated in different ways.
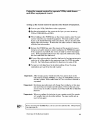
Pay particular
attention to topics bulleted by a red arrow and either an
Important
or a Warning label. These terms are used sparingly in the owner's
guide. They are intended to highlight information
which should be carefully
read.
If you will be activating TV GUIDE Plus+, take careful note of all information
with the TV GUIDE Plus+ signal cues. These directions
are exclusively for
your use+ They should not be followed or used if you will not be using this
feature.
I r?ated
Imain
topic or task_
+
This cue alerts you to
information
describing
dangerous
situations
that
could damage your equipment
or cause electrical shock.
Ilist _opics
Plus+ signal
I
or tasks
The step-by-step
instructions
on how to accomplish a
particular
task are signaled
by white numbers on a black
background.
TV GUIDE
topics or tasks
cue.
Information
This cue indicates
informa-
tion critical to the operation
of your new TV+
is exclusively
for TV GUIDE
Plus+
users.
What's
in Each
Chapter
11
Preface:Welcome
to Mitsubishi
12
C HAPTE.R_
_0 N....EE
Getting
to Know
Your
TV
Now that you have unpacked your TV, read through the safety information
and glanced at the overview of how this owner's guide is organized, it's time
to become familiar with the buttons and controls you will be using when you
operate the TV. This chapter will introduce the range of options available
when using the buttons on the remote control or on the TV's control panel. It
also offers some general guidelines for using the remote control.
Most functions can be controlled by using either the control panel or the
remote control. Certain specialized functions require the use of either the
remote control or the control panel. This chapter, which will familiarize
you
with the full range of button functions, contains the following sections:
0
Overview
of the
Control
Panel
0
Overview
of the
Remote
Control
Overview
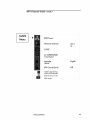
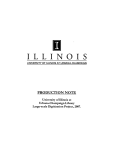
of the Control
VS-50800,
VS-50803,
Panel
VS-60803,
WS-73903,
WS-65903
.....
0.0
VS-70803
1____1
INPUt-4
V8-80803
S.VIDEO
•
V_DEO
_6666_L_
(MONO}
L AUO_O4_
CHANNEL
VOL
....
ADJUST
r-
14
Chapter
1: Getting
to Know Your TV
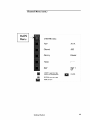
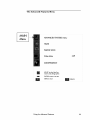
Overview
of the
control
panel
(cont.)
S-video input terminal
(INPUT 4)
Use to connect the S-video output of a camcorder or other component to
the TV. If you connect an S-video cable to this terminal,
the adjacent
video input terminal cannot be used.
video input terminal
(INPUT 4)
Use to connect the video output from a standard
component to the TV.
camcorder
audio input terminals
(INPUT 4)
Use to connect the audio output from a camcorder
input key (INPUT)
Use to select the input
• TV channels
or other component.
source you wish to view:
on Antenna
• other equipment
or other
A (Ant-A) or Antenna
connected
B (Ant-B)
to Inputs
• HDTV, if connected
channel
controls
(CHAr)
Use the (A) key to switch to a channel with a higher
(V) key to switch to a channel with a lower number.
volume controls
(VOL AV )
Press the (A) key to increase
volume.
the volume.
number.
Use the
The (V) key decreases
the
a/v reset key (AN RESET)
Press to reset most of the audio and video functions to their original
factory adjustments
or settings.
The volume setting is not affected by
this key.
menu key (MENU)
Use this key to display
additional
instructions
Overview
the on-screen menu system,
for special functions.
of the Control
Panel
which
contains
15
Overview
of the
control
panel
(cont.)
cancel key (CANCEL) enter key (ENTER)
The cancel key is used to clear the settings of on-screen menus. It can
also be used for Guide Plus+ installation
as explained in the TV Guide
Plus+Operating
Guide. The enter key is used to select an item from
the on-screen menus.
(_
adjust up and down keys (ADJUST
• • )
In the menu screens use this (•) key to move up through the screen
choices, or select an option, in the selection field. In the menu screens
use this (•)
button to move down through the screen choices, or select
an option, in the selection field.
adjust left and right keys (ADJUST
• • )
In the menu screens use this (•) key to move to the title (left) field.
In the menu screens use this ( • ) key to move to the selection (right)
field.
power key (POWER)
Use to turn the television
16
Chapter
1: Getting
on or off.
to Know Your TV
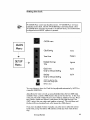
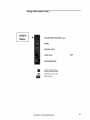
t Overview
of the Remote
Control
This section provides you with an overview of the remote control's keys and
the features that they control. For detailed instructions
on the use of these
keys, refer to the instruction
section for that feature.
Features
are listed by
name in the Index at the end of this guide.
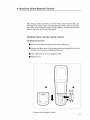
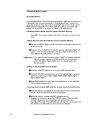
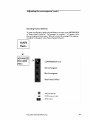
Getting
ready
installing
the batteries
O
to use
the
remote
Take the two AAA size batteries
control
from the packing
bag.
Remove the back cover of the remote control by pushing
direction of the arrow and sliding off the cover.
Insert
Replace
batteries
as shown in diagram
the tab in the
below.
cover.
@
size AAA
batteries
@
Overview
of the Remote
Control
17
Getting
some
ready
do's and
to use
the remote
(cont.)
don'ts
To ensure _hat your remote
guidelines:
control will continue
working
properly,
*
Doff_ press two or more bu_ons at _he same _ime, unless
specifically instructed
_o do so in _his owner's guide.
*
Doff_ allow the remo_e control _o get wet or become
°
Avoid dropping
°
V_rhen cleaning the remo_e control, doff_ use any harsh
chemicals.
Use only a soft; slightly moistened
cloth.
general
O
follow _hese
you are
hea_ed.
the remo_e control on a hard surface.
instructions
VVqaen using _he remo_e
audio equipment:
Be within
control
to operate
Press
guidelines
the TV, VCR, DVD, Cable
box, or
20 feet of_he equipment.
Poin_ the tip of the remo_e control
18
control
the appropriate
for using
bu_on
_oward the equipment.
or sequence
batteries
*
For best results;
*
Doff_ use a new bat_e_-
°
Doff_ hea_, _ake apart;
°
Load the batteries
_hey art positioned
°
Replace
use alkaline
AAA batteries.
wi_h an old one.
or throw
ba_eries
into a fire.
as indicated in the illustration;
correctly (i _o i, and - to - ).
_he back cover of the remo_e
Chapter
of buttons.
1: Getting
control
_o Know Your TV
making
sure tha_
Getting
ready
to use
the
remote
control
(cont.)
®
®
@
®
@
@
@ @
@
_
@
_
Overview
MITSUBISHI
of the Remo_e Cont_ol
19
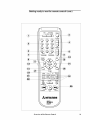
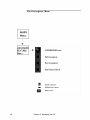
Remote
control
keys
@ select switch
Your remote control has four layers:
1) TV, 2) VCR, 3) DVDiCABLE and 4)
AUDIO. Yea can set up each of these
layers to operate a different piece of
equipment.
Use this switch to select the
layer you want to set up or use.
• TV channels
zip cedes for TV GUIDE
or
@ enter/exchange
key (ENTER/EXCH)
Use this key aider selecting a channel
number, after selecting an item from the
onsereen menu system, or with the
picture-in-picture
mode.
TM
_._information
TM
key (INFO)
Use to view an onscreen samma_current settings for the TV.
of the
I
(VOLUME)
Press the top part of the key to increase
the volume. Press the bottom pax of the
key to decrease the volume.
@ input key (INPUT)
Use to select the input source:
* TV channels on Antenna A or B.
° Other equipment
connected to:
- Input 1
- Input 2
- Input 3 or DVD - Input 4
20
to return
_ mute control
(MUTE)
Use to turn the sound off cempletely
to restore it to its original volume.
In the DTV menu, pressing and holding
this key will scroll through the major
chacmels.
control
again
This key has a special function for
HDTV. In HDTV mode, entering two
digits and pressing the CANCEL!SUB
key will allow you to enter a subchannel
(SUB) number.
@ charmel selector
(CHANNEL)
Press the top part of the key to change to
a channel with a higher number; press
the bottom part to change to a channd
with a lower number.
6_volumc
to the last
@) canecl/sub
key (CANCEL/SUB)
Use to clear the current entry without
exiting the menu. Vvqaen a SQV channel
is displayed, pressing this key will
delete the channel from the SQV
choices,
Plus,
(_) SuperQuickView
key (SQV)
Press to view channels yeu have
programmed
into SuperQuickView
memory. A long key press will add
chacmels to SQV memory.
on HDTV receiver.
channel viewed.
Press
to the original charmeL
(_) number key (0-9)
Use to select a channel number, to select
an SQiV bank, to enter a parental lock
code, OR
_=. [ setuo.
to enter
(cont.)
(g_lrccall key (RCL)
Press this button to switch
@ power key (POWER)
Press this switch to turn the TV on or off.
_
and functions
Chapter
_)
[.-_j
- :::>
This batten is also used extensively for
added program information
in the
GUIDE Plasl menu system.
See the TV
GUIDE Plu.s i Operating Guide,
_)light
key
Use to light up the remote
seconds).
1: Getting to Know Your TV
(for four
I
I
Remote
control
keys
and functions
(_adjust
keys (AV4
l_ )
Within menus, use ADJUST key to select
and change options. Also use _o a_jus_
convergence
and to move PIP positions
when the menu is not displayed.
Use
these keys after selection of an AV
ftmctSon, to adjust _he sound or pic?ure.
ADJUST keys may also be used to scroll
through:
the DTV Channel
Guide
PIP input key (PIP INPUT)
-- Press
repeatedly
to switch _he source of the PIP
image between the TV and the external
inputs.
PIP channel
key (PIP CH/NV
) -Press A or V
to change the channel of
_he PIP if _he PIP input is An_ A, Ant B
or DTV.
pause key (PAUSE)
-- Press _o freeze
_he PIP image and _o return to a "live"
image. V_q_enin _he VCR layer, _his key
will pause the VCR.
OR
I
[
the channels
in TV GUIDE
Plus,
menus.
I
(_)GUIDE key (GUIDE)
Use this key to display:
the DTV Channel
DTV inpu_ OR
TV GUIDE
TV GUIDE
Guide, when using the
Plus i program listings,
Plus i is activated.
_jlhome
key (HOME)
Press to re_urn _o regular
from _he onscreen menus,
the onscreen displays.
when
TV viewing
and to ?urn off
@ audio and video controls
Use _he AUDIO key or VIDEO key _o selec_
sound and picture se_tSngs for adjustmenL
See "Customizing
the A/V Memoo _Se_ings"
in Chapter 2 for de_ailed information.
_)VCR, DVD player and audio product
function
keys
Use _hese buttons to control VCR, DVD
players, CD players, etc. These are proprogrammed
_o operate man), brands of
VCR's and selected Mitsubishi
components.
The PLAY key is also used with the Active
AfV Network.
See "Using the Active AW
Network Feature" in Chapter 3.
I
_::>
delays
I Turns
]
off
GUIDEPlusPlus
displays
TV TV
GUIDE
i installation.
(cont.)
and ]
I
I_l menu key (MENU)
,
"-- --.
The REC VCR PLUS I key in the TV layer
Use this key to display the TV s on-screen I_
"_?>I is the key which brings up the VCR Plus
menu system, which provides access _o
IJ J _ I menu to'_egistor a recording evenL
additional features and functions.
_8)picture-in-picture
controls
Use to control the special
picture (PIP) function.
picture-ln-
_format
key (FORMAT)
Use _o change the size and shape
viewing area.
C_)sleep
• PIP key (PIP) -- Press _o _urn on the
PIP image, _o change its size, or _o turn
offthe PIP image.
For de_ailed informatSon on PIP screen sizes see Chapter
2 "PIP".
Overview
of the Remote
timer
key
of the
(SLEEP)
Use _o program the TV to ?urn off automatically at a later _ime.
Control
21
Using the
and other
about
your
remote
contro]
equipment
rcmotc
to operate
VCRs,
cable
boxes
control
This TWs remo_e control has foar "layers":
TV: VCR: DVDiCABLE and
AUDIO, Each layer can be ased _o operate a differen_ componen_ in yoar AiV
system.
You choose _he layer yoa wan_ to ase by- se_ing _he "select" switch
across the _op of the remote control.
Vvqaen you firs_ receive your remote control, the TV layer is set up to operate
your Mi_subishi TV and the VCR layer is se_ up to operate your Mitsubishi
VCR. The DVD layer is programmed
_o operate your Mi_subishi DVD player
and the AUDIO layer is programmed
for your Mi_subishJ AA r recoiver.
You can set up layers in _he remote control to operate a cable box, some
digital satellite receivers; a non-Mi_subishJ
VCR; a Mi_subishJ laserdisc
player; Mi_subishJ Ale receiver or a compact disc player.
The VCR layer can be set up _o operate a non-MJtsubishi
VCR,
layer can be set _o operate a Mitsubishi
DVD player, cable box;
lite receiver; VCR or a Mi_subishJ laserdisc player, The AUDIO
se_ up to operate a cable box; digital satellite receiver, laserdisc
MJtsubishi A_ r receiver,
The TV layer can be set up to operate
and mu_e controls of a Mi_subisb5 AfV receiver.
22
Chapter
1: Getting
_o Know Your TV
The DVD
digital satellayer can be
player; or a
the volume
Using the
and other
setting
remote
control
to operate
equipment
(cont.)
up the remote
control
to operate
VCRs,
other
cable
brands
boxes
of equipment.
O
Tam
on your VCR, Cable Box or o_her eqalpmem.
0
Se_ the select switch
VCR or DVDiCABLE
@
While holding in the POWER
number lis_ed for your brand
found in the charts following
digits of the code number. If
wi_h the firs_ code number.
@
Release _he POWER key, poin_ the remo_e at _he equipmen_ you are
t_-ing _o set up the remote _o control and press the POWER key again.
If _he eqaipmen_ turned off. the remo_e is ready _o control _hat eqaipmen_. If the equipment
did no_ turn off, repea_ the instructions
using
the nex_ code listed for _hat brand.
on the remo_e to the layer yon wan_ to set ap:
or AUDIO.
key on the remo_e
of eqaipment.
The
_hese ins_ructlons.
more than one code
control, enter _he code
code number can be
Be sure to enter both
number is listed, start
O If none of the code numbers listed for _hat brand of equipment
seems to
work, try all of the codes for _he eqaipmen_ _-pe. For VCR's try codes
01 to 21. For Cable Boxes and Satellite Receivers _- codes 47-99.
To rese_ an individual layer to its initial setting,
instructions
and use 00 as the code number.
Important:
follow t:he setup
Aider se_ing up your remote control, if you canno_ turn on t:he
cable box by pressing POWER, _ry using _he CHANNEL bu_ton or
number buttons.
Some cable boxes will turn on when a channel is
requested.
[_>Important:
Sometimes manufacturers
will change their produc_% or they may
use more than one remote control system.
If _his is the case, your
remo_e may no_ be able _o operate your VCR, Cable Box or Satellite
Receiver.
[_>Important:
When you replace _he ba_eries
will usually return to its initial
your remo_e again.
in your remote control, _he remote
setting.
You may need to set up
I
_i_--;:.
If you are using TV GUIDE
the cable box on.
Overview
II
Plus _, do not turn the cable box off'. Always leave
of t:he Remo_e Control
23
Using the
and other
remote
control
to operate
equipment
(cont.)
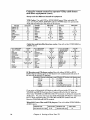
Setup
for different
code
brands
VCRs,
cable
boxes
of equipment
VCR Codes: Use with VCR or DVDiCABLE layers. When using the TV
layer, the PLAY, STOP, REWiREV and the FFiFWD keys will operate the
VCR that the VCR layer has been set to control.
VCRbrand
Mi_ub(shi
{A)
Mi_ub(shi
(B)
Canon
Eme_on
Funai
Gene_lElectric
Go[dstar
Hitachi
JVC
code.co
enter:
O_
O2
O3
04,05
08
O3
O7
O8
O9
VCRbrand
Magnavox
Mu[tilech
NEC
Panasonic
Phi[co
Phi[ips
Quasar
RCNProsc_n
Sanyo
Cable Box and
AUDIO layers.
If your ¢_bl_llito
b_x is (:h$btandmABC
Color Voice
Comkolqi_
Di_h.,'Echc_tar
Gemini
GelTeral L[e_dc
Gelqsr_l In_rumelq_
Hsmlin
Hi_chi
Jerrold
[b__tCOm
Magnavox
[b_OmOeOX
.-en_rthis
cocle
67,59,62,57,89
73,74, 98
93
46
55
66
55,56, 57
52,53,69
57
54,55,56,57,56
59.60,85.67
71
94
51
Satellite
co.'coan.car;
03,`10,
`1`1
08
`12
03,21
03, 10
03, `10,`1`1
03
08, `13,20
`14
Rccci_cr
If yo_r ¢_bl_sa_llito
box is this brand-.
Oak
Pfln_5olqit_
PanasolTi_ [3SS
Pflra._lOn
PiolToer
Prime Sta.r
Pu[sar
RCA
RCA DSS
ROrJ.81
Regency
Sarnsun0
codes:
...e_erthfs
cede
6%62,82
63,76
45
51
73,74.75,76,77
93.94,98,99
64,65,84
46
51
63
49
53
79
65,84
code_en_r:
15
16
`17,`18
03,10,11
06
04,08
15
O7
19
VCff brand
Soot
Sharp
Sony
S_,tvsnr6
Telmi_
Toshiba
Totevision
Zenilh
Use with either
DVDiCABLE
...enterthis
c_de
66,88,89,91.92
57
47
63
54.55.56,
87
55
67, 68,72
5_
44
62
54
93,94
5_
ff your cabfe/_,l_telli_e
_x i$ this brand...
Scienffic AUsn_a
Sirj.nst_re
SolTy DS_
Spr_ar
S_arcorn
S_a_ate
ro_hib8
ro_hib8
[3S_
UiTited Arti_f_
UiTited Cable
View_ar
LelTith
AV Receiver
and CD player codes: Use with either AUDIO
CABLE layers (setting up for an AV Receiver will automatically
the controls tooperate
CDplayers).
or
or DVDi
set some of
_itsubishiAVRecoivermodel
;ode to coter:
MiteubishiAVRcoaivermodel
HTS-100
H7S-300
M-AV1
M-AV2
M=R7020
M-R0010
30
3_
3_
31
3"1
31
M-VR400
M-VR600
M-VRS00
M-VR_000
other Mitsubishl(AV ra_ivers
some Y_na h_ AV race(vats
code to enter:
35
35
38
38
31
36, 37
If vou enter a Mitsubisihi
AV Receiver code while set tothe TV layer, the
VOLUME and MUTE functions for all layers will be for the AV receiver.
Otherwise, VOLUME and MUTE will be TV fanctions on all layers except the
Audio layer. Yoa may also enter any of the Mitsubishi AV Receiver codes into
the TV layer and change the TV VOLUME and MUTE controls into AV
Receiver VOLUME and MUTE controls.
Mitsubishi
Laser
AUDIO layers.
Disc and
Equipment TV_e
DVD players:
i
code to enter:
Use with either
Equipment Type
m
Mitsubishi Laser Disc Player l
Chapter
1: Getting
i
I
i
code to enter:
m
i
24
DVDiCABLE
32, 33
MitsL_bishi[3VD player
to Know Your TV
_,
or
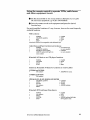
Using the
and other
O
remote
control
to operate
equipment
(cont.)
VCRs,
cable
boxes
Set the select switch on the remote control to the layer you set up for
the individual equipment,
e.g. VCR or DVDiCABLE.
Point the remote
function keys.
control
For each brand the functions
available functions.
at the equipment
and press the desired
will vary; however;
here are the most frequently
VCR functions:
*
*
*
*
POWER
CHANNEL
REC
STOP
VCRu wi]] be compatible
Mitsubishi
Cable
*
*
*
*
u1_down
Boxes
*
*
*
*
and
Satellite
with additiona]
Receivers
POWER
CHANNEL
uI_dowll
ENTER (on some models)
ARROW uBidovatileff/15ght
PAUSE
REW
PLAY
FF
keys
functions:
* 0-9 number keys
(on some models)
* CANCEL
(on some mode]s)
(on
soroe roodels)
Mitsubishi
AV Receiver
and CD player
functions:
POWER
VOLUME
MUTE
PLAY
Additional
Mitsubishi
_iI-VR1000
*
_121dl_ VP_00
0-9 numbers
*
*
*
*
AV Receiver
functions
and )iI-VR4O0
0-9 numbers
fITS-300,
*
*
*
rd-AVl, M-AV2_ :YI-RS010 AND :YI-RT020
CHANNEL
uI_down
IIffPUT
ENTER
0-9 numbers
MENU
Mitsubishi
by model number:
* ARROWS
)iI-VR600
*
*
*
PAUSE
STOP
FF
REW
for menus
* CANCEL
* AUD[O
* VIDEO
* ARROW
up/down
DVD and Laser Disc players
*
*
*
POWER
0-9 numbers
MENU
* PAUSE
* REW
* PLAY
*
*'
Ca.NOEL
STOP
* ARROW up/dowrdleft]right
(D¥]) players only)
Over,Sew
of the Remote
Control.
25
blank
26
page
Chapter
1: Getting
to Kcow Your TV
6
_'_
_CHAPTER
TWO
Operating
Your TV
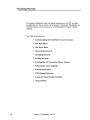
This chapter will explain how _o operate _he TV, first focusing on fmac_ions
that are basic and easy and _hen explaining
some advanced features,
This chapter
explains:
0
The
ViewPoint
0
Using
the
0
Audio
Video
_ On-Screen
Advanced
Settings
Features
Operating
System
t Getting
Started
This section is designed to ge_ yoa started enjoying your new TV by unders_anding the way the on-screen menas function,
Incladed in this chapter are
Important
no_es, _o help you use your new Mi_subishi _elevision _o its full
capacity.
Yoa?l _md information
28
on:
*
Understanding
*
The Main Menu
*
The Setup
*
Memorizing
*
Changing
*
Setting
*
Creating
the A/V Connection
*
Selecting
the menu
*
DTV Charmcl
Guide
*
DTV Charmcl
Selection
*
Using
*
Charmcl
Chapter
the ViewPoint
_ on-screen
menus
Menu
channels
channels
the clock
the Closed
language
Caption
Menu
2: Operating
(Home
Your TV
Decoder
Theater)
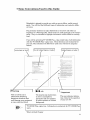
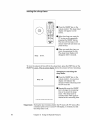
Understanding
the ViewPoint
One of the distinctive
features
® on-screen
of this TV is Mi_subishi's
ViewPoint
ON-SCREEN
menus
exclusive:
®
OPERATING
SYSTEM
ViewPoin_ includes a special Pie_ure-in-Pie?ure
screen, while you are memorizing channels on Antenna A or Antenna B. ViewPoint also provides s_epby-s_ep instructions
for using some of the TWs special capabilities.
Vvqaen using the ViewPoin_
system,
*
The selected
for the icon.
*
The on-screen
minutes,
°
Some on-screen
please keep _he following
menu i_em is indicated
menus
menu
in mind:
by yellow tex_ and outline
will turn off if no item is selected
within
items mus_ be set before o_her items are
available.
For example, "Set the Timer" will only be possible
"Clock Time" and "Set Day" have been se_.
°
<SK:_
For ease of use, all menu
ADJUST
up/down
2
selections
if
are made the same way:
moves up or down _o your menu
choice,
After making a menu choice, ADJUST righ_ moves you _o the
selection field where you can enter or change your selection.
ADJUST left moves you from _he selection back to _he title field
While in the selection
option.
*
field, ADJUST
You can exi_ the on-screen
menus
up/down
selects
_he
in two ways:
MENU
O
Press
_he exit
MENU
key menus
_o moveto back
screenviewing
a_ a time
until you
all the
re_urnone_omenu
television
OR
EOME
Press HOME t;0 exi_ all menus
television viewing
Getting
S_a_ed
with one keystroke
and re_urn
_o
29
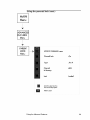
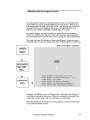
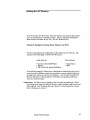
The
Main
Menu
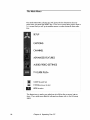
This is the Main Mena Screen and will always be the first screen _ha_ appears when you press the MENU key. If_he mena name has a picture next _o
i_, i_ means _hat yon will go to another screen _o make choices for tha_ selection.
SETUP
CAPTIONS
CHANNEL
ADVANCED FEATURES
AUDIO/VIDEO SETTINGS
TV GUIDE PLUS+
ADJUST to select Ttern
ENTERfor rnevu or to start
MENU to return
The fastest way _o make yo_r selections is to follow the on-screen instructions, Ifyo_ need more detailed information,
please refer _o '_he following
pages,
30
Chapter
2: Operating
Your TV
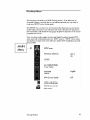
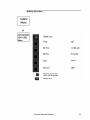
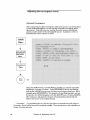
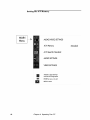
The
Setup
Menu
The first step is to make your SETUP menu choices. If the television is
relocated or there is a power loss, or you add components
you may need to
make your SETUP menu choices again.
The SETUP menu is where you will memorize the channels you can receive,
set the Clock, select how your television will work with other AV eqtfipment
(AV Connection) and choose the Language
(English or Spanish), for on-screen
programs and menus.
Your television is also capable of receiving Digital broadcast
signals (DTV)
when used with a MitsubishJ external
HDTV receiver.
NOTE: Some broadcast stations in m_ior U.S. cities will start limited DTV broadcasting
as early
as Fall, 1998.
MAIN
Men u
SETUP menu
Memorize Channels
:Ant A
Air
CLOCK
AV CONNECTION
(Home Theater)
Language
{ldioma)
:English
DTV Channel Guide
:Off
ADJUSTto s_bct item then
moveto and changeoption
ENTERfor menuor to ster_
MENU to return
Getting
Started
31
Memorizing
channels
I
L_
_
TV GUIDE Plas i users do not need to memorize channels for ANT-A. TV
GUIDE Plusl will do this aatomatically.
See the TVGUIDEPIusi
Operating Guide. However, you should still memorize channels for A.NT-B and
DTV if those inputs will be used.
You can use the menus to automatically
memorize the channels your TV can
receive and skip the tmused channels.
Once channels are memorized, you
can scan through them using the channel up/down keys on the remote control
or front control panel. Added channels will be labded, "In Memory", as
shown below. Channels not added will be labeled "Not in Memo_ m.
You will need to select the input you wish to memorize channels for. AIR and
DTV are for broadcast
stations that use antennas.
CABLE is for stations
using a cable or cable box.
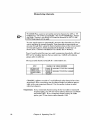
The inputs
and
channels
available
for memorization
are:
CHANNELS THAT CAN BE MEMORIZED
INPUT
ANTENNA A AIR
ANTENNA E_AIR
ANTENNAA OABLE
ANTENNA E_CABLE
2 throu_h 69 inot t_vt_ilable
if%' GUIDE Plus+ iv aciivated
2 _hrouqh 69
1 throt_qh125 inot twailabl_if TV GUIDE Plu_ ÷ i_t_ctivated)
1 throv_h 125
1 thmv,qh99
CHANNEL
up/down controls will work differently after charmels have been
memorized.
After memorizing,
use the channel controls to advance sequentially to the next memorized
channel.
Use the number buttons to select
individual channels.
l>Important:
32
If you memorized
channels using the Air (non-cable or standard)
Antenna option, your TV can receive antenna channds
2-13 (VHF)
and 14-69 (UHF). If you memorized
channels using the Cable
option, your TV can receive cable channels
1-125.
Chapter
2: Operating
Your TV
I
I
Memorizing
channels
cont.
Select the input yoa want to memorize channels for by as_g
ADJUST
_ to move to the selection field and ADJUST <::E>
to select the input.
SE=JIJPmenu
MAIN
Memorize Channels
ENTERto sfad
Menu
:AntA
Air
CLOCK
AV CONNECTION
Language
(IdiemaI
:English
DW Channel Guide
:OF
]
ADJUSTIo_@e_l
il_r_
th_
J
ENTERJ_rm_nuo_Io $1VH
Press ENTE1UEXCH
to start
message similar to this:
memorization.
You will see a
MEMORIZE menu
MemoFze channels
In Mcrnory
:002
Now m_mori_ing
oil th_ s+a*ions
yo_J _r_
m_e_ve
on Ant-A Air,
Fleases+andby,
PIP
OrC_Igrtlg
_CELIo_nr._msmorlz_ion
Yoa can stop the memorization
process at any time by pressing
CANCEL.
Channels
memorized before stopping are retained in
memo_-.
Getting
Started
33
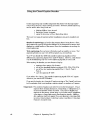
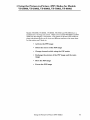
Changing
channels
Your TV offers you six ways to change channels
been programmed
into channel memo_-:
1) selecting channels one-by-one
CHANNEL down (W) controls
2)
directly
3) using
accessing
the Recall
a channel
5) using
the ADJUST
6) using
DTV Channel
l>Important:
To change
by pressing
channels
TM
faster,
up (A) and
the number
to the previous
keys
channel
function to scan through
(AV) keys in TV GUIDE
Guide
numbers have
with the CHANNEL
option to return
4) using the SuperQaickView
special user-chosen
lists.
once their
Plusl
any of nine
SURF screens
(when available)
use either
of the following
procedures:
•
Enter three digits for eve_- channel number, using zeros where
needed. For example, enter 004 to view channel 4 and 028 to
view channel 28, or
•
Press the ENTER button after selecting the number of the
channel.
For example, press 4, then press ENTER (in less than
three seconds) to view channel 4.
For DTV channds
you will need to sdect a major and minor
channel.
For example, enter 04 (m_ior), press CANCEL/SUB
(a
dot will appear after the first numbers) then 11 (minor). It will
appear as: 04.11. If you press ENTERiEXCH
after selecting only
the m_ior channel, you will see the first available minor channel.
If only one or two keys are used to select the ANT A or ANT B
channel number, the onscreen display will appear and remain
visible for three seconds if no more keys are entered.
The TV
will then tune to the selected channel.
•
34
If you have local cable channels that TV GUIDE Plus i does not
list, you can still select these channels by using the number keys
and enter them into one of the the SuperQuickView
lists.
Chapter
2: Operating
Your TV
Setting
the
clock
TV GUIDE Plusl users may skip this _ction.
TV GUIDE Plusl will automatically set the clock. See the TV GUIDE Plus ! Operating Guide. Once
TV GUIDE Plus i has been activated in the SETUP menu, the CLOCK menu
is skipped
when ADJUST
up/down is pressed.
CLOCK menu
MAIN
Menu
SETUP
Menu
Clock Settlng
:Auto
rime Zone
:Eastern
Dayllght Sovlngs
"rime
:Ignore
Clock "rlme
Only for Manual Settlng
:N/A
Set Day
Only for Manual Settlng
:N/A
ADJUSTto s_lecti_rn _nen
rno_ to and change option
MENU to return
You may choose to have the Clock Setting
manually
(MANUAL).
adjusted
automatically
(AUTO) or
Auto allows the time to be set up using Extended Data Service (XDS) data
available when tuned to a PBS channel that carries this service. In the Auto
mode you will need to select the time zone (Atlantic, Eastern, Central, Mountain, Pacific, A2aska and Hawaii), and choose the Daylight Savings Time
(DST) option that your state uses (applies or ignores).
The clock time and
the day will be automatically
set, after tuning to a PBS channel.
If you want to adjust the time manually, you only need to select the correct
Clock Time, along with AM or PM and the correct day of the week for Set
Day.
Getting
Started
35
Creating
the AN
Connection
(Home
Theater)
The AV Connection allows you to customize the way your TV works with
other audio and video components.
Full use of the system and components
will provide you with a completely- integrated
home theater experienco.
The features
you can adjust
are:
• AV Network:
for use with selected Mitsubishi VCR's.
The
adjustments
are: Off, Basic or Active
• External
Audio System:
when the TV is being used with an
AV Recoiver; Audio Receiver or Stereo System. The addusta_ents
are: Yes or No. To hear the audio through the _ speakers,
select No.
• AV Receiver
at Input 1: for use when an AV recoiver is
connected to Input 1, to ensure your best audio and video
performance.
The a_ustments
are Yes or No.
° Volume Changed
by AV Rceelver:
to va_- the audio output
level from the TV to the AV Receiver using the TWs Volume
Control, select No. If you have an AV Receiver that cannot be
controlled
using a remote control; sdect No. Select Yes to have
the TV output a fixed audio output level to the AV Receiver.
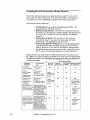
Setting choices van-, depending
on which components
are connected to the
TV. Below is a chart of common combinations
and the recommended
settings.
Detailed information
for each feature and setting instruction
can be found in
the following
Eq_dpment
Connecteti
VCR _tb_ut
ActP,'e AV Network
pages.
TV Yea_*_ Se_ti_g
TV connection
1_
Active AV
Network
VCR Output to:
TV Ii_put 1.
VCR with
Ae_ AV Netw_k
t_ot_remo_
cot_ol]_d
_ce_v_r
or stereo system
VCR Output to:
TV Mput 1,
TV Audi_ Outputs to:
s_o systeminputs.
VCR _qt_ Active
AV l_stwork,
_m_e c_tr_l]ed
_c_i_r o_
s_o system
VCR O_tput to:
_ Mput I,
TV Audi_Outputsto:
s_o systeminputs.
Ho_e Theater AV
receiver _qt_ _e_ot_
VCR (auy) and a_y
_hsrAVequipment
TV Mo_t_r _Sdeo aud
audio ou_uts to the AV
red, vet's TVi_put. Othe_
AV equ_pme_t¢_nne_¢_d
toAVrece_ver.
AV
External
Audio System
Off
AV F_c, eive_
at Input 1
No
No
Active
(al_o s_t VCR
AV Ne_rk
to On)
Yes
No
AcYtive
(al_osetVOI_
AV l_etwo_k
_oO_)
Yes
No
Off
36
TV Movltozvideom_d
audi_oul;puts
t_t_eAV
reea4ver's
TV ivput. Other
AV equi3_raev_
_
comp_vantaud S Video
outpu_ b_theAV
_vers
i_puts.AV
recadver's
m_u_torv_d_o
and S V_deooutput_to
TVTuguts I a_d 2.[Not_:
Cvanpoue_ D*€_ _houid
becomplected
toTNPUT4_
Chapter
2: Operating
No
No
Yes
(u_et_eremo_
for thereceiver o_
stereot_¢_1
the_lu_e)
Ye_
Ye_
t_TV_n_t 1. [Note:
Comps.out DVD should
be couuec_ed
to _-3
H_me TheaterAV
ve_iver v_t_ remote
VCR (a_y) amd any
o_er AV equ_pme_
Using a comblv_on
ofv_
and S Video
c_les.
Volu_ae C_amage_
by AV Receiver
Yes
(use the remo_
fbrthe AV
_t_l the
_mlu_e)
Off
Yes
Yes
(u_et_eremot_
fbr theAV
ca_:tral the
Your TV
Creating
the AN
MAIN
Connection
(Home
Theater)
(cont.)
AV CONNECTION menu
(Home Theater)
Menu
SETUP
Menu
AV Ne_ork
:off
External Audio
:No
System
AV Receiver at
Input 1
Volume Changed by
AV Receiver
(TV Audio Level can
be Fixed or Variable)
:N/A
:N/A
ADJUSTto selectrtem then
moveto and changeoptbn
MENUto return
Ge_h_g Started
37
Creating
Activc
the AN
A/V Nctwork
Connection
with
(Home
a Mitsubishi
Theater)
(cont.)
VCR
The ActSve AiV Network is a system that Mitsubishi
developed to make it
easier to operate many MJtsubishi products with one remote control. The
Active AiV network will automate
the TV's input selection and the playback
of Mitsubishi VCRs into a single command.
You will gain even more benefits if you have a Mitsubishi
VCR equipped for
the Active AA r Network,
The Active AiV Network allows you to perform
many of the commonly used features of your system at the press of just one
button, as explained below,
before
you begin,
bc sure you have:
*
Connected an A_r Network cable from the Active AiV Network
terminal of your TV to the "AiV Network IN" terminal of your
VCR.
*
Connected
*
Set your TV AiV Network
*
Set your VCR's remote
*
Turned
your VCR to INPUT-1
setting
of your TV.
to Active or Basic.
control settings
your VCR video mute setting
to VCR.
on,
If you have installed TV GUIDE Plus
on your TV, you can use the VCR
Plus i feature to control your VCR for recording,
what
the Active
AN
Network
does
The ActSve AiV Network makes it easier and faster to use the VCR Play
command or display your VCR's menu. _%qaen using the Active AiV Network,
you should always point your remote control at your television.
38
Chapter
2: Operating
Your TV
Creating
using
the AN
Connection
the PLAY key on the remote
(Home
Theater)
(cont.)
control:
•
Active AiV Network will turn yo_r VCR on and play a tape (if may).
•
Active A/V Network
PUT-1.
•
When you turn your TV off. your VCR wiE turn
playing or recording.
displaying
will turn your TV on and switch
it to IN-
off. m,z!_
it is
the VCR menu
When you set the remote
to VCR and then press MENU:
•
Active A]V Network will turn on your VCI_ if it is off and display
the VCI_'s menu (this function may not work with some older
Mitsubishi
VCI_'s).
•
Active A/V Network
will turn
on your TV if it is off and switch
it
to INPUT-1.
I:>Important:
If the TV is not receiving a signal on LNPUT-1, it will automaticaEy
turn offin two minutes.
If you use a TV menu during this tSme,
the TV will turn offin five minutes after you stop using the menus.
I_>
Important:
If you de not use the AA r Network system, set "AiV Network"
_Off". If you don't, channel selection may not work correctly.
A_ r Network can still be used to pass remote control signals
when the TV's, _A_ r Network" setting is "Off".
to
The
even
When the AiV Network is set to "ACTIVE', selecting an input
choice (Input 1, 2 or 3) that is either offer not connected will cause
the TV to automatically
turn off within two minutes.
Getting
Started
39
Creating
External
the AN
Audio
Connection
(Home
Theater)
(cont.)
System
The external audio s_*tem selection allows you _o turn offthe speakers in the
TV when you have connected _he TV to a Home Theater Receiver, Audio
Receiver or o_her stereo system. This will prevent potential mismatches
between the TV speaker volume. To use "Volume Controlled by AV Received'
or "AV Receiver a_ Inpu_ 1" se_ to YES.
[:::*Important:
If you changed _he _Ex_ernal Audio System" setting from YES _o
NO _he speakers in _he TV will be turned on again.
To prevent
damaging the TV speakers and _o prevent a sudden increase of
volume, make sure you have _urned down the TWs volume first.
AV Receiver
at Input
To make this selection,
1
the "External
Vvqaen an AV receiver
selec_ YES.
is connected,
Volume
by AV Receiver
Controlled
To make this selection,
Audio System" must be set _o YES.
_o ensure
the "External
_he best possible
picture,
always
Audio System" must be set _o YES.
Some Home Theater Receivers, Audio Receivers and s_ereo systems use a
remo_e control for volume se_tSng. If your receiver or stereo s_*tem has this
functSon, set _he %rolume Change By AV ReceiveF' to YES. If your system
does not use a remote control to adjust _he volume se_tings, then set _he
%rolume Change By AV ReceiveF' _o NO.
40
Chapter
2: Operating
Your TV
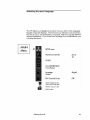
Selecting
the
menu
language
This TV allows you to display the on-screen menus in either of two languages:
English or Spanish (Espafio[).
The first tSme your television was powered on,
the _Se_up" menu was automat_cally
displayed;
with the Language
(Idioma)
selection highlighted.
If you do not wan_ to change _he current selectSon, you
may skip this section.
MAIN
SETUPmenu
Menu
Memorize Channels
:Ant A
Air
CLOCK
AV CONNECTION
(HomeThealer)
Language
(Idioma)
:English
DTV Channel Guide
:Off
ADJUSTto selectitem then
moveto and changeop_on
ENTERfor menuor to start
MENU to retorn
Getting
S_ar_ed
41
DTV
Channel
Guide
DTV channels are made up of major (main) channel and minor(sab)
channels. A major channel can have up _o 6 minor channels,
Mino_ channels 0199 are fo_ broadcas_ viewing,
Channel availability
is decided by _he broadcas_ station.
to view
DTV Channels
in DTV Channel
Guide
• verifl, that b_oadcast s_atlon(s) in your area area
DTV signal. (Check with your local broadcaster),
are sending
• have an external Mi_subishi HDTV _eceive_ cormec_ed
Systems
Com_ections Gaide) and
a
(see AV
• have the DTV Channel Guide enabled,
To enable the DTV
Channel Guide, p_ess GUIDE on the _emo_e control while on a
DTV channel, or in the Setup Menu a_ the DTV Channel Guide
i_em, select ON,
CHANNEL
Up/Down
Keys
in DTV Channel
Guide:
Press _he CHANNEL key to display _he DTV Channel Guide, Majo_ and
mino_ channels are accessible with the CHANNEL up/down key. To scroll
_hrough the available major channels, p_ess _he CHANNEL key and hold.
V_rhenyou have selected a major channel, p_ess _he channel key to selec_ the
available minor channels.
ADJUST
Keys
in DTV Channel
Guide:
You can scroll through the available DTV broadcast
ADJUST up/down keys. Af_e_ selecting the channel
press ENTER/EXCH
_o view the channel.
42
Chapter
2: Operating
Your TV
channels by using _he
with ADJUST up/down,
DTV
Channe]
Guide
(cont.)
MAIN
SETUPmenu
Menu
Memorize Channels
:Ant A
Air
CLOCK
AV CONNECTION
(HomeTheater)
Language
(Idioma)
:English
DTV Channel Guide
:Off
ADJUSTto selectitem then
moveto and changeop_on
ENTERfor menuor to start
MENU to retom
Getting
S_arted
43
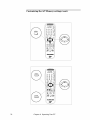
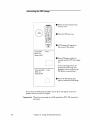
DTV
channel
selection
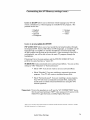
In addition _o using the DTV Channel Guide you can access _he DTV channels with _he number keys on the remo_e control,
Number
Kcys:
For broadcas_
channels
01-99:
Oen_er the 2 digit Major channel namber, then press CANCEL/SUB.
do_ will appear after _he first _wo nambers,
Oen_er
the 2 digit Minor channel
The namber
may be displayed
namber,
as follows:
68,86 - Major
channel
is 63, Minor channel
04,** - Major
broadcaster
channel
is 04, no Minor channel
272? - Major channel is 27, the television
This may take ap to 2 seconds.
is 86,
has been assigned
is looking
Chapter
2: Operating
Your TV
by _he
for Minor channels,
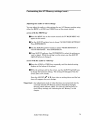
Oafter
selecting a Major chacmel, holding down the CHANNEL
allow yea to scroll through available Major channels.
44
A
key will
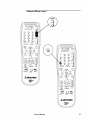
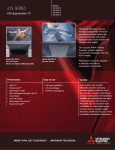
DTV
channel
selection
(cont.)
VGR
DVDff.'_kBLE
POWER
C] [ANNEL
Q®®8
Q®Q
Q ® ® VOLUOE
Q®Q8
]NPLIT
MUTE
CANCEL
[NFO
ADJUST
0
AUDIO
REC
®
_lP _H
STOP
VCR PLUS*
REWiREV
PLAY
PAUSE
Q
FFIFWD
,_ MITSUBISHI
Getting
$tar_ed
45
Using
the
Closed
Caption
Decoder
Closed captioning was initially designed so tha_ those with hearing impairmen_s could more fully enjoy viewing _elevision. However, dosed eapthoning
can be used in other ways, such as:
• helping children learn to read
• learning a foreign language
•asing
_he television wi_hoa_ disturbing
There
tox_.
are _wo _ypes of captSoning
tha_ broadcasters
others
can send: s_andard and
Standard
captioning
is rela_ed _o the program that is being shown, S_andard captioning
_sually follows the dialogue of the characters
on-screen and
displays in a small section of the screen when _he broadcaster
is sending _he
dosed captioning.
Tcxt captioning
often contains information
such as weather or news.
captioning blocks ou_ your view of the program you are watching.
Tex_
Your TV can decode four different s_andard captioning signals and four
different _ex_ captioning signals from each TV station.
However, each statSon
may be broadcastSng
only one or two captioning signals, or none a_ all.
Vvqaen se_ting the decoder
you can choose to display:
• captions when muting (On if mute)
• one of four standard
captioning signals (CC1, CC2, CC3, CC4)
• one of four tex_ captioning signals (Tex_ 1, Tex_ 2, Text 3,
Tex_ 4)
• _urn the captions off (Off)
If you selec_ "On if mu_e," the s_andard
whenever you use the MUTE button.
captioning
signal
(CC1) will appear
If you se_ the decoder to a "s_andard" cap_ion se_tSng or "On if mute" and tune
to a broadcaster
that is not sending a captSon signal, no captions will appear.
I>Important:
46
The content of captions art determined
by the broadcaster.
If your
cap_ions show s_range characters,
misspellings,
or odd grammar,
i_
is not a malfunction
of the _devision.
If you canno_ display any
cap_ions on the screen, please keep in mind tha_ not all broadcasts,
video tapes, or laserdiscs supply closed captSon signals. Additionally, captions might no_ appear if you are playing a video tape that
is worn or de_erioratod,
or startSng _o play a [aserdisc or video tape
from s_ill or search mode.
Chapter
2: Operating
Your TV
Using
the
c]osed
For the _ex_ display,
caption
the CAPTIONS
• the _-pe of captioning,
• the background
decoder
standard
menu
(cont.)
allows you to select:
or _ext you will receive
color, black or translueen_
gray
MAIN
Menu
CAPTIONS menu
Closed Captions
:On if
mute
CC Background
:Gray
ADJUSTto sel_ti_m _en
moveto arid changeoption
MENU to r_tum
Getting
Star_ed
47
Channel
Menu
The Channel Menu allows yon to name your inpats and/or channels (Name),
add or delete channels from memory (Memory) and add your favorite channels to the SaperQuick
View (SQV) special memo_-.
TM
Input
Select the input that you want to add, delete or name. The options are: ANT
A, ANT B, DTV (if DTV receiver is connected), Input 1, Inpat 2, Input 3 (or
DVD), or Input 4. Adding or deleting channels and SQV choices can only be
made in inpats Ant A or Ant B or DTV.
Channel
Select the channel to add, delete or name, You may ase the CHANNEL up/
down keys for channels already in memo_-. The ADJUST apidown keys will
allow you to select any channel
Memory
T V GUIDE Plasl offers a singular method to add/delete channels.
See the
]
7%; GL,TDE Plu.si Operating Gaide. For ANT-B channelsl yon can still follow [
the instructSons below.
Or for ANT A if TV Gaide Plus i is not enabled.
]
At_er all available channels have been memorized with the "Memorize Channels" feature, weaker channels viewed with Ant A or Ant B can be added back
in or unwanted
channels can be deleted manually by the channel number.
Mojor channels in DTV can also be added or deleted manually.
l::'Import_nt:
Adding a channel to memo_- allows you to tane to the channel with
the CHANNEL up/down keys. Ira channel is not in memo_-, yon
can only tane to it with the number ke_.
S_ome
TV Guide Plasl users can follow the steps below for ANT-B only. Refer to the
TV GL,TDE Phts _ Operating Gaide.
For Ant A, Ant B channels yon can select a name, asing
down keys, to choose letters (A-Z), numbers (0-9) and/or
blank).
the ADJUST api
symbols (!.&'i:*-, and
If you want to change yoar selectSon while in the option field, use CANCEL
move the carsor one position back. If you press CANCEL while at the first
character,
the entJre name will be deleted.
If you connect component DVD to Inpat 3, yon cannot rename the Input.
Input 1, 2, 3 (if not DVD) and 4 you can scroll through and select a name
the following choices:
For
from
OFF; VCR1; VCR2; DVD; LASR (laser) ; SAT (satellite);
CABL (cable) ;
CAM (camcorder);
GAME; VHS; S-VItS; DTV; WEB (Internet
set-top-box);
MAIN; AUX; mad SURV (sarveillance
or security).
48
Chapter
2: Operating
Your TV
to
Channel
Menu
(cont.)
MAIN
CHANNEL menu
Menu
Input
:Anl A
Channel
:002
Memory
:Deleted
Name
:....
SQV
:SQV!
ADJUSTta sel_:t item 1hen
move to and change option
CANCEL
off
ENTERfor menu or te start
MENU to re_rn
Getting
S_arte_
49
Channel
Menu
SupcrQuiekVicw
(cont.)
TM
The SuperQuickView
feature has 9 memory banks.
Each one can store up _o
6 channels.
Add or remove channels to _he SuperQuickView
memo_- by
using the on-screen menu instructions
or the SQV key on _he remote control.
SQV memorizes
channels from ANT A, ANT 13 or DTV in numerical order.
Inputs 1, 2, 3 (or DVD), or 4 canno_ be placed in the SQ7¢ memory.
TM
TM
changing
mcmory
bank
with thc rcmotc
control's
SQV kcy
Press SQV, _hen press a number key from 1 to 9 _o go _o a new memo,bank.
adding
channels
directly
with
OUse the CHANNEL
to add _o _he lis_.
the remote
control's
SQV key
keys or number keys to select _he channel
you wan_
OPress
and hold the SQV key for abou_ 3 seconds. The letters "SQV _ will
appear under the channel number, indicating that _he channel has
been added _o SuperQuickView
memo_-.
TM
I:>Important:
adding
If you use only the first memory bank, "SQ_ m will appear under
channel number any time i_ is displayed.
If you use additSona[
banks, the letters "SQV1, SQV2, e_c." will appear under the
channel number.
or dclcting
_Press
SQV memory
the ADJUST
the
breaks
right key _o move to the SQV selectSon field.
_Press
the ADJUST up/down keys _o scroll _hrough the SQV numbered
banks. Your choices are: SQV1, SQV2, SQ7¢3, SQ7¢4, SQVS, SQV6,
SQV7, SQV8, SQVg.
_Press
ENTERiEXCH
_o selec_ the desired
left _o exit the selection field.
removing
channels
from
SQV with
SQ7¢ bank.
thc rcmotc
control's
_Press
the SQV key repeatedly
to select _:he channel
the lis_, or press INFO if the channel is displayed.
Press
ADJUST
CANCEL
to be removed
kcy
from
OWhile
the channel number and SQV indicators
are s_il[
displayed on _he screen, press the CANCEL button. When _he SQV
indicator disappears,
_he channel has been canceled from the
SuperQuickView
list, The CANCEL key will only remove the channel
the channel and SQV indicator are on the screen display,
50
Chapter
2: Operating
Your TV
if
Channel
Menu
(cont.)
m_ MITStJBISHI
®
F_LAy
_. MITSUBISHI
Gctth_g
Started
51
t Using
the Advanced
Features
This section explains
features. You'll learn
52
how _o use some of the mo_e advanced
about:
*
Sctting
thc timcr
*
Using
the parental
*
UsingVidco
*
Adjusting
Chapter
lock
Mutc
thc Convcrgcncc
2: Operating
You_ TV
The
Advanced
Features
Menu
MAIN
ADVANCED FEATURESmenu
Menu
TIMER
PARENT LOCK
Video Mute
:Off
CONVERGENCE
ADJUSTto solectitomthen
movoto and changeoptlon
i
ENTER[or menu or fo start
MENU to m_m
Using _he Advanced
Features
CANCEL
53
Setting
the timer
This special feature allows you to program the TV to ?urn on automatically
a specific time and channel that you preseL
You may also use this feature
turn the TV on to a specific channel at a specific time, if you would like to
record and/or watch a special presentation.
I>Important:
at
to
The clock must be set prior to setting the timer. If you have not set
the time and/or day, you will automatically
be routed to the "Set
the Clock" menu.
Timer
The timer will remain off. unthl you choose to turn it On or move to another
option on this menu. If you set the timer to Off aftor selecthng the other
options, the Time and Channel will remain in memo_- for future use.
Set Time
Set the time you want the television
hoar, minute and AM or PM.
to turn on. You will need to select the
Set Day
You may select Everyday,
day, Tuesday, Wednesday,
Mon-Fri (Monday through Friday), Sunday, MonThursday,
Friday or Saturday.
Input
You may scroll through the inputs, or use the INPUT key to selecL
connected input options may be selected: Ant A, Ant B, DTV, Input
Input 3 (or DVD), and Input 4.
All
1, Input
2,
Channel
Only channels
I>Important:
54
already
in memory
When the timer turns
stay on" is displayed.
within 5 minutes, the
on the remote control
Chapter
2: Operating
can be selected.
the TV on, the message "Press a key for TV to
If you do not press any remote control key
TV will automatically
turn off. Press any key
or the front panel to keep the TV on.
Your TV
Setting
the timer
MAIN
Menu
TIMER menu
Timer
:Off
Set Time
:12:00 AM
Set Day
:Everyday
Input
:Ant A
Channel
:002
ADJUSTto svlectitemlhvn
moveto and changeoption
MENUto retum
Using _he Advanced
Features
55
Using
Parental
the parental
lock
Lock Mcnn
This special feature allows you to lock the TV during a certain time period or
lock individual channels by entering a 4 digit passcede.
If you t_- to view a
locked channel or the locking time period begins, the screen will show a
message, asking you to enter the secret code. If you don't enter the code
within five minutes, the TV will turn offor change to an unlocked channel.
If you enter your secret code, the message will disappear
and the lock will be
turned offtemporarily.
However, the channels will be locked again after you
turn offthe TV unless you permanently
cancel the lock.
setting
the passcode
To set your 4 digit passcede
using the number
keys:
At the Set Passcede selection field, enter four numbers for your code. If you
wish to go back within the first three spaces, press CANCEL and you will
move back one space. **_en you enter the fourth digit, the new passcode is
set.
To set your 4 digit passcede
using the ADJUST
up/down
keys:
At the Set Passcede selection field, using ADJUST up/down, scroll through
the numbers until you see your desired number.
Press ENTERiEXCH
after
each choice to lock in the number.
If you wish to go back, press CANCEL and
you will move back one space.
After entering
the passcede,
you may choose to lock by time or by channel.
lock by time
To change the lock, use ADJUST
to "Lock by Time".
up/down
in the Parent
OUse ADJUST right to move to the selection
_Lock by Time" selection field.
56
Lock menu
to move
field, then select On at the
OUse the ADJUST
to start.
keys to move to Lock Time to set the time the lock is
_Use
the ADJUST
will turn off.
keys to move to Unlock Time to set the time the lock
I>Important:
If the lock and unlock time are set to the same time, the Parent
Lock will not be activated.
I>Important:
If there has been a power loss after the TV has been locked by time,
the lock will be on the television until the time is reset.
Chapter
2: Operating
Your TV
Using
the
parenta]
]ock
(cont.)
MAIN
Menu
DVANCEDI
ATURES
enu
PARENTLOCKmenu
I
SetPasscode
LOCKBYCHANNELS
Lockby Time
:off
LockTime
:12:00 AM
UnlockTime
:12:00 AM
ADJUSTto select
or changeoption
ENTER
Formenu to stor_
CANCEL
MENU to r_turn
Using _he Advanced
Features
57
Using
the parental
locking
by charmcl
lock
(cont.)
Aider entering the passcede, you can lock specific ehamaels. You can use the
number or ADJUST up/down keys to select the channel.
Only channels in
memo_- can be locked. Objectionable channels need to be placed in memory,
so they can be locked. To lock by channel:
OUse
the ADJUST
keys to select Channel
OSelect
the input for the channels
ANT A, ANT B, DTV.
Lock: On
you want to lock. Your choices are:
_Select
the specific channel you want to lock, IfDTV is the input, only
the Major channels can be locked, A21 Miner channels for that Major
channel will also be locked.
Your television
even if Channel
Lock to On.
I_>
Important:
changing
will remember
the individual channels you selected to lock,
Lock is Off. To enable the locks again, turn the Channel
If you have a cable box, your TV cannot completely prevent access
to cable channels.
This is because your cable box channels can be
controlled outside the TV.
thc lock
To change the lock, use ADJUST
to "Set Passcede'.
Use ADJUST
_Enter
OUse
your existing
ADJUST
secret
up/down in the Parent Lock menu to move
right to move to the selection field, then:
code in the passcede
let_ to exit the passcede
_Use
ADJUST right to reenter
New Code" will appear.
selection
the passcede
selection
field.
field.
field.
The message
_Enter
OTo change the passcede enter a new 4 digit cede. To change any digits,
press "CANCEL"
to move back one space. Press ENTE1UEXCH
after
the fourth digit to lock in the code.
canceling
thc lock
To cancel the lock permanently,
enter your passcede.
If you locked by time,
turn "Lock by Time" in the PARE.-_Yr LOCK menu to off. If you locked individual channels, turn the "Channel Lock" off in the "LOCK BY CHANNELS"
menu.
I>Important:
58
If you forget your four-digit secret code, please
Procedm_e for Bypassing
the Parental Lock,
Chapter
2: Operating
Your TV
see the Appendix
Using
the parental
]ock
(cont.)
MAIN
Menu
ADVANCED
FEATURES
Menu
PARENT
LOCK
Men u
LOCKBYCHANNELmenu
ChannelLock
:On
Input
:Ant A
Channel
In Memory
:002
Lock
:Locked
ADJUST
to select
itomthen
movetoand adjustoption
MENU to return
Using _he Advanced
Features
59
Using
video
mute
Vvqaen Video Mute is ON, yoar TV will display a blue or gray screen whenever
i_ receives a weak signal (or no signal at all) from Inpa_-l, Input-2, Input-3,
DVD or Input4.
Ifa PIP is displayed _he screen will be gray. If no PIP is
displayed, _he screen will be blue.
When Video Mute is OFF, _he screen will be black whenever it receives a
weak signal (or no signal at all) from Inpa_-l, Inpa_-2, Inputs3, DVD or
Input4.
60
Chapter
2: Operating
Your TV
Using
video
mute
(cont.)
MAIN
Menu
ADVANCED FEATURESmenu
TIMER
PARENT LOCK
Video Mute
:Off
CONVERGENCE
ADJUSTto _lect item then
moveto and changeoption
ENTERfor menuor to start
MENU to t_'um
Using the Advanced
Features
61
The Convergence
Menu
Men u
fEAT
DVANCED
URES
enu
_
CONVERGENCEmenu
I
RedConvergence
BlueConvergence
ResetFactory Default
ADJUSTto sel_ item
ENTERfor menu or to start
MENU to r_lurn
62
Chapter
2: Operating
Your TV
Adjusting
the
convergence
(cont.)
Your Mi_subishi Projection TV has three picture tubes wi_h large diameter
lenses which are aligned to project light beams on the screen. Each picture
tube projects only one color: red, green or blue. Adjos_ments
are required to
converge _he three color images on _he screen. During production,
your
television was carefully a_jus_ed to properly align _hese colors.
As a special feature, you have the ability to a_ius_ the color convergence,
should you _bhnk tha_ the red and/or blue [igh_ beams are out of alignment,
The green beam ac_s as a fixed referenco for aligning _he red and blue beams,
There are _wo _ypes of convergence:
the whole screen a_ once, Advanced
Static and Advanced.
Static converges
aligns 64 individual adjustmen_
positions.
static
convcrgcncc
example:
MAIN
Menu
ADVANCED
FEATURES
Men u
CONVERGENCE
Menu
Using t:he ADJUST keys, you can align t:he red or blue lines with t:he green
lines that are already on the screen. Vvqaen _he vertical and horizontal
lines
merge into a single white cross, your television is in alignment.
Press the VIDEO
to go to Advanced
key to switch between
Convergenco.
Using t:he Advanced
Features
red and blue. Press the AUDIO key
63
Adjusting
Advanccd
the
convergence
(cont.)
Convcrgcncc
At_e_ completing 1;he static convergence; if the colors are s1;fll oat of alignment
or need farther adjustmen1;; yon can ase the Advanced Convergence
procedures below, This will allow yon 1;oadjas1; the eolo_ beams a1; 64 different
positions on the screen for 1;he best possible pie1;are. A position is where a
horizontal
line and a vertical line cross.
MAIN
Menu
ADVANCED
FEATURES
MOI1U
CONVERGENCE
Menu
iii!iiii!ii!iiiii_iiii_i!ii!_!ii!i!!!iiiiii!i_ii!!_ii_!_i!iiiii!!_ii
¸ili!iiii!i_!ii!i_ili!i
¸i!_ii!ii!iiiii!!ii!i!iii!iii_!i!!i!i!i_!iiii!_i!ii!i_ili!i
¸i!_i!i_ili!i
¸i!_i!i_ii!_!i!!i!iiii!iii:i!_iiiiiiil
¸iii!i_!i_!ii!_!i
¸iii!i
¸i!_i!i_ili!i
¸i!_i!iiiii!!!ili!!!ii!ii!i_!_i!i!iiii
¸i!i_!_ii!ii!_!i
¸iii!i
¸i!_i!i_ili!i
¸i!_il
¸i_i_i!i!ii:iii_ii!iiii_i!ii!_!iiiii!!_ii
¸ili!iiii!i_!ii!i_ili!i
¸i!_i!i_ili!i
¸i!_ii_!_!_!_i_!!!!!_i_!:¸ill_!_!_!!_!!!!_i_i_!!
i_!_!i!_!!_i_i_i_i_!_:ii_ii_i_i_i_i_
¸iii!¸:iiiiiii!ii_ii_!iiiiiiii_iiii
Using the ADgUST keys, move the flashing bracket t;o a posi1;ion 1;hat needs
adjustmen1; (lines are no1; white), Press ENTE1UEXCH
to s1;op 1;he flashing
and use the ADJUST ke_ to move the lines in1;o the coffee1; positions.
V_rhen
complete press ENTERIEXCH.
The bracket will start flashing again and can
be moved 1;oto a different position with the ADJUST keys. Pressing CANCEL
at_e_ making an a_jus1;ment will cancel all a_jus1;ments made du_ing 1;his
session and tel;urn 1;othe o_iginal se1;ting.
_>Importan1;:
I1; is normal for the red, blue and green lines 1;oseparate along the edges of
1;he screen. Not all of the lines will be perfectly s1;raight. These si1;ua1;ions are no1; noticeable on
normal 1;elevision pic1;ures.
64
Chap1;er 2: Operating
Your TV
Adjusting
Resetting
the
Factory
convergence
(cont.)
Dcfaults
To reset _he alignmen_ to the original factory se_tSngs, press ENTERiEXCH
a_ "Rese_ Factory Defaults'.
The message "in progress..." will appear, while
the convergence
is being reset. When it is done, the message"Convergence
Complete" will appear under "Reset Factory Defaults".
MAIN
Menu
DVANCEDI
TURES I_
enu
CONVERGENCE
menu
I
Red Convergence
Blue Convergence
ResetFactoryDefault
ADJUST to ._lect item
i
ENTER for menu or to _tort
MENU to t_l_rn
Using the Advanced
Features
65
t Audio/Video
Settings
This section explains
yoar _elevision
how _o customize
* Setting
the AN Memory
* Customizing
66
Chapter
the audio and/or video settings
the AV Memory
2: Operating
Your TV
settings
for
Setting
the AN
Memory
Your TV has five AiV Memories.
Each A_ r Memo_- contains the best picture
and sound settings for a specific situation.
You can ad,jast the settings for
these memories as often as you like. The A_ r Memories are:
Standard,
Daylight,
Evcning,
Homc
Thcatcr
and DVD.
The following settings are independent
of the individual
justments
for these apply to all five A/V Memories:
A/V Memory.
Audio settings
Video settings
• Listen to: StereoiSAPiMono
• Balance
• PIP Audio Out: StoreoiSAPiMono
• Auto Picture
• IRIS
iklthough the preset A_ r Memories are designed
sound quality for different types of environments;
settings (tint; treble, etc.) for any AiV Memo_-.
Memory Settings" in this chapter for information
video and audio settings.)
Ad-
to optimize the picture and
you can adjust indivldua[
(See "Customizing
the AiV
on adjusting indivldua[
I:>Important:
A/V Memodes are specific to the currently
selected input, When
you change your input; the last AN Memory used with that input is automatJcall), selected,
(See "Selecting the Input Source" in this chapter for information on choosing your input,)
Audio/Video
Settings
67
Setting
the AN
Memory
MAIN
Menu
AUDIO/VIDEO SETIINGS
A/V Memory
A/V Resetfor Standard
AUDIO SEn-INGS
VIDEO SEn-INGS
ADJUSTtoselecti_m then
moveto and changeoption
ENTER
for menuor tostart
MENUtoreturn
68
Chapter
2: Operating
Your TV
:Standard
Setting
the AN
Memory
resetting
the current
(cont.)
AN Memory
to the factory
If you have changed the carrent AV Memo_settings to the factor- defaalt settings:
default
settings
and woald like to _eturn
O
Press the MENU
Menu will appear
button on the remote
on the screen.
control,
O
Use the ADJUST up/down ke)_ to select "AUDIO/VIDEO
SETTINGS." Press ENTEFJEXCH.
these
The Main TV
At the AUDIO/VIDEO
SETTINGS
menu use the ADJUST
down keys to select _AV Reset." Press ENTEFJEXCH.
Press
resetting
To reset
the MENU
all AN Memory
all AV Memory
key twice to exit all menus.
banks
to the factory
to the factor-
Press the AV Reset
All AV memory
settings.
Audio Video Settings
up/
default
settings
default settings:
key on the front panel,
banks
will be reset
to the factor-
default
69
Setting
the AN
Memory
FffrF_
I-
rNpitl-._
J
u-
k
70
00
k__._l
Chapter
2: Operating
Your TV
_n jit,_T- _
Customizing
Adjusting
the A/V memory
settings
the picture
You can adjust the individual video and audio settings for each of the five
preset A/V Memory positions to your preferred picture and sound qualities.
This section provides descriptions
of each video and audio setting, and explains how to adjust them for the A/V Memory.
(See "Selecting the A/V
Memory," in this chapter for more information.)
descriptions
of video
settings
IRIS '_'is the Intelligent
Room Illumination
(light) Sensor. You may choose to
set it on or off. When IRIS is on, it will automatically
optimize picture
contrast and brightness
for the room lighting, and the brightness
and contrast cannot be manually
adjusted.
Contrast
provides a scale that controls the level of white-to-black
in the
picture. When the contrast is low, you will be able to see the variety of
shades in the darker images on the screen. When the contrast is high, the
screen's dark images will appear more uniformly black, but this will also
make the colors on the screen seem more vibrant.
Brightness
picture.
provides
Sharpness
provides
Color
provides
a scale that
controls
a scale that adjusts
a scale that determines
the overall
the detail
the intensity
brightness
and clarity
of the
of the picture.
of the color.
Tint provides a scale that adjusts the proportion
of red to green
ture. This determines
the delicate tones of color.
in the pic-
Color Temp (Color temperature)
allows you to set how the TV will display
white images. Your choices are "Low," "Middle" or "High".
*With the Low setting, white images on-screen will have a warm
them. This setting represents
the 6500°K industry standard.
• With the Middle setting, white images on-screen
tween the above warm and cool setting.
will be balanced
cast to
be-
• With the High setting, white images on-screen will have a cool cast to
them. This setting may provide the most realistic picture under bright
lighting.
Auto Picture
for Antenna A and Antenna B, senses the tuner signal
strength and adjusts color and sharpness
to optimize the picture for the
signal conditions.
The default setting for this feature is off. When turned
sharpness
and color cannot be manually
adjusted.
Audio Video Settings
on,
71
Customizing
Adjusting
the A/V Memory
settings
(cont.)
the sound
This section contains descriptions
adjust them for the A/V Memory
descriptions
of audio
for each audio setting
positions.
and explains
how to
settings
Balance
adjusts the level of sound between the left and right speakers.
Adjust the scale until the sound seems to come equally from both speakers.
Treble
Bass
enhances
enhances
or reduces
or reduces
high frequency
low frequency
sound.
sound.
Level Sound allows the TV to automatically
equalize the volume level of
programs that contain significant
sound level differences for example, from
regular programming
to commercials.
To receive the best audio fidelity for
music programs, you may want to turn this setting off.
Listen to for An_nna
A or Ant_ma
B allows you to determine how your TV
will receive a broadcast
audio signal and play back the sound that you hear.
You can set this function to "Stereo," "S.A.P." or "Mono."
• For almost all situations,
you should choose Stereo.
With this setting,
the TV will play stereo broadcasts
in stereo and mono broadcasts
in
mono. If a channel is broadcasting
in stereo, the word "Stereo" will
display when you tune to that channel.
• Some TV stations will broadcast
second audio program, or S.A.P. signal.
This signal is an additional
monaural
soundtrack
that you can't hear
during normal TV viewing.
The S.A.P. signal might be related to the
program you are watching, such as a soundtrack
in a foreign language,
or it might be unrelated;
for example, a weather report. If a channel is
broadcasting
the S.A.P. signal, the letters "SAP" will appear on-screen
when you tune to that channel. Choose "Listen to: SAP" to hear the
S.A.P. signal.
• Use the Mono setting if you are receiving a weak stereo audio signal.
This setting will reduce background
noise. The TV will then only play in
mono, even if the program you are watching is in stereo.
72
Chapter
2: Operating
Your TV
Customizing
the A/V Memory
settings
(cont.)
Listen to for DTV allows you to determine
which language your TV will
receive a broadcast in, if that language is available for the program.
The
possible choices are:
Listen
• English
• French
• German
• Italian
• Spanish
• Portuguese
•
to _s not available
Other
for INPUTS
PIP AUDIO OUT allows you to hear sound that is being broadcast through
the displayed PIP. Stereo, SAP, Mono or DTV languages,
as available, can be
heard through an amplifier or wireless headphones
connected to the PIP
AUDIO outputs (on the back of the television).
Once connected, if the PIP is
not displayed
you will be able to hear the main TV program through the
headphones.
If Antenna B is in the main picture and the PIP, PIP AUDIO
perform the same function as "Listen To".
OUT will
SURROUND
creates simulated
stereo and surround
setting to "Off," "Simulate"
or "Surround
sound."
You can set this
• Select "Off'
effects.
if you do not want to use any surround
• Select "Simulate"
if you are watching a monaural
program.
Your TV will create a simulated
stereo
effects.
non-stereo
effect.
• Select "Surround
sound" if you are watching a stereo program.
Your TV will create a simulated
surround effect, making the
sound seem to extend around and behind you using the TV's
internal speakers.
[_Important:
_Dolby,"
1992
To turn the speakers on or off, use the "A/V CONNECTION"
menu.
Set the surround setting to "OFF" when using an A/V receiver with
Dolby _ Pro Logic Surround, on Dolby Digital Surround.
_AC -3," "Pro Logic" and
Dolby
Laboratories,
Inc
tbo double-D
All rights
symbol
are trademarks
of Dolby Laboratories
Licensing
Corporation
Copyright
reserved.
Audio Video Settings
73
Customizing
MAIN
Menu
the A/V Memory
AUDIO/VIDEO
settings
SETTINGS
:Standard
A/V Memory
A/V Resetfor Standard
AUDIO SETTINGS
VIDEO SETTINGS
ADJUST to select item then
move to and change option
ENTERfor menu or to start
MENU to return
74
Chapter
2: Operating
(cont.)
Your TV
Customizing
Adjusting
the A/V Memory
the audio
or video
settings
(cont.)
settings
You can adjust the audio or video settings for any A/V Memory position
either the MENU or AUDIO and VIDEO keys on the remote control.
access
with
the MENU
using
key
OPress the MENU key on the remote
appear on the screen.
OUse the ADJUST up/down
Press ENTER/EXCH.
control,
the TV MAIN MENU
keys to choose "AUDIO/VIDEO
OUse the ADJUST up/down buttons to select "VIDEO
"AUDIO SETTINGS".
Press ENTER/EXCH.
will
SETTINGS".
SETTINGS"
or
Press ADJUST up/down, then ENTER/EXCH
to select the setting you
want to adjust. While the setting is on the screen, use the ADJUST
rightAeft buttons to change it.
access
with
the audio
or video
key
OPress the AUDIO or VIDEO key repeatedly
displays at the bottom of the screen.
until
the desired
setting
OWhile
the setting is still on the screen, use the ADJUST right!left keys
to change the function's setting.
The setting will disappear
from the
screen after a few seconds.
Press the ADJUST (AV • _) keys when no setting
item will reappear for you to change.
[>Important:
shows and the last
Any adjustments
made to video functions are memorized into the
currently selected A/V Memory position (Standard,
Daylight,
Evening, Home Theater, DVD). To reset the video functions to
their factory settings, see "Selecting the A/V Memory" in this
chapter.
Audio Video Settings
75
Customizing
the A/V Memory
_
L,_,_L_
settings
V
I
@®@
_MffSt._m.I
@®®
\\\\\\
76
Chapter
2: Operating
Your TV
(cont.)
_
CHAPTER
Using
the THREE
Special
Features
In addition to the basic and advanced features explained in the previous
chapter, your TV offers some special features that you can use when operating your TV. This chapter contains the following topics:
€
Understanding
the
€
Using
the
€
Using
Models
70803,
the Picture-in-Picture
VS-50800,
VS050803,
VS-80803
€
Special
73903
Sleep
Features
On-Screen
Displays
Timer
of Models
(PIP) Modes
for
VS-60803,
VS-
WS-65903,
WS-
Understanding
the On-Screen
To view this information,
the remote control.
Displays
press the information
button
(INFO)
on
Your TV provides an on-screen summary
of the current settings for the TV or
cable channels, or channel and program information
provided by TV GUIDE
Plus+. Some of the screen information
shown below will not appear on ANTA if TV GUIDE Plus+ has been installed.
ANT-A 023 ESPN
NTSC 4:3
Stereo SAP
SQV
If the source of the main
PIPA002
10:23 am
Thursday
The first setting shows:
• antenna (A)
• channel number (23)
• channel name (ESPN)
• PIP input source (Antenna A,
Channel 002)
• format: NTSC with a tradi-
picture is an antenna:
tional 4:3 shape
• stereo and SAP are available
• channel programmed
into
SuperQuickView
'_'memory
• current time
• current day of the week
• signal strength (for DTV)
Input 1 S-VIDEO
If the source of the main
picture is an input:
PIPA002
This second setting shows:
• the input name (Input-i)
• S-video cable is connected
• PIP input source is Antenna
Channel 23
• current time
10:23 am
Thursday
• current
The on-screen
78
displays
Chapter
will automatically
3: Using the Special
disappear
Features
day of the week
after about 5 seconds
A,
t Using
the
Sleep
Timer
This special feature allows you to set the TV to turn off automatically.
You
can set the TV to turn off after a period of time ranging from 30 to 120 minutes, in thirty minute intervals.
In this section you will learn:
•
Setting
•
Changing
the sleep
timer
or canceling
Using the Sleep Timer
the sleep
timer
79
setting
the
sleep
timer
0
Press the SLEEP key on the
remote control. The sleep timer
display will appear on the
screen.
J
O Select how long you want the
TV to stay on by repeatedly
pressing the SLEEP button.
The time will increase in 30
minute intervals
press the key.
Sleep:
30min,
When you
want, stop
The sleep
disappear
each time you
reach the time you
pressing the key.
timer display will
after 5 seconds.
To view the amount of time left in the sleep timer, press the INFO key or the
SLEEP k_ _once. The on-screen display shows the amount of time remaining.
changing
or canceling
sleep timer
Press
Sleep: Off
the SLEEP
remote
display
amount
the TV
the
key on the
control. An on-screen
will indicate the
of time remaining
until
turns off.
Repeatedly
press the SLEEP
key to change the remaining
time or to cancel the sleep
timer. The sleep timer is
canceled when "Off' appears
instead of the remaining
time.
TV turns off in 2 minutes, press a key to cancel
[_Important:
80
During the last 2 minutes before the TV turns off, "TV turns offin
2 minutes press a key to cancel" will display, to remind you that
the sleep timer is set.
Chapter
3: Using the Special
Features
t Using the Picture-in-Picture
VS-50800,
VS-50803,
VS-60803,
(PIP) Modes for Models
VS-70803,
VS-80803
Models VS-50800, VS-50803,
VS-60803, VS-70803 and VS-80803 have a
traditional
4:3 viewing size screen. Wide screen models WS-65903 and WS73903 can also display a 4:3 picture.
The picture-in-picture
(PIP) mode for
these televisions allows you to view two different sources at the same time.
In this section you'll learn to:
•
Activate
the PIP
•
Select
•
Change
channels
•
Exchange
image
the
•
Move
•
Freeze
the
the
the
source
image
of the PIP
while
picture
using
image
the
of the PIP
PIP
image
modes
and the main
PIP image
PIP
image
Using the Picture-in-Picture
(PIP) Modes
81
activating
the
PIP
image
O Select the main
want to view.
Press
channel
the PIP key once.
A PIP image will appear
the corner of the screen.
Ant-A ESPN
NTSC: 4:3
Stereo & SAP
you
in
A 002
Press PIP again within 10
seconds and the PIP will change
size.
Ant-A 023 ESPN
NTSC: 4:3
Stereo & SAP
A 002
(If you wait longer than 10
seconds the PIP image will
disappear
when you press the
PIP button a second time.)
Press the PIP button once
again to cancel the PIP image.
If you move the PIP image and then turn it off, it will appear
position when you turn it on again.
[_Important:
82
When the main
activated.
Chapter
image
in the new
is an HD signal from DTV, PIP cannot
3: Using the Special
Features
be
selecting
the
source
of the
PIP
image
If you have only an ANT-A input connected, you can view one program on the
main picture and another channel from the same ANT input on the PIP
display without the use of a second external tuner, such as a VCR.
If you have ANT-A and ANT-B connected, you can view ANT B in the main
picture and ANT A in the PIP input. Each time you select a different PIP
input, an on-screen display will appear for about five seconds. The screen
will display the name of the input selected.
[_Important:
If you have a cable box on ANT-A, you will not be able to have
different pictures when both the PIP and main pictures are from
ANT-A.
O Turn the PIP image on by
pressing the PIP key.
To select the PIP input, press
the PIP INPUT key. Each time
you press the key, the PIP input
will select the next input from
the inputs available.
A_ltennaA _BC
S[ereaSAp
[_Important:
7
pip
{NPUT1
If the main picture is an HD signal from DTV, a PIP or POP cannot
be displayed.
With HDTV a message "NO PIP display with HDTV"
will appear onscreen.
Using the Picture-in-Picture
(PIP) Modes
83
changing
channels
while
using
the
PIP
modes
O Press the PIP
down key (PIP
remote control
channel of the
channel up or
CH) on the
to change the
PIP image.
Press the CHANNEL up or
down key on the remote control
to change the channel of the
main image.
When the PIP image comes from another piece of equipment
(e.g., your
satellite receiver, cable box or VCR) the PIP CH keys do not change the
picture.
freezing
the
PIP
image
Press the PAUSE key to freeze
the PIP image on the screen.
Press PAUSE
a live picture.
again
to return
\\\
_>Important:
84
If you press the PAUSE key while viewing a picture without a PIP
image, a PIP image will appear and be frozen. To remove the
frozen PIP image, press the PIP key.
Chapter
3: Using the Special
Features
to
exchanging
image
the
picture
of the
PIP
image
and the
main
You may exchange the picture of
the main (background)
image and
the PIP image by pressing the
ENTER!EXCH
key.
Ant-A ESPN
NTSC 4:3
Stereo SAP
in ut-1
N_SC 4:3
Input-1
•
Moving
PIP A 023
S-VIDEO
the PIP image
You may move the image while
viewing an on-screen picture by
pressing the ADJUST keys to
move the PIP image, if there is no
other onscreen display.
[_Important:
If you move the PIP image and then turn it off, it will appear
last position when you turn it on again.
Using the Picture-in-Picture
(PIP) Modes
in its
85
changing
the
screen
format
For models VS-50800, VS-50803, VS-60803, VS-70803 and VS-80803, a press
of the FORMAT key allows you to zoom in on the picture.
If you are watching
a movie that is in letterbox format (with bars at the top and bottom) pressing
FORMAT will reduce the size of the bars and enlarge the middle of the
picture.
Standard
Press
86
picture,
NTSC 4:3:
the Format key, NTSC ZOOM:
Chapter
3: Using the Special
Features
t
Special
Features
of Models
WS-65903,
WS-73903
Please read the previous section for basic PIP functions.
The wide
screen format of models WS-65903 and WS-73903 allow you additional functions with picture-outside-picture
(POP) modes. You can
also change the size and shape of the picture that is displayed.
In
this section you'll learn to:
•
Displaying
• Change
the POP image
the screen
format
Using the Picture-outside-Picture
(POP) Modes
87
displaying
the
POP
image
Mitsubishi widescreen
model owners can view POP (pictureoutside-picture)
images in a varieity of ways. By using the remote
control you can see images, side-by-side,
with three small POPs or
with nine small POPs:
E>Important:
This multi-image
system
nent DVD images.
is not compatible
with HDTV or compo-
Side-by-side
O Press
the PIP key once
OTo
change
the POP (right)
OTo
select a different
input
channel,
source,
TV
PICTURE
88
Chapter
3: Using the Special
press the PIP CH key
press PIP Input.
POP
Features
displaying
To display
the
three
POP
or nine
image
small
(cont.)
pictures
Select an input source. If the source is ANT-A or ANT -B, the POPs will be
displayed in channel order.
To select a particular
sequence.
channel
press the PAUSE
key to interrupt
To have the POPs at the left of the main picture,
key.
Three
the channel
press the ENTER/EXCH
POPs
For 3 POPs press the PIP key once (after displaying
side-by-side
POP)
POP 1
TV
PICTURE
POP 2
POP 3
Nine
POPs
For 9 POPs,
press the PIP ke" •once (after displaying
POP
1
TV
PICTURE
POP
2
3 POPs)
POP
3
POP
4
POP
5
POP
6
POP
7
POP
8
POP
9
To return to a PIP image, press PIP a fourth time. To reduce the PIP size,
press the PIP a fifth time. To remove the PIP, press the PIP a sixth time.
Using the Picture-outside-Picture
(POP) Modes
89
changing
the
screen
format
The standard
format for your WS-65903 or WS-73903 television is a 16:9
aspect ratio. This allows you to watch television broadcasts
that are shown in
4:3 aspect ratio and movies that are shown in 16:9 aspect ratio. By using the
FORMAT key, you can change the size of the picture.
This allows you to
decide which format you view.
Standard
NTSC 4:3:
Press
the Format
key, NTSC EXPAND:
Press
the Format
key again,
Any PIP or POP screens
main television picture.
90
Chapter
will appear
NTSC ZOOM:
in the TV picture
3: Using the Special
Features
area, along with the
changing
the
screen
format
(cont.)
Movies are sometimes shown in a letterbox format with black bars at the top
and bottom of the screen. With the WS-65903 or WS-73903, you can leave the
bars in the picture or with the press of the FORMAT key, eliminate them:
Standard
picture,
NTSC 4:3:
Press the FORMAT key, NTSC EXPAND:
Press
FORMAT
again,
NTSC ZOOM:
Using the Picture-outside-Picture
(POP) Modes
91
t DiamondShield
TM
Removal
You may remove the DiamondShield
TM screen
from your television if needed.
If you want to remove the shield but feel you are unable to do so, please
consult your dealer for assistance.
Before you begin, place a small piece of
masking tape on the surface of the DiamondShield
that faces out, so it may be
easily identified, if you choose to replace it.
removing
the DiamondShield
TM
OIn order to remove the
DiamondShield.
you will need
to remove the side molding
panels from the TV. Use a
small flat head screwdriver
for
pressing into the opening that
is found between the panel and
the TV side panel. Be very
careful not to scratch the
screen. Pull gently on the
panel corner with your hand
(wearing cloth gloves to
prevent fingerprints
is encouraged) to remove the side
molding.
OAfter removing the panels,
insert the flat head screwdriver behind the
DiamondShield
at either side.
Pull gently toward you, to
create a slight outward bow in
the shield. This will cause it to
pop out of the top panel. After
shield removal, reinstall the
side molding panels.
OTo reinstall the
DiamondShield,
remove the
side molding panels, slide the
screen into a side panel and
replace the moldings.
[_Important:
92
Store your DiamondShield
become scratched.
Chapter
carefully
3: Using the Special
Features
so that the screen
does not
CHAPTER
FOUR
Troubleshooting
Even though you're now familiar with the basic and advanced operations
of
the TV, you may occasionally
encounter
a problem. This chapter offers
answers to some of the most frequently
asked questions of TV owners. We
suggest that you consult this chart before contacting
a Mitsubishi service
representative.
Troubleshooting
Problem
• The remote
work.
Possible
control
doesn't
Solution
For
•
Check that the batteries
installed correctly,
are
•
Check that the select switch
is set to "TV'.
•
•
You can't access
from Channel
•
a channel
up/down.
On-screen displays appear
each time you adjust a
function.
• You can't program the TV to
turn on automatically.
94
•
Control Buttons
and Functions in Chapter
which explains where the
select switch is located.
1,
See Getting Ready to Use
the Remote Control in
Chapter 1, which contains
pointers for using the remote
control.
Use the ENTER/EXCH
button to avoid delays.
Enter
Information
See Getting Ready to Use
the Remote Control in
Chapter 1 for an explanation
of how to install batteries
in
the remote control.
See Remote
Be sure that you are
pointing the tip of the
remote control toward the
TV from a distance of no
more than 20 feet.
• The TV takes several
seconds to respond to
channel commands.
More
•
3 digits for channel.
Be sure that the channel
you want to view is programmed into memory.
See Changing Channels in
Chapter 3, which explains
the function of the ENTER/
EXCH button.
See Memorizing
Channels
Chapter 3, which explains
how to program channels
into the TV's memory.
in
Check that the TV is tuned
to the correct input source
(antenna) for that channel.
•
See Selecting the Input
Source in Chapter 3, which
explains how to change the
input source.
This is part of the normal
operation of the TV.
•
See Understanding
Screen
Displaysin
Chapter 4 for a
full explanation
of the onscreen displays.
• The TV may be locked.
•
See Using the Parental Lock
within Using the Advanced
Features in Chapter 3.
•
•
See Setting
Chapter 3.
•
Time is not set
Chapter
4: Troubleshooting
the Clock in
Troubleshooting
(cont.)
Problem
Possible
•
•
There's no sound even when
the volume is turned up.
Solutions
Check to see if the MUTE
button is on.
The TV's "Listen
For
•
to:"
Check that "External Audio
System" setting is set to
"NO."
•
The sound doesn't
image
match
the
•
•
on screen.
Information
See Remote Control Buttons
and Functions in Chapter 1,
which explains the location
and function of the MUTE
button.
See Customizing
AV
Memory in Chapter 3, which
explains how to adjust the
"Listen to:" setting.
setting may be set to
"second audio program"
(S.A.P.).
• You forget the code you used
to set the parental lock.
More
See Creating the A V Connection in Chapter 3, which
explains how to adjust the
"External
Audio System"
setting.
Use the alternate
procedure
that doesn't require the use
of the code.
•
The TV's "Listen
•
See CustomizingAV
Memory
in Chapter 3,
which explains how to
adjust the "Listen to:"
setting.
to:"
setting may be set to
"secondary
audio program"
(S.A.P.).
See the Appendix,
Procedure for Bypassing
Parental Lock.
the
•
There is a large black or gray
rectangle on the screen.
•
The TV has been set to
Closed Captioning
"text"
mode, but there is no text
information
being broadcast.
•
See Using the Closed
Caption Decoder in the
Getting Started section of
Chapter 3.
•
You cannot see a picture
when you play a tape in the
VCR.
• If you connected your VCR
with A/V cables, use the
INPUT button to select the
input source (Input 1,2 or 3
or 4) that the VCR is
connected to.
•
See Selecting the Input
Source for an explanation
about changing the input.
Troubleshooting
95
Caution
))Warning:
and
care
Don't leave stationary
images
on-screen
These images can scar the picture tube, causing
TV. Some examples of stationary
images are:
•
stock-market
•
station
•
video game displays
•
shopping
•
the television's
for more than
permanent
10 minutes.
damage
to the
reports
logos (especially
channel
bright
ones)
displays
own on-screen
displays
DImportant:
If you plan to place speakers next to the TV, make sure they are
magnetically
shielded.
Ordinary
speakers will cause distortion in the picture
due to their strong magnets.
This distortion,
however, will not harm the
picture tubes.
For maximum enjoyment and safe operation of your Mitsubishi TV, please
read IMPORTANT
SAFEGUARDS,
pages 3 and 4 of your Owners Guide,
very caremlly ana apply them properly.
Cleaning
Normally,
clean.
light dusting
with a non-scratching
duster
will keep your TV
If you want to wipe down your TV, turn it off and unplug it. Then, wipe it
gently with a soft cloth slightly moistened
with water. You can add a few
drops of mild liquid detergent
to the water for oily dirt.
DO NOT allow liquid to enter
DO NOT use strong
or abrasive
DO NOT use spray liquids
the TV through
Chapter
slots.
cleaners.
or cleaners
DO NOT scrub or rub the TV harshly.
96
the ventilation
4: Troubleshooting
directly
on the TV's surface.
Wipe gently.
calling
for service
If you are unable to correct a problem with your TV, consult your
Mitsubishi
dealer or Mitsubishi Authorized
Warranty
Service Center.
DO NOT adjust
any controls
DO NOT remove
not described
the protective
in this owner's
guide.
back cover of this unit.
If you see the following display on your screen, you should not change
any settings.
This is a special display used by the factory.
If any settings
are changed
your warranty
NOTE:
"Firmware
Versions" are included
vary from those shown below.
may be void.
for reference
only and will
If this display appears, make sure that all of the on/offsettings
are the
same as the illustration
below and then turn the TV off. If any ofthe
settings are different from the illustration
below, turn the TV off and
consult your Mitsubishi
dealer or Mitsubishi Authorized
Warranty
Service Center.
tnitiat
E2RESET
DTV Port
: Auto
DTV Signal Strength : N/A
Power Restore
: Off
When Mute
: On
Convergence Reset
DTV Diagnostics
Vsrsion:
Main:
VI5XXXXX
Sub:
VI5YYYYY
Caution
and Care
97
Solid Red Page
98
APPENDIX
Procedure
for Bypassing
Cut along dotted
the Parental
Lock
line and file after reading.
After you set the lock, you will need the secret
code in order to:
• view a locked channel,
• view the locked TV, or
• cancel the lock.
If you forget the code, you can view the locked TV without entering
the code. To do this, simply press the buttons on your remote
labeled "RCL" and "9" at the same time whenever your secret code
is requested.
[_Important:
_>Important:
Unlocking with this procedure is only temporary.
lock completely, follow the procedure below:
To cancel the
O
Turn on your TV. If the TV requests your secret
"RCL" key and the "9" key on the remote control
time.
@
Press the MENU key to view the main menu. Use the ADJUST key to select "Advanced Features".
Press ENTER!EXCH.
O
Use the ADJUST
EXCH.
O
At "Passcode", use ADJUST right to move to the passcode
number field. Press the "RCL" key and the "9" key on the
remote control at the same time, instead of entering the code.
O
The message "Enter New Code" will appear.
Press CANCEL to
remove the code and cancel the lock. Or to choose a new code,
press ADJUST left to go back to the "Passcode" field and then
ADJUST right to go to the code selection field where you may
enter your new 4 digit code. Press ENTER/EXCH
to lock in
your new code, then press the HOME key or press the MENU
key three times.
key to select"
Parental
Lock".
code, press the
at the same
Press
ENTER!
You must use the remote control included with this TV. You
cannot use a remote control from another Mitsubishi component
and you cannot use "Universal"
remotes from other manufacturers.
99
SOLID RED PAGE
Index
E
A
Active A/V Network, Creating
36,38
A/V Connection
(Home Theater)
Creating
36-40
Setting the A/V Network
38
A/V Memory 67-76
Audio 72-75
Customizing
71
resetting factory defaults
69
Video 71,75
A/V reset key
15
Adding, Deleting Channels
48
Adjust Keys 16, 21
Adjusting the Convergence
62-65
Adjusting A/V Memory Settings
Audio 72-75
Video 71,75
Advanced Convergence
64
Advanced Features
Menu 53
Audio Control Key 21
Audio Functions
Adjusting
72
Descriptions
72
Remote Control Key 21
Audio input terminal,
front
panel 15
Audio Layer Selection Switch 20
Audio Settings, Adjusting 72
Auto Picture
9, 71
AV Receiver
at Input 1
36, 40
code 24
volume change 36, 40
Memorizing
32, 48
Naming
48
Remote Control 20
Using the SQV Key 50
Cleaning your TV 96
Clock
Setting
35
Closed Caption Decoder
46
Using
47
Closed Captioning
Descriptions
Standard
46
Text 46
Codes with remote control
AV Receiver 24
Cable Box
24
CD Player
24
Mitsubishi
Enter Key 16
Enter/Exchange
Key 20
Espanol, choosing
41
External Audio System
Setting 36, 40
DVD player
24
Laser disc player
24
Satellite Receiver
24
VCR
24
Color Temperature
Control 9, 71
Component Video Input 8
Control Panel Overview
14-16
Convergence
62-65
Adjusting
63
Advanced
64
Resetting factory defaults 65
Static 63
Home Key 21
Home Theater Connections
B
DiamondShield
removal
92
Batteries,InstMling
in Remote
0
Cable TV
Codes 24
Layer Selection Switch
Cancel Key 16
Cancel!Sub Key 20
Channel Menu 48-51
Channels
20
Adding and Deleting 48
Capacity
8
Changing
34
Front Panel Display
15
Locking (Parental
Lock) 58
17
Creating the A/V Connection
(Home Theater)
36-40
D
replacement
DTV
92
Format
Changing
Key 21
screen
86, 90-91
G
Guide
key
21
H
Creating
36-40
ExternalAudio
System
HDTV
summary
7
upgrade capability
36,40
8
I
Important
Safeguards
3-4
Information
Key 20
Input
Front Panel Display 15
Key (Remote) 20
Inputs
Naming
48
Intelligent
Room Illumination
Sensor (IRIS)
9, 71
K
Adjust keys 42
Channel guide 42-43
Channel keys
42
Language
73
number keys 44
viewing 42
DVD
Function Key 21
Layer Selection Switch
F
Keys
front panel
15-16
remote control 20-21
L
20
Language,
DTV selection
73
menu selection 41
Layers
Description
20, 22
Selecting on remote
Light Key 20
control
20
Locking Your TV (Parental
Lock)
Bypassing
99
Changing or Canceling
58
Locking by Channel
58
Locking by Time 56
Setting the Passcode
56
Using the Parental
Lock 5659
M
Memorizing
channels
32
Memory, setting A/V 67-70
Menus
A/V Memory 68
A/V Connections
37
Advanced Features
53
Audio Video Settings
74
Channel
49
Closed Caption 47
Convergence
62, 63, 64, 65
DTV Channel Guide 43
Language
Main
41
30
Memorizing
channels
Parental
Lock 57
Setup
30, 31
Timer
55
Video Mute
61
Menu Key
Front Panel Display
Remote Control 21
Mitsubishi
Codes
33
By Time 56
Bypassing
99
Canceling
58
Changing
58
Menu
57
Setting the Passcode
56
Picture-in-Picture
(PIP)
Modes. See PIP
PIP 81-86
Activating the PIP Image 82
Audio Output
9, 73
Changing Channels
84
Exchanging
the Picture
85
Freezing the Image 84
Moving the Image 85
Remote Control Keys 21
Selecting the Image Source 83
Picture-outside-Picture
(POP)
Modes. See POP
POP WS-65903, WS-73903 87-90
Changing
90, 91
Displaying
88-89
Power Key(Front Panel) 16
Power Key (Remote) 20
Problems and Solutions
94-95
R
15
DVD Player 24
Laser Disc Player 24
Mute Control Key 20
Recall Key 20
Remote Control
and Active A/V Network
39
Installing
batteries
17
Keys and Functions 20-21
Selecting Layers 20
Using with other equipment
22-25
N
S
Naming
Naming
Number
channels
48
the Inputs
48
Key (0-9) 20
O
On-Screen Displays
Understanding
78
On-Screen Menus Summary
29
Operating
other equipment
with
remote control 23-25
P
Parental
Lock
By Channel
56-59
58
S-Video input, front panel 15
Safeguards,
important
3-4
Satellite Receivers
codes 24
using remote control with 25
Select Switch (Layers)
20
Selecting the Menu Language
41
Service 97
Setting the Clock 35
Setting the Timer 54
Sleep Timer
Changing or canceling
Key 21
Setting 80
Spanish Language
41
80
Special
Features
Summary
8-9
SQV
Adding or Deleting
Channels
50
Memory Banks 50
Key 20
Overview
50
SuperQuickView,
See SQV
Static Convergence
63
Surround
Sound 73
T
3D Y/C Comb Filter
8
Time, Locking By 56
Timer
Setting the TV timer 54
Sleep timer Key 21
Troubleshooting
94-95
Calling for service 97
U
Unpacking
Your TV 6
V
VCR
Codes
24
Layer Selection Switch 20
VCR Function Keys 21
VideoControl
Keys 21
Video input, front panel 15
Video Mute, using
60
Video Settings
Adjusting
71
Description
71
ViewPoint Menus, Using 29
Volume Control
AV receiver 40
Front Panel 15
Key 20
Remote Control
20
W
Warranty
Inside
Back
Cover
MITSUBISHI
PROJECTION TELEVISION
LIMITED WARRANTY
MITSUBISHI CONSUMER ELECTRONICS AMERICA, INC. ("MCEA") warrants to the original purchaser of this television that if purchased from ml
authorized MITSUBISHI Audio/Video Dealer, should it prove defective by reason of improper workmanship and/or material:
a. Parts. The lenficular (i.e. front picture) screen and/or the Diamond Shield _Mis warranled against defects in materials and workmanship for a period of
30 days. All other parts are warranted for a period of one year from tile date of the original purchase at retail. We will repair or replace, at our option, mW
defective pint without charge for tile part. Parts used lbr replacement are warranled for the remainder of the original warranty period.
b. Labor. For 30 days al)er the original purchase at retail, we will repair or replace, at our option, the lenticular screen if it proves detective. For all other
pasts, we will provide the labor lbr a warranty repair by an authorized MITSUBISHI service center without charge lbr one year fi'om the date or original
purchase at retail.
c. Notice.
To obtain
warranIy
seivice,
you must
notify
ml authorized
MITSUBISHI
service
center
of mW defect
within
the applicable
warranty
TO OBTAIN WARRANTY SERVICE:
a. Contact your nearest authorized MITSUBISHI service center whose name and address can be obtained from your MITSUBISHI
calling MCEA al the address and telephone number provided below.
time period.
1.
dealer or by writing or
b. Warranty service will be provided in your home or, if required, at ml authorized service shop, provided that your television is located within the
geographic territoq¢ customarily covered by an authmized MITSUBISHI service center. If not, you must either deliver your lelevision to an authorized seiaAce
location at your own expense, or pay for any travel and/or transportation costs the service cen_er may charge to and from your home. Actual seivice labor will
be provided without charge.
c. Proof of purchase date fi'om an authorized MITSUBISHI dealer is required when requesting warranty selazice. Present your sales receipt or other
document which establishes proof and date of purchase. THE RETURN OF THE OWNER REGISTRATION CARD IS NOT A CONDITION OF WARRANTY COVERAGE. However, please return the Owner Registration Card so that we can contact you should a question of safety arise which could affect
you.
2. THIS WARRANTY DOES NOT COVER damage caused by: modification, alleration, repair or service of the product by anyone other than an authorized
MITSUBISHI service center; physical abuse to, or misuse oI. the product; operafion in a mmmer contrary to the instrucfions which accompany the product;
l'reigllt damage; or any damage caused by acts of God such as lightning or fluctuation in electrical power. This warranty also excludes all costs arising from
installation, adjustment of user controls, external mltenna systems, selaAce of products purchased or serviced outside the U.S.A., initial technical adjustments
(set-up) and user-required maintenance. Consult the operating instructions furnished with the product for inibrmaflon regarding user controls.
3.
ANY
EXPRESS
WARRANTY
NOT
PROVIDED
HEREIN,
IMPLICATION
OR OPERATION
OF LAW, IS HEREBY
AND OF FITNESS
FOR ANY PARTICULAR
PURPOSE
4.
UNDER
NO CIRCUMSTANCES
CONSEQUENTIAL
DAMAGES,
SHALL
WHETHER
MCEA
AND
BE LIABLE
ARISING
ANY
EXCLUDED
AND
ARE EXPRESSLY
REMEDY
TO PURCHASER
OUT OF BREACH
WHICH,
BUT
FOR THlS
PROVISION,
MIGHT
DISCLAIMED.
THE IMPLIED
WARRANTIES
LIMITED
TO A TERM OF ONE YEAR.
OR ANY
OF WARRANTY,
OTHER
BREACH
PERSON
FOR ANY
OF CONTRACT,
ARISE
BY
OF MERCHANTABILITY
INCIDENTAL,
SPECIAL
5. Some states do not allow limitations on how long an implied warranty lasts, or the exclusion or limitation of incidental, special, or consequential
so the above limitations or exclusions may not apply to you.
6.
damages,
This warranty gives you specific legal rights, and you may also have other rights which vary from state to state.
7. BEFORE REQUESTING SERVICE, please review the instruction booklet to insure proper installation mad correct customer control adjustment. If the
problem persists, contact your nearest MITSUBISHI Dealer for name(s) of authorized MITSUBISHI Service Center(s). If you are unable to obtain this
information, please call 800-332-2119, or write us at the address below.
MITSUBISHI
CONSUMER
9351 Jeronimo Road
Irvine, CA 92618-1904
RETAIN THIS PORTION
CUSTOMER
STREET
FOR YOUR
AMERICA,
RECORDS
INC.
SERIAL
NO.
NAME
ADDRESS
CITY
PHONE(
ELECTRONICS
STATE
)
ZIP
PURCHASE
/
DATE
MO
PLACE
OF PURCHASE
OR
OR OTHERWISE.
/
DAY
YR
MITSUBISHI
MITSUBISHI
9351 Jeronimo
Irvine,
CONSUMER
Road
ELECTRONICS
AMERICA,
INC.
CA 92618-1904
@ 1998 Mitsubishi Consumer Electronics America, Inc.
871D253A20
Printed in U.S,A