1
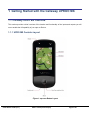
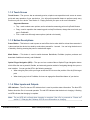
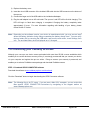
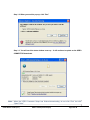
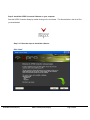
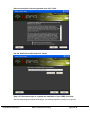
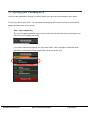
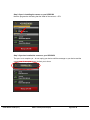
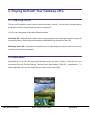
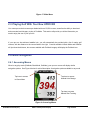
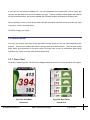
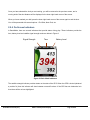
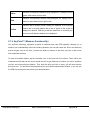
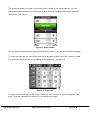
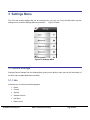
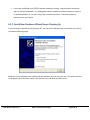
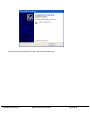
™ Callaway UPRO MX Golf GPS User Guide (v1.1) ©2011 Callaway Golf Company Table of Contents 1 2 3 GETTING STARTED WITH THE CALLAWAY UPRO® MX ........................................................................... 4 1.1 CALLAWAY UPRO MX OVERVIEW............................................................................................................... 4 1.2 SYSTEM REQUIREMENTS ............................................................................................................................ 6 1.3 CHARGING THE CALLAWAY UPRO MX ........................................................................................................ 7 1.4 CONNECTING YOUR CALLAWAY UPRO MX.................................................................................................. 8 1.5 REGISTERING YOUR UPRO MX ................................................................................................................ 15 1.6 FINDING AND DOWNLOADING PROMODE COURSES .................................................................................... 15 1.7 SYNCING YOUR CALLAWAY UPRO .............................................................................................................. 19 PLAYING GOLF WITH YOUR CALLAWAY UPRO....................................................................................... 22 2.1 POWERING ON/OFF .................................................................................................................................. 22 2.2 MAIN MENU .............................................................................................................................................. 22 2.3 PLAYING GOLF WITH YOUR NEW UPRO MX ............................................................................................. 23 2.4 BASIC NAVIGATION ................................................................................................................................... 23 2.5 BASIC MODE ............................................................................................................................................ 25 2.6 GOMODE ................................................................................................................................................. 28 2.7 PROMODE ............................................................................................................................................... 28 2.8 SHOT TRACKING ....................................................................................................................................... 31 2.9 SCORE KEEPING ...................................................................................................................................... 31 2.10 ROUND REVIEWS...................................................................................................................................... 33 2.11 CHANGING HOLES .................................................................................................................................... 33 SETTINGS MENU ......................................................................................................................................... 35 3.1 4 PREVIEW MODE .......................................................................................................................................... 37 4.1 5 6 DEVICE SETTINGS .................................................................................................................................... 35 ENABLING PREVIEW MODE........................................................................................................................ 37 COMPLIANCE ............................................................................................................................................... 38 5.1 FCC STATEMENT (USA) .......................................................................................................................... 38 5.2 INDUSTRY CANADA STANDARD (CANADA 310) ........................................................................................... 39 5.3 BATTERY INFORMATION AND WARNING ...................................................................................................... 39 TROUBLESHOOTING................................................................................................................................... 41 6.1 BASIC OPERATION .................................................................................................................................... 41 UPRO MX User Guide (v1.1) ©2011 Callaway Golf Company Page 2 of 46 6.2 SYNCHRONIZING YOUR DEVICE ................................................................................................................. 43 UPRO MX User Guide (v1.1) ©2011 Callaway Golf Company Page 3 of 46 1 Getting Started with the Callaway UPRO® MX 1.1 Callaway UPRO MX Overview This section provides a brief overview of the location and functionality of the inputs and outputs you will use to enable the full capability of your upro mx Device. 1.1.1 UPRO MX Controls Layout Figure 1: upro mx Button Layout UPRO MX User Guide (v1.1) ©2011 Callaway Golf Company Page 4 of 46 1.1.2 Touch Screen Touch Screen – The upro mx has an extremely precise, simple-to-use capacitive touch screen to ensure quick and easy operation of your new device. You will use this powerful feature to perform nearly every function on your new device. See Section 2 – Playing Golf with your upro mx for more information Supported Gestures: Tap – used to select menu options, and to activate the measuring point on AnyPoint® feature Drag – used to reposition the measuring point on AnyPoint feature, change the zoom level, and pan in ProMode® Flick - used to scroll through menu options (vertical or horizontal), 1.1.3 Button Descriptions Power Button – This button is used to power on and off the device when held for at least three seconds. It is also used put the device into stand-by mode when pressed for 1 second. You can bring the device out of stand-by mode by pressing the power or mode button again Mode Button – This button is used to switch between BasicMode, ProMode (requires purchase and download of additional content), and GoMode® Optical Finger Navigation (OFN) – The upro mx has a state-of-the-art Optical Finger Navigation button which offers the user a powerful, flexible, and extremely precise method of navigating through the upro mx user interface. You can use the OFN in the following scenarios: When using AnyPoint, slide your finger across the OFN to move the position of the AnyPoint target point When viewing any hole in ProMode, click once to engage the SmartView feature of your device 1.1.4 Other Inputs and Outputs LED Indicator - The uPro has an LED indicator that is used to provide status information. The blue LED flashes when the uPro is in normal operation. The red LED indicates that the device is charging. A flashing red LED indicates that charging is complete. Note: The red LED will not flash when charging is complete if the uPro is powered on. Please see section 1.3 Charging the Callaway uPro for more information on charging. UPRO MX User Guide (v1.1) ©2011 Callaway Golf Company Page 5 of 46 Micro-USB Port - The Micro-USB Port is used to connect the device to the your computer to access the uxplore website for course downloads and updates. It is also used to charge the battery within the device. Headphone Jack - The uPro contains a small, 2.5mm headphone jack that allows connection of stereo or mono headphones. Note that your upro mx does not come with headphones. 1.2 System Requirements Prior to registering your upro mx via the Internet, please verify that your computer system meets the following requirements: - Operating System: Windows XP(Service Pack 3)/Vista/Windows 7 Mac OS 10.4.10 or greater - Browser: Internet Explorer 7.0 or greater, Firefox 3.0 or greater, Safari 4.0 or greater, Chrome - USB: Available USB Port - System Memory: 512 MB of RAM - Hard Disk Space: 1GB of free space - Internet Connection: DSL, Cable, Satellite or faster UPRO MX User Guide (v1.1) ©2011 Callaway Golf Company Page 6 of 46 1.3 Charging the Callaway UPRO MX Prior to operating your upro mx the battery must be fully charged. Follow these steps to charge the battery: 1) Remove the battery cover on the upro mx. Using your finger, un-screw the screw head located on the back of the device until the battery cover is loose, and can be removed by lifting up gently. Figure 2: Battery Cover Removal 2) Insert the Li-Ion rechargeable battery into the battery compartment. Angle the battery such that the bottom edge with the three contacts makes contact with connector on the upro mx first and then push the top side of the battery into place. Side Facing Up UPRO MX User Guide (v1.1) Side Facing Down ©2011 Callaway Golf Company Page 7 of 46 3) Replace the battery cover. 4) Insert the micro-USB connector of the included USB cable into the USB connector on the bottom of the upro mx. 5) Connect the larger end of the USB cable to the included wall adapter. 6) Plug the wall adapter into an AC wall outlet. The upro mx’s red LED will be lit while charging. This LED will begin to flash when charging is completed. Charging the battery completely takes approximately 3 hours. For more information regarding safe handling of your battery, please review Section 5.3 below. Note: Depending on the software version your device is manufactured with, you may see an issue where the battery indicator during charge overstates the battery charge level. You can verify the true battery life by removing the USB cable, and from the main menu, touch Settings, then Info. The accurate battery level is displayed as a % charged. 1.4 Connecting your Callaway UPRO MX Although your new upro mx device comes pre-loaded with more than 25,000 courses worldwide which enables you to use the device as soon as you buy it, we strongly recommend that you connect your device via your computer and register the upro mx online. Doing so ensures your warranty is preserved, and enables you to select a ProMode course package and download ProMode courses. STEP 1: Download UPRO CONNECTOR software Download the software at www.callawayuxplore.com/downloads Click the “Download” button to begin downloading the UPRO Connector software Note: The following flow is for PC users. If you are own a Mac OS X computer, you can review the Mac specific UPRO CONNECTOR instructions by navigating to the support section at www.callawayuxplore.com UPRO MX User Guide (v1.1) ©2011 Callaway Golf Company Page 8 of 46 Note: For PC users - to install software onto your pc you need to have an administrator role. For more information, contact your system administrator. Step 1.1: When you see this pop-up window, click “Save” UPRO MX User Guide (v1.1) ©2011 Callaway Golf Company Page 9 of 46 Step 1.2: When you see this pop-up, click “Run” Step 1.3: You will see this status window come up – it will continue to update as the UPRO CONNECTOR downloads. Note: When the UPRO Connector Setup has finished downloading, do not click “Run” but click “Open Folder” UPRO MX User Guide (v1.1) ©2011 Callaway Golf Company Page 10 of 46 Step 2: Install the UPRO Connector Software on your computer Start the UPRO Connector Setup by double-clicking on the icon below. This file should be in the list of files you downloaded. Step 2.1: Follow the steps to install the software: Click “Next” UPRO MX User Guide (v1.1) ©2011 Callaway Golf Company Page 11 of 46 Read and accept the License Agreement, then click “Next” Use the default file location and click “Install” Step 2.2: Follow these steps to complete the installation of your UPRO Connector After the setup program finishes a few steps, you will be prompted to connect your upro mx. UPRO MX User Guide (v1.1) ©2011 Callaway Golf Company Page 12 of 46 2.1.1: After plugging in your upro mx, you will be prompted on the device to “Sync” or “Charge Only.” Tap “Sync” 2.1.2: After tapping “Sync” you will be prompted to choose your operating system (Macintosh or PC). Tap the icon for your operating system on your computer. 2.1.3: Click “Retry” on your computer screen 2.1.4: When Setup is complete, you will see this message: 2.1.5: You will now see a pop-up box asking you to restart your computer. Close any open programs running on your computer then click “Yes” on the box below. UPRO MX User Guide (v1.1) ©2011 Callaway Golf Company Page 13 of 46 Note: You will notice that your upro mx screen says “OK to Disconnect.” You should unplug the USB from your upro mx device now. STEP 3: Connect device and launch www.callawayuxplore.com Once your computer has restarted, you should notice the UPRO Connector icon in the tray in the lowerright hand corner of your screen. The icon will look like this: Step 3.1: Connect your upro mx again using the provided USB Cable. 3.1.1: After plugging in your upro mx, you will be prompted on the device to “Sync” or “Charge Only.” Tap “Sync” 3.1.2: After tapping “Sync” you will be prompted to choose your operating system (Macintosh or PC). Tap the icon for your operating system on your computer. Note: As your UPRO Connector establishes a connection with your upro mx, you will see several messages in the lower right hand of your screen referring to the connection status. You do not need to take any action with these messages. Also, if your computer launches the New Connection Wizard you can click “Cancel” Once your UPRO Connector has successfully the icon in your tray in the lower right-hand corner of your screen will change to this: The UXPLORE™ website will launch automatically once your device has been connected. UPRO MX User Guide (v1.1) ©2011 Callaway Golf Company Page 14 of 46 1.5 Registering your UPRO MX 1.5.1 UPRO MX Registration Once you connect your upro mx, the uxplore website will take you through the steps to complete registration. After the registration is complete you will be able to purchase course packages and download courses. Step 1: Create a Uxplore Account Fill in the necessary information to create an account in our new Uxplore web environment. Step 2: Choose a Pro Mode Course Plan for your upro mx Here you will decide which plan is best for you Basic Mode Plan allows you to play over 25,000 courses worldwide in basic and Go Mode 25 ProMode Course Plan allows you to download and play 25 unique courses in ProMode, taking advantage of the power and performance the upro mx brings Unlimited ProMode Course Plan allows you the ability download as many ProMode courses as you like (limit 50 at any time on your upro mx device). Note: Existing uPro users will be prompted to convert their existing course credits into one of these new packages. The Uxplore website will you through the process. Registration Complete! 1.6 Finding and Downloading ProMode Courses 1.6.1 Finding and Downloading ProMode Courses When you have signed up for a ProMode course package, you will have access to search and download ProMode courses from our extensive list of available courses. This section will show you how to find and download these courses to your upro mx. UPRO MX User Guide (v1.1) ©2011 Callaway Golf Company Page 15 of 46 Note: If you decided not to purchase a ProMode course package when registering, you can still do so when browsing courses. See below for more information. STEP 1: Connect your UPRO MX and Login to Your Uxplore Account If you have just finished registering your upro mx you should already be logged in and your upro mx should be properly connected. If you are not logged in, please use your selected username and password to log in at the top of the Uxplore screen. Once logged in, please verify that your uPro is connected to the website correctly. To verify your connection, refer to the upper right hand corner of the web page to see the connection status of your upro mx. UPRO MX Not Connected UPRO MX Connected If you have not registered your uPro, please follow the instructions in Sections 1.4 and 1.5 on connecting and registering your uPro. STEP 2: Search For Courses There are several ways you can access the course list to find and download courses. This guide will show you a few of those options, but feel free to use whichever path works best for you. Depending on what state of connection you have, and what section of the site you are in, you will have different options for searching and downloading courses. Here are the most common options: UPRO MX Connected – Site Launched Automatically UPRO MX User Guide (v1.1) ©2011 Callaway Golf Company Page 16 of 46 You will be directed to the upro mx Manager screen after logging in. From here, you can click on the PROMODE tab Click the button at the bottom of the screen to FIND MORE COURSES --OR-At any time, click on the COURSES option in the top navigation bar UPRO MX User Guide (v1.1) ©2011 Callaway Golf Company Page 17 of 46 Course Search Use the search options to find the course you are interested in. From the list, you can click LOAD TO UPRO Once you click LOAD TO UPRO, you will see this pop-up window. Click on GET COURSE After selecting GET COURSE, you will see the status of the course change to IN QUEUE UPRO MX User Guide (v1.1) ©2011 Callaway Golf Company Page 18 of 46 1.7 Syncing your Callaway uPro Once you have selected the courses you wish to load to your upro mx, they will reside in your queue. To sync your device, click on the You can monitor the progress of the sync by looking in the tray at the upper-right hand corner of your screen. Step 1: Sync is beginning The tray in the upper right hand corner of your screen will now show that the sync has begun, and instruct you not to unplug your device. If you wish to track the progress of your sync more closely, click on the tab to expand the detail information. Note that the Queue contains the course you wish to sync UPRO MX User Guide (v1.1) ©2011 Callaway Golf Company Page 19 of 46 Step 2: Sync is installing the course on your UPRO MX Note the progress bar indicating that the install of the course is ~25% Step 3: Sync has installed the course on your UPRO MX The sync is not complete yet – do not unplug your device until the message on your device and the message on the computer screen instruct you to do so. UPRO MX User Guide (v1.1) ©2011 Callaway Golf Company Page 20 of 46 Step 4: Sync is complete. Unplug your device. When you see this screen, you can unplug your device. UPRO MX User Guide (v1.1) ©2011 Callaway Golf Company Page 21 of 46 2 Playing Golf with Your Callaway uPro 2.1 Powering On/Off The upro mx Power/Menu button is used to power the device on and off. Turn on the uPro by pressing the power button for three seconds while the device is powered off. The uPro can be powered off with three different methods: Soft Power Off - Holding down the power button for approximately 3-4 seconds will bring up the power off confirmation screen. Answering yes by pressing the Select/Enter key will power off the uPro. Mandatory Power Off - Holding down the power button for approximately 8 seconds will force the device to power off without any confirmation. 2.2 Main Menu After powering on, the uPro will display the Main Menu screen as shown in Figure 3. From this menu you can choose Play Golf, Preview, Settings, Training Videos, Stats Replay, UTRACK™, or Applications. To access additional menu options, swipe the touch screen to the left and right. UPRO MX User Guide (v1.1) ©2011 Callaway Golf Company Page 22 of 46 Figure 17: Main Menu 2.3 Playing Golf With Your New UPRO MX Your new upro mx device comes pre-loaded with over 25,000 courses, as well as the ability to download and use actual aerial imagery to play in ProMode. This section will provide you all the information you need to enjoy the use of your upro mx. If your upro mx has achieved satellite lock, you will automatically be provided with a list of nearby golf courses, with the distance to the course listed to the right. Courses available in Basic Mode and GoMode will just show the distance, but courses available with ProMode imagery will display the ProMode icon 2.4 Basic Navigation 2.4.1 Accessing Menus When in any play mode (ProMode, BasicMode, GoMode), your upro mx screen will display similar navigation options. See Figure 4 below for a brief description of navigation options available in any mode Tap here to access Tap here to access Manual Hole Change In-Game Menu Tap here to access Manual Shot Tracking Figure 4: Accessing Menus UPRO MX User Guide (v1.1) ©2011 Callaway Golf Company Page 23 of 46 2.4.2 Navigating Through Lists Whenever you have a list of items on your upro mx, you can scroll through the list by swiping the list up or down. In Figure 5 below, if you wish to scroll down, you simply touch the screen near the bottom (do not touch the corners) and drag your finger upwards along the screen. This will cause the list to scroll downward. When you have found the list item you wish to select, simply tap the screen on that item to open it. Tap the Back Arrow to Tap the Red X to exit return to previous screen this list Figure 5: Navigating Through Lists To return to the previous screen, tap the back arrow indicated in Figure 5 above. You can also click the red X to exit that menu. 2.4.3 Play Golf From the Main Menu (See Figure 3 above) tap the Play Golf option. You will then be able to select available ProMode courses by tapping on the PRO MODE COURSES option. If you wish to play a course in BasicMode, or GoMode, you can select the country where your course is located, and navigate to the specific golf course. Note: The upro mx’s electronics provide unmatched GPS performance. Satellite acquisition typically occurs in less than one minute when you are positioned outdoors with an unobstructed view of the sky. UPRO MX User Guide (v1.1) ©2011 Callaway Golf Company Page 24 of 46 If your upro mx has achieved satellite lock, you will automatically be provided with a list of nearby golf courses, with the distance to the course listed to the right. Courses available in Basic Mode and GoMode will just show the distance, but courses available with ProMode imagery will display the ProMode icon. When selecting a course, you will be provided with basic information about the course including city, state or province, country, and map version. Click Play to begin your round. 2.5 Basic Mode Your upro mx contains more than 25,000 pre-loaded courses which you can use without additional fees required. There are two modes with which to access these pre-loaded courses. The first mode, called Basic Mode, gives distances to the green center, front and back as well as all hazards. Basic Mode consists of two views, the Green View and the Hazard View. 2.5.1 Green View As shown in below Figure 6a, the Green View displays distances to the front, center and back of the green. Figure 6a: BasicMode Figure 6b: Basic Mode Green View Hazard View UPRO MX User Guide (v1.1) ©2011 Callaway Golf Company Page 25 of 46 2.5.2 Hazard View The Hazard View (Figure 6b) displays distances to each hazard as well as the distance to clear each hazard or object on the course. There is no limit to the number of hazards that can be displayed in the Hazard View and the hazards are displayed in order of proximity to your current location. 2.5.3 Shot Tracking Distances of your individual shots can be measured by using the Shot Tracking function from either screen in Basic Mode. Start a measurement by tapping the Shot Tracking icon in the lower right hand corner of the screen (See Figure 4 on Page 9). A screen will pop up asking you to choose the club used on that shot. Once you have selected the club you are tracking, you will be returned to the previous screen, and a running total of the shot distance will be displayed in the lower right hand corner of the screen, including the number of shots you have tracked. When you have reached your ball, press the lower right hand corner of the screen again to end the shot. You will be presented with several options – See Figure 7 below. Figure 7: Shot Tracking Options UPRO MX User Guide (v1.1) ©2011 Callaway Golf Company Page 26 of 46 Once you have selected the club you are tracking, you will be returned to the previous screen, and a running total of the shot distance will be displayed in the lower right hand corner of the screen. When you have reached your ball, press the lower right hand corner of the screen again to end the shot. You will be presented with several options – End Shot, Next Club, etc. 2.5.4 On-Screen Indicators In BasicMode, there are several indicators that provide status during play. These indicators provide the time, battery level and satellite signal strength as shown below in Figure 8. Signal Strength Time Battery Level Figure 8: Basic Mode Indicators The satellite strength indicator provides status on the state of the GPS. When the GPS is locked (obtained a position fix) then this indicator will show between one and five bars. If the GPS has not obtained a lock then there will be no bars highlighted. UPRO MX User Guide (v1.1) ©2011 Callaway Golf Company Page 27 of 46 2.6 GoMode In addition to BasicMode, your new upro mx comes with the ability to utilize our powerful GoMode option to enhance your understanding of your approach shots. By clicking on the Mode button on the right hand side of the device while in BasicMode, you will toggle between these BasicMode and GoMode. 2.6.1 AnyPoint Technology within GoMode You can access AnyPoint technology by taping the tab at the bottom left corner of the screen. See Section 2.7.4 for more information on AnyPoint technology. 2.7 ProMode Your upro mx can be enhanced through the download and use of the patented ProMode technology. This powerful information tool encompasses a variety of features that allow you to get the best information for each shot in the most intuitive way. The most common method for entering ProMode from BasicMode is by simply pressing the Mode button on the right side of the device (See Figure 1 above). Pressing this button at anytime will toggle back and forth between ProMode, Go Mode, and BasicMode. Note: You can purchase and download ProMode courses from www.callawayuxplore.com at any time after your purchase and registration. 2.7.1 SmartView Technology Upon entering ProMode, the uPro dynamically generates the most appropriate view of the course for your next shot. This patented technology allows you to cycle through two additional views with press of the OFN button. Based on your location on the course and the layout of the hole, three different SmartViews are dynamically generated. An example of one of these views is shown in Figures 9a and 9b below. UPRO MX User Guide (v1.1) ©2011 Callaway Golf Company Page 28 of 46 Figure 9a: Fairway SmartView Figure 9b: Green SmartView The distances are constantly updating while in ProMode as your position changes. Additionally, the uPro identifies your current position on the image of the course by displaying a red diamond character. As your position changes, the uPro will continually update your position on the image as well. 2.7.2 Pan and Zoom The uPro also allows you to zoom in and out and pan anywhere you like on the hole. There is a zoom slider at the bottom of the touch screen which allows you to zoom in to any level you desire. You can also double-tap the screen and it will automatically zoom in. To zoom out, you can double-tap the screen again. If you wish to pan in any direction, you simply swipe up or down on the screen to view your desired portion of the hole. 2.7.3 Displayed Distances in ProMode Depending on the zoom level, the number of features in view and the font size, it may not be feasible or practical to show all distances at the same time superimposed on the image. The uPro’s software dynamically determines what distances will be displayed and which ones will be hidden. A colored dot, or reading point, located next to the distance reading is used to show the precise location corresponding to the distance being shown. The table below illustrates the meaning of each of these colored coded reading points: UPRO MX User Guide (v1.1) ©2011 Callaway Golf Company Page 29 of 46 White Red Indicates corresponding distance being displayed is a reading from the green, either center, front or back. Indicates corresponding distance being displayed is a reading from a bunker or other feature on the golf course. Indicates that a distance would normally be displayed for this precise Yellow location but is currently hidden due to lack of space on the screen to display this distance. Selecting a different SmartView or increasing the zoom level will allow the distance to be displayed. 2.7.4 AnyPoint™ (Measure Functionality) Our AnyPoint technology represents a hybrid of traditional laser and GPS capability, allowing you to enhance your understanding of the hole including obstacles you can and cannot see. Due to the extremely precise imagery used on the uPro, you have the ability to measure to and from any point on the course with exceptional accuracy. To reach this helpful feature, tap the crosshairs icon in the lower left of the screen. There will be two measurement lines that can be mover around the hole to get distances from where you are to anywhere you like, and a second lay-up distance. First, touch the point you’d like to move, you will notice that the point turns red. You are able to then drag the point to your desired measurement location, or you can use the OFN to precisely place the point at your desired location. UPRO MX User Guide (v1.1) ©2011 Callaway Golf Company Page 30 of 46 Figure 10: AnyPoint Measurement During a measurement, you can also change zoom levels if you would like. Exiting Measure Mode can be done at any time by tapping the tab on the lower left of the screen. 2.8 Shot Tracking Shot Tracking gives you the ability to select the club you use for each shot and let the device keep track of your yardage. You will be able to build an averages distance for each club in your bag by consistently tracking your shots during your rounds. See Section 2.5.3 above for instructions on how to operate. 2.9 Score Keeping You can keep your score, and the score of up to 3 playing partners with your upro mx. After clicking Play Golf, and selecting the course you want to play, you will be prompted to select your stats settings. If you select the scorecard, you will then have the option to select Fairways Hit, GIR (Greens in Regulation), and Putts. Choose your selections, and click the Green Check Mark at the lower right-hand corner of the screen. UPRO MX User Guide (v1.1) ©2011 Callaway Golf Company Page 31 of 46 The next screen allows you to enter in your initials, and the initials of your playing partners. You can change the initials by clicking on the Initials section, then clicking on the letter to bring up the additional letter options. See figure 11. Figure 11: Player Initials Click the Green Check at the lower right-hand corner of the screen, or click Add New to add more players. To access the scorecard, you can click the menu tab at the upper left-hand corner of the screen, or rotate the mx device to the left, so that you are holding it in this orientation. See figure 12. Figure 12: Scorecard From this screen, tap the cell you wish to edit to enter your score, fairways hit, greens in regulation, and putts. To exit the scorecard, click the red X, or turn the upro mx upright. UPRO MX User Guide (v1.1) ©2011 Callaway Golf Company Page 32 of 46 2.10 Round Reviews This feature allows you to review the scorecard from a previous round. You can edit the scorecard if there are changes to make. Note: If you have already uploaded the scorecard to www.callawayuxplore.com, you will not be able to edit the scorecard on your device. You can update that scorecard online. 2.11 Changing Holes The uPro automatically prompts you to go the next hole at the appropriate times during the round by default. You can manually change holes at any time as well. 2.11.1 Hole Change Menu From nearly all screens, the Hole Change menu item can be used (See Figure 4 above). From any ProMode, GoMode or BasicMode screen, tap the Hole Number tab in the upper right hand corner of the screen. This tab will be indicated by the current hole you are playing. Tap the hole you wish to switch to, and you will automatically return the mode you were playing in (ProMode, GoMode, or BasicMode). See Figure 13 below. To see more holes, swipe the touch screen upward to scroll down. UPRO MX User Guide (v1.1) ©2011 Callaway Golf Company Page 33 of 46 Figure 13: Change Hole Menu UPRO MX User Guide (v1.1) ©2011 Callaway Golf Company Page 34 of 46 3 Settings Menu The uPro has several settings that can be configured for your upro mx. From the Main Menu, tap the settings icon to reach the Settings Menu as pictured in Figure 14 below. Figure 14: Settings Menu 3.1 Device Settings Selecting Device Settings from the Settings Menu gives you the ability to alter some of the functionality of the uPro and to enable additional functionality. 3.1.1 Info Info allows you to confirm the following details: Owner Contact Serial # Software Version Last Sync Battery Level UPRO MX User Guide (v1.1) ©2011 Callaway Golf Company Page 35 of 46 3.1.2 General Settings By selecting the General Settings from the settings menu, you can adjust the units of measure (yards or meters), power settings (the default setting is normal and will represent the best combination of battery life and backlight brightness), time zone, and language. 3.1.3 Appearance This option allows you to adjust the backlight, font size, and whether you want the green outline to appear in Pro and Go Mode or not. TIP: Battery life can be improved significantly by reducing the backlight setting below the default of 40%. 3.1.4 Sensors This is informational only, and provides the status of various sensors on your upro mx. 3.1.5 UTRACK Your upro mx comes equipped to support exciting new technologies that will be introduced in the future. 3.1.6 Statistics This menu allows you to set your preferences regarding the use of the scorecard. 3.1.7 Applications This feature will become available following future software releases. UPRO MX User Guide (v1.1) ©2011 Callaway Golf Company Page 36 of 46 4 Preview Mode The uPro contains a patent-pending mode of operation that allows you to simulate playing any downloaded golf course while away from the course. This mode enables all of the functionality within Basic Mode and ProMode. 4.1 Enabling Preview Mode The upro mx Preview Mode is enabled by selecting the Preview option from Main Menu. UPRO MX User Guide (v1.1) ©2011 Callaway Golf Company Page 37 of 46 5 Compliance 5.1 FCC Statement (USA) Callaway uPRO MX GOLF GPS - # 5911016 Callaway Golf Company Corporate Address: 2180 Rutherford Road, Carlsbad, CA 92008 Phone number: 1.888.358.5788 http://www.uprogps.com FCC Class B Part 15 This device complies with Part 15 of the FCC Rules. Operation is subject to the following two conditions: (1) this device may not cause harmful interference, and (2) this device must accept any interference received, including interference that may cause undesired operation. WARNING: Changes or modifications to this unit not expressly approved by the manufacturer could void the user’s authority to operate this equipment. NOTE: This equipment has been tested and found to comply with the limits for a Class B digital device, pursuant to part 15 of the FCC rules. These limits are designed to provide reasonable protection against harmful interference in a residential installation. This equipment generates, uses and can radiate radio frequency energy and, if not installed and used in accordance with the instructions, may cause harmful interference to radio communications. However, there is no guarantee that interference will not occur in a particular installation. If this equipment does cause harmful interference to radio or television reception, which can be determined by turning the equipment off and on, the user is encouraged to try to correct the interference by one or more of the following measures: -- Reorient or relocate the receiving antenna. -- Increase the separation between the equipment and receiver. -- Connect the equipment into an outlet on a circuit different from that to which the receiver is connected. -- Consult the dealer or an experienced radio/TV technician for help. UPRO MX User Guide (v1.1) ©2011 Callaway Golf Company Page 38 of 46 5.2 Industry Canada Standard (Canada 310) This Category II radio communication device complies with Industry Canada Standard RSS-310. Operation is subject to the following two conditions: (1) this device may not cause interference, and (2) this device must accept any interference, including interference that may cause undesired operation of the device. Ce dispositif de radiocommunication de catégorie II respecte la norme CNR-310 d'Industrie Canada. Son fonctionnement est subordonné aux deux conditions suivantes : (1) ce dispositif ne doit pas produire d'interférences, et (2) ce dispositif doit pouvoir supporter toute interférence, y compris les interférences qui peuvent nuire à son fonctionnement. 5.3 Battery Information and Warning Handle your Li-ion battery (3.7V) with care. Do not place the battery in prolonged direct sunlight or high temperature environments (e.g., vehicle trunks, dashboards, open fires, heaters, etc.). Exposing the battery to prolonged direct sunlight or extreme heat may result in the battery pack leaking, overheating, or exploding, which in turn may cause fire or other hazards. High temperatures could also deform the battery and/or device. Do not drop or submerge the battery in water, expose to excessive moisture or subject it to strong impact or continuous mechanical shocks. Doing so may generate heat or corrode the battery and result in poor performance and could also create a fire, explosion or shock hazard. Do not attempt to open or service the battery pack. Do not disassemble, crush, throw, puncture, solder, modify or otherwise mutilate the battery. Servicing should be done by qualified personnel only. Do not store the battery in humid or dusty locations or with metal objects (e.g., metallic watch bands, necklaces, etc.) or with metal golf clubs or other metallic golf equipment. Doing so may result in fire, electric shock, or other hazards. Do not touch the (+) and (-) terminals with a metal object. Do not insert the battery with the (+) and (-) terminals reversed. Always keep the battery out of the reach of babies and small children to avoid choking hazard or poisoning. Consult a doctor immediately if battery or battery materials are swallowed. Always dispose of battery in a special recycle bin according to local regulations. Never dispose of battery in fire or water. UPRO MX User Guide (v1.1) ©2011 Callaway Golf Company Page 39 of 46 An improperly disposed battery could be short-circuited by metal parts of other objects and result in a fire or explosion. Cover the exposed battery terminals with electrician’s tape prior to disposal. Do not use the battery if it appears to be damaged, deformed or discolored or if it leaks or emits unusual odors. In such case, immediately ensure that the battery is away from any exposed skin and/or open flames and promptly and properly dispose the battery. If a battery is leaking, do not let the electrolyte get on your eyes, skin or clothing. If the electrolyte gets into your eyes or skin, promptly flush with clear, cold running water and seek medical attention immediately. Do not rub eyes. Use only the battery and battery charger as specified by manufacturer. The charging unit and any other charging units should be operated only from the type of power source indicated on the marking label and are intended for indoor use only. Do not overload wall outlets or use with extension cords, as this may result in a risk of fire or electric shock. Failure to observe all safety instructions will void the Limited Warranty, and may lead to suspension or denial of services to the offender, or legal action, or both. Batteries should not be discarded in the normal waste stream, local/regional systems exist to dispose of the batteries. As an end user/consumer you contribute by ensuring that the battery is disposed of properly. UPRO MX User Guide (v1.1) ©2011 Callaway Golf Company Page 40 of 46 6 Troubleshooting 6.1 Basic Operation 6.1.1 Device Will Not Turn On If your device will not turn on, even after you have plugged it in to ensure the battery is charged, try the following: Open the battery cover, and make sure the battery is facing the proper direction (See picture below) Side Facing Up Side Facing Down Remove the battery and inspect the 3 gold colored connectors on the bottom edge of the battery to ensure they are not dirty, or have any corrosion that would prevent a good contact with the connector pins on the device While the battery is removed, inspect the 3 connector pins that connect to the battery to make sure they are not damaged or broken. Note: If the battery is damaged, or the connector pins on the upro mx are damaged or broken, please contact customer service for assistance. UPRO MX User Guide (v1.1) ©2011 Callaway Golf Company Page 41 of 46 6.1.2 Battery Indicator Shows Full Charge – Not Fully Charged When you plug your upro mx into the included power adapter, or into a computer and tap the charge icon, you will see a battery image and an approximate charge level. In software version 2.00, there is a bug that prevents the accurate display of the charge level of the battery when it is plugged in. To correctly assess the charge level of the battery, do the following: Unplug the USB cable from the upro mx device, and from the Main Menu screen tap Settings, then tap Info. You will see a Battery Level at the bottom – this will indicate the correct battery level. To get a full charge, see the table below for charging time required: Current Charge Level Approximate Time to Charge to 100% 0 – 40% 3hrs 40 – 70% 2hrs 70 – 90% 1hr Remember also that the device has a red LED light on the front that will blink when the charge is complete. Note: This software bug is being addressed – continue to update your upro mx device through www.callawayuxplore.com to receive the latest software 6.1.3 Not Able to Finish a Round Without Battery Dying If you are unable to get ~6.5hrs of normal play on one full charge, try the following: Ensure that you have followed steps in 6.1.2 to guarantee you have a full charge on your battery From the Main Menu, tap Settings, then tap General. Ensure that the Power Settings are set to Longer Use Tap the back arrow at the lower left of the screen, and tap Appearance. The Backlight should be set to ~40. Sliding it to the left will extend your battery life. 6.1.4 Scrolling Through Long Lists is Difficult When you are selecting a course to play from the Play Golf option on the Main Menu, at times you may need to scroll several pages to reach the course you are trying to play. Due to the constraints of a compact screen size your upro mx is unable to quickly page through more than about 5 courses at a time. To avoid this, you should turn your upro mx about 10 minutes before you are ready to tee off, which will allow the device to achieve GPS lock. If the upro mx has achieved GPS lock, when you tap Play Golf, you UPRO MX User Guide (v1.1) ©2011 Callaway Golf Company Page 42 of 46 will see only a list of courses near you. You should then be able to easily select the course you are going to play. 6.2 Synchronizing your Device 6.2.1 Cannot Connect the UPRO MX If you are plugging your upro mx into your computer, and are not automatically launched into the uxplore website, try the following: Verify that you have downloaded and installed the UPRO Connector correctly. If you are using a computer running Windows XP, click on the Start button, then All Programs, and look for a program folder named “Callaway.” If the “Callaway” program folder is there, hold your cursor over the folder to display the contents, and click on UPRO Connector to ensure that the software is running. o If you do not see the “Callaway” folder in All Programs, you have not installed the software. Refer to section 1.4 above for instructions on how to install. Ensure that you are using the USB cable provided with your upro mx. The micro connector for the device is specially designed with the proper length to ensure a good connection. If you use another USB cable, you may not get a good connection Ensure that you are selecting the correct options on your upro mx when you first plug it in. You need to tap “Sync” then choose the correct computer type “Mac” or “PC” o If you experience a situation where you tap Sync, but you are not asked to select the correct computer type, and are instead brought to the Main Menu, you will need to power off the device, and power it back on. Reconnect the USB cable and try again 6.2.2 Website Does Not Launch When Connecting Device to a Computer If the uxplore website does not launch when you connect your upro mx to the computer using the provided USB cable, try the following: Verify that the UPRO Connector software is running. For PC users, check the lower right-hand corner of your screen (the “Tray”), and look for this icon: If you do not see this icon, navigate Start>All Programs>Callaway>UPRO Connector. This should turn on the UPRO Connector software. You will want to unplug your device, and plug it back in. UPRO MX User Guide (v1.1) ©2011 Callaway Golf Company Page 43 of 46 If you have verified that your UPRO Connector software is running, it may be that the connection was not correctly established. Try unplugging the device, waiting for the device screen to return to it’s operational state (i.e., not sync mode), then reconnect the device. Follow the on-device prompts to sync your device. 6.2.3 Found New Hardware Wizard Keeps Popping Up If you are using a computer running Windows XP, you may notice that each time you connect your upro mx you see the following pop-up: Although it is not necessary to do anything with this window to connect your upro mx, if you wish to prevent it from popping up in the future, select “Yes, this time only” and allow the wizard to run. UPRO MX User Guide (v1.1) ©2011 Callaway Golf Company Page 44 of 46 Click “Install the software automatically” and then click “Next.” You will see some additional messages appear in the lower right hand corner of your screen – you can ignore these. The Wizard will install the drivers it believes will connect the device. When it finishes, click “Next” UPRO MX User Guide (v1.1) ©2011 Callaway Golf Company Page 45 of 46 Once the wizard is finished, click “Finish” and the window will close. UPRO MX User Guide (v1.1) ©2011 Callaway Golf Company Page 46 of 46