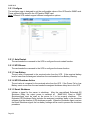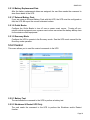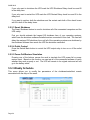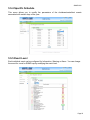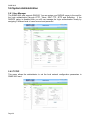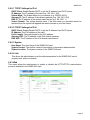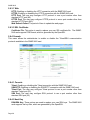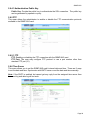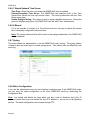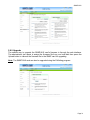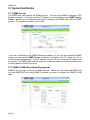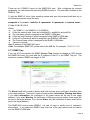
1
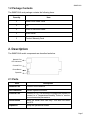
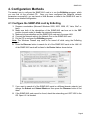
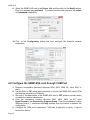
SNMP-NV6 UPS SNMP Card (Web-Based monitoring SNMP Card) User’s Manual SNMP-NV6 About this manual This manual contains information about the installation and the operation of the SNMP-NV6 SNMP card. Save this Manual This manual contains instructions and warnings that should be followed during the installation, operation and storage of this product. Failure to heed these instructions and warnings will void the product warranty. Electromagnetic Interference This is a Class A product. In a domestic environment, this product might cause radio interference in which case the user is required to take adequate measures. These limits are designed to provide reasonable protection against harmful interference when the equipment is operated in a commercial environment. DOS, Windows: NT, 2000, XP, 2003, Vista, and 7 are registered trademarks of Microsoft Corporation. All other trademarks belong to their respective proprietors. Safety Information Qualified service personnel must perform the servicing of this equipment. Remove rings, watches and other jewelry before servicing the unit. Before plugging in or pulling out the SNMP-NV6 card to and/or from the UPS, we recommend turning the UPS off. © Copyright 2012 Page 2 SNMP-NV6 Table of Contents 1. Overview .................................................................................... 6 1.1 Features ............................................................................................... 6 1.2 Package Contents ................................................................................ 7 2. Description ................................................................................ 7 2.1 Ports ..................................................................................................... 7 2.1.1 LED Indicators............................................................................. 8 2.1.2 Dipswitch Settings ....................................................................... 8 3. Installation ................................................................................. 8 4. Configuration Methods ............................................................ 9 4.1 Configure the SNMP-NV6 card by EzSetting ....................................... 9 4.2 Configure the SNMP-NV6 card through COM Port ............................ 10 4.3 Configure the SNMP-NV6 card through Telnet .................................. 11 4.4 Configure the SNMP-NV6 card via Text Mode ................................... 11 4.4.1 SNMP-NV6 card’s Main Menu .................................................. 11 4.4.1.1 User Manager ........................................................................ 12 4.4.1.2 TCP/IP Setting ....................................................................... 13 4.4.1.3 Network Parameter ................................................................ 14 4.4.1.4 Time Server............................................................................ 15 4.4.1.5 Soft Restart ............................................................................ 15 4.4.1.6 Reset All To Default ............................................................... 15 4.4.1.7 Exit Without Save ................................................................... 15 4.4.1.8 Save And Exit......................................................................... 15 5. Web Interface .......................................................................... 16 5.1 Run a Web Browser ........................................................................... 16 5.2 Monitor Information ............................................................................ 16 5.2.1 UPS Properties ......................................................................... 17 5.2.2 Battery Parameters ................................................................... 17 5.2.3 In/Out Parameters ..................................................................... 18 5.2.4 Identification .............................................................................. 18 5.2.5 Status Indication........................................................................ 19 5.2.6 ShutdownAgent ......................................................................... 19 5.3 Monitor History ................................................................................... 20 5.3.1 Event Log .................................................................................. 20 5.3.2 Data Log.................................................................................... 20 5.3.3 Configure................................................................................... 21 5.4 Monitor About ..................................................................................... 21 5.4.1 Information ................................................................................ 21 5.5 Device (UPS) Management................................................................ 21 5.5.1 Configure................................................................................... 22 5.5.1.1 Auto Restart ........................................................................... 22 5.5.1.2 UPS Buzzer............................................................................ 22 5.5.1.3 Low Battery ............................................................................ 22 5.5.1.4 UPS Shutdown Action ............................................................ 22 5.5.1.5 Smart Shutdown..................................................................... 22 Page 3 SNMP-NV6 5.5.1.6 Battery Replacement Date ..................................................... 23 5.5.1.7 External Battery Pack............................................................. 23 5.5.1.8 Outlet Banks........................................................................... 23 5.5.1.9 Economy Mode ...................................................................... 23 5.5.2 Control............................................................................................. 23 5.5.2.1 Battery Test ............................................................................ 23 5.5.2.2 Shutdown & Restart UPS Only .............................................. 23 5.5.2.3 Smart Shutdown..................................................................... 24 5.5.2.4 Outlet Control ......................................................................... 24 5.5.2.5 Power Fail/Restore Simulation ............................................... 24 5.5.3 Weekly Schedule ............................................................................ 24 5.5.4 Specific Schedule ............................................................................ 25 5.5.5 Event Level ..................................................................................... 25 5.6 System Administration........................................................................ 26 5.6.1 User Manager ........................................................................... 26 5.6.2 TCP/IP....................................................................................... 26 5.6.2.1 TCP/IP Settings for IPv4 ........................................................ 27 5.6.2.2 TCP/IP Settings for IPv6 ........................................................ 27 5.6.2.3 System ................................................................................... 27 5.6.2.4 Link......................................................................................... 27 5.6.3 Web ........................................................................................... 27 5.6.3.1 Web ........................................................................................ 28 5.6.3.2 SSL Certificate ....................................................................... 28 5.6.4 Console ..................................................................................... 28 5.6.4.1 Console .................................................................................. 28 5.6.4.2 Host Key................................................................................. 28 5.6.4.3 Authentication Public Key ...................................................... 29 5.6.5 FTP ........................................................................................... 29 5.6.5.1 FTP ........................................................................................ 29 5.6.6 Time Server............................................................................... 29 5.6.6.1 Simple Network Time Server ................................................. 30 5.6.6.2 Manual ................................................................................... 30 5.6.7 Syslog ....................................................................................... 30 5.6.8 Batch Configuration................................................................... 30 5.6.9 Upgrade .................................................................................... 31 5.7 System Notification ............................................................................ 32 5.7.1 SNMP Access ........................................................................... 32 5.7.2 SNMPv3 USM (User Based Management) ............................... 32 5.7.3 SNMP Trap ............................................................................... 33 5.7.4 Mail Server ................................................................................ 34 5.7.5 Wake On LAN ........................................................................... 35 5.8 Environment ....................................................................................... 35 5.8.1 Information ................................................................................ 35 5.8.2 Configuration ............................................................................. 36 6. Upgrade ................................................................................... 37 Page 4 SNMP-NV6 7. Specifications ......................................................................... 39 7.1 Technical Specifications ..................................................................... 39 7.2 DIP Switch Settings ............................................................................ 39 7.3 LED Indicators .................................................................................... 39 8. Troubleshooting ..................................................................... 40 9. Limited Product Warranty ...................................................... 43 Page 5 SNMP-NV6 1. Overview SNMP-NV6 card is an interface between the UPS and the network. It can obtain the information from a UPS and issue commands to it. SNMP-NV6 card supports two kinds of protocols – SNMP and HTTP for user access. Through the SNMP NMS and Web Browser, the user can setup the SNMP-NV6 card obtain information from the UPS and issue commands to UPS. SNMP-NV6 card also provides shutdown software that operates with various Operating Systems that can link to the SNMP-NV6 card automatically through the network and communicate with it via SNMP protocol. The shutdown software retrieves the UPS information from SNMP-NV6 card and based on this information can start the shutdown process in order to prevent the abnormal shutdown of the host or server due to power events. 1.1 Features UPS network management: Allows remote management of a UPS from any workstation through the Internet or Intranet UPS remote monitor via SNMP & HTTP: Allows remote monitoring of a UPS via SNMP NMS together with the UPS MIB (Management Information Base) files or via a Web Browser UPS and system configuration from any client (password protected): Set UPS and system parameters from a Web Browser Supports Load Shedding on a Power Event Records event logs & monitored data: Provides history data and event log for the UPS User notified via SNMP Trap and e-mail Supports gmail accounts Configurable SMTP server port Supports Network Time Protocol Supports Telnet configuration Supports BOOTP/DHCP Supports security protocols - HTTPS, SSH, SFTP, and SNMPv3 Login via RADIUS and local authentication Supports Syslog Supports IPv4 and IPv6 Supports Environmental Monitoring Page 6 SNMP-NV6 1.2 Package Contents The SNMP-NV6 card package contains the following items. Quantity Item 1 SNMP-NV6 SNMP Card 1 CD 1 RJ45 to DB9 serial cable 1 Quick Install 1 Product Warranty Card 2. Description The SNMP-NV6 card’s components are described as below. Network Port LED Indicators Console Port Reset Button Dipswitch 2.1 Ports Item Description Network Port Connect to the Network. LED Indicators Indicate operational status. Console Port Connect to a VT100 terminal to configure the system or connect to a Temperature/Humidity Probe to monitor the environmental parameters. Reset Button Reset the SNMP-NV6 card only. This does not affect the UPS. Dipswitch Setup the operational modes. Page 7 SNMP-NV6 2.1.1 LED Indicators No. Yellow LED Green LED Description 1 --- OFF Hardware or network error 2 Flashing (1sec) --- UPS is disconnected ON Normal operation Without Temp/Humidity probe Flashing (50 ms) 3 With Temp/Humidity probe 4 5 Flashing (50 ms) Flashing (50 ms) Normal operation Flashing (50 ms) ON Temp/Humidity probe is disconnected 2.1.2 Dipswitch Settings No. 1 Dip1 OFF Dip2 OFF Description Normal operation 2 OFF ON Pass Through Mode 3 ON OFF Sensor Mode (with Temp/Humidity probe) 4 ON ON Console Mode 3. Installation Note: The SNMP-NV6 cards are designed to be Hot Swappable, but there is a remote chance that when Hot-Swapping the SNMP-NV6 card that the UPS will shutdown. Minuteman recommends following steps 1 through 13 when installing the SNMP-NV6 card, but to hot-swap skip to step number 3 and omit steps 6, 7. 1. 2. 3. 4. 5. 6. 7. 8. Turn off all of the equipment that is plugged into the UPS. Turn off the UPS and unplug the UPS’s power cord from the AC wall outlet. Remove the Option Slot cover plate from the rear panel of the UPS. Insert the SNMP-NV6 card into the option slot and secure with the retaining screws. Connect the Network cable to the Network Port on the SNMP-NV6 card. Plug the UPS’s power cord into the AC wall outlet and turn the UPS on. Turn on all the equipment that is plugged into the UPS. Open a web browser and type in the default host name SNMP-NV6 or the default IP address 192.168.1.100 in the address box. 9. Login as administrator with admin for the default Account and password for the default Password. 10. Open the TCP/IP page and configure the IP address, Subnet Mask, Gateway IP and the host name for the SNMP-NV6 card. 11. Open the User Manager page to change your accounts and passwords. 12. We recommended disabling the BOOTP/DHCP option and assigning a valid static IP address. 13. Open the Time Server page to set the time and the date. Note: The BOOTP/DHCP default setting is Enabled. Page 8 SNMP-NV6 4. Configuration Methods The easiest way to configure the SNMP-NV6 card is to run the EzSetting program, which you can find on the provided CD. Once you have configured the essential network parameters successfully, you can launch a Web Browser or telnet to the SNMP-NV6 card to execute more detailed configuration. 4.1 Configure the SNMP-NV6 card by EzSetting 1. Prepare a workstation (Microsoft Windows 2000, 2003, 2008, XP, Vista, Win7 or later). 2. Make sure both of the dipswitches of the SNMP-NV6 card are set to the OFF position (normal mode) to enable the network transmission. 3. Make sure the workstation and the SNMP-NV6 card are in the same LAN. 4. Connect the Network cable to the Network Port on the SNMP-NV6 card. 5. Put the CD in and open the EzSetting program. Note: The Windows Firewall may need to be turned off while using the EzSetting program. 6. Press the Discover button to search for all of the SNMP-NV6 cards in the LAN. All of the SNMP-NV6 cards will be listed in the Device List as shown below. 7. If you want to search all of the SNMP-NV6 cards in a different domain network, just change the Subnet and Subnet Mask and then press the Discover button to list them. 8. If the SNMP-NV6 card cannot be found, check the networking port UDP 3456 in the OS. Open it if it is blocked. Page 9 SNMP-NV6 9. Select the SNMP-NV6 card in the Device List and then click on the Modify button. Enter the account and password. The default account and password are admin and password respectively. 10. Click on the Configuration button and then configure the essential network parameters. 4.2 Configure the SNMP-NV6 card through COM Port 1. Prepare a workstation (Microsoft Windows 2000, 2003, 2008, XP, Vista, Win7 or later). 2. Use the RJ45 to DB9 serial cable (provided) to connect the SNMP-NV6 card’s COM port with the workstation’s COM port. 3. Set both of the dipswitches of the SNMP-NV6 card to OFF position (normal mode) to enable the network transmission. 4. From the workstation running Windows 2000, 2003, 2008, or XP, open HyperTerminal in the Accessories Program Group. From the workstation running Windows Vista or 7, download the Putty software from the Internet to execute the configuration. 5. Configure the COM port’s parameters: 2400 bps, 8 data bits, no parity, 1 stop bit and no flow control. Page 10 SNMP-NV6 6. Set both of the dipswitches of the SNMP-NV6 card to ON position (configuration mode). After the message appears on the screen, key in the account (default account is admin’) and password (default password is password). Then the SNMP-NV6 card’s Main Menu will appear on the screen. Refer to section 4.4 Configure the SNMP-NV6 card via Text Mode for more information. 4.3 Configure the SNMP-NV6 card through Telnet 1. Connect the SNMP-NV6 card to the network. 2. Prepare a workstation (Microsoft Windows, Mac OS X or Linux) that is in the same LAN. 3. Set both of the dipswitches of the SNMP-NV6 card to the OFF position (normal mode). 4. From the Windows workstation open a DOS Prompt, type in the telnet HostName or the IP address. For other operating systems, please run the OS shell and type the same command. 5. After the message appears on the screen, enter the account (default account is admin) and the password (the default password is password) and then the SNMP card’s Main Menu will appear on the screen. Please refer to 4.4 Configure the SNMP-NV6 card via Text Mode for more information. Note: The SNMP-NV6 card will terminate the telnet connection if there is no activity within 1 minute. 4.4 Configure the SNMP-NV6 card via Text Mode You can configure the SNMP-NV6 card via text mode by using a Telnet utility or through the COM port. 4.4.1 SNMP-NV6 card’s Main Menu +========================+ | Web Card Main Menu | +========================+ Web Card Version 01.00.00 MAC Address 00-30-ab-25-e9-1e [1]. User Manager [2]. TCP/IP Setting [3]. Network Parameter [4]. Time Server [5]. Soft Restart [6]. Reset All To Default [z]. Exit Without Save [0]. Save And Exit Please Enter Your Choice => Page 11 SNMP-NV6 4.4.1.1 User Manager +========================+ | User Manager | +========================+ RADIUS [1]. RADIUS Auth: Disable [2]. Server: [3]. Secret: [4]. Port: 1812 ---------------Local Auth Administrator [5]. Account: admin [6]. Password: ******** [7]. Limitation: Only in This LAN Device Manager [8]. Account: device [9]. Password: ******** [a]. Limitation: Only in This LAN Read Only User [b]. Account: user [c]. Password: ******** [d]. Limitation: Allow Any [0]. Back To Previous Menu Please Enter Your Choice => Item Function Description Default [1]. RADIUS Auth: [2]. Server: Obtain the login authentication from a RADIUS server The RADIUS server name [3]. Secret: The RADIUS secret [4]. Port: The RADIUS port number [5]. Administrator Account [6]. Administrator Password Administrator has sole right to modify the admin SNMP-NV6 settings. password [7]. Administrator Limitation Restrict login area for the administrator Only in this LAN [8]. Device Account device [9]. Device Password Device Manager is not permitted to change the network settings but has the ability to configure the UPS settings. [a]. Device Limitation Restrict login area for the device manager Only in this LAN [b]. User Account [c]. User Password Read Only. User can observe the UPS information only. password [d]. User Limitation Restrict login area for the user Allow Any Page 12 Disable 1812 password user SNMP-NV6 4.4.1.2 TCP/IP Setting +========================+ | TCP/IP Setting | +========================+ [1]. IPv4 Address: 192.168.001.100 [2]. IPv4 Subnet Mask: 255.255.255.000 [3]. IPv4 Gateway IP: 192.168.001.254 [4]. IPv4 DNS or WINS IP: 192.168.001.001 [5]. DHCPv4 Client: Enable [6]. IPv6 Address: fe80::230:abff:fe25:900 [7]. IPv6 Prefix Length: 64 [8]. IPv6 Gateway IP: :: [9]. IPv6 DNS IP: :: [a]. DHCPv6: Enable [b]. Host Name (NetBIOS): SNMP-NV6 [c]. System Contactor: [d]. System Location: [e]. Auto-Negotiation: Enable [f]. Speed: 100M [g]. Duplex: Full [h]. Status Stable: 3 [0]. Back To Previous Menu Please Enter Your Choice => Item Function Description Default [1]. IPv4 Address The default IPv4 address 192.168.001.100 [2]. IPv4 Subnet Mask The IPv4 sub-net mask setting 255.255.255.000 [3]. IPv4 Gateway IP The IPv4 network default gateway 192.168.001.254 [4]. IPv4 DNS IP IPv4 Domain Name Server IP address 192.168.001.001 [5]. DHCPv4 Client Enable/Disable DHCPv4 protocol [6]. IPv6 Address The SNMP-NV6 IPv6 address [7]. IPv6 Subnet Mask The IPv6 sub-net mask setting [8]. IPv6 Gateway IP The IPv6 network default gateway [9]. IPv6 DNS IP IPv6 Domain Name Server IP address [a]. DHCPv6 Client Enable/Disable DHCPv6 protocol [b]. Host Name [c]. System Contactor [d]. System Location [e]. Auto-Negotiation [f]. Speed [g]. Duplex Enable Enable SNMP-NV6 Enable The network link operation 100M Full Page 13 SNMP-NV6 4.4.1.3 Network Parameter +========================+ | Network Parameter | +========================+ [1]. HTTP Server: Enable [2]. HTTPS Server: Enable [3]. Telnet Server: Enable [4]. SSH/SFTP Server: Enable [5]. FTP Server: Enable [6]. Syslog: Enable [7]. HTTP Server Port: 80 [8]. HTTPS Server Port: 443 [9]. Telnet Server Port: 23 [a]. SSH Server Port: 22 [b]. FTP Server Port: 21 [c]. Syslog Server1: [d]. Syslog Server2: [e]. Syslog Server3: [f]. Syslog Server4: [g]. SNMP Get, Set Port: 161 [0]. Back To Previous Menu Please Enter Your Choice => Item Function Description Default [1]. HTTP Server Enable/Disable HTTP protocol Enable [2]. HTTPS Server Enable/Disable HTTPS protocol Enable [3]. Telnet Server Enable/Disable telnet protocol Enable [4]. SSH/SFTP Server Enable/Disable SSH/SFTP protocol Enable [5]. FTP Server Enable/Disable FTP protocol Enable [6]. Syslog Enable/Disable remote syslog Disable [7]. HTTP Server Port HTTP networking port 80 [8]. HTTPS Server Port HTTP networking port 443 [9]. Telnet Server Port Telnet networking port 23 [a]. SSH Server Port SSH networking port 22 [b]. FTP Server Port FTP networking port 21 [c]. Syslog Server1 The remote syslog host name [d]. Syslog Server2 The remote syslog host name [e]. Syslog Server3 The remote syslog host name [f]. Syslog Server4 The remote syslog host name [g]. SNMP Get, Set Port The SNMP networking port Page 14 161 SNMP-NV6 4.4.1.4 Time Server There are two ways to set the SNMP-NV6 card’s current time and date. One is to set the system time manually, but this is not the best way. The ideal way is to set up a timeserver. The SNMP-NV6 card does support SNTP, which is supported by Windows XP. To configure a Windows PC to act as a timeserver, please install the Simple TCP/IP Services from the Add/Remove Windows Components. +========================+ | Time Server | +========================+ [1]. Time Selection: SNTP [2]. Time Zone: +0 hr [3]. 1st Time Server: POOL.NTP.ORG [4]. 2nd Time Server: [5]. Manual Date: 01/01/2000 (MM/DD/YYYY) [6]. Manual Time: 00:00:00 (hh:mm:ss) [0]. Back To Previous Menu Please Enter Your Choice => Item Function Description Default [1]. Time Selection Select SNTP or manually SNTP [2]. Time Zone [3]. Select time zone +0 hr st The first time server for SNTP POOL.NTP.ORG nd 1 Time Server [4]. 2 Time Server The second time server for SNTP [5]. Manual Date Assign the date manually if the Time Selection is selected to Manual 01/01/2000 [6]. Manual Time Assign the time manually if the Time Selection is selected to Manual 00:00:00 4.4.1.5 Soft Restart Simply restart the SNMP-NV6 card. It does not affect the UPS. 4.4.1.6 Reset All To Default Resets all of the settings back to the original default values. 4.4.1.7 Exit Without Save Exit and disregard any changes. 4.4.1.8 Save And Exit Saves the changes and exits. Page 15 SNMP-NV6 5. Web Interface 5.1 Run a Web Browser 1. Make sure that you have a TCP/IP network already installed. 2. Start your Web Browser. Enter http://host_name or http://ip_address in the address bar for the plain web transmission or https://host_name or https://ip_address for the encrypted web transmission. The SNMP-NV6 card will then ask for your user name and password. After keying in the correct user name and password, the SNMP-NV6 card’s Home Page will appear on the screen. 3. If the login page does displayed, but you are unable to login with the correct user name and password, it might be because that the IP address that you used to login is different from the SNMP-NV6 card’s IP address subnet. Note: The SNMP-NV6 cards will automatically logout the user if there is no activity for 30-minutes. 5.2 Monitor Information This section includes information about the UPS Properties, Battery Parameters, Input/Output Parameters, Identification, Status Indication and the ShutdownAgent. Because different models provide different information, the model you have may not display the same information. Page 16 SNMP-NV6 5.2.1 UPS Properties This page gives a snapshot of all the principal UPS parameters. The values will update automatically. To set the refresh time, select the menu Administration – Web – Web Refresh Period. 5.2.2 Battery Parameters This page displays a list of the UPS battery parameters. Page 17 SNMP-NV6 5.2.3 In/Out Parameters Select In/Out Parameters from the UPS Information on the main menu to get a list of the UPS input, and output parameters. 5.2.4 Identification Select Identification from the UPS Information menu to get a list of the UPS information. Page 18 SNMP-NV6 5.2.5 Status Indication This page lists the UPS events and indicates which event has occurred by turning the button on or off. 5.2.6 ShutdownAgent The SNMP-NV6 card will interface with the ShutdownAgent software. See the ShutdownAgent software user’s manual to configure the SNMP-NV6 card to communicate with the ShutdownAgent software. Page 19 SNMP-NV6 5.3 Monitor History 5.3.1 Event Log This table lists all the events that have occurred. The existing values are overwritten when the maximum number of entries (rows) has been reached. You can also download all of the event logs to your computer. 5.3.2 Data Log This table lists all of the saved UPS data. The existing values are over written when the maximum number of entries has been reached. You can also download the data log to your computer. Page 20 SNMP-NV6 5.3.3 Configure This page allows you to clear the event log, the data log and assign the time interval to record the data. 5.4 Monitor About 5.4.1 Information This menu provides important information about the OpenSSL toolkit that the SNMP-NV6 card utilizes. 5.5 Device (UPS) Management Because different UPSs provide different functions, the UPS you have may not support the same configuration or control items. Page 21 SNMP-NV6 5.5.1 Configure The configure page is designed to set the configurable values of the UPS and/or SNMP card. These values will be stored in the UPS and/or SNMP card. Note: Different UPS models support different configuration options. 5.5.1.1 Auto Restart The card sends the command to the UPS to configure the auto restart function. 5.5.1.2 UPS Buzzer The card sends the command to the UPS to configure the buzzer function. 5.5.1.3 Low Battery The set value is compared to the received value from the UPS. If the received battery level is lower than the assigned value then the card sends the Low Battery Warning. 5.5.1.4 UPS Shutdown Action The set value is compared to the received value from the UPS. If the Power Fail or Low Battery event occurs then the card sends the assigned shutdown delay time to the UPS. 5.5.1.5 Smart Shutdown Initiates a signal for the server to shutdown. After the user-defined Estimated OS Shutdown Delay, the output power is switched off. SNMP-NV6 Client or SNMP ShutdownAgent must be used on the server for it to be properly shutdown. The Estimated OS Shutdown Delay includes the assigned countdown delay in the shutdown software plus the duration of OS shutdown process. When the Shutdown Agent receives the Smart Shutdown signal, the low battery settings will be used to process the shutdown procedure. Page 22 SNMP-NV6 5.5.1.6 Battery Replacement Date After the battery replacement dates are assigned, the card then sends the command to store these dates in the UPS. 5.5.1.7 External Battery Pack If you are using an External Battery Pack with this UPS, the UPS must be configured so that; the UPS will report the correct estimated runtime. 5.5.1.8 Outlet Banks Configure the Outlet Banks to turn off once a power event occurs. Turning off nonmission critical equipment once a power event occurs can extend the battery backup time for the mission critical equipment. 5.5.1.9 Economy Mode Configure the UPS to operate in the Economy mode. See the UPS user’s manual for the Economy mode operation. 5.5.2 Control This menu allows you to send the control commands to the UPS. 5.5.2.1 Battery Test The card sends the command to the UPS to perform a battery test. 5.5.2.2 Shutdown & Restart UPS Only The card sends the command to the UPS to perform the Shutdown and/or Restart function. Page 23 SNMP-NV6 If you only want to shutdown the UPS mark the UPS Shutdown Delay check box and fill in the delay time. If you only want to restart the UPS mark the UPS Restart Delay check box and fill in the delay time. If you want to perform both the shutdown and the restart mark both of the check boxes and fill in both of the delay times. 5.5.2.3 Smart Shutdown The Smart Shutdown feature is used to shutdown all of the connected computers and the UPS safely. First you should estimate the longest OS shutdown time of your operating systems, which have the shutdown software installed and are connected to this card. The card will delay the assigned OS shutdown time until all of the operating systems are shutdown by the shutdown software then sends the UPS the shutdown command. 5.5.2.4 Outlet Control Press the Switch Bank button to control the UPS output relay to turn on or off the outlet banks. 5.5.2.5 Power Fail/Restore Simulation Pressing one of the buttons causes the card to simulate the UPS power fail or power restore event. Based on this function, we can test all of the connected software to verify whether they work properly or not. The UPS will remain in its original state and will not go to the battery mode. 5.5.3 Weekly Schedule This menu allows you to modify the parameters of the shutdown/restart/test events associated with the days of the week. Page 24 SNMP-NV6 5.5.4 Specific Schedule This menu allows you to modify the parameters of the shutdown/restart/test events associated with certain days of the year. 5.5.5 Event Level Each individual event can be configured for Information, Warning or Alarm. You can change the event for e-mail or SNMP trap by modifying the event level. Page 25 SNMP-NV6 5.6 System Administration 5.6.1 User Manager The SNMP-NV6 card supports RADIUS. You can assign your RADIUS server to the card for the login authentication through HTTP, Telnet, SSH, FTP, SFTP and EzSetting. If the RADIUS option is disabled then you still can manage the login authentication locally by assigning 3 different level of users account and password. 5.6.2 TCP/IP This menu allows the administrator to set the local network configuration parameters in SNMP-NV6 card. Page 26 SNMP-NV6 5.6.2.1 TCP/IP Settings for IPv4 DHCP Client: Enable/Disable DHCP to get the IP address from DHCP server. IP Address: The IP address of the card (e.g. 192.168.1.100). Subnet Mask: The Subnet Mask for your network (e.g. 255.255.255.0). Gateway IP: The IP address of the network gateway (e.g. 192.168.1.254). DNS IP: The IP address of the domain name server (e.g. 192.168.1.1). Search Domain: The system domain name, if the host name you provided cannot be searched then the system will append the search domain to your host name. 5.6.2.2 TCP/IP Settings for IPv6 DHCP Client: Enable/Disable DHCP to get the IP address from DHCP server. IP Address: The IPv6 address of the card. Prefix Length: The prefix length for the IPv6 address. Gateway V6IP: The IP address of the IPv6 network gateway. DNS V6IP: The IP address of the IPv6 domain name server. 5.6.2.3 System Host Name: The Host Name of the SNMP-NV6 card. System Contact: The system contactor information of the network administration. System Location: The system location of the SNMP-NV6 card. 5.6.2.4 Link This allows the administrator to set the data transmission for the SNMP-NV6 card to properly work with your network. 5.6.3 Web This menu allows the administrator to enable or disable the HTTP/HTTPS communication protocols available in the SNMP-NV6 card. Page 27 SNMP-NV6 5.6.3.1 Web HTTP: Enabling or disabling the HTTP connection with the SNMP-NV6 card. HTTPS: Enabling or disabling the HTTPS connection with the SNMP-NV6 card. HTTP Port: The user may configure HTTP protocol to use a port number other than standard HTTP port (80). HTTPS Port: The user may configure HTTPS protocol to use a port number other than standard HTTPS port (443). Web Refresh Period: The period of time to update the web pages. 5.6.3.2 SSL Certificate Certificate File: This option is used to replace your own SSL certificate file. The SNMPNV6 card supports PEM format, which is generated by the OpenSSL. 5.6.4 Console This menu allows the administrator to enable or disable the Telnet/SSH communication protocols available in the SNMP-NV6 card. 5.6.4.1 Console Telnet: Enabling or disabling the Telnet connection with the SNMP-NV6 card. SSH/SFTP: Enabling or disabling the SSH/SFTP connection with the SNMP-NV6 card. Telnet Port: The user may configure Telnet protocol to use a port number other than standard Telnet port (23). SSH Port: The user may configure SSH protocol to use a port number other than standard SSH port (22). 5.6.4.2 Host Key DSA/RSA Key: These options are used to replace your own SSH keys. The SNMP-NV6 card supports the key files, which are generated by the OpenSSH. Page 28 SNMP-NV6 5.6.4.3 Authentication Public Key Public Key: Provide the public key to authenticate the SSL connection. The public key can be generated by openssh or putty. 5.6.5 FTP This menu allows the administrator to enable or disable the FTP communication protocols available in the SNMP-NV6 card. 5.6.5.1 FTP FTP: Enabling or disabling the FTP connection with the SNMP-NV6 card. FTP Port: The user may configure FTP protocol to use a port number other than standard FTP port (21). 5.6.6 Time Server This menu allows you to set the SNMP-NV6 card’s internal date and time. There are 2 ways to set the date and time. Synchronize with SNTP server or set the date and time manually. Note: If the SNTP is enabled, but cannot get any reply from the assigned time server then the event log and data log will not work. Page 29 SNMP-NV6 5.6.6.1 Simple Network Time Server Time Zone: Select the time zone where the SNMP-NV6 card is installed. Primary/Secondary Time Server: The SNMP-NV6 card searches both of the Time Servers and follows the first reply server’s time. The card synchronizes with the Time Server every hour. Enable Daylight Saving: This option is used to setup a daylight saving time. During the period of daylight saving time, the SNMP-NV6 card will add 1 hour automatically. 5.6.6.2 Manual If it is not possible to connect to a Time Server then the only way to adjust the system time is manually configure the date and time. Note: The system date and time will be reset to the assigned date/time if the SNMP-NV6 card is restarted. 5.6.7 Syslog This menu allows the administrator to set the SNMP-NV6 card’s syslog. The syslog feature is used to save the event log to a remote syslog server. This feature does not affect the local event log. 5.6.8 Batch Configuration If you are the administrator and you have finished configuring one of the SNMP-NV6 cards, you can copy the same configuration to the other SNMP-NV6 cards by distributing the configuration files. Note: You should only delete the lines which you don’t want to distribute and if the IP address is static then you must delete the line of IP address = xxx.xxx.xxx in the [System] section. The batch configuration can be done through FTP. Page 30 SNMP-NV6 5.6.9 Upgrade The easiest way to upgrade the SNMP-NV6 card’s firmware is through the web interface. The administrator just needs to assign the firmware file from your local disk then press the Upload button to transmit the firmware file to the SNMP card for upgrading. Note: The SNMP-NV6 card can also be upgraded using the EzSetting program. Page 31 SNMP-NV6 5.7 System Notification 5.7.1 SNMP Access The SNMP-NV6 card supports the SNMP protocol. You can use an NMS to manage a UPS through a network. You must enter the IP address of the workstation in the SNMP Access Table to prevent any unauthorized users from configuring the SNMP-NV6 card via SNMP protocol. The maximum number of IPs is 256. If you use a workstation with SNMP Manager installed, or if you set more restrictive SNMP access, you can use the SNMP Access to add the IP address of the PC, which you use to modify the access permission. If the IP address is set as 0.0.0.0, it means the IP address will be ignored. The SNMP-NV6 card will check the community string first to identify whether the incoming packet is Read Only or not. 5.7.2 SNMPv3 USM (User Based Management) SNMPv3 is an encryption version of SNMP protocol. Before you can access the SNMP OID from the SNMP-NV6 card using SNMPv3 protocol you have to configure the SNMPv3 USM table. Page 32 SNMP-NV6 There can be 8 SNMPv3 users for the SNMP-NV6 card. After configuring the account parameters you can access the card using SNMPv3 protocol. This user table is related to the SNMPv3 Trap. To test the SNMPv3, find a Linux operating system and open the terminal shell then key in the following command to get the reply: snmpwalk -v 3 -u <user> -l authPriv -A <password> -X <password> -n <context name> t 3 <ip> 1.3.6.1.2.1.1.1.0 Where: -v: 1 for SNMPv1, 2 for SNMPv2c, 3 for SNMPv3. -l: Follow the security level, there are noAuthNoPriv, authNoPriv and authPriv. -u: The user name, which is assigned in the SNMPv3 USM table. -A: Follow an Auth Password, which is assigned in the SNMPv3 USM table. -X: Follow a Priv Password, which is assigned in the SNMPv3 USM table. -n: The Context Name, which is assigned in the SNMPv3 USM table. -t: Timeout in second. <ip>:IP address of the SNMP-NV6 card. <oid>: The available SNMP OID, please refer to the MIB file. For example: 1.3.6.1.2.1.1.1.0 5.7.3 SNMP Trap If you use a PC and perform the SNMP Manager Trap function to manage an UPS through the SNMP-NV6 card, you must add the IP address of the PC to the SNMP Trap list. The maximum number of SNMP trap targets is 256. The Event Level field is used to decide what kind of power event notification should be sent to the target address. There are 3 levels of power events: Information, Warning and Alarm. If you select Information, the notification of all power events will be sent to the target address; if you select Warning, the notification of Warning event as well as Alarm event will be sent to the target address; if you choose Alarm, only the notification of Alarm event will be sent to the target address. The SNMP-NV6 card provides SNMPv1, v2c and v3 traps to satisfy most of customer’s environment. If you select the SNMPv3 trap, then one of the user names must be entered into the SNMPv3 USM table. Page 33 SNMP-NV6 5.7.4 Mail Server The administrator can set up the SMTP Mail Server and the e-mail receiver so the designated recipient can receive the e-mail notification from the SNMP-NV6 card whenever a power event occurs. Gmail accounts are supported. The maximum number of e-mail users is 256. SMTP Server Name or IP: This is the hostname of a SMTP Mail Server used to send the email message from the SNMP-NV6 card. When entering a hostname, you are also required to enter the DNS IP in the TCP/IP page. Gmail accounts are supported. SMTP Server Port: Default SMTP server port is 25. This can be changed as required. Account: The Mail Server’s login account (if required). Password: The Mail Server’s login password (if required). Receiver: Enter the email address that you want the SNMP-NV6 card to send an e-mail to. Event Level: Select the event level that you want to go to the corresponding e-mail recipient. If you select Information, the notification of all power events will be sent to the target address; if you select Warning, the notification of the Warning event as well as the Alarm event will be sent to the target address; if you choose Alarm, only the notification of the Alarm event will be sent to the target address. You can change the event level from UPS Management – Event Level menu. Page 34 SNMP-NV6 5.7.5 Wake On LAN The Wake On LAN function can start up the client PC from the network by the MAC address. From this page, you can set 256 MAC addresses of the clients to be restarted after the power is restored or when the SNMP-NV6 card starts up. 5.8 Environment 5.8.1 Information The ENV Probe is an option for the SNMP-NV6 card that supports temperature and humidity and has 4 contact closure inputs for monitoring environmental status such as smoke, fire, water, and security alarms. See the ENV PROBE User’s Manual for installation. Features: Environmental temperature and humidity monitoring. Attaches up to 4 contact closure inputs for monitoring other environmental devices. Allows remote monitoring through network. Page 35 SNMP-NV6 5.8.2 Configuration This page allows you to change the values in the Temperature Warning and Alarm Thresholds and Humidity Warning and Alarm Thresholds, and then click on the Submit button to update the changes. If the temperature or humidity exceeds the alarm threshold, the event will be displayed in red on the Event log page. The ENV Probe can be configured to send an SNMP trap to the assigned target hosts. Select normal open or normal close for each of the 4 options, and then click on the Submit button to update the changes. If an alarm for one of the 4 input contact closures occurs, the alarm will be displayed in red on the Event log page. The 4 input contact closures can be configured to send an SNMP trap to the assigned target hosts. Page 36 SNMP-NV6 6. Upgrade The EzSetting program can be used to perform the firmware upgrade. program is compatible with the Windows operating system. The EzSetting Note: The firmware can also be upgraded by using the upgrade function in the web interface. 1. Make sure the SNMP-NV6 card is in the Subnet that has been specified. If it is not in the specified subnet configure the subnet and subnet mask to match the SNMP-NV6 card that you want to upgrade. 2. Press the Discover button to search for all of the SNMP cards in the specified subnet. 3. Select one device in the Device List then press the Modify button to enter the Account and Password. Page 37 SNMP-NV6 4. On the main screen press the Upgrade button. When the upgrade dialog box appears press the Browse button to locate the new firmware file. Verify the firmware version is the new file, which is listed in the File Information field then press the Upgrade Now button. The SNMP-NV6 card will response to the upgrade request in approximately 20-seconds 5. After the upgrade procedure is finished, the following dialog box will appear. Please wait approximately 1-minute for SNMP-NV6 card to reboot. 6. The EzSetting program supports Batch Upgrading. Select the checkboxes of the devices, which are listed in the Device List, then press the Batch Upgrade button. Select the firmware file, enter the Account name and Password, and then press the Upgrade Now button to upgrade all of the selected devices sequentially. Page 38 SNMP-NV6 7. Specifications 7.1 Technical Specifications Network Connection RJ-45 connector Operating Temperature 0 ~ 40 C Operating Humidity 10 ~ 80 % Power Input 9~24V DC Power Consumption 2 Watt Maximum Size 130 mm x 60 mm (L x W) Weight 75g 7.2 DIP Switch Settings No. Dip1 Dip2 Description 1 OFF OFF Normal operation 2 OFF ON N/A 3 ON OFF Sensor Mode (with ENV Probe) 4 ON ON Console Mode 7.3 LED Indicators No. Yellow LED Green LED Description 1 --- OFF 2 Flashing (1sec) --- UPS Disconnected ON Normal operation Hardware or network error Without ENV Probe 3 Flashing (50 ms) With ENV Probe 4 Flashing (50 ms) Flashing (50 ms) Normal operation 5 Flashing (50 ms) ON ENV Probe Disconnected Page 39 SNMP-NV6 8. Troubleshooting 1. How do I setup a SNTP (Simple Network Time Protocol) server? Answer: In the Windows XP operating system, click Start select Control Panel choose Add/Remove Programs click the Add/Remove Windows Components button click Networking Services select the Simple TCP/IP Services check box and then click ‘OK’ to finish the installation of Simple TCP/IP Services. After that, enter in the host’s IP address on the Time Server page. 2. How do I verify the network connection between my workstation and the SNMP-NV6 card? Answer: Check the network connection by typing the following command ping HostName or IP address at your workstation. 3. In the Web Browser, I can see the Login page but cannot login. Answer: Please check the IP address of the SNMP-NV6 card and the PC you trying to login from. If both of the IP addresses are not in the same LAN, run the EzSetting program to configure the User Limitation to Allow Any. 4. How do I refresh the NetBIOS table in Windows operating system? Answer: Sometimes the IP address of the SNMP-NV6 card will be changed, but the host name will remain the same. Although Windows will update its NetBIOS table periodically, you can force it to purge its cache immediately by typing the command nbtstat –R in the shell. After that, you can connect to the SNMPNV6 card by its host name. 5. How can I get the IP address and MAC address of my computer? Answer: For Windows system: type ipconfig /all at the DOS prompt. For UNIX system: enter ifconfig in the shell. 6. I am unable to ping or connect to the SNMP-NV6 card? Answer: Check the following items: 1) Check all the network connections. 2) Ensure that your PC and the SNMP-NV6 card are in the same network segment. If you don't have a router, they must be in the same network segment. 3) You can connect to the SNMP-NV6 card only, if your PC and the SNMP-NV6 cards are using the IP addresses from the same IP address block. Normally, private LANs use the IP addresses from one of the following blocks. 10.0.0.0 ~ 10.255.255.255 172.16.0.0 ~ 172.31.255.255 192.168.0.0 ~ 192.168.255.255 The SNMP-NV6 card's default IP address (192.168.1.100) is from the last block. If your LAN is using a different address block, you will not be able to connect to the SNMP-NV6 card via the LAN. Under such situation, you can choose to: Page 40 SNMP-NV6 Use the Terminal Mode to reset the SNMP-NV6 card's IP address. Change your PC's IP address to allow connection via the LAN. 7. I am unable to perform the SNMP Get operation? Answer: Check the SNMP settings stored in the SNMP-NV6 card. The IP address of the PC you are using must be entered in one of the SNMP Access Control NMS IP fields, with Read or Read/Write permission. The community string on the PC and the SNMP-NV6 card must match. 8. I am unable to perform the SNMP Set operation? Answer: Check the SNMP settings stored in the SNMP-NV6 card. The IP address of the PC you are using must be entered in one of the SNMP Access Control NMS IP fields, with Read/Write permission. The community string on the PC and the SNMP-NV6 card must match. 9. I do not receive traps at my management station? Answer: Check the SNMP Trap settings in the SNMP-NV6 card. The IP address of the PC you are using must be entered in one of the Target IP fields. 10. I forgot my administrator’s account and password? Answer: Connect the RJ45 to DB9 serial cable to the console port on the SNMP-NV6 card and set both of the dipswitches to the ON position (configuration mode). Enter rstadmin within 30 seconds while the Account and Password are prompted. After that, the administrator’s account and password are now reset to the default values. 11. Where can I get information about IPv6? Answer: 1) For every device that supports IPv6, it will have a LLA (Link Local Address) generated according to its own MAC address and the EUI-64 standard algorithm. For example, if the MAC address is 00:11:22:33:44:55, the according LLA will be fe80::211:22ff:fe33:4455. The SNMP-NV6 card does support IPv6 and can directly connected via LLA without any additional configuration. You should note that, according to RFC-4862, the IPv6 interface will automatically shutdown if the same LLA already existed on the LAN. 2) If both of the IPv4 and IPv6 DNS configurations co-exist, the IPv4 DNS configuration will have the top priority. 3) If your operating system is Windows XP, please enable IPv6 first (select RUN from START and enter ipv6 install). 4) To know more about IPv6 compatibility information, refer to RFC documents (1981, 2460, 4861, 4862, and 4443) on IETF website (http://tools.ietf.org/html), or refer to IPv6 Ready Logo website (http://www.ipv6ready.org). Page 41 SNMP-NV6 12 How do I generate a private SSL certificate file (PEM format) for HTTPS? Answer: 1) Download the openssl from http://www.openssl.org and install it on the Linux machine. 2) Open the command shell and enter the following command to create your own certificate file: Openssl req –x509 –nodes –days 3650 –newkey rsa:1024 –keyout cert.pem –out cert.pem 3) Once it is complete the cert.pem will be created in the current working directory. 4) Upload the cert.pem file to the SNMP-NV6 card through the web page. 13 How do I generate the SSH DSA and RSA keys for SSH? Answer: For Linux Version: 1) Download the openssh from http://www.openssh.org and install it on the Linux machine. 2) Open the command shell and enter the following command to create your own keys: Ignore the passphrase when ask. DSA Key: ssh-keygen –t dsa RSA Key: ssh-keygen –t rsa 3) Upload the DSA and RSA key files to the SNMP-NV6 card through the web page. For Windows Version: 1) Download the Putty from http://www.putty.org and install it. 2) Run the puttygen.exe in the putty installed directory. 3) Select SSH-2 RSA from the Parameters area and select the Generate key pair from the Key menu to generate the RSA key. 4) Select Export OpenSSH Key from the Conversions menu and assign a file name for the RSA key. Ignore the passphrase when ask. 5) Select SSH-2 DSA from the Parameters area and select the Generate key pair from the Key menu to generate the DSA key. 6) Select Export OpenSSH Key from the Conversions menu and assign a file name for the DSA key. Ignore the passphrase when ask. 7) Upload the DSA and RSA key files to the SNMP-NV6 card through the web page. Page 42 SNMP-NV6 9. Limited Product Warranty Para Systems Inc. (Para Systems) warrants this equipment, when properly applied and operated within specified conditions, against faulty materials or workmanship for a period of three years from the date of original purchase by the end user. For equipment sites within the United States and Canada, this warranty covers repair or replacement of defective equipment at the discretion of Para Systems. Repair will be from the nearest authorized service center. Replacement parts and warranty labor will be borne by Para Systems. For equipment located outside of the United States and Canada, Para Systems only covers faulty parts. Para Systems products repaired or replaced pursuant to this warranty shall be warranted for the remaining portion of the warranty that applies to the original product. This warranty applies only to the original purchaser who must have properly registered the product within 10 days of purchase. The warranty shall be void if (a) the equipment is damaged by the customer, is improperly used, is subjected to an adverse operating environment, or is operated outside the limits of its electrical specifications; (b) the equipment is repaired or modified by anyone other than Para Systems or Para Systems-approved personnel; or (c) has been used in a manner contrary to the product's operating manual or other written instructions. Any technical advice furnished before or after delivery in regard to use or application of Para Systems’ equipment is furnished without charge and on the basis that it represents Para Systems’ best judgment under the circumstances, but it is used at the recipient's sole risk. EXCEPT AS PROVIDED HEREIN, PARA SYSTEMS MAKES NO WARRANTIES, EXPRESSED OR IMPLIED, INCLUDING WARRANTIES OF MERCHANTABILITY AND FITNESS FOR A PARTICULAR PURPOSE. Some states do not permit limitation of implied warranties; therefore, the aforesaid limitation(s) may not apply to the purchaser. EXCEPT AS PROVIDED ABOVE, IN NO EVENT WILL PARA SYSTEMS BE LIABLE FOR DIRECT, INDIRECT, SPECIAL, INCIDENTAL, OR CONSEQUENTIAL DAMAGES ARISING OUT OF THE USE OF THIS PRODUCT, EVEN IF ADVISED OF THE POSSIBILITY OF SUCH DAMAGE. Specifically, Para Systems is not liable for any costs, such as lost profits or revenue, loss of equipment, loss of use of equipment, loss of software, loss of data, cost of substitutes, claims by third parties, or otherwise. The sole and exclusive remedy for breach of any warranty, expressed or implied, concerning Para Systems’ products and the only obligation of Para Systems hereunder, shall be the repair or replacement of defective equipment, components, or parts; or, at Para Systems’ option, refund of the purchase price or substitution with an equivalent replacement product. This warranty gives you specific legal rights and you may also have other rights, which vary from state to state. Minuteman Technical Support: Voice 1.972.446.7363 / Fax 1.972.446.9011 / Web www.minutemanups.com PN: 34000425 R4 Page 43