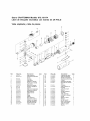
1
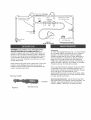
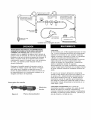
Owner's Manual
Pneumatic
3/8" Drive
RATC ET
Model No.
875.191174
WARNING:
Before operating tool, read this
manual and follow all
Safety Recommendations
Operating Instructions.
and
Safety
Warranty
Features & Operation
Maintenance
Espa_ol
Distributed
www,Sears,com
by Sears,
Roebuck and Co., Hoffman
Estates,
IL 60179
iNSTRUCTiONS
PERTAiNiNG
iNJURY
TO PERSONS
TO A RiSK
OF FIRE,
ELECTRIC
SHOCK,
OR
WARNING- Some dust created by using power tools contains chemicals known to the
State of California to cause cancer and birth defects or other reproductive
harm
WARNING-When
followed,
General:
read
Work
using
including
To reduce
all
the
the
product,
basic
precautions
the following:
the risks of electric
instructions
before
using
shock,
the
should
fire,
and
always
injury
be
to persons,
tool.
area
t, Keep
the
work
area
clean
and
well
lighted,
Cluttered
benches
and dark areas
increase the risks of electric shock, fire and injury to persons.
2. Do not operate
the
tool
of flammable
liquids,
in explosive
gases,
atmospheres,
or dust.
such
as in the
presence
The tool is able to create sparks resulting
in
the ignition of the dust orfumes.
3. Keep bystanders,
children,
and visitors
away while
Distractions are able to result in the loss of control of the tool.
Personal
1. Stay
the
operating
the
product.
safety
alert.
Watch
product.
drugs,
what
Do not
alcohol,
you are
use the
doing
product
or medication.
and
use common
while
tired
sense
when
operating
the
influence
of
or under
A moment of inattention while operating
the tool increases
the risk of injury to persons.
2. Dress
hair,
properly.
Do not
clothing,
and
hair increases
3, Remove
wear
gloves
loose
away
clothing
from
or jewelry.
moving
paris.
Contain
long
Loose clothes, jewelry,
adjusting
keys
and
wrenches
before
turning
to a rotating part of the tool increase
the
tool
equipment.
the applicable
the risk of personal
wear
eye
7. Always
wear
hearing
the
Proper footing
safety shoes and a hard hat must be used for
protection.
protection
when
using
the
tool.
Prolonged
exposure
to high
noise is able to cause hearing loss.
8. Disconnect
9. Avoid
A dust mask, non-skid
injury.
conditions.
6. Always
intensity
or long
on. A wrench or a
4, Do not overreach.
Keep proper footing
and balance
at all times,
and balance enables better control of the tool in unexpected situations.
safety
Keep
the risk of injury to persons as a result of being caught in moving parts.
key that is left attached
5. Use
hair.
the
product
unintentional
air supply.
from
starting.
the
air source
Be sure
the
before
switch
making
any
is off before
adjustments.
connecting
to
Do not carry the tool with your finger on the switch or connect the tool to the
air supply with the switch on.
A CAUTION
1. Inspect hose connection before each use;
2. Do not exceed 90psi when using pneumatic
3. Do not kink, twist, knot or abrade hose.
Applicable
is applicable
Range:
for pneumatic
Specifications:
Air tools Maximum
J
tools.
tools and accessories.
Working
Pressure .......... 90psi
Operation
Tool
use and
1. Use
care
clamps
or another
to a stable
platform.
to loss of control.
2. Do not force
the
practical
way
to secure
and
support
the
workpiece
Holding the work by hand or against the body is unstable
tool.
Use the
correct
tool
for the
application.
and to lead
The correct tool
will do the job better and safer at the rate for which the tool is designed.
3. Do not use the tool if the switch
does not turn the tool on or off, Any tool that
cannot be controlled with the switch is dangerous and must be repaired.
4. Disconnect
changing
the tool from the air source
before
making
any adjustments,
accessories,
or storing
the tool, Such preventive safety measures
reduce
the risk of starting the tool unintentionally.
5. Store
the
tool
tool is dangerous
6. Maintain
the
when
it is idle
out of children
in the hands of untrained
tool
with
care.
and
other
untrained
persons.
A
users.
Keep a cutting tool sharp and dean. A property
maintained
too, with sharp cutting edges reduced the risk of binding and is easier to control.
7.Check
any
for misalignment
other
serviced
condition
or binding
that
affects
before using. Many accidents
of bursting if the tool is damaged.
8 Use only accessories
that
tool
model.
Use of an accessory
are
of moving
the
tool's
parts,
operation,
breakage
if damaged,
are caused by poorly maintained
identified
not intended
by the
manufacturer
of parts,
and
have the tool
tools. There is a risk
for the
specific
for use with the specific tool model, increases
the risk of injury to persons.
ENG-3
Service
1. Too| service
must be performed
2. When servicing
a tool,
use only
authorized
parts.
3. Use only the lubricants
manufacturer.
supplied
on|y by qualified
repair personne|.
identical
replacement
parts.
Use
with
the
tool
of specified
only
by the
Air source
1. Never connect
to an air source
that is capable
pressurizing the tool is able to result in busting, abnormal
of exceeding
115psi.Over
operation, and breakage of the
tool or serious injury to persons. Use only clean, dry, regulated compressed air at the rated
pressure or within the rated pressure range as marked on the tool. Always verify prior to using
the tool that the air source has been adjusted to the rated air pressure or within the rated
air-pressure range.
2. Never use oxygen, carbon dioxide, combustible
the tool. Such gases are capable of explosion
gases or any bottled gas as an air source for
and serious injury to persons.
USER-MAINTENANCE
INSTRUCTIONS
SAVE THESE
iNSTRUCTiONS
ENG-4
Read
Operating
Instructions
Please
become
familiar
withalltheinstructions
and
warnings
before
operating
anypneumatic
tool.
Always
Wear
Approved
Eye
Protection
Impact
resistant
eyeprotection
should
meetorexceed
thestandards
setforthinANSI
Z87.1,
Occupational
and
Educational
EyeandFace
Protection.
Look
formarking
Z87.1
onyoureyeprotection
toensure
thatit isan
approved
style.
Hearing
Protection
isRecommended
Hearing
protection
should
beused
whenthenoiselevel
exposure
equals
orexceeds
an8 hourtime-weighted
average
sound
levelof85dBA.
Process
noise,
reflective
surfaces,
othertoolsbeingoperated
nearby,
alladdtothe
noiselevelinagivenworkarea.
Ifyouareunable
to
determine
yournoiselevelexposure,
werecommend
the
useofhearing
protection.
Avoid
Prolonged
Exposureto
Vibration
Pneumatic
toolscanvibrate
duringuse.Prolonged
exposure
tovibration
orveryrepetitive
handandarm
movements
cancause
injury.
Discontinue
theuseofany
toolif youexperience
tingling,
numbness,
discomfort
or
paininyourhands
orarms.
Youshould
consult
your
physician
before
resuming
useoftool.
90PSI
Maximum
Thistoolisdesigned
tooperate
atanairpressure
of90
pounds
persquare
inchgauge
pressure
(90PSI)
maximum,
atthetool.Useofhigher
airpressure
can,and
maycause
injury.
Also,theuseofhigher
airpressure
places
theinternal
components
underloadsand
stresses
theywerenotdesigned
for,causing
premature
toolfailure.
NOTE:THE
AIR
SUPPLY
SHOULD
BECLEAN,
DRYAND
PREFERABLY
LUBRICATED.
FOR
BEST
RESULTS
DRAIN
THE
MOISTURE
FROM
YOUR
COMPRESSOR
DAILY.
Use Only Power Sockets & Accessories
Sockets
socket
drives
and accessories
type. Always
regularly
used shall be of the
check
sockets,
for wear or damage
retainers
If this Craftsman
tool fails to give complete
satisfaction
within one year from the date of purchase, RETURN IT
TO THE NEAREST SEARS STORE IN THE UNITED
STATES, and Sears will repair or replace it free of charge.
If this Craftsman tool is used for commercial or rental
purposes, this warranty applies
date of purchase. This warranty
for only 90 days from the
gives you specific legal
rights, and you may also have other
from state to state.
rights which
vary
Distributed by Sears, Roebuck and Co.
Hoffman Estates, IL 60179.
The Craftsman
Model 875.191174
Wrench is designed
3/8" Drive Ratchet
for applications
such as automotive
repair, general assembly, transmission
teardown
and
maintenance.
Features include a lever throttle for speed
control
and low profile
head for work
in close quarters.
Features
Lever throttle for ease of operation.
1-1/8" Ratchet head height (without
socket) for use in
close-quarter
applications.
Front exhaust directs air away from operator.
Specifications
Drive size......................................................................................
3/8"
Free speed (No Load) ..............................................
160 RPM
Ultimate torque .........................................................
45 ft. Ibs.
Weight ..................................................................................
21/2Ibs.
Overall length .............................................................................
10"
Average air consumption ......................................
3.2 SCFM
Recommended hose size ........................................
3/8" I.D.
Air inlet .................................................................................
1/4" NPT
Maximum Air Pressure ...................................................
90 PSI
power
and
and replace
when
necessary.
Pre-Operation
WARNING
Some dust created
by power sanding,
sawing,
grinding,
drilling and other construction
activities contains chemicals known to the State of California to cause cancer, birth
birth defects or other reproductive harm.
Some examples of these chemicals are:
and other
masonry
products,
and chromium
lumber.
from
and
chemically-
Your risk from those exposures varies, depending on how
often you do this type of work. To reduce your exposure to
these chemicals: work in a well ventilated area, and work
with approved
safety equipment,
are specifically
ticles.
designed
such as dust masks that
to filter out microscopic
Before the tool is connected to the air supply, clear the air
hose of accumulated
dust and moisture by running air
freely through the air hose for 5-10 seconds. Before
removing a tool for service, make sure the air line is shutoffat the compressor. This will prevent the tool from
operating if the throttle is accidently engaged.
Installation
(See figure 1)
This tool is designed to operate at 90 psi. Lower pressure (below 90 psi) will reduce performance of the tool
while higher air pressure (over 90 psi) raises the performance of the tool beyond its rated capacity and could
cause serious damage to tool and user.
Lead from lead based paint
crystalline silica from bricks and cement
arsenic
treated
F ULL ONE YEARWARRANTY ON CRAFTSMAN AIR-DRIVETOOLS
par-
Always use clean dry air. Excessive moisture and dirt will
greatly reduce the life of any air motor. We recommend
the installation
of an in-line filter-regulator-lubricator
as
close to the tool as possible.
A 3/8" air hose is required up to a length of 8 ft. If more
length is required a 1/2" air hose should be used at the
compressor. Attach a 3/8" whip hose for the remaining
4 - 8 ft. for flexibility. Be sure all hoses and fittings are the
correct size and tightly secured before using air tool.
More than 1/100 slope
Stop
VaJve
Filter
Main line = 3 times
Regulator
Lubricator
Tool inlet/hose
size
Stop
Valvel
Air Tool
::_
Auto
_
Valve
Drain
Air Compressor
Figure 1
Air Hose Hook Up
WARNING:
BISCONNECTTOOL FROM AIR SUPPLY
BEFORE SERVICING OR CHANGING SOCKETS, This
ratchet is equipped with a lever throttle which allows the
operator to vary the speed. Direction control is located on
the back of the ratchet head. Initial tightening and loosen =
ing of fasteners should be done manually with ratchet
used as a hand tool. Fasteners may then be run on and
off with relative ease.
Keep socket firmly against work surface when running the
ratchet to avoid dislodging the socket from the anvil.
Excessive torque leverage above tool specifications will
result in premature gear wear.
Reverse Switch
I
t--
I
Figure 2
Throttle
Lever
Air Inlet
Lubrication
An in-line filter-regulator=lubricator (fig 1) is recommended
as it increases tool life and keeps the tool in sustained
operation. The in-line lubricator should be regularly
checked and filled with air tool oil. Proper adjustment of
the in-line lubricator is performed by placing a sheet of
paper next to the tools exhaust ports and holding the
throttle open approximately 30 seconds. The lubricator is
properly set when a light stain of oil collects on the paper.
Excessive amounts of oil should be avoided.
In the event that it becomes necessary to store the tool for
an extended period of time (overnight, weekend, etc.), it
should receive a generous amount of lubrication through
the air inlet (fig 2). The tool should be run for
approximately 30 seconds to ensure oil has been evenly
distributed throughout the tool. The tool should be stored
in a clean and dry environment.
Recommended lubricants: Use air tool oil or any other
high grade turbine oil containing moisture absorbent, rust
inhibitors, metal wetting agents and an EP (extreme
pressure) additive. (See Fig. 2 for location/air inlet).
Sears CRAFTSMAN
Model 875.191174
Pneumatic 3/8" Drive Ratchet Wrench
Exploded View and Parts List
20
22
23
26
28
25
./
//12
/
./
13
r/19
42
Ref.
1
2
3
4
5
6
7
8
9
10
11
12
13
14
15
16
17
18
19
20
21
22
23
Part No.
985001G
985002-01G
985003G
9150070G
9106464G
9106465G
9106365G
9106467G
946011G
927503G
985011G
9106469G
9106470G
9106471G
9106472G
9106473G
9106686G
9106476G
9106477G
985020G
9106680G
915012-02G
9145024G
Description
Housing
Air Inlet Bushing
Washer
O-Ring
Valve Stem
Valve Spring
O-Ring
Valve Screw
Throttle Lever Pin
Valve Bushing
Throttle Lever
Ball Bearing
Rear End Plate
Rotor Blade
Rotor
Spring Pin
Cylinder
Front End Plate
Ball Bearing
Exhaust Deflector
Bearing Cap
Internal Gear
Clamp Nut
Q'ty
1
1
1
1
1
1
1
1
1
1
1
1
1
4
1
2
1
1
1
1
1
1
1
Ref.
24
25
Part No.
9150140G
9106482G
Description
Planet Gear
Idle Gear Seat
26
27
9106481G
985047G
Needle
Handle
28
29
30
31
9106484G
9106485G
915038G
915042G
Anvil Bushing
Needle Bearing
Reverse Switch
Washer
32
33
34
9150190G
9150180G
9106491G
Ratchet
Ratchet
Spring
35
36
37
9106490G
9150360G
9106500G
Locking Pin
Ratchet Pawl
Retainer Ring
38
39
40
9150320G
9150370G
9106497G
Thrust Washer
Pin
Steel Ball
41
42
43
9106496G
9106486G
9106698G
Spring
Crank Shaft
Drive Bushing
44
45
46
9115023G
9150430G
9150440G
Ratchet Yoke
Steel Ball
Spring
Roller
Grip
Housing
Anvil
Q'ty
3
1
3
1
1
1
1
1
1
1
1
1
1
1
1
1
2
2
1
1
1
1
1
Troubleshooting
Tool runs slowly or will not operate
1. Grit or gum in tool
1. Flush the tool with air tool oil or gum
solvent.
2. No oil in tool
2. Lubricate the tool according
instructions
in this manual
3. Low air pressure
3. a. Adjust the regulator
mum setting
to the lubrication
on the tool to the maxi-
b. Adjust the compressor regulator to tool
maximum of 90 psi.
4.Tighten and seal hose fittings if leaks are found
4. Air hose leaks
use pipe thread tape.
5. Pressure drops
5. a. Be sure the hose is the proper size. Long
hoses or tools using large volumes of air may
require a hose with an I.D. of 1/2" or larger
depending
on the total length of the hose
b. Do not use a multiple number of hoses
connected together with quick connect fittings.
This causes additional
pressure drops and
reduces the tool power. Directly connect the
hoses together
6. Worn rotor blade in motor
7. Worn ball bearing
in motor
6. Replace rotor blade
7. Remove and inspect bearing
for rust, dirt and
grit. Replace or clean and grease bearing with
bearing grease
Moisture
blowing
out of tool exahust
1. Water in tank
1. Drain tank. (See air compressor
manual). Oil tool
and run until no water is evident.
run 1-2 seconds
Impacts
slowly or will not impact
1. Lack of lubrication
1. Lubricate
2.Tool regulator
(See Lubrication section of this manual)
2. Adjust the regulator on the tool to the maximum
set in wrong
3. In-line regulator
Impacts rapidly but
will not remove bolts
Does not impact
and the impact
mechanism.
setting
position
compressor
set too low
the air motor
Oil tool again and
or
3. Adjust regulators
in the air system
regulator
1. Worn impact
1. Broken impact
mechanism
mechanism
1. Replace worn
1. Replace broken
impact
impact
mechanism
mechanism
components
components
INSTRUCCIONES
PERSONALES.
RELATIVAS
A PELIGROS
DE INCENDIO,
DESCARGAS
ELECTRICAS
O LESIONES
ADVERTENCIA:
El Estaddo de California
sabe algunos polvos creados pot el lijado, aserrado,
desgastado, taladrado
y otras actividades
de construccion
contienen substancias
quimicas
conocidas como causantes de cancer defectos de nacimiento
u ortas iesiones en el sistema
de reproduccion
ADVERTENCIA:
siguientes:
cuando
use el producto,
tome siempre
las precauciones
Precaucibn general: para reducir el peligro de descargas
lea todas las instrucciones
antes de usar la herramienta.
el_ctricas,
basicas,
incendios
incluidas
o lesiones
las
personales,
Area de trabajo
1. Mantenga el area de trabajo limpia y bien iluminada. Los bancos de trabajo abarrotados
de cosas y
las Areas oscuras incrementan
el peligro de descargas electricas, incendios o lesiones personales.
2.
3.
No utilice la herramienta
en atmbsferas
explosivas,
como en aquellas que tengan Iiquidos
o
gases inflamables
o polvos. La herramienta
puede generar chispas resultando en la ignicion del polvo
o los gases.
Mantenga a las personas
circundantes,
nihos y visitantes
alejados mientras
utiliza el producto.
Cualquier distraccion puede resultar en la perdida de control de la herramienta.
Seguridad
1.
2.
3.
4.
5.
6.
7.
8.
9.
personal
Mant_ngase
alerta. Preste atencibn a Io que esta haciendo y utilice sentido comt_n cuando
ponga en funcionamiento
este producto. No Io use cuando est_ cansado, bajo el efecto de
drogas, alcohol o medicamentos.
Cualquier momento de desatencion durante el uso de la
herramienta incrementa el peligro de lesiones personales.
Vistase apropiadamente.
No use vestimenta
ni joyas sueltas. Recbjase el pelo si Io tiene largo.
Mantenga el pelo, la vestimenta
y los guantes alejados
de las piezas en movimiento.
La
vestimenta, joyas o el pelo largo sueltos pueden quedar atrapados en las piezas moviles e incrementar
el peligro de lesiones personales.
Quite las Ilaves de ajuste y Ilaves
generales
antes
de encender
la herramienta.
Si se deja una de
estas Ilaves en una pieza giratoria de la herramienta, incrementara
el peligro de lesiones personales.
No se acerque demasiado.
Mantdngase todo el tiempo a una distancia
adecuada
yen una
posicibn
equilibrada.
Esto proporciona mejor control de la herramienta en situaciones
inesperadas.
Use equipos
de seguridad.
Se debe usar una mascarilla antipolvo, calzado de proteccion
antiresbaladizo
y un casco resistente seg6n Io requieran las condiciones.
Use siempre
proteccibn
ocular.
Use siempre proteccibn
auditiva
cuando utilice la herramienta.
La exposicion prolongada al ruido
de alta intensidad puede causar una perdida de la audicion.
Desconecte
el producto
de la fuente de suministro
de aire antes de hacer cualquier
ajuste.
Evite los arranques
involuntarios.
Asegdrese
de que el interruptor
estd en la posicibn
de
apagado
antes conectar
la herramienta
a la fuente de suministro
de aire. No transporte la
herramienta
con el dedo en el interruptor
ni la conecte
a la fuente de suministro
de aire con el
1. Inspeccionela conexionde la mangueraantesde cadauso.
2. No excedalos 90 psicuandouse herramientasneumaticas
3. Noenrosque,tuerza,anudeni erosionela manguera.
Rango
correspondiente:
Presion
de trabajo
maxima
de herramientas
de aire
90 psi
Operacibn
Uso y cuidado de la herramienta
1. Use abrazaderas
u otra forma practica
para afianzar y soportar la pieza de trabajo a una
plataforma
estable. Sujetar la pieza con las manos o apoyarla contra el cuerpo es algo inestable
puede Ilevar a la perdida de control.
2.
3.
4.
5.
6.
7.
8.
y
No fuerce la herramienta.
Use la herramienta
que corresponda
con la aplicaci6n.
La herramienta
adecuada hara un trabajo mejor y mas seguro, y a la velocidad para la cual fue diseSada.
No use la herramienta
si el interruptor
no la enciende
y apaga. Cualquier herramienta que no
pueda controlarse con el interruptor es peligrosa y debe repararse.
Desconecte
la herramienta
de la fuente de surninistro
de aire antes de hacer cualquier
ajuste,
cambiar accesorios
o alrnacenarla.
Tales medidas preventivas de seguridad reducen el peligro del
arranque involuntario de la herramienta.
Almacene la herramienta cuando no se est_ usando, alejada de los ni_os y de otras personas
no calificadas.
Las herramientas
en manos de personas no calificadas son peligrosas.
D_le mantenimiento
a la herramienta
con cuidado.
Mantenga las herramientas
de corte afiladas y
limpias. Estas herramientas
de corte con el mantenimiento
adecuado, con bordes de corte afilados,
reducen el riesgo de atasco y son mas faciles de controlar.
Revise los desajustes
o atascos de las piezas m6viles,
roturas de las piezas y cualquier
otra
condici6n
que afecte el funcionamiento
de la herramienta.
Si la misma esta daSada, haga que se
le de mantenimiento
antes de usarla. Muchos accidentes ocurren debido a que las herramientas
no se
les ha dado el mantenimiento
adecuado.
Si la herramienta esta daSada existe el peligro de que explote
repentinamente.
Use solamente accesorios
que est_n identificados
por el fabricante
para el modelo especffico
de la herramienta.
El uso de accesorios no concebidos para utilizar con el modelo especifico de la
herramienta
incrementa el peligro de lesiones personales.
SP-2
Servicio
1. El servicio de la herramienta debe realizarse solamente por personal de reparacion calificado.
2. Cuando se le de servicio a las herramientas, use solo piezas de repuestos identicas. Use solo
piezas autorizadas.
3. Use solo lubricantes suministrados con la herramienta o especificados por el fabricante.
Fuente de suministro
1.
de aire
Nunca conecte la herramienta a una fuente de suministro de aire capaz de exceder los 115 psi.
El exceso de presurizaci6n de la herramienta puede resultar en una explosi6n, funcionamiento
anormal
y rotura de la misma o lesiones personales graves. Use solamente aire comprimido limpio, seco y
regulado a la presi6n nominal o dentro del rango de la presi6n nominal segt3n se indique en la
herramienta. Antes de usar la herramienta
sido ajustada a la presi6n de aire nominal
2.
siempre verifique que la fuente de suministro
o dentro del rango de esta.
de aire haya
Nunca use oxfgeno, di6xido de carbono, gases combustibles
ni ningt3n gas embotellado como fuente de
suministro de aire para la herramienta.
Estos gases pueden explotar y causar lesiones personales
graves.
INSTRUCCIONES
DE MANTENIMIENTO
CONSERVE
ESTAS INSTRUCClONES.
PARA EL USUARIO
SP-3
Lea las instrucciones
de operaci6n
Por favor familiaricese
con todas las instrucciones
advertencias
antes de operar cualquier
herramienta
GARANTJA POR UN AI_IO COMPLETO EN
LAS HERRAMIENTAS NEUMATICAS CRAFTSMAN
y
neum&tica.
Use siempre
protecci6n
adecuada
para los ojos
La protecci6n
de los ojos resistente
al impacto debe cumplir o
exceder
los est&ndares
establecidos
en ANSI Z87.1, Protecci6n
ocupacional
y educativa
de los ojos y el rostro. Busque la marca
Z87.1 en su protector
de los ojos para asegurar
que es un estilo
aprobado.
Se recomienda
el uso de protecci6n
auditiva
Deber& usar protecci6n
auditiva si la exposici6n
al nivel de ruido
equivale al nivel act_stico promedio
cronoponderado
de 8 horas
de 85 dBA o Io supera. El ruido del proceso, superficies
reflectoras,
otras herramientas
operadas
en la cercania,
todos
agregan al nivel de ruido en un &rea determinada
de trabajo. Si
no es posible determinar
la exposici6n
al nivel de ruido, se
recomienda
usar protecci6n
auditiva.
Evite una exposici6n
prolongada
a la vibraci6n
Las herramientas
neum&ticas
pueden vibrar durante su uso. La
exposici6n
prolongada
alas vibraciones
o los movimientos
muy
repetidos
de manos y brazos pueden causar lesiones.
Interrumpa
el uso de cualquier
herramienta
si experimenta
cosquilleo,
adormecimiento,
malestar o dolor en las manos o
brazos. Antes de reanudar el uso de la herramienta,
usted debe
consultar
con su medico.
disefiados,
causando
una falla prematura
de la herramienta.
NOTA: EL SUMINISTRO
DE AIRE DEBERA SER LIMPIO Y SECO,
PREFERENTEMENTE
LUBRICADO.
PARA OBTENER LOS
Use s61o casquillos
y accesorios
LAHUMEDAD
and Co.
La Ilave de trinquete de 3/8 pulgadas
Craftsman
875.191174
est& disefiada
para las aplicaciones
Modelo
como la
reparaci6n
de autom6viles,
el ensamble
en regeneal,
el
desmonataje
y mantenimiento
de la transmisi6n.
Entre las
caracteristicas
se incluen un acelerador
con palanca para el
control de la velocidad
y un cabezal
de bajo perfil para trabajar
de cerca.
Features
Para el escape
cuadrada
(90 PSI) en la herramienta.
El uso de una presi6n de
aire mayor puede y podr& causar lesiones.
Tambien, el uso de
una presi6n
neum&tica
mayor somete a los componentes
internos a cargas y tensiones
para las cuales no fueron
PURGUEADIARIO
Distribuido
por Sears, Roebuck
Hoffman
Estates,
IL 60179.
Acelerador
por palanca que facilita la operaci6n.
Altura del cabezal del trinquete
de 1-1/8 pulg (sin cubo)
para usar en las aplicaciones
donde se trabaja bien cerca.
M&ximo
de 90 PSI (libras
manom_tricas
por pulg.
cuadrada)
Esta herramienta
est& disefiada
para operar a una presi6n
neum&tica
m&xima de indicador de 90 libras por pulgada
MEJORES RESULTADOS,
COMPRESOR.
Si esta herrarnienta Craftsrnan no le proporciona una
satisfacci6n completa dentro de un afio a partir de su fecha de
compra, DEVUI_LVALAA LATI ENDA SEARS M,_,SCERCANA EN
LOS ESTADOS UNIDOS, y Sears la reparar& o reemplazara
gratis. Si esta herramienta Craftsman se usa para fines
comerciales o de alquiler, esta garantia se aplica por 90 dias
solamente a partir de la fecha de compra. Esta garantia le
proporciona derechos legales especificos, y usted puede tener
tambien otros derechos que varian de estado a estado.
DEL
aleja
el aire del operario.
Especificaciones
Tamafio del mando ..............................................................
3/8 pulg
Velocidad
libre (sin carga) ................................................
160 RPM
Par torsor final .......................................................
45 pies por libra
Peso .................................................................................
2 ½ libras
Longitud general ...................................................................
10 pulg
Consumo
promedio de aire .............................................
3.2 SCFM
Tamafio recomendado
de la manguera .......... 3/8 pulg de di&m. int.
Entrada de aire ............................................................
Presi6n de aire m&xima .........................................................
de potencia
1/4 pulg NPT
90 PSI
Los casquillos
y accesorios
que se usen deben ser casquillos
tipo de potencia.
Siempre
verifique el estado de los casquillos,
retenedores
y elementos
de accionamiento
desgastes
o averias.
Reemp&celos
cuando
I
para detectar
sea necesario.
Previo a la operacibn
ADVERTENCIA1
Algunos
polvos
creados
por el lijado,
aserrado,
desgastado,
taladrado
y otras actividades
de construcci6n
contienen
substanciasquimicasconocido
al Estado de California para causardec&ncer,
defectos
de nacimiento
u otras lesiones en el sistema de
reproducci6n.
Algunos
ejemplos
de esas
sustancias
quimicas
Plomo de pinturas fabricadas
a base de plomo
Silice cristalino
de ladrillos, cemento y otros
productos
de mamposteria,
asi como
y cromo
de maderas
quimicamente
Instalaci6n
(Vea la Figura
1)
La herramienta
est& disefiada
para que funcione
a 90 psi. Una
presi6n menor (por debajo de 90 psi) disminuir&
el rendimiento
de
la herramienta,
mientras que una presi6n neum&tica
mayor
(sobre 90 psi) incrementar&
el rendimiento
de la herramienta
m&s
all& de su capacidad
nominal y puede causar dafios extensos
a
la herramienta
y lesiones graves al usuario.
son:
Arsenico
Antes de conectar la herrarnienta
al suministro
de aire, limpie la
manguera
de aire para quitarle el polvo y la humedad
acumulados.
H&galo pasando aire libremente
por la manguera
por
un tiempo de 5 a 10 segundos.
Antes de quitar la herramienta
del
servicio, asegurese
de que la linea de aire este apagada en el
compresor.
Con ello se prevendr&
que la herramienta
funcione
si
el acelerador
se acciona
accidentalmente.
tratadas.
Su riesgo a esas exposiciones
varia, dependiendo
de la
frecuenca
a la que usted efectue este tipo de trabajo. Para
reducir su exposici6n
a estos materiales:
trabaje en un &rea
blen
ventilada
y con los equipos de protecci6n
aprobados,
como
m&scaras
de polvo que esten especificamente
disefiadas
para
filtrar particulas
microsc6picas.
Use siempre aire limpio y seco. La humedad
excesiva
y la
suciedad
reducir&n
en gran medida la vida util de cualquier
motor
de aire comprimido.
Se recomienda
la instalaci6n
de un filtroregulador-lubricador
en linea Io m&s cerca posible a la
herramienta.
Para una Iongitud de hasta 8 pies se requiere usar una manguera
de aire de 3/8 pulgada. Si se necesita una Iongitud mayor, se
debe usar una manguera
de aire de 1/2 pulgada en el compresor.
Conecte una manguera
de 3/8 pulg de conexi6n flexible para el
resto de los 4 a 8 pies, para que ayude a la flexibilidad.
Asegurese
de que todas las mangueras
y accesorios
sean del
tamafio
correcto
y que esten firmemente
conectados
antes de
usar la herramienta
neum&tica.
ADVERTENCIA: DESCONECTE LA HERRAMIENTA DEL
SUMINISTRO DE AIRE ANTES DE DARLE SERVIClO O
CAMBIAR LOS CASQUILLOS. Este trinquete est_
equipado con un regulador de palanca que le permite al
operario variar la velocidad. El control de la direcci6n esta
Iocalizado en la parte de atras del cabezal del trinquete. El
afloje y el apriete inicial de los fijadores debe hacerse
manualmente usando el trinquete como una herramienta
de mano. Los fijadores podran despu6s entrarse y
sacarse facilmente.
Mantenga el casquillo apoyado firmemente contra la
superficie de trabajo cuando est6 usando el trinquete
para evitar que el casquillo se salga del yunque. El
exceso de apalancamiento de par torsor por encima de
las especificaciones de la herramienta resultar_ en un
desgaste prematuro del engranaje.
Interruptor
de marcha
I
Admision
de aire
I
Figura 2
Planca del acelerador
Lubricacibn
Se recomienda usar un filtro-regulador-lubricador en linea
(Fig. 1) ya que incrementa la duraci0n de la herramienta y
mantiene la herramienta en una operaci6n sostenida.
Debera comprobar el lubricador en linea con regularidad
y Ilenarlo con aceite para herramientas de aire
comprimido. El ajuste correcto del lubricador en linea se
realiza colocando una hoja de papel pr6xima a los
orificios de escape de la herramienta y manteniendo
abierto el acelerador durante 30 segundos
aproximadamente. Se ajusta correctamente el lubricador
cuando el papel queda manchado con una ligera mancha
de aceite. Deberan evitarse las cantidades excesivas de
aceite.
En caso de ser necesario almacenar la herramienta
durante un largo tiempo (de la noche a la maSana, un fin
de semana, etc.), deber& lubricarla abundantemente a
traves de la entrada de aire (Fig. 2). Debera operar la
herramienta durante 30 segundos aproximadamente
para asegurar la distribuci0n pareja del aceite en toda la
herramienta. Debera almacenarse la herramienta en un
medio limpio y seco.
Lubricantes recomendados:Use
un aceite de
herramienta neumatica u cualquier otro aceite de grado
elevado de turbina que contenga absorbente de
humedad, inhibidores de Oxido, agentes humidificadores
del metal y un aditivo EP (presi6n extrema). (Vea la Fig. 2
para la ubicaci6n y entrada de aire).
Sears CRAFTSMAN Modelo 875.191174
Llave de trinquete neumatica con mando de 3/8 PULG
Vista ampliada y lista de piezas
28
31
32
41
rJ19
42
t
t
Ref.
1
2
Pieza No.
985001G
985002-01G
3
4
5
6
7
8
9
10
11
12
13
14
15
16
17
18
19
20
21
22
23
985003G
9150070G
Descripcion
Caja protectora
Cojinete de la admisi6n
de a/re
Arandela
Junta t6rica
9106464G
9106465G
9106365G
Vastago de v_lvula
Resorte de la valvula
Junta t6rica
9106467G
946011G
927503G
985011G
9106469G
9106470G
9106471G
9106472G
9106473G
9106686G
9106476G
9106477G
985020G
9106680G
915012-02G
9145024G
Ref.
24
25
26
Pieza No.
9150140G
9106482G
9106481G
27
28
985047G
9106484G
1
1
1
29
30
9106485G
915038G
Tap6n de la v_lvula
Clavija de la palanca
Cojinete
Palanca del acelerador
Rodamiento esf6rico
1
1
1
1
1
31
915042G
32
9150190G
33
9150180G
Placa posterior
Paleta del rotor
Rotor
1
4
1
34
35
9106491G
9106490G
Clavija
Cilindro
Placa delantera
Rodamiento esf_rico
2
1
1
1
36
37
38
39
9150360G
9106500G
9150320G
9150370G
Deflector de escape
Tapa del rodamiento
Engranaje del anillo
Tuerca mordaza
1
1
1
1
40
41
42
9106497G
9106496G
9106486G
43
44
45
9106698G
9115023G
9150430G
46
9150440G
Cant.
1
1
1
1
Descripci6n
Cant.
Engranaje de ralenti
3
Jaula de engranaje
1
Clavija de engranaje
3
Empur_adura del mango
1
Cojinete
1
Rodamiento de aguja
1
Interruptor de marcha
atras
1
Arandela
1
Caja protectora de
trinquete
1
Jaula de yunque
1
Resorte
1
Clavija de bloqueo
1
Trinquete
1
Anillo retenedor
1
Arandela de empuje
1
Clavija
1
Esfera de acero
2
Resorte
2
Eje del cigeer_al
Buje de conducci6n
Yugo de trinquete
Esfera de acero
Resorte
1
1
1
1
1
Localizacibn
y solucibn
La herramienta
lentamente
funciona
o no funciona.
de fallas
1. En la herramienta hay polvo,
arena o resina.
1. Irrigue
2. En la herramienta
2. Lubrique
la herramienta
de lubricaci6n
indicadas
3. La presi6n
no hay aceite.
del aire esta
baja.
4. La manguera
de aire tiene
escapes.
5. Caidas de presi6n.
la herramienta
para herramientas
en diluyente.
3. a. Ajuste
con aceite
o diluyente
de resinas
neumaticas.
el regulador
de acuerdo
alas
en este manual.
de la herramienta
instrucciones
al valor maximo.
b. Ajuste el regulador
del compresor
al maximo
herramienta
de 90 psi.
4. Apriete y selle los accesorios
de la manguera.
de la
Si ha
encontrado
escapes,
use una cinta adhesiva
.
5. a. Asegurese
de que la manguera
que esta usando
tenga el tamafio
correcto.
Las mangueras
largas o las
herramientas
que usan grandes
volumenes
de aire
podrian requerir una manguera
con un diametro
interno
de 1/2 pulgada o mas, dependiendo
de la Iongitud total
de la manguera.
b. No use varias mangueras
conectadas
una a la otra
a traves de accesorios
de conexi6n
rapidos.
Esto
causa caidas de presi6n adicionales
y reduce la
potencia
de la herramienta.
con la otra directamente.
6. Paleta
del rotor en el motor
desgastada.
7. Rodamiento
esferico
en el motor
desgastado.
6. Reemplace
7. Retire e inspeccione
herrumbre,
suciedad
engrase
Por el escape de la herramienta
saliendo
humedad.
Impactos
lentos
esta
1. Agua en el tanque.
Drene
1. Falta de lubricaci6n
2. El regulador de la herramienta esta
puesto en la posici6n incorrect&
3. Regulador
regulador
fijado
impactos
no quita
los pernos,
No da impactos
rapidamente
el rodamiento
en busca de
y arena. Reemplace
o limpie
el rodamiento
el tanque.
pero
en linea o
del compresor
las mangueras
una
del rotor.
con
(Consulte
grasa
y
para rodamientos.
el manual
Engrase la herramienta
y hagala
vea agua. Engrase la herramienta
funcionar
de 1 a 2 segundos.
o no hay impactos.
Proyecta
la paleta
Conecte
del compresor).
funcionar
hasta que no
otra vez y dejela
1. Lubrique el motor del aire y el mecanismo de impacto.
(Consulte la secci6n Lubricaci6n de este manual).
2. Ajuste el regulador de la herramienta a su valor
maximo.
3. Ajuste
los reguladores
del sistema
de aire.
muy bajo
1. Mecanismo
de impacto
1. Reemplace
desgastado,
1. Mecanismo
mecanismo
de impacto
roto.
1. Reemplace
impacto.
los componentes
desgastados
del
de impacto.
los componentes
rotos
del mecanismo
de
Service
Notes:
For the repair or replacement
parts you need delivered directly to your home
Call 7 am - 7 pm, 7 days a week
1-800-366-PART
(1-800-366-7278)
Para ordenar piezas con entrega
a domicilio - 1-800-659-7084
For the location of a
Sears Parts and Repair Center
in your area
Call 24 hours a day, 7 days a week
1-800-488-1222
For more information
on
purchasing a Sears
Maintenance Agreement or to inquire
about an existing Agreement
Call 9 am - 5 pm, Monday-Saturday
1-800-827-6655
The model number of your air tool is located
on the serial plate attached to the tool.
When requesting service or ordering parts,
always give the following information:
• Product Type
• Model Number
Distributed
SEARS
• Pneumatic Tool
• Part Description
by Sears, Roebuck and Co., Hoffman Estates, IL 60179 USA