1
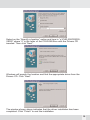
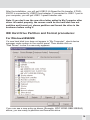
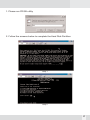
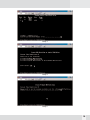
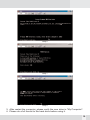
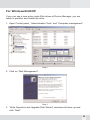
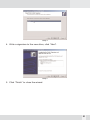
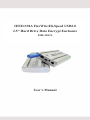
IEEE1394A FireWire/Hi-Speed USB2.0
2.5” Hard Drive Data Encrypt Enclosure
PHR-250CE
User’s Manual
© Copyright 2005
This manual is furnished under license and may be used or copied only in accordance with the
terms of such license.
Except as permitted by such license, no part of this publication may be reproduced, stored in a
retrieval system, or transmitted, in any form or any means, electronic, mechanical, recording, or otherwise, including translation to another language or format, without the prior written permission of
Part.
The content of this manual is furnished for informational use only, is subject to change without
Notice, and should not be construed as a commitment by Part2 Research Inc,. Part2 Research Inc,.
assumes no responsibility or liability for any errors or inaccuracies that may appear in this book.
FCC Information
This device complies with part 15 of the FCC Rules. Operation is subject to the following two conditions: (1) this device may not cause harmful interference and (2) this device must accept any interference received, including interference that may cause undesired operation.
Operation of this equipment in a residential area is likely to cause interference in which case the
user at his or her own risk and expense will be required to correct the interference.
Declaration of Conformity
Part2 Research declares that the PHR-250CE conforms to the following standards, in accordance
with the provisions of the EC Directive 89/366/EEC: EN 55022 (CISPR 22:1985), Class A.
Warranty
Part2 Research Inc,. warrants that this product will be free from defects in title, materials and manufacturing workmanship for one year from the date of the purchase. If the product is found to be
defective then, as your sole remedy and as the manufacturer’s only obligation, Part2 research will
repair or replace the product.
This warranty is exclusive and is limited to PHR-250CC. This warranty shall not apply to products
that have been subjected to abuse, misuse, abnormal electrical or environmental conditions, or any
condition other than what can be considered normal use.
Warranty Disclaimers
Part2 Research Inc,. makes no other warranties, express, implied or otherwise, regarding the PHR250CC, and specifically disclaims any warranty for merchantability or fitness for a particular purpose.
The exclusion of implied warranties is not permitted in some states and the exclusions specified
herein may not apply to you. This warranty provides you with specific legal rights. There may be
other rights that you have which vary from state to state.
Limitation of Liability
The liability of Part2 Research Inc,. arising from this warranty and sale shall be limited to a refund of
the purchase price. In no event shall Part2 research be liable for costs of procurement of substitute
products or services, or for any lost profits, or for any consequential, incidental, direct or indirect
damages, however caused and on any theory of liability, arising from this warranty and sale. These
limitations shall apply not with standing any failure of essential purpose of any limited remedy.
Mace Group Inc./ Macally Peripherals
6401E. Airport Drive, Ontario, CA 91761
Tel: 909.230.6888
Fax: 909.230.6889
http://www.macally.com
e-mail: [email protected]
CONTENTS
IMPORTANT: PLEASE READ BEFORE USING
ENCRYPT KEYS!
4
INTRODUCING FIREWIRE/USB2.0 HI-SPEED
DATA ENCRYPT ENCLOSURE
5
About this Guide
System Requirements
Registration
Products and Services
Package Contents
Safety Precautions
5
5
5
6
6
6
HARDWARE INSTALLATION
8
SECURE KEY
12
SOFTWARE INSTALLATION
13
Software Installation for MAC
FireWire Connection for MacOS
USB Connection for MacOS
Software Installation for PC
13
13
13
14
IEEE1394A FireWire Connection for Windows98SE/ME/2000/XP 14
USB Connection for WindowsME/2000/XP
14
USB Connection for Windows98SE Software Installation
14
IDE HARD DRIVE PARTITION and
FORMAT PROCEDURES
For Windows98SE/ME
For Windows2000/XP
16
16
20
3
IMPORTANT: Please Read Before Using Encrypt Keys!
Please read it thoroughly before using PHR-250CE encrypt enclosures, and
save this note for future reference use.
1. For security purposes, the encrypt keys cannot be duplicated. Without the
matching encrypt key, your data in the hard disk cannot be accessed.
Please keep the keys in a safe place.
2. Each encrypt enclosure comes with a unique pair of keys. After using the
first key to format the hard drive, we recommend you to try the second key
to confirm both keys can access the same hard drive and data. Then put the
second key in a safe place. If the second key cannot access the same data,
please back up the data and contact us for key replacement.
3. Different enclosures come with different pair of keys, they are not interchangeable. If you own multiple encrypt enclosures, please label enclosures
and keys properly.
4. The hard drive will not be mounted on the computer if a wrong encrypt
key is used. Please be aware, running any Disk Utility, Disk Management or
3rd party software to access the hard drive with the wrong encrypt key can
damage the security encoding on the hard disk, and data will be lost.
5. When one encrypt key is lost, please purchase a new pair from us. The
new keys will
be different from your existing ones. Please back up all data
in the hard drive with your existing second key. When the new keys arrive,
plug in the new key with the enclosure powered off. Power on again, reformat the hard drive and restore the data from your back up. You can discard
your existing key.
6. If the correct encrypt key is used but the hard drive cannot be mounted,
please contact our technical support for assistance. If you return the defective enclosure to us for replacement, PLEASE KEEP BOTH KEYS AND THE
HARD DRIVE WITH YOU! Please note that, in order to access the original
data in a new enclosure, you must have the original key.
4
Introducing IEEE1394A FireWire/Hi-Speed USB2.0
2.5" Hard Drive Data Encrypt Enclosure-PHR-250CE
Thank you for using the PHR-250CE-Portable IEEE1394A FireWire/HiSpeed USB2.0 2.5" Hard Drive Enclosure. This is a portable size enclosure
which support 2.5” IDE Hard drive. It is simple to install and comes with all
the parts you need to create an external IEEE1394A FireWire/ Hi-Speed
USB2.0 device.
About This Guide
Before you begin using the PHR-250CE, be sure to read this manual in its
entirety.
This guide contains:
• Introducing IEEE1394 FireWire/Hi-Speed USB2.0
2.5" Hard Drive Data Encrypt Enclosure
• Hardware Installation
• Software Installation
System Requirements
For Mac
• G3, G4, iMac, G3 PowerBook, iBook or G4 PowerBook models
with USB or FireWire port ready
• MacOS 9.2, FireWire support 2.4 and up, and/or USB
support 1.4.1 and up for USB1.1 Speed
• MacOS X for USB2.0 Hi-Speed (USB2.0 Host adapter required)
For PC
• Pentium II or compatible Desktop or Notebook with USB or IEEE
1394 FireWire port ready.
• Windows98 SE, Windows2000, WindowsME or WindowsXP
• USB2.0 host adapter is required for Hi-Speed USB2.0 transfer speed
Using AC/DC Adapter (optional)
Basically, if you connect the PHR-250CC direct into built-in FireWire or
USB port (USB power cable is also needed), AC/DC adapter is not
required. However
(1) if USB connection dose not response or
(2) the PHR-250CC Enclosure is connected to a CardBus to
FireWire adapter, or 4-pin iLink Firewire port
AC/DC adapter is required.
5
Package Contents
The PHR-250CE-Portable IEEE1394A FireWire/Hi-Speed USB2.0 2.5" Hard
Drive Enclosure package includes the following software and documentation:
•
•
•
•
•
•
The software CD contains the drivers and manual
6 pin to 6 pin FireWire Cable
USB2.0 data cable
USB power cable
IEEE1394A FireWire/Hi-Speed USB2.0 2.5" Hard Drive Enclosure
2 x Secure Keys
Safety Precautions
ON INSTALLATION
1. To reduce the risk of fire or electric shock, do not expose this
product to rain or moisture.
2. Do not place any containers with liquids (drinking glass, flower
vase, etc.) or containers with small metal parts (paper clips, etc.)
on top of the unit.
3. According to standard industry practice, surge protection is
recommended for all telecommunications devices. Surge suppressors
and/or line conditioning should be used on the input power supply.
ON OPERATION
•
•
•
•
•
•
•
•
Do not move the chassis during operation. Doing so may cause
a malfunction.
Protect the unit from shocks and vibrations.
Do not use the subsystem in areas exposed to oily smoke or steam,
such as a kitchen or close to a humidifier.
Do not use the subsystem in locations exposed to rain or splashes of
water, such as outdoors, in a bathroom, or close to a window.
Do not use the subsystem on an unstable or slanted surface without
proper support.
Do not expose the unit to direct sunlight or hot air where the
temperature could exceed 45ºC, or very cold locations where the
temperature is below 0ºC.
Keep the power cord away from hot appliances.
Do not touch the power cord with wet hands.
6
ON TRANSPORTATION
Save the packing materials as you may need to repack and transport the
unit at a later date.
Always remove the disc before moving the unit.
ON POWER SOURCES
When you are not using the unit for a long time, disconnect the power cord
from the unit.
To unplug the AC power adapter from the wall outlet, grasp the adapter
itself. Do not pull the cord.
Warning
If any of the following conditions occur, immediately disconnect the power
cord from the wall outlet and contact your dealer or an authorized service
station. Continuing to use the computer involves the risk of fire and electric
shock.
•
•
•
•
•
Smoke or unusual smell is coming from the subsystem.
Water has entered the unit, or the unit has become wet.
A foreign object has entered the unit.
The unit has been dropped or the front panel or frame has been damaged.
The power cable is damaged, causing wire breakage or exposed leads.
7
Hardware Basic
Precaution:
1) Please connect the enclosure directly to your computer.
2) Please make sure your hand is dry and remove static from
your body by touching metal parts of your computer chassis.
Circuit Board
Enclosure Sleeve
Bottom Tray
Power
Connector
Back Panel
Power
On/Off sw
Secure
Key port
USB Data
cable connector
LED
1394A FireWire Data
cable connector
Package Content:
Enclosure Sleeve
Circuit Board w/ bottom tray
Back Panel
2 Secure Keys
1 USB power cable
1 USB Data Cable
1 FireWire Data Cable
4 - 5mm Diameter Screws
2 - 3mm Diameter Screws
8
Hardware Installation
1. Remove the Back Panel from the Enclosure.
2. Use both thumb to push the Bottom Tray out.
3. Align the pins on the hard drive to the 44-pin connector on the Circuit
Board, and push the pins all the way in.
9
4. (a) Seat the Circuit Board and hard drive to the Bottom Tray. (b) Secure
the hard drive with Screws (5mm in diameter) on the bottom of the tray.
(a)
(b)
hard drive & circuit board
Bottom Tray
5. Align the Bottom Tray to the Sleeve Slot. Slide and push the hard drive/
Bottom Tray into the Enclosure Sleeve.
6. Put the Back Panel back to the Enclosure.
10
7. Secure the Back Panel with 2 screws (3mm in diameter) from each side.
8. Plug in the secure key, connect the Enclosure directly to the computer by
using the USB or FireWire cable and it is now ready to use.
11
Secure Key
Power
Connector
Secure Key
Port
Back Panel
Power
On/Off
Switch
USB Data
cable connector
1394A FireWire Data
cable connector
Macally Firewire/USB2.0 Data Encrypt enclosure comes with two identical
secure keys, which are powered by NIST and CSE certified DES 40-bit
encryption engine. Independing to OS, it provides real-time, automatic
hardware based bit-by-bit data encryption to entire hard drive including
boot sector in the enclosure. With Macally Encrypt enclosures, data security
could never be simpler and easier. All you have to do is, plug one secure
key into the secure key port with lock symbol, then power on and connect
the enclosure to computer, use it just like a regular hard drive enclosure.
The secure key is needed for both Firewire and USB connection, and should
remain plugged while enclosure is in use. Without the key, computer can't
detect the enclosure at plug-in. Data Encrypt enclosures come with different
keys in different packages, keys are not interchangeable. If you have
multiple Data Encrypt enclosures, please mark your keys and enclosures
properly.
Since secure key is the only authentication to access your data, please do
not lose your secure keys. One good practice is to put one key in your
keychain, and keep the second key in a safe place for future use. If the
hard drive is removed outside the enclosure, the hard drive appears as a
raw hard drive, the data is simply not accessible. If the enclosure become
defective within warranty period, please keep your hard drive and the secure
keys, get a new enclosure replacement from us, install the hard drive and
use the original keys to mount the drive to access data. If a new key is used,
computer will detect the enclosure as a brand new hard drive, once formatted again, previous data on the hard drive is lost.
As a precaution, you should frequently back up data on the enclosure to
other secure location.
12
Software Installation
Software Installation for Mac
MacOS Software Installation
FireWire Connection for MacOS
MacOS will recognize the enclosure automatically,
initialize (if the drive is not initialized) and mount the drive to desktop.
USB2.0 Connection for MacOS
MacOS will recognize the enclosure automatically,
initialize (if the drive is not initialized) and mount the drive to desktop.
* Plug in the USB2.0 enclosure and it is ready to use. For USB2.0
performance, you must plug the enclosure into a USB2.0 port and
Mac OS X, or you will get USB1.1 performance only.
Note: Whether it is FireWire or USB Connection, MacOS provides a Disk Utility to
create multiple volumes, which is located in Utilities folder inside Applications folder.
13
Software Installation for PC
IEEE1394 FireWire Connection for Windows98SE/ME/2000/XP
Plug the IEEE 1394 cable into any available port, Windows(98,ME,2000
or XP) will start searching for the proper driver. Please follow the
on screen instruction to complete the driver installation. (You may need
the Windows CD during the installation.)
USB Connection for Windows/ME/2000/XP
Plug the USB cable into any available port, Windows(,ME,2000
or XP) will start searching for the proper driver. Please follow the
on screen instruction to complete the driver installation. (You may need
the Windows CD during the installation.)
USB Connection for Windows98 Software Installation
Power on the USB2.0 Enclosure and plug the USB cable into your USB2.0
port. The “Add New Hardware Wizard” should automatically appear as
shown above. Click “Next” when this window appears.
Choose “Search for the best driver for your device.” And click “Next”.
14
Select on the “Specify a location” option and type in “x:\PHR-250CE\DRIVERS” where “x” is the letter of the CD-ROM drive with the Drivers CD
inserted. Then click “Next”.
Windows will search the location and find the appropriate driver from the
Drivers CD. Click “Next”.
The window shown above indicates that the driver installation has been
completed. Click “Finish” to end the installation.
15
After the installation, you will get USB2.0 Hi-Speed for file transfer, if PHR250CE is connected to USB2.0 host adapter; if connected to USB1.1 port in
your computer, you will get USB1.1 speed transfer rate.
Note: If you don’t see the new drive letter added in My Computer after
driver is loaded properly, the reason could be the hard disk has not
partition and format yet, please partition and format the drive in the
enclosure before using it.
IDE Hard Drive Partition and Format procedures:
For Windows98SE/ME
If a new hard disk icon dose not appear in “My Computer”, check device
manager under system in the control panel. Then double click on
“Disk Drives” to see if a new entry appears.
If you can see a new entry as shown (Example, WDC WD80 OBB-32BSA0)
above, you are ready to partition and format the drive.
16
1. Please run FDISK utility.
2. Follow the screens below to complete the Hard Disk Partition.
Step 1
Step 2
17
Step 3
Step 4
Step 5
18
Step 6
Step 7
Step 8
3. After restart the computer, please verify the new drive in "My Computer".
4. Please do a full format to the hard drive before using it.
19
For Windows2000/XP
If you can see a new entry under Disk drives of Device Manager, you are
ready to partition and format the drive.
1. Open Control panel, “Administrative Tools” and “Computer management”.
Step 2
2. Click on “Disk Management”.
Step 3
3. “Write Signature and Upgrade Disk Wizard” windows will show up and
click “Next”.
20
Step 4
4. Write a signature to the new drive, click “Next”.
Step 5
5. Click “Finish” to close the wizard.
21
Step 7
7. Partition and fully format the drive and follow the onscreen prompts.*
*note: If it assigns a new hard drive letter but format dose not run automatically,
please exit “Computer Management”, and find the new drive letter in My computer to
run full format.
22