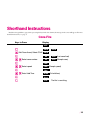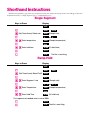
1
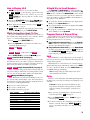
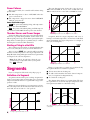
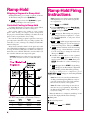
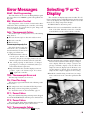
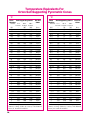
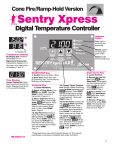
Sentry Xpress
Digital Temperature Controller
Single Segment, Ramp-Hold &
Cone-Fire Instructions
Temperature Display
No Display Dot: Temperature display, °F.
Right Display Dot: Temperature display, °C.
See page 9 for instructions on
selecting °F and °C.
Time Display
Center Display Dot:
Separates hours from
minutes.
Display Dot
Indicator
Lights
Top: On during
programming.
Middle: On during
program review.
Bottom: Blinks during firing.
START/STOP Key
1) On/Off: Starts and stops a
firing.
2) Enters Data: Press after
each programming step.
Up Arrow Key
1) Increases values during Programming.
2) Select Mode: from
IdLE press START.
Press Up Arrow to select
mode.
3) Skip Segment: during
Ramp-Hold firing, skips to
the next segment. After
pressing Up Arrow,
SStP will appear. To
skip, press Up Arrow.
Down Arrow Key
1) Decreases values during programming.
2) Review: from IdLE
or during firing, press
Down Arrow. The program
will appear one step at a
time.
3) Delay: from Strt
press Down Arrow.
Contents
General Guidelines . . . . . . . . . . . . . . . . . . . 2
Thermocouple Inspection . . . . . . . . . . . . . . . . . . . . . . . 2
How to Display IdLE . . . . . . . . . . . . . . . . . . . . . . . . . . 3
Which Instructions In This Manual
Apply To Your Controller . . . . . . . . . . . . . . . . . . . . . 3
A Rapid Way to Scroll Numbers . . . . . . . . . . . . . . . . . . 3
Program Review & Repeat Firing . . . . . . . . . . . . . . . . . 3
Hold . . . . . . . . . . . . . . . . . . . . . . . . . . . . . . . . . . . . . . . . . 3
Delay . . . . . . . . . . . . . . . . . . . . . . . . . . . . . . . . . . . . . . . . 3
Power Failures . . . . . . . . . . . . . . . . . . . . . . . . . . . . . . . . 4
Thunder Storms & Power Surges. . . . . . . . . . . . . . . . . 4
Starting a Firing in a Hot Kiln. . . . . . . . . . . . . . . . . . . . 4
Understanding Segments . . . . . . . . . . . . . . 4
Definition of a Segment . . . . . . . . . . . . . . . . . . . . . . . . . 4
Rate . . . . . . . . . . . . . . . . . . . . . . . . . . . . . . . . . . . . . . . . . 5
Temperature Over-Shoot . . . . . . . . . . . . . . . . . . . . . . . 5
Single Segment Firing Instructions. . . . . . . 5
Ramp-Hold Mode . . . . . . . . . . . . . . . . . . . . . 6
Skipping a Segment in Ramp-Hold . . . . . . . . . . . . . . . 6
Controlled Cooling in Ramp-Hold . . . . . . . . . . . . . . . . 6
Ramp-Hold Firing Instructions . . . . . . . . . . 6
Safety
The warranty on your Sentry controller
does not cover damage from overfiring,
regardless of the circumstances. It is the
operator’s responsibility to make sure
the kiln turns off at the proper time.
Follow these safety rules in addition to
the ones in your kiln or furnace manual.
G When the kiln is not in use, disconnect the
power.
G
Do not leave the kiln unattended, especially
near the expected shut-off time.
G
Wear firing safety glasses when looking into
the firing chamber of a hot kiln.
G
Do not touch hot sides of kiln or furnace.
Keep unsupervised children away.
G
Install your kiln or furnace at least 12 inches
from any wall or combustible surface.
G
Do not open lid or door until kiln or furnace
has cooled and all switches are off.
G
Fire only in a well-ventilated, covered and protected area away from combustible materials.
G
Keep cordset away from hot sides of kiln or
furnace.
G
DANGEROUS VOLTAGE! Do not touch
heating elements with anything. Disconnect
kiln or furnace before servicing.
Cone-Fire Mode . . . . . . . . . . . . . . . . . . . . . . 7
Pyrometric Witness Cones . . . . . . . . . . . . . . . . . . . . . . 7
How to Interpret Cone Bending . . . . . . . . . . . . . . . . . . 7
How to Correct for Under or Over-Fired Cones. . . . . 7
Cone-Fire Hold. . . . . . . . . . . . . . . . . . . . . . . . . . . . . . . . 7
When the Kiln Shuts Off Too Soon . . . . . . . . . . . . . . . 8
How to Customize Cone-Fire . . . . . . . . . . . . . . . . . . . . 8
Cone-Fire Firing Instructions . . . . . . . . . . . 8
Error Messages . . . . . . . . . . . . . . . . . . . . . . 9
BadP / Bad Programming . . . . . . . . . . . . . . . . . . . . . . 9
EtH / Electronics Too Hot . . . . . . . . . . . . . . . . . . . . . 9
FAIL / Thermocouple Failure . . . . . . . . . . . . . . . . . . . 9
TCR / Thermocouple Reversed . . . . . . . . . . . . . . . . . 9
FtL / Fired Too Long . . . . . . . . . . . . . . . . . . . . . . . . 9
PF 1 / Power Failure. . . . . . . . . . . . . . . . . . . . . . . . . . . 9
PF 2 / Power Failure. . . . . . . . . . . . . . . . . . . . . . . . . . . 9
TcO / Thermocouple Failure . . . . . . . . . . . . . . . . . . . 9
General Guidelines
Thermocouple Inspection
The small rod protruding into the firing chamber is the
temperature sensor, or thermocouple.
Selecting °F or °C Display . . . . . . . . . . . . . . 9
Caution: Bumping the thermocouple can push it
out of the firing chamber. This could cause an
overfire! The controller does not contain an alarm to
detect this type of failure.
Display Messages . . . . . . . . . . . . . . . . . . . 10
Trouble Shooter . . . . . . . . . . . . . . . . . . . . . 10
Cone-Fire Schedules . . . . . . . . . . . . . . . . . 12
Orton Pyrometric Cone Chart . . . . . . . . . . 14
Shorthand Instructions . . . . . . . . . . . . . . . 15
©2001, by Paragon Industries, Inc. IM-213/7-02
2/
I
A 1/8” diameter thermocouple should extend into the firing chamber ½” - 5/8”.
I
A ¼” diameter thermocouple should extend into the firing chamber 1” or more.
I
Keep shelves, posts and ware 1” - 1 ½” away from the
thermocouple.
How to Display IdLE
IdLE must appear before you can fire the kiln.
A Rapid Way to Scroll Numbers
The Up Arrowand Down Arrowkeys change number settings during programming. Ordinarily, you would press Up
Arrow to raise a number and Down Arrow to lower it. But
sometimes it is faster to press the opposite key. This is because the numbers scroll below 0000 to the maximum setting, and vice versa. Examples:
I
If CPLt , STOP , or other message appears instead of
IdLE when the kiln is first turned on, press the
START/STOP key (the key with the circular arrow).
IdLE will appear.
I
If you press START/STOPduring a firing, STOP will appear. To get back to IdLE , press START/STOP again.
I
I
If the display shows an error message such as FAIL instead of IdLE , see page 9.
To program a 99.59 hour Hold when the display shows
00.00, press the Down Arrow once.
I
I
CPLt (firing completed) appears at the end of a firing.
To make IdLE appear, press START/STOP.
To program a FULL rate when the display shows 0000,
press the Down Arrow once.
I
To program a temperature of 200°F when the display
shows 1800°F, press the Up Arrow.
Which Instructions Apply To You
For greater flexibility in the types of ware you can fire, we
have installed two firing modes in your controller. Follow
steps 1 - 3 to find out which modes you have:
1 From IdLE press START/STOP once.
2 Press the Up Arrowkey several times. You will see the
following display messages:
COnE and ProG
or
SPd1 - SPd5 / temperature and ProG
3 Press START/STOPrepeatedly until IdLE appears.
COnE Cone-Fire Mode (see page 7)
Cone-Fire mode fires the ware to a pyrometric cone number using the Orton cone tables on page 14. This mode is
used for ceramics, pottery, stoneware, and glazes. Your supplier can tell you which cone number to program.
SPd1 - SPd5 Single Segment Mode (see page 5)
Choose one of five firing speeds. Then enter the temperature you are firing to. This mode is for firings that need only
one rate, such as Art Clay Silver and Precious Metal Clay.
ProG Ramp-Hold Mode (see page 6)
Ramp-Hold mode offers the most flexibility. Use it to create custom firings with multiple rates and temperatures.
Use this mode for glass fusing and glass slumping. Some of
the reasons to use Ramp-Hold mode:
I
To use two or more firing rates
I
To cool at a controlled rate
I
To modify a Cone-Fire program
Type of Firing
China Painting
Decals
Enameling
Glass Bead Annealing
Glass Fusing
Glass Slumping
Glaze
Greenware
Silver Clay
Suggested Firing Mode
Cone-Fire
Cone-Fire
Single Segment
Ramp-Hold
Ramp-Hold
Ramp-Hold
Cone-Fire
Cone-Fire
Single Segment
Program Review & Repeat Firing
Program Review lets you check that the information programmed into the controller is correct. It is a good habit to
use Program Review before every firing.
I
Program Review during firing: press the Down Arrow key. The rate, temperature, hold, etc. will display one
after the other. Firing will continue.
I
Program Review from IdLE: press the Down Arrow
key. After rate, temperature, hold, etc., Strt will appear.
Press START/STOP. -On- will appear, and the kiln will
begin firing the program just reviewed.
Hold
Hold maintains a steady temperature for the length of
time you specify. You can use Hold in both heating up and
cooling down segments.
When Hold is set to 99.59 hours, the controller will remain at that temperature indefinitely, until you press STOP.
To enter a 99.59 hour Hold, press the Down Arrow once
from 00.00 during programming.
Note: During firing, the Hold temperature alternates with time left in Hold.
Delay
Delay is a count-down timer. The kiln begins firing when
the timer runs out of time. Use Delay to fit a firing into your
schedule.
Caution: For safety, do not leave the kiln alone during a delay or a firing. We cannot guarantee your kiln
against overfiring even though the controller is automatic.
1 After you have programmed the controller and it is
ready to begin firing, Strt will appear.
2 Press the Down Arrow key once. dELA will appear,
alternating with 00.00 .
3 Use the arrow keys to enter delay time (e.g. 1 hour 10
minutes = 01.10). Then press START. dELA will
appear, alternating with time left until the firing
begins.
/3
Power Failures
After a power failure, the controller will continue firing
provided that:
I
The kiln temperature is above 212°F/100°C when the
power comes back on.
I
The temperature dropped no more than 180°F/100°C
while the power was off.
The next diagram, below, shows three rates. A rate of
1000° will reach 1000° in 1 hour. A rate of 500° will reach
1000° in 2 hours. A rate of 333° will reach 1000° in 3 hours.
Power Failure Messages
PF 1 The power failed during firing, and temperature
dropped more than 180°F/100°C.
PF 2 The power failed during firing, and kiln temperature was below 212°F/100°C when the power came back on.
Thunder Storms and Power Surges
Unplug the kiln or disconnect the power when the kiln is
not in use, especially during thunder storms and in areas
with frequent power surges. If the kiln is part way through a
firing when a storm begins, it is probably okay to continue
the firing. Do not leave the kiln unattended.
Rate is degrees per hour. This diagram shows 3 rates.
A segment, which is a target temperature and a rate of
heating to reach that temperature, can also have a hold. Hold
means maintaining the target temperature for a length of
time. (See next diagram.)
Starting a Firing in a Hot Kiln
After a temporary power failure, or when the kiln has shut
off too soon, it may be necessary to turn the kiln back on.
After you press START, the controller will begin firing
from the current temperature to the target temperature. In
Ramp-Hold, the firing will begin from the first segment that
encompasses the current temperature.
Note: If the kiln is already hotter than the programmed target temperature when you begin firing, CPLt will flash.
Segments
If you are using Cone-Fire mode only, skip to page 7.
Definition of a Segment
A segment is the most basic part of a firing. A segment includes a target temperature and a heating rate to reach that
temperature. Shown below is a segment with a target temperature of 750°.
Firing rate is figured in degrees of temperature per hour.
Since the temperature in the chart below takes two hours to
reach 750°, the rate is 750 ÷2 = 375° per hour.
A single segment with a one hour hold.
Firing to a temperature at a single rate would need only
one segment. Reasons to add more segments:
I
To have more than one heating rate
I
To add a hold somewhere below the shut-off temperature (see Segment 1 in diagram below)
I
To control the cooling rate.
The diagram below shows a 3 segment firing. The first
two segments were used on the way up in temperature. The
last segment was added for controlled cooling.
A 3 segment firing. Segments 1 and 2 include a Hold. Segment 3 controls
cooling rate.
4/
A single segment with a rate of 375°.
Rate
Each segment must include a rate, which is degrees of
temperature change per hour. Single Segment mode has
only one rate.
The kiln will fire at full power when the rate is
1799°F/999°C. Full power displays as FULL .
Single Segment
Firing Instructions
Note: Single Segment firing is all you will ever
need if you are enameling or firing silver clay.
Note: To enter full power from 0000 , press the
Down Arrow key once.
1 From IdLE , press START.
Temperature Over-Shoot
2 Use the Up Arrow key (not the Down Arrow) to
select a firing rate (temperature rise per hour)
from 1 through 5:
When a kiln is heated too fast, it may over-shoot the target
temperature, especially in small kilns at lower temperatures.
To avoid this, add an extra segment to slow the firing. If you
experience over-shoot in Single Segment mode, either slow
the rate, or use Ramp-Hold to add a slow segment near the
target temperature.
SPd1 / (200°F or 111°C)
SPd2 / (500°F or 277°C)
SPd3 / (1000°F or 555°C)
SPd4 / (1500°F or 833°C)
SPd5 / (Full Power)
ProG (Selects Ramp-Hold mode: see next page.)
Then press START.
3 °F or °C and the target temperature from the
last firing will appear. Use the arrow keys to
change the target temperature. Then press
START.
4 HLd and the hold time from the last firing will
appear (e.g. 1 hour 10 minutes = 01.10). Use the
arrow keys to change the hold time. Then press
START.
A fast rate (above diagram) can cause the temperature to
over-shoot the target temperature.
5 Strt will appear. Press START to begin firing.
-On- will appear, the Run indicator light with begin blinking, and the kiln will begin firing.
T o st op a f ir in g b e f or e c omple t io n , p r es s
START/STOP. StOP will appear, alternating with kiln
temperature.
Note: Do not be concerned if your kiln makes a
clicking sound during firing. Kilns use relays to
power the elements. The relays click each time
their electrical contacts come together.
The simplest solution to temperature over-shoot is to
slow the rate, as in diagram above.
Note: The firing speed you select (see step 2) is
a pre-programmed speed. The kiln’s actual firing speed may be less, depending on the kiln
model, available voltage, and density of load you
are firing.
When the kiln fires to completion, the controller will
beep for 30 seconds. The display will show the following:
I
Firing time
I
Present temperature
I
Another solution to temperature over-shoot: in
Ramp-Hold (select the ProG prompt), add a segment with
a slower rate, to begin approximately 40° - 60° below the target temperature.
CPLt
To return to IdLE , press START.
/5
Ramp-Hold
Skipping a Segment in Ramp-Hold
In Ramp-Hold firing, you can skip a segment as follows:
1 The kiln is firing. Press the Up Arrow key.
Ramp-Hold Firing
Instructions
Note: If you don’t need all 8 segments available
in Ramp-Hold, zero out the unused segments.
See step 6 below.
2 SStP will appear. Press the Up Arrow key again.
The firing will skip to the next segment.
1 From IdLE , press START.
Controlled Cooling in Ramp-Hold
Use Ramp-Hold mode to program a slow cooling. This is
the only firing mode that can control cooling rate.
2 Using the Up Arrowkey (not the Down Arrow),
by-pass firing speeds or COnE and select
ProG . Then press START.
Slow cooling enhances the quality of some ceramic
glazes. Slow cooling encourages crystal development,
deeper gloss, and sometimes startling color shifts. Iron red
glazes seem to respond well to slow cooling.
3 rA 1 will appear. Enter firing rate (temperature change per hour) for segment 1. 1° = slowest rate. 1799°F/999°C = full power. Then
press START.
For controlled cooling, program a segment to a lower target temperature than that of the preceding segment. The
controller, of course, cannot speed cooling beyond the kiln’s
natural cooling rate.
4 °F 1 or °C 1 and the target temperature from
the last firing will appear. Use the arrow keys to
change the temperature. Then press START.
Glass artists sometimes flash-cool the glass after it has
fused. They lift the lid slightly for a few minutes to allow heat
to escape. To flash-cool the glass, you will need to add a segment with a rate of FULL. Otherwise, after the flash-cool,
the controller will raise the temperature again.
5 HLd 1 and the hold time from the last firing
will appear (e.g. 1 hour 10 minutes = 01.10).
Use the arrow keys to change the hold time.
Then press START.
6 Continue entering values for the segments
needed. When ra _ appears for the first segment you don’t need, select 0000. Then press
ENTER. This will zero out the remaining segments.
Caution: During fast cooling, do not open the lid or
door all the way. Do not force-cool the kiln with a
fan.
7 Strt will appear. Press START to begin firing.
-On- will appear, the Run indicator light with
begin blinking, and the kiln will begin firing.
To stop a firing before completion, press
START/STOP. StOP will appear, alternating with kiln
temperature.
Note: Do not be concerned if your kiln makes a
clicking sound during firing. Kilns use relays to
power the elements. The relays click each time
their electrical contacts come together.
Note: The kiln’s actual firing rate may be less
than the rate you programmed, depending on
the kiln model, available voltage, and density of
load you are firing.
The above firing would be programmed as follows:
Rate
°F/°C
Temp.
°F/°C
Hold
1
950/527
1350/732
00.12
2
FULL
950/510
00.00
3
300/166
550/287
00.00
Segment
6/
When the kiln fires to completion, it will beep for 30
seconds. The display will show the following:
I
Firing time
I
Present temperature
I
CPLt
To return to IdLE , press START.
Cone-Fire
Cone-Fire mode is based on pyrometric
cones. It is not designed for heat treating,
glass fusing and enameling. For these
firings, use Ramp-Hold mode (page 6).
Use Ramp-Hold to fire ceramic pieces
that require a custom firing schedule.
You can also use Ramp-Hold to add a
slow cooling.
Pyrometric Witness Cones
It is important to understand pyrometric witness cones,
because clay and glazes are rated to cone numbers. Pyrometric cones are small pyramids of clay that bend when exposed
to the correct amount of heat work. Cones are rated by number. See page 14 for a list of cone numbers and their temperatures.
When a witness cone bends during firing, the clay and
glaze in that firing, rated to that cone number, have received
the correct amount of heat.
Place the pyrometric witness cone on the kiln shelf near
the ware you are firing. Use the cone to check for firing accuracy. The cone is the most accurate measurement of heat
work in a ceramic firing. This is because the cone measures
the combined effects of time, kiln atmosphere, and temperature.
We suggest using the witness cone to trouble shoot problems with the ware. If china paints appear faded and you suspect it is due to over-firing, test fire with a witness cone. Another example: glaze crazing due to under-fired bisque.
How to Interpret Cone Bending
The cones illustrated here are called self-supporting
cones. They are the easiest type of witness cone to use.
1. Correct Bend
When the self-supporting
cone bends so that the tip is approximately even with the top of
the base, the cone has been exposed to the correct amount of
heat work for that cone number.
This is called a 6 o’clock bend.
2. Under-Fired Cone
This cone has not bent far
enough. It indicates that the kiln
did not fire long enough or hot
enough.
3. Over-Fired Cone
When a cone collapses, or
puddles, it indicates that the
kiln over-fired the ware rated to
that cone number.
Note: Do not be overly concerned with achieving an
exact 6 o’clock bend. The
difference between a 3 o’clock and a 6 o’clock bend
is only a few degrees of temperature.
How to Correct for Under or
Over-Fired Cones
Before changing a firing because of an under or over-fired
cone, make sure the correct cone was in the kiln. For instance, if you fired to cone 05, make sure the cone in the kiln
was not a cone 5 instead. (See the cone temperature chart on
page 14.)
Compensating for an Under-Fired Cone
Fire to the same cone number next time, but add hold
time. How much hold time to add is a matter of experimentation. A general guideline would be 10-30 minutes.
I
I
If the kiln still does not fire hot enough, then fire to the
next hotter cone number, without hold time.
I
Another option: customize the firing in Ramp-Hold. See
the next page.
Compensating for an Over-Fired Cone
Fire to the next cooler cone number.
I
I
If firing to the next cooler cone number results in under-firing, add hold time.
I
Another option: customize the firing in Ramp-Hold. See
the next page.
Cone-Fire Hold
Cone-Fire Hold heat-soaks the ware at the cone temperature at the end of the firing. Without Hold, the kiln shuts off
after it reaches the cone temperature. Hold maintains the
cone temperature for the period you specify.
Hold is not needed in every firing. Experience will help
you decide when to use Hold. Some of the reasons you might
consider using it:
I
To even out the temperature throughout the kiln.
I
To allow heat to penetrate more completely into the clay.
(Rapid firing is like cooking: the turkey will be done on
the outside but not on the inside.)
I
To help glaze absorb china paint.
I
To heal glaze defects such as bubbles.
Caution: Use Hold sparingly. A little hold time can
yield dramatic results. But too much hold time can
easily overfire your ware and burn out colors.
One way to add Hold time without over-firing is to fire to
one cone cooler than needed. Then add enough hold time to
bend the next hotter cone. Hold time needed to bend the
/7
next cone will vary. As a rule of thumb, 45 - 60 minutes of
hold = one cone of heat work.
Example: to fire to cone 05, program Cone-Fire for 06
and add 45-60 minutes of hold time.
If your kiln has a peephole, watch the pyrometric witness
cones during firing. Press STOP when the correct witness
cone bends. Note how much Hold time was needed. Program that much Hold time the next time you fire the same
type of ware.
Cone-Fire Firing
Instructions
1 From IdLE , press START.
2 Using the Up Arrowkey (not the Down Arrow),
by-pass ProG and select COnE . Then press
START.
Note: During Hold, the display temperature will alternate with time left in Hold. To figure hold time
for the next firing, subtract time left in Hold from
the total Hold time entered.
3 The last pyrometric cone you fired, and its temperature, will appear. Use the arrow keys to
change the cone number. Then press START.
4 SLO _ Ed or FASt will appear. Use the arrow keys to change speed. Then press START.
When Hold is set to 99.99 hours, the Sentry Xpress will remain at that temperature indefinitely, until STOPis pressed.
5 HLd and the hold time from the last firing will
appear (e.g. 1 hour 10 minutes = 01.10). Use
the arrow keys to change the hold time. Then
press START.
When the Kiln Shuts Off Too Soon
If the kiln shuts off before the pyrometric witness cone
bends, you can turn the hot kiln back on and keep firing.
1 From IdLE , program the next hotter cone in
Cone-Fire.
2 Strt will appear. To begin firing, press START.
-On- will appear and the Run indicator light will
begin blinking. The hot kiln will begin firing, taking
up where it left off.
6 Strt will appear. Press START. -On- will appear, the Run indicator light with begin blinking, and the kiln will begin firing.
To stop a firing before completion, press
START/STOP. StOP will appear, alternating with kiln
temperature.
How to Customize Cone-Fire
Note: Do not be concerned if your kiln makes a
clicking sound during firing. Kilns use relays to
power the elements. The relays click each time
their electrical contacts come together.
You can customize a Cone-Fire program using
Ramp-Hold. On pages 12 and 13, tables show the segments
used to program each cone number in Cone-Fire. For instance, a cone 016 firing at medium speed ( _Ed )uses these
two segments:
Rate
°F/°C
Temp.
°F/°C
Hold
1
396/220
1314/712
00.00
2
108/60
1422/772
00.00
Segment
Suppose your 016 witness cone, at a medium speed firing,
only barely started to bend. To fire 25° hotter, raise the target
temperature of segment 2 by 25°:
This is the program you would enter in Ramp-Hold:
Rate
°F/°C
Temp.
°F/°C
Hold
1
396/220
1314/712
00.00
2
108/60
1447/786
00.00
You could also easily add a slow cooling segment:
Rate
°F/°C
Temp.
°F/°C
Hold
1
396/220
1314/712
00.00
2
108/60
1447/786
00.00
3
100/55
1000/537
00.00
Segment
8/
When the kiln fires to completion, it will beep for 30
seconds. The display will show the following:
I
Firing time
I
Present temperature
I
1422 + 25 = 1447
Segment
Note: The kiln’s actual firing rate may be less
than the rate you programmed, depending on
the kiln model, available voltage, and density of
load you are firing.
CPLt
To return to IdLE , press START.
Error Messages
BAdP / Bad Programming
The kiln will not fire because the Ramp-Hold program
just entered has a rate of 0000 in segment 1. Program the firing again.
EtH / Electronics Too Hot
The temperature of the electronic circuit board is above
185°F/85°C. This could damage the controller, so the firing
has been stopped. To prevent this, keep the firing room
cooler. Use better ventilation.
FaIL / Thermocouple Failure
Selecting °F or °C
Display
The controller can display temperature in either °F or °C.
If your controller shows a small display dot in the lower right
corner of the display, the temperature shown is °C. No dot
means °F. To change temperature display:
1 UNPLUG kiln or disconnect power.
2 Remove the four screws that hold the controller to the
front of the kiln. Carefully remove the controller
from the kiln. Leave wires attached to the controller.
The thermocouple, or temperature sensor, failed during
firing. Causes:
I
Defective thermocouple or disconnected/loose wires
I
Defective controller
I
Electrical noise
Thermocouple Paperclip Test
Check the thermocouple wire
connections. (See your kiln instruction manual.) If connections
are tight, perform this test:
1 UNPLUG the kiln or disconnect the power. Remove the
controller. (See photo at far right.) Remove the two
thermocouple wires from the back of the controller.
2 Cut a thin paperclip in half. Insert a U-shaped
paperclip piece, or other piece of thin wire, where you
removed the thermocouple wires.
4 Plug in the kiln. If the controller displays room temperature, replace the thermocouple. If it shows
FaIL , replace the controller.
TCR / Thermocouple Reversed
Thermocouple lead wires are reversed.
3 Look at the back of the controller. A plastic jumper on
the back of the board determines the type of temperature display. When the jumper connects two
pin-type terminals, display reads °F. When the
jumper is removed, display reads °C. Remove or insert the jumper as desired. (You can purchase the
jumper from a computer supply store if necessary.)
4 Install the controller being careful not to jar components on the back of the controller against the kiln
case.
FtL / Fired Too Long
This message appears when both of the following conditions are met:
I
The temperature rise is less than 27°F/15°C per hour
I
The firing is 4 hours longer than programmed
See “Controller turns on. No heat in kiln,” page 11.
PF 1 / Power Failure
The power failed during firing and temperature dropped
more than 180°F/100°C by the time the power came back on.
PF 2 / Power Failure
The power failed during firing and kiln temperature was
below 212°F/100°C when the power came back on.
TcO / Thermocouple Failure
The thermocouple failed during the IdLE display.
/9
Display Messages
Abrt The firing was stopped.
Trouble Shooter
Problem: Controller display is blank.
No heat in kiln.
COnE (page 8) This is the prompt for Cone-Fire mode.
Press the START key to select Cone-Fire. The controller is then
ready for you to select a pyrometric cone number.
I
Is the kiln connected to the power?
I
Has the circuit breaker tripped or fuse blown?
CPLt Fired to completion. If the kiln is already hotter than the
I
Is power reaching the wall receptacle?
Test with a voltmeter or test light if you are not sure.
I
Has the kiln switch box ½ amp fuse blown?
programmed target temperature when you begin firing, CPLt
will appear immediately after you begin firing.
dELA (page 3) Delay is a count-down timer that starts the
kiln when the time runs out.
°F
or °C
(and temperature) (pages 5 & 6) The target
temperature (the temperature that the kiln will fire to). Each segment in Ramp-Hold has a target temperature. Single Segment
mode has one target temperature.
FULL Full power firing rate. At this setting the kiln will fire at
its fastest rate. There are two ways to select full power:
1) Select SPd5 in Single Segment mode.
2) Select a rate of 1799°F/999°C at the ra _ prompt in
Ramp-Hold mode. A fast way to do this is to press the Down Arrow key once from 0000 . FULL will appear.
HLd (and time) (pages 5 & 6) Hold time of a segment,
shown in hours and minutes. (i.e. 2 hours 15 minutes = 02.15.)
IdLE (page 3) The controller is ready for you to enter a program or to begin a repeat firing.
-On- Firing has begun. A moment after -On- appears, you
will hear the relay(s) clicking.
ProG (Program) (page 6) Select this option to program a
Ramp-Hold firing.
rA 1 , rA 2 , etc. (Rate) (page 6) This appears in
Ramp-Hold programming for each segment. 1, 2, etc. are segment numbers. Enter the rate of temperature change for that
segment. Rate is figured in degrees of temperature change per
hour. Example:
A temperature rise of 100° in two hours = 50° rate.
A temperature drop of 200° in one hour = 200° rate.
SPd1 , SPd2 , SPd3 , SPd4 , SPd5 (page 5)
These are firing rates, or speeds, in Single Segment mode.
SStP (Skip Step) (page 6) This message appears when you
press the Up Arrow key during a Ramp-Hold firing. If you press
the UpArrowkey again, the firing will skip to the next segment.
StOP The firing was stopped by pressing START/STOP.
Strt The “Ready to Start” message appears after programming a firing. Press START/STOP to begin firing.
10 /
The kiln’s ½ amp fuse is located in the kiln switch box. Remove by pressing the fuse holder
and turning counter-clockwise
half a turn. Check the fuse by
placing the probes of an ohmmeter on the ends of the fuse. If the
ohmmeter reads less than an
ohm (digital meter) or reads 0
ohms (analog meter), the fuse is
okay. If the reading is OPEN (digital meter) or infinity/no
needle movement (analog meter), the fuse is bad. Replacement fuse:
AGC 1/2 A 250V AC
I
Is the controller receiving power? Test the power INPUT connections on the back
of the controller with a voltmeter.
Controller Power Input Test
Unplug the kiln. Remove the 4
screws holding the controller
faceplate to the switch box. Lift
faceplate out of box and let the
board hang on the box with the
back of the board facing you.
Plug the kiln back in. Touch voltmeter probes (in AC mode)
to both INPUT connections (the white and orange wires).
Caution: Do not let the back of the board touch a
grounded object. Make sure the voltmeter is in the
AC mode when placing the probes on INPUT connections.
Controller Power Input Test Result: No voltage
UNPLUG kiln. Check the switch box for disconnected
wires between the cord, transformer, and controller. If wiring is okay, replace the transformer.
Controller Power Input Test Result: 20 - 24 volts AC
Correct current is reaching the board from the transformer. But since the board is not lighting up, it is probably
defective. Return the controller for repair or replacement.
Controller Power Input Test Result: less than 20 volts
Did you recently replace the transformer? It may be the
wrong voltage. The voltage is below 20, which is not enough
power for the controller. To
find out the cause of low voltage, continue below:
Controller Input Test #2
The back of the board is
still facing you and the kiln is
plugged in. Remove the INPUT plug, which is the
white, orange, and blue
wires, from the back of the
controller. Touch a voltmeter probe to the white wire and the
other probe to the orange wire.
Input Test #2 Result: Less than 20 Volts AC
There are two possible reasons: 1) Low voltage at the wall
receptacle; 2) defective transformer. If wall receptacle voltage is correct, replace the transformer.
Input Test #2 Result: 20 - 24 Volts AC
The transformer is sending correct voltage to the controller. Yet when the INPUT plug was connected to the controller, voltage was less than 20. This means the controller is
draining the voltage and is defective. Return the controller
for repair or replacement.
Problem: Controller display turns on.
No heat in kiln.
I
Is the relay making its normal clicking sound?
Yes, the relay is clicking.
Test the elements with an ohmmeter:
Element Resistance Test
1 UNPLUG kiln/disconnect the power. Open the
kiln’s switch box. Make sure the wires connecting the
relay to the elements are secure. If connections are
okay, continue to step 2:
2 Touch the ohmmeter leads to the two element connectors of each element. A no-needle-movement
reading on an analog meter, or OPEN on a digital meter, indicates a broken element.
If the elements check out okay, replace the relay.
Note: To replace relay, see your kiln’s instruction
and service manual.
No, the relay is not clicking.
We know the controller is receiving voltage, because the
display is lit. But the voltage from the transformer may be too
low to power the relays. Perform the “Controller Power Input Test,” page 10. If your controller passes the input test,
perform the “Controller Power Output Test”:
Controller Power Output Test
Is the controller sending voltage to the relay? Test OUTPUT with a voltmeter:
1 UNPLUG the kiln/disconnect the power. Remove
the 4 screws holding the controller faceplate to the
switch box. Lift faceplate out of box and let the con-
troller hang on the outside of the box with the back of
the board facing you. Then plug the kiln back in. Program the controller to fire to 1000EF at FULL rate in
Ramp-Hold mode. Press START.
2 Put the voltmeter in DC mode. (It must be in DC
mode when testing OUTPUT voltage.) Touch
probes to the red wire and black wire connections.
Measure voltage when the relay clicks on.
Output Test Result: No voltage at red and black wires
The controller is not sending power to the relay. Return
the controller for repair or replacement.
Output Test Result: 10 - 14 v. at red and black wires
The controller is sending correct power to the relay. Unplug kiln/disconnect power. Remove the kiln switch box.
Look for disconnected wires between the controller, relay
and elements. Check the wiring diagram to be sure wires are
connected to the correct terminals. Be sure connections are
tight. If the wiring is okay, replace the relay.
Note: To replace relay, see your kiln’s instruction
and service manual.
Problem: Kiln switch box ½ amp
fuses keep blowing.
I
What size fuse are you using? Correct fuse:
AGC ½ A 250V AC.
If the fuse is the correct size, perform the following test:
Kiln Switch Box ½ Amp Fuse Power Test
1 UNPLUG the kiln/disconnect the power. Remove
the 4 screws holding the controller board faceplate to
the switch box. Lift faceplate out of box and let the
board hang on the outside of the box with the back of
the board facing you. Then plug the kiln back in. Disconnect both wire plugs
from the back of the controller. Apply power to
kiln. If fuse blows, replace the transformer. (If
the fuse does not blow,
the problem is a board or
relay. Go to step 2.)
2 Connect the INPUT plug (orange, blue, and white
wires) to the board again. Leave off the OUTPUT
wire plug (the one with the red, green and black
wires). Program the controller to fire to 1000EF at
FULL rate in Ramp-Hold mode. Press START. If the
fuse blows, replace or service the board. (If the fuse
does not blow, the problem is caused by a short in the
coil of a relay. Go to step 3.)
3 UNPLUG kiln/disconnect power. Reconnect the
OUTPUT wire plug. Reinstall the board in the
switch box. Replace the relay.
Note: To replace relay, see your kiln’s instruction
and service manual.
/ 11
Cone-Fire Schedules - °F
These are the Medium Speed firing schedules programmed in Cone-Fire mode. To customize a schedule, write down your
changes on a separate sheet of paper. Then load your new schedule into Ramp-Hold.
Note: Your controller accepts only cone numbers that fall within the kiln’s maximum temperature range.
Low Fire Cones °F
Cone
022
021
020
019
018
017
016
015
014
013
012
011
Segment 1
Rate 1 Temp. 1
396
979
396
1004
396
1051
396
1144
396
1211
396
1252
396
1314
396
1348
396
1377
396
1431
396
1474
396
1499
Medium Fire Cones °F
Cone
010
09
08
07
06
05
04
03
02
01
Segment 1
Rate 1 Temp. 1
324
1022
324
1022
324
1022
324
1022
324
1022
324
1022
324
1022
324
1022
324
1022
324
1022
High Fire Cones °F
Cone
1
2
3
4
5
6
7
8
9
10
12 /
Segment 1
Rate 1 Temp. 1
324
1022
324
1022
324
1022
324
1022
324
1022
324
1022
324
1022
324
1022
324
1022
324
1022
Segment 2
Rate 2 Temp. 2
108
1087
108
1112
108
1159
108
1252
108
1319
108
1360
108
1422
108
1456
108
1485
108
1539
108
1582
108
1607
Segment 2
Rate 2 Temp. 2
153
1112
153
1112
153
1112
153
1112
153
1112
153
1112
153
1112
153
1112
153
1112
153
1112
Segment 3
Rate 3 Temp. 3
180
1549
180
1580
180
1620
180
1681
180
1720
180
1780
180
1837
180
1879
180
1908
180
1938
Segment 4
Rate 4 Temp. 4
108
1657
108
1688
108
1728
108
1789
108
1828
108
1888
108
1945
108
1987
108
2016
108
2046
Segment 2
Rate 2 Temp. 2
153
1112
153
1112
153
1112
153
1112
153
1112
153
1112
153
1112
153
1112
153
1112
153
1112
Segment 3
Rate 3 Temp. 3
162
1863
162
1872
162
1890
162
1908
162
1951
162
2016
162
2046
162
2064
162
2084
162
2129
Segment 4
Rate 4 Temp. 4
108
2079
108
2088
108
2106
108
2124
108
2167
108
2232
108
2262
108
2280
108
2300
108
2345
Cone-Fire Schedules - °C
These are the Medium Speed firing schedules programmed in Cone-Fire mode. To customize a schedule, write down your
changes on a separate sheet of paper. Then load your new schedule into Ramp-Hold.
Note: Your controller accepts only cone numbers that fall within the kiln’s maximum temperature range.
Low Fire Cones °C
Cone
022
021
020
019
018
017
016
015
014
013
012
011
Segment 1
Rate 1 Temp. 1
220
526
220
540
220
566
220
618
220
655
220
678
220
712
220
731
220
747
220
777
220
801
220
815
Medium Fire Cones °C
Cone
010
09
08
07
06
05
04
03
02
01
Segment 1
Rate 1 Temp. 1
180
550
180
550
180
550
180
550
180
550
180
550
180
550
180
550
180
550
180
550
High Fire Cones °C
Cone
1
2
3
4
5
6
7
8
9
10
Segment 1
Rate 1 Temp. 1
180
550
180
550
180
550
180
550
180
550
180
550
180
550
180
550
180
550
180
550
Segment 2
Rate 2 Temp. 2
60
586
60
600
60
626
60
678
60
715
60
738
60
772
60
791
60
807
60
837
60
861
60
875
Segment 2
Rate 2 Temp. 2
85
600
85
600
85
600
85
600
85
600
85
600
85
600
85
600
85
600
85
600
Segment 3
Rate 3 Temp. 3
100
843
100
860
100
882
100
916
100
938
100
971
100
1003
100
1026
100
1042
100
1059
Segment 4
Rate 4 Temp. 4
60
903
60
920
60
942
60
976
60
998
60
1031
60
1063
60
1086
60
1102
60
1119
Segment 2
Rate 2 Temp. 2
100
600
100
600
100
600
100
600
100
600
100
600
100
600
100
600
100
600
100
600
Segment 3
Rate 3 Temp. 3
90
1017
90
1022
90
1032
90
1042
90
1066
90
1102
90
1119
90
1129
90
1140
90
1165
Segment 4
Rate 4 Temp. 4
60
1137
60
1142
60
1152
60
1162
60
1186
60
1222
60
1239
60
1249
60
1260
60
1285
/ 13
Temperature Equivalents For
Orton Self-Supporting Pyrometric Cones
°F
°C
Cone
Self-Supporting Cones
Num-ber
Heated at:
27° F
108° F
270° F
Per Hour* Per Hour* Per Hour*
Pre-Fire
Color
Cone
Number
15° C
60° C
150° C
Per Hour* Per Hour* Per Hour*
Pre-Fire
Color
022
—
1087
1094
Green
022
—
586
590
Green
021
—
1112
1143
Fuschia
021
—
600
617
Fuschia
020
—
1159
1180
Orange
020
—
626
638
Orange
019
1213
1252
1283
Yellow
019
656
678
695
Yellow
018
1267
1319
1353
White
018
686
715
734
White
017
1301
1360
1405
Pink
017
705
738
763
Pink
016
1368
1422
1465
Light Blue
016
742
772
796
Light Blue
015
1382
1456
1504
Violet
015
750
791
818
Violet
014
1395
1485
1540
Gray
014
757
807
838
Gray
013
1485
1539
1582
Green
013
807
837
861
Green
012
1549
1582
1620
Fuschia
012
843
861
882
Fuschia
011
1575
1607
1641
Orange
011
857
875
894
Orange
010
1636
1657
1679
Dark Red
010
891
903
915
Dark Red
09
1665
1688
1706
Dark Red
09
907
920
930
Dark Red
08
1692
1728
1753
Dark Red
08
922
942
956
Dark Red
07
1764
1789
1809
Dark Red
07
962
976
987
Dark Red
06
1798
1828
1855
Dark Red
06
981
998
1013
Dark Red
05 1/2
1839
1859
1877
Dark Red
05 1/2
1004
1015
1025
Dark Red
05
1870
1888
1911
Dark Red
05
1021
1031
1044
Dark Red
04
1915
1945
1971
Dark Red
04
1046
1063
1077
Dark Red
03
1960
1987
2019
Dark Red
03
1071
1086
1104
Dark Red
02
1972
2016
2052
Dark Red
02
1078
1102
1122
Dark Red
01
1999
2046
2080
Dark Red
01
1093
1119
1138
Dark Red
1
2028
2079
2109
Dark Red
1
1109
1137
1154
Dark Red
2
2034
2088
2127
Dark Red
2
1112
1142
1164
Dark Red
3
2039
2106
2138
Dark Red
3
1115
1152
1170
Dark Red
4
2086
2124
2161
Gray
4
1141
1162
1183
Gray
5
2118
2167
2205
Green
5
1159
1186
1207
Green
5 1/2
2133
2197
2237
White
5 1/2
1167
1203
1225
White
6
2165
2232
2269
Fuchsia
6
1185
1222
1243
Fuchsia
7
2194
2262
2295
Orange
7
1201
1239
1257
Orange
8
2212
2280
2320
Yellow
8
1211
1249
1271
Yellow
9
2235
2300
2336
White
9
1224
1260
1280
White
10
2284
2345
2381
Pink
10
1251
1285
1305
Pink
*Rate of temperature increase during last 90 - 120
minutes of firing. Tables by courtesy of the Edward
Orton, Jr. Ceramic Foundation.
14 /
Heated at:
Self-Supporting Cones
*Rate of temperature increase during last 90 - 120
minutes of firing. Tables by courtesy of the Edward
Orton, Jr. Ceramic Foundation.
Shorthand Instructions
Read the safety guidelines, page 2. After pressing the keys in the left column, the message in the center will appear. For more
detailed instructions, see page 8.
Cone-Fire
Keys to Press
Display
IdLE
COnE -
PrOG
(Not Down Arrow) Select COnE COnE
Select cone number
06
/
1828 (Last cone fired)
06
/
1828 (Sample cone)
FASt
Select speed
FASt (Sample speed)
HLd
Enter Hold Time
00.00 (Or hold time)
Strt
-O n-
The kiln is now firing.
/ 15
Shorthand Instructions
Read the safety guidelines, page 2. After pressing the keys in the left column, the message in the center will appear. For more
detailed instructions, see Single Segment, page 5, or Ramp-Hold, page 6.
Single Segment
Keys to Press
Display
IdLE
SPd1
(Not Down Arrow) Select rate
SPd1 (Sample rate)
or °C
°F
Enter temperature
- PrOG
1900 (Sample temperature)
HLd
Enter hold time
00.00 (Or hold time)
Strt
The kiln is now firing.
-O n-
Ramp-Hold
Keys to Press
Display
IdLE
SPd1 -
(Not Down Arrow) Select ProG
ProG
ProG
rA 1
Enter Segment 1 rate
500
°F
Enter Temperature
(Sample rate)
1 or °C 1
1900 (Sample temperature)
HLd1
Enter Hold Time
00.00 (Or hold time)
First segment not needed: enter a rate of 0000.
Strt
-O n- The kiln is now firing.