1
Acronis Snap Deploy 4
User Guide
Copyright Statement
Copyright © Acronis International GmbH, 2002-2012. All rights reserved.
“Acronis” and “Acronis Secure Zone” are registered trademarks of Acronis International GmbH.
"Acronis Compute with Confidence", “Acronis Startup Recovery Manager”, “Acronis Active Restore”,
“Acronis Instant Restore” and the Acronis logo are trademarks of Acronis International GmbH.
Linux is a registered trademark of Linus Torvalds.
VMware and VMware Ready are trademarks and/or registered trademarks of VMware, Inc. in the
United States and/or other jurisdictions.
Windows and MS-DOS are registered trademarks of Microsoft Corporation.
All other trademarks and copyrights referred to are the property of their respective owners.
Distribution of substantively modified versions of this document is prohibited without the explicit
permission of the copyright holder.
Distribution of this work or derivative work in any standard (paper) book form for commercial
purposes is prohibited unless prior permission is obtained from the copyright holder.
DOCUMENTATION IS PROVIDED "AS IS" AND ALL EXPRESS OR IMPLIED CONDITIONS,
REPRESENTATIONS AND WARRANTIES, INCLUDING ANY IMPLIED WARRANTY OF MERCHANTABILITY,
FITNESS FOR A PARTICULAR PURPOSE OR NON-INFRINGEMENT, ARE DISCLAIMED, EXCEPT TO THE
EXTENT THAT SUCH DISCLAIMERS ARE HELD TO BE LEGALLY INVALID.
Third party code may be provided with the Software and/or Service. The license terms for such thirdparties are detailed in the license.txt file located in the root installation directory. You can always find
the latest up-to-date list of the third party code and the associated license terms used with the
Software and/or Service at http://kb.acronis.com/content/7696
Acronis patented technologies
Technologies used in this product are covered by the following patents: U.S. Patent # 7,047,380; U.S.
Patent # 7,246,211; U.S. Patent # 7,318,135; U.S. Patent # 7,366,859; U.S. Patent # 7,636,824; U.S.
Patent # 7,831,789; U.S. Patent # 7,886,120; U.S. Patent # 7,934,064; U.S. Patent # 7,949,635; U.S.
Patent # 7,979,690; U.S. Patent # 8,069,320; U.S. Patent # 8,073,815; U.S. Patent # 8,074,035.
2
Copyright © Acronis International GmbH, 2002-2012.
Table of contents
1
Introducing Acronis Snap Deploy 4 .......................................................................................... 7
1.1
Overview .................................................................................................................................... 7
1.1.1
1.1.2
1.1.3
1.2
What you can do with Acronis Snap Deploy 4 ........................................................................... 7
1.2.1
1.2.2
1.2.3
1.2.4
1.2.5
1.2.6
1.2.7
1.2.8
1.3
1.3.10
1.3.11
1.3.12
1.3.13
1.3.14
New: Support for UEFI................................................................................................................................11
New: Support for Windows 8.....................................................................................................................11
New: List of machines ................................................................................................................................12
New: List of deployment tasks ...................................................................................................................12
New: Per-deployment licensing .................................................................................................................12
New: Support for the VHD format .............................................................................................................12
New: Graphical user interface in WinPE ....................................................................................................13
New: E-mail notifications about deployment............................................................................................13
New: Compatibility with Acronis True Image, Acronis Backup & Recovery 10, and Acronis Backup &
Recovery 11 backups ..............................................................................................................................13
New: Support for multiple network adapters ...........................................................................................13
Multicast TTL and network bandwidth throttling .....................................................................................14
New: Falling back to unicast.......................................................................................................................14
Encrypted communication .........................................................................................................................14
Password protection ..................................................................................................................................14
1.4
Supported operating systems for imaging and deployment ...................................................15
1.5
Licensing policy ........................................................................................................................16
1.5.1
1.5.2
1.5.3
1.5.4
1.6
1.7
Machine licenses and deployment licenses ..............................................................................................16
Server licenses and workstation licenses ..................................................................................................17
Licenses for Acronis Universal Deploy .......................................................................................................17
Trial version of Acronis Snap Deploy 4 ......................................................................................................17
Upgrading to Acronis Snap Deploy 4 .......................................................................................18
1.6.1
1.6.2
Upgrading licenses......................................................................................................................................18
Upgrading components..............................................................................................................................18
Technical Support ....................................................................................................................19
Understanding Acronis Snap Deploy 4 ................................................................................... 20
2.1
Terminology .............................................................................................................................20
2.2
Components.............................................................................................................................21
2.3
Support for file systems and storage media ............................................................................22
2.3.1
2.3.2
2.4
3
Taking an image of the master system ........................................................................................................8
Deployment to specific machines (immediate, manual, and scheduled deployment) .............................8
Deployment to any ready machines (event-driven deployment) ..............................................................9
Stand-alone deployment..............................................................................................................................9
Deployment with individual deployment settings ......................................................................................9
User-initiated deployment (custom deployment) ....................................................................................10
Deployment of a disk volume and MBR ....................................................................................................10
Command-line mode and scripting under WinPE .....................................................................................11
Features of Acronis Snap Deploy 4 ..........................................................................................11
1.3.1
1.3.2
1.3.3
1.3.4
1.3.5
1.3.6
1.3.7
1.3.8
1.3.9
2
What is Acronis Snap Deploy 4 ....................................................................................................................7
Who needs Acronis Snap Deploy 4 ..............................................................................................................7
Acronis Snap Deploy 4 infrastructure ..........................................................................................................7
Supported file systems ...............................................................................................................................22
Supported media ........................................................................................................................................22
Supported types of disk and firmware interface .....................................................................23
Copyright © Acronis International GmbH, 2002-2012.
2.5
Usage .......................................................................................................................................23
2.5.1
2.5.2
2.5.3
2.6
What is Acronis Universal Deploy ............................................................................................26
2.6.1
2.6.2
2.6.3
2.6.4
2.7
Offline imaging ...........................................................................................................................................24
Online imaging............................................................................................................................................24
Deployment ................................................................................................................................................25
Acronis Universal Deploy purpose .............................................................................................................26
Acronis Universal Deploy general principles .............................................................................................27
Acronis Universal Deploy and Microsoft Sysprep .....................................................................................27
Getting Acronis Universal Deploy ..............................................................................................................27
How to .....................................................................................................................................27
3
Getting started with Acronis Snap Deploy 4 ........................................................................... 29
4
Installation of Acronis Snap Deploy 4 ..................................................................................... 39
4.1
Supported operating systems ..................................................................................................39
4.2
System requirements...............................................................................................................39
4.3
Used ports and IP addresses ....................................................................................................40
4.4
Typical installation ...................................................................................................................40
4.5
Custom installation ..................................................................................................................41
4.5.1
4.5.2
4.5.3
4.6
Other ways of installation ........................................................................................................47
4.6.1
4.6.2
4.7
5
Uninstalling Acronis Snap Deploy 4 .........................................................................................50
Connecting to a machine .........................................................................................................51
5.1.1
5.1.2
7
Connect to a local machine ........................................................................................................................51
Connect to another machine .....................................................................................................................51
5.2
Browsing logs ...........................................................................................................................53
5.3
Checking for software updates ................................................................................................53
Using Acronis Snap Deploy 4 License Server ........................................................................... 54
6.1
Understanding Acronis Snap Deploy 4 License Server ............................................................54
6.2
Adding licenses by using Acronis Snap Deploy 4 Management Console.................................54
6.3
Viewing information about licenses ........................................................................................55
6.4
Removing licenses....................................................................................................................56
6.5
Adding licenses in the command-line mode ...........................................................................56
6.6
Using Acronis Snap Deploy 4 License Server Management Tool.............................................57
Deployment tools .................................................................................................................. 58
7.1
4
Upgrading from a previous product version .............................................................................................49
Upgrading from the trial to full product version .......................................................................................50
Using Acronis Snap Deploy 4 Management Console ............................................................... 51
5.1
6
Installing components remotely ................................................................................................................47
Extracting the components of Acronis Snap Deploy 4 ..............................................................................48
Upgrading Acronis Snap Deploy 4 ...........................................................................................49
4.7.1
4.7.2
4.8
Installation procedure ................................................................................................................................42
Common installation configurations .........................................................................................................42
Installation of components ........................................................................................................................44
Bootable components .............................................................................................................58
Copyright © Acronis International GmbH, 2002-2012.
7.2
Creating a bootable media ......................................................................................................58
7.2.1
7.2.2
7.3
8
Creating an Acronis bootable media .........................................................................................................59
Creating a WinPE-based bootable media ..................................................................................................62
Configuring Acronis PXE Server ...............................................................................................65
Creating a master image ........................................................................................................ 67
8.1
Preparation of the master operating system ..........................................................................67
8.2
Online vs. offline imaging ........................................................................................................67
8.3
Performing online imaging ......................................................................................................68
8.4
Performing offline imaging ......................................................................................................68
8.5
Steps of the Master Image Creator wizard ..............................................................................71
8.5.1
8.5.2
8.5.3
8.5.4
Disks or volumes to image .........................................................................................................................71
Image name and location...........................................................................................................................72
Options of imaging .....................................................................................................................................73
Comments and summary ...........................................................................................................................76
9
Validating a master image ..................................................................................................... 78
10
Deploying a master image ..................................................................................................... 79
10.1 Files supported as master images ...........................................................................................79
10.2 Licenses for deployment ..........................................................................................................80
10.3 Deployment templates ............................................................................................................80
10.3.1
10.3.2
10.3.3
Creating a deployment template ...............................................................................................................80
Configuring default deployment settings ..................................................................................................98
Managing deployment templates .............................................................................................................99
10.4 Deployment through a deployment task.................................................................................99
10.4.1
10.4.2
10.4.3
10.4.4
10.4.5
10.4.6
Prerequisites ............................................................................................................................................ 100
Deployment to specific machines ........................................................................................................... 100
Deployment to any ready machines ....................................................................................................... 106
Booting the target machines................................................................................................................... 107
Operations with deployment tasks......................................................................................................... 111
Deployment behind an NAT device ........................................................................................................ 111
10.5 Stand-alone deployment ...................................................................................................... 112
10.6 User-initiated deployment (custom deployment) ................................................................ 113
10.6.1
10.6.2
10.6.3
10.6.4
10.6.5
Understanding user-initiated deployment ............................................................................................. 113
Considerations when using a PXE server ................................................................................................ 115
Setting up the user-initiated deployment mode .................................................................................... 115
Changing parameters of the user-initiated deployment mode ............................................................. 118
Switching off the user-initiated deployment mode ............................................................................... 118
10.7 BIOS-based systems to UEFI-based and vice versa............................................................... 119
10.7.1
10.7.2
Deploying volumes .................................................................................................................................. 119
Deploying disks ........................................................................................................................................ 120
10.8 Bootability troubleshooting .................................................................................................. 122
10.8.1
10.8.2
10.8.3
11
How to reactivate GRUB and change its configuration.......................................................................... 124
How to reactivate LILO ............................................................................................................................ 125
About Windows loaders.......................................................................................................................... 125
Managing the list of machines (the Machines view) ............................................................. 126
11.1 Adding machines................................................................................................................... 126
5
Copyright © Acronis International GmbH, 2002-2012.
11.2 Groups of machines .............................................................................................................. 127
11.3 Actions on machines ............................................................................................................. 127
11.4 States and results for machines ............................................................................................ 128
12
Individual deployment settings ............................................................................................ 129
12.1 Enabling, disabling, and resetting individual settings........................................................... 129
12.2 List of individual settings ...................................................................................................... 129
13
Managing deployment tasks (the Deployment tasks view)................................................... 131
13.1 List of deployment tasks ....................................................................................................... 131
13.2 Actions on deployment tasks................................................................................................ 131
13.3 States and results for deployment tasks .............................................................................. 132
14
Command-line mode and scripting under WinPE ................................................................. 133
14.1 Command-line syntax ........................................................................................................... 133
14.1.1
14.1.2
14.1.3
14.1.4
Supported commands ............................................................................................................................. 133
Common parameters (parameters common for most commands)...................................................... 135
Specific parameters (parameters specific for individual commands) ................................................... 137
Usage examples ....................................................................................................................................... 141
14.2 Sample scenarios .................................................................................................................. 142
14.2.1
14.2.2
15
6
Deploying images assigned to target machines ..................................................................................... 142
Creating images assigned to target machines ........................................................................................ 143
Collecting system information ............................................................................................. 145
Copyright © Acronis International GmbH, 2002-2012.
1 Introducing Acronis Snap Deploy 4
1.1
1.1.1
Overview
What is Acronis Snap Deploy 4
Acronis Snap Deploy 4 is a flexible, efficient software solution for deployment of a fully configured
operating system (with or without application software and any other data) to multiple machines.
Because the product uses disk imaging technology, it is ideal for rapid bare-metal installations and
flexible centralized provisioning.
1.1.2
Who needs Acronis Snap Deploy 4
Acronis Snap Deploy 4 is primarily designed to be used by:
Small and medium-size businesses:
IT service providers
Hardware retailers
IT departments of larger corporations
Schools and universities
R&D and software testing labs
The enterprise features of Acronis Snap Deploy 4 (scheduled deployment, support for Preinstallation
Environment, command-line interface, and scripting, to name a few) can help automate the tasks of
the IT department in large enterprise environments.
1.1.3
Acronis Snap Deploy 4 infrastructure
Components of the Acronis infrastructure are installed on Windows machines. Managing the Acronis
infrastructure is performed by using Acronis Snap Deploy 4 Management Console.
A reference image, called the master image, can be taken in Windows, in the Acronis environment,
or in Windows Preinstallation Environment (WinPE) that contains components of Acronis Snap
Deploy 4.
Deployment is performed in the Acronis environment or in WinPE that contains components of
Acronis Snap Deploy 4. In either environment, Acronis Snap Deploy 4 provides the graphical user
interface (GUI). In addition, command-line mode and scripting are supported in WinPE.
A dedicated bootable utility enables fully-functional deployment with GUI on a stand-alone machine
(a machine that is isolated from the network or is included in a network without Acronis Snap Deploy
4 infrastructure).
1.2
What you can do with Acronis Snap Deploy 4
This section describes typical usage scenarios for Acronis Snap Deploy 4.
7
Copyright © Acronis International GmbH, 2002-2012.
1.2.1
Taking an image of the master system
First, you create the desired system configuration and save the image of the system hard disk to a
network folder, detachable media (such as a USB hard drive) or removable media (such as a DVD). An
image, also called a master image, is a file that contains the system in a packaged form.
Scenarios
Scenario 1
Each department in your organization, such as accounting, sales, and technical support, uses a
fixed set of applications for daily work.
You create a library of master images. For example, you create one image for each department.
You then deploy these images to new hardware without having to manually configure the
operating system and applications.
Scenario 2
You need to deploy a standard configuration included in a master image, to machines with
different hardware.
You use the separately-sold Acronis Universal Deploy add-on. This add-on configures Windows
system drivers so that Windows is able to boot on dissimilar hardware. Without this add-on, the
motherboard, processors, and mass-storage devices of the imaged and the target hardware must
be identical. The same applies to non-Windows operating systems.
1.2.2
Deployment to specific machines (immediate, manual, and
scheduled deployment)
You can perform deployment to a specific list of machines with known physical addresses (called
MAC addresses). The deployment can run immediately after you set it up, on a schedule, or when
you start it manually.
These ways of deployment are also known as manual deployment and scheduled deployment.
When the deployment is about to start, the software will power on the target machines with
predefined MAC addresses by using the BIOS Wake-on-LAN (WOL) functionality.
Machines in another subnet can be woken up through a component called Wake-on-LAN Proxy,
which is delivered with Acronis Snap Deploy 4. The machines typically boot into the PXE server that is
installed in the same subnet.
Machines that do not support Wake-on-LAN can be booted into the Acronis environment manually
before the deployment starts. Such machines will also be deployed, provided that they are listed for
deployment.
Scenarios
Scenario 1. An organization receives a shipment of machines from a manufacturer along with the list
of their MAC addresses. The IT department has to deploy the operating system to the new hardware.
Scenario 2. An Internet café, school or university lab has 100 machines with known MAC addresses.
The nightly deployment of the initial standard image on these machines is needed.
8
Copyright © Acronis International GmbH, 2002-2012.
1.2.3
Deployment to
deployment)
any
ready
machines
(event-driven
You can set up deployment to start when a specific number of any machines become ready. Unlike
deployment to specific machines (p. 8), this way of deployment does not require knowing the MAC
addresses of the machines.
The software counts how many machines have connected to the deployment server and starts
deployment when the number of machines you specified (for example, 10) is connected.
This way of deployment is also called event-driven deployment or deployment upon an event.
You can specify a time-out period. After the time-out, deployment will start on the machines that are
ready despite the fact that the predefined number is not reached.
Scenario
Your organization receives 100 machines from a manufacturer. You want to deploy the operating
system and programs to all these machines at once.
1. You set up a deployment operation that waits until any 100 machines are ready.
2. You boot each machine into the Acronis environment, by using either Acronis bootable media or
Acronis PXE (Preboot Execution Environment) Server.
3. Acronis Snap Deploy 4 uses multicasting to perform the deployment to all machines at once.
1.2.4
Stand-alone deployment
The administrator might need to perform deployment to a machine that is isolated from a network
or is included in a network without an Acronis Snap Deploy 4 infrastructure (such as the deployment
server or the license server). A dedicated bootable utility enables a fully-functional deployment with
the graphical user interface on a stand-alone machine.
The master image for deployment can be located in a network folder or on a removable drive (such
as a DVD) on the machine you are performing deployment to. The image cannot be located on the
local hard disk of the machine, because deployment usually involves overwriting the contents of the
disk.
The Universal Deploy add-on is unavailable for stand-alone deployment.
1.2.5
Deployment with individual deployment settings
You can set up individual deployment settings (p. 129) for a machine. These settings will override the
general settings of the deployment operation (the deployment template).
Scenarios
Scenario 1
You want to perform deployment to several machines. For each machine, you want to assign a
specific name, rather than an automatically-generated name.
1. You enter the MAC addresses of the machines so that they all appear in the list of machines.
2. You select each machine in the list and specify an individual setting: the machine name.
3. You set up a deployment operation. Other deployment settings will be the same for all machines.
9
Copyright © Acronis International GmbH, 2002-2012.
Scenario 2
You want to perform deployment to a big number of machines. For one of those machines, however,
you need to perform deployment to the second hard disk, rather than to the first hard disk.
1. You enter the MAC addresses of all machines so that all machines appear in the list of machines.
2. You specify an individual setting for the corresponding machine: to deploy to the second hard
disk.
3. You set up a deployment operation to perform deployment to the first hard disk. Deployment to
that specific machine will be performed to the second hard disk.
1.2.6
User-initiated deployment (custom deployment)
Acronis Snap Deploy 4 can be configured in such a way that users will be able to deploy and redeploy their machines with one click on the boot menu.
This way of deployment is also called custom deployment.
Scenarios
Scenario 1
Software testers have to deploy clean operating systems or preconfigured systems on test
machines.
A test team leader creates a custom bootable media or a PXE package that provides a fixed set of
choices on the target side. A test team member reboots a test machine and selects what to
deploy from the boot menu with one click. The deployment starts immediately. The choices can
be various operating systems, various editions of the same operating system, the same operating
system with various settings or various applications, to name a few. The deployment proceeds
independently on each machine.
Scenario 2
In a university or school lab, switching between exercises requires reconfiguring the machine
entirely. Students can switch or restart exercises without the teacher’s assistance. If a student
messes up the machine (for example, deletes a file or changes configuration), the student can
choose a self-restore option from the boot menu.
1.2.7
Deployment of a disk volume and MBR
You do not necessarily have to deploy the entire disk. Provided that the master and the target disks
have a similar partitioning scheme, you can image and deploy only the system volume or only the
data, depending on your needs.
When deploying a system volume, Acronis Snap Deploy 4 will automatically repair the bootability of
the deployed system.
Note: GPT volumes with Linux operating systems on UEFI machines are not supported for imaging and
deployment.
10
Copyright © Acronis International GmbH, 2002-2012.
1.2.8
Command-line mode and scripting under WinPE
Acronis Snap Deploy 4 provides a command-line utility that can be added to a bootable media based
on Windows Preinstallation Environment (WinPE). The administrator can create such media on a
physical drive or place it to the PXE server.
Having booted a machine into Windows Preinstallation Environment, the administrator can perform
imaging or deployment in the command-line mode or execute scripts.
Scenarios
Scenario 1
The administrator needs to deploy a different image to each machine on the network.
The administrator writes a deployment script that can read the target machine’s MAC address
(for example, 01-02-03-04-05-06) and pull an image whose name matches the MAC address (for
example, image-01-02-03-04-05-06.tib) The image can be located in any convenient location,
such as a network share.
The administrator then runs the script on any number of target machines to deploy the
corresponding image to each of them.
Scenario 2
The administrator needs to start imaging or deployment automatically each time a machine
boots from the PXE server.
The administrator creates an imaging or deployment script, adds the script to the PE and includes
the script in the startnet.cmd file. On booting into the PE, the operation will be performed
automatically.
Scenario 3
The administrator needs to automatically execute pre-deployment operations (disk partitioning,
for example) on the machines on the network.
The administrator creates a script that performs pre-deployment operations, adds the script
along with deployment script to the PE and includes both scripts in the startnet.cmd file. On
booting into the PE, both operations will be performed automatically.
1.3
1.3.1
Features of Acronis Snap Deploy 4
New: Support for UEFI
Acronis Snap Deploy 4 supports imaging and deployment for machines based on the UEFI
architecture as well as BIOS machines. See Deploying BIOS-based systems to UEFI-based and vice
versa (p. 119) for details of deploying BIOS-based machines to UEFI and vice versa.
Limitation: Deployment of Linux GPT disks on UEFI machines is not supported.
1.3.2
New: Support for Windows 8
Acronis Snap Deploy 4 supports Windows 8 operating system (all editions except for RT edition).
You can install Acronis Snap Deploy 4 on Windows 8, create and deploy master images of Windows 8.
11
Copyright © Acronis International GmbH, 2002-2012.
1.3.3
New: List of machines
Acronis Snap Deploy 4 provides the Machines view (p. 126). This view contains a list of all machines
that you added for deployment or that have ever been deployed.
In this view, you can:
View and edit the list of machines.
Check which machines are ready for deployment.
Examine the current state of the deployment operation, and the result of the last deployment.
Add machines for subsequent deployment by specifying the machines’ MAC addresses.
Specify individual deployment settings (p. 9).
Set up deployment for one or more machines.
Organize machines into groups.
1.3.4
New: List of deployment tasks
Centralized deployment is performed by a deployment task. Acronis Snap Deploy 4 provides a list of
deployment tasks in the Deployment tasks (p. 131) view.
In this view, you can:
View and edit the list of tasks, including scheduled tasks and tasks that perform deployment
when a specified number of machines are ready.
Edit tasks; for example, to change the list of machines to perform deployment to.
Start any task manually; for example, to perform deployment outside the normal schedule.
Examine the current state of the task and the result of the last run of the task.
1.3.5
New: Per-deployment licensing
In addition to per-machine licensing, Acronis Snap Deploy 4 supports per-deployment licensing.
A deployment license enables you a single successful deployment to a particular machine. A machine
license enables you an unlimited number of deployments to a particular machine.
For more details, see “Licensing policy” (p. 16).
Scenario
You provision machines to end users by deploying the operating system with the necessary software
to a machine and then shipping the machine to the end user. Because you are planning to perform
deployment to each machine only once, you want a cheaper license for the machine.
You buy a number of deployment licenses based on the number of machines that you want to
provision. A deployment license becomes used only if the deployment to the corresponding machine
has been successful.
1.3.6
New: Support for the VHD format
In addition to using its own format for an image, Acronis Snap Deploy 4 can perform deployment
from a Virtual Hard Disk (VHD) file. Such file stores contents of one or more disks. It can be created in
Windows Server 2008 and Windows 7.
12
Copyright © Acronis International GmbH, 2002-2012.
Scenario
You saved the disks of one of your machines to a VHD file by using the Windows Backup program.
Now you want to deploy that machine to other machines.
When setting up the deployment, you specify the VHD file as you would specify an image file created
by Acronis Snap Deploy 4. When performing the deployment, the software can change the settings
for the machines being deployed.
1.3.7
New: Graphical user interface in WinPE
A bootable media based on Windows Preinstallation Environment (WinPE) now provides a graphical
user interface (GUI) similar to that in an Acronis bootable media.
By using the GUI, you can take a master image and perform deployment.
You may want to use a WinPE-based media if the Acronis media cannot recognize a specific device,
such as an exotic storage device.
A WinPE-based bootable media also provides a command-line utility (p. 11) for performing imaging
and deployment.
1.3.8
New: E-mail notifications about deployment
When using the command-line mode (p. 11), you can set up e-mail notifications about the result of
each deployment operation.
Scenario
In Scenario 1 or Scenario 2 described in “Command-line mode and scripting under WinPE” (p. 11), the
administrator also wants to receive e-mail notifications about deployment.
The administrator includes in the deployment script a command that sets up the parameters of the
e-mail notifications, such as the administrator’s e-mail address and the parameters of the mail
server.
An e-mail notification is sent after each deployment command. Each notification contains the MAC
address and IP address of the corresponding machine and whether the deployment has been
successful.
1.3.9
New: Compatibility with Acronis True Image, Acronis Backup
& Recovery 10, and Acronis Backup & Recovery 11 backups
Acronis Snap Deploy 4 can use as a master image a disk-level backup created by the Acronis True
Image, Acronis Backup & Recovery 10, or Acronis Backup & Recovery 11 product family.
1.3.10 New: Support for multiple network adapters
A machine license is bound to the machine’s network adapter (also known as network interface card,
NIC).
13
Copyright © Acronis International GmbH, 2002-2012.
If the machine has more than one network adapter, Acronis Snap Deploy 4 ensures that only one
license is assigned to the machine. No extra license will be consumed if you add or remove a network
adapter.
To make sure that only one license is assigned to the machine, do not remove all network adapters at
once.
When using the Wake-on-LAN functionality for the machine, the software sends a special packet,
called the magic packet, to all network adapters of the machine.
1.3.11 Multicast TTL and network bandwidth throttling
Deployment configuration has a parameter that specifies time to live (TTL) for multicast packets. By
using this setting, you can limit the distribution of multicast packets via gateways.
By setting the permitted bandwidth, you can limit the network usage during deployment.
1.3.12 New: Falling back to unicast
To make deployment to multiple machines faster, Acronis Snap Deploy 4 multicasts the contents of
the master image (the deployment stream) across the network. This way, deployment can run
simultaneously on all machines even though the deployment stream is sent only once.
If the network restricts multicasting, Acronis Snap Deploy 4 can automatically switch to the use of
unicast instead.
When using unicast, Acronis Snap Deploy 4 sends a copy of the deployment stream to each machine.
This way, the network becomes more loaded, so the deployment process may take longer.
1.3.13 Encrypted communication
Components of Acronis Snap Deploy 4 communicate to each other by using the Secure Sockets Layer
(SSL) cryptographic protocol. Encryption starts on the first (earliest) stage of the connection attempt,
so all data transferred in the next steps (including data required for client authentication) is
encrypted.
After the components of Acronis Snap Deploy 4 are installed, encrypted communication between the
components is enabled automatically.
The contents of the master image are transferred unencrypted.
1.3.14 Password protection
Master images taken with Acronis Snap Deploy 4 can be protected with a password to prevent
unauthorized deployment.
Acronis Snap Deploy 4 also supports password-protected backups created with the Acronis True
Image, Acronis Backup & Recovery 10, and Acronis Backup & Recovery 11 product family.
To prevent Acronis bootable components from unauthorized execution, the bootable components in
the Acronis boot menu can also be protected with a password. The user will be asked for the
password when selecting a bootable component. No password is required to start the operating
system on the machine.
14
Copyright © Acronis International GmbH, 2002-2012.
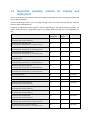
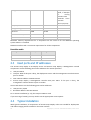
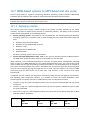
1.4
Supported operating systems for imaging and
deployment
Acronis Snap Deploy 4 provides full-featured imaging and deployment of the operating systems listed
in the table that follows.
For most operating systems, you can change settings such as the network name that the machines
will have after the deployment.
Deploying an operating system requires a license. Depending on the type of operating system, you
need a server license or a workstation license. For details about licensing, see “Licensing policy” (p.
16).
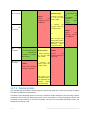
Operating system
Imaging
and Changing
deployment
settings
License type
Windows Server 2008 R2
(No Service Pack or Service Pack 1)
Yes
Yes
Server
Windows Server 2008 (x86, x64)
(No Service Pack, Service Pack 1, or Service Pack 2)
Yes
Yes
Server
Windows Server 2003 (x86, x64)
(No Service Pack, Service Pack 1, or Service Pack 2)
Yes
Yes
Server
Windows Server 2003 R2 (x86, x64)
(No Service Pack, Service Pack 1, or Service Pack 2)
Yes
Yes
Server
Windows Small Business Server 2011
(No Service Pack)
Yes
Yes
Server
Windows Small Business Server 2003
(No Service Pack, Service Pack 1, or Service Pack 2)
Yes
Yes
Server
Windows Storage Server 2003 R2
(No Service Pack, Service Pack 1, or Service Pack 2)
Yes
Yes
Server
Windows Server 2003 x64 Edition
(No Service Pack, Service Pack 1, or Service Pack 2)
Yes
Yes
Server
Windows 8 (x86, x64)
Yes
Yes
Workstation
Windows 8 Pro (x86, x64)
Yes
Yes
Workstation
Windows 8 Enterprise (x86, x64)
Yes
Yes
Workstation
Windows 7 Home Basic (x86, x64)
(No Service Pack or Service Pack 1)
Yes
Yes
Workstation
Windows 7 Home Premium (x86, x64)
(No Service Pack or Service Pack 1)
Yes
Yes
Workstation
Windows 7 Professional (x86, x64)
(No Service Pack or Service Pack 1)
Yes
Yes
Workstation
Windows 7 Ultimate (x86, x64)
(No Service Pack or Service Pack 1)
Yes
Yes
Workstation
Windows Vista Home Basic (x86, x64)
(No Service Pack, Service Pack 1, or Service Pack 2)
Yes
Yes
Workstation
Windows Vista Home Premium (x86, x64)
(No Service Pack, Service Pack 1, or Service Pack 2)
Yes
Yes
Workstation
15
Copyright © Acronis International GmbH, 2002-2012.
Windows Vista Business (x86, x64)
(No Service Pack, Service Pack 1, or Service Pack 2)
Yes
Yes
Workstation
Windows Vista Ultimate (x86, x64)
(No Service Pack, Service Pack 1, or Service Pack 2)
Yes
Yes
Workstation
Windows XP Home
(Any Service Pack or no Service Pack)
Yes
Yes
Workstation
Windows XP Professional
Yes
(No Service Pack, Service Pack 1, Service Pack 2, or Service
Pack 3)
Yes
Workstation
Windows XP Professional x64 Edition
(No Service Pack, Service Pack 1, or Service Pack 2)
Yes
Yes
Workstation
Windows 2000 Server
(Any Service Pack or no Service Pack)
Yes
No
Server
Windows 2000 Advanced Server
(Any Service Pack or no Service Pack)
Yes
No
Server
Windows 2000 Professional
(Any Service Pack or no Service Pack)
Yes
No
Workstation
Windows NT/4.0 Server
Yes
No
Server
Windows 98/Me
Yes
No
Workstation
Linux (kernel: 2.4.9 and later)
Yes
No
Server
Acronis Snap Deploy 4 enables imaging and deployment of any PC-based operating system. However,
for certain operating systems, some operations or options will not be available. For example,
Windows 98/NT/ME, NT/4.0 Server, Windows 2000, and Linux (kernel: 2.4.9 and later) can be
deployed only as is; on-the-fly settings adjustment is not performed.
Deploying an unrecognized operating system or a disk without an operating system requires a
workstation license.
The Acronis Universal Deploy option is not applicable to the Windows 2000, Windows 98/NT/ME,
and Windows NT/4.0 Server operating systems.
1.5
Licensing policy
Acronis Snap Deploy 4 licensing is based on the number of machines (servers or workstations) that
you deploy. For example, to deploy a system on 100 machines, you need 100 licenses.
1.5.1
Machine licenses and deployment licenses
In terms of the number of allowed deployments, a license can be one of two types:
A machine license enables an unlimited number of deployments to a particular machine. You
may want to use this type of license if you perform deployment to the same machine on a
regular basis.
A deployment license enables a single successful deployment to a machine. You may want to
use this type of license if you perform deployment to the same machine once or infrequently. If
deployment under a deployment license fails, you can perform another deployment under the
same license.
16
Copyright © Acronis International GmbH, 2002-2012.
You can obtain a license key that corresponds to a number of deployment licenses.
When setting up a deployment operation, you can choose (p. 94) whether a deployment license can
be automatically used instead of a machine license, or conversely.
1.5.2
Server licenses and workstation licenses
In terms of the operating system you can deploy, a license can be one of two types:
A server license enables deploying a server operating system.
A workstation license enables deploying a workstation operating system. A workstation license is
needed to deploy a disk or volume that does not contain an operating system, if the target
machine has not been assigned a machine license before.
Linux is considered as a server operating system. See also the complete list of supported server and
workstation operating systems (p. 15).
If Acronis Snap Deploy 4 fails to identify the type of operating system, the operating system is
considered as a workstation operating system.
When setting up a deployment operation, you can choose (p. 94) whether a server license can be
automatically used instead of a workstation license for deploying a workstation operating system.
1.5.3
Licenses for Acronis Universal Deploy
Acronis Universal Deploy is an add-on to Acronis Snap Deploy 4 and has its own license keys.
The Acronis Universal Deploy licenses are counted, used and upgraded in the same way as the
Acronis Snap Deploy 4 licenses:
Acronis Universal Deploy has licenses for server and workstation operating systems.
A Universal Deploy license can be per-machine (allowing an unlimited number of Universal
Deploy steps) or per-deployment (allowing a single Universal Deploy step).
You need one Universal Deploy license per target machine.
You do not need a license to install Universal Deploy. However, do not forget to add the Universal
Deploy licenses to the license server before starting the deployment. If the licenses are not found
during deployment, the Universal Deploy step will be skipped.
1.5.4
Trial version of Acronis Snap Deploy 4
The Acronis Snap Deploy 4 trial version has all the functionality of the full version.
To use the trial version, you need to obtain a trial license. You can obtain a server or workstation trial
license.
A trial license enables you an unlimited number of deployments on up to five machines for 15 days.
No trial license for Acronis Universal Deploy is available.
To upgrade from the trial to full version you do not need to re-download the software. Simply buy
the full licenses and import them to the license server. Acronis Snap Deploy 4 will start using a full
license as soon as the corresponding trial license expires.
17
Copyright © Acronis International GmbH, 2002-2012.
1.6
Upgrading to Acronis Snap Deploy 4
To upgrade from Acronis Snap Deploy 3 to Acronis Snap Deploy 4, upgrade both the licenses and the
software components.
1.6.1
Upgrading licenses
To upgrade the licenses of Acronis Snap Deploy 3, obtain the necessary number of upgrade licenses
and import them to the license server.
You should obtain one upgrade license for Acronis Snap Deploy 4 (ASD4) per each license for Acronis
Snap Deploy 3 (ASD3) that you have. After you import the upgrade licenses to the license server, you
will be able to perform deployment to any machine by using Acronis Snap Deploy 4.
It does not matter whether the ASD3 license is itself an upgrade license for an even earlier version.
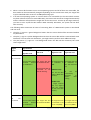
The following table illustrates how the various combinations of licenses will be upgraded. Use this
table to calculate the number of upgrade licenses that you need.
You have
You obtain and import
You now can
ASD3 full license
ASD4 upgrade license
Perform deployment to any target machine
ASD4 upgrade license
Perform deployment to any target machine
ASD3 upgrade license
ASD4 upgrade license
License(s) for an earlier version
Perform deployment to any target machine
Available
ASD3 full license
Assigned to Machine1
Available
ASD3 upgrade license
ASD4 upgrade license
License(s) for an earlier version
Perform deployment to any target machine
Assigned to Machine1
No license
1.6.2
ASD4 full license
Perform deployment to any target machine
Upgrading components
Install the components of Acronis Snap Deploy 4 over those of Acronis Snap Deploy 3.
If all components of Acronis Snap Deploy 3 are installed on the same machine, simply run the setup
program of Acronis Snap Deploy 4 on that machine. During installation, you can add the upgrade
licenses.
If components are installed on different machines, upgrade the license server first, by running the
setup program of Acronis Snap Deploy 4. When upgrading the license server, import the upgrade
licenses. Then, upgrade other components on the machines.
Upgrading Acronis PXE Server removes any components of Acronis Snap Deploy 3 that are uploaded
to the PXE server. To continue using the PXE server, you need to upload the new components (p. 65)
to it.
Components of versions of Acronis Snap Deploy earlier than 3 are incompatible with Acronis Snap
Deploy 4. You need to remove those components before installing Acronis Snap Deploy 4.
18
Copyright © Acronis International GmbH, 2002-2012.
1.7
Technical Support
Maintenance and Support Program
If you need assistance with your Acronis product, please go to http://www.acronis.eu/support/
Product Updates
You can download the latest updates for all your registered Acronis software products from our
website at any time after logging into your Account (https://www.acronis.eu/my) and registering the
product. See Registering Acronis Products at the Website (http://kb.acronis.com/content/4834) and
Acronis Website User Guide (http://kb.acronis.com/content/8128).
19
Copyright © Acronis International GmbH, 2002-2012.
2 Understanding Acronis Snap Deploy 4
This section describes the components of the Acronis Snap Deploy 4 infrastructure and their
interaction.
2.1
Terminology
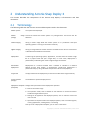
The following table lists the common terms and descriptions used in this document.
Master system
Master
(Image)
The system to be deployed.
image A file that contains the master system in a packaged form. The file has the .tib
extension.
Online imaging
Taking a master image while the master system is in a production state (the
operating system is running on the master machine).
Offline imaging
Taking an image while the master machine is booted into the Acronis environment
or Windows Preinstallation Environment.
Deployment
Transferring the operating system, applications, and data from the master image
file to a physical hard disk (see “Target disk”). In most cases, deployment is
performed by multicasting the master image through the network.
Stand-alone
deployment
Deployment to a machine isolated from a network or included in a network
without Acronis Snap Deploy 4 infrastructure. Stand-alone deployment is
performed locally by using a bootable component of Acronis Snap Deploy 4.
Target disk
The physical disk to be deployed to (an internal hard disk of the target machine).
Target machine
(Target)
The hardware to perform deployment to.
Deployment template Configuration parameters of the deployment operation:
(Template)
Path to the master image
The operation mode, such as whether to use multicast or unicast and how to
handle the target disk free space
Settings to be applied to the deployed systems, such as machine names and
user accounts
Operations to be performed on the deployed systems, such as transferring files,
running applications, shutting down, or restarting
Once you save a deployment template, you can use it in the future.
20
Copyright © Acronis International GmbH, 2002-2012.
Administrator
The person who has rights to manage the Acronis Snap Deploy 4 infrastructure.
User-initiated
deployment mode
The mode when deployment can be initiated on the side of the target machine.
User
The person on the side of the target machine who starts the user-initiated
deployment. This term relates to the user-initiated deployment mode only.
2.2
Components
Acronis Snap Deploy 4 includes the following components:
Components for Windows
These are components that are installed on machines running Windows and provide Acronis Snap
Deploy 4 infrastructure.
Acronis Snap Deploy 4 Management Console is an administrative tool for remote access to
Acronis servers and Acronis Snap Deploy 4 Management Agent.
When disconnected from the Acronis components, the console allows only for the installation of
product components on remote machines and for the creation of bootable media.
Acronis Snap Deploy 4 OS Deploy Server (the deployment server) is a component that performs
centralized deployment through the network with the help of Acronis Snap Deploy 4 Agents. The
deployment server is installed with the Acronis Universal Deploy add-on, which enables
hardware-independent deployment of an operating system.
Acronis Snap Deploy 4 Management Agent is a component that takes an image of the master
system in Windows environment under the administrator’s control through Acronis Snap Deploy
4 Management Console.
Acronis PXE Server allows booting machines over the network into Acronis Snap Deploy 4 Agent,
Acronis Snap Deploy 4 Master Image Creator, or Windows Preinstallation Environment. The
machines must support PXE. Using Acronis PXE Server considerably reduces the time required for
booting multiple machines as compared to using bootable media. It also eliminates the need to
have a technician onsite to install the bootable media into the system that must be booted.
Acronis Wake-on-LAN Proxy is a component that enables Acronis Snap Deploy 4 OS Deploy
Server to wake up the target machines located in another subnet.
Acronis Snap Deploy 4 License Server is a component that tracks licenses of Acronis products.
Bootable components
These are components that are available in the Acronis environment or Windows Preinstallation
Environment. A machine must boot into the corresponding component when you need to perform
imaging or deployment.
21
Acronis Snap Deploy 4 Agent is a bootable component that performs deployment to a target
machine under the control of Acronis Snap Deploy 4 OS Deploy Server.
There are two ways to load Acronis Snap Deploy 4 Agent on target machines: locally from
bootable media or remotely by using Acronis PXE Server.
Copyright © Acronis International GmbH, 2002-2012.
Acronis Snap Deploy 4 Master Image Creator is a bootable, locally controlled component that
creates an image of the master system.
There are two ways to load Acronis Snap Deploy 4 Master Image Creator on a master machine:
directly from bootable media or remotely by using Acronis PXE Server.
Acronis Snap Deploy 4 Standalone Utility is a bootable component that enables fully-functional
deployment with a GUI on a stand-alone machine (a machine isolated from the network or
included in a network without Acronis Snap Deploy 4 infrastructure).
The only way to load Acronis Snap Deploy 4 Standalone Utility is from an Acronis bootable media.
Acronis System Report is a bootable component that collects information about the machine
and saves this information to a locally-attached USB drive.
There are two ways to load Acronis System Report: directly from an Acronis bootable media or
remotely by using Acronis PXE Server.
2.3
Support for file systems and storage media
2.3.1
Supported file systems
Acronis Snap Deploy 4 provides full-featured imaging and deployment of the following file systems:
FAT16
FAT32
NTFS
Ext2
Ext3
Ext4
ReiserFS
Reiser4
Linux SWAP
XFS
JFS
Acronis Snap Deploy 4 can perform imaging and deployment of corrupted or unsupported file
systems by using a sector-by-sector approach. This approach usually leads to a bigger size of the
master image and makes the imaging or deployment process longer. A volume with an unsupported
file system cannot be resized during deployment.
2.3.2
Supported media
Acronis Snap Deploy 4 Master Image Creator and Acronis Snap Deploy 4 Management Agent can
save an image:
In a network folder.
On DVD+R/RW, DVD-R/RW, CD-R/RW, or recordable Blu-ray Discs (BD-R, BD-RE) loaded in the
media drive of the master machine.
22
On an internal hard disk of the master machine.
On USB and FireWire (IEEE-1394) storage devices (hard drives, flash drives) attached to the
master machine.
Copyright © Acronis International GmbH, 2002-2012.
A sizeable image can be split between multiple media automatically.
Acronis Snap Deploy 4 OS Deploy Server can deploy images located:
In network folders.
On DVD+R/RW, DVD-R/RW, CD-R/RW, or recordable Blu-ray Discs (BD-R, BD-RE) loaded in the
media drive of the deployment server.
On an internal hard disk of the deployment server.
On USB and FireWire (IEEE-1394) storage devices (hard drives, flash drives) attached to the
deployment server.
The best practice is keeping images on the deployment server’s hard disk. This minimizes network
traffic during deployment.
The image created on removable media has to fit into one media disk. To deploy an image spread
over two or more CDs, DVDs or other media, copy all parts of the image to the same folder on the
deployment server or to a network folder.
Acronis Snap Deploy 4 Standalone Utility can deploy images located:
In network folders.
On USB and FireWire (IEEE-1394) storage devices (hard drives, flash drives) attached to the
managed machine.
On DVD+R/RW, DVD-R/RW, CD-R/RW, or recordable Blu-ray Discs (BD-R, BD-RE) loaded in the
media drive of the managed machine.
The image created on removable media has to fit into one media disk. To deploy an image spread
over two or more CDs, DVDs or other media, copy all parts of the image to the same folder on an
external drive or to a network folder.
2.4
Supported types of disk and firmware interface
Acronis Snap Deploy 4 can perform imaging and deployment of basic disks whose partitioning
scheme is master boot record (MBR) or GUID Partition Table (GPT).
You can perform deployment to a basic MBR or GPT disk as well as an empty or uninitialized disk.
Dynamic disks currently are not supported for imaging and deployment.
Both basic input/output system (BIOS) and Unified Extensible Firmware Interface (UEFI) firmware
interfaces are supported for master and target machines.
Tip: To perform imaging and deployment of systems that are not supported by Acronis Snap Deploy 4, such as
dynamic disks, you can use the Acronis Backup & Recovery 11 product. Namely, you can “image” the machine
by creating a disk-level backup of it, and then perform “deployment” to the target machine by recovering data
from the backup. For more information, including the list of supported operating systems, refer to Help for
Acronis Backup & Recovery 11.
2.5
Usage
This section gives a general idea of using the product and does not contain the detailed instructions
on how to perform operations. Nevertheless, advanced users are welcome to use this section as a
step-by-step quick start guide. The details can be found in the further sections.
23
Copyright © Acronis International GmbH, 2002-2012.
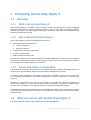
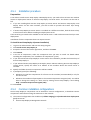
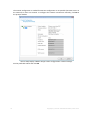
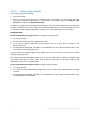
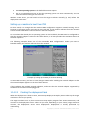
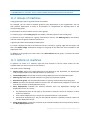
2.5.1
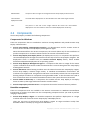
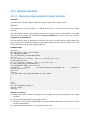
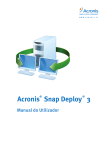
Offline imaging
Offline imaging means that the master system is stopped and the master machine boots into the
Acronis environment or into Windows Preinstallation Environment (WinPE).
To perform offline imaging
1. Configure the master system.
2. Install Acronis Snap Deploy 4 Management Console.
3. Do one of the following:
Create a bootable media (either an Acronis media or a WinPE-based media) with Acronis
Snap Deploy 4 Master Image Creator.
OR
Install Acronis PXE Server, connect the console to the PXE server and upload Acronis Snap
Deploy 4 Master Image Creator.
4. Depending on your choice in the previous step, boot the machine into Acronis Snap Deploy 4
Master Image Creator from the bootable media or from the PXE server.
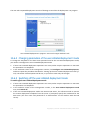
5. On the master machine, follow the instructions of the Master Image Creator wizard to configure
and launch the imaging operation. The image can be saved in a network folder, on detachable
media (such as a USB drive), or removable media (such as a DVD). To access the network from
the bootable environment, you must have a DHCP server or configure the network settings of the
master machine manually.
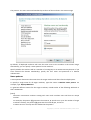
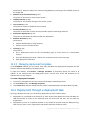
Offline imaging
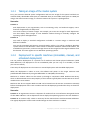
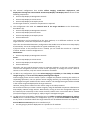
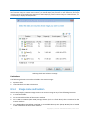
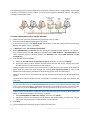
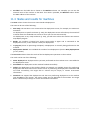
2.5.2
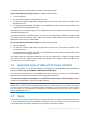
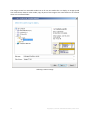
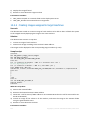
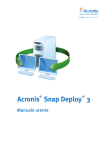
Online imaging
Online imaging means that the master system is imaged live (without restarting the machine or
suspending operations). Online imaging can be performed remotely whenever you need. The
disadvantage is that you have to install imaging software that is included in the master image. This is
not always rational.
24
Copyright © Acronis International GmbH, 2002-2012.
To perform online imaging
1. Configure the master system.
2. Install Acronis Snap Deploy 4 Management Console.
3. Install Acronis Snap Deploy 4 Management Agent on the master system either locally by using
the setup program, or remotely by using Acronis Snap Deploy 4 Management Console.
After Acronis Snap Deploy 4 Management Agent is installed, you can image the master system
online (without restarting the machine) at any time.
4. Connect the console to the master system, click Create image -> Next -> A master image. Follow
the instructions of the Master Image Creator wizard to configure and launch the imaging
operation. The image can be saved in a network folder, on detachable media (such as an USB
drive) or on removable media (such as a DVD).
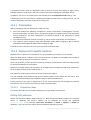
Online imaging
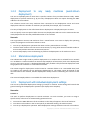
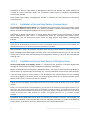
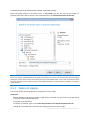
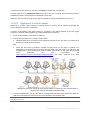
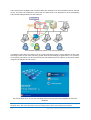
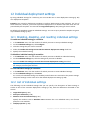
2.5.3
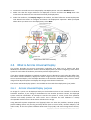
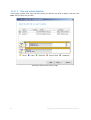
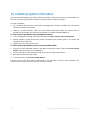
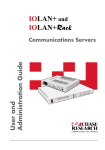
Deployment
This section illustrates the Acronis components functionality by the example of deployment that you
start manually. For details about the ways of deployment, see “Deploying a master image” (p. 79).
This procedure presumes that you have installed Acronis Snap Deploy 4 Management Console and
created a master image.
To perform deployment
1. Install Acronis Snap Deploy 4 License Server. Import licenses to the license server. Install Acronis
Snap Deploy 4 OS Deploy Server.
2. Do one of the following:
Create bootable media (either Acronis media or WinPE-based media) with Acronis Snap
Deploy 4 Agent.
OR
Install Acronis PXE Server, connect the console to the PXE server, and then upload Acronis
Snap Deploy 4 Agent.
3. Depending on your choice in the previous step, boot the target machines into Acronis Snap
Deploy 4 Agent from the bootable media or from the PXE server.
You must have a DHCP server or configure the network settings of the target machines manually
to enable the target machines to connect to Acronis Snap Deploy 4 OS Deploy Server.
25
Copyright © Acronis International GmbH, 2002-2012.
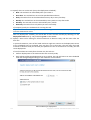
4. Connect the console to Acronis Snap Deploy 4 OS Deploy Server. Go to the Machines view.
5. Make sure that the target machines are displayed in the list and have the Ready state. This
means that the machines are connected and ready for deployment.
6. Select the machines, click Deploy image on the toolbar, and then follow the Create Deployment
Task Wizard instructions to configure and launch the deployment operation. When prompted
about when you want to run the deployment, select Now.
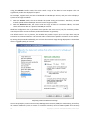
Deployment that starts manually
2.6
What is Acronis Universal Deploy
This section describes the Acronis proprietary technology that helps you to deploy and boot
Windows on dissimilar hardware. Acronis Universal Deploy saves you from configuring a new master
system for each make of hardware you need to perform deployment to.
If you plan to deploy Windows to multiple machines that are identical to each other but differ from
the master machine hardware, deploy the master image to one of the identical machines by using
Acronis Universal Deploy. This will adjust Windows to the dissimilar hardware. Then, create a master
image of the adjusted system and deploy that image to the identical machines.
The Acronis Universal Deploy option is not available in the stand-alone deployment (p. 9) mode.
2.6.1
Acronis Universal Deploy purpose
An image of a system can be deployed easily on the hardware where it was created or to identical
hardware. However, if you change a motherboard or use another processor version, the deployed
system could be unbootable. An attempt to transfer the system to a new, much more powerful
machine will usually produce the same result. This is because the new hardware is usually
incompatible with the most critical drivers included in the image.
Using Microsoft System Preparation Tool (Sysprep) does not solve this problem, because Sysprep
permits adding drivers only for Plug and Play devices (such as sound cards, network adapters, and
video cards). As for the system Hardware Abstraction Layer (HAL) and mass-storage device drivers,
26
Copyright © Acronis International GmbH, 2002-2012.
they must be identical on the source and the target machines; see Microsoft Knowledge Base,
articles 302577 and 216915.
Acronis Universal Deploy technology provides an efficient solution for hardware-independent system
deployment by adding the crucial Hardware Abstraction Layer (HAL) and mass-storage device drivers.
2.6.2
Acronis Universal Deploy general principles
Automatic HAL and mass-storage drivers selection
Acronis Universal Deploy searches the Windows default driver storage folders (in the master image
being deployed) for HAL and mass-storage device drivers and installs drivers that better fit the target
hardware. You can specify a custom driver repository (a network folder or a CD) which will also be
used for driver searches.
Tip: The Windows default driver storage folder is determined by the DevicePath value in the
HKEY_LOCAL_MACHINE\SOFTWARE\Microsoft\Windows\CurrentVersion registry key. This storage folder is
usually WINDOWS\inf.
Manual selection of mass-storage device driver
If the target hardware has a specific mass-storage controller (such as a SCSI, RAID, or Fibre Channel
adapter) for the hard disk, you can install the appropriate driver manually, bypassing the automatic
driver search-and-install procedure.
Installing drivers for Plug and Play devices
Acronis Universal Deploy relies on built-in Plug and Play discovery and configuration process to
handle hardware differences in devices that are not critical for the deployed system startup, such as
video, audio and USB. Windows takes control over this process during the logon phase, and if some
of the new hardware is not detected, you will have a chance to install drivers for it later manually.
2.6.3
Acronis Universal Deploy and Microsoft Sysprep
Acronis Universal Deploy is not a system preparation tool. You can apply it to any system image
created by Acronis products, but you cannot apply it to images of systems prepared with Microsoft
System Preparation Tool (Sysprep).
2.6.4
Getting Acronis Universal Deploy
Acronis Universal Deploy is an add-on to Acronis Snap Deploy 4. It is purchased separately and has its
own license.
For information about purchasing Universal Deploy, visit the Acronis Snap Deploy Web page.
2.7
How to
How to image a machine without installing additional software to it?
Perform offline imaging (p. 68).
How to image a machine without restarting it?
Perform online imaging (p. 68).
27
Copyright © Acronis International GmbH, 2002-2012.
How to prepare deployment tools?
Create bootable media (p. 58) with Acronis Snap Deploy 4 Agent. The machines will boot from
these media.
How to deploy an image to a list of specific machines?
Use the The machines listed below option in the Create Deployment Task wizard (p. 102).
Specify the list of machines to perform deployment to.
How to deploy an image to a number of any machines?
Use the Any machines ready for deployment option in the Create Deployment Task wizard (p.
106). Specify the number of machines to wait for.
How to deploy an image in the absence of a network connection?
Use Acronis Snap Deploy 4 Standalone Utility (p. 112).
How to enable users to start deployment on their own?
Set up user-initiated deployment (p. 113).
How to view the status of mass deployment?
Open the Deployment tasks view (p. 131).
How to view the list of machines?
Open the Machines view (p. 126).
How to add or remove licenses for deployment?
Open the Licenses view (p. 54).
28
Copyright © Acronis International GmbH, 2002-2012.
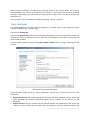
3 Getting started with Acronis Snap Deploy 4
This section describes how to install Acronis Snap Deploy 4 and perform a simple deployment.
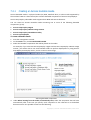
By following the procedures in this section, you will:
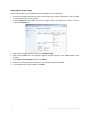
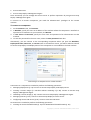
a) Install and start Acronis Snap Deploy 4.
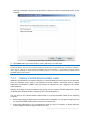
b) Create a master image of a machine.
c) Deploy the master image to the same or a different machine.
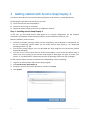
Step 1. Installing Acronis Snap Deploy 4
In this step, you will install Acronis Snap Deploy 4 in a typical configuration. For the complete
description of installation methods and procedures, see the installation section (p. 39).
Before installation, make sure that:
You have a machine running a modern version of Windows, such as Windows 7 Professional. For
the list of operating systems where you can install Acronis Snap Deploy 4, see “Supported
operating systems” (p. 39).
You have the setup program. You can download the setup program from the Acronis product
download Web page.
You have one or more license keys for Acronis Snap Deploy 4. You can buy full license keys or
obtain trial ones by going to the Acronis Snap Deploy 4 Web page. The type of license (“for
Server” or “for Workstation”) determines the type of operating system that you can deploy.
On the machine where you want to install Acronis Snap Deploy 4, do the following:
1.
2.
3.
4.
29
Log on as an administrator and start the setup program.
Click Install Acronis Snap Deploy 4.
Accept the terms of the license agreement, and then click Next.
Click Typical.
Copyright © Acronis International GmbH, 2002-2012.
5. Click Add license, and then specify the license keys. You can type the license keys manually or
import them from a text file.
6. Specify whether the machine will participate in the Customer Experience Program (CEP).
7. Click Install.
Step 2. Starting Acronis Snap Deploy 4
On the machine where you installed Acronis Snap Deploy 4:
On the desktop, click Acronis Snap Deploy 4.
When Acronis Snap Deploy 4 starts, the welcome screen appears.
Step 3. Creating a bootable media
In this step, you will create a bootable media that enables creating master images and performing
deployment.
On the machine where you installed and started Acronis Snap Deploy 4, do the following:
30
Copyright © Acronis International GmbH, 2002-2012.
1. On the Tools menu, click Create bootable media.
2. In the list of components, select Acronis Snap Deploy 4 Agent and Acronis Snap Deploy 4 Master
Image Creator.
3. In Network settings, in Server name/IP, specify the name of the machine where you installed
Acronis Snap Deploy 4.
4. Choose to create the media on a CD or DVD. Insert a blank CD-R/RW or DVD-R/RW.
Tip. If no CD-RW, DVD-RW, or a similar optical disc drive is present on the machine, you can
choose to create an ISO file that you can later burn to an optical disc on another machine. You
can also create the media on a USB drive. For details, see “Creating a bootable media” (p. 58).
5. Click Create.
Step 4. Creating a master image
In this step, you will create an image of a machine and save the image to a USB hard disk.
Choose a machine whose image you want to create. No license is required for imaging the machine.
However, a server or a workstation license will be used for deploying the machine, depending on
whether the machine is running a server operating system (such as Windows 2008 Server or Linux) or
a workstation operating system (such as Windows 7). For the list of server and workstation operating
systems, see “Supported operating systems for imaging and deployment” (p. 15).
On the machine whose image you want to create, do the following:
31
Copyright © Acronis International GmbH, 2002-2012.
1. Make sure that the CD or DVD drive has a higher boot priority than the hard disk drive. You may
need to open the BIOS setup utility of the machine and adjust the boot priority setting, similarly
to what is shown in the following picture.
2. Attach the USB hard disk drive to the machine.
Tip. Alternatively, you will be able to save the image to a network folder, as described later in
this procedure.
3. Boot the machine from the bootable media you created.
4. On the boot menu, click Acronis Snap Deploy 4 Master Image Creator.
5. In the pop-up window, click Cancel or wait until that window closes.
32
Copyright © Acronis International GmbH, 2002-2012.
6. Select the volumes that you want to include in the master image. You can leave the default
selection, which normally includes the volumes that contain the operating system.
7. Specify a folder on the USB hard disk where you want to save the image.
Alternatively, specify a network folder, and the user name and password to access that folder.
8. Keep clicking Next until the summary screen appears. Click Create in that screen.
Acronis Snap Deploy 4 starts creating the image.
After the image is created, the machine will restart.
Step 5. Performing deployment
In this step, you will deploy the created master image to a single machine (the target machine).
Tip: For getting started, we recommend performing deployment to the same machine from which you created
the image, or to a machine with identical hardware. This way, no extra steps, such as using the Universal
Deploy option, are required.
Preparing the target machine
On the target machine, do the following:
33
Copyright © Acronis International GmbH, 2002-2012.
1. Make sure that the CD or DVD drive has a higher boot priority than the hard disk drive. You may
need to open the BIOS setup utility of the machine and adjust the boot priority setting.
2. Boot the machine from the bootable media you created.
3. On the boot menu, click Acronis Snap Deploy 4 Agent.
4. In the pop-up window, click Cancel or wait until that window closes.
5. Make sure that the machine is ready for deployment. The window should look similar to the
following picture.
Details. The target machine becomes ready for deployment when it connects to Acronis Snap
Deploy 4 OS Deploy Server. This server is part of Acronis Snap Deploy 4. If the machine does not
connect to the server, you may need to adjust network settings, as described in “Booting the
target machines” (p. 107).
After the target machine is ready, you can deploy the master image to it.
34
Copyright © Acronis International GmbH, 2002-2012.
Deploying the master image
On the machine where you installed Acronis Snap Deploy 4, do the following:
1. Attach the USB hard disk drive with the master image to the machine. Optionally, copy the image
to the local hard disk of the machine.
2. Click the Machines view. Make sure that the target machine you prepared is shown in the list
and has the Ready state.
3. Right-click the target machine, and then click Deploy image.
4. Keep clicking Next until the template selection window appears. Click Create new in that
window.
5. Click Create a new template, and then click Next.
6. Select the master image (the .tib file) that you created, and then click Next.
7. In the deployment settings window, click Next.
35
Copyright © Acronis International GmbH, 2002-2012.
Note. If you imaged a machine running a workstation operating system (such as Windows 7) but
you only have server licenses (such as Acronis Snap Deploy 4 for Server – Trial License), you may
want to allow the software to use this type of license to deploy the machine. To do so, click
Licensing in the deployment settings window, and then click Use a server license automatically.
Alternatively, you can add a workstation license before starting the deployment, by opening the
Licenses view and clicking Add license on the toolbar.
8. Keep clicking Next until the summary window appears. Click Save in that window.
Details. You have created a deployment template. It determines how to perform deployment.
You can reuse this template in other deployment tasks.
9. Select the deployment template you created, and then click Next.
36
Copyright © Acronis International GmbH, 2002-2012.
10. When asked about when to run the deployment, select Now and type the user name and
password that you use to log on to Windows.
11. Keep clicking Next until the summary window appears. Click Create in that window.
You can view the progress of the deployment both on the machine where you installed Acronis Snap
Deploy 4 and on the target machine.
37
Copyright © Acronis International GmbH, 2002-2012.
Viewing the deployment progress on the machine with Acronis Snap Deploy 4
Viewing the deployment progress on the target machine
What you can do next
In the navigation pane, you can open the corresponding views to navigate across the software.
To run the deployment again, open the Deployment tasks view, select the task you created, and
then click Run on the toolbar.
For details about the Deployment tasks view, see “Managing deployment tasks” (p. 131).
To add more machines, open the Machines view and then click Add machines. You can add
machines by their physical addresses, known as MAC addresses.
Another way to add a machine to this view is to boot the machine so that it becomes ready for
deployment, as described in “Preparing the target machine” earlier in this section. You can then
turn off or restart the machine without performing deployment. The machine remains in the
view.
For details about the Machines view, see “Managing the list of machines” (p. 126).
To add more licenses for deployment, open the Licenses view and then click Add license on the
toolbar. Clicking Obtain license opens the Acronis Snap Deploy 4 Purchasing Web page.
For details about managing licenses, see “Using Acronis Snap Deploy 4 License Server” (p. 54).
For information about license types, see “Licensing policy” (p. 16).
To set up network booting of machines (instead of booting them from a media), open the PXE
server view, click Upload components to PXE, and then follow the steps similar to those
described in “Creating a bootable media” earlier in this section.
For details about setting up the network booting, see “Configuring Acronis PXE Server” (p. 65).
38
Copyright © Acronis International GmbH, 2002-2012.
4 Installation of Acronis Snap Deploy 4
4.1
Supported operating systems
This section lists the operating systems where components of Acronis Snap Deploy 4 can be installed.
It does not matter which Service Pack (if any) is installed in the operating system.
Any components for Windows can be installed in the following operating systems:
Windows Server 2008 R2
Windows Server 2008 (x86, x64)
Windows Server 2003 (x86, x64)
Windows Server 2003 R2 (x86, x64)
Windows Small Business Server 2011
Windows Small Business Server 2003
Windows Server 2003 x64 Edition
Windows 8 (x86, x64)
Windows 8 Pro (x86, x64)
Windows 8 Enterprise (x86, x64)
Windows 7 Professional (x86, x64)
Windows 7 Ultimate (x86, x64)
Windows Vista Business (x86, x64)
Windows Vista Ultimate (x86, x64)
Windows XP Professional
Windows XP Professional x64 Edition
In addition to the above-listed operating systems, Acronis Snap Deploy 4 Management Console and
Acronis Snap Deploy 4 Management Agent can be installed in any of the following operating
systems:
Windows 7 Home Basic, Windows 7 Home Premium
Windows Vista Home Basic, Windows Vista Home Premium
Windows XP Home
4.2
System requirements
Components for Windows
Component
Disk space required Disk space occupied Additional
during installation or by the component(s)
update
Complete installation
485 MB
39
271 MB
Copyright © Acronis International GmbH, 2002-2012.
Management Console
386 MB
193 MB
CD-R/RW,
DVDR/RW, or BD-R/RE
for
creating
bootable media
1024x768
resolution
screen
Mouse (required)
OS Deploy Server
54 MB
27 MB
Management Agent
38 MB
19 MB
PXE Server
30 MB
15 MB
Wake-on-LAN Proxy
12 MB
6 MB
License Server
24 MB
12 MB
Minimum memory requirements for a component are the same as for the Windows operating
system where it is installed.
Network interface card is a common requirement for all the components.
Bootable media
Media type
Memory
ISO image size
Based on Windows PE
512 MB
357 MB
Linux-based
256 MB
110 MB
4.3
Used ports and IP addresses
The Acronis Snap Deploy 4 OS Deploy Server and Acronis Snap Deploy 4 Management Console
components use the following ports and IP addresses for remote operation:
UDP port: 9876
IPv4 multicast address: 239.255.219.45
TCP port: 9876. If this port is busy, the deployment server and the management console choose a
port at random
Acronis Snap Deploy 4 Management Console UDP port: 9877. If this port is busy, the
management console chooses a port at random
Acronis PXE Server uses the following ports and IP addresses:
UDP port: 67, 68, 69
Broadcast address: 255.255.255.255
For a remote installation (p. 47), the TCP port 25001 is used.
If you are using a firewall, you may need to set the appropriate access options.
4.4
Typical installation
With typical installation, all components of Acronis Snap Deploy 4 that are needed for deployment
and offline imaging will be installed on the same machine.
40
Copyright © Acronis International GmbH, 2002-2012.
Acronis Snap Deploy 4 will be installed with the following functionality:
Performing deployment through the network
Booting of the target machines over the network
Managing the deployments by using the management console
Creating a bootable media for deployment
Creating a bootable media for taking a master image
Storing and managing licenses of Acronis Snap Deploy 4
The following components will be installed on the machine:
Acronis Snap Deploy 4 OS Deploy Server (including the Acronis Universal Deploy (p. 26) add-on)
Acronis Snap Deploy 4 License Server
Acronis Snap Deploy 4 Management Console
Acronis PXE Server
To install Acronis Snap Deploy 4 Management Agent or Acronis Wake-on-LAN Proxy, and for more
flexible installation, use custom installation (p. 41).
To install Acronis Snap Deploy 4 (typical installation)
1.
2.
3.
4.
5.
Log on as an administrator and start the setup program.
Click Install Acronis Snap Deploy 4.
Accept the terms of the license agreement, and then click Next.
Click Typical.
Click Add license, and then type the license keys for Acronis Snap Deploy 4 or import them from
a file. You must provide at least one license key (either a machine license or a deployment
license).
Note: The licenses will not be used until you start deployment.
6. Specify whether the machine will participate in the Customer Experience Program (CEP).
You will be able to change this setting at a later time by starting Acronis Snap Deploy 4 and
clicking Help -> Customer Experience Program (CEP).
7. Click Install.
4.5
Custom installation
With custom installation, you can select which components of Acronis Snap Deploy 4 to install. You
can also specify additional parameters. For example, you can change the default folder for
installation.
You may want to use custom installation in the following cases:
Installing Acronis Snap Deploy 4 Management Agent to take a master image of a machine
without restarting it (p. 24)
Installing Acronis Wake-on-LAN Proxy to wake up machines that are located in another subnet
41
Installing different components on different machines, such as installing Acronis Snap Deploy 4
OS Deploy Server on one machine and Acronis PXE Server on another. For examples, see
“Common installation configurations” (p. 42).
Copyright © Acronis International GmbH, 2002-2012.
4.5.1
Installation procedure
Preparation
To be able to install Acronis Snap Deploy 4 OS Deploy Server, you need to have at least one machine
license or deployment license on Acronis Snap Deploy 4 License Server. The license can be trial or
full.
If you are installing both Acronis Snap Deploy 4 License Server and Acronis Snap Deploy 4 OS
Deploy Server on the same machine, you will be able to provide the license keys during
installation.
If Acronis Snap Deploy 4 License Server is installed on a different machine, load the license keys
to that license server before installing the deployment server.
The license key just needs to be available on the license server. It will not become used until you start
deployment.
Installation of other components does not require licenses.
To install Acronis Snap Deploy 4 (custom installation)
1.
2.
3.
4.
5.
6.
7.
8.
9.
Log on as an administrator and start the setup program.
Click Install Acronis Snap Deploy 4.
Accept the terms of the license agreement, and then click Next.
Click Custom.
In the list of components, select the components that you want to install. For details about
installing the components, see “Installation of components” (p. 44).
If you selected Acronis Snap Deploy 4 License Server for installation, provide the license keys of
Acronis Snap Deploy 4.
If you selected Acronis Snap Deploy 4 OS Deploy Server without selecting Acronis Snap Deploy 4
License Server, specify the name or IP address of the machine where the license server is
installed.
Specify the folder where the components will be installed.
If prompted, specify the following:
Whether to install the components for all users on the machine (recommended) or only for
the current user
Whether the machine will participate in the Customer Experience Program (CEP). You will be
able to change this setting at a later time by starting Acronis Snap Deploy 4 and clicking
Help -> Customer Experience Program (CEP).
10. Click Install.
4.5.2
Common installation configurations
Acronis Snap Deploy 4 components can be installed in various configurations, to distribute various
components and features among the machines on the network.
a) The minimal configuration that enables only offline imaging (p. 24) and stand-alone deployment
(p. 9) consists of:
42
Acronis Snap Deploy 4 Management Console
Copyright © Acronis International GmbH, 2002-2012.
b) The minimal configuration that enables offline imaging, stand-alone deployment, and
deployment through the network with Acronis Snap Deploy 4 OS Deploy Server consists of the
following components:
Acronis Snap Deploy 4 Management Console
Acronis Snap Deploy 4 Management Console
Acronis Snap Deploy 4 License Server
Acronis Snap Deploy 4 OS Deploy Server
On the target machines, no Acronis components are required.
c) The configuration that adds the network boot of the target machines to the functionality
described in (b):
Acronis Snap Deploy 4License Server
Acronis Snap Deploy 4 OS Deploy Server
Acronis PXE Server
The components can be installed all on the same machine, or on different machines. On the
target machines, no Acronis components are required.
This is the recommended elementary configuration that enables most of the Acronis Snap Deploy
4 functionality. This is the configuration for typical installation (p. 40).
If physical access to the powerful server is limited, you can install the console on a separate
machine. Another common configuration is:
Workstation:
Acronis Snap Deploy 4 Management Console
Server:
Acronis Snap Deploy 4 License Server
You are going to perform deployment to a specific list of machines.
Acronis Snap Deploy 4 OS Deploy Server
Acronis PXE Server
Generally, you can install all Acronis servers on separate machines. In this case, you will have to
connect the management console to each server separately to manage the server. With all
servers on one machine, only one console connection is needed.
d) To add to any configuration (a)–(c) the online imaging (p. 24) ability and the ability to validate
images integrity, install Acronis Snap Deploy 4 Management Agent.
Online imaging means that the master system is imaged live (without restarting the machine or
suspending operations). You can perform online imaging remotely, by connecting the console to
the management agent installed on the master machine. The management agent will be included
in the master image and deployed to all target machines.
However, having excess software in the master image is not always rational.
We recommend that you create a master image by using the bootable component called Acronis
Snap Deploy 4 Master Image Creator. Nevertheless, having at least one management agent on
the network (not necessarily on the master machine) makes sense. You will be able to validate
(check) the integrity of your images (p. 78) by using the management agent.
e) To add to Acronis Snap Deploy 4 OS Deploy Server an ability to perform deployment in another
subnet (across a network switch) in configuration (b) or (c), install Acronis Wake-on-LAN Proxy
on any server in the subnet where the target machines are. No additional actions are required.
Acronis Wake-on-LAN Proxy has to be installed only if:
43
Copyright © Acronis International GmbH, 2002-2012.
AND
All or some of the target machines are in a subnet other than Acronis Snap Deploy 4 OS
Deploy Server.
4.5.3
Installation of components
The setup program of Acronis Snap Deploy 4 includes the following components and component
features:
OS Deploy Server, which includes:
Acronis Snap Deploy 4 License Server
The Acronis Snap Deploy 4 License Server Management Tool command-line utility
Management Console, which includes:
Acronis Universal Deploy
License Server, which includes:
Acronis Snap Deploy 4 OS Deploy Server
Acronis Snap Deploy 4 Management Console
Media builders for creating an Acronis bootable media and a WinPE-based bootable media
PXE Server
Management Agent
Wake-on-LAN Proxy
The list of components
4.5.3.1
Installation of Acronis Snap Deploy 4 Management Console
Acronis Snap Deploy 4 Management Console is an administrative tool for local and remote access to
Acronis servers and Acronis Snap Deploy 4 Management Agent. Install Acronis Snap Deploy 4
Management Console on any machine from which you prefer to operate.
44
Copyright © Acronis International GmbH, 2002-2012.
Installation of Acronis Snap Deploy 4 Management Console also includes the media builders for
creating an Acronis bootable media and a bootable media based on Windows Preinstallation
Environment (WinPE).
Once Acronis Snap Deploy 4 Management Console is installed, you can install other components
remotely (p. 47).
4.5.3.2
Installation of Acronis Snap Deploy 4 License Server
Acronis Snap Deploy 4 License Server is a component that tracks licenses of Acronis products. Install
Acronis Snap Deploy 4 License Server on a machine accessible to Acronis Snap Deploy 4 OS Deploy
Server. Consider installing both products on the same machine.
Installation of Acronis Snap Deploy 4 License Server also includes Acronis Snap Deploy 4 License
Server Management Tool. This is a command-line utility for controlling the license server.
Alternatively, you can control the license server by using Acronis Snap Deploy 4 Management
Console.
Note: If you have already installed a license server that came with another Acronis product, you will still need to
install Acronis Snap Deploy 4 License Server. You can install both license servers on the same machine. The
machine will then act as a common license server for all Acronis products.
After installation, Acronis Snap Deploy 4 License Server launches automatically as a Windows service.
When installing Acronis Snap Deploy 4 License Server, you can add the license keys to it. You can add
license keys at a later time, either by using the management console (p. 54) or in the command-line
mode (p. 56).
4.5.3.3
Installation of Acronis Snap Deploy 4 OS Deploy Server
Acronis Snap Deploy 4 OS Deploy Server is a component that performs centralized deployment
through the network with the help of bootable components called agents.
Before installing Acronis Snap Deploy 4 OS Deploy Server, you need to install Acronis Snap Deploy 4
License Server (p. 45) and import license keys to it. You can install both servers on the same machine.
If Acronis Snap Deploy 4 License Server is not installed on the machine where you are installing
Acronis Snap Deploy 4 OS Deploy Server, the setup program will ask you to specify a license server.
Browse to the server, or enter its name or IP address.
Note: We recommend specifying the license server by its machine name. If you specify the license server by its IP
address, Acronis Snap Deploy 4 OS Deploy Server will not be able to find the license server if this address
changes.
There is one exception to this recommendation: if your license server machine has non-English characters in its
host name, you need to specify license server by IP address. Currently Unicode is not supported in Acronis Snap
Deploy 4 communication between components, so Acronis Snap Deploy 4 OS Deploy Server will not be able to
resolve the license server name properly if it contains non-English characters (i.e. if it contains Unicode
symbols).
Installation of the deployment server does not decrease the number of licenses. The software just
checks the availability of the licenses and stores the specified parameters of Acronis Snap Deploy 4
License Server to be able to access the license server at the time of deployment.
45
Copyright © Acronis International GmbH, 2002-2012.
Important: If you are planning to use more than one deployment server, make sure that each particular
machine is deployed only by one of them. Otherwise, each deployment server may use a separate license for the
machine.
4.5.3.4
Installation of Acronis PXE Server
Acronis PXE Server allows network booting of the target machines for performing deployment.
Using Acronis PXE Server considerably reduces the time required for booting the machines as
compared to using bootable media. It also eliminates the need to have a technician onsite to install
the bootable media into the system that must be booted. This allows for unattended scheduled
deployment.
Using Acronis PXE Server makes sense if there is a Dynamic Host Control Protocol (DHCP) server in
your network, so that the machines can automatically obtain IP addresses at boot. Without a DHCP
server, you cannot boot machines from PXE.
We recommend that you have only one PXE server within a subnet to ensure predictability of the
booting machines’ behavior.
Acronis PXE Server starts running as a service immediately after installation. It will automatically
launch at each system restart. You can stop and start this service in the same way as other services.
4.5.3.5
Installation of Acronis Wake-on-LAN Proxy
Acronis Wake-on-LAN Proxy enables Acronis Snap Deploy 4 OS Deploy Server to wake up the target
machines located in another subnet.
You need to install Acronis Wake-on-LAN Proxy only if:
You are going to perform deployment to specific machines (deployment to any ready machines
does not involve waking up the machines by the deployment server)
AND
All or some of the target machines are in a subnet other than Acronis Snap Deploy 4 OS Deploy
Server.
Install Acronis Wake-on-LAN Proxy on any server in the same subnet as the target machines. No
additional actions are required.
Acronis Wake-on-LAN Proxy runs as a service immediately after installation. Later on it will
automatically launch at each system restart. You can stop and start this service in the same way as
other services.
4.5.3.6
Installation of Acronis Snap Deploy 4 Management Agent
Installation of Acronis Snap Deploy 4 Management Agent adds the online imaging ability and the
ability to validate integrity of the master images.
Online imaging means that the master system is imaged live (without restarting the machine or
suspending operations). You can perform online imaging remotely by connecting the console to the
management agent installed on the master machine. The management agent will be included in the
master image and deployed on all target machines.
However, having excess software in the master image is not always rational.
46
Copyright © Acronis International GmbH, 2002-2012.
We recommend that you create a master image by using the bootable component called Acronis
Snap Deploy 4 Master Image Creator. Nevertheless, having at least one management agent on the
network (not necessarily on the master machine) makes sense. You will be able to validate (check)
the integrity of your images (p. 78) by using the management agent.
4.5.3.7
Installation of Acronis Universal Deploy
Acronis Universal Deploy is an add-on to Acronis Snap Deploy 4. It is installed automatically when
you install Acronis Snap Deploy 4 OS Deploy Server (p. 45).
Universal Deploy requires a separate license (p. 17).
Note: You do not need a license to install Acronis Universal Deploy. However, do not forget to add the Acronis
Universal Deploy licenses to the license server before starting deployment. If the licenses are not found during
deployment, the Acronis Universal Deploy step will be skipped.
4.6
Other ways of installation
4.6.1
Installing components remotely
By using Acronis Snap Deploy 4 Management Console, you can install the following components of
Acronis Snap Deploy 4 remotely:
Acronis Snap Deploy 4 Management Agent
Acronis Wake-on-LAN Proxy
Acronis PXE Server
Acronis Snap Deploy 4 License Server
Acronis Snap Deploy 4 OS Deploy Server
4.6.1.1
Preparation
Before proceeding with remote installation, prepare the remote machines as follows:
Simple file sharing. For a successful installation on a remote machine running any version of
Windows XP, the option Control panel > Folder options > View > Use simple file sharing must be
disabled on that machine.
User Account Control. For a successful installation on a remote machine running Windows Vista
or later, User Account Control (UAC) must be disabled. To access this option, go to Control panel
> User Accounts > Change User Account Control Settings.
File and Printer Sharing must be enabled on the remote machine. To access this option:
47
On a machine running Windows XP with Service Pack 2 or Windows 2003 Server: go to
Control panel > Windows Firewall > Exceptions > File and Printer Sharing.
On a machine running Windows Vista, Windows Server 2008, or Windows 7: go to Control
panel > Windows Firewall > Network and Sharing Center > Change advanced sharing
settings.
Ports. Acronis Snap Deploy 4 uses TCP ports 445 and 25001 for remote installation. Make sure
that these ports are added to exceptions in the firewall settings on the remote machines. TCP
port 445 is added to exceptions automatically by Windows Firewall when you enable File and
Printer Sharing.
To add a port to exceptions:
Copyright © Acronis International GmbH, 2002-2012.
In Windows XP, Windows 2003 Server, and Windows Vista: go to Control panel > Windows
Firewall > Exceptions > Add Port
In Windows 7: go to Control panel > Windows Firewall > Advanced settings > Inbound
Rules > New Rule > Port
Tip: If the remote machines are members of an Active Directory domain and use no firewall other than
Windows Firewall, you can add TCP port 25001 to exceptions by using Group Policy. On a domain
controller, create a Group Policy object, then go to Administrative Templates > Network > Network
Connections > Windows Firewall > Domain Profile > Windows Firewall: Define port exceptions (or: Define
inbound port exceptions), and then add the following port exception:
25001:tcp:*:enabled:Acronis remote install
You can exclude both ports from exceptions after the remote installation is complete.
4.6.1.2
Installation procedure
To install a component of Acronis Snap Deploy 4 remotely
1. Start Acronis Snap Deploy 4 Management Console.
2. On the Tools menu, click Install components remotely.
3. Select the location from which the installation packages of the components will be taken.
The selection The registered components corresponds to the default folder:
%ProgramFiles%\Common Files\Acronis\SnapDeploy\RemoteInstall
4. Select the component that you want to install.
5. If you are installing Acronis Snap Deploy 4 OS Deploy Server, specify the name or IP address of
the machine with Acronis Snap Deploy 4 License Server. That license server must contain at least
one available license.
6. In Machine, specify the name or IP address of the machine where you want to install the
component. To open the list of machines on your network, click Browse.
7. To allow restarting the remote machine if it is required for installation, select the Restart the
machine automatically when required check box. If you clear this check box, you may need to
restart the remote machine later for the component to start working.
8. In User name and Password, specify the user name and password of an administrator on the
remote machine.
9. Click Install.
Updating a component
To update a component on a remote machine, perform the same procedure.
4.6.2
Extracting the components of Acronis Snap Deploy 4
When you install Acronis Snap Deploy 4 Management Console, all installation files (.msi files) of
Acronis Snap Deploy 4 components are placed in the %ProgramFiles%\Common
Files\Acronis\SnapDeploy\RemoteInstall folder. As a result, you will be able to install a component
remotely (p. 47) by using the management console; or install, modify, or repair a component by using
the msiexec program.
To extract one or more components
1. Run the Acronis Snap Deploy 4 setup program.
2. Click Extract installation files.
3. Select the check boxes for the components whose installation files you want to extract.
48
Copyright © Acronis International GmbH, 2002-2012.
4. Select a location for the installation files, and then click Extract.
4.7
Upgrading Acronis Snap Deploy 4
This section describes how to upgrade Acronis Snap Deploy 4.
4.7.1
Upgrading from a previous product version
Prerequisites
Before proceeding with the upgrade from a previous version of Acronis Snap Deploy, make sure that
you have one or more license keys for Acronis Snap Deploy 4. These can be either standard license
keys or upgrade license keys.
An upgrade license key enables you to continue using a license key for the previous version (“old”
license key). The old license key cannot be reassigned to a different machine.
You need at least one license key for Acronis Snap Deploy 4 (no matter which type) to be able to
upgrade Acronis OS Deploy Server. This license key will remain available.
To upgrade from Acronis Snap Deploy 3
Perform the following steps on each machine where any component of Acronis Snap Deploy 3 is
installed. Start with the machine where Acronis License Server is installed.
1.
2.
3.
4.
Start the setup program of Acronis Snap Deploy 4.
Click Install Acronis Snap Deploy 4.
Click Update.
If you are upgrading Acronis License Server, provide the license keys for Acronis Snap Deploy 4.
The license keys for Acronis Snap Deploy 3 remain stored on the license server.
5. If you are upgrading Acronis OS Deploy Server apart from Acronis License Server, specify the
machine with the license server.
6. Review the installation summary, and then click Install.
Upgrading Acronis PXE Server removes all components of Acronis Snap Deploy 3 that are uploaded to
the PXE server. To continue using the PXE server, you need to upload the new components by
connecting to the PXE server and clicking Upload components. For details, see the “Configuring
Acronis PXE Server” (p. 65) section of the built-in Help.
Upgrading from older versions
Components of versions of Acronis Snap Deploy earlier than 3 are incompatible with Acronis Snap
Deploy 4. To perform the upgrade:
1. Prepare a list of license keys that includes the license keys for the older version, and standard or
upgrade license keys for Acronis Snap Deploy 4.
2. Uninstall all components of the older version.
3. Install Acronis Snap Deploy 4. For example, you can perform a typical installation (p. 40). When
prompted, specify all license keys from your list.
49
Copyright © Acronis International GmbH, 2002-2012.
4.7.2
Upgrading from the trial to full product version
To upgrade from the trial to a full version of the software, buy the full licenses and import the license
keys to Acronis Snap Deploy 4 License Server.
To upgrade to the full product version
1. Start Acronis Snap Deploy 4 Management Console.
2. Click Licenses. If prompted, specify the machine where the license server is installed.
3. Click Add license, and then provide the full license keys.
Acronis Snap Deploy 4 will start using the full licenses as soon as the trial ones expire.
4.8
Uninstalling Acronis Snap Deploy 4
To uninstall Acronis Snap Deploy 4, you should use the setup program.
To uninstall some or all components of Acronis Snap Deploy 4
1. Start the setup program of Acronis Snap Deploy 4.
2. Click Install Acronis Snap Deploy 4.
3. Do one of the following:
To uninstall all components, click Remove.
To uninstall individual components, click Modify, and then clear the check boxes for the
components that you want to uninstall.
4. Proceed with the uninstallation.
Data remaining after uninstallation
Uninstalling Acronis Snap Deploy 4 License Server does not delete license keys. If you later reinstall
the license server, all license keys automatically appear on the new license server. Used licenses
remain used.
Uninstalling Acronis Snap Deploy 4 OS Deploy Server does not delete the deployment tasks,
deployment templates, the list of machines, and individual deployment settings. If you later reinstall
the deployment server, this data will be available to the new deployment server.
50
Copyright © Acronis International GmbH, 2002-2012.
5 Using Acronis Snap Deploy 4 Management
Console
5.1
Connecting to a machine
5.1.1
Connect to a local machine
When started, Acronis Snap Deploy 4 Management Console connects to the local machine if there is
a manageable component of Acronis Snap Deploy 4 (such as Acronis Snap Deploy 4 OS Deploy
Server) on this machine. You can manage any Acronis server or Acronis Snap Deploy 4 Management
Agent installed on the same machine without any additional actions.
The welcome screen of the management console
5.1.2
Connect to another machine
Acronis Snap Deploy 4 Management Console can connect over the network to a machine where one
or more of the following components are installed:
51
Acronis Snap Deploy 4 OS Deploy Server
Acronis Snap Deploy 4 License Server
Copyright © Acronis International GmbH, 2002-2012.
Acronis PXE Server
Acronis Snap Deploy 4 Management Agent
Once connected, you can manage the Acronis server or perform operations by using Acronis Snap
Deploy 4 Management Agent.
To connect to an Acronis component, you need the administrator’s privileges on the remote
machine.
To connect to a component
1. On the Connect menu, click Connect.
2. In Machine, specify the name or IP address of the machine where the component is installed. To
open the list of machines on your network, click Browse.
3. In User name and Password, specify the user name and password of an administrator on that
machine.
4. To save the password for the user name, select the Save password check box.
Alternatively, you can connect to the corresponding component when you open the Machines,
Deployment tasks, PXE server, or Licenses view. In the welcome screen, you will be asked to connect
to Acronis Snap Deploy 4 OS Deploy Server if this component is not installed on the local machine.
Connecting to a component on a remote machine
Connection to a component is needed to perform the following operations:
Managing deployment (p. 79): connect to Acronis Snap Deploy 4 OS Deploy Server.
Validating a master image (p. 78): connect to Acronis Snap Deploy 4 Management Agent.
Creating a master image of a machine without restarting it (p. 68): connect to Acronis Snap
Deploy 4 Management Agent.
Managing licenses (p. 54): connect to Acronis Snap Deploy 4 License Server.
Configuring Acronis PXE Server (p. 65): connect to Acronis PXE Server.
No connection is needed to perform the following operations:
52
Creating an Acronis bootable media (p. 59) or a WinPE-based bootable media (p. 62)
Copyright © Acronis International GmbH, 2002-2012.
Installing Acronis components remotely (p. 47)
5.2
Browsing logs
Acronis Snap Deploy 4 OS Deploy Server and Acronis PXE Server store the log of the operations they
have performed.
The view the log of Acronis Snap Deploy 4 OS Deploy Server
1. Connect the management console to the machine with Acronis Snap Deploy 4 OS Deploy Server.
2. Do either of the following:
In the left pane, click Deployment tasks, and then click Log on the toolbar.
On the Help menu, click View log.
3. In the left pane, select a log. In the right pane, examine the events recorded in the log.
The left pane shows up to 50 log entries. If there are more log entries, you can browse the list by
using the buttons with the left and right arrows.
To delete a log entry, select it and click the Delete the selected log entry button.
If any step was terminated by an error, the corresponding log entry will be marked by a red circle
with a white “X” inside.
The right window shows the list of events contained in the selected log entry. The three buttons to
the right control message filters: the white “X” in the red circle filters error messages, the
exclamation sign in a yellow triangle filters warnings, and the “i” in a circle filters information
messages.
To select columns to display (such as the date and time of an event), right-click the table header, and
then select the columns.
To sort the events by a particular column, click the desired column name. To reverse the sort order,
click the column again.
You can also change column width by dragging the borders.
To view the log of Acronis PXE Server
1. Connect the management console to the machine with Acronis PXE Server.
2. In the left pane, click PXE server.
3. Examine the log entries in the lower part of the view.
5.3
Checking for software updates
Each time you start the management console, Acronis Snap Deploy 4 checks whether a new version
of the software is available on the Acronis Web site. If so, the software provides a link for
downloading the setup program of the new version.
To check for updates manually, start the management console and then click Help -> Check for
update. In that window, you also can disable the automatic checks for updates.
53
Copyright © Acronis International GmbH, 2002-2012.
6 Using Acronis Snap Deploy 4 License Server
This section contains general information necessary for understanding Acronis Snap Deploy 4 License
Server and covers operations with licenses.
6.1
Understanding Acronis Snap Deploy 4 License Server
Acronis Snap Deploy 4 License Server is a mechanism that tracks licenses of Acronis products. Acronis
Snap Deploy 4 licensing is based on the number of machines (servers or workstations) that you
deploy. For example, to deploy a system to 100 machines, you need 100 licenses.
Acronis Universal Deploy (p. 26) is an add-on to Acronis Snap Deploy 4 and has its own license key.
Acronis Snap Deploy 4 License Server tracks the licenses using a MAC address, which is unique for
each network interface card (NIC). Although a MAC address is usually hardwired to the NIC, some
operating systems offer a way to change it. It is important to note that attempting to change the
MAC address on a system may impede the Acronis Snap Deploy 4 License Server operation and
prevent you from other deployments to the same machine.
When installing Acronis Snap Deploy 4 OS Deploy Server, you need to specify a license server. After
the license server is found, the software checks for available licenses on the server and stores its
network address to be able to access the license server later, when deployment is launched.
When starting a deployment, Acronis Snap Deploy 4 OS Deploy Server checks for available licenses
on the license server. If an appropriate license is available for a machine, the deployment operation
will run on the machine. The number of available licenses will decrease by the number of systems
being deployed.
If deployment under a deployment license has failed, that license becomes available again. A
machine license remains used by the machine regardless of the result of deployment.
Acronis Snap Deploy 4 License Server can import multiple license keys from .txt or .eml files, saving
you from the time-consuming procedure of typing each number.
When upgraded, recovered or reinstalled, the license server keeps all the imported licenses intact.
However, it is recommended that you copy the files with license keys to removable media, or create
a hard copy of those files and keep it in a safe place. This ensures that you have license data available
in case of hardware failure.
6.2
Adding licenses by using Acronis Snap Deploy 4
Management Console
You can add the licenses when you are installing Acronis Snap Deploy 4 License Server. After the
license server is installed, you can add licenses by using Acronis Snap Deploy 4 Management Console,
as follows.
To add one or more license keys to the license server
1. Run Acronis Snap Deploy 4 Management Console.
2. Click Licenses. If the license server is installed on a different machine, click Connect to Acronis
Snap Deploy 4 License Server, and then type the name or IP address of that machine.
54
Copyright © Acronis International GmbH, 2002-2012.
3. Click Add License.
4. In the Add Licenses window, type the license key or the path to a .txt or .eml file containing the
license keys; or, you can browse to the file.
5. Click Add. Acronis Snap Deploy 4 License Server performs the operation and reports the number
of newly-added licenses.
The license server has 10 license keys of various types. The license corresponding to the highlighted
license key has already been used for deployment. The bottom license key corresponds to 100
deployment licenses.
6.3
Viewing information about licenses
To view information about licenses
1. Run Acronis Snap Deploy 4 Management Console.
2. Click Licenses. If the license server is installed on a different machine, click Connect to Acronis
Snap Deploy 4 License Server, and then type the name or IP address of that machine.
55
Copyright © Acronis International GmbH, 2002-2012.
This will display all license keys available on Acronis Snap Deploy 4 License Server. One license
key can correspond to multiple licenses.
The license server contains 10 server licenses and five workstation licenses
3. Right-click the column headings bar to choose the details to display: license key, import date,
expiration date (for trial licenses), the total number of licenses assigned to each license key, how
many of them are available (that is, free), and how many are used. For example, if one license
corresponds to one license key, Total=1, Available=1, Used=0 (if the license is free) or
Available=0, Used=1 (if the license has been allocated).
6.4
Removing licenses
To completely remove a license from Acronis Snap Deploy 4 License Server, select the corresponding
license key from the list, and then click Remove license on the toolbar.
The following licenses cannot be removed:
Used licenses
Trial licenses
When a trial license expires, Acronis Snap Deploy 4 will use an available full license of the
corresponding type.
6.5
Adding licenses in the command-line mode
As an alternative to the graphical user interface, you can add licenses in the command-line mode, by
using Acronis Snap Deploy 4 License Server Management Tool.
To add licenses in the command-line mode
1. Run cmd.exe to open the Command Prompt window.
2. Go to the folder where Acronis Snap Deploy 4 License Server is installed. By default, the folder
name is: %Program Files%\Acronis\SnapDeploy\LicenseServerConsole
3. Run the following command:
LicenseServerCmdLine --import-file <server name> <file name>
56
Copyright © Acronis International GmbH, 2002-2012.
In this command:
<server name> is the name of the machine where Acronis Snap Deploy 4 License Server
is installed.
<file name> is the name of the .txt or .eml file with the license keys.
For the complete syntax of Acronis Snap Deploy 4 License Server Management Tool, see “Using
Acronis Snap Deploy 4 License Server Management Tool” (p. 57).
Example
The following command adds the license keys from the file C:\Licenses.txt to the license server
mymachine:
licenseservercmdline --import-file mymachine c:\Licenses.txt
6.6
Using Acronis Snap Deploy 4 License Server
Management Tool
Acronis Snap Deploy 4 License Server Management Tool is a command-line utility for controlling
Acronis Snap Deploy 4 License Server. The tool is the LicenseServerCmdLine.exe file located
in
the
installation
folder.
By
default,
the
folder
name
is
%ProgramFiles%\Acronis\SnapDeploy\LicenseServerConsole.
The management tool uses the following syntax:
LicenseServerCmdLine <command> <option1> <option2> …
The management tool supports the following commands and parameters:
--list
Displays the list of license servers found on the local network.
--status <server name or IP address>
Displays the status of the specified license server, which is the number of total and available
licenses for each Acronis product.
--import <server name> <license key>
Adds a new license key. You can specify multiple license keys by separating them with a space.
--import-file <server name> <file name>
Imports license keys from a .txt or an .eml file.
--help
Shows usage information.
57
Copyright © Acronis International GmbH, 2002-2012.
7 Deployment tools
Before deployment, each target machine must boot into a dedicated bootable component of Acronis
Snap Deploy 4. An example of such component is Acronis Snap Deploy 4 Agent.
The machine can boot into the component in either of these ways:
From a physical media (such as a DVD or a USB drive) that contains the component. Such media
is called a bootable media.
Over the network, by using Acronis PXE Server with the component uploaded to it.
This section describes how to create a bootable media or configure the PXE server.
7.1
Bootable components
Acronis Snap Deploy 4 has a number of bootable components that can perform operations on any
PC-compatible hardware, including bare metal and machines with unsupported file systems.
Acronis Snap Deploy 4 Agent boots on a target machine to enable deployment performed by
Acronis Snap Deploy 4 OS Deploy Server (p. 99).
Acronis Snap Deploy 4 Master Image Creator boots on a master machine and creates an image
of the system (p. 68).
Acronis Snap Deploy 4 Standalone Utility boots on a target machine and performs deployment
on its own (p. 112).
Acronis Snap Deploy 4 Command-Line Utility provides a command-line interface (p. 133) for
performing imaging and deployment, and for sending e-mail notifications about deployment.
Acronis System Report boots on a machine, collects information about the machine, and saves
this information to a removable USB drive (such as a USB flash drive). For details, see “Collecting
system information” (p. 145).
7.2
Creating a bootable media
You can create two types of bootable media:
Acronis bootable media (recommended in most cases) is based on a Linux kernel and contains
bootable components of Acronis Snap Deploy 4. To create this type of media, use the Acronis
Snap Deploy 4 Bootable Media Builder wizard (p. 59).
WinPE-based bootable media is based on Windows Preinstallation Environment (WinPE) and
contains bootable components of Acronis Snap Deploy 4. To create this type of media, use the
Acronis Snap Deploy 4 PE Builder wizard (p. 62).
Both types of media provide similar graphical user interface but differ in the set of bootable
components they contain. Generally, you can use an Acronis media. You may want to use a WinPEbased media if the machine’s hardware, such as network adapters, is not properly recognized from
the Acronis media, or if you need to use the command-line interface.
You can create a bootable media on a physical media, such as a DVD or a USB drive. Acronis PXE
Server with uploaded bootable components can also be thought of as a kind of bootable media. That
is why you can create a bootable media or upload bootable components to the PXE server by using
the same wizards. Alternatively, you can configure the PXE server directly (p. 65).
58
Copyright © Acronis International GmbH, 2002-2012.
7.2.1
Creating an Acronis bootable media
Acronis bootable media is a physical media (CD, DVD, USB flash drive, or other media supported by
the machine’s BIOS as a boot device) that contains bootable components of Acronis Snap Deploy 4.
Acronis Snap Deploy 4 bootable media supports both BIOS and UEFI architecture.
You can create an Acronis bootable media containing one or more of the following bootable
components (p. 58):
Acronis Snap Deploy 4 Agent
Acronis Snap Deploy 4 Master Image Creator
Acronis Snap Deploy 4 Standalone Utility
Acronis System Report
To create a bootable media
1. Start the management console.
2. On the Tools menu, click Create bootable media.
3. Select the bootable components that will be placed on the media.
For example, if you select Acronis Snap Deploy 4 Agent and Acronis Snap Deploy 4 Master Image
Creator, you will be able to use such bootable media to perform deployment by using Acronis
Snap Deploy 4 OS Deploy Server, and to create a master image.
Selecting bootable components
4. Under When booting from the media, automatically start, select the component that will start
automatically after a time-out you specify. Such component is also referred to as the default
boot menu item. The possible choices are the following:
59
Copyright © Acronis International GmbH, 2002-2012.
One of the components on the media: The component will start after the time-out.
No autostart: The Acronis loader will display the boot menu and wait for someone to select
whether to boot the operating system or one of the Acronis components.
Start operating system: The operating system, if present on the booting machine’s hard disk,
will start after the time-out. This option is designed to make the target machine boot into the
deployed operating system after deployment. The main usage scenario is as follows.
You use this wizard to configure the PXE server for deployment on a schedule (p. 100).
You set up Acronis Snap Deploy 4 Agent to start automatically. After the deployment is
completed, the target machine reboots into the agent again and might be deployed by
another deployment operation. How to avoid this situation?
To ensure that the target machine boots into the deployed operating system after the
deployment, choose the Start operating system option in this step of the wizard. To
ensure that the target machine boots into the agent before the deployment, tune the PXE
server to work with your deployment server when setting up the deployment (p. 102).
Note: When booting from media, automatically start option does not apply when Acronis bootable
media loads in the UEFI mode.
5. Under Start automatically after, specify the time-out interval in seconds. For example, if you
choose to automatically start Acronis Snap Deploy 4 Agent, and set this parameter to 10, the
agent will launch 10 seconds after the boot menu is displayed.
6. If you are placing Acronis Snap Deploy 4 Agent on the media, specify whether the agent will
connect to a particular Acronis Snap Deploy 4 OS Deploy Server. This setting allows you to have
multiple deployment servers that perform different functions on the same network.
To specify a deployment server, type its name or IP address in Server name/IP.
Note: Acronis bootable media uses NetBIOS networking protocol to resolve Acronis Snap Deploy 4 OS
Deploy Server in a network. NetBIOS protocol uses ANSI characters for host names. So, machines that have
non-English characters in their names cannot be accessed from Acronis bootable media. If the name of the
Acronis Snap Deploy 4 OS Deploy Server machine contains non-English characters, use the machine's IPaddress to specify it in the network.
The deployment server (along with the network settings for the agent) can also be specified
onsite (on the target machine’s side) when booting the agent. To be able to configure the agent
onsite, set up a reasonable delay before the default network settings will be applied. For details,
see “Booting the target machines” (p. 107).
60
Copyright © Acronis International GmbH, 2002-2012.
If not configured in either way, the deployment server will be found automatically. The agent will
start the search after the number of seconds you specify in Timeout (sec).
Settings for Acronis Snap Deploy 4 Agent
The option to save the agent’s log to the deployment server is designed primarily for
troubleshooting. The log will be available on the deployment server in the following folder:
%AllUsersProfile%\Application Data\Acronis\DeployServer\AgentsLogs
7. Select the type of bootable media to create. You can:
Create a CD, a DVD, or other media such as a USB flash drive if the hardware BIOS allows for
booting from such media.
Create an ISO image of a bootable disc to burn it later onto a blank disc or writing it to a USB
flash drive.
Upload the selected components to Acronis PXE server. The previously uploaded
components will be deleted from the PXE server before uploading the newly selected ones.
Note: Acronis Snap Deploy 4 Standalone Utility can be placed on a physical media only. This component is
not designed to boot from a PXE server.
If you have chosen to create a physical media, insert a blank disc (so the software can determine
its capacity) or attach a USB flash drive.
If you have chosen to create an ISO image of a bootable disc, specify the name of the ISO file and
the folder in which to place it.
If you have chosen to upload the components to a PXE server, specify the name of the machine
with the PXE server and provide the user name and password of an administrator on that
machine.
8. [Optional.] Protect the components being uploaded to the PXE server with a password to prevent
the components from unauthorized execution. The password prompt will come up when
61
Copyright © Acronis International GmbH, 2002-2012.
selecting a bootable component. No password is required to start the operating system on the
machine.
Protecting the bootable components with a password
9. Click Create. After you create the disc, mark it and keep it in a safe place.
Note: Components on an Acronis bootable media are based on a Linux kernel and are equipped with the Linux
system and device drivers. Acronis regularly supplements the driver set with drivers for new devices. However,
there may be a chance of drivers being incompatible with your hardware, so a bootable component cannot
start, stops responding or cannot access the necessary device. In this case, consider creating a WinPE-based
bootable media (p. 62) instead.
7.2.2
Creating a WinPE-based bootable media
Windows Preinstallation Environment (WinPE) is a minimal Windows system based on the Windows
Vista, the Windows Server 2008, or the Windows 7 kernels. WinPE is commonly used by original
equipment manufacturers (OEMs) and corporations for deployment, test, diagnostic and system
repair purposes.
Similarly to creating an Acronis bootable media (p. 59), you can create a bootable media that is based
on WinPE and includes bootable components of Acronis Snap Deploy 4.
You may want to use a WinPE-based media instead of an Acronis bootable media for the following
purposes:
Performing imaging or deployment to machines whose hardware is not properly recognized from
the Acronis bootable media (which is based on a Linux kernel)
Performing deployment in the command-line mode (p. 133); for example, to deploy different
master images to different target machines (p. 142)
62
Copyright © Acronis International GmbH, 2002-2012.
Sending e-mail notifications about deployment
Note: PE-based bootable media cannot be started in the UEFI mode.
7.2.2.1
Components included in the bootable media
Each WinPE-based bootable media contains the following bootable components (p. 58):
Acronis Snap Deploy 4 Agent
Acronis Snap Deploy 4 Master Image Creator
Acronis Snap Deploy 4 Command-Line Utility
The media also contains the Acronis Universal Deploy (p. 26) add-on.
7.2.2.2
Acronis Snap Deploy 4 PE Builder
Acronis Snap Deploy 4 PE Builder is a dedicated tool for creating a WinPE-based bootable media. The
PE Builder is installed with Acronis Snap Deploy 4 Management Console.
The PE builder creates the bootable media by adding components of Acronis Snap Deploy 4 to a
source file called a PE image.
A PE image is normally a .wim file. The PE builder can create a PE image automatically or use a PE
image you provide. The PE image can be based on WinPE 2.x or WinPE 3.0.
The term “image” in “PE image” is unrelated to the notion of “master image.”
7.2.2.3
Creating a bootable media based on WinPE 2.x, 3.0 or 4.0
Installing Windows AIK
To be able to create a bootable media based on WinPE 2.x or WinPE 3.0, you must have Windows
Automated Installation Kit (AIK) installed. For this purpose, install Acronis Snap Deploy 4
Management Console on a machine where Windows AIK is installed. If you do not have such
machine, do the following:
1.
2.
3.
4.
Download Windows AIK; for example, from the Windows AIK 3.0 Web page.
Burn the AIK to a DVD or write it to a USB flash drive.
Attach the flash drive or insert the DVD in the media drive of a machine running Windows.
From this kit, install:
a. Microsoft .NET Framework 2.0 (NETFXx86 or NETFXx64, depending on your hardware).
b. Microsoft Core XML Services (MSXML) 5.0 or 6.0.
c. Windows AIK.
5. Install Acronis Snap Deploy 4 Management Console.
Installing Windows ADK 1.0 for Windows 8
To be able to create a bootable media based on WinPE on Windows 8, you must have Windows
Preinstallation Environment (Windows PE) installed. For this purpose, install Acronis Snap Deploy 4
Management Console on a machine where Windows PE is installed. If you do not have such machine,
do the following:
1. Download Windows ADK from the Windows ADK 1.0 Web page.
2. Burn it to a DVD or write it to a USB flash key.
63
Copyright © Acronis International GmbH, 2002-2012.
3. Attach the flash key or insert the DVD in the media drive of a machine running Windows.
4. Select to install the following (Internet connection is required):
Deployment tools
Windows Preinstallation Environment.
5. Install Acronis Snap Deploy 4 Management Console.
Creating the bootable media
A bootable media based on WinPE 2.x requires at least 256 MB of memory to work. The
recommended memory size for such media is 512 MB. A bootable media based on WinPE 3.0 or 4.0
requires at least 512 MB of memory to work.
The PE builder supports only 32-bit (x86) WinPE 2.x or 3.0 or 4.0. These WinPE distributions can also
work on 64-bit (x64) hardware.
To create a bootable media based on WinPE 2.x or WinPE 3.0 or WinPE 4.0
1. Start Acronis Snap Deploy 4 Management Console.
2. On the Tools menu, click Create PE image.
3. Do one of the following:
If you do not have a PE image to base the media on, click Create Windows PE 2.x or 3.0
automatically or Create Windows PE 4.0 or 3.0 automatically.
If you want to base the bootable media on a specific PE image, click Use WinPE files located
in the folder I specify, and then specify the folder with the WIM file of the image.
4. In Network settings, specify whether Acronis Snap Deploy 4 Agent will connect to a particular
Acronis Snap Deploy 4 OS Deploy Server.
5. In Autostart, specify whether to start Acronis Snap Deploy 4 Agent automatically after a timeout.
6. Select how you want to create the bootable media.
If you want to create a physical media, select ISO image. The software will create an ISO file
that you can later burn to a DVD or write to a USB drive.
If you want to upload the bootable components to Acronis PXE server, select Acronis PXE
Server.
If you want to create a PE image (a WIM file) to later upload it to the PXE server (p. 65),
select WIM image. You may want to select this setting if you are planning to use
Preinstallation Environment for unattended deployment to specific machines (p. 100). If so,
make sure that you have selected to start the agent automatically (see the previous step).
Tip: The setting WIM image enables you to create a PE image for any future purpose, such as for
adding other tools in addition to Acronis components.
7. Do one of the following:
If you have chosen to create an ISO or a WIM file, specify the full path to the resulting file,
including the file name.
If you have chosen to upload the components to Acronis PXE Server, specify the machine
with the PXE server and provide the user name and password of an administrator on it.
8. [Optional.] Specify the storage controller drivers and/or network adapter drivers that you want
to add to the media. Click Add and specify the path to the necessary .inf file for a corresponding
SCSI, RAID, SATA controller or a network adapter. You will have to repeat this procedure for each
driver you want to be included in the bootable media.
64
Copyright © Acronis International GmbH, 2002-2012.
9. Check your settings in the summary screen, and then click Create.
10. If you have chosen to create an ISO file, burn the file to a DVD by using a third-party tool, or write
the file to a USB drive.
7.2.2.4
Uploading a PE image to Acronis PXE Server
You can upload a WIM file of WinPE 2.x or WinPE 3.0 to Acronis PXE Server. Such file is called a PE
image. We recommend creating the WIM file by using Acronis Snap Deploy 4 PE Builder (p. 63).
To upload a PE image
1.
2.
3.
4.
5.
Start Acronis Snap Deploy 4 Management Console.
Click PXE server. If prompted, specify the machine where Acronis PXE Server is installed.
Click Upload PE image.
Specify the path to the WIM file of WinPE 2.x or 3.0 that you want to upload.
Check your settings in the summary screen, and then click Create.
7.3
Configuring Acronis PXE Server
You can configure Acronis PXE server:
When creating an Acronis bootable media (p. 59) or a WinPE-based bootable media (p. 62).
When creating a bootable media for user-initiated deployment (p. 115).
Alternatively, you can use direct server configuration, as follows.
To perform a direct configuration of the PXE server
1. Start Acronis Snap Deploy 4 Management Console.
2. In the navigation pane, click PXE server.
3. If the PXE server is installed on a different machine, click Connect to the PXE server, and then
specify the name or IP address of that machine. In logon settings, specify the user name and
password of an administrator on that machine.
When connected to the PXE server, you can perform the following operations by clicking the
corresponding buttons on the toolbar:
Upload components: Upload bootable components (p. 58), such as Acronis Snap Deploy 4 Agent,
in the same way as when creating an Acronis bootable media (p. 59). The previously uploaded
components will be deleted from the PXE server before uploading the newly selected ones.
Upload PE image to PXE: Upload the Preinstallation Environment (PE) image (a .wim file) that
was previously created with Acronis Snap Deploy 4 PE builder. For details, see “Uploading a PE
image to Acronis PXE Server” (p. 65).
Remove: Remove a component or PE image from the PXE server.
65
Disable PXE Server: Disable the PXE server. The service does not stop, but no longer responds to
incoming requests.
Copyright © Acronis International GmbH, 2002-2012.
Enable PXE Server: Enable the previously disabled PXE server.
Two bootable components of Acronis Snap Deploy 4 are uploaded to the PXE server.
66
Copyright © Acronis International GmbH, 2002-2012.
8 Creating a master image
To be able to deploy a system, you need to create the desired system configuration and then to save
an image of the system’s hard disk or volume to a network folder, detachable media (such as a USB
drive) or removable media (such as a DVD).
This section describes how to create a master image by using Acronis Snap Deploy 4.
In addition, Acronis Snap Deploy 4 can use any of the following files as a master image:
Backups created with the Acronis True Image, Acronis Backup & Recovery 10, and Acronis Backup
& Recovery 11 product family, including password-protected backups
Virtual Hard Disk (VHD) files
For information about deploying an image, see “Deploying a master image” (p. 79).
8.1
Preparation of the master operating system
In the Acronis environment and Windows Preinstallation Environment (any case except the
command-line mode (p. 133)), Acronis Snap Deploy 4 automatically configures each of the deployed
systems by using the deployment settings you specify.
Alternatively, you can prepare a master operating system by using the Microsoft System Preparation
Tool (Sysprep) before creating the image of the system. Acronis Snap Deploy 4 does not configure
the deployed systems in this case.
The Sysprep tool is designed for corporate system administrators, original equipment manufacturers
(OEMs), and others who need to deploy and automatically configure operating systems on multiple
machines.
After an operating system that was prepared with Sysprep is deployed to machines, Sysprep
configures settings that are normally unique to each machine. In particular, Sysprep does the
following:
Generates a unique security identifier (SID) for the new machines
Initiates Windows mini-setup for Plug and Play devices
Applies the machine name, domain or workgroup membership, and other settings specified in
the Sysprep.inf answer file
You can either download Sysprep from the Microsoft Web site, or extract it from the deploy.cab file,
which is located on the installation disk of Windows NT, Windows 2000, Windows XP, and Windows
Server 2003. In Windows Vista, Windows 2008, and Windows 7, the Sysprep tool is located in the
folder Windows\System32.
Important: If you are planning to use Sysprep, we strongly recommend that you read articles about Sysprep and
disk duplication in the Microsoft Knowledge Base.
8.2
Online vs. offline imaging
You can create the master image in either of these ways:
67
Copyright © Acronis International GmbH, 2002-2012.
In Windows, by using Acronis Snap Deploy 4 Management Agent installed on the master
machine. This type of imaging is called online imaging.
By using a bootable media (either Acronis media or WinPE-based media) with Acronis Snap
Deploy 4 Master Image Creator, or by using the command-line utility in a WinPE-based bootable
media. This type of imaging is called offline imaging.
This section describes imaging with Acronis Snap Deploy 4 Management Agent and Acronis Snap
Deploy 4 Master Image Creator. For information about imaging in the command-line mode, see
“Command-line mode and scripting under WinPE” (p. 133).
8.3
Performing online imaging
Online imaging means that the master system is imaged live (without restarting the machine or
suspending operations). Online imaging can be performed remotely whenever you need. The
disadvantage is that you have to install imaging software that is included in the master image. This is
not always rational.
To perform online imaging
1. Install Acronis Snap Deploy 4 Management Console.
2. Configure the master system.
3. Install Acronis Snap Deploy 4 Management Agent on the master system either locally by using
the setup program, or remotely by using Acronis Snap Deploy 4 Management Console. Once
Acronis Snap Deploy 4 Management Agent is installed, you can image the master system online
(without a restart) at any time.
4. Start the Acronis Snap Deploy 4 Management Console.
5. Connect to the master machine.
6. Click Create image -> Next -> A master image.
Tip: The alternative selection, A bootable media, enables you to create a bootable media (p. 59) for offline
imaging (p. 68).
7. Follow the steps of the Master Image Creator wizard (p. 71).
8.4
Performing offline imaging
Offline imaging means that the master system is stopped and the master machine boots into the
Acronis environment or into Windows Preinstallation Environment.
To perform offline imaging
1. Install Acronis Snap Deploy 4 Management Console.
2. Do one of the following:
Create a bootable media (p. 58) that contains Acronis Snap Deploy 4 Master Image Creator.
OR
Install Acronis PXE Server, connect the console to the PXE server (p. 65), and upload Acronis
Snap Deploy 4 Master Image Creator. Make sure that network booting is enabled on the
master machine (p. 102).
Tip: While creating the bootable media or uploading Acronis Snap Deploy 4 Master Image Creator to the
PXE server, you can configure the image creator to start automatically after a time-out.
3. Configure the master system.
68
Copyright © Acronis International GmbH, 2002-2012.
4. Depending on your choice in step 2, boot the master machine into Acronis Snap Deploy 4 Master
Image Creator from the bootable media or from the PXE server.
The boot menu appears on the master machine.
The boot menu on the master machine
5. In the boot menu, click Acronis Snap Deploy 4 Master Image Creator.
6. The master image creator establishes a network connection to be able to save the image in a
network folder. A dialog box appears asking whether you want to configure the network
connection that will be used by the image creator.
By default, Acronis Snap Deploy 4 Master Image Creator uses DHCP auto configuration. Ignore
the prompt (click Cancel) if there is a DHCP server on the network or the image has to be placed
on a local hard disk or a removable media.
Prompt for configuring the master image creator
The master image creator can be preconfigured to apply the default network settings
automatically after a time-out.
69
Copyright © Acronis International GmbH, 2002-2012.
The manual configuration is needed if automatic configuration is not possible (no DHCP server on
the network) or does not succeed. To configure the network connections manually, click OK in
the prompt window.
Acronis Snap Deploy 4 Master Image Creator configuration: network settings
Set the preferable values and click OK.
70
Copyright © Acronis International GmbH, 2002-2012.
7. When Acronis Snap Deploy 4 Master Image Creator starts, it displays the Master Image Creator
welcome window.
Master Image Creator Wizard: welcome window
8. In this window, click Next, and then follow the steps of the Master Image Creator wizard (p. 71).
8.5
Steps of the Master Image Creator wizard
This section describes the steps of the Master Image Creator wizard in the order that they appear.
Use the Next and Back buttons to go between steps.
8.5.1
Disks or volumes to image
Select the disks or volumes that you want to include in the master image.
You can select any set of disks and volumes. The master boot record (MBR) will be also included in
the image.
Important: An operating system includes a loader: a small program that loads the main part of the operating
system. The loader and the rest of the operating system may reside on different volumes. For example,
Windows 7 and Windows Server 2008 R2 place the loader on a hidden volume called System Reserved. If your
operating system and its loader reside on different volumes, always include both volumes in the image. A
volume with the loader is usually marked as the active volume and is shown with the Act. flag in the list. The
volumes must also be deployed together; otherwise, there is a high risk that the operating system will not start.
71
Copyright © Acronis International GmbH, 2002-2012.
Also, machines with UEFI architecture have a special ESP partition (EFI System partition). If you are deploying a
UEFI machine image to another UEFI machine, you should deploy ESP partition as well. Otherwise, the target
machine will be non-bootable after deployment. When deploying a UEFI machine image to a BIOS machine, it is
not necessary to deploy the ESP partition.
Selecting disks and volumes to image
Limitations
The following volumes cannot be included in the master image:
Dynamic disks
Linux GPT disks on UEFI architecture
8.5.2
Image name and location
Acronis Snap Deploy 4 Master Image Creator can save an image in any of the following locations:
In a network folder
On a DVD+R/RW, DVD-R/RW, CD-R/RW, or recordable Blue-ray Disc (BD-R, BD-RE) that is loaded
in the media drive of the master machine
72
On an internal hard disk of the master machine
On a USB or FireWire (IEEE-1394) storage device (such as a flash drive) that is attached to the
master machine
Copyright © Acronis International GmbH, 2002-2012.
A sizeable image can be split between multiple media automatically.
Select the image location in the device tree. In File name, type the file name of the image. To
generate a file name that is unique in the selected location, click Generate a name for the file.
Note: Acronis bootable media uses NetBIOS networking protocol to resolve Acronis Snap Deploy 4 OS Deploy
Server in a network. NetBIOS protocol uses ANSI characters for host names. So, machines that have non-English
characters in their names cannot be accessed from Acronis bootable media. If the name of the Acronis Snap
Deploy 4 OS Deploy Server machine contains non-English characters, use the machine's IP-address to specify it
in the network.
8.5.3
Options of imaging
You can set up the following options for creating the master image.
Protection
Defines whether to protect the master image with a password. You may want to use this option
to prevent unauthorized deployment.
The preset is: No password
To specify a password, type it in the Enter the password and Confirm the password fields.
Setting up a password does not lead to encrypting the contents of the image.
73
Copyright © Acronis International GmbH, 2002-2012.
Compression
Defines the compression level for the image.
The preset is: Normal
A higher compression level may lead to a smaller size of the image, but creating the image will
take longer. The default Normal level is recommended in most cases.
Selecting the data compression level
Process priority
This option is available only for online imaging (p. 67).
The preset is: Low
Defines the priority of the imaging process.
74
Copyright © Acronis International GmbH, 2002-2012.
The priority of any process running in the operating system determines the amount of CPU usage
and system resources allocated to that process. Decreasing the image creation priority will free
more resources for other programs. Increasing the image creation priority could speed up the
imaging by taking resources from the other running processes. The effect will depend on the
total CPU usage and other factors.
Setting up the process priority
Splitting
Defines how to split a sizable image into two or more files that together make up the original
image.
The preset is: Only when it is required
With this setting, the program will act as follows.
When creating the image on a hard disk
If the selected disk has enough space and its file system allows the estimated file size, the
software will create a single image file.
If the storage disk has enough space, but its file system does not allow the estimated file size,
the image will automatically be split into two or more files. Such might be the case when the
image is placed on FAT16 and FAT32 file systems that have a 4-GB file size limit.
If free space on the disk runs out while creating an image, the operation will stop with an
error.
When creating an image on a CD-R/RW, DVD-R/RW, DVD+R/RW, or recordable Blu-ray Disc (BDR, BD-RE)
Acronis Snap Deploy 4 Master Image Creator will ask you to insert a new disc when the
previous one is full.
75
Copyright © Acronis International GmbH, 2002-2012.
Alternatively, you can click Always, into the files of fixed size and type the desired file size or
select it from the list. The image will then be split into multiple files of the specified size. This
comes in handy when creating an image that you plan to burn to multiple discs later on.
You can enter the file size in bytes (B), kilobytes (KB), megabytes (MB), gigabytes (GB), or
terabytes (TB).
Note: Creating images directly on CD-R/RW, DVD-R/RW, DVD+R/RW, or recordable Blu-ray Discs usually
takes more time than it would on a hard disk.
Error handling
Defines how to handle errors that may occur during imaging.
Ignore bad sectors
The preset is: Disabled
When the option is disabled, the software will display a pop-up window each time it comes
across a bad sector and ask for a user decision as to whether to continue or stop imaging.
Enable silent mode (no prompts during imaging)
The preset is: Disabled
With the silent mode enabled, the software will automatically handle situations requiring
user interaction (except handling bad sectors, which is defined by the Ignore bad sectors
option). If an operation cannot continue without user interaction, it will fail. Details of the
operation, including errors, if any, can be found in the operation log.
In case of error, re-attempt in (minutes)
The preset is: 5
When a recoverable error occurs, the software re-attempts to perform the unsuccessful
operation. You can set the time interval between attempts. The attempts will be stopped as
soon as the operation succeeds.
For example, if the location of the image on the network becomes unavailable or not
reachable, the software will attempt to reach the destination every five minutes. The
attempts will be stopped as soon as the connection is resumed.
Additional settings
Check the image when it is created
The preset is: Disabled
If enabled, the program will check the integrity of the just-created image.
You can perform this check after imaging (p. 78).
8.5.4
Comments and summary
We recommend providing a comment for easy identification of the master image.
After you click Next, the summary of the imaging procedure appears. Check the settings and then
click Proceed.
76
Copyright © Acronis International GmbH, 2002-2012.
The imaging operation starts and its progress is displayed.
Acronis Snap Deploy 4 is taking the master image
77
Copyright © Acronis International GmbH, 2002-2012.
9 Validating a master image
You can ensure that the master image is not damaged by validating it.
To validate a master image
1. Start Acronis Snap Deploy 4 Management Console.
2. Connect the management console to a machine where Acronis Snap Deploy 4 Management
Agent is installed.
3. On the Action menu, click Validate image.
4. Select the master image that you want to validate.
5. Click Validate in the summary window.
The validation operation starts. You can stop the operation if need be, by clicking Cancel.
After the validation is complete, the software shows the result.
78
Copyright © Acronis International GmbH, 2002-2012.
10 Deploying a master image
This section describes how to deploy a master image to one or more machines.
Caution: Deployment to a machine involves deleting some or all data that is currently stored on that machine.
Make sure that you are performing deployment to the correct machines and to the correct disks on those
machines.
10.1 Files supported as master images
Acronis Snap Deploy 4 can perform deployment from any of the following files:
A master image created by Acronis Snap Deploy 4 or by an earlier version of the software
A Virtual Hard Disk (VHD) file
A disk-level backup created by the Acronis True Image, Acronis Backup & Recovery 10, or Acronis
Backup & Recovery 11 product family
Support for Acronis True Image, Acronis Backup & Recovery 10, and Acronis Backup
& Recovery 11 backups
These Acronis products save the disks and volumes of a machine to a file called a backup.
Similarly to master images, backups are stored as .tib files. You can specify such file as you would the
master image.
Some backups (known as incremental and differential backups) depend on other backups. To ensure
that Acronis Snap Deploy 4 finds all of the backups it needs, we recommend leaving the backup in the
location where it was created by your Acronis product.
If the backup is split into two or more parts, make sure that all these parts are in the same folder. To
specify such a backup, specify any one of these parts.
The backup can contain disks of various types, but only basic disks are available for deployment.
Support for VHD files
These files store disks and volumes of a machine. Such a file can be created by the following
programs:
Microsoft Virtual PC 2007 SP 1.0, Windows Virtual PC, and Microsoft Virtual Server
Windows Backup (in Windows 7)
Acronis True Image Home 2010 and later
You can perform deployment from a VHD file that contains both basic and dynamic volumes.
However, any dynamic volumes, such as simple or spanned volumes, will be deployed as basic
volumes.
Important: If you created the VHD file by using the Windows Backup program, we recommend leaving such a
file in its original location. If you must move the VHD file to a new location, make sure to move the entire folder
containing this file, including subfolders and supplementary files such as .xml files. Otherwise, the deployment
operation may fail.
79
Copyright © Acronis International GmbH, 2002-2012.
If the VHD file is split into two or more parts, make sure that all these parts are in the same folder. To
specify the VHD file, select any one of these parts.
10.2 Licenses for deployment
Acronis Snap Deploy 4 OS Deploy Server performs deployment to a machine by using an available
machine license or deployment license (p. 16). Once used by one machine, the license cannot be
reused by another machine.
A machine license becomes used when the first deployment to the machine starts. The license
remains used regardless of the result of deployment.
Normally, a deployment license becomes used if the deployment has been successful. If the
deployment has failed, Acronis Snap Deploy 4 OS Deploy Server can use the license for another
deployment to the same machine or to a different machine.
In some cases, a deployment license becomes used even if the deployment has failed. Acronis Snap
Deploy 4 OS Deploy Server will use the license for the next deployment to the same machine.
10.3 Deployment templates
A deployment template is a set of configuration parameters of the deployment operation. These
parameters include:
A path to the master image.
The operation mode (multicast or unicast, how to handle the target disk free space, and so on).
Settings to be applied to the deployed systems (for example, machine names and user accounts).
Operations to be performed on the deployed systems (transfer files, run applications, shut down,
restart).
All deployment templates are saved on Acronis Snap Deploy 4 OS Deploy Server. You can use a saved
template in the future.
When setting up a deployment operation (deployment task), you must specify a deployment
template. You can simply select a saved template and set up the condition for starting deployment.
Alternatively, you can create a new template.
Templates also enable user-initiated deployment (p. 113). In this mode, users can perform one-click
deployment to their machines without the administrator’s assistance. To set up this mode, the
administrator must create one or more deployment templates.
To view or edit the list of saved templates, open the Templates window (p. 99).
10.3.1 Creating a deployment template
You can create a deployment template when you create a deployment task or set up user-initiated
deployment (p. 115).
Alternatively, you can create a deployment template in the Templates window (p. 99).
This section describes how to use the Create Deployment Template Wizard.
80
Copyright © Acronis International GmbH, 2002-2012.
10.3.1.1
Master image selection
In this step, specify the following:
The master image
The user name and password for the network folder if the image is on the network. The best
practice is to map the network folder as a local drive (on the desktop, right-click Computer or My
Computer, and then click Map Network Drive)
In addition to images created by Acronis Snap Deploy 4, you can perform deployment from disk-level
backups created by Acronis True Image, Acronis Backup & Recovery 10, Acronis Backup & Recovery
11, and from Virtual Hard Disk (VHD) files. For details, see “Files supported as master images”.
Image location
Acronis Snap Deploy 4 OS Deploy Server can deploy an image located:
In a network folder.
On DVD+R/RW, DVD-R/RW, CD-R/RW, or recordable Blu-ray Discs (BD-R, BD-RE) loaded in the
media drive of the deployment server.
On the internal hard disk of the deployment server.
On a USB or FireWire (IEEE-1394) storage device (such as a flash drive) attached to the
deployment server.
The best practice is keeping images on the deployment server’s hard disk. This minimizes network
traffic during deployment.
The image created on removable media has to fit into one media disk. To deploy an image spread
over several CDs, DVDs or other media, copy all parts of the image to the same folder on the
deployment server or to a network folder.
Acronis Snap Deploy 4 Standalone Utility can deploy images located:
In a network folder.
On DVD+R/RW, DVD-R/RW, CD-R/RW, or recordable Blu-ray Discs (BD-R, BD-RE) loaded in the
managed machine’s media drive.
81
On a USB or FireWire (IEEE-1394) storage device (such as a flash drive) attached to the managed
machine.
Copyright © Acronis International GmbH, 2002-2012.
The image created on removable media has to fit into one media disc. To deploy an image spread
over several CDs, DVDs or other media, copy all parts of the image to the same folder on an external
drive or to a network folder.
Selecting a master image
82
Copyright © Acronis International GmbH, 2002-2012.
10.3.1.2
Disk and volume selection
If the image contains more than one disk, specify the disk that you want to deploy, and then click
Next. You can select only one disk.
Selecting a disk from the master image
83
Copyright © Acronis International GmbH, 2002-2012.
If the disk you selected contains more than one volume, specify the volumes that you want to
deploy. You can select one or more volumes.
Selecting disk volumes to deploy
The further steps will depend on how many volumes you select.
If you deploy only one volume, it is assumed that the target disk has volumes, so you can select
the target volume, to deploy over it. Other volumes will remain untouched in this case.
Alternatively, you can choose to delete all volumes that currently exist on the target disk.
Deploying more than one volume will delete all volumes on the target disk. Only the newly
deployed volumes will exist on the disk after deployment.
The master boot record (MBR) is always deployed from the image regardless of your choice.
Important: An operating system includes a loader: a small program that loads the main part of the operating
system. The loader and the rest of the operating system may reside on different volumes. For example,
Windows 7 and Windows Server 2008 R2 place the loader on a hidden volume called System Reserved. If your
operating system and its loader reside on different volumes, always include both volumes in the image. A
volume with the loader is usually marked as the active volume and is shown with the Act. flag in the list. The
volumes must also be deployed together; otherwise, there is a high risk that the operating system will not start.
10.3.1.3
Deployment settings
In this step, specify the deployment settings.
The default values for these settings are taken from the default settings (p. 98).
84
Copyright © Acronis International GmbH, 2002-2012.
Most settings are related to configuring the operating system of the target machine. Such settings
are unavailable if the volumes you selected do not contain an operating system for which changing
settings is supported (p. 15). You always can specify general settings such as the disk to perform the
deployment to.
These settings can be overridden by individual settings (p. 129) for a machine.
Target disk layout
This setting determines the target disk for deployment, and what space on the target disk will be
available for deploying the master image.
The preset is: Default disk
The selection Default disk means that the image will be deployed to the hard disk whose number in
the BIOS is 1. (Note for advanced users: for such disk, the hexadecimal value known as the physical
drive number is 0x80.)
You can specify a different disk by clicking Disk number in BIOS and then typing or selecting the disk
number.
Selecting the target disk and volume
If you selected a single volume (p. 83) for deployment, specify how to place that volume on the
target disk:
Replace all volumes: All existing volumes on the target disk will be deleted, and the entire disk
space (including the currently unallocated space) will be available for the volume you are
deploying.
Replace volume: Only the volume with the selected number will be deleted. If the target disk
contains only one volume, the entire disk space (including the currently unallocated space) will
85
Copyright © Acronis International GmbH, 2002-2012.
be available for the volume you are deploying. Otherwise, only the space that was occupied by
the selected volume will be available for the volume you are deploying; currently unallocated
space will remain unallocated.
Note: The active volume of the target disk will remain active. Even if you deploy an active volume side by
side with an already present active volume, the newly deployed volume will not become active. Therefore,
you need to deploy an active volume to an active volume if you want to boot from the deployed volume.
Tip: To deploy a single volume to unallocated space or bare metal, first create a target volume of a desired
size by using a third-party partitioning tool, such as Microsoft Disk Management or Acronis Disk Director.
In either case, the size of the deployed volume will depend on the setting in Disk space utilization (p.
86).
The When deploying a single volume setting is not effective when you deploy multiple volumes. In
this case, all existing volumes on the target disk are always deleted, and the entire disk space is
available for the volumes.
Converting target disk to GPT
If you are deploying MBR disk or volume, specify if target disk should be converted to GPT when
image is being deployed to machines with hard disk larger than 2TB.
The preset is: Convert disk to GPT if target disk is larger than 2TB
Convert disk to GPT if target disk is larger than 2TB: MBR disks have size limitation of 2TB – if
image of MBR disk will be deployed to target disk that is larger than 2TB, only first 2TB of disk
capacity would be used. To get around this issue, Acronis Snap Deploy will automatically convert
disk to GPT layout. However, in order to boot from GPT volume target machine must support
UEFI architecture. If target machine does not support UEFI, uncheck this option to deploy the
disk as MBR.
Convert disk to GPT if target disk is larger than 2TB option is available only when deploying MBR
disk\volume with convertible OS. The following Microsoft Windows operating systems are
convertible, that is, allow changing the boot mode from BIOS to UEFI and back:
Windows Vista SP1 x64 and later.
Windows Server 2008 x64 SP1 and later.
Windows 7 x64.
Windows Server 2008 R2 x64.
For volumes with other operating systems (and volumes without operating system at all) Convert
disk to GPT if target disk is larger than 2TB option is not available, because Acronis Snap Deploy does
not convert such volumes to GPT.
Disk space utilization
This setting determines whether to change the size of the volumes you are deploying according to
the available space on the target disk. The available space depends on the size of the target disk and
on whether you selected to replace all volumes or only a particular volume (see the Target disk
layout (p. 85) setting).
The preset is: Resize volumes to fit target disk
The settings are the following:
86
Copyright © Acronis International GmbH, 2002-2012.
Resize volumes to fit target disk: The software will proportionally extend or reduce each of the
deployed volumes according to the available space on the target disk.
The following examples assume that you have a 300-GB target disk that already contains two
volumes: the first volume is 50 GB in size, and the second volume is 250 GB in size.
Example 1. You are deploying a single 100-GB volume. In Target disk layout, you selected to
replace all volumes on the target disk. In this case, the size of the deployed volume will be
300 GB.
Example 2. You are deploying a single 100-GB volume. In Target disk layout, you selected to
replace the second (250-GB) volume on the target disk. In this case, the size of the deployed
volume will be 250 GB. The first volume on the target disk will remain intact.
Example 3. You are deploying two 50-GB volumes. Because you are deploying more than one
volume, all volumes on the target disk will be deleted; see “Target disk layout” (p. 85). Each
of the deployed volumes will be 150 GB in size.
Example 4. You are deploying a 10-GB volume and a 20-GB volume. All volumes on the target
disk will be deleted. The deployed volumes will be 100 GB and 200 GB in size, respectively.
Example 5. You are deploying a 1000-GB volume and a 2000-GB volume, both of which
contain little data. All volumes on the target disk will be deleted. The deployed volumes will
be 100 GB and 200 GB in size, respectively. If either volume contains too much data to be
reduced to the respective size, the deployment will fail.
As in the master image: Each deployed volume will have the same size as in the master image.
Any excess available space on the target disk will become unallocated. If the target disk does not
contain enough available space for placing the volumes, the deployment will fail.
Settings preference
The Settings preference setting determines whether individual deployment settings of a machine (p.
129) can override the deployment settings in the template.
When the Settings preference setting is enabled and you set up an individual setting for a machine,
deployment to that machine will be performed with the individual setting, ignoring the
corresponding setting in the template.
When the Settings preference setting is disabled, deployment to all machines will be performed with
the settings in the template, ignoring any individual settings.
Machine name and membership
This setting determines the machine names, also known as NetBIOS names, of the target machines; it
also determines the name of the workgroup or the Active Directory domain to which the target
machines will be added after the deployment.
87
Copyright © Acronis International GmbH, 2002-2012.
The preset is: The same name and membership as those of the machine in the master image
By default, all deployed machines will have the same name as the machine in the master image.
Alternatively, you can specify a name pattern for the machines.
Specify whether the machine will be a member of a workgroup or an Active Directory domain. If you
have selected the domain membership, specify the user name and password of a domain
administrator.
Name patterns
A name pattern determines the names that the target machines will have after the deployment.
To specify a single name for all target machines, type that name in Machine name pattern. For
example, type: DeployedMachine
To generate different names for the target machines, include either of the following wildcards or
their combination.
{start}
Generates consecutive numbers starting with start. Each machine name will have its unique
number.
For example, the pattern {1} generates the names 1, 2, 3, and so on up to the number of target
machines. Similarly, the pattern {5} generates the names 5, 6, 7, and so on.
It makes sense to use only one such wildcard in the pattern.
88
Copyright © Acronis International GmbH, 2002-2012.
{start,count}
Generates count consecutive numbers starting with start.
For example, the pattern {1,5} generates the names 1, 2, 3, 4, and 5. Similarly, the pattern {8,5}
generates the names 8, 9, 10, 11, and 12.
Make sure that the value of count is big enough. If the number of target machines exceeds count,
deployment to the remaining machines will fail.
You can use two or more of these wildcards. See examples later in this section.
In the wildcards, the value of start must be 0 or greater. The value of count must be 1 or greater.
You can use the wildcards alone or accompany them with text, as in the following examples.
Examples
Machine{1}
This pattern generates the names Machine1, Machine2, …, MachineN, where N is the number of
target machines.
Name{1,3}
This pattern generates the names Name1, Name2, and Name3.
{1,3}{1,4}
This pattern generates the names 11, 12, 13, 14; 21, 22, 23, 24; 31, 32, 33, and 34
{1,9}{0,10}
This pattern generates 90 names: 10, 11, 12, …, 19; 20, 21, 22, …, 29; …; 90, 91, 92, …, 99
Machine{2,3}{5,4}
This pattern generates the names Machine25, Machine26, Machine27, Machine28, Machine35,
Machine36, Machine37, Machine38, Machine45, Machine46, Machine47, Machine48
Name{0}{0,10}
This pattern generates the names Name00, Name01, …, Name09, Name10, Name11, Name12,
…, Name100, Name101, and so on. Each machine will have a unique name.
Considerations when using name patterns
Patterns are most effective when you need to easily create different names for the target machines,
no matter which machine gets which name. If you need to specify a particular name for a particular
machine, you may want to use an individual deployment setting (p. 129) for that machine instead.
There is no order in which the names from the pattern are assigned to the machines. The same
machine may be assigned a different name the next time you perform deployment.
TCP/IP properties
This setting determines the network settings for the target machines, such as the Internet Protocol
(IP) addresses.
The preset is: The network settings of the master system
You have the options to:
89
Use the network settings of the master system.
Copyright © Acronis International GmbH, 2002-2012.
Set up the target machines to obtain IP addresses automatically from a DHCP server.
Specify a range of static IP addresses, a subnet mask, and a default gateway for the target
machines. You may want to use this option if your network does not have the DHCP capability.
Each machine will be assigned an IP address from the range. Make sure that the range is big
enough. If there are more target machines than IP addresses in the range, deployment to the
remaining machines will fail.
TCP/IP properties
If you have not selected to preserve the network settings of the master system settings, you can
specify the DNS server. You can specify the IP address of the DNS server, such as 192.168.0.1; or the
network name of the DNS server in Host name and Domain name, such as dns and example.com
respectively if your DNS server is dns.example.com.
You will be able to change the network settings later when you start the operating system on the
deployed machine.
User accounts
This setting determines the local user accounts that will be created on the target machines in
addition to the accounts that exist in the master system.
Each user account can be added to the Administrators, Power Users, or Users group. Here you have
an opportunity to add a unified administrator’s account to all the systems, if needed. The Remove
and Remove all buttons are provided to remove the accounts you specified.
The password complexity has to meet the password policy set for the master machine. To view or
edit the password policy on the master machine:
90
Copyright © Acronis International GmbH, 2002-2012.
1. Click Start -> Control Panel -> Administrative Tools -> Local Security Policy.
2. Under Account Policies, click Password Policy.
Security identifiers
This setting determines whether Acronis Snap Deploy 4 will generate unique security identifiers
(SIDs) for the target machines.
The preset is: Generate a unique SID for each target machine
Generating unique SIDs should normally be enabled. We recommend not to change the SID only if
you are deploying the image to the same machine from which the image was created.
You can keep the SID unchanged if there is no machine with the same SID in the same workgroup or
domain. Such is the case when the master machine is no longer on the network.
Note: SID will not be changed if master image contains a server with Domain Controller role enabled: Domain
Controller server stores domain SID which should be the same on all domain machines and therefore is not
supposed to be altered.
Action after deployment
This setting determines what to do with the target machines after the deployment is complete.
The preset is: Shut down
Choose whether to shut down or restart the target machine after the deployment and all associated
operations, such as transferring files (p. 92), are completed.
91
Copyright © Acronis International GmbH, 2002-2012.
Files to transfer
This setting determines the list of files, such as installation files, to be transferred to all target
machines after the deployment.
Each file must be located in a network folder. When adding the file, specify the credentials to the
network folder.
The destination of each file must be on one of the volumes you are deploying.
To run the file after it is transferred, select the Run the file on target machines check box. The file
will run when Windows first starts on the target machine.
Example
You want the target machines to use a particular Plug and Play device driver, such as a video adapter
driver, so that Windows automatically recognizes the device at boot. In this case, do the following:
1. Create a network folder, such as \\server\share, and place the driver files to it. Driver files usually
include an .inf file and a .sys file.
2. Specify both files in the Files to transfer setting, with the following paths in the Destination field:
For the .inf file: C:\Windows\inf
For the .sys file: C:\Windows\System32\drivers
If the operating system in the master image resides on a different volume, change the drive
letter in these paths accordingly.
During the deployment, the files are placed in the corresponding folders. When starting on the target
machine, Windows discovers the new device and finds your driver for it.
Applications to run
This setting determines the applications, such as service applications, that will run on the target
machines after the deployment is complete.
To add an application, click Add, and then specify the path to the application and the parameters the
application will run with.
The application must be located on one of the volumes you are deploying.
The application will run when Windows first starts on the target machine.
Network utilization
This setting determines the data transfer mode for the deployment.
The preset is: Multicast
With the Multicast transfer mode, Acronis Snap Deploy 4 OS Deploy Server sends data to a group of
recipients simultaneously.
When the Switch to unicast if multicast fails during deployment check box is selected, the
deployment server will automatically switch to using the unicast transfer mode if the network
hardware, such as a router, does not allow multicasting or limits the distribution of multicast packets
across the network. Switching to unicast may take up to one minute. After switching to unicast, the
deployment server continues deployment.
92
Copyright © Acronis International GmbH, 2002-2012.
Using the Unicast transfer mode, the server sends a copy of the data to each recipient. This can
significantly reduce the deployment speed.
For example, suppose that you have a bandwidth of 100 MB per second, and you want to deploy a
system to 10 target machines.
With the Unicast mode, the server divides the speed among 10 machines. Therefore, the data
transfer speed will be 10 MB per second for each target machine.
With the Multicast mode, the server sends one copy of data to a multicast address, and each
client will receive data at a speed of 100 MB per second.
Multicast configuration has a parameter that specifies the time to live (TTL) for multicast packets.
Use this parameter to limit multicast packets distribution via gateways.
The default value is 15. In practice, this enables the packets to pass up to 15 hops which may be
treated as an unlimited distance. The minimal value 1 will limit the packets circulation to one subnet.
By setting the permitted bandwidth, you can limit the network usage during deployment. The default
value is 1 gigabit (Gbit) per second.
Adjusting network utilization settings
Acronis Snap Deploy 4 uses Internet Group Management Protocol (IGMP) for multicasting. Therefore,
all network hardware (such as routers or network switches) must be IGMP-capable and correctly
93
Copyright © Acronis International GmbH, 2002-2012.
configured. The specific information on configuring any particular router or network switch is usually
available in the documentation provided with the hardware.
If there is no IGMP-capable hardware (or you cannot configure it correctly) in the network, use the
Unicast data transfer mode.
Licensing
This setting determines which type of license to use for deployment to a target machine and what to
do when no appropriate license is available on the license server.
The preset is:
Use a deployment license of the corresponding type (a server license or a workstation license)
If no such deployment license is found, use a machine license of the same type
Stop deployment otherwise
Specifying licensing settings
Based on your selection, the software will use a deployment license (which enables a single
successful deployment) or a machine license (which enables an unlimited number of deployments to
94
Copyright © Acronis International GmbH, 2002-2012.
a machine). Based on the operating system you are deploying, a workstation license or a server
license will be used.
If no appropriate license is available on the license server, the software can either stop deployment
to the machine, or use an alternative license.
Tip: To force a machine license to be used for a particular machine, you can specify the Licensing setting as an
individual setting (p. 129) for that machine.
When you deploy a workstation operating system (p. 15) and you selected the Use a server license
automatically option, the software will use a server license if no workstation license can be used.
The Licensing setting also applies to the Acronis Universal Deploy licenses independently from the
main licenses. For example, if a workstation license for performing deployment is found, but a
workstation license for applying Acronis Universal Deploy is not, Acronis Snap Deploy 4 may use a
server license for Acronis Universal Deploy, but still use a workstation license for performing
deployment.
Example
Suppose that you are deploying a workstation operating system. Consider the following settings:
During deployment: Use deployment licenses
If there are no deployment licenses: Use a machine license automatically
If the license server is out of workstation licenses: Use a server license automatically
With these settings, the software will use a license based on the following priority:
a)
b)
c)
d)
Deployment workstation license
Machine workstation license
Deployment server license
Machine server license
If you change the second setting from Use a machine license automatically to Stop deployment, the
software will use only deployment licenses. The software will use the following priority:
a) Deployment workstation license
b) Deployment server license
10.3.1.4
Using Acronis Universal Deploy
Specify whether you want to use Acronis Universal Deploy during deployment.
Acronis Universal Deploy is an add-on to Acronis Snap Deploy 4. It requires a separate license.
Skip this section if either of the following is true:
You do not have a license for Acronis Universal Deploy.
You want to deploy an image that does not contain Windows.
To configure this setting:
1. Select whether to use Acronis Universal Deploy.
Acronis Universal Deploy will help you to create a bootable Windows clone on different
hardware by automatically installing the necessary system drivers. Use Acronis Universal Deploy
when deploying Windows to a machine with a dissimilar processor, different motherboard or
95
Copyright © Acronis International GmbH, 2002-2012.
other mass-storage device than in the imaged system. For detailed information, see “What is
Acronis Universal Deploy” (p. 26).
Select whether to use Acronis Universal Deploy
Acronis Universal Deploy uses three sources for drivers:
The Windows default driver storage folder (in the master image being deployed)
The driver repository, which is one or more network folders or removable media
The mass-storage device driver specified by the user
The software will find the most suitable drivers of all available drivers and install them into the
deployed system. However, the driver defined by the user will have the priority. It will be
installed, with appropriate warnings, even if the software finds a better driver.
2. [Optional] Specify the driver repository.
96
Copyright © Acronis International GmbH, 2002-2012.
Specify a driver storage to search for HAL and storage device drivers during the automatic
search-and-install procedure. You can add network locations and enable a search of removable
media for drivers.
Adding a driver storage
3. [Optional] Specify the mass-storage driver.
If the target hardware has a specific mass-storage controller (such as a SCSI, RAID, or Fibre
Channel adapter) for the hard disk, explicitly specify the appropriate driver for that controller.
The driver will be installed in any case, bypassing the automatic driver search-and-install
procedure.
Use this option only if the automatic search-and-install procedure was unsuccessful.
Tip: When deploying the system to a virtual machine that uses SCSI hard drive controller, make sure to
specify SCSI drivers for the virtual environment. For example, VMware requires Buslogic or LSI logic drivers.
Use drivers bundled with your virtualization software or download the latest driver versions from the
software manufacturer’s Web site.
97
Copyright © Acronis International GmbH, 2002-2012.
10.3.1.5
Summary window
Check your settings in the summary window, and then click Save.
The summary window
10.3.2 Configuring default deployment settings
In the Default Deployment Settings window, you can specify the values that will be used by default
when you create a deployment template (p. 80).
To view or change the default deployment settings
1. Start Acronis Snap Deploy 4 Management Console.
2. On the Tools menu, click Configure default settings. If prompted, specify the name or IP address
of the machine where Acronis Snap Deploy 4 OS Deploy Server is installed, and the user name
and password of an administrator on that machine.
Each default setting has a preset value. To reset all default settings to their preset values, click Reset
all.
List of default settings
The following is the list of default deployment settings and their preset values.
Target disk layout (p. 85)
The preset is: Perform deployment to the first hard disk in the BIOS
Disk space utilization (p. 86)
98
Copyright © Acronis International GmbH, 2002-2012.
The preset is: Extend or reduce the volumes being deployed, according to the available space on
the target disk
Machine name and membership (p. 87)
The preset is: The same as of the master system
TCP/IP properties (p. 89)
The preset is: The network settings of the master system
User accounts (p. 90)
The preset is: Create no additional user accounts
Security identifiers (p. 91)
The preset is: Generate a unique security identifier (SID) for each target machine
Action after deployment (p. 91)
The preset is: Shut down the machine after the deployment
Network utilization (p. 92)
The preset is:
Perform deployment by using multicast
Switch to unicast if multicast fails
Licensing (p. 94)
The preset is:
Use a deployment license of the corresponding type (a server license or a workstation
license)
If no such deployment license is found, use a machine license of the same type
Stop deployment otherwise
10.3.3 Managing deployment templates
In the Templates window, you can create, view, edit, and delete the deployment templates that are
saved on Acronis Snap Deploy 4 OS Deploy Server.
To open this window, click Actions -> Manage templates. If prompted, specify the name or IP
address of the machine with the deployment server, and the user name and password of an
administrator on that machine.
To create a deployment template
1. Connect the management console to Acronis Snap Deploy 4 OS Deploy Server.
2. On the Actions menu, click Manage templates.
3. Click Create new, and then follow the steps of the Create Deployment Template Wizard (p. 80).
10.4 Deployment through a deployment task
By using a deployment task, you can perform deployment in either of these ways:
Deployment to a specified list of machines (p. 100). Acronis Snap Deploy 4 will use the Wake-onLAN functionality to wake up the machines that are turned off and thus are not ready for
deployment.
Deployment as soon as a specified number of any machines become ready for deployment (p.
106). You (or users in your organization) will need to make the machines ready.
99
Copyright © Acronis International GmbH, 2002-2012.
A machine becomes ready for deployment after it boots to Acronis Snap Deploy 4 Agent from a
bootable media or a PXE server, and then connects to Acronis Snap Deploy 4 OS Deploy Server.
In addition, you can run any deployment task manually from the Deployment tasks view (p. 131).
A deployment task runs according to a deployment template (p. 80). When creating the task, you can
create a deployment template or specify an existing one.
10.4.1 Prerequisites
Before proceeding with the deployment, make sure that:
You have installed the following components: Acronis Snap Deploy 4 Management Console,
Acronis Snap Deploy 4 License Server, Acronis Snap Deploy 4 OS Deploy Server, and (optionally)
Acronis PXE Server. All these components are already installed if you performed a typical
installation (p. 40).
You imported a sufficient number of licenses (p. 16) to Acronis Snap Deploy 4 License Server.
You created a master image by using either bootable media (offline imaging (p. 68)) or Acronis
Snap Deploy 4 Management Agent (online imaging (p. 68)).
Procedures in this section assume that you have performed these steps.
10.4.2 Deployment to specific machines
Deployment to a specified list of machines can run immediately, manually, or on a schedule.
When the deployment is about to start, the software uses the Wake-on-LAN (WOL) functionality of
the BIOS to wake up (turn on) the machines in the list.
Acronis Snap Deploy 4 wakes up each machine by sending a special packet, called the magic packet,
to all network adapters of the machine.
Machines in another subnet can be woken up through the Acronis Wake-on-LAN Proxy component,
which is delivered with Acronis Snap Deploy 4.
The woken up machines then boot into Acronis Snap Deploy 4 Agent.
You can manually boot machines that do not support Wake-on-LAN, before the task starts. Such
machines will also be deployed, provided that they are listed for deployment.
A best practice for this type of deployment is to use Acronis PXE Server for booting the machines.
Alternatively, you can boot the machines by using a bootable media.
10.4.2.1
Preparation steps
This section describes how to prepare deployment to a specified list of machines.
Getting MAC addresses
Media Access Control address (MAC address) is a 48-bit physical (hardware) address of a network
device. In Windows, the physical address can be obtained by running the command
ipconfig /all or by selecting Local Area Connection -> Status -> Support -> Details (in
Windows 7, you can access this option from the Network and Sharing Center).
100
Copyright © Acronis International GmbH, 2002-2012.
MAC addresses for bare metal are usually supplied by the hardware manufacturer. You can get the
MAC address of any PC-compatible hardware by entering the network configuration menu of any
Acronis bootable component, such as Acronis Snap Deploy 4 Master Image Creator.
An administrator can execute a script that collects the MAC addresses of all machines on the network
and saves the MAC addresses to a text file. This can be a plain text file, such as the following:
00-01-23-45-67-1A
02-01-23-45-67-1B
You can then specify this file when creating the deployment task or in the Machines view when
adding machines (p. 126).
You also will be able to provide each MAC address manually.
Enabling Wake-on-LAN on target machines
Make sure that Wake-on-LAN is enabled on the target machines. Enter the machine BIOS and set
Power -> Wake On PCI PME -> Power On. The exact names might vary depending on the BIOS
version.
To enable the Wake-on-LAN feature on a machine running Windows, set the network adapter (NIC)
properties on the machine as follows:
Select Control Panel -> System -> Device Manager -> Network adapters -> select the network
adapter -> Properties -> Advanced:
Enable PME -> Enabled
Wake On Link Settings -> OS Controlled
Wake On Settings -> Wake On Magic Packet
The exact names of the controls may differ depending on your operating system.
If you cannot or do not wish to use Wake-on-LAN on some or all of the target machines, you will have
to boot them into Acronis Snap Deploy 4 Agent manually (p. 107) before the scheduled time comes.
Installing and configuring the PXE server
For the machines to automatically boot over the network into Acronis Snap Deploy 4 Agent when the
scheduled time comes, do the following:
1. Install Acronis PXE Server. If you performed a typical installation (p. 40), the PXE server is already
installed together with Acronis Snap Deploy 4 OS Deploy Server.
Tip: If all of the target machines are located in one subnet, but Acronis Snap Deploy 4 OS Deploy Server is
installed in a different subnet, we recommend installing a separate PXE server in the target machines’
subnet. For details, see “Deployment in another subnet” (p. 105).
2. Connect the management console to the PXE server.
3. Do one of the following, as described in “Configuring Acronis PXE Server” (p. 65):
Upload Acronis Snap Deploy 4 Agent to the PXE server by clicking Upload components.
Upload a Preinstallation Environment (PE) image to the PXE server by clicking Upload PE
image to PXE. For information about creating a PE image (a WIM file), see “Creating a
bootable media based on WinPE 2.x or 3.0” (p. 63).
When uploading the agent or the PE image:
101
Copyright © Acronis International GmbH, 2002-2012.
Set Start operating system as the default boot menu option.
Set up a reasonable time-out so that the operating system can start automatically. You can
leave the default setting for the time-out.
Without a PXE server, you will need to boot the target machines manually (p. 107) before the
deployment task starts.
Setting up a machine to boot from PXE
For bare metal, it is enough that the machine BIOS configuration supports network booting. This is
because no operating system is present on the hard disk, so the machine will boot from the network
even if the hard disk drive is the first device in the boot sequence.
On a machine that already has an operating system on the hard disk, the BIOS must be configured so
that the network adapter is either the first boot device, or at least precedes the Hard Drive device in
the boot sequence.
The following example shows one of the reasonable BIOS configurations. Unless you insert a
bootable media, the machine will boot from the network.
Example of setting up the BIOS for network booting
In some BIOS versions, you have to save changes to BIOS after enabling the network adapter so that
the network adapter appears in the list of boot devices.
If the hardware has multiple network adapters, make sure that the network adapter supported by
the BIOS has the network cable plugged in.
10.4.2.2
Creating the deployment task
When the deployment is about to start, Acronis Snap Deploy 4 OS Deploy Server wakes up the target
machines in the list you specify.
The target machines turn on, boot into Acronis Snap Deploy 4 Agent from Acronis PXE Server, and
connect to the deployment server. When all (or some, depending on your choice) target machines
connect, the deployment server starts deployment. Deployment is usually performed by
multicasting.
102
Copyright © Acronis International GmbH, 2002-2012.
The following picture illustrates deployment to specific machines within a single subnet. If the target
machines are located in another subnet, you may need to perform additional steps (p. 105) before
creating the deployment task.
Deployment to specific machines within one subnet
To create a deployment task for specific machines
1. Make sure that you have completed the preparation steps (p. 100).
2. Start Acronis Snap Deploy 4 Management Console.
3. In the welcome screen, click Deploy image. If prompted, specify the machine where Acronis Snap
Deploy 4 OS Deploy server is installed.
4. In Deploy to, select The machines listed below.
5. Select Add machines -> From file, and then specify the file with the MAC addresses you created.
You can also specify the MAC addresses manually (select Add machines -> By MAC address) or
select machines that are currently listed in the Machines view (select Add machines -> From
machine list).
6. Tune the PXE server as follows:
a. Select the Use PXE server for booting into agent check box, and then click Specify.
b. Specify the name or the IP address of the machine with the PXE server, and the user name
and password of an administrator on that machine.
Tuning the PXE server ensures that the machines in your list boot into Acronis Snap Deploy 4
Agent when the task starts (even though you selected Start operating system (p. 101) as the
default boot menu option), and boot to the operating system after the task finishes.
Machines that are not in your list are not affected: they boot according to the default boot menu
option.
The PXE server remains tuned until the task finishes. It becomes tuned again the next time the
task starts.
Note when using WinPE: Tuning the PXE server is not effective if you uploaded the bootable components to
the PXE server directly (using the Acronis PXE Server setting) when creating a WinPE-based bootable media
(p. 63). This is because choosing a default boot menu option is not available in this case. You need to create
a PE image first (using the WIM image setting), and then upload the PE image to the PXE server (p. 65).
7. If the machines are located in a different subnet than the deployment server (p. 105), specify the
Wake-on-LAN proxy installed in that subnet, as follows:
a. Expand Show Wake-on-LAN Proxy settings, and then click Specify.
b. Specify the name or the IP address of the machine with Acronis Wake-on-LAN Proxy, and the
user name and password of an administrator on that machine.
8. Click Next.
9. Create a deployment template (p. 80) or select an existing one.
103
Copyright © Acronis International GmbH, 2002-2012.
10. Specify when to run the task (set up the deployment schedule):
Now: The task will run immediately after you create it.
Once later: The task will run once at the specified date and time.
Daily: The task will run at the selected times every day or every few days.
Weekly: The task will run on the selected days every week or every few weeks.
Monthly: The task will run on the selected day every month.
Manually: The task will run only when you start it manually.
If prompted, specify the credentials for running the task.
Important: Make sure that the target machines are turned off or booted into Acronis Snap Deploy 4 Agent
when the scheduled time comes.
With any deployment schedule, you will be able to start the task manually by selecting it in the
Deployment tasks view (p. 131) and clicking Run on the toolbar.
11. Specify a time-out for waiting for all listed machines to become ready, and the action after the
time-out.
In practical situations, some of the listed machines might not connect to the deployment server
at the scheduled time. For example, they may be in use at that time. The task waits for listed
machines to become ready for the time you specified. As soon as all machines are ready, the task
starts deployment.
If not all machines are ready after the time-out, the task can:
Perform deployment to the machines that are currently ready.
Stop without performing deployment to any machine. The task will start at its next scheduled
time and will again begin waiting for the readiness of all machines.
Start condition for deployment
104
Copyright © Acronis International GmbH, 2002-2012.
12. Review the task summary, and then click Create to create and save the task.
The task appears in the Deployment tasks view. When the task is started, the connected machines’
IP addresses and the task progress are displayed in that view.
When the task is finished, its log entries will be available in the log of the deployment server.
10.4.2.3
Deployment in another subnet
Machines in another subnet (behind a network switch or router) can be woken up through the
Acronis Wake-on-LAN Proxy component.
If Acronis Snap Deploy 4 OS Deploy Server is installed in one subnet (Subnet 1) and the target
machines in another subnet (Subnet 2), prepare deployment as follows:
1. Install Acronis Wake-on-LAN Proxy in Subnet 2.
2. Prepare Acronis PXE Server in either of these ways:
Install the PXE server in Subnet 2 and configure that PXE server. This way, only machines in
Subnet 2 can boot to the PXE server.
OR
Install the PXE server in Subnet 1. Enable this PXE server to also work in Subnet 2 by
configuring the network switch to relay the PXE traffic. The PXE server’s IP addresses are
configured on a per-interface basis using IP helper functionality in the same way as DHCP
server
addresses.
For
more
information,
see
http://support.microsoft.com/default.aspx/kb/257579. This way, machines from both
subnets can boot to this PXE server.
Deployment in another subnet by using Acronis Wake-on-LAN Proxy. The network switch is
configured to relay the PXE traffic and DHCP traffic.
3. Create the deployment task (p. 102). When creating the deployment task, specify the Wake-onLAN proxy and specify the PXE server that you prepared in the previous step.
Note: If your router also acts as a Network Address Translation (NAT) device, see also “Deployment behind an
NAT device” (p. 111).
105
Copyright © Acronis International GmbH, 2002-2012.
10.4.3 Deployment to any ready machines
Deployment to any ready machines starts when a specified number of machines becomes ready.
Acronis Snap Deploy 4 OS Deploy Server counts how many machines have connected to it, and starts
deployment when a specified number of machines is reached. Deployment is usually performed by
multicasting.
You can specify a time-out period. After the time-out, deployment will start anyway on the machines
that will be ready at that moment.
This way of deployment decouples configuring the deployment operation from booting the target
machines. You configure the deployment first, no matter whether the target machines are ready or
not, and then boot the machines. The operation will start as soon as the target machines are ready or
(optionally) on a time-out.
To create a deployment task for any ready machines
1. Do one of the following:
Create a bootable media (p. 58) with Acronis Snap Deploy 4 Agent.
OR
2.
3.
4.
5.
Connect the management console to Acronis PXE server and upload Acronis Snap Deploy 4
Agent (p. 65).
Start Acronis Snap Deploy 4 Management Console.
In the welcome screen, click Deploy image. If prompted, specify the machine where Acronis Snap
Deploy 4 OS Deploy server is installed.
In Deploy the image to, select Any machines ready for deployment.
Select the condition that triggers the deployment:
106
Specify the number of machines that you need to deploy; for example, 70 machines.
Choose whether you want the deployment to start anyway after a time-out.
If you do not specify a time-out (clear the Deploy anyway after check box), the deployment
server will wait until any 70 machines boot into Acronis Snap Deploy 4 Agent and connect to
the deployment server.
Copyright © Acronis International GmbH, 2002-2012.
If you specify a time-out, the deployment will start either when any 70 machines connect, or
when the time runs out and at least one machine is connected. If no machine is connected,
the task will stop.
Triggering conditions for the deployment
6. Click Next.
7. Create a deployment template (p. 80) or select an existing one.
8. Review the deployment operation summary and click Create to create and save the deployment
task. You can see the task in the Deployment tasks view. The task will be in the Waiting for
machines state until the specified number of machines is connected.
9. Boot the target machines (p. 107) into Acronis Snap Deploy 4 from the bootable media or the
PXE server.
As the target machines connect to the deployment server, they appear in the Machines view with a
state of Ready.
While the deployment server is waiting, you are able to cancel the deployment by selecting the task
and then clicking Stop on the toolbar.
As soon as the triggering condition arises, the available machines become engaged in the
deployment, and their state changes to Running.
10.4.4 Booting the target machines
You need to manually boot the target machines into Acronis Snap Deploy 4 Agent in the following
cases:
107
To perform deployment to any ready machines (p. 106)
Copyright © Acronis International GmbH, 2002-2012.
To perform deployment to the specific machines (p. 100) that do not support the Wake-on-LAN
functionality
You can boot the machines by using a bootable media or Acronis PXE Server.
To boot a target machine
1. Do one of the following:
Create a bootable media (p. 59) with Acronis Snap Deploy 4 Agent.
OR
Connect the management console to Acronis PXE Server and upload Acronis Snap Deploy 4
Agent (p. 65).
Tip: When creating the bootable media or uploading the agent to the PXE server, you can configure the
agent to start automatically after a time-out.
2. Boot the target machine into Acronis Snap Deploy 4 Agent from the bootable media or the PXE
Server.
The boot menu on the target machine’s side
3. Select Acronis Snap Deploy 4 Agent in the boot menu. You can skip this step if you configured the
agent to start automatically.
4. [Optional.] Choose whether you want to configure the agent. The agent configuration includes
the network settings and the address of Acronis Snap Deploy 4 OS Deploy Server. A dialog box
comes up suggesting that you configure the agent.
108
Copyright © Acronis International GmbH, 2002-2012.
To load the agent with the default configuration (recommended in most cases), click Cancel or
wait until the dialog box disappears after the time-out. To configure the agent before loading
(recommended if your network does not have a DHCP server), click OK.
Prompt for configuring the agent on the target machine’s side
With the default configuration, the agent:
Takes the network settings, such as the IP address, from the DHCP server (uses DHCP auto
configuration).
Connects to the Acronis Snap Deploy 4 OS Deploy Server that you specified when creating
the bootable media or uploading the agent. If you did not specify a deployment server, the
agent connects to the first deployment server it finds on the network.
You can load the agent with the default configuration if there is a DHCP server and only one
Acronis Snap Deploy 4 OS Deploy Server on the network.
When configuring the agent, you can set up the following settings:
Network settings for each network adapter of the target machine. This option enables you to
manually specify network configuration if automatic configuration is not possible (for
example, if no DHCP server is present on your network).
The Acronis Snap Deploy 4 OS Deploy Server the agent will connect to. This option enables
you to have multiple deployment servers that perform different functions on the same
network. If you leave this field empty, the software will search for the deployment server
automatically.
Note: Acronis bootable media uses NetBIOS networking protocol to resolve Acronis Snap Deploy 4 OS
Deploy Server in a network. NetBIOS protocol uses ANSI characters for host names. So, machines that have
non-English characters in their names cannot be accessed from Acronis bootable media. If the name of the
Acronis Snap Deploy 4 OS Deploy Server machine contains non-English characters, use the machine's IPaddress to specify it in the network.
Configuring the agent on the target side
Set the preferable values, and then click OK.
109
Copyright © Acronis International GmbH, 2002-2012.
When Acronis Snap Deploy 4 Agent starts and the target machine is ready for deployment, the target
machine displays the following window:
Acronis Snap Deploy 4 Agent: ready for deployment
110
Copyright © Acronis International GmbH, 2002-2012.
10.4.5 Operations with deployment tasks
Once a deployment task is created, it appears in the Deployment tasks view.
List of deployment tasks
To edit a task (for example, to change its schedule), select it and click Edit. Editing is performed in the
same way as creation; but, the previously selected options are already set, so you need to enter only
the changes.
Any task stays on the deployment server until you delete it. To delete a task, select the task and then
click Delete.
To run a task immediately, select the task and then click Run. The task schedule remains unchanged.
You cannot edit or delete a task while it is running.
10.4.6 Deployment behind an NAT device
Successful deployment is not guaranteed if Acronis Snap Deploy 4 OS Deploy Server and the target
machines are separated by a Network Address Translation (NAT) device. A typical router usually acts
as an NAT device.
All machines behind an NAT device normally form a separate subnet and appear to the deployment
server as having the same IP address. This may lead to problems when connecting to components of
Acronis Snap Deploy 4 and when showing the deployment progress for each target machine.
To avoid these problems, we recommend installing Acronis Snap Deploy 4 OS Deploy Server in the
same subnet as the target machines.
If installing the deployment server in that subnet is not possible, configure the NAT device as follows:
1. Set up port forwarding for the NAT device:
111
Copyright © Acronis International GmbH, 2002-2012.
If Acronis Wake-on-LAN Proxy is installed in that subnet, forward the TCP and UDP ports
9876 to the machine with the Wake-on-LAN proxy.
If Acronis PXE Server is installed in that subnet, forward UDP ports 67, 68, and 69 to the
machine with the PXE server.
2. When creating the deployment task, specify the IP address of the NAT device when asked about
the address of the PXE server and/or of the Wake-on-LAN proxy.
Even after you configure the NAT device this way, you might still receive inconsistent information
about the deployment progress for each machine.
10.5 Stand-alone deployment
Stand-alone deployment is deployment to a machine that is isolated from the network or included in
a network without Acronis Snap Deploy 4 infrastructure (to be exact, without Acronis Snap Deploy 4
OS Deploy Server). Stand-alone deployment is performed locally by using the bootable component
called Acronis Snap Deploy 4 Standalone Utility.
The Acronis Universal Deploy (p. 26) option is not available in the stand-alone deployment mode.
To perform a stand-alone deployment
1. Install Acronis Snap Deploy 4 Management Console.
2. Create an Acronis bootable media (p. 59) with Acronis Snap Deploy 4 Master Image Creator and
Acronis Snap Deploy 4 Standalone Utility.
Note: Acronis Snap Deploy 4 Standalone Utility can be placed on a physical media only. This component is
not designed to boot from a PXE server or from a WinPE-based bootable media.
The Acronis stand-alone components to be placed on the bootable media
112
Copyright © Acronis International GmbH, 2002-2012.
3. Configure the master system.
4. Boot the master system into Acronis Snap Deploy 4 Master Image Creator. Create an image of
the master system and save it to a network folder, detachable media, or removable media. You
should not save the image to an internal hard disk of the target machine, because it cannot be
accessed during the stand-alone deployment.
5. Boot the target machine into Acronis Snap Deploy 4 Standalone Utility.
6. If you saved the master image to a media, attach or insert the media.
Acronis Snap Deploy 4 Standalone Utility can deploy an image located:
In a network folder.
On a USB or FireWire (IEEE-1394) storage device (such as a flash drive) attached to the target
machine.
On DVD+R/RW, DVD-R/RW, CD-R/RW, or recordable Blu-ray Discs (BD-R, BD-RE) loaded in
the target machine’s media drive.
The image created on removable media has to fit into one media disk. To deploy an image spread
over several CDs, DVDs or other media, copy all parts of the image to the same folder on an
external drive or to a network folder.
7. Configure the deployment operation as described in “Creating a deployment template” (p. 80).
Note that the template cannot be saved because the stand-alone utility does not access Acronis
Snap Deploy 4 OS Deploy Server.
8. Review the deployment settings, and then start the stand-alone deployment.
10.6 User-initiated deployment (custom deployment)
Acronis Snap Deploy 4 can be configured in such a way that users will be able to deploy and redeploy their machines with one click on the boot menu.
User-initiated deployment is also called custom deployment.
10.6.1 Understanding user-initiated deployment
An administrator creates a set of deployment templates (p. 80) that meet the organization’s needs
and assigns to each template a name that can be easily understood by a user.
The administrator creates an Acronis bootable media with these templates or uploads these
templates to a PXE server. The administrator then switches on the user-initiated deployment mode.
113
Copyright © Acronis International GmbH, 2002-2012.
Users who need to redeploy their machines boot the machines from the bootable media or the PXE
server, and select the template by name from the boot menu. The deployment starts immediately
and proceeds independently on each machine.
User-initiated deployment mode: a user starts deployment.
In software testing labs, the choices can be various operating systems, various editions of the same
operating system, or the same operating system with various settings or applications. In a university
or school lab, the choices can be various exercises that students have to explore, or the initial system
image for the purpose of self-restore.
The custom boot menu. A user can start deployment with any of the two templates or boot into
Windows.
Tip: To find a template in the custom boot menu, press a letter key which corresponds to the first letter of the
template name. The cursor will jump on the first template whose name starts with the pressed letter.
114
Copyright © Acronis International GmbH, 2002-2012.
Important: If the user-initiated deployment uses a PXE server, machines that are deployed through deployment
tasks (p. 99) will not be able to boot from that PXE server. However, deployments to such machines will be
possible if they boot from a bootable media.
The user-initiated deployment mode is primarily intended for continual work without the
administrator’s assistance. Only users (the ones on the target side) will be able to initiate
deployment. However, the administrator can view logs, create new deployment templates, change
the user-initiated deployment configuration (add, edit or remove boot menu items) and perform
other management operations except initiating the custom deployment.
10.6.2 Considerations when using a PXE server
When enabling or configuring the user-initiated deployment mode with Acronis PXE Server, the
software first removes all bootable components (Acronis Snap Deploy 4 Agent, Acronis Snap Deploy
4 Master Image Creator, and the PE image) from the PXE server, because users might be confused by
the unknown items appearing in the boot menu. Then, the software uploads to the PXE server the
templates selected by the administrator. So you will have to upload the bootable utilities again, if
they are needed after switching off the user-initiated deployment mode.
If you need to perform both user-initiated deployment and deployment through a deployment task,
you can use the PXE server for the former and bootable media for the latter.
Alternatively, you can use another Acronis Snap Deploy 4 OS Deploy Server to perform deployment
through deployment tasks, while one Acronis Snap Deploy 4 OS Deploy Server is in the user-initiated
deployment mode. To do so, ensure that the target machines connect to the appropriate
deployment server, by specifying the deployment server when creating the bootable media or by
configuring Acronis Snap Deploy 4 Agent at boot. Two deployment servers cannot use the same
Acronis PXE Server.
10.6.3 Setting up the user-initiated deployment mode
Preparation
1. Install Acronis Snap Deploy 4 Management Console and Acronis Snap Deploy 4 License Server.
Import licenses to the license server. Install Acronis Snap Deploy 4 OS Deploy Server and Acronis
PXE Server. All these components are already installed if you have performed a typical
installation (p. 40).
2. Configure and image the master system (or systems), either from a bootable media with Acronis
Snap Deploy 4 Master Image Creator (p. 68) or by using Acronis Snap Deploy 4 Management
Agent (p. 68).
To set up user-initiated deployment
1. Start Acronis Snap Deploy 4 Management Console.
2. In the welcome screen, click Configure user-initiated deployment. If prompted, specify the
machine where Acronis Snap Deploy 4 OS Deploy server is installed.
Note: If you are planning to use an Acronis PXE Server with user-initiated deployment and there are active
operations that use that PXE server, either cancel those operations or wait until they are completed, before
proceeding. See also “Considerations when using a PXE server” (p. 115).
115
Copyright © Acronis International GmbH, 2002-2012.
3. Create the deployment templates (p. 80) according to your organization’s needs. Assign to each
template a name that can be easily understood by the users. Select one or more templates to be
added to the boot menu.
Adding templates to the boot menu
4. Select how to display the boot menu. For example, you can choose to start a particular
deployment template automatically after a time-out.
5. Select whether you want to create an Acronis bootable media (a removable media or an ISO file
of the media) or to upload the templates to Acronis PXE Server.
116
Having saved the ISO file, you can create as many media copies as the users need by using
third-party CD/DVD burning software. When creating a bootable media for user-initiated
deployment, you can specify network settings, such as the name of the deployment server, in
the same way as when creating any other bootable media. For details, see “Creating an
Acronis bootable media” (p. 59).
The templates being uploaded to the PXE server can be protected with a password to
prevent the templates from unauthorized execution. A password prompt will come up when
the user selects a template in the boot menu. No password will be required to start the
operating system.
Copyright © Acronis International GmbH, 2002-2012.
6. Review the operation summary and then click Switch on to proceed. The software creates the
media with the custom boot menu. Acronis Snap Deploy 4 OS Deploy Server switches to the userinitiated deployment mode.
Acronis Snap Deploy 4 OS Deploy Server in the user-initiated deployment mode
In the Machines view, the administrator can see the status of the user-initiated deployment for each
machine.
While the deployment server is in the user-initiated deployment mode, the administrator can:
Change parameters (p. 118) of the user-initiated deployment mode.
Switch off (p. 118) the user-initiated deployment mode.
117
Create a new media for the user-initiated deployment mode.
Stop the selected operation, if need be, by right-clicking the corresponding machine in the
Machines view, and then clicking Cancel deployment.
Copyright © Acronis International GmbH, 2002-2012.
The user who requested deployment sees the following screen while the deployment is in progress.
User-initiated deployment in progress: view on the target machine’s side
10.6.4 Changing parameters of the user-initiated deployment mode
To change the templates or the boot menu password used in the user-initiated deployment mode,
you need to reconfigure the user-initiated deployment mode.
1. If some user-initiated deployment operations are active, either stop the operations or wait until
the operations are completed.
2. In the welcome screen of the management console, click Configure user-initiated deployment,
and then repeat the procedure described in “Setting up the user-initiated deployment mode” (p.
115). The earlier selected options will be set, so you have to enter only the changes.
10.6.5 Switching off the user-initiated deployment mode
To switch off the user-initiated deployment mode
1. If some user-initiated deployment operations are active, either stop the operations or wait until
the operations are completed.
2. In the welcome screen of the management console, in the User-initiated deployment mode
area, click Switch off.
3. If the user-initiated deployment mode uses Acronis PXE Server, the software needs to remove
the custom deployment templates from the server. If prompted, specify the credentials for the
PXE server (the user name and password of an administrator on the machine with the PXE
server).
118
Copyright © Acronis International GmbH, 2002-2012.
10.7 BIOS-based systems to UEFI-based and vice versa
Acronis Snap Deploy 4 supports transferring Windows operating systems between BIOS-based
hardware and the hardware that supports Unified Extensible Firmware Interface (UEFI).
Important: When migrating systems to UEFI-based hardware, use Linux-based bootable media. PE-based
bootable media and Acronis PXE Server do not support UEFI.
10.7.1 Deploying volumes
Let's assume you have created a master image of the system and boot volumes (or the entire
machine), and want to deploy these volumes to a different platform. The ability of the recovered
system to boot up depends on the following factors:
Source operating system: convertible or non-convertible OS. The following Microsoft Windows
operating systems are convertible, that is, allow changing the boot mode from BIOS to UEFI and
back:
Windows Vista SP1 x64 and later.
Windows Server 2008 x64 SP1 and later.
Windows 7 x64.
Windows Server 2008 R2 x64.
Windows 8 x64
All other operating systems are non-convertible.
Source and target disk partition style: MBR or GPT. System and boot volumes of BIOS platforms
use MBR disks. System and boot volumes of UEFI platforms use GPT disks.
When selecting a not initialized target disk for recovery, this disk will be automatically initialized
either to GPT or to MBR depending on the original disk partitioning style, the current boot mode
(UEFI or BIOS) and the type of operating systems (convertible or non-convertible) that are located on
this volume. If the initialization may result in bootability loss, the software takes the partitioning style
from the source volume ignoring the target disk size. In such cases the software can select the MBR
partitioning style for disks whose size is more than 2 TB; however, a user cannot use the space
beyond 2 TB.
If required, you can initialize the target disk manually by using the Disk management functionality.
The following table summarizes whether it is possible to retain the system bootability when
recovering boot and system volumes of a BIOS-based system to UEFI-based and back.
The plus (+) sign on a green background means that the system will be bootable. No user action
is required.
The plus (+) sign on a yellow background means you need to perform additional steps to make
the system bootable.
The minus (-) sign on a red background means the system will not be able to boot due to BIOS
and UEFI platform limitations.
Original system Target hardware
119
BIOS
BIOS
UEFI
UEFI
Disk: MBR
Disk: GPT
Disk: MBR
Disk: GPT
Copyright © Acronis International GmbH, 2002-2012.
BIOS
-
+
+
Additional steps
OS: convertible
The convertible OS
will
be
Solution
1. Before recovery,
automatically
turn off the UEFI
Recover
the
converted
to
mode in BIOS
operating system to
support
UEFI
an MBR disk.
booting.
2. Perform the recovery under the
bootable media.
Solution
BIOS
OS:
non+
convertible
or
Recover
the
operating system
to an MBR disk.
After recovery, turn
off the UEFI mode in
BIOS. Otherwise, the
operating
system
cannot be booted.
UEFI
OS: +
convertible
The convertible OS will
be
automatically
converted to support
UEFI booting.
UEFI OS: non- convertible
Solution
Recover the operating
system to a GPT disk.
+
-
Additional steps
Solution
1. Before recovery, Recover
the
turn off the UEFI operating system to
mode in BIOS
a GPT disk.
2. Perform the
recovery under the
bootable media.
+
or
After recovery, turn
off the UEFI mode in
BIOS. Otherwise, the
operating
system
cannot be booted.
10.7.2 Deploying disks
Let's assume you have taken a master image of a whole disk (with all its volumes) and want to deploy
this disk to a different target platform.
The ability of the deployed system to boot up in different modes depends on the operating systems
installed on the source disk. Operating systems can be convertible i.e. allow changing the boot mode
from BIOS to UEFI and back, or be non-convertible. For the list of convertible operating systems, see
Deploying volumes (p. 119).
120
Copyright © Acronis International GmbH, 2002-2012.
When a source disk contains one or more operating systems and all of them are convertible, the
boot mode can be automatically changed. Depending on the current boot mode, the target disk
may be initialized either to GPT or to MBR partitioning style.
If at least one operating system on a source disk is non-convertible (or the source disk contains
any boot volumes of the non-convertible OSes), the boot mode cannot be changed automatically
and the software will initialize the target disk as the source one. To boot up the target machine,
you have to turn on/off the UEFI mode in BIOS manually. Otherwise, the system will not boot
after recovery.
The following table summarizes all cases of recovering disks of a BIOS-based system to UEFI-based
and vice versa.
The plus (+) sign on a green background means that the source disk will be recovered without
any limitations.
The plus (+) sign on a yellow background means that the source disk will be recovered with some
limitations. To overcome such limitations, you might need to perform some additional steps.
The plus/minus (+/-) signs on a red background means the disk will be recovered, but some
issues might occur.
Original
Target hardware
system
Platform: BIOS
Target disk <2 TB
BIOS
+
Platform: BIOS Target Platform:
UEFI Platform:
UEFI
disk >2 TB
Target disk >2 TB
Target disk <2 TB
-
+
+
OS: convertible
The source disk will be The target disk will The target disk will The target disk will
recovered
without be initialized as GPT. be initialized as be initialized as
any modification.
MBR.
GPT. The recovered
disk
Recovered OS will be
converted to use Additional steps
UEFI for booting.
OS
will
be
Turn off the UEFI
automatically
mode in BIOS after
converted
to
recovery*
support
UEFI
booting.
Possible issue
If target machine
does not support
BIOS, the system
will not boot after
recovery.
BIOS
OS:
nonconvertible
121
+
+/-
+/-
+/-
The source disk will be The target disk will The target disk will The target disk will
recovered
without be initialized as MBR. be initialized as the be initialized as the
any modification.
source one (MBR). source one (MBR).
Copyright © Acronis International GmbH, 2002-2012.
Limitation: only 2 TB
of the disk space will
Additional steps
be available for use.
Turn off the UEFI
mode in BIOS after
recovery*
Possible issue
Limitation: only 2
TB of the disk space
will be available for
use.
Additional steps
Turn off the UEFI
If target machine
mode in BIOS after
does not support
recovery*
BIOS, the system
will not boot after
recovery.
Possible issue
If target machine
does not support
BIOS, the system
will not boot after
recovery.
UEFI
OS: convertible
The recovered disk OS
will
not
be
automatically
converted to support
BIOS booting.
UEFI OS: non- +/convertible
-
+
+
The recovered disk
OS will not be
automatically
converted to support
BIOS booting.
The source disk will
be
recovered
without
any
modification.
The source disk will
be
recovered
without
any
modification.
+/-
+
+
The target disk will be The target disk will The source disk will
initialized
as
the be initialized as the be
recovered
source one (GPT).
source one (GPT).
without
any
modification.
Possible issue
Possible issue
If target machine does
not support UEFI, the
system will not boot
after recovery.
If target machine
does not support
UEFI, the system will
not
boot
after
recovery.
The source disk will
be
recovered
without
any
modification.
* In most of the current motherboards there is a BIOS compatibility mode. So, if the system does not
find any UEFI boot loader it will try to boot system in BIOS mode.
10.8 Bootability troubleshooting
If a system was bootable at the time of taking master image, you expect that it will boot after
deployment. However, the information the operating system stores and uses for booting up may
122
Copyright © Acronis International GmbH, 2002-2012.
become outdated during deployment, especially if you change volume sizes, locations or destination
drives. Acronis Snap Deploy 4 automatically updates Windows loaders after deployment. Other
loaders might also be fixed, but there are cases when you have to re-activate the loaders.
Specifically, when you deploy Linux volumes, it is sometimes necessary to apply fixes or make
booting changes so that Linux can boot and load correctly.
Below is a summary of typical situations that require additional user actions.
Why a deployed operating system may be unbootable
The machine BIOS is configured to boot from another HDD.
Solution: Configure the BIOS to boot from the HDD where the operating system resides.
The system was deployed to dissimilar hardware and the new hardware is incompatible with
the most critical drivers included in the backup
Solution: Use Acronis Universal Deploy option in deployment template (p. 80) to install the
appropriate drivers and modules.
The system uses Acronis OS Selector
Because the Master Boot Record (MBR) can be changed during the system deployment, Acronis
OS Selector, which uses the MBR, might become inoperable. If this happens, reactivate Acronis
OS Selector as follows.
Solution: Boot the machine from the Acronis Disk Director's bootable media and select in the
menu Tools -> Activate OS Selector.
The system uses GRand Unified Bootloader (GRUB) and was recovered from a normal (not
from a raw, that is, sector-by-sector) master image
One part of the GRUB loader resides either in the first several sectors of the disk or in the first
several sectors of the volume. The rest is on the file system of one of the volumes. System
bootability can be recovered automatically only when the GRUB resides in the first several
sectors of the disk and on the file system to which direct access is possible. In other cases, the
user has to manually reactivate the boot loader.
Solution: Reactivate the boot loader. You might also need to fix the configuration file.
The system uses Linux Loader (LILO) and was recovered from a normal (not from a raw, that is,
sector-by-sector) master image
LILO contains numerous references to absolute sector numbers and so cannot be repaired
automatically except for the case when all data is deployed to the sectors that have the same
absolute numbers as on the source disk.
Solution: Reactivate the boot loader. You might also need to fix the loader configuration file for
the reason described in the previous item.
The system loader points to the wrong volume
This may happen when system or boot volumes are not recovered to their original location.
Solution: Modification of the boot.ini or the boot\bcd files fixes this for Windows loaders.
Acronis Snap Deploy 4 does this automatically and so you are not likely to experience the
problem. For the GRUB and LILO loaders, you will need to correct the GRUB configuration files. If
the number of the Linux root partition has changed, it is also recommended that you change
/etc/fstab so that the SWAP volume can be accessed correctly.
Linux was deployed from an LVM volume master image to a basic MBR disk
Such system cannot boot because its kernel tries to mount the root file system at the LVM
volume.
123
Copyright © Acronis International GmbH, 2002-2012.
Solution: Change the loader configuration and /etc/fstab so that the LVM is not used and
reactivate the boot loader.
10.8.1 How to reactivate GRUB and change its configuration
Generally, you should refer to the boot loader manual pages for the appropriate procedure. There is
also the corresponding Knowledge Base article on the Acronis Web site. The following is an example
of how to reactivate GRUB in case the system disk (volume) is deployed to identical hardware.
1. Start Linux or boot from the bootable media, press F11 in Acronis boot menu, remove word
“quiet” and press OK. That will boot Acronis media in command line mode.
2. Mount the system you are deploying:
mkdir /mnt/system/ mount -t ext3 /dev/sda2 /mnt/system/ # root partition mount
-t ext3 /dev/sda1 /mnt/system/boot/ # boot partition
3. Mount the proc and dev file systems to the system you are deploying:
mount -t proc none /mnt/system/proc/ mount -o bind /dev/ /mnt/system/dev/
4. Save a copy of the GRUB menu file, by running one of the following commands:
cp /mnt/system/boot/grub/menu.lst /mnt/system/boot/grub/menu.lst.backup or cp
/mnt/system/boot/grub/grub.conf /mnt/system/boot/grub/grub.conf.backup
5. Edit the /mnt/system/boot/grub/menu.lst file (for Debian, Ubuntu, and SUSE Linux
distributions) or the /mnt/system/boot/grub/grub.conf file (for Fedora and Red Hat Enterprise
Linux distributions)—for example, as follows:
vi /mnt/system/boot/grub/menu.lst
6. In the menu.lst file (respectively grub.conf), find the menu item that corresponds to the system
you are recovering. This menu items have the following form:
title Red Hat Enterprise Linux Server (2.6.24.4) root (hd0,0) kernel /vmlinuz2.6.24.4 ro root=/dev/sda2 rhgb quiet initrd /initrd-2.6.24.4.img
The lines starting with title, root, kernel, and initrd respectively determine:
The title of the menu item.
The device on which the Linux kernel is located—typically, this is the boot partition or the
root partition, such as root (hd0,0) in this example.
The path to the kernel on that device and the root partition—in this example, the path is
/vmlinuz-2.6.24.4 and the root partition is /dev/sda2. You can specify the root partition by
label (such as root=LABEL=/), identifier (in the form root=UUID=some_uuid), or device
name (such as root=/dev/sda2).
The path to the initrd service on that device.
7. Edit the file /mnt/system/etc/fstab to correct the names of any devices that have changed as a
result of the recovery.
8. Start the GRUB shell by running one of the following commands:
chroot /mnt/system/ /sbin/grub or chroot /mnt/system/ /usr/sbin/grub
9. Specify the disk on which GRUB is located—typically, the boot or root partition:
root (hd0,0)
10. Install GRUB. For example, to install GRUB in the master boot record (MBR) of the first disk, run
the following command:
setup (hd0)
11. Exit the GRUB shell:
124
Copyright © Acronis International GmbH, 2002-2012.
quit
12. Unmount the mounted file systems and then reboot:
umount /mnt/system/dev/ umount
umount /mnt/system/ reboot
/mnt/system/proc/
umount
/mnt/system/boot/
13. Reconfigure the bootloader by using tools and documentation from the Linux distribution that
you use. For example, in Debian and Ubuntu, you may need to edit some commented lines in the
/boot/grub/menu.lst file and then run the update-grub script; otherwise, the changes might not
take effect.
10.8.2 How to reactivate LILO
Generally, you should refer to the boot loader manual pages for the appropriate procedure. There is
also the corresponding Knowledge Base article on the Acronis Web site. The following is an example
of how to reactivate LILO in case the system disk (volume) is deployed to identical hardware.
1. Boot from Linux installation CD and enter rescue mode;
2. Mount all partitions and change root from the temporary root to the root partition of the
installed system:
#mkdir /mnt/tmp
#mount /dev/sdXY /mnt/tmp (/dev/sdXY is the root partition)
#chroot /mnt/tmp
3. Run the following command to reactivate LILO:
#/sbin/lilo
4. Reboot.
10.8.3 About Windows loaders
Windows NT/2000/XP/2003
A part of the loader resides in the partition boot sector, the rest is in the files ntldr, boot.ini,
ntdetect.com, ntbootdd.sys. boot.ini is a text file that contains the loader configuration. Example:
[boot
loader]
timeout=30
default=multi(0)disk(0)rdisk(0)partition(1)\WINDOWS
[operating
systems]
multi(0)disk(0)rdisk(0)partition(1)\WINDOWS="Microsoft
Windows XP Professional" /noexecute=optin /fastdetect
Windows Vista/2007
A part of the loader resides in the partition boot sector, the rest is in the files bootmgr, boot\bcd. At
starting Windows, boot\bcd is mounted to the registry key HKLM \BCD00000000.
125
Copyright © Acronis International GmbH, 2002-2012.
11 Managing the list of machines (the Machines
view)
The Machines view shows a list of machines for which you can set up deployment by using Acronis
Snap Deploy 4 OS Deploy Server.
A machine is determined by the MAC address of its network adapter. A MAC address is a set of six
hexadecimal numbers, such as: 01-35-79-BD-F1-23.
The list of machines includes:
The machines that you added to the list. For example, you can add machines by using a file with
MAC addresses.
The machines that have ever connected to the deployment server.
The lower part of the window shows details about the selected machine and enables setting up
individual deployment settings (p. 129) for it.
To open the Machines view
1. Start Acronis Snap Deploy 4 Management Console.
2. Click Machines. If prompted, specify the name or IP address of the machine with Acronis Snap
Deploy 4 OS Deploy Server.
11.1 Adding machines
To add one or more machines to the list, click Add machines on the toolbar.
You can add machines in either of these ways:
By MAC address: Type the MAC address of the machine.
Optionally, provide a label that will be shown in the Machine column.
From file: Specify a text file with the list of MAC addresses, one machine per line. If the machine
has more than one network adapter, separate the MAC addresses for each adapter with a
semicolon (;). No space character is allowed between the MAC addresses.
The hexadecimal numbers in a MAC address can be separated by a colon (:) or a hyphen (-), or
have no separator.
Optionally, provide a label that will be shown in the Machine column. The label must follow the
MAC address (or addresses). The label and the MAC address must be tab separated. In text
editors such as Notepad, you can normally insert a tab character by pressing the TAB key. The
label itself cannot contain a tab character.
The following is a sample file:
00:01:23:45:67:1A
02-01-23-45-67-1B
My machine
010203040506
Machine 2
00-11-22-33-44-55;AA-BB-CC-DD-EE-FF Machine 3
In either case, the label that you provide is unrelated to the network name of the machine. If no label
is provided, the Machine column will contain the MAC address of the machine.
126
Copyright © Acronis International GmbH, 2002-2012.
Tip: Make sure that you specify the MAC address correctly. Any set of six hexadecimal numbers is recognized as
a valid MAC address of a machine, even if a network adapter with that address does not actually exist.
11.2 Groups of machines
Using groups helps you to organize the list of machines.
For example, you can create a separate group for each department in your organization. You can
then perform deployment to some or all machines of a department by selecting them in the
corresponding group.
Each machine can be a member of one or more groups.
To create a group, click Create group on the toolbar, and then type the name of the group.
To add one or more machines to a group, select them in the list, click Add to group on the toolbar,
and then select the group to add the machines to.
A group itself cannot be specified for deployment.
To create a deployment task for all machines that are currently in a group, right-click the group, and
then click Deploy image. Subsequent changes to the group do not affect the list of machines in the
deployment task.
In addition to the groups you create, there is the All machines built-in group. It contains the entire
list of machines.
11.3 Actions on machines
To perform an action on a machine, right-click that machine in the list. Most actions are also
available when you select more than one machine.
The actions are the following:
Deploy image: Starts the Create Deployment Task Wizard (p. 99). By default, the deployment
task is being created for the selected machine (or machines).
Cancel deployment: Cancels the currently running deployment for the selected machine.
Deny deployments: Excludes the selected machines from any deployment through the
deployment server. As a result:
127
Add to group: Adds the selected machines to a group you previously created.
Remove from group: For the selected machines in a group, removes them from that group.
Delete: Removes the selected machines from the list. The machine will reappear in the list the
next time it connects to the deployment server.
Any deployment tasks do not apply to the machine. However, the list of machines in those
tasks is not affected.
User-initiated deployment (p. 113) for the selected machines is not possible.
Stand-alone deployment (p. 112) for the selected machines is possible, because it does not
use the deployment server.
Allow deployments: Undoes the exclusion of the selected machines that was previously done by
the Deny deployments action.
Copyright © Acronis International GmbH, 2002-2012.
Set label: Sets the label that is shown in the Machine column. For example, you can use the
network name of the machine as the label. If no label is provided, the Machine column shows
the MAC address of the machine.
11.4 States and results for machines
The State column shows the current state related to deployment.
The state can be one of the following:
Not ready: The machine is not connected to the deployment server; for example, the machine is
turned off.
For deployment to specific machines (p. 100), the deployment server will wake up the turned-off
machine when the scheduled time comes or when you start the task manually.
For deployment to any ready machines (p. 106), you will have to boot the machine into Acronis
Snap Deploy 4 Agent.
Ready: The machine is booted into Acronis Snap Deploy 4 Agent and is connected to the
deployment server, so the machine is ready for deployment.
In progress (shown as percentage complete): A deployment is currently being performed to the
machine.
Deployments denied: You excluded the machine from deployment (see the Deny deployments
(p. 127) action).
The Last result column shows the result of the last deployment operation on the machine.
The result can be one of the following:
Never deployed: No deployment has yet been performed on the machine since it was added to
the deployment server.
Succeeded: The deployment to the machine finished successfully.
128
Failed: The deployment to the machine failed. For example, no available license for performing
deployment has been found on the license server. If performing the deployment started but did
not finish successfully, the target disk or volume may be empty or contain inconsistent
information.
Canceled: You stopped the deployment task that was performing deployment to the machine
(see the Stop (p. 131) action). The master image was not deployed to the machine. The target
disk or volume may be empty or contain inconsistent information.
Copyright © Acronis International GmbH, 2002-2012.
12 Individual deployment settings
By using individual settings for a machine, you can override one or more deployment settings (p. 84)
of a deployment template.
Example. You created a deployment template to perform deployment to 100 machines. For one of
those machines, however, you need to perform deployment to a different hard disk than the one
prescribed by the template. You override the Target disk layout (p. 85) setting for that machine.
By default, all templates recognize individual settings. You can set up a particular template to ignore
any individual settings (p. 87).
12.1 Enabling, disabling, and resetting individual settings
To enable an individual setting for a machine
1.
2.
3.
4.
5.
In the Machines view, click the machine for which you want to set up individual settings.
On the Individual settings tab, click Configure.
Click the setting that you want to override.
Select the Enable this setting to override the common deployment setting check box.
Specify the individual setting.
To disable an individual setting for a machine
1. In the Machines view, click the machine for which you want to disable an individual setting.
2. On the Individual settings tab, click the setting that you want to disable.
3. Clear the Enable this setting to override the common deployment setting check box.
Tip: The value that you specified for the individual setting is still remembered, so you can easily re-enable
the setting by reselecting the check box.
To reset individual settings for a machine
1. In the Machines view, click the machine for which you want to reset individual settings.
2. On the Individual settings tab, click Reset.
As a result, all individual settings are disabled, and all values are returned to the preset settings.
The preset settings are the same as for the default deployment settings (p. 98).
12.2 List of individual settings
The following are the individual settings that you can specify. The description of these settings is
similar to that of the common deployment settings (p. 84), with the differences described in this
section.
Target disk layout (p. 85)
TCP/IP properties (p. 89)
129
Disk space utilization (p. 86)
Machine name and membership (p. 87)
Specify the machine name in Machine name. Because this is an individual name, use of name
patterns is not available.
Copyright © Acronis International GmbH, 2002-2012.
If you choose to use a specific (static) IP address, specify that address in IP address. Because this
is an individual address, use of IP address range is not available.
130
User accounts (p. 90)
Security identifiers (p. 91)
Action after deployment (p. 91)
Licensing (p. 94)
By selecting the Use machine license check box, you force using a machine license for the
machine, even if the template prescribes using deployment licenses.
If no machine license is available, the software will act according to the setting in the template: it
will either stop deployment to the machine, or use a deployment license.
A machine license enables an unlimited number of deployments. A deployment license enables a
single successful deployment.
This individual setting cannot be changed if the machine already uses a machine license.
Copyright © Acronis International GmbH, 2002-2012.
13 Managing deployment tasks (the Deployment
tasks view)
The Deployment tasks view contains the list of deployment tasks (p. 99) that you previously created
on Acronis Snap Deploy 4 OS Deploy Server.
To open the Deployment tasks view
1. Start Acronis Snap Deploy 4 Management Console.
2. Click Deployment tasks. If prompted, specify the name or IP address of the machine with Acronis
Snap Deploy 4 OS Deploy Server, and the user name and password of an administrator on that
machine.
13.1 List of deployment tasks
The upper part of the view shows the list of deployment tasks and related information, such as the
name of the master image that will be deployed by the task.
The list of deployment tasks is divided into three categories:
Scheduled: Tasks that will run once or more at a time you specified. For details about creating
such tasks, see “Deployment to specific machines” (p. 100).
Upon event: Tasks that will perform deployment as soon as a specified number of machines
becomes ready for deployment. For details about creating such tasks, see “Deployment to any
ready machines” (p. 106).
One of these tasks may be already running and waiting for the machines. If none of these tasks is
running, you can start any of them manually.
Manual start: Tasks that perform deployment to specific machines (p. 100) and have no
schedule. These are tasks that you chose to run Manually, and completed tasks that you chose to
run Now or Once later.
To start any of the deployment tasks manually, select the task, and then click Run on the toolbar.
The lower part of the view shows the machines that are related to the selected task. The list depends
on the type of task.
For a task that performs deployment to specific machines (p. 100): the list of machines to which
the task performs deployment. Deployment will start on a schedule or when you start the task
manually.
For a task that performs deployment to any ready machines (p. 106): the list of machines that are
currently ready for deployment (have the Ready (p. 128) state). Deployment will start as soon as
a sufficient number of machines become ready (or after a time-out), even if you start the task
manually.
13.2 Actions on deployment tasks
To perform an action on a deployment task, select the task in the list. The available actions appear on
the toolbar.
The actions are the following:
131
Copyright © Acronis International GmbH, 2002-2012.
Create: Starts the Create Deployment Task Wizard (p. 99).
Stop: Stops the selected task. The machines whose deployment finished by the time you stop the
task remain deployed (the last result (p. 128) for such machines is Succeeded).
Edit: Edits the task in the Create Deployment Task Wizard.
Run: Starts the selected task. The task will wait for machines to become ready and then will
perform deployment to them.
Delete: Deletes the task from the deployment server.
View log: Shows the log entries related to the selected task.
13.3 States and results for deployment tasks
The State column shows the current state of the task.
The state can be one of the following:
Idle: The task is not running. It will run on a schedule or when a specified number of machines
become ready. Alternatively, you can start the task manually.
Waiting for machines: The task has started but is waiting for machines to become ready. This
state occurs in the following cases:
A task that performs deployment to a specific list of machines waits until the machines are
woken up.
A task that performs deployment to a number of any ready machines waits until this number
is reached.
In progress (shown as percentage complete): The task is performing deployment. After
deployment has finished on all machines, the task state becomes Idle.
Stopping: The task is stopping after you chose to stop it or after not enough machines became
ready after a time-out. The task will then enter the Idle state.
The Last result column shows the result of the deployment task.
The result can be one of the following:
Succeeded: Deployment has been successful on all of the machines where it started (all of these
machines have the Succeeded (p. 128) result).
Failed: Deployment to one or more machines failed (a machine has the Failed (p. 128) result).
Stopped: The task has been stopped. This state occurs in either of these cases:
132
You stopped the task, by using the Stop action (p. 131).
The task stopped because not enough machines became ready for deployment, according to
the deployment start condition you specified when creating the deployment task (p. 102).
Copyright © Acronis International GmbH, 2002-2012.
14 Command-line mode and scripting under WinPE
Having booted a machine in Windows Preinstallation Environment (WinPE), the administrator can
perform imaging or deployment in the command-line mode or execute scripts.
Acronis Snap Deploy 4 Command-Line Utility is included in a WinPE-based bootable media that you
can create by using Acronis Snap Deploy 4 Management Console (p. 62).
The section “Sample scenarios” (p. 142) provides examples of using the command-line utility.
Limitation. Acronis Snap Deploy 4 Command-Line Utility can generate a new security identifier (SID)
but cannot adjust other settings on the fly. To change the machine name, domain or workgroup
membership, and other settings, either use the graphical user interface or apply the Microsoft
System Preparation Tool (Sysprep) to the master system and specify the new settings in the
Sysprep.inf answer file.
14.1 Command-line syntax
This section provides the list of commands and parameters of Acronis Snap Deploy 4 Command-Line
Utility.
14.1.1 Supported commands
Acronis Snap Deploy 4 Command-Line Utility asdcmd.exe has the following format:
asdcmd /command /parameter1 [/parameter2 …]
Commands may be accompanied with parameters. Some parameters are common for most
commands of asdcmd, while others are specific for individual commands. The following is the list of
supported commands and compatible parameters.
Command
Common parameters
Specific parameters
create
/filename:<file name>
/password:<password>
Creates an image of /net_user:<user name>
specified disks and /net_password:<password>
volumes
/incremental
/differential
/compression:<0…9>
/split:<size in MB>
/oss_numbers
/reboot
/harddisk:<disk number>
/partition:<volume number>
/file_partition:<volume
letter>
/raw
/progress:<on|off>
/shutdown
/log:<file name>
/log_net_user:<remote
user>
/log_net_password:<passw
ord>
133
Copyright © Acronis International GmbH, 2002-2012.
deploy
/filename:<file name>
/password:<password>
Deploys disks and /net_user:<user name>
volumes, including the /net_password:<password>
master boot record /oss_numbers
(MBR), from an image /reboot
/harddisk:<disk number>
/partition:<disk
number><volume number>
/target_harddisk:<disk
number>
/target_partition:<disk
number>-<volume number>
/shutdown
/start:<start sector>
/log:<file name>
/fat16_32
/log_net_user:<remote
size
in
/size:<volume
user>
sectors>
/log_net_password:<passw
/type:<active|primary|logical
ord>
>
/preserve_mbr
/preserve_disk_layout
/license_server:<server
address>
/grant_server_license
/use_machine_license
/use_deployment_license
IP
When using the Acronis Universal Deploy
add-on:
/ud_path:<path>
/ud_username:<user name>
/ud_password:<password>
/ud_driver:<inf-file name>
verify
Verifies the
integrity
/filename:<file name>
/password:<password>
image /net_user:<user name>
/net_password:<password>
/reboot
/shutdown
/log:<file name>
/log_net_user:<remote
user>
/log_net_password:<passw
ord>
list
/password:<password>
/filename:<file name>
/net_user:<user name>
Lists available drives /net_password:<password>
and volumes. With the
filename
parameter, lists the
contents of the image
134
Copyright © Acronis International GmbH, 2002-2012.
email_n
Turns
on
notifications
deployment
/email_from:<sender address>
/email_to:<recipient address>
/email_subject:<message
subject>
server
/email_smtp:<SMTP
address>
server
/email_port:<SMTP
port>
/email_user:<SMTP server user
name>
server
/email_password:<SMTP
user password>
/email_encryption:<no|ssl|tls
>
e-mail
about
The same as for the email_n command
email_n_test
Sends a test e-mail
message
14.1.2 Common parameters (parameters common for most
commands)
Parameter
Description
Image location
Access to images
/filename:<file name>
Specifies the full path to the image, Any
including the file name
/password:<password>
Specifies the password for the image (if Any
required)
/net_user:<user name>
Specifies a user name for accessing the Network drive
network drive
/net_password:<password>
Specifies a password for accessing the Network drive
network drive
Imaging options
/incremental
Sets the image type to incremental. If this Any
parameter is not specified or if there is no
basic full image, a full image will be
created.
An incremental image stores changes to
the data against the latest image. The
name of an incremental image is the
name you specified in the /filename
parameter, followed by an index; for
example:
MasterImage2.tib,
MasterImage3.tib, and so on.
To deploy an incremental image, specify
its name in the /filename parameter of
the deploy command. Make sure that
the image is in the same folder as all
images it depends on.
135
Copyright © Acronis International GmbH, 2002-2012.
/differential
Sets the image type to differential. If this Any
parameter is not specified or if there is no
basic full image, a full image will be
created.
A differential image stores changes to the
data against the latest full image. The
name of a differential image is the name
you specified in the /filename
parameter, followed by an index; for
example:
MasterImage2.tib,
MasterImage3.tib, and so on.
To deploy a differential image, specify its
name in the /filename parameter of
the deploy command. Make sure that
the image is in the same folder as the full
image.
/compression:<0…9>
Specifies the data compression level. The Any
compression level ranges from 0 to 9 and
is set to 3 by default
/split:<size in MB>
Splits the image into parts of the specified Any
size, in megabytes
General options
/oss_numbers
If this parameter is specified, the numbers Any
of the volumes in the /partition
parameter are adjusted for the MBR
partition table. This means that primary
volumes have numbers 1-1, 1-2, 1-3, and
1-4 (a disk cannot have more than four
primary
volumes);
logical
volume
numbers start with 1-5.
If this parameter is not specified,
consecutive volume numbering must be
used.
For example, if the disk has one primary
volume and two logical volumes, their
numbers can appear as follows:
/oss_numbers
5,1-6
/partition:1-1,1-
or
/partition:1-1,1-2,1-3
/reboot
Restarts the machine after the operation Any
is completed. Cannot be used with the
/shutdown option
/shutdown
Shuts down the machine after the Any
operation is completed. Cannot be used
with the /reboot option
136
Copyright © Acronis International GmbH, 2002-2012.
/log:<file name>
Creates a log file of the current operation Any
with the specified file name
/log_net_user:<remote user> If the log file is created in a network Any
folder, specifies the user name for
accessing that folder
/log_net_password:<password If the log file is created in a network Any
>
folder, specifies the password for
accessing that folder
14.1.3 Specific parameters (parameters specific for individual
commands)
Option
Description
create
/harddisk:<disk
number>
Specifies the hard disks to include into the image.
An image may contain data of more than one hard disk. In that case,
separate disk numbers by commas, for example:
/harddisk:1,3
To view the list of available hard disks, use the /list command.
/partition:<disk
number>-<volume
number>
Specifies the volumes to include into the image file.
Volume numbers are specified as <disk
number>, for example:
number>-<volume
/partition:1-1,1-2,3-1
See also the /oss_numbers parameter.
To view the list of available volumes, use the /list command.
/raw
Use this parameter to create an image of a volume with an
unrecognized or unsupported file system, or of a disk that contains
such volume.
With this parameter, all contents of the disk or volume will be copied
sector-by-sector.
Without this parameter, only the sectors containing useful system and
user data are imaged (for the supported file systems).
/progress:<on|off>
Shows or hides the progress information (percent completed). The
progress is shown by default.
deploy
/harddisk:<disk
number>
Specifies the hard disk in the image.
/partition:<disk
number>-<volume
number>
Specifies the volumes in the image.
/target_harddisk:<disk
number>
Specifies the target hard disk.
/target_partition:<vol
ume number>
Specifies the target volume number for deploying a volume over an
existing one. If this parameter is not specified, the software assumes
137
Copyright © Acronis International GmbH, 2002-2012.
that the target volume number is the same as the volume number
specified with the /partition parameter.
/start:<start sector>
/size:<volume
sectors>
size
Sets the start sector for deploying a volume to the unallocated space
on the hard disk.
in Sets the new size of the volume in sectors. The size of a sector is
considered to be 512 bytes, regardless of the physical sector size on
the hard disk drive.
For example, if you want the volume size to be 512 MB (a megabyte is
1 048 576 bytes), specify the size as follows:
/size:1048576
Specify this size even if you are using a hard disk drive with 4-KB
sectors.
To see the size of the volume in the master image, use the /list
command.
/fat16_32
Enables the file system conversion from FAT16 to FAT32 if the volume
size after deployment is likely to exceed 2 GB. Without this parameter,
the deployed volume will inherit the file system from the image.
/restore_bootable:<aut
o|on|off>
Sets the rule of deployment for the master boot record (MBR) when
deploying a volume (when deploying a disk, MBR is always deployed):
auto: Deploy the MBR only when deploying an active volume that
contains an operating system. Use this setting to ensure that the
operating system can boot.
on: Deploy the MBR when deploying any active volume, no matter
whether the volume contains an operating system or not.
off: Do not deploy the MBR. Use this setting, for example, to
preserve the Unix boot loader.
/type:<active|primary|
logical>
Sets the deployed volume to active, primary or logical, if possible (for
example, there cannot be more than four primary volumes on a disk).
Setting a volume to active always sets it to primary, but a volume that
is set to primary may remain non-active.
If the type is not specified, the software tries to keep the target
volume type. If the target volume is active, the deployed volume is set
to active. If the target volume is primary and there are other primary
volumes on the disk, one of them will be set to active, and the
deployed volume becomes primary. If no other primary volumes
remain on the disk, the deployed volume is set to active.
When deploying a volume to unallocated space, the software extracts
the volume type from the image. For a primary volume, the type will
be set as follows:
If the target disk is the first according to BIOS and it has no other
primary volumes, the deployed volume will be set to active.
If the target disk is the first according to BIOS and there are other
primary volumes on it, the deployed volume will be set to logical
If the target disk is not the first according to BIOS, the deployed
volume will be set to logical.
138
Copyright © Acronis International GmbH, 2002-2012.
/preserve_mbr
When deploying a volume over an existing one, the target volume is
deleted from the disk along with its entry in the target disk’s master
boot record (MBR). Then, with the /preserve_mbr parameter, the
deployed volume’s entry will occupy the upper empty position in the
target disk’s MBR. Thus, the target disk’s MBR is preserved.
Without this parameter, the deployed volume’s entry will occupy the
same position as in the source disk MBR saved in the image. If the
position is not empty, the existing entry will be moved to another
position.
/preserve_disk_layout
When deploying an MBR disk or volume with a convertible OS,
and the target drive is larger than 2 TB, the target drive is
converted to GPT by default. To disable this default behavior
and preserve the MBR disk layout on the deployed machine, use
/preserve_disk_layout parameter. This may be useful
when are deploying an image to a machine that does not
support UEFI architecture and thus cannot boot from a GPT
volume.
This parameter is an equivalent for the deployment template
option Convert disk to GPT if target disk is larger than 2 TB (p.
85).
/patching_sid
Generates a unique security identifier (SID) for the target machine.
Without this parameter, the target machine will have the same SID as
the master machine.
The following parameters related to licensing are effective only when booting from Acronis PXE Server.
You do not need to use these parameters when booting from a physical media.
Deployment is performed by using a deployment license or a machine license (p. 16). By default, the
software uses a machine license only if no appropriate deployment license is found on the license server.
By using the /use_deployment_license and /use_machine_license parameters, you can
force a particular type of license to be used for performing the deployment. If you specify both of these
parameters, their order will determine license priority. For example, if you specify
/use_machine_license /use_deployment_license, the software will use a machine license;
if no machine license is found on the license server, the software will use a deployment license instead.
/license_server:<server
IP address>
Specifies the IP address of Acronis Snap Deploy 4 License Server.
/use_deployment_licens
e
Forces a deployment license to be used for deployment. If no
deployment license is found, the deployment will fail.
By using this parameter with the /grant_server_license
parameter, you can allow a server deployment license to be taken if no
workstation deployment license is found on the license server.
/use_machine_license
Forces a machine license to be used for performing the deployment. If
no machine license is found, the deployment will fail.
By using this parameter with the /grant_server_license
parameter, you can allow a server machine license to be taken if no
workstation machine license is found on the license server.
/grant_server_license
139
Allows a server license (p. 16) to be taken for deploying a workstation
operating system (p. 15). The server license will be used if no
Copyright © Acronis International GmbH, 2002-2012.
workstation license is found on the license server.
By default, when you use this parameter and deploy a workstation
operating system, the software uses the following priorities for
licenses, from highest to lowest:
1. Deployment workstation licenses
2. Machine workstation licenses
3. Deployment server licenses
4. Machine server licenses
By
using
this
parameter
with
the
/use_deployment_license
parameter,
the
/use_machine_license parameter, or both, you can force
a particular type of license to be used for performing the
deployment or change the priorities for licenses.
To use the following parameters, you must have a license for the Universal Deploy add-on. Acronis Snap
Deploy 4 License Server with the licenses must be available from the machine booted into the PE. For
more details, see “What is Acronis Universal Deploy” (p. 26).
/ud_path:<path
to Specifies using Acronis Universal Deploy, the path to the drivers
driver storage>
storage (in a network folder), and the user name and password to
/ud_username:<user
access the folder.
name>
/ud_password:<password
>
/ud_driver:<inf-file
name>
Specifies using Acronis Universal Deploy, and the mass-storage driver
to be installed. The driver is specified as an .inf file.
list
/filename:<file name>
Displays the image content.
When listing image content, volume numbers may not coincide with
those in the list of disks and volumes if the image does not contain all
the volumes.
For example, if the image contains only volumes 2-3 and 2-5, they will
be listed as 2-1 and 2-2.
If the deploy /partition command cannot find a volume in the
image by its physical number, use the list command to obtain the
volume number in the image. Then, use the /partition:<number
in the image> /target_partition:<physical number
of the target volume> parameters.
In the example above, to deploy the volume 2-5 to its original place,
use:
/partition:2-2 /target_partition:2-5
email_n
/email_from:<sender
address>
Specifies the e-mail address of the sender. For example:
/email_to:<recipient
address>
Specifies the e-mail address of the recipient. For example:
140
/email_from:[email protected]
/email_to:[email protected]
Copyright © Acronis International GmbH, 2002-2012.
/email_subject:<messag
e subject>
Specifies the custom text in the subject line of the e-mail message. For
example:
/email_subject:"Deployment notification"
In addition to the custom text, the subject line will include the text
“[ASD4]”, and the MAC address and the IP address of the machine
being deployed.
/email_smtp:<SMTP
server address>
Specifies the name or IP address of the outgoing (SMTP) server. For
example:
/email_smtp:smtp.example.com
/email_port:<SMTP
server port>
Specifies the port of the SMTP server. For example:
/email_port:465
Without this parameter, port 25 is used.
/email_user:<SMTP
server user name>
Specifies the user name to log on to the SMTP server. For example:
/email_password:<SMTP
server user password>
Specifies the password to log on to the SMTP server. For example:
/email_encryption:<no|
ssl|tls>
Specifies the type of encryption that is used by the SMTP server. For
example:
/email_user:user
/email_password:MyPassWd
/email_encryption:tls
Without this parameter, no encryption is used.
email_n_test
Use this command instead of the email_n command, with the same set of parameters, to test the
configuration of e-mail notifications.
14.1.4 Usage examples
Example 1. The following command creates an image arc.tib of hard disk 1, and places the image to
the network folder \\server1\folder. The operation log file log1.log is saved in another network
folder: \\server2\dir\. Credentials for both network folders are provided:
asdcmd /create /harddisk:1 /filename:\\server1\folder\arc.tib /net_user:user1
/net_password:pw1
/log:\\server2\dir\log1.log
/log_net_user:user2
/log_net_password:pw2
Example 2. The following command creates an image of the volume 1-2 sector-by-sector (in the raw
mode) and saves the image to volume H:
asdcmd /create /filename:h:\raw.tib /partition:1-2 /raw /log:c:\log.txt
Example 3. The following command deploys the hard disk 2 from the password-protected image
1.tib that is located in the network folder \\server1\folder, to the disk with the same number, 2.
asdcmd /deploy /filename:\\server1\folder\1.tib /password:qwerty /harddisk:2
141
Copyright © Acronis International GmbH, 2002-2012.
14.2 Sample scenarios
14.2.1 Deploying images assigned to target machines
Scenario
An administrator needs to deploy a different master image to each target machine.
Solution
The administrator puts the images in a shared location that can be accessed from each target
machine.
The administrator renames each image according to the target machine’s MAC address. The image
destined to the machine with MAC address 01-02-03-04-05-06 will have the name, for example,
image-01-02-03-04-05-06.tib.
The administrator writes a deployment script that can read the target machine’s MAC address and
pull an image with a name corresponding to the MAC address from the shared location. The script
can be executed on any number of target machines.
Sample script
setlocal
SET IMG_PATH=\\image_server\images
SET TMP_DRV_LETTER=h:
net use %TMP_DRV_LETTER% %IMG_PATH%
echo off
for /f "tokens=1-13 delims= " %%a in ('ipconfig /all') do (
IF %%a EQU Physical (
for /f "tokens=1-3 delims= " %%a in ('echo %%l') do (
IF EXIST %TMP_DRV_LETTER%\%%a.tib (
echo DEPLOYMENT IMAGE file: %%a.tib
asdcmd.exe
/deploy
/filename:%TMP_DRV_LETTER%\%%a.tib
/target_partition:c
goto end
) ELSE (
echo THE IMAGE FILE %IMG_PATH%\%%a.tib NOT FOUND
)
)
)
)
:end
echo on
net use %TMP_DRV_LETTER% /d
wpeutil Reboot
endlocal
/harddisk:1
What this script does:
a) Mounts the network folder containing the set of images (one image corresponds to one target
machine)
b) Retrieves the MAC address of the target machine
c) Generates a .tib file name (if MAC address is 01-02-03-04-05-06 then the .tib file name must be
01-02-03-04-05-06.tib)
d) Searches the network folder for an image with such name
142
Copyright © Acronis International GmbH, 2002-2012.
e) Deploys the image if found
f) Restarts or shuts down the target machine
Environment variables:
IMG_PATH: the path to a network folder on the deployment server.
TMP_DRV_LETTER: the mounted drive on target side.
14.2.2 Creating images assigned to target machines
Scenario
The administrator needs to create an image of each machine to be able to later roll back the system
to the imaged state by deploying the image to the same machine.
Solution
The administrator creates a script that:
Creates an image of each machine.
Names each image according to the machine’s MAC address.
The images can be deployed to the corresponding target machines (p. 142).
Sample script
setlocal
SET IMG_PATH=\\image_server\images
SET TMP_DRV_LETTER=h:
net use %TMP_DRV_LETTER% %IMG_PATH%
echo off
for /f "tokens=1-13 delims= " %%a in ('ipconfig /all') do (
IF %%a EQU Physical (
for /f "tokens=1-3 delims= " %%a in ('echo %%l') do (
echo IMAGE FILE: %%a.tib
asdcmd.exe /create /filename:%TMP_DRV_LETTER%\%%a.tib /harddisk:1 /compression:8
goto end
)
)
)
:end
echo on
net use %TMP_DRV_LETTER% /d
wpeutil Reboot
endlocal
What this script does:
a) Mounts the network folder
b) Retrieves the booted machine’s MAC address
c) Generates a .tib file name (if MAC address is 01-02-03-04-05-06 then the .tib file name will be 0102-03-04-05-06.tib)
d) Creates an image of the volume C of the machine, and saves the image to the network folder
using the generated file name
e) Restarts or shuts down the machine
Environment variables:
143
Copyright © Acronis International GmbH, 2002-2012.
144
IMG_PATH: the path to a network folder on the deployment server.
TMP_DRV_LETTER: the mounted drive on target side.
Copyright © Acronis International GmbH, 2002-2012.
15 Collecting system information
The Acronis System Report tool collects information about a machine and saves this information to a
file. You may want to provide this file when contacting Acronis technical support.
The tool is available:
On a machine where Acronis Snap Deploy 4 Management Console is installed. The tool collects
information about that machine.
Under an Acronis bootable media. The tool collects information about the machine that is
booted from the media, and saves this information to a locally-attached USB drive.
To collect system information in the management console
1. In the management console, select from the top menu Help > Collect system information.
2. Specify whether to split the file with system information into smaller parts. If so, specify the
maximum size of such part.
3. Specify where to save the file or files.
To collect system information under an Acronis bootable media
1. Create an Acronis bootable media (p. 59). When creating the media, select the Acronis System
Report check box in the list of components.
2. Attach a USB drive to the machine for which you want to collect information.
3. Boot that machine from the media.
4. In the boot menu, click Acronis System Report.
The tool saves the file with system information to the USB drive. If two or more USB drives are
attached, the tool saves the file to the first such drive it finds.
145
Copyright © Acronis International GmbH, 2002-2012.