1
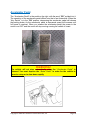
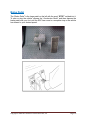
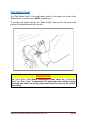
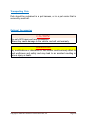
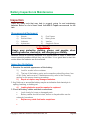
2013 Owner’s Manual HUMMER H3 Electric Golf Cart (eGC) This Manual is effective as of May 15, 2012 Manufactured by: American Custom Golf Cars, Inc. (ACG) 15740 El Prado Rd. Chino, CA 91710 USA (909) 597-2885 (909) 597-7183 fax www.acgcars.com Copyright 2009-2013 American Custom Golf Cars, Inc. American Custom Golf Cars, Inc., ACG and California Roadster Are registered trademarks of American Custom Golf Cars, Inc. HUMMER and H3 Are registered trademarks of General Motors Corporation. HUMMER H3 eGC Is Officially Licensed Product by GM Copyright © 2009-2013 American Custom Golf Cars, Inc. Page 2 Notice The American Custom Golf Cars, Inc., herein known as ACG, Limited Warranty for owners of the ACG HUMMER H3 is included with this manual. No other warranties, expressed or implied, are contained herein. ACG and your authorized representative checked this vehicle before it was delivered to you. This vehicle does conform to the current American National Standards Institute’s Z130 Safety and Performance Requirements for Golf Cars. Throughout this manual, the words “golf cart”, “eGC” and “vehicle” are used interchangeably. Unless ordered as such, these vehicles do not conform to Federal Motor Vehicle Safety Standards for automobiles or to FMVSS 500 for low-speed vehicles, and are not equipped for operation on public streets, roads, or highways. If ordered as a vehicle that conforms to FMVSS 500 for low-speed vehicles you must still check your individual state laws to make sure there are no other additional requirements to make your vehicle eligible for operation on public streets, roads, or highways. If ordered as a certified vehicle, it will meet the minimum requirements for FMVSS 500 for low-speed vehicles. ACG is not liable for any additional requirements or modifications that your individual state may require. ACG is not liable of errors in this manual or for incidental or consequential damages that result from the use of the material in this manual. The information contained in this document including the warranty information contained in the end of this document is subject to change without notice. ACG Reserves the right to make design and equipment changes to vehicles without obligation to make these changes on units sold prior to the changes being made. Copyright © 2009-2013 American Custom Golf Cars, Inc. Page 3 Table of Contents Notice………………………………………………………………………………… 3 Table of Contents…………………………………………………………………… 4 Foreword…………………………………………………………………………….. 5 Introduction……………………………………………………………………………. 6 ABOUT THIS MANUAL……………………………………………………………… 6 Insurance Notice……………………………………………………………………… 7 Warranty Registration………………………………………………………………… 7 General Warnings…………………………………………………………………….. 8 SAFE OWNERSHIP OF ACG eGC…………………………………………………. 10 Cautions, Warnings and Notes……………………………………………………..… 11 Controls and Indicators…………………………………………………………..……. 12 Key Switch……………………………………………………..…….……….... 12 Forward-Neutral-Reverse Switch……………………………………..….….… 13 Accelerator Pedal……………………………………………..……………….. 14 Brake Pedal…………………………………………………………..………… 15 Park Brake Pedal……………………………………………………..……….. 16 Light Switch………………………………………………………….……….… 17 Turn Signal Lever Switch…………………………….…………….……….… 18 Hazard Warning Flashers Switch………………………………………….… 19 Turn Signal Directional Indicators……………………………………..…….. 19 Display Panel……………………………………..........................………..… 20 Glove Box………………………………………...……………………….…… 28 Front Trunk Release………………………………………………………….. 28 Accessory Outlet……………………………………………..……………….. 29 Safety Belts……………………………………………………………………………… 30 Tires & Wheels…………………………………………………………………………. 37 Tire Changing and Jacking Points……………………………………………………. 40 Brakes……………………………………………………………………………………. 42 Pre-Operation and Daily Safety Checklist……………………………….....………… 42 Performance Inspection…………………………………………………………....….. 43 Driving Instructions………………………………………………………………….. 44 Starting the Vehicle………………………………………………………….. 46 Stopping or slowing the Vehicle…………………………………………… 46 Parking and Leaving the Vehicle…………………………………………… 46 47 Batteries……………………………………………………………………………….. Battery Care…………………………………………………………………… 47 Battery Inspection & Maintenance………………………………………….. 48 INSPECTION………………………………………………………………….. 48 CLEANING……………………………………………………………………….50 WATERING……………………………………………………………………. 51 Charging Batteries……………………………………………………………. 53 Battery Replacement…………………………………………………………. 54 Battery Disposal……………………………………………………………. 54 Periodic Maintenance………………………………………………………………… 56 DAILY TASKS…………………………………………………………………. 56 MONTHLY TASKS……………………………………………………………. 56 Cleaning………………………………………………………………………………… 58 Specifications………………………………………………………………………….. 61 Warranty……………………………………………………………………………….. W-1 Copyright © 2009-2013 American Custom Golf Cars, Inc. Page 4 Foreword Thank you for choosing the ACG HUMMER H3 for your golf and community transportation needs. American Custom Golf Cars, Inc. would like to welcome you to the new revolution in the Custom Golf Cart Industry. Please protect your investment to make sure that your California Roadster will provide you with years of reliable performance. Your safety is important to us, so please make sure that prior to operating the vehicle you have read the following instructions and warnings. If you rent or loan your vehicle to others, please make sure that they have read this manual prior to operating this vehicle. Please consider this manual to be a permanent part of this vehicle and if it is sold, please make sure that the new owner receives the manual so that they will have the operating information that it contains as well. Copyright © 2009-2013 American Custom Golf Cars, Inc. Page 5 Introduction ABOUT THIS MANUAL Thank you for purchasing ACG HUMMER H3 vehicle manufactured by American Custom Golf Cars, Inc. (ACG) Your vehicle is designed to operate exclusively on battery power. It is a “Zero Emission Vehicle” (ZEV). The ACG company objective includes customer safety and product satisfaction. This “Owner’s Manual” is designed to acquaint you with the proper and safe operation of your ACG vehicle. Please take the time to read and understand the manual before operating your vehicle. Maintenance schedules and general care instructions are included in the Operation and Maintenance section. This manual is applicable only to the following ACG models: 2013 ACG HUMMER H3 eGC If any questions arise after reading the manual, please contact ACG Customer Service at: (909) 597-2885. Please have your Vehicle Identification Number (VIN) and date of purchase information available. NOTE: All information and specifications in this “Owner’s Manual” are current at the time of printing. However, due to ACG’s policy of continuous product improvement, we reserve the right to make changes, at any time, without written notice or obligation. Copyright © 2009-2013 American Custom Golf Cars, Inc. Page 6 Insurance Notice Your Insurance may not provide coverage for accidents involving the use of this vehicle. To determine if coverage is provided you should contact your insurance company or agent. Warranty Registration The separate “Warranty” document includes a “Warranty Registration Card”. Your new ACG HUMMER H3 (Electric Golf Cart) comes with a: One (1) Year Limited Warranty. The Warranty begins from the date that the ACG HUMMER H3 is purchased from an approved Dealer or Distributor of American Custom Golf Cars, Inc. products, provided that the “Warranty Registration Card” is received by American Custom Golf Cars, Inc. within 45 Days of the purchase date of the vehicle. If the “Warranty Registration Card” is not received within 45 days of purchase date, the Warranty commencement date will be the vehicle production date, as shown on the vehicle’s “Certification Label”. Please protect your Warranty and mail your “Warranty Registration Card” today! There are no other expressed warranties on your ACG vehicle beyond those set in the accompanying “Warranty” document (Appendix W-1), and no implied warranties of merchantability or fitness to the full extent allowed by law. ACG and its dealers shall not be liable for loss of use, inconvenience, lost time, commercial loss or any incidental, consequential or other damages. A separate “Tire Registration Card” is provided for Warranty and potential Tire Recall campaign, the Tire Registration is required by Federal Law under the TREAD Act. Please fill out and mail both Registration Cards today! Copyright © 2009-2013 American Custom Golf Cars, Inc. Page 7 General Warnings _ 1. This “Owner’s Manual” should be read completely before attempting to drive or service the vehicle. Failure to follow the instructions in this manual could result in property damage, severe personal injury, or death. 2. When charging the vehicle, be sure that the key switch is in the “OFF” position. If the key is left in the “ON“ position, it may damage the charger or the EGC. 3. Your vehicle is equipped with an on-board UL- listed charger. When charging your EGC, please be sure to use a proper, grounded cord to provide power to the charger. Please be sure to raise the hood of the golf cart to allow ventilation of the charger so that it does not overheat. Please refer to the separate “ Charging Procedures Manual” for further detailed information on your eGC charging. 4. Always obey all traffic regulations when operating the vehicle. 5. When stopping and leaving the vehicle: a) Make sure vehicle has come to a complete stop. b) Switch “Forward-Neutral-Reverse Switch” to the “Neutral” position. c) Engage parking brake d) Turn the “Key Switch” to “OFF” position and remove key. 6. Wear safety glasses or approved eye protection when servicing the vehicle. Wear a full-face shield and rubber gloves when working with the batteries. 7. Use insulated tools when working around batteries or electrical connections. Use extreme caution to avoid shorting of components or wiring. 8. Improper use of the vehicle or failure to properly maintain it could result in decreased vehicle performance or severe personal injury. 9. Any modification or change to the vehicle that affects the stability or handling of the vehicle or increases maximum speed beyond factory specifications, could result in severe personal injury or death. 10. Prior to servicing Vehicle: a. Chock the wheels. b. Turn the “Key Switch” to “OFF“ position and remove the key. c. Disconnect battery cables, negative (--) cable first. Copyright © 2009-2013 American Custom Golf Cars, Inc. Page 8 WARNING! 1. If renting or loaning the vehicle, make sure that the driver is familiar with all controls and operating procedures before allowing the vehicle to be driven. 2. Any modification or change to the vehicle that affects the stability or handling of the vehicle, or increases maximum vehicle speed beyond factory specifications, could result in severe personal injury or death. 3. Do not shift the “Forward-Neutral-Reverse Switch” while the vehicle is moving. To avoid damaging the vehicle or injuring an unsuspecting passenger, always bring the vehicle to a full and complete stop before switching from Forward to Reverse. 4. To avoid unintentionally starting or rolling the vehicle: A). Set the “Parking Brake”, B). Turn the “Key Switch” to the “OFF” position, C). Remove keys prior to leaving the vehicle. Copyright © 2009-2013 American Custom Golf Cars, Inc. Page 9 SAFE OWNERSHIP OF ACG ELECTRIC VEHICLES ACG pure battery electric vehicles are different from vehicles you might be accustomed to owning. Special precautions should be followed when owning and operating an ACG vehicle. Please read this “Owner’s Manual” and pay particular attention to the “Cautions” and “Warnings” in this Manual, as well as those placed on the vehicle in various locations. In general, ACG Golf Carts are designed and are intended only for use at low speed, up to 15 mph, and are not intended for use on public roads. Specific to ACG vehicles, the following safe habits should always be followed: • ACG vehicles are open vehicles. For this reason, safety belts should always be worn by all occupants to prevent being thrown from the vehicle during operation. If your ACG is equipped with optional canvas or plastic doors, these were designed and are intended only to keep wind and water out of the vehicle and should not be relied upon to keep occupants in the vehicle or to protect them in case of collision. • ACG vehicles are not designed to meet any collision or roll-over requirements. Therefore, you should always drive your ACG vehicle in a safe manner while being alert to potential dangerous situations around you. As with all motor vehicles, never drink alcohol and attempt to drive an ACG vehicle. • Operate an ACG vehicle only on Golf courses or private roads where the speed limits are appropriate for low speed vehicles and the traffic is light. (individual state laws vary, so check with your DMV) • You should never operate an ACG vehicle so that you are an obstacle and become an annoyance for faster moving traffic. • ACG vehicles are designed to be recharged from a standard 120 VAC-15 Ampere electrical outlet that is ground-fault protected. Charging from a circuit of lesser capacity and/or using a cord from the outlet to the ACG vehicle that is not sufficient in wire gauge (AWG) could create a fire hazard. Please consult “Charging Procedures Manual” for the proper extension cord gauge which depends on its length. Copyright © 2009-2013 American Custom Golf Cars, Inc. Page 10 • The voltage in an ACG vehicle battery pack (the battery pack is what you charge and provides the “fuel” to the ACG’s electric drive system) is 48 Volt DC and is sufficient to cause death by electric shock - electrocution. For this reason, ACG owners should never attempt to do any maintenance or repair work on their ACG vehicle’s electric drive system, including the battery pack, unless they have had special training. The one exception is inspection and refilling, if necessary, of the distilled water in flooded type batteries that can be ordered with ACG vehicles. • In this “Owner’s Manual”, the above safe ownership and operation habits will be pointed out to you as the different aspects of owning and operating an ACG vehicle are explained. Please read, understand and abide by them for years of safe operation and enjoyment of your ACG Electric Golf Cart. Warnings, Cautions and Notes Throughout this “Owner’s Manual” you will find the words “WARNING!” and “CAUTION!” These serve as reminders that attention is required. “WARNING!” Indicates an immediate hazard, which could result in an accident causing bodily injury. “CAUTION!” Identifies something that could result in damage to your vehicle. “NOTE” Notes are for your information and to make procedures more easily understood. Copyright © 2009-2013 American Custom Golf Cars, Inc. Page 11 Controls and Indicators Key Switch The “Key Switch” is mounted on the central dash just under the Display Panel. It has two positions: 1. OFF position- There is no power to vehicle. (Key is Vertical as shown in picture below) 2. ON position- vehicle is ON and can be driven. (Key is turned clockwise 45 degrees) (Key Switch shown in “OFF” position) WARNING! Never turn the “Key Switch” to the “OFF” position while the vehicle is in motion. This could lead to loss of speed control and loss of control of the vehicle. This can cause a serious accident. Copyright © 2009-2013 American Custom Golf Cars, Inc. Page 12 Forward – Neutral - Reverse Control Switch The “Forward-Neutral-Reverse Switch” is located on the seat support panel. There are three (3) distinct positions: Forward, Neutral and Reverse. 1.) FORWARD - To operate the vehicle in the forward direction, rotate the switch towards the passenger side of the vehicle. 2.) REVERSE - To operate the vehicle in the reverse direction, rotate the switch towards the driver side of the vehicle. Your Vehicle has been equipped with a reverse warning beeper so that when the vehicle is in reverse you will hear a loud beep signaling that the vehicle is in reverse. 3.) NEUTRAL - When the switch is in the straight up and down position the vehicle is in Neutral and will not move when the accelerator pedal is depressed. (Switch shown in Reverse position) CAUTION! Always bring the vehicle to a complete stop before changing the position of the “Forward-Neutral-Reverse Switch”. Copyright © 2009-2013 American Custom Golf Cars, Inc. Page 13 Accelerator Pedal The “Accelerator Pedal” is the pedal on the right, with the word “GO” molded into it. The operation of the accelerator pedal differs from that of an Automobile. When the “Key Switch” is in the “ON” position, depressing the accelerator pedal will release the parking brake. As the accelerator pedal is depressed speed will increase until full speed is reached. When you release the accelerator pedal the power to the motor is cut OFF and the motor will stop running causing the vehicle to coast. WARNING! The vehicle will not stop automatically when the “Accelerator Pedal” is released. You must depress the “Brake Pedal” in order for the vehicle to come to a stop or to slow down rapidly. Copyright © 2009-2013 American Custom Golf Cars, Inc. Page 14 Brake Pedal The “Brake Pedal” is the large pedal on the left with the word “STOP” molded into it. To slow or stop the vehicle, release the “Accelerator Pedal” and then depress the brake pedal with your foot until the EGC has come to a complete stop or the vehicle has slowed to your desired speed. Copyright © 2009-2013 American Custom Golf Cars, Inc. Page 15 Park Brake Pedal The “Park Brake Pedal” is the small raised portion in the upper left corner of the “Brake Pedal”. It has the word “PARK” molded into it. To set the park brake, depress the “Brake Pedal” firmly and tilt the park brake portion of the pedal forward with your foot. WARNING! The “Park Brake” will release automatically when either the “Accelerator Pedal” or “Brake Pedal” is depressed. The park brake has multiple locking positions and should be firmly pressed and locked to prevent the vehicle from rolling. Copyright © 2009-2013 American Custom Golf Cars, Inc. Page 16 Light Switch The “Light Switch” is located on the Dashboard to the left of the steering Column. It is a 2 position switch it is labeled with ISO symbol (icon). 1.) OFF - When the top portion of the switch “O” is depressed the lights are off. 2.) ON - When the bottom portion of the switch “I” is depressed, the lights are on. (Light switch shown in “ON” position) Fog Light Switch The “Fog Light Switch” is located on the Dashboard to the left of the steering Column, next to the “Light Switch”. It is a 2 position switch it is labeled with ISO symbol (icon). 1.) OFF - When the top portion of the switch “O” is depressed the fog lights are off. 2.) ON - When the bottom portion of the switch “I” is depressed, the fog lights are on. Auxiliary Switches Two “Auxiliary Switches” are located on the Dashboard to the left of the steering Column, next to the “Fog Light Switch” . It is a 2 position switch it is labeled with ““ symbol (icon). 1.) OFF - When the top portion of the switch “O” is depressed the fog lights are off. 2.) ON - When the bottom portion of the switch “I” is depressed, the fog lights are on. Copyright © 2009-2013 American Custom Golf Cars, Inc. Page 17 Turn Signal Lever Switch The Turn Signals are activated by Lever Switch located on Left side of steering column below Steering Wheel. It is a 3 position switch. 1.) RIGHT - When the Lever is pushed UP (Clockwise) – the Right Lights Flash. 2.) OFF - When the Lever is Horizontal, the Turn Signal lights are “OFF”. 3.) LEFT – When the Lever is pushed down (Counter Clockwise) – the Left Lights Flash. NOTE: The system DOES NOT have a “self-canceling” feature; return the Lever to the horizontal “OFF” position after completing the intended Turn or Lane Change! (Turn Signal Lever Switch shown in “OFF “position) Copyright © 2009-2013 American Custom Golf Cars, Inc. Page 18 Hazard Warning Flashers The Hazard Warning Flasher Switch activates both Turn Signals to provide “Hazard Warning” by flashing both Right and Left as well as Front and Rear Turn Signals at the same time. The “Hazard” function is activated by Pull Switch located on Left side of steering column below Steering Wheel. And immediately below the Turn Signal Lever. It is a 2 position switch. OFF - When the Pull Switch is released (pushed INWARD) ON - When the Pull Switch is pulled out, the Turn Signal lights are activated. NOTE: The Hazard function can be canceled ONLY by moving the “Turn Signal Lever” from the the horizontal “OFF” position to either “UP” (Right Turn) or “DOWN” (Left Turn) position! Turn Signal Directional Indicators • • The GREEN LED Light to the Left of the Display Panel will flash when the Left Turn Signal is activated The GREEN LED Light to the Right of the Display Panel will flash when the Right Turn Signal is activated Copyright © 2009-2013 American Custom Golf Cars, Inc. Page 19 Display Panel The ACG HUMMER H3 LCD display has following unctions: • • • • • • • • Battery State of Charge (SoC) shown on bar graph at right of the screen and as percent % at top of the bar graph (shown above as 88%) Trip Distance Traveled in miles in NN.N format (shown above as 90.6 mi.) Odometer TOTAL Distance Traveled in miles in NNNN.N format (shown above as 231.9 mi.) Vehicle Speed in MPH and KPH shown on semi elliptical bar graph (shown as 0 MPH/KPH above) Direction – Monitors the position of the “Direction Control Switch” and shows: D for Forward Drive N for Neutral (as shown above) R for Reverse For additional display features please refer to following section. Copyright © 2009-2013 American Custom Golf Cars, Inc. Page 20 Display Panel - Battery State of Charge (SoC) IMPORTANT INFORMATION Battery Percent Charge Information on SEVCON Display The Battery charge level indicates the relative state of charge of the Traction Battery and NOT the remaining driving range of the vehicle. Its algorithm is based on the PEAK Traction Battery Pack Voltage, which in turn calculates the APPROXIMATE charge of the Traction Battery. The indicator may not always show 100% when the vehicle is first turned on even if the On-Board Delta-Q charger indicates 100% or full charge condition. (Green LED ON – see Charging Procedure in Owner Manual for more detail). This condition is not a defect as the computerized “smart” Delta-Q On-Board Charger may under certain conditions stop the charging before achieving the maximum potential voltage. The ambient and battery temperatures are monitored by the charger and the charge cycle is automatically terminated based on internal charge algorithm that is matched to the specific type of Battery, which is used in your vehicle. The charge algorithm is designed to maximize the battery life and to prevent battery damage by overcharge. Initially when the vehicle is FIRST driven after delivery or whenever Traction Battery is serviced, the vehicle MUST be driven so that a discharge level of 69% or less is achieved, and the Traction Battery MUST BE FULLY CHARGED thereafter, in order for the State of Charge bar graph indicator in the SEVCON Display to self reset to 100% indication. If the Traction Battery is not deeply discharged (to below 69%) the State of Charge will generally not indicate more than 80% even if the On-Board Delta-Q Charger indicates FULLY Charged condition. For long battery service life, the vehicle should not be operated when the indicated Charge Level is 20% or less, and need not to be re-charged if the Display Indication is 80% or more. Copyright © 2009-2013 American Custom Golf Cars, Inc. Page 21 Display Screen – Other Functions Main Screen Main screen will display Direction, Speed and Battery Charge Level, it also displays Trip and Odometer (total miles) mileage traveled. If the low water battery symbol appears please check the water level in all batteries. To clear the low water battery symbol push upper arrow button [# ] 2 times; this will clear the low water level symbol. NOTE: The vehicle MUST be in neutral (N) when you first turn the key “ON”; thereafter you can select forward (F) or reverse (R). The car will not move unless you start in neutral (N). To proceed to a 2nd Screen push center arrow button [8 ] once. Copyright © 2009-2013 American Custom Golf Cars, Inc. Page 22 2nd Screen VEHICLE STATUS MONITOR Section A Battery shows Battery Nominal Voltage Trac Drive Status shows current status Section B 1. Cont. Temp. (Controller Temperature) 2. 3. 4. 5. Motor Volts Motor Amps Motor RPM (Rotations Per Minute) Motor Torque in Percent (%) These values will change as soon as you start driving the vehicle. This will also let you monitor and diagnose the condition of the motor and controller . To proceed to a 3rd Screen push center arrow button [8 ] once. Copyright © 2009-2013 American Custom Golf Cars, Inc. Page 23 3rd Screen VEHICLE INPUTS MONITOR on this screen all switch and input signal conditions are displayed: Forward FS1 Drv Select 1 Hand Brake Inch FWD sw Reverse Seat Drv Select 2 Foot Brake Inch REV sw Note: Drive profile #2 (Drv Select 2) is only used for testing Purpose to see the Range of motor on the controller. Features not used: Seat Hand Brake Inch FWD sw Inch REV sw To proceed to a 4th Screen push center arrow button [8 ] once. Copyright © 2009-2013 American Custom Golf Cars, Inc. Page 24 4th Screen TIME TO DISTANCE This screen displays the acceleration of the vehicle from 0-1000 feet and will automatically record the performance of the vehicle. It also displays the number of hours the vehicle was driven. To proceed to a 4th Screen push center arrow button [8 ] once. Copyright © 2009-2013 American Custom Golf Cars, Inc. Page 25 5th Screen FAULT LOG Log of all faults that have ever possibly occurred on the vehicle. The first 8 of the faults on the screen are fault checks which are created at the time the vehicle is the first programmed. Any fault after that might be relevant. To check new faults you need to press the upper button [# ] twice and the fault will appear (6th Screen). 6th Screen It will give you the date and time the fault first appeared and the explanation what the fault means. Copyright © 2009-2013 American Custom Golf Cars, Inc. Page 26 Note: You will see a sequence fault if not started in neutral this code will clear as soon as you put the car in neutral. The vehicle will possibly give you a cut back code. When the vehicle gets low on power it will automatically cut back, this is a safety precaution to protect the motor and controller. In many cases the fault is just a warning. For example: Thermal cut back just means the motor is too hot and will reduce the power to protect the motor. Push the center arrow button [8 ] once, this will get you back to main screen Copyright © 2009-2013 American Custom Golf Cars, Inc. Page 27 Glove Box The ACG HUMMER H3 is equipped with glove box on the passenger side of the dashboard. Front Trunk Release The “Front Trunk Release Lever” on the ACG HUMMER H3 is located inside the passenger side glove box at the center of the top of the glove box. Pull on Top of the handle towards you , to release the Front Hood Latch Copyright © 2009-2013 American Custom Golf Cars, Inc. Page 28 Accessory Outlet The accessory outlet is located on the dash. This outlet will accept a standard automotive 12-volt accessory outlet and is only intended for moderately powered accessories, such as a cellular phone, Lap top computer, etc. It is not intended to operate large current items, such as cigarette lighters. The accessory outlet is fused at 15 Amperes with fuse “F2”. WARNING! Damage to electrical components may occur from improper use. Cup Holders The vehicle is equipped with two cup holders that are installed in central divider between front seats. CAUTION! Liquids can damage electrical components and the circuit board. Handle all liquids with care. Do not spray water directly into the upper or lower dash. Copyright © 2009-2013 American Custom Golf Cars, Inc. Page 29 Safety Belts Your ACG vehicle is equipped with “Safety Belts” for both driver and passenger. Research has shown that safety belts save lives. Safety belts can reduce the seriousness of injuries in a single vehicle accident. Some of the worst injuries happen when people are thrown from the vehicle. Safety belts provide protection, and they reduce the risk of injury caused by striking the inside of the vehicle. Everyone needs to buckle up all the time, even for short trips. WARNING! Wearing a safety belt incorrectly is dangerous. Safety belts are designed to go around the large bones of your body. These are the strongest parts of your body and can take the forces of a collision best. • Wearing your safety belt incorrectly could increase your risk for injury in a collision. You could suffer internal injuries, or even slide out of part of the belt. Use the instructions in this manual to insure you and your passengers are wearing the safety belts properly. • Two people should never be belted into a single safety belt. People belted together can crash into one another in an accident, causing injury. Never use a lap belt for more than one person, no matter the size of the person. • WARNING! In a collision, you and you passengers can suffer injuries, including fatalities, if you are not properly buckled up. You can strike the interior of your vehicle or other passengers, or you can be thrown out of the vehicle. Always be sure you and others in your vehicle are buckled up properly. CAUTION! Maximum occupancy is limited to two people (including the driver). Copyright © 2009-2013 American Custom Golf Cars, Inc. Page 30 Proper Use of Lap Belt 1. Enter the vehicle and sit back. 2. Grasp the safety belt buckle and slide the buckle up the webbing as far as necessary to make the belt go around your lap. 3. When the safety belt is long enough to fit, insert the buckle into the latch until you hear a click. 4. Position the lap belt across your thighs, and below your abdomen. To remove slack in the lap belt pull up on the belt. To loosen the lap belt if it is too tight, tilt the buckle and pull on the lap belt. A snug belt reduces the risk of sliding under the belt in a collision. 5. To release the belt, push the red button on the latch. CAUTION! Make sure the button on the latch faces upward or outward, so that you are able to unbuckle your safety belt quickly. WARNING! A frayed or torn belt could rip apart in a collision and leave you with no protection. Inspect the belt system periodically, checking for cuts, frays, or loose parts. Damaged parts must be replaced immediately. Do not modify or disassemble the system. Seat belt assemblies must be replaced after a collision if they have been damaged (bent buckle, torn webbing, etc.). WARNING! • A belt that is buckled into the wrong latch will not function or protect you properly. The lap portion of the safety belt could ride too high on your body, possibly causing internal injuries. Always buckle your safety belt into the latch nearest you. • A safety belt that is too loose will not function properly. In a sudden stop, you could jerk too far forward, increasing the possibility of injury. Wear your safety belt snugly. Copyright © 2009-2013 American Custom Golf Cars, Inc. Page 31 SEAT BELTS AND PREGNANT WOMEN We recommend that pregnant women use seat belts throughout their pregnancy. Keeping the mother safe is the best way to keep the baby safe. Pregnant women should wear the lap part of the belt across the thighs and as snug across the hips as possible. Keep the belt low so that it does not come across the abdomen. That way the strong bones of the hips will take the force if there is a collision. SEAT BELT EXTENDER If a seat belt is too short, even when fully extended, your dealer can provide you with a seat belt extender. This extender should be used only if the existing belt is not long enough. When it is not required, remove the extender and store it. WARNING! Using a seat belt extender when not needed can increase the risk of injury in a collision. Only use when the seat belt is not long enough when it is worn low and snug, and in the recommended seating positions. Remove and stow the seat belt extender when not needed. Copyright © 2009-2013 American Custom Golf Cars, Inc. Page 32 Child Restraint Everyone in your vehicle needs to be buckled up at all times - babies and children, too. Every state in the United States and all Canadian provinces require that small children ride in proper restraint systems. This is the law, and you can be prosecuted for ignoring it. Children 12 years and under should ride properly buckled up in a rear seat, if available. According to crash statistics, children are safer when properly restrained in the rear seats, rather than in the front. There are different size and types of restraints for children from newborn size to the child almost large enough for an adult safety belt. Always check the child seat owner’s manual to ensure you have the correct seat for your child. Use the restraint that is correct for your child. WARNING! In a collision, an unrestrained child, even a tiny baby, can become a missile inside the vehicle. The force required to hold an infant could become so great that you could not hold the child, no matter how strong you are. The child and others could be badly injured. Any child riding in your vehicle should be in a proper restraint for the child’s size. Copyright © 2009-2013 American Custom Golf Cars, Inc. Page 33 Infants and Child Restraints Safety experts recommend that children ride rearward-facing in the vehicle until they are at least one year old and weigh at least 20 lbs (9 kg). Two types of child restraints can be used rearward-facing: infant carriers and “convertible” child seats. The infant carrier is only used rearward-facing in the vehicle. It is recommended for children who weigh up to about 20 lbs (9 kg). “Convertible” child seats often have a higher weight limit in the rearward-facing direction than infant carriers do, so they can be used rearward-facing by children who weigh more than 20 lbs (9 kg) but are less than one year old. Both types of child restraints are held in the vehicle by the lap/shoulder belt. This vehicle is not equipped with a “latch” child restraint anchorage system. The lap belt must be used to secure both types of child restraints into the vehicle. WARNING! Improper installation can lead to failure of an infant or child restraint. It could become loose in a collision. The child could be badly injured or killed. Follow the restraint manufacturer’s directions exactly when installing an infant or child restraint. Other children and child restraints Children who weigh more than 20 lbs (9 kg) and who are older than one year can ride forward-facing in the vehicle. Forward-facing child seats and convertible child seats used in the forward-facing direction are for children who weigh 20 to 40 lbs (9 to 18 kg), and who are older than one year. These child seats are also held in the vehicle by the lap belt. The belt-positioning booster seat is for children weighing more than 40 lbs (18 kg), but who are still too small to fit the vehicle’s seat belts properly. If the child cannot sit with knees bent over the vehicle’s seat cushion while the child’s back is against the seat back, they should use a belt-positioning booster seat. The child and belt-positioning booster seat are held in the vehicle by the lap belt. Copyright © 2009-2013 American Custom Golf Cars, Inc. Page 34 Children too large for booster seats Children who are large enough to wear the lap belt comfortably, and whose legs are long enough to bend over the front of the seat when their back is against the seat back, should use the lap belt. • Make sure that the child is upright in the seat. • The lap belt should be low on the hips and as snug as possible. • Check belt fit periodically. A child’s squirming or slouching can move the belt out of position. Not all child restraint systems will be installed as we have described here. Again, carefully follow the instructions that come with the child restraint system. Tips forgetting the most out of your child restraint • Before buying any restraint system, make sure that it has a label certifying that it meets all applicable Safety Standards. ACG also recommends that you try a child restraint in the vehicle seats where you will use it before you buy it. • The restraint must be appropriate for your child’s weight and height. Check the label on the restraint for weight and height limits. • Carefully follow the instructions that come with the restraint. If you install the restraint improperly, it may not work when you need it. • All passenger seat belts are equipped with cinching latch plates. • Seat belts are designed to keep the lap portion tight around the child restraint so that it is not necessary to use a locking clip. • The cinching latch plate will keep the belt tight, however, any seat belt system will loosen with time, so check the belt occasionally and pull it tight if necessary • Buckle the child into the restraint exactly as the restraint manufacturer’s instructions tell you. • When your child restraint is not in use, secure it in the vehicle with the seat belt or remove it from the vehicle. Do not leave it loose in the vehicle. In a sudden stop or collision, it could strike the occupants and cause serious personal injury. NOTE: For additional information refer to www.seatcheck.org or call 1-866-SEATCHECK.. Copyright © 2009-2013 American Custom Golf Cars, Inc. Page 35 Transporting Pets Pets should be restrained in a pet harness, or in a pet carrier that is secured by seat belt. Optional Accessories CAUTION! Use only ACG approved rear accessories. Others may cause damage to the vehicle, and will void warranty. WARNING! Any modifications or alterations to this vehicle could seriously affect its road worthiness and safety and may lead to an accident resulting in serious injury or death. Copyright © 2009-2013 American Custom Golf Cars, Inc. Page 36 Tires & Wheels Tires Proper tire inflation pressure is essential to the safe and satisfactory operation of your vehicle. Tire inflation pressures are provided on your vehicle’s “Tire Information Label” (See page 39, Figure 1). Four (4) primary areas are affected by improper tire pressure: 1. Safety Under-inflation increases tire flexing and can result in tire failure. Over-inflation causes a tire to lose its ability to cushion shock. Objects on the road and potholes could cause tire damage that may result in tire failure. Unequal tire pressure can cause steering problems. CAUTION! After inspecting or adjusting the tire pressure always reinstall the valve stem cap. This will prevent moisture and dirt from entering the valve stem, which could damage the valve stem. 2. Range Improper inflation pressures can cause uneven wear patterns to develop across the tire tread. These abnormal wear patterns will reduce tread life resulting in premature replacement. Under-inflation increases tire rolling-resistance, resulting in lower vehicle range. 3. Ride Comfort and Vehicle Stability Proper tire inflation contributes to a comfortable ride. Over-inflation produces a jarring and uncomfortable ride. Both under-inflation and over-inflation affect the stability of the vehicle and can produce a feeling of sluggish response or over responsiveness. Replace valve stem caps after tire maintenance to prevent dirt from damaging valve stem or preventing the stem from closing properly. 4. Wear Any accelerated wear of tires may be an indicator of improper alignment or poor driving habits. If uncertain, consult your ACG service provider. NOTE: The vehicle’s tire information can be found on the “Tire Information Label” (See page 39, Figure 1). Copyright © 2009-2013 American Custom Golf Cars, Inc. Page 37 WARNING! Improperly inflated tires are dangerous and can cause accidents. • • • Under inflation increases tire flexing and can result in tire failure. Over inflation reduces a tire’s ability to cushion shock. Objects on the road and chuck holes can cause damage that can result in tire failure. Unequal tire pressures can cause steering problems. You could lose control of your vehicle. WARNING! Overinflated or under inflated tires can affect vehicle handling and can fail suddenly, resulting in loss of vehicle control. • Unequal tire pressures from one side of the vehicle to the other can cause the vehicle to drift to the right or left. Always drive with each tire properly inflated. • Replacement Tires The tires on your new vehicle provide a balance of many characteristics. They should be inspected regularly for wear and correct inflation pressure. ACG strongly recommends that you use tires equivalent to the originals in quality and performance when replacement is needed. Failure to use equivalent replacement tires may adversely affect the safety, handling, and ride of your vehicle. We recommend that you contact your dealer or ACG Customer Service regarding any questions you may have on tire specifications or capability. WARNING! • • • • • • Do not use a tire size other than that specified on your vehicle’s tire label. Improperly sized tires can cause vehicle components to wear out prematurely and may change your vehicle’s ride, handling, and steering behavior. In addition, it may affect the accuracy of your speedometer/odometer. Using tires sized other than specified on your vehicle’s tire label could cause you to lose control resulting in serious injury or death. Never use a tire smaller than the minimum tire size listed on your vehicle’s tire label. Using a smaller tire could result in tire overload and failure. Failure to equip your vehicle with tires having adequate speed capability can result in sudden tire failure and loss of vehicle control. Overloading your tires is dangerous. Like under inflation, overloading can cause tire failure. Use tires of the recommended load capacity for your vehicle and Never overload them. Copyright © 2009-2013 American Custom Golf Cars, Inc. Page 38 WARNING! • • • Do not use a tire, wheel size or rating other than that specified for your vehicle. Some combinations of unapproved tires and wheels may change suspension dimensions and performance characteristics, resulting in changes to steering, handling, and braking of your vehicle. This can cause unpredictable handling and stress to steering and suspension components. You could lose control and have an accident resulting in serious injury or death. Use only the tire and wheel sizes with load ratings approved for your vehicle. NOTE: The vehicle’s tire information can be found on the “Tire Information Label” (Reproduced below) (The label location on the vehicle is under Certification Label under driver seat). Copyright © 2009-2013 American Custom Golf Cars, Inc. Page 39 Tire Changing & Jacking Points In the event of a flat tire, you need to observe the following precautions: Park the vehicle on a firm level surface; avoiding icy or slippery areas. Set the parking brake and block both the front and rear of the tire diagonally opposite the jacking position. For example, if the right front tire is being changed, block the left rear wheel. Use a small floor style jack or low profile scissors jack only. Jack the vehicle only from the side of the vehicle, on the main frame rail, at the points indicated by where the tub or floor panel support and the main frame rail are welded (See picture below). Do not use the rear Trailer Hitch Adapter indicated by as lifting point ! However it can be used as Tie-Down point during transport see page 60 for details. The ACG HUMMER H3 eGC chassis (body removed). CAUTION! Jacking at any location other than the proper jacking points may cause major vehicle body damage. WARNING! Getting under a jacked-up vehicle is dangerous. The vehicle could slip off the jack and fall on you. Never get any part of your body under a vehicle that is on a jack. Never start or run the motor when the vehicle is on a jack. If you need to get under the vehicle, make sure the vehicle is first located on a flat solid surface, and is supported securely by automotive jack stands or, take the vehicle to a service center where a technician can put it on a properly adjusted hoist. Copyright © 2009-2013 American Custom Golf Cars, Inc. Page 40 Brakes ACG HUMMER H3 eGC has Front Disc Brakes which are self adjusting. Brake Fluid Level The Brake Fluid Reservoir is located under the hood, at the Front to the side of the hood latch mechanism. The fluid level of your brake system is a very important safety component. It should be checked according to the Monthly Vehicle Maintenance Schedule, on Page 55, by removing the Brake Fluid Reservoir Cap and observing the fluid level. The maximum fluid level should be at about one inch (25 millimeters) below the reservoir top. If it is substantially lower, fill it with DOT 4 Brake Fluid. If the Brake Fluid needs to be refilled more frequently than every other month then check the entire Brake System for any leakage and see your dealer for service or call immediately ACG Customer Service at (909) 597-2885 . CAUTION! Brake fluid may cause damage to painted and finished surfaces. Use caution when refilling the brake fluid reservoir. CAUTION! Use only DOT 4 Brake Fluid from a sealed Container. Clean Filler Cap before removing. Copyright © 2009-2013 American Custom Golf Cars, Inc. Page 41 Pre-Operation and Daily Safety Checklist Every ACG HUMMER H3 eGC is thoroughly inspected and adjusted at the factory and again re-inspected by your ACG Dealer before it arrives at your door. However, upon receiving your new ACG HUMMER H3 eGC you should take time to become familiar with its controls and operation. The following checklist should be used daily to ensure that the vehicle is in proper working condition and in conjunction with the Periodic Service Schedule. Any problems should be corrected by an authorized American Custom Golf Cars, Inc. distributor/dealer or a fully trained technician. General: All parts should be in place and properly installed. Be sure that any additional attachments are securely mounted prior to the operation of your vehicle. Tires: Check for proper tire pressure on your new ACG HUMMER H3 eGC. Visually inspect the tires for wear, damage, and proper inflation on a daily basis. NOTE: The vehicle’s tire pressure information can be found on the “Tire Information Label” (See Page 39) Batteries: Check battery posts. Wires should be tight and free from corrosion. Charge Batteries fully before first use of the vehicle. Charger Receptacle: Visually inspect for cracks, loose connections, and frayed wiring. Copyright © 2009-2013 American Custom Golf Cars, Inc. Page 42 Performance Inspection After you have familiarized yourself with the operation of all the controls of the ACG HUMMER H3 eGC and have read and understood the driving instructions, take the vehicle for a test drive. Use the following checklist as a guide to inspect the vehicle and check daily for proper operation. Any problems or deficiencies you may find should be corrected at once by an authorized American Custom Golf Cars, Inc. dealer/distributor or a trained technician. Check For: Forward – Neutral - Reverse Switch: Check for proper operation. Brakes: Be sure the brakes function properly. When the brake pedal is depressed under moderate pressure, it should not reach to the floor of the vehicle. When properly adjusted, the golf cart should come to a straight, smooth, stop within 20 feet. If the vehicle swerves, or fails to stop within 20 feet, have the brake system checked and adjusted. The brake adjustment must be maintained so that the brake pedal cannot reach the floor when depressed. The hydraulic disk brake actuator should be greased monthly to ensure that it is clean and that it can slide smoothly so that the brakes will operate smoothly without binding up. Park Brake: When in use, the park brake should lock the wheels and hold the vehicle stationary. It should automatically release when either the accelerator or brake pedal is depressed. Steering: The vehicle should not have any play in the steering wheel and it should steer easily without obstruction. Accelerator: When the key switch is in the “ON” position and the “Forward–Neutral-Reverse Switch” is in the “Forward” position, as the accelerator pedal is depressed, the motor should start and the vehicle should smoothly come up to full speed. When the pedal is released it should return itself to the original or “zero” position and the motor should stop. General: Listen for any unusual squeaks or rattles. Check the vehicle’s ride and performance. Have an American Custom Golf Cars, Inc. distributor or dealer or a fully trained technician investigate anything unusual. Copyright © 2009-2013 American Custom Golf Cars, Inc. Page 43 Driving Instructions WARNING! No person should be allowed to operate the vehicle without being instructed in the proper use and operation of the vehicle’s controls. Each first time driver should be accompanied by an experienced driver on a test drive before being allowed to operate the vehicle alone. 1. Only licensed drivers should be allowed to drive this vehicle. 2. If renting or loaning the vehicle, make sure the person driving the vehicle is familiar with all controls and operating procedures before allowing the vehicle to be driven. 3. No more than two people should be in the vehicle at any time. 4. Be sure all persons can properly operate the vehicle prior to allowing them to drive the vehicle. 5. Be sure all passengers are capable of securing themselves with provided “Seat Belts” before allowing them to ride in the vehicle. 6. When using the vehicle at night or in low light situations make sure that the “Light Switch” is in the ON or “I” position as this ensures that the headlights and tail lights are on to increase visibility and safety. 7. Be sure that the vehicle is at a complete stop before shifting the “Forward-Neutral-Reverse Switch”. Failure to do so may cause injury to an unsuspecting passenger and/or damage to the vehicle. 8. To avoid being struck by the vehicle, do not stand in front or behind the vehicle. 9. Operate vehicle only from driver seat. 10. To prevent falling from vehicle, remain seated when vehicle is in motion. Driver should always drive vehicle with both hands on steering wheel. 11. To avoid possible serious injury, keep your entire body inside the vehicle when it is in motion. 12. Never leave children unattended in or near the vehicle. Copyright © 2009-2013 American Custom Golf Cars, Inc. Page 44 13. To prevent the vehicle from overturning, drive slowly straight up and down slopes. Slope exceeding 20% incline should be avoided. 14. Avoid sudden stops, sudden starts, and abrupt turns to prevent possible injury to an inattentive passenger or damage to the vehicle. 15. Reduce speed for adverse driving conditions such as wet grass or terrain to avoid the possibility of losing control of or overturning the vehicle. 16. The vehicle should not be driven on roadways where it is prohibited by local laws. 17. Do not drive vehicle while under the influence of alcohol, drugs, or medications, prescription or otherwise as they may affect your ability to drive. 18. Drive slowly through turns to avoid overturning the vehicle. 19. Use brakes to reduce speeds when coasting downhill. NOTE: The ACG HUMMER H3 eGC is not specially equipped for handicapped persons. Copyright © 2009-2013 American Custom Golf Cars, Inc. Page 45 Starting the Vehicle 1. Study and understand controls. 2. Make sure everyone is seated with all parts of their body inside the vehicle. 3. Make sure everyone’s “Seat Belts” are properly fastened. 4. Make sure front wheels are turned in the desired travel direction. 5. Turn “Key Switch” to the “ON” position and make sure nothing is in your path. 6. Select the travel direction using the “Forward–Neutral-Reverse Switch”. 7. Slowly depress the “Accelerator Pedal” (GO) and bring vehicle up to desired speed. 8. The park brake will automatically release when either the accelerator or brake pedal is depressed. Stopping or slowing the Vehicle 1. Release “Accelerator Pedal” (GO) and depress the “Brake Pedal” (STOP). The vehicle will begin to come to a stop. WARNING! Driving through water may affect the brakes. When stopped on a hill, use the brake pedal to hold your position. Do not use accelerator pedal. Parking and Leaving the Vehicle 1. After vehicle comes to a complete stop, firmly depress park brake pedal “PARK” until it locks into position to prevent the vehicle from rolling. 2. Put the “Forward – Neutral - Reverse Switch” in the “Neutral” Position 3. Turn the “Key Switch” to the “OFF” position. Remove key to prevent theft and/or unauthorized use of the vehicle. Copyright © 2009-2013 American Custom Golf Cars, Inc. Page 46 Batteries Your vehicle is operated as a 48-volt unit with six (6) 8-Volt batteries. The batteries are Trojan® T-875 deep-cycle batteries, specially designed and produced for use in an electric vehicle. If the batteries need to be replaced at any time for any reason, do not use automotive batteries. New batteries usually will not deliver their full capabilities until they have been discharged and recharged 15 to 30 times. To obtain maximum service life on your batteries, be sure to fully charge them prior to using the vehicle for the first time and maintain proper fluid levels in all batteries. Battery Care To keep the batteries in top working condition, this maintenance program should be followed on a regular basis: 1. The batteries should always be kept clean and corrosion free. The tops and terminals should be cleaned with a solution of one cup of baking soda per gallon of water. Before rinsing the batteries make sure the caps to the batteries are tight so that the cleaning solution does not enter the battery. Please be sure to dispose of any waste water properly. 2. The fluid level in the batteries should be checked on a weekly basis. If fluid needs to be added, it should only be done after the batteries have been charged unless the top of the plates are visible prior to charging. Then, you should add just enough water to cover the tops of the plates, charge the batteries and finally check the water level again. 3. After using your golf cart for any period of time, the batteries should be charged. CAUTION! If battery wire terminals are damaged or corroded, they should be replaced or cleaned as necessary. Failure to do so may cause them to overheat during operation. WARNING! – HIGH VOLTAGE The battery pack is at a high voltage. High voltage is always present at the battery terminals. Never touch the battery terminals when performing maintenance procedures. Copyright © 2009-2013 American Custom Golf Cars, Inc. battery Page 47 Battery Inspection & Maintenance Inspection There are many tools that may help in properly caring for and maintaining batteries. Below is a list of basic items that ACG & Trojan recommends for this task: Recommended Equipment: 3.) 4.) 5.) 6.) Wrench Distilled Water Voltmeter Hydrometer 3.) 4.) 5.) 6.) Post Cleaner Baking Soda Vaseline Goggles & Gloves CAUTION! Always wear protective clothing, gloves, and goggles when handling batteries, electrolyte, and charging your battery. Batteries should be carefully inspected on a regular basis in order to detect and correct potential problems before they can do harm. It is a great idea to start this routine when the batteries are first received. Inspection Guidelines: 1. Examine the outside appearance of the battery. 3.) Look for cracks in the container. 4.) The top of the battery, posts, and connections should be clean, free of dirt, fluids, and corrosion. If batteries are dirty, refer to the Cleaning section for the proper cleaning procedure. 5.) Repair or replace any damaged batteries. 2. Any fluids on or around the battery may be an indication that electrolyte is spilling, leaching, or leaking out. 4.) Leaking batteries must be repaired or replaced. 3. Check all battery cables and their connections. Look closely for loose or damaged parts. Battery cables should be intact; broken or frayed cables can be extremely hazardous. Replace any cable that looks suspicious. Copyright © 2009-2013 American Custom Golf Cars, Inc. Page 48 CAUTION! If battery wire terminals are damaged or corroded, they should be replaced or cleaned as necessary. Failure to do so may cause them to overheat during operation. 4. Tighten all wiring connections to the proper specification (see below). Make certain there is good contact with the terminals. Proper Torque Values for Connection Hardware: Flooded Side 70-90 in-lbs Wing nut 95-105 in-lbs LPT 95-105 in-lbs Stud 120-180 in-lbs LT 100-120 in-lbs VRLA Button 90 to 100 in-lbs LT 100-120 in-lbs WARNING! Do not over tighten terminals. Doing so can result in post breakage, post meltdown, or fire. Copyright © 2009-2013 American Custom Golf Cars, Inc. Page 49 Cleaning Batteries seem to attract dust, dirt, and grime. Keeping them clean will help one spot trouble signs if they appear and avoid problems associated with grime. 1. Check that all vent caps are tightly in place. 2. Clean the battery top with a cloth or brush and a solution of baking soda and water. When cleaning, do not allow any cleaning solution, or other foreign matter to get inside the battery. 3. Rinse with water and dry with a clean cloth. 4. Clean battery terminals and the inside of cable clamps using a post and clamp cleaner. Clean terminals will have a bright metallic shine. 5. Reconnect the clamps to the terminals and thinly coat them with petroleum jelly (Vaseline) to prevent corrosion. 6. Keep the area around batteries clean and dry. CAUTION! Battery acid from cleaning batteries can damage vehicle, driveway or garage floor. Copyright © 2009-2013 American Custom Golf Cars, Inc. Page 50 WATERING (FLOODED BATTERIES ONLY) Flooded batteries need water. More importantly, watering must be done at the right time and in the right amount or else the battery's performance and longevity suffers. Water should always be added after fully charging the battery. Prior to charging, there should be enough water to cover the plates. If the battery has been discharged (partially or fully), the water level should also be above the plates. Keeping the water at the correct level after a full charge will prevent having to worry about the water level at a different state of charge. Depending on the local climate, charging methods, application, etc. ACG recommends that batteries be checked once a month until you get a feel for how thirsty your batteries are. Important things to remember: 1. Do not let the plates get exposed to air. This will damage (corrode) the plates. 2. Do not fill the water level in the filling well to the cap. This most likely will cause the battery to overflow acid, consequently losing capacity and causing a corrosive mess. 3. Do not use water with a high mineral content. Use only distilled or deionized water only. CAUTION! The electrolyte is a solution of acid and water so skin contact should be avoided. Copyright © 2009-2013 American Custom Golf Cars, Inc. Page 51 Step by step watering procedure: 1. Open the vent caps and look inside the fill wells. 2. Check electrolyte level; the minimum level is at the top of the plates. 3. If necessary add just enough water to cover the plates at this time. Add only water, never acid, to cells ! (distilled water is highly recommended) 4. Put batteries on a complete charge before adding any additional water (refer to the “Charging Batteries” section, on page 43). 5. Once charging is completed, open the vent caps and look inside the fill wells. 6. Add water until the electrolyte level is 1/8" below the bottom of the fill well. 7. A piece of rubber can be used safely as a dipstick to help determine this level. 8. Clean, replace, and tighten all vent caps. WARNING! Never add acid to a battery. CAUTION! If necessary only add Water to battery cells. Use of Distilled Water is recommended. Use of contaminated Water can permanently damage the battery. Copyright © 2009-2013 American Custom Golf Cars, Inc. Page 52 Charging Batteries CAUTION! Be sure that the “Key Switch” is in the “OFF” position prior to charging. 1. Your vehicle is equipped with an on board charger. To begin charging the batteries, insert a UL approved 3 prong extension cord into any 110volt outlet and plug the other end into the charging cord receptacle located below the “Forward – Neutral - Reverse Switch”. (Refer to supplied “Battery Charger Manual” and “Charging Procedures Manual” for further information regarding the operation of the charger.) 2. Your charger has an on-board computer that is actuated when the charger is plugged in. The charger will turn on automatically and when the optimum amount of energy to charge your batteries has been delivered the charger will turn itself off. As long as the charger is left plugged in until it turns itself off, over and under charging will be avoided. NOTE: The first time your batteries are charged, the approximate time of charge will be 21-25 hours. The Charger features a microprocessor controller that reads the battery banks so that it knows what the optimum capacities of each battery are. After the first charge, the average charging time is 7-8 hours. Batteries should be charged even if they have only been used for a short period of time. The charger will turn on and off automatically when the batteries are fully charged. CAUTION! Never charge batteries if plates are exposed above water level. CAUTION! Batteries can be permanently damaged (and the battery warranty voided) if allowed to remain 30 days or more with low charge. CAUTION! Fully charge batteries before storing. • In hot climates, battery self-discharge will increase. • In cold climates, batteries could freeze if not properly charged. If the vehicle will not be used for 10 or more days, leave the car plugged in. Copyright © 2009-2013 American Custom Golf Cars, Inc. Page 53 Battery Replacement CAUTION! If the batteries are replaced, make sure they are the exact type and make originally supplied with the vehicle. Failure to follow this caution can result in damage to the vehicle’s electrical system. CAUTION! Each vehicle is programmed at the factory for a particular battery type. Switching battery types can only be done by ACG certified technician. WARNING! Improper handling of high voltage wiring, batteries, or control systems could result in serious or fatal injury by electric shock. Only qualified technicians should repair or access high voltage wiring, battery packs, and associated systems. Battery Cable Replacement CAUTION! It is essential, when replacing the cables on the batteries that the positive cable is attached to the positive post (+) and the negative cable is attached to the negative post (-). Battery posts are identified on the battery case as positive (+) and negative (-). Cable clamps should be tight on the terminal posts and free of corrosion. Battery Disposal Lead-acid batteries are recyclable. Return whole scrap batteries to distributor, manufacturer or lead smelter for recycling. For neutralized spills, place residue in acid-resistant containers with absorbent material, sand or earth and dispose of in accordance with local, state and federal regulations for acid and lead compounds. Contact local and/or state environmental officials regarding disposal information. You can also contact ACG Customer Service at (909) 597-2885 for information. Copyright © 2009-2013 American Custom Golf Cars, Inc. Page 54 Additional Battery Service Warnings & Cautions WARNING! Always wear safety glasses or approved eye protection when servicing the vehicle. Wear a full-face shield and gloves when working with or around batteries and electrical connectors. Always use insulated tools when working with or near batteries. WARNING! Battery fluid is a corrosive acid solution and can burn or blind you. Do not allow battery fluid to contact eyes, skin or clothing. If acid splashes in eyes or on the skin, flush the area immediately with large quantities of water. Battery gas is flammable and explosive. Keep flame or sparks away from the battery or any other booster source. Do not allow battery cable clamps to touch each other. Battery posts, terminals and related accessories contain lead and lead compounds. Wash your hands after handling. CAUTION! Battery acid from cleaning batteries can damage vehicle, driveway or garage floor. WARNING! The “Key Switch” will disable the vehicle by disconnecting the battery pack from the motor. It does not disable the battery pack. HIGH VOLTAGE will be present at the battery terminals. HIGH BATTERY VOLTAGE IS ALWAYS PRESENT. DO NOT TOUCH THE BATTERY TERMINALS. Copyright © 2009-2013 American Custom Golf Cars, Inc. Page 55 Periodic Maintenance DAILY TASKS 1. Charge Batteries fully before first use of vehicle. 2. Check battery terminals for tight connections. 3. Visually inspect the tires for wear, damage, and proper inflation. 4. Check for proper operation of parking brake. 5. Check seat belts for proper operation. Copyright © 2009-2013 American Custom Golf Cars, Inc. Page 56 Periodic Maintenance MONTHLY TASKS 1. Check all six (8 Volt) Flooded batteries for proper water level. Use only Distilled Water for addition. (Not necessary if vehicle is equipped with Sealed or maintenance free Gel batteries). 2. Check battery terminals for tight connections. 3. Check tires for correct air pressure and wear. 4. Check for proper operation of parking brake. 5. Check brake fluid reservoir for proper brake fluid level. 6. Check brake lines for leaks. 7. Grease the hydraulic disk brake actuator, and check for proper operation of service brake. 8. Check all wheel bearings for looseness or free-play. Copyright © 2009-2013 American Custom Golf Cars, Inc. Page 57 Cleaning CARE AND CLEANING Cleaning the Windshield Please be extremely careful when cleaning the Windshield on your ACG HUMMER H3 eGC as it is made from acrylic plastic. ACG recommends using Windshield Washer Fluid to remove normal dust and dirt. A liquid household glass cleaner can also be used. Do not use abrasive cleaners on the windshield, as they will cause scratches. CAUTION! Be very careful when cleaning the acrylic glazing as it can be scratched or damaged. Do not use a cleaner with an abrasive, a combination cleaner and wax or any solvent that contains ethyl or methyl alcohol. Do not use products containing ammonia, soaps, or abrasives. Never use gasoline or any cleaning solvent. These products scratch or destroy the surface of the windows. To remove oil, grease or road tar use isopropyl alcohol and then wash the windows with water. Dry gently with a soft cloth or chamois. Cleaning the Exterior The best way to preserve your vehicle’s finish is to wash the vehicle regularly. Mild liquid detergents (no strong soaps or chemical detergents), can be used. Rinse promptly after cleaning. Dry the finish with a soft, clean chamois or towel to avoid surface scratches and water spotting. NOTE: To avoid spotting, do not wash your vehicle in direct sunlight. Copyright © 2009-2013 American Custom Golf Cars, Inc. Page 58 Cleaning the Seats To clean the seats of your ACG vehicle, use water or mild liquid detergent. Rubbing seats with warm water and a clean, damp cloth will also remove dirt. Substances such as tar, asphalt, and other soils will stain if not removed quickly. Use a clean cloth and solvent type vinyl cleaner and then wash the area thoroughly with a damp cloth and mild liquid detergent. Finish by rinsing with cool water. Dry with a soft, clean chamois or towel to avoid surface scratches or water spotting. Cleaning the Interior Use mild liquid detergent and warm water to clean the interior. Wipe using a cloth dampened with warm or cool water or remove detergent or deposits. CAUTION! Do not spray the interior of your vehicle. Water contact with the dash panel, instrument panel or switches could damage the electrical system. WARNING! Do not use volatile solvents for cleaning purposes. Many are potentially flammable, and if used in closed areas they may cause respiratory harm. Protection From the Elements Covering your vehicle is optional; however, prolonged exposure to UV light may deteriorate the exterior and interior finish. It is recommended to protect the vehicle whenever possible and preferably to store it indoors during extended non-use periods. ACG Custom Vehicle Cover is available at ACG dealerships. Copyright © 2009-2013 American Custom Golf Cars, Inc. Page 59 Transport or Towing Transporting Your Vehicle The best way to transport your vehicle is in an enclosed trailer. If it is necessary to transport your vehicle on an open trailer, follow these guidelines: 1. Never transport your vehicle while the vehicle is facing rearward on the trailer. 2. With the vehicle facing forward, pull the trailer at speeds of 55 MPH or less. 3. Secure any items that could be affected by airflow through the vehicle. 4. Do not secure across any plastic body or floor panel component of the vehicle. Use Tie-Down points on the frame identified with an “X” as shown on page 40. NOTE: ACG is not responsible for damage incurred or lost items due to vehicle towing. CAUTION! TOWING THE VEHICLE IS NOT RECOMMENDED. This vehicle is not designed for dolly towing. Any vehicle failures resulting from dolly towing will not be covered under vehicle warranty. Copyright © 2009-2013 American Custom Golf Cars, Inc. Page 60 Specifications Overall Length Overall Width Height to top of Windshield Wheelbase Ground Clearance Weight (standard golf cart no batteries) Weight (Curb, with Batteries) Weight (GVWR) Front Wheels Rear Wheels Front Tire Size Rear Tire Size Front Brakes Rear Brakes Drive Motor Transaxle Electrical System Batteries Speed Controller Steering Chassis Body Body Finish Interior Material Carpet Forward Speed Braking Distance (at 12 mph) Standard Seating Capacity 124 Inches 51 Inches 55 Inches 78 Inches 7.2 Inches 541 lb. 1,200 lb. 1,800 lb. 15”x7.5” 15”x7.5” P205 65/R15 P205 65/R15 Hydraulic Disk 7” Mechanical Drum Type Direct Drive, 48 Volts AC, 3-phase Induction, 17.5 hp Double Reduction, high speed gears 48 volts DC Six (6) @ 8V each in series = 48V DC SEVCON 450 Amp Reduced speed reverse Self-adjusting rack and pinion Aluminum I-Beam One-piece Fiberglass Composite Automotive Paint Marine-type Vinyl Marine-type Synthetic <15 mph 8 ft. 2 Copyright © 2009-2013 American Custom Golf Cars, Inc. Page 61 2013 ACG HUMMER H3 electric Golf Cart Manufactured by: American Custom Golf Cars, Inc. (ACG) 15740 El Prado Rd. Chino, CA 91710 USA (909) 597-2885 (909) 597-7183 fax www.acgcars.com ACG logo is registered trademark of American Custom Golf Cars, Inc. HUMMER and H3 Are registered trademarks of General Motors Corporation This Manual is effective as of May 15, 2012 Copyright © 2009-2013 American Custom Golf Cars, Inc.