1
Sears Item No.
f
!
BLADEZ
F
I
T
N
VeloPro
ASSEMBLY
OPERATION
WARRANTY
PARTS
15
5
5
o
HW3018B
MAINTENANCE
ORDERI
NG
CA UTION: Exe_vise of a strenuous nature, as is customarily done on this equipment, should not be
undertaken without first consult#_g a physician. No specific health claims are made or implied as they
relate to the equipment.
IMPORTANT."
Read all instt_tctions carefully before using this produet. Retain this owner's
manual for future reference.
TABLE OF CONTENTS
Safety ........................................................
1
Training ......................................................
3
Pre-Assembly
8
Assembly
Instructions
Instructions
Monitor Operations
Maintenance
.............................
9
....................................
13
..........................................
Troubleshooting
Exploded
...........................
...................................
View .............................................
14
15
16
Parts List ..................................................
17
Warranty ...............................................
18
IMPORTANT
Carefully
read through the instructions
information
SAFETY
ADVICE
contained in this manual. It provides you with important
about assembly, safety and use of the machine.
1 This unit has been designed for liome use. The weight of the user must not exceed 275 Ibs. (125
kg.)
2 Parents and/or those responsible for children should always take their curious nature into account
and how this can often lead to hazardous situations and behavior resulting in accidents.
circumstances
should this appliance
Under no
be used as a toy.
3 The owner is responsible for ensuring that anyone who uses the machine is duly informed about the
necessary
precautions.
PRECAUTIONS
This bike
has been designed
and constructed
to provide
maximum
safety. Nevertheless,
certain
precautions should be taken when using exercise equipment. Read the whole manual before assembling
and using the bike. The following safety precautions should also be observed:
1. Keep children or pets away from this equipment at all times. DO NOT leave them unsupervised in the
room where this bike is kept.
2.
This bike does not free-whee!. You can stop the bike immediately by pus h..i..ngdown the ernerqency
brake on the tension knob while you are exercising.
3.
It can only be used by one person at a time.
4.
If you experience dizziness, nausea, chest pains or any other symptom while using this appliance
STOP the exercise. SEEK MEDICALATTENTION IMMEDIATELY!
5.
Use the unit on a met placed level, solid surface. Adjust the stabilizer for assure stability.
6.
Keep yourhands
well awayfrom
anyofthe
moving parts.
7. Wear clothing suitable for doing exercise. Do not use baggy clothing that might get caught up in the
bike. Always wear running shoes or trainers when using the machine.
8. This appliance must only be used for the purposes described in this manual. DO NOT use accessories
that are not recommended bythe manufacturer.
9.
Do not place sharp objects near the machine.
t0. Disabled person should not use the machine without the assistance of a qualified trainer or a doctor.
11. Do warm up stretching exercises before using the equipment.
12. Do not use the bike if it is not working correctly
13. Review all the warnings affixed to the machine and replace all the labels if damaged, illegible, or
removed.
14. Functional and visual inspections of the equipment shall be made after assembly is complete.
15. Don't exceed the MAX mark when you're adjusting the handlebar post or seat post.
KEEP THESE INSTRUCTIONS
BLADEZ"
F
{
T
N
E
S
S
SAFE FOR FUTURE
USE
IMPORTANT
SAFETY ADVICE
14. Spinning pedals can cause injury. Pedal speed should be reduced in a controlled manner.
15. For safety, a perimeter distance of 3 feet / I meter is required before operating the unit.
16. User must adjust the seat and handlebars to the user's height requirements.
Please be sure the
adjustment knob is locked tight and seat and handlebars are secure.
17. Do not ride the bike in a standing position.
18. The bike should only be used for the home. Not meant for commercial use.
19. Before every use please examine brake pads for signs of wear. Brake pads are susceptible to
damage and should be replaced over time.
20. This bike is not suitable for therapeutic
use. Consult a physician prior to starting an exercise
program.
21. This bike should only be used after a thorough review of the assembly_ operation manual and the
warnings
22. Distributed by BH North America Corporation 20155 ellipse, Foothill Ranch, California, 92610 USA
Toll Free: (866)325-2339
CAUTION"
Consult your doctor before beginning to use the bike. This advice is especially important
for those over 35 or suffering from health problems. Read all of the instructions before using any
exercise equipment.
/Keep children off and away from the bike.
/Spinning pedals can cause injury.
/This bike does not free-wheel.
/Pedal speed should be reduced in a controlled manner.
/The exercise bicycle should only be used atter a thorough review of the
operation manual
BLADEZ"
F
I
T
N
E
S
S
2
TRAINING
GUIDELINES
Exercise is one of the most important factors in the overall health of a n individual. Listed among its
be nefits are:
•
Increased capacity for physical work (strength endurance)
•
Increased cardiovascular
•
Decreased risk of coronary heart disease
-
Changes in body metabolism,
•
Delaying the physiological
•
Physiological effects, e.g. reduction
(heart and arteries/veins)
and respiratory
efficiency
e.g. losing weight
effects of age
Basic Components of Physical Fitness
There are four all encompassing components
in stress, increase in self-confidence,
etc.
of physical fitness and we need to briefly define each
and clarify its role:
Strength is the capacity of a muscle to exert a force against resistance. Strength contributes
and speed and is of great importance to a majority of sports people.
Muscular Endurance is the capacity to exert a force repeatedly
capacity of your legs to carry you 10 Km without
to power
over a period of time, e.g. it is the
stopping.
Flexibility is the range of motion about a joint. Improving flexibility
involves the stretching of muscles
and tendons to mainta in or increase suppleness, and provides increased resistance to muscle injury
or sore ness.
Cardio-Respiratory
functioning
Aerobic
Endurance
is the most essential component
of physical fitness. It is the efficient
of the heart and lungs.
Fitness
The largest amount of oxygen that you can use per minute during exercise is called your maximum
oxygen uptake (MVo2). This is often referred to as your aerobic capacity.
The largest amount of
oxygen that you can use per minute during exercise is called your oxygen uptake.
The effort that you
can exert over a prolonged period of time is limited by your ability to deliver oxygen to the working
muscles. Regular vigorous exercise produces a training effect that can increase your aerobic capacity
by as much as 20 to 30%. An increased MVO2 indicates an increased ability of the heart to pump
blood, of the lungsto
ventilate oxygen and of the muscles to take up oxygen.
Anaerobic Training
This means "without oxygen" and is the output of energywhen the oxygen supply is insufficient to
meet the body's long term energy demands. (For example, 100 meter sprint).
The Training Threshold
This is the minimum
level of exercise which is required to produce significant improvements in any
physical fitness parameter.
Progression
As your become more fit, a higher intensity of exercise is required to create an overload and
therefore
provide continued improve ment
Overload
This is where you exercise at a level above that which can be carried out comfortably. The intensity,
duration
and frequency of exercise should be above the training threshold and should be gradually
BLADEZ"
F
f
T
N
E
S
S
3
TRAINING
GUIDELINES
(cont'd)
increased as the body adapts to the increasing demands. As your fitness level improves, the training
threshold should be raised. Working through
factor is important.
your program and gradually increasing.the
overload
Specifics
Different forms of exercise produce different
results. The type of exercise that is carried out is
specific both to the muscle groups being used and to the ener_ sou rce involved. There is little
transfer of the effects of exercise, i.e. from strength training to cardiovascu la r fitness. That is why it
is important
to have an exercise program tailored to your specific needs.
Reversibility
If you stop exercising or do not doyour program often enough, you will lose the benefits you have
gained. Regular workouts are the key to success.
Warm Up
Every exercise program should start with a warm upwhere the body is prepared for the effort to
come. It should be gentle and preferably use the muscles to be involved later. Stretching should be
included in both your warm up and cool down, a nd should be performed
intensity aerobic activity or callisthenic
after 3-5 minutes of low
type exercise.
Warm Down or Cool Down
This involves a gradual decrease in the intensity of the exercise session. Following exercise, a large
supply of blood remains in the working muscles. If it is not returned promptlyto
the central
circulation, pooling of blood may occur in the muscles.
Heart Rate
As you exercise, the rate at which your heart beat increases. This is often used as a measure of the
required intensity
of exercise. You need to exercise ha rd en ough to co ndition your circ ulatory system,
and increase your pulse rate, but not enough to strain your heart. Your initial level of fitness is
important in developing an exercise program for you. If you are starting off, you can get a good
training effect with a heart rate of 110-120 beats per minute (bpm). If you are more fit, you will need
a higher threshold of stimulation.
To begin with, you should exercise at a level that elevates your
heart rate to about 65 to 70% of your maximum. If you find this is too easy, you may want to
increase it, but it is better to lean on the conservative
side.
As a rule of thumb, the maximum heart rate is 220 minus your age. As you increase in age, your
heart, like other muscles, loses some of its efficiency. Some of its natural loss is won back as fitness
°
im proves. The following
Age
table is a guide to those who are "starting fitness".
25
30
35
40
45
50
55
60
65
21
20
19
19
18
18
120
114
114
108
108
Target heart Rate
lOSecond Count
23
22
22
Beats per Minute
138
132
132 ...... 126
Pulse Count
The pulse count (on your wrist or carotid artery in the neck, taken with two index fingers) is done for
ten seconds, taken a few seconds after you stop exercising. This is for two reasons:
BLADEZ
I=
I
T
N
°
E
S
S
4
TRAINING
GUIDELINES
(cont'd)
a) Ten seconds are long enough for accuracy, (b) The pulse count is to approximate your BPM rate at
the time you are exercising. Since heart rate slows as you recover, a longer count isn't as accurate.
The target is not a magic number, but a general guide.
quite comfortably
If you're above average fitness, you maywork
a little above that suggested for your age group.
The following table is a guide to those who are keeping fit. Here we are working atabout
maximum.
Age
25
30
35
40
45
50
55
60
65
Target heart Rate
10 Second Count
26
26
25
24
23
22
22
21
20
Beats per Minute
!56
156
150
144
138
132
132
126
120
80% of
Don't push yourself too hard to reach the figures on this table. It can be very uncomfortable if you
overdo it. Let it happen naturally as you work throughyour
program. Remember, the target is a guide,
not a rule, a little above or below is just fine.
Two final comments:(1) don't be concerned with day to day variations in your pulse rate, being under
pressure or not enough sleep can affect it;(2) your pulse rate is a guide, don't become a slave to it.
Muscle Soreness
For the first week or so, this may be the only indication you have that you are on an exercise program.
This, of course, does depend on your overall fitness level. A confirmation that you are on the correct
program is a very slight soreness in most major muscle groups. This is quite normal and will disappear
in a matter of days. Ifyou experience major discomfort, you may be on a program that is too
advanced oryou have increased your program too rapidly.
If you experience PAl N during or after exercise, your body is tel ling you sore ething.
and consult you r doctor.
Stop exercising
What to Wear
Wear clothing that will not restrict your movement
enough to allow the bodyto
in any way while exercising. Clothes should be light
cool. Excessive clothing that causes you to perspire more than you
normally would while exercising, gives you no advantage. The extra weight you lose is body fluid and
will be replaced with the next glass of water you drink. It is advisable to wear a pair of gym or running
shoes or "sneakers".
Breathing during Exercise
Do not hold your breath while exercising.
Breathe normally as much as possible. Remember,
breathing involves the intake and distribution
of oxygen, which feeds the working muscles.
Rest periods
Once you start your exercise program, you should continue through to the end. Do not break off
halfway through and then restart at the same place later on without going through the warm-up stage
again. The rest period required between strength training exercises may vary from person to person.
This will depend mostly on your level of fitness and the program you have chosen. Rest between
exercises by all means, but do not allow this to exceed two minutes. Most people manage with half
minute to one minute rest periods
BL4 p EZ"
5
TRAINING
GUIDELINES
(cont'd)
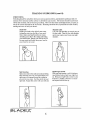
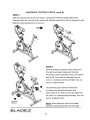
STRETCHING
Stretching should be included in both your warm up and cool down, and should be performed atter 3-5
minutes of low intensity aerobic activity or callisthenic type exercise. Movements should be performed
slowly and smoothly, with no bouncing or jerking. Move into the stretch until slight tension, not pain, is
Felt in the muscle and hold for 20-30 seconds. Breathing should be slow, rhythmical and under control,
making sure never to hold your breath.
Head Roll
Rotate your head to the right for one count,
feeling the stretch up the side of your neck.
Next, rotate your head back for one count,
stretching your chin to the ceiling and letting
your mouth open. Rotate your head to the left
for one count, and finally, drop your head to
your chest for one count
Shoulder Lifts
Lift your fight shoulder up toward your ear
for one count. Then Iift your left shoulder
up for one count as you lower your fight
shoulder.
Side Stretches
Open your arms to the side and continue lifting
them until they are over your head. Reach your
right arm as far upward toward the ceiling as
you can for one count. Feel the stretch up your
fight side. Repeat this action with your left arm
Quadriceps Stretch
With one hand against a wall for balance,
reach behind you'and pu!l your fight foot
up. Bring your right heel as close to your
buttock as possible. Hold for 15 counts
and repeat with left foot up
BLADEZ"
F
I
T
N
E
S
S
6
TRAINING
I
(cont'd)
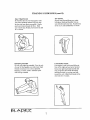
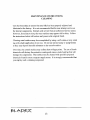
Inner Thigh Stretch
Sit with the soles of your feet together with
your knees pointing outward. Put your feet
as close into your groin as possible.
Gently
push your knees towards the floor. Hold
your mouth open. Rotate your head to the left
for 15 counts.
Toe Touches
Slowly bend forward from your waist,
lettingyour back and shoulder relax as
you stretchtoward your toes. Reach down
as far as you can and hold for 15 counts.
Hamstring Stretches
Sit with your right leg extended. Rest the sole
of your left foot against your right inner thigh.
Stretch toward your toe as far as l_ossible.
Hold for i5 counts. Relax and then repeat
with left leg extended
Calf/Achilles Stretch
Lean against a wall with your left leg in
front of the right and your arms forward.
Keep your right leg straight and the left
foot on the floor then bend the left leg
and lean forward by moving your hips
toward the wall. Hold, fl_en repeat on the
other side for 15 counts.
BLADEZ
F
GUIDELINES
T
°
N
E
S
S
7
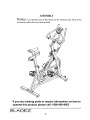
ASSEMBLY
Notice:
necessarily
Line sketches used in this section are for reference
only. They do not
reflect the actual unit in detail.
If you are missing parts or require information on how to
operate this product please call 1-800-469-4663
BLADEZ
F
I
T
°
N
E
S
S
8
ASSEMBLY
Note: Assembly
INSTRUCTIONS
of this unit should take TWO persons
about 45 minutes
to properly
STEP 1
Attach
front stabilizer
(26), washers
(2) to main frame
(1) and secure
it with carriage
bolts
(27), and dome nuts (28).
?_7
1
STEP 2
Attach
rear stabilizer
(26), washers
(3) to main frame (1) and secure
(27), and dome nuts (28).
BLAp EZ"
9
it with carriage
bolts
assemble.
ASSEMBLY
STEP
INSTRUCTIONS
(cont'd)
3
Slide the handlebar post (6) into the main
frame (I) and tighten with the spring loaded
knob (52) to secure from vibrating and
wobbling
6
7
67
sz p4
Attach the handle
bar (7) to the main
frame (1) and attach
(55), washers
it with L-shape
(54). Attach the elbow pads
(66) on to the handlebar
(67) and nuts (68). Attach
the computer
holder (63) on to the
(7)with
the computer
BLADEZ"
!
-F
N
E
S
S
10
(7) and locking it
with washers
handlebar
F
bolt
(69)
screw (56) and insert
ASSEMBLY
INSTRUCTIONS
(cont'd)
STEP 5
Slide
the seat
Securely
tighten
post (4) into the main frame
attach
(1) and secure
it with the spring
loaded
knob.
lhe seat (64) to the seat bar (5). Slide the seat bar (5) into the seat post (4) and
the spring
loaded
knob to secure
it
STEP 6
Carefully
thread
The right-hand
(R),screws
the pedals
pedal,
onto the crank arms.
marked
onto the right-hand
with the letter
crank,
also marked
with an (R). First, hand turn the pedal onto the
crank in a clockwise
wrench
(L),screws
pedal,
marked
onto the left-hand
wrench
to tighten further.
Notice:
When
should
BLADEZ'
11
with the letter
crank,
also
with an (L). First hand turn the pedal onto
the crank in a counterclockwise
Tightening
Direction
until tight, then use
to tighten further.
The left-hand
marked
direction
tightening,
be turning
toward
direction,
then use
both of the pedals
the front of the bike
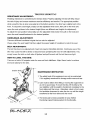
Operation
of the Monitor
Getting familiar with the control panel
XLG
EXERCISE
COMPUTER-2007
K/M
SPECIFICATIONS :
TIME ..................................................................
SPEED............................................................
00:00-99:59
0.0-
MIN:SEC
999.9KM/H
DISTANCE................................................................
or ML/H
0 - 999.9 KM or ML
CALORIES....................................................................
O- 999.9KCAL
KEY FUNCTIONS:
MODE: To select a desired function. Hold the key for 4 seconds to have all function
reset to zero (0) - total reset
values
SET: To input the target value.
RESET:To let the value reset.
KM/ML SWITCH : Switch the unit to KM or ML
Follow the steps below to change measurement
unit to English or metric
1) Remove batteries then set the switch to ON(_mL)
for Mile
or
OFF(I)
for KM
2) Install batteries
OPERATION PROCEDURES:
AUTO ON/OFF
To conserve power, the monitor
will automatically
or no key pressed in 4 minutes.
or at any key press
The monitor
<I>TIME
<2>SPEED
<3>DISTANCE
<4>CALORIES
<5>SCAN
BLADEZ"
I
T
N
E
when the exercise begins
Displays work out time lapse while exercising.
Displays the current speed.
Accumulates the distance while exercising.
Displays calories consumed while exercising.
Scans through each function between: TIMESPEED-CALORIES-DISTANCE.
If there is an improper display on the monitor, Please
replace or change for new batteries. This monitor uses
two "AA" batteries. Always replace both batteries at the
same time.
BATTERY
F
shut off if there is no speed signal sensed
will be auto-powered
S
S
12
MAINTENANCE
INSTRUCTIONS.
CLEANING
Care has been taken to assure that your bike has been properly adjusted and
lubricated
at the factory.
It is not recommended
that the user attempt service on
the internal components. Instead, seek service from an authorized service center.
However, from time to time, the outer surfaces may appear dull or dirty. Follow
the instructions
Cleaning
below will restore and preserve the original finish.
metal surfaces may be accomplished
rag with a light application
by using a soft cotton or terry cloth
of car wax. Do not use aerosol spray or pump bottles
as they may deposit harmful substance
on the console surface.
Over time, the console surface may collect dust or fingerprints.
The use of harsh
chemicals will destroy the protective coating and cause a static build up that will
damage the components.
This surface may be cleaned wit1 specially prepared
chemicals
found in most computer
supply stores.
you employ such a cleaning compound.
BLADEZ"
F
l
T
N
E
S
S
13
It is strongly recommended
that
TROUBLE
RES ISTANCE
Pedaling
ADd USTM
resistance
is controlled
the risk of injury and ensure
while
SHOOTING
ENT:
by the tension
maximum
exercise
knob. Properly
efficiency
using this bike is when one pedal is in the bottom
knee. To adjust
the seat height,
move the seat up!down
simply
to the desired
To adjust the seat position
horizontally,
move the seat forward/backward
HANDLEBAR
There
BELT
position,
to the desired
The appropriate
the other leg is sligh_y
position
bent at the
knob loose; then pull on the knob and
(there are different
turn the adjustable
the seat will help reduce
seat heights for adjustment).
knob loose then pull on the knob and
posilJon.
ADJ USTMENT:
are different
Please
and comfort.
turn the adjustable
height
adjusting
handlebar
heights
lhat can also be adjusted.
adjust the seat height first then adjust the proper
ADJ USTM
and should
the belt to stretch
simply
loosen
HOW
TO LEVEL
There
are a total of 4 footpads
not require
or become
the bolts on both side of flywheel
level and stability
tension
of handtebarto
immediate
attention.
match the seat.
ENT:
The belt has been pre-adjusted
bike may cause
height
THE
loose prompting
Continuous
use of the
the need for belt adjustments.
and pull forward
unUt the belt becomes
If so,
tight.
BIKE:
under the rear and front stabilizers.
Adjust
these knobs to achieve
for the bike.
knob
MAINTENANCE
\
INSTRUCTION
1. The safely level of the equipment
If it is regularly
examined
can only be maintained
for damage
and/or wear and tear.
Care must be taken when lifting or moving the equipment
so
as not to cause injury. To move the bike, lift the bike by the
rear stabilizer
until the weight is transferred
front rollers and then move.
Alternately,
completely
to the
stand in front; press
the handlebar downward to raise the rear up until the weight
transferred to the front rollers and then move
The brake pad is most susceptible
Exercising
505ram
BLADEZ"
P
i
T
N
E
S
S
14
inspect
braking
to wear. Before
system for functionality.
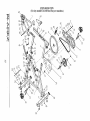
EXPLODED VIEW
(Use key numbers to reference the part numbers.)
7
64
17
42
19
67
68
55
33
52
9
J
q,h
45 .,.J
51
12
3
3
6O
16
26
36
PARTS
Model
SIZE
LIST
No. 21976
REF#
NO.
DESCRIPTION
QTY
REF#
NO_
DESCRIPTION
SIZE
QTY
01
2197601
main frame
1
37
2197637
flat washer
o10
2
02
2197602
front stabifizer
1
38
2197638
nylon nut
03
2197603
rear stabilizer
1
39
2197639
04
2197604
seat post
1
40
2197640
bearing
decoration
05
2197605
seat bar
1
41
2197641
06
07
2197606
2197607
front post
handlebar
1
1
42
43
08
2197608
flywheel
1
09
2197609
Belt cover
m8
1
6203
2
1
cover
bolt
st4.2x20
4
2197642
bolt
st4,2x12
4
2197643
bolt
st4.2xl0
2
44
2197644
1
45
2197645
Computer
cable
bolt
1
m5x12
2
10
2197610
belt
1
46
2197646
bottle holder
11
2197611
belt wheel
1
47
2197647
tension knob
12
2197612
axle
1
48
2 ]97648
emergency
brake
13
2197613
inner bett cover
1
49
2197649
14
15
2197614
2197615
protec(ion cover
crank
1
1
50
2197650
knob
51
2197651
End cap
16
2197616
pedal
set
1
52
2197652
spring knob
t7
2197617
cap nut
m12x1
2
53
2197653
clamp
18
2197618
rn6
2
54
2197654
washer
a38xo10x4
1
19
2197619
m 12xl
5
55
2197655
1 shaped knob
m10x25
1
2197656
bolt
m6x75
1
adjusting
screw
hex nut
adjustable
I
m8x55
1
1
knol:
5
m8x 12
1
2
m16xl.5
o 14
3
1
20
2197620
flat washer
3
56
21
2197621
spacer
o14xo12x1
1
57
2197657
bolt
22
23
2197622
2197623
spacer
axle
¢017xqo12x6
I
1
58
2197658
caliper brake
1
59
2197659
brake pad
2
24
2197624
bearing
600t
2
60
2197660
end cap
m6
3
61
2197661
bushing
!60x30xl.5x190
3
4
62
2197662
end cap
53x23x1.5
1
8
63
2197663
computer
holder
m8
4
64
2197664
saddle
ml0
2
65
2197665
flat washer
25
2197625
q)12
nylon nut
26
2197626
carriage bolt
m8x40
27
2197627
washer
_8
28
2197628
29
2197629
ny_n
30
2197630
moving
2
66
2197666
elbow pad
3t
2197631
bolt
m10x45
2
67
2197667
roofing washer
32
2197632
end cap
for crank
2
68
2197668
33
34
2197633
' 2i97534
flange bolt
nut
m8x20
mi7x1
2
I
69
70
bolt
m8x16
4
m8x30
4
35
2197635
36
2197636
cap nut
a_u_able
nut
•
wheel
foot
60x30
E
S
°
S
16
1
1
o 12
I
2
tp 10
2
cap nut
ml0
2
2197669
2197670
computer
bolt
m5xl0
1
2
71
2197671
magnet holder
1
72
2197672
magnet
1
NOTE: Please see the next page of this manual for information about ordering
If you are missing parts call t-800-469-4663 for assistance.
BLADEZ
F
!
T
N
4
replacement
part
..--.
.
..
•
- .
, .
• -,-.
. .
:•_"
:i!_il!_:_ _
i :
.-
Get it;fixed; at- your home or ours!
• "
_:_-i_
.'•
-:--
Your Home
For repair--in your home-of
all major brand appliances, lawn and garden equipment,
or heating and cooling systems, no matter who made it, no matter who sold it!
For the replacement parts, accessories, and user's manuals that you need to do-it-yourself.
For Sears professional installation of home appliances
and items like garage door openers and water heaters.
1-800-4-MY-H O ME ® (1-800-469-4663)
i
'
Call anytime,
:
.
day or night (U.S.A. and Canada)
www.sears.com
www.sears.ca
.....
.
_,
=
,
.
,
Our Home
For repair of carry-in items Jike vacuums, lawn equipment,
and electronics, call or go on-line for the location of your nearest
Sears Parts & Repair Center.
1-800-488-1222
Call anytime, day or night (U.S.A. only)
www.sears.com
To purchase a protection agreement (U.S.A.)
or maintenance agreement (Canada) on a product serviced by Sears:
1-800-827-6655
(u.s_)
1-800-361-6665
(Canada)
°
Pars pedir servicio de reparaci6n a domicilio, y pars ordenar piezas:
1-888-SU-HOGAR e (I-888-784-6427)
Sealrs
®
®
Registered
Trademark
Registrada
Marca
I "ru Marca
/ TM Trademark
de
F_bdce
•
t su Service
I sM Mares
. ,-
Mark
de
Serv_cfo
of Sears
de
Brands,
Sears
LLC
Brands,
LLC
f
ONE (1) YEAR WARRANTY
r
If this Sears Indoor Cycle fails due to a defect in material or workmanship within ONE (1) year of the
date of purchase, call 1800-4MYHOME® (1-800 469-4663) to arrange for free repair (or replacement if
repair proves impossible).
This warranty does not apply when the equipment is used commercially or for rental purposes.
This warranty
state.
gives you specific legal rights and you may also have other rights which vary from state to
Sears, Roebuck and Co., Hoffman Estates, IL 60179
J
%_,,
BLADEZ
F
I
T
N
°
E
S
S
1"7
-: