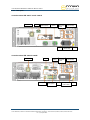
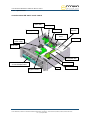
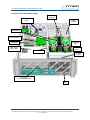
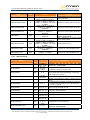
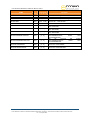
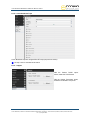
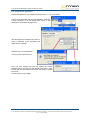
1
Crown E Series User’s Manual FME 350W to FME 2000W BROADCAST TRANSMITTER 87.5 – 108 MHz STEREO AND MULTIPLEX WITH TCP/IP MONITORING* *depending on options ©2013 Crown Broadcast, a division of International Radio & Electronics Corporation 25166 Leer Drive, Elkhart, Indiana, 46514-5425 U.S.A. (574) 262-8900 web: www.crownbroadcast.com e-mail: [email protected] Crown Broadcast FME 350W to 2000W User Manual– 05/2013 TABLE OF CONTENTS 1. INTRODUCTION .............................................................................................................................. 6 1.1. Crown Broadcast History ......................................................................................................... 6 1.2. Before you start ....................................................................................................................... 7 2. DESCRIPTION ................................................................................................................................. 8 2.1. General description.................................................................................................................. 8 2.2. Accessories ............................................................................................................................. 8 2.3. Crown Broadcast FME 350 W / 750 W / 1000 W / 1500 W / 2000 W Description .................... 9 2.3.1. Front panel ......................................................................................................................... 9 2.3.2. Rear panel .........................................................................................................................10 2.3.3. Opened cover ....................................................................................................................12 2.3.4. Synoptic .............................................................................................................................14 2.3.5. 3U Rack .............................................................................................................................15 2.4. Protecting the transmitter ........................................................................................................15 2.4.1. Surge Protector .................................................................................................................15 2.4.2. Protection against VSWR ..................................................................................................16 2.4.3. Protection against high temperature ..................................................................................16 2.4.4. Protections incorporated into the PSU ...............................................................................16 3. TECHNICAL SPECIFICATIONS .....................................................................................................17 3.1. RF section ..............................................................................................................................17 3.2. Composite operation ...............................................................................................................17 3.3. Stereo operation .....................................................................................................................17 3.4. Mono operation .......................................................................................................................17 3.5. AF inputs ................................................................................................................................18 3.6. HF output ................................................................................................................................18 3.7. Power supply ..........................................................................................................................18 3.1. Interface panel ........................................................................................................................19 3.2. Environmental .........................................................................................................................19 3.3. Physical ..................................................................................................................................19 3.4. Miscellaneous .........................................................................................................................20 4. STARTING UP YOUR TRANSMITTER ...........................................................................................21 4.1. Connecting the transmitter ......................................................................................................21 4.2. Using the front panel ...............................................................................................................22 4.2.1. Setting the transmitter........................................................................................................22 4.2.2. Input selection ...................................................................................................................23 4.2.3. Setting the MPX inputs ......................................................................................................24 4.2.4. MPX configuration .............................................................................................................25 4.2.5. Setting the analog or AES inputs .......................................................................................26 4.2.6. Getting on air .....................................................................................................................26 4.3. Using the PC application.........................................................................................................27 4.3.1. Connecting with the control software application ...............................................................27 4.3.2. Setting the transmitter........................................................................................................27 4.3.3. Input selection ...................................................................................................................27 4.3.4. Setting the MPX inputs ......................................................................................................28 4.3.5. MPX configuration .............................................................................................................28 4.3.6. Setting the analog or AES inputs .......................................................................................28 4.3.7. Getting on air .....................................................................................................................28 4.4. With the TCP/IP option ...........................................................................................................29 4.4.1. Network configuration ........................................................................................................29 Page 2 Crown Broadcast, a division of International Radio & Electronics Corporation 25166 Leer Drive, Elkhart, Indiana, 46514-5425 USA Ph +1 (574) 262 8900 Crown Broadcast FME 350W to 2000W User Manual– 05/2013 4.4.2. Connecting to the web interface ........................................................................................29 4.4.3. Configuring the transmitter.................................................................................................30 4.4.4. Getting on air .....................................................................................................................30 5. FRONT SCREEN USE ....................................................................................................................31 5.1. Overview.................................................................................................................................31 5.2. Working principle ....................................................................................................................31 5.3. Structure of the menus ...........................................................................................................33 5.3.1. Overview............................................................................................................................33 5.3.2. First level measurements ...................................................................................................34 5.3.3. First level menus ...............................................................................................................35 5.3.4. TX Parameters menu.........................................................................................................36 5.3.5. ALARMS menu ..................................................................................................................36 5.3.6. Input Switch menu .............................................................................................................37 5.3.7. Line1 menu ........................................................................................................................38 5.3.8. MPX In menu .....................................................................................................................39 5.3.9. Audio Gene menu ..............................................................................................................40 5.3.10. Modulation menu ...............................................................................................................41 5.3.11. Stereo encoder menu ........................................................................................................42 5.3.12. RDS / SCA encoder menu .................................................................................................43 5.3.13. FM limiter menu .................................................................................................................44 5.3.14. RDS menu .........................................................................................................................45 5.3.15. Network menu ...................................................................................................................46 5.3.16. COM menu ........................................................................................................................47 5.3.17. Power supply menu ...........................................................................................................48 5.3.18. Temp/Fan menu ................................................................................................................49 5.3.19. Time/Date menu ................................................................................................................50 5.3.20. License menu ....................................................................................................................51 5.3.21. About / System menu ........................................................................................................52 5.3.22. Easy/Expert menu .............................................................................................................53 5.3.23. Exit menu...........................................................................................................................53 5.4. Main parameters description...................................................................................................54 5.4.1. TX Parameters menu.........................................................................................................54 5.4.2. Input Switch menu .............................................................................................................54 5.4.3. Line1 menu (ANA) .............................................................................................................55 5.4.4. Line2 menu (AES) .............................................................................................................56 5.4.5. MPX In menu .....................................................................................................................57 5.4.6. Player menu ......................................................................................................................57 5.4.7. Audio Gene menu ..............................................................................................................58 5.4.8. Modulation Menu ...............................................................................................................58 5.4.9. Stereo Encoder menu ........................................................................................................60 5.4.10. RDS / SCA Encoder menu.................................................................................................61 5.4.11. FM Limiter menu ................................................................................................................61 5.4.12. RDS Menu .........................................................................................................................63 6. SERIAL & TELNET COMMANDS ...................................................................................................67 6.1. Working principle ....................................................................................................................67 6.2. Serial commands ....................................................................................................................68 6.2.1. System commands ............................................................................................................68 6.2.2. Measurement commands ..................................................................................................69 6.2.3. Configuration commands ...................................................................................................70 6.2.4. Transmitter commands ......................................................................................................71 6.2.5. Alarm commands ...............................................................................................................72 6.2.6. Input commands ................................................................................................................72 6.2.7. Encoder commands ...........................................................................................................75 Page 3 Crown Broadcast, a division of International Radio & Electronics Corporation 25166 Leer Drive, Elkhart, Indiana, 46514-5425 USA Ph +1 (574) 262 8900 Crown Broadcast FME 350W to 2000W User Manual– 05/2013 6.2.8. RDS commands ................................................................................................................75 6.2.9. Status commands ..............................................................................................................80 6.2.10. Communication board commands .....................................................................................80 7. CONFIGURATION WITH THE PC APPLICATION .........................................................................81 7.1. Overview.................................................................................................................................81 7.2. Using the application ..............................................................................................................81 7.2.1. Connection ........................................................................................................................81 7.2.2. Configuration .....................................................................................................................82 7.2.3. Saving parameters.............................................................................................................87 8. REMOTE CONTROL AND MONITORING WITH THE GPIO BOARD ............................................88 8.1. Introduction .............................................................................................................................88 8.2. Standard GPIO board .............................................................................................................88 8.2.1. Description of control and monitoring functions .................................................................88 8.2.2. Remote control function pinout ..........................................................................................89 8.2.3. Remote monitoring function pinout ....................................................................................89 8.2.4. Physical representation of the GPIOs ................................................................................90 8.2.5. Management using serial commands ................................................................................91 9. THE EMBEDDED WEBSITE ...........................................................................................................93 9.1. Introduction .............................................................................................................................93 9.2. Connecting to the embedded web site ....................................................................................93 9.3. Viewing the Status ..................................................................................................................95 9.3.1. Advanced measurements ..................................................................................................95 9.3.2. Main status ........................................................................................................................98 9.4. Transmitter configuration ........................................................................................................99 9.4.1. Easy configuration .............................................................................................................99 9.4.2. Main configuration ...........................................................................................................100 9.4.3. Modulation configuration ..................................................................................................101 9.4.4. Input Selection .................................................................................................................103 9.4.5. Input Sources ..................................................................................................................104 9.5. Setting the RDS data ............................................................................................................106 9.5.1. Basic encoder ..................................................................................................................106 9.5.2. Advanced Encoder ..........................................................................................................108 9.6. System configuration ............................................................................................................112 9.6.1. Product ID........................................................................................................................112 9.6.2. Date / Time ......................................................................................................................113 9.6.3. Network ...........................................................................................................................114 9.6.4. Communication ................................................................................................................114 9.6.5. Users ...............................................................................................................................115 9.6.6. SNMP Agent ....................................................................................................................116 9.6.7. Notifications .....................................................................................................................117 9.6.8. Common traps .................................................................................................................118 9.6.9. IRT Traps.........................................................................................................................118 9.6.10. Crown Broadcast Traps ...................................................................................................119 9.6.11. Support ............................................................................................................................119 9.6.12. EMR ................................................................................................................................120 9.7. About ....................................................................................................................................120 10. SERVICE AND SUPPORT ..........................................................................................................121 10.1. Service..................................................................................................................................121 10.2. 24–Hour Support ..................................................................................................................121 10.3. Spare Parts...........................................................................................................................121 10.4. Factory Service Instructions..................................................................................................122 11. CROWN BROADCAST THREE YEAR LIMITED PRODUCT WARRANTY ................................123 Page 4 Crown Broadcast, a division of International Radio & Electronics Corporation 25166 Leer Drive, Elkhart, Indiana, 46514-5425 USA Ph +1 (574) 262 8900 Crown Broadcast FME 350W to 2000W User Manual– 05/2013 APPENDIX A: SOFTWARE OPTION MANAGEMENT .....................................................................124 A.1. Using the front panel application .............................................................................................124 A.2. Using the PC application .........................................................................................................125 A.3. Using serial commands ...........................................................................................................126 APPENDIX B: ADJUSTING THE IMPEDANCE OF ANALOG INPUTS ...........................................127 APPENDIX C: MAINTENANCE ........................................................................................................128 C.1. Changing the fuses .................................................................................................................128 C.2. Changing the fan ....................................................................................................................129 C.3. Changing the surge protector .................................................................................................130 APPENDIX D: TROUBLESHOOTING...............................................................................................131 D.1. Calibration ..............................................................................................................................131 D.2. Complete Reset of the Crown Broadcast FME .......................................................................131 FOR MORE INFORMATION .............................................................................................................132 Page 5 Crown Broadcast, a division of International Radio & Electronics Corporation 25166 Leer Drive, Elkhart, Indiana, 46514-5425 USA Ph +1 (574) 262 8900 Crown Broadcast FME 350W to 2000W User Manual– 05/2013 1. INTRODUCTION 1.1. Crown Broadcast History Crown Broadcast is a division of International Radio & Electronics Corporation located in Elkhart, Indiana. Crown began as International Radio and Electronics Corporation in 1947. The founder's intent was to provide high-quality audio equipment and transmitter products to the broadcasting industry. In the following decades, the company evolved into a world-class supplier of professional audio equipment and, later, of industrial power supplies and medical imaging power systems. The name of the company was changed to Crown International in 1975. In 2000, Crown International was purchased by Harman International, primarily for Crown's Pro Audio division. As the Crown Broadcast division was not central to the vision of Harman International, remaining members of Crown's founding family secured the Broadcast division as a separate entity and brought it under the newly resurrected corporate name of International Radio & Electronics Corporation (IREC). Today, Crown Broadcast continues to fulfill its mission to provide Best-in-Class FM broadcast transmitter equipment to its customers by providing highly robust and reliable transmitters worldwide. Crown Broadcast and WorldCast Systems entered into an agreement allowing Crown Broadcast to add WorldCast’s Ecreso line of transmitters for distribution, service and support domestically. We believe this will allow our valued customers the ability to select from a very diverse and fully featured line up including our current product, now called the Classic line, and the new “E” Series products which will meet all customers’ needs in power levels up to 10kWs. Page 6 Crown Broadcast, a division of International Radio & Electronics Corporation 25166 Leer Drive, Elkhart, Indiana, 46514-5425 USA Ph +1 (574) 262 8900 Crown Broadcast FME 350W to 2000W User Manual– 05/2013 1.2. Before you start This equipment complies with international mechanical and electrical standards. To maintain this compliance, as well as to ensure proper and safe working conditions and avoid electrical shocks and fire hazards, you must comply with the following recommendations: The device should only be utilized in the conditions described in the user manual. The device is designed for industrial usage and must only be operated by qualified personnel. The device may be heavy; it must be lifted and handled with care, specifically during unpacking and set up. Electrical precautions Unplug from mains outlet before any intervention. Any maintenance, adjustment, or repair must be carried out by personnel specifically trained by WorldCast Systems. Before switching on the device, make sure the nominal voltage specified on the device matches the mains nominal voltage. The device should only be operated on a stable electrical network. If the electrical network is not stable, a power conditioner, such as a UPS, must be used. The device must only be used with a plug that incorporates a protective ground contact. To avoid any risk of electrocution, the protection conductor must not be cut, intentionally or accidentally, either on the device or on the power cord. High quality shielded cables are mandatory. Environmental precautions It is necessary to verify that environmental conditions comply with those recommended in the manual. Nothing must obstruct the ventilation. To avoid any electromagnetic interference, the device must only be used when it is closed, installed in a cabinet and connected to the earth ground as per the instructions. The device should not be exposed to dripping or splashing and no objects filled with liquids, such as coffee cups, should be placed on the equipment. Connectors may be hot on high power units. Precautions regarding the lithium battery This device includes a lithium battery. If the battery is not correctly replaced, there is a risk of explosion. Only replace it with a battery of the same type. Contact Crown Broadcast before attempting to use another type. Do not puncture the battery Do not throw the battery in fire Do not immerse the battery in water Do not throw away the used battery, recycle it instead. You may send it back to us if needed. If these precautions are not followed, the guarantee will be void. Page 7 Crown Broadcast, a division of International Radio & Electronics Corporation 25166 Leer Drive, Elkhart, Indiana, 46514-5425 USA Ph +1 (574) 262 8900 Crown Broadcast FME 350W to 2000W User Manual– 05/2013 2. DESCRIPTION 2.1. General description Combining the very latest technologies with our proven RF experience, our 350 W, 750 W, 1000 W, 1500 W, and 2000 W transmitters have been designed to offer an innovative and highly reliable solution. Among the first FM transmitters based on 6th Generation MOSFET, these transmitters are not only more robust, they also deliver efficiency of up to 74%. Top signal quality and performance are achieved thanks to the “FM Band Direct to Frequency” digital modulator which is at the heart of this range. The manufacturing quality and the simplicity of use make these truly powerful transmitters to broadcast analog FM programs. The Crown Broadcast FME 350 W, the Crown Broadcast FME 750 W, the Crown Broadcast FME 1000 W, the Crown Broadcast FME 1500 W, and the Crown Broadcast FME 2000 W are fully protected against overheating and VSWR. They also offer a number of built-in functions that can eliminate the additional cost and space requirements of external equipment. Fully featured for local maintenance and configuration, they also allow full remote control by Web server, SNMP, RS232, or GPIOs*. * Options available with the current version are: Basic RDS: The internal RDS encoder makes it possible to manage basic RDS parameters (PI, PS, TP, TA, PTY, MS, DI, radiotext, PTYN, group sequence, AF, 1 PSN, 2 DSN, dynamic scrolling PS). GPIO: This additional board allows remote control and management of your transmitter. TCP/IP: This additional board allows remote configuration via a web site and SNMP management. Please refer to Appendix A for more information on option management. Project co-financed by the European Union, involved in the Aquitaine Area, through the European Funds for local development. 2.2. Accessories The Crown Broadcast FME is supplied with: 1 power cable 1 serial cable 1 USB cable 4 10A fuses (for Crown Broadcast FME 350 W, 750 W and 1000 W only) 1 interlock plug + locks 1 box including 1 CD (documentation + PC application) and 1 quick start notice. Page 8 Crown Broadcast, a division of International Radio & Electronics Corporation 25166 Leer Drive, Elkhart, Indiana, 46514-5425 USA Ph +1 (574) 262 8900 Crown Broadcast FME 350W to 2000W User Manual– 05/2013 2.3. Crown Broadcast FME 350 W / 750 W / 1000 W / 1500 W / 2000 W Description 2.3.1. Front panel LCD contrast RS232 port LCD display Navigation keys Indicators: CPU, Fault, Warning, RF (3 dB), VSWR and Interlock RF monitoring output RF on/off and local mode keys and LEDs Description of indicator LEDs: CPU: Blinks to indicate CPU activity FAULT: Major fault of the unit (RF / VSWR protection, Temperature, …) WARNING: Minor fault of the unit (ambient temperature, radiator temperature, fan, current, voltage, loss of signal). VSWR: VSWR of the unit RF (3dB) : 3 dB of the unit INTERLOCK: Indicates that internal or external safety links are not activated RF: Indicates that the unit is on RF=ON. Associated to the RF button. LOCAL: Indicates that the unit is in local mode. Associated to the Local button. Page 9 Crown Broadcast, a division of International Radio & Electronics Corporation 25166 Leer Drive, Elkhart, Indiana, 46514-5425 USA Ph +1 (574) 262 8900 Crown Broadcast FME 350W to 2000W User Manual– 05/2013 2.3.2. Rear panel Crown Broadcast FME 350 W / 750 W / 1000 W 7/16 RF output Interlock Communication board (option) * GPIO (option) MPX/SCA1 MPX/SCA2 19 kHz Mains Audio input Line1 (Ana or AES) Audio input Line2 (Ana or AES) Ground Crown Broadcast FME 1500 W / 2000 W 7/16 RF output Interlock N RF input GPIO (option) Communication board (option) * MPX/SCA1 MPX/SCA2 19 kHz Mains Audio input Line1 (Ana or AES) Audio input Line2 (Ana or AES) Ground Page 10 Crown Broadcast, a division of International Radio & Electronics Corporation 25166 Leer Drive, Elkhart, Indiana, 46514-5425 USA Ph +1 (574) 262 8900 Crown Broadcast FME 350W to 2000W User Manual– 05/2013 * Two optional communication boards are available: TCP/IP board 2 RS232 ports (COM1 and COM2) 1 µSD card 1 USB port 1 Ethernet port 1 CAN port On the TCP/IP board, the COM1 port is used to send serial commands and the COM2 port is used for dynamic PS tags. CAN board 2 RS232 ports (COM0 and COM1) 1 slave USB port 1 CAN port On the CAN board, the COM0 port is reserved for the unit’s upgrade and the COM1 port is used to send serial commands. Page 11 Crown Broadcast, a division of International Radio & Electronics Corporation 25166 Leer Drive, Elkhart, Indiana, 46514-5425 USA Ph +1 (574) 262 8900 Crown Broadcast FME 350W to 2000W User Manual– 05/2013 2.3.3. Opened cover Crown Broadcast FME 350 W / 750 W / 1000 W Mains filter Surge protector Audio inputs RF output detection GPIO board Communication board Output filter High output power supply Power bloc RF amplifier bloc LCD display on control/display board Control board Fans RF input board Digital modulator Page 12 Crown Broadcast, a division of International Radio & Electronics Corporation 25166 Leer Drive, Elkhart, Indiana, 46514-5425 USA Ph +1 (574) 262 8900 Crown Broadcast FME 350W to 2000W User Manual– 05/2013 Crown Broadcast FME 1500 W / 2000 W RF output detection Communication board Output combiner Output filters Digital modulator Power bloc RF amplifier blocs High output power supply Input splitter Control board RF input board LCD display on control/display board Fans Page 13 Crown Broadcast, a division of International Radio & Electronics Corporation 25166 Leer Drive, Elkhart, Indiana, 46514-5425 USA Ph +1 (574) 262 8900 Crown Broadcast FME 350W to 2000W User Manual– 05/2013 2.3.4. Synoptic Crown Broadcast FME 350 W / 750 W / 1000 W Crown Broadcast FME 1500 W / 2000 W Page 14 Crown Broadcast, a division of International Radio & Electronics Corporation 25166 Leer Drive, Elkhart, Indiana, 46514-5425 USA Ph +1 (574) 262 8900 Crown Broadcast FME 350W to 2000W User Manual– 05/2013 Audio Audio 1 G1 D1 AES1 G2 D2 Audio 2 AES2 MPX SCA Internal player 19 kHz output 2.3.5. 3U Rack The choice of stainless steel as material guarantees against corrosion. The rack structure and the structure of the monoblock front panel reinforce the device. The rectangular outline of the front panel has an LCD display. The transport handles are mechanically interchangeable and can be removed. The cover is fixed by a set of M3 POZIDRIV screws and can be easily removed. The user has access to every module to set the parameters of the device. 2.4. Protecting the transmitter To ensure the transmitter will work with no risk of damage, a series of protections has been set. 2.4.1. Surge Protector An optional surge protector module can be added to the chassis. The goal of this module is to limit the surge caused by lightning. It works after the main protector usually located in the electrical board and before the power supply protector, thus offering an optimal level of protection. The protector principle is to capture the surge and divert it to the ground so as to protect the transmitter and its power supplies. The surge protector used by Crown Broadcast includes multi-MOV technology and a gas discharge tube (GDT) giving a very high protection and very low parasitic capacitance and leakage currents. Please refer to Appendix B ‘Maintenance’ for the procedure to replace the surge protection module. Page 15 Crown Broadcast, a division of International Radio & Electronics Corporation 25166 Leer Drive, Elkhart, Indiana, 46514-5425 USA Ph +1 (574) 262 8900 Crown Broadcast FME 350W to 2000W User Manual– 05/2013 2.4.2. Protection against VSWR Several systems coexist to offer the optimal protection against VSWR: Hardware protection: In case of open circuit or short-circuit, the RF is cut. When the situation returns to normal, it is automatically reset. Software protection: The reflected power is limited to 3 W for Crown Broadcast FME 20 W, to 10 W for Crown Broadcast FME 100 W, to 40 W for Crown Broadcast FME 350 W / 750 W / 1000 W and to 80 W for Crown Broadcast FME 1500 W / 2000 W. Software settings for the reflected power security management (see VSWR Trip, section 5.4.1). 2.4.3. Protection against high temperature The Power Supply module includes its own protector against high temperature. The protector cuts off the power supply output voltage if the temperature is abnormally high. When the situation returns to normal, it is automatically reset. The temperature threshold value varies depending on the PSU. The ambient temperature and the radiator temperature are monitored. The max ambient temperature is set by software (see menu Temp/Fan, section 5.3.18) Default value is 50°C. In case of overshoot, a Warning alarm is triggered (Alarm Amb). The max radiator temperature is set by serial command (see serial command CONF.HEAT.MAX, section 6.2.3). Default value is 65°C. In case of overshoot, a Warning alarm is triggered (Alarm Heat). The max internal temperature is set at 70°C. If the temperature exceeds 70°C, the RF is cut off and a fault alarm is triggered (Alarm Temp). 2.4.4. Protections incorporated into the PSU The main power supply voltage and the auxiliary power supply voltage are monitored as follows: Main power supply: If the difference between the measured voltage and the expected voltage is greater than 10%, a Warning alarm is triggered (Alarm Volt1). Expected voltage is automatically computed. Auxiliary power supply: Voltage should be either 5, 12 or -12 V. If the difference between the measured voltage and the nominal voltage is greater than 10%, a Warning alarm is triggered (Alarm Volt Aux). The amperage is also measured. The threshold varies depending of the power of the Crown Broadcast FME: 2 A for the Crown Broadcast FME 20 W, 8.5 A for the Crown Broadcast FME 100 W, 20 A for the Crown Broadcast FME 350 W, 23 A for the Crown Broadcast FME 750 W, 29 A for the Crown Broadcast FME 1000 W, 26 A per amplifier pallet for the Crown Broadcast FME 1500 W, 31 A per amplifier pallet for the Crown Broadcast FME 2000 W. In case of overshoot, a Warning alarm is triggered (Alarm Cur) and the nominal power is reduced. Page 16 Crown Broadcast, a division of International Radio & Electronics Corporation 25166 Leer Drive, Elkhart, Indiana, 46514-5425 USA Ph +1 (574) 262 8900 Crown Broadcast FME 350W to 2000W User Manual– 05/2013 3. TECHNICAL SPECIFICATIONS 3.1. RF section Frequency range 87.5 to 108 MHz Summary of different steps 10 kHz Frequency stability < 10-6 per year Power range 50-350 W, 50-750 W, 50-1000 W, 150-1500 W or 200-2000 W @ ROS=1.35 Power output Continuously 0-350 W, 0-750 W, 0-1050 W, 0-1550 W or 0-2050 W Spurious and harmonic suppression > 75 dBc 10 MHz input recommended range -10 dBm to +10 dBm 3.2. Composite operation Bandwidth > 40 Hz to 53 kHz @ 0.1 dB > 20 Hz to 60 kHz @ 0.2 dB > 60 kHz to 80 kHz @ 0.4 dB Intermodulation distortion < 0.05% FM S/N ratio > 80 dB RMS @ 75 kHz deviation AM noise < 0.1% (50 dB) RMS (20-20 000 Hz) 3.3. Stereo operation Bandwidth > 20 Hz to 15 kHz @ 0.1 dB 38 kHz discontinuance > 50 dB Stereophonic crosstalk > 50 dB Pre-emphasis 0 µs, 50 µs or 75 µs 3.4. Mono operation Bandwidth > 40 Hz to 15 kHz @ 0.1 dB Out of band rejection > 40 dB @ 19 kHz Pre-emphasis 0 µs, 50 µs or 75 µs Page 17 Crown Broadcast, a division of International Radio & Electronics Corporation 25166 Leer Drive, Elkhart, Indiana, 46514-5425 USA Ph +1 (574) 262 8900 Crown Broadcast FME 350W to 2000W User Manual– 05/2013 3.5. AF inputs Analog (LINE1) Connector "XLR" type Impedance > 10 kΩ by default, adjustable to 600 Ω by jumpers, balanced Bandwidth Software adjustable Level Software adjustable (-18/+18 dBu range) AES (LINE2) Connector "XLR" type Impedance > 110 Ω balanced Bandwidth Software adjustable Level Software adjustable (-20 to 0 dBFS range) Sampling rate Auto adjusted up to 192 kHz Bit 16, 24, 32 Multiplex (MPX/SCA) Connector "BNC" type Impedance > 5 kΩ unbalanced Level Software adjustable (-18/+18 dBu range) 3.6. HF output Connector 7/16 type Impedance 50 Ω Monitoring (RF Monitor) Level Crown Broadcast FME 350 W / 750 W / 1000 W 10 dBm 3 dB @ 750 W at main output Crown Broadcast FME 1500 W / 2000 W 10 dBm 3 dB @ 1500 W at main output Slope 20 x Log (F/98) Directivity >20 dB in the band 3.7. Power supply Voltage 184 VAC to 264 VAC Frequency 47 Hz - 63 Hz Max consumption 550 W @ nominal power (350 W version) 1150 W @ nominal power (750 W version) 1550 W @ nominal power (1000 W version) 2300 W @ nominal power (1500 W version) 3050 W @ nominal power (2000 W version) Fuses (for Crown Broadcast FME 350 W / 750W / 1000 W) 10 AT Page 18 Crown Broadcast, a division of International Radio & Electronics Corporation 25166 Leer Drive, Elkhart, Indiana, 46514-5425 USA Ph +1 (574) 262 8900 Crown Broadcast FME 350W to 2000W User Manual– 05/2013 3.1. Interface panel Indicators Green CPU LED: CPU activity Red FAULT LED: major fault Yellow WARNING LED: minor fault Red RF (3 dB) LED: RF fault (3 dB) Red VSWR LED: VSWR fault Green INTERLOCK LED: safety interlock Green RF LED: RF on Orange LOCAL LED: local mode Screens Back lighted LCD: displays operating parameters and menus. Buttons RF, local, +, -- and OK 3.2. Environmental Nominal operating temperature 5°C to 45°C Maximum operating temperature 0°C to 50°C Warehousing temperature -20°C to +70°C Warehousing time < 10 years Cooling Internal ventilation Crown Broadcast FME 350 W: ~20 I/s Crown Broadcast FME 750 W: ~20 I/s Crown Broadcast FME 1000 W: ~20 I/s Crown Broadcast FME 1500 W: ~55 l/s Crown Broadcast FME 2000 W: ~55 l/s 3.3. Physical Crown Broadcast FME 350 W / 750 W / 1000 W Overall dimension 19’’ (482.6 mm) X 3U (133.5 mm) X 470 mm Rack size without front panel 440.4 X 126.2 X 432 mm (WxHxD) Enclosure depth required 600 mm Mounting 19’’enclosure, with 4 M6X12 screws Weight around 13 kg Crown Broadcast FME 1500 W / 2000 W Overall dimension 19’’ (482.6 mm) X 3U (133.5 mm) X 690 mm Rack size without front panel 440.4 X 126.2 X 620 mm (WxHxD) Enclosure depth required 700 mm Mounting 19’’enclosure, with 4 M6X12 screws Weight around 18 kg Page 19 Crown Broadcast, a division of International Radio & Electronics Corporation 25166 Leer Drive, Elkhart, Indiana, 46514-5425 USA Ph +1 (574) 262 8900 Crown Broadcast FME 350W to 2000W User Manual– 05/2013 3.4. Miscellaneous Marking CE Standards 1999/5/CE (R&TTE) ETS 302 018 (EMC) ETS 300 384 (Radio) NF EN 60215 (Safety) Typical performances unless otherwise noted Page 20 Crown Broadcast, a division of International Radio & Electronics Corporation 25166 Leer Drive, Elkhart, Indiana, 46514-5425 USA Ph +1 (574) 262 8900 Crown Broadcast FME 350W to 2000W User Manual– 05/2013 4. STARTING UP YOUR TRANSMITTER 4.1. Connecting the transmitter 1* Rear panel 3 2 Crown Broadcast FME 350 W / 750 W / 1000 W 5 Rear panel 3 1* 2 Crown Broadcast FME 1500 W / 2000 W 5 Front panel all versions 6 4 * Secure the interlock plug if needed: locks Interlock plug 1. 2. 3. Make sure the interlock plug is present on the rear panel; secure it using the provided locks if needed. Connect the transmitter RF output to a 50 load with a wattmeter. The 50 charge power must be greater than 500 W for a 350 W transmitter, greater than 1000 W for a 750 W transmitter, greater than 1250 for a 1000 W transmitter, greater than 1875 W for a 1500 W transmitter, and greater than 2500 W for a 2000 W transmitter. When you acquired your transmitter, the RF amplifier is deactivated and power is set to 0 W. These settings can be adjusted using the PC application, the front panel application or serial commands. 4. Connect the audio or MPX inputs. 5. To use the PC application or the serial commands, connect a PC to the serial port on the front panel of the Crown Broadcast Transmitter. If your PC does not have a RS-232 port, use a USB/RS-232 cable. 6. Connect to power using the provided cable; you may unscrew the cable loop and pass the power cable through it to secure it. 7. Press the Local button on the front panel, then the RF button. Page 21 Crown Broadcast, a division of International Radio & Electronics Corporation 25166 Leer Drive, Elkhart, Indiana, 46514-5425 USA Ph +1 (574) 262 8900 Crown Broadcast FME 350W to 2000W User Manual– 05/2013 To configure the transmitter using the front panel: See section 4.2. To configure the transmitter using the PC application: See section 4.3. To set network parameters (TCP/IO option only): See section 4.4. To use serial commands: See section 6. 4.2. Using the front panel Please refer to section 5.2 for front panel working principle. 4.2.1. Setting the transmitter Set the power (in W), the frequency (in MHz) and enable the RF: 9 8 . 0 0 M H z 0 W 9 8 . 0 0 M H z 0 W -> T X P A R A M E T E R S > 1 Once you see this screen, press “Enter”. You may now set the frequency and the power. The arrow preceding the frequency indicates that this parameter is selected. Press “Enter” to switch to edit mode. -> F R E Q 9 8 . 0 0 P F W D 0 -> F R E Q 9 8 . 0 0 P F W D 0 Using the “+” and “–” keys, adjust the frequency starting with the last digit. Once you’ve reached the desired value, press “Enter” to go to the next digit. Follow the same procedure for all digits and confirm with the “Enter” key. Use the "+" to go the next parameter. F R E Q 1 0 4 . 0 5 P F W D -> 0 The arrow now appears before the power. Set the power in the same way you set the frequency. 1 1 From the main screen, press the "Enter” key to display menus and then the “+” key until you see the TX Parameters menu. After confirming the power value with the “Enter” key, enable the RF using the front panel button. 1 G O T O M A I N -> R F Press the “+” key until you see this screen. When the RF menu is selected, press “Enter” to return to the list of menus. Page 22 Crown Broadcast, a division of International Radio & Electronics Corporation 25166 Leer Drive, Elkhart, Indiana, 46514-5425 USA Ph +1 (574) 262 8900 Crown Broadcast FME 350W to 2000W User Manual– 05/2013 4.2.2. Input selection G O -> I N P U T T O S W I T C H > 1 I N P U T S E L E C T -> M O D E : M A N U 1 I N P U T S E L E C T -> M A I N : L I N E 1 Press the “+” key until you see the Input Select menu. Then press the “Enter” key. Browse through the Input Select menu using the “+” and “– ” keys to switch to manual mode. Select the current input: "LINE1" for analog (see sections 9 to 11) "LINE2" for AES (see sections 9 to 11) "MPX1" for MPX (see sections 8 and 11) "MPX2" for MPX (see sections 8 and 11) "PLAYER": internal generator Use the “Enter” key to switch to edit mode, the “+” and “–” keys to adjust values and the “Enter” key to confirm. 1 G O T O M A I N -> I N P U T S E L Press the “+” key until you see this screen. When the Input Sel menu is selected, press “Enter” to return to the list of menus. Page 23 Crown Broadcast, a division of International Radio & Electronics Corporation 25166 Leer Drive, Elkhart, Indiana, 46514-5425 USA Ph +1 (574) 262 8900 Crown Broadcast FME 350W to 2000W User Manual– 05/2013 4.2.3. Setting the MPX inputs G O -> M P X 1 2 T O I N > M P X I N -> M P X 1 > M P X - I N -> M P X 1 -> L E V E L : + 0 6 . 0 0 Press the “+” key until you see the MPX In menu. Then press the “Enter” key. Press the “Enter” key once more to set the MPX1 input. Browse through the MPX1 menu using the “+” and “–” keys to set the nominal level between -50 and +50 dBu, Use the “Enter” key to switch to edit mode, the “+” and “–” keys to adjust values and the “Enter” key to confirm. 2 G O -> M P X - I N T O M P X 1 Press the “+” key until you see this screen. When the MPX-IN menu is selected, press “Enter” to return to main MPX menu and set the MPX2 input in the same way. 1 G O T O M P X - I N To return to the main screen, press the “+” key until you see this screen. When the Main menu is selected, press “Enter” to return to the list of menus. -> M A I N Page 24 Crown Broadcast, a division of International Radio & Electronics Corporation 25166 Leer Drive, Elkhart, Indiana, 46514-5425 USA Ph +1 (574) 262 8900 Crown Broadcast FME 350W to 2000W User Manual– 05/2013 4.2.4. MPX configuration G O T O E N C O D E R > Press the “+” key until you see the ST Encoder menu. Then press the “Enter” key. S T E N C O D E R -> M O / S T : S T E R E O Press once again the “Enter” key to set the audio type. Select what you need using “+” and “–” keys: -> S T 1 STEREO MONO MONO_L MONO_R Selecting STEREO enables the internal 19 kHz; you will therefore want to select MONO for an MPX input. 1 G O M A I N -> S T T O -> C O D E R G O T O E N C O D E R > G O T O -> M O D U L A T I O N > 1 1 M O D U L A T I O N -> D E V M P X : 1 2 7 . 2 M O D U L A T I O N -> D E V Confirm with the “Enter” key and press “+” until you see this screen. When the CODER menu is selected, press “Enter” to return to the list of menus. Press the “+” key until you see the Modulation menu. Then press the “Enter” key. Browse through the Modulation menu using the “+” and “–” keys to set the total deviation between 0 and 150 kHz, Set the pilot deviation between 0 and 25.5 kHz. P I L O T : 1 8 . 4 For each of these values, use the “Enter” key to switch to edit mode, the “+” and “–” keys to adjust values and the “Enter” key to confirm. 1 G O T O M A I N -> M O D U L A T I O N Press the “+” key until you see this screen. When the Modulation menu is selected, press “Enter” to return to the list of menus. Page 25 Crown Broadcast, a division of International Radio & Electronics Corporation 25166 Leer Drive, Elkhart, Indiana, 46514-5425 USA Ph +1 (574) 262 8900 Crown Broadcast FME 350W to 2000W User Manual– 05/2013 4.2.5. 1 Setting the analog or AES inputs G O T O -> L I N E 1 > Press the “+” key until you see the Line1 (or Line2) menu. Then press the “Enter” key. L I N E 1 -> L E V E L : + 0 6 . 0 0 Browse through the Line1 (or Line2) menu using the “+” and “–” keys to set the nominal level between -50 and +50 dBu. Use the “Enter” key to switch to edit mode, the “+” and “–” keys to adjust values and the “Enter” key to confirm. 1 G O M A I N T O -> L I N E 1 Press the “+” key until you see this screen. When the Line1 (or Line2) menu is selected, press “Enter” to return to the list of menus. Default transmitter pre-accentuation is 50 µs. Depending on your country, you might need to switch it to 75 µs (in the United States, for instance). The pre-accentuation parameter is only visible in Expert mode; you must therefore first change the front panel working mode: 9 8 . 0 0 M H z -> E A S Y 1 0 0 W G O T O -> L I N E 1 > 1 L I N E 1 -> P R E A C : 5 0 1 G O -> M A I N 4.2.6. T O -> L I N E 1 Press the “+” key until you see the Easy menu. Then press the “Enter” key, “+” and “Enter” again to switch to Expert mode. Go back to the Line1 menu. Press the "Enter" key and then the “+” key to change the pre-accentuation. Use the “Enter” key to switch to edit mode, the “+” and “–” keys to adjust values and the “Enter” key to confirm. Press the “+” key until you see this screen. When the Line1 (or Line2) menu is selected, press “Enter” to return to the list of menus. Getting on air 1. Disable the RF using the front panel RF button. 2. Make sure the RF indicator LED is off. 3. Disconnect the load and connect the antenna to the transmitter RF output. 4. Enable the RF again using the front panel RF button. Page 26 Crown Broadcast, a division of International Radio & Electronics Corporation 25166 Leer Drive, Elkhart, Indiana, 46514-5425 USA Ph +1 (574) 262 8900 Crown Broadcast FME 350W to 2000W User Manual– 05/2013 4.3. Using the PC application 4.3.1. Connecting with the control software application 1. On the PC, start the control software. This is a set-up tool that will allow you to quickly set and test your transmitter. It is available on the supplied CD. 2. Select the serial port connected to the Crown Broadcast transmitter and the port speed (9600 for the front panel connector). 4.3.2. 1. 2. 3. On the transmitter’s page, click the control interface link to download the zipped file to your PC. Extract the .exe file. You do not need to install it: simply double-click on ENGI_REV_xxx.exe to launch the application. Setting the transmitter Set the power (in W), the frequency (in MHz) and enable the RF. To send a parameter value to the transmitter, click the login button; no password is set in the factory. Click the button to the right of the text zone. A set of buttons give access to other parameters. Click on one of them to open a window displaying associated parameters. The “Audio Input” and “Modulator” windows will enable input and MPX configuration. 4.3.3. Input selection The input can be set to: Line1 for the analog inputs (see sections 4.3.4 to 4.3.6) Line2 for the AES (see sections 4.3.4 to 4.3.6) MPX1 and MPX2 inputs (see sections 4.3.3 and 4.3.6) Internal generator Page 27 Crown Broadcast, a division of International Radio & Electronics Corporation 25166 Leer Drive, Elkhart, Indiana, 46514-5425 USA Ph +1 (574) 262 8900 Crown Broadcast FME 350W to 2000W User Manual– 05/2013 4.3.4. Setting the MPX inputs Click the "Audio Input" button: 4.3.5. Set the nominal level between -50 and +50 dBu MPX configuration Click the "Modulator" button: 4.3.6. Set the audio type to: o STEREO o MONO o MONO_L o MONO_R Selecting STEREO enables the internal 19 kHz; you should therefore select MONO for an MPX input. Set the total deviation between 0 and 150 kHz Set the pilot deviation between 0 and 25.5 kHz Setting the analog or AES inputs Click the "Audio Input" button: 4.3.7. Set the nominal level between -50 and +50 dBu Set the pre-emphasis to 0, 50 or 75 µs depending on your country (50 µs in Europe, 75 µs in the USA). Getting on air 1. Disable the RF using the front panel RF button. 2. Make sure the RF indicator LED is off. 3. Disconnect the load and connect the antenna to the transmitter RF output. 4. Enable the RF again using the front panel RF button. Page 28 Crown Broadcast, a division of International Radio & Electronics Corporation 25166 Leer Drive, Elkhart, Indiana, 46514-5425 USA Ph +1 (574) 262 8900 Crown Broadcast FME 350W to 2000W User Manual– 05/2013 4.4. With the TCP/IP option 4.4.1. Network configuration If the optional IP board is present on the transmitter, first set the IP address with the front panel: 9 8 . 0 0 M H z 0 W 9 8 . 0 0 M H z 1 0 0 W -> N E T W O R K > From the main screen, press the "Enter” key to display menus and then the “+” key until you see the Network menu. Once you see this screen, press “Enter”. 1 N E T W O R K -> A D R -> 1 9 2 . 1 6 8 . 0 1 2 . 1 0 3 The IP address screen is displayed. Press “Enter” to switch to edit mode. Use the “+” and “–” keys to adjust values and the “Enter” key to confirm. 1 N E T W O R K -> M A S K -> 2 5 5 . 2 5 5 . 2 5 5 . 0 0 0 Press the “+” key to display the Netmask and modify it if needed. Press the “Enter” key to confirm. 4.4.2. Connecting to the web interface Now the transmitter is set. Connect it to the network. Open a web browser (Google Chrome, Mozilla Firefox …) and enter in the address bar the transmitter’s IP address such as it was set above. Select the language if necessary. Enter the user name and password (default: Admin / admin). You can now access the web interface. Page 29 Crown Broadcast, a division of International Radio & Electronics Corporation 25166 Leer Drive, Elkhart, Indiana, 46514-5425 USA Ph +1 (574) 262 8900 Crown Broadcast FME 350W to 2000W User Manual– 05/2013 4.4.3. Configuring the transmitter Click the button Config’ page. in the tool bar to access the transmitter configuration and display the ‘Easy Basic configuration can be managed on this single page: Power, frequency and RF on Input priority setting MPX configuration Input configuration Default transmitter pre-accentuation is 50 µs. Depending on your country, you might need to switch it to 75 µs (in the United States, for instance). The pre-accentuation parameter is available in the Input Source section. 4.4.4. 1. Getting on air Disable the RF using the front panel RF button. 2. Make sure the RF indicator LED is off. 3. Disconnect the load and connect the antenna to the transmitter RF output. 4. Enable the RF again using the front panel RF button. Page 30 Crown Broadcast, a division of International Radio & Electronics Corporation 25166 Leer Drive, Elkhart, Indiana, 46514-5425 USA Ph +1 (574) 262 8900 Crown Broadcast FME 350W to 2000W User Manual– 05/2013 5. FRONT SCREEN USE 5.1. Overview The transmitter can be entirely set using the front panel application. For audio configuration you will use the following menus: Input Switch: To select the main audio source and the secondary audio sources and to set switching criteria between these sources. Line1 / Line2 / MPX1 / MPX2 / Audio Gene: To set levels and processes for each source. Modulation: To set the deviation for each sub-carrier of the multiplex signal. In this menu you may also enable RDS and SCA. Stereo Encoder: To choose the content of stereo sub-carrier of the multiplex signal. RDS/SCA Encoder: To choose the content of the RDS and SCA sub-carrier of the multiplex signal. RDS: To set the RDS. The default mode for the transmitter is the “Easy” mode: only menus required for basic configuration are available. For instance, the RDS menu mentioned above is not visible. To display all menus, simply switch to “Expert” mode: 9 8 . 0 0 M H z -> E A S Y 1 0 0 W From the main screen, press the “Enter” key to display the menu and press the “+” key until you see the Easy menu. Then press the “Enter” key, “+” and “Enter” again to switch to Expert mode. On the menu representations section 5.3, “Easy” menus are in green and “Expert” menus are in orange. 5.2. On startup, the screen displays the name of the unit, its software release and its serial number. Working principle ENTER Three keys allow you to browse through the menus: With the and keys, go from one screen to the next or rather from one command to the next. If 2 commands are available on a single screen, press twice to go to the next screen. A command is selected when an arrow is visible before its name. Example: 1 -> F R E Q 9 8 . 0 0 The frequency is selected P F W D 7 5 0 1 F R E Q 9 8 . 0 0 P F W D -> 7 5 0 The power is selected Page 31 Crown Broadcast, a division of International Radio & Electronics Corporation 25166 Leer Drive, Elkhart, Indiana, 46514-5425 USA Ph +1 (574) 262 8900 Crown Broadcast FME 350W to 2000W User Manual– 05/2013 The and keys are also used to adjust values after the edit mode has been enabled. To adjust a value, set each character at a time. Text values are set from left to right; number values are set from right to left. The ENTER button is used to: Access a lower level menu Enable the edit mode for parameters that can be modified Confirm a new value Return to the higher level menu Return to the main screen when pressed for a few seconds Some menus include sub-menus. To make it easier to browse through the menus and locate the information, a small number is visible on the top left of the screen; it gives you the level of the menu you are viewing (1 or 2). If a text string is longer than the screen, press the ENTER key to access the text string and to scroll. Page 32 Crown Broadcast, a division of International Radio & Electronics Corporation 25166 Leer Drive, Elkhart, Indiana, 46514-5425 USA Ph +1 (574) 262 8900 Crown Broadcast FME 350W to 2000W User Manual– 05/2013 5.3. Structure of the menus 5.3.1. Overview Menus followed by are read-only. The Alarm menu only appears when at least one alarm is active. Menu and menu items in orange are only visible in Expert mode. Page 33 Crown Broadcast, a division of International Radio & Electronics Corporation 25166 Leer Drive, Elkhart, Indiana, 46514-5425 USA Ph +1 (574) 262 8900 Crown Broadcast FME 350W to 2000W User Manual– 05/2013 5.3.2. First level measurements These values are read-only; bar graphs may also be available. 9 8 . 0 0 M H z 1 0 0 W ||| ||| ||| ||| ||| ||| ||| ||| ||| ||| ||| ||| ||| ENTER First level menu: RF parameters P r = ||| ||| ||| ||| ENTER First level menu: RF parameters ENTER First level menu: Modulation I N P U T S O U R C E L I N E 1 ENTER First level menu: Input Switch A N A 1 L E V E L ( d B U ) L = + 1 2 . 0 R = + 1 2 . 0 ENTER First level menu: Line 1 A E S 2 L E V E L ( d B F S ) L = + 1 2 . 3 R = + 1 2 . 1 ENTER First level menu: Line 2 8 W V S W R = 1 . 0 P E A K = 7 8 k H z ||| ||| ||| ||| ||| ||| ||| ||| ||| ||| ||| | M P X 1 L E V E L ( d B U ) 1 1 . 8 ENTER First level menu: MPX-In M P X 2 L E V E L ( d B U ) 1 2 . 1 ENTER First level menu: MPX-In P L A Y E R L V L ( d B F S ) 0 . 1 ENTER First level menu: Player ENTER First level menu: Stereo Encoder M O N O / S T E R E O M O N O See next page for first level menus Page 34 Crown Broadcast, a division of International Radio & Electronics Corporation 25166 Leer Drive, Elkhart, Indiana, 46514-5425 USA Ph +1 (574) 262 8900 Crown Broadcast FME 350W to 2000W User Manual– 05/2013 5.3.3. First level menus ENTER 9 ||| ||| 9 -> 9 -> 9 8 ||| 8 T 8 R 8 . ||| . X . F . 9 8 . -> I N 9 8 . 9 8 . 9 8 . 9 8 . 9 8 -> 9 8 -> 9 8 -> 9 8 . A . M . S . 0 0 M H ||| ||| ||| ||| 0 0 M H P A R 0 0 M H P A R 0 0 M H -> A L A 0 0 M H P U T 0 0 M H -> L I N 0 0 M H -> L I N 0 0 M H -> M P X 0 0 M H -> P L A 0 0 M H U D I O 0 0 M H O D U L 0 0 M H T E N 0 0 M H -> R D S / S M -> F M 9 8 . 0 0 -> 9 8 . 0 0 -> N E 9 8 . 0 0 -> 9 8 . 0 0 -> P O W E 9 8 . 0 0 -> T E 9 8 . 0 0 -> T I 9 8 . 0 0 -> L I 9 8 . 0 0 -> A B O U 9 8 . 0 0 -> 9 8 . 0 0 -> z ||| z A z A z R z S z E z E z z Y z z A z C z C A E L M R M T M C M R M M M M M C M T M E M E N I H D H W H O H H P H E H E H / H A H X 1 ||| ||| ||| ||| 1 M E T E 1 M E T E 1 M S > 1 W I T C 1 1 > 1 2 > 1 I N > 1 E R > 1 G E N E 1 T I O N 1 O D E R 1 0 0 W 0 R 0 R 0 0 S 0 S 0 W > W > W 0 0 W H > 0 0 W 0 0 W 0 0 W 0 0 W 0 > 0 > 0 > 0 0 W 0 W 0 W 0 W E N C O D E R U M z S z O z M z S z / z / z N z S z S z I S I T E R 1 > 1 R K > 1 > 1 U P P L 1 F A N > 1 D A T E 1 S E 1 Y S T E 1 Y 1 T The arrow > at the end of the 2nd line indicates there is a sub-menu. Press the “Enter” key to access it. Available menus vary depending on the options actually implemented on the transmitter and its state. Menus in orange are only visible in Expert mode Each menu is detailed in the following pages. > 0 0 W 0 0 W 0 0 W 0 0 W Y > 0 0 W 0 0 W > 0 0 W 0 0 W M > 0 0 W 0 0 W Page 35 Crown Broadcast, a division of International Radio & Electronics Corporation 25166 Leer Drive, Elkhart, Indiana, 46514-5425 USA Ph +1 (574) 262 8900 Crown Broadcast FME 350W to 2000W User Manual– 05/2013 5.3.4. TX Parameters menu 9 8 . 0 0 M H z 1 0 0 W -> T X P A R A M E T E R S > ENTER 1 -> F R E Q 9 8 . 0 0 P F W D 1 0 0 1 -> P W R 1 0 0 P F W D P R E F 1 0 0 5 2 1 3 D B -> 3 2 5 M A X V S W R 2 . 0 1 -> V S W R O N 1 -> 1 T R I P 3 1 D B 1 G O T O M A I N -> R F MAIN is selected * ENTER 9 8 . 0 0 M H z 1 0 0 W ||| ||| ||| ||| ||| ||| ||| ||| ||| ||| ||| ||| ||| RF is selected * * An arrow appears before the selected command. Main measurement screen 5.3.5. ALARMS menu 1 0 4 . 0 5 M H z 1 0 0 W -> A L A R M S > This read-only menu is only visible if alarms are present. It then displays one screen per current alarm. Press the ENTER key and then the key to scroll through them. Page 36 Crown Broadcast, a division of International Radio & Electronics Corporation 25166 Leer Drive, Elkhart, Indiana, 46514-5425 USA Ph +1 (574) 262 8900 Crown Broadcast FME 350W to 2000W User Manual– 05/2013 5.3.6. Input Switch menu 9 8 , 0 0 M H z 1 0 0 W -> I N P U T S W I T C H > ENTER 1 1 1 1 1 1 1 I N P U T -> I N P U T S W I T C H S E L E C T > ENTER I N P U T S W I T C H -> L I N E 1 > I N P U T S W I T C H -> L I N E 2 > I N P U T S W I T C H -> M P X > I N P U T S W I T C H -> P L A Y E R > I N P U T S W I T C H -> A U D I O / I P > 2 I N P U T S E L E C T -> M O D E : M A N U 2 I N P U T S E L E C T -> M A I N : L I N E 1 2 I N P U T -> B A C K U P S E L E C T 1 : L I N E 2 2 I N P U T -> B A C K U P S E L E C T 2 : M P X 1 2 I N P U T -> B A C K U P S E L E C T 3 : P L A Y E R 2 G O T O -> S W I T C H -> I N P U T S E L I N P U T S W I T C H -> T U N E R > ENTER 1 I N P U T S W I T C H -> C R O S S F A D E : 1 8 . 5 1 -> M A I N G O T O ‐> I N P U T - S W The tuner submenu is similar to these sub-menus: MAIN is selected * ENTER Line1, Line2, MPX, Player, Audio/IP INPUT-SW is selected * 9 8 . 0 0 M H z 1 0 0 W ||| ||| ||| ||| ||| ||| ||| ||| ||| ||| ||| ||| ||| INPUTSEL is selected * ENTER SWITCH is selected * 2 S W I T C H -> T U N E R -> T H R E S H O L D : - 9 0 d B 2 S W I T C H -> T U N E R -> S I L E N C E : B O T H 2 S W I T C H -> T U N E R -> D E L A Y : 1 2 0 2 S W I T C H -> T U N E R -> B A C K D E L A Y : 3 0 s 2 G O -> S W I T C H TUNER is selected * T O ‐> T U N E R ENTER SWITCH is selected * * An arrow appears before the selected command. Main measurement screen Page 37 Crown Broadcast, a division of International Radio & Electronics Corporation 25166 Leer Drive, Elkhart, Indiana, 46514-5425 USA Ph +1 (574) 262 8900 Crown Broadcast FME 350W to 2000W User Manual– 05/2013 5.3.7. Line1 menu (similar to the Line2 menu and to the Player menu) 9 8 . 0 0 M H z -> L I N E 1 > 1 0 0 W ENTER 1 L I N E 1 P R E S E N C E : L & R 1 L I N E 1 -> L E V E L : + 0 6 . 0 0 1 L I N E 1 -> D R I V E : + 0 . 0 1 L I N E 1 -> R I G H T T R I M : 1 L I N E 1 -> F I L T E R : 1 5 1 L I N E 1 -> P R E A C : 5 0 1 G O -> M A I N MAIN is selected * 9 8 . 0 0 M H z 1 0 0 W ||| ||| ||| ||| ||| ||| ||| ||| ||| ||| ||| ||| ||| 0 . 0 T O -> L I N E 1 ENTER LINE1 is selected * * An arrow appears before the selected command. Main measurement screen Page 38 Crown Broadcast, a division of International Radio & Electronics Corporation 25166 Leer Drive, Elkhart, Indiana, 46514-5425 USA Ph +1 (574) 262 8900 Crown Broadcast FME 350W to 2000W User Manual– 05/2013 5.3.8. MPX In menu 9 8 . 0 0 M H z 7 5 0 W -> M P X I N > ENTER 1 1 M P X I N -> M P X 1 > ENTER M P X I N -> M P X 2 > 1 G O -> M A I N T O M P X - I N The MPX2 menu is similar to the MPX1 menu 2 M P X - I N -> M P X 1 P R E S E N C E : S T + R + S 2 M P X - I N -> M P X 1 -> L E V E L : + 0 6 . 0 0 2 M P X - I N -> M P X 1 -> D R I V E : + 0 . 0 2 M P X - I N -> M P X 1 R M S : - 1 2 6 2 M P X - I N -> M P X 1 P E A K : - 1 1 8 2 G O -> M P X - I N T O M P X 1 ENTER MAIN is selected * ENTER MPX-IN is selected * MPX1 is selected * MPX-IN is selected * 9 8 . 0 0 M H z 1 0 0 W ||| ||| ||| ||| ||| ||| ||| ||| ||| ||| ||| ||| ||| Main measurement screen * An arrow appears before the selected command. Page 39 Crown Broadcast, a division of International Radio & Electronics Corporation 25166 Leer Drive, Elkhart, Indiana, 46514-5425 USA Ph +1 (574) 262 8900 Crown Broadcast FME 350W to 2000W User Manual– 05/2013 5.3.9. Audio Gene menu 9 8 . 0 0 M H z 1 0 0 W -> A U D I O G E N E > ENTER 1 A U D I O G E N E -> S T A T E : O F F 1 A U D I O G E N E -> P R E A C : 5 0 1 A U D I O G E N E -> L E V E L : + 0 6 . 0 0 1 A U D I O G E N E -> F R E Q : 1 0 0 0 0 0 . 0 0 1 -> M A I N MAIN is selected * 9 8 . 0 0 M H z 1 0 0 W ||| ||| ||| ||| ||| ||| ||| ||| ||| ||| ||| ||| ||| G O T O A U D I O - G E N E ENTER AUDIO-GENE is selected * * An arrow appears before the selected command. Main measurement screen Page 40 Crown Broadcast, a division of International Radio & Electronics Corporation 25166 Leer Drive, Elkhart, Indiana, 46514-5425 USA Ph +1 (574) 262 8900 Crown Broadcast FME 350W to 2000W User Manual– 05/2013 5.3.10. Modulation menu 9 8 . 0 0 M H z 7 5 0 W -> M O D U L A T I O N > ENTER 1 M O D U L A T I O N R M S : - 1 2 6 1 M O D U L A T I O N -> D E V M P X : 7 5 . 0 1 M O D U L A T I O N -> D E V A U D I O : 6 3 . 9 1 M O D U L A T I O N -> D E V P I L O T : 7 . 1 1 M O D U L A T I O N -> D E V R D S : 4 . 0 1 M O D U L A T I O N -> D E V S C A : 0 . 0 1 -> M A I N MAIN is selected * 9 8 . 0 0 M H z 1 0 0 W ||| ||| ||| ||| ||| ||| ||| ||| ||| ||| ||| ||| ||| G O T O M O D U L A T I O N ENTER MODULATION is selected * * An arrow appears before the selected command. Main measurement screen Page 41 Crown Broadcast, a division of International Radio & Electronics Corporation 25166 Leer Drive, Elkhart, Indiana, 46514-5425 USA Ph +1 (574) 262 8900 Crown Broadcast FME 350W to 2000W User Manual– 05/2013 5.3.11. Stereo encoder menu 9 8 . 0 0 M H z 7 5 0 W -> S T E N C O D E R > ENTER 1 S T E N C O D E R -> M O / S T : S T E R E O 1 S T A U D I O E N C O D E R C H : L I N E 2 1 M O D U L A T I O N -> P H I 1 9 k : - 1 8 0 . 0 0 1 S T E N C O D E R -> 1 9 k O U T L E V E L : 1 G O -> M A I N MAIN is selected * 9 8 . 0 0 M H z 1 0 0 W ||| ||| ||| ||| ||| ||| ||| ||| ||| ||| ||| ||| ||| T O -> C O D E R ENTER CODER is selected * * An arrow appears before the selected command. Main measurement screen Page 42 Crown Broadcast, a division of International Radio & Electronics Corporation 25166 Leer Drive, Elkhart, Indiana, 46514-5425 USA Ph +1 (574) 262 8900 Crown Broadcast FME 350W to 2000W User Manual– 05/2013 5.3.12. RDS / SCA encoder menu 9 8 . 0 0 M H z 1 0 0 W -> R D S / S C A E N C O D E R ENTER 1 R D S / S C A E N C O D E R R D S C H : M P X 2 1 R D S / S C A E N C O D E R -> R D S I N : M P X 1 1 R D S / S C A E N C O D E R -> R D S B A C K U P : O F F 1 R D S / S C A E N C O D E R -> P H I R D S : + 9 0 . 0 0 1 R D S / S C A E N C O D E R S C A C H : M P X 2 1 R D S / S C A E N C O D E R -> S C A I N : M P X 2 1 -> M A I N MAIN is selected * G O T O -> R D S / S C A ENTER LINE1 is selected * 9 8 . 0 0 M H z 1 0 0 W ||| ||| ||| ||| ||| ||| ||| ||| ||| ||| ||| ||| ||| Main measurement screen * An arrow appears before the selected command. Page 43 Crown Broadcast, a division of International Radio & Electronics Corporation 25166 Leer Drive, Elkhart, Indiana, 46514-5425 USA Ph +1 (574) 262 8900 Crown Broadcast FME 350W to 2000W User Manual– 05/2013 5.3.13. FM limiter menu 9 8 . 0 0 M H z 1 0 0 W -> F M L I M I T E R > ENTER 1 H A R D 1 H A R D C L I P P E R -> D E V : 2 0 0 C L I P P E R -> S T A T E : O F F 1 A G C S T A T E -> O N 1 A G C D R I V E -> + 1 0 0 . 5 6 1 A G C A T T A C K -> 3 2 0 . 0 1 A G C R E L E A S E -> 5 0 . 0 0 1 A G C G A T E T H R E S H -> - 7 0 . 0 0 1 L I M I T E R -> O F F S T A T E 1 L I M I T E R D R I V E -> 2 1 . 0 2 1 M P X P W R L I M I T E R -> S T A T E : O F F 1 M P X P W R L I M I T E R -> L E V E L : - 1 0 . 5 d B 1 -> M A I N MAIN is selected * 9 8 . 0 0 M H z 1 0 0 W ||| ||| ||| ||| ||| ||| ||| ||| ||| ||| ||| ||| ||| G O T O -> L I M I T E R ENTER NETWORK is selected * * An arrow appears before the selected command. Main measurement screen Page 44 Crown Broadcast, a division of International Radio & Electronics Corporation 25166 Leer Drive, Elkhart, Indiana, 46514-5425 USA Ph +1 (574) 262 8900 Crown Broadcast FME 350W to 2000W User Manual– 05/2013 5.3.14. RDS menu 9 8 . 0 0 M H z -> R D S > ENTER 1 0 0 W 1 R D S C U R R E N T : M A I N ( 1 ) 1 R D S -> M A I N - D S N ( 1 ) > ENTER 1 R D S -> A L T - D S N ( 2 ) > 2 R D S -> M A I N - D S N -> P I : F 1 0 B -> P T Y : 1 9 1 G O -> M A I N 2 R D S -> M A I N - D S N -> P S : M Y R A D I O 2 R D S -> M A I N - D S N -> M S : 0 9 -> D I : 1 2 2 R D S -> M A I N - D S N -> T A / T P : T A T P T O -> R D S The ALT-DSN menu is similar to the MAIN-DSN menu 2 R D S -> M A I N - D S N -> A F : 8 8 . 5 ; 1 0 8 . 0 ; 9 2 R D S -> M A I N - D S N -> R T : R A D I O T E X T 2 R D S -> M A I N - D S N -> G S : 0 A ; 1 A ; E N D 1 -> R D S G O T O -> M A I N - D S N ENTER MAIN is selected * ENTER RDS is selected * 9 8 . 0 0 M H z 1 0 0 W ||| ||| ||| ||| ||| ||| ||| ||| ||| ||| ||| ||| ||| MAIN-DSN is selected * RDS is selected * * An arrow appears before the selected command. Main measurement screen Page 45 Crown Broadcast, a division of International Radio & Electronics Corporation 25166 Leer Drive, Elkhart, Indiana, 46514-5425 USA Ph +1 (574) 262 8900 Crown Broadcast FME 350W to 2000W User Manual– 05/2013 5.3.15. Network menu 9 8 . 0 0 M H z 1 0 0 W -> N E T W O R K > ENTER 1 N E T W O R K -> A D R -> 1 9 2 . 1 6 8 . 0 1 2 . 1 0 3 1 N E T W O R K -> M A S K -> 2 5 5 . 2 5 5 . 2 5 5 . 0 0 0 1 N E T W O R K -> G W -> 2 5 5 . 2 5 5 . 2 5 5 . 1 2 7 1 G O -> M A I N MAIN is selected * 9 8 . 0 0 M H z 1 0 0 W ||| ||| ||| ||| ||| ||| ||| ||| ||| ||| ||| ||| ||| T O -> N E T W O R K ENTER NETWORK is selected * * An arrow appears before the selected command. Main measurement screen Page 46 Crown Broadcast, a division of International Radio & Electronics Corporation 25166 Leer Drive, Elkhart, Indiana, 46514-5425 USA Ph +1 (574) 262 8900 Crown Broadcast FME 350W to 2000W User Manual– 05/2013 5.3.16. COM menu 9 8 . 0 0 M H z -> C O M > 1 0 0 W ENTER 1 L O C A L C O M S P E E D -> 1 1 5 2 0 0 1 C O M 1 S P E E D -> 1 1 5 2 0 0 1 C O M 2 S P E E D -> 1 1 5 2 0 0 1 L O C A L C O M -> O N E C H O 1 C O M 1 E C H O -> O N 1 C O M 2 E C H O -> O N 1 G O -> M A I N MAIN is selected * 9 8 . 0 0 M H z 1 0 0 W ||| ||| ||| ||| ||| ||| ||| ||| ||| ||| ||| ||| ||| T O -> C O M ENTER COM is selected * * An arrow appears before the selected command. Main measurement screen Page 47 Crown Broadcast, a division of International Radio & Electronics Corporation 25166 Leer Drive, Elkhart, Indiana, 46514-5425 USA Ph +1 (574) 262 8900 Crown Broadcast FME 350W to 2000W User Manual– 05/2013 5.3.17. Power supply menu 9 8 . 0 0 M H z 1 0 0 W -> P O W E R S U P P L Y > ENTER 1 C U R 1 : 2 1 . 2 A V O L T 1 : 4 8 . 2 V 1 C U R 2 : 2 1 . 2 A V O L T 2 : 4 8 . 2 V 1 C U R 3 : 2 1 . 2 A V O L T 3 : 4 8 . 2 V 1 1 1 The number of PSU varies depending on the unit type. C U R 4 : 2 1 . 2 A V O L T 4 : 4 8 . 2 V S T A N D B Y -> O F F G O -> M A I N MAIN is selected * 9 8 . 0 0 M H z 1 0 0 W ||| ||| ||| ||| ||| ||| ||| ||| ||| ||| ||| ||| ||| T O -> P O W E R ENTER POWER is selected * * An arrow appears before the selected command. Main measurement screen Page 48 Crown Broadcast, a division of International Radio & Electronics Corporation 25166 Leer Drive, Elkhart, Indiana, 46514-5425 USA Ph +1 (574) 262 8900 Crown Broadcast FME 350W to 2000W User Manual– 05/2013 5.3.18. Temp/Fan menu 9 8 . 0 0 M H z 7 5 0 W -> T E M P / F A N > ENTER 1 T ° A M B : 3 1 ° C T ° H E A T : 5 2 ° C 1 F A N 1 : 2 0 0 0 r p m F A N 2 : 2 0 0 0 r p m 1 M A X A M B -> 5 0 ° C 1 M A X H E A T -> 7 0 ° C 1 -> M A I N MAIN is selected * 9 8 . 0 0 M H z 1 0 0 W ||| ||| ||| ||| ||| ||| ||| ||| ||| ||| ||| ||| ||| G O T O -> T E M P / F A N ENTER TEMP/FAN is selected * * An arrow appears before the selected command. Main measurement screen Page 49 Crown Broadcast, a division of International Radio & Electronics Corporation 25166 Leer Drive, Elkhart, Indiana, 46514-5425 USA Ph +1 (574) 262 8900 Crown Broadcast FME 350W to 2000W User Manual– 05/2013 5.3.19. Time/Date menu 9 8 . 0 0 M H z 1 0 0 W -> T I M E / D A T E > ENTER 1 H H M M 1 4 : 0 4 1 -> M A I N MAIN is selected * 9 8 . 0 0 M H z 1 0 0 W ||| ||| ||| ||| ||| ||| ||| ||| ||| ||| ||| ||| ||| D D M M Y Y 2 3 / 0 6 / 1 1 G O T O -> T I M E / D A T E ENTER TIME/DATE is selected * * An arrow appears before the selected command. Main measurement screen Page 50 Crown Broadcast, a division of International Radio & Electronics Corporation 25166 Leer Drive, Elkhart, Indiana, 46514-5425 USA Ph +1 (574) 262 8900 Crown Broadcast FME 350W to 2000W User Manual– 05/2013 5.3.20. License menu 9 8 . 0 0 M H z 1 0 0 W -> L I C E N S E > ENTER 1 S E R I A L N U M B E R 0 0 0 0 0 0 2 5 1 L A S T K E Y 6 0 B 2 6 2 E 0 0 1 C ENTER 1 C U R R E N T L I C E N S E -> R D S B A S I C , P L A Y E 2 1 E N A B L E L I C . -> N E W > 2 1 D I S A B L E L I C . -> R E M O V E > 2 1 G O -> M A I N T O -> L I C E N S E 1 G E N E R A T E -> G O K E Y E N T E R K E Y -> 0 0 0 0 0 0 0 0 0 0 0 C L E A R K E Y -> C L E A R G O T O -> L I C E N S E -> R E M . REM. is selected * ENTER ENTER 2 2 1 LICENSE is selected * E N T E R K E Y -> 0 0 0 0 0 0 0 0 0 0 0 G E N E R A T E -> G O K E Y G O T O -> L I C E N S E -> A D D . ENTER MAIN is selected * ENTER LICENSE is selected * 9 8 . 0 0 M H z 1 0 0 W ||| ||| ||| ||| ||| ||| ||| ||| ||| ||| ||| ||| ||| ADD. is selected * LICENSE is selected * * An arrow appears before the selected command. Main measurement screen Page 51 Crown Broadcast, a division of International Radio & Electronics Corporation 25166 Leer Drive, Elkhart, Indiana, 46514-5425 USA Ph +1 (574) 262 8900 Crown Broadcast FME 350W to 2000W User Manual– 05/2013 5.3.21. About / System menu 1 0 4 . 0 5 M H z 7 5 0 W -> A B O U T / S Y S T E M > ENTER 1 S Y S T Y P E : H 1 0 P C A P : 7 5 0 W S Y S 1 T X T X T Y P E : H 1 0 P C A P : 7 5 0 W 1 N A M E S Y S -> S Y S G L T 7 5 1 T X -> T X N A M E G L T 7 5 1 S O F T R E L L I S T -> C P U : 0 1 0 0 ; E X C : 0 1 1 S O F T R E L E A S E 0 1 0 0 1 H A R D R E L 0 3 1 C A N I D -> 1 2 1 D A T E C A L I B 2 3 0 6 2 0 1 1 1 S E R I A L N U M B E R 0 1 2 5 A A 1 1 1 U P T I M E 1 0 2 8 5 H 1 O P T I O N S L I S T -> G P I O , I P , A U D I O 1 G O -> M A I N MAIN is selected * 9 8 . 0 0 M H z 1 0 0 W ||| ||| ||| ||| ||| ||| ||| ||| ||| ||| ||| ||| ||| T O -> A B O U T ENTER ABOUT is selected * * An arrow appears before the selected command. Main measurement screen Page 52 Crown Broadcast, a division of International Radio & Electronics Corporation 25166 Leer Drive, Elkhart, Indiana, 46514-5425 USA Ph +1 (574) 262 8900 Crown Broadcast FME 350W to 2000W User Manual– 05/2013 5.3.22. Easy/Expert menu 9 8 . 0 0 M H z -> E A S Y 1 0 0 W 9 8 . 0 0 M H z -> E X I T 1 0 0 W 5.3.23. Exit menu ENTER 9 8 . 0 0 M H z 1 0 0 W ||| ||| ||| ||| ||| ||| ||| ||| ||| ||| ||| ||| ||| Main measurement screen Page 53 Crown Broadcast, a division of International Radio & Electronics Corporation 25166 Leer Drive, Elkhart, Indiana, 46514-5425 USA Ph +1 (574) 262 8900 Crown Broadcast FME 350W to 2000W User Manual– 05/2013 5.4. Main parameters description Parameters are described for the main menus; serial commands are indicated in parenthesis. Possible values and/or value format are indicated for each parameter. 5.4.1. TX Parameters menu These parameters are available as TX and CONF serial commands (see sections 6.2.8 and 6.2.3). 3 DB (TX.3DB) With this parameter, set the triggering threshold for the 3 dB alarm. Default value is half the transmitter’s power. From 0 to 9999 dB (depending on the transmitter’s power) MAX VSWR (TX.VSWR.MAX) With this parameter, set the triggering threshold for the VSWR alarm. From 0 to 99.9 VSWR TRIP (TX.VSWRTRIP) With this parameter, enable or disable the reflected power safety (ON or OFF). In case the VSWR is too high (reflected power greater than the maximum threshold), RF is disabled and automatically starts again. If the fault is still present, the cut/restart process is repeated 3 times. If the 3rd time it is still present, the transmitter is cut for good. 5.4.2. Input Switch menu These parameters are available as INPUT and CONF serial commands (see sections 6.2.5 and 6.2.3) but are managed differently: the PRIO parameter for each input sets the selection order for the various audio sources. MODE With this parameter, choose whether audio source selection is done manually or automatically. In manual mode, the user selected audio source is used regardless of the state of the audio source. In auto mode, the effective audio source depends directly on the switching configuration and on the channels selected as Main or as Backup (1, 2 or 3). MANU or AUTO MAIN With this parameter, select the main audio source. LINE1, LINE2, MPX1, MPX2 or GENE BACKUP 1 / BACKUP 2 / BACKUP 3 With this parameters, select the audio sources which the transmitter will switch to in case of issue. LINE1, LINE2, MPX1, MPX2 ou GENE Page 54 Crown Broadcast, a division of International Radio & Electronics Corporation 25166 Leer Drive, Elkhart, Indiana, 46514-5425 USA Ph +1 (574) 262 8900 Crown Broadcast FME 350W to 2000W User Manual– 05/2013 CROSSFADE (CONF.CROSSFADE) - – read/write With this parameter, set the crossfade time between channels when switching from one to the next (in seconds). From 0 to 25.5 s LINE 1 or 2 / MPX / PLAYER sub menu These parameters are available as INPUT.LINE1.SW / INPUT.LINE2.SW / INPUT.MPX.SW / INPUT.PLAYER.SW serial commands (see section 6.2.5). THRESHOLD (INPUT.xx.SW.THRESH) – read/write With this parameter, set the silence threshold level in dBFS on the selected channel. From -90 to 0 dBFS SILENCE (INPUT.xx.SW.SILENCE) – read/write With this parameter, select the channel (L / R / L or R / L and R) on which silence detection must be performed (not available on the MPX sub-menus). L, R, ANY or BOTH DELAY (INPUT.xx.SW.DELAY) – read/write With this parameter, set the switching delay in seconds when audio loss occurs. From 1 to 120 s BACK DELAY (INPUT.xx.SW.BACKDELAY) – read/write With this parameter, set the delay before returning to the highest priority channel, in seconds. From 0 to 30 s 5.4.3. Line1 menu (ANA) These parameters are available as INPUT.LINE1 serial commands (see section 6.2.5). PRESENCE (INPUT.LINE1.PRESENCE) – read only This parameter indicates the presence of audio signal at the input: none, left, right or L&R. NONE, L, R, L&R LEVEL (INPUT.LINE1.LEVEL) – read/write This parameter is the max audio peak in dBu that can come from the transmitter on the LINE1 input. For example, if the audio peak from the source is +6 dBu, this parameter must be set to +6 dBu for optimal operation. If you do not know the audio source level, you may use an audio analyzer or display first level measurements on the front panel to read the LINE1 LEVEL. Be aware that if the level is poorly set the deviation may become too low or too high. This level is also called nominal level, i.e. the level producing the deviation as set in the Modulation menu. From -18 dBu to +18 dBu Page 55 Crown Broadcast, a division of International Radio & Electronics Corporation 25166 Leer Drive, Elkhart, Indiana, 46514-5425 USA Ph +1 (574) 262 8900 Crown Broadcast FME 350W to 2000W User Manual– 05/2013 DRIVE (INPUT.LINE1.DRIVE) – read/write With this parameter, you can slightly compensate the input audio level. It directly affects the final deviation. A negative value decreases the deviation; a positive value can increase the deviation and/or cause the MPX hard clipper to be used (if enabled) which in turn may lead to audio distortion. We recommend you leave it at 0 dB. From -6 dB to +6 dB RIGHT TRIM (INPUT.LINE1.TRIM) – read/write With this parameter, you can correct the balance between the Left and Right channels. However, it is better to look for and correct the cause of a lack of balance (before the transmitter) rather than correcting it at this stage. A positive value increases the Right channel; a negative value decreases the Right channel level. It is best to leave it at 0 dB. From -3 dB to +3 dB FILTER (INPUT.LINE1.FLT) – read/write This parameter is crucial; it sets the low-pass filter applied on the audio input. The FM bandwidth is limited to 15 kHz, so the filter must be set to 15 kHz for the FM. Digital technology and the quality of the internal stereo encoder make it possible to set the filter at 16 or 17 kHz while maintaining an acceptable pilot protection. Select 0 kHz to disable the filter. This solution can be used in mono operation (in stereo operation, the incidence on the MPX signal and its sub-carrier would be too great) or when a 15 kHz filter is already used upstream as with an FM processor, for instance. In this specific situation, you may also use 2 filters, the standard 15 kHz standard filter with the external processor, plus the 16 kHz transmitter filter. The listeners will hear the processor’s filter; the internal filter will take the relay in case of issue with the processor. 0, 15, 16 or 17 kHz PREACC (INPUT.LINE1.PREAC) – read/write With this parameter, set the pre-emphasis. Select 0 µs is the audio signal is pre-emphasized before getting to the transmitter. Otherwise, select according to the country: 50 µs in Europe, 75 µs in the USA. 0, 50 or 75 µs 5.4.4. Line2 menu (AES) These parameters are available as INPUT.LINE2 serial commands (see section 6.2.5). They are identical to LINE1 menu parameters, except for the level. LEVEL (INPUT.LINE2.LEVEL) – read/write This parameter is the max audio peak in dBu that can come from the transmitter on the LINE2 input. For example, if the audio peak from the source is -4 dBFS, this parameter must be set to -4 dBFS for optimal operation. If you do not know the audio source level, you may use an audio analyzer or display first level measurements on the front panel to read the LINE2 LEVEL. Be aware that if the level is poorly set, the deviation may become too low or too high. This level is also called nominal level, i.e. the level producing the deviation as set in the Modulation menu. From -20 dBFS to 0 dBFS Page 56 Crown Broadcast, a division of International Radio & Electronics Corporation 25166 Leer Drive, Elkhart, Indiana, 46514-5425 USA Ph +1 (574) 262 8900 Crown Broadcast FME 350W to 2000W User Manual– 05/2013 5.4.5. MPX In menu MPX1 or MPX2 Sub-menu These parameters are available as INPUT.MPX1 / INPUT.MPX2 serial commands (see section 6.2.5). TYPE (INPUT.MPXn.TYPE) – read/write This parameter applies a filter to extract the type of signal needed on the MPXn input. This filtered signal will become the MPXn channel audio signal. Note that when switching from stereo to mono, the total deviation is maintained. MO (mono), ST (stereo), ST+R+S (stereo+RDS+SCA), ST+R (stereo+RDS), RDS, R+S (RDS+SCA), SCA or NONE PRESENCE (INPUT.MPXn.PRESENCE) – read only This parameter indicates the composition of the signal on the MPXn entry. MO (mono), MO+R (mono+RDS), MO+R+S (mono+RDS+SCA), ST (stereo), ST+R (stereo+RDS) ou ST+R+S (stereo+RDS+SCA) LEVEL (INPUT.MPXn.LEVEL) – read/write This parameter is the max audio peak in dBu that can come from the transmitter on the MPX input. For example, if the audio peak from the source is +6 dBu, this parameter must be set to +6 dBu for optimal operation. If you do not know the audio source level, you may use an audio analyzer or display first level measurements on the front panel to read the MPXn LEVEL. Be aware that if the level is poorly set, the deviation may become too low or too high. This level is also called nominal level, i.e. the level producing the deviation as set in the Modulation menu. From -18 dBu to +18 dBu DRIVE (INPUT.MPXn.DRIVE) – read/write With this parameter, you can slightly compensate the input audio level. It directly affects the final deviation. A negative value decreases the deviation; a positive value can increase the deviation and/or cause the MPX hard clipper to be used (if enabled) which in turn may lead to audio distortion. We recommend you leave it at 0 dB. From -6 dB to +6 dB RMS (INPUT.MPXn.RMS) – read only This parameter indicates the average value of the transmitted signal’s excursion in kHz. From -150 to +150 kHz PEAK (INPUT.MPXn.PEAK) – read only This parameter indicates the peak value of the transmitted signal’s excursion in kHz. From -150 to +150 kHz 5.4.6. Player menu These parameters are available as INPUT.PLAYER serial commands (see section 6.2.5). They are identical to LINE2 menu parameters. Page 57 Crown Broadcast, a division of International Radio & Electronics Corporation 25166 Leer Drive, Elkhart, Indiana, 46514-5425 USA Ph +1 (574) 262 8900 Crown Broadcast FME 350W to 2000W User Manual– 05/2013 5.4.7. Audio Gene menu The audio generator is a multiplex channel and is therefore not affected by the stereo encoder parameters. These parameters are available as INPUT.AUDIOGEN serial commands (see section 6.2.5). STATE (INPUT.AUDIOGEN.STATE) – read/write With this parameter, set the type of MPX signal generated by the internal generator. OFF, PILOT, L, R, L+R (mono) or L-R (stereo) PREAC (INPUT.AUDIOGEN.PREAC) – read/write With this parameter, set the pre-emphasis. Select 0 µs is the audio signal is pre-emphasized before getting to the transmitter. Otherwise, select according to the country: 50 µs in Europe, 75 µs in the USA. 0, 50 or 75 µs LEVEL (INPUT.AUDIOGEN.LEVEL) – read/write With this parameter, set the internal generator audio level. From -100.00 to 12.00 dBFS FREQ (INPUT.AUDIOGEN.FREQ) – read/write With this parameter, set the internal generator audio frequency. From 0 to 100000.00 Hz 5.4.8. Modulation Menu These parameters are available as MEAS.DEV and CONF serial commands (see section 6.2.2 and 6.2.3). RMS (MEAS.DEV.RMS) – read only This parameter indicates the average value of the transmitted signal’s excursion in kHz. From -150 to +150 kHz DEV MPX (CONF.DEV.MPX) – read/write With this parameter, set the maximum MPX deviation in kHz generated when the audio source is at the nominal level (the nominal level is set with the LEVEL parameter of the menus: LINE1, LINE2, MPX1 or MPX2). It is often set at 75 kHz but this value may vary according to the country and relevant regulatory authorities. To ensure the sub-carrier levels remain stable, this parameter directly changes the audio deviation. From 0 to 150.00 kHz Page 58 Crown Broadcast, a division of International Radio & Electronics Corporation 25166 Leer Drive, Elkhart, Indiana, 46514-5425 USA Ph +1 (574) 262 8900 Crown Broadcast FME 350W to 2000W User Manual– 05/2013 DEV AUDIO (CONF.DEV.AUDIO) – read/write With this parameter, set the maximum audio deviation in kHz generated when the audio source is at the nominal level (the nominal level is set with the LEVEL parameter of the menus: LINE1, LINE2, MPX1 or MPX2). The audio deviation is set automatically when the MPX deviation parameter is set; however, it is possible to set the audio deviation rather than the MPX deviation. Increasing or decreasing the audio deviation affects the total deviation and thus automatically adjusts the MPX deviation. Make sure to avoid over-modulation. From 0 to 150.00 kHz DEV PILOT (CONF.DEV.PILOT) – read/write With this parameter, set the 19 kHz pilot deviation. For countries modulating at 75 kHz, the pilot deviation should be 10% of the total deviation, i.e. 7.5 kHz without RDS or 7.1 kHz if RDS is used. From 0 to 25.5 kHz DEV RDS (CONF.DEV.RDS) – read/write With this parameter, set the RDS sub-carrier deviation. The most widely used value is 4 kHz. From 0 to 25.5 kHz DEV SCA (CONF.DEV.SCA) – read/write With this parameter, set the SCA deviation (auxiliary sub-carrier other than RDS), as needed. From 0 to 25.5 kHz Interaction between the various components according to the input type: In all cases described below, the transmitter configuration is as follows: Audio = 67.5 kHz Pilot = 7.5 kHz RDS = 4.0 kHz. In the case of audio inputs (analog or AES), the set MPX represents the total of audio, pilot and RDS. If the RDS is disabled, the audio is automatically adjusted with +4 kHz. Ex 1: set MPX = 75 kHz Pilot = 7.5 kHz RDS = 4.0 kHz. If the RDS is enabled: Audio = 63.5 kHz Pilot = 7.5 kHz RDS = 4.0 kHz If the RDS is disabled: Audio = 63.5 + 4 = 67.5 kHz Pilot = 7.5 kHz In the case of MPX inputs, if the RDS is disabled, the audio cannot be adjusted. Page 59 Crown Broadcast, a division of International Radio & Electronics Corporation 25166 Leer Drive, Elkhart, Indiana, 46514-5425 USA Ph +1 (574) 262 8900 Crown Broadcast FME 350W to 2000W User Manual– 05/2013 Ex 2: inject stereo MPX + RDS with: Audio = 63.5 kHz Pilot = 7.5 kHz RDS = 4.0 kHz. If the RDS is disabled: Audio = 63.5 kHz Pilot = 7.5 kHz RDS on the MPX input: Audio = 63.5 kHz Pilot = 7.5 kHz RDS = 4.0 kHz With internal RDS: Audio = 63.5 kHz Pilot = 7.5 kHz RDS = 4.0 kHz Ex 3: inject stereo MPX with: Audio = 67.5 kHz Pilot = 7.5 kHz If the RDS is disabled: Audio = 67.5 kHz Pilot = 7.5 kHz With internal RDS: Audio = 67.5 kHz Pilot = 7.5 kHz RDS = 4.0 kHz ! The total modulation 67,5+7,5+4,0 = 79 kHz is too high! 5.4.9. Stereo Encoder menu These parameters are available as CODER and CONF serial commands (see sections 6.2.6 and 6.2.3). MO/ST (CODER.MOST) – read/write With this parameter, set the stereo generator in mono or stereo mode. For mono, there are 3 options: Left channel broadcast in mono (Mono_L), right channel broadcast in mono (Mono_R), the sum Left+Right broadcast in mono (Mono). Otherwise left and right channels are broadcasted in stereo. STEREO, MONO, MONO_L or MONO_R AUDIO CH (CODER.SELECT.AUDIO) – read only This parameter indicates the channel used by the modulator for the audio, as set with the INPUT.SELECT menu. NONE, AUTO, LINE1, LINE2, MPX1, MPX2 or GENE PHI 19k (CONF.PHASE.PILOT) – read/write With this parameter, set the pilot sub-carrier phase. We recommend setting it at 0°. From -180° to +180° Page 60 Crown Broadcast, a division of International Radio & Electronics Corporation 25166 Leer Drive, Elkhart, Indiana, 46514-5425 USA Ph +1 (574) 262 8900 Crown Broadcast FME 350W to 2000W User Manual– 05/2013 19k OUT LEVEL (CODER.19KOUT.LEVEL) – read/write With this parameter, enable/disable the rear panel 19 kHz clock and set its output level. 0=off; between 1 and 7: set a level between 0.9 and 1.1 V peak-to-peak. 5 corresponds to 1 V. From 0 to 8 V 5.4.10. RDS / SCA Encoder menu These parameters are available as CODER and serial CONF commands (see sections 6.2.6 and 6.2.3) . RDS CH (CODER.CURRENT.RDS) – read only This parameter indicates the channel used by the modulator for the RDS, as set with the RDS IN parameter. NONE, MPX1, MPX2 or INTERNAL RDS STATE (CONF. STATE.RDS) – read/write With this parameter, enable or disable the RDS. When the RDS is enabled or disabled, the RDS deviation is automatically subtracted from or added to the audio deviation to maintain the same total deviation. Off/On RDS IN (CODER.SELECT.RDS) – read/write With this parameter, set the RDS component source of the broadcast signal either with an external source or with the internal encoder. MPX1, MPX2 or INTERNAL PHI RDS (CONF.PHASE.RDS) – read/write With this parameter, set the RDS sub-carrier phase in relation to the pilot sub-carrier. We recommend setting it at 90°. From -180° to +180° SCA STATE (CONF. STATE.SCA) – read/write With this parameter, enable or disable the SCA. When the SCA is enabled or disabled, the SCA deviation is automatically subtracted from or added to the audio deviation to maintain the same total deviation. Off/On SCA IN (CODER.SELECT.SCA) – read/write With this parameter, set the SCA component source of the broadcast signal MPX1 or MPX2 5.4.11. FM Limiter menu These parameters are available as CONF serial commands (see section 6.2.3). Without the FM Limiter option, the CLIP parameter is the only available parameter. Page 61 Crown Broadcast, a division of International Radio & Electronics Corporation 25166 Leer Drive, Elkhart, Indiana, 46514-5425 USA Ph +1 (574) 262 8900 Crown Broadcast FME 350W to 2000W User Manual– 05/2013 CLIP (CONF.DEV.CLIP) – read/write With this parameter, set the MPX hard clipper to prevent any possibility of overmodulation on the modulator itself. This process is carried out digitally right before the RF generation and is therefore enabled on all the inputs. If the deviation is greater than the configured value (in kHz), the MPX hard clipper is automatically enabled. Unlike FM limiters/clippers used in audio processing, this clipper cannot be used continuously for it generates a noticeable audio distortion. It is therefore best to set it at 0, or at the maximum authorized deviation, plus a few kHz to ensure additional security with the audio processor. From 0 to 200 kHz The FM Limiter option includes 3 processing stages: AGC: The Automatic Gain Control purpose is to compensate level variations applied to the selected audio input. The algorithm is wide-band for maximum audio fidelity and gated to avoid noise and unwanted level corrections. FM LIMITER: The FM Limiter prevents from over-modulation by limiting the audio peaks. MPX POWER LIMITER: The MPX Power Limiter is based on to the ITU-R 412 standard applied on some FM markets. CLIP STATE (CONF.STATE.CLIP) – read/write This parameter enables or disables the clipper. Default: off. Off/On CLIP (CONF.DEV.CLIP) – read/write Set in kHz, this parameter represents the maximum FM deviation and is used as a reference by the FM Limiter algorithm. Default value: 75 kHz. From 0 to 150 kHz AGC STATE (CONF.AGC.STATE) – read/write This parameter enables or disables the Automatic Gain Control processing stage. Default: off. Off/On AGC DRIVE (CONF.AGC.DRIVE) – read/write With this parameter, load more or less the AGC input. At 0 dB gain reduction will be applied when the transmitter is fed by an audio level higher than the input level setting. Increasing the drive will add gain reductions, while low audio levels will be increased (more processed). Default value: +4 dB. From 0 to 12 dBu AGC ATTACK (CONF.AGC.ATT) – read/write With this parameter, tune in dB/s the AGC reactivity speed to a volume increase. A high setting is recommended to protect the FM limiter stage against high audio levels and possible audio distortions. Default value: 8641dB/s From 0.1 to 10 000 dB/s Page 62 Crown Broadcast, a division of International Radio & Electronics Corporation 25166 Leer Drive, Elkhart, Indiana, 46514-5425 USA Ph +1 (574) 262 8900 Crown Broadcast FME 350W to 2000W User Manual– 05/2013 AGC RELEASE (CONF.AGC.REL) – read/write With this parameter, tune in dB/s the AGC correction speed to a volume decrease. A low setting is recommended to slowly increase the gain in case of low audio level and maintain maximum audio fidelity. Set this parameter to 1dB/s or lower for more transparency; 2 or 3 dB/s will give a slightly more processed result. Default value: 1 dB/s From 0 to 6 dB/s AGC GATE THRESHOLD (CONF.AGC.THR) – read/write This threshold will freeze the AGC operation when the audio level is below the user-set limit. This function limits floor noise and prevents unwanted AGC processing on the audio. Default value: -20 dB From -100 to 0 dB LIMITER STATE (CONF.STATE.LIMIT) – read/write This parameter enables or disables the FM Limiter stage. Default: off. Off/On LIMITER DRIVE (CONF.DRIVE.LIMIT) – read/write With this parameter, load more or less the FM limiter input. CAUTION: Always be aware that increasing the FM limiter drive may lead to noticeable distortion. Setting the limiter drive at 0 dB is recommended to use the FM Limiter as a protection stage against over-modulation. From 0 to 1 dB MPX POWER LIMITER STATE (CONF.STATE.MPXPWR) – read/write This parameter enables or disables the MPX Power Limiter processing stage. Do not activate the MPX power reduction if no standard requires you to do it; it could have a negative impact on the sought after sound level. Default: off. Off/On MPX POWER LIMITER LEVEL (CONF.DEV.MPXPWR) – read/write Set the maximum authorized MPX Power. Default value: 3 dB. From -3 to -10 dB 5.4.12. RDS Menu With the Basic RDS option, configure up to 2 DSNs each with a main PSN. Among other things, the DSNs allow fast and easy changing of the encoder settings remotely. Note: the RDS is enabled in the RDS/SCA ENCODER menu. These parameters are available as RDS serial commands (see section 6.2.7). CURRENT MAIN (RDS.DSN) This parameter indicates the current DSN number. Page 63 Crown Broadcast, a division of International Radio & Electronics Corporation 25166 Leer Drive, Elkhart, Indiana, 46514-5425 USA Ph +1 (574) 262 8900 Crown Broadcast FME 350W to 2000W User Manual– 05/2013 MAIN DSN sub-menu PI (RDS.MAINDSN.PI) – read/write With this parameter, set the PI code (Program Identifier) used by RDS receivers to identify the station while searching for a frequency using AF or EON-AF codes. 4-digit hexadecimal code PTY (RDS.MAINDSN.PTY) – read/write With this parameter, set the PTY (Program Type). Select on 32 RDS or RDBS preset codes as given in the table below. From 0 to 31 as indicated on the table PTY code RDS Program type (EU) RBDS Program type (USA) 0 No program type or undefined No program type or undefined 1 News News 2 Current affairs Information 3 Information Sports 4 Sport Talk 5 Education Rock 6 Drama Classic Rock 7 Culture Adult Hits 8 Science Soft Rock 9 Varied Top 40 10 Pop Music Country 11 Rock Music Oldies 12 M.O.R. Music Soft 13 Light classical Nostalgia 14 Serious classical Jazz 15 Other Music Classical 16 Weather Rhythm and Blues 17 Finance Soft Rhythm and Blues 18 Children’s programs Language 19 Social Affairs Religious Music 20 Religion Religious Talk 21 Phone In Personality 22 Travel Public 23 Leisure College 24 Jazz Music Unassigned Page 64 Crown Broadcast, a division of International Radio & Electronics Corporation 25166 Leer Drive, Elkhart, Indiana, 46514-5425 USA Ph +1 (574) 262 8900 Crown Broadcast FME 350W to 2000W User Manual– 05/2013 25 Country Music Unassigned 26 National Music Unassigned 27 Oldies Music Unassigned 28 Folk Music Unassigned 29 Documentary Weather 30 Alarm Test Emergency Test 31 Alarm Emergency PS (RDS.MAINDSN.PS) – read/write With this parameter, set the PS (Program Station). 8-digit code MS (RDS.MAINDSN.MS) – read/write With this parameter, indicate whether the program is Music or Speech to automatically adjust the sound level of the RDS receiver. 0 (music) or 1 (speech) DI (RDS.MAINDSN.DI) – read/write With this parameter, set the DI (Decoder Identification) which enables an RDS receiver’s audio level to be adjusted according to the type of received audio (mono or stereo, static or dynamic PTY, compressed or not, with or without artificial head). From 0 to 15, as indicated in the table below. Mono / Stereo With / Without artificial head Compressed / non compressed static / dynamic PTY 0 mono without non static 1 mono without non dynamic 2 mono without compressed static 3 mono without compressed dynamic 4 mono with non static 5 mono with non dynamic 6 mono with compressed static 7 mono with compressed dynamic 8 stereo without non static 9 stereo without non dynamic 10 stereo without compressed static 11 stereo without compressed dynamic 12 stereo with non static 13 stereo with non dynamic 14 stereo with compressed static Page 65 Crown Broadcast, a division of International Radio & Electronics Corporation 25166 Leer Drive, Elkhart, Indiana, 46514-5425 USA Ph +1 (574) 262 8900 Crown Broadcast FME 350W to 2000W User Manual– 05/2013 15 stereo with compressed dynamic TA/TP (RDS.MAINDSN.TATP / RDS.MAINDSN.TA / RDS.MAINDSN.TA) – read/write With this parameter, enable or disable the TA (Traffic Announcement) / TP (Traffic Program). Enabling the TA instantaneously switches an RDS receiver onto road information reports; at the end of the report, the receiver will automatically go back to its former operating state. Enabling the TP shows RDS receivers that the allocated station is likely to broadcast road information. You may enable both the TA and the TP, the TP only, or neither. TATP, TP or OFF AF (RDS.MAINDSN.AF) – read/write With this parameter, set up to 25 alternative frequencies in MHz with the method A. An RDS receiver will shift to an alternative frequency when the set frequency is no longer properly received. XX;XX; …;XX RT (RDS.MAINDSN.RT) – read/write With this parameter, display and set the radiotext, function which enables text messages to be broadcast in groups of 64 characters. The RDS receiver can only benefit from this function if fitted with a specific display (home receivers, Smartphone mobile receivers). The RT function cannot be used on car radios as road safety commissions have forbidden its use on board a vehicle. GS (RDS.MAINDSN.GS) – read/write With this parameter, set the group sequence (32 max) which must include at least one group 0A. XX;XX; …;XX Parameters of the ALT DSN sub-menu are identical to those of the MAIN DSN sub-menu; for serial commands, use ALT instead of MAIN. Page 66 Crown Broadcast, a division of International Radio & Electronics Corporation 25166 Leer Drive, Elkhart, Indiana, 46514-5425 USA Ph +1 (574) 262 8900 Crown Broadcast FME 350W to 2000W User Manual– 05/2013 6. SERIAL & TELNET COMMANDS 6.1. Working principle Crown Broadcast FME has a serial interface. The physical connection is done using the SUB-D9 (SERIAL MONITOR) on the front panel. A common computer with an RS 232 interface (example: PC+ Windows + Hyper-Terminal) is all you need to send commands. The dialog is in text mode (ASCII) and no specific software is required. Like all serial PC connected equipment, a good cable and correct communication settings are essential to ensure good communication. The cable must be a straight cable (not crossover), with a female plug to connect to the PC, and male plug to connect to the unit. To avoid problems during connection, set the same communication speed and identical settings for both devices. See figure ‘Port parameters”. -> 9600 Bits per second -> 8 Data bits -> No Parity -> 1 Stop bit -> No Handshaking Commands may also be used in Telnet when the transmitter is fitted with an IP interface. The commands make it possible to read the functional parameters (R) or even to edit some of them (W). To retrieve the value of a functional parameter, simply enter the command name and press the <Enter> key. Example: To display the status of the 3 dB alarm, type: ALARM.3DB The answer, ON or OFF will indicate the 3 dB alarm is on or not. To set a parameter, type the command name, the equal sign, the new value and press the <Enter> key. Example: To set the transmitter working mode (local or remote), type: CONF.MODE=LOCAL The answer: LOCAL will indicate the command has been implemented. In case it has not, the message ERROR CMD will appear. Protection with a password: By default, there is no protection to send commands. This can be secured with the command: SYS.PASSWORD = my_password, where my_password is the password you chose To connect without a password, enter: LOGIN And if a password has been set: LOGIN = my_password Page 67 Crown Broadcast, a division of International Radio & Electronics Corporation 25166 Leer Drive, Elkhart, Indiana, 46514-5425 USA Ph +1 (574) 262 8900 Crown Broadcast FME 350W to 2000W User Manual– 05/2013 For Telnet connections, the embedded website identifiers will be requested with the command prompts LOGIN USER and LOGIN PASSWORD (see section 9.6.5). 6.2. Serial commands 6.2.1. System commands NAME Access (R/W) Possible value on the serial port of the unit R/W XXXX,X=[0…z] "LOGGED" ou "NOT LOGGED" LOGIN W Comments Logs the user and allows them to update variables if the password is correct. Returns Logged or not logged Logs out the user and locks all variables. LOGOUT SYS.CID R/W [0..31] Unit identifier used by the CAN bus. SYS.CIDIP R/W [0..31] Unit identifier used by the IP option CAN bus SYS.CIDUC R/W [0..31] SYS.COM1.ECHO R/W "ON" or "OFF" SYS.COM1.SPEED R/W 9600,19200,38400,57600,115200 SYS.COM2.ECHO R/W "ON" or "OFF" SYS.COM2.SPEED R/W 9600,19200,38400,57600,115200 Unit identifier used by the CAN2 bus. Adds the local echo on the rear panel serial port Speed of the rear panel serial port 1 Adds the local echo on the rear panel serial port Speed of the rear panel serial port 2 SYS.DATE R/W DD/MM/YY R DDMMYYYY "AMB" or "FAN1" or "VOLT" or "HEAT" or "FAN2" or "CURRENT" or "PWR" "AMB" or "FAN1" or "VOLT" or "HEAT" or "FAN2" or "CURRENT" or "PWR" SYS.DATECALIB SYS.GPIO.CONF1 R/W SYS.GPIO.CONF2 R/W SYS.GPIO.IN.ACT R XX X=[A..F;0..9] SYS.GPIO.IN.MASK R/W XX X=[A..F;0..9] SYS.GPIO.OUT.ACT R/W XX X=[A..F;0..9] SYS.GPIO.OUT.MASK R/W XX X=[A..F;0..9] R xx.xx.xx x=[0..9] SYS.HARDREL Reads and sets the amplifier date Date of the last calibration Sets the remote monitoring ANA3 on the optional GPIO Analog board Sets the remote monitoring ANA4 on the optional GPIO Analog board Indicates the corresponding RC when managed manually (see SYS.GPIO.IN.MASK) Sets the RC control either by the control board or manually. Hexadecimal code: each bit corresponds to an input. Ex: A1 (10100001) indicates the RC 1, 6 and 8 are managed manually Enables the corresponding RM when managed manually (see SYS.GPIO.OUT.MASK) Sets the RM control either by the control board or manually. Hexadecimal code: each bit corresponds to an input: Ex: 21 (00100001) indicates RM 1 and 6 are managed manually. Hardware version: example "3.0.1" SYS.IP.ADR R/W XXX.XXX.XXX.XXX X=[0…9] IP address of the optional IP board SYS.IP.GW R/W Network gateway of the optional IP board R/W XXX.XXX.XXX.XXX X=[0…9] XX:XX:XX:XX:XX:XX:XX:XX X=[A..F;0..9] XXX.XXX.XXX.XXX X=[0…9] SYS.KEY.ADD R/W ADD SYS.KEY.REM R/W REM SYS.IP.MAC SYS.IP.MASK R/W Mac address of the optional IP board IP mask of the optional IP board Generates a key to enable the specified option Generates a key to disable the specified option Page 68 Crown Broadcast, a division of International Radio & Electronics Corporation 25166 Leer Drive, Elkhart, Indiana, 46514-5425 USA Ph +1 (574) 262 8900 Crown Broadcast FME 350W to 2000W User Manual– 05/2013 Access (R/W) Possible value on the serial port of the unit R/W "NORMAL" or "ADVANCED" SYS.LOCALCOM.ECHO R/W "ON" or "OFF" SYS.LOCALCOM.SPEED R/W 9600,19200,38400,57600,115200 NAME SYS.LCDMENUS SYS.LOG R SYS.LOG.CLR W SYS.NAME R/W XXXX X=[A…Z] R RF,RC,AIP,TUN,IP,COM,REC SYS.PASSWORD R/W xxx x=[A..Z;0..9] SYS.PASSWORD.RESET R/W xxx x=[A..Z;0..9] R [0..999] SYS.RAZ W "RAZ" SYS.RST W SYS.RST.CPU W "RST" SYS.SN R YYMMXXXX A,M,X=[0..9] SYS.SOFTREL R xx.xx.xx x=[0..9] SYS.SOFTREL.LIST R xx.xx.xx x=[0..9] SYS.OPT.LIST SYS.PCAP SYS.TIME R/W HH:MM:SS SYS.TYPE R xxx x=[A..Z;0..9] SYS.UPTIME R [0..99999999] 6.2.2. Comments Sets the display type on the front panel screen Adds the local echo on the front panel serial port Speed of the front panel serial port List of the latest 200 events (configuration changes, alarm start date and end date…) Clears the event list Equipment name List of implemented options Password for the console and front panel display. ‘NONE’ disables the password Creates a text string to unlock the password if it has been forgotten Nominal power of the unit: example "300"=>300 W Reloads NVRAM default values Reset of all parameters. General reset of the µc. Sends the return code: RST Serial number of the unit: Y => year, M => month, X => number Software version: example "3.0.1" List of the exciter software versions CPU;DSP;FPGA;IP;EXC;A/IP;TUN Reads and sets the amplifier time Unit type: example "E35" for E Series 350 W Indicates the number of working hours since commissioning Measurement commands Access (R/W) Possible value on the serial port of the unit MEAS.12V R xx.x x=[0..9] Measures the 12 V voltage MEAS.5V R xx.x x=[0..9] Measures the 5 V voltage MEAS.AMB R ±[0..125] MEAS.DEV.PEAK R -150,0…150,0 MEAS.DEV.RMS R -150.0…150.0 MEAS.N12V R -xx.x x=[0..9] MEAS.PFWD R [0..9999] MEAS.PREF R xxx.x x=[0..9] MEAS.VSWR R XX.X X=[0..9] NAME MEAS.VSWRTRIP [0..99] Comments Measures the ambient temperature from 0 to 125°C. "52"=>52°C. Gives the peak value for the signal deviation in kHz Gives the average value for the signal deviation in kHz Measures the -12 V voltage Measure of forward power. examples: "20" or "300" => 300 W Measure of reflected power: "20" => 2 W VSWR measure "01.0" or "20.0" Gives the number of reflected power safety in the past hour Page 69 Crown Broadcast, a division of International Radio & Electronics Corporation 25166 Leer Drive, Elkhart, Indiana, 46514-5425 USA Ph +1 (574) 262 8900 Crown Broadcast FME 350W to 2000W User Manual– 05/2013 6.2.3. Configuration commands Access (R/W) Possible value on the serial port of the unit CONF.10M.OPE R/W "AUTO or "MANU" CONF.AGC.ATT R/W [0…32000] CONF.AGC.DRIVE R/W [-320,00…320.00] CONF.AGC.REL R/W [0…50,00] CONF.AGC.STATE R/W CONF.AGC.THR R/W [-70,00…0] CONF.AMB.MAX R/W [0..999] CONF.CROSSFADE R/W 0 to 25.5 CONF.DEV.AUDIO R/W 0…150 CONF.DEV.CLIP R/W 0 to 200 CONF.DEV.LIMIT R/W 0 to 200 CONF.DEV.MPX R/W 00000 à 150.00 CONF.DEV.MPXPWR R/W -12.7…12.7 NAME ON/OFF Comments Indicates the operating mode of the external 10 MHz input Attack in dB/s Drive applied before the AGC Release in dB/s Enables/disables the AGC function on Line1, Line2 and Player Sets the non-triggering threshold in dB Sets the triggering threshold for the ambient temperature alarm Crossfade between channels (in seconds) CONF.DEV.PILOT R/W 0 to 25.5 Sets the audio excursion Set the excursion clipping ; +128 = disabled limitation Set the MPX excursion limitation; +128 = disabled limitation Sets the MPX excursion Set the MPX power limitation; +128 = disabled limitation Sets the pilot excursion CONF.DEV.RDS R/W 0 to 25.5 Sets the RDS excursion CONF.DEV.SCA CONF.DRIVE.LIMIT R/W 0 to 25.5 R/W 0 to 25.5 Sets the SCA excursion Drive value of the FM limiter in dB CONF.HEAT.MAX R/W [0..125] R "LOCAL" or "REMOTE" R/W -180..+180 CONF.PHASE.RDS R/W -180..+180 CONF.RF R/W ON/OFF R "ON" or "OFF" R/W ON/OFF CONF.MODE CONF.PHASE.PILOT CONF.SBY CONF.STATE.CLIP Sets the triggering threshold for the radiator 1 temperature alarm Indicates the mode, local or remote Sets the pilot phase Sets the RDS phase Enables/disables the RF Indicates if the transmitter is in standby mode Enables/disables the Hard Clipper CONF.STATE.LIMIT R/W ON/OFF Enables/disables the FM limiter CONF.STATE.MPXPWR R/W ON/OFF Enables/disables the MPX Power limiter Page 70 Crown Broadcast, a division of International Radio & Electronics Corporation 25166 Leer Drive, Elkhart, Indiana, 46514-5425 USA Ph +1 (574) 262 8900 Crown Broadcast FME 350W to 2000W User Manual– 05/2013 6.2.4. Transmitter commands Access (R/W) Possible value on the serial port of the unit TX.1DB R/W [0..9999] TX.3DB R/W [0..9999] TX.3DB.AUTO R/W "ON" or "OFF" R R R "ON" or "OFF" "ON" or "OFF" "ON" or "OFF" Sets the triggering threshold for the 1 dB alarm. Example "250" => 250 W Sets the triggering threshold for the 3 dB alarm. Example "250" => 250 W If ON set the 3 dB level to TX.PWR/2. If TX.3DB is modified, switches automatically to OFF ON => 1 dB alarm, OFF => No alarm. ON => 3 dB alarm, OFF => No alarm. ON => VSWR alarm, OFF => No alarm R/W "ON" or "OFF" Indicates if there has been a VSWR trip default R R/W R R R R/W R/W R R R R/W R R/W "FAULT" or "OK" 87.5 to 108 "CLOSE" or "OPEN" "OPEN" or "CLOSE" "LOCAL" or "REMOTE" XXXX X=[A…Z] "ON" or "OFF" [0..999] [0..9999] xxx.x x=[0..9] [0..9999] "PRES" or "NOT PRES" "ON" or "OFF" TX.TYPE R xxx x=[A..Z;0..9] TX.VSWR R XX.X X=[0..9] TX.VSWR.MAX R/W XX.X X=[0..9] TX.VSWRTRIP TX.WARNING R/W R "ON" or "OFF" "ON" or "OFF" NAME TX.ALARM.1DB TX.ALARM.3DB TX.ALARM.VSWR TX.ALARM.VSWR TRIP TX.FAULT TX.FREQ TX.INTERLOCK TX.LINK TX.MODE TX.NAME TX.OPMODE TX.PCAP TX.PFWD TX.PREF TX.PWR TX.RFPRESENT TX.SBY Comments Fault state of transmitter Working frequency of the modulator in MHz. Ex: 102.4 State of the safety loop State of the CAN bus link Single transmitter, indicates the local or remote mode Transmitter name Single transmitter control Amplifier nominal power: example "300"=>300W Measure of forward power. examples: "20" or "300" => 300W Measure of reflected power: "20" => 2W Sets the output power. From "0" .. "9999" Indicates if the single transmitter output power is present Enables/disables the standby mode System type: example "1000-NT" For a 1000 W transmitter with Nephtys central unit VSWR measure "01.0" or "20.0" Sets the triggering threshold for the VSWR alarm. Must be of type "XXX"."020" => VSWR = 2. Do not use "2" or "1.4". Enables/disables reflected power safety Single transmitter. Warning state of single transmitter Page 71 Crown Broadcast, a division of International Radio & Electronics Corporation 25166 Leer Drive, Elkhart, Indiana, 46514-5425 USA Ph +1 (574) 262 8900 Crown Broadcast FME 350W to 2000W User Manual– 05/2013 6.2.5. Alarm commands NAME ALARM.10MSWITCH ALARM.1DB Access (R/W) R Possible value on the serial port of the unit "ON" or "OFF" R "ON" or "OFF" ON =>1 dB Alarm, OFF => => No alarm Comments Indicates there was a 10 MHz switch ALARM.3DB R "ON" or "OFF" ON =>3 dB Alarm, OFF => => No alarm ALARM.AMB R "ON" or "OFF" ON => ambient alarm, OFF => No alarm. ALARM.BATLOW R "ON" or "OFF" ALARM.CUR1 R "ON" or "OFF" ALARM.FAN1 R "ON" or "OFF" Indicates if the NVRAM battery’s level is OK Indicates the PSU 1 current is over the max threshold. Fan 1 alarm; speed is too slow ALARM.FAN2 R "ON" or "OFF" ALARM.FAULT R "ON" or "OFF" ALARM.HEAT1 R "ON" or "OFF" ALARM.INPUTSWITCH R "ON" or "OFF" ALARM.LIST R ALARM.OVDR R "ON" or "OFF" ALARM.PLL R "ON" or "OFF" ALARM.RDSSWITCH R "ON" or "OFF" ALARM.SUPPLY1 R "ON" or "OFF" ALARM.TEMP1 R "ON" or "OFF" ALARM.VOLT.AUX R "ON" or "OFF" ALARM.VOLT1 R "ON" or "OFF" ALARM.VSWR R "ON" or "OFF" ALARM.WARN R "ON" or "OFF" 6.2.6. Fan 2 alarm; speed is too slow ON => critical alarm OFF => => No alarm (3 dB, VSWR) ON => radiator temp alarm, OFF => No alarm. Indicates if the current audio input corresponds to the highest priority channel Returns the list of current alarms in ASCII format Indicates whether the input power is too high (ON) or not (OFF) Indicates whether the PLL is locked (OFF) or unlocked (ON) Indicates there was a RDS switch (auto mode only) PSU 1 state ON => temp alarm (thermocoupler) OFF => No alarm Indicates if auxiliary voltage is offset by more than 10% of the set value ON => PSU 1 voltage is offset by more than 10% of the expected value ON => VSWR Alarm, OFF => No VSWR alarm ON =>Internal Alarm (warnings) OFF=> No alarm. (fan, current, voltage, power supply, temperature, radiator, ambient temp) Input commands Access (R/W) Possible value on the serial port of the unit INPUT.AUDIOGEN.FREQ1 INPUT.AUDIOGEN.FREQ2 INPUT.AUDIOGEN.LEVEL1 INPUT.AUDIOGEN.LEVEL2 INPUT.AUDIOGEN.PREAC R/W R/W R/W R/W R/W INPUT.AUDIOGEN.STATE R/W 0 ~ 100000.00 0 ~ 100000.00 -100.00 ~ 12.00 -100.00 ~ 12.00 "0" or "50" or "75" "OFF" or "L" or "R" or "L+R" or "L-R" INPUT.LINE1.DRIVE R/W -6.00 to 6.00 INPUT.LINE1.FLT R/W "0" or "15" or "16" or "17" INPUT.LINE1.LEFT.PEAK R -100 … 28 INPUT.LINE1.LEFT.PKMAX R -100 … 28 NAME Comments delta phase = freq audio / 200000 delta phase = freq audio / 200000 Audio level Audio level Sets the value of the pre-emphasis Type of generated MPX signal Drive setting, allows an increase of the input audio level without changing the deviation setting. Configuration of the audio filter Gives the left audio input max peak value over 100 milliseconds Gives the left audio input max peak value over 1 second. Page 72 Crown Broadcast, a division of International Radio & Electronics Corporation 25166 Leer Drive, Elkhart, Indiana, 46514-5425 USA Ph +1 (574) 262 8900 Crown Broadcast FME 350W to 2000W User Manual– 05/2013 Access (R/W) Possible value on the serial port of the unit INPUT.LINE1.LEVEL R/W -20.00...18.00 INPUT.LINE1.PREAC R/W 0;50;75 "NONE" or "L" or "R" or "L&R" NAME INPUT.LINE1.PRESENCE R INPUT.LINE1.RIGHT.PEAK R -100 … 28 INPUT.LINE1.RIGHT.PKMAX R -100 … 28 INPUT.LINE1.SW.BACKDELA Y INPUT.LINE1.SW.DELAY INPUT.LINE1.SW.PRIO R/W XXX=[0…30] R/W R/W INPUT.LINE1.SW.SILENCE R/W INPUT.LINE1.SW.THRESH R/W XXX=[1…120] 0..7 ; 0=disabled "L" or "R" or "ANY" or "BOTH" -90…000 INPUT.LINE1.TRIM R/W -3.00 to 3.00 INPUT.LINE1.TYPE R "ANA" or "AES" "OFF" INPUT.LINE2.DRIVE R/W -6.00 to 6.00 INPUT.LINE2.FLT R/W 0;1;2 0=15;1=16;2=17 INPUT.LINE2.LEFT.PEAK R -100 … 28 INPUT.LINE2.LEFT.PKMAX R -100 … 28 INPUT.LINE2.LEVEL R/W -20.00...18.00 INPUT.LINE2.PREAC R/W 0;50;75 "NONE" or "L" or "R" or "L&R" INPUT.LINE2.PRESENCE R INPUT.LINE2.RIGHT.PEAK R -100 … 28 INPUT.LINE2.RIGHT.PKMAX R -100 … 28 INPUT.LINE2.SW.BACKDELA Y INPUT.LINE2.SW.DELAY INPUT.LINE2.SW.PRIO R/W XXX=[0…30] R/W R/W INPUT.LINE2.SW.SILENCE R/W INPUT.LINE2.SW.THRESH R/W XXX=[1…120] 0..7 ; 0=disabled "L" or "R" or "ANY" or "BOTH" -90…000 INPUT.LINE2.TRIM R/W -3.00 to 3.00 INPUT.LINE2.TYPE R "ANA" or "AES" "OFF" INPUT.MPX.SW.BACKDELAY R/W XXX=[0…30] INPUT.MPX.SW.DELAY INPUT.MPX.SW.THRESH R/W R/W XXX=[1…120] -90…000 INPUT.MPX1.DRIVE R/W -6.00 to 6.00 INPUT.MPX1.LEVEL R/W -18.00...+18.00 INPUT.MPX1.PEAK R -150…150 INPUT.MPX1.PKMAX R -150…150 Comments Internal numerical gain. For AES, between -20 and 0; for ANA between -18 and +18 Sets the value of the pre-emphasis Indicates audio signals are present on input 1 Gives the right audio input max peak value over 100 milliseconds Gives the right audio input max peak value over 1 second. Back delay on the channel with the highest configurable priority. Switching delay when loss of audio 1 Priority of each audio channel (7= highest priority) Sets on which channel (L,R or L+R) silence detection must be conducted for the audio input 1 Silence triggering level in dBFS on channel 1 Sets the offset between left and right channels (+3 = left channel level is 3 dBu higher than right channel level) Indicates the type of audio signals present on input 1 Drive setting, allows an increase of the input audio level without changing the deviation setting. Configuration of the audio filter Gives the right audio input max peak value over 100 milliseconds Gives the right audio input max peak value over 1 second. Internal numerical gain. For AES, between -20 and 0; for ANA between -18 and +18 Sets the value of the pre-emphasis Indicates audio signals are present on input 2 Gives the right audio input max peak value over 100 milliseconds Gives the right audio input max peak value over 1 second Back delay on the channel with the highest configurable priority. Switching delay when loss of audio 2 Priority of each audio channel (7= highest priority) Sets on which channel (L,R or L+R) silence detection must be conducted for the audio input 2 Silence triggering level in dBFS on channel 2 Sets the offset between left and right channels (+3 = left channel level is 3 dBu higher than right channel level) Indicates the type of audio signals present on input 2 Back delay on the channel with the highest configurable priority. Switching delay when loss on the MPX input Silence triggering level in dBFS on MPX 1 Drive setting, allows an increase of the input audio level without changing the deviation setting. Internal numerical gain Gives the deviation max peak value of the transmitted signal in kHz over 100 milliseconds Gives the deviation max peak value of the transmitted signal in kHz over 1 second Page 73 Crown Broadcast, a division of International Radio & Electronics Corporation 25166 Leer Drive, Elkhart, Indiana, 46514-5425 USA Ph +1 (574) 262 8900 Crown Broadcast FME 350W to 2000W User Manual– 05/2013 NAME INPUT.MPX1.PRESENCE Access (R/W) R Possible value on the serial port of the unit MO" or "MO+R" or "MO+R+S" or "ST" or "ST+R" or "ST+R+S" 0..7 ; 0=disabled "MO" or "ST" or "ST+R+S" or "ST+R" or "RDS" or "RDS+SCA" or "SCA" INPUT.MPX1.SW.PRIO R/W INPUT.MPX1.TYPE R/W INPUT.MPX2.DRIVE R/W -6.00...6.00 INPUT.MPX2.LEVEL R/W -18.00...+18.00 INPUT.MPX2.PEAK R -150…150 INPUT.MPX2.PKMAX R INPUT.MPX2.PRESENCE R -150...150 MO" or "MO+R" or "MO+R+S" or "ST" or "ST+R" or "ST+R+S" 0..7 ; 0=disabled "MO" or "ST" or "ST+R+S" or "ST+R" or "RDS" or "RDS+SCA" or "SCA" INPUT.MPX2.SW.PRIO R/W INPUT.MPX2.TYPE R/W INPUT.PLAYER.DRIVE R/W -6.00 to 6.00 INPUT.PLAYER.FLT R/W 0;1;2 0=15;1=16;2=17 INPUT.PLAYER.LEFT.PEAK R -100 … 28 INPUT.PLAYER.LEFT.PKMAX R -100 … 28 INPUT.PLAYER.LEVEL INPUT.PLAYER.PREAC INPUT.PLAYER.PRESENCE R/W R/W R -20...0 0;50;75 OFF or "L" or "R" or "L&R" INPUT.PLAYER.RIGHT.PEAK R -100 … 28 INPUT.PLAYER.RIGHT.PKMA X R -100 … 28 R/W "44" or "48" or "96" R/W XXX=[0…30] R/W R/W INPUT.PLAYER.SAMPLING INPUT.PLAYER.SW.BACKDEL AY INPUT.PLAYER.SW.DELAY INPUT.PLAYER.SW.PRIO INPUT.PLAYER.SW.SILENCE R/W INPUT.PLAYER.SW.THRESH R/W XXX=[1…120] 0..4 ; 0=disabled "L" or "R" or "ANY" or "BOTH" -90…000 INPUT.PLAYER.TRIM R/W -3.00 to 3.00 Comments Gives the composition of MPX1 on channel 3. R = RDS ; MO = Mono ; ST = Stereo ; S = SCA Priority of each audio channel (4= highest priority) Sets the type of signal on the MPX1 input and applies the corresponding filter Drive setting, allows an increase of the input audio level without changing the deviation setting. Internal numerical gain Gives the deviation max peak value of the transmitted signal in kHz over 100 milliseconds Gives the deviation max peak value of the transmitted signal in kHz over 1 second Gives the composition of MPX2 on channel 3. R = RDS ; MO = Mono ; ST = Stereo ; S = SCA Priority of each audio channel (4= highest priority) Sets the type of signal on the MPX1 input and applies the corresponding filter Drive setting, allows an increase of the input audio level without changing the deviation setting. Configuration of the audio filter Gives the left audio input max peak value over 100 milliseconds Gives the left audio input max peak value over 1 second. Internal numerical gain Sets the value of the pre-emphasis Indicates audio signals are present on the player Gives the right audio input max peak value over 100 milliseconds Gives the right audio input max peak value over 1 second. Sampling frequency of the internal player audio signal Back delay on the channel with the highest configurable priority. Switching delay when loss of audio 1 Priority of each audio channel (7= highest priority) Sets on which channel (L,R or L+R) silence detection must be conducted for the audio input 1 Silence triggering level in dBFS on channel 1 Sets the offset between left and right channels (+3 = left channel level is 3 dBu higher than right channel level) Page 74 Crown Broadcast, a division of International Radio & Electronics Corporation 25166 Leer Drive, Elkhart, Indiana, 46514-5425 USA Ph +1 (574) 262 8900 Crown Broadcast FME 350W to 2000W User Manual– 05/2013 6.2.7. Encoder commands NAME CODER.19KOUT.LEVEL Access (R/W) Possible value on the serial port of the unit Comments R/W 0…8; 0=OFF Enables/disables and sets the rear panel 19 kHz level output CODER.CURRENT.AUDIO R CODER.CURRENT.RDS R CODER.CURRENT.SCA R CODER.MOST R/W CODER.RDS.BACKUP R/W CODER.SELECT.AUDIO R/W CODER.SELECT.RDS R/W CODER.SELECT.SCA R/W 6.2.8. "AUTO" or "LINE1" or "LINE2" or "TUNER" or "MPX1" or "MPX2" or "TUNER1" or "TUNER2" or "PLAYER" or "GENE" "NONE" or "MPX1" or "MPX2" or "TUNER1" or "TUNER2" or "INTERNAL" "NONE" or "MPX1" or "MPX2" or "TUNER1" or "TUNER2" or "INTERNAL" "STEREO" or "MONO" or "MONO_L" or "MONO_R" "AUTO or "MANU" "AUTO" or "LINE1" or "LINE2" or "TUNER" or "MPX1" or "MPX2" or "TUNER1" or "TUNER2" or "PLAYER" or "GENE" “OFF” or "MPX1" or "MPX2" or "TUNER1" or "TUNER2" or "INTERNAL" “OFF” or "MPX1" or "MPX2" or "TUNER1" or "TUNER2" Indicates the channel used by the exciter. Indicates the channel used by the exciter. Indicates the channel used by the exciter. Configuration of the audio on MPX STEREO; MONO;MONO_L RDS is automatically or manually added on loss of RDS in MPX Imposes a specific input. Channel to use, ‘OFF’ disables the RDS Channel to use, ‘OFF’ disables the SCA RDS commands NAME PS_TEXT RDS.ALTDSN.AF Acces Possible value s on the serial (R/W) port of the unit ascii R/W [0x21…0x7E] XX,…,XX R/W XX=[87.5 ~108.00] RDS.ALTDSN.DI R/W 0~15 RDS.ALTDSN.GS R/W XX;;XX XX=service RDS.ALTDSN.ID R/W X; X=[1…8] RDS.ALTDSN.MS R/W "0" or "1" RDS.ALTDSN.PI R/W RDS.ALTDSN.PS R/W RDS.ALTDSN.PTY R/W RDS.ALTDSN.PTYN R/W RDS.ALTDSN.RT R/W RDS.ALTDSN.TATP R/W RDS.APPOINTMENT.STR R/W XXXX X=[0..9;A…F] XXXX X=[0..9;A…Z] 0~31 XXXX X=[0..9;A…Z] X..X ; X=[0..9;A..Z] "OFF" or "TA" or "TP" or "TATP" [A…Z] Comments Dynamically sets the PS text. <ITEM.TITLE>, <ITEM.ARTIST>, … Text with Tags List of alternative frequencies (26 max). Enter frequencies as 5 character values. Ex: 89.70 or 103.2 Numerical function that drives an RDS receiver’s audio stage to adjust audio decoding depending on the type of audio channel (mono, stereo, ...) Group sequence: 0A => 0, 2A=>4, 10A=>20 (32 max) Indicates which DSN sent by UECP is copied to the ALT memory Numerical flag that automatically modifies the sound level of an RDS receiver depending on the broadcast program (1 = music, 0 = speech) Enables RDS to identify the station when searching the frequency using AF or EON-AF code Station name; with 8 characters Program type as set by the RDS standard Program type name radiotext Enables/disables TA and TP services Sets the command that modifies <APPOINTMENT>; default value: APPOINTEMENT Page 75 Crown Broadcast, a division of International Radio & Electronics Corporation 25166 Leer Drive, Elkhart, Indiana, 46514-5425 USA Ph +1 (574) 262 8900 Crown Broadcast FME 350W to 2000W User Manual– 05/2013 NAME Acces Possible value s on the serial (R/W) port of the unit RDS.CHAT.CENTER.STR R/W [A…Z] RDS.CHAT.STR R/W [A…Z] RDS.DSN R/W "MAIN" or "ALT" RDS.EMAIL.HOTLINE.STR R/W [A…Z] RDS.EMAIL.OTHER.STR R/W [A…Z] RDS.EMAIL.STUDIO.STR R/W [A…Z] RDS.GET_DATA.STR R/W [A…Z] RDS.IDENTIFIER.STR R/W [A…Z] RDS.INFO.ADVERTISEMENT.STR R/W [A…Z] RDS.INFO.ALARM.STR R/W [A…Z] RDS.INFO.CINEMA.STR R/W [A…Z] RDS.INFO.DAILY_DIVERSION.STR R/W [A…Z] RDS.INFO.DATE_TIME.STR R/W [A…Z] RDS.INFO.EVENT.STR R/W [A…Z] RDS.INFO.HEALTH.STR R/W [A…Z] RDS.INFO.HOROSCOPE.STR R/W [A…Z] RDS.INFO.LOTTERY.STR R/W [A…Z] RDS.INFO.NEWS.LOCAL.STR R/W [A…Z] RDS.INFO.NEWS.STR R/W [A…Z] RDS.INFO.OTHER.STR R/W [A…Z] RDS.INFO.SCENE.STR R/W [A…Z] RDS.INFO.SPORT.STR R/W [A…Z] RDS.INFO.STOCKMARKET.STR R/W [A…Z] RDS.INFO.TRAFFIC.STR R/W [A…Z] RDS.INFO.TV.STR R/W [A…Z] RDS.INFO.URL.STR R/W [A…Z] RDS.INFO.WEATHER.STR R/W [A…Z] RDS.ITEM.ALBUM.STR R/W [A…Z] RDS.ITEM.ARTIST.STR R/W [A…Z] Comments Sets the command that modifies <CHAT.CENTER>; default value: CHATCENTRE Sets the command that modifies <CHAT>; default value: CHAT transmit the DSN 1 or 2 to the exciter Sets the command that modifies <EMAIL.HOTLINE>; default value: EMAILHOTLINE Sets the command that modifies <EMAIL.OTHER>; default value: EMAILOTHER Sets the command that modifies <EMAIL.STUDIO>; default value: EMAILSTUDIO Sets the command that modifies <GET_DATA>; default value: GETDATA Sets the command that modifies <IDENTIFIER>; default value: IDENTIFIER Sets the command that modifies <INFO.ADVERTISEMENT>; default value: ADVERTISEMENT Sets the command that modifies <INFO.ALARM>; default value: ALARMINFO Sets the command that modifies <INFO.CINEMA>; default value: CINEMA Sets the command that modifies <INFO.DAILY_DIVERSION>; default value: DAILYDIVERSION Sets the command that modifies <INFO.DATE_TIME>; default value: DATETIME Sets the command that modifies <INFO.EVENT>; default value: EVENT Sets the command that modifies <INFO.HEALTH>; default value: HEALTH Sets the command that modifies <INFO.HOROSCOPE>; default value: HOROSCOPE Sets the command that modifies <INFO.LOTTERY>; default value: LOTTERY Sets the command that modifies <INFO.NEWS.LOCAL>; default value: LOCALNEWS Sets the command that modifies <INFO.NEWS>; default value: NEWS Sets the command that modifies <INFO.OTHER>; default value: OTHER Sets the command that modifies <INFO.SZENE>; default value: SCENE Sets the command that modifies <INFO.SPORT>; default value: SPORT Sets the command that modifies <INFO.STOCKMARKET>; default value: STOCKMARKET Sets the command that modifies <INFO.TRAFFIC>; default value: TRAFFIC Sets the command that modifies <INFO.TV>; default value: TVINFO Sets the command that modifies <INFO.URL>; default value: URLINFO Sets the command that modifies <INFO.WEATHER> ; ; default value: WEATHER Sets the command that modifies <ITEM.ALBUM>; default value: ALBUMNAME Sets the command that modifies <ITEM.ARTIST>; default value: ARTISTNAME Page 76 Crown Broadcast, a division of International Radio & Electronics Corporation 25166 Leer Drive, Elkhart, Indiana, 46514-5425 USA Ph +1 (574) 262 8900 Crown Broadcast FME 350W to 2000W User Manual– 05/2013 NAME Acces Possible value s on the serial (R/W) port of the unit RDS.ITEM.BAND.STR R/W [A…Z] RDS.ITEM.COMMENT.STR R/W [A…Z] RDS.ITEM.COMPOSER.STR R/W [A…Z] RDS.ITEM.COMPOSITION.STR R/W [A…Z] RDS.ITEM.CONDUCTOR.STR R/W [A…Z] RDS.ITEM.DURATION.STR R/W [A…Z] RDS.ITEM.GENRE.STR R/W [A…Z] RDS.ITEM.MOVEMENT.STR R/W [A…Z] RDS.ITEM.TITLE.STR R/W [A…Z] RDS.ITEM.TRACKNUMBER.STR R/W [A…Z] RDS.MAINDSN.AF R/W XX,…,XX XX=[87.5 ~108.0] RDS.MAINDSN.DI R/W 0~15 RDS.MAINDSN.GS R/W XX;;XX XX=service RDS.MAINDSN.ID R/W X; X=[1…8] RDS.MAINDSN.MS R/W "0" or "1" RDS.MAINDSN.PI R/W RDS.MAINDSN.PS R/W RDS.MAINDSN.PTY R/W RDS.MAINDSN.PTYN R/W RDS.MAINDSN.RT R/W RDS.MAINDSN.TATP R/W RDS.MMS.OTHER.STR R/W [A…Z] RDS.PHONE.HOTLINE.STR R/W [A…Z] RDS.PHONE.OTHER.STR R/W [A…Z] RDS.PHONE.STUDIO.STR R/W [A…Z] RDS.PLACE.STR R/W [A…Z] RDS.PROGRAM.EDITORIAL_STAFF. STR R/W [A…Z] RDS.PROGRAM.HOMEPAGE.STR R/W [A…Z] XXXX X=[0..9;A…F] XXXX X=[0..9;A…Z] 0~31 XXXX X=[0..9;A…Z] X..X ; X=[0..9;A..Z] "OFF" or "TA" or "TP" or "TATP" Comments Sets the command that modifies <ITEM.BAND>; default value: BAND Sets the command that modifies <ITEM.COMMENT>; default value: COMMENT Sets the command that modifies <ITEM.COMPOSER>; default value: COMPOSER Sets the command that modifies <ITEM.COMPOSITION>; default value: COMPOSITION Sets the command that modifies <ITEM.CONDUCTOR>; default value: CONDUCTOR Sets the command that modifies <ITEM.DURATION>; default value: DURATION Sets the command that modifies <ITEM.GENRE>; default value: GENRE Sets the command that modifies <ITEM.MOVEMENT>; default value: MOVEMENT Sets the command that modifies <ITEM.TITLE>; default value: SONGTITLE Sets the command that modifies <ITEM.TRACKNUMBER>; default value: TRACKNUMBER List of alternative frequencies (26 max). Enter frequencies as 5 character values. Ex: 89.70 or 103.2 Numerical function that drives an RDS receiver’s audio stage to adjust audio decoding depending on the type of audio channel (mono, stereo, ...) Group sequence: 0A => 0, 2A=>4, 10A=>20 (32 max) Indicates which DSN sent by UECP is copied to the MAIN memory Numerical flag that automatically modifies the sound level of an RDS receiver depending on the broadcast program (1 = music, 0 = speech) Enables RDS to identify the station when searching the frequency using AF or EON-AF code Station name; with 8 characters Program type as set by the RDS standard Program type name radiotext Enables/disables TA and TP services Sets the command that modifies <MMS.OTHER>; default value: MMSOTHER Sets the command that modifies <PHONE.HOTLINE>; default value: PHONEHOTLINE Sets the command that modifies <PHONE.OTHER>; default value: PHONEOTHER Sets the command that modifies <PHONE.STUDIO>; default value: PHONESTUDIO Sets the command that modifies <PLACE>; default value: PLACE Sets the command that modifies <PROGRAMME.EDITORIAL_STAFF>; default value: EDITORIALSTAFF Sets the command that modifies <PROGRAMME.HOMEPAGE>; default value: HOMEPAGE Page 77 Crown Broadcast, a division of International Radio & Electronics Corporation 25166 Leer Drive, Elkhart, Indiana, 46514-5425 USA Ph +1 (574) 262 8900 Crown Broadcast FME 350W to 2000W User Manual– 05/2013 NAME Acces Possible value s on the serial (R/W) port of the unit RDS.PROGRAM.HOST.STR R/W [A…Z] RDS.PROGRAM.NEXT.STR R/W [A…Z] RDS.PROGRAM.NOW.STR R/W [A…Z] RDS.PROGRAM.PART.STR R/W [A…Z] RDS.PROGRAM.SUBCHANNEL.STR R/W [A…Z] RDS.PROGRAMME.FREQUENCY.ST R R/W [A…Z] RDS.PS1.CENTER RDS.PS1.DELAY RDS.PS1.EN RDS.PS1.INCREMENT RDS.PS1.REP R/W R/W R/W R/W R/W RDS.PS1.TEXT R/W RDS.PS1.TRUNCATE RDS.PS2.CENTER RDS.PS2.DELAY RDS.PS2.EN RDS.PS2.INCREMENT RDS.PS2.REP R/W R/W R/W R/W R/W R/W RDS.PS2.TEXT R/W RDS.PS2.TRUNCATE RDS.PS3.CENTER RDS.PS3.DELAY RDS.PS3.EN RDS.PS3.INCREMENT RDS.PS3.REP R/W R/W R/W R/W R/W R/W ON/OFF 0…99 ON/OFF [0…8] 0,,,16 ascii [0x21…0x7E] ON/OFF ON/OFF 0…99 ON/OFF [0…8] 0,,,16 ascii [0x21…0x7E] ON/OFF ON/OFF 0…99 ON/OFF [0…8] 0,,,16 RDS.PS3.TEXT R/W [0x21…0x7E] RDS.PS3.TRUNCATE RDS.PS4.CENTER RDS.PS4.DELAY RDS.PS4.EN RDS.PS4.INCREMENT RDS.PS4.REP R/W R/W R/W R/W R/W R/W ON/OFF ON/OFF 0…99 ON/OFF [0…8] 0,,,16 RDS.PS4.TEXT R/W [0x21…0x7E] RDS.PS4.TRUNCATE RDS.PS5.CENTER RDS.PS5.DELAY RDS.PS5.EN RDS.PS5.INCREMENT RDS.PS5.REP R/W R/W R/W R/W R/W R/W ON/OFF ON/OFF 0…99 ON/OFF [0…8] 0,,,16 RDS.PS5.TEXT R/W [0x21…0x7E] RDS.PS5.TRUNCATE RDS.PS6.CENTER RDS.PS6.DELAY R/W R/W R/W ON/OFF ON/OFF 0…99 Comments Sets the command that modifies <PROGRAMME.HOST>; default value: PROGRAMMEHOST Sets the command that modifies <PROGRAMME.NEXT>; default value: PROGRAMMENEXT Sets the command that modifies <PROGRAMME.NOW>; default value: PROGRAMMENOW Sets the command that modifies <PROGRAMME.PART>; default value: PROGRAMMEPART Sets the command that modifies <PROGRAMME.SUBCHANNEL>; default value: SUBCHANNEL Sets the command that modifies <PROGRAMME.FREQUENCY>; default value: FREQUENCY Centered text Delay between 2 consecutive screens Enables/disables string1 Increment type of the frame. 0 = Word Sets the number of repetition of string1. 0=infinite st Dynamically sets the 1 PS scroll line. Text with Tags <ITEM.TITLE>, <ITEM.ARTIST>, … Truncated text Centered text Delay between 2 consecutive screens Enables/disables string2 Increment type of the frame. 0 = Word Sets the number of repetition of string1. 0=infinite nd Dynamically sets the 2 PS scroll line. Text with Tags <ITEM.TITLE>, <ITEM.ARTIST>, … Truncated text Centered text Delay between 2 consecutive screens Enables/disables string3 Increment type of the frame. 0 = Word Sets the number of repetition of string1. 0=infinite rd Dynamically sets the 3 PS scroll line. Text with Tags <ITEM.TITLE>, <ITEM.ARTIST>, … Truncated text Centered text Delay between 2 consecutive screens Enables/disables string4 Increment type of the frame. 0 = Word Sets the number of repetition of string1. 0=infinite th Dynamically sets the 4 PS scroll line. Text with Tags <ITEM.TITLE>, <ITEM.ARTIST>, … Truncated text Centered text Delay between 2 consecutive screens Enables/disables string5 Increment type of the frame. 0 = Word Sets the number of repetition of string1. 0=infinite th Dynamically sets the 5 PS scroll line. Text with Tags <ITEM.TITLE>, <ITEM.ARTIST>, … Truncated text Centered text Delay between 2 consecutive screens Page 78 Crown Broadcast, a division of International Radio & Electronics Corporation 25166 Leer Drive, Elkhart, Indiana, 46514-5425 USA Ph +1 (574) 262 8900 Crown Broadcast FME 350W to 2000W User Manual– 05/2013 NAME RDS.PS6.EN RDS.PS6.INCREMENT RDS.PS6.REP RDS.PS6.TEXT RDS.PS6.TRUNCATE RDS.PURCHASE.STR RDS.SMS.OTHER.STR RDS.SMS.STUDIO.STR RDS.STATIONNAME.LONG.STR RDS.STATIONNAME.SHORT.STR RDS.VOTE.CENTER.STR RDS.VOTE.QUESTION.STR Acces Possible value s on the serial Comments (R/W) port of the unit R/W ON/OFF Enables/disables string6 R/W [0…8] Increment type of the frame. 0 = Word R/W 0,,,16 Sets the number of repetition of string1. 0=infinite th Dynamically sets the 6 PS scroll line. Text with Tags R/W [0x21…0x7E] <ITEM.TITLE>, <ITEM.ARTIST>, … R/W ON/OFF Truncated text Sets the command that modifies <PURCHASE>; default R/W [A…Z] value: PURCHASE Sets the command that modifies <SMS.OTHER>; default R/W [A…Z] value: SMSOTHER Sets the command that modifies <SMS.STUDIO>; default R/W [A…Z] value: SMSSTUDIO Sets the command that modifies R/W [A…Z] <STATIONNAME.LONG>; default value: STATIONNAMELONG Sets the command that modifies R/W [A…Z] <STATIONNAME.SHORT>; default value: STATIONNAMESHORT Sets the command that modifies <VOTE.CENTER>; R/W [A…Z] default value: VOTECENTRE Sets the command that modifies <VOTE.QUESTION>; R/W [A…Z] default value: VOTEQUESTION Page 79 Crown Broadcast, a division of International Radio & Electronics Corporation 25166 Leer Drive, Elkhart, Indiana, 46514-5425 USA Ph +1 (574) 262 8900 Crown Broadcast FME 350W to 2000W User Manual– 05/2013 6.2.9. Status commands Access (R/W) R R NAME STAT.10M STAT.1PPS Possible value on the serial port of the unit "PRES" or "NOT PRES" "LOCK" or "UNLOCK" "INTERNAL" or "EXTERNAL" "1+OPT" or "1+2" or "2+OPT" STAT.CLK R STAT.CURRENT.IN R STAT.DCOK1 R "ON" or "OFF" STAT.DCOK2 R "ON" or "OFF" STAT.DCOK3 R "ON" or "OFF" STAT.DCOK4 R "ON" or "OFF" STAT.INTERLOCK STAT.LINK STAT.PLL R R R "CLOSE" or "OPEN" "OPEN" or "CLOSE" "LOCK" or "UNLOCK" STAT.SECPIN R "ON" or "OFF" STAT.SECPREF STAT.SECTEMP STAT.SWRF R R R "ON" or "OFF" "ON" or "OFF" "ON" or "OFF" Comments Indicates the presence of an external 10 MHz Indicates the presence of an external 1 PPS Indicates the 10 MHz switch position Indicates the channels used for channels 1 and 2 Indicates if the PSU 1 of the amplifier is "ON" or "OFF" Indicates if the PSU 2 of the amplifier is "ON" or "OFF" Indicates if the PSU 3 of the amplifier is "ON" or "OFF" Indicates if the PSU 4 of the amplifier is "ON" or "OFF" State of the safety loop State of the CAN bus link Indicates the state of the exciter PLL Indicates if the input power is greater than the hardware threshold Indicates if the reflective protection is enabled State of the temperature safety State of the RF switch 6.2.10. Communication board commands NAME Access (R/W) CAN R/W CAN.SCAN R/W Possible value on the serial port of the unit Comments Gateway between the serial port and the CAN bus. ID,CMD,DATA ; ID=[0…9]; ID=recipient’s address; TABLE=table containing the CMD=[0…FF] DATA=[0..9 ; A…Z]" command; CMD=command number; DATA=parameter value. The list of tables/commands is available on request. Returns the list of units present of the CAN bus. Commands related to options are only available when the option is present. Page 80 Crown Broadcast, a division of International Radio & Electronics Corporation 25166 Leer Drive, Elkhart, Indiana, 46514-5425 USA Ph +1 (574) 262 8900 Crown Broadcast FME 350W to 2000W User Manual– 05/2013 7. CONFIGURATION WITH THE PC APPLICATION 7.1. Overview The Crown Broadcast CD includes the Engi application which enables the transmitter’s configuration with a simple serial connection to a PC. On the transmitter’s page, click the control interface link to download the zipped file to your PC. Extract the .exe file. You do not need to install it. Simply double-click on ENGI_REV_xxx.exe to launch the application. Connect the Crown Broadcast Transmitter front or rear panel serial port to a RS-232 port on the PC using a straight cable with a female connector for the PC and a male connector for the transmitter, or if the IP optional board is present on the Crown Broadcast Transmitter, connect both the transmitter and the PC to the network. 7.2. Using the application 7.2.1. Connection After launching the application, the connection window pops up. For a serial connection, select the PC COM port and set the rate at 9600 bauds, and indicate which port is used. If the transmitter is fitted with an IP interface, you can connect remotely. Select TELNET and enter the unit IP address, user name and password as you would to access the embedded web site (see section 9.6.5). Click the "OK" button. Page 81 Crown Broadcast, a division of International Radio & Electronics Corporation 25166 Leer Drive, Elkhart, Indiana, 46514-5425 USA Ph +1 (574) 262 8900 Crown Broadcast FME 350W to 2000W User Manual– 05/2013 When connected, the unit information is automatically updated. With a serial connection, if the module is password protected, you will need to enter the password before you can access all the functions. 7.2.2. Configuration Once connected, click the “Start” button to retrieve RF values and thresholds on the main page. These values are also available with the TX Parameters front panel menu or with the TX and CONF serial commands. . Click this button Values that can be set are followed by the button after having updated a value to send it to the transmitter. A set of buttons give access to other parameters. Click on one of them to open a window displaying associated parameters. As long as the application is in “Start” mode, current values are retrieved for all open windows. Clicking “Stop” prevents retrieval of data. However, sending data to the module remains possible. Page 82 Crown Broadcast, a division of International Radio & Electronics Corporation 25166 Leer Drive, Elkhart, Indiana, 46514-5425 USA Ph +1 (574) 262 8900 Crown Broadcast FME 350W to 2000W User Manual– 05/2013 Audio input: These values are also available with the Line 1, Line 2, MPX and Player front panel menus or with the INPUT.LINE1, INPUT.LINE2, INPUT.MPX1, INPUT.MPX2 and INPUT.PLAYER serial commands Modulator: These values are also available with the Modulation front panel menu or with the MEAS.DEV and CONF serial commands. Page 83 Crown Broadcast, a division of International Radio & Electronics Corporation 25166 Leer Drive, Elkhart, Indiana, 46514-5425 USA Ph +1 (574) 262 8900 Crown Broadcast FME 350W to 2000W User Manual– 05/2013 Static RDS: These values are also available with the RDS front panel menu or with the RDS serial commands and only it the Basic RDS option is enabled. On the Basic RDS page, set the main DSN and the alternate DSN. On this page, three buttons give you access to PS scroll management. (Not available with the front panel application.) Scroll Définition Dynamic fields can be inserted into all PS lines by clicking the ‘Tags’ button. Tags Configuration: Current value of dynamic fields. Tags Automation: Command definitions for automation software. See section 9.5.2 for a complete list of tags. Page 84 Crown Broadcast, a division of International Radio & Electronics Corporation 25166 Leer Drive, Elkhart, Indiana, 46514-5425 USA Ph +1 (574) 262 8900 Crown Broadcast FME 350W to 2000W User Manual– 05/2013 Input Switch: These values are also available with the Select and Input Switch front panel menus or with the INPUT and CONF serial commands. Internal Generator: These values are also available with the Audio Generator front panel menu or with the INPUT.AUDIOGEN serial commands. AGC/Limiter: These values are also available with the FM Limiter front panel menu or with the CONF serial commands. Page 85 Crown Broadcast, a division of International Radio & Electronics Corporation 25166 Leer Drive, Elkhart, Indiana, 46514-5425 USA Ph +1 (574) 262 8900 Crown Broadcast FME 350W to 2000W User Manual– 05/2013 Maintenance: These values are also available with the TX Parameters and Temperature/Fan front panel menus or with the STATUS, TX, MEAS and CONF serial commands. Events: Logs are also available with SYS.LOG serial commands. Page 86 Crown Broadcast, a division of International Radio & Electronics Corporation 25166 Leer Drive, Elkhart, Indiana, 46514-5425 USA Ph +1 (574) 262 8900 Crown Broadcast FME 350W to 2000W User Manual– 05/2013 System: These values are also available with the COM Port, Time/Date and System front panel menus or with the SYS serial commands. Alarms: These values are also available with the Alarms front panel menu or with the ALARM serial commands. 7.2.3. Saving parameters With the application, you may also save parameters before upgrading or as a backup for instance. Select the Files / Save menu. Select the location and name for the backup file. Default name is module_type_serial_number.conf. To load a previously saved configuration, use the Files / Load menu. Page 87 Crown Broadcast, a division of International Radio & Electronics Corporation 25166 Leer Drive, Elkhart, Indiana, 46514-5425 USA Ph +1 (574) 262 8900 Crown Broadcast FME 350W to 2000W User Manual– 05/2013 8. REMOTE CONTROL AND MONITORING WITH THE GPIO BOARD 8.1. Introduction This function is available when the optional standard or analog GPIO board is installed on the transmitter. It provides an interface between CROWN BROADCAST transmitters and external systems. The modules are remotely controlled via “RC” inputs using opto isolators. Working state and alarms are sent to “RM” outputs via relays, or “RM ANA” analog outputs on the analog board. 8.2. Standard GPIO board 8.2.1. Description of control and monitoring functions Control commands work when an impulsion longer than 100 ms is sent to the corresponding input. There are eight control functions: Standby off: Turns on the transmitter Standby on: Turns off the transmitter RF on: Enables the RF RF off: Disables the RF TA on: Enables the TA (basic RDS) TA off: Disables the TA (basic RDS) DSN main: Enables the main DSN (basic RDS) DSN alt: Enables the alternative DSN (basic RDS) Outputs are relays that include a normally closed or normally open contact. When an event occurs in the unit, the corresponding relay is activated. Six monitoring functions are associated with relays: Local: Indicates if the unit is in local mode Default: Indicates a transmitter default Warning: Indicates an alarm linked to the internal working of the transmitter (temperature, voltage…) RF: Indicates if the RF is enabled On: Indicates if the transmitter is not in standby mode Off: Indicates if the transmitter is in standby mode VSWR: Indicates if there is a VSWR error Page 88 Crown Broadcast, a division of International Radio & Electronics Corporation 25166 Leer Drive, Elkhart, Indiana, 46514-5425 USA Ph +1 (574) 262 8900 Crown Broadcast FME 350W to 2000W User Manual– 05/2013 8.2.2. Remote control function pinout Function Remote Control Input name Common STANDBY OFF RC1 OPT1A(20) RC_COMMUN(24) STANDBY ON RC2 OPT2A(8) RC_COMMUN(24) RF ON RC3 CONF1(21) RC_COMMUN(24) RF OFF RC4 CONF2(9) RC_COMMUN(24) TA ON RC5 CONF3(22) RC_COMMUN(24) TA OFF RC6 CONF4(10) RC_COMMUN(24) DSN MAIN RC7 CONF5(23) RC_COMMUN(24) DSN ALT RC8 CONF6(11) RC_COMMUN(24) Numbers in parenthesis indicated the pin number on the DB25 connector. 8.2.3. Remote monitoring function pinout Event Remote Monitoring Output name Common LOCAL RM1 REL1_RT(1) REL1_C(14) FAULT RM2 REL2_RT(2) REL2_C(15) WARNING RM3 REL3_RT(3) REL3_C(16) RF (ON/OFF) RM4 REL4_RT(4) REL4_C(17) ON RM5 REL5_T(5) REL5_C(6) OFF RM6 REL5_R(5) REL5_C(6) VSWR RM7 REL6_RT(6) REL6_C(7) Numbers in parenthesis indicated the pin number on the DB25 connector. A closed link indicates valid information when configuration is as in the following table. Default jumper position: Relay Positions Contacts REL_1RT JUMP2[1 ;2] NO REL2_RT JUMP3[1 ;2] NO REL3_RT JUMP5[1 ;2] NO REL4_RT JUMP1[1 ;2] NO REL6_RT JUMP4[1 ;2] NO Jumpers from 1 to 5 (JUMP1 to JUMP5): select the NO or NC contact of the relays. When switching to local mode (relay 1), all other relays are disabled. Page 89 Crown Broadcast, a division of International Radio & Electronics Corporation 25166 Leer Drive, Elkhart, Indiana, 46514-5425 USA Ph +1 (574) 262 8900 Crown Broadcast FME 350W to 2000W User Manual– 05/2013 Physical representation of the GPIOs DB25 FEMALE 8.2.4. 12 V floating power supply TC COMMON Page 90 Crown Broadcast, a division of International Radio & Electronics Corporation 25166 Leer Drive, Elkhart, Indiana, 46514-5425 USA Ph +1 (574) 262 8900 Crown Broadcast FME 350W to 2000W User Manual– 05/2013 8.2.5. Management using serial commands A set of commands makes it possible to override the control board to modify specific RC outputs and read specific RM inputs. To do so, set the RC you want to control (SYS.GPIO.IN.MASK) and the RM you want information from (SYS.GPIO.OUT.MASK). When these commands are used, the control board cannot monitor nor control them. Access (R/W) Serial port possible value R XX X=[A..F;0..9] Indicates the corresponding RC when managed manually (see SYS.GPIO.IN.MASK). SYS.GPIO.OUT.ACT R/W XX X=[A..F;0..9] Enables the corresponding RM when manually (see SYS.GPIO.OUT.MASK). SYS.GPIO.IN.MASK R/W XX X=[A..F;0..9] Sets the RC control either by the control board or manually. Hexadecimal code: each bit corresponds to an input. Ex: A1 (10100001) indicates the RC 1, 6 and 8 are managed manually. SYS.GPIO.OUT.MASK R/W XX X=[A..F;0..9] Sets the RM control either by the control board or manually. Hexadecimal code: each bit corresponds to an input: Ex: 21 (00100001) indicates RM 1 and 6 are managed manually. NAME SYS.GPIO.IN.ACT Comments Serial commands used to configure RC/RM Remote control binary values: Remote Control Binary value RC1 xxxxxxx1 RC2 xxxxxx1x RC3 xxxxx1xx RC4 xxxx1xxx RC5 xxx1xxxx RC6 xx1xxxxx RC7 x1xxxxxx RC8 1xxxxxxx Remote monitoring binary values: Remote Monitoring Binary value RM1 xxxxxxx1 RM2 xxxxxx1x RM3 xxxxx1xx RM4 xxxx1xxx RM5 xxx1xxxx RM6 xx1xxxxx RM7 x1xxxxxx Page 91 Crown Broadcast, a division of International Radio & Electronics Corporation 25166 Leer Drive, Elkhart, Indiana, 46514-5425 USA Ph +1 (574) 262 8900 managed Crown Broadcast FME 350W to 2000W User Manual– 05/2013 However, the format of values returned by serial commands is hexadecimal. You must then convert each 4 digit set as per the following table: Hexadecimal Binary 0 0000 1 0001 2 0010 3 0011 4 0100 5 0101 6 0110 7 0111 8 1000 9 1001 A 1010 B 1011 C 1100 D 1101 E 1110 F 1111 Examples: If the command SYS.GPIO.IN.ACT returns 8A You must convert the hexadecimal value in binary, ie 8A=10001010, which indicates that RC 2, 4 and 8 are activated. To control RM 3 and 5, convert the binary value 00010100: you get 14 as per the above table. You must then send the command: SYS.GPIO.OUT.MASK=14 Page 92 Crown Broadcast, a division of International Radio & Electronics Corporation 25166 Leer Drive, Elkhart, Indiana, 46514-5425 USA Ph +1 (574) 262 8900 Crown Broadcast FME 350W to 2000W User Manual– 05/2013 9. THE EMBEDDED WEBSITE 9.1. Introduction This function is available with the IP/IO version when the optional TCP/IP board is installed on the transmitter. 9.2. Connecting to the embedded web site For remote access, connect to the transmitter’s embedded web site. Simply open a web browser (Google Chrome, Mozilla Firefox …) and enter the transmitter’s IP address in the address bar (set on the front panel). Though the web application is compatible with most browsers, performances vary greatly from one browser to another. For this reason, we recommend you use Google Chrome, Mozilla Firefox or install the Chrome Frame plug-in for Microsoft Internet Explorer Select the language if necessary. Enter the user name and password: Two user levels are available: Administrator (Admin / admin by default). The administrator has full rights Guest (Guest / guest by default). The guest has read-only access to all pages except the user management page. Check the box to save connection information. This process is managed by the web browser cookies; login and passwords are saved for 15 days. The tool bar on top of the page enables access to all pages of the site: the user can view the status, access receiver configuration, RDS data and system configuration. Data can be both viewed and modified. A series of indicators on the bottom of the screen enables all connected users to know the transmitter current status: Page 93 Crown Broadcast, a division of International Radio & Electronics Corporation 25166 Leer Drive, Elkhart, Indiana, 46514-5425 USA Ph +1 (574) 262 8900 Crown Broadcast FME 350W to 2000W User Manual– 05/2013 Local mode Transmitter in standard mode Transmitter in local mode Fault No fault Current fault alarm Warning No warning Current warning alarm 3 dB Alarm No alarm Current 3 dB alarm 1 dB Alarm No alarm Current 1 dB alarm VSWR Alarme No alarm Current VSWR alarm Interlock Interlock not present Interlock present RF On RF off RF on The menu on the left allows navigating to the various pages of each section. Clicking on the double-arrow button displays it again. hides the menu. Clicking on the button A section may include one or more pages; display of hide links to reach them by clicking the buttons or . The tool bar, the indicators and the menu will be available on all pages of the site. Page 94 Crown Broadcast, a division of International Radio & Electronics Corporation 25166 Leer Drive, Elkhart, Indiana, 46514-5425 USA Ph +1 (574) 262 8900 Crown Broadcast FME 350W to 2000W User Manual– 05/2013 9.3. Viewing the Status 9.3.1. Advanced measurements Overview Four graphs are available on this page: RF spectrum MPX output Current input spectrum Audio level displays the abscissa and ordinate of a On each curve, the button specific point. Click and drag the abscissa’s label to view other points on the curve. The RF Spectrum page displays the same curve as on the overview page but on a larger scale. The Audio/MPX Spectrum page displays either of the selected curve: Page 95 Crown Broadcast, a division of International Radio & Electronics Corporation 25166 Leer Drive, Elkhart, Indiana, 46514-5425 USA Ph +1 (574) 262 8900 Crown Broadcast FME 350W to 2000W User Manual– 05/2013 Line 1 Line 2 MPX outputs MPX inputs The Audio levels page displays the same curve as on the overview page but on a larger scale. Page 96 Crown Broadcast, a division of International Radio & Electronics Corporation 25166 Leer Drive, Elkhart, Indiana, 46514-5425 USA Ph +1 (574) 262 8900 Crown Broadcast FME 350W to 2000W User Manual– 05/2013 Red lines indicate the reference level. On the MPX outputs graph, the reference level is the total deviation, which can be set in the transmitter configuration pages. If the total deviation is changed, the audio levels page has to be refreshed to display the new value. 24 hour history This page displays measurements over the last day or the last hour: Direct power Forward power VSWR Voltage Current Global efficiency Mosfet efficiency Ambient temperature Preamplifier power* Radiator temperature* Fan speed* * Available measurements vary depending on the power of the transmitter To display a specific day or time, slide the abscissa’s label. A button allows clearing the history. Page 97 Crown Broadcast, a division of International Radio & Electronics Corporation 25166 Leer Drive, Elkhart, Indiana, 46514-5425 USA Ph +1 (574) 262 8900 Crown Broadcast FME 350W to 2000W User Manual– 05/2013 9.3.2. Main status This page displays the main parameters of the transmitter (read-only). The "Switched to Backup" indicator shows: Main input is on Switch to backup input Page 98 Crown Broadcast, a division of International Radio & Electronics Corporation 25166 Leer Drive, Elkhart, Indiana, 46514-5425 USA Ph +1 (574) 262 8900 Crown Broadcast FME 350W to 2000W User Manual– 05/2013 9.4. Transmitter configuration Click the button to access transmitter configuration pages. This section displays the parameters of the transmitter so they can be updated. When values have been changed, click the button to save the new settings. If the transmitter is in local mode (orange indicator at the bottom of the page), you will not be able to modify settings. 9.4.1. Easy configuration All basic parameters are available on this page. They are available on the front panel in the Easy mode. Please refer to parameter descriptions sections 5.4.1 to 5.4.8 for more details. The "Switched to Backup" indicator shows: Main input is on Switch to backup input For a complete configuration, use the Main, Modulation, Input Select and Input Sources pages. Page 99 Crown Broadcast, a division of International Radio & Electronics Corporation 25166 Leer Drive, Elkhart, Indiana, 46514-5425 USA Ph +1 (574) 262 8900 Crown Broadcast FME 350W to 2000W User Manual– 05/2013 9.4.2. Main configuration Parameters Set RF parameters on this page. Please refer to parameter descriptions section 5.4.1 for more details. Indicators show: Trip VSWR alarm No alarm Current VSWR trip alarm Link input Link disabled Active link Interlock input Interlock not present Interlock present RF presence RF disabled RF enabled Local mode Transmitter in standard mode Transmitter in local mode Page 100 Crown Broadcast, a division of International Radio & Electronics Corporation 25166 Leer Drive, Elkhart, Indiana, 46514-5425 USA Ph +1 (574) 262 8900 Crown Broadcast FME 350W to 2000W User Manual– 05/2013 Log View the event log on this page. Click on a column title to display a menu that will allow you to sort the column and to display or hide other columns. The event color gives its degree of severity: Red: Errors Yellow: Warning Blue or grey: Notice (when the source is respectively Configuration or System) White: Notice or information, when the source is neither configuration nor system) 9.4.3. Modulation configuration Deviation Set the deviation on this page. Please refer to parameter descriptions section 5.4.8 for more details. Page 101 Crown Broadcast, a division of International Radio & Electronics Corporation 25166 Leer Drive, Elkhart, Indiana, 46514-5425 USA Ph +1 (574) 262 8900 Crown Broadcast FME 350W to 2000W User Manual– 05/2013 Settings Set the RDS and SCA sub-carriers on this page. Please refer to parameter descriptions section 5.4.10 for more details. The "RDS Switched to Backup" indicator shows: Main RDS input is on RDS switched to backup input AGC/Limiter Set the limiter on this page. Please refer to parameter descriptions section 5.4.11 for more details. Page 102 Crown Broadcast, a division of International Radio & Electronics Corporation 25166 Leer Drive, Elkhart, Indiana, 46514-5425 USA Ph +1 (574) 262 8900 Crown Broadcast FME 350W to 2000W User Manual– 05/2013 9.4.4. Input Selection Priority Set the priority of the various inputs on this page. Please refer to parameter descriptions section 5.4.2 for more details. The "Switched to Backup" indicator shows: Main input is on Switch to backup input Thresholds Set input thresholds on this page. Please refer to parameter descriptions section 5.4.2 for more details. Page 103 Crown Broadcast, a division of International Radio & Electronics Corporation 25166 Leer Drive, Elkhart, Indiana, 46514-5425 USA Ph +1 (574) 262 8900 Crown Broadcast FME 350W to 2000W User Manual– 05/2013 9.4.5. Input Sources Line 1 / Line 2 Set the analog input (Line 1) or the AES input (Line 2) on these pages. Please refer to parameter descriptions sections 5.4.3 and 5.4.4 for more details. MPX Set the MPX 1 and MPX 2 inputs on this page. Please refer to parameter descriptions section 5.4.5 for more details. Page 104 Crown Broadcast, a division of International Radio & Electronics Corporation 25166 Leer Drive, Elkhart, Indiana, 46514-5425 USA Ph +1 (574) 262 8900 Crown Broadcast FME 350W to 2000W User Manual– 05/2013 Generator Set the internal generator on this page. Please refer to parameter descriptions section 5.4.7 for more details. Page 105 Crown Broadcast, a division of International Radio & Electronics Corporation 25166 Leer Drive, Elkhart, Indiana, 46514-5425 USA Ph +1 (574) 262 8900 Crown Broadcast FME 350W to 2000W User Manual– 05/2013 9.5. Setting the RDS data Click the button to access RDS data pages. This section displays RDS parameters so they can be updated. When values have been changed, click the button If the transmitter is in local mode (orange indicator at the bottom of the page), you will not be able to modify settings. 9.5.1. to save the new settings. Basic encoder This page is available when the Basic RDS option is enabled. Please refer to parameter descriptions section 5.4.12 for more details. Parameters Enter the ID of the main and the alternate DSN. Page 106 Crown Broadcast, a division of International Radio & Electronics Corporation 25166 Leer Drive, Elkhart, Indiana, 46514-5425 USA Ph +1 (574) 262 8900 Crown Broadcast FME 350W to 2000W User Manual– 05/2013 Main DSN / Alternate DSN Set DSN parameters on these pages. Page 107 Crown Broadcast, a division of International Radio & Electronics Corporation 25166 Leer Drive, Elkhart, Indiana, 46514-5425 USA Ph +1 (574) 262 8900 Crown Broadcast FME 350W to 2000W User Manual– 05/2013 9.5.2. Advanced Encoder The advanced encoder can be set using serial commands (see section 6.2.7) or the web interface but not with the front panel. PS Scroll Set the PS scroll on this page. For each line of PS text, set: Text: Text may include dynamic data (<ITEM….>, <INFO…>…) that will only be sent if filled in, and for ITEM type fields if the validity time frame is correct. Repetition: Then encoder will repeat the line before sending the next one (max: 99 times). Enabled: Check the box for the line to be sent. Center: When scrolling is done word by word, the encoder may center each word in the receiver screen. Only applicable when ‘Word’ is the chosen increment Truncated: Set the number of scrolling characters. Scrolling may be done by word. In that case, the encoder will detect whole words (identifiable delimiters are: ‘ ‘, ‘-‘, ‘,’), and fit as many whole words as possible on each screen. Increment: When scrolling is done word by word, the encoder truncates words longer than the display screen (longer than 8 characters). Only applicable when ‘Word’ is the chosen increment. Delay: Time laps between 2 consecutive screens. Page 108 Crown Broadcast, a division of International Radio & Electronics Corporation 25166 Leer Drive, Elkhart, Indiana, 46514-5425 USA Ph +1 (574) 262 8900 Crown Broadcast FME 350W to 2000W User Manual– 05/2013 TAG pages Dynamic fields presented on the ‘Items Tags’, ‘Info Tags’ and ‘Miscellaneous Tags’ pages display current data in the left column and automation command definitions in the right column. Definitions should be configured to match commands of the automation software application. Each name must be unique. Automation commands are case sensitive. Page 109 Crown Broadcast, a division of International Radio & Electronics Corporation 25166 Leer Drive, Elkhart, Indiana, 46514-5425 USA Ph +1 (574) 262 8900 Crown Broadcast FME 350W to 2000W User Manual– 05/2013 Table of definition of commands Category Item RTplus classes MP3 id3v2 TIT2 TALB TITLE ALBUM Title of item The collection name to which this track belongs ITEM.TRACKNUMBER TRCK TRACKNUM ITEM.ARTIST TPE1 ARTIST ITEM.CONDUCTOR TPE3 CONDUCTOR ITEM.COMPOSER ITEM.BAND TCOM TPE2 COMPOSER BAND ITEM.COMMENT ITEM.GENRE COMM TCON COMMENT CONTENTTYPE Number of the current part of the current level A person or band/collective generally considered responsible for the work A complete composition (mainly used in classical music) A movement is a large division of a larger composition or musical form The artist(s) who performed the work. In classical music this would be the conductor, soloists Name of the original composer Band / orchestra / accompaniment / musician Any comment related to the content The main genre of the audio or video; e.g. "classical", "ambient-house", "synthpop", "sci-fi", "drama", etc. Headline Local news. Quote information Result of a game, either as one tag "Indiana University : Purdue University 101:78" or as 2 distinct tags Lottery Horoscope Daily tip / diversion / joke ... ITEM.COMPOSITION ITEM.MOVEMENT Info INFO.NEWS INFO.NEWS.LOCAL INFO.STOCKMARKET INFO.SPORT INFO.LOTTERY INFO.HOROSCOPE INFO.DAILY_DIVERSIO N INFO.HEALTH INFO.EVENT INFO.SZENE INFO.CINEMA INFO.TV INFO.DATE_TIME INFO.WEATHER INFO.ALARM INFO.ADVERTISEMENT INFO.OTHER Program Description ITEM.TITLE ITEM.ALBUM STATIONNAME.LONG PROGRAM.NOW PROGRAM.NEXT PROGRAM.PART PROGRAM.HOST PROGRAM.EDITORIAL _STAFF Information about health: Allergy alarms ... Info about an event Information about scene (Hot locations to be, ...) Information about movies in cinema Information about TV-movies Information about date and time (Client to chose between date and time) Information about weather An alarm information, typically an official alarm send out while the alarm flag is set Info about an advertisement. May be in parallel to an audio advertisements Other Information: Not especially specified Name describing the radio station EPG info program now EPG info program next Part of the current radio show: E.g. one of several parts of the PROGRAM.NOW Name of the host of the radio show Page 110 Crown Broadcast, a division of International Radio & Electronics Corporation 25166 Leer Drive, Elkhart, Indiana, 46514-5425 USA Ph +1 (574) 262 8900 Crown Broadcast FME 350W to 2000W User Manual– 05/2013 Category RTplus classes MP3 id3v2 PROGRAM.RADIO Interactivity PROGRAM.HOMEPAGE PHONE.HOTLINE WORS WWWRADIOPAGE APPOINTMENT HOTLINE IDENTIFIER TSRC ISRC PURCHASE WPAY WWWPAYMENT PHONE.STUDIO PHONE.OTHER SMS.STUDIO SMS.OTHER EMAIL.HOTLINE EMAIL.STUDIO EMAIL.OTHER MMS.OTHER CHAT CHAT.CENTER VOTE.QUESTION VOTE.CENTER Descriptor PLACE GET_DATA Description Information about radio shows: A link towards another frequency with other content (NOT AF list) May be one tag (keyword##frequency) or two distinctive tags Link to radio station homepage The telephone number of the radio stations hotline The telephone number of the radio stations studio Name and telephone number: Either as one tag ("keyword##phone number") or as two distinct tags The sms number of the radio stations studio (to send directly a sms into the studio) Name and sms number: Either as one tag ("keyword##sms number") or as two distinct tags The email address of the radio stations hotline The email address of the radio stations studio Name and email address: Either as one tag ("keyword##phone number") or as two distinct tags Name and mms number: Either as one tag ("keyword##mms number") or as two distinct tags chat content: send by users to a specific address and broadcasted by the Radio Station Address, where contributions to the chat shall be sent (may be url or sms) A question (typically binary) which can be answered by "yes" or "no" or "1" or "2" url or sms number to send your answer to Descriptor will always be the second RT tag in a message. And will describe the RT tag 1 in more detail Adds info about date and time Hotline number to call to get more info Can identify any tag in RT1. For music it is the: International Standard Recording Code (http://www.ifpi.org/isrc/) Address where item can be purchased. Address can be an url or a sms-number Retrieves either via a sms or url-link more data about tag in RT1. (Info request via Point to Point - unicast) Page 111 Crown Broadcast, a division of International Radio & Electronics Corporation 25166 Leer Drive, Elkhart, Indiana, 46514-5425 USA Ph +1 (574) 262 8900 Crown Broadcast FME 350W to 2000W User Manual– 05/2013 9.6. System configuration Click the button to access system pages. When values have been changed, click the button to save the new settings. If the transmitter is in local mode (orange indicator at the bottom of the page), you will not be able to modify settings. 9.6.1. Product ID General information regarding the product: name, serial number, versions… Use the product name and product description to adequately and uniquely describe your unit. They are useful in a network environment to identify it. Specifically, these values are sent with SNMP traps. Page 112 Crown Broadcast, a division of International Radio & Electronics Corporation 25166 Leer Drive, Elkhart, Indiana, 46514-5425 USA Ph +1 (574) 262 8900 Crown Broadcast FME 350W to 2000W User Manual– 05/2013 9.6.2. Date / Time Set system date: The user may update both date (year/month/day) and time (hour/minute/second). Set system time zone: The user selects the geographical zone from the list. Important to have this set correctly when using an NTP server. Set the time zone first! Changes in the time zone affect the time that is displayed in the system time window, so setting the zone first will eliminate the need to set the system time twice! U U Page 113 Crown Broadcast, a division of International Radio & Electronics Corporation 25166 Leer Drive, Elkhart, Indiana, 46514-5425 USA Ph +1 (574) 262 8900 Crown Broadcast FME 350W to 2000W User Manual– 05/2013 9.6.3. Network IP Configuration: Static Ethernet configuration Set the parameters for the network interface. DNS Servers: DNS configuration. Mandatory if before using DNS addresses on other configuration pages. 9.6.4. Communication Parameters of the communication board. Page 114 Crown Broadcast, a division of International Radio & Electronics Corporation 25166 Leer Drive, Elkhart, Indiana, 46514-5425 USA Ph +1 (574) 262 8900 Crown Broadcast FME 350W to 2000W User Manual– 05/2013 9.6.5. Users This is where web site connection settings can be modified. This page is only visible to administrators. Two web and software accounts are available: Administrator (Admin / admin by default). The administrator has full rights Guest (Guest / guest by default). The guest has read-only access to all pages except the user management page. The guest can download logs. Two FTP accounts are available: Administrator (Admin / admin by default). The administrator has full rights Update manager (update / maj by default). This account is only used for software updates. You may change login names but make sure each is unique! Only use alphanumerical characters for user names and passwords. Page 115 Crown Broadcast, a division of International Radio & Electronics Corporation 25166 Leer Drive, Elkhart, Indiana, 46514-5425 USA Ph +1 (574) 262 8900 Crown Broadcast FME 350W to 2000W User Manual– 05/2013 9.6.6. SNMP Agent SNMP configuration The equipment enables multiple addresses to be configured for SNMP notifications. However, only the Main Manager has the authority to acknowledge notifications. With “INFORMS” messages, automatic answers from secondary managers are ignored by the unit. MIB: To download the MIB right click on the link and select “Save link as”. SNMP Traps configuration SNMP Notification Type / Trap Community / System Description: trap settings Life Sign Trap / Minutes between Life Signs: sends life signs every X minutes. This trap makes it possible to check that the unit is connected to the network. Trap sending test: enables the user to carry out a test according to the trap settings. 9.6.6.1 Supported SNMP versions The unit implements an SNMP agent conforming to SNMPv1 and SNMPv2c versions. GET and SET commands are supported, as well as GETBULK in SNMPv2c. Notifications can be transmitted in TRAP V1 or V2c form or with an INFORM V2c type. 9.6.6.2 Notification mode To make sure traps are received by the main recipient, the unit offers 2 methods. With both methods, traps are sent until they are acknowledged. Automatic acknowledgement for sending with INFORM. These notifications are only available with the version 2c of the protocol. This protocol checks that the manager sends the notification to the transmitter. This process is simple and reliable, no specific configuration is required for the manager. Page 116 Crown Broadcast, a division of International Radio & Electronics Corporation 25166 Leer Drive, Elkhart, Indiana, 46514-5425 USA Ph +1 (574) 262 8900 Crown Broadcast FME 350W to 2000W User Manual– 05/2013 Manual acknowledgement for Traps V1 and Traps V2c. A specific OID (“alarmPendingAlarmsalarmAck”) is extracted and its variables are sent with the trap. The manager must then execute a SET command. This method is more complex but is the only one that can work with the version 1 of the protocol. The acknowledgment mode (Trap V1, Trap V2c or Inform) is identical for all alarms. See the next section “Notifications” for additional settings. With “SNMPv2c traps” notifications, it not possible to acknowledge traps. In the same way, traps which do not require acknowledgment cannot be sent with the “Inform SNMPv2c” format, even when this format is selected. This is the case with the ‘test’ trap as well as with equipment information traps such as the ‘Equipment On’ trap. 9.6.7. Notifications SNMP Actions The user may replay traps that have not been acknowledged yet. The user may also delete pending traps that have not been acknowledged yet. Page 117 Crown Broadcast, a division of International Radio & Electronics Corporation 25166 Leer Drive, Elkhart, Indiana, 46514-5425 USA Ph +1 (574) 262 8900 Crown Broadcast FME 350W to 2000W User Manual– 05/2013 9.6.8. Common traps Click the arrow next to the trap name to display its parameters. Set the mode: Resend until acknowledgement: The trap is regularly sent until acknowledgement. Send and forget: The trap is sent once, no follow-up is expected. Do not send. If “Resend until acknowledgement” is selected, set the time to wait for acknowledgement before resending the trap (Ack timeout, in seconds) and the maximum number of times the trap will be resent (Max retries). Set also the severity (log, minor, critical…). 9.6.9. IRT Traps IRT traps are configured like common traps (see previous section), with 2 additional parameters: To enable the trap, check "Enabled" (replaces the “Do not send option” of the Common traps) Set the priority; this information which is sent with the traps can be used by an SNMP Manager as filter criteria for instance. Page 118 Crown Broadcast, a division of International Radio & Electronics Corporation 25166 Leer Drive, Elkhart, Indiana, 46514-5425 USA Ph +1 (574) 262 8900 Crown Broadcast FME 350W to 2000W User Manual– 05/2013 9.6.10. Crown Broadcast Traps Crown Broadcast traps are configured like IRT traps (see previous section). No trap is sent on automatic audio switch. 9.6.11. Support With the ‘Reboot TCP/IP option’ button, restart the TCP/IP board. With the ‘Reboot Transmitter’ button, restart the transmitter’s front panel. Page 119 Crown Broadcast, a division of International Radio & Electronics Corporation 25166 Leer Drive, Elkhart, Indiana, 46514-5425 USA Ph +1 (574) 262 8900 Crown Broadcast FME 350W to 2000W User Manual– 05/2013 9.6.12. EMR EMR (Expert Maintenance Reporting) is a service offered by your Crown Broadcast dealer to monitor your Crown Broadcast FME transmitters. A report is periodically sent to you to give you the state of the transmitters. This report may suggest corrective or preventive actions to solve potential issues or improve the performance of the transmitters. If you have subscribed to this service, you will need to set your transmitter so it can communicate with the EMR server. Enter its position and your EMR account ID as supplied by your dealer. Check the box to enable EMR. Enter the IP address of the EMR server (or web address) as supplied by your dealer and click the Test button to establish proper communication between your transmitter and the EMR server. The EMR service program is administered by our OEM partner, WorldCast Systems, via a secure server in Miami, Florida. The reports generated by this system will allow you to take necessary corrective action to prevent transmitter issues. Questions regarding EMR can be directed to Crown Broadcast Service support who will assist directly or facilitate direct interaction between the end user and WorldCast Systems. 9.7. About This window application. displays information regarding the web Page 120 Crown Broadcast, a division of International Radio & Electronics Corporation 25166 Leer Drive, Elkhart, Indiana, 46514-5425 USA Ph +1 (574) 262 8900 Crown Broadcast FME 350W to 2000W User Manual– 05/2013 10. SERVICE AND SUPPORT We understand that you may need various levels of support or that the product could require servicing at some point in time. This section provides information for both of these scenarios. 10.1. Service The product warranty (see page 123) outlines our responsibility for defective products. Before returning a product for repair or replacement (our choice), call our Customer Service department using the following telephone number: (866) 262-8917 Our Customer Service Representative will give you further instructions regarding the return of your product. Use the original shipping carton or a new one obtained from Crown Broadcast. Place shipping spacers between the slide-out power amplifier assembly and the back panel. Please fill out the Factory Service Instructions sheet (page 122) and include it with your returned product. 10.2. 24–Hour Support In most instances, what you need to know about your product can be found in this manual. There are times when you may need more in-depth information or even emergency-type information. We provide 24–hour technical assistance on your product via a toll telephone call. For emergency help or detailed technical assistance, call (866) 262-8917 You may be required to leave a message at this number but your call will be returned promptly from our oncall technician. 10.3. Spare Parts To obtain spare parts, call Crown Broadcast Sales at the following number. (866) 262-8972 Or 574-262-8900 You may also write to the following address: International Radio and Electronics Corporation 25166 Leer Drive Elkhart, Indiana, U.S.A. 46514-5425 Page 121 Crown Broadcast, a division of International Radio & Electronics Corporation 25166 Leer Drive, Elkhart, Indiana, 46514-5425 USA Ph +1 (574) 262 8900 Crown Broadcast FME 350W to 2000W User Manual– 05/2013 10.4. Factory Service Instructions To obtain factory service, complete the bottom half of this page, include it with the unit, and ship to: International Radio and Electronics Corporation 25166 Leer Drive Elkhart, Indiana, U.S.A. 46514-5425 For units in warranty (within 3 years of purchase from any authorized Crown Dealer). We pay for ground UPS shipments from anywhere in the continental U.S. and Federal Express Second Day service from Hawaii and Alaska to the factory and back to you. Expedited service/shipment is available for an additional charge. You may forward your receipt for shipping charges which we will reimburse. We do not cover any charges for shipping outside the U.S. or any of the expenses involved in clearing customs. If you have any questions about your Crown Broadcast product, please contact Crown Broadcast Customer Service at: Telephone: (866) 262-8917 or (866) 262-8972 or (574) 262-8900 or via Fax: (574) 262-5399 Name: Company: Shipping Address: Phone Number: Model: Fax: Serial Number: Purchase Date: Nature of the Problem (Describe the conditions that existed when the problem occurred and what attempts were made to correct it.) Other equipment in your system: ____________________________________________________________________ If warranty has expired, payment will be: __Cash/Check __VISA __MasterCard __Please Quote before servicing Card Number: _________________Exp. Date:___________________ Signature:______________________________ Return Shipment Preference if other than UPS Ground: __Expedite Shipment __Other PLEASE ENCLOSE THIS DOCUMENT WITH UNIT — DO NOT MAIL SEPARATELY Page 122 Crown Broadcast, a division of International Radio & Electronics Corporation 25166 Leer Drive, Elkhart, Indiana, 46514-5425 USA Ph +1 (574) 262 8900 __AMEX Crown Broadcast FME 350W to 2000W User Manual– 05/2013 11. CROWN BROADCAST THREE YEAR LIMITED PRODUCT WARRANTY Summary Of Warranty Crown Broadcast IREC warrants its broadcast products to the ORIGINAL PURCHASER of a NEW Crown Broadcast product for a period of three (3) years after shipment from Crown Broadcast. All products are warranted to be free of defects in materials and workmanship and meet or exceed all specifications published by Crown Broadcast. Product nameplate with serial number must be intact and not altered in any way. This warranty is non - transferable. This warranty in its entirety is the only warranty offered by Crown Broadcast. No other warranties, expressed or implied, will be enforceable. Exclusions Crown Broadcast will not warranty the product due to misuse, accident, neglect and improper installation or operation. Proper installation included A/C line surge suppression, lightning protection and proper grounding of the entire transmitter, and any other recommendations designated in the Instruction manual. This warranty does not extend to any other products other than those designed and manufactured by Crown Broadcast or it authorized OEM. This warranty does not cover any damage to any accessory such as loads, transmission line or antennas resulting from the use or failure of a Crown Broadcast transmitter. Warranty does not cover any loss of revenue resulting from any failure of a Crown Broadcast product, act of God, or natural disaster. Procedure for Obtaining Warranty Service Crown Broadcast will repair or service, at our discretion, any product failure as a result of normal intended use. Warranty repair can only be performed at our plant facility in Elkhart, Indiana, USA, or at a factory authorized service depot. Expenses in remedying the defect will be borne by Crown Broadcast, including two-way ground transportation cost within the continental United States. Prior to returning any product or component to Crown Broadcast for warranty work or repair, a Return Authorization (RA) number must be obtained from the Crown Broadcast Customer Service Department. Product must be returned in the original factory pack or equivalent. Original factory packing materials may be obtained at a nominal charge by contacting Crown Broadcast Customer Service. Resolution of the defective product will be made within a reasonable time from the date of receipt of the defective product. Warranty Alterations No person has the authority to enlarge, amend, or modify this warranty, in whole or in part. This warranty is not extended by the length of time for which the owner was deprived the use of the product. Repairs and replacement parts that are provided under the terms of this warranty shall carry only the unexpired portion of the warranty. Product Design Changes Crown Broadcast reserves the right to change the design and manufacture of any product at any time without notice and without obligation to make corresponding changes in products previously manufactured. Legal Remedies of Purchaser This written warranty is given in lieu of any oral or implied warranties not covered herein. Crown Broadcast disclaims all implied warranties including any warranties of merchantability or fitness for a particular purpose. Page 123 Crown Broadcast, a division of International Radio & Electronics Corporation 25166 Leer Drive, Elkhart, Indiana, 46514-5425 USA Ph +1 (574) 262 8900 Crown Broadcast FME 350W to 2000W User Manual– 05/2013 APPENDIX A: SOFTWARE OPTION MANAGEMENT A set of options is available for Crown Broadcast FME transmitters. Contact your Crown Broadcast dealer if you wish to install one of them after the initial transmitter purchase. You will need to retrieve the software activation key from the transmitter and forward to your Crown Broadcast contact. From this activation key a new key will be created which will enable the desired option. The last step will be to send it to the transmitter. This activation process can be done using the front panel, the PC application or serial commands. Follow the selected procedure as described below. A.1. Using the front panel application Display the License menu, only visible in Expert mode (first switch to Expert mode if necessary). Press the “Enter” button and write down the transmitter’s serial number. Press the “+” key until you see this screen. Press the “Enter” button to access the Enable License submenu and then press “Enter” again to generate the key for your transmitter. Send the serial number and the key to Crown Broadcast. A new key will be returned to you. To enter the new key, access the License menu then access the Enable License screen. The ‘Pending’ state indicates the transmitter awaits a new key. 9 8 . 0 0 M H z 1 0 0 W -> L I C E N S E > 1 S E R I A L N U M B E R 0 0 0 0 0 0 2 5 1 E N A B L E L I C . -> N E W > 2 1 G E N E R A T E -> G O K E Y E N A B L E L I C . -> P E N D I N G Once you have received the new key, press the “Enter” button to display this screen and press Enter again to switch to edit mode. Using the “+” and “–” keys, adjust the value for each digit, press “Enter” to go to the next digit. 2 E N T E R K E Y -> 0 0 0 0 0 0 0 0 0 0 0 Press the “+” key until you see the Go To screen and select ‘License’ to return to the previous level of menus. 1 G O T O -> L I C E N S E -> A D D . Press the “+” key to access the Current License screen. The new license should now be part of the list. 1 C U R R E N T L I C E N C E -> R D S B A S I C , P L A Y E Page 124 Crown Broadcast, a division of International Radio & Electronics Corporation 25166 Leer Drive, Elkhart, Indiana, 46514-5425 USA Ph +1 (574) 262 8900 Crown Broadcast FME 350W to 2000W User Manual– 05/2013 A.2. Using the PC application License management is only available with Engi version 1.1.1 (or more recent). Connect to the transmitter with the Engi application, either with a direct connection or via the network (see section 7) and display the Tools/License Manager menu. Click the ‘Request an Activation Key’ button: a value is generated by the transmitter and copied into the clipboard. Send this key to Crown Broadcast. A new key will be returned to you. Once you have received the new key, display the License Manager again and click on the ‘Set Activation Key’ button. Copy the new key into this window and click the ‘OK’ button to enable the license. The new option is now enabled. Page 125 Crown Broadcast, a division of International Radio & Electronics Corporation 25166 Leer Drive, Elkhart, Indiana, 46514-5425 USA Ph +1 (574) 262 8900 Crown Broadcast FME 350W to 2000W User Manual– 05/2013 A.3. Using serial commands Connect a PC to the front panel serial port as described in section 6. Send the command: SYS.KEY.ADD The return value will have the following format: serial_number-key1. Send this key to Crown Broadcast. A new key will be returned to you (serial_number-key2). Once you have received the new key, send the command: SYS.KEY.ADD= serial_number-key2 The unit will return: $OPTION ACTIVATED If the key is not recognized, the unit will return: WRONG KEY In that case you will need to contact Crown Broadcast. You can check the current options by sending the command: SYS.OPT.LIST The unit will return the list of enabled options, including the new one. Page 126 Crown Broadcast, a division of International Radio & Electronics Corporation 25166 Leer Drive, Elkhart, Indiana, 46514-5425 USA Ph +1 (574) 262 8900 Crown Broadcast FME 350W to 2000W User Manual– 05/2013 APPENDIX B: ADJUSTING THE IMPEDANCE OF ANALOG INPUTS Default impedance of analog inputs is high. It can be set to 600 by jumpers. Before setting the jumpers, make sure that all cables are disconnected. Remove all the screws securing the cover. J2 J1 Jumper position on a type II carte board: J2 J1 High impedance 600 Jumper position on a type I carte board (previous model): J2 J1 High impedance 600 J2 J1 Page 127 Crown Broadcast, a division of International Radio & Electronics Corporation 25166 Leer Drive, Elkhart, Indiana, 46514-5425 USA Ph +1 (574) 262 8900 Crown Broadcast FME 350W to 2000W User Manual– 05/2013 APPENDIX C: MAINTENANCE To order spare parts, please contact your Crown Broadcast dealer. C.1. Changing the fuses If you need to change the fuses, make sure the surge protector has not been damaged (see section C3). Crown Broadcast FME 350 W / 750 W / 1000 W: Fuses are located in the power socket on the rear panel. Open the trap to remove them. Crown Broadcast FME 1500 W / 2000 W: On the rear panel, the switch can have three positions : 1 The transmitter is on. 0 The transmitter is off. The circuit has been cut off. Turn off the module (position 0) and turn it on again (position 1) to reset it. Page 128 Crown Broadcast, a division of International Radio & Electronics Corporation 25166 Leer Drive, Elkhart, Indiana, 46514-5425 USA Ph +1 (574) 262 8900 Crown Broadcast FME 350W to 2000W User Manual– 05/2013 C.2. Changing the fan Fan reference: SP01309 Fans should be changed every 3 years. Turn off the module needing a new fan and pull it out of the cabinet. Unscrew all lid screws and remove the lid. Fan block Unscrew the screws that keep the fan in place: 1 on the side and 2 under the frame. Disconnect the cable connecting the fan to the control board. Pull out the fan block. Remove the fan from its frame by gently pulling the 4 rubber legs. Insert the legs of the new fan using pliers. Make sure the cable does not get stuck. Place the fan block back in the frame. Screw it back with 2 screws under the frame and one on the side. Connect the fan cable on the FAN1 connector of the control board. Screw the lid back in place. Page 129 Crown Broadcast, a division of International Radio & Electronics Corporation 25166 Leer Drive, Elkhart, Indiana, 46514-5425 USA Ph +1 (574) 262 8900 Crown Broadcast FME 350W to 2000W User Manual– 05/2013 C.3. Changing the surge protector To check whether the surge protector is damaged, remove the top cover. If the surge protector indicator LED is on, it is ok. If the LED is off, the surge protector needs to be replaced. The surge protector is located between the power supply bloc and the mains filter. Crown Broadcast FME 350 W / 750 W / 1000 W: 1. Disconnect the unit. 2. Unscrew the top cover and remove it. 3. Using pliers, remove the metal washers that keep the surge protector in place on the rivets and unscrew the cables connecting it to the power bloc, to the mains filter and to the ground. Neutral (Blue) « N » & Phase (Brown) « L » connects to power 1. Replace the old surge protector with the new one. 2. Connect the 5 wires of the terminal as shown. 3. Snap the washers on the rivets to secure the surge protector in the chassis. 4. Set the cover back in place. Earth/Ground(Yellow/ Green) Neutral(Blue) « N » & Phase (Brown) « L » From the filter area Alimentation Page 130 Crown Broadcast, a division of International Radio & Electronics Corporation 25166 Leer Drive, Elkhart, Indiana, 46514-5425 USA Ph +1 (574) 262 8900 Crown Broadcast FME 350W to 2000W User Manual– 05/2013 APPENDIX D: TROUBLESHOOTING D.1. Calibration ! Your transmitter is calibrated at the factory and should not need to be recalibrated. In case it become misadjusted, first contact Crown Broadcast’s technical support department. They may advise you to recalibrate the unit, in which case you will be sent the calibration file. Connect your module to a PC to be able to use the PC application (see section 7). Once connected launch the application and: Open the Calibration Tool/Calibration menu. Click the “Load” button and select the .cal calibration file supplied by Crown Broadcast. Click the “Set” button to load the calibration file into the unit. window using the D.2. Complete Reset of the Crown Broadcast FME ! The reset procedure erases you whole configuration; however the calibration is kept. Connect a PC to the front panel serial port as described in section 6. Send the command: SYS.RAZ=RAZ After the module has restarted, on the front panel: Enter the transmitter’s nominal power (example 750 for a Crown Broadcast FME 750 W). Set the CAN Id to 00. Exit the Init Config menu to return to standard menus. T X P C A P -> 7 5 0 I D C A N -> 0 0 I N I T C O N F I G E X I T Page 131 Crown Broadcast, a division of International Radio & Electronics Corporation 25166 Leer Drive, Elkhart, Indiana, 46514-5425 USA Ph +1 (574) 262 8900 Crown Broadcast FME 350W to 2000W User Manual– 05/2013 FOR MORE INFORMATION Please contact: Crown Broadcast 25166 Leer Drive Elkhart, Indiana 46514-5425 24-Hour Service: (866) 262-8917 Sales: (866) 262-8972 General Information: (574) 262-8900 Fax: (574) 262-5399 www.crownbroadcast.com Page 132 Crown Broadcast, a division of International Radio & Electronics Corporation 25166 Leer Drive, Elkhart, Indiana, 46514-5425 USA Ph +1 (574) 262 8900