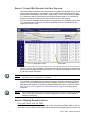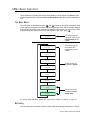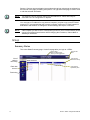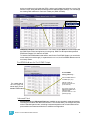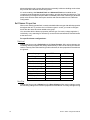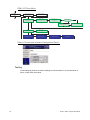
1
CEM+
Configuration Manual
Version 1.2
C o p y r i g h t © E le c tr o n i c T h e a t r e C o n t r o l s , I n c .
All Rights reserved.
P r o d u c t in f o r m a t i on a n d s p e c i f i c a t i o n s s u bj e c t t o c h a n g e .
P a r t N u m b e r : 7150M1400-1.2.0 R e v A
Released: May 2005
Table of Contents
Introduction . . . . . . . . . . . . . . . . . . . . . . . . . . 1
Congratulations.... . . . . . . . . . . . . . . . . . . . . . . . . . . . . . . . . . . . .1
Using this Manual . . . . . . . . . . . . . . . . . . . . . . . . . . . . . . . . . . . .1
Chapter 1
Overview . . . . . . . . . . . . . . . . . . . . . . . . . . . . 2
System Components . . . . . . . . . . . . . . . . . . . . . . . . . . . . . . . . . .2
Sensor+ Connect Web Browser Interface Overview . . . . . . . . . .3
Sensor+ Dimming System Features . . . . . . . . . . . . . . . . . . . . . .3
CEM+ Playback Priorities . . . . . . . . . . . . . . . . . . . . . . . . . . . . . .5
Chapter 2
Basic Navigation . . . . . . . . . . . . . . . . . . . . . . 6
The CEM+ User Interface . . . . . . . . . . . . . . . . . . . . . . . . . . . . . .6
CEM+ Basic Operation. . . . . . . . . . . . . . . . . . . . . . . . . . . . . . . . . . . .7
The Main Menu . . . . . . . . . . . . . . . . . . . . . . . . . . . . . . . . . . . . . .7
NoConfig . . . . . . . . . . . . . . . . . . . . . . . . . . . . . . . . . . . . . . . . . . .7
About . . . . . . . . . . . . . . . . . . . . . . . . . . . . . . . . . . . . . . . . . . . . . .8
Login . . . . . . . . . . . . . . . . . . . . . . . . . . . . . . . . . . . . . . . . . . . . . .9
Presets. . . . . . . . . . . . . . . . . . . . . . . . . . . . . . . . . . . . . . . . . . . . .9
Panic [Guest][User][Power] . . . . . . . . . . . . . . . . . . . . . . . . . . .10
Dimmer [Guest][User][Power] . . . . . . . . . . . . . . . . . . . . . . . . .10
Rack [User][Power]. . . . . . . . . . . . . . . . . . . . . . . . . . . . . . . . . .13
Group [User][Power] . . . . . . . . . . . . . . . . . . . . . . . . . . . . . . . . .15
Chapter 3
Sensor+ Connect Web Interface Overview. 16
Group . . . . . . . . . . . . . . . . . . . . . . . . . . . . . . . . . . . . . . . . . . . . . . . .17
Summary Status . . . . . . . . . . . . . . . . . . . . . . . . . . . . . . . . . . . .17
Dimmer Check . . . . . . . . . . . . . . . . . . . . . . . . . . . . . . . . . . . . . .18
Racks & Dimmers. . . . . . . . . . . . . . . . . . . . . . . . . . . . . . . . . . . . . . .18
All Racks . . . . . . . . . . . . . . . . . . . . . . . . . . . . . . . . . . . . . . . . . .18
Add Racks . . . . . . . . . . . . . . . . . . . . . . . . . . . . . . . . . . . . . . . . .19
Rack # . . . . . . . . . . . . . . . . . . . . . . . . . . . . . . . . . . . . . . . . . . . .19
Search . . . . . . . . . . . . . . . . . . . . . . . . . . . . . . . . . . . . . . . . . . . .23
Rooms & Presets . . . . . . . . . . . . . . . . . . . . . . . . . . . . . . . . . . . . . . .24
Assign Dimmers. . . . . . . . . . . . . . . . . . . . . . . . . . . . . . . . . . . . .24
Room (1-4). . . . . . . . . . . . . . . . . . . . . . . . . . . . . . . . . . . . . . . . .25
Configuration . . . . . . . . . . . . . . . . . . . . . . . . . . . . . . . . . . . . . . . . . .25
Panic . . . . . . . . . . . . . . . . . . . . . . . . . . . . . . . . . . . . . . . . . . . . .25
Patch . . . . . . . . . . . . . . . . . . . . . . . . . . . . . . . . . . . . . . . . . . . . .25
Network . . . . . . . . . . . . . . . . . . . . . . . . . . . . . . . . . . . . . . . . . . .28
File Transfer. . . . . . . . . . . . . . . . . . . . . . . . . . . . . . . . . . . . . . . .28
File Upload. . . . . . . . . . . . . . . . . . . . . . . . . . . . . . . . . . . . . . . . .29
Load Management. . . . . . . . . . . . . . . . . . . . . . . . . . . . . . . . . . .29
i
Chapter 4
CEM+ Configuration Procedures . . . . . . . . 30
CEM+ Configuration Overview . . . . . . . . . . . . . . . . . . . . . . . . .30
Configuration Procedures. . . . . . . . . . . . . . . . . . . . . . . . . . . . . . . . .30
Configure Your Computer for an ETCNet2 Network . . . . . . . . .30
Software Changes [Power] . . . . . . . . . . . . . . . . . . . . . . . . . . . .31
Delete All Racks [Power]. . . . . . . . . . . . . . . . . . . . . . . . . . . . . .32
Configure/Confirm Network Settings of CEM+ . . . . . . . . . . . . .33
Add Racks [Power] . . . . . . . . . . . . . . . . . . . . . . . . . . . . . . . . . .33
Set Patch Mode . . . . . . . . . . . . . . . . . . . . . . . . . . . . . . . . . . . . .34
Port Settings (Standard Patch) . . . . . . . . . . . . . . . . . . . . . . . . .34
Advanced Patch. . . . . . . . . . . . . . . . . . . . . . . . . . . . . . . . . . . . .34
Set Dimmer Properties . . . . . . . . . . . . . . . . . . . . . . . . . . . . . . .35
Assign Dimmers to Rooms . . . . . . . . . . . . . . . . . . . . . . . . . . . .38
Create a Preset (Web Only) . . . . . . . . . . . . . . . . . . . . . . . . . . .38
Record vs. Snapshot a Preset . . . . . . . . . . . . . . . . . . . . . . . . . .39
Activate/Deactivate a Preset . . . . . . . . . . . . . . . . . . . . . . . . . . .39
Panic . . . . . . . . . . . . . . . . . . . . . . . . . . . . . . . . . . . . . . . . . . . . . . . .39
Record Panic . . . . . . . . . . . . . . . . . . . . . . . . . . . . . . . . . . . . . . .39
Activate Panic . . . . . . . . . . . . . . . . . . . . . . . . . . . . . . . . . . . . . .39
Record Loads . . . . . . . . . . . . . . . . . . . . . . . . . . . . . . . . . . . . . .40
Clear Loads (Web Only) . . . . . . . . . . . . . . . . . . . . . . . . . . . . . .40
Clear Errors . . . . . . . . . . . . . . . . . . . . . . . . . . . . . . . . . . . . . . . . . . .40
Download (config from selected IP). . . . . . . . . . . . . . . . . . . . . .41
Backup (to all) . . . . . . . . . . . . . . . . . . . . . . . . . . . . . . . . . . . . . .41
View a Configuration . . . . . . . . . . . . . . . . . . . . . . . . . . . . . . . . .41
Download a Configuration . . . . . . . . . . . . . . . . . . . . . . . . . . . . .42
Upload a Configuration . . . . . . . . . . . . . . . . . . . . . . . . . . . . . . .42
FTP Server . . . . . . . . . . . . . . . . . . . . . . . . . . . . . . . . . . . . . . . .43
Chapter 5
Service . . . . . . . . . . . . . . . . . . . . . . . . . . . . 44
Contacting ETC about Equipment Problems . . . . . . . . . . . . . . .44
Changing Installation Rack Modules . . . . . . . . . . . . . . . . . . . . .45
CEM+ Fuses . . . . . . . . . . . . . . . . . . . . . . . . . . . . . . . . . . . . . . .47
Make a Preliminary Examination of Your System.... . . . . . . . . .48
If You Cannot Locate or Correct the Problem.... . . . . . . . . . . . .48
Appendix A
CEM+ Error Messages . . . . . . . . . . . . . . . . 50
Appendix B
Dimmer Curves . . . . . . . . . . . . . . . . . . . . . . 52
Linear curve . . . . . . . . . . . . . . . . . . . . . . . . . . . . . . . . . . . . . . . .52
Modified linear curve . . . . . . . . . . . . . . . . . . . . . . . . . . . . . . . . .53
Square law curve . . . . . . . . . . . . . . . . . . . . . . . . . . . . . . . . . . . .53
Modified Square law curve . . . . . . . . . . . . . . . . . . . . . . . . . . . .54
Sensor 2.0 curve . . . . . . . . . . . . . . . . . . . . . . . . . . . . . . . . . . . .54
ii
Sensor+ CEM+ Configuration Manual
Appendix C
Sensor+ SineWave Dimming . . . . . . . . . . . 56
SineWave Benefits . . . . . . . . . . . . . . . . . . . . . . . . . . . . . . . . . .56
Configuration . . . . . . . . . . . . . . . . . . . . . . . . . . . . . . . . . . . . . . .56
D20SW Dimmer Module Default Properties . . . . . . . . . . . . . . .57
SineWave Differences You Need to Know . . . . . . . . . . . . . . . .57
Appendix D
UL924 Setup . . . . . . . . . . . . . . . . . . . . . . . . 58
Introduction . . . . . . . . . . . . . . . . . . . . . . . . . . . . . . . . . . . . . . . .58
Terminations . . . . . . . . . . . . . . . . . . . . . . . . . . . . . . . . . . . . . . .58
Configuration . . . . . . . . . . . . . . . . . . . . . . . . . . . . . . . . . . . . . . .58
Testing . . . . . . . . . . . . . . . . . . . . . . . . . . . . . . . . . . . . . . . . . . . .59
Appendix E
CEM+ LCD Menu . . . . . . . . . . . . . . . . . . . . 60
No Config Menu. . . . . . . . . . . . . . . . . . . . . . . . . . . . . . . . . . . . .60
Rack Errors . . . . . . . . . . . . . . . . . . . . . . . . . . . . . . . . . . . . . . . .61
About Menu . . . . . . . . . . . . . . . . . . . . . . . . . . . . . . . . . . . . . . . .61
Preset Menu . . . . . . . . . . . . . . . . . . . . . . . . . . . . . . . . . . . . . . .62
Login Menu . . . . . . . . . . . . . . . . . . . . . . . . . . . . . . . . . . . . . . . .62
Panic Menu . . . . . . . . . . . . . . . . . . . . . . . . . . . . . . . . . . . . . . . .63
Dimmers Menu . . . . . . . . . . . . . . . . . . . . . . . . . . . . . . . . . . . . .64
Rack Menu. . . . . . . . . . . . . . . . . . . . . . . . . . . . . . . . . . . . . . . . .65
Rack Menu (cont.) . . . . . . . . . . . . . . . . . . . . . . . . . . . . . . . . . . .66
Rack Menu (cont.) . . . . . . . . . . . . . . . . . . . . . . . . . . . . . . . . . . .67
Group Menu. . . . . . . . . . . . . . . . . . . . . . . . . . . . . . . . . . . . . . . .68
Appendix F
Sensor+ Connect Site Map. . . . . . . . . . . . . 69
iii
Introduction
Congratulations...
on your purchase of an ETC Sensor®+ system. Sensor+ continues ETC's tradition of
providing the highest quality products for the entertainment lighting market.
Using this Manual
This manual contains information on using and configuring features of the Sensor+ CEM+
in any Sensor+ rack or pack available up through the Power User login user level.
The following symbols are used in this manual to alert you to danger or important
information.
Note:
Provides important information about your installation.
CAUTION:
1
Alerts you to important information relating to equipment performance or reliability.
WARNING:
RISK OF ELECTRIC SHOCK! Warns you when electricity may cause injury.
WARNING:
Warns you when there is the possibility of other types of injury.
Sensor+ CEM+ Configuration Manual
Chapter 1
Overview
This manual covers functions and configuration of the CEM+ and Sensor+ Connect that are
available to the Guest and User and Power User login levels.
User Level
Default
Guest
User
Power User
PIN
none
1111
2222
3333
Login
Password
Just click “Log On”
guest
guestpass
user
userpass
power
powerpass
A Sensor+ dimming system controls lighting using EDMX™ control levels from a lighting
control system on the ETCNet2™ network and/or DMX512 control levels from a lighting
control system on the DMX network and/or architectural presets which can also be used as
backup looks. The CEM+ can accept levels from EDMX and up to two DMX512A inputs.
The configuration of your dimming system determines which input or combination of inputs
will generate the output levels of your dimmers.
System Components
The Sensor+ system consists of Sensor+ racks or packs, CEM+ control modules and
various dimmer module types, however a module may contain only a circuit breaker, a
relay, or may contain no electronics at all.
CEM+ Control Module
ETC CEM+ R 1/ 6 G 9 E
[Rack OK]
The CEM+ control module is required for Sensor+ dimming systems - the system will not
function without a properly configured CEM+. This module serves as the real time
processor for incoming control signals and transmits that information to the individual
dimmers. It also monitors the system status and reports any errors. The CEM+ module can
be used to configure the system. Configuration and error data can be accessed either
locally at the CEM+ keypad, or by using the Sensor+ Connect web browser interface.
Networked Sensor+ systems can be split into separately configured subsystems called
Groups. Each configuration can support up to 16 CEM+ modules in a Group. The Group
configuration is stored in all CEM+ modules in that group. A single ETCNet2 network may
contain up to 64 Groups (up to 1024 racks total). One exception to these rules are racks
which can contain two CEM+s in redundant tracking mode. In this mode, the number of
racks in a Group are limited to 8 racks (still 16 CEM+ modules).
The CEM+ has an Ethernet data input for incoming EDMX data and two DMX512 input
ports (Port A and Port B). DMX Port B can be used as a DMX output port for one universe
of DMX on the last logical rack in the Group. Data management is determined in the Group
configuration.
1
Overview
2
Sensor+ Connect Web Browser Interface Overview
The CEM+ module contains a web server that delivers graphical web pages for you to use
during system configuration. The Sensor+ Connect Web browser interface can be used
instead of the direct buttons on the CEM+ module itself. You can use an Ethernet-capable
PC connected to the ETCNet2 network and running Windows 2000 or XP and Internet
Explorer 6 or later to browse into any of the Sensor+ racks on the network.
If you are using an Emphasis Control System running version 1.8.0 software or later, there
is a command in the WYSILink menu that automatically opens a browser window and
connects to Sensor+ racks.
Edit Tabs
Navigation Frame
Logout
button and
user level
Edit Frame
Sensor+ Connect uses a navigation layout where the various main areas are selected on
the left side of the page presenting sub-options. The right side of the page is used to view
or edit the selected information.
Note:
The Emphasis Server network settings are the default ETC values and ready for
immediate use. No configuration is required.
You must set an IP address for any personal computer you plan to use on an ETCNet2
network. ETC recommends that the personal computer used on an ETCNet2 network is
dedicated to that network so changes to network settings are kept to a minimum. Please
see ”Configure Your Computer for an ETCNet2 Network”, page 30 for setting up your
computer.
Note:
If the computer you wish to use is currently being used on a non-ETCNet2 network please
consult your Network Administrator before changing the IP address, Subnet Mask or
Gateway IP addresses.
Sensor+ Dimming System Features
Play back Presets from the CEM+
The CEM+ module provides 128 Presets that can be recorded from EDMX, DMX, or directly
set levels. You can configure each Preset’s name, fade times and playback priority. Presets can
3
Sensor+ CEM+ Configuration Manual
be assigned to any one of four Rooms in the configuration. Sensor+ systems can also have the
Group play back a Preset in case of data loss.
S e n s o r + C o n ne c t a n d W Y S I L i n k f o r F e e d b a c k
Sensor+ Connect duplicates the functions of the CEM+ module on a PC or Emphasis
Server on the ETCNet2 network. The Web browser interface allows you to monitor rack
activity, reconfigure dimmer curves, record and activate presets, load and backup
configurations, and many other features.
Access to the CEM+ and Sensor+ Connect configuration features is protected by specific
user levels and passwords to limit system-altering features to selected personnel, while
allowing basic operational functions to a wider range of users.
Note:
Sensor+ Connect and Message logging are available on Emphasis Servers as a base
functionality.
Advanced Features
Sensor+ Advanced Features (AF) racks provide additional reporting features that help you
to quickly learn the status of your dimming system and diagnose problems. AF dimmer
modules indicate the presence of data and the relative output of power with LED indicators
on the modules themselves. Much more information can be displayed on the CEM+
module’s integral LCD display, a PC on the network running Sensor+ Connect in a Web
browser or WYSIWYG with the WYSILink upgrade.
Advanced Features include the ability to record and monitor individual dimmer loads,
dimmer removed, SCR fail, breaker trip and several other monitoring tools. Constant
comparison of actual dimmer loads against the recorded value lets the system signal you
when a load value changes. The change usually indicates a lamp has burned out or failed,
allowing you to make an immediate replacement.
Dimmer Doubling™ (60Hz systems only)
ETC’s dimmer doubler technology allows you to double the number of controllable circuits
in your system without adding dimmer modules or running additional cable. The key to this
feature is the dimmer doubler two-fer.
The dimmer doubler two-fer is installed between a Sensor dimmer module and two ETC
Source Four 77 volt fixtures. It splits the output of a single dimmer into two, separatelycontrolled outputs. You can then use an ETC control console to independently control the
output of the two fixtures.
Note:
1
Overview
For more information on using dimmer doubler two-fers, see the Dimmer Doubler User
Manual. For more information configuring your system for use with Dimmer Doubler twofers, see the CEM+ Configuration Manual.
4
CEM+ Playback Priorities
The CEM+ uses the same
priority structure as all of the
ETC products that use
ETCNet2 and adds two more
internally.
Any incoming EDMX is reprioritized internally on the
CEM+ as set on the patch
page. The priorities of the
EDMX sources (Emphasis,
Obsession II, Unison,
ETCNet2 DMX Node) are
used to determine what level
information makes it to the
CEM+. That level information
is then flatly re-prioritized to
the level specified on the
patch page.
ETCNet2 EDMX Pr iorities
Highest Priority
Panic (CEM+)
Set Level (CEM+)
Any sources at
the same Priority
will pile-on (HTP)
with each other.
Replace (Unison)
Priority 1
Priority 20
Lowest Priority
Pass-Through If Active (Unison)
That means that if (for the
same set of EDMX addresses) you set your Emphasis to an EDMX priority of two (2), an
Obsession II to a priority of nine (9) and an input port of a DMX Node to a priority of two (2),
the level information will pile-on/HTP for the DMX Node and Emphasis and ignore the
Obsession II’s levels. Internally to a CEM+ that EDMX level information will be prioritized
and used at the EDMX priority setting on the patch page (defaults to a priority of 10). The
EDMX priority is set on a rack-by-rack basis just like the DMX ports.
Once inside the CEM+, the new priority is used when determining what source level
information is used (EDMX, DMX Port A, DMX Port B, Presets, Set Levels and Panic).
EDMX, DMX Port A, DMX Port B, and Presets can all be set with their own priorities (1-20).
Set Levels and Panic have fixed priorities above the other priorities. See the inset above.
5
Sensor+ CEM+ Configuration Manual
Chapter 2
Basic Navigation
This manual covers functions and
configuration of the CEM+ and Sensor+
Connect that are available to the Guest
and User and Power User login levels.
The CEM+ User Interface
User Level
Default
Guest
User
Power User
PIN
None
1111
2222
3333
You can access all the menus described in
this chapter using the buttons on the face of the CEM+ module. Menus and messages are
displayed on the integral 2x20 LCD display.
Plus
Reset
Set Levels
Accept
Home
Back
Minus
Basic use of the CEM+ user interface:
2
•
Use
•
Use
and
to scroll through menus and through digits and letters in screens
requiring user input.
•
Use
to accept settings and to view the error list.
•
Use
to step back through menus.
•
Use
to access the Set Levels menu.
•
Use
to reset the CEM+.
Basic Navigation
to return to the main menu at any time.
6
CEM+ Basi c Operation
The procedures covered in this section are available to users logged in as Guest, which
requires no password or PIN, and User and Power User which do require a password or
PIN.
The Main Menu
The main menu is accessed using the
and
buttons on the CEM+ face panel. Each
of the main menu items is described in the following pages. Each main menu item contains
a number of sub-menus, each of which is illustrated in each section. To return to the CEM+
resting display (the display at the top of the diagram to the right), press
.
No Config R__/ 0 G__
[Login]
ETC CEM+ R__/__ G__
[Rack OK]
This menu appears
only when there is no
configuration in the
CEM+.
This menu appears
when there is a
configuration in the
CEM+.
ETC CEM+ R__/__ G__
[About]
ETC CEM+ R__/__ G__
[Login]
ETC CEM+ R__/__ G__
These menus are
available to Guest.
[Presets]
ETC CEM+ R__/__ G__
[Panic]
ETC CEM+ R__/__ G__
[Dimmer]
ETC CEM+ R__/__ G__
[Rack]
ETC CEM+ R__/__ G__
[Group]
These menus are
available to User &
Power User.
For the full menu structure, please See “Appendix E: CEM+ LCD Menu” on page 60.
NoConfig
The NoConfig menu provides a place to make initial base settings and begin to create a
7
Sensor+ CEM+ Configuration Manual
configuration for the local CEM+. The NoConfig menu has no login requirements and
anyone has access to these menu items.
Set Group / Rack
The Set Group / Rack menu allows you to set the rack number of your local rack and the
group number it belongs to. It also provides a place to set the network information (IP
address, subnet mask and gateway IP). This should be done before creating a
configuration.
Generate Defaults
The Generate Defaults menu allows you to create an initial configuration for your local rack.
You can set your group and rack numbers along with rack type and dimmer information.
However, you can only add multiple racks of the same type. Additional racks or rack types
must be added later via the Add Racks menu item. For the face panel menu see Add Rack
[Power], page 14 and for the web interface see Add Racks, page 19.
•
Rack Types: SRxx is the U.S. style perminent installation rack and SPxx is the U.S.
style type of portable rack (including touring racks). ESRxx and ESPxx are for
European installation racks and portable racks respectively. In all cases, the “xx”
number is determined by the number of slots in the rack for modules (not the number
of dimmers).
Select Config
After selecting this function, you will be prompted with the name of the rack you want to get
the configuration from. Options will include Server which refers to an FTP server if one is
configured on your lighting network. Please see the section FTP Server, page 43 for more
information about setting up an FTP server for use with CEM+. It will then transfer the
configuration to the local CEM+. After the transfer is complete, you will get a confirmation
or error message for the transfer.
Setup Network
The Setup Network menu allows you to configure the IP addresses in the network table of
the local CEM+. These are the IP addresses that the local CEM+ will use to communicate
with other CEM+s in the group. Making changes in this menu does not change the actual
IP addresses of other CEM+s, just what this CEM+ thinks they should be. You can also
enable or disable a selected CEM+ network entry in the table. This will determine if the local
CEM+ will attempt to share information with that unit. Lastly, you can enable or disable
whether the local CEM+ will look for a bootp server for IP address information. Currently,
it is strongly recommended that you leave the bootp setting disabled.
About
The About menu provides status information about the dimmers, racks, network and Group.
Everything in the About menu is accessible by all users. No settings can be changed within
the About menu. Data can only be viewed.
About Dimmer provides information about a selected dimmer, including recorded and
actual loads, the dimmer type, curve and maximum voltage. You can also view the current
output level, the source of that level, and the dimmer’s location.
Rack General
The Rack General menu provides the current ambient temperature and air flow status of
the selected rack. It also displays the rack type, the air filter cleaning reminder setting, and
the number of hours until the air filter cleaning reminder is due.
Rooms & Presets
About Rooms & Presets provides information on the room and preset settings for the rack
you are currently browsing.
2
Basic Navigation
8
Netw ork
About Network provides the network settings for the currently selected rack. You can view
the settings for any rack in the Group.
Rack Data
About Rack Data provides status information for the DMX and EDMX inputs for any rack in
the Group.
Rack Power
About Rack Power provides status information for the line feed power and the voltage
headroom settings for any rack in the Group.
Identify Rack
Identify Rack flashes the LCD and buttons on the face panel of the selected rack.
Group
About Group provides the software version currently installed in the racks, the status of the
Panic state and the name of the Group.
Rack Address
About Rack Address provides the DMX A and B starting addresses for each rack in the
Group.
Login
The Login menu is where you enter the PIN number for the user level you want to access.
Guests need no PIN to view the menu items accessible to them. You will need to enter a
four-digit PIN to gain access to features that are restricted to higher user levels. Enter 2222
for User level access and 3333 for Power User level access. Use
and
to scroll
the digits and use
to enter the set digit.
Presets
The Presets menus are used to activate and deactivate Presets at the rack. If you are
logged in at the User level, you can also record and modify Presets from the CEM+.
There are four available Rooms and 128 available Presets in a single Group. A Room is a
way of grouping dimmers - such as “Lobby” or “Auditorium”. An individual Preset can only
control dimmers assigned to the same Room. For example, a Preset with dimmers
assigned to the Room named “Lobby” cannot also control dimmers in the Room
“Auditorium”.
Presets can also be assigned Priority. Priority is a function of ETCNet2 that defines how
various sources of control interact with dimmers. The default priority for controllers on the
network is 10. When controllers share the same priority level, a single dimmer assigned to
those controllers will output the highest level it receives. If the controllers are at different
priorities, the highest-priority controller (lowest priority number - a priority of 1 wins versus
a priority 10) will win and the dimmer will output the level sent by that controller.
Activate Preset
The Activate Preset menu allows you to activate a selected preset.
Deactivate Presets
The Deactivate Preset menu allows you to deactivate a selected preset.
C l e a r P r es e t s [User ]
The Clear Presets menu allows a User to delete a selected preset.
9
Sensor+ CEM+ Configuration Manual
R e c o r d P r e s e t s [User ]
The Record Presets menu allows a User to assign a preset number, and set the source for
levels, the fade time and playback priority and the room. If the preset number is already
recorded, you can record over it with the new settings, or if the preset is empty, you can
record these settings to that selected number.
S e t F a d e T i m e [ User ]
The Set Fade Time menu allows a User to customize the fade time for a recorded preset.
S e t P r i o r i t y [ User ]
The Set Priority menu allows a User to customize the priority for a recorded preset.
S e t P r e s e t N a m e [ User]
The Set Preset Name menu allows a User to customize the name of a recorded preset.
Names are alphanumeric and can be up to 20 characters long (not all 20 characters will be
visible on the LCD). Presets are assigned a default name of “Preset###” where ### is a
three-digit number up to 128.
S e t R o o m N a m e [ User]
The Set Room Name menu allows a User to set the name of a room.
M a x A c t i v e P r e s e t s [ User ]
The Max Active Presets menu allows a User to set the maximum number of active presets
for a selected room.
Panic [Guest][User][Power]
The Panic menu allows a Guest to activate and deactivate the Panic look and allows a
User to record or clear the Panic look.
Activate Panic
The Activate Panic menu toggles between “Activate” and “Deactivate”, depending on the
status of the Panic look.
R e c o r d P a n i c [User ]
The Record Panic menu allows you to record dimmers that currently have an output level
at the Master Level (or greater) to the Panic look. You can set the Master Level to anything
between 80% and 100%. When the Panic look is activated, the assigned dimmers will all
output at the Master Level. You can also choose to set all other dimmers to turn off when
panic is activated.
C l e a r P a n i c [User ]
The Clear Panic menu allows you to clear the current Panic settings.
C o n f i g u r e S w i t c h e s [ Power ]
The Configure Switches menu allows you to define the external switch action types
(maintained vs. momentary) and resting states (normally-open vs. normally-closed).
Dimmer [Guest][User][Power]
The Dimmer menu allows Guest access to setting and releasing dimmer levels, and
allows User access to module setup items such as setting the module type, curve,
name, firing mode and properties. The Dimmer menu also allows a User to perform
a dimmer check.
Set Levels
The Set Levels menu allows you to set a dimmer or a range of dimmers to a specified level
2
Basic Navigation
10
at the CEM+. Levels set here take priority over any other level inputs, such as control
consoles and architectural control systems. Levels set here do not take priority over levels
generated by an active Panic look.
The
button on the CEM+ face panel accesses this menu directly.
Release Levels
The Release Levels menu allows you to release the level of a dimmer or a range of
dimmers. Once released, those dimmers are available to other control inputs.
S e t M o d u l e T y p e [ User]
The Set Module Type menu allows a User to set a dimmer or range of dimmers to a specific
module type and firing mode. If the module is set to “Fluorescent”, you also set the
threshold in this menu. Threshold is the control level that must be present for the
fluorescent dimmer to output voltage based on the selected curve.
Set C u rve [User]
The Set Curve menu allows a User to set a dimmer or a range of dimmers to a specific
curve. A dimmer curve is a mathematical function that maps control levels to RMS output
voltage. Curves are scaled from the minimum voltage to the maximum voltage (settings that
are not available to the User login). The CEM+ supports the following curves: Square, Mod
Square, Linear, Mod Linear, Sensor 2.0. See Dimmer Curves, page 52, for more
information.
S e t D im m e r N a m e [User]
The Set Dimmer Name menu allows a User to name a dimmer. Names are alphanumeric
and can be up to 20 characters long (not all 20 characters will be visible on the LCD).
Dimmers are assigned a default name of “Dimmer#####” where ##### is a five-digit
number up to 32767.
S e t F i r i n g M o d e [ User]
The Set Firing Mode menu allows a User to set a dimmer or a range of dimmers to a
specific firing mode. Available modes include Normal, Off, Switched, Fluorescent and DD
(Dimmer Doubled).
•
Off: turns the dimmer off.
•
Normal: operates as a standard incandescent dimmer.
•
Switched: dimmers output unregulated AC voltage when the control level is above the
threshold level.
•
DD (Dimmer Doubled): dimmer operates as two controllable circuits. See Dimmer
Doubling™ (60Hz systems only), page 4.
Note:
Changing the dimmer firing mode will cause a change to default settings for curve,
minimum voltage, maximum voltage, threshold and regulation. Whenever a dimmer
mode is set the defaults for that mode will be applied to the other dimmer properties.
S e t P r o p e r t i e s [ User]
The Set Properties menu allows a User to set Voltage Regulation, Dynamic Preheat, DC
Output Prevent and Inrush Settings for a dimmer or range of dimmers.
•
11
Voltage Regulation: when enabled, the dimmer will regulate to the desired output
voltage. When disabled, the dimmer will be set to a constant firing time based on the
control level. This setting defaults “on”. The ability to disable regulation is sometimes
useful when dimming non-tungsten loads.
Sensor+ CEM+ Configuration Manual
•
Dynamic Preheat: this setting allows quick blackouts on dimmers that are set to
preheat. Preheat settings are not available to the User level login.
•
DC Output Prevent: this setting offers protection on selected dimmers for loads that are
sensitive to DC buildup, which can occur under certain conditions when positive and
negative half-cycles become uneven.
•
Inrush Protection: this setting protects against large voltage increases in a single AC
cycle. This protection is useful for high-wattage loads (especially if comprised of many
smaller wattage lamps) that may cause nuisance tripping of circuit breakers and to limit
peak currents in wiring and switchgear. This protection is particularly useful on RCD/
GFCI protected circuits. Settings for inrush protection include: Instant, 100mS (for
loads up to 10A), 300mS (for loads up to 25A) and 500mS (for loads of 50 or 100A).
S e t T h r e s h o l d [ Power]
The Set Threshold menu allows a Power User to set a dimmer or a range of dimmers to
come on at a specific control level.
S e t M a x S c a l e V o l t a ge [ Power]
The Max Scale Voltage menu allows a Power User to set a dimmer or a range of dimmers
to a maximum output voltage that is the top (100% control) of the scaled output of that
dimmer.
S e t M i n S c a l e V o l t a ge [ Power]
The Min Scale Voltage menu allows a Power User to set a dimmer or a range of dimmers
to a minimum output voltage that is the bottom (1% control) of the scaled output of that
dimmer. The dimmer will switch on to an RMS output voltage of Min Scale Voltage when
the control level reaches the value set for threshold. This is also the dynamic preheat value
for the dimmer.
A s s i g n D i m t o R o o m [ Power]
The Assign Dimmer to a Room menu allows a Power User to set a dimmer or a range of
dimmers to a specific room for use with recording presets. A dimmer can only be assigned
to a single room at a time. There are four (4) rooms available and all dimmers default to
being assigned to Room 1.
A d v a n c e d F e a t u r e s [ Power]
The Advanced Features menu allows a Power User to set Advanced Features (on/off),
Report Load Errors, AF Sensitivity, and AF Reaction Time for a dimmer or range of
dimmers.
•
Advanced Features (on/off): additional feedback from a dimmer that provides load
recording/reporting and advanced error reporting including a breaker trip, module
removed, load changes, dc output and SCR failures.
•
Report Load Errors (on/off): allows for messages to report load changes once initial
loads have been recorded for a dimmer.
•
AF Sensitivity (1 to 10): defines the resolution of the advanced features sensitivity in
reporting load changes. One (1) is the most sensitive/highest resolution setting and the
default is 5. AF sensitivity is based on a percentage of the recorded load.
•
AF Reaction Time (5 to 60 seconds): this setting defines the hysteresis for an advanced
feature error. The error must be present for the minimum set in the AF Reaction Time
before an error will be reported.
D i m m e r C h e c k [ User]
The Dimmer Check menu allows a User to set an output level and then step through
dimmers at a selected starting point.
2
Basic Navigation
12
Rack [User][Power]
The Rack menu includes menus for setting the rack name and patch settings. The Rack
menu is available only to those logged in at the User or Power User level.
S e t G r o u p / R a c k [ Power]
The Set Group / Rack menu allows you to set the rack number of your local rack and the
group number it belongs to. This should be done before creating a configuration. Care and
understanding should be used when making a change to these settings after a
configuration is already loaded.
S e t R a c k T y p e [ Power]
The Set Rack Type menu allows you to set the rack type of the selected rack. The options
of this menu are determined by the operating voltage specified during the rack configuration
creation.
S e t R a c k N a m e [ User]
The Set Rack Name menu allows you to set the name of the rack you are currently
browsing. Names are alphanumeric and can be up to 20 characters long (not all 20
characters will be visible on the LCD).
S e t P a t c h M o d e [ User ]
The Set Patch Mode menu allows a User to set the patch mode for a selected rack. The
patch mode can be set to “Standard” or “Advanced”.
S e t P a t c h [ User]
The Set Patch menu allows a User to enable and disable DMX and EDMX inputs, set their
priority and create the patch for those input ports. The choices that appear are dependent
on the patch mode set in the previous menu.
In Standard patching, you set the first dimmer number to be addressed by a selected DMX
or EDMX address and the length of the DMX or EDMX stream to be used for that port - for
example: setting the first dimmer to 1 and the DMX Start to 101 and the DMX Length to 24
will cause dimmer #1 to respond to input levels on DMX channel 101, dimmer #2 to respond
to DMX 102, and so on until dimmer #24.
In Advanced patching, you set a discrete DMX or EDMX address for each dimmer number.
D a t a L o s s B e h a v i o r [User]
Data Loss Behavior can be set independently for each input port (DMX A, DMX B and
EDMX) in each rack in the Group. Data loss behavior options are: Hold Last Look, Wait &
Fade Out and Generate Event. When data is restored, the source look will fade in at a 2second rate.
•
Hold Last Look: the CEM+ will hold any active dimmers at whatever levels they were
receiving when the data was lost. The dimmers will remain on until data is restored or
the CEM+ is reset.
•
Wait & Fade: the CEM+ will hold any active dimmers at whatever levels they were
receiving when the data was lost for a user-defined amount of time and then fade those
dimmers to zero (or to the levels generated by the next highest priority source) in a
user-defined fade time. The maximum wait and fade time is 60:59 minutes.
•
Crossfade To: this setting will play back Preset 128 when data is lost. The default fade
time for Preset 128 is 2 seconds. If this time is changed, both sides of the crossfade
(the fade into Preset 128 and the fade back into restored data) will use the new time.
V o l t a g e H e a d r o o m [ Po wer ]
This menu allows you to specify the threshold for the incoming voltage at which a warning
will appear to notify you about a drop in voltage.
13
Sensor+ CEM+ Configuration Manual
S e t N e t w o r k [User ]
Set Network allows a User to enable or disable the network, enable or disable BootP
(defaults to disabled) and set the network addressing for a selected rack.
S e t F i r s t D i m m e r [ User]
Set First Dimmer allows you to set the first dimmer number in a selected rack. For example,
in a two SR48 rack Group, Rack 1 can be set with a First Dimmer of 1, and Rack 2 can be
set with a First Dimmer of 97.
S e t T e m p A l a r m [User ]
The Temp Alarm is used to generate a warning when the ambient temperature monitored
by the rack exceeds a user-defined level. Use the Set Temp Alarm menu to set that level
for the selected rack.
S e t P h as e B a l a n c e [ User ]
The Set Phase Balance menu allows you to set the type of phasing used by the selected
rack and the voltage of the line feed power. Available settings include: Balanced-3Phase,
Balanced-1Phase, Straight-3Phase and Straight-1Phase.
•
Balanced-3Phase: rack is fed 3-Phase power and dimmer numbers are distributed
numerically by phase, rather than by rack position. Example: dimmers 1 and 2 are in
the top slot of a rack; dimmers 3 and 4 are located first on the second phase, 1/3 of the
way down the rack; dimmers 5 and 6 are located first on the third phase, 2/3 of the way
down the rack.
•
Balanced-1Phase: rack is fed split-phase power and dimmer numbers are distributed
numerically by bus bar, rather than by rack position. Example: dimmers 1 and 2 are in
the top slot of a rack; dimmers 3 and 4 are located in the first dimmer module of the bus
bar, 1/2 of the way down the rack.
•
Straight3-Phase: rack is fed 3-Phase power and dimmer numbers are distributed
numerically from top to bottom in the rack. Example: dimmers 1 and 2 are in the top slot
of a rack, dimmers 3 and 4 are located in the next slot, etc.
•
Straight1-Phase: rack is fed 1-Phase power and dimmer numbers are distributed
numerically from top to bottom in the rack. Example: dimmers 1 and 2 are in the top slot
of a rack, dimmers 3 and 4 are located in the next slot, etc.
A d d R a c k [ Power ]
The Add Rack menu is the place to add additional racks to your existing configuration. You
do this by specifying: the rack voltage, the rack type, first dimmer in the rack, the patch
mode, the ambient alarm temperature, the default module type, the phase balancing, and
whether or not to enable advanced features for the rack.
A i r F i l t e r T im e r [ User]
The Air Filter Timer menu allows you to set the amount of time between air filter cleaning
reminders for a selected rack. This timer counts down only when the fan is running in the
rack.
A d v a n c e d F e a t u r e s [ Power]
The Advanced Features menu allows you to enable/disable Advanced Features (AF) for a
selected rack in the group.
C o n f i g u r e F a n [User]
The Configure Fan menu allows you to configure the behavior of the fan in the selected
rack. Available settings include: No Data/15 Min and Always On. No Data/15 Min will allow
the fan to shut off if there have been no dimmer levels sent to that rack in 15 minutes. When
levels are sent to dimmers in the rack, the fan will start up automatically. The fan will always
2
Basic Navigation
14
run for 15 minutes following a reset of the CEM+.
G e t C o n f i g [ Power]
After selecting this function, you will be prompted with the name of the rack (1-16) you want
to get the configuration from. One option is Server which refers to an FTP server if one is
configured on your lighting network. Please see the section FTP Server, page 43 for more
information about setting up an FTP server for use with CEM+. It will then transfer the
configuration to the local CEM+. After the transfer is complete, you will get a confirmation
or error message for the transfer.
S e n d C o n f i g t o A l l [ Power ]
Upon pressing
for this function, you will immediately send the locally contained
configuration out to all of the other CEM+s in the group and to the FTP server if one is
configured for the group. Please see the section FTP Server, page 43 for more information
about setting up an FTP server for use with CEM+.
D e l e t e A l l R a c k s [Power ]
Immediately after pressing
, this operation clears the rack configuration from the local
rack (the one you are logged into), but does not clear everything from the CEM+. The
network settings, and custom PIN for the face panel remain intact.
N e t w o r k D e f a u l t s [Power ]
Pressing
on this screen will immediately reset your network table (IP addresses, subnet
masks, and gateway IPs) to their defaults for the current Group and Rack settings.
Group [User][Power]
The Group menu includes menus for recording loads, naming the group, setting the
preferred units for temperature reporting, and language and login settings. The Group
menu is available only to those logged in at the User level.
R e c o r d L o a d s [ User ]
The Record Loads menu is used to record the loads on each dimmer. This is useful in
Advanced Features systems where load reporting is desired.
N a m e G r o u p [ User ]
The Name Group menu allows a User to set the name of the Group. Names are
alphanumeric and can be up to 20 characters long (not all 20 characters will be visible on
the LCD).
S e t L a n g u a g e [ User]
The Set Language menu allows a User to set the language of the user interface.
A m b i e n t T e m p T y p e [ User]
The Ambient Temp Type menu allows a User to set temperature reporting as either
Fahrenheit or Celsius.
S e t L o g i n T i m e - o u t [ User]
The Set Login Time-out menu allows a User to set the time after which the CEM+ will
automatically log the current user out and return to the default access level as set in the
Group configuration. The time-out is based upon inactivity at the keypad.
Set P I N [ User ] [ Power]
The Set PIN menu allows you to set the PIN for your current login access level and below.
User can set the User level PIN and Power can set the Power and User level PINs.
Guests require no PIN for access.
15
Sensor+ CEM+ Configuration Manual
Chapter 3
Sensor+ Connect Web Interface
Overview
This section covers
functions and configuration
of the CEM+ and Sensor+
Connect that are available
to the Guest and User and
Power User login levels.
User Level
Default
Guest
User
Power User
Login
[empty field]
guest
user
power
Password
[empty field]
guestpass
userpass
powerpass
The web interface is a
series of web pages intended to give you easier access to all of a CEM+ module’s features
and settings. This section will provide you screenshots of various key pages and provide
further insight into how to use them. Setup and configuration procedures are covered in
“Chapter 4: CEM+ Configuration Procedures” on page 30.
For a complete web interface site map outline, please see See “Appendix F: Sensor+
Connect Site Map” on page 69.
The CEM+ module contains a web server that delivers graphical web pages for you to use
during system configuration. The Sensor+ Connect Web browser interface can be used
instead of the direct buttons on the CEM+ module itself. You can use an Ethernet-capable
PC connected to the ETCNet2 network and running Windows 2000 or XP and Internet
Explorer 6 or later to browse into any of the Sensor+ racks on the network. Any changes
made in the web interface are not communicated to the CEM+ until you send that
information by clicking Save Changes on that page.
If you are using an Emphasis Control System running version 1.8.0 software or later, there
is a command in the WYSILink menu that automatically opens a browser window and
connects to Sensor+ racks.
Logout
button and
user level
Edit Tabs
Navigation Frame
3
Sensor+ Connect Web Interface Overview
Edit Frame
16
Sensor+ Connect uses a navigation layout where the various main areas are selected on
the left side of the page presenting sub-options. The right side of the page is used to view
or edit the selected information.
Note:
The Emphasis Server network settings are the default ETC values and ready for
immediate use. No configuration is required.
You must set an IP address for any personal computer you plan to use on an ETCNet2
network. ETC recommends that the personal computer used on an ETCNet2 network is
dedicated to that network so changes to network settings are kept to a minimum.
Note:
If the computer you wish to use is currently being used on a non-ETCNet2 network please
consult your Network Administrator before changing the IP address, Subnet Mask or
Gateway IP addresses.
Group
Summary Status
This is the Status Summary page. It’s the first page after you login to a CEM+.
Group name
Rack # & Rack name
which you are logged into
Current user
level
List of
racks in
the Group
List of errors
within the Group
Rack with
an error
List of active
presets & panic
Rack okay
17
Sensor+ CEM+ Configuration Manual
Dimmer Check
Also from the Group section is the Dimmer Check page. This page provides a quick and
easy method to step through individual dimmers to do a dimmer check.
Set dimmer number
Set dimmer level
Release current
dimmer & apply level
to previous dimmer
Release current dimmer &
apply level to next dimmer
Start dimmer check
Release current dimmer
Racks & Dimmers
All Racks
All Racks provides a place to access and set the properties of all racks in the configuration.
Provides current rack status
information for all racks in the Group.
Set the name
of the group
Set the temperature
scale to use
Set the ambient
alarm temperature
Set the rack fan time-out
(15 min. or Always On)
Set the fan cleaning
countdown reminder
Set the load balancing
according to supply power
Set the rack name
Set the rack type
Set the voltage headroom warning
Set the first dimmer of the rack
Turn on/off
Advanced
Features
3
Set the Patch Mode
(Standard or Advanced)
Sensor+ Connect Web Interface Overview
18
Add Racks
This page is where you add racks to your configuration.
First dimmer of the
first added rack.
Enable Advanced
Features for added
racks.
240V changes the available rack & module
types to European models. (Read below)
Set initial patch
mode.
Set ambient
temperature alarm.
Set the default
module type
Set the dimmer
balancing type
To change the rack and module types to the European models, click the 240V check box.
After checking 240V, you must click Save Changes before you will see the available rack
and module types change to European (ESR/ESP) models. Clicking Save Changes the
first time after the 240V check box has been altered (checkmark vs. no checkmark) will not
add a rack to the group.
Rack #
Status
This page displays the individual rack’s power information, the dimmers’ control source and
current intensity level.
Displays which
rack’s info you are
viewing which may
19
Sensor+ CEM+ Configuration Manual
Configure Rack
This page is the individual rack equivalent to the All Racks/Configure Rack page listed
above. See “All Racks” on page 18.
Configure Dimmers
This webpage provides a single place to set all of your dimmer’s properties. Below is a list
explaining each one of the settings.
3
Sensor+ Connect Web Interface Overview
20
Set Dimmer Name [User]
The Set Name menu allows a User to name a dimmer. Names are alphanumeric and can
be up to 20 characters long (not all 20 characters may be visible on the LCD).
Set Module Type [Power]
The Set Module Type menu allows a User to set a dimmer or range of dimmers to a specific
module type and firing mode. If the module is set to “Fluorescent”, you also set the
threshold in this menu. Threshold is the control level that must be present for the
fluorescent dimmer to output voltage based on the selected curve.
Pos (Position) [Power]
This is a display only field. It lists the position of each circuit within a rack.
Set Firing Mode [Power]
The Set Firing Mode menu allows a User to set a dimmer or a range of dimmers to a
specific firing mode. Available modes include Normal, Off, Switched, Fluorescent and DD
(Dimmer Doubled).
Note:
•
Off: turns the dimmer off.
•
Normal: operates as a standard incandescent dimmer.
•
Switched: dimmers output unregulated AC voltage when the control level is above the
threshold level.
•
DD (Dimmer Doubled): dimmer operates as two controllable circuits. See ”Dimmer
Doubling™ (60Hz systems only)”, page 4.
Changing the dimmer firing mode will cause a change to default settings for curve,
minimum voltage, maximum voltage, threshold and regulation. Whenever a
dimmer mode is set the defaults for that mode will be applied to the other dimmer
properties.
Set Curve [User]
The Set Curve menu allows a User to set a dimmer or a range of dimmers to a specific
curve. A dimmer curve is a mathematical function that maps control levels to RMS output
voltage. Curves are scaled from the minimum voltage to the maximum voltage (settings that
are not available to the User login). The CEM+ supports the following curves: Square, Mod
Square, Linear, Mod Linear, Sensor 2.0. See ”Dimmer Curves”, page 52, for more
information.
Set Threshold [Power]
The Set Threshold menu allows a Power User to set a dimmer or a range of dimmers to
come on at a specific intensity level.
Set Min Scale Voltage [Power]
The Min Scale Voltage menu allows a Power User to set a dimmer or a range of dimmers
to a minimum output voltage that is the bottom (1% control) of the scaled output of that
dimmer.
Set Max Scale Voltage [Power]
The Max Scale Voltage menu allows a Power User to set a dimmer or a range of dimmers
to a maximum output voltage that is the top (100% control) of the scaled output of that
dimmer.
Voltage Regulation [Power]
When enabled, the dimmer will regulate to the desired output voltage. When disabled, the
dimmer will be set to a constant firing time based on the control level. This setting defaults
“on”. The ability to disable regulation is sometimes useful when dimming non-tungsten
21
Sensor+ CEM+ Configuration Manual
loads. When disabling Voltage Regulation, you should also set the Maximum Scale Voltage
to a level well above the incoming line voltage to ensure that power wave is not clipped in
any way.
Preheat [Power]
This setting enables/disables preheat for the selected dimmer. The preheat level is the
Minimum Scale Voltage.
Dynamic Preheat [Power]
This setting allows quick blackouts on dimmers that are set to preheat. It sets the amount
of time a dimmer will remain at a zero (0) level before returning to the preheat level. It can
be set from 0.5 seconds to 15 seconds and has a default of 2 seconds.
DC Output Prevent [Power]
This setting offers protection on selected dimmers for loads that are sensitive to DC buildup,
which can occur under certain conditions when positive and negative half-cycles become
uneven.
Inrush Protection [Power]
This setting protects against large voltage increases in a single AC cycle. This protection is
useful for high-wattage loads that may cause nuisance tripping of circuit breakers and to
limit peak currents in wiring and switch gear. This protection is particularly useful on RCD/
GFCI protected circuits. Settings for inrush protection include: Instant, 100mS (for loads up
to 10A), 300mS (for loads up to 25A) and 500mS (for loads of 50 or 100A).
Advanced Features (AF) [Power]
Enables/disables additional feedback from a dimmer that provides load recording/reporting
and advanced error reporting including a breaker trip, module removed, load changes, dc
output and SCR failures.
(Report) Load Errors [Power]
Enables/disables messages to report load changes once initial loads have been recorded
for a dimmer. Load errors must be enabled to record loads in Load Management. See
“Load Management” on page 29..
AF Sensitivity (1-10) [Power]
This setting defines the resolution of the advanced features sensitivity to report load
changes. One (1) is the most sensitive/highest resolution setting and the default is 5. AF
sensitivity is based on a percentage of the recorded load.
AF Reaction (Time) [Power]
This setting defines the hysteresis for an advanced feature error. The error must be present
for the minimum set in the AF Reaction Time before an error will be reported. Five (5)
seconds is the shortest amount of time and 60 seconds is the longest allowed.
Scale Load [Power]
This setting adjusts the choke correction curve based on the specified percent load of the
maximum for that dimmer type. Scale Load can be set from 1% to 100% and should reflect
the approximate percent load on a given dimmer to precisely match all dimmed load. The
default setting is 35% which is based on a single Source Four 750w fixture on a D20
dimmer with a max scale voltage of 115Vac.
3
Sensor+ Connect Web Interface Overview
22
Errors
Errors for a rack can be viewed and cleared on this webpage.
1) To clear a specific
error, click in the
2) Click the Clear
Error(s) button.
...or...
Click the Clear All Error(s) button
to clear all errors regardless of
Search
The Search pages (search appears multiple times within the CEM+) allow you to find
dimmers based on multiple search criteria. For example, you can search for all of the
D20AF modules in rack 3 with a specific dimming curve.
The results of that search are presented on a dimmer status page (the next tab).
Selected search criteria
(from the example above)
Using the Configure Dimmers webpage within the Search function provides an easy way to
set one property or properties on the top of the page and have it apply those settings to
every found dimmer in the group.
These are the same dimmer properties as explained above. See “Configure Dimmers” on
page 20.
23
Sensor+ CEM+ Configuration Manual
You can also use the Configure Dimmers tab to modify the properties of all the found
dimmers at once. (See below.)
Use this section to make
changes that will get
applied to all found
dimmers below.
This section gets
the changes
applied to it.
Apply to All
makes the
changes to
the table
Save
Changes
updates the
information
Rooms & Presets
Assign Dimmers
All dimmers in a group default to being in (and thus available only to) Room1. You can
assign a dimmer or range of dimmers to any of the rooms (1-4) only once. Shown below,
dimmers 101-112 are assigned to Room1 and dimmers 201-212 are assigned to Room2.
Use this section
to assign a range
of dimmers to a
room.
Use this section to
assign an individual
dimmer to a room.
Dimmers may only
be assigned to a
single room at a
time.
3
Sensor+ Connect Web Interface Overview
24
Room (1-4)
Clicking on a room in the navigation bar will bring up the display shown below. This is where
you create presets, name presets, record or snapshot presets to give them level
information or clear a preset to remove all level information from it.
Indicates
which room
you are
Creates a new preset
to be named,
recorded later.
Indicates an
inactive
preset.
Indicates which
preset is being
manipulated.
Record will only
use the level
information set at
the CEM+ in the
preset.
Indicates an
active
preset.
Snapshot will use
all level information
available to the
CEM+ in the preset.
Configuration
Panic
This is the page where you configure Panic for switch mode and type as well as record or
clear the Panic preset.
Master Level is the threshold for
dimmer levels when recording
Panic. Levels below the threshold
will not be recorded in Panic.
Force others off enables
load shedding. (If a dimmer
is not part of the recorded
Panic, they are turned off.
Patch
Port Settings (Standard Patch)
The port settings page is where you can enable/disable any of the data input ports as well
25
Sensor+ CEM+ Configuration Manual
as the port relative priority inside the CEM+, and any port’s data loss behavior on any of the
Sensor+ racks. Along with the port settings are the standard patch settings. You can assign
the starting DMX address for each rack’s data port (DMX & EDMX).
Both must be checked for DMX
Output from port B to work.
DMX Port B Output is also enabled here. You need to enable both the Port B Output and
the DMX B port of the last logical rack in the group. DMX Port B Output takes patched
EDMX and outputs 512 channels of DMX.
To find the first EDMX address that will be used for the Port B DMX Output, you need to do
some math (not much though). In a patch that is not 1-to1, the first EDMX address used is
not clearly shown.
F in d E D M X A dd r e s s f o r P o r t B D M X O u t p u t
Find the EDMX
starting address by...
Take the EDMX Start for
the EDMX port (121)...
For a patch that is
not 1-to-1 (like one
shown here) This is
not the EDMX start
Add the number of
dimmers in the last rack
(in this case 96)
This means your Port B
DMX Output EDMX start
Address is 217.
(This also works for 1-to-1
patched groups)
Advanced Patch
Standard Patch and Advanced Patch are handled as two completely separate patches
including port enables and data loss behaviors. This means that if you configure the ports
while in standard patch mode, switching to advanced patch mode will also switch those
ports enables and data loss behaviors to a different configuration.
3
Sensor+ Connect Web Interface Overview
26
While in Advanced Patch mode, port enable and data loss behavior are still set on the Port
Settings page.
Apply to All
makes the
changes to
the table
Use this section
to do range
patching.
Save
Changes
updates the
information
Use this section
to edit dimmer
by dimmer for all
ports.
Port enables and
data loss behaviors
are still made on the
Port Settings page.
27
Sensor+ CEM+ Configuration Manual
Network
The Network screen displays the network table for the CEM+. This information is local to
the CEM+ and changing IP information here does not change the corresponding CEM+’s
actual IP address. It only serves as a place to store and lookup the IP addresses of other
CEM+s in the same group. This table does get shared to the other CEM+s in the group.
Save Changes must be clicked to
send your changes to the CEM+
Restore Defaults resets the network table IP
information to a default state based on the filled in
Rack and Group settings.
Set the web UI inactivity time-out in
minutes.
Set the face panel / LCD inactivity
time-out in minutes.
Set the default login user level.
(when logging in with no password)
The multicast IP address. Do not
change this unless told to do so by
Technical Services.
Make the
CEM+ active in
the network
table.
To change the entire network table at once from the web interface, set the Group and Rack
numbers and click Restore Defaults. This will repopulate the network table with the default
addresses.
Note:
To edit the IP addresses directly from the web interface, you need to contact ETC
Technical Services.
File Transfer
This webpage is used to initiate configuration transfers between the CEM+ module and an
FTP server if one is configured and available. Please see the section ”FTP Server”, page 43
for more information about setting up an FTP server for use with CEM+.
Download configuration
from selected device IP
address
Backup to all other
devices in the
group.
The four files that
make up the group
configuration.
Left-click file name
to view
3
Sensor+ Connect Web Interface Overview
Right-click & “Save Target as...”
to save the file to disk.
28
File Upload
The File Upload web page is where you send
either a configuration file or a software file to the
CEM+ you are logged into. The CEM+ looks at
the file being sent to automatically handle the file
type or part of the configuration file.
Load Management
From this webpage, you can record, check, and clear load information for Advanced
Feature modules (such as the D20AF).
For the functions on this page to work properly, you must turn on Load Errors for each of
the advanced features (AF) dimmer modules you want to use in load management. Please
see ”Configure Dimmers”, page 20 for more information about enabling load errors for a
dimmer.
Performs a Load Check by
running the levels of dimmers
up & down checking for
differences between recorded
and actual loads.
Record Loads runs the
dimmers levels up & down to
record the loads.
You must turn on (check)
Load Errors for Record
Loads to work properly. Just
turning on AF does not turn on
Load Errors by default.
Clear Loads will delete the
previously recorded loads.
Level & Source display the
current dimmer level and the
control source for the dimmer.
Shown above, dimmers 101106 are controlled by the
Lobby preset.
29
Sensor+ CEM+ Configuration Manual
Chapter 4
CEM+ Configuration Procedures
CEM+ Configuration Overview
Configuring a CEM+ from either the face panel via the LCD and buttons or the Sensor+
Connect web interface are basically the same procedures done in the same order. The web
interface is more intuitive and you are able to make more changes simultaneously; making
it a more efficient way to configure the modules.
Please refer to the LCD menu structures and web interface site map for navigation details.
Since there are nearly an infinite number (at least for practical purposes of counting them)
of ways for you to configure your racks and dimmers, the procedures in this section are
intended to be building blocks for you to use to configure your unique system.
The headings for each procedure will contain either a [Power], [User] or a [Guest] to
denote the minimum required access level. [Web] or [FP] will note whether a specific
navigation path is for the web interface or the CEM+ face panel.
Configuration Procedures
Configure Your Computer for an ETCNet2 Network
Prior to changing any Network settings on your personal computer please record the
current settings in the following spaces below.
IP Address
_____._____._____._____
Subnet Mask
_____._____._____._____
Gateway IP
_____._____._____._____
To use your personal computer on an ETCNet2 network that does not use a network router
(i.e. hub and/or switch only), ETC recommends the following default settings:
Note:
IP Address
10.101.1.101
Subnet Mask
255.255.0.0
Gateway IP
10.101.1.101
If you are setting this computer up to be an FTP server, then you should set the IP
address to 10.101.101.117 —the default FTP server IP address of CEM+ modules.
If you have a network that does include a network router, you must set the Gateway IP
address to the appropriate port on the router.
Each additional computer on an ETCNet2 network must have it’s own IP address which
must be different from any other computer on the same ETCNet2 network. Select from the
following default range of IP addresses for an additional personal computer on the network:
•
4
10.101.1.101 thru 10.101.1.249
CEM+ Configuration Procedures
30
Browse into a CEM+ from Internet Explorer 6:
Note:
Step 1:
Open Internet Explorer 6.
Step 2:
Type the IP address of the rack you want to browse to in the address box and
press RETURN. Sensor+ Connect will open in the browser window if the CEM+
at the entered address is online.
10.101.101.101 is the default address for a CEM+ in the first rack of the first group. Your
system may use a different addressing scheme. If that is the case, simply enter the IP
address of one of the racks in the group you want to browse.
The default IP address scheme for CEM+ follows the two-digit Group and Rack numbers of
each module.
•
10.101.1GG.1RR where GG is the two-digit Group number and RR is the two-digit
rack number.
To browse into a CEM+ that is in Group 2, Rack 3 (for instance) the default IP address is
10.101.102.103.
Software Changes [Power]
Software changes must be done via the web interface.
Changing the software in a CEM+ is done by uploading a software file to a CEM+. Once
the upload is complete, the CEM+ will automatically start the software replacement
process.
Once the software replacement begins, the CEM+ will turn off all of its dimmers and stop
responding to all level information data.
These steps begin after you have the CEM+ software file on your computer in a known
location.
Upload software to a CEM+:
31
Step 1:
Launch Internet Explorer 6 (or later) from a PC and browse to the CEM+ by
typing in the IP address of the CEM+
Step 2:
Login to the CEM+ at the Power User level (User name: power
/ Password: powerpass)
Step 3:
Browse to the File Upload page by clicking the Configuration
button on the side navigation bar then the File Upload icon.
Step 4:
From the File Upload page, click Browse and locate the CEM+ software file.
Step 5:
Click Install.
Sensor+ CEM+ Configuration Manual
•
Step 6:
After clicking Install, the software will be
uploaded to the CEM+. While the software
is being sent to the CEM+, the browser will
no longer respond. After several minutes,
there will be a pair of errors indicating that
the CEM+ is done transferring the file and is
now installing the software (and no longer
communicating with Internet Explorer which
is what causes the errors).
After seeing the errors, it is safe to clear the
errors (click OK) and close Internet Explorer.
•
The following screens will be seen on the face panel display during software
installation:
Loading New SW
Please Wait...
Installing Software
<various messages>
CEM+
1.0.2
Loading SW For
Dimming Processor
Loading SW For
AF Card
ETC CEM+ R 1/ 4 G 1
[Rack OK]
Step 7:
While the software is being
downloaded.
While the individual components
are being decompressed and
installed.
While the CEM+ reboots with the
new software.
While theCEM+ transfers some
software to the dimming engine.
While the CEM+ transfers some
software to the Advanced
Features (AF) cards (if installed).
Installation is complete. The
CEM+ returns to its normal
resting display.
Repeat for any remaining CEM+s in the system.
Delete All Racks [Power]
Step 1:
Login as a Power User
Step 2:
Delete the config from the local rack (the one you are logged into).
•
[Web] Racks & Dimmers>Add Racks>Delete All Racks
•
[FP] Rack>Delete All Racks
Step 3:
Send the local rack’s configuration to the other racks. This will send the
“noconfig” configuration to the other CEM+s in the group and effectively delete
their configuration as well.
•
Configuration>File Transfer>Backup
•
[FP] Rack>Send Config to All
This operation clears the rack configuration from the local rack (the one you are logged
into), but does not clear everything from the CEM+. The network settings, and custom PIN
for the face panel remain intact.
4
CEM+ Configuration Procedures
32
Bui ld New Configuration (from NoConfig State)
This overall procedure is made up of the next several smaller procedures.
When a CEM+ is in the state of “NoConfig”, the face panel menu is different than during
normal operation. It changes to options that are centered around getting the CEM+
configured. That menu can be found on the first page of “Appendix E: CEM+ LCD Menu”
on page 60. From the NoConfig menu at the face panel you can Generate Defaults for that
rack with a any user level including Guest.
C o n f i g u r e / C o n fi r m N e t wo r k S e t t i n g s o f C E M +
The IP address settings of each CEM+ module must point to each other in order for the
configuration information to transfer between racks/CEM+s.
The first part of this process is to confirm/set the individual network settings of each CEM+.
The easiest way to do this is at the CEM+ face panel.
•
[Web] Configuration>Network
•
[FP] Setup Network
From the Set Group / Rack menu, specify:
•
Group - Specifies a selection of racks that share a common config and relay preset,
panic and level information between themselves. Groups can be numbered from 1 - 64.
•
Rack - Specifies the number of a rack within the Group. Racks can be numbered from
1-16. All Groups must start with Rack 1.
•
Network Enable - Makes the specified unit active in the network table.
•
IP address - Specifies the IP address for the CEM+ you are using (the local CEM+).
•
Subnet Mask - Specifies the subnet mask for the CEM+ you are using (the local
CEM+).
•
Gateway IP - Specifies the gateway IP address for the CEM+ you are using (the local
CEM+).
This must be done for each CEM+ module. It works best if the IP addresses adhere to the
default IP address scheme:
•
10.101.1GG.1RR where GG is the two-digit Group number and RR is the two-digit
rack number.
Once the racks have all been assigned their group and rack numbers, login to Rack #1 and
confirm that the IP addresses that Rack #1 has for each of the other racks matches what
was set for each of the previous racks.
To change the entire network table at once from the web interface, set the Group and Rack
numbers and click Restore Defaults. This will repopulate the network table with the default
addresses.
Note:
To edit the IP addresses directly from the web interface, you need to contact ETC
Technical Services.
Add Racks [Power]
Racks can be added individually or multiples of the same rack type and dimmer type.
Adding racks is very easy and you are asked for everything needed to create a rack.
However, there are a couple of points you need to be aware of:
33
Sensor+ CEM+ Configuration Manual
•
Every Group of racks must have a Rack 1.
•
Racks must be added sequentially, starting with rack 1 to a maximum of 16 racks.
•
For European rack and module options, set the voltage to 240V.
•
•
[FP] This is straightforward in the face panel LCD menu (it’s the first setting).
•
[Web] However, the web interface requires that you click the 240V check box then
Save Changes before the options will change. The first click of Save Changes
after altering the 240V setting will not add another rack (it changes the options), the
next click of Save Changes will add the specified rack(s).
Rack Types: SRxx is an permanent installation rack and SPxx is any type of portable
rack (including touring racks). ESRxx and ESPxx are for European installation rack
and portable racks respectively. In all cases, the “xx” number is determined by the
number of slots in the rack for modules (not the number of dimmers).
Set Patch Mode
Standard Patch and Advanced Patch are handled as two completely separate patches
including port enables and data loss behaviors. This means that if you configure the ports
while in standard patch mode, switching to advanced patch mode will also switch those
ports enables and data loss behaviors to a different configuration.
Port Settings (Standard Patch)
Standard patch gives every port on every rack a starting address and sequentially
addresses the rest of the dimmers in the rack from that point. To edit the dimmer’s
addressing individually, you need to switch the patch mode of the rack to Advanced.
By default every rack added will be set to an incremental DMX address starting at one (1)
and continuing with the next available DMX channel available with only port A enabled on
each rack (Port B and EDMX are disabled by default).
You can edit the DMX start channel for each rack from the Patch/Port Settings page. You
can enable/disable the data ports here as well.
Note:
To output DMX from port B of the last rack BOTH the checkbox for “Enable Port
B Output” and the checkbox to enable port B on the last rack must be checked for
this to work.
Port B DMX Output is only available from the last logical rack in a group,
regardless of its physical position within the group.
This is also where you set the data priority and data loss behavior for each port of each rack.
Priority is the preference given to each control source internally to the CEM+ (it is not
broadcast to other ETCNet2 devices, nor does it use the source device’s priority once
inside the CEM+) Priorities can be set for each port of each rack as well as recorded
Presets. Data Loss Behavior tells the port what you want to happen when data is no
longer being received on that port.
CAUTION:
An EDMX port will not currently go into a specified data loss behavior. If all EDMX
is lost, the dimmers will maintain the last known level until they have new level
information to use.
Advanced Patch
Advanced Patch mode gives you direct dimmer to address patching for each port of each
rack with advanced patch enabled. Port enable, priority and data loss behavior are still set
from the Port Settings webpage. Dimmer Doubled addresses are always shown in
4
CEM+ Configuration Procedures
34
advanced patch mode, however dimmers are not actually in dimmer doubling mode unless
they are set with a Dimmer Double firing mode.
It’s worth restating, that Standard Patch and Advanced Patch are handled as two
completely separate patches including port enables, priorities and data loss behaviors. This
means that if you configure the ports while in standard patch mode, switching to advanced
patch mode will also switch those ports enables and data loss behaviors to a different
configuration.
Set Dimmer Properties
When a rack initially gets defined, it contains the default dimmer type with default properties
throughout the rack. If you have a mix of dimmer types in a rack, you need to configure
those after the racks have been added to the group.
You can either edit the dimmer properties (dimmer type, fire mode, voltage regulation...)
individually, or by searching for dimmers by several criteria and edit those found dimmers
at the same time.
For specific dimmer configurations:
Switched
Change the firing mode to Switched and click Save Changes. After saving changes, the
remaining dimmer properties will change automatically or can now be set to your desired
values. Currently when Switched firing mode is selected, all other properties for that dimmer
are ignored.
Property
120V
230V
Firing Mode
Switched
Switched
Curve
Linear
Linear
Threshold
1%
1%
Min. Scale Voltage
140V
265V
Max. Scale Voltage
140V
265V
Voltage Regulation
Unchecked
Unchecked
Preheat
Unchecked
Unchecked
Dynamic Preheat
0 sec.
0 sec.
DC Output Prevent
Unchecked
Unchecked
InRush Protect
Unchecked
Unchecked
Non-Dim
Change the firing mode to Normal and click Save Changes. After saving changes, make
the remaining changes to the dimmer properties as listed below. Currently, setting the firing
35
Sensor+ CEM+ Configuration Manual
mode to Switched and turning on Voltage Regulation does not work.
Property
120V
230V
Firing Mode
Normal
Normal
Curve
Linear
Linear
Threshold
1%
or desired setting
1%
or desired setting
Min. Scale Voltage
115V
or desired setting
265V
Max. Scale Voltage
115V
or desired setting
265V
Voltage Regulation
Checked
Checked
Preheat
Unchecked
Unchecked
Dynamic Preheat
0 sec.
0 sec.
DC Output Prevent
Unchecked
Unchecked
InRush Protect
Unchecked
Unchecked
Fluorescent
Change the firing mode to Fluorescent and click Save Changes. After saving changes,
the remaining dimmer properties will change automatically or can now be set to your
desired values.
Property
120V
230V
Firing Mode
Fluorescent
Fluorescent
Curve
Linear
Linear
Threshold
1%
or desired setting
1%
or desired setting
Min. Scale Voltage
56V
or desired setting
56V
or desired setting
Max. Scale Voltage
120V
or desired setting
240V
or desired setting
Voltage Regulation
Checked
Checked
Preheat
Unchecked
Unchecked
Dynamic Preheat
0 sec.
0 sec.
DC Output Prevent
Checked
Checked
InRush Protect
Unchecked
Unchecked
Dimmer Doubling™
Change the firing mode to DimDbl and click Save Changes. After saving changes, the
remaining dimmer properties will change automatically or can now be set to your desired
4
CEM+ Configuration Procedures
36
values. Dimmer Doubling is only available for 120V systems.
Property
120V
230V
Firing Mode
DimDbl
---
Curve
Mod-Square
---
Threshold
1%
---
Min. Scale Voltage
6V
---
Max. Scale Voltage
115V
---
Voltage Regulation
Checked
---
Preheat
Unchecked
---
Dynamic Preheat
0 sec.
---
DC Output Prevent
Checked
---
InRush Protect
Unchecked
---
Currently, Dimmer Doubling works in Advanced Patch mode only. To configure a dimmer
for Dimmer Doubling:
37
Step 1:
Set the rack that contains the dimmer to Advanced Patch mode.
Step 2:
Set the dimmer’s firing mode to DimDbl.
Step 3:
Re-configure your port settings and data loss behavior for that rack if they were
modified from the defaults.
Step 4:
Use advanced patch to patch your dimmers.
•
You may need to re-patch all of the dimmers if you are not using the default
patch.
•
You will need to patch the Dimmer Doubled side of the dimmer for each port
you are using (DMXA DD, DMXB DD, EDMX DD).
Sensor+ CEM+ Configuration Manual
Rooms & Presets
Assign Dimmers to Rooms
All dimmers in a group default to being in (and thus available only to) Room1. You can
assign a dimmer or range of dimmers to any of the rooms (1-4), but to only one room at a
time. Shown below, dimmers 101-112 are assigned to Room1 and dimmers 221-212 are
assigned to Room2.
Use this section
to assign a range
of dimmers to a
room.
Use this section to assign an individual dimmer to a room.
Dimmers may only be assigned to a single room at a time.
Create a Preset (Web Only)
In the web interface, you must create a preset before you can record levels into it. The face
panel LCD combines creating a preset with recording it.
Click on Create New and the web interface will add a new preset to the list below. It will add
an incremental preset (Preset1, Preset2, Preset3 and so on) or if an older preset was
recorded, it will recycle the old preset first before making a new one. Once it appears in the
list, you can record and modify it as needed.
4
CEM+ Configuration Procedures
38
Record vs. Snapshot a Preset
Record and Snapshot are two different operations.
Record will only use level information from Set Levels from the CEM+ modules in the group
when storing a preset.
Snapshot will use level information from all available sources to the CEM+ modules
(DMXA, DMXB, EDMX, and Set Levels) when storing a preset.
Activate/Deactivate a Preset
You can toggle any preset on or off from either the web interface or the face panel LCD.
Stations are currently not supported and therefore can not be used to turn presets on or off.
Max Active Presets
Maximum Active Presets defines how many presets can be active in any one given room
at a time. It can be set from a minimum of one (1) and to a maximum of four (4) at a time.
Activating one preset more than allowable by Max Active Presets will deactivate the active
preset with the lowest priority or if all active presets are at the same priority, the oldest
previously activated priority.
Max Active Presets defaults to one (1) which results in a “last action” activation/
deactivation manner. (Turning on one preset turns off the previous preset.)
Pani c
Panic is configurable for different external switch action types (maintained vs. momentary)
and switch resting states (normally-open vs. normally-closed). Panic always operates at the
highest priority in the CEM+ and no other control source can pile-on with it or override it.
Record Panic
Create the desired panic look by setting dimmer levels from the CEM+ or from a external
control source. Keep in mind that the Master Level acts as an intensity threshold for
dimmers and determines whether or not they are included in the panic. Only dimmers with
an intensity level equal to or greater than the Master Level will be included in Panic. When
Panic is active, the dimmers will also playback at the set Master Level.
Set the Panic Master Level to your desired level (80% to 100%).
Enable Force Others Off if you want load shedding to occur when Panic becomes active.
What this means is when Panic becomes active, any dimmers that are not included in Panic
will be turned off.
Lastly, record Panic.
Activate Panic
Panic can be activated via an external switch closure or locally via the face panel LCD
menu. It cannot be activated/deactivated via the web interface. Deactivation is also done
by a switch closure (or lack of one, depending on the switch action type) or locally via the
face panel LCD menu.
39
Sensor+ CEM+ Configuration Manual
Load Management
Load management can be used after your system is setup and your loads (lights) are
connected to dimmers. For load management to work properly, Load Errors must be
enabled for each dimmer you want to monitor. Load Errors is not enabled on any dimmers
by default.
Record Loads
When you record loads, the CEM+ steps through a series of dimmer intensities and
monitors the wattage as it proceeds. Only dimmers that have an initial intensity level
greater than zero (0) are included in the process.
Once loads have been recorded, load changes and missing loads are reported at the face
panel LCD menu and in the web interface.
Clear Loads (Web Only)
Clearing loads will clear all previously recorded loads. Clearing loads is only available via
the web interface.
Clear Errors
Errors will appear on both the face panel LCD and in the web interface.
When viewing errors on the face panel LCD at an access level of User or higher, pressing
will clear that error. Continuing to press
will cycle through the remaining errors and
clear any that are capable of being cleared. Errors that are still current will quickly reappear
in the list (such as No Data Port B or Module Removed).
From the web interface, you can view the errors present from a couple of locations,
however you can only clear errors from the individual rack’s errors tab webpage. From this
page you will have the option to checkmark and clear individual errors or to clear all errors.
4
CEM+ Configuration Procedures
40
File Transfers
The configuration files that are shared from CEM+ to CEM+ in a group are XML files that
are sent and received via FTP (File Transfer Protocol). They are then parsed at each CEM+
for use locally within that CEM+ depending on the rack number (the CEM+ knows what rack
number it is and looks to that part of the configuration to get it’s settings).
There are four (4) separate files that make up the user-defined configuration.
•
Sensor.rak - Contains all of the rack configurations and dimmer information including
the patch.
•
Preset.pre - Contains the preset information for the group.
•
Arch.rm - Contains the room/dimmer assignments for the group.
•
Panic.pan - Contains the settings for Panic within the group.
Understanding these few pieces of information first makes the rest of this section easier to
use and understand.
Download configuration
from selected device IP
address
Backup to all other
devices in the
group.
The four files that
make up the group
configuration.
Left-click file name
to view
Right-click & “Save Target as...”
to save the file to disk.
D o w n l oa d ( c o n f i g f r o m s e l e c t e d I P )
This function will make the local CEM+ (the one you are logged into) get the group
configuration (all of the racks configurations in one) from the specified device and IP
address in the pull-down menu. The configuration will go from the specified device to only
the one device asking for the configuration.
This is useful to get an existing configuration into a new or replacement CEM+.
Backup (to all)
This function will send the local CEM+’s group configuration to all other devices (CEM+s
and FTP if one is configured) in the group as set in the network table.
This is useful to send a newly uploaded/modified configuration to the other CEM+s in the
group.
View a Configuration
To view a configuration file’s raw XML content on screen, just left-click on the configuration
file name you want to see. Once you are viewing the configuration, click back in your
browser to get back to the File Transfer page. (You can not make any edits to the
configuration file while viewing it like this.)
41
Sensor+ CEM+ Configuration Manual
Below is what the sensor.rak file looks like viewed in this manner.
D o w n l oa d a C o n f i g u r a t i o n
To download a configuration file to disk, just right-click on the file name and select “Save
Target As...”. This will bring up a standard dialog box asking you to name the file and to pick
a location to save it. It will append the file name with “.xml” instead of the file extension listed
on the web page. This will not prevent you from uploading the configuration file to a CEM+
later.
Upload a Configuration
Browse to the File Upload web page and click
Browse to select a file to upload to the local
CEM+. Once the file is selected, click Install and
the file will begin to transfer to the CEM+. This is
the same place and manner to send either a
configuration file or a software file. The CEM+
looks at the file being sent to automatically handle the file type or part of the configuration
file. In the same way, it doesn’t matter if the file ends with .rak or .xml when it is sent.
4
CEM+ Configuration Procedures
42
FTP Server
An FTP server can be configured to be on the ETCNet2 network and act as a file storage
location for the configuration files of the group.
An FTP server is not provided as standard with a CEM+.
CEM+ modules can access any stock FTP server that is configured with the following
minimum settings:
•
IP address of the FTP server needs to match the one specified in the network table in
the configuration.
•
The CEM+ uses an authenticated login so the FTP server must have a user created
and configured for the CEM+. (The user name and password are usually casesensitive.)
•
•
User name: etc
•
Password: sensor
The FTP server must have a specified default file storage location. The CEM+ does not
specify any path to write the file to on the server. They will only go in the default root
directory.
WARNING:
By default, you cannot currently use an FTP server with more than one (1)
group of CEM+s at the same time. All CEM+s will send their configurations
to the FTP server with the same file names and the same directory (root) and
will overwrite other configuration files present.
Contact ETC Technical Services if this is a requirement of your system.
43
Sensor+ CEM+ Configuration Manual
Chapter 5
Service
Contacting ETC about Equipment Problems
If you are having difficulties, your most convenient resources are provided in this user
manual. To search more widely, try the ETC website at www.etcconnect.com. If none of
these resources is sufficient, contact ETC Technical Services directly at one of the offices
identified below.
If possible, please have this information available before contacting ETC about an
equipment problem:
•
Your location and job name
•
Any error messages on the CEM+ status LCD display
•
Related system problems or equipment failures
Americas
United Kingdom
Electronic Theatre Controls Inc.
Technical Services Department
3031 Pleasant View Road
Middleton, WI 53562
800-775-4382 (USA, toll-free)
+1-608 831-4116
[email protected]
Asia
Ger many
Electronic Theatre Controls Asia, Ltd.
Technical Services Department
Room 605-606
Tower III, Enterprise Square
9 Sheung Yuet Road
Kowloon Bay, Kowloon, Hong Kong
+852 2799 1220
[email protected]
5
Electronic Theatre Controls Ltd.
Technical Services Department
5 Victoria Industrial Estate
Victoria Road,
London W3 6UU England
+44 (0)20 8896 1000
[email protected]
Electronic Theatre Controls GmbH
Technical Services Department
Ohmstrasse 3
83607 Holzkirchen, Germany
+49 (80 24) 47 00-0
[email protected]
Note:
For the best service results, always tell your service representative you are using
the CEM+ version of Sensor dimming system.
WARNING:
RISK OF ELECTRIC SHOCK! Servicing Sensor CEM+ dimming equipment
exposes high amperage power connections inside the rack. If possible,
always turn off power at the main circuit breaker before servicing your
system.
Service
44
Changing Installation Rack Modules
All Sensor+ rack dimmer modules can be easily replaced without tools. Modules slide in
and out of their slots and are ready to start dimming immediately.
Although Sensor modules, including the CEM+, can be replaced with power on, always turn
rack power off at the main circuit breaker, if possible, before changing modules.
R e l e a s in g a n d S e c u r i n g M o d u l e S a f e t y S t o p s ( E S R R a c k s O n l y )
To prevent unauthorized access to rack modules
and interior wiring, Sensor+ CE Installation Racks
(ESR) are provided with module safety stops that
hold modules in place until released by a service
technician.
Step 1:
Turn off rack power at the main breaker.
Step 2:
Open the rack door. The safety stops are
along the left side of the dimmer modules.
See the illustration.
Step 3:
CAUTION:
•
To release the safety stop, loosen the
three safety stop securing screws and
slide the stop to the left to release the
modules. It is not necessary to
remove the stop.
•
To secure the safety stop, slide it back
to the right and tighten the three safety
stop screws.
Module safety stop
Follow the appropriate instructions below
to remove or replace the desired dimmer
or control modules.
Operating a dimmer rack with open module
slots disrupts airflow inside the rack, which
can lead to rack overheating and
subsequent rack shutdown.
Remove and Replace a Dimmer or Airflow
Module:
Turn off rack power at the main breaker, if
possible.
Step 2:
Open the rack door.
Step 3:
Switch the dimmer module’s circuit breaker(s) to the “off” position (breaker to the
right).
•
45
Safety stop
securing screws
Step 1:
Please see Releasing and Securing Module Safety Stops (ESR Racks Only)
above if appropriate.
Step 4:
Grasp the dimmer module by the center of the main air vent.
Step 5:
Pull the dimmer straight out.
Step 6:
Ensure the circuit breaker(s) on the replacement module are in the “off” position.
Step 7:
Insert the replacement dimmer or airflow module into the correct slot and firmly
press the module into the slot until you feel the connections seat (the module
face will be flush with the other modules).
Step 8:
Switch the module’s circuit breaker(s) to the “on” position (to the left).
Step 9:
Close and lock the Sensor rack door before applying power.
Sensor+ CEM+ Configuration Manual
Remove a CEM+ Module:
Step 1:
Turn off rack power at the main breaker.
Step 2:
Open the rack door.
•
Please see Releasing and Securing Module Safety Stops (ESR Racks Only)
above if appropriate.
Step 3:
Press the “eject” symbol on the right end of the spring-loaded handle and grab
the other end of the handle, pulling it until it is perpendicular to the face of the
CEM+. The CEM+ will be gently pushed out of the rack as you move the handle.
Step 4:
Pull the CEM+ straight out.
Press here to insert.
ETC CEM+ R 1/ 6 G 9 E
[Rack OK]
Pull handle while pressing
.
Press here to get handle.
Replace a CEM+ Module:
Step 1:
WARNING:
5
Service
Firmly press the new CEM+ module into the correct slot by pressing on the
outside edges until you feel the connections seat (the module face will be flush
with the other modules).
Do not press on the center of the CEM+ to insert it into a rack. Doing so may
result in damage to the CEM+.
Step 2:
Close and lock the Sensor rack door before applying power.
Step 3:
ONLY if directed to do so by an ETC-authorized service representative, transfer
the configuration files/information to your new CEM+.
46
CEM+ Fuses
The CEM+ has two fuses:
•
The F1 fuse is a 250V, 0.75 amp, fuse. CEM+ operating power and power for the
dimmer module electronics, is drawn through this fuse. If F1 fails, the CEM+ will not
operate and dimming will not work. The Sensor+ rack beacon will be dark. The fuse in
the F2 position is a spare 0.75 amp fuse.
•
Phase F3 fuse is a 250V, 5 amp fuse. Power for the rack’s fan is drawn through this
fuse. If F3 fails, the fan will stop running and the CEM+ will display an air flow error. The
Sensor+ rack beacon will flash to signal a problem. The rack may shut down due to
overheating. The fuse in the F4 position is a spare 5 amp fuse.
Replacing a Fuse:
Step 1:
Remove the CEM+ module (See Changing Installation Rack Modules, page 45).
Step 2:
Locate and replace the defective fuse. Fuses are held in vertical fuse holders.
a: Use a slotted screwdriver to gently turn the cap of the fuse holder to the left
until it comes free.
b: Lift the cap and the fuse straight out of the fuse holder.
c:
Remove the defective fuse and replace it with a fuse of the same type. A
spare fuse of each type is provided on the CEM+.
d: Replace the fuse and cap in the fuse holder and use a slotted screwdriver to
gently turn the cap to the right to fully capture the fuse.
Fuse - 5A - Spare
Fuse - 5A - Fan Power
Fuse - .75A - CEM+ and
Module Electronics
Fuse - .75A - Spare
Step 3:
47
Replace the CEM+ module and close the door.
Sensor+ CEM+ Configuration Manual
Troubleshooting
Your Sensor+ system helps you identify system problems with status reporting and
diagnostic testing capabilities.
You will usually notice a system problem in one of two ways:
•
The Sensor+ beacon on the dimmer rack begins blinking, indicating the CEM+ has
detected a problem. The system may still continue to dim normally.
•
You notice a problem with system performance. The beacon may be flashing, or the
problem may be caused by another part of your lighting control system.
When either of these situations occur, you can follow these steps to isolate and correct the
cause.
Make a Preliminary Examination of Your System...
Check the CEM+ display, Sensor+ Connect or WYSILink for error messages. For an
explanation of error message causes and possible corrections, see CEM+ Error
Messages, page 50.
If lights are stuck on...
Check for an activated Preset at your CEM+. (This can lock some or all of your dimmer
circuits at one level.)
Make sure your Panic circuit is not activated. (This will drive some of your dimmer
circuits to full and hold them there.)
Make sure all direct dimmer levels at the CEM+ are cleared. (This can lock some or all
of your dimmer circuits at one level.)
If lights won’t come on...
Look for obstructions on top or in front of your installation rack that may be blocking
rack ventilation.
Open the door and look for dust buildup on the air filter or rack modules.
Check for tripped dimmer module circuit breakers.
Check for tripped breakers on your main circuit breaker panel.
Check for loose or damaged control cables coming into your dimmer rack.
Check to see in Panic is activated (circuits set to load-shed will not come on).
EDMX sources with a higher priority and a level of zero will override other lower priority
levels.
When you think you’ve found the problem...
Correct any of these problems you find, press the reset button
on the front of the
CEM+ module and observe the system to see if the problem still exists.
I f Y o u C a n n o t L o c a te o r C o r r e c t t h e P r o b l e m . . .
If you are unable to eliminate the problem, contact your authorized ETC representative.
See Contacting ETC about Equipment Problems, page 44, for procedures on contacting
ETC for technical help.
5
Service
48
49
Sensor+ CEM+ Configuration Manual
Appendix A
CEM+ Error Messages
If the CEM+ detects an error, it will flash the beacon and display the appropriate error
message on the LCD display. A CEM+ will only display error messages for the same rack
it is in - you can’t browse to other racks to view their errors from a single CEM+.
Errors are also displayed in the WYSILink Message Log on Emphasis Control Systems and
WYSILink PCs on the network. You can also view rack error messages in the Sensor+
Connect interface on Emphasis Control Systems or by browsing into a CEM+ using Internet
Explorer 6 on a PC on the network.
View error messages on the CEM+ LCD display:
Step 1:
Open the door of the rack with the blinking beacon. The CEM+ will display the
message [Rack Errors].
Step 2:
Press
to enter the error list. The number of errors and which error is currently
displayed of that number are displayed at the top of the display.
Step 3:
Press
CEM+ Error Message
and
to increment and decrement through the list, if necessary.
Probable Cause
Possible Corrective Action
AMBIENT OVERTEMP
Ambient temperature is higher than 115°F (46°C).
Lower dimmer room temperature.
AMBIENT TEMP HIGH
Ambient temperature is higher than 104°F (40°C).
Lower dimmer room temperature.
AMBIENT TEMP LOW
Ambient temperature is lower than 32°F (0°C).
Raise dimmer room temperature.
DIMMER ERROR
A dimmer in this rack has an error.
Use About Dimmer to check the specific
error.
DATA ERROR PORT (A or B) DMX512 data error
Check DMX512 port input cable and
termination.
FREQUENCY ERROR
Feed power is not 50 or 60Hz. (±2.5Hz)
Check input frequency.
NO AIRFLOW
Insufficient airflow detected.
Check fan and air filter for obstruction.
NO DATA PORT (A or B)
No DMX512 data has been received by Port (A or B).
Check DMX512 source devices and input
cables.
MODULE __ OVERTEMP
Dimmer module has overheated and shut down.
Check airflow
PHASE (A, B or C) OFF
No voltage on phase (A, B or C).
Check line feed.
PHASE DETECT FAIL
CEM+ could not read the line feed phasing.
Re-seat the CEM+ and try again. If
problem persists, replace the CEM+.
TEMP SENSOR STUCK
Ambient temperature sensor is stuck.
Replace CEM+.
ZERO CROSS ERROR
CEM+ hardware failure.
Replace CEM+.
SOFTWARE ERROR
CEM+ units running different versions of software are
on the same network.
Install the same version of software on all
CEM+ units.
PHASE (A, B or C) VOLTS
HIGH
Voltage on phase (A, B or C) is higher than 140Vac.
Check line feed.
A
CEM+ Error Messages
50
CEM+ Error Message
Probable Cause
Possible Corrective Action
PHASE (A, B or C) VOLTS
LOW
Voltage on phase (A, B or C) is lower than 80Vac.
Check line feed.
LOW AIRFLOW
Airflow is low.
Check fans and air filter for obstruction.
CLEAN YOUR FILTER
This is a reminder to clean your air filter. It appears
when the “Clean Time” clock has counted down to
zero.
Reset the “Clean Time” counter to the
number of hours you want between filter
cleaning.
PHASE (A, B or C)
HEADROOM
Reduce the load on the indicated phase
Incoming line voltage on phase (A, B or C) has dipped
through repatching or lowering output
below the configuration-defined Headroom level.
levels of associated dimmers.
CONFIG MISMATCH __
Configuration error.
Transfer configuration data from another
rack.
BREAKER __ TRIP
The circuit breaker on dimmer ___ has tripped.
Check circuit for cause of circuit breaker
trip, such as too many lamps on the
dimmer, or bad cabling.
SCR __ STUCK ON
The SCR in dimmer ___ has failed on.
Replace dimmer module.
SCR __ STUCK OFF
The SCR in dimmer ___ has failed off.
Replace dimmer module.
RCD __ TRIP
The RCD in ___ has failed tripped.
Replace RCD module.
MODULE __ REMOVED
Module has been removed from the rack.
Reinsert or replace module.
LOAD __ CHANGE HIGH
Load is currently higher than the recorded load for this Rerecord the load, or check for additional
dimmer.
or higher wattage lamp(s) on the circuit.
LOAD __ CHANGE LOW
Load is currently lower than the recorded load for this
dimmer.
Rerecord the load, or check for missing or
burned-out lamp(s) on the circuit.
LOAD __ NO LOAD
A load is recorded, but there is currently no load
present on this dimmer.
Rerecord the load, or check for missing or
burned-out lamp(s) on the circuit.
51
Sensor+ CEM+ Configuration Manual
Appendix B
Dimmer Curves
Dimmer curves determine how dimmers set voltage output in response to control signal
input. To accommodate designer preferences and load response variations, Sensor offers
five dimmer curve choices, which can be applied to individual dimmers.
Linear curve
The linear curve matches the control input percentage to Root Mean Squared (RMS)
voltage output. Each percent increase in control level increases dimmer voltage output by
the same amount
.
Output % of Scaled Voltage
Linear Curve
100
83
66
50
33
16
0
1
10
20
30
40
50
60
70
80
90
100
Console percentage setting
B
Dimmer Curves
52
Modified linear curve
A modified linear curve reduces the voltage change at low control levels for better
performance in low-wattage fixtures.
Output % of Scaled Voltage
Linear Curve
100
83
66
50
33
16
0
1
10
20
30
40
50
60
70
Console percentage setting
Modified linear curve
80
90
100
(for reference)
Linear curve
Square law curve
At low control levels, much of traditional incandescent fixture’s light output is in the invisible
infrared spectrum. This results in poor visible response to low control levels. A square law
curve is derived from the square root of the control level (with full output equal to 1.00) to
increase voltage response at low control levels to compensate for the infrared loss.
Output % of Scaled Voltage
S qu are L aw Curve
100
83
66
50
33
16
0
1
10
20
30
40
50
60
70
80
90
100
Console percentage setting
Square law curve
53
Linear curve
(for reference)
Sensor+ CEM+ Configuration Manual
Modified Square law curve
A standard square law curve may overcompensate for infrared loss, resulting in “steppy”
response to incremental control changes at low levels. ETC’s modified square law curve
modifies the standard square law curve for more uniform response to control levels
changes across the entire range of dimmer output,
Output % of Scaled Voltage
Modified Square Law Curve
100
83
66
50
33
16
0
1
10
20
30
40
50
60
70
Console percentage setting
Modified square law curve
80
90
100
(for reference)
L inear curve
Sensor 2.0 curve
The Sensor 2.0 curve is the previous version of ETC’s modified square law curve. It
provides backwards compatibility for shows created using earlier versions of ETC
equipment and familiar response for designers who prefer the earlier version.
Output % of Scaled Voltage
Sensor 2. 0 Curve
100
83
66
50
33
16
0
1
10
20
30
40
50
60
70
80
90
100
Console percentage setting
Sensor 2.0 curve
B
Dimmer Curves
L inear curve
(for reference)
54
55
Sensor+ CEM+ Configuration Manual
Appendix C
Sensor+ SineWave Dimming
This appendix provides information for configuring a Sensor+ system that includes one or
more UL and cUL approved Sensor+ SineWave dimmer installation racks.
SineWave Benefits
Sine wave dimming provides “silent dimming” by controlling the power in a way that
maintains a clean sinusoidal wave form to your fixtures and does not create any “lamp
noise” or “buzz”. Due to the added level of control, ETC SineWave dimming also provides
superior voltage regulation.
Other sine wave benefits include:
•
Saves energy compared with phase-controlled dimmers
•
Reduces volt-drop which means less heat dissipation
•
Improves lamp life – lower maintenance costs
•
Harmonic distortion is virtually eliminated
•
Reduces cost of electricity by removing reactive component (Unity Power Factor)
•
Saves on infrastructure costs – reduced size of wiring and containment plus lowerrated switch gear and transformers
•
Accommodates generator supplies and poor mains
•
Controls virtually all types of light source, even HMI
Configuration
SineWave (SW) racks are configured in the same way as SR racks. However, SW racks
only use D20SW dimmers. All other rack and dimmer properties are set in the same way
and coexist in your same rack configuration file.
C
•
When adding a rack, select SW24 from the rack type list.
•
When selecting module type, choose D20SW.
Sensor+ SineWave Dimming
56
D20SW Dimmer Module Default Properties
Property
120V
Firing Mode
Normal
Curve
Mod-Square Law
Threshold
1%
Min. Scale Voltage
6V
Max. Scale Voltage
115V
Voltage Regulation
Checked
Preheat
Unchecked
Dynamic Preheat
2 sec.
DC Output Prevent *
Unchecked
InRush Protect **
Unchecked
Advanced Features (AF)
Checked
Load Errors
Checked
AF Sensitivity
5
AF Reaction
10 sec.
Scale Load
35%
* ETC sine wave dimming produces no DC component so this function
is unnecessary. Checking this may reduce the dimmer’s response time
by up to 8.3 msec.
** This feature is automatically in effect regardless of the setting
because of the nature of ETC’s sine wave dimming.
SineWave Differences You Need to Know
The SineWave rack (SW24+) and module (D20SW) are very similar in most operational
respects to SR racks and D20AF dimmers. However, there are a few notable differences
listed here:
57
•
D20SW dimmers have built-in electronic overcurrent protection and it is unlikely that
you will ever see a breaker trip on a dimmer module. When an overcurrent event occurs
the dimmer will shut itself off and the red overcurrent LED will come on.
To reset the dimmer, bring the level of the dimmer to zero (0) for a minimum of 1 second
and the dimmer will reset itself and begin to operate again.
•
The power LED on D20SW’s is blue instead of red as on other D20-family modules.
•
The green signal LED on the D20SW module will not come on if the dimmer’s breaker
is turned off. On other D20-family modules, the green signal LED will continue to show
the presence of level for the dimmer even if the dimmer breaker is turned off.
•
If you pull the CEM+ out of a SineWave rack, the D20SW dimmers will remain on at the
last level they had for 3 seconds and then fade out. This is a function of the dimmers
losing communication with the CEM+.
Sensor+ CEM+ Configuration Manual
Appendix D
UL924 Setup
I n t r o d u c ti o n
This appendix provides information for configuring a Sensor+ system to operate within the
UL924 specification.
WARNING:
RISK OF ELECTRIC SHOCK! Failure to disconnect all power to the rack
before working in the rack could result in serious injury or death.
Terminations
A dry contact closure (maintained recommended) must be wired to each rack containing
dimmers in the emergency look.
Data - (Black)
Data + (Red)
If daisy-chaining to
another rack or
DMX device...
To trigger Panic,
use a
COM
From source
DMX A
n/c
n/c
Data - (Black)
COM
n/c
n/c
n/c
n/c
n/c
n/c
n/c
n/c
J11
1 2 3 4 5 6 7 8
Turn on DMX termination
in the last rack that is
physically connected in
the DMX chain.
If daisy-chaining to
another rack or
DMX device...
1 2 3 4 5 6 7 8
Data + (Red)
From source
DMX B
J10
To trigger Panic,
use a
Maintained
Closure
J3
For remote
indication of
Panic activation,
wire to
external load
(such as a
lamp or relay)
+12Vdc
For remote
indication of
Panic activation,
wire to
external load
(such as a
lamp or relay)
+12Vdc
Maintained
Closure
J3
Configuration
Step 1:
D
Login to the CEM+ with at least Power User Level of access.
•
CEM+ face panel PIN: 3333
•
Sensor+ Connect web interface - Login: power / password: powerpass
Step 2:
Set the levels of the dimmers/lights you want in the emergency look to level of at
least the Panic Master Level in the CEM+ (80 to 100% - defaults to 100%).
Step 3:
Record Panic on the CEM+. Be sure the configuration closure type matches your
actual physical closure type.
UL924 Setup
58
CEM+ LCD Panic Menu:
ETC CEM+ R__/__ G__
Panic >Active<
Panic
Activate Panic
Panic Activated
Panic
Record Panic
Force Others Off
Record Panic
Master Level [100]%
[Disabled]
Panic already Rec?
No
Yes
Overwrite Panic?
Panic Recorded
Yes
Overwrite? [No}
No
Panic
Clear Panic
Clear Panic
Panic Cleared
Panic
Panic Switch type
Panic Switch Action
Updating Settings
Configure Switches
[Normally-Open]
[Maintained]
Please Wait
S e n s o r + C o n ne c t w e b i n t e r f a c e ( C o n f i g u r a t i o n > P a n i c ) :
Testing
Local testing can be done by either installing a local test switch or by local activation of
Panic via the CEM+ face panel.
59
Sensor+ CEM+ Configuration Manual
Config is
checked vs.
backplane On
Power UP of
CEM+
E
CEM+ LCD Menu
yes
If Valid Config
No
Enabled
Network Enable
[Enabled]
Select Rack
name >Rack Name<
No Config R__/ 0 G__
[Setup Network]
Rack 1 Successful
Config loaded from
Load Config from
Select Config
[__]
[___] C
[Standard]
Rack
Set Alarm Temp
Set Address Mode
No Config R__/ 0 G__
Rack Number [__]
Set Group / Rack
Set Group / Rack
Group Number [__]
__ *
[Generate Defaults]
__
[Disabled]
[www.xxx.yyy.zzz]
Set IP Address
[Balanced-3Phase]
Enable BootP
Set Phase Balance
[120] Volts
Set Input Power
Set Module Type
Disabled
Set IP Address
[www.xxx.yyy.zzz]
Module = [D20AF]
Racks to Add [__]
Set Group / Rack
[Enabled]
Network Enable
Level: Guest
Set Group / Rack
Access Granted
Level: User
Access Granted
Access
Valid
Level: Power User
Access Granted
Level: Guest
Invalid
PIN
Rack Number
0
Group Number
0
Set Group / Rack
0
Enter PIN
0
No Config R__/ 0 G__
Set Group / Rack
No Config R__/ 0 G__
Login
No Config R__/ 0 G__
No Config Menu
Set Subnet Mask
Updating Settings
Please Wait
[Cancel]
Yes
[www.xxx.yyy.zzz]
Set Gateway
[No]
Save Changes?
Dimmer [_____]
Reboot Required
Cancel
[www.xxx.yyy.zzz]
Set Subnet Mask
[Off]
Advanced Features
[SR6]
Set First Dimmer
Please Wait
Set Rack Type
Updating Settings
Yes
[www.xxx.yyy.zzz]
Set Gateway
Level: Guest
Access Granted
Level: User
Access Granted
[Cancel]
Cancel
Access Granted
Level: Power User
Reboot Required
[www.xxx.yyy.zzz]
Menu Key
No
IP
Changed?
No
IP
Changed?
Appendix E: CEM+ LCD Menu
This appendix contains the entire LCD menu structure. Note that the different looks of the
screens denotes a different user level required for access.
60
61
Sensor+ CEM+ Configuration Manual
Home (<<) to Exit
[Rack Error(s)]
ETC CEM+ R__/__ G__
>1</16
>1</16
>1</16
Rack Address
>1</16
DMXA[std] start[___]
Select Rack
Group
About
About Group
SW >1.0.0.9.0.42<
About
>1</16
[Rack Name]*
Select Rack
[Rack Name]*
Select Rack
[Rack Name]*
Select Rack
[Rack Name]
Select Rack
Identify Rack
About
Rack Power
About NNNNNNNNNNNNN
Rack Data
About NNNNNNNNNNNNN
Network
About
About Rack Power
>1</16
DMXB[std] start[___]
Select Rack
Panic >inactive<
About Group
60.0 Hz SINGLE_PHASE
[Group Name]
About Group
V a:123 b:125 c:126
About Rack Power
EDMX: OK
About Rack Data
DMX B:OK
About Rack Data
DMX A:OK
[www.xxx.yyy.zzz]
About Subnet Mask
[www.xxx.yyy.zzz]
About IP Address
Room1 Presets
>NNNNNNNNNNNNNN<*
[Rack Name]*
>dimmer xxxxx<
Room 1 dimmers
Select Room >x<
About
Rooms & Presets
VH a:20 b:16 c:19
Voltage Headroom
[www.xxx.yyy.zzz]
About Gateway
Clean Set:[128] hrs
About NNNNNNNNNNNNN
Source >EDMX<
Level >yy%<
About NNNNNNNNNNNNN
About Dimmer >xxx<
About Dimmer >xxx<
Type: SR48
About NNNNNNNNNNNNN
Curve >Mod-Square<
About Dimmer >xxx<
Type >D20AF<
About Dimmer >xxxxx<
Amb > 75<F Air>OK<
>1</16
Rec >xxx< Act >xxx<
Select Rack
About Dimmer >xxxxx<
About Dimmer
Select Dimmer [xxxxx]
[No Data Port A]
View Error [Y of XX]
[Rack Name]*
Rack General
About
About
Dimmer
About
About Menu
Yes
ETC CEM+ R__/__ G__
[Rack OK]
ETC CEM+ R__/__ G__
no
if error
Rack Errors
About Dimmer
Circuit cc
Clean Due:[128] hrs
About NNNNNNNNNNNNN
Rack rr
About Dimmer >xxx<
Max Voltage >115<
E
CEM+ LCD Menu
62
0
0
>ppp<
[Room Name]
Set Active Presets
Select Room >r<
[Room Name]
Setup Preset
Max Active Presets
[a] Active Presets
Name Room r
Name Room
Room Number [r]
Setup Preset
Set Room Name
Please Wait
Updating Settings
Please Wait
Updating Settings
Name Preset
[Preset Name]
Name Preset
Preset Number [ppp]
Please Wait
[10]
Setup Preset
[Preset Name]
Select Preset
Set Preset Name
Set Priority
Setup Preset
Updating Settings
Please Wait
Set Priority >ppp<
Updating Settings
[mm:ss]
[Preset Name]
>ppp<
Set Fade Time
Set Fade Time
Select Preset
[10]
[00:02]
[Snapshot]
Setup Preset
Set Priority >p<
Set Fade Time
Record Source
Record Preset
[Preset Name]
[Preset Name]
Preset Number [ppp]
Preset >p< Cleared
Clear presets >ppp<
Preset
Clear Presets
Setup Preset
Deactivated
[Preset Name]
Record Preset
Preset >PPP<
Select Preset >ppp<
Preset
Deactivate Presets
Preset ppp Active
[Preset Name]
>ppp<
Level: Guest
Select Preset
Access Granted
Level: User
Access Granted
Access
Valid
Level: Guest
Invalid
PIN
Access Granted
Level: Power User
[Preset Name]
Preset
Activate Preset
Presets
Preset Menu
0
Enter PIN
0
ETC CEM+ R__/__ G__
Login
ETC CEM+ R__/__ G__
Login Menu
[Room Name]
Assign to Room >n<
No
Overwrite? [No}
Preset Recorded
Yes
Yes
Preset already Rec?
Preset ppp Recorded
No
63
Sensor+ CEM+ Configuration Manual
Panic Switch type
[Normally-Open]
Panic
Configure Switches
Clear Panic
Panic Cleared
Panic
Clear Panic
Record Panic
Master Level [100]%
Panic Activated
Panic
Activate Panic
Record Panic
Panic >Active<
Panic
Panic Menu
ETC CEM+ R__/__ G__
Updating Settings
Please Wait
Yes
[Maintained]
No
Overwrite? [No}
Overwrite Panic?
Yes
Panic already Rec?
Panic Switch Action
[Disabled]
Force Others Off
Panic Recorded
No
E
CEM+ LCD Menu
64
Set Module Type
Module = [list]
Set Levels >xx<
Thru Dimmer [xxxxx]
Set Module Type
Thru Dimmer [xxxxx]
Set Levels
From Dimmer [xxxxx]
Dimmer
Release Levels
Name Dimmer
Set Curve
From Dimmer [xxxxx]
Name Dimmer
Select Dimmer >xxxxxx<
Setup Dimmer
Set Curve
Setup Dimmer
Set Dimmer Name
Dimmer Check
First Dimmer >xxxxxx<
Dimmer Check
Set Level >xxx<
Dimmer
Dimmer Check
+ or - Dimmer[xxxxx]
Dimmer Check
Off
>ON<
ON
Please Wait
Updating Settings
>ON<
Report Load Errors
Advanced Features
Select Dimmer
Thru Dimmer [xxxxx]
Select Dimmer
From Dimmer [xxxxx]
Setup Dimmer
Advanced Features
Please Wait
Room [_]
Updating Settings
Select Room
Dimmer to Room
Thru Dimmer [xxxxx]
Dimmer to Room
From Dimmer [xxxxx]
Setup Dimmer
Assign Dim To Room
Please Wait
Voltage [xxx]
Updating Settings
Min Scale Voltage
Min Scale Voltage
Thru Dimmer [xxxxx]
Min Scale Voltage
From Dimmer [xxxxx]
Setup Dimmer
Min Scale Voltage
Please Wait
Voltage [xxx]
Updating Settings
Max Scale Voltage
Max Scale Voltage
Thru Dimmer [xxxxx]
Max Scale Voltage
From Dimmer [xxxxx]
Setup Dimmer
Please Wait
Max Scale Voltage
] %
Updating Settings
[
Set Threshold
Set Threshold
Thru Dimmer [xxxxx]
Set Threshold
From Dimmer [xxxxx]
Setup Dimmer
Set Threshold
[Off]
[On]
Dynamic Preheat
Voltage Regulation
Set Properties
Thru Dimmer [xxxxx]
Set Properties
Please Wait
Updating Settings
From Dimmer [xxxxx]
]
Setup Dimmer
Normal
Please Wait
Updating Settings
if Flourescent
Yes
Please Wait
Updating Settings
Set Properties
Mode [
Set Firing Mode
Set Firing Mode
Thru Dimmer [xxxxx]
Set Firing Mode
From Dimmer [xxxxx]
Setup Dimmer
Set Firing Mode
Please Wait
[namenamenamena]
Updating Settings
Set Curve
[Mod-Square]
Set Curve
Thru Dimmer [xxxxx]
Set Module Type
From Dimmer [xxxxx]
Setup Dimmer
Set Module Type
Please Wait
Updating Settings
Set Levels
Set level [00-FF]
Set Levels >xx<
Set Levels
Thru Dimmer [xxxxx]
Dimmer
From Dimmer [xxxxx]
Dimmer
Set Levels
ETC CEM+ R__/__ G__
Dimmers Menu
No
1 is most Sensitive
AF Sensitivity __
[Off]
DC Output Prevent
Set Mode [xxxxx]
Set Firing Mode
Dimmer % [xx]
Set Threshold
Please Wait
Updating Settings
>sec<
AF Reaction Time
Please Wait
Updating Settings
[Off]
Inrush Protection
Please Wait
Updating Settings
65
Sensor+ CEM+ Configuration Manual
Rack
Name Rack >#<
Select Rack > #/ #<
[Rack Name]*
Setup Rack
Set Rack Name
EDMX Priority [xx]
[Enabled]
Set DMX A
[Rack Name]*
Set EDMX
If disabled
Set EDMX
[Enabled]
Set Rack Data
Mode
Standard
Advanced
CH>xxxxx< DD[zzzzz]
Set EDMX >xxxxx<
Set EDMX
DMX Length [xxx]
Set EDMX
DMX Start [xxxxx]
EDMX Priority [xx]
If disabled
Set DMX B Priority
Set DMX B
[Disabled]
Set DMX B
Standard
Advanced
Set DMX B
DMX Length [xxx]
Advanced
Set DMX B
Mode
Mode
Set DMX A
DMX Length [xxx]
DMX Start [xxxxx]
Standard
Set Rack Data
If disabled
Set DMX A Priority
Set DMX A
Set Rack Data
Select Rack > #/ #<
Set Patch
Set DMX A
DMX Start [xxxxx]
Setup Rack
[Standard]
[Rack Name]*
Set Patch Mode
Select Rack > #/ #<
Setup Rack
Please Wait
Updating Settings
Please Wait
Updating Settings
Please Wait
Updating Settings
Set Patch Mode
[NNNNNNNNNNNNNNNN]
[SR12]
[Rack Name]*
Rack Type
Select Rack > #/ #<
__
Setup Rack
Rack Number
Set Group / Rack
Set Rack Type
__
Set Group / Rack
Group Number
Setup This Rack
Set Group / Rack
ETC CEM+ R__/__ G__
Rack Menu
DD CH[zzz]
DD CH[zzz]
Please Wait
Updating Settings
CH[zzz]
Set DMX B >XXXXX<
Please Wait
Updating Settings
CH[zzz]
Set DMX A >XXXXX<
Please Wait
Updating Settings
E
CEM+ LCD Menu
66
Please Wait
Updating Settings
Network Enable
[Enabled]
Set First Dimmer
Dimmer [xxxxxx]
Set Temp Alarm
Select Rack > #/ #<
[Rack Name]
Select Rack > #/ #<
[Rack Name]*
Select Rack > #/ #<
[Rack Name]*
Setup Rack
[Set Network]
Setup Rack
[Set First Dimmer]
Setup Rack
[Set Temp Alarm]
Updating Settings
Please Wait
Updating Settings
Advanced Features
[off]
Configure Fan
[No Data/15 Min]
Select Rack > #/ #<
[Rack Name]*
Select Rack > #/ #<
[Rack Name]*
Setup Rack
[Advanced Features]
Setup Rack
[Configure Fan]
Please Wait
Please Wait
[Rack Name]*
Updating Settings
Set Clean Time
Hours of Use [xxxx]
Select Rack > #/ #<
Setup Rack
[Balanced-3Phase]
[Air Filter Timer]
Advanced Features
Set Phase Balance
Set Module Type
Module = [D20AF]
[Off]
[Standard]
Set Patch Mode
Dimmer [xxxxx]
[120]Volts
[Add Rack]
] F Temp
[No]
Save Changes?
[
Set Temp Alarm
Please Wait
Yes
[Cancel]
Set First Dimmer
Set Input Power
Set Group / Rack
Racks to Add [xx]
Setup Rack
Set Gateway
[www.xxx.yyy.zzz]
Updating Settings
Cancel
[www.xxx.yyy.zzz]
Wait & Fade Out
Fade Time [60]:[59]
Save and Reboot
Updating Settings
Please Wait
Wait Time [60]:[59]
Set Subnet Mask
Wait & Fade
[SR48]
[120]Volts
[Balanced-3Phase]
[Rack Name]*
[www.xxx.yyy.zzz]
Set IP Address
Hold Last Look
If
Generate Event
Wait & Fade Out
Set Rack Type
Set Input Power
Set Phase Balance
Select Rack > #/ #<
Setup Racks
Please Wait
Updating Settings
Enabled
[Disabled]
Updating Settings
[Set Phase Balance]
] F Temp
Enable BootP
Headroom >xxx<v
[Rack Name]*
[
Please Wait
Voltage Headroom
Select Rack > #/ #<
Setup Rack
[Voltage Headroom]
Please Wait
Updating Settings
[Wait & Fade Out]
[DMX A]
[Rack Name]
[Data Loss Behavior]
Data Loss Behavior
Select Data Type
Select Rack > #/ #<
Rack Menu (cont.)
Setup Rack
No
IP
Changed?
67
Sensor+ CEM+ Configuration Manual
Network Defaults
[No]
Setup Rack
Please Wait
[Network Defaults]
Updating Settings
Setup Rack
Please Wait
[Delete All Racks]
Updating Settings
Setup Rack
Please Wait
[NAMENNNNNNNNNN]
[Get Config]
[Send Config To All]
Updating Settings
Get From Rack [xx]
Setup This Rack
Rack Menu (cont.)
Transfer Failed
Updating Settings
Failed
Transfer Ok?
Ok
Transfer Complete
Updating Settings
E
CEM+ LCD Menu
68
Set PIN
Power User
User Level
[mm] Minutes
Setup Group
Set Login Timeout
Setup Group
GMT [- 6]
Set Login Timeout
Set Time Zone
Setup Group
Set Time Zone
User
Updating Settings
Set Temp type
Report as [F]
Setup Group
Ambient Temp Type
Enter New PIN
PIN: [X X X X]
Select Access Level
[Power User]
Enter New PIN
PIN: [X X X X]
[User]
Select Access Level
Please Wait
Updating Settings
Please Wait
Please Wait
[English]
Updating Settings
Set Language
Please Wait
Updating Settings
Setup Group
[Group Name]
Name Group
Recording
Recording Loads
Set Language
Name Group
Setup Group
Group
Setup Group
Current Control
Setup Group
Record Loads
ETC CEM+ R__/__ G__
Group Menu
PIN: [X X X X]
Re-enter New PIN
PIN: [X X X X]
Re-enter New PIN
69
+ All racks
+ Add racks
+ Individual rack select
+ Search
Racks & Dimmers
+ Summary
+ Set dimmer levels
+ Dimmer check
+ Search
Group
Login Screen
• Find dimmers in group
Search
• Status
Individual Rack Select
• Add racks to group
• Delete all racks in group
Add Racks
• Rack name & type
• Rack power per phase & frequency
• Ambient rack termperature
All Racks
• Find dimmers in group
Search
• Set dimmer to level
• Release & go to the next dimmer
• Release & go to the previous dimmer
• Release current dimmer
Dimmer Check
• Set individual & ranges of dimmers to a level
• Release set dimmer levels
• Release all dimmer levels
Levels
• General rack status
• Active presets/panic
• Rack errors
Summary
• Dimmer #/ Name / Position
• Control source
• Level of dimmer
Status of Found Dimmers
• Set rack properties
Configure Rack
• Set Group (system) name
• Set temperature scale (F or C)
• Set rack properties
Configure Rack
• Set individual dimmer properties
• Set properties of all found dimmers
Configure Found Dimmers
This is an outline of the Sensor+ Connect web interface.
• Set individual dimmer properties
• Set properties of all found dimmers
Configure Found Dimmers
• Set individual dimmer properties of selected rack
Configure Dimmers
• Dimmer # / Name / Position
• Control source
• Level of dimmer
Status of found dimmers
• View rack errors
• Clear individual errors
• Clear all errors
Errors
Appendix F
Sensor+ Connect Site Map
Sensor+ CEM+ Configuration Manual
F
Sensor+ Connect Site Map
70
+ Panic
+ Patch
+ Network
+ File transfer
+ File upload
+ Load Management
Configuration
+ Room 1
+ Room 2
+ Room 3
+ Room 4
+ Assign Dimmers
Rooms & Presets
• View individual dimmer recorded loads and actual loads
• Load check
• Record loads
• Clear loads
Load Management
• Upload CEM+ software to local CEM+
• Upload configuration file to local CEM+
File Upload
• Get a configuration from another CEM+
• Send local configuration to all other CEM+s in group
• View configuration (as raw xml)
• Download configuration to disk (right-click)
File Transfer
• Set Group and Rack number
• Set web user interface time-out
• Set CEM+ face panel time-out
• Set default login access level
• Restore network default IP addresses
Network
• Set starting address per port per rack
• Enable / disable ports
• Set port priority
• Set data loss behavior
• Enable / disable DMX Output for Port B of last rack
Patch
• Set switch mode
• Set switch type
• Set master level
• Set load shedding (force others off)
• Record / clear panic
Panic
• Assign individual dimmers to a room
• Assign ranges of dimmers to a room
Assign Dimmers
• View presets in room
• Record presets
• Activate/deactivate presets
• Clear presets
• Set dimmer levels
Room #
• Individual dimmer patching per port
• Range patching per port
• Range unpatching per port
Advanced Patch
• Set room name
• Set maximum number of active presets in a room
• View dimmers assigned to a room
Room Properties
• Create new presets
• Set preset properties
• Set dimmer levels
Edit
Corporate Headquarters 3031 Pleasant View Road, P.O. Box 620979, Middleton, Wisconsin 53562-0979 USA Tel +608 831 4116 Fax +608 836 1736
London, UK Unit 26-28, Victoria Industrial Estate, Victoria Road, London W3 6UU, UK Tel +44 (0)20 8896 1000 Fax +44 (0)20 8896 2000
Rome, IT Via Ennio Quirino Visconti, 11, 00193 Rome, Italy Tel +39 (06) 32 111 683 Fax +39 (06) 32 656 990
Holzkirchen, DE Ohmstrasse 3, 83607 Holzkirchen, Germany Tel +49 (80 24) 47 00-0 Fax +49 (80 24) 47 00-3 00
Hong Kong Room 605-606, Tower III Enterprise Square, 9 Sheung Yuet Road, Kowloon Bay, Kowloon, Hong Kong Tel +852 2799 1220 Fax +852 2799 9325
Service: (Americas) [email protected] (UK) [email protected] (DE) [email protected] (Asia) [email protected]
Web: www.etcconnect.com Copyright © 2005 ETC. All Rights Reserved. Product information and specifications subject to change.
7150M1400-1.2.0 Rev A Released 05/2005