1
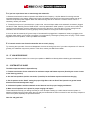
1
Important Safety Instructions
1)
Read these instructions.
2)
Keep these instructions.
3)
Heed all warnings.
4)
Follow all instructions.
5)
Do not use this apparatus near water.
6)
Clean only with dry cloth.
7)
Do not block any ventilation openings. Install in
accordance with the manufacturer's instructions.
Do not install near any heat sources such as radiators,
heat registers, stoves, or other apparatus (including
amplifiers) that produce heat.
8)
9)
10)
11)
Do not defeat the safety purpose of the polarized plug.
A polarized plug has two blades with one wider than
the other. The wide bladed is provided for your safety.
If the provided plug does not fit into your outlet,
consult an electrician for replacement of the obsolete
outlet.
Protect the power cord from being walked on or
pinched particularly at plugs, convenience receptacles,
and the point where they exit from the apparatus.
12)
Use only with the cart, stand, tripod, bracket, or
table specified by the
manufacturer, or sold with the
apparatus. When a cart is used, use
caution when moving the
cart/apparatus combination to
avoid injury from tip-over.
13)
Unplug this apparatus during lightning storms or
when unused for long periods of time.
14)
Refer all servicing to qualified service personnel.
Servicing is required when the apparatus has been
damaged in any way, such as power-supply cord or
plug is damaged, liquid has been spilled or objects
have fallen into the apparatus, the apparatus has
been exposed to rain or moisture, does not
operate normally, or has been dropped.
15)
The equipment shall be used at maximum 35
degree C ambient temperature.
16)
Do not open the equipment to reduce the risk of
electrical shock. For safety reasons it is only allow
to the opened by qualified service personnel.
17)
WARNING: To reduce the risk of fire or electric
shock, do not expose this apparatus to rain or
moisture. And the apparatus shall not be exposed
to dripping or splashing and that no objects filled
with liquids, such as vases, shall be placed on the
apparatus.
18)
The MAINS plug is used as the disconnect device
and shall remain readily operable.
19)
The product shall be used on open bench.
20)
No naked flame sources, such as lighted candles, should
be placed on the apparatus.
Only use attachments/accessories specified by the
manufacturer.
CAUTION
RISK OF ELECTRIC SHOCK!
DO NOT OPEN!
The lightning flash with arrowhead symbol, within an equilateral
triangle, is intended to alert the user to the presence of uninsulated
dangerous voltage within the product's enclosure that may be of
sufficient magnitude to constitute a risk of electric shock to persons.
ATTENTION ! RISQUE DE CHOC ! ÉLECTRIQUE PAS OUVRIR !
The exclamation point within an equilateral triangle is intended to
alert the user to the presence of important operating and
maintenance (servicing) instructions in the literature accompanying
the appliance.
2
Consignes de sécurité importantes
1)
Lisez ces instructions.
2)
Conservez ces instructions.
3)
Observez tous les avertissements.
4)
Suivez toutes les instructions.
5)
N'utilisez pas cet appareil à proximité de l'eau.
6)
Utilisez uniquement un chiffon sec pour le nettoyer.
7)
Ne bloquez pas les ouvertures de ventilation.
Installez conformément aux instructions du fabricant.
8)
Ne l'installez pas à proximité de sources de chaleur telles
que des radiateurs, des bouches de chaleur, des poêles ou
d'autres appareils (amplificateurs compris) produisant de
la chaleur.
9)
l'appareil. Cas d'utilisation d'un
chariot,faites attention lorsque vous
déplacez l'ensemble chariot / appareil de
ne pas le renverser.
13) Débranchez cet appareil lors d'orage avec foudre ou
lorsque vous ne l'utilisez pas pendant des périodes
prolongées.
14) Faites-le réparer et entretenir par un personnel de service
qualifié. Il est nécessaire de faire réparer l'appareil
lorsqu'il a subi des dommages quelconques du type
suivant : cordon ou fiche d'alimentation abîmé, liquide
renversé ou objets tombés dans l'appareil, exposition de
l'appareil à la pluie ou à l'humidité, mauvais
fonctionnement ou chute.
15) La température ambiante lors de l'utilisation ne doit pas
dépasser 35 degrés Celsius.
Ne pas contourner le dispositif de sécurité de la fiche
polarisée. Une fiche polarisée possède deux lames dont
une plus large que l'autre. La grande lame est fournie pour
votre sécurité. Si la fiche fournie ne rentre pas dans votre
prise, consultez un électricien pour le remplacement de la
prise obsolète.
16) Afin de réduire les risques d'électrocution, n'ouvrez pas
l'équipement. Pour des raisons de sécurité, seul du
personnel d'entretien qualifié est autorisé à l'ouvrir.
17) ATTENTION: Pour réduire le risque d'incendie ou
d'électrocution, n'exposez pas cet appareil à la pluie ou à
l'humidité. De plus, l'appareil ne doit pas être exposé au
dégouttement ou aux éclaboussures et aucun objet rempli
de liquide, tel qu'un vase, ne doit être posé sur l'appareil.
10) Protégez le cordon d'alimentation, surtout au niveau des
fiches, des prises et des points où il sort de l'appareil, pour
éviter qu'on ne marche dessus ou qu'on ne le pince.
11)
18)
La fiche d'alimentation CA sert de principal dispositif de
déconnexion et doit toujours être capable de fonctionner
correctement.
19)
Ce produit doit être utilisé sur une surface ouverte
20)
Aucune source de flame nue, telle, que des bougies
allumées, ne doit être placé sur l'appareil.
Utilisez uniquement les accessoires spécifiés par le
fabricant.
12) Utilisez uniquement avec le
chariot, le socle, le trépied, la table
ou le support spécifié par le
fabricant ou vendu avec l’appareil.
En le fabricant ou vendu avec
CAUTION
RISK OF ELECTRIC SHOCK!
DO NOT OPEN!
ATTENTION ! RISQUE DE CHOC ! ÉLECTRIQUE PAS OUVRIR !
Le symbole de l'éclair avec une flèche à son extrémité, dans un triangle
équilatéral, a pour but de vous avertir de la présence d'une « tension
électrique dangereuse » et non isolée à l'intérieur de l'enceinte de
l'appareil, qui peut être suffisamment puissante pour constituer un
risque d'électrocution pour les personnes.
Le point d'exclamation dans un triangle équilatéral vous avertit de
l'existence d'instructions importantes de fonctionnement et
d'entretien (intervention) dans la documentation accompagnant
l'appareil.
3
TABLE OF CONTENTS
1. SAFETY INSTRUCTIONS ENGLISH & FRENSCH ............................ 2-3
2. INTRODUCTION .................................................................................. 5
3. VOLTAGE SELECTOR & POWER CORD. ........................................... 5
4. SUBWOOFER HOOK UP ..................................................................... 6
5. WHERE TO PLACE YOUR SUBWOOFER ........................................... 7
6. USE OF THE “PHASE” CONTROL. ...................................................... 8
7. CROSSOVER BYPASS SETTING ........................................................ 9
8. CROSSOVER CONTROL ..................................................................... 9
9. USING MULTIPLE SUBWOOFERS .................................................... 10
10. HOME THEATER USAGE ................................................................ 10
11. TROUBLESHOOTING ...................................................................... 11
12. IF YOU NEED SERVICE ................................................................... 12
13. SYSTEM SET-UP GUIDE ................................................................. 12
14. SPEAKER SET UP ........................................................................... 13
APPENDIX A: SPEAKER PLACEMENT DIAGRAMS ............................. 15
APPENDIX B: SPECIFICATIONS. ........................................................ 16
DIAGRAMS
FIG. 1 CONNECTING TO A COMPONENT’S SUBWOOFER OUTPUT .... 6
FIG. 2 SURROUND SOUND SPEAKER PLACEMENT ........................... 15
Please record the following information for your records:
Serial Number:
Date of Purchase:
Dealer Name:
Dealer Address:
City/State/Zip:
Country:
Invoice Number:
Rev 2. 111114
4
2. INTRODUCTION
CONGRATULATIONS! You have just made perhaps the most exciting and dramatic addition that you could possibly make
to your audio system. The new dimension of deep, powerful bass provided by your M&K Sound powered subwoofer will
positively thrill and excite you.
We encourage you to read this owner’s manual, as there is a great deal of information provided here to help you get the
best possible performance from your new subwoofer. This manual will give you basic set-up instructions and a system
overview followed by more detailed information.
If you still have questions about your subwoofer or your system installation after you have read this manual, please contact
your M&K Sound dealer.
3. VOLTAGE SELECTOR AND POWER CORD
Adjacent to the AC power cord receptacle on the back of the subwoofer you will find a voltage selector switch pre-set at the
factory for the proper local voltage. USA, Canada and Taiwan standard voltage is 120 volt.
Europe, the UK and Asia standard voltage is 230 Volt. Japan voltage 100V
Always check to make sure that your subwoofer is set to your country’s voltage.
If you have questions about this, contact your M&K Sound dealer.
The voltage input can be changed to the correct local voltage by sliding the selector to correct position.
DETACHABLE POWER CORD
Your new subwoofer is provided with a detachable power cord. ALWAYS attach the cord to the subwoofer first, BEFORE
plugging it into the AC wall socket.
5
4. SUBWOOFER HOOK-UP
M&K Sound subwoofers come with line-level phono (sometimes referred to as RCA) connectors.
If your receiver or processor has a line-level subwoofer output (sometimes labeled “Sub”, “Sub Out”, “SW” or “LFE”) with
phono connectors, use it. This is the preferred connection for your M&K Sound subwoofer.
FIGURE 1.
CONNECTING TO A COMPONENT’S SUBWOOFER OUTPUT
Always connect a single line level sub signal from amplifier to the subwoofers “Left / mono input” as the V-subs
sensitivity control for auto on /off circuits is calibrated at the Left RCA input socket.
When connecting dual line level sub signals from amplifier, the subwoofers left and right input sockets will summate the
input signals internally.
PLUGGING IN THE SUBWOOFER
Once your audio connections are complete, you are ready to make the electrical connection.
Set the “VOLUME” control to “MIN”, attach the power cord to the receptacle on the subwoofer’s back panel and plug the
other end of the power cord into an AC outlet.
Do NOT use the “switched” power outlet found on the back of some receivers, processors and amplifiers.
Set the switch on the back of your subwoofer to either the “AUTO” or “ON” position.
With “AUTO ON”, your subwoofer is in Standby until it receives an audio
signal. At that point, it automatically switches on and continues operation
as long as an audio signal is detected.After a few minutes without an
audio signal, it will power down to Standby.
With the power switch in the “ON” position, the subwoofer is fully active
whether or not your other components are switched on.
6
Now, play some music through your system to make sure that the satellite (main) speakers are working properly.
Once you confirm that they are, slowly advance the “BASS VOLUME” control.
The subwoofer should begin to play. Set the “BASS VOLUME” control to where the subwoofer sounds in balance
with the satellite speakers. If the system is not working properly, unplug the subwoofer and check all of your
connections. If you still have no success, contact your M&K Sound dealer.
Note the V12 model has a fixed gain marked as “THX MODE” at volume control.In this position the volume is intended
to be adjusted by the receiver or processor bass management only.
By simply rotating (clicking) the volume control out of the fixed THX mode – the function will be as a normal adjustable
control for volume.
NOTE: Once you have achieved a rough subwoofer level setting, refer to the system set-up guide found later in this
manual.
NOTE: When your subwoofer is switched to the “AUTO ON” position, it will use a slight amount of electricity when
in Standby. If you are concerned about power usage, you may want to switch the subwoofer off instead. Switching
the unit off is also a good idea if you know that you will not be using it for some time.
5. WHERE TO PLACE YOUR SUBWOOFER
M&K Sound subwoofers perform well in most room locations. With a properly tuned speaker system, you should hear deep
bass coming from the front of your system as if your satellites and subwoofer were one big system rather than separate
speakers.
One proven way to find the best location for your subwoofer is to first place the subwoofer at the listening position. Run
music with good bass content through it and then go over to the area where you believe the final subwoofer placement will
be. Listen to how the room reacts to deep bass being played. As you walk around that area, you should find places where
the bass sounds deep and well defined and places where the bass sounds weak and less well defined. The place where
you hear the tightest bass with the most impact is probably the best location for your subwoofer.
We recommend that you place your subwoofer as close to a solid wall as possible. Avoid placing your subwoofer farther
than a few inches away from any wall surface as the reflected sound from the wall will interfere with the direct sound coming
from the subwoofer and create phase anomalies that will be destructive to good bass performance. Also try to avoid corners
that are near doorways or openings.
Sometimes the best sound results from aiming the subwoofer’s drivers directly into the wall (1” to 2” away from the wall
itself.)
If you are using multiple subwoofers, sometimes putting them in the same location provides the best solution.
Stacking them is also a possible solution or you could place them side-by-side.
Alternatively, when using multiple subwoofers, you could try placing them in different locations. This may be appropriate
when you have limited choices for placement and none of the available locations seem to work well. Try to place your
subwoofers at equal distances from the listening position to avoid phase problems.
Ultimately, the amount and quality of deep bass you get in your room are dependent on the room itself. Low frequency
sounds are affected most by the size of the room and construction used to build it. All rooms are different when it comes to
reproducing bass, and in any given room, bass quality and quantity change when the subwoofer is moved from one location
to another.
7
In some rooms, a corner location may excite resonance modes resulting in a muddy or boomy sound. In this situation, a
more central location along a wall, away from a corner may give better results. It’s a good idea to experiment with your
subwoofer location or locations. Try to find a placement or placements that provide an overall sound that is powerful and
well defined throughout the audio bandwidth, where no one bass note or notes overpower others.
Because the subwoofer generates so much sonic energy, its output may cause objects in and around the listening room to
vibrate. If this occurs in your room, you may need to damp the vibration of these objects.
One subwoofer is usually sufficient in a two-channel stereo system for the same reason that one subwoofer works well with
multi-channel systems. Our ear-brain hearing physiology is unable to locate the direction of low frequencies below
approximately 80 Hz. The directionality of low frequency sounds (bass drums, bass instruments, etc.) is determined by the
higher frequency overtones and harmonics that are reproduced by the satellite speakers.
Some people believe that we can determine directionality from frequencies down to 60 Hz. In any case, M&K Sound satellite
speakers are tuned to crossover to an M&K Sound subwoofer at 80 Hz. This is also the Dolby Laboratory and THX
specification.
No matter where you place your subwoofer, you must allow room for ventilation of its heat sink and back plate. The
subwoofer’s power amplifier is mounted on the back plate and it generates heat. Please observe the following:
1. Leave adequate clearance around the subwoofer’s heat sink. Do not cover it with
drapes or close it up in an unventilated cabinet.
2. Do not place the subwoofer near baseboard heaters or forced air heating outlets.
3. Do not use your subwoofer outdoors or in an overly humid environment.
4. Do not plug the subwoofer into an AC outlet until all system wiring is complete.
6. USE OF THE PHASE CONTROL
M&K Sound V8, V8 Movie V10 & V12 subwoofers feature a phase control variable from 0 to180 degrees. This control can
help you to fine tune the transition between sound sent to your main speakers and your subwoofer.
In order to optimize the integration of your subwoofer with your main speakers, you should perform a phase test.
This test will help you to achieve a seamless transition between your main speakers and subwoofer(s).
A phase test is helpful, because when satellite (or main) speakers are located in a different location from the subwoofer,
each speaker is located at a different distance to the listener. Even small differences in distance mean that the arrival times
of sound from the various speakers to the listener are also different. These time differences can cause phase anomalies,
which are destructive to the reproduction of sound in your room. Be sure to re-do this test if you move your speakers.
To begin, select something to play through your speakers that you are familiar with. A stereo CD is a good choice since
surround sound material with its complexity can make this test more difficult. While playing the CD through your left and
right ront speakers along with your subwoofer, listen to the mid-bass region (70 - 100 Hz) – that part of the audio spectrum
where instruments like bass and drums need both the satellites and subwoofer for accurate reproduction.
Adjust the phase control or switch from 0 degrees to 180 degrees. Note the difference between the two settings. If you hear
a tighter, more defined quality to the sound with better low bass reproduction with one of these options, then this is probably
the best setting. If you are using two or more subwoofers, perform this test with each subwoofer individually with the others
turned off.
8
When you hear the best balance between stereo image localization, maximum low bass impact and well defined output in
the mid-bass, you have found the correct setting.
If you hear little or no difference when adjusting the phase control knob between 0 – 180, set it to the 0 degree (default)
position.
A more accurate method of establishing the phase relationship between your satellites and subwoofer or subwoofers is to
use a pink noise generator and a spectrum analyzer. Place the microphone at the listening position and run pink noise
through the system. Take note of the mid-bass region (70 - 100 Hz) on the analyzer’s display. The setting that shows the
most output in that region and also shows the best low bass response has the correct phase.
7. CROSSOVER BYPASS SETTING
All modern Home Theater receivers and processors provide the necessary high-pass and low-pass filtering (bass
management) to ensure proper integration of satellite/subwoofer speaker systems. When using your subwoofer with one of
these components it is recommended to set the “CROSSOVER CONTROL” on the back of the subwoofer to the “BYPASS”
position. This leaves the full control for crossover settings to the handled by the receiver/processor build in bass
management functions, and will in most setups provide the best integration between satellite/subwoofer.
When connecting THX certified subwoofers, the crossover control “BYPASS” position is marked “THX” to directly indicate
the correct setting.The bass management section in THX certified receivers and processors are optimized in their filter
design to make smooth and easy integration between subs and satellites speakers.It is recommended to carefully studying
your receiver or processor manual for speaker setup, as correct settings is important to achieve best possible sound.
8. CROSSOVER CONTROL
If your receiver or processor does not have an internal crossover, you can use the “CROSSOVER CONTROL” to variable
set the upper roll-off point of the subwoofer to match your satellites.
The control of fine-tuning the transition of sound between satellites and subwoofer is defined to set “CROSSOVER
CONTROL” to 80 Hz when using larger main speakers and 110 Hz when using smaller satellite speakers.
9
The overall system is expected to reproduce frequencies at the entire bandwidth, but as the subwoofer will be rolling off
above the crossover point, it is therefore recommended to look at the main speakers or satellite speaker’s specification
sheet for frequency response, in order to choose the best working crossover frequency at subwoofer.
Setting the sub woofer crossover control to the same frequency as the lowest given value for a main speaker or satellite
speaker, is a good start setting. The satellites, or main speakers, which reproduce the upper frequencies, need only small
cabinet and small drivers to do their job, while the subwoofer, which reproduces the low frequencies, requires a larger
cabinet, a larger driver and sufficient power in order to do its job.
Properly tuned, your M&K Sound satellite/subwoofer system will provide you with the highest quality sound reproduction
available today.
9. USING MULTIPLE SUBWOOFERS
Using two or more subwoofers in your system will give you the ultimate in low bass performance. You will hear improved
impact and definition, as well as greater output and dynamic range.
While all the information in section 4 WHERE TO PLACE YOUR SUBWOOFER should be observed, additional
considerations need to be taken into account when using multiple subwoofers.
First, try to place all subwoofers at equal distances from the listening position. This will help to avoid phase anomalies.
Check the phase relationship between each subwoofer and your main speakers by using the phase test discussed earlier
Since your receiver or processor may only have one phono subwoofer output, you may need to use a “Y” connector to feed
the additional subwoofers.
10. HOME THEATER USAGE
The subwoofer in a home theater system has a critical role to play in the enjoyment of your system, which makes perfect
sense, as the subwoofer is the only speaker in your system capable of accurately reproducing low bass.
All the bass from the main channels is reproduced by the subwoofer, including Low Frequency Effects (LFE) that creates
the dramatic low end frequencies we hear in movies. In the electronics bass management setup, a choice of large speaker”
mode or “small speaker mode will appear. Your M&K subwoofer is designed to operate in both modes, and the choice of
large / small speakers is concern of size for satellites only.
In either setting, make sure you have connected the “line level Phono subwoofer output” from your home theater receiver or
processor, to the line level Phono input on your subwoofer.
Make a final check of your receiver or processor that subwoofer is selected as “On” or “Yes” in the setup menu, to ensure all
low frequency material from your receiver or processor, and sent to your subwoofer through this connection.
The routing of signals for satellites and subwoofer is internally distributed to the 5.1 or 7.1 system by the surround receiver
or processor build in bass management system, where the .1 is referring to the subwoofer output channel. In cases where a
setup with multiple subwoofers is wanted, it will still be the receiver or processor .1 output that will drive the added numbers
of subwoofers.
NOTE: For maximum enjoyment of your M&K Sound satellite/subwoofer system, we recommend to set your
Receiver or processor to “Small” for speakers.
10
11. TROUBLESHOOTING
Your M&K Sound subwoofer amplifier provides high reliability and, in the rare event service is ever required, easy modular
replacement of parts. This section of the manual will help you to solve or diagnose most problems that can occur with your
subwoofer. In the event that a fuse blows,
ALWAYS replace it with a fuse of the correct value to avoid malfunction of the unit or even a fire hazard. Use of an incorrect
fuse value will void your warranty.
A. Your subwoofer has no output.
1. Make sure that the subwoofer is plugged into an AC outlet that you know is active and that is the power cord is securely
plugged into the back of the subwoofer.
2. Make sure that the “POWER” switch is set to the “AUTO” or “ON” position. If you hear no output with the switch set to
“AUTO”, move the switch to the “ON” position.
3. Check the “BASS LEVEL” control and make sure that it is set above the “MIN” position. Rotate it clockwise, if it is set to
the “MIN” position.
4. Check the Power ON LED on the subwoofer’s back panel. If the LED is not lit (usually blue), check the fuse. ALWAYS
unplug he subwoofer before changing the fuse. If the element inside the fuse is broken, replace the fuse with a new one of
the same value. If the new fuse blows immediately, contact your M&K Sound dealer.
5. If the Power LED is lit, but you still hear no sound, try this test: Disconnect the phono interconnect cable from the back of
the receiver or processor. Touch the tip of the connector. If you hear sound coming from the subwoofer when you touch the
connector, the subwoofer is working. You need to look elsewhere in your system to solve the problem.
6. Make sure that all the cables in your system are OK. Double check all your connections. If necessary, replace any
defective cables.
B. After operating the subwoofer at high volume levels for a long time, the subwoofer cuts out or Stops working
or becomes intermittent:
1. Your subwoofer has a protection circuit that protects it from overheating. After hours of continuous operation at extremely
high volume levels, this circuit may shut off the power to the subwoofer. When it activates, the sound may switch in and out
rapidly, with a fluttering sound. If this happens, unplug the unit and let it sit for at least half an hour. After that time, plug it
back in. It should operate normally. If you find this happens frequently, contact your M&K Sound dealer.
C. If the mid-bass range the area of transition between your subwoofer and satellite speakers Sounds weak:
Refer to the section on phase testing discussed earlier in this manual.Try reversing the phase switch from plus (+) to minus
(-) (or vice versa.)
11
D. If you hear a persistent hum or buzz through the subwoofer:
1. Because the subwoofer is able to reproduce the 50/60 Hz hum frequency, it is often blamed for causing hum that
originates elsewhere in the system. Always avoid running all speaker wires and Phono interconnects cables near to AC
cords and component power supplies. Wires and cables running close to AC lines are a common source of hum. If
necessary, reroute your cables.
2. To identify the source of a perceived hum or other noise, remove all input cables to the subwoofer, but leave it plugged
into the AC outlet. Carefully turn the “BASS LEVEL” control up towards the “MAX” position. If you hear hum or other noise
coming from the subwoofer, then the subwoofer is the source of the noise. If you hear little or no hum coming from the
subwoofer, then the subwoofer is working properly and the problem is coming from another component.
3. Hum can also be caused by AC ground loops. If the subwoofer is plugged into a separate AC outlet, try plugging it into
the same outlet used for your receiver or processor. You might also try reversing the polarity of the AC plug. If none of these
suggestions solve the problem, contact your M&K Sound dealer.
E. If unusual sounds come from the subwoofer with no music playing:
Try removing the input cable. If the sound disappears, the noise is coming from one of your other components. If it does not
go away, the subwoofer may have a problem. In this case, contact your M&K Sound dealer.
12. IF YOU NEED SERVICE
Contact your M&K Sound dealer. Do not send your speaker to M&K Sound directly without obtaining prior authorization.
13. SYSTEM SET-UP GUIDE
The 5 Most Important Items in System Set-up:
1. Find the best location for the subwoofer for maximum output and flattest response (Possibly the corner closest
to the listening position)
2. Aim the front speakers (and the surrounds, if possible) for the flattest response and the best imaging
3. Set all speakers to the “Small” setting for proper High-Pass and Low-Pass Filter Operation to get the lowest
distortion and maximum dynamic range
4. Calibrate all speakers and the subwoofer to the identical level for proper imaging and balance
5. Make sure all speakers are in phase for proper imaging and impact
These instructions will help you making sure that you cover all steps in setting up a multi-channel surround system. In
addition to following this list, make certain that you study and understand the owner’s manual for each and every component
used in the system, especially the processor/receiver.
Have fun and good luck!
12
14. SPEAKER SET UP
1. Front Speaker Placement
The left, right, and center speakers should be equidistant from the main listening position. Try to set up the speakers so that
they are reasonably symmetrical to room surfaces. A tape measure may be very helpful.
2. Subwoofer Placement
One possible location for the subwoofer is the corner with the best structural strength. If the corners are roughly equal in
construction, use the corner nearest the listening position. If the listening position is in the front half of the room, place the
subwoofer in a front corner. If it is in the back of the room, place the subwoofer in a back corner. If possible, avoid corners
near doorways or openings.
If you are willing to experiment, another option is to place the subwoofer at the listening position and walk around the room.
Stand in and near each corner. The location where you hear the tightest bass with the most impact is probably the best
location in the room for the subwoofer. If multiple subwoofers are used, place them in the same location. Stacking is best,
but you can also put them side by side.
Another option for multiple subwoofers is to place them in different locations. This is appropriate when you have limited
choices in locating the subwoofer and none of the available locations work well. Try to place multiple subwoofers at equal
distances from the listening position to avoid phase cancellation.
3. Surround Speaker Placement
Determine the best position in the room. It will probably be the position directly to the right and left of the main listening
position on the side walls (so that a listener in the center seat is directly between the speakers). If that doesn’t work or is not
practical because of the room, try these locations: on the ceiling; on the back wall.
4. Install all wiring and interconnects.
5. Connect the subwoofer.
Always use the processor/receiver’s subwoofer output.
6. Aim the front left and right speakers in both the horizontal and vertical planes.
Horizontal toe-in may help to achieve the best possible imaging.
7. If you have a Dolby or DTS processor/receiver, follow these instructions.
“Always check the processor/receiver’s owner’s manual”
13
8. Channel Calibration
Take the measurement at the listening position to establish the reference level. Set all channels to exactly the same level
(usually 75 dB for home theater systems.)
Use a Sound Level Meter either analogue or digital. Point it directly at the speaker being measured. Set all channels to the
same level, using your receiver or processor’s internal test signal.
All major receivers / processors are today equipped with high quality measurement systems, as well as microphones. This
can also be used in order to make the final audio calibration of your system.
And a final recommendation is to use your own judgment “Your Ears”.
9. Check phase for the five main channel speakers are wired correctly in phase.
10. Make sure that the subwoofer and main speakers are in phase at the 80 Hz crossover point.
Listen to something with a consistent bass line around 80 Hz while a partner rotates the “Phase” control on the Subwoofer
from “+” to “-” The position that results in the greatest bass at the listening position is the correct setting.
11. Play something that is familiar to you through the system to verify the system’s overall performance.
If something does not sound right, recheck your connections and settings.
12. Switch the processor/receiver to each input that you will use.
Check your settings for each input and each mode, some processor/receivers require that you enter settings separately for
each mode and/or input.
13. Before playing the system check levels and speaker alignment one last time.
Make sure that you write down all processor settings for future reference.
14
Appendix A FIGURE 2.
Speaker Placement Diagrams
Typical Surround System Speaker Placement
Set up 7.1
Set up 5.1
15
Appendix B Specifications
V8 & V8 Movie
ENCLOSURE TYPE: Sealed cabinet
WOOFER: Single 8”
POWER AMP: 150W RMS at 4 ohms / 250W peak
FREQUENCY RESPONSE: 30 Hz to 200 Hz (+/- 2 dB in band tolerance)
AMP THD: Less than 0.5% at 150W into 4 ohm
DIMENSIONS: H34cm x W26cm x D 29cm / H13.3 x W10.3 x D11.4 inch
WEIGHT: 10.3 Kg / 22.7 lbs
AC POWER CONSUMPTION: 0.5W standby, 30W average, 150W max
V10
ENCLOSURE TYPE: Sealed cabinet
WOOFER: Single 10”
POWER AMP: 200W RMS at 4 ohms / 450W peak
FREQUENCY RESPONSE: 25 Hz to 200 Hz (+/- 2 dB in band tolerance)
AMP THD: Less than 0.5% at 200W into 4 ohm
DIMENSIONS: H40.5cm x W31.5cm x D35cm / 15.9 x 12.4 x 13.7 inch
WEIGHT: 16.3 kg / 35.9 lbs
AC POWER CONSUMPTION: 0,5W standby, 40W average, 200W max
V12
ENCLOSURE TYPE: Sealed cabinet
WOOFER: Single 12”
POWER AMP: 300W RMS at 4 ohm / 500W peak
FREQUENCY RESPONSE: 20 Hz to 200 Hz (+/- 2 dB in band tolerance)
AMP THD: Less than 0.5% at 300W into 4 ohms
DIMENSIONS: H46.5cm x W36cm x D40cm / 18.3” x 14.1” x 15.7” inch
WEIGHT: 21 kg / 46.3 lbs
AC POWER CONSUMPTION: 0.5W standby, 50W average, 300W max
M&K Sound · Denmark
www.mksound.com
16