1
MODEL: MX-2300G
MX-2300N
MX-2700G
MX-2700N
Printer Guide
MX-3500N
MX-3501N
MX-4500N
MX-4501N
CONTENTS
FUNCTIONS THAT COMBINE TEXT AND
IMAGES . . . . . . . . . . . . . . . . . . . . . . . . . . . . . . . . . . . 28
• ADDING A WATERMARK TO PRINTED
PAGES (Watermark) . . . . . . . . . . . . . . . . . . . . . . 28
• PRINTING AN IMAGE OVER THE PRINT
DATA (Image Stamp) . . . . . . . . . . . . . . . . . . . . . . 29
• CREATING OVERLAYS FOR PRINT DATA
(Overlays) . . . . . . . . . . . . . . . . . . . . . . . . . . . . . . . 30
ABOUT THIS MANUAL . . . . . . . . . . . . . . . . . . . . . . . . 3
• MANUALS PROVIDED WITH THE MACHINE . . . 4
PRINTER FUNCTION OF THE MACHINE . . . . . . . . . . 5
1
PRINTING FROM WINDOWS
BASIC PRINTING PROCEDURE . . . . . . . . . . . . . . . . . 6
• SELECTING THE PAPER . . . . . . . . . . . . . . . . . . . 8
PRINT FUNCTIONS FOR SPECIAL PURPOSES . . . 31
• PRINTING SPECIFIED PAGES ON
DIFFERENT PAPER (Different Paper). . . . . . . . . 31
• ADDING INSERTS WHEN PRINTING ON
TRANSPARENCY FILM (Transparency
Inserts) . . . . . . . . . . . . . . . . . . . . . . . . . . . . . . . . . 32
• PRINTING A CARBON COPY (Carbon Copy) . . . 33
• PRINTING TEXT ON TABS OF TAB PAPER
(Tab Printing) . . . . . . . . . . . . . . . . . . . . . . . . . . . . 34
PRINTING WHEN THE USER AUTHENTICATION
FUNCTION IS ENABLED . . . . . . . . . . . . . . . . . . . . . . . 9
VIEWING PRINTER DRIVER HELP. . . . . . . . . . . . . . 11
SELECTING THE COLOUR MODE . . . . . . . . . . . . . . 12
TWO-SIDED PRINTING . . . . . . . . . . . . . . . . . . . . . . . 14
FITTING THE PRINT IMAGE TO THE PAPER . . . . . 16
PRINTING MULTIPLE PAGES ON ONE PAGE . . . . 18
CONVENIENT PRINTER FUNCTIONS . . . . . . . . . . . 35
• USING TWO MACHINES TO PRINT A LARGE
PRINT JOB (Tandem Print) . . . . . . . . . . . . . . . . . 35
• USING THE DOCUMENT FILING FUNCTION
(Retention/Document Filing) . . . . . . . . . . . . . . . . . 36
STAPLING OUTPUT/PUNCHING HOLES IN
OUTPUT . . . . . . . . . . . . . . . . . . . . . . . . . . . . . . . . . . . 20
2
CONVENIENT PRINTING
FUNCTIONS IN WINDOWS
SAVING FREQUENTLY USED PRINT SETTINGS . . 37
• SAVING SETTINGS AT THE TIME OF
PRINTING . . . . . . . . . . . . . . . . . . . . . . . . . . . . . . 37
• USING SAVED SETTINGS . . . . . . . . . . . . . . . . . 39
CONVENIENT FUNCTIONS FOR CREATING
PAMPHLETS AND POSTERS . . . . . . . . . . . . . . . . . . 22
• CREATING A PAMPHLET
(Pamphlet/Pamphlet Staple). . . . . . . . . . . . . . . . . 22
• INCREASING THE MARGIN (Margin Shift) . . . . . 23
• CREATING A LARGE POSTER (Poster
Printing) . . . . . . . . . . . . . . . . . . . . . . . . . . . . . . . . 23
CHANGING THE PRINTER DRIVER DEFAULT
SETTINGS . . . . . . . . . . . . . . . . . . . . . . . . . . . . . . . . . 40
3
FUNCTIONS TO ADJUST THE SIZE AND
ORIENTATION OF DATA . . . . . . . . . . . . . . . . . . . . . 24
• ROTATING THE PRINT IMAGE 180
DEGREES (Rotate 180 degrees) . . . . . . . . . . . . . 24
• ENLARGEMENT/REDUCTION
(Zoom/XY-Zoom) . . . . . . . . . . . . . . . . . . . . . . . . . 24
• REVERSING THE IMAGE (Mirror Image) . . . . . . 25
PRINTING FROM A MACINTOSH
BASIC PRINTING PROCEDURE . . . . . . . . . . . . . . . . 42
• SELECT PAPER SETTINGS . . . . . . . . . . . . . . . . 42
• PRINT. . . . . . . . . . . . . . . . . . . . . . . . . . . . . . . . . . 43
• SELECTING THE PAPER . . . . . . . . . . . . . . . . . . 45
PRINTING WHEN THE USER AUTHENTICATION
FUNCTION IS ENABLED . . . . . . . . . . . . . . . . . . . . . . 46
COLOUR MODE ADJUSTMENT FUNCTION . . . . . . 26
• ADJUSTING THE BRIGHTNESS AND
CONTRAST OF THE IMAGE (Color
Adjustment) . . . . . . . . . . . . . . . . . . . . . . . . . . . . . 26
• PRINTING LIGHT COLOUR CHARACTERS
OR LINES IN BLACK (Text To Black/Vector To
Black) . . . . . . . . . . . . . . . . . . . . . . . . . . . . . . . . . . 26
• SELECTING COLOUR SETTINGS TO
MATCH THE IMAGE TYPE (Image Type) . . . . . . 27
1
4
PRINTING WITHOUT THE PRINTER
DRIVER
DIRECTLY PRINTING FROM THE MACHINE. . . . . . 48
• DIRECTLY PRINTING A FILE ON AN FTP
SERVER. . . . . . . . . . . . . . . . . . . . . . . . . . . . . . . . 48
• DIRECTLY PRINTING A FILE IN USB
MEMORY . . . . . . . . . . . . . . . . . . . . . . . . . . . . . . . 50
DIRECTLY PRINTING FROM A COMPUTER . . . . . . 52
• SUBMIT PRINT JOB . . . . . . . . . . . . . . . . . . . . . . 52
• FTP PRINT . . . . . . . . . . . . . . . . . . . . . . . . . . . . . . 52
• E-MAIL PRINT . . . . . . . . . . . . . . . . . . . . . . . . . . . 53
PRINTING AN ENCRYPTED PDF FILE. . . . . . . . . . . 54
5
CHANGING THE JOB QUEUE
GIVING A PRINT JOB PRIORITY / CANCELLING
A PRINT JOB . . . . . . . . . . . . . . . . . . . . . . . . . . . . . . . 55
• GIVING A PRINT JOB PRIORITY . . . . . . . . . . . . 55
• CANCELLING A PRINT JOB . . . . . . . . . . . . . . . . 56
CHANGING TO ANOTHER PAPER SIZE AND
PRINTING WHEN PAPER RUNS OUT . . . . . . . . . . . 57
6
PRINTER DRIVER SPECIFICATIONS
PRINTER DRIVER SPECIFICATION LIST . . . . . . . . 58
2
ABOUT THIS MANUAL
Please note
• For information on installing the drivers and software cited in this manual, please refer to the separate Software Setup Guide.
• For information on your operating system, please refer to your operating system manual or the online Help function.
• The explanations of screens and procedures in this manual are primarily for Windows® XP in Windows® environments, and
Mac OS X v10.3.9 in Macintosh environments. The screens may vary depending on the version of the operating system.
• Wherever "MX-xxxx" appears in this manual, please substitute your model name for "xxxx".
• Where this manual shows the "MX-2300/2700 series" or the "MX-3500/4500 series", the following models are indicated:
MX-2300/2700 series: MX-2300G, MX-2300N, MX-2700G, MX-2700N
MX-3500/4500 series: MX-3500N, MX-3501N, MX-4500N, MX-4501N
• This manual contains references to the fax function. However, please note that the fax function is not available in some
countries and regions.
• Considerable care has been taken in preparing this manual. If you have any comments or concerns about the manual, please
contact your dealer or nearest authorised service representative.
• This product has undergone strict quality control and inspection procedures. In the unlikely event that a defect or other problem
is discovered, please contact your dealer or nearest authorised service representative.
• Aside from instances provided for by law, SHARP is not responsible for failures occurring during the use of the product or its
options, or failures due to incorrect operation of the product and its options, or other failures, or for any damage that occurs due
to use of the product.
Warning
• Reproduction, adaptation or translation of the contents of the manual without prior written permission is prohibited, except as
allowed under copyright laws.
• All information in this manual is subject to change without notice.
Illustrations and the operation panel and touch panel shown in this manual
The peripheral devices are generally optional, however, some models include certain peripheral devices as standard equipment.
The explanations in this manual assume that a right tray and stand/2 x 500 sheet paper drawer are installed on the MX-2700N
(equipped standard with an automatic document feeder).
To further explain certain functions and uses, some explanations assume that additional peripheral devices are installed.
The display screens, messages, and key names shown in this manual may differ from those on the actual machine
due to product improvements and modifications.
3
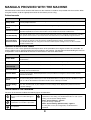
MANUALS PROVIDED WITH THE MACHINE
Printed manuals and manuals stored in PDF format on the machine's hard drive are provided with the machine. When
using the machine, read the appropriate manual for the feature you are using.
Printed manuals
Manual name
Safety Guide
Software Setup
Guide
Contents
This manual contains instructions for using the machine safely and lists the specifications of the machine
and its peripheral devices.
This manual explains how to install the software and configure settings to use the machine as a printer or scanner.
Quick Start Guide
This manual provides easy-to-understand explanations of all the functions of the machine in a single volume.
Detailed explanations of each of the functions can be found in the manuals in PDF format.
Troubleshooting
This manual explains how to remove paper misfeeds and provides answers to frequently asked questions regarding
the operation of the machine in each mode. Refer to this manual when you have difficulty using the machine.
Facsimile Quick
Reference Guide
This manual explains the basic procedures for using the fax function of the machine, and provides an
overview of the features of the fax function, troubleshooting procedures, and specifications.
For detailed information on using the fax function and the system settings for fax, see the "Facsimile
Guide" in PDF format.
Operation manuals in PDF format
The manuals in PDF format provide detailed explanations of the procedures for using the machine in each mode. To
view the PDF manuals, download them from the hard drive in the machine. The procedure for downloading the manuals
is explained in "How to download the manuals in PDF format" in the Quick Start Guide.
Manual name
Contents
User's Guide
This manual provides information, such as basic operation procedures, how to load paper, and machine
maintenance.
Copier Guide
This manual provides detailed explanations of the procedures for using the copy function.
Printer Guide
(This manual)
This manual provides detailed explanations of the procedures for using the printer function.
Facsimile Guide
This manual provides detailed explanations of the procedures for using the fax function and the "System
Settings" that are related to fax.
Scanner Guide
This manual provides detailed explanations of the procedures for using the scanner function and the
Internet fax function.
Document Filing
Guide
This manual provides detailed explanations of the procedures for using the document filing function. The
document filing function allows you to save the document data of a copy or fax job, or the data of a print
job, as a file on the machine's hard drive. The file can be called up as needed.
System Settings
Guide
This manual explains the "System Settings", which are used to configure a variety of parameters to suit
the aims and the needs of your workplace. Current settings can be displayed or printed out from the
"System Settings".
Icons used in the manuals
The icons in the manuals indicate the following types of information:
This alerts you to a situation where
there is a risk of machine damage or
failure.
This indicates the name of a system setting and a provides a brief
explanation of the setting. For detailed information on each system
setting, see the System Settings Guide.
This provides a supplemental
explanation of a function or procedure.
When "System Settings:" appears:
A general setting is explained.
This explains how to cancel or correct
an operation.
When "System Settings (Administrator):" appears:
A setting that can only be configured by an administrator is
explained.
4
PRINTER FUNCTION OF THE MACHINE
This machine has a full colour printing function which can be used in a Windows environment as a standard feature. The
printer driver can be installed from the provided CD-ROM to enable printing from your computer.
Expansion kits are available to enable the machine to be used in various environments.
For this reason, the following printer driver types are available for use with the machine. Please select a suitable printer
driver depending on the expansion kits that are installed. The functions that are available vary depending on the printer
driver type.
☞ PRINTER DRIVER SPECIFICATION LIST (page 58)
Printer driver type
PCL6, PCL5c:
SPLC-c:
PS:
The machine supports the Hewlett-Packard PCL6 and PCL5c printer control languages. It is
recommended that you use the PCL6 printer driver. If you have a problem printing from older software
using the PCL6 printer driver, use the PCL5c printer driver.
This is the SHARP proprietary printer driver. The printer driver compresses the data in each print job
before sending the job to the machine, enabling smooth printing.
(SPLC is an acronym for "SHARP Printer Language with Compression".)
This printer driver supports the PostScript 3 page description language developed by Adobe Systems
Incorporated and enables the machine to be used as a PostScript 3 compatible printer.
(A PPD file is available if it is desired to use the Windows standard PS printer driver. To install the PPD
file, see the Software Setup Guide.)
The printer drivers that can be used vary depending on your machine model. Check which printer drivers can be used in
the tables below.
MX-2300G/2700G
Environment
Printer driver type
Requirements
SPLC-c*
Windows
Can be used in the standard machine configuration.
PCL6, PCL5c
The printer expansion kit is required.
The printer expansion kit and PS3 expansion kit are
required.
PS
Macintosh
* Cannot be used when the printer expansion kit is installed.
MX-2300N/2700N or MX-3500/4500 series
Environment
Printer driver type
Requirements
PCL6, PCL5c
Can be used in the standard machine configuration.
Windows
PS
The PS3 expansion kit is required.
Macintosh
The explanations in this manual of printing in a Windows environment generally use the PCL6 printer driver screens. The
screens may vary slightly depending on the printer driver that you are using.
5
1
PRINTING FROM WINDOWS
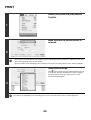
BASIC PRINTING PROCEDURE
The following example explains how to print a document from "WordPad", which is a standard accessory program in
Windows.
Select [Print] from the [File] menu of
WordPad.
1
The menu used to execute printing may vary depending on the software application.
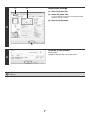
Open the printer driver properties
window.
(1) Select the printer driver of the machine.
• If the printer drivers appear as icons, click the icon
of the printer driver to be used.
• If the printer drivers appear as a list, select the
name of the printer driver to be used from the list.
(2) Click the [Preferences] button.
• In Windows 98/Me/NT 4.0, click the [Properties]
button.
• If you are using Windows 2000, the [Preferences]
button does not appear. Click each tab in the "Print"
dialog box to adjust the settings on that tab.
2
(1)
(2)
The button that is used to open the printer driver properties window (usually [Properties] or [Printing Preferences])
may vary depending on the software application.
6
(1)
Select print settings.
(2)
(1) Click the [Paper] tab.
(2) Select the paper size.
To select settings on other tabs, click the desired tab
and then select the settings.
(3) Click the [OK] button.
3
(3)
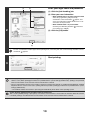
Click the [Print] button.
Printing begins.
In Windows 98/Me/NT 4.0, click the [OK] button.
4
The print job is delivered to the output tray, with the position of the paper offset slightly from the previous job (other than the
right tray).
7
SELECTING THE PAPER
This section explains how to configure the "Paper Selection" setting on the [Paper] tab of
the printer driver properties window.
Before printing, check the paper sizes, paper types, and paper remaining in the machine's
trays. To view the most recent tray information, click the [Tray Status] button.
• When [Auto Select] is selected in "Paper Source"
The tray that has the size and type of paper selected in "Paper Size" and "Paper Type" on the [Paper] tab is
automatically selected.
• When other than [Auto Select] is selected in "Paper Source"
The specified tray is used for printing regardless of the "Paper Size" setting.
When [Bypass Tray] is selected
Also select the "Paper Type". Check the bypass tray and make sure that the desired type of paper is loaded, and then
select the appropriate "Paper Type" setting.
• Special media such as envelopes can also be placed in the bypass tray. For the procedure for loading paper and other
media in the bypass tray, see "LOADING PAPER IN THE BYPASS TRAY" in the User's Guide.
• When "Enable Detected Paper Size in Bypass Tray" (disabled by factory default) or "Enable Selected Paper Type in
Bypass Tray" (enabled by factory default) is enabled in the system settings (administrator), printing will not take place if the
paper size or paper type specified in the printer driver is different from the paper size or paper type specified in the settings
of the bypass tray.
• When [Auto Select] is selected in "Paper Type"
A tray with plain paper or recycled paper of the size specified in "Paper Size" is automatically selected. (The factory
default setting is plain paper only.)
• When other than [Auto Select] is selected in "Paper Type"
A tray with the specified type of paper and the size specified in "Paper Size" is used for printing.
System Settings (Administrator): Exclude Bypass-Tray from Auto Paper Select
When [Auto Select] is selected in "Paper Selection", specify whether or not the paper in the bypass tray will be excluded from
the paper that can be selected. This setting is disabled by factory default, and thus paper in the bypass tray is included in the
paper that can be automatically selected. If special types of paper are frequently loaded in the bypass tray, it is
recommended that this setting be enabled.
8
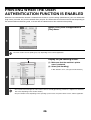
PRINTING WHEN THE USER
AUTHENTICATION FUNCTION IS ENABLED
When the user authentication function is enabled in the machine's system settings (administrator), your user information
(login name, password, etc.) must be entered in the setup screen of the printer driver before you can print. The
information that must be entered varies depending on the authentication method being used, so check with the
administrator of the machine before printing.
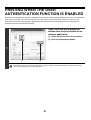
Open the printer driver properties
window from the print window of the
software application.
(1) Select the printer driver of the machine.
(2) Click the [Preferences] button.
1
(1)
(2)
The button that is used to open the printer driver properties window (usually [Properties] or [Printing Preferences])
may vary depending on the software application.
9
(1)
Enter your login name and password.
(2)
(1) Click the [Job Handling] tab.
(2) Enter your user information.
• When authentication is by login name/password
Select the [Login Name] and [Password]
checkboxes so that checkmarks
appear, and
enter your login name and password. Enter 1 to 32
characters for the password.
• When authentication is by user number
Click the [User Number] checkbox
and enter a
user number (5 to 8 digits).
2
(3) Click the [OK] button.
(3)
To have a confirmation window appear before printing starts, select the [Auto Job Control Review] checkbox so that a
checkmark
appears.
Start printing.
3
• Normally printing is possible without entering your user information. (In this case, the printed pages will be added to the
"Others" count.) When printing by invalid users is prohibited in the system settings (administrator), printing is not permitted
when user information is not entered or incorrect information is entered.
• The user authentication function of the machine cannot be used when the PPD file* is installed and the Windows standard
PS printer driver is used. For this reason, printing will not be possible if printing by invalid users is prohibited in the system
settings (administrator).
* The PPD file enables the machine to print using the standard PS printer driver of the operating system.
System Settings (Administrator): Disable Printing by Invalid User
This is used to prohibit printing of print jobs by users whose user information is not stored in the machine. When this function
is enabled, printing is not allowed when user information is not entered or incorrect information is entered.
10
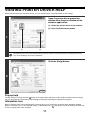
VIEWING PRINTER DRIVER HELP
When selecting settings in the printer driver, you can display Help to view explanations of the settings.
Open the printer driver properties
window from the print window of the
software application.
(1) Select the printer driver of the machine.
(2) Click the [Preferences] button.
1
(1)
(2)
The button that is used to open the printer driver properties window (usually [Properties] or [Printing Preferences])
may vary depending on the software application.
Click the [Help] button.
2
Pop-up help
To view Help for a setting, click the
button in the upper right-hand corner of the window and then click the setting.
You can also view the same Help by right-clicking the setting and clicking the Help box that appears.
Information icon
Some restrictions exist on the combinations of settings that can be selected in the printer driver properties window.
When a restriction exists on the selected setting, an information icon (
) will appear next to the setting. Click the icon
to view an explanation of the restriction.
11
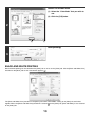
SELECTING THE COLOUR MODE
This section explains how to select the "Color Mode" on the [Color] tab of the printer driver properties window. The
following three selections are available for the "Color Mode".
Automatic:
The machine automatically determines whether each page is colour or black and white and prints the
page accordingly. Pages with colours other than black and white are printed using Y (Yellow), M
(Magenta), C (Cyan) and Bk (Black) toner. Pages that are only black and white are printed using Bk
(Black) toner only. This is convenient when printing a document that has both colour and black and
white pages, however, the printing speed is slower.
Color:
All pages are printed in colour. Both colour data and black and white data are printed using Y (Yellow),
M (Magenta), C (Cyan) and Bk (Black) toner.
Black and White: All pages are printed in black and white. Colour data such as images or materials for a presentation
are printed using black toner only. This mode helps conserve colour toner when you do not need to
print in colour, such as when proofreading or checking the layout of a document.
When [Automatic] is selected in the PCL6, PCL5c, or PS printer driver
Print data that includes images are counted as colour even though the data is black and white. To be always counted and
printed as black and white, select [Black and White].
Open the printer driver properties
window from the print window of the
software application.
(1) Select the printer driver of the machine.
(2) Click the [Preferences] button.
1
(1)
(2)
The button that is used to open the printer driver properties window (usually [Properties] or [Printing Preferences])
may vary depending on the software application.
12
Select the colour mode.
(1) Select the "Color Mode" that you wish to
use.
(2) Click the [OK] button.
2
(2)
(1)
Start printing.
3
BLACK AND WHITE PRINTING
Black and white printing can be selected on the [Main] tab as well as on the [Color] tab. Click the [Black and White Print]
checkbox on the [Main] tab so that a checkmark appears
.
The [Black and White Print] checkbox on the [Main] tab and the "Color Mode" setting on the [Color] tab are linked
together. When the [Black and White Print] checkbox is selected
on the [Main] tab, [Black and White] is also selected
on the [Color] tab.
13
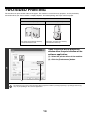
TWO-SIDED PRINTING
The machine can print on both sides of the paper. This function is useful for many purposes, and is particularly
convenient when you want to create a simple pamphlet. Two-sided printing also helps conserve paper.
Printing result
2-Sided (Book)
2-Sided (Tablet)
The pages are printed so that they
can be bound at the side.
The pages are printed so that they
can be bound at the top.
Open the printer driver properties
window from the print window of the
software application.
(1) Select the printer driver of the machine.
(2) Click the [Preferences] button.
1
(1)
(2)
The button that is used to open the printer driver properties window (usually [Properties] or [Printing Preferences])
may vary depending on the software application.
14
Select 2-sided printing.
(1) Select [2-Sided(Book)] or
[2-Sided(Tablet)].
(2) Click the [OK] button.
2
(1)
(2)
Start printing.
3
15
FITTING THE PRINT IMAGE TO THE PAPER
This function is used to automatically enlarge or reduce the printed image to the size of the paper loaded in the machine.
This is convenient for such purposes as enlarging an A4 or letter size document to A3 or ledger size paper to make it
easier to view, and to print when the same size of paper as the document image is not loaded in the machine.
A4 or Letter
A3 or Ledger
The explanation below assumes that you intend to print an A4 size document on A3 size paper.
Open the printer driver properties
window from the print window of the
software application.
(1) Select the printer driver of the machine.
(2) Click the [Preferences] button.
1
(1)
(2)
The button that is used to open the printer driver properties window (usually [Properties] or [Printing Preferences])
may vary depending on the software application.
16
Select Fit to Page.
(2)
(1)
(1) Click the [Paper] tab.
(2) Select the paper size of the print image
(for example: A4).
(3) Select [Fit To Paper Size].
(4) Select the actual paper size to be used
for printing (for example: A3).
2
(5) Click the [OK] button.
(3) (4)
(5)
Start printing.
3
17
PRINTING MULTIPLE PAGES ON ONE PAGE
This function can be used to reduce a print image and print multiple pages on a single sheet of paper.
This is convenient when you want to print multiple images such as photos on a single sheet of paper, and when you
want to conserve paper. This function can also be used in combination with 2-sided printing for maximum conservation
of paper.
The print results of [2-Up] and [4-Up] are shown below for each selection in the "Order" menu.
Print results
N-Up
Left To Right
Right To Left
Top To Bottom (when the
printing orientation is
landscape)
[2-Up]
N-Up
Right, and Down
Down, and Right
Left, and Down
Down, and Left
[4-Up]
The order of 6-Up, 8-Up, 9-Up, and 16-Up is the same as 4-Up.
The order can be viewed in the print image in the printer driver properties window.
Open the printer driver properties
window from the print window of the
software application.
(1) Select the printer driver of the machine.
(2) Click the [Preferences] button.
1
(1)
(2)
The button that is used to open the printer driver properties window (usually [Properties] or [Printing Preferences])
may vary depending on the software application.
18
Select N-Up Printing.
(1) Select the number of pages per sheet.
(2) If you wish to print borderlines, click the
[Border] checkbox so that a checkmark
appears.
(3) Select the order of the pages.
(4) Click the [OK] button.
2
(1) (2)
(3)
(4)
Start printing.
3
19
STAPLING OUTPUT/PUNCHING HOLES IN
OUTPUT
Staple function
The staple function can be used to staple output.
This function saves considerable time when preparing materials such as handouts for a meeting. The staple function
can also be used in combination with 2-sided printing to create materials with a more sophisticated appearance.
Stapling positions and the number of staples can be selected to obtain the following stapling results.
Staples
Left
Right
Top
[1 Staple]
[2 Staples]
Punch function
To punch holes in the output, click the [Punch] checkbox so that a checkmark
set using [Binding Edge].
Left
Right
appears. Punch hole positions can be
Top
• To use the staple function, a finisher or saddle stitch finisher is required.
• To use the punch function, a punch unit must be installed on the finisher or saddle stitch finisher.
• The number of holes that can be punched and the spacing between the holes varies depending on the installed punch
module.
• The maximum number of sheets that can be stapled is as follows.
When a finisher is installed: 50 sheets (30 sheets for Foolscap, B4, or larger sizes)
When a saddle stitch finisher is installed: 30 sheets (25 sheets for Foolscap, B4, or larger sizes)
• The staple function and offset function cannot be used at the same time.
• When the finisher is disabled in the machine's system settings (administrator), the staple function and punch function
cannot be used.
• When the staple function or the punch function is disabled in the machine's system settings (administrator), stapling or
punching is not possible.
• For information on pamphlet stapling, see "CREATING A PAMPHLET (Pamphlet/Pamphlet Staple)" (page 22).
20
Open the printer driver properties
window from the print window of the
software application.
(1) Select the printer driver of the machine.
(2) Click the [Preferences] button.
1
(1)
(2)
The button that is used to open the printer driver properties window (usually [Properties] or [Printing Preferences])
may vary depending on the software application.
Select the staple function or the
punch function.
(1) Select the binding edge.
(2) Select the staple function or the punch
function.
• For the staple function, select the number of staples
in the "Staple" menu.
• For the punch function, click the [Punch] checkbox
so that a checkmark
appears.
2
(3) Click the [OK] button.
(1) (2)
(3)
Start printing.
3
21
2
CONVENIENT PRINTING
FUNCTIONS IN WINDOWS
This section explains convenient functions for specific printing objectives. The procedures for selecting these functions
assume that the printer driver properties window has been opened from the print window of your application and that
basic settings such as the paper size have been selected. When the settings are completed, return to the print window
and begin printing.
☞ BASIC PRINTING PROCEDURE (Page 6)
For details on printer driver settings used for each printing function, view printer driver Help.
CONVENIENT FUNCTIONS FOR CREATING
PAMPHLETS AND POSTERS
CREATING A PAMPHLET (Pamphlet/Pamphlet Staple)
The pamphlet function prints on the front and back of
each sheet of paper so that the sheets can be folded and
bound to create a pamphlet. This is convenient when
you wish to compile printed output into a pamphlet.
When a saddle stitch finisher is installed and saddle
stitch printing and the staple function are selected, the
output is automatically folded at the centre. This allows
you to conveniently use the output as a handout or
pamphlet without the need for any further work.
Selecting the settings:
The settings are on
the [Main] tab.
Select [Pamphlet Style].
Pamphlet printing can be
selected from the pull-down
menu.
22
Select the "Binding Edge".
[2 Staples] can be selected in
"Staple" when a saddle stitch
finisher is installed.
INCREASING THE MARGIN (Margin Shift)
This function is used to shift the print image to increase
the margin at the left, right, or top of the paper. This is
convenient when you wish to staple or punch the output,
but the binding position overlaps the text. When a finisher
or saddle stitch finisher is installed, you can use the
staple function or the punch function with this function.
Selecting the settings:
The settings are on
the [Main] tab.
Select the "Binding
Edge".
Select the "Margin Shift".
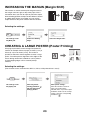
CREATING A LARGE POSTER (Poster Printing)
One page of print data can be enlarged and printed in
sections on multiple sheets of paper (4 sheets (2 x 2), 9
sheets (3 x 3) or 16 sheets (4 x 4)). This makes it
possible to attach the sheets together to create a large
poster. To enable precise alignment of the edges of the
sheets during attachment, borderlines can be printed
and overlapping edges can be created (overlap
function).
Selecting the settings:
(This function can be used when the SPLC-c, PCL6, or PS printer driver is used.)
The settings are on
the [Paper] tab.
Select the [Poster
Printing] checkbox
and click the [Poster
Settings] button.
Select poster settings.
Select the number of sheets of
paper to be used from the
pull-down menu. If you wish to print
borderlines and/or use the overlap
function, select the corresponding
checkboxes
.
23
FUNCTIONS TO ADJUST THE SIZE AND
ORIENTATION OF DATA
ROTATING THE PRINT IMAGE 180 DEGREES (Rotate
180 degrees)
This feature enables the image to be rotated 180
degrees so that it can be printed correctly on paper that
can only be loaded in one orientation (such as
envelopes or paper with punch holes).
ABCD
ABCD
Selecting the settings:
The setting is on the
[Main] tab.
Select the [Rotate 180
degrees] checkbox
.
ENLARGEMENT/REDUCTION (Zoom/XY-Zoom)
This function is used to enlarge or reduce the image to a
selected percentage. This allows you to add margins to
the paper by slightly reducing the image, or to enlarge a
small image.
When using the PS printer driver, you can set the width
and length percentages separately to change the
proportions of the image. (XY-Zoom)
Selecting the settings:
The settings are on
the [Paper] tab.
Select [Zoom] and click the
[Settings] button.
The actual paper size to be used for
printing can be selected from the
pull-down menu.
24
Select the zoom ratio.
Directly enter a number (%) or click
the
button to change the ratio
in increments of 1%.
REVERSING THE IMAGE (Mirror Image)
The image can be reversed to create a mirror image.
This function can be used to conveniently print a design
for a woodblock print or other printing medium.
B
Selecting the settings:
(This function can be used when the PS printer driver is used.)
The settings are on the
[Advanced] tab.
Select the Mirror Image settings.
If you wish to reverse the image
horizontally, select [Horizontal]. If
you wish to reverse the image
vertically, select [Vertical].
25
B
COLOUR MODE ADJUSTMENT FUNCTION
ADJUSTING THE BRIGHTNESS AND CONTRAST OF
THE IMAGE (Color Adjustment)
The brightness and contrast can be adjusted in the print settings when printing a photo or other image. These settings
can be used for simple corrections when you do not have image editing software installed on your computer.
Selecting the settings:
The settings are on the
[Color] tab.
Click the [Color
Adjustment] button.
Adjust the image settings.
To adjust a setting, drag the slide bar
or
buttons.
or click the
PRINTING LIGHT COLOUR CHARACTERS OR LINES IN
BLACK (Text To Black/Vector To Black)
When printing a colour image in greyscale, colour text
and lines that are faint can be printed in black. (Raster
data such as bitmap images cannot be adjusted.) This
allows you to bring out colour text and lines that are faint
and difficult to see when printed in greyscale.
• [Text To Black] can be selected to print all text other
than white text in black.
• [Vector To Black] can be selected to print all vector
graphics other than white lines and areas in black.
ABCD
Selecting the settings:
The settings are on the
[Color] tab.
Select the [Text To Black] checkbox
and/or the [Vector To Black]
checkbox
.
26
ABCD
SELECTING COLOUR SETTINGS TO MATCH THE
IMAGE TYPE (Image Type)
Preset colour settings are available in the machine's printer driver for [Graphics], [Photo], and other image types. These
enable printing using the most suitable colour settings for the colour image type.
If you wish to select advanced settings, click the [Advanced Color] button. The advanced colour settings allow you to
configure settings to match the printing purpose of the colour image, such as colour management settings and the
screening setting that adjusts the expression of colour tones.
The following items can be configured in the advanced colour management settings:
• [Windows ICM] checkbox: Colour management method
• "Source Profile": Select the colour profile used to display the image on the computer screen.
• "Rendering Intent": Standard value used when converting the colour balance of the image displayed on the computer
screen to a colour balance that can be printed by the machine.
• "Screening": Select the most suitable image processing method for the image being printed.
• "Neutral Gray"*: Select the toner colour used to print grey areas.
• "Print Priority"*: Select whether you wish to give priority to image quality or speed when printing.
* This setting is not available in the SPLC-c printer driver.
Selecting the settings:
The settings are on the
[Color] tab.
Select the color image
type.
A document type to
match your purpose can
be selected from the
pull-down menu.
If you wish to select
advanced settings, click
the [Advanced Color]
button.
To configure all
the advanced
colour settings,
select [Custom]
from the pull-down
menu and then
click the
[Advanced Color]
button.
27
Select the advanced colour settings.
If you wish to perform colour management using
Windows ICM in your operating system, select the
[Windows ICM] checkbox
. To configure
advanced colour management settings such as
"Source Profile", select the desired settings from the
menus.
The settings that can be selected vary
depending on the printer driver type. The PS
printer driver also allows you to select the
Black Overprint function, which prevents
whitening of the outline of black text, and the
CMYK Simulation function, which allows you
to perform colour adjustment to obtain a
result similar to that of the process colour
([Default] is set to "SWOP" for Northern
America or "Euroscale" for other countries.)
ink used by a printing press.
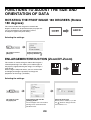
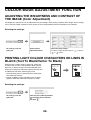
FUNCTIONS THAT COMBINE TEXT AND
IMAGES
ADDING A WATERMARK TO PRINTED PAGES
(Watermark)
CO
NF
ID
EN
TI
AL
Faint shadow-like text can be added to the background
of the printed image as a watermark. The size, colour,
density, and angle of the watermark text can be
adjusted. The text can be selected from a pre-stored list,
or entered to create an original watermark.
Selecting the settings:
The settings are on the
[Watermarks] tab.
Select the watermark setting.
Select a stored water mark from the pull-down menu.
You can click the [Edit] button to edit the font colour
and select other detailed settings.
If you wish to create a new watermark...
Enter the text of the watermark in the text box
and click the [Add] button.
28
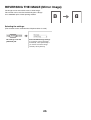
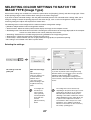
PRINTING AN IMAGE OVER THE PRINT DATA (Image
Stamp)
A bitmap or JPEG image stored on your computer can
be printed over the print data. The size, position, and
angle of the image can be adjusted. This feature can be
used to "stamp" the print data with a frequently used
image or an icon of your own creation.
MEMO
MEMO
Selecting the settings:
(This function can be used when the SPLC-c, PCL6, or PS printer driver is used.)
The settings are on the
[Watermarks] tab.
Select the image stamp setting.
Select a stored image stamp from the pull-down menu.
If you wish to create a new image stamp...
Select an image file and then click the [Add]
button.
29
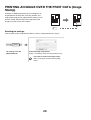
CREATING OVERLAYS FOR PRINT DATA (Overlays)
The print data can be printed in a previously created
overlay. By creating table rulings or a decorative frame
in an application different from the text and registering
the data as an overlay file, an attractive print result can
be easily obtained without the need for complex
manipulations.
XXXX
XXX
XXXX
XXX
XXXX
XXXX
1
10
0
10
100
150
120
250
XXX
XXXX
XXX
XXXX
1
10
0
10
100
150
120
250
aaabbbccc 1-2-3
aaabbbccc 1-2-3
Overlay file
Selecting the settings:
(This function can be used when the PCL6, PCL5c, or PS printer driver is used.)
Create an overlay file
The settings are on the
[Advanced] tab.
Configure the printer
driver settings from the
software application used
to create the overlay file.
Click the [Edit]
button.
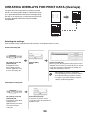
Create an overlay file.
Click the [Create Overlay] button and specify the name
and folder to be used for the overlay file that you wish to
create. The file will be created when the settings are
completed and printing is started.
• When printing is started, a confirmation
message will appear. The overlay file will not
be created until the [Yes] button is clicked.
• To register a previously existing overlay file,
click the [Load Overlay] button.
Print with an overlay file
The settings are on the
[Advanced] tab.
Configure the printer driver
settings from the
application that you wish to
use to print using the
overlay file.
Select the overlay file.
A previously created or stored
overlay file can be selected from the
pull-down menu.
30
PRINT FUNCTIONS FOR SPECIAL
PURPOSES
Print functions for special purposes can be found in the "Special Option" field on the [Paper] tab of the printer driver
properties window.
Click the [Settings] button to display the setting screen of the selected print function.
• Select [Normal] when you do not wish to use a print function in "Special Option".
• The functions that are available vary depending on the printer driver type.
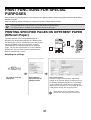
PRINTING SPECIFIED PAGES ON DIFFERENT PAPER
(Different Paper)
The front and back cover and specified pages of a
document can be printed on paper that is different from
the other pages. Use this function when you wish to print
the front and back cover on heavy paper, or insert
coloured paper or a different paper type at specified
pages. You can also insert paper as an insert without
printing on it. (Only a cover can be inserted when the
SPLC-c printer driver is used.)
1
2
3
4
5
Selecting the settings:
The settings are on the
[Paper] tab.
Select [Different
Paper] and click the
[Settings] button.
Select insert settings
The paper setting, insertion position, and printing
method can be selected. Settings configured here can
be added by clicking the [Add] button. Saved settings
can be checked in the "Information" list. Settings are
added to this list when they are saved. When you have
completed the settings, click the [Save] button.
When [Bypass Tray] is selected in "Paper
Source", be sure to select the "Paper Type".
31
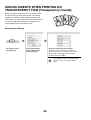
ADDING INSERTS WHEN PRINTING ON
TRANSPARENCY FILM (Transparency Inserts)
When printing on transparency film, this function helps
prevent the sheets of transparency film from sticking
together by inserting a sheet of paper between each
sheet of film. It is also possible to print the same content
on each inserted sheet of paper as is printed on the
corresponding sheet of transparency film.
A B C
Selecting the settings:
The settings are on
the [Paper] tab.
Select [Transparency
Inserts] and click the
[Settings] button.
Select the transparency film settings.
To print the same content on the insert as is
printed on the sheet of transparency film, select
the [Printed] checkbox
. Select the paper
selection setting as needed.
When [Bypass Tray] is selected in "Paper
Source", be sure to select the "Paper
Type".
32
PRINTING A CARBON COPY (Carbon Copy)
This function is used to print an additional copy of the
print data on paper that is the same size but from a
different paper tray.
For example, if carbon copy print is selected when
standard paper is loaded in tray 1 and coloured paper is
loaded in tray 2, a print result similar to a carbon copy
slip can be obtained by selecting the print command only
once. As another example, if standard paper is loaded in
tray 1 and recycled paper is loaded in tray 2, Carbon
Copy can be used to simultaneously print one copy for
presentation and one copy as a duplicate.
A
AAA
Selecting the settings:
(This function can be used when the PCL6, PCL5c, or PS printer driver is used.)
The settings are on the
[Paper] tab.
Select [Carbon Copy] and
click the [Settings] button.
Select the carbon copy settings.
Select the tray for the "Top Copy" and then
select the tray for the carbon copy (or
copies) in "Carbon Copy".
When the bypass tray is selected, be
sure to select the "Paper Type".
33
PRINTING TEXT ON TABS OF TAB PAPER (Tab Printing)
ABC
This function is used to print text on the tabs of tab paper.
Printing tab data created in the printer driver (PCL6 only)
Enter the text to be printed on the tabs in [Tab Paper Print]
on the [Paper] tab of the printer driver properties window,
and configure detailed settings such as the size of the
tabs, the starting position, the distance between tabs, and
the page numbers where tab sheets will be inserted.
Printing tab data created in a software application
(PCL6, PCL5c, PS only)
After creating the text to be printed on the tabs in a
software application, use [Tab Paper Settings] on the
[Advanced] tab of the printer driver properties window to
specify how far the text needs to be shifted for tab printing.
DEF
GHI
Selecting the settings:
Printing tab data created in the printer driver (PCL6 only)
The settings are on the
[Paper] tab.
Select [Tab Paper
Print] and click the
[Settings] button.
Select the tab paper settings.
The position of the first tab, the distance between tabs,
and the horizontal and vertical dimensions of the tab can
be directly entered or changed using the
button. In
addition, the size of the tab paper can be selected in
"Paper Size". If you wish to enter text to be printed on tab
paper or specify the page numbers where tab sheets will
be inserted, click the [Page Settings] button.
The tab paper settings can be stored and a stored
file opened in "User Settings".
Printing tab data created in a software application (PCL6, PCL5c, PS only)
The settings are on the
[Advanced] tab.
Click the [Tab Paper
Settings] button.
Select the tab paper settings.
To shift the image, directly enter a number
or click the
button.
34
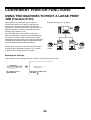
CONVENIENT PRINTER FUNCTIONS
USING TWO MACHINES TO PRINT A LARGE PRINT
JOB (Tandem Print)
Example: Printing 4 sets of copies
Two machines are required to use this function.
Tandem Print allows you to divide a large print job
between two machines connected to your network.
The machines simultaneously print each half of the job,
making it possible to shorten the printing time when
printing a large number of sets.
To use Tandem Print, the IP address of the slave
machine configured in "Tandem Connection Setting" of
the machine's system settings (administrator) must be
configured in the printer driver. This can be accomplished
automatically by clicking the [Auto Configuration] button
on the [Configuration] tab of the printer driver.
Tandem Print can only be used when the printer driver is
installed using a "Standard installation" or a "Custom
installation" with "LPR Direct Print" selected.
2 sets of
copies
Selecting the settings:
(This function can be used when the PCL6, PCL5c, or PS printer driver is used.)
The setting is on the
[Advanced] tab.
Select the [Tandem Print]
checkbox
.
35
2 sets of
copies
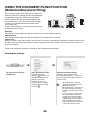
USING THE DOCUMENT FILING FUNCTION
(Retention/Document Filing)
This function is used to store a print job as a file on the
machine's hard drive, allowing the job to be printed from
the operation panel when needed. You can select a
folder to keep the file from being mixed together with
files of other users, and a password (from 5 to 8 digits
number) can be established to prevent others from
accessing the file.
To print a file stored with a password, the password must
be entered on the machine.
HDD
Hold Only
This setting is used to hold a print job on the machine's hard drive without printing it.
Hold After Print
This setting is used to hold a print job on the machine's hard drive after it is printed.
Sample Print
When a print job is sent to the machine, only the first set of copies is printed. After checking the contents of the first set
of copies, you can print the remaining sets from the operation panel of the machine. This prevents the occurrence of
excessive misprints.
To print files stored on the machine's hard drive, see the Document Filing Guide.
Selecting the settings:
The settings are on the [Job
Handling] tab.
Select the retention setting.
Select the [Retention]
checkbox
and then select
the retention method for the
print job in "Retention
Settings". To enter the
password (from 5 to 8 digits
number), click a [Password]
checkbox
.
36
Select document filing settings.
Select the folder for storing the file in
"Document Filing Settings". If you selected
[Custom Folder], click the [Stored to] button to
select the folder.
• When [Quick File] is selected,
"Retention Settings" will be set to
[Hold After Print] only.
• When [Quick File] is selected, the
password entered in "Retention
Settings" is cleared and cannot be
used.
• To store a file in a custom folder,
the custom folder must first be
created using "Document Filing
Control" in the system settings
(administrator). If a password has
been established for a custom
folder, enter the "Folder Password"
in the folder selection screen.
SAVING FREQUENTLY USED PRINT
SETTINGS
Settings configured on each tab at the time of printing can be saved as user settings. Saving frequently used settings or
complex colour settings under an assigned name makes it easy to select those settings the next time you need to use
them.
SAVING SETTINGS AT THE TIME OF PRINTING
Settings can be saved from any tab of the printer driver properties window. Settings configured on each tab are listed at
the time of saving, allowing you to check the settings as you save them.
Open the printer driver properties
window from the print window of the
software application.
(1) Select the printer driver of the machine.
(2) Click the [Preferences] button.
1
(1)
(2)
The button that is used to open the printer driver properties window (usually [Properties] or [Printing Preferences])
may vary depending on the software application.
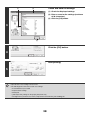
Save the print settings.
(1) Configure print settings on each tab.
(2) Click the [Save] button.
2
(1)
(2)
37
(1)
Check and save the settings.
(2)
(1) Check the displayed settings.
(2) Enter a name for the settings (maximum
of 20 characters).
(3) Click the [OK] button.
3
(3)
Click the [OK] button.
4
Start printing.
5
• Up to 30 sets of user settings can be saved.
• The following items cannot be saved in user settings.
• A watermark that you created
• Paper insertion settings
• Overlay file
• [Tab Paper Print] settings on the [Paper] tab (PCL6 only)
• The login name, password, user name, and job name entered in the [Job Handling] tab
38
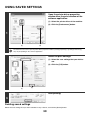
USING SAVED SETTINGS
Open the printer driver properties
window from the print window of the
software application.
(1) Select the printer driver of the machine.
(2) Click the [Preferences] button.
1
(1)
(2)
The button that is used to open the printer driver properties window (usually [Properties] or [Printing Preferences])
may vary depending on the software application.
Select the print settings.
(1) Select the user settings that you wish to
use.
(2) Click the [OK] button.
2
(1)
(2)
Start printing.
3
Deleting saved settings
Select the user settings that you want to delete in step 2 above, and click the [Delete] button.
39
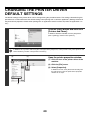
CHANGING THE PRINTER DRIVER
DEFAULT SETTINGS
The default settings of the printer driver can be changed using the procedure below. The settings selected using this
procedure are saved and become the default settings when printing from a software application. (Settings selected in
the printer driver properties window when printing from an application remain in effect only while the application is in
use.)
Click the [start] button and then click
[Printers and Faxes].
In Windows 98/Me/NT 4.0/2000, click the [Start] button,
point to [Settings], and then select [Printers].
1
In Windows XP, if [Printers and Faxes] does not appear in the [start] menu, select [Control Panel], select [Printers and
Other Hardware], and then select [Printers and Faxes].
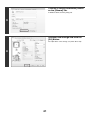
(2)
Open the printer properties window.
(1)
(1) Click the icon of the printer driver of the
machine.
(2) Click the [File] menu.
(3) Select [Properties].
In Windows NT 4.0, select [Document Defaults] from
the [File] menu to open the printer driver properties
window. Go to step 4.
2
(3)
40
Click the [Printing Preferences] button
on the [General] tab.
In Windows 98/Me, click the [Setup] tab.
3
Configure the settings and click the
[OK] button.
For explanations of the settings, see printer driver Help.
4
41
3
PRINTING FROM A MACINTOSH
BASIC PRINTING PROCEDURE
The following example explains how to print a document from "TextEdit", which is a standard accessory program in Mac OS X.
The PS3 expansion kit is required to use the machine as a printer in a Macintosh environment. (On the MX-2300G/2700G,
the printer expansion kit must also be installed.) In addition, the printer function can only be used when the machine is
connected to a network. To install the PPD file and configure the printer driver settings, see the Software Setup Guide.
SELECT PAPER SETTINGS
Select paper settings in the printer driver before selecting the print command.
Select [Page Setup] from the [File]
menu of TextEdit.
1
Select paper settings.
(1)
(1) Make sure that the correct printer is
selected.
(2) Select paper settings.
The paper size, paper orientation, and enlarge/reduce
can be selected.
(3) Click the [OK] button.
2
(2)
(3)
• The machine name that appears in the "Format for" menu is normally [SCxxxxxx]. ("xxxxxx" is a sequence of
characters that varies depending on your machine model.)
• The contents of the screen and procedures for changing the settings vary depending on your operating system
version, the printer driver version, and the software application.
42
PRINT
Select [Print] from the [File] menu of
TextEdit.
1
Make sure that the correct printer is
selected.
2
• The machine name that appears in the "Printer" menu is normally [SCxxxxxx]. ("xxxxxx" is a sequence of characters
that varies depending on the machine model.)
• The print window varies depending on the operating system version, the printer driver version, and the application.
Select print settings.
Click
next to [Copies & Pages] ([General] in Mac OS 9.0
to 9.2.2) and select the settings that you wish to configure
from the pull-down menu. The setting screen of each
selected setting will appear.
3
The settings vary depending on the operating system version, the printer driver version, and the application.
43
Click the [Print] button.
Printing begins.
4
The print job is delivered to the output tray, with the position of the paper offset slightly from the previous job (other than the
right tray).
44
SELECTING THE PAPER
This section explains the [Paper Feed] settings ([Paper Source] setting in "General" in Mac OS 9.0 to 9.2.2) in the print
settings window.
• When [Auto Select] is selected
A tray with plain paper or recycled paper (the factory default setting is plain paper only) of the size specified in "Paper
Size" in the page settings window is automatically selected.
• When a paper tray is selected
The specified tray is used for printing regardless of the "Paper Size" setting in the page settings window. A paper type
can also be specified for the bypass tray. Check the bypass tray and make sure that the desired type of paper is
loaded, and then select the appropriate paper type setting for the bypass tray.
• Special media such as envelopes can also be placed in the bypass tray. For the procedure for loading paper and other
media in the bypass tray, see "LOADING PAPER IN THE BYPASS TRAY" in the User's Guide.
• When "Enable Detected Paper Size in Bypass Tray" (disabled by factory default) or "Enable Selected Paper Type in
Bypass Tray" (enabled by factory default) is enabled in the system settings (administrator), printing will not take place if the
paper size or paper type specified in the printer driver is different from the paper size or paper type specified in the settings
of the bypass tray.
• When a paper type is selected
A tray with the specified type of paper and the size specified in "Paper Size" in the page settings window is used for
printing.
System Settings (Administrator): Exclude Bypass-Tray from Auto Paper Select
When [Auto Select] is selected, specify whether or not the paper in the bypass tray will be excluded from the paper that can
be automatically selected. This setting is disabled by factory default, and thus paper in the bypass tray is included in the
paper that can be automatically selected. If special types of paper are frequently loaded in the bypass tray, it is
recommended that this setting be enabled.
45
PRINTING WHEN THE USER
AUTHENTICATION FUNCTION IS ENABLED
When the user authentication function is enabled in the machine's system settings (administrator), your user information
(login name, password, etc.) must be entered when you print. The information that must be entered varies depending on
the authentication method being used, so check with the administrator of the machine before printing.
Select [Print] from the application's
[File] menu.
1
The menu used to execute printing may vary depending on the software application.
Display the job handling screen.
(1)
(1) Make sure that the machine's printer
name is selected.
(2) Select [Job Handling].
In Mac OS 9.0 to 9.2.2, select [User Authentication].
2
(2)
• The machine name that appears in the "Printer" menu is normally [SCxxxxxx]. ("xxxxxx" is a sequence of characters
that varies depending on the machine model.)
• The print window varies depending on the operating system version, the printer driver version, and the application.
46
Start printing.
(1) Enter your user information.
• When authentication is by login name/password
Enter your login name in "Login Name" and your
password in "Password" (1 to 32 characters).
• When authentication is by user number
Enter your user number (5 to 8 digits) in "User
Number".
(2) Click the [Print] button.
3
(1)
(2)
You can click the
(lock) button after entering your login name and password, or user number, to simplify operation
the next time you wish to print based on the same user authentication.
• Normally printing is possible without entering your user information. (In this case, the printed pages will be added to the
"Others" count.) When printing by invalid users is prohibited in the system settings (administrator), printing is not permitted
when user information is not entered or incorrect information is entered.
• If you are using Mac OS X v10.1.5, the user authentication function of the machine is not available. For this reason,
printing will not be possible if printing by invalid users is prohibited in the system settings (administrator).
System Settings (Administrator): Disable Printing by Invalid User
This is used to prohibit printing of print jobs by users whose user information is not stored in the machine. When this function
is enabled, printing is not allowed when user information is not entered or incorrect information is entered.
47
4
PRINTING WITHOUT THE
PRINTER DRIVER
When you do not have the printer driver installed on your computer, or when the software application used to open a file
that you wish to print is not available, you can print directly to the machine without using the printer driver.
The file types (and corresponding extensions) that can be printed directly are shown below.
File Type
TIFF
JPEG
PCL
PDF/
Encrypted
PDF
PS
Extension
tiff, tif
jpeg, jpg, jpe,
jfif
pcl
pdf
ps
• Print data that includes images are counted as colour even though the data is black and white. To be always counted and
printed as black and white, select black and white printing.
• To use these functions on the MX-2300G/2700G, the printer expansion kit must be installed.
• To print PDF and PS files, the PS3 expansion kit must be installed.
• Depending on the file type, it may not be possible to print some files in the above table.
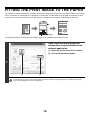
DIRECTLY PRINTING FROM THE MACHINE
A file on an FTP server or in a USB memory device connected to the machine can be selected and printed from the
operation panel of the machine without using the printer driver.
DIRECTLY PRINTING A FILE ON AN FTP SERVER
When an FTP server is configured in the machine's Web page, you can specify and print a file on the FTP server from
the operation panel of the machine. This saves you the trouble of downloading the file and printing it from a computer.
To configure FTP server settings, click [Application Settings] and then [FTP Print Settings] in the Web page menu, and
configure the settings in "FTP Print Settings from Operation Panel". (Administrator rights are required.)
1
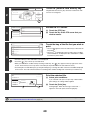
DOCUMENT
FILING
Press the [DOCUMENT FILING] key.
48
HDD Status
File Store
Touch the [External Data Access] key.
Search
The [External Data Access] key cannot be touched if an FTP
server is not configured.
File Retrieve
File
Folder
Scan to HDD
2
Quick File
Folder
External Data
Access
Access the FTP server.
External Data Access
Server 1
FTP
(1) Touch the [FTP] key.
Server 2
Server 3
3
(2) Touch the key of the FTP server that you
wish to access.
USB Memory
(2)
(1)
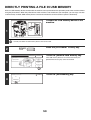
Touch the key of the file that you wish to
print.
Server 1
File or Folder Name
1/2
file-01.tiff
• The icon
appears on the left side of keys of files that can
be printed.
• The icon
is displayed on the left side of keys of folders
on the FTP server. To display the files and folders in a folder,
touch the key of the folder.
file-02.tiff
file-03.tiff
folder01
4
• A total of 100 keys of files and folders can be displayed.
• Touch the
key to move up one folder level.
• When you move down a folder level by touching a folder key, the
key appears in the top right corner of the
screen. Touch this key to move up to the root folder (the top folder level in the selected FTP server).
• Touch the [File or Folder Name] key (or the [File Name] key) to change the order of the files and folders displayed
on the screen. The order switches between ascending order and descending order each time you touch the key.
Cancel
Print
(1) Select print conditions.
file-01.tiff
5
Auto
Paper Select
B/W Print
If you selected a file (PCL or PS) in step 4 that includes
print settings, the settings will be applied.
Number of Prints
1
Output
Print the selected file.
(1 999)
Quick File
2-Sided
Print
(1)
(2) Touch the [Print] key.
Printing begins. When the message "Job stored. ..."
appears in the touch panel, touch the [OK] key.
(2)
When you select a PDF file that has a password, you must enter the password in the job status screen to begin printing.
☞ PRINTING AN ENCRYPTED PDF FILE (page 54)
49
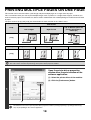
DIRECTLY PRINTING A FILE IN USB MEMORY
A file in a USB memory device connected to the machine can be printed from the operation panel of the machine without
using the printer driver. When the printer driver of the machine is not installed on your computer, you can copy a file into
a commercially available USB memory device and connect the device to the machine to print the file directly.
Connect the USB memory device to the
machine.
1
Consult your dealer for USB memory devices that can be used.
Press the [DOCUMENT FILING] key.
DOCUMENT
FILING
2
HDD Status
File Store
Scan to HDD
3
Search
File Retrieve
File
Folder
Touch the [External Data Access] key.
If the USB memory device is not connected correctly, the
[External Data Access] key cannot be touched.
Quick File
Folder
External Data
Access
External Data Access
Back
Touch the [USB Memory] key.
FTP
4
USB Memory
50
Back
USB Memory
File Name
1/2
file-01.tiff
Touch the key of the file that you wish to
print.
A maximum of 100 printable files in the USB memory device
can be displayed.
file-02.tiff
file-03.tiff
5
file-04.tiff
• To return to the screen of step 4, touch the [Back] key.
• Files in a folder in a USB memory device will not appear.
• To change the order of display of the files on the screen, touch the [File Name] key. The order switches between
ascending order and descending order each time you touch the key.
Cancel
Print
(1) Select print conditions.
file-01.tiff
Auto
Paper Select
B/W Print
(1 999)
Quick File
2-Sided
6
If you selected a file (PCL or PS) in step 5 that includes
print settings, the settings will be applied.
Number of Prints
1
Output
Print the selected file.
Print
(1)
(2) Touch the [Print] key.
Printing begins after the selected file is transferred.
When the message "Job stored. ..." appears in the touch
panel, touch the [OK] key.
(2)
To cancel printing...
To cancel printing while the file is being transferred, touch the [Cancel] key in the message screen that appears in the
touch panel.
Remove the USB memory device from
the machine.
7
When you select a PDF file that has a password, you must enter the password in the job status screen to begin printing.
☞ PRINTING AN ENCRYPTED PDF FILE (page 54)
51
DIRECTLY PRINTING FROM A COMPUTER
Settings can be configured in the Web pages of the machine to enable direct printing from a computer without using the
printer driver.
SUBMIT PRINT JOB
You can specify a file to be printed directly without using the printer driver.
In addition to a file on your computer, this procedure can be used to print any file that can be accessed from your
computer, such as a file on another computer connected to the same network.
To directly print a file on a computer, click [Document Operations] and then [Submit Print Job] in the Web page menu.
FTP PRINT
You can print a file from your computer by simply dragging and dropping the file onto the FTP server of the machine.
• Configuring settings
To enable FTP Print, click [Application Settings] and then [FTP Print Settings] in the Web page menu, enable FTP
Print in "FTP Print Settings from Client PC", and configure the port number. (Administrator rights are required.)
• Performing FTP Print
Type "ftp://" and then the IP address of the machine in the address bar of your computer's Web browser as shown
below.
(Example)
ftp://192.168.1.28
Drag and drop the file that you wish to print onto the "lp" folder that appears in your Web browser. The file will
automatically begin printing.
If you printed a file (PCL or PS) that includes print settings, the settings will be applied.
52
E-MAIL PRINT
An e-mail account can be configured in the machine to have the machine periodically check your mail server and
automatically print received e-mail attachments without using the printer driver.
• Configuring settings
To use E-mail Print, you must first configure an e-mail account in the machine. To configure an account, click
[Application Settings] and then [E-mail Print Settings] in the Web page menu. (Administrator rights are required.)
• Using E-mail Print
To print a file using E-mail Print, use your e-mail program on your computer to send the file as an attachment to the
machine's e-mail address.
Control commands can be entered in the message of the e-mail to specify the number of copies and print format.
Commands are entered in the format "command name = value".
The following control commands can be entered:
Function
Command name
Values
Copies
COPIES
1-999
Staple
JOBSTAPLE
STAPLENO, STAPLELEFT, STAPLETWO
Punch
PUNCH
OFF, ON
Output
COLLATE
OFF, ON
Two-sided print
DUPLEX
OFF, TOP, LEFT, RIGHT
Account number*
ACCOUNTNUMBER
Number (5 to 8 digits)
File type
LANGUAGE
PCL, PCLXL, POSTSCRIPT, PDF, TIFF, JPG
Paper
PAPER
Name of available paper (A4, LETTER, etc.)
Document Filing
FILE
OFF, ON
FOLDERNAME
30 characters
Quick File
QUICKFILE
OFF, ON
Output tray
OUTTRAY
CENTER, RIGHT, FINISHER
Black and white
printing
B/W PRINT
OFF, ON
Example
COPIES=2
DUPLEX=LEFT
ACCOUNTNUMBER=11111
PAPER=A4
B/W PRINT=ON
* Can be omitted except when authentication is by user number.
• Enter the commands in Plain Text format. If entered in Rich Text format (HTML), the commands will have no effect.
• To receive a list of the control commands, enter the command "Config" in the e-mail message.
• If nothing is entered in the body text (message) of the e-mail, printing will take place according to the "Printer Default
Settings" in the system settings. If you printed a file (PCL or PS) that includes print settings, the settings will be applied.
• To print PDF and PS files, the PS3 expansion kit must be installed.
• Only enter a "File type" when you are specifying a page-description language. Normally there is no need to enter a file
type.
53
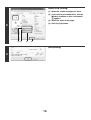
PRINTING AN ENCRYPTED PDF FILE
Encrypted PDF is used to protect a PDF file by requiring the entry of a password to print or edit the file. To directly print
an encrypted PDF file on an FTP server or in a USB memory device, follow the steps below to enter the password and
begin printing.
The PS3 expansion kit is required to use this function.
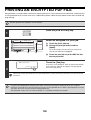
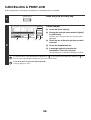
Press the [JOB STATUS] key.
JOB STATUS
1
Job Queue
Sets / Progress
Spool
Status
Computer01
020 / ---
Ripping
Computer02
020 / ---
Spooling
1/1
Job Queue
Complete
Select the encrypted PDF print job.
(1) Touch the [Print Job] key.
Detail
2
Computer03
--- / ---
Spooling
Computer04
002 / ---
Encrypt PDF
Print Job
(1)
Scan to
Stop/Delete
Fax Job
(3)
Internet Fax
(2)
The mode changes each time the key is touched. The
currently selected mode is highlighted.
(3) Touch the print job key of the PDF file that
has the password.
Touch the [Yes] key.
Enter the password?
No
3
(2) Change the print job status mode to
[Spool].
Yes
A text entry screen will appear. Enter the password (maximum
of 32 characters) and touch the [OK] key. The print job will
move to the [Job Queue].
When both a master password and a user password (which is used to open the file) have been set, enter the master
password.
• To print an encrypted PDF file using the printer driver, enter the password when opening the file on your computer.
• Printing is not possible if you do not know the password for an encrypted PDF file. To delete a spooled print job, touch the
[No] key in the screen of step 3 and touch the [Stop/Delete] key.
• Encrypted PDF versions that can be directly printed are 1.5 (Adobe® Acrobat® 6.0) and earlier.
54
5
CHANGING THE JOB QUEUE
GIVING A PRINT JOB PRIORITY /
CANCELLING A PRINT JOB
GIVING A PRINT JOB PRIORITY
When the machine is busy copying or printing a received fax or other job, you can give priority to a print job that is
waiting to be printed and print it ahead of the other jobs.
Press the [JOB STATUS] key.
JOB STATUS
1
Job Queue
Sets / Progress
Spool
Status
Copy
020 / 001
Copying
Copy
020 / 000
Waiting
1/1
Job Queue
Complete
Give the desired job priority.
(1) Touch the [Print Job] key.
Detail
Computer01
020 / 000
Waiting
0312345678
002 / 000
Waiting
Print Job
2
(1)
Scan to
Priority
Stop/Delete
Fax Job
(3)
(2) Change the print job status mode to [Job
Queue].
Internet Fax
(2)
(4)
Touch this key to change modes. The selected mode will
be highlighted.
(3) Touch the key of the print job to which you
want to give priority.
(4) Touch the [Priority] key.
The job being printed stops and the job selected in (3) is
printed.
To check print information on the selected job, touch the [Detail] key.
55
CANCELLING A PRINT JOB
A job being printed, a job waiting to be printed, or a spooled job can be cancelled.
Press the [JOB STATUS] key.
JOB STATUS
1
Job Queue
Sets / Progress
Spool
Status
Copy
020 / 001
Copying
Copy
020 / 000
Waiting
1/1
Cancel the job.
Job Queue
Complete
(1) Touch the [Print Job] key.
Detail
Computer01
020 / 000
Waiting
Priority
0312345678
002 / 000
Waiting
Stop/Delete
Print Job
(1)
2
Scan to
Fax Job
(3)
(2) Change the print job status mode to [Spool]
or [Job Queue].
Touch this key to change modes. The selected mode is
highlighted.
Internet Fax
(2)
(4)
(3) Touch the key of the print job that you wish
to cancel.
(4) Touch the [Stop/Delete] key.
(5) A message appears to confirm the
cancellation. Touch the [Yes] key.
The selected job key is deleted and printing is cancelled.
It is also possible to cancel printing with the [STOP] key (
) on the operation panel. When the [STOP] key (
pressed, a message will appear asking you if you want to cancel the job.
If you do not want to cancel the selected print job...
Touch the [No] key in step 5.
56
) is
CHANGING TO ANOTHER PAPER SIZE AND
PRINTING WHEN PAPER RUNS OUT
If printing stops because the machine ran out of paper, or if the size of paper specified in the printer driver is not loaded
in the machine, a message will appear in the touch panel. Printing will begin automatically when the [OK] key is touched
and paper is loaded in the machine. If you wish to print on paper in another tray because the desired size of paper is not
immediately available, follow the steps below.
Press the [JOB STATUS] key.
JOB STATUS
1
Job Queue
Sets / Progress
Computer01
020 / 001
Spool
Status
1/1
Paper Empty
Job Queue
Complete
Detail
2
Priority
Stop/Delete
Print Job
Scan to
Fax Job
Internet Fax
(1)
Detail of
Computer01
Data
3
:
(1) Touch the key of the job for which "Paper
Empty" appeared.
(2) Touch the [Detail] key.
(2)
OK
020/000
Display details on the print job for which
there is no paper.
Paper Empty
Touch the [Paper Select] key.
file-01.tiff
Colour / B/W:
B5
Paper: Plain
Full Colour
Paper Select
Document
Style:
2-Sided
(Book)
Output:
Special
Modes:
Paper Select
4
OK
A4
Plain
B5
Plain
B4
Plain
A3
Plain
A4
Touch the key of the tray that has the
paper you wish to use.
Plain
Printing begins.
If you change to another paper size before printing, printing may not take place correctly; for example part of the text or
image may run off the paper.
57
6
PRINTER DRIVER
SPECIFICATIONS
PRINTER DRIVER SPECIFICATION LIST
PCL6
PCL5c
SPLC-c*1
PS
Windows
PPD*2
Macintosh
PPD*2
1-999
1-999
1-999
1-999
1-999
1-999
Yes
Yes
Yes
Yes
Yes
Yes
Printing
2,4,6,8,9,16
2,4,6,8,9,16
2,4,6,8,9,16
2,4,6,8,9,16
2,4,6,9,16*1,3
2,4,6,9,16
Order
Selectable
Selectable
Selectable
Selectable
Selectable
Selectable
Border
On/Off
On/Off
On/Off
On/Off
Yes
Selectable
Duplex
Yes
Yes
Yes
Yes
Yes
Yes
Fit To Page
Yes
Yes
Yes
Yes
No
Yes*4
Selectable
Selectable
Selectable
Selectable
No
Yes*5
Black and White
Print
Yes
Yes
Yes
Yes
Yes
Yes
Staple*6
Yes
Yes
Yes
Yes
Yes
Yes
Punch*6
Yes
Yes
Yes
Yes
Yes
Yes
Paper Size
Yes
Yes
Yes
Yes
Yes
Yes
1 size
1 size
1 size
1 size
Yes*1
Yes*5
Paper Selection
Yes
Yes
Yes
Yes
Yes
Yes
Output
Yes
Yes
Yes
Yes
Yes
Yes
Pamphlet/
Pamphlet Staple*7
Yes
Yes
Yes
Yes
Yes
Yes
10mm/20mm/
30mm
10mm/20mm/
30mm
10mm/20mm/
30mm
10mm/20mm/
30mm
Yes
Yes
Poster Printing
Yes
No
Yes
Yes
No
No
Rotate 180
degrees
Yes
Yes
Yes
Yes
Yes
Yes*5
Yes*8
Yes*8
Yes*8
Yes
Yes*8
Yes*8
No
No
No
Yes
Yes
Yes*9
Driver selections
Frequently
used
functions
Copies
Orientation
N-Up
Binding Edge
Paper
Custom Paper
Convenient
printer
functions
Margin Shift
Zoom/XY-Zoom
Mirror Image
58
PCL6
PCL5c
SPLC-c*1
PS
Windows
PPD*2
Macintosh
PPD*2
Different Paper
Yes
Yes
Yes*10
Yes
No
Yes*10
Transparency
Inserts
Yes
Yes
Yes
Yes
Yes
Yes
Carbon Copy
Yes
Yes
No
Yes
No
No
Tab Printing
Yes
Yes
No
Yes
No
No
Tandem Print
Yes
Yes
No
Yes
No
Yes*5,11
Retention
Yes
Yes
Yes
Yes
No
Yes*5
Document Filing
Yes
Yes
Yes
Yes
No
Yes*5,11
Color
Adjustment
Yes
Yes
Yes
Yes
No
Yes*5,11,12
Text To Black/
Vector To Black
Yes
Yes
Yes
Yes
No
No
Image Type
Yes
Yes
Yes
Yes
Yes
Yes
Functions
to combine
text and
images
Watermark
Yes
Yes
Yes
Yes
Yes
Yes
Image Stamp
Yes
No
Yes
Yes
No
No
Overlays
Yes
Yes
No
Yes
No
No
Graphic
Resolution
600x600 dpi/
300x300 dpi
600x600 dpi/
300x300 dpi
600x600 dpi/
300x300 dpi
600x600 dpi/
1200x600 dpi*13
600x600 dpi
600x600 dpi
Graphics Mode
Yes
Yes
No
No
No
No
Toner Save*14
Yes
Yes
No
Yes
Yes
Yes
Resident font
80 fonts
80 fonts
No
136 fonts
136 fonts*15
35 fonts
Download font
bitmap,
TrueType,
Graphics
bitmap,
TrueType,
Graphics
No
bitmap,
TrueType,
Type1
bitmap,
TrueType,
Type1
No*16
Auto
Configuration
Yes
Yes
Yes
Yes
No
Yes*5,12
User
Authentication
Yes
Yes
Yes
Yes
No
Yes*5
Driver selections
Special
functions
Colour
mode
adjusting
function
Font
Others
*1 Cannot be used in Windows NT 4.0.
*2 The specifications of each function in Windows PPD and Macintosh PPD vary depending on the operating system
version and the software application.
*3 Only 2-Up and 4-Up printing can be used in Windows 98.
*4 Only Mac OS X v10.4 can be used.
*5 Cannot be used in Mac OS X v10.1.5.
*6 Can be used when a finisher or saddle stitch finisher is installed. (To use the punch function, a punch module must
be also installed.)
*7 To use the pamphlet staple function, a saddle stitch finisher is required.
*8 The horizontal and vertical proportion cannot be set separately.
*9 Only Mac OS 9.0 to 9.2.2 can be used.
*10 Only covers can be inserted.
*11 Cannot be used in Mac OS 9.0 to 9.2.2.
*12 Cannot be used in Mac OS X v10.2.8.
*13 1200x600 dpi can only be selected for black and white printing.
*14 This setting may not operate in some software applications and operating systems.
*15 The number of available resident fonts is 35 in Windows NT 4.0.
*16 True Type and Type 1 can be selected in some versions of LaserWriter.
59
Printer Guide
MODEL: MX-2300G
MX-2300N
MX-2700G
MX-2700N
MX-3500N
MX-3501N
MX-4500N
MX-4501N
MX4500-EX-PRT-Z2