1
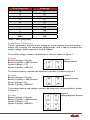
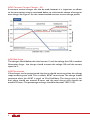
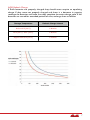
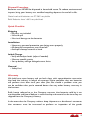
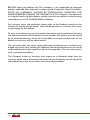
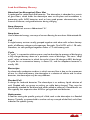
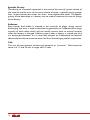
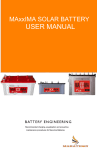
BATTERY USER MANUAL
CAUTION
ONE MEAN BATTERY
Recommended charging, equalization and preventive
maintenance procedures for Rolls Batteries.
RAILROAD &
DIESEL STARTER
MOTIVE POWER
MARINE
RENEWABLE
ENERGY
AGM
Table of Contents
Manual ....................................................................................................................2
E quipment Needed ..........................................................................................2
Safe Handling Procedure ................................................................................2
Inspection .............................................................................................................2
Installation ............................................................................................................2
Rolls AGM Battery Charging Instructions................................................. 4
Activation of a Dry Battery..............................................................................8
Battery Charging
....................................................................................... 8
Activation of a Wet Battery .............................................................................9
Cleaning .................................................................................................................9
Initial Charge of Wet Batteries .......................................................................9
Initial Charge....................................................................................................... 10
Method ................................................................................................................. 12
Storage Procedure ........................................................................................... 14
Spillage Procedure ........................................................................................... 14
Disposal Procedure........................................................................................... 15
Quick Checklist .................................................................................................. 15
Warranty ............................................................................................................... 15
Lead Acid Battery Glossary ............................................................................ 17
Rolls Batter Warranty Claim ........................................................................... 19
Rolls Battery Warranty Procedure ............................................................... 20
Contacts ................................................................................................................ 22
1
MANUAL
Rolls Battery has been manufacturing deep cycle lead-acid batteries since 1935.
Experience gained has helped us achieve an unmatched reputation along with
specific measures to obtain the maximum performance and life from our product.
This manual describes the recommended charging, equalization and preventive
maintenance procedures for Rolls batteries in order to maximize battery life.
Equipment Needed
• Goggles, rubber gloves and rubber boots
• Distilled water
• Baking soda
• Voltmeter
• Hydrometer
• Battery charger
Safe Handling Procedure
Always wear acid-resistant clothing, PVC gloves, goggles and rubber boots –
especially where there is risk of splashing. Always keep the batteries in an upright
position. Always have plenty of water available in case of acid spillage.
Inspection
Upon arrival, check the battery for visible damage (i.e. cracks, dents, deformation
and other visible abnormalities). Verify connections, assure that they are clean.
If the battery is dirty, or if any minor amount of acid has spilled onto the case,
check cleaning section. Any fluid on or around the battery could indicate that
the case is not properly sealed. Please verify the polarity of the terminals.
Please contact your retailer or Rolls Battery Company Limited to determine
if the battery needs replacement.
Installation
Rolls offers batteries for a wide variety of applications. No matter the application,
always be certain that the battery is properly secured, free of contaminants and
that all connections are in good contact with the terminals. Contact your retailer
or Rolls Battery Company Limited for additional information.
Battery Orientation
Flooded lead acid batteries must be kept in an upright position at all times.
Electrolyte in the battery will spill if tilted.
Cable Sizing
The size of the cables used should be proportionate to the amount of amperage
in your system. See Table 1 for maximum current carrying capacity based on
cable gauge.
2
Wire Gauge Size
Amperage
14
12
10
8
6
4
2
1
00
25
30
40
55
75
95
130
150
195
0000
260
Table 1 – Wire gauge sizing
Parallel/Series Connections:
Certain applications demand more voltage or more capacity than one battery’s
output. By arranging the connection configuration, one is able to increase the
output voltage, output capacity or both if needed.
To increase voltage, connect the batteries in series as shown in Figure 1.
Example:
Battery Voltage = 6V each
Battery Capacity = 400 AH each
System Voltage = 12V
System Capacity = 400 AH
Figure 1
Voltage Increase
To increase capacity, connect the batteries in parallel as shown in Figure 2.
Example:
Battery Voltage = 6V each
Battery Capacity = 400 AH each
System Voltage = 6V
System Capacity = 800 AH
Figure 2
Capacity Increase
To increase capacity and voltage, connect the batteries in series parallel as shown
in Figure 3.
Example:
Battery Voltage = 6V each
Battery Capacity = 400 AH each
System Voltage = 12V
System Capacity = 800 AH
Figure 3
Voltage/Capacity Increase
3
Rolls AGM Battery Charging Instructions
To maximize the life of your Rolls battery, it is important that it is properly charged.
Over and under-charging a Rolls battery will result in shortened service life.
The best protection from improper charging is the use of a quality charger and
routinely checking that the charger current and voltage settings are maintained.
Please review the following Rolls Battery Charging Instructions.
AGM Charger Inspection
The charger cabling should be insulated and free of breaks or cuts. The cable
connectors should be clean and properly mate with the battery terminals to ensure
a snug connection. The charger’s AC cord should be free of breaks or cuts and the
wall plug should be clean.
AGM Charging Guidelines
Fully charge batteries after each use. Charge in a ventilated area as gasses may be
released through the pressure relief valve if the batteries are excessively over-charged.
Never charge a frozen battery. Ideal charging temperatures: 32°F – 104°F (0°C – 40°C).
AGM Charging Characteristics
If the charger has a setting for AGM, use this setting to charge your Rolls battery.
To maximize your battery life, a voltage regulated charger with temperature
compensation is strongly recommended. See Figure 1 for the recommended
voltage regulated charge profile.
Voltage Regulated Charger – UU
4
AGM Bulk Stage
The charger should deliver the initial current I1 until the voltage limit U0 is
reached. Absorption Stage - the charger should maintain the voltage U0 until
the current tapers to I1. The initial charge current is recommended to be set at
I1 = 0.25 X C20 (Imax = 0.35 X C20) in order to fully charge the batteries within
a reasonable amount of time. It can be set lower, however; please be aware that
charge time will increase so make sure the batteries have enough time to fully
Storage Tem
charge before being put back into service. Rolls batteries have a low internal
resistance allowing them to be charged at a higher current, therefore, faster than
Below 68°F
conventional flooded/wet batteries.
68°F (20°C) - 8
AGM Float Stage and Termination
The charger can maintain the current I1 indefinitely or until the charger is shut off
Higher than 86
or unplugged. This stage is ideal to maintain battery state of charge. Make sure the
temperature compensation is programmed as specified in Figure 1 (-4mV/°C/cell
or -2mV/°F/cell) or manually adjust the voltage setting for temperatures varying
from 25°C (77°F). As the temperature decreases, the voltage should be increased
and as the temperature increases the voltage should be decreased. The profile
in Figure 1 can be used with or without the float stage. Without the float stage,
recharge can be terminated based on time (this will need to be determined as
it will vary with depth of discharge and charge current) or percentage recharge
(105%-110%).
AGM Charge Voltage Quick Reference
12 V
Battery
32°F
(0°C)
Charge
Voltage
15.30
15.06
14.82
Float
Voltage
14.25
14.01
13.77
50°F
(10°C)
68°F
(20°C)
77°F
(25°C)
86°F
(30°C)
104°F
(40°C)
14.70
14.58
14.34
13.65
13.53
13.29
5
AGM Constant Current Charger – IUI
A constant current charger can also be used; however, it is important to adhere
to the termination criteria mentioned below to minimize the chance of excessive
over-charge. See Figure 2 for the recommended constant current charge profile.
AGM Bulk Stage
The charger should deliver the initial current I1 until the voltage limit U0 is reached.
Absorption Stage - the charger should maintain the voltage U0 until the current
tapers to I1.
AGM Termination
If the charger can be programmed, the charge should terminate when the voltage
stops increasing over time. This is called a dV/dT termination. The charge should
terminate when the dV/dT is equal to 2.5mV/cell/hour. The charge time in the
final phase should not exceed 8 hours and the total charge time should not
exceed 20 hours. The percentage recharge should be between 105%-110%.
Storage Temperature
Refresh Charge Interval
Below 68°F (20°C)
9 Months
6
AGM Refresh Charge
If Rolls batteries are properly charged they should never require an equalizing
charge. If they were not properly charged and there is a decrease in capacity,
recharge the batteries and make sure they complete the entire charge cycle. If the
batteries are stored for extended periods of time, recharge them as follows
StorageTemperature
Temperature
Storage
RefreshCharge
ChargeInterval
Interval
Refresh
Below68°F
68°F(20°C)
(20°C)
Below
Months
99Months
68°F(20°C)
(20°C)--86°F
86°F(30°C)
(30°C)
68°F
Months
66Months
Higherthan
than86°F
86°F(30°C)
(30°C)
Higher
months
33months
4°F
°F
°C)
°C)
34
34
29
29
7
Activation of a Dry Battery (Lead Acid)
Special order batteries can be shipped dry (acid shipped separately). To activate
these batteries, start by removing the vent caps. Using approved battery grade
electrolyte (1.265), fill each cell half way between the plates and the bottom of
the vent well tube. (See Figure 4 on page 11.) It is important not to over fill
the cells as the acid will expand upon charging. If the cells are too full, the acid
will spill out of the top of the cells. Allow electrolyte to saturate into the plates
and separators for at least 90 minutes. The temperature of the electrolyte will
rise and the specific gravity will drop. Once this is complete, place the batteries
on charge at the finishing rate (5% of the 8 or 20 hour rate). The rate may be
increased if the battery does not begin to gas. Do not let the cell temperature
exceed 115° F (46° C). If the temperature becomes excessive or the cells begin
to gas vigorously, reduce the rate of charge. Continue charging until the cell
(or cells) reaches within .005 points of the specific gravity of the filling electrolyte
corrected for 77° F (25° C). We recommend to continue charging for an additional
60 minutes to insure no further rise in specific gravity.
Top up or remove electrolyte as necessary for proper level. Never add electrolyte
(only approved water) after activation. Replace vent caps and remove any
spillage of electrolyte. If necessary, clean with bicarbonate of baking soda and
water (100 grams of soda to one litre of water). Rinse with water and wipe dry.
Ensure that the soda solution does not get into cells.
*Do not place on charge until electrolyte temperature is below 35°C.
Lead Acid Battery Charging
Temperature/Volt per cell
Example: 12V
(6 cells)
Bulk/Absorption
Float
Equalization
15.0 Volts
14.4 Volts
14.16 Volts
13.14 Volts
15.48-16.02 Volts
0˚C to 16˚C
17˚C to 27˚C
28˚C to 40˚C
2.5 Volt
2.4 Volt
2.36 Volt
2.19
2.58-2.67
Table 2 – Charge parameters
Note: The most common type of charge method at present is the three stage plus equalization. This outline
is based on this type of charging method. Check with your charger manufacturer for specific settings for
their equipment. Please note, if “topping up” with water is required more than once every two (2) months,
the voltage settings are too high on your system.
8
Activating Instructions/Maintenance for a Wet Battery (Lead Acid)
Caution: Always wear the proper personal protective equipment (goggles, gloves,
clothing) when handling batteries and electrolytes
WARNING:
• WET BATTERIES MUST BE FULLY CHARGED BEFORE BEING
DELIVERED TO THE END USER. PLEASE REFER TO THE “INITIAL
CHARGE OF WET BATTERIES” SECTION OF THIS DOCUMENT.
• ADD DISTILLED WATER ONLY TO WET BATTERIES. UNLESS
INSTRUCTED BY ROLLS TECHNICAL SUPPORT, NEVER ADD
MORE ACID TO THE BATTERIES AT ANY TIME.
• FAILURE TO DO SO WILL RESULT IN MALFUNCTION AND VOID
THE WARRANTY.
Cleaning
Batteries should be kept clean at all times, including storage or usage. If stored in
a dirty area, regular cleaning should be performed. Before doing so, ensure that all
the vent caps are tightly fastened. Using a solution of water and baking soda (100g
per litre), gently wipe the battery and terminals, then rinse with water.
Initial Charge of Wet Batteries (Lead Acid)
1. Inspect batteries for damage. Important: read warning label on batteries
before proceeding.
2. Wet batteries are fully charged and tested before shipping, but do self-discharge
during transportation and storage. The first charge brings the battery to an
operational state. Before this charging process, the cell electrolyte level should be
checked, making sure the electrolyte covers the plates. If this isn’t the case, add
distilled water until all the plates are submerged. It is important not to over fill
because the level will rise during the charge process.
3. Check for correct polarity. Attaching the positive and negative voltmeter lead to
the positive and negative battery terminal should give a positive voltage reading. If it
is negative, a reverse polarity condition exists and you should contact your dealer
or Surrette Battery Company Ltd.
4. Place batteries on charge. Please see Table 2 – charge parameters for requited
charging settings. Do not let the cell temperature exceed 125°F (51.8°C). If the
temperature becomes excessive or the cells begin to gas vigorously, reduce the
rate of charge. Continue charging until all cells reach the SG of the filling acid.
All cell voltages should be even.
9
5. See Initial Charge below.
Initial Charge
A battery may not be fully charged when received. The first charge brings the
battery to an operational state. Before this charging process, the cell electrolyte
level should be checked. Please ensure the electrolyte (liquid) covers the plates.
If this isn’t the case, add distilled water until all the plates are just submerged.
It is important not to over fill because the level will rise during the charging process.
Charge voltages are indicated in Table 2.
The electrolyte’s specific gravity is the most accurate measurement and it is
recommended to verify its value to determine if the cells are, in fact, fully charged.
The specific gravity should be constant for 3 hours for an accurate full charge
reading. Check the state of charge as related to specific gravity. Initial charging
may take 10 hours. Once the battery is fully charged, verify the electrolyte level
in the cell once more. The fluid should be 1/4 – 1/2 inch below the vent tube on
each cell as shown in Figure 1. Carefully add distilled water to adjust the level
if needed.
% Charge
100
75
50
25
0
Specific Gravity* (SG)
1.255 – 1.275
1.215 – 1.235
1.200 – 1.180
1.165 – 1.155
1.130 – 1.110
Table 3 – Specific Gravity vs State of Charge
*PLEASE NOTE: The Specific Gravity is dependent on the electrolyte temperature. These values are for
a temperature of 27°C (80°F). To adjust, add/subtract 0.003 for every 5°C (10°F) increase/decrease.
10
Caution: Do not add
water or electrolyte to
cells before initial charging.
Adjust electrolyte levels
only when cells are fully
charged. Please contact us
if you have any questions
or concerns.
Figure 4 – Electrolyte level
Bulk Charge
The first part of the charging process is the bulk charge.This is when the maximum
amount of current flows into the battery bank until a desired voltage is reached.
The recommended maximum current is 15% of the AH capacity of the battery
bank based on the 6 hour rate. A lower current can be used, but this will prolong
the charging time. Bulk charge voltage set points are outlined in Table 2.
Absorption Charge
Arguably, the most important part of the charge cycle is the absorption charge.
Since the bulk charge only recharges the battery bank to an 80% level, the
absorption charge completes the charging cycle. Most chargers on the market have
a timer that allows the user to adjust the duration for the required time to return
the battery to full charge. In order to set the correct time, a simple calculation is
required. With the help of the 20 AH capacity, you can figure out the remaining
charge required for the battery bank.
As stated previously, the bulk charge brings the bank to an 80% charging level.
The remaining 20% of the capacity is a function of time and current. The charger will
maintain current level until the bulk set point has been reached, then the charger switches
to the absorption timer. The current levels start decreasing as the internal resistance in
the battery increases. Assume over the time of the absorption charge that 50% of your
maximum charge current will be available (this is factored into the equation).
***Where:
t = 0.42* C/1
t = Absorption Charge Time
C = 20hr Rated Capacity
I = Charging Current
0.42 = (20%/50%) + 5%. 5% is added due to losses***
11
Float Charge
The batteries require a certain amount of voltage in order to maintain full charge
when no load is applied. The power supply keeps the batteries at a constant full
state of charge. In order to prolong battery life, the float settings on the power
supply should be adjusted to the voltage indicated in Table 2.
Equalization
Individual cells will vary slightly in specific gravity after a charging cycle.
Equalization or a “controlled overcharge” is required to bring each battery
plate to a fully charged condition. This will reduce stratification and sulfating,
two circumstances that shorten battery life. Equalization of the battery bank is
recommended every 60 to 180 days, depending on the usage of the individual
system. To equalize the cells, charge the batteries until the voltage elevates to
the “Equalization” voltage shown in Table 2. Charge parameters and maintain for
2 to 3 hours per bank. A constant SG for 30 minutes is a good indication of cell
equalization. It is recommended to water the battery cells half way through the
equalization. This will assure the water is mixed with the electrolyte.
Frequency
It is recommended to equalize the batteries before usage. Corrective equalization
needs to be performed if symptoms arise such as a constantly running generator
(low capacity) or the battery bank will “not hold a charge”. These symptoms are
typical of a heavily sulfated battery. If a battery is not being fully charged on a
regular basis or limited equalization is performed using a generator, sulfating will
occur from “deficit” cycling. This undercharge condition can take months before it
becomes a major and noticeable problem.
Method
Corrective equalization can take a very long time depending on the
degree of sulfating.
1. If you have a recombination cap, remove during equalization.
2. Set the charging controls to the highest voltage allowable by the charge
controller (inverter). Temperature should be monitored very closely and kept
below 50ºC.
3. Charge at a low DC current (5 A per 100 AH of battery capacity).
If grid power is not available, use solar panels or a good DC source when
possible. At high voltages, charging with generator can be difficult and hard
on the inverter.
12
4. Once every hour, measure and record the specific gravity and temperature of a
test cell. If the temperature rises above 46ºC and approaches 52ºC, remove the
batteries from charge.
5. If severely sulfated, it may take many hours for the specific gravity to rise.
6. Once the specific gravity begins to rise, the bank voltage will most likely drop, or
the charging current will increase. The charging current may need to be lowered
if temperature approaches 46ºC. If the charge controller was bypassed, it should
now be used or put back in line.
7. Continue measuring the specific gravity until 1.265 is reached.
8. Charge the batteries for another 2 to 3 hours. Add water to maintain the
electrolyte above the plates.
9. Allow bank to cool and check and record the specific gravity of each cell.
The gravities should be 1.265 ± 0.005 or lower. Check the cell electrolyte levels
and add water if necessary.
It is recommended that a specific gravity reading of one pilot cell is measured
and recorded on a regular basis when it is thought that the bank is fully charged.
The measurement should be compared to previous readings. If the measurement is lower
than the previous reading, a longer absorption time and/or higher voltage setting should
be used. The longer the absorption time and the higher the bulk voltage, the more water
will be consumed but less equalization will be required.
Note: The specific gravity should rise as the cells use water. Look for trends in the specific
gravity over a period of time and make small adjustments as necessary.
Temperature Probe
For additional data and safety, many people choose to install temperature
probes inside the battery banks. Regardless of the size of the battery bank,
the probe should be installed on the side of one battery, below the liquid level
on a battery placed in the center of the bank. The main factor to look for
is maximum temperature. The battery bank should not exceed an operating
temperature of 50ºC.
13
Figure 5 – Temperature Probe
Cleaning
Batteries should be kept clean at all times. If stored in a dirty area, regular cleaning should be performed. Before doing so, assure that all the vent caps are tightly
fastened. Using a solution of water and baking soda (100g per litre), gently wipe the
battery and terminals with a damp sponge, then rinse with water.
Pulse Charging
Pulse charging has shown that the banks do not get as sulfated as one with the
traditional 3-step charging, but will not eliminate the need for controlled, preventive
equalization.The benefit of pulse charging is that the bank will need less overcharge
and hence less maintenance.
Battery Additives
Most battery additives are mainly a form of a common preservative, EDTA.
These additives help to increase the solubility of the sulfate in the electrolyte
(common salt effect). Some additives contain cadmium sulfate, which could
cause disposal problems in the future. These additives are not beneficial and
are not recommended.
Storage Procedure
Keep the batteries clean and always store in a cool, dry area. Where acid is
stored or handled, good ventilation is necessary. Keep the bungs on the containers
at all times.
Spillage Procedure
Small spills may be neutralized using water. Spray the spill from a windward
location wearing protective equipment. Direct the jet to the outside of the
spillage, working your way inward towards the center. Larger spills should
be contained using soda ash, sand or dirt and finally washed down with water
once absorbed.
14
Disposal Procedure
Batteries must NEVER be disposed in household waste. To reduce environmental
impacts, bring your battery to a certified recycling depot at the end of its life.
Note: Lead-acid batteries are 97-98% recyclable.
Rolls Batteries have >66% recycled lead.
Quick Checklist
Shipping
• All parts are included
• No acid spill
• No visual damage to the batteries
Installation
• Necessary personal protective gear being worn properly
• All electrical components are turned off
• Acid spill cleanup material at hand
Initial Charge
• Verify electrolyte levels (adjust if needed)
• Measure specific gravity
• Set up battery charge voltage/current limits
General
• Safety first!
Warranty
We build one mean battery and we back them with comprehensive warranties
that lead the industry in length of coverage. We’re confident that our batteries
will perform time after time, year after year. But should a problem arise, you
can be confident that you’re covered better than any other battery warranty in
the business.
Rolls, herein referred to as the Company, warrants that batteries sold by it are
merchantable and free of defects in workmanship and material at the time they are
shipped from the Company’s factory.
In the event that the Company makes a drop shipment to a distributor’s customer,
that customer must be instructed to perform an inspection of the goods
15
BEFORE signing the delivery slip. The Company is not responsible for damaged
product reported after shipment has been signed “Received in Good Condition”.
NOTE: ALL SHIPMENTS SHOULD BE THOROUGHLY INSPECTED FOR
DAMAGE BEFORE SIGNING THE DELIVERY SLIP. The Company will replace or,
at its option, repair any Rolls Battery sold by it that fails to conform to the warranty
stated above on a NO CHARGE BASIS as follows:
For warranty terms and conditions, please refer to the Products section on the
website for model-specific details: www.rollsbattery.com. A warranty claim form
may be found on the website.
To claim a manufacturing warranty, proof of purchase must be presented, showing
the date of purchase and the battery’s serial number. The battery must be tested
by an authorized battery outlet for actual defect, and upon confirmation of the
defect, the warranty will be administered.
The warranty does not cover shipping damage, cracked covers, cracked cases,
bulged cases from heat, freezing or explosion, discharged batteries or the use of
undersized batteries damaged from electrical equipment. This warranty covers
only manufacturing defects.
The Company makes no warranty with respect to its batteries other than the
warranty stated above. All implied warranties of merchantability and all expressed
and implied warranties of any other kind are hereby excluded.
16
Lead Acid Battery Glossary
Absorbed (or Absorptive) Glass Mat
A technique for sealed lead-acid batteries. The electrolyte is absorbed in a matrix
of glass fibers, which holds the electrolyte next to the plate and immobilizes it,
preventing spills. AGM batteries tend to have good power characteristics, low
internal resistance, and good behavior during charging.
Amp, Ampere
Unit of electrical current. Abbreviated “A”.
Amp-hour
Unit of electrical energy, one amp of current flowing for one hour. Abbreviated Ah.
Cell
A single battery canister usually grouped together with other cells to form battery
packs of different voltages and amperages. Example: One NiCD cell is 1.20 volts;
therefore, six cells packaged together makes a 7.2 volt battery pack.
Cycle
A “cycle” is a somewhat arbitrary term used to describe the process of discharging
a fully charged battery down to a particular state of discharge. The term “deep
cycle” refers to batteries in which the cycle is from full charge to 80% discharge.
A cycle for an automotive battery is about 5%, and for telephone batteries is
usually 10%.
Electrolyte
An electrically conductive medium in which current flow is due to the movement
of ions. In a lead-acid battery, the electrolyte is a solution of sulfuric acid. In other
batteries, the electrolyte may be very different.
Flooded Cell
A design for lead-acid batteries. The electrolyte is an ordinary liquid solution of
acid. Flooded cells are prone to making gas while being charged. They must be
periodically checked for fluid level and water added as necessary. Flooded cells are
also typically less expensive than AGM or gel type lead-acid batteries.
Hydrometer
A tool for testing the specific gravity of a fluid, such as the electrolyte in a flooded
battery. Typically, a squeeze-bulb is used to suck up a sample of the fluid, and a float
indicates the specific gravity.
17
Specific Gravity
The density of a material, expressed as the ratio of the mass of a given volume of
the material and the mass of the same volume of water; a specific gravity greater
than 1 means heavier than water, less than 1 means lighter than water. The specific
gravity of the electrolyte in a battery can be used to measure the state of charge
of the battery.
Sulfation
Even though lead sulfate is created in the materials of plates during normal
discharging, this term is used to describe the generation of a different form (large
crystals) of lead sulfate which will not readily convert back to normal material
when the battery is charged. Sulfation occurs when a battery is stored too long
in a discharged condition, if it is never fully charged, or if electrolyte has become
abnormally low due to excessive water loss from overcharging and/or evaporation.
Volt
The unit of measurement of electrical potential or “pressure”. Most batteries
come in 6, 12 and 24 volt. A single cell is 2 volts.
18
Rolls Battery Warranty Claim
To receive a returned goods authorization for a Rolls battery that has failed, we
require an analysis of the battery in question. To do so, please contact our
technical support department (Tel: +44 (0)1489 570770) and a warranty claim
form similar to the one shown* will be supplied for the batteries in question.
Once it has been established that it is a valid warranty claim, we will process your
RGA for either a replacement or credit your account. With this procedure you
do not need to send the battery back unless instructed to do so by Rolls Battery.
FROM POS TO NEG
END OF STRING
BAT VOLTAGE
**
CELL
1
1
2
3
2
4
5
6
3
7
8
9
4
10
11
12
5
13
14
15
6
16
17
18
7
19
20
21
8
22
23
24
SG
BATTERY MODEL:
DATE PURCHASED:
CUSTOMER/DEALER:
SYSTEM INFORMATION
Stand Alone
Grid-Tie
Back-up
INVERTER
Make & Model
Charger Output
Absorption Voltage & Time
CHARGING SOURCE
Panels
Wind
Generator
Other
TYPE
QTY
OUTPUT
Average daily consumption:
KWH/AC or AH/DC
Duty cycle:
Any irregular occurances?
(Lighting, component/controller failure)
**Open cell voltage should be taken after 2 hours rest with negative connection removed**
Date code is the four digit number located on the edge of the cover.
1st digit = day of week (3 = Wednesday)
2nd and 3rd digits = week of year
4th digit = year (2 = 2001)
If low SG (specific gravity)
Equalize at 2.58 VPC (voltage per cell). Monitor centre cell Tª.
* This form is for illustrative purposes only.
19
Rolls Battery Warranty Procedure
Please refer to product warranty for the specific model as terms and conditions
may vary.
For warranty requests and inquiries, please consult your Rolls Battery Distributor
or Dealer (point of purchase).
DAMAGED BATTERY
YES
Damaged batteries DO NOT qualify
for Rolls Battery product warranty
NO
Check individual
cell voltages
< 2.1 VPC
Charge battery at
0.1/c20 for 10 hours
Cells
< 1.250
Charge battery at
0.1/c20 for 10 hours
> 2.1 VPC
Check
specific
gravities
All cells > 1.250
and even
All cells
> 1.250
and uneven
YES
Equalize
@ 2.58 VPC
for 2 hours*
First time
through cycle
Discharge @ c/10
or c/20 rate. Contact
[email protected]
for assistance.
NO
NO
Holds 1.75VCP
for c/10 or
c/20 rate
Battery does NOT meet
warranty criteria. Battery is
charging and discharging
properly. Product warranty
does not apply. Please refer
to dealer for assistance.
20
One cell is
0.040 points lower
than others
YES
Battery meets warranty
criteria and is eligible for
repair or replacement.
Complete Rolls Battery
warranty claim form and fax
to Rolls Technical Support
(+44 01489 570770) for
further instruction.
21
Contacts
Rolls Battery Europe
5 Little Park Farm
Segensworth West
Fareham
Hampshire
England
UK
PO15 5SJ
T: +44 (0)1489 570770
F: +44 (0)1489 579913
www.rolls-battery.com
Sales:
Jason Osborne
+44 (0)1489 567515
22