1
Operating and Installation manual
Vented Dryer
PT 7136 Plus
To prevent accidents
and machine damage
read these instructions
before
installation or use.
en - US
M.-Nr. 06 975 240
Contents
IMPORTANT SAFETY INSTRUCTIONS. . . . . . . . . . . . . . . . . . . . . . . . . . . . . . . . . 4
Guide to the dryer . . . . . . . . . . . . . . . . . . . . . . . . . . . . . . . . . . . . . . . . . . . . . . . . . 7
Control panel . . . . . . . . . . . . . . . . . . . . . . . . . . . . . . . . . . . . . . . . . . . . . . . . . . . . . . 7
Display function . . . . . . . . . . . . . . . . . . . . . . . . . . . . . . . . . . . . . . . . . . . . . . . . . 8
Before using for the first time. . . . . . . . . . . . . . . . . . . . . . . . . . . . . . . . . . . . . . . 10
Use . . . . . . . . . . . . . . . . . . . . . . . . . . . . . . . . . . . . . . . . . . . . . . . . . . . . . . . . . . . . 11
Fabric care labels . . . . . . . . . . . . . . . . . . . . . . . . . . . . . . . . . . . . . . . . . . . . . . . . . 11
Drying tips . . . . . . . . . . . . . . . . . . . . . . . . . . . . . . . . . . . . . . . . . . . . . . . . . . . . . . . 11
Coin mechanism . . . . . . . . . . . . . . . . . . . . . . . . . . . . . . . . . . . . . . . . . . . . . . . . . . 15
Canceling a program . . . . . . . . . . . . . . . . . . . . . . . . . . . . . . . . . . . . . . . . . . . . . . . 15
Adding/removing laundry during a drying program . . . . . . . . . . . . . . . . . . . . . . . 15
Program guide . . . . . . . . . . . . . . . . . . . . . . . . . . . . . . . . . . . . . . . . . . . . . . . . . . . 16
Timer . . . . . . . . . . . . . . . . . . . . . . . . . . . . . . . . . . . . . . . . . . . . . . . . . . . . . . . . . . . 19
Favorites . . . . . . . . . . . . . . . . . . . . . . . . . . . . . . . . . . . . . . . . . . . . . . . . . . . . . . . . 20
Selecting/Changing a Favorite . . . . . . . . . . . . . . . . . . . . . . . . . . . . . . . . . . . . . 20
Low temp. . . . . . . . . . . . . . . . . . . . . . . . . . . . . . . . . . . . . . . . . . . . . . . . . . . . . . 22
Saving a Favorite . . . . . . . . . . . . . . . . . . . . . . . . . . . . . . . . . . . . . . . . . . . . . . . 22
Cleaning and Care . . . . . . . . . . . . . . . . . . . . . . . . . . . . . . . . . . . . . . . . . . . . . . . . 23
Cleaning the lint filter . . . . . . . . . . . . . . . . . . . . . . . . . . . . . . . . . . . . . . . . . . . . . . . 23
Cleaning the exterior and the control panel . . . . . . . . . . . . . . . . . . . . . . . . . . . . . 25
Frequently asked questions . . . . . . . . . . . . . . . . . . . . . . . . . . . . . . . . . . . . . . . . 26
After sales service . . . . . . . . . . . . . . . . . . . . . . . . . . . . . . . . . . . . . . . . . . . . . . . . 32
Optional accessories . . . . . . . . . . . . . . . . . . . . . . . . . . . . . . . . . . . . . . . . . . . . . . . 32
2
Contents
INSTALLATION INSTRUCTIONS. . . . . . . . . . . . . . . . . . . . . . . . . . . . . . . . . . . . . 33
IMPORTANT SAFETY INSTRUCTIONS. . . . . . . . . . . . . . . . . . . . . . . . . . . . . . . . 34
Installation . . . . . . . . . . . . . . . . . . . . . . . . . . . . . . . . . . . . . . . . . . . . . . . . . . . . . . 36
Electrical connection . . . . . . . . . . . . . . . . . . . . . . . . . . . . . . . . . . . . . . . . . . . . . . . 40
Installation of exhaust venting . . . . . . . . . . . . . . . . . . . . . . . . . . . . . . . . . . . . . . 41
General notes . . . . . . . . . . . . . . . . . . . . . . . . . . . . . . . . . . . . . . . . . . . . . . . . . . . . 41
How to calculate the effective duct length . . . . . . . . . . . . . . . . . . . . . . . . . . . . . . 42
Determining the position of the exhaust connection . . . . . . . . . . . . . . . . . . . . . . . 46
Exhaust connection with a flexible exhaust hose or rigid pipe . . . . . . . . . . . . . . . 47
Technical Data . . . . . . . . . . . . . . . . . . . . . . . . . . . . . . . . . . . . . . . . . . . . . . . . . . . 51
Caring for the environment . . . . . . . . . . . . . . . . . . . . . . . . . . . . . . . . . . . . . . . . . 52
Settings J . . . . . . . . . . . . . . . . . . . . . . . . . . . . . . . . . . . . . . . . . . . . . . . . . . . . . . . 53
Opening the menu Settings . . . . . . . . . . . . . . . . . . . . . . . . . . . . . . . . . . . . . . . 54
Language J . . . . . . . . . . . . . . . . . . . . . . . . . . . . . . . . . . . . . . . . . . . . . . . . . . . . . . 55
Settings - Supervisor level . . . . . . . . . . . . . . . . . . . . . . . . . . . . . . . . . . . . . . . . . 57
3
IMPORTANT SAFETY INSTRUCTIONS
,WARNING - To reduce the risk of
fire, electric shock, or injury to
persons when using your appliance,
follow basic precautions, including
the following:
~ Make sure that no unattended
children can access the machine.
There is a potential danger that children
can be trapped in the drum. This may
cause major injuries or the death of the
child.
~ Do not reach into the dryer if the
drum is moving.
~ Do not install or store this appliance
~ It is essential to read all instructions
before using this appliance.
where it will be exposed to the weather.
~ Do not tamper
with the controls.
This machine conforms to current
safety requirements. However,
inappropriate use can lead to
personal injury and property
damage. Read the operating
instructions carefully before using
this machine.
The manufacturer cannot be held
responsible for damage caused by
non-observance of these Important
Safety Instructions.
~ The tumble dryer is only intended for
drying fabrics washed in a water
solution. Check fabric care labels to
verify materials can be machine dried.
~ Before maintenance, or cleaning
and care disconnect the dryer from the
electrical supply pulling the plug or
tripping the circuit breaker.
~ Do not allow children to play on or in
the appliance. Close supervision is
necessary when the appliance is used
near children. Always close the door
after use to prevent child hazards.
4
~ Do not repair or replace any part of
the appliance or attempt any servicing
unless specifically recommended in
these operating instructions. Repairs to
electrical appliances should only be
performed by qualified personnel.
Incorrectly repaired machines may
pose a considerable risk to the user.
~ Clean the lint filter before or after
each load.
~ Keep the area around the exhaust
opening (toekick) and adjacent
surrounding areas free of lint, dust and
dirt.
~ The interior of the machine and
exhaust duct should be cleaned
periodically by qualified personnel.
~ Only use genuine Miele accessories
and replacement parts. If other parts
are used, guarantee, performance and
product liability claims may become
void.
IMPORTANT SAFETY INSTRUCTIONS
~ To prevent the risk of fire, the
following articles must not be dried in
this tumble dryer:
~ To prevent the risk of fire, the
– items which have not been washed.
– fabrics which contain a large amount
of rubber, foam rubber or rubber-like
materials. For example, products
made from latex, shower caps,
waterproof textiles, rubberized
articles, and items of clothing and
pillows with foam rubber filling, or
similarly textured rubber-like
materials.
– items, such as workwear, which have
not been thoroughly cleaned and are
still soiled with grease, oil or other
substances (such as cosmetics,
lotions, etc.)
If items have not been thoroughly
cleaned there is a danger that they
could ignite when heated, even after
they have been removed from the
dryer at the end of the program.
– items that have been previously
cleaned, washed, soaked or spotted
with gasoline, dry-cleaning solvents,
wax, wax remover, chemicals for
buffing (e.g. mops and floor cloths)
or other flammable or explosive
substances. They may give off
vapors that could ignite or explode.
– items which have been spattered
with hair spray, nail polish remover or
similar substances.
When washing such heavily soiled
items ensure that you use sufficient
detergent and select a high
temperature. If in doubt, wash the
items several times.
following articles or items must not be
dried in this tumble dryer:
– which contain padding or fillings
(e.g. pillows, jackets). If these were
damaged the filling could get out
with the risk of igniting in the dryer.
~ In many programs, the heating
phase is followed by a cooling down
phase to ensure that the items are not
too hot to handle when you remove
them (this also avoids the danger of the
laundry self-igniting). The program is
not finished until the cooling down
phase is complete.
Always wait until the end of the
program before removing the laundry.
~ Warning: Do not switch the tumble
dryer off before the end of the drying
program. If this was done and the
laundry was then removed immediately
it could give off a great amount of heat.
~ Do not use fabric softeners or
products to eliminate static unless
recommended by the manufacturer of
the fabric softener or product.
5
IMPORTANT SAFETY INSTRUCTIONS
~ GROUNDING INSTRUCTIONS
This appliance must be grounded. In
the event of a malfunction or
breakdown, grounding will reduce the
risk of electric shock by providing a
path of least resistance for electric
current.
This appliance is equipped with a cord
having an equipment-grounding
conductor and a grounding plug. The
plug must be inserted into an
appropriate outlet that is properly
installed and grounded in accordance
with all local codes and ordinances.
~ WARNING – Improper connection of
the equipment grounding conductor
can result in a risk of electric shock.
Contact a qualified electrician if you are
in doubt as to whether the appliance is
properly grounded.
~ Do not modify the plug provided
with the appliance: if it will not fit the
outlet, have a proper outlet installed by
a qualified electrician.
~ Before this appliance is removed for
service or discarded, remove the door
to the drying compartment.
SAVE THESE
INSTRUCTIONS
6
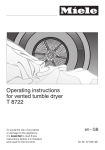
Guide to the dryer
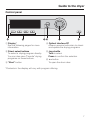
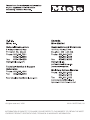
Control panel
a Display*
See the following pages for more
information
d Optical interface PC
Allows a service technician to check
and update the drying programs
b Direct select buttons
To select a drying program directly.
You can also save "Favorite" drying
programs on these buttons.
e Jog shuttle
Turn to select
Press to confirm the selection
c "Start" button
f a button
To open the drum door.
*Contents in the display will vary with program offering.
7
Guide to the dryer
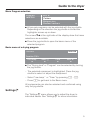
Display function
Contents in the display will vary with program offering.
Main menu
1
Cottons
Program selection ...
2
Minimum iron
Settings F ...
3
Woollens handcare
4
Smoothing
10:00
The display shows the main menu (with factory default
settings). "Program selection" is highlighted.
If the display is dark (in Stand-by mode) turn the jog shuttle.
Jog shuttle
Turn the jog shuttle to select a program or setting.
Press the jog shuttle to confirm the selection.
Direct select buttons
The first four programs shown in the display on the left are the
"Favorites". They can be selected with the direct select
buttons.
The Favorites can be individually set to your desire. See
"Favorites" for more information.
The direct select buttons have different functions in the other
menus. In these menus an arrow H is displayed above the
respective button with the function description of the button.
Program selection possibility
– Possibility 1 Select and confirm the menu "Program
selection" in the display with the jog shuttle.
– Possibility 2 Press one of the direct select buttons
D E F G and access directly the basic menu of
the program.
8
Guide to the dryer
Menu Program selection
Program
selection
Back A
Cottons
Minimum iron
Woollens handcare
H
^ All pre-set programs can be selected with the jog shuttle.
Depending on the direction the jog shuttle is turned the
highlighter moves up or down.
The arrows e- at the right side of the display show that more
selections are available.
^ Press the jog shuttle to open the basic menu of the
selected program.
Basic menu of a drying program
Cottons
Normal
Duration 1:16 h
Low temp.
H
Timer Y
H
Save
H
Back A
H
^ The "Drying level" or "Program" can be selected by turning
the jog shuttle.
– The selected component is highlighted. Press the jog
shuttle to select or adjust the component.
– Select "Low temp." or "Timer" by pressing D - E.
– Press G to get back to the Basic menu.
All components can also be selected and confirmed using
only the jog shuttle.
Settings J
The "Settings J" menu allows you to adjust the dryer to
individual needs. See "Settings J" for more information.
9
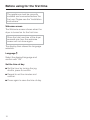
Before using for the first time
The appliance must be correctly
installed and connected before the
first use. Please see the "Installation
instructions."
Welcome screen
The Welcome screen shows when the
dryer is turned on for the first time.
Once the total use time of the dryer
exceeds one hour the welcome
screen will not show again.
The display then shows the language
selection.
Language J
Select the desired language and
confirm with "OK".
Set the time of day
^ Set the hour by turning the jog
shuttle, press to confirm.
^ Repeat to set the minutes and
confirm.
^ Press again to save the time of day.
10
Use
Fabric care labels
Before drying, check fabric care labels
for special drying instructions.
q = Drying with normal temperature
r = Drying with low temperature
s = Do not dry in a tumble dryer
Drying tips
– Observe the maximum loads, see the
"Program guide".
Overloading the dryer will result in
poor drying and wrinkling.
– Do not place dripping wet items in
the dryer. Spin the laundry after the
wash for at least 30 seconds.
– Dry delicate fabrics (with the fabric
care symbol r) with the "Low
temperature" option.
– Open jackets to allow even drying.
– Wool and wool blends tend to felt
and shrink. Dry wool and wool
blends in the "Woollen handcare"
program.
– The fine fabric of down filled items
tend to shrink. Dry these items in the
"Smoothing" program.
– Dry pure linen items only if it is
recommended on the fabric care
label. The surface of the fabric may
become "rough". Dry these items in
the "Smoothing" program.
– Knitted fabrics (e.g. T-Shirts and
underwear) tend to shrink when
washed and dried for the first time.
Do not overdry these fabrics.
– Permanent press and delicate
fabrics tend to crease more the
bigger the load size.
For better drying results reduce the
load size or select the "Shirts"
program.
– Starched laundry can be dried in
the tumble dryer. The amount of
starch should be doubled during the
wash.
– Wash new, colored items before
drying for the first time and do not
dry with light-colored items. These
fabrics can "bleed" (also onto plastic
parts of the dryer). Colored lint may
also get on the light colored items.
11
Use
1. Sort the laundry
2. Load the laundry
^ Loosen up the washed laundry.
^ Use the a button to open the drum
door.
^ For even drying results sort by
desired dryness, fiber/fabric, size
and residual moisture after spinning.
,Do not dry items that may melt or
ignite in the dryer such as plastics,
rubber or sneakers. They could melt
and damage the laundry.
^ Load the laundry loosely into the
drum.
Do not overload the drum.
Overloading strains the fabrics and
results in poor drying.
– Check hems and seams, be sure that
no filling can come out.
– Comforter covers and pillowcases
should be fastened in order to
prevent small items from getting
trapped inside of them.
– Close zippers, hooks and eyelets.
– Tie fabric belts and apron ties.
– Remove or sew up released bra
underwires.
To prevent fabric damage, check
that laundry is not caught in the
closed door. Do not use softener
sheets in this dryer. Silicates
contained in these sheets could
cause the dryer to overheat.
^ Close the door with a firm swing or
lean against the dryer and push it
closed.
12
Use
3. Select a program
6. Starting a program
Two program selection possibilities:
"Start" flashes when the program can
be started.
^ Select a "Favorite" by pressing the
respective direct select button.
^ Press the "Start" button.
or
The "Start" button lights.
^ Select from the "Program selection"
menu by turning the jog shuttle.
– The display shows "Program start"
and then "Drying" with the program
duration.
4. Select "Low temp." and/or
"Timer"
– The drying levels are displayed,
e.g. machine iron, hand iron, etc.
^ If desired select "Low temp." and/or
"Timer" from the respective
submenus.
^ Press one of the following buttons
during the running program:
Note:
The displayed duration (remaining time)
can vary with every new program
selection.
5. Insert coins (if operated by
coin mechanism)
^ If a coin mechanism operates the
machine, please regard the
displayed request to pay.
– Button E "Timer"
The time of day and the approximate
program end is displayed.
– Button F "Save"
The currently running program can
be saved as a "Favorite".
– Button G "Cancellation"
To cancel the currently running
program.
If the door is opened after the
program has started or if the
program is canceled the credit is
lost.
13
Use
Remaining time
7. At the end of a program
When a program is selected, the
approximate duration is displayed. This
is the "remaining time".
"Anti-crease" (if selected) and "End"
mark the end of a program in the
display. During the anti-crease phase
the drum will turn in intervals if the
laundry is not immediately removed
from the dryer to prevent the laundry
from wrinkling. Run time 1 h.
The program duration can vary due to
some factors: residual moisture after
spinning, fabric, load size, room
temperature and voltage fluctuations.
The adaptive electronic adjusts to the
individual load to display the accurate
remaining time. The remaining time is
constantly checked which can lead to
leaps in time.
The "Woolens handcare" and
"Smoothing" programs can be ended
ahead of time once a certain
temperature is reached. This may be
the case with fine fabrics or if the dryer
had some residual heat from a previous
program.
^ Use the a button to open the drum
door.
^ Remove the laundry.
Check the drum for any missed
pieces of laundry. Any items left in
the dryer can be damaged because
of over-drying.
If the door stays open, the light goes off
after a few minutes (saving energy).
^ Close the door.
Cleaning and care hints
Before the end of a program
After drying with hot air, the cool down
phase finishes the program. "Cooling
down" is displayed. Only after the
cooling phase has ended is the
program finished.
The programs: "Woollen handcare" and
"Smoothing" do not have a cooling
down phase.
14
^ See "Cleaning and Care".
Use
Coin mechanism
For coin mechanism operated
machines: Money or tokens will be
lost when the door is opened after
program start or when canceling a
program.
Technical Service can set a time frame
when a program can be changed.
Adding/removing laundry
during a drying program
^ Press the a button.
^ Open the door.
,Do not touch the rear of the
drum while adding or removing
items. Danger of burns due to high
temperatures in the drum.
Canceling a program
^ Add or remove items.
^ Press the G button "Cancel".
^ Close the door.
The laundry is cooled down.
Continue drying
^ Press G "Cancel" once more and
"End" is displayed.
^ Press the "Start" button.
^ Press the a button.
Note
^ Open and close the door.
When the program cycle is changed
the displayed remaining time may differ
from the actual drying time.
^ Select the new program.
^ Press the "Start" button.
15
Program guide
Programs may vary depending on the offerings of your machine.
Cottons
Extra dry, Normal+, Normal
Items
Load size: 14.3 lbs (6.5 kg)
Single and multilayered cotton and linen laundry e.g. terry towels,
beach towels, bath robes, T-Shirts, underwear, cottons bed linens,
baby clothing, etc.
– Select "Low temp." for items with the fabric care symbol r.
– Select "Extra dry" for multilayered and thick items.
– The "Extra dry" program should not be selected for jersey materials.
Items may shrink.
Hand iron r, Hand iron rr, Machine iron
Items
Cotton or linen fabrics to be left damp for easier ironing.
e.g. table cloths, bed linen, starched laundry, etc.
Note
– Select "Low temp." for items with the fabric care symbol r.
– Roll up items until they are ironed to keep them moist.
Note
Minimum iron
Normal+, Normal, Hand iron r
Items
Load size: 7.7 lbs (3.5 kg)
Permanent Press items of cotton, mixed fabrics or synthetics.
e.g. sweaters, dresses, pants, table cloths, etc.
– Select "Low temp." for items with the fabric care symbol r.
– Select "Hand iron r" for crease-free drying and reduce the load size
to (3.3 lbs) 1.5 kg.
– Items will be dried wrinkle free, depending on fabric and load.
The load size is the dry laundry weight.
Note
16
Program guide
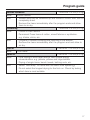
Woollen handcare
Items
Note
Load size: 5.5 lbs (2.5 kg)
Woolen fabrics
– Woolen items will be loosened up and fluffed in a short time, but not
completely dried.
– Remove the items immediately after the program ends and allow
them to air dry.
Smoothing
Load size: 6.6 lbs (3.0 kg)
Items
– Cotton or linen fabrics
– Permanent Press items of cotton, mixed fabrics or synthetics.
e.g. khakis, shirts, etc.
Note
– Program to reduce creasing after spinning in the washer.
– Remove the items immediately after the program end and allow to
air dry.
Cool air
Items
Load size: 14.3 lbs (6.5 kg)
To air items
Warm air
Load size: 14.3 lbs (6.5 kg)
Items
– Final drying of multi-layer fabrics, with unique drying
characteristics. e.g. jackets, pillows and large textiles.
– Drying of single items: beach towels, bathing suits, etc.
Note
– Select "Low temp." for items with the fabric care symbol r.
– Do not select the longest drying for the first run. Check by testing
which time is most suitable.
17
Program guide
Load size: 7.7 lbs (3.5 kg)
Jeans
Normal, Hand iron r
Items
Denim fabric items, pants, jackets, skirts or shirts, etc.
Shirts
Normal, Hand iron r
Items
Shirts and dress shirts.
Outerwear
Normal, Hand iron r
Items
Load size: 5.5 lbs (2.5 kg)
Load size: 7.7 lbs (3.5 kg)
Outdoor clothing suitable to dry in a tumble dyer.
Proofing
Load size: 5.5 lbs (2.5 kg)
Items
For dryer suitable items, e.g. ski and outdoor clothing, tablecloths
and poplin items.
Note
– This program has an additional step for water proofing.
– Water proofed items must only be treated with a water
repellant that is "Suitable for membrane textiles". These
chemicals are based on flourochemicals.
– Do not dry items which were treated with agents containing
paraffin! This is a fire hazard.
Towelling
Load size: 14.3 lbs (6.5 kg)
Normal+
Items
Terry laundry, e.g. towels, beach towels, bath robes.
18
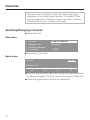
Timer
The timer allows the user to select the time of day for the
program end. The program start can be delayed from 30
minutes to 24 hours.
Select the submenu Timer
Cottons
Normal+
Low temp.
Duration 1:47 h
Low temp. B
Timer Y
Save
Back A
H
H
H
H
^ Press the direct select button E. The "Timer" menu
shows.
Select the time
Cottons
Normal
Low temp.
10:00
Start
10:13
Finish
12:00
^ Select the desired program end time with the jog shuttle
and confirm.
The program end time is adjusted to the next full or half hour.
The program start will be delayed in accordance with the
desired program end time.
Starting the timer function
^ Press the "Start" button.
The elapsed time is displayed and will count down in
minutes.
The drum turns briefly every hour to prevent creases.
Canceling the timer
^ Press the G button to cancel the timer.
^ Press it once more to get back to the main menu.
19
Favorites
The dryer has the option to save the most used drying
programs on the direct select buttons. The option "Save"
must be selected in "Settings - Supervisor level". Contact
Technical Service for access to this level.
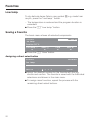
Selecting/Changing a Favorite
^ Close the door.
Main menu
1
Cottons
Program selection ...
2
Minimum iron
Settings F ...
3
Woollens handcare
4
Smoothing
10:00
^ Press the D button.
Basic menu
Cottons
Normal
Duration 1:16 h
Low temp.
H
Timer Y
H
Save
H
Back A
H
^ Turn the jog shuttle to select the component you would like
to adjust: program ("Cottons") or the drying level ("Normal").
^ Press the jog shuttle to confirm the selection.
20
Favorites
Depending on the selection the display shows one of the following
submenus
– Select a program
Program
selection
Back A
Cottons
Minimum iron
Woollens handcare
H
^ Select the desired program with the jog shuttle and
confirm.
Important: If no selection is made in the submenu, the
display will switch back to the basic menu after
20 seconds.
– Drying level programs
Cottons
Normal+
Drying levels from
Machine iron - Extra dry
c
^ Select and confirm the desired drying level with the jog
shuttle.
The display shows the drying level range of each program.
– Program "Warm air", "Cool air"
Warm air
10:00
0:30 h
Finish
Duration
10:30
0:30 h
^ The duration can be extended or shortened with the jog
shuttle (maximum 2 hr cold air / 1 hr warm air).
The program end time is displayed.
– other programs
The defined programs have a fixed drying level and duration
and cannot be adjusted.
21
Favorites
Low temp.
To dry delicate items (fabric care symbol r) e.g. made from
acrylic, press the "Low temp." button.
– The temperature is reduced and the program duration is
extended.
^ Press the D "Low temp." button.
Saving a Favorite
The basic menu shows all selected components.
Cottons
Normal+
Low temp.
Duration 1:47 h
Low temp. B
H
Timer Y
H
Save
H
Back A
H
^ Press the F "Save" button.
Assigning a direct select button
Cottons
Normal+
Low temp.
Previous
: Cottons
Save to
:
1
2
Normal
3
4
Back A
^ Select the desired number for the favorite with the jog
shuttle and confirm. The favorite is saved with the individual
selections and shown in the main menu.
^ To assign more favorites, repeat the process with the
remaining direct select buttons.
22
Cleaning and Care
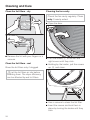
Cleaning the lint filter
,Check and clean the lint filter
when the following message shows:
"Clean the filters" or "Clean out
airways".
A two-piece lint filter in the dryer fan
cavity collects the lint. It has to be
removed and disassembled.
Note: Use a vacuum cleaner to clean
the lint filter without touching it.
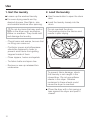
Removing the lint filter
^ Pull the lint filter out by its handle.
Disassembling the lint filter
^ Press on the right side of the flap to
open it.
^ Hold the lint filter with both handles
and twist the inner filter towards you,
then pull apart (see illustration).
23
Cleaning and Care
Clean the lint filters - dry
Cleaning the fan cavity
Check the fan cavity regularly. Clean
only if heavily soiled.
^ Open the door.
^ Remove the lint with your fingers or a
vacuum.
Clean the lint filters - wet
Rinse the lint filters only if clogged.
^ Turn the knobs, a, of the left and
right covers until they click.
^ Holding by the knobs, pull the covers
up, b, and clean.
,Let the lint filters air dry before
inserting them. The dryer efficiency
can be affected by wet lint filters.
^ Use a vacuum to clean the lint filter.
^ Insert the covers and lock them in
place by turning the knobs until they
click.
24
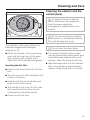
Cleaning and Care
Cleaning the exterior and the
control panel
,To reduce the risk of electric
shock, disconnect the appliance
from the power supply by
unplugging or tripping the circuit
breaker.
,Do not use an abrasive cleaner,
glass cleaner or all-purpose cleaner.
They will damage the dryer.
The impeller in the dryer interior can
become clogged with detergent
residues or lint.
,Do not hose the dryer down.
^ Clean the impeller, the surrounding
area and the inner part of the open
flap carefully with a damp cloth.
Take care not to damage the gasket.
^ The exterior and the control panel
can be cleaned with warm water and
liquid dish soap applied with a soft
sponge. Wipe dry using a soft cloth.
Inserting the lint filter
^ Stainless steel parts can be cleaned
with a non-abrasive stainless steel
cleaner. Wipe clean with a soft cloth.
^ Interlock the inner and outer lint filter
part.
^ Turn the inner lint filter clockwise until
it clicks into place.
^ Hold the lint filter by its handle and
push it into the fan cavity.
^ The handle of the inner lint filter may
be turned so that the filter can be
conveniently inserted/removed.
^ Close the lint filter flap.
25
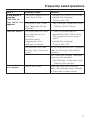
Frequently asked questions
Repairs to electrical appliances must only be carried out by a qualified and
trained technician in accordance with local and national safety regulations.
Unauthorized repairs could cause injury or machine damage. The
manufacturer cannot be held responsible for unauthorized work.
Check and fault messages in the display
What if ...
l
Adjust the load
,
Technical fault
A numerical fault
message shows,
e.g. "F47".
26
Possible cause
Solution
This is not a fault.
The electronic reads that no
laundry is in the drum and
cancels the program.
Single items or already dried
laundry can also cause a
program stop.
Single items should be
dried with a "Timed
drying" program.
To delete the message:
– Open the door.
The fault cannot be detected
immediately.
In some cases "Clean out
airways" is displayed.
– See "Settings Supervisor level Cleaning the airways".
To delete the message:
– Confirm with "OK".
If the problem persists
contact Miele.
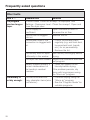
Frequently asked questions
What if ...
Possible cause
At the end of a
program
Clean filter or
The dryer reminds you to – Remove and clean the lint filter.
clean the lint filter.
To delete this message:
– Confirm with "OK".
The cycle of the "Clean – See "Settings - Supervisor level
filter" message can be
- Cleaning the lint filters".
adjusted.
Clean the lint filter
appears
Solution
Clean out airways
The dryer does not work – Check all possibilities as
at its optimum or not
described under "Other faults efficiently.
The program runs too long or
stops".
Possible cause:
clogging by lint or
To delete this message:
detergent residues.
– Confirm with "OK".
The exhaust duct may
With a long exhaust duct, program
be very long. This is not times and energy consumption
a fault.
increase.
The "Clean out airways" message
cycle can be adjusted.
– See "Settings - Supervisor level
- Cleaning the airways".
Program finish
time changed
This is not a fault.
While the timer was counting
down, the settings were changed
or there was a power failure.
27
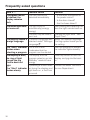
Frequently asked questions
Other faults
What if ...
The program
runs too long or
stops.
Possible fault
Solution
In some cases "Clean out airways" is displayed. See
"Settings - Supervisor level - Clean the airways". Open and
close the dryer door.
The air supply is
Open a window or door to
insufficient.
increase the air flow.
The lint filter is clogged
Remove the lint.
with lint.
The exhaust hose or the
– Check the exhaust parts
connection is clogged with
regularly (e.g. wall vent duct,
lint.
louvered wall vent, bends,
etc.) for air permeability.
– Remove the lint.
The laundry was not spun
sufficiently in the washer.
The laundry is
not dry enough.
28
Spin laundry thoroughly before
drying.
The dryer has over-loaded. Regard the maximum load size
per program.
Metallic zippers prevent a – Open the zippers of the
correct measurement of
laundry before drying.
the laundry’s residual
If the problem persists, dry
moisture.
items with long zippers using
the "Warm air" program.
– Continue drying using the
The load contained too
many dissimilar items (size
"Warm air" program.
and fabrics.)
– See the "Program Guide" for
suitable programs.
Frequently asked questions
What if ...
Possible fault
What if there is
The non-return flap of the
condensed water in dryers' collective exhaust
the drum?
duct does not work
correctly.
Items made of
synthetic fabrics
have static cling
after drying.
Lint has built up.
Solution
– The dryer must only be
installed with a non-return
flap to a collective
exhaust duct.
– Check the non-return flap
regularly for damages
and replace if necessary.
Synthetics are prone to
static cling.
Use liquid fabric softener in
the last rinse of the wash to
minimize the static cling
during drying.
Lint is the result of friction
The lint is collected in the
caused by items being worn lint filters and can be easily
cleaned (see "Cleaning and
and washed. This lint is
loosened during drying. It
Care").
has been established by
research institutes, that
dryers have no detrimental
effects on the lifetime of
fabrics.
29
Frequently asked questions
What if ...
Possible cause
Solution
A program cannot
be started, the
display remains
dark.
The fault cannot be
detected immediately.
– Is the dryer connected to
the power mains?
– Is the door closed?
– Are the fuses blown?
After closing and opening the
door the light comes back on.
The drum light does The light turns off
not come on.
automatically (energy
saving).
The bulb may be bad or
burnt out.
The display shows a
foreign language.
The "Start" indicator
flashes when
selecting a program.
The display is dark,
the ring of light
around the jog
shuttle does not
light.
The "Start" indicator
flashes slowly.
30
Change the light bulb. See
"Dryer Care".
A different language was Select the desired language.
selected under "Settings - The flag symbol leads you to
Language J".
the setting.
After the program is started,
This is not a fault.
the indicator lights steadily.
It indicates that the
program can be started.
The display and the
Press any button to turn the
program selector go into display and jog shuttle back
"Standby" mode to save on.
energy.
If pressing a button does Contact the Miele Technical
not bring the display and Service Department.
light back on, a fault has
occurred.
Frequently asked questions
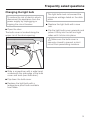
Changing the light bulb
To reduce the risk of electric shock,
disconnect the appliance from the
power supply by unplugging or
tripping the circuit breaker.
^ Open the door.
The bulb cover is located along the
upper rim of the drum opening.
The light bulb must not exceed the
maximum wattage listed on the data
plate.
^ Replace the light bulb with a new
one.
^ Flip the light bulb cover upwards and
press it firmly into the left and right
sides until it clicks into place.
,Make sure the bulb cover is
securely closed to prevent a short
circuit from penetrating moisture.
^ Slide a screwdriver with a wide head
underneath the side edge of the bulb
cover and twist (see illustration).
^ Flip down the bulb cover.
^ Replace the light bulb with a
temperature proof bulb available
from Miele.
31
After sales service
In the event of a fault which you cannot
fix yourself, please contact the Miele
Technical Service Department at the
address on the back of this booklet.
When contacting the Service
Department, please quote the model
and serial number of your appliance.
They can be found on the data plate
located below the drum opening.
The PC indicator allows a service
technician to check and update the
drying programs.
The update allows future developments
of fabrics, detergents and drying
programs to be incorporated into the
machine’s electronic control.
Optional accessories
Optional accessories are available from
Miele.
32
INSTALLATION INSTRUCTIONS
To prevent accidents
and machine damage
read these instructions
before
installation or use.
IMPORTANT SAFETY INSTRUCTIONS
, WARNING - Risk of Fire
~ To reduce the risk of severe injury or
death, follow all installation instructions.
~ Clothes dryer installation must be
performed by a qualified installer.
~ Install the clothes dryer according to
the manufacturer's instructions and
local codes.
~ Check the packaging, the dryer and
accessories for any signs of damage.
Do not use a damaged appliance.
~ Repair and maintenance work
should be performed by a Miele
authorized service technician. Work by
unqualified persons could be
dangerous and may void the warranty.
~ Before installation, disconnect the
dryer from the electrical supply by
shutting off the power, unplugging the
power cord or tripping the circuit
breaker. Do not restore power until
installation is complete.
~ GROUNDING INSTRUCTIONS
This appliance must be grounded. In
the event of a malfunction or
breakdown, grounding will reduce the
risk of electric shock by providing a
path of least resistance for the electric
current. This appliance is equipped
with a cord having an equipment
grounding conductor and a grounding
plug. The plug must be inserted into an
appropriate outlet that is properly
installed and grounded in accordance
with all local codes and ordinances.
34
~ WARNING – Improper connection of
the equipment grounding conductor
can result in a risk of electric shock.
Check with a qualified electrician,
service representative or personnel if
you are in doubt as to whether the
appliance is properly grounded.
~ Do not modify the plug provided
with the appliance! If it will not fit the
outlet, have a proper outlet installed by
a qualified electrician.
~ Do not use an extension cord to
connect this appliance to the power
supply. Extension cords do not
guarantee the required safety of the
appliance (e.g. danger of overheating).
~ This dryer must be vented outdoors
to reduce the risk of fire. Be sure to
observe local building codes.
~ Do not install a clothes dryer with
flexible plastic venting materials. If
flexible metal (foil type) duct is
installed, it must be of a specific type
identified by the manufacturer as
suitable for use with clothes dryers.
Flexible venting materials are known to
collapse, be easily crushed, and trap
lint. These conditions will obstruct
clothes dryer airflow and increase the
risk of fire.
~ Use flexible or rigid metal pipe for
venting. Non-metallic flexible hose
should not be used, it is a potential fire
hazard.
~ The appliance shall not be
exhausted into a chimney, a wall, a
ceiling, an attic, a crawl space, or a
concealed space of a building.
IMPORTANT SAFETY INSTRUCTIONS
~ When installing multiple dryers to
one collective exhaust duct, a
non-return flap per dryer must be
installed directly to the collective duct.
Otherwise the dryers could be
damaged and the electrical safety
affected.
~ The installation of this unit in non
stationary locations (e.g. ships) must be
performed by a qualified installer or
service agency, in strict accordance
with national and local safety
regulations and standards.
~ Do not install the machine in rooms
where temperatures below freezing
may occur.
~ If there is any doubt concerning
installation, contact Miele’s Technical
Service Department.
SAVE THESE
INSTRUCTIONS
35
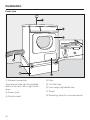
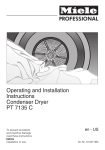
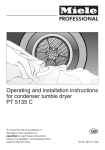
Installation
Front view
a Exhaust connection
d Door
The exhaust hose can be installed
either at the rear, left or right of the
dryer.
e Lint filter flap
b Power cord
c Control panel
36
f Four height adjustable feet
g Stand
h Retaining clips (for concrete stand)
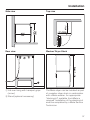
Installation
Side view
Top view
Rear view
Washer/ Dryer Stack
a Lid over hang with transport grips
(arrow)
The Miele dryer can be installed as part
of a washer-dryer stack in combination
with a Miele washer. An appropriate
"stacking kit" available from Miele is
required. Installation of the stacking kit
must be completed by a Miele Service
Technician.
b Stand (optional accessory)
37
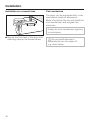
Installation
Installation on a cement base
Coin mechanism
The dryer can be equipped with a coin
mechanism (optional accessory).
Miele’s Technical Service will install the
coin mechanism and program the
electronic.
Empty the coin mechanism regularly
to avoid jams.
^ Secure the front feet of the dryer with
retaining clips on the cement base.
,Do not install devices to
automatically turn the dryer off,
e.g. clock timers.
38
Installation
Installation
,Do not install a lockable or slide
door in the pivoting area of the dryer
door.
Transporting the dryer to the
installation site
The rear overhang of the lid has
transport grips.
^ Use the front dryer feet and the rear
overhang to transport the dryer from
the packaging base to the installation
site.
Level the dryer
^ The machine can be leveled by
turning the legs clockwise or
counterclockwise as necessary.
,An air gap of 3/8" (10 mm) must
be provided between the machine
and the floor. The vents must not be
blocked by toe kicks, long piled
carpet, etc.
The appliance is not intended to be
mounted in a wall or other vertical
surface of a building or cabinet. The
unit is allowed for built-in
application.
The dryer must be level to ensure safe
and proper operation.
,The machine may not be
operated without the lid in place.
39
Installation
Electrical connection
,This installation should be
performed by an experienced and
qualified technician, in accordance
with local codes and regulations.
The dryer comes with a power cord and
NEMA L6-30 plug.
The machines is supplied for a
connection to a 2 AC 208V 60Hz
2x30A, Single Phase Supply.
For extra safety it is advisable to install
a residual current device (RCD) with a
trip current of 30 mA.
The machine must only be connected
to the voltage and frequency shown on
the data plate.
40
Installation of exhaust venting
General notes
,The dryer must only run if the
moist exhaust air from the drying
process is conducted outside by an
installed exhaust duct vent.
,Disconnect the dryer from the
power supply during installation of
the exhaust duct.
The exhaust connection (e.g. a wall
pipe) must be installed, so that the
moist exhaust air cannot get drawn
back into the installation room and
cause constructional damage or
unreasonable disturbance.
The room air, which is taken in when
the dryer is in operation, is blown out
via the exhaust vent. It is important,
particularly if the room is small, to
ensure adequate ventilation and air
supply opening a window or
installing unlockable ventilation
openings in the wall., for example,
will allow more air to enter the room.
Otherwise drying times and energy
consumption may increase.
Danger of suffocation by suction of
exhaust fumes.
41
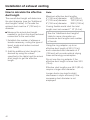
Installation of exhaust venting
How to calculate the effective
duct length
The overall duct length will determine
the duct diameter (see the "Additional
duct lengths" table). In Canada the
exhaust duct must be 4" (102 mm) in
diameter.
^ Measure the actual duct length
needed to go from the dryers exhaust
connection to the vent outlet:
1. Establish the number of elbows or
bends necessary, noting the type of
bend, angle and radius involved
(see Table).
2. Add the additional duct length (as
derived by using the values
specified in the table) and the actual
duct length to get the effective
length.
Note:
Maximum effective duct lengths:
4" (100 mm) diameter
66 ft (20 m)
5" (125 mm) diameter
132 ft (40 m)
6" (150 mm) diameter
328 ft (100 m)
If using flexible metal duct the total
length must not exceed 7' 10" (2.4 m).
See the "Additional duct lengths"
table for more information on
maximum duct lengths and number
of bends.
Using the ring adapter, up to an
effective duct length of 33 ft (10 m),
and a standard duct diameter of 4"
(100 mm) will provide optimal drying
times and energy consumption.
Do not use the ring adapter if the
effective duct length is more than 33 ft
(10 m).
Effective duct lengths over 66 ft (20 m)
require a larger duct diameter.
Longer ducts may lead to slight
decreases in dryer efficiency if the
necessary duct diameter is not
employed.
42
Installation of exhaust venting
Tips about the ductwork
– Check with your local building codes
to determine the maximum allowable
duct length.
– Only use rigid or flexible metal duct
for exhausting. Non-metallic flexible
hose should not be used, it is a
potential fire hazard.
– In the United Stated foil-type flexible
ducts should only be used if
identified for use by the manufacturer
as compliant with the Outline for
Clothes Dryer Transition Duct,
Subject ANSI/UL 2158A.
In Canada, only flexible metal
(foil-type) ducts specifically identified
for use by the manufacturer should
be used.
– Use the wall vent or window
connection (optional accessories) for
venting outdoors.
– For optimal drying results avoid long
ducting with too many bends, angles
or tight corners.
– Do not assemble the duct with
screws or other fastening devices
that extend into the duct and catch
lint.
– The shorter the exhaust ductwork,
the more efficient the dryer will be.
Expelled air is slowed down in the
ducts due to friction against the inner
walls. The shorter and smoother the
inner walls are, the less friction will
be created.
– An elbow or bend creates more
friction than a straight duct. An
additional duct length factor must be
added for each elbow or bend (see
Table). This factor expresses the
resistance of the bend in terms of a
straight length of duct.
The additional length factor is then
added to the existing duct to give the
effective length.
A larger duct diameter helps reduce
friction. Therefore the duct diameter
and length should be increased
simultaneously.
43
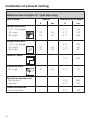
Installation of exhaust venting
Additional duct lengths (4" rigid pipe only)
Type of bend
Radius
Additional duct length
ft
cm
ft
cm
Flexible metal duct
– 3’ 3" (1 m) straight
– 45° angle
– 90° angle
10"
10"
25
25
5’ 11"
4’ 11"
8’ 2"
180
150
250
Smooth metal duct
– 3’ 3" (1 m) straight
– 45° angle
– 90° angle
10"
10"
25
25
3’ 3"
1’ 11"
2’ 7"
100
60
80
7’ 6"
230
2’ 4"
70
Wall vent or window vent
– with louvers
– with flap
12’ 5"
4’ 11"
380
150
Exhaust connection
– left or right side
3’ 3"
100
Elbow 90° sharp
Concertina bend
– 90° angle
44
8"
20
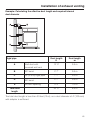
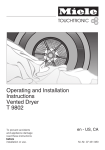
Installation of exhaust venting
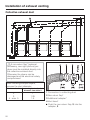
Example: Calculating the effective duct length and required internal
duct diameter
Rigid pipe
Duct length
ft
Duct length
m
A
Wall duct with
louvered wall vent
12’ 5"
3.8 m
B
90° bend
2’ 7"
0.8 m
C
20" (0.5 m) rigid pipe
1’ 7"
0.5 m
D
90° bend
2’ 7"
0.8 m
E
left vent opening
3’ 3"
1.0 m
22’ 5"
6.9 m
Total duct
length
The total duct length is less than 33 feet (10 m), so a duct diameter of 4" (100 mm)
with adapter is sufficient.
45
Installation of exhaust venting
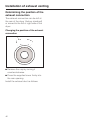
Determining the position of the
exhaust connection
The exhaust connection can be left at
the rear of the dryer (factory standard)
or moved to the left or right side of the
dryer.
Changing the position of the exhaust
connection
^ Remove the cap by turning it
counterclockwise.
^ Press the supplied cover firmly into
the rear opening.
Install the exhaust duct as follows.
46
Installation of exhaust venting
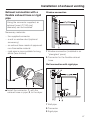
Exhaust connection with a
flexible exhaust hose or rigid
pipe
Window connection
Using the connector supplied, an
exhaust hose (4" [100 mm]
diameter) can be installed.
Necessary materials:
– the supplied connector
– a wall or window duct (optional
accessory)
– an exhaust hose made of approved
non-flammable material.
– rigid pipe is more suitable for long
ducts (less friction)
1 Window connection (installed in an
"plexiglass" pane)
2 Connector for the flexible exhaust
hose
Wall connection with rigid pipe
^ Install the connector, 1, with the
exhaust hose or pipe, 2, to the dryer.
1 Wall pipe
2 Connector
3 Rigid pipe
47
Installation of exhaust venting
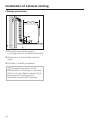
Chimney connection
1 Pipe with connection nozzle
(= single parts of the Miele wall pipe)
2 Connector for the flexible exhaust
hose
3 Chimney, humidity insulated
,The appliance must not be
connected to a chimney or vent flue
which is in use. Neither should it be
connected to ducting which
ventilates rooms with fireplaces.
48
Installation of exhaust venting
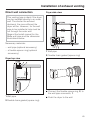
Direct wall connection
Dryer side view
This venting type is ideal if the dryer
can be installed directly to an outer
wall. The shorter the exhaust
ductwork, the more efficient the
dryer will be. However, for the wall
pipe to be installed a hole must be
cut through the outer wall.
Regard the Install manual for the
Miele wall pipe and the dimension
illustrations below.
Necessary materials:
– wall pipe (optional accessory)
– a flexible spacer ring (optional
accessory)
1 Wall pipe
2 Flexible foam gasket (space ring)
Dryer top view
^ Connect the flexible space ring, 2, to
the wall pipe connector, 1.
1 Wall pipe
^ Push the dryer to the wall.
2 Flexible foam gasket (space ring)
49
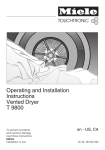
Installation of exhaust venting
Collective exhaust duct
,A non-return flap* (optional
accessory, see right picture) per
dryer must be installed directly into
the collective exhaust duct.
Otherwise the dryers can be
damaged and the electrical safety
compromised.
When installing multiple dryers,
increase the duct diameter.
Number of units
Increasing factor for duct
diameter from table 2
2
3
4 - max. 5
1
1.25
1.5
50
1 Connection to collecting duct
2 Non-return flap*
3 Additional adapter*
4 Vent hose*
^ Push the non-return flap, 2, into the
adapter, 3.
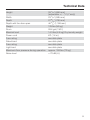
Technical Data
Height
33 7/16" (850 mm)
(adjustable + / - 1/4" (7 mm))
Width
23 7/16" (595 mm)
Depth
Depth with the door open
27 9/16" (700 mm)
46 3/4" (1,188 mm)
Weight
Drum
123 lbs (56 kg)
28.6 gal (130 l)
Maximal load
Power cord
14.3 lbs (6.5 kg) Dry laundry weight
63" (1.6 m)
Fuse rating
Rated load
see data plate
see data plate
Fuse rating
Light load
see data plate
see data plate
Maximum floor pressure during operation
approx. 159 lbs (72 kg)
Noise level
< 70 dB (A)
51
Caring for the environment
Disposal of the packing
materials
The cardboard box and packing
materials protect the appliance during
shipping. They have been designed to
be biodegradable and recyclable.
To prevent suffocation, ensure that any
plastic wrappings, bags, etc. are
disposed of safely and kept out of the
reach of children.
52
Disposal of an appliance
Old appliances may contain materials
that can be recycled. Please contact
your local recycling authority about the
possibility of recycling these materials.
Ensure that a discarded dryer presents
no danger to children. While being
stored for disposal remove the door to
the drying compartment.
Menu Settings J
to adjust standard settings
The dryer controls can be adjusted to changing demands through the settings.
Depending on default settings:
– some settings are visible and can be changed by all users (Menu "Settings J")
or
– all setting are locked in the "Supervisor level" by a code
(Menu "Settings - Supervisor level").
Contact Miele Technical Service.
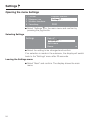
Settings J
Opening the menu Settings
1
Cottons
Program selection ...
2
Minimum iron
Settings F ...
3
Woollens handcare
4
Smoothing
10:00
^ Select "Settings" J in the main menu and confirm by
pressing the jog shuttle.
Selecting Settings
Settings
Back A
Language F ...
Anti-crease
Buzzer
H
^ Select the setting to be changed and confirm.
If no selection is made in the submenu, the display will switch
back to the "Settings" menu after 20 seconds.
Leaving the Settings menu
^ Select "Back" and confirm. The display shows the main
menu.
54
Settings J
Language J
The displayed language can be set
in the submenu "Language J".
The flag behind the word "Language J"
is a guide to find the settings menu in
case a foreign language is selected.
^ Select the desired language and
confirm.
The change is only valid for the current
program. At the end of the program the
display language will change back to
the language set in the "Settings Supervisor level".
The display will change back to the
default language setting if no further
entry is made within 15 seconds after
setting a new language.
Anti-crease
The drum will continue to turn in
intervals for one hour after the
program has ended if the laundry is
not immediately removed.
Default setting: on
Buzzer
When the buzzer is selected a tone
sounds at the end of the program.
off
The end-of-program buzzer is turned
off (default setting).
However, it does not turn off the
warning tone which indicates a fault
message.
normal
The buzzer sounds "normal" at the end
of a program.
loud
The buzzer sounds "loud" at the end of
a program.
Time of day
The selection allows the clock to be
shown as 24 hours, 12 hours or not
at all. Afterwards the clock will be
set to the current time of day.
If the option "Time not displayed" is
selected, the "Timer" will be displayed
as a 24 hour clock.
^ Select the desired clock display and
confirm.
The display changes to the clock
setting.
^ Select the hour with the jog shuttle
and confirm. Select the minutes and
confirm. The time of day is saved.
55
Settings J
Contrast/Brightness
Display contrast and brightness can
be adjusted in 10 levels.
Lengthening the cooling time
The cooling phase can be
lengthened before the program is
started. The laundry will be cooled.
The bar shows the selected level.
The bar shows the selected level.
Standby
The display goes into standby mode
after 10 minutes and the "Start"
button flashes slowly to save energy.
on
Standby is turned on:
– when no program is selected.
– after pressing the "Start" button.
– at the end of a program.
not during current program
(default setting)
Standby is turned on:
– when no program is selected.
Pressing any button or turning the jog
shuttle turns the display on again.
off
The display stays turned on.
56
Delivery status: 0 minutes (normal
cooling down phase).
– The program duration is extended
respectively.
The cooling time cannot be extended in
the programs "Warm air, Cool air,
Woollen handcare, Smoothing".
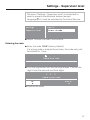
Settings - Supervisor level
The menu "Settings - Supervisor level" is locked with a
code to prevent unauthorized access (except
Language J). It must be activated by Technical Service.
Settings
Back A
Supervisor level
Access via code
^ Select "Access via code" and confirm.
Entering the code
^ Enter the code "0 0 0" (factory default).
If a wrong code is entered three times, the code entry will
be locked for 1 hour.
0
_
_
Please enter code
^ Turn the jog shuttle until the first digit shows. Confirm the
digit. Enter the second and third digits.
0
0
0
Please confirm code
OK
H
Back A
H
^ Confirm the code.
57
Settings - Supervisor level
Language J
The display contents can be shown
in different languages.
The fixed default language can be set
in the submenu "Language J".
Controls
The controls can be set to
"Household" (default setting) or
laundromat version "WS-KW buttons
simple".
^ Select the desired language and
confirm with "OK".
WS-KW = Waschsalon-Kurzwahltasten
(Laundromat-Direct select buttons)
Sort languages
The laundromat version displays the
four pre-set favorite programs which
cannot changed by the user.
The order of the first 4 languages in
the display can be set, when the
option "Language menu international" or "Language menu International 4 languages" is
selected.
Supervisor level
The access code for the supervisor
level can be changed.
^ Enter the old code.
^ Enter the new code.
Once the new code is confirmed, the
display will show the beginning of the
"Settings" menu.
The use is simplified by the direct
select buttons D - G.
^ Select the four favorite programs first
before activating the laundromat
version, see "Favorites".
, Caution: When selecting the
laundromat version and exiting the
"Settings - Supervisor level", the
option "Settings" will no longer be
listed. The supervisor level can no
longer be opened.
Contact Technical Service to adjust
more settings.
– The basic menu of a program cannot
be opened with the jog shuttle.
– The components "Gentle", "Timer",
"Save" and "Program selection" are
deactivated.
– The time of day is not shown.
– The "Settings" and the "Supervisor
level" can only be accessed by
Technical Service.
58
Settings - Supervisor level
Language entry
A selection can be set to show an
additional welcome menu with
language selection before the entry
menu and at the end of the program.
national:
no additional welcome menu
international:
The welcome menu shows. A language
must be selected. All languages are
available. See "Sort languages".
Drying levels
The bars show the selected level.
Factory default: medium level
– The program duration shortens (more
moist) or lengthens (more dry).
Drying level "Cottons" and
"Minimum iron"
The drying level of "Cottons" or
"Minimum iron" can be adjusted.
Drying level "Cottons" and "Machine
iron"
This drying level can be adjusted.
international 4 languages:
The welcome menu shows. A language
must be selected. Four languages are
available. See "Sort languages".
Timer
The timer allows the user to select
the time of the program end, see
"Timer". "active" or "inactive" (without
function) are available.
When pressing the "Timer" button, the
"inactive" option (default setting) shows
only the program duration, the
estimated time of day of the program
end and the current time of day.
59
Settings - Supervisor level
Cleaning the airways
The lint filters must be cleaned after
every drying cycle. Additionally the
indicator "Clean out airways" lights
once a certain level of lint is
collected. The user can decide at
which level of lint collection the
indicator should come on.
off
"Clean out airways" does not light up
heavy
"Clean out airways" shows only when
large amount of lint is collected.
normal
Factory default
light
"Clean out airways" shows even when a
small amount of lint is collected.
Cleaning the lint filters
The display "Clean filter" reminds the
user to clean the lint filter. The user
can decide after how many
operating hours this reminder should
show.
The setting depends on the amount of
lint. Adjust the interval depending on
the use of the dryer.
Factory default: after 20 hours.
Display the residual moisture
as a percentage
In addition to the drying levels, the
residual moisture as a % can be
displayed in the program cycle.
Factory default: without percent
indication
Cool air free
If the dryer is used with a coin
mechanism, the program "Cool air"
can be provided free of charge.
free (factory default)
60
61
62
63
All rights reserved / 1912
M.-Nr. 06 975 240 / 04
INFORMATION IS SUBJECT TO CHANGE. PLEASE REFER TO OUR WEBSITE TO OBTAIN THE MOST
CURRENT PRODUCT SPECIFICATIONS, TECHNICAL & WARRANTY INFORMATION.