1
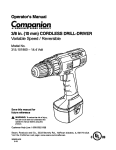
Operator's Manual
II:RRFTSHRN'I
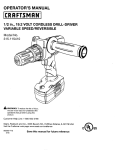
10 mm (3/8 in.) CORDLESS DRILL-DRIVER
Variable Speed / Reversible
Stock Nos.
_22535 - 9.6 Volt
22536 - 12 Volt
Model Nos.
973.225350 - 9.6 Volt
973.225360- 12 Volt
Save this manual for
future reference
CAUTION:
Read and follow all
Safety Rules and Operating Instructions
before first use of this product.
Customer Help Line: 1-877-369-8665
Sold by: Sears Canada Inc., Toronto M5B 2B8
Visit the Craftsman web page: www.sears.com/craftsman
972000*963
2-02
•
•
•
•
•
Safety
Features
Operation
Maintenance
Parts List
•
Table Of Contents ..........................................................................................................................................................
2
•
Warranty .........................................................................................................................................................................
2
•
Introduction.....................................................................................................................................................................
3
•
Gsnerai Safety Rules, Specific Safety Rules, And Symbols .....................................................................................
•
Product Specifications....................................................................................................................................................
•
Features .....................................................................................................................................................................
7-8
•
Operation..................................................................................................................................................................
8-13
•
Maintenance .................................................................................................................................................................
14
•
Acceasodas ..................................................................................................................................................................
14
•
Exploded View And Repair Parts list ..........................................................................................................................
15
•
Parts Ordering/Service ...............................................................................................................................................
16
3-6
7
FULL TWO YEAR WARRANTY ON CRAFTSMAN TOOL
If this CRRFTSMIIMtool fails to to operate withintwo years from the date of purchase,return it to the nearest Sears
Canada Inc. ("Sears') store and "Sears"will repair It, free of charge.
If this tool is used for commercialor rentalpurposes, this warranty applies for only 90 daysfrom the date of purchase.
Thiswarranty is in additionto any statutorywarranty.
Sears Canada Inc., Toronto MSB 2B8
Look for this symbol to point out imporlant safety precautions. It means attentionlll Your safety is
involved.
A
WARNING:
The operation of any power tool _ result in foreign objectsbeing thrown into youreyes, which can
result in severe eye damage. Before beginningpower tool operation,always wear safety gogglesor
safety glasses with side shields and a fullface shield when needed. We recommend Wide Vision
Safety Mask for use over eyeglasses or standard safety glasses with side shields,available at Seam
Retail Stores. Always wear eye protectionwhich is marked to complywith ANSI Z87.1.
"SAFETY AND INTERNATIONAL
SYMBOLS
This operator'smanual describes safety and internationalsymbolsand piotographsthat may appear on this product.
Read the operator'smanual for complete safety, assembly, operatingand maintenance,and repair information.
@
MEANING
Do not expose to rainor use in damp locations.
2
Yourdrill-driver
hasmanyfeatures
formaking
yourdrilling
operations
morepleasant
andenjoyable. Safety,
,_
performanceand dependabilityhave been giventop
pnorityin the design of this drill-drivermaking iteasy to
maintainand operate.
A
WARNING: Read and understand all Irmtructlino.
Failure to follow all instructionslistedbelow, may
result in electdoshock,fire and/or serious personal
injury.
Personal Safety
•
Stay alert, welch whst you are doing and use
common eanM when oparetlng a power tool. Do
not use tool while Urad or under the Influence of
drugs, alcohol, or medication. A moment of inattention while operatingpowertools may result in serious
personalinjury.
•
Dress properly. Do not wear loose clothing or
jewelry. Confaln long hair. Keep your heW,clothing,
and gloves away from moving pads. Loose clothes,
jewelry, or long hair can be caught in movingparts.
Avoid accidental starting. Be sum switch Is In the
licked or off paaltion before InserUng battery
pack. Carryingtoolswith your finger on the switchor
insertingthe battery pack intoa tool with the switchon,
invitesaccidents.
SAVE THESE INSTRUCTIONS
Work Area
•
Keep your work area clean and well lB. Cluttered
benches and dark areas inviteaccidents.
Do not operate power tools In m(ploalve atmospheres, such as In the presence of flammable
liquids, gases, or dust. Power tools create sparks
which may ignitethe dust or fumes.
•
Keep bystanders, children, and visllora away while
operating a power tool. Distractionscan cause you
to lose control.
•
•
Remove adjusting keys ormnchse
beforatumIng the tool on. A wrenchor a key that is Isf_attached
to a rotatingpart of the tool may resultin personal
injury.
•
Do not overreach. Keep proper footing and hal=nee st all tlmea. Proper footingand balanceenables
better controlof the tool in unexpected situations,Do
net use on a ladder or unstablesupport,
•
Use safety equlpmcoL Always wear aye protection.
Dust mask, nonskidsafety shoes, hard hat, or hearing
protectionmustbe used for appropriateconditions.
Elect dcal Safety
•
•
Do not abu_sethe cord. Never use the cord to carry
the charger. Keep cord away from he_, o11,shaft)
edges, or moving parts. Replace damaged cords
Immodlatoly. Damaged cords may create a fire,
A battery operated tool wRh Integral hattorles or a
separate battery pack must be recharged only wlh
the specified cherger for the battery. A charger that
may be suitablefor one type of battery may create a
risk of fire when used with another battery.Use battery
only with charger listed.
MODEL
BATFERYPACK CHARGINGASSEMBLY
973.225350 1323401
1425001
973.225360 139.3402
1425002
Use hattery operated tool only with spuclflcally
designated battery peck. Use of any otherbatteries
may creme a riskof fire. Use onlywith battery pack
listed.
CAUTION: Carefully read through this entire
operator'smanual before using yournew drill-driver.
Pay close attentionto the SpecificSafety Rules/
Symbols, Warnings and Cautions. if you use your
drill-driverproberly and onlyfor it'sintendeduse, you
will enjoyyears of safe, reliableservice.
Tool Use and Care
•
•
•
•
•
•
Use clamps or other practical way to secure end
support the workploce to a stable platform. Holding
the work by hand or againstyour body is unstableand
may lead to lossof control.
Do not fome tool. Use the corract tool for your
applicction. The correcttoolwill do the job better and
safer at the rate forwhich it is designed.
Do not use tool if switch does not turn It on or off.
A tool that cannotbe controlledwith the sw_chis
dangerousand mustbe repaired.
Discomte_ hettec/pack from tool or plaes tlw w_lctt
In the lockedor off poallicn balers nwldngeny edJustmerits,changing am
or storklgthetcoL Such
pr_ver_ve safetymeasuresreduceriskofsta_ngthe_col
a_er_l_.
Store Idle tools out of reach of children and other
unlrained persons. Too|s are dangerousin the hands
of untrained users.
•
Maintain tools wIth oars. Keep cutting tools sharp
and olsun. Propedy maintainedtools, with sharp
cuttingedges are less likelyto bind and are easier to
control.
•
Checkfor mlesitgnmontor binding of moving pads,
brealmge of pads, and any other condItion that may
affect the toors operation, ff damaged, have the tool
se_lced before using. Many accidentsare caused by
poodymaintained
tools,
Use only eccosserles that are recommended by
the manufacturer for your model. Accessoriesthat
may be suitablefor one tool, may create a nck of injury
when used on another tool.
•
Service
•
•
When battery pack is not in use, keep It away from
other metal objects like: paper clips, coins, keys,
nails, screws, or other roll metal objects that can
make a connection from one terminal to another.
Shortingthe battery terminatstogether may cause
sparks,bums, or a fire.
Tool =mvlce must be performed only by qualified
repair personnel. Service or malntananco performed
by unqualifiedpersonnel could resultin a nsk of injury.
When servicing a tool, use only Identicat replacemerit parts. Follow Instructions In the Maintenance
section of this manual. Use of unauthonzedparts or
failure to followMaintenance Instructionsmay create a
risk of shock or iniury,
Hold tool by Insulated gripping surfaces when performing an operation where the cutting tool may contact hidden
wiring. Contact with a *live" wire will make exposed metal parts of the tool "live"and shock the operator.
AddlUonal
•
•
Rules For Safe
Opera.on
fire or heat. This will reduce the risk of explosionand
possible injury.
Know your power tool. Read operetoYs manual
carefully. Learn Its applications end limitations, as
well as the specific potential hazards related to
this tool. Followingthis rule will reduce the risk of
electricshock,fire, or sedous injury.
_L WARNING: Batteriesvent hydrogengas and can
explode inthe presence of a seurca of ignition, such
as a pilot light.To reduce the risk of seriouspersonal
injury, never use any cordless product in the presence of open f_me. An explodedbattery can propel
debris and chemicals. If exposed, flushwith water
immediately.
Make anre your extsuston cord IS In gnod condllon.
When using an ex'tansicn cord, he =are to use one
heavy enough to eany the cuwent your product will
draw. Awlro gags size (A.W.G.) of at Isast 16 Is
recommended for an extenalon cord 100 fact or
In length. A cord a(coedlng 100 feet Is not recommended. If In doubt, usethe next heavlar gage. The
smaller the gage number, the he=wlarthe cord, An
undemizedcord will cause a dropin linevolt=qge
resulting in lossof power and overheating,
Do not charge bsttow tool In u damp or wet
location. Followingthis rule will reducethe risk of
electric shock.
For best results, your battery tool should be
charged In s location where the temperature Is
mare then 50°F but less than IOOOF.Do not store
outside or In vehicles.
Important Rules for Battery Tools
•
Bsttery tools do not heveto he plugged Into an
eta€ideal outlet; therefore, they am always In
operating condItion. Be aware of possible hazards
when not using your battery tool or when changIng sccesserlos. Followingthis rulewi11reduce the
dsk of sled:rioshock, fire, or seriouspersonal injury.
•
Do not place battery tools or their bsttorlse near
•
4
Under extreme usage or temperature condItions,
battery Isekugu mey occur. If Itqukl comes In
contact with your skin, wseh Immediately with
seep and water, then noutrallz= with lemon juice
or vinegar. If liquid gets Into your eyes, flush them
with olean water for at least 10 minutes, then seek
Immedlatu medical attenilon. Followingthis rule will
reducethe risk of seriouspersonal injury,
_kWARNING:
Never use a battery that has been
dropped or received a sharp blow. A damaged battery
is subjectto explosion. Properlydispose of a dropped
battery immediately.Failure to heed this warning can
result in sedous personal Injury.
•
Save these Instructions. This manual contains
Important safety and operating Instructicns for
charger. Followingthis rule will reducethe riskof
electric shock,fire, or serious personal injury.
•
Do notoperatechargarwlthadamagndcordor
plug. If damaged, have raglannd Immediately by a
qualIfied serviceman. Followingthis rule will reducethe
risk ofelectricshock,fire, or serious personalinjury.
•
Do not operate charger If It has received a sharp
blow, been dropped, or othen_lse damaged In any
way; take It to a qualIfied serviceman. Following
this rulewill reducethe risk of electric shock,fire, or
sedous personal injury.
•
•
Do not disassemble charger; take It to e qualified
serviceman whan service or repair is required.
Incorrect reeseembly may result In a dak of
electric shock or fire. Followingthis rulewill reduce
the risk of electric shock,fire, or serious personal
injury.
•
To reduce the risk of eluctdc shack, unplug
charger from outlet before attempting any malntenanns or cleaning. Turning off controls will not
reduce this dsk. Followingthis rule will reducethe
risk of electdc shock,fire, or serious personal injury.
•
Do not use charger outdoors. Followingthis rule will
reduce the risk of electric shock,fire, or serious
personal injury.
•
Disconnect chargerfrom power supply when not
In use. Followingthis rule will reduce the risk of
electricshock, fire, or serious personalinjury.
A
DANGER: RISK OF ELECTRIC SHOCK. DO NOT
TOUCH UNINSULATED PORTION OF OUTPUT
CONNECTOR OR UNINSULATED BATFERY
TERMINAL.
•
Save these Instructicne. Refer to them frequently
and use them to Instruct others who may use this
tool. If you loan someone this tool, loan them
these Instructions also. Followingthis rule will
reduce the risk of electricshock, fire, or serious
personal injury.
Before using battery charger, reed all Instructions
and cautlonon/markings In this manual, on
hatteoy charger, and product using balttary
charger. Following this rule will reduce the risk of
electric shock,fire, or serious personal injury.
_k CAUTION: To reduce risk of Injury, charge only
nickel-cadmium and nickel metal bydrlde type
rashargnsble hattedes. Other types of batteries
may burst causing personal Injury and damage.
Followingthis rulewill reducethe dsk of electric
shock, firs, or serious personal injury.
Do not expose charger to rain or snow. Following
this rule will reduce the risk of electricshock, fire, or
serious personal injury.
Use of an attachment not recommended or sold
by the battery charger manufacturer may result In
s risk of fire, electric shack, or Injury to persons.
Followingthis rule will reducethe risk of electric
shock, fire, or serious personal injury.
To reduce risk of damage to charger body and
cord, pull by charger plug rather than cord whan
disconnecting charger. Followingthis rule will
reducethe risk of electricshock, fire, or serious
personal injury.
Make sure cord Is located so that It will not ha
stepped on, tdpped over, or othenvlse subjected
to damage or stress. Followingthis rule will reduce
the risk of serious personal injury.
An extension cord should not he used unless
absolutely necessary. Use of improperextension
cord could resultin a risk of fire and electric shock. If
extension cord mustbe used, make sure:
_.WARNING:
Some dust created by power sanding,
sawing, grinding, drilling, and other construction
activities contains chemicals known to cause
cancer, bl_h defects or other reproductive harm.
Some examples of these chemicals are:
• lead from lead-based paints,
• crystalline silica from bricks and cement
and other masonry products, and
• arsenic and chromiumfrom chemicallytreated lumber.
Your risk from these exposures varies, depending
on how often you do this type of work. To reduce
your exposure to these chemicals: work in a well
ventilated area, and work with approved safety
equipment, such as those dust masks that are
specially designed to filter out microscopic particles.
a. That pinson plug of extension cordam the
same number, size and shape as those of
plug on charger.
b. That extension cord is properlywired and in
good electrical condition;and
c. That wire size is large enough for AC ampere
rating of charger as specified below:
Cord Length (Feet) 25'
50'
100'
Cord Size (AWG)
16
16
16
Note: AWG = American Wire Gage
SAVE THESE INSTRUCTIONS
5
Important:
Someofthefollowing
symbols
maybeusedonyourtool.Pleasestudythemandlearntheirmeaning.
Proper
interpretation
ofthesesymbols
willnllow you to operate the tool better and safer,
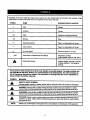
SYMBOL
_
DESIGNATION/EXPLANATION
V
Volts
Voltage
A
Amperes
Currem
Hz
Hertz
Frequency (cyclesper second)
rain
Minutes
Time
"_
AlternatingCurrent
Type or a characteristicof current
--=
DirectCurrent
Type or a charaoteristloof current
no
No Load Speed
Rotational speed, at no load
•../rain
Revolutionsor ReciprocationPer Minute
Revolutions,strokes,
surface speed, orbitsetc, per minute
Safety Alert Symbol
Indicates danger, warningor caution.
It rreans a_entlonlll Your safety is
involved,
The purpose of safety symbols Is to attract your nttention to poselbio dangers. The safely symbols, and
the explanations with them, deserve your careful attenilon and understanding. The safety warnings do
not by themselves eliminate any danger. The Instructions or warnings they give are not substitutes for
proper accident prevention measures.
SYMBOL
MEANING
&
,&
A
&
SAFETY ALERT SYMBOL:
NOTE:
Indicatesdanger,warning, or caution.May be used in conjunction withothersymbolsor pictogrephs.
DANGER: Failure to obey a safety warningwill resuitin sedous injuryto yourselfor to others,
Always followthe safety precautionsto reducethe risk of fire, electrioshock and personal injury.
WARNING: Failureto obey a selety warning can resultin serious injuryto yourseffotto others,
Always followthe safety precautionsto reducathe risk of fire, eleotdcshock and personal injury.
CAUTION: Failure to obey a safety warningmay result in propertydamage or personalinjuryto
yourselfor to others,Always follow the safety precautionsto reducethe risk of fire, electricshock
and personalinjury.
Advisesyou of informationor instructionsvital to the operationor maintenanceof the equipment.
6
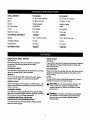
DRILL-DRIVER
973.225350
973.225360
Chuck
10 mm (3/8 in. Keyless)
10 mm (3/8 in.) Keyless
Motor
DC Motor 9.6 Volt
DC Motor 12 Volt
Switch
Vadable Speed
No Load Speed
Vadable Speed
O-7OORPM
Clutch
24 Positions
24 Positions
Maximum Torque
90 in,/lbs
"_00in._bs
CHARGING
1425001
1425002
Rating
"_20V, 60 Hz, AC only
"_20V, 60 Hz, AG oNy
Charging Voltage
9.6 Volt
12 Volt
Charge Rate
3-6 Hours
3-6 Hours
BATTERY PACK
1323401
1323402
ASSEMBLY
0-600
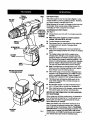
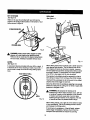
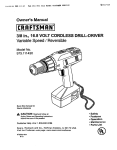
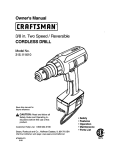
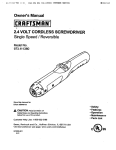
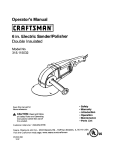
KNOW YOUR DRILL-DRIVER
F_zLIl'eI.
Before attempting to use your drill-driver,familiarize
yourselfwith all operatingfeatures and safety
requirements.
WRIST STRAP
KEYLESS CHUCK
BIT STORAGE
Your ddll-ddverhasa keylesschuck that allowsyouto hand
tightenor release ddnbit in the chuck jaws,
When not in use, bits providedwith yourdrill-drivercartbe
placed in the storage area locatedon the bottomof the
motor housing,
See F_ure I.
A wrist strap is providedto mduosthe chancesof dropping
yourdrill-driver.Plaos one handthroughthe wrist strap
when carryingtool.
SWITCH
LEVEL
To tum yourddll-ddverON, depress the switchtdggen
Release switchtdggsr to turn your ddll-ddverOFF,
To keep dd]l bit level dudng ddllingoperations,a level is
located on the back of the motor housing.
SWITCH LOCK
The switchtdgger can be locked in the OFF position.This
feature helps reducethe possibilityof accidental starting
when not in use,
VARIABLE
_,
WARNING: Do not allowfamiliaritywith your dri!ldriverto make you c_reless. Rememberthst a
careless fractionof a second is sufficientto inflict
severe iniury,
A
WAFINING: If any partsare missing,do not operate
yourddll-ddveruntilthe missingpartsare replaced.
Failureto do so oould resultinpossibleserious
personal
injury,
SPEED
Your drillhas a variable speed switch that delivemhigher
speed with increasedtdgger pressure. Speed is controlled
by the amount of switchtdgger depression.
FORWARDIREVERSE
SELECTOR
(DIRECTION OF ROTATION SELECTOR)
Your drill-driverhas a forward/h_erse selector located
above the switchtdgger,
7
KEYLESS
CHUCK
TOROUE
ADJUSTMENT
I_NG
LEVEL
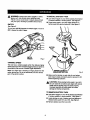
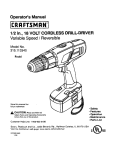
BATTERY PACK
The battery pack for your tool has been shipped In a low
charge conditionto prevent possibleproblems.Therefore,
you shouldcharge it overnightpriorto use.
Note: Batterieswill not reach full charge the first time they
are charged.Allow several cycles (drillingfollowed by
recharging]for them to become fullycharged.
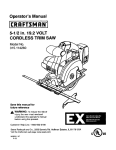
DIRECTION CHARGING BATrERY PACK
OF ROTATION See F-_ure I.
SELECTOR
•
Charge battery pack only withthe chargingassembly
(FORWARD
provided.
REVERSE)
•
SWITCH
TRIGGER
•
•
STOOGE
SCREWDRIVER
BITS
•
•
BAI"rERY
PACK
WRIST
STRAP
•
BATTERYPACKSHOWN
IN CHARGING
STAND
•
CHARGER
•
•
REDUGHT
(LED)
•
Make sure power supply Is normal household
voltage, 120 volts, 60 Hz, AC only.
Connect chargarto power supply.
Place battery pack in chargingstand. Align raisedrib
on battery pack with groove in charging stand.
See F_ure I.
Press down on battery packto be sum contacts on
battery pack engage propadywith contacts in charging
stand.
The charge indicaZorlight (LED), Iocad_ed
on the
charging stand, willlight up red and glowwhen the
charger is properlyconnected to power supply.This
light indicatesthe charger is operatingproperly.It will
remain on untilbattery pack is removedfrom charging
stand or charger is disoonneotedfrom power supply,
The tightonlyglowswhile battery pack is charging.
Note: ff chargerdoes not chargebattery pack, ratum
battery pack and charging essembly to your nearest
Sears Repair Center for electricalcheck.
After normalusage, 3 hoursor lessof chargingtimeis
requiredtofullyrechargebatterypack. Note: it battery
packis cornplstely discharged,6 hoursor longerof
chargingtime is requiredto fullyrechargebatterypack.
The battery pack willbecome slightlywarm to the
touch while charging.This is normal and does not
indicatea problem.
Do not place charger in an area of extreme heat or
cold. it will work best at normal roomtemperature.
When batteriesbecome fully charged, unplugcharger
from power supplyand remove the battery pack.
IMPORTANT INFORMATION
HOT BATTERIES
FOR RECHARGING
When using your drill-drivercontinuously,the batteries in
your battery pack will become hot, You shouldlet a hot
battery pack cool down for approximately30 minutes
before attemptingto recharge,
CHARQ[NG
STAND
Note: This situationonlyoccurswhen continuous useof
yourdrillcausesthe batteriesto become hat. it does net
occurunder normaldmumstances,Refarto "CHARGING
BA'I'rERY PACK" for normalrechargingof batteries,ffthe
chargerdoes notchargeyourbatterypack undernormal
dmumstances,returnboth the batterypack and chargerto
your nearest Sears repairranter for electrioai check.
Fig. 1
8
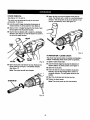
WARNING:Always
wearsafetygoggles
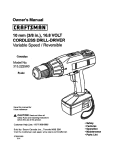
orsafety
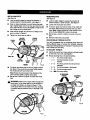
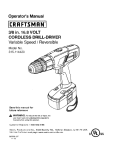
TO INSTALL BATrERY
glasses with side shields when operatingtools.
Failure to do so could resultin objectsbeing thrown
Into your eyes, resultingin possible serious injury.
•
SWITCH
See _gure 2.
PACK
Lock switchtrigger on your drill by placingthe direction
of rotationselector in center position.Sea F7#u/e4.
• Place battery peck in your ddU.Align raisedrib on
battery pack with groove inside ddlL Sac F/gura 3.
To turn your ddll ON, depress the switch tdgger. To turn it
OFF, release the switch tdgger.
t
BATI'ERY
PACK
LATCHES
VARIABLE
SPEED
This tool has a vadable speed switch that delivers higher
speed and torquewith increasedtdggerpressure. Speed is
controlledby the amount of switchtdgger depression,
Note: You might hear a whistling or dnging noisefrom the
switchduring use, Do not be concerned,this is a normal
part of the switchfunction,
DEPRESS
LATCHESTO
RELEASE
BATTERYPACK
Fig. 3
• Make sure the latches on each side of your battery
pack snap in place and battery pack is secured in drill
before beginningoperation.
CAUTION: When placingbattery pack in your drill,
be sure raised fib on battery pack aligns with groove
Insideddll and latches snap Imo place pmpedy.
Improperassembly of battery pack can c_use
damage to intemat components.
TO REMOVE BA'R'ERY
•
PACK
Lock switch trigger on your drillby placingthe direction
of rotationselector in senter position. Sae r"Tgu/e4.
• Locate latches on end of battery pack and depress to
release battery pack from yourddll. See F_jure 3.
• Remove battery pack from yourdrill.
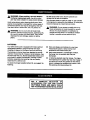
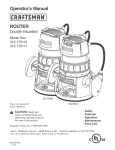
SWITCHLOCK
KEYLESSCHUCK
See Figure 4.
See R'gum 5.
The switchtrigger can be lockedin the OFF position.This
feature can be used to prevent the possibilityof accidental
startingwhen not in use. To lock switchtdgger, push the
directionof rotationselector (Forward/Reverse Selector)
to the center position.
Your drillhas e keylesschuck As the came implies,you can
handtightenor releasedrillbits in the chuckjaws. Grasp and
hold the collar of the chuck with one hand. Rotate the chuck
body with your other hand. The arrowsonthe chuck
indicatewhichdirection to rotatethe chuck bodyin orderto
LOCK (tighten)or UNLOCK (release)the drillbit.
SELECTOR
WITH
CENTERLOCKPosfrlON
CHUCK
FORWARD
A
UNLOCK
(RELEASE)
CHUCK
COLLAR
TRIGGER
Fig. 4
(TIGHTEN)
WARNING: Battery tools are always in operating
condition.Therefore, switch shouldalways be locked
when not in use or carrying at your side,
WARNING: Do not hold chuck bedywith one hand
and use power of the drillto tighten chuck jaws on
drill bit, Chuck body could slip in your hand or your
hand could slipand come in contact with rotatingdrill
bit. This could cause an accident resultingin serious
persona] injury.
REVERSIBLE
See Figure 4.
This tool has the feature of being reversible. The direction
of rotation is controlled by a selector locatedabove the
switchtrigger. With the drill held in normal operating
position,the directionof rotationselector should be
positionedto the left of the switeh for drilling.The drilling
directionis reversedwhen the selector is to the right of
the switch. When the selector Is in center position,the
switchtrigger is locked.
_lh CAUTION: To prevent gear damage, always allow
chuck to come to a complete stop before changing
the directionof rotation.
To stop, release switchtrigger and allowthe chuckto come
to a complete stop.
10
INSTALLING BITS
See Figure 6.
REMOVING BITS
•
•
Lock the switch triggerby placingthe directionof
rotationselectorin center position.Sae FTqum4,
•
•
Loosenthe chuck jawsfrom ddll bit.
To loosen: grasp and held the collar of the chuck with
one hand, while rotatingchuck bodywith your other
hand. Note; Rotate chuck body in the directionof the
arrow marked UNLOCK to loosenchuckjaws.
Do not use a wrenchto tighten or loosenthe chuck
See F_gure6.
Lock the switchtrigger by placingthe diraction of
rotationselector in center position. See Figure #.
Open or dose chuck _ws to a pointwhere the opening is slightlylarger than the bit size you intendto use.
Also, raise the front of your drillslightlyto keep the bit
from falling out of the chuckjaws.
•
•
Insert drillbit straightinto chuck the full lengthof the
jaws as shown in Figure 6.
•
Tighten the chuck jaws on drillbit.
CHUCK
UNLOCK
(RELEASE)
•
j_WS.
•
CHUCK
COU,.AR
Remove drillbit from chuckJaws.
ADJUSTABLE
TORQUE CLUTCH
Your ddll is equipped with an adjustable torque clutchfor
driving different types of screws into different matedals.
The proper setting depends on the type of matahal and the
size of screw you are using.
TO ADJUST TORQUE
•
•
DRILLBiT
LOCK
(TIGHTEN)
CHUCK
BODY
RIGHT
•
•
Identify the twentyfour torque indicatorsettingslocated
on the frontof your drill. See Fi#/Jre8,
Rotate adjustingringto the desiredsetting.
• 1- 4
For drivingsmall screws.
5 -8
For drivingscrews intosoft
material.
• 9-12
Fig. 6
• 13- 16
• 17- 20
To tightenthe chuckjaws on ddll bit; grasp and hold
the collar of the chuckwith one hand, while rotating
the chuck body with yourother hand.
For drivingscrews intosoft and hard
materials.
For drivingscrewsin hard wood.
For drivinglarge scmws.
• 21 - 4k,1 For heavy drilling.
Note: Rotate the chuck body In the directionof the
arrow marked LOCK to tighten chuck jaws.
Do not use a wrench to tighten or loosen the chuck
TODECREASE
TORQUE
jaws.
_k
ADJUSTING
RING
WARNING: Make sure to insertdrillbit straightinto
chuck jaws. Do not Insert drillbit into chuckjaws st
an angle then tighten, as shown in Figure 7. This
could cause drillbit to be thrown from ddll, resulting
in possible serious personal injury or damage to the
chuck.
TO INCREASE
TORQUE
WRONG
Fig. 7
11
Fig. 8
BIT STORAGE
DRILLING
See Fioure 9.
See Figure I f.
When not in use, bits provided with your drill can be
placed in the storage area locatedon the bottomof your
drillas shown in figure 9.
SCREWDRIVER
BITS
BIT
Fig. 9
A
WARNING: Always wear safety gogglesor safety
glasses with side shieldswhen operatingtools.
Failureto do so could resultin objectsbeing thrown
STORAGE
AREA
intoyour
eyes,
resultingin possibleserious injury.
Fig. 11
LEVEL
See Figure fO.
When drillinghard smoothsurfaces use a center punch to
mark desired hole location. Thiswill preventthe drill bit
from slippingoff (:enter as the hole is started. However,
the low speed feature allows startingholes withoutcenter
punchingif desired, To accomplishthis, simply operate
your drillat a low speed until the hole is started.
The materialto be drilled shouldbe secured in a vise or
with damps to keep it from turning as the drillbit rotates,
A convenient feature providedwith your drillis a level. It
is recessed in the motor housingon back of your drill. It
can be used to keep ddll bit level during drillingoperations,
REARVIEWOFDRILL
Hold tool firmly and place the bit at the pointto be drilled.
Depress the switchtrigger to start tool.
Move the ddl]bit Into the workplecoapplyingonly enough
pressure to keep the bit cutting,Do not fores or apply side
pressure to elongate a hole.
_,
LEVEL
Fig. 10
WARNING: Be preparedfor bindingor bit
breakthrough.When these situationsoccur, drillhas
a tendency to grab and kick opposite to the direction
of rotationand could cause loss of oontrol when
breaking through material. If not prepared, this loss
of control can resultin possibleserious injury.
When diflllngmetals, use a light oil on the drillbit to keep
It from overheating. The oil willprolongthe life of the bit
and increasethe drillingaction.
ff the bit jams in workpiece or ifthe drillstalls, release
switchtrigger Immediately.Remove the bit from the
workpieca and determine the reason for jamming.
12
CHUCKREMOVAL
•
See Figures 12, 13, and 14.
The chuck mustbe removed in order to use some
accessories.To remove:
•
Lock the switchtrigger by placing the directionof
rotationselector In center position.See _gura 4.
•
Inserta 5/16 In. or larger hex key Intothe chuckof your
dnlland tightenthe chuck jaws securely.
•
Tap the hex key sharply with a mallet in a clockwise
direction.See fTgure 1_ This will loosenthe screw in
the chuck for easy removal.
Ir_ert hex key in chuck and tighten chuck jaws securely. Tap sharply with a mallet in a counterclockwise
direction.This will loosen chuck on the spindle. It can
now be unscrewedby hand. See Figure 1#.
MAILEr
CHUCK
JAWS
Fig. 14
TO RETIGHTEN A LOOSE CHUCK
The chuck may become loose on spindleand develop a
wobble. Periodicallycheck chuck screw for tightness.
To tighten, follow these steps:
KEYLESS
CHUCK
HB( KEY
Fig, 12
•
• Open chuck jaws and remove hex key. Remove the
chuck screw by tuming it in a clockwisedirection.
See Figure f3.
Note: The screw has left hand threads.
Lockthe switch tdgger by placingthe directionof
rotation selector in center position.See F/gum 4.
• Open the chuck jaws.
•
Insert hex key intochuck and tighten chuck jaws
securely. Tap hex key sharply with a mallet in a
clockwisedirection.This will tighten chuck on the
spindle.
• Open the chuck jaws and remove hex key.
• _ghten the chuck screw.
Note: The chuck screw has left handthreads.
SCREWDRIVER
Fig. 13
13
Do not abuse powertools. Abusive practicescan
damage tool as well as workplece.
WARNING: When sewlclng, use only Identical
Craltsman replacement parts. Use of any other
pan may create a hazard or cause productdamage.
Only the parts shown on parts list,page 15, are Intended
to be repaired or replaced by the customer. All other parts
shouldbe replaced at a Sears Service Center.
Avoid using solventswhen c_eaningplasticparts. Most
plasticsare susceptibleto damage from various types of
commercialsolvents and may be damaged by theiruse.
Use clean c_othsto remove dirt, dust,oil, grease, etc.
A
WARNING: Do not attemptto modifythis tool or
create accessoriesnot recommendedfor use with
this tool, Any such alterationor modificationis
misuse and could resultin a hazardous condition
leading to possibleserious personal injury.
WARNING: Do not at any time let brake fluids,
gasoline, petroleum-basedproducts, penetratingoils,
etc. come in contact with plasticparts. They contain
chemicalsthat can damage, weaken or destroy
plastic.
BATFERIES
Your ddlrs battery pack is equipped with nickel-cadmium
rechargeeble batteries. Length of service from each
charging will depend on the type of work you are doing.
The battehes in this tool have been designed to provide
maximumtrouble free life. However, like all batteries, they
will eventually wear out, Do not disassemble battery pack
and attempt to replace the batteries, Handlingof these
batteries, espaciaily when wearing rings and jewelry,
could resultin a serious bum.
•
•
•
To obtain the longest possiblebattery life, we suggestthe
following:
I
Store and charge yourbatteries in a cool area.
Temperatures above or below normal room
temperature will shorten battery life.
Neverstora batteries in a dischargedcondition.
Recharge them immediatelyafter they are
discharged.
All batteriesgradually lose their charge. The higher
the temperature the quickerthey lose their charge, ff
you store your tool for long periodsof time without
using it, recharge the bettedas every month or two.
This practicewill pro!ongbattery life.
ACCESSORIES
FOR THIS AND OTHER[
CRAFTSMAN
POWER
BENCH TOOLS,[
FOR
A COMPLETE ANDSELECTION
OF1
VISff YOUR NEAREST SEARS RETAIL STORE.)
14
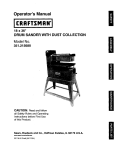
CRAFTSMAN 10 mm (3/8 In.) CORDLESS DRILL-DRIVER
MODEL NOS, 973.225350 / 973.225360
in all correspondenceregardingyour10 mm (3/8 In.) CORDLESS DRILL-DRIVER orwhen ordedng repair
parts,
Them_de_numberw___bef_und_nap_ateatta_hedt_them_t_rh_using_A_waysmenti_nthem_de_number
J
SEE BACK PAGE FOR PARTS ORDERING
INSTRUCTIONS
2
4
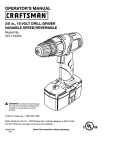
PARTS LIST
Key
No.
Part
Number
Descdpltlon
Quart,
1
2
616478-003
6903326
Screw (Special)...................................................................... 1
3
1323401
1323402
4
1425001
1425002
Battery Pack (Model 973.225350) .........................................
Battery Pack (Model 973.225360) .........................................
Charging Assembly (Model 973,225350) ...............................
ChargingAssembly(Model 973.225360) ...............................
Operator'sManual
972000-963
Chuck (Item No. _ 75188) ...................................................... 1
15
1
1
1
1
Operator's Manual
STOCK NOS. 922535 / 222536
MODEL NOS. 973.225350 / 973.225360
Sears service is available at or through
your Sears Retail Store
or Catalogue Sales Office,
How to order repair parts
SERVICE AND REPAIR PARTS
CALL 1-800-665-4455 *
Keep this number handyshould you requirea
service call or need to order repair parts.
If ordedng parts, make sure you have the name, make and
model no, of the merchandise and the name and number
of the part you wish to order,
When orderingrepairparts always give:
1. The Part Number
2. The Part Description
3. The Model Numbers:
973.225350 / 973,225360
4. The name of the item:
10 mm (3/8 in.) CordlessDrill-Driver
* If calling locally, please use one of the following numbers:
Regina - 566-5124
Montreal - 333-5740
Toronto - 744-4900
Halifax - 454-2444
Kitchener - 894-7590
Ottawa - 738-4440
Vancouver - 420-8211
WE SERVICE WHAT WE SELL.
WE MAKE THIS PLEDGE BECAUSE OUR CONCERN FOR OUR CUSTOMERS DOES NOT END WITH
THE SALE. TO HONOR OUR PLEDGE, WE HAVE DEVELOPED A TOP-NOTCH SERVICE PROGRAM
STAFFED BY HIGHLY TRAINED SPECIALISTS. THEIR KNOWLEDGE OF OUR NEW PRODUCTS IS
CONSTANTLY UPGRADED. THEY USE ONLY PARTS SPECIFICALLY DESIGNED FOR YOUR FINE
SEARS PRODUCTS.
Sold by: SEARS CANADA INC., TORONTO
MSB 2B8