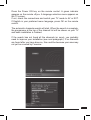
1
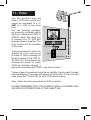
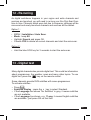
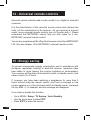
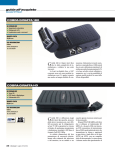
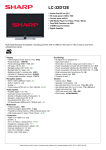
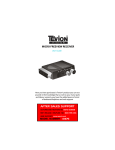
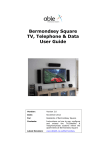
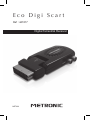
Eco Digi Scart Ref : 441817 Digital Terrestrial Receiver MET006 Digital TV Thank you for choosing the Metronic Eco Digi-Scart. Not only can it receive over 40 Freeview channels, but you can also listen to digital radio, all at the touch of a button. Any electrical equipment should be used with care. Please read the safety section on page 24 before using your Eco Digi-Scart. This appliance is for household use only. Roof-top aerial : a wideband roof-top aerial is recommended for your Eco Digi-Scart to work properly. For more information visit : www.digitaluk.co.uk Digital Approved product This Eco Digi-Scart allows you to access free digital channels broadcast in the UK. It uses a digital signal received through your normal aerial which you can then watch through your existing television This FREEVIEW Eco Dig-Scart gives you up to 48 digital TV channels and up to 24 digital radio stations without a subscription or contract. For more information on FREVIEW and to check reception in your area please visit www.freeview.co.uk This Eco Digi Scart lets you access the free digital channels that are broadcast in the UK. It uses a digital signal, received through your outdoor aerial and lets you watch it through your existing television. 3 After the digital switchover some Freeview channels will move to different frequencies.When this happens, you SOS will lose some (or even all) channels in some areas. This loss of channels may also arise occasionally due to some network changes. Thanks to the SOS key, retrieving the channels couldn’t be simpler. Press and hold the blue key marked SOS on the remote control for 3 seconds and your receiver will automatically start an “auto-retune” scan for easy and fast channel recovery. TOUCHE Programming the receiver is achieved through the various menus. In order to make this manual easier to understand, we will describe the access to a menu in the following simplified form: MENU / menu. / Submenu For example, where you read : • Go to Menu / Installation / Channel Scan. It means : • Press the MENU key to access the main menu. • Press the 6 arrow to select Installation and press OK. • Press the 6 arrow to select Channel Scan. • Press OK to confirm. The words printed in bold in this manual are the words that appear on your TV screen. 4 SOMMAIRE 1 Installation 06 2 Remote control description 10 3 Receiver description 12 4 Daily use 12 5 Organising channel list 13 6 Parental lock 14 7 Resetting the receiver 15 8 Screen settings 15 9 16 Radio 10. EPG 16 11 Using the receiver with a VCR 17 12 Channel search 19 13 Digital text 19 14 Universal remote control 20 15 Energy saving 20 16 Useful accessories 21 17 Troubleshooting 22 18 Specifications 23 19 Warnings 24 5 1 - Installation A - Simplified installation Please refer to the installation diagram below. With the receiver not yet plugged into the mains, connect the aerial cable directly to the ANT input of the receiver. Plug the remote «Eye» into the IR input of the Eco Digi-Scart and stick this eye on your TV so that there is a direct sight between the eye and the remote control. Connect the power supply to the 5V socket of the receiver. Insert the Digi-Scart into the scart socket of your TV. Switch your TV on and plug the power supply into the mains socket. Insert the batteries in the remote control. Back of TV 3 2 6 1 Infrared Remote «Eye» 2 Power adaptor 3 Receiver 1 Press the Power ON key on the remote control. A green indicator appears on the remote «Eye». A language selection menu appears on the TV screen. If not, check the connections and switch your TV mode to AV or EXT. If English is your preferred menu language, press OK on the remote control. The automatic channels search will start. When the search is complete, the programme at the top of the channel list will be shown on your TV and basic installation is finished. If the search has not found all the channels (or none), you probably need to improve your installation (see next paragraph). If no channels are found after you have done so, this could be because your area may not yet be covered by Freeview. 7 B - Wedging / adjusting the aerial If no channels have been found through your current antenna, it’s possibly because it is pointing towards a non digital transmitter. If your area is covered by digital, it means that the programs are coming from another transmitter and you will have to adjust the direction of the antenna. There are two possible options, as follows : Option 1 You know at least one network number (between 21 and 69) transmitting in your area. • Menu / Installation/ Channel Scan. • Scroll down to the 3rd line and, using the 34 keys, select a channel number used in your area. • Wait for a few seconds and check the Signal Quality and Signal Intensity. • Swivel the antenna to maximise reception. As you get nearer the transmitter, the Signal Intensity should increase, then the Signal Quality. A minimum of 65% quality is needed for a good picture. If the Signal Quality does not increase, this means that you have chosen an incorrect network number, or that the emission is too far away from your antenna. • Once you have found the maximum Signal Intensity and Quality, tighten the antenna fixing bolts. • Go to MENU / Installation / Auto Scan or press the SOS key on the remote control for 3 seconds ; the search will start automatically. 8 Option 2 You are able to receive national analogue channels but don’t know what digital channels you can receive. If you are certain that you can receive additional channels, but you do not know which network is used for these channels, we suggest the following : Connect a high gain UHF antenna (at least 15 dB) to the ANT input of the Eco Digi-Scart. Adjust the antenna so it is in the same position as the previous one and start an automatic channels search (Go to MENU / Installation / Auto Scan) or press the SOS key on the remote control for 3 seconds for the automatic search to start. If you find channels that you were unable to receive with your previous antenna, simply replace it with the new one. Otherwise, swivel the antenna 1/8 of a turn and start another automatic search. Continue this process until you find some channels. Choose any channel, then press key twice to display the signal bar. Turn the antenna slightly to the maximise the signal, then tighten the fixing bolts. Start an automatic channel search again. 9 2 - Remote Control Description 21 10 1 2 Numerical pad. Select a channel by entering the channel number. : power on / Standby 3 MENU : allows you to open the menu to change the settings 4 Volume up / down 5 Channel up / down 6 OK : confirm selection in menu / on screen displays. 7 EXIT : allows you to go back one step in the menus. 8 EPG : display the EPG, Electronic Program Guide. 9 10 11 : Mute key. : to access Favourites. : press once to display informations about the current programme. Press twice to display technical informations about the current programme and signal. 12 : to enable or disable the subtitles (DVB). 13 : to switch between TV and Radio mode. 14 15 16 TV/VCR : not used on this product. : adjust the aspect ratio of the video output. LANG : to select another audio track (other language, Dolby Digital, ...) when available. 17 : access digital text content. 18 colour keys for interactive functions. 19 20 : exit all menus or go to previous channel. 3465 : navigate up / down / left / right in menus / on screen displays. 11 3 - Eco Digi-Scart description A IR 5V E 1A D TV/VCR F G ANT. C B Infrared Remote «Eye» A B C D E F G Scart outlet, to connect the receiver to the TV. Terrestrial antenna input. TV/VCR output. Connect the TV to this socket if you want to watch analog channels on your TV. (This is dependent upon your antenna) Mains power supply input. Infra-red remote eye input. Status indicator : red when on standby, green when the receiver is switched on. Infra-red remote eye. Receives commands from the remote control. 4 - Daily use 12 In normal use, you will only need the following keys : • CH6 CH5 to change channels. • to mute and bring back the sound. • Numerical keys to go directly to a channel. • EPG key to access the programme guide. • OK key to access the list of TV channels. 5 - Personalising the channels list Deleting channels • Press OK or go to Menu / Channel / TV Channel List. • Press to enter the Edit menu. • Press 56 to select the channel you want to delete. • Press OK, the channel is marked as selected. • You can select more channels in the same way. • Press to delete the selected channels. • A confirmation window appears, press 3 and OK. • Press EXIT several times to quit the menus. Moving channels • • • • • • • Press OK or go to MENU / Channel / TV Channel List. Press 56, to select the channel you want to move. Press , a cursor will appear next to the channel name. Use the 56, arrows to move the channel up or down the list. Press OK to validate. A confirmation window appears, press 3 and OK. Press EXIT several times to quit the menus. Note : Moving a channel does not change the channel number, e.g. if you insert BBC3 below BBC2, it will still be number 7. For the channel number to change with its position you must set the option MENU / Setup / TV System / LCN Mode to OFF with the 34 keys. Press EXIT several times to quit the menus. 13 6 - Parental Lock Your receiver is delivered with a code (PIN) which is 0000. This code allows you to lock channels that you do not wish your children to view, or to protect the settings of the receiver. We advise you to change this code, make a note of it and hide it. Modifying the PIN code • • • • Go to MENU / Setup / Parental Lock. Enter the original PIN code (0000 when first purchased). Next to New Pin, enter the 4 digits of your new code. Next to Confirm Pin, enter the same new PIN number again. Locking channels • Go to Menu MENU / Setup / Parental Lock. • Enter the PIN code. • Next to Channel Lock, select Manual with the > arrow. • Press EXIT 3 times. • Press OK. • Press 1 to enter the Edit menu. • Enter your PIN again. • With the 56, arrows, select the channel you want to lock. • Press and enter your PIN again ; a lock will appear next to the channel name. • Press EXIT several times to leave the menus. 14 7 - Resetting the receiver You should follow this process if you have lost some functions after modifying some settings. The factory settings will be restored and you will lose all personalised functions (favourites, parental lock etc). • Go to MENU / Tools / Load Factory Default. • Enter your password (0000 when first purchased). • Press 3 then OK to confirm ; wait until the language selection menu appears. 8 - Screen settings MENU / Setup / TV System gives you a choice of options : • Aspect Ratio : - 4:3LB. For 4:3 TV. 16:9 image are shown in full with a black strip at the top and at the bottom. - 4:3PS. For 4:3 TV. 16:9 image fills the screen but is cut off on both left and right hand sides. - 16:9. For 16:9 TV. If your TV is set up correctly, the 16:9 zoom will be automatically activated for programmes shown in this format. • Video Output allows you to choose between RVB and CVBS mode. The RVB mode gives a better image on most TVs. • LCN Mode allows you to deactivate automatic channel numbering. 15 9 - Radio Digital terrestrial reception also gives you a choice of radio stations. Press , for radio mode. 10 - EPG The screen on the top left lists the channels, the screen on the top right lists the programme currently showing on the channel highlighted. The lower half of the screen also lists the programmes coming next on that particular channel. Press to move from the channel list to the programme list. Use the arrows to select a programme and press for more information on this programme (if supplied by the broadcaster) Some channels provide detailed information about their programmes, press to access them. The window will remain empty if the information is not available. 16 11 - Timer Your Eco digi-Scart does not have a VCR scart socket and cannot be connected to a TV AND to a VCR at the same time. You can however purchase an automatic multiscart switch (Metronic reference 475020 or 475003) which will allow you to connect your TV, VCR and freeview receiver together. The timer function will be operable in this case. VCR BOITIER 475020 To record a channel, select the ZAPBOX channel as if you were going to watch it. Start recording on the AV channel of the VCR (0, AV, EXT etc). This channel can normally be found on many VCRs by selecting channel 1 and by then pressing the PROG - key once or twice. To play a tape, the receiver should be on standby. Simply insert the tape and start playing. The image will appear on the screen. If this is not the case, press the TV/VCR key on your VCR remote control. Note : follow the same procedure for DVD recorders. PLEASE REMEMBER THAT YOU CANNOT WATCH A CHANNEL AND RECORD A DIFFERENT ONE AT THE SAME TIME. 17 Programming Select the channel as if you were going to watch it. • Go to MENU / Setup / Timer Setting / Program Timer. • Timer Number : enter 1 for the 1st programme you want to record (2 for the 2nd etc.). • Timer Mode : select Once with the 4 key. • Wake-up Channel : displays the current channel. You can still change channels at this stage. • Date : choose a date with 34 arrows. • Month : choose a month with 34 arrows. • Time : press OK and enter start time using the numerical keys. Press OK to accept. • Duration: enter in the same way the duration of the programme (in hours and minutes) • Press EXIT and click on YES to save. • Press EXIT several times to leave the menus. You must then program your VCR in the same way so that it starts recording at the same time. Remember to record the channel that corresponds to the scart extension (AUX, EXT etc). Please refer to our VCR manual if necessary. Note 1 : In Mode, you can also select Daily, Weekly or Monthly for recurring events. Note 2 : You can also program a recording from the EPG by pressing OK on the event you want to record. Note 3 : 2 minutes before the recording ends the following message will appear on the screen : “Without action of the user, the receiver will go to standby within 2 minutes”. You can let the receiver switch to standby mode, or cancel. 18 12 - Re-tuning As digital switchover happens in your region and extra channels and services are launched, you will need to re-tune your Eco Digi-Scart from time to time. Channels which were lost due to frequency changes will be recovered and newly launched channels and services will be added. Option 1 : • • • • MENU / Installation / Auto Scan. Mode : keep All. Highlight Search and press OK. Choose YES to delete all current channels and start the auto-scan. Option 2 : • Hold the blue SOS key for 3 seconds to start the auto-scan. 13 - Digital text Many digital channels also provide digital text. This could be information about programmes, the weather, news and many other topics. To use digital text, press the key on the remote control. Some channels provide DVB subtitles with some programmes. To activate subtitles : . • Press • Subtitles Display : press the 4 key to select Standard. • If the Language line shows “No Subtitles” in grey, it means subtitles are not available. • If the Language line shows, e.g. 11-eng, it means English subtitles are available ; just press OK on that line. 19 14 - Universal remote controls Universal remote controls need a code (usually 3 or 4 digits) to work with a receiver. It is the manufacturer of the universal remote control who chooses the code, not the manufacturer of the receiver. As your receiver is a recent model, some universal remote controls may not function with it. Please understand that METRONIC cannot help you with codes for a nonMETRONIC universal remote control. You can buy a replacement Eco Digi-Scart remote control from METRONIC LTD. Also see chapter 16 for METRONIC universal remote control. 15 - Energy saving To prevent unnecessary energy consumption and in accordance with European regulations relating to electrical devices, measures have been taken to avoid leaving the receiver switched on unnecessarily. Your receiver will therefore automatically switch to standby mode if you haven’t used it for 3 hours. If, however, you have been watching a programme for more than 3 hours without using the remote control, you’ll see a message on the screen warning you of the imminent switch to standby mode. Just press the key VOL , or example, and the message will disappear. If you want to disable this function, • Go to MENU / Setup / TV System / Auto Standby. • Use the arrow keys to select OFF. • Press EXIT to leave the menus. 20 16 - Useful Accessories METRONIC Universal remote control : Zap 6 learning (ref.495336) : thanks to its learning function it will memorise all the keys of your original remote control. 21 17 - Troubleshooting Please note indoor aerial are not recommended for use with this product (this includes loft aerials) otherwise you may experience problems with reception or picture break ups on some channels. Problem Possible cause What to do Standby light not lit Mains lead unplugged Mains fuse blown Check mains lead Check fuse No signal found Aerial is disconnected Aerial is damaged / misaligned Check aerial lead Check aerial Ensure that you are capable of receiving Digital TV. No picture or sound Tuned to digital teletext channel or not supported format channel. Switch to another channel Scrambled channel message Channel is scrambled This Eco Digi Scart is not able to decode scrambled channels No response to remote control New batteries required Plug in and turn on switch at mains Forgotten PIN code You have moved your TV and you find you are no longer able to receive digital channels 22 Contact the helpline The aerial feed Try a signal booster or maybe sent through a direct feed from the a distribution system aerial. which can / may reduce the digital signal now received by the Eco Digi Scart. 18 - Specifications Tuner and channel Decoder • Transport stream • Profile level • Input rate • Video format • Audio format • Video output Connection • Main power cable • Tuner • Video • Audio • Data port Power supply • Input voltage • Power consumption • • • RF input connector (IEC-TYPE, IEC169-2, female) RF output connector (IEC-TYPE, IEC169-2, male) Frequency range: 470MHz ~862MHz (UHF) MPEG-2 ISO/IEC 13818 MAX. 15Mbit/s MPEG-2 Main profile@Main level 4:3/16:9 Switchable MPEG Layer I & II, 32 / 44.1 / 48KHz RGB, CVBS Fixed type Antenna input Composite video output, twin scart Stereo audio output, digital coaxial audio output RS-232 (for service use only) AC 230V~50Hz MAX. 8W/standby <1W IMPORTANT : Due to continual revision and improvements to our products design, specifications are subject to change without notice. 23 19 - Warnings • Attempts to repair this will invalidate the warranty. • Refer repairs to this Eco Digi Scart to a qualified service personnel only. • Do not disassemble this Eco Digi Scart. • There are dangerous-voltage parts inside that may cause electric shock even after power is disconnected. • Store your Eco Digi Scart in a clean, dry environment. • Unplug the Eco Digi Scart immediately if it gets wet, and consult a servicing technician. • Always unplug the Eco Digi Scart beforecleaning it. • Wipe dust off the cabinet of the Eco Digi Scart with a clean, dry and soft cloth. • Do not place any objects on top of the Eco Digi Scart. • Avoid exposing your Eco Digi Scart directly to sunlight or other heat sources. • Put your Eco Digi Scart in a well-ventilated area away from high humidity. • Do not expose this Eco Digi Scart to rain or moisture, dripping or splashing. • For stubborn stains use a damp (not dripping) cloth. • Do not use any cleaning solutions on this Eco Digi Scart. 24 Safety Tips If smoke, abnormal noise or odour comes out of this Eco Digi Scart, unplug from the mains supply immediately and contact the retailer. Never try to repair the Eco Digi Scart on your own. Always contact the dealer. Note This manual contains for-reference-only graphics and information that are subject to change without notice. WEEE This appliance is labelled in accordance with European Directive 2002/96/EG concerning used electrical and electronic appliances (waste electrical and electronic equipment - WEEE). The guideline determines the framework for the return and recycling of used appliances as applicable throughout the EU. EN 060065 As per the EN 60065 norm requirements, please pay particular attention to the following safety guidelines. Do not obstruct the air vents with objects such as newspapers, table cloths, curtains etc. Allow at least 5 cm around the product to allow enough ventilation. Do not place the product on or near flamable objects such as lit candles. The device may not be exposed to dripping or splashing and no object filled with liquid, such as vases, must be put on the device. If the mains power supply is used as the on / off control, it must be easily accessible. Please respect the environment and the law : do not throw batteries with the household rubbish ; take them back to your retailer and dispose of them in the correct container. 25 How the Digital switchover may affect you : Television in the UK is going digital, bringing us all more choice and new services. Starting in late 2007 and ending in 2012, television services in the UK will go completely digital, TV region by TV region. The map shows when your area will switchover to digital. When the TV switchover happens in your area, there are at least two occasions when you will need to re-tune your Eco zapbox in order to continue receiving your existing TV channels, and also to pick up new ones. Digital UK, the body leading the digital TV switchover, will advise you when you need to re-tune during the switchover. For re-tuning instructions for this Eco zapbox please see page 15 of this instruction book. If you find you can’t receive the extra digital channels, it may be because your area is not covered by Freeview yet or that you need an aerial upgrade. Visit www.digitaluk.co.uk to check. If you have any questions, please contact your equipment supplier or call Digital UK on 0845 6 50 50 50 or visit www.digitaluk.co.uk 26 Metronic Ltd Park House, 15-23 Greenhill Crescent, Watford, Herts, WD18 8PH. UK www.metronic.com Product made in Asia