1
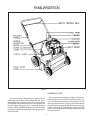
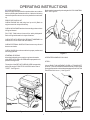
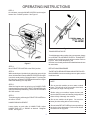
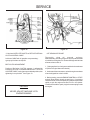
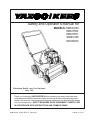
Safety and Operator's Manual for
MODELS: RBSIC050
RBSIT550
RBSIT551
SBSIC050
RHON050
Professional Quality Lawn Care Equipment
since 1945
Thank you for buying a YAZOO/KEES! Before operating your new power rake, read,
understand and follow the important safety instructions and the other instructions contained in this manual. Lawnmowers and all power equipment, can be potentially dangerous if used improperly. SAFETY REQUIRES GOOD JUDGEMENT, CAREFUL USE
IN ACCORDANCE WITH INSTRUCTIONS AND COMMON SENSE.
MANUAL No. 100431 REV. 07 (02/19/02)
Printed in U.S.A.
IMPORTANT SAFETY INSTRUCTIONS
WARNING: Failure to comply with the following instructions may result in serious injury to the operator or other persons. The
owner of the machine must understand these instructions, and must allow only persons who understand these instructions
to operate the machine. Each person operating the machine must be of sound mind and body and must not be under the
influence of any substance which might impair vision, dexterity or judgment. If you have any questions about your machine
which your dealer cannot answer to your satisfaction , call or write YAZOO / KEES POWER EQUIPMENT, Beatrice, NE
68310 ( Phone 402-223-2391)
TRAINING
1. Read this manual carefully and question your dealer if
something is not clear.Should the dealer be unable or
unavailable to answer to your satisfaction, write or call our
factory. Be thoroughly familiar with the controls and proper
use of the equipment.
2. DO NOT allow children in yard or area when machine is
operated.
2. Do not put hands or feet near or under rotating parts. Keep
clear of discharge area while engine is running.
3. Stop engine when crossing gravel drives, walks, roads, or
under any condition where thrown objects might be a hazard.
4. After striking a foreign object or if machine vibrates
abnormally, stop the engine and disconnect the spark plug.
Inspect the machine for any damage and repair the damage.
3. DO NOT allow pre-teenage children to operate unit.
4. Allow only responsible teenagers with mature judgment to
operate machine and only under close supervision.
5. Keep the area clear of all persons, particularly small
children and pets.
PREPARATION
1. Never operate machine without proper guards, covers,
safety switches and devices in place and properly functioning.
Inspect to determine that these safety devices are installed
properly, are in good repair, and operate properly. If the
condition of these devices are questionable, they must be
repaired or replaced before using the machine.
2. Thoroughly inspect the area where machine is to be used
and remove all stones, sticks, wire, and other debris. Also
note the location of holes, stumps, and other possible
hazards.
3. Do not operate the machine when barefoot or wearing open
shoes.Always wear substantial footwear and long pants.
4. Fill gasoline tank before starting the engine. Use only an
approved gasoline container. Do not smoke near open gasoline
container. Do not fill gasoline tank indoors or when engine is
running. Allow engine to cool off for at least 10 minutes before
refueling. Wipe off any spilled gasoline before starting engine.
Do not run engine indoors.
5. Never attempt to make a depth adjustment while engine
is running.
6. Operate only in daylight or in good artificial light.
7. Never operate machine in wet grass. Always be sure of
your footing; keep a firm hold on the handle and walk, never
run.
OPERATION
1. Do not change engine governor settings or overspeed the
engine.
2
5. Stop the engine whenever you leave the operating position
for any reason, including clearing debris, inspecting, or
making adjustments.
6. Rake across slopes, never up and down. Use caution
when changing direction on slopes. Do not rake very steep
slopes, or areas where stability or safety might be in doubt.
7. Do not rake water-soaked lawns. This will pull turf off the
surface. Cut tall grass before raking.
MAINTENANCE
1. Keep all nuts, bolts, and screws tight to keep mower in
safe operating condition.
2. Never store machine with gas in the tank inside a building
where fumes can reach an open flame or spark. Allow engine
to cool before storing in an enclosure.
3. To reduce fire hazard, keep machine free of grass, leaves,
or excessive grease.
4. Have your machine inspected and serviced each year by
an authorized Yazoo/ Kees dealer. Determine if any additional
devices are available which might upgrade the safety of your
machine.
5. Use only authentic Yazoo/Kees replacement parts to
insure the safety of your machine is maintained.
! WARNING !
THE ENGINE EXHAUST FROM
THIS PRODUCT CONTAINS
CHEMICALS KNOWN TO THE STATE
OF CALIFORNIA TO CAUSE
CANCER, BIRTH DEFECTS OR
OTHER REPRODUCTIVE HARM.
FAMILIARIZATION
Figure 1
NOMENCLATURE
The nomenclature drawing above (Figure 1) shows the
essential parts of the Yazoo/Kees Power Rake/Slicer. It is
recommended that all operators of this equipment become
thoroughly familiar with the controls, parts and operation of
this machine before operating. Specific details involving the
engine are found in the seperate engine owner’s manual.
Study these manuals before operating and keep both handy
for future reference.
This manual has been prepared for the operators of the
Yazoo/Kees Power Rake, Model RBSIC050 and Slicer,
Model SBSIC050. Its purpose, aside from recommending
operating instructions and routine service requirements, is to
promote safety through the use of accepted operating
practices. READ, UNDERSTAND AND FOLLOW the safety
and operating instructions herein before attempting any work
with the machine.
3
OPERATING INSTRUCTIONS
BEFORE OPERATING:
Be thoroughly familiar with all controls and how to use them
before operating the Dethatcher/Slicer. Make the following
checks and perform the service as required before each start
up.
Shaft rotation is stopped by releasing the CLUTCH CONTROL
BAIL. See Figure 3.
PRE-START CHECK LIST
CHECK ENGINE OIL and bring level up to full. (Refer to
engine manual for oil specifications).
CHECK AIR CLEANER and service according to instructions
in Engine Manual.
FILL FUEL TANK where fumes will be safely dissipated.
Refer to Engine Manual for fuel specifications.
CHECK DETHATCHER OR SLICER SHAFT ASSEMBLY to
make sure it is free of dirt and other debris.
CHECK EXTERNAL SURFACES and remove any dirt and
dust accumulation.
CHECK GUARDS to make sure all are in proper position and
securely tightened.
Figure 3
STARTING-STOPPING
Know beforehand how to stop the engine and rotation
of the DETHATCHER or SLICER shaft in preparation for
possible emergencies.
OPERATE ENGINE AS FOLLOWS:
STEP 1:
The engine of the DETHATCHER/SLICER is stopped by
pulling the engine THROTTLE CONTROL to the rear to
“STOP”. See Figure 2
Move HEIGHT ADJUSTMENT LEVER to “TRANSPORT”
position. (This insures that the Shaft Assembly is clear of the
ground/pavement should accidental engagement of CLUTCH
CONTROL BAIL occur.) See Figure 4.
Figure 2
Figure 4
4
OPERATING INSTRUCTIONS
STEP 2:
On cold starts, move the CHOKE CONTROL on the engine
forward into “CHOKE" position. See Figure 5.
Figure 6
TRANSPORTING TO SITE
To avoid damage to the machine, lawn or pavement, always
move HEIGHT ADJUSTMENT LEVER to “TRANSPORT”
position when moving from one location to another. Refer to
Figure 4. Also, when transporting, the
machine is more easily steered when tilted backwards onto
its rear wheels.
Figure 5
STEP 3:
Move THROTTLE CONTROL to the “RUN” position.
DETHATCHING PROCEDURE
STEP 4:
While remaining on right side of unit, place foot on top of right
wheel, hold handle bar and pull ROPE STARTER on engine
in smooth, steady motion until engine starts. To prolong the
life of the rope, guide the STARTER handle back to the engine
rather than allowing it to snap back .
The DETHATCHER/SLICER SHOULD NOT BE PULLED
BACKWARDS! If an area must be gone over again, turn the
machine around.
STEP 5:
Allow brief engine warm-up period, move CHOKE LEVER
rearward and move the engine THROTTLE CONTROL to the
rear to the desired speed setting. Refer to DETHATCHING/
SLICING section.
*Do not use this machine on wet or water soaked
lawns. This will pull turf off the surface of the lawn,
particularly in rough or bumpy areas.
NOTE
*Before using your machine, inspect the lawn and
remove all sticks, stones, wire and any foreign objects
that are likely to damage the machine.
STEP 6:
To stop the engine, pull the engine THROTTLE CONTROL to
the rear to “STOP”.
*Do not use machine in tall grass. You receive a
better job when raking after a recent mowing.
HANDLE BAR ADJUSTMENT
*Do not let the DETHATCHER set in one spot without
having the clutch disengaged. Failure to do this will
cause the unit to dig up turf.
Loosen knobs on each side of HANDLE BAR. Adjust
HANDLE BAR “UP” or “DOWN” as desired. Retighten
Knobs. See Figure 6.
5
OPERATING INSTRUCTIONS
1. SET HANDLE BAR in desired position before engaging
CLUTCH CONTROL.
Extra holes in the Main Shaft are provided for longer life of the
Main Shaft. If the hole holding the satellite shaft becomes
distorted, rotate all four (4) satellite shafts to the next
adjacent hole. See Figure 8.
2. SET HEIGHT ADJUSTMENT LEVER to desired raking
height.
3. SET SPEED by moving THROTTLE CONTROL to desired
speed setting.
4. BEGIN dethatching by stepping behind DETHATCHER,
lifting “UP” on CLUTCH CONTROL BAIL and pushing machine
forward.
5. TO MAKE SHARP TURNS, release CLUTCH CONTROL
BAIL and tilt machine back on its rear wheels.
DETHATCHER DEPTH ADJUSTMENT
Normal Depth Adjustment on the DETHATCHER is
accomplished by placing the machine on a hard surface,
making sure one of the satellite shafts is at dead bottom, and
adjusting the wheels so that the fingers are just touching the
ground. (IMPORTANT: DO NOT set the fingers so that they
will penetrate the ground. This will counteract the centrifugal
force of the fingers and prevent them from doing a proper dethatching job).
Figure 8
Through constant use, the raking edges of the fingers will
begin to wear. When this occurs, remove the end plates and
turn the entire Shaft Assembly, end-for-end and replace it in
the machine. This will give the fingers a new square raking
edge. See Figure 7.
SLICING PROCEDURE
The following text gives instructions for making depth
adjustments on the SLICER. For machine operation, see
“DETHATCHING PROCEDURE” in preceding column.
SLICER DEPTH ADJUSTMENT
Normal depth setting for proper blade penetration for slicing
and aerating is approximately 1/2" to 3/4" into the ground. To
obtain the proper setting, place the machine on the lawn
surface and adjust the wheel height one to two notches.
For the crawling type grasses such as Bermuda, Zoysia,
Bahia, St. Augustine, etc., the setting is obtained in the
same manner, except the wheels are raised only one notch.
For single strand grasses such as Bluegrass and Rye grass,
it is best to slice in two separate directions, perpendicular to
each other. For example, when slicing the first time,
direction of travel is north and south. Then it is best to slice
again in a east-west direction. (IMPORTANT: It is necessary
to water thoroughly after the aerating process is complete.
Fertilizer and seed, if desired, can be applied after slicing).
As the blades wear, they may be rotated four times to give
new cutting edges each time. See Figure 9.
Figure 7
6
OPERATING INSTRUCTIONS
Figure 9
Figure 10
SERVICE PARTS & ASSISTANCE
To retain the original quality of your DETHATCHER/SLICER,
use only genuine Yazoo/Kees replacement parts. Specify
the model and serial number as found on the nameplate of
your machine when contacting your Yazoo/Kees Dealer for
parts or service assistance.
Your Yazoo/Kees Dealer has a complete listing of all
components. For engine parts, look for the engine
manufacturer’s dealers under the heading ENGINES - gasoline
in the yellow pages of your telephone directory.
DETHATCHER/SLICER LUBRICATION
CRANKSHAFT ASSEMBLY: Lubricate each ENDCAP
BEARING with 2 shots of grease every 8 operating hours and
before running if unit has been unused for a long period of
time. See Figure 10.
WHEELS: DETHATCHER/SLICER
Figure 11
Lubricate each wheel with 1 shot of grease every 8 operating
hours. See Figure 11
MOVING PARTS: (ALL MACHINES)
1. Lubricate HEIGHT ADJUSTMENT LEVER and related
parts monthly (or more often if required) with oil.
2. SATELLITE oil to assure free movement of FINGERS.
7
SERVICE
Figure 13
Figure 12
2. Lubricate SATELLITE SHAFTS on DETHATCHER with
CLUTCH CONTROL CABLE
OFF SEASON STORAGE
Thoroughly
clean
all
external
surfaces,
Shaft Assembly (including Fingers or Slicers) and underside
of unit before storing the unit. Grease all fittings and lubricate
all wear surfaces with oil.
Lubricate CABLE with oil, graphite or a penetratingtype spray lubricant as required.
BELT/CLUTCH ADJUSTMENT
1. Drain gasoline from fuel system and drain the crankcase
oil (Refer to Engine Manual for details).
Position of Bail when CLUTCH engages, is adjusted by
loosening jam nuts on threaded barrel end of CLUTCH
CONTROL CABLE, turning jam nuts to desired position, then
tightening in new position. See Figure 13.
2. At the start of the new season, replenish engine crankcase
oil and add gasoline to the fuel tank.
3. Before starting, move the ENGINE CONTROL to “STOP”
and pull Rope Starter slowly several times. If excessive
resistance is felt, remove the spark plug and pull Rope Starter
rapidly to spin the engine and clear oil from the cylinder.
Clean and reinstall the spark plug before attempting to start
the engine.
CAUTION:
NEVER ADJUST MACHINE WITH
ENGINE RUNNING
8
Yazoo/Kees Limited Two Year Warranty
1.
This Limited two-year Warranty is issued by Yazoo/Kees Power Equipment, only to the original
purchaser. The warranty period is limited to ninety (90) days when product is or has been used
for rental purposes.
2.
Yazoo/Kees warrants that all new equipment manufactured by Yazoo/Kees (Yazoo/Kees Products), listed in paragraph 9 hereof, shall be free of defects in material and workmanship for the
term described in paragraph 4 below. Component parts, equipment, and accessories not manufactured by Yazoo/Kees are not warranted hereunder, but are warranted by the original manufacturer only to the extent of any original manufacturer’s warranty, with the exception of the
following; five years on wheel motors, ninety days on belts, hoses, tires, and battery, one year
on electrical components, and one year on Peerless model 700 transmissions (first ninety days
warranted by Peerless, remainder by Yazoo/Kees).
3.
In the event that any Yazoo/Kees Product warranted hereunder shall be defective or fail to
conform with this limited warranty, Yazoo/Kees shall, subject to the provisions hereof, pay for,
or provide labor and materials for, the repair or replacement of such defective Yazoo/Kees
Product.
4.
This limited warranty is for two years (24 months) from purchase date for Yazoo/Kees Products.
5.
To obtain limited warranty service on a Yazoo/Kees Product use this procedure:
a.
b.
c.
d.
e.
6.
Locate the nearest Yazoo/Kees dealer or distributor.
If you have moved, notify any Yazoo/Kees dealer or distributor in your area. You must
be able to confirm purchase date to validate your warranty.
Make arrangements to have the equipment delivered to the dealer or distributor (refer
to paragraph 6a).
If you have questions concerning the Yazoo/Kees Limited Warranty, they should be
referred to :
Yazoo/Kees Power Equipment
P.O. Box 8
700 Park Street
Beatrice, NE 68310
Attention: Customer Service Department
(402) 223-2391
Warranty service on Yazoo/Kees Products must be performed by an authorizedYazoo/
Kees dealer.
This limited warranty does not cover the following:
a.
Transportation to and from the Yazoo/Kees dealer or distributor.
9
b.
c.
d.
Normal maintenance services and normal maintenance items such as brakes, brake
shoes, spark plugs, oil, air filters, mower blades, gauge wheels, skids and other wear
items.
Any Yazoo/Kees Product which had been altered or modified in any way.
Any repair or replacement caused by customer neglect or lack of maintenance. (The
purchaser is responsible for making sure that Yazoo/Kees Products are operated and
serviced as directed in the applicable manual or service instruction. Incorrect use or
maintenance will void this Limited Warranty.
7.
YAZOO/KEES MAKES NO OTHER EXPRESS OR IMPLIED WARRANTY, OR WARRANTIES AS TO THE MERCHANTABILITY OR FITNESS FOR A PARTICULAR PURPOSE.
ALL WARRANTIES ARE LIMITED IN DURATION TO THE TERMS SET OUT IN PARAGRAPH 4, ABOVE. YAZOO/KEES SHALL HAVE NO LIABILITY FOR ANY INCIDENTAL
OR CONSEQUENTIAL DAMAGES RESULTING FROM THE BREACH OF ANY WARRANTY, INCLUDING, BUT NOT LIMITED TO, LIABILITY FOR INCONVENIENCE,
RENTAL OR PURCHASES OF REPLACEMENT EQUIPMENT, OR FOR LOSS OF PROFITS OR OTHER COMMERCIAL LOSS. SOME STATES DO NOT ALLOW A LIMITATION ON HOW LONG AN IMPLIED WARRANTY LASTS, SO THE ABOVE STATEMENT
MAY NOT APPLY TO YOU. SOME STATES DO NOT ALLOW THE EXCLUSION OR
LIMITATION OF INCIDENTAL OR CONSEQUENTIAL DAMAGES, SO THE ABOVE
LIMITATION OR EXCLUSION MAY NOT APPLY TO YOU.
8.
This warranty is not subject to change or modification by anyone, including Yazoo/Kees dealers
or distributors, and no Yazoo/Kees dealer or distributor is authorized to make any representations on behalf of Yazoo/Kees Power Equipment.
Note: This Warranty is for the following machines or products:
• ZTMax Midmount Riding Mowers
• Kutter Midsize Walk-behind Rotary Mowers
• Power Rake Dethatchers
• Power Slicer Aerators
• Core Plugger Aerators
• Classic High-wheel Walk-behind Rotary Mowers
10
11